

User Manual
Mini • Solo • Duo • Max • Quad • Elite
JOOVVSOCIALJOOVVSOCIALJOOVV.COM

© Copyright Joovv, Inc. All rights reserved.

Getting Started:
Introduction Section 1
Treatment Guidelines Section 2
Testimonials Section 3
Setup Guides:
Joovv Solo or Mini Section 4
Joovv Duo Section 5
Corporate Office
TABLE OF CONTENTSTABLE OF CONTENTS
Joovv, Inc.
940 Calle Amanecer, Suite D
San Clemente, CA 92673
Joovv Max Section 6
Joovv Quad Section 7
Joovv Elite Section 8
Customer Service
Email: help@joovv.com
Web: www.joovv.com
Other Information:
Troubleshooting Guidelines Section 9
Frequently Asked Questions Section 10
General Information Section 11
Setup: www.joovv.com/setup
Welcome to the Joovv family! You’ve chosen the
Many of these benefits happen because red and
only device that was purposefully designed to
provide the most optimal light therapy
experience possible.
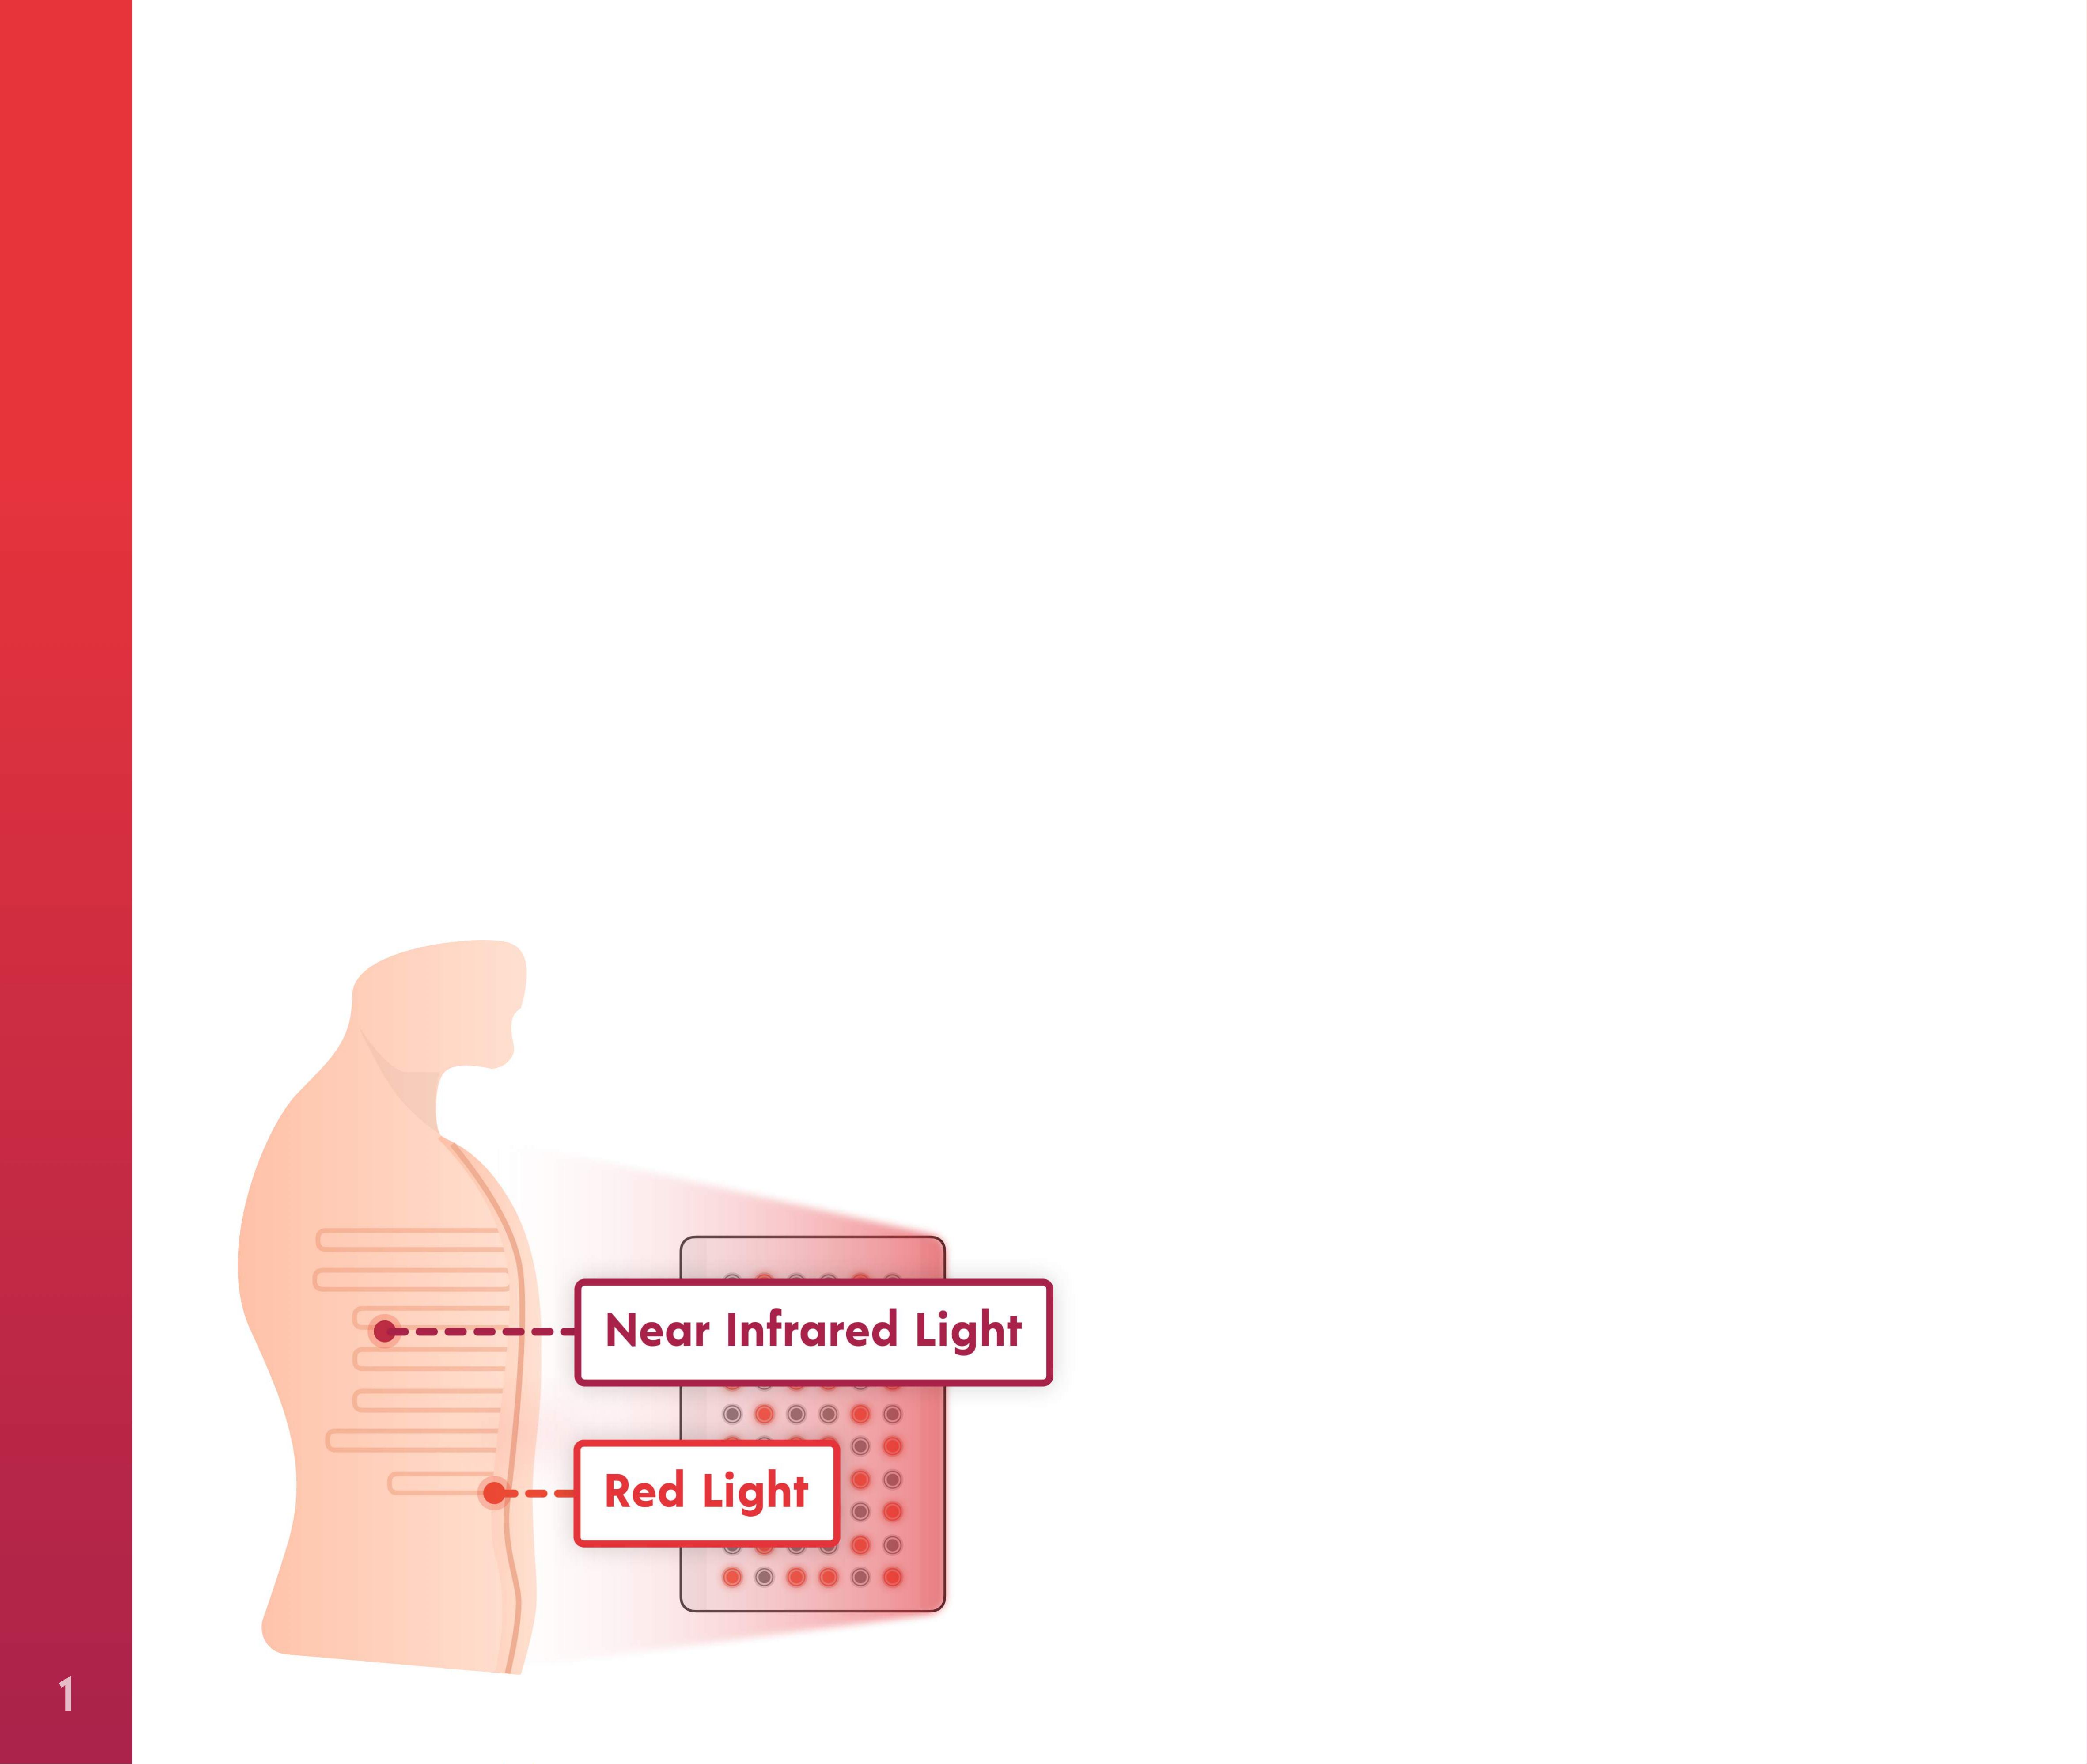
Your Joovv delivers clinical-grade irradiance at
both 660 nm (visible red light), 850 nm (non-
near infrared light activates various metabolic
pathways, leading to increased production of
ATP (adenosine triphosphate), enhanced cellular
signaling, and elevated protein synthesis.
Red and near infrared light therapy has been
visible near infrared light), or a combination of
both. These light wavelengths have been
scientifically proven to provide therapeutic
effects.
How Joovv Works
proven to be effective for a wide range of health
issues, including, but not limited to the following:
• Muscle recovery
Your Joovv works by emitting red and near
infrared light within a certain range of
therapeutic wavelengths and intensity. These
treatments penetrate your body to generate a
number of health benefits.
• Athletic performance
• Joint pain and arthritis
INTRODUCTION
• Sexual performance
• Mental clarity
• Relaxation and sleep
The light energy emitted by Joovv should be used
on bare skin for best results.
FDA Indication
Joovv is indicated for the relief of muscle spasms,
1
minor muscle & joint aches, as well as pain &
stiffness associated with arthritis.

Getting Started with Joovv
Your Joovv comes with everything you need to
access the amazing health benefits of light
therapy. For the best results, please read this
manual completely before using your Joovv.
Photobiomodulation (PBM), or light therapy, is
like food for your cells. Unfortunately, most
people do not get the proper amount of healthy
light their bodies need for optimal wellbeing.
Because of this, their bodies may respond with
detox-like symptoms. So if you're experiencing
Light Sensitivity
Prior to using your Joovv, please check for
photosensitivity. To do this, expose an area of
your forearm 6 inches away from the device for
3 minutes. If you experience any redness or
these types of effects, we recommend starting
out with 1-2 minute treatments per area, slowly
working up to a 10-minute session(s) over the
course of 2-3 weeks as your body acclimates to
the therapy.
TREATMENT GUIDELINES
discomfort, you might be photosensitive and we
recommend consulting with your doctor or
healthcare provider prior to using your Joovv.
Treatment Instructions
Joovv delivers medical-grade power—also called
As always, if you have any concerns regarding
the use of photobiomodulation, we recommend
consulting with your trusted healthcare provider.
Results and Expectations
The amount of time required to see benefits and
irradiance—of red and near infrared light. For
optimal results, we recommend positioning your
Joovv approximately 4 to 6 inches from the area
on your body you intend to treat. The
recommended default treatment time is 10
minutes per area, which will result in a clinically-
improvements depends on your health goals.
The cellular health benefits of light therapy have
been thoroughly proven across hundreds of
clinical studies, so trust that your body is
benefiting from every therapy session. But there
proven dose of energy for both superficial and
deep tissues.
Consistency is Key
It’s important to be consistent with your light
are many factors that may affect how quickly
you experience improvements in your symptoms.
Some people will see benefits within a matter of
days. But overall improvements in health or skinrelated issues can take 8-12 weeks of consistent
use. By using your Joovv on a daily basis, you
therapy treatments. That’s why we recommend
using your Joovv every day, or at least 5 times
per week. For additional health benefits,
including pain relief from aches and strains, up
to 3 treatments per day can be helpful.
can maximize your body’s rate of healing.
2

"Photobiomodulation has a wide range of clinically-proven health
benefits. Everything from enhanced muscle recovery, to increased sexual
libido, to improved skin health—and much more. After using the Joovv for
close to 2 years, it's the only light therapy device I'd ever recommend. Give
it a try—you won't be disappointed."
- Ben Greenfield, Voted America’s Top Personal Trainer
"The research supporting light therapy is shockingly robust, and my own
experience matches up with what is documented in scientific literature. In
particular, using Joovv has resulted in improved energy, markedly reduced
pain, elevated mood, and improved skin. As you can imagine, I'm a huge
fan—and can't recommend this product enough!"
- Dr. Sarah Ballantyne, Medical Biophysicist and New York Times Best-Selling Author
TESTIMONIALS
⋆ ⋆ ⋆ ⋆ ⋆
“Less muscle soreness
after exercise and am
now sleeping like a
log.”
improved my lower
back pain and my skin
is looking so much
⋆ ⋆ ⋆ ⋆ ⋆
“The Joovv has
better!”
⋆ ⋆ ⋆ ⋆ ⋆
More energy, better
libido, and looking
better. Absolutely
great light therapy
product.
⋆ ⋆ ⋆ ⋆ ⋆
"I love the Joovv! It
feels like my own
personal superhuman
charger."
3
Rebecca D.
Julie L.
Olli S.
Tim F.

Setting Up Your
Joovv Solo or Mini
!
If you’d prefer instructional setup videos, please visit: www.joovv.com/setup
4

Parts List - Door Mount
JOOVV SOLO & JOOVV MINI
1 x Mini/Solo Device 1 x Power Cord
2 x Threaded Posts 2 x Braided Steel Cables - 90mm
1 x M5 Allen Wrench 1 x Instruction Manual
DOOR MOUNTING KIT
1 x Door Hook 1 x Height-Adjusting Pulley
For instructions on how to set up your Joovv Mini with the Mini Stand, please refer to
the online Setup page at www.joovv.com/pages/setup
! Approximate setup time: 15-30 minutes
4.1

STEP 1
FIG. A
FIG. B
Place your Solo or Mini face down on a scratch-free
surface. Next, screw in the threaded posts to the top
of the device and hand-tighten with the included
Allen wrench. Then, screw the braided cables to the
threaded posts, as shown in Figure A.
SETTING UP YOUR JOOVV SOLO OR MINI
STEP 2
Hang the included custom hook on any standardsized door, as shown in Figure B.
4.2

STEP 3
FIG. C
FIG. D
Connect the braided cables to the snap link attached
to the height-adjusting pulley. Then, connect the
snap link on the opposite end directly to the door
hook, as shown in Figure C.
SETTING UP YOUR JOOVV SOLO OR MINI
STEP 4
To raise your Solo or Mini to your desired height, pull
down on the loose cable while supporting the device
with your opposite hand, as shown in Figure D.
Be sure to adequately support the device while
raising and lowering it with the height-adjusting
system.
4.3

STEP 5
FIG. E
Lead Mode
Neutral
Follow Mode
FIG. F
To lower your Solo or Mini, push up on the lever on
the height-adjusting pulley while supporting the
device with your opposite hand, as shown in Figure E.
SETTING UP YOUR JOOVV SOLO OR MINI
Be sure to adequately support the device while
raising and lowering it with the height-adjusting
system.
STEP 6
Plug the power cord into the male power socket
located on the back of the device and plug the other
end into a wall outlet. Next, turn the pairing switch
to “Neutral mode” and turn the power switch on, as
shown in Figure F.
4.4

STEP 7
STEP 8
To adjust the treatment time, press the “Time”
button on the control panel. This will add time
in one-minute increments up to 20 minutes.
The timer will cycle back to 1 minute after the
time exceeds 20 minutes on the display.
The default wavelength mode utilizes both red
and near infrared wavelengths. After pausing
your treatment session, you can change the
mode to use only the red or near infrared LEDs
by selecting the “Mode” button on the control
panel. The green indicator light will illuminate
indicating which wavelength configuration is
selected.
Remember that near infrared LEDs emit light
STEP 9
that is NOT visible to the naked eye.
SETTING UP YOUR JOOVV SOLO OR MINI
To start your treatment session, press the
“Play/Pause” button once. You can pause your
treatment at any time by pressing the “Play/
Pause” button a second time. Resume your
treatment by pressing the “Play/Pause” button
again.
That’s it—you’re ready to start Joovvin’!
Your Joovv’s cooling fans will run for
5 minutes after the treatment session is
4.5
complete to cool the LEDs.

Setting Up Your
Joovv Duo
!
If you’d prefer instructional setup videos, please visit: www.joovv.com/setup
5
Parts List - Door Mount
JOOVV DUO
2 x Joovv Solo Devices 1 x Power Cord
4 x Threaded Posts 2 x Braided Steel Cables - 90mm
1 x M5 Allen Wrench 1 x Instruction Manual
DOOR MOUNTING KIT
1 x Door Hook 1 x Height-Adjusting Pulley
PATCH CORD
1 x Power Patch Cord - 120cm
! Approximate setup time: 35-40 minutes
5.1

#1 Lead Mode
#2 Follow Mode
Lead Mode
Neutral
Follow Mode
FIG. A
(2 people required)
SETTING UP YOUR JOOVV DUO
STEP 1
Place each Solo face down on a scratch-free surface
and align, as shown in Figure A.
STEP 2
Next, screw in the threaded posts to the tops of both
Solos and hand-tighten with the included Allen
wrench. Then, screw the braided cables onto the
threaded posts, as shown in Figure A.
5.2

STEP 3
FIG. B
FIG. C
(2 people required)
Next, hang the door hook on any standard-size door,
as shown in Figure B.
Oversized doors may require a different hook.
SETTING UP YOUR JOOVV DUO
STEP 4
Remove one of the snap links from the heightadjusting pulley. Next, connect the braided cables of
#1 Solo to the snap link. Then, attach the snap link
and #1 Solo to the door hook, as shown in Figure C.
The height-adjusting pulley is only needed for
oversized doors.
5.3

FIG. D
(2 people required)
STEP 5
SETTING UP YOUR JOOVV DUO
To connect #2 Solo, lift it into position below #1 Solo
that is already in place. Line up the threaded posts
with the holes in the end caps of #1 Solo. Then,
insert threaded posts into the holes, and slide
forward to lock in place, as shown in Figure D.
5.4

#1 Lead Mode
#2 Follow Mode
FIG. E
(2 people required)
STEP 6
Plug the power cord into #2 Solo. Next, connect the
power patch cord from the male socket on #1 Solo to
the female socket on #2 Solo, as shown in Figure E.
SETTING UP YOUR JOOVV DUO
5.5

Lead Mode
Neutral
Follow Mode
Lead Mode
Neutral
Follow Mode
#1 Lead Mode
#2 Follow Mode
FIG. F
(2 people required)
Locate the pairing switch on #1 and #2 Solos. Turn
the switch on #1 Solo to “Lead Mode” and to “Follow
Mode” on #2 Solo, as shown in Figure F.
If you don’t wish to connect your devices via
Bluetooth, follow the instructions included with the
Hardwire Pairing kit.
Connect the power cord from #2 Solo into a wall
outlet. Then, turn on the power switches on both
Solos and both Solos will pair automatically.
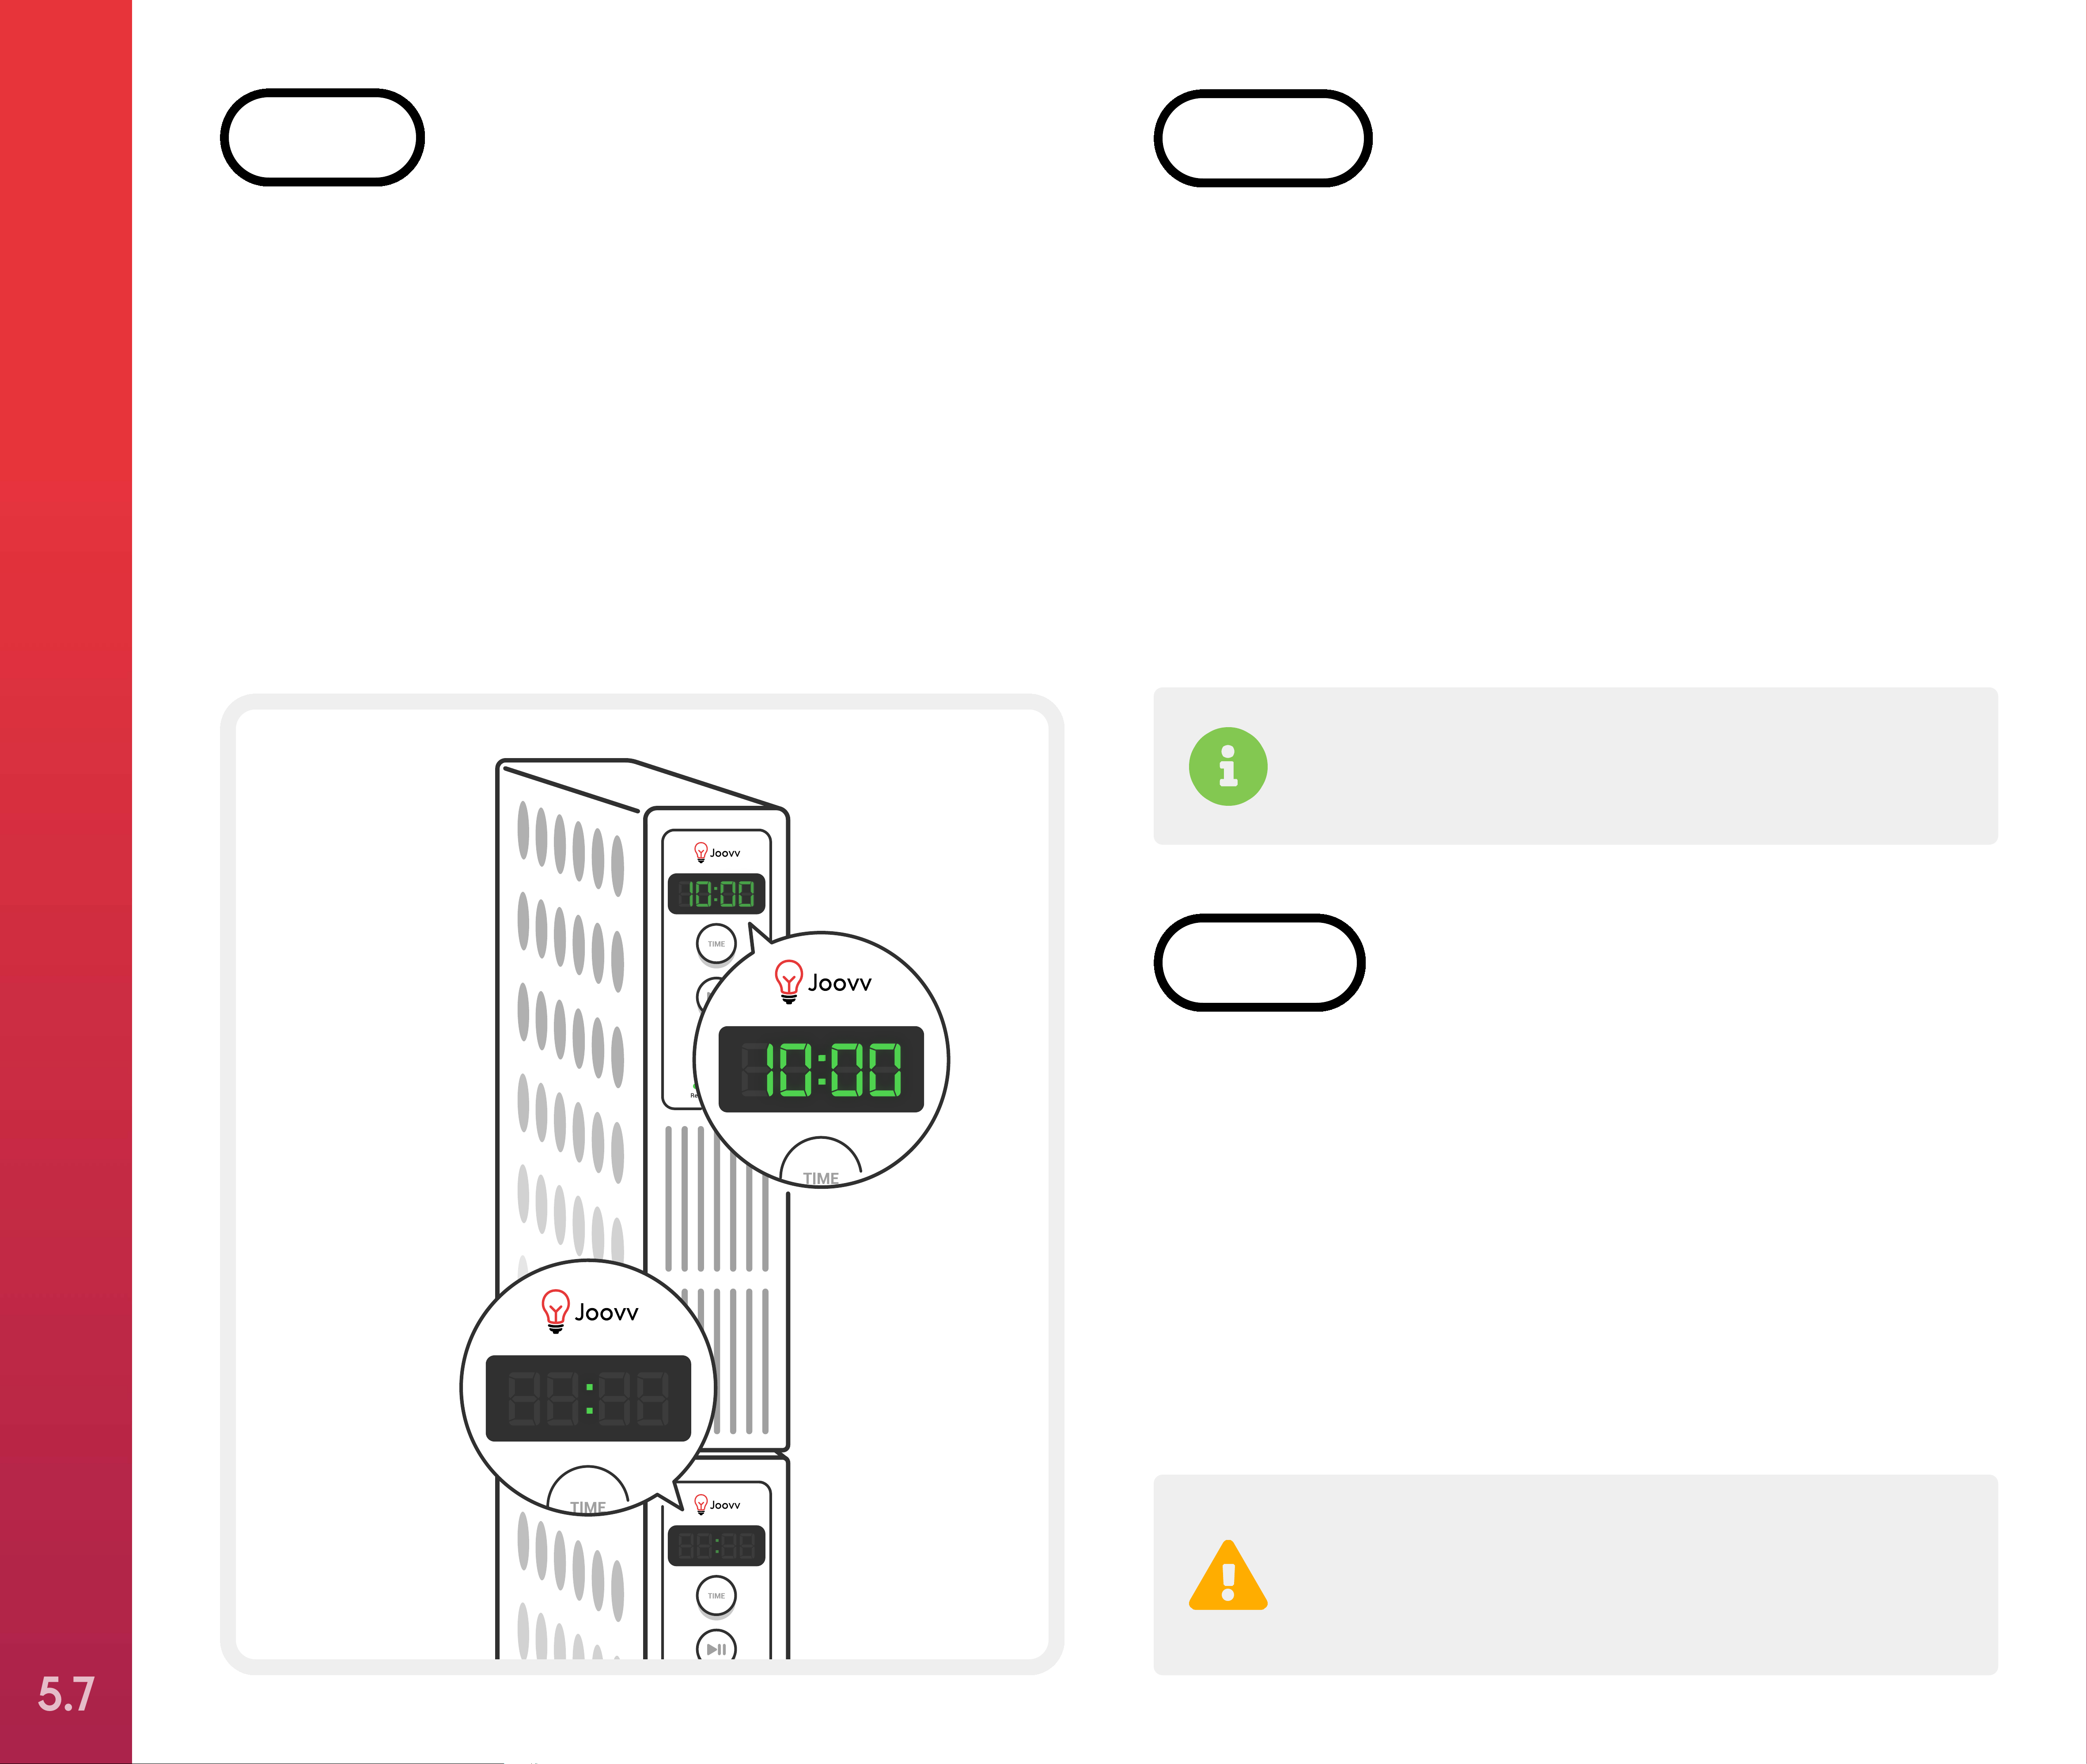
Follow devices will show “No” on the display until
successfully paired with a lead device. Once paired,
the display will change to ":".
5.6
(2 people required)
STEP 9
Once paired, #1 Solo will display the treatment
time and #2 Solo will display a colon “:”. To
adjust the treatment time, press the “Time”
STEP 10
The default wavelength mode utilizes both red
and near infrared wavelengths. After pausing
your treatment session, you can change the
button on the control panel. This will add time
in one-minute increments up to 20 minutes.
The timer will cycle back to 1 minute after the
time exceeds 20 minutes on the display.
mode to use only the red or near infrared LEDs
by selecting the “Mode” button on the control
panel. The green indicator light will illuminate
indicating which wavelength configuration is
selected.
Remember that near infrared LEDs emit light
that is NOT visible to the naked eye.
STEP 11
SETTING UP YOUR JOOVV DUO
To start your treatment session, press the
“Play/Pause” button once. You can pause your
treatment at any time by pressing the “Play/
Pause” button a second time. Resume your
treatment by pressing the “Play/Pause” button
again.
That’s it—you’re ready to start Joovvin’!
Your Joovv’s cooling fans will run for
5 minutes after the treatment session is
5.7
complete to cool the LEDs.

Setting Up Your
Joovv Max
!
If you’d prefer instructional setup videos, please visit: www.joovv.com/setup
6
Parts List — Door Mount
JOOVV MAX
2 x Joovv Solo Devices 2 x Joovv Mini Devices
2 x Power Cords
4 x Braided Steel Cables - 90mm
2 x Door Mount Kits 1 x Instruction Manual
4 x Threaded Posts
1 x M5 Allen Wrench
MAX CONNECTION KIT - DOOR MOUNT
2 x Power Patch Cords
16 x M4x8mm Allen Screws
3 x Connection Bars - 14”
1 x Allen Screwdriver - 2.5mm
4 x Braided Steel Cables - 180mm 4 x Braided Steel Cables - 280mm
4 x Braided Steel Cables - 380mm
! Approximate setup time: 60-90 minutes
6.1

#1 Lead Mode #2 Follow Mode
#4 Follow Mode#3 Follow Mode
FIG. A
Door Mount
(2 people required)
STEP 1
Place each Solo and Mini face down on a scratch-
SETTING UP YOUR JOOVV MAX
free surface and align, as shown in Figure A.
STEP 2
Locate three connection bars and place them on the
Solos and Minis, as shown in Figure A. Attach
connection bars using (12) M4x8mm Allen screws
and hand tighten using the included Allen wrench.
Your Joovv system comes with extra screws.
Do not use a drill to install the screws as this can
strip the threads.
6.2

#1 Lead Mode #2 Follow Mode
#4 Follow Mode#3 Follow Mode
FIG. B
Door Mount
(2 people required)
STEP 3
Locate the power patch cords in the Max connection
kit. Connect each cord by inserting the female end
into #1 Solo and #3 Mini, and male end into #2 Solo
SETTING UP YOUR JOOVV MAX
and #4 Mini, as shown in Figure B.
6.3
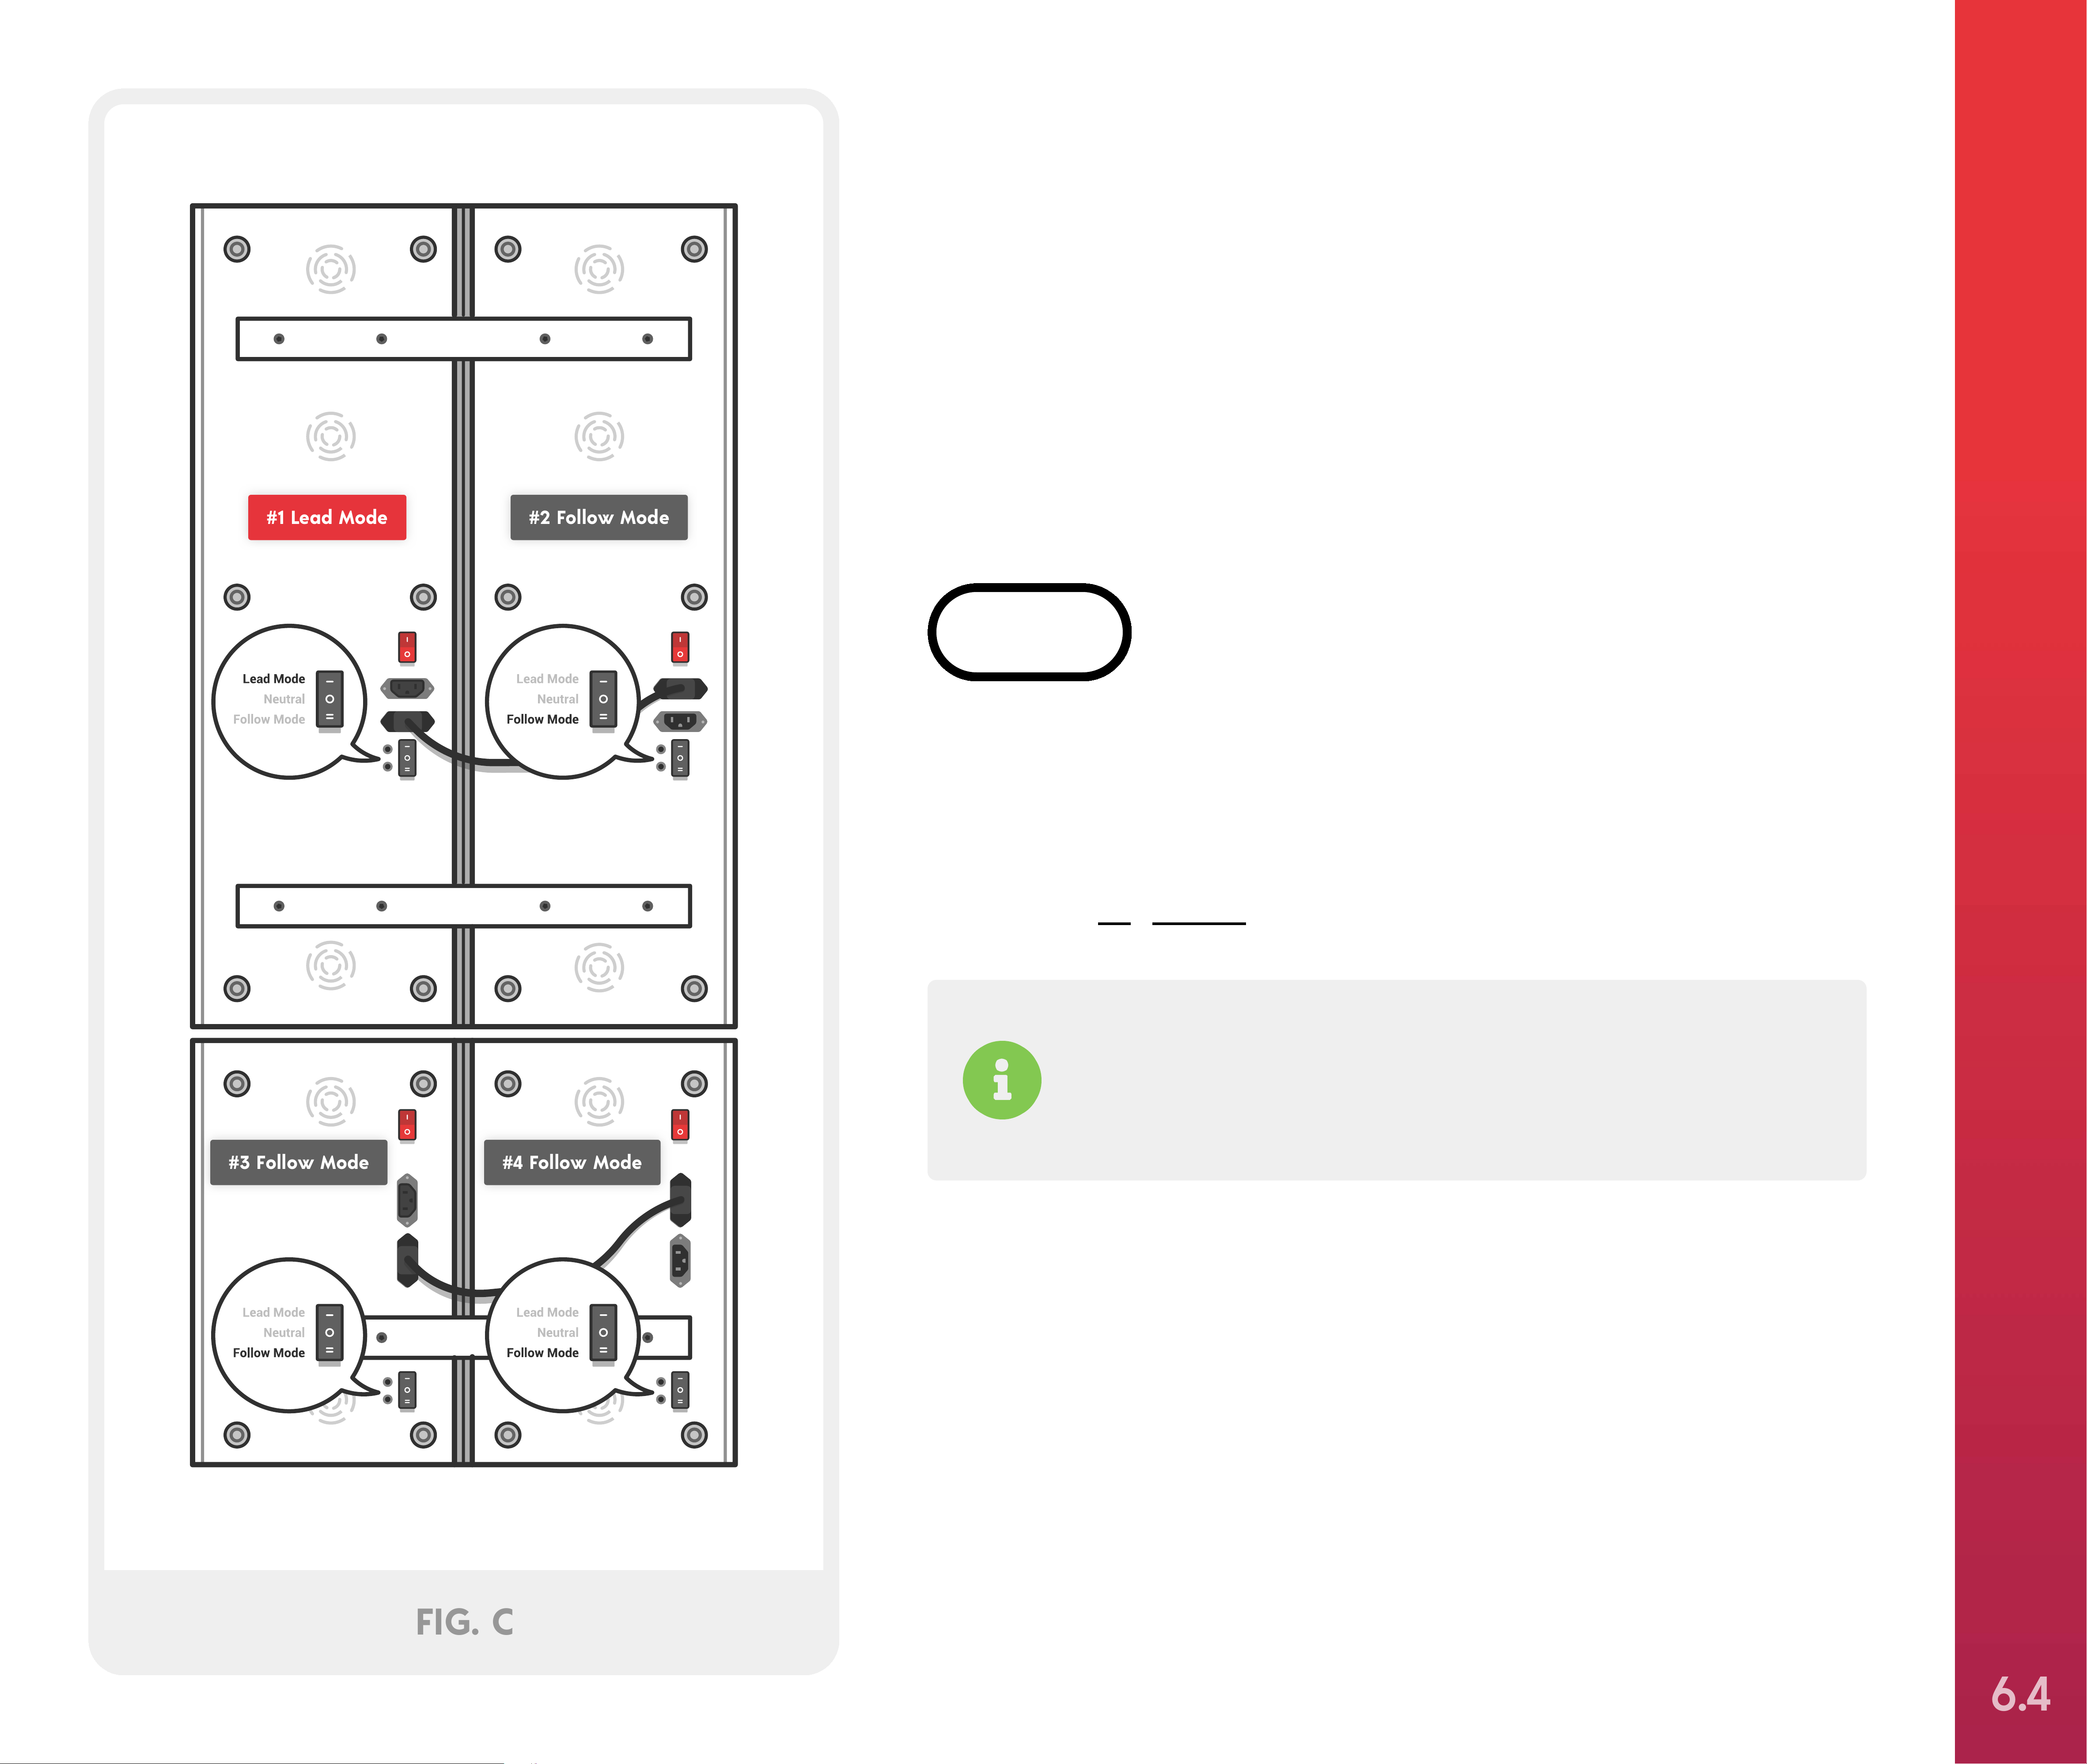
#1 Lead Mode #2 Follow Mode
#4 Follow Mode#3 Follow Mode
FIG. C
Door Mount
(2 people required)
SETTING UP YOUR JOOVV MAX
STEP 4
Locate the pairing switch on each Solo and Mini.
Turn the switch on #1 Solo to “Lead Mode” and
“Follow Mode” on #2 Solo, #3 Mini, and #4 Mini, as
shown in Figure C.
If you don’t want to connect your devices via
Bluetooth, follow the instructions included with the
Hardwire Pairing kit.
6.4

#1 Lead Mode #2 Follow Mode
FIG. D
9 INCHES
FIG. E
Door Mount
(2 people required)
STEP 5
Screw the threaded posts into the tops of each Solo
and Mini with the included Allen wrench. Then, select
the braided cables that match the desired height of
your Max and screw them to the threaded posts on
the Solos, as shown in Figure D. Next, locate two
snap links from the door hook kit and connect them
to the braided cables.
Your Joovv Max system includes 4 sets of support
cables with varying lengths that allow for different
heights.
SETTING UP YOUR JOOVV MAX
STEP 6
Hang the door hooks about 9” apart on any
standard-sized door, as shown in Figure E.
6.5
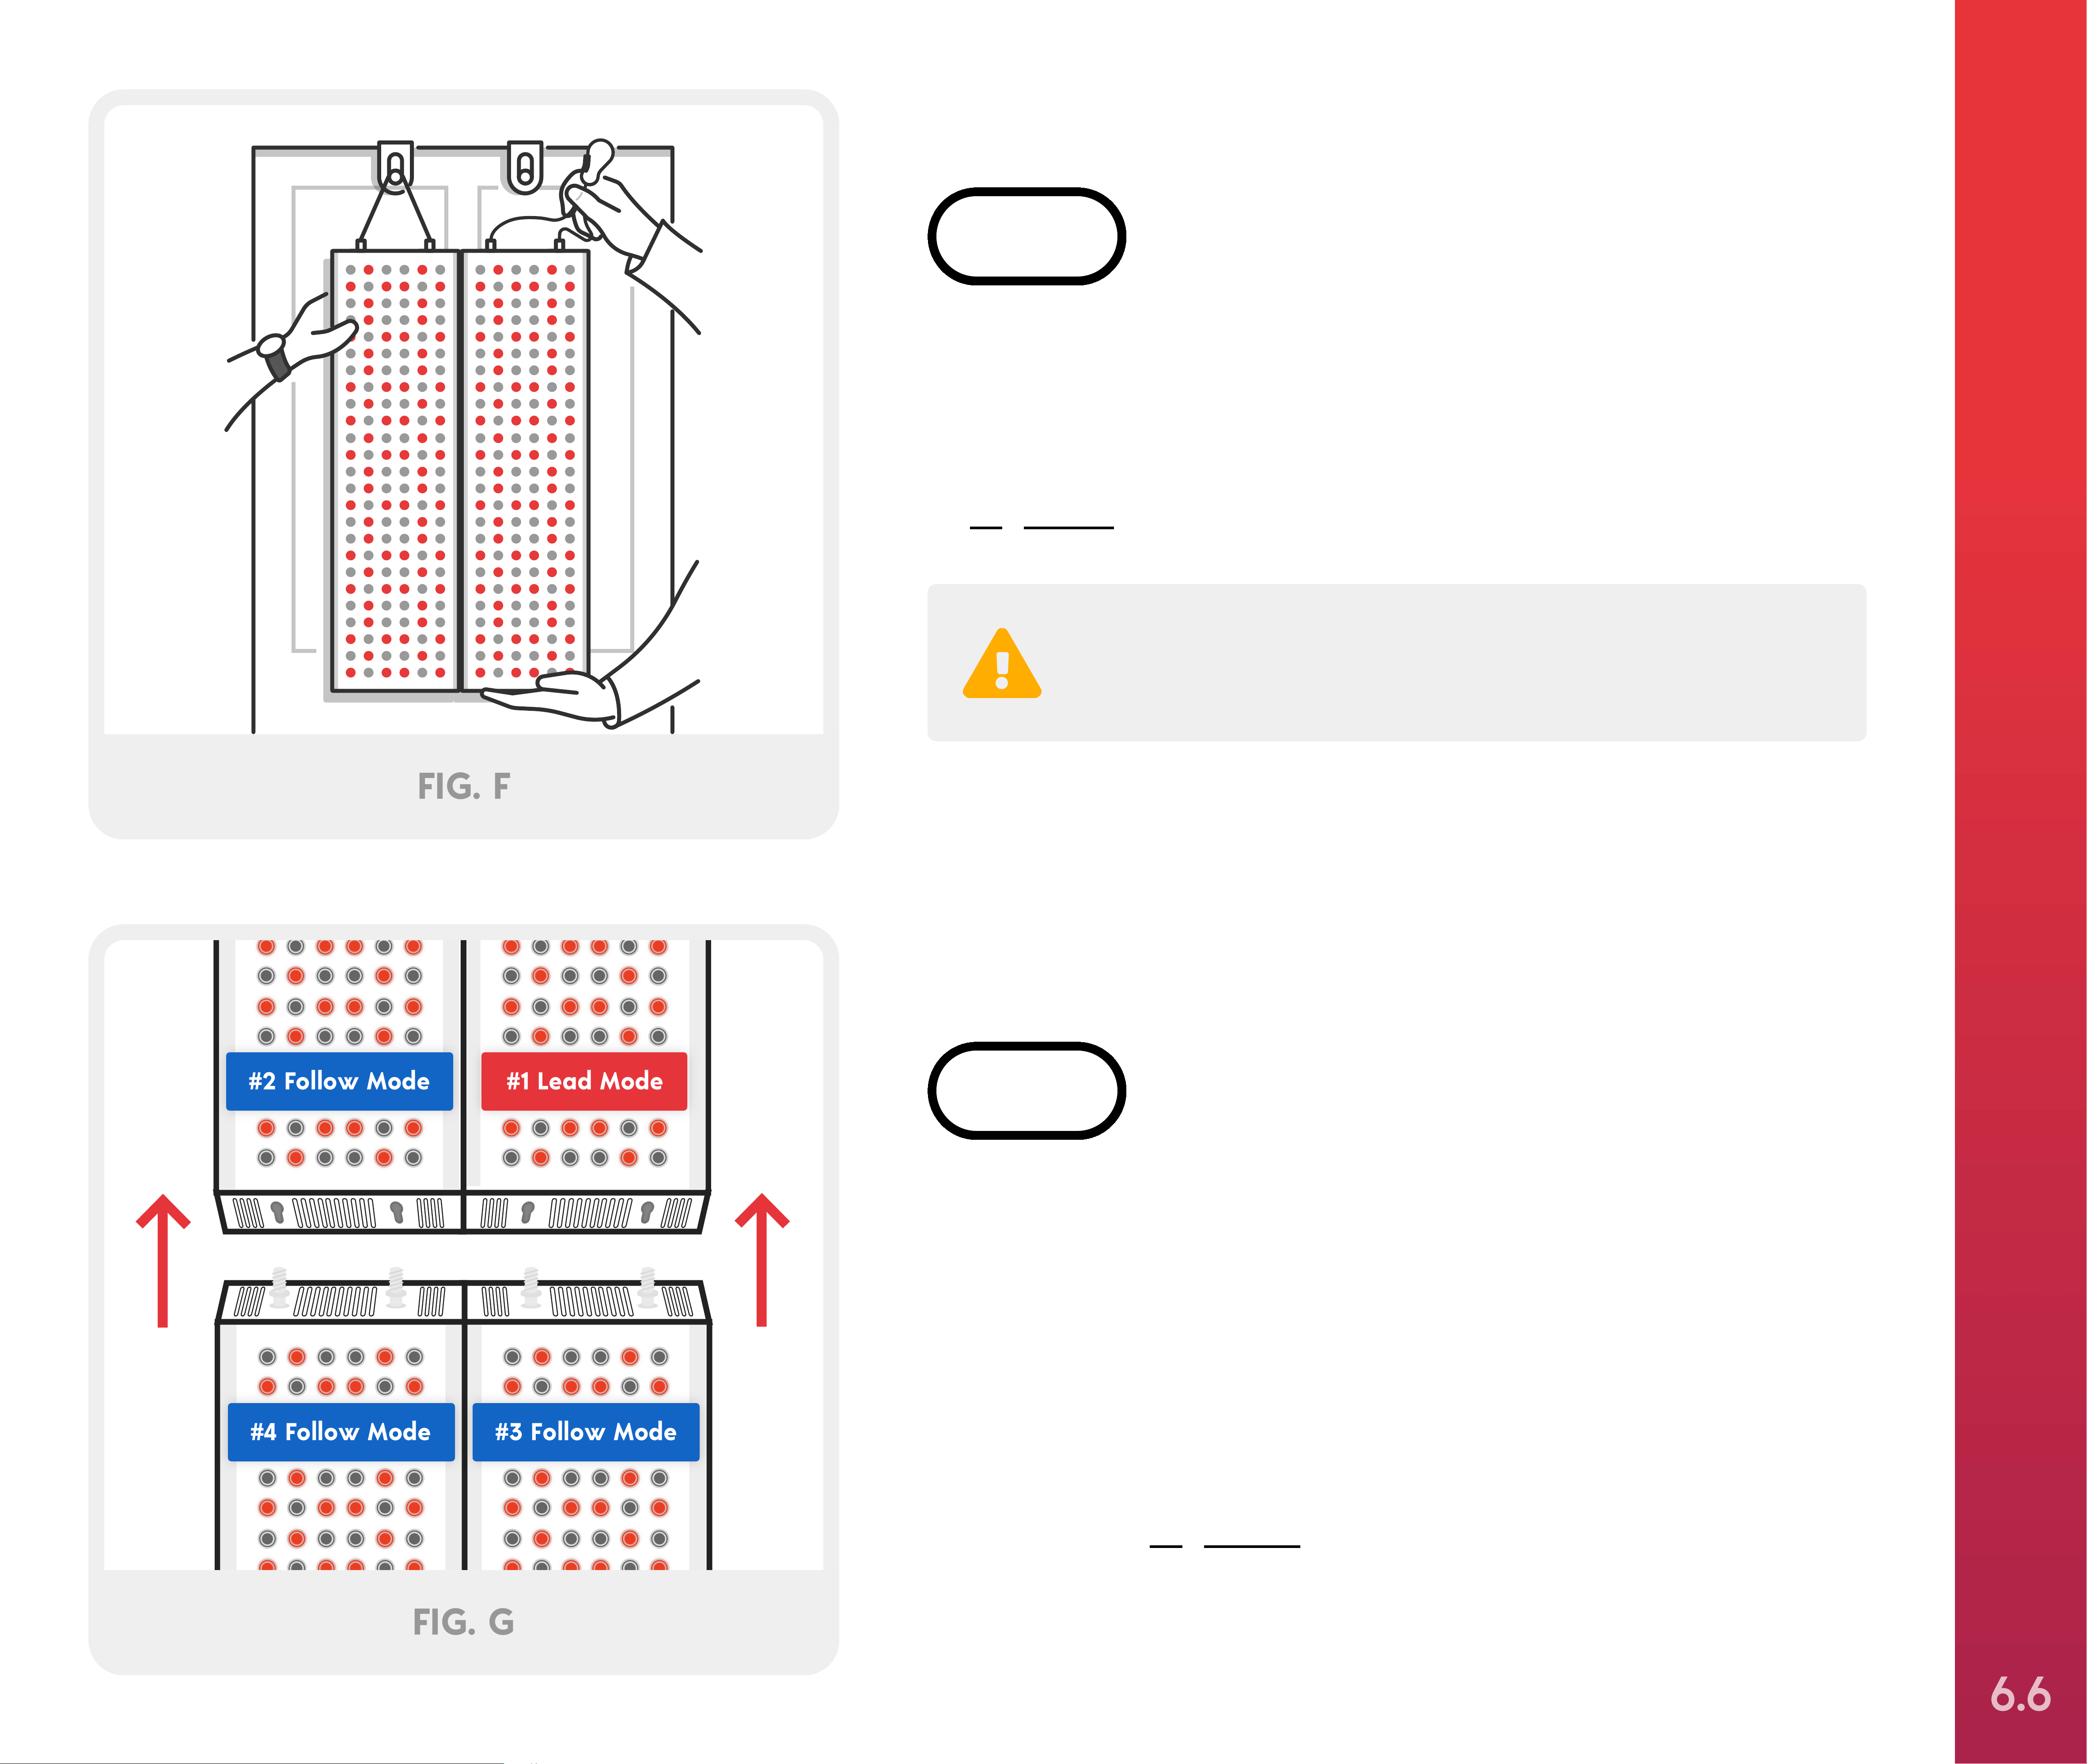
FIG. F
#1 Lead Mode#2 Follow Mode
#3 Follow Mode#4 Follow Mode
FIG. G
Door Mount
(2 people required)
STEP 7
With assistance from another person, hold the pair
of Solos (#1 and #2) in place. With your free hand
connect the snap links to the door hooks, as shown
in Figure F.
Be sure to adequately support the devices while
SETTING UP YOUR JOOVV MAX
connecting them to the door hooks.
STEP 8
With assistance from another person connect the
pair of Minis to the pair of Solos by lining up the
threaded posts with the slots on the bottom ends of
Solo #1 and #2. Then, lift up and insert threaded
posts on the top ends of Mini #3 and #4. Once
inserted, slide forward to lock in place and release,
as shown in Figure G.
6.6
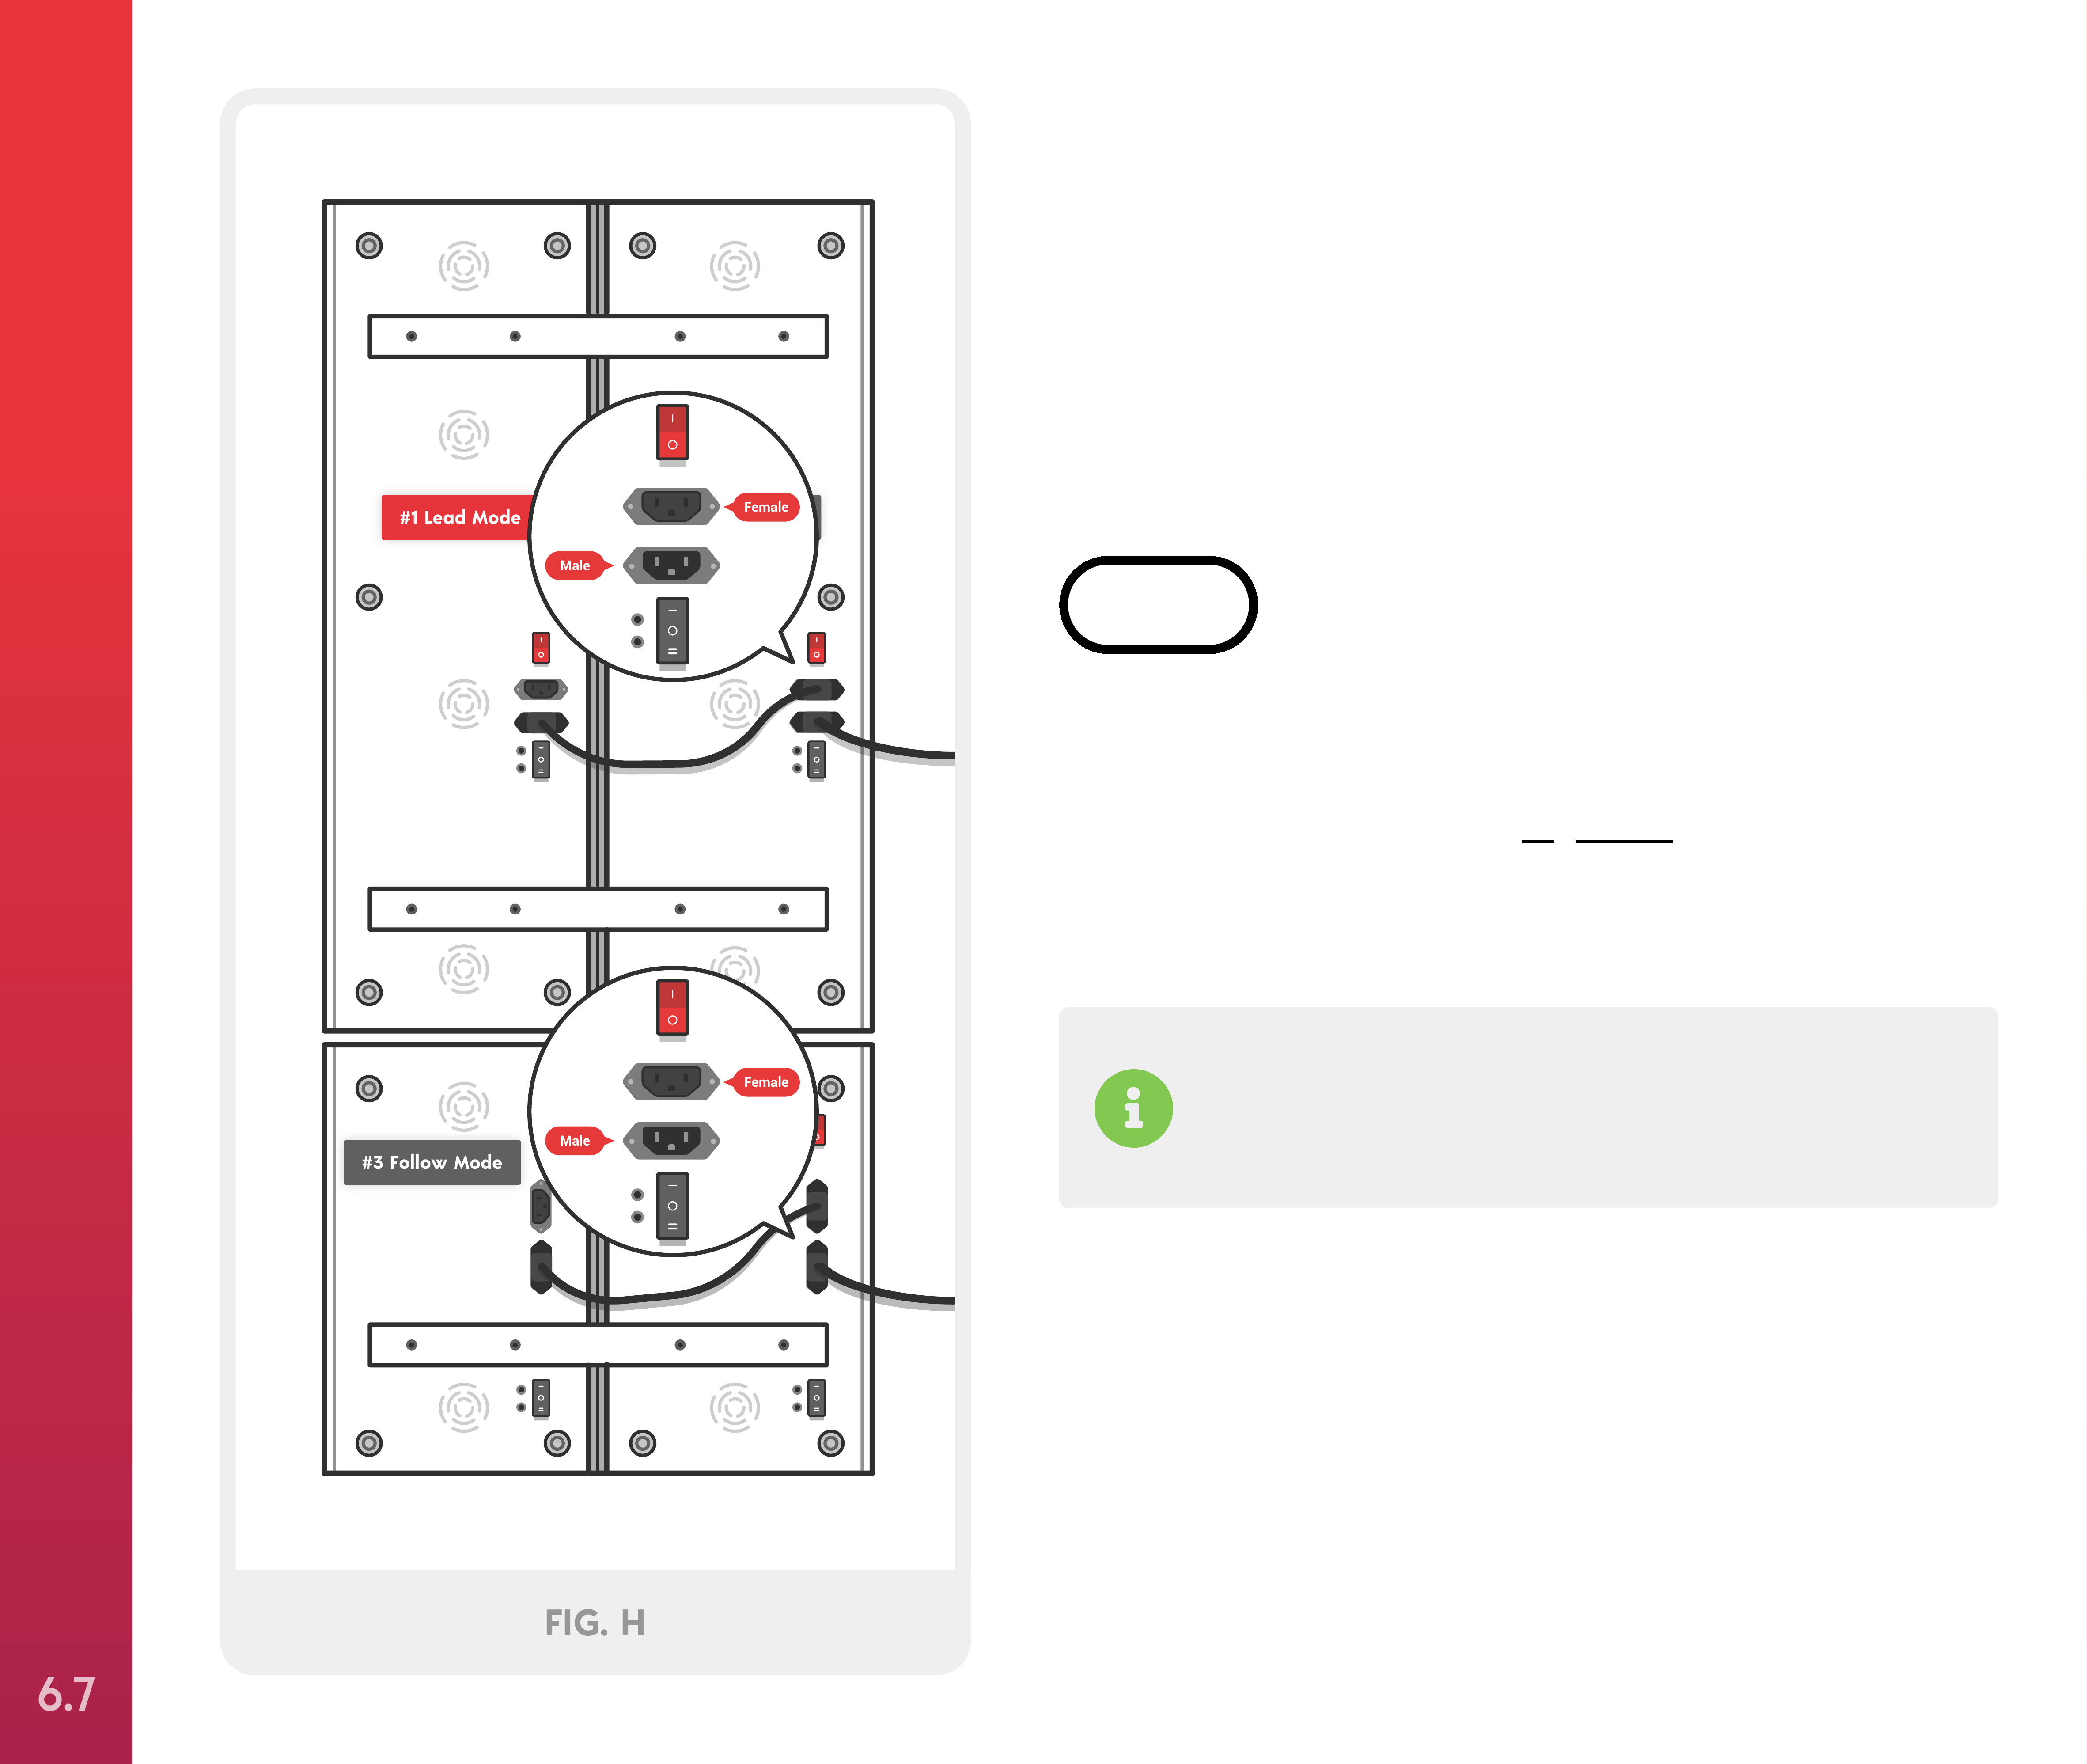
#1 Lead Mode #2 Follow Mode
#4 Follow Mode#3 Follow Mode
FIG. H
Door Mount
(2 people required)
STEP 9
Locate two power cords and plug the female ends
into #2 Solo and #4 Mini, plug the opposite end into
a wall outlet, as shown in Figure H. Then, turn on the
power switches on all devices and your Max will
automatically pair.
Follow devices will show “No” on the display until
successfully paired with a lead device. Once paired,
SETTING UP YOUR JOOVV MAX
the display will flash “Yes” then will change to “:”.
6.7

Door Mount
STEP 10
Once paired, #1 Solo will display the treatment
time and #3 Mini will display a colon “:”. To
adjust the treatment time, press the “Time”
STEP 11
(2 people required)
The default wavelength mode utilizes both red
and near infrared wavelengths. After pausing
your treatment session, you can change the
button on the control panel. This will add time
in one-minute increments up to 20 minutes.
The timer will cycle back to 1 minute after the
time exceeds 20 minutes on the display.
mode to use only the red or near infrared LEDs
by selecting the “Mode” button on the control
panel. The green indicator light will illuminate
SETTING UP YOUR JOOVV MAX
indicating which wavelength configuration is
selected.
Remember that near infrared LEDs emit light
that is NOT visible to the naked eye.
STEP 12
To start your treatment session, press the
“Play/Pause” button once. You can pause your
treatment at any time by pressing the “Play/
Pause” button a second time. Resume your
treatment by pressing the “Play/Pause” button
again.
That’s it—you’re ready to start Joovvin’!
Your Joovv’s cooling fans will run for 5
minutes after the treatment session is
complete to cool the LEDs.
6.8

Parts List — Optional Mounting Systems
(Mobile Stand or Wall Setup)
JOOVV MAX
2 x Joovv Solo Devices 2 x Joovv Mini Devices
2 x Power Cords
1 x M5 Allen Wrench 1 x Instruction Manual
2 x Threaded Posts (Wall Setup Only)
QUAD BRACKET KIT
2 x Connection Bars - 14”2 x Power Patch Cords
4 x Floor Bumpers2 x M6x120mm Phillips Head Screws
32 x M4x6mm Allen Screws1 x Quad Bracket
1 x Anti-Tip Kit1 x Allen Screwdriver - 2.5mm
! Approximate setup time: 60-90 minutes
6.9

STEP 1
#1 Lead Mode #2 Follow Mode
#4 Follow Mode#3 Follow Mode
FIG. A
Optional Mounting Systems
(2 people required)
Place each Solo and Mini face down on a scratchfree surface and align, as shown in Figure A.
SETTING UP YOUR JOOVV MAX
STEP 2
Locate the Quad Bracket Kit, and place the Quad
Bracket on top of the Solos and Minis aligning the
bracket holes with the corresponding holes on each
device. Attach the bracket using (24) M4x6mm Allen
screws and hand tighten using the included Allen
wrench, as shown in Figure A.
Your Joovv system comes with extra screws.
Do not use a drill to install the screws as this can
strip the threads.
6.10

#1 Lead Mode #2 Follow Mode
#3 Follow Mode #4 Follow Mode
FIG. B
#1 Lead Mode
#4 Follow Mode#3 Follow Mode
FIG. B
Optional Mounting Systems
(2 people required)
STEP 3
Now, attach one connection bar to the Solo devices
using 8 M4x6mm Allen screws and hand tighten with
the included Allen wrench, as shown in Figure B.
STEP 4
For instructions on how to use your Joovv Max with
an optional mounting system, refer to the guide
included with that system. Then proceed to step 5.
SETTING UP YOUR JOOVV MAX
STEP 5
Locate the power patch cords in the Quad Bracket
connection kit. Connect each cord by inserting the
female ends into #1 Solo and #3 Mini, and male ends
into #2 Solo and #4 Mini, as shown in Figure B.
6.11

FIG. C
FIG. D
Optional Mounting Systems
(2 people required)
STEP 6
Locate the pairing switch on each Solo and Mini.
Turn the switch on #1 Solo to “Lead Mode” and
“Follow Mode” on #2 Solo, #3 Mini, and #4 Mini, as
SETTING UP YOUR JOOVV MAX
shown in Figure C. Next, locate the four black rubber
floor bumpers and attach by inserting the adjustable
nut into the bottom slots of Mini #3 and #4. Once
inserted slide the nut forward and pull down and
tighten by screwing clockwise until hand tight, as
shown in Figure D.
If you don’t want to connect your devices via
Bluetooth, follow the instructions included with the
Hardwire Pairing kit.
6.12

#1 Lead Mode #2 Follow Mode
#3 Follow Mode #4 Follow Mode
FIG. D
#1 Lead Mode
#4 Follow Mode#3 Follow Mode
FIG. E
Optional Mounting Systems
(2 people required)
STEP 7
Locate two power cords and plug the female ends
into #2 Solo and Mini #4, plug the opposite end into
a wall outlet, as shown in Figure E. Then, turn on the
power switches on all devices and your Max will
automatically pair.
Follow devices will show “No” on the display until
successfully paired with a lead device. Once paired,
the display will flash “Yes” then will change to “:”.
6.13

FIG. F
Optional Mounting Systems
STEP 8
Once paired, #1 Solo will display the treatment
time and #3 Mini will display a colon “:”. To
adjust the treatment time, press the “Time”
STEP 9
(2 people required)
The default wavelength mode utilizes both red
and near infrared wavelengths. After pausing
your treatment session, you can change the
button on the control panel. This will add time
in one-minute increments up to 20 minutes.
The timer will cycle back to 1 minute after the
time exceeds 20 minutes on the display.
mode to use only the red or near infrared LEDs
by selecting the “Mode” button on the control
panel. The green indicator light will illuminate
SETTING UP YOUR JOOVV MAX
indicating which wavelength configuration is
selected.
Remember that near infrared LEDs emit light
that is NOT visible to the naked eye.
STEP 10
To start your treatment session, press the
“Play/Pause” button once. You can pause your
treatment at any time by pressing the “Play/
Pause” button a second time. Resume your
treatment by pressing the “Play/Pause” button
again.
That’s it—you’re ready to start Joovvin’!
Your Joovv’s cooling fans will run for
5 minutes after the treatment session is
complete to cool the LEDs.
6.14

Setting Up Your
Joovv Quad
!
If you’d prefer instructional setup videos, please visit: www.joovv.com/setup
7

Parts List — Door Mount
JOOVV QUAD
2 x Power Cords4 x Joovv Solo Devices
4 x Threaded Posts 4 x Braided Steel Cables - 90mm
1 x M5 Allen Wrench 1 x Instruction Manual
2 x Door Mount Kits
QUAD CONNECTION KIT
2 x Power Patch Cords
16 x M4x6mm Allen Screws
4 x Connection Bars - 14”
1 x Allen Screwdriver - 2.5mm
! Approximate setup time: 60-90 minutes
7.1
#1 Lead Mode #2 Follow Mode
#4 Follow Mode#3 Follow Mode
FIG. A
Door Mount
(2 people required)
STEP 1
Place each Solo face down on a scratch-free surface
SETTING UP YOUR JOOVV QUAD
and align, as shown in Figure A.
STEP 2
Locate the Quad Door Connection Kit and lay out the
connection bars on the Solos, as shown in Figure A.
Attach each connection bar using (4) M4x6mm Allen
screws and hand tighten using the included Allen
wrench.
Your Joovv system comes with extra screws.
Do not use a drill to install the screws as this can
strip the threads.
7.2

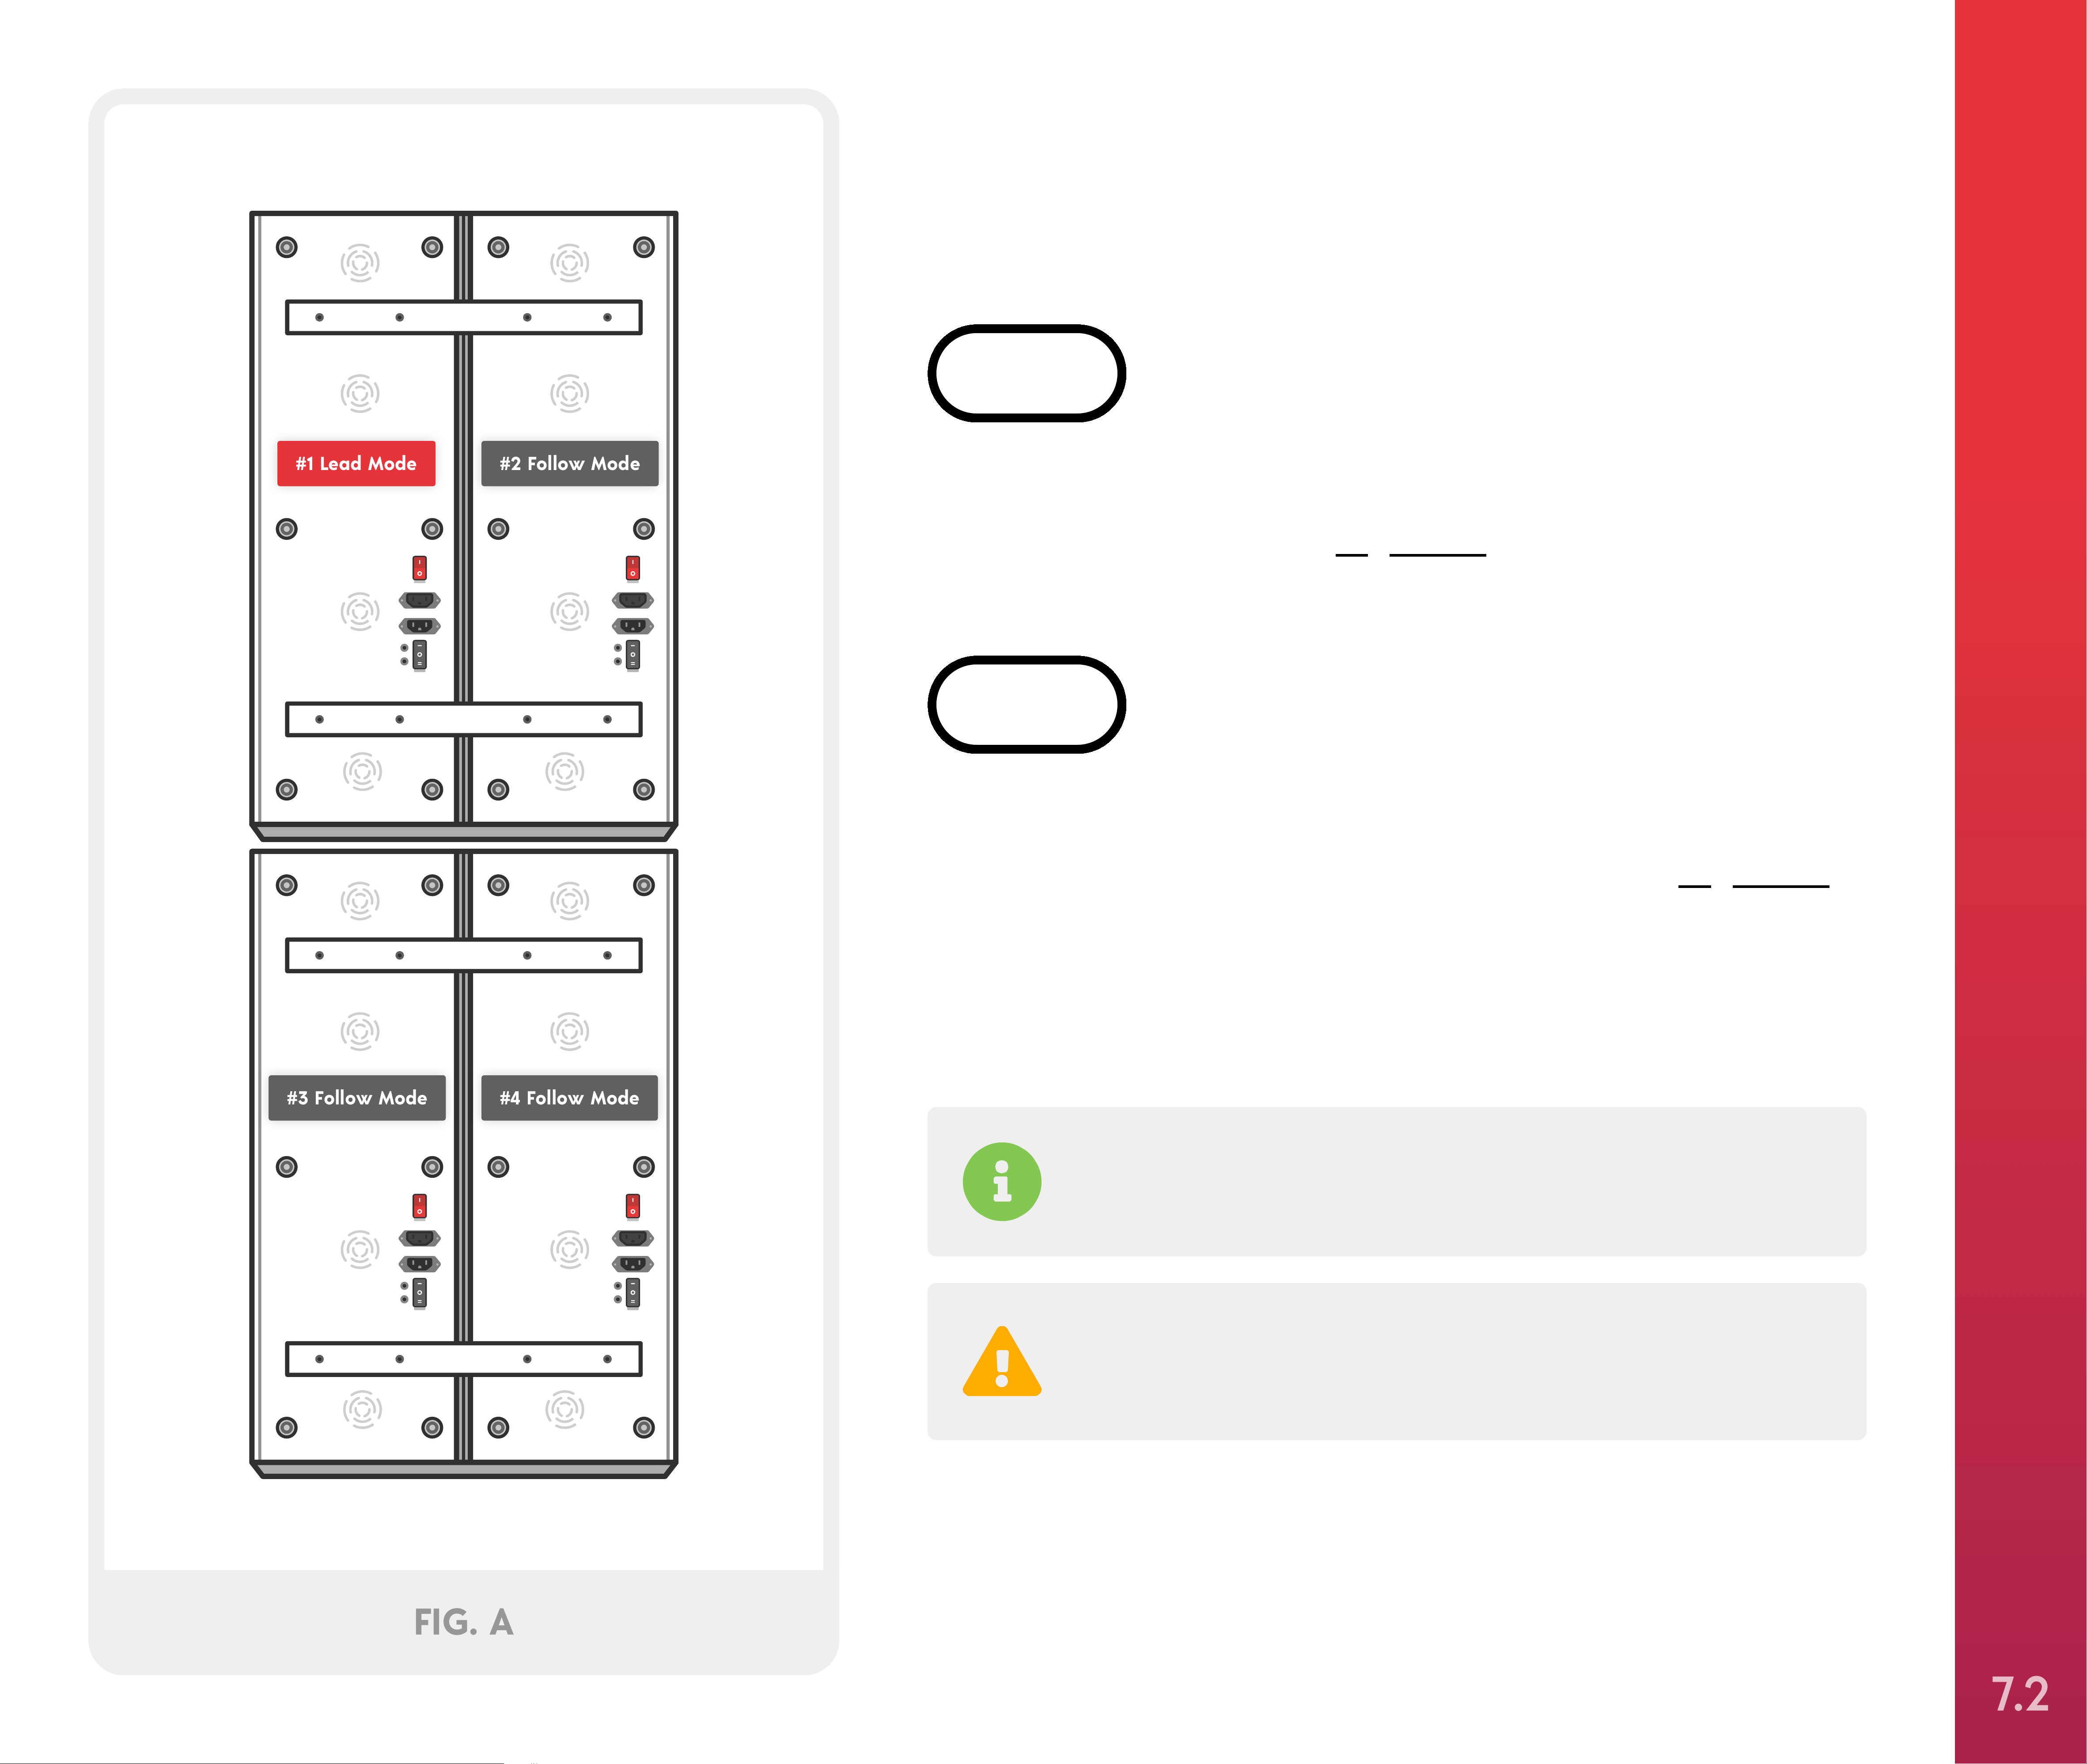
#1 Lead Mode #2 Follow Mode
#4 Follow Mode#3 Follow Mode
FIG. B
Door Mount
(2 people required)
STEP 3
Locate the power patch cords in the Quad Door
connection kit. Connect each cord by inserting the
female ends into #1 Solo and #3 Solo, and male ends
into #2 Solo and #4 Solo, as shown in Figure B.
SETTING UP YOUR JOOVV QUAD
7.3

#1 Lead Mode #2 Follow Mode
#4 Follow Mode#3 Follow Mode
FIG. C
Door Mount
(2 people required)
SETTING UP YOUR JOOVV QUAD
STEP 4
Locate the pairing switch on each Solo. Turn the
switch to “Lead Mode” on #1 Solo and “Follow
Mode” on Solos #2, #3 and #4, as shown in Figure C.
If you don’t wish to connect your devices via
Bluetooth, follow the instructions included with the
Hardwire Pairing kit.
7.4

#1 Lead Mode #2 Follow Mode
FIG. D
9 INCHES
FIG. E
Door Mount
(2 people required)
STEP 5
Screw the threaded posts into the tops of each Solo
with the included Allen wrench. Then, attach the
braided cables to the threaded posts of Solos #1 and
#2, as shown in Figure D. Next, locate two snap links
from the door hook kit and connect them to the
braided cables, as shown in Figure D.
SETTING UP YOUR JOOVV QUAD
STEP 6
Hang the door hooks about 9” apart on any
standard-sized door as shown in Figure E.
7.5
If you don’t wish to connect your devices via
Bluetooth, follow the instructions included with the
Hardwire Pairing kit.

FIG. F
#1 Lead Mode#2 Follow Mode
#3 Follow Mode#4 Follow Mode
FIG. G
Door Mount
(2 people required)
STEP 7
With assistance from another person, hold the pair
of Solos (devices #1 and #2) in place. With your free
hand connect the snap links to the door hooks, as
shown in Figure F.
Be sure to adequately support the devices while
SETTING UP YOUR JOOVV QUAD
connecting them to the door hooks.
STEP 8
With assistance from another person connect the
second set of Solos by lining up the threaded posts
with the slots on the bottom ends of Solos #1 and
#2. Then, lift up and insert threaded posts on the top
ends of Solos #3 and #4. Once inserted, slide
forward to lock in place and release, as shown in
Figure G.
7.6

#1 Lead Mode #2 Follow Mode
#4 Follow Mode#3 Follow Mode
FIG. H
Door Mount
(2 people required)
Locate two power cords and plug the female ends
into Solos #2 and #4, plug the opposite ends into a
wall outlet, as shown in Figure H. Then, turn on the
power switches on all devices and your Quad will
automatically pair.
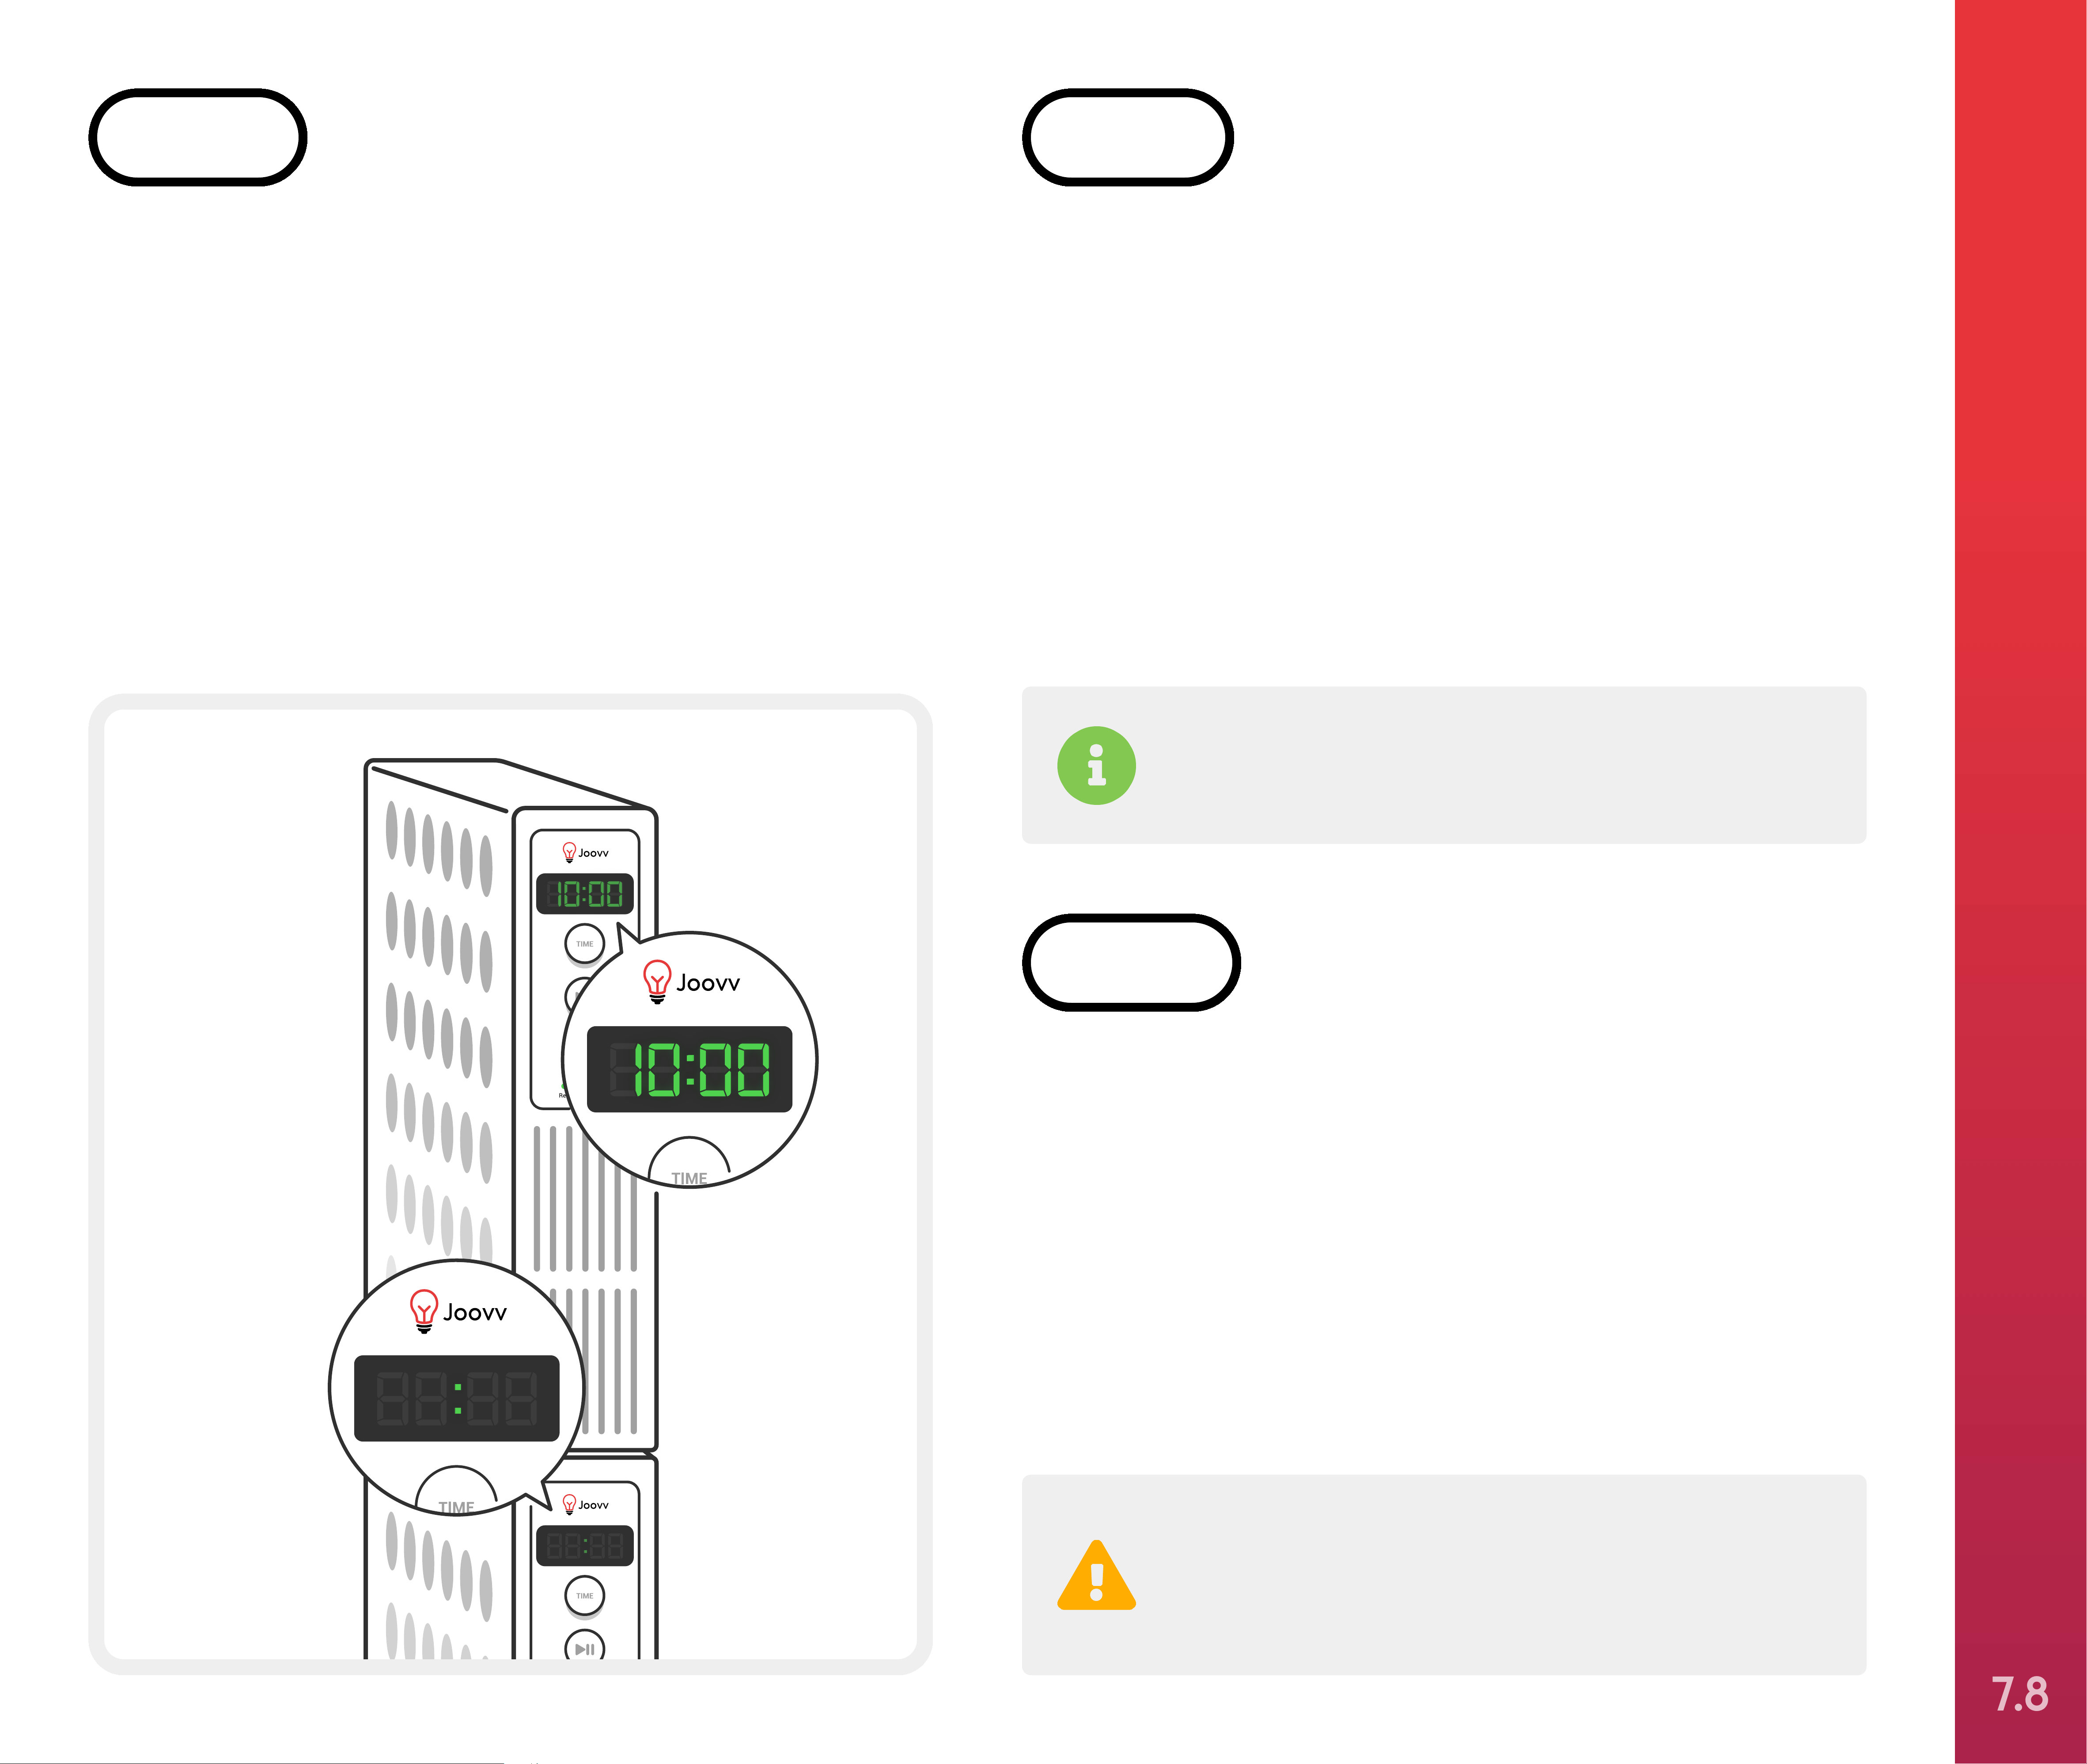
Follow devices will show “No” on the display until
successfully paired with a lead device. Once paired,
the display will change to ":".
7.7
Door Mount
STEP 10
Once paired, #1 Solo will display the treatment
time and #3 Solo will display a colon “:”. To
adjust the treatment time, press the “Time”
STEP 11
(2 people required)
The default wavelength mode utilizes both red
and near infrared wavelengths. After pausing
your treatment session, you can change the
button on the control panel. This will add time
in one-minute increments up to 20 minutes.
The timer will cycle back to 1 minute after the
time exceeds 20 minutes on the display.
mode to use only the red or near infrared LEDs
by selecting the “Mode” button on the control
panel. The green indicator light will illuminate
indicating which wavelength configuration is
selected.
SETTING UP YOUR JOOVV QUAD
Remember that near infrared LEDs emit light
that is NOT visible to the naked eye.
STEP 12
To start your treatment session, press the
“Play/Pause” button once. You can pause your
treatment at any time by pressing the “Play/
Pause” button a second time. Resume your
treatment by pressing the “Play/Pause” button
again.
That’s it—you’re ready to start Joovvin’!
Your Joovv’s cooling fans will run for
5 minutes after the treatment session is
complete to cool the LEDs.
7.8

Parts List — Optional Mounting Systems
(Mobile Stand & Wall Setup)
JOOVV QUAD
2 x Power Cords4 x Joovv Solo Devices
2 x Threaded Posts (Wall Setup Only) 1 x M5 Allen Wrench
1 x Instruction Manual
QUAD BRACKET KIT
2 x Connection Bars - 14”2 x Power Patch Cords
4 x Floor Bumpers2 x M6x120mm Phillips Head Screws
32 x M4x6mm Allen Screws1 x Quad Bracket
1 x Anti-Tip Kit1 x Allen Screwdriver - 2.5mm
! Approximate setup time: 60-90 minutes
7.9

STEP 1
#1 Lead Mode #2 Follow Mode
#4 Follow Mode#3 Follow Mode
FIG. A
Optional Mounting Systems
(2 people required)
Place each Solo face down on a scratch-free surface
and align, as shown in Figure A.
SETTING UP YOUR JOOVV QUAD
STEP 2
Locate the Quad Bracket Kit, and place the Quad
Bracket on top of the Solos aligning the bracket
holes with the corresponding holes on each device.
Attach the bracket using (24) M4x6mm Allen screws
and hand tighten using the included Allen wrench,
as shown in Figure A.
Your Joovv system comes with extra screws.
Do not use a drill to install the screws as this can
strip the threads.
7.10

STEP 3
#1 Lead Mode #2 Follow Mode
#4 Follow Mode#3 Follow Mode
FIG. B
Optional Mounting Systems
(2 people required)
Now, set the included connection bars across the top
and bottom of your Joovv Quad. Attach the bars
using 8 M4x6mm Allen screws and hand tighten
using the included Allen wrench, as shown in
Figure B.
STEP 4
For instructions on how to use your Joovv Quad with
an optional mounting system, refer to the guide
included with that system. Then proceed to step 5.
SETTING UP YOUR JOOVV QUAD
STEP 5
Locate the power patch cords in the Quad Bracket
kit. Connect each cord by inserting the female ends
into Solos #1 and #3, and male ends into Solos #2
7.11
and #4, as shown in Figure B.

#1 Lead Mode #2 Follow Mode
#4 Follow Mode#3 Follow Mode
FIG. C
FIG. D
Optional Mounting Systems
STEP 6
(2 people required)
Locate the pairing switch on each Solo. Turn the
switch to “Lead Mode” on #1 Solo and “Follow
Mode” on Solos #2, #3 and #4, as shown in Figure C.
Next, locate the four black rubber floor bumpers and
attach by inserting the adjustable nut into the
bottom slots of Solos #3 and #4. Once inserted slide
the nut forward and pull down and tighten by
screwing clockwise until hand tight, as shown in
SETTING UP YOUR JOOVV QUAD
Figure D.
If you don’t wish to connect your devices via
Bluetooth, follow the instructions included with the
Hardwire Pairing kit.
7.12

#1 Lead Mode #2 Follow Mode
#4 Follow Mode#3 Follow Mode
FIG. E
Optional Mounting Systems
(2 people required)
Locate two power cords and plug the female ends
into Solos #2 and #4, plug the opposite ends into a
wall outlet, as shown in Figure E. Then, turn on the
power switches on all devices and your Quad will
automatically pair.
Follow devices will show “No” on the display until
successfully paired with a lead device. Once paired,
the display will change to ":".
7.13

Optional Mounting Systems
STEP 8
Once paired, #1 Solo will display the treatment
time and #3 Solo will display a colon “:”. To
adjust the treatment time, press the “Time”
STEP 9
(2 people required)
The default wavelength mode utilizes both red
and near infrared wavelengths. After pausing
your treatment session, you can change the
button on the control panel. This will add time
in one-minute increments up to 20 minutes.
The timer will cycle back to 1 minute after the
time exceeds 20 minutes on the display.
mode to use only the red or near infrared LEDs
by selecting the “Mode” button on the control
panel. The green indicator light will illuminate
indicating which wavelength configuration is
selected.
SETTING UP YOUR JOOVV QUAD
Remember that near infrared LEDs emit light
that is NOT visible to the naked eye.
STEP 10
To start your treatment session, press the
“Play/Pause” button once. You can pause your
treatment at any time by pressing the “Play/
Pause” button a second time. Resume your
treatment by pressing the “Play/Pause” button
again.
That’s it—you’re ready to start Joovvin’!
Your Joovv’s cooling fans will run for
5 minutes after the treatment session is
complete to cool the LEDs.
7.14

Setting Up Your
Joovv Elite
!
If you’d prefer instructional setup videos, please visit: www.joovv.com/setup
8

Parts List
(Mobile Stand & Wall Setup)
JOOVV ELITE
6 x Joovv Solo Devices 2 x Power Cords
1 x M5 Allen Wrench 1 x Instruction Manual
ELITE BRACKET KIT
2 x Power Patch Cords 1 x Elite Bracket
2 x Connection Bars - 23” 48 x M4x6mm Allen Screws
3 x M6x120mm Phillips Head Screws 1 x Allen Screwdriver - 2.5mm
6 x Floor Bumpers 1 x Anti-tip Kit
! Approximate setup time: 90-120 minutes
8.1

STEP 1
#1 Lead Mode #2 Follow Mode #3 Follow Mode
#5 Follow Mode #6 Follow Mode#4 Follow Mode
FIG. A
Optional Mounting Systems
(2 people required)
Place each Solo face down on a scratch-free surface
and align, as shown in Figure A.
STEP 2
Locate the Elite Bracket Kit, and place the Elite
bracket on top of the Solos aligning the bracket
holes with the corresponding holes on each device.
Attach the bracket using (36) M4x6mm Allen screws
and hand tighten using the included Allen wrench.
SETTING UP YOUR JOOVV ELITE
Next, place the connection bars across the top and
bottom of each Solo. Attach the bars using (12)
M4x6mm Allen screws and hand tighten using the
included Allen wrench, as shown in Figure A.
Your Joovv system comes with extra screws.
Do not use a drill to install the screws as this can
strip the threads.
8.2

#1 Lead Mode #2 Follow Mode #3 Follow Mode
#5 Follow Mode #6 Follow Mode#4 Follow Mode
FIG. B
Optional Mounting Systems
(2 people required)
STEP 3
For instructions on how to use your Joovv Elite with
an optional mounting system, refer to the guide
included with that system. Then proceed to step 4.
SETTING UP YOUR JOOVV ELITE
STEP 4
Locate the power patch cords in the Elite Bracket kit.
Connect each cord by inserting the female ends into
Solos #1, #2, #4, and #5 and male ends into Solos
2#, #3, #5 and #6, as shown in Figure B.
STEP 5
Plug the two power cables into devices #3 and #6.
Next, plug patch cables into the male sockets
devices #1 and #4 and the female sockets on devices
#2 and #5. Finally, connect the last two devices by
connecting patch cables into the male sockets of
devices #2 and #5 and the female sockets on devices
#3 and #6, as shown in Figure B.
8.3

FIG. D
#1 Lead Mode #2 Follow Mode #3 Follow Mode
#5 Follow Mode #6 Follow Mode#4 Follow Mode
FIG. C
Optional Mounting Systems
(2 people required)
Locate the pair switch on each Solo. Turn the switch
on #1 Solo to “Lead Mode” and “Follow Mode” for
Solos #2, #3, #4, #5 and #6, as shown in Figure C.
Next, locate the six black rubber floor bumpers and
attach by inserting the adjustable nuts into the
bottom slots of Solo #4, #5 and #6. Once inserted,
slide the nuts forward and pull down and tighten by
screwing clockwise until hand tight, as shown in
Figure D.
If you don’t wish to connect your devices via
Bluetooth, follow the instructions included with the
Hardwire Pairing kit.
8.4

#1 Lead Mode #2 Follow Mode #3 Follow Mode
#5 Follow Mode #6 Follow Mode#4 Follow Mode
FIG. E
Optional Mounting Systems
(2 people required)
SETTING UP YOUR JOOVV ELITE
Locate two power cords and plug the female ends
into Solos #3 and #6, plug the opposite ends into a
wall outlet, as shown in Figure E. Then, turn on the
power switches on all devices and your Elite will
automatically pair.
Follow devices will show “No” on the display until
successfully paired with a lead device. Once paired,
the display will change to ":".
8.5

Door Mount
STEP 8
Once paired, #1 Solo will display the treatment
time and #3 Solo will display a colon “:”. To
adjust the treatment time, press the “Time”
STEP 9
(2 people required)
The default wavelength mode utilizes both red
and near infrared wavelengths. After pausing
your treatment session, you can change the
button on the control panel. This will add time
in one-minute increments up to 20 minutes.
The timer will cycle back to 1 minute after the
time exceeds 20 minutes on the display.
mode to use only the red or near infrared LEDs
by selecting the “Mode” button on the control
panel. The green indicator light will illuminate
indicating which wavelength configuration is
selected.
Remember that near infrared LEDs emit light
that is NOT visible to the naked eye.
STEP 10
SETTING UP YOUR JOOVV ELITE
To start your treatment session, press the
“Play/Pause” button once. You can pause your
treatment at any time by pressing the “Play/
Pause” button a second time. Resume your
treatment by pressing the “Play/Pause” button
again.
That’s it—you’re ready to start Joovvin’!
Your Joovv’s cooling fans will run for
5 minutes after the treatment session is
8.6
complete to cool the LEDs.

Troubleshooting Guidelines
9

Some of the devices in my full-body system won’t turn on.
1. Power off the device(s).
2. Unplug the device(s) from the wall receptacle(s) and wait 1 minute.
3. If you are using the wireless pairing method, set the pairing switch to
“Lead Mode” for the lead device and “Follow Mode” for the other devices. If
you are using the hardwired pairing method, reference the hardwire
pairing kit instructions to assure cables are plugged in as instructed, then
set all of the pairing switches to neutral.
4. Plug back in device(s) to the wall receptacle(s).
5.
Power on the device(s) using the Lead device. Note you will need by
pressing the play button on either the top or bottom device.
6.
The lead device will display the treatment time, and the following device(s)
will display a colon “:” once successfully paired.
- Note: Follow devices will show “n0” on the display until successfully
paired with a lead device.
• If the standard door hook is not the appropriate size for your door, you
may contact us at help@joovv.com to request a larger size. All inquiries
must include a detailed summary of your issue, including measurements of
the door you intend to use.
• By default we include a 1 3/8+ wide door hook that accommodates most
standard size doors, for larger doors we have a 1 ⅞’’ option. To inquire
about the larger option please contact us at help@joovv.com.
My Joovv is displaying “FA:n”.
• Each Solo device requires 300 watts (W) and each Mini requires 120W of
power. So the Max system requires 840W, the Quad requires 1200W, and
the Elite requires 1800W.
Due to these power requirements, we recommend using a dedicated 15-
•
amp circuit for the Quad setup and a dedicated 20-amp circuit for the Elite
setup with 110 volts of power.
• You can check to see if your Joovv system is receiving enough power
through the following steps:
• When the device has been used consecutively and not allowed to run
through its regular 5 minute post-treatment cool down operation; the
device will initiate a lock-out on further treatments being selected and run
through a cool down operation. During this cool down operation period,
the display will show the wording “FA:n”, alerting the users that the cool
down operation is in effect.
⁃ Start by powering on and pairing just the upper row of devices. Power off
and unplug the other devices.
⁃ After confirming the upper devices are operating correctly, plug the lower
row of devices into a wall outlet on another circuit, using an extension
cord if necessary.*
⁃ Power on all the devices. If they work correctly, then the devices weren’t
receiving the required power from the initial power supply. To continue use
without problems, make sure the Joovv system is on a circuit that isn’t
My door hook is not large enough for my door.
being used other electrical devices.
⁃ *Note: Use an extension cord with a rated capacity exceeding the power
requirements. We recommend a 12-gauge power cord for optimal results.
My Joovv devices won’t pair together.
My Joovv is displaying “n0”.
• If your device displays “n0:”, this means the black pairing switch on the
back of the device is set to “Follow Mode” and the device is looking to pair
with a “Lead Mode” device. To correct this, change the black pairing
switch to either “Neutral” or “Lead Mode”, this will allow you to operate
the device individually.
Why isn’t your phone number listed?
• We offer nearly 24/7 online support via email and live chat throughout the
week. All of our Customer Success Representatives are real, friendly
people working from our headquarters in California. We love answering
TROUBLESHOOTING GUIDELINES
I’m not sure how to use the timer in the control panel.
• The “Time” button adjusts the treatment time in increments of 1 minute,
with a maximum treatment time of 20 minutes. The time will cycle back to
1 minute when the display exceeds 20 minutes.
questions, providing support, and helping you pick out the best Joovv for
you.
• We don't offer phone support because we truly believe it wouldn't be
possible to provide the same level of service over the phone. We decided
to keep our support online for a few reasons:
We can instantly view your questions, order information, system details,
⁃
and other information so we can troubleshoot efficiently and effectively.
We don’t use any automated systems, which means you’re always being
⁃
• When the desired treatment time is selected, it will be shown on the
display.
• Pressing “Play/Pause” will start the treatment. If “Play/Pause” is pressed
again during the treatment, the session will pause.
• If the timer has been adjusted and the treatment started, the device will
recall the newly programmed treatment time for subsequent sessions.
9.1
supported by a real Joovv employee.
It's faster. We can quickly get to the bottom of your questions without
⁃
putting you on hold. Online support keeps detailed records in one place.
This ensures nothing gets lost in translation if we need to escalate your
issue.
We'll always have access to previous inquiries, so you won't have to
⁃
repeat questions.

Frequently Asked Questions
10

How should I use my Joovv?
Why do the near infrared LEDs on my Joovv
look like they’re not working?
Will the Joovv interfere with the medications
For optimal cellular health, including deep tissue treatment,
we recommend 10-minute sessions for each desired
treatment area at a distance of approximately 4-6 inches
from the device.
Should I wear eye protection?
Eyewear is optional but not required. The LEDs may appear
I use?
Hundreds of clinical studies have proven light therapy to be
safe and effective. However, if you use medications such as
Tetracycline, Digoxin, Retin A, and/or other photosensitizing
drugs, it's recommended that you consult your healthcare
provider before using the Joovv.
very bright until your eyes are accustomed to the light. For
this reason, we recommend closing your eyes until you find
that it’s comfortable to open them. If you have any concerns,
we recommend that you consult your trusted healthcare
provider.
Is it safe for children to use the Joovv?
Clinical studies have shown light therapy to be safe and
efficacious. However, we recommend consulting with a
healthcare professional if you have any concerns.
How soon can I expect results?
The human eye can only see wavelengths of light up to 760
nm on average. Joovv uses a wavelength of 850 nm for the
near infrared LEDs making them invisible to the naked human
eye.
The cellular benefits provided by the wavelengths in our
products have been proven in many studies. Red and near
infrared light are energy for your cells. Exposing your body to
this light enhances your cells to function at a higher level. The
human body is complex yet amazing! It is hard to predict the
way your body will respond to photobiomodulation and how
quickly you will see results. Your cells will decide what healing
FREQUENTLY ASKED QUESTIONS
What is the difference between red and near
infrared wavelengths?
Both red light at 660 nm and near infrared light at 850 nm
have been proven to enhance cellular function. The main
difference is that red light is readily absorbed by skin tissue,
leading to improved skin health and collagen production. Near
needs to take place first.
Why do the fans continue to run after my
treatment?
By default, the fans are programmed to run an additional 5
minutes after your treatment is complete to assure proper
infrared light at 850 nm is invisible to the human eye and
penetrates into deeper tissue, leading to benefits like
increased muscle recovery and reduced joint pain.
Can I wear clothes when using the Joovv?
You can wear clothes during your treatment sessions, or you
cooling of the device.
can be nude. Just make sure the area of your body that you’re
treating is fully exposed to the light and not covered by any
clothing.
10.1

General Information
11

Technical Information
If you have any difficulty setting up your device, using, cleaning or
maintaining your device, please contact our customer support at
help@joovv.com
Model Number:
⁃ Do not modify, or attempt to modify or repair, this equipment. There
are no user-serviceable parts.
⁃ If this equipment is modified in anyway, appropriate inspection must
Joovv Mini, Joovv Solo.
be taken to ensure continued safe use.
Sizes
Irradiance
Note
Voltage Input
Rated Power
Joovv Mini, Joovv Solo.
>100mW/cm2*
Only use power supply provided.
This device has no user serviceable parts.
90 – 265V/AC
120W for Joovv Mini, 300W for Joovv Solo
Cautions
We recommend consulting your doctor prior to use if you believe you are
sensitive to light. Medicines for colds, allergies, pain medicine and drugs to
treat infections may cause light sensitivity. To check if you’re sensitive to
light, turn on the device and shine the light on a single spot for a total of 3
minutes to see if any reaction occurs. If you see any redness or a rash on
the exposed area, please discontinue use and contact your health
physician.
Operating Temperature/Altitude/
Atmospheric Pressure/Humidity
Storage & Transportation
Temperature/Humidity/
Atmospheric Pressure
Wavelength
“0°C to +29°C/0-2000m 80kPa to 106kPa/0%-90%,
(32°F to 90°F) relative humidity
-30°C to +55°C / 0%- to 90%, relative humidity
/50kPa to 106kPa
660nm Red +/- 10nm visible light
850nm Infrared +/- 10nm non-visible light
• Consult your doctor prior to use if you are:
⁃ Pregnant.
Are taking drugs known to cause sensitivity of skin to light.
⁃
Have any suspicious or cancerous lesions.
⁃
Recently had a steroid injection or use topical steroids.
⁃
⁃ Do not use this device on infants.
• If you experience discomfort or have a concern about the device, stop
use immediately and contact your doctor.
• Use indoors only.
• Use supplied power supply only.
*Irradiance varies based on wavelength configuration and distance from the device.
Warnings and Cautions
Warnings
• Do not stare directly into the diodes or its reflection in a mirror because
it can cause temporary irritation of the eyes.
• Do not let children use the devices unsupervised.
• This device is an electrical device. To avoid electric shock, adhere to the
• Unplug from outlet when not in use to avoid tripping hazards.
• Do not unplug by pulling directly onto the cord. Grasp the plug itself, not
the cord, when unplugging from the outlet.
• Do not exceed 20 minutes of use in one therapy session.
GENERAL INFORMATION
following:
⁃ Do not drop your device in water or liquids because you may get an
electric shock.
⁃ Do not wash electrical parts with water or liquids.
⁃ Do not directly touch the device or touch the plugs or switches with
wet hands.
⁃ Do not apply or touch the device to wet or damp skin.
⁃ Do not pull, carry, or lift the device by its cord. If the cord is damaged,
do not use the device because you could get an electric shock.
⁃ Do not use the device if it has been dropped, left outside, or has
Electrical Safety
• Do not place your device where it can fall or be pulled into water or
other liquid.
• Do not expose your device to running water. If your device comes into
contact or becomes submerged into water or other liquid, unplug it
immediately from the electrical power outlet.
• If device is to be used in the vicinity of water, we recommend using an
electrical outlet protected by Ground Fault Circuit Interrupter.
• Do not store your device in hot temperatures that are or can exceed
140°F (60°C).
encountered water or liquids.
⁃ Do not use on or near heated surfaces.
⁃ Do not operate this device in areas where it could be exposed to
flammable or combustible products, or where vapours may be
present. Explosion of fire may occur.
⁃ This device is not to be used by sleeping, or unconscious persons.
⁃ Do not use the device on open wounds, as heat may increase
circulation and cause bleeding.
⁃ Do not use this device in combination with liniments, salves,
ointments, and balms that contain heat-producing ingredients as a
• Do not separate power supply or cables during use. Switch the device
off at the back and then unplug device from the electrical power outlet
before separating cables.
• If you have any difficulty setting up your device, using, cleaning or
maintaining your device please contact our customer support at
help@joovv.com
• Do not use your device if it is damaged. Continuous use of a damaged
device may result in electric shock or injury.
• When not in use, store device in a dry room, making sure it is protected
from excessive moisture, heat and dust.
skin burn could result.
⁃ Use of this device in any way other than described in this manual
voids the warranty and could result in serious injury.
11.1
• Do not use extension cords unless they are designed to carry the total
rated wattage of the devices being powered.
• Do not connect more than 3 Joovv devices with the included power
patch cords, as described in this product manual.

Maintenance, Cleaning, Disposal Guidelines, Warranty and Returns
Maintenance
The Joovv does not require maintenance other than routine
cleaning.
Cleaning
• Turn off your device by switching off the power switch to
Warranty
Joovv, Inc. warrants that its devices will function and perform
within the specifications for two years from the date of
delivery. The warranty covers all parts and labor during the
warranty period with some exclusions. If service is required,
the buyer is responsible to return the device to Joovv within
the 2-year warranty period. The warranty shall not apply to
equipment that has been abused, modified, damaged, or fitted
the off position on the back of the device.
• Unplug the power adaptor at the power wall outlet.
• Clean the surface of device with a slightly damp cloth,
making sure the device is dry before using.
• Avoid the use of any harsh cleaners or bleaches as this may
damage your device.
with substitute parts. Joovv shall not be liable for any
consequential loss or inconvenience caused by any failure of
its products. If the device is repaired or replaced, Joovv
reserves the right to provide parts in different colours to the
original device.
To obtain warranty service, please complete your product(s)
registration card and contact Joovv at help@joovv.com or
GENERAL INFORMATION
Disposal Instructions
This symbol on the device or
packaging indicates that this device
may not be disposed of with your
other household waste. This device
requires disposal via your designated
collection point for the recycling of
www.joovv.com/warranty to request an authorization
number.
Returns
All of our modular products come with a risk-free 60-day trial.
If you’re not satisfied with your purchase during the trial
period, just go to www.joovv.com/returns and we’ll provide a
waste electrical and electronic equipment. Recycling your
waste equipment at the time of disposal will help to conserve
natural resources and ensure that it is recycled in a manner
that protects human health and the environment.
Disclaimer
hassle-free return process. Here are some details to note:
• Because we ship our products for free within the domestic
U.S., return shipping will be your responsibility.* We cannot
be responsible for lost or damaged shipments.
• All returns or exchanges must be received in like new
condition with all original accessories and packaging.
• All returns received with damaged or missing components
*Joovv light therapy products are registered as class II medical
devices and are indicated for use in the relief of muscle and
joint pain, including arthritis and muscle spasm pain, and
increasing of blood circulation, and relaxation of muscles. The
information provided is for educational purposes only and is
not intended to support the safety or effectiveness of Joovv
devices, or diagnose, treat, cure, or prevent any disease. It's
not a substitute for a face-to-face consultation with your
may be subject to additional fees. If applicable, these fees
will be deducted from the refunded amount.
• After submitting a return request, we'll provide you with a
return authorization number.
• All returns will be inspected and processed within 3-5 days.
• Returns must be postmarked before the end of the 60-day
trial. Returns sent after 60 days will not be accepted.
healthcare provider, and should not be construed as medical
advice. The independent reviews presented are applicable to
the individual depicted and may not represent the uses
mentioned above. Individual results may vary.
*Due to the policies of our financing partner, for Bread
financed orders with expedited shipping, you will assume
responsibility for the expedited shipping charge in advance of
the return.
11.2

Corporate Office
Customer Service
Joovv, Inc.
940 Calle Amanecer, Suite D
San Clemente, CA 92673
JV-MKTG-PUM-05
Email: help@joovv.com
Web: www.joovv.com
Setup: www.joovv.com/setup
 Loading...