

Page 1

Joomla 1.5 User Manual
1
Page 2
JOOMLA USER MANUAL 1
SITE 7
CONTROL PANEL 7
H
OW TO ACCESS
D
ESCRIPTION
S
CREENSHOT
I
CONS
7
Q
UICK TIPS
7
7
7
8
USER MANAGER 9
H
OW TO ACCESS
D
ESCRIPTION
S
CREENSHOT
C
OLUMN HEADERS
T
OOLBAR
Q
UICK TIPS
9
9
9
9
10
10
USER MANAGER - NEW/EDIT 11
H
OW TO ACCESS
D
ESCRIPTION
S
CREENSHOT
U
SER DETAILS AND PARAMETERS
T
OOLBAR
Q
UICK TIPS
11
11
11
11
12
13
MEDIA MANAGER 14
H
OW TO ACCESS
D
ESCRIPTION
S
CREENSHOT
T
OOLBAR
F
UNCTIONS
Q
UICK TIPS
14
14
14
14
15
15
MENUS 16
MENU ITEM MANAGER 16
H
OW TO ACCESS
D
ESCRIPTION
S
CREENSHOT
C
OLUMN HEADERS
T
OOLBAR
Q
UICK TIPS
16
16
16
16
17
17
2
Page 3
MENU ITEM MANAGER - NEW/EDIT 18
H
OW TO ACCESS
D
ESCRIPTION
S
CREENSHOT
M
ENU ITEM TYPES
I
NTERNAL LINK - ARTICLES
I
NTERNAL LINK - CONTACTS
I
NTERNAL LINK - NEWS FEEDS
I
NTERNAL LINK - POLLS
I
NTERNAL LINK - SEARCH
I
NTERNAL LINK - USER
I
NTERNAL LINK - WEB LINKS
I
NTERNAL LINK - WRAPPER
E
XTERNAL LINK
S
EPARATOR
A
LIAS
53
M
ENU ITEM DETAILS AND PARAMETERS - SYSTEM
Q
UICK TIPS
T
OOLBAR
56
18
18
18
18
18
37
40
43
44
45
49
52
53
53
53
56
MENU MANAGER – NEW/EDIT 57
H
OW TO ACCESS
D
ESCRIPTION
S
CREENSHOT
C
OLUMN HEADERS
T
OOLBAR
Q
UICK TIPS
57
57
57
57
57
58
MENU MANAGER 59
D
ESCRIPTION
S
CREENSHOT
C
OLUMN HEADERS
T
OOLBAR
Q
UICK TIPS
59
59
59
60
60
TRASH MANAGER 61
H
OW TO ACCESS
D
ESCRIPTION
S
CREENSHOT
C
OLUMN HEADERS
T
OOLBAR
Q
UICK TIPS
62
61
61
61
62
63
CONTENT 64
CONTENT CATEGORY MANAGER - NEW / EDIT 64
H
OW TO ACCESS
D
ESCRIPTION
S
CREENSHOT
64
64
64
3
Page 4
D
ETAILS
T
INY
JCE
65
MCE
EDITOR
EDITOR
65
66
BUTTONS 66
N
O EDITOR
I
MAGE BUTTON
T
OOLBAR
70
70
71
CONTENT CATEGORY MANAGER 72
H
OW TO ACCESS
D
ESCRIPTION
S
CREENSHOT
C
OLUMN HEADERS
T
OOLBAR
L
IST FILTERS
Q
UICK TIPS
73
72
72
72
72
74
74
ARTICLE MANAGER 76
H
OW TO ACCESS
D
ESCRIPTION
S
CREENSHOT
C
OLUMN HEADERS
T
OOLBAR
L
IST FILTERS
G
LOBAL CONFIGURATION
Q
UICK TIPS
76
76
76
76
77
78
79
85
FRONT PAGE MANAGER 86
H
OW TO ACCESS
D
ESCRIPTION
S
CREENSHOT
C
OLUMN HEADERS
T
OOLBAR
L
IST FILTERS
Q
UICK TIPS
87
86
86
86
86
88
88
SECTION MANAGER: NEW / EDIT 90
H
OW TO ACCESS
D
ESCRIPTION
S
CREENSHOT
D
ETAILS
T
INY
JCE
B
UTTONS
N
O EDITOR
I
MAGE BUTTON
T
OOLBAR
91
MCE
EDITOR
92
97
90
90
90
EDITOR
91
92
96
96
4
Page 5
SECTION MANAGER 98
H
OW TO ACCESS
D
ESCRIPTION
S
CREENSHOT
C
OLUMN HEADERS
T
OOLBAR
L
IST FILTERS
Q
UICK TIPS
99
98
98
98
98
100
100
CONTENT CATEGORY MANAGER - NEW / EDIT 102
H
OW TO ACCESS
D
ESCRIPTION
S
CREENSHOT
D
ETAILS
T
INY
JCE
B
UTTONS
N
O EDITOR
I
MAGE BUTTON
T
OOLBAR
103
MCE
EDITOR
104
109
102
102
102
EDITOR
103
104
108
108
CONTENT CATEGORY MANAGER 110
H
OW TO ACCESS
D
ESCRIPTION
S
CREENSHOT
C
OLUMN HEADERS
T
OOLBAR
L
IST FILTERS
Q
UICK TIPS
111
110
110
110
110
112
112
ARTICLE MANAGER: NEW / EDIT 114
H
OW TO ACCESS
D
ESCRIPTION
S
CREENSHOT
H
EADING INFORMATION
I
MAGE, PAGEBREAK, AND READ MORE BUTTONS
T
INY
MCE
JCE
EDITOR
B
UTTONS
N
O EDITOR
P
ARAMETERS - ARTICLE
P
ARAMETERS - ADVANCED
M
ETADATA INFORMATION
T
OOLBAR
Q
UICK TIPS
118
125
114
114
114
114
115
EDITOR
117
118
121
122
122
124
126
MODULE MANAGER 127
H
OW TO ACCESS
D
ESCRIPTION
S
CREENSHOT
127
127
127
5
Page 6
C
OLUMN HEADERS
T
OOLBAR
L
IST FILTERS
Q
UICK TIPS
M
ODULES: SITE
H
OW TO ACCESS
D
ESCRIPTION
S
CREENSHOT
M
ODULE TYPES
128
129
130
131
131
127
131
131
131
COMPONENTS 133
RIPPLENET VIRTUEMART 133
JOOMFISH TRANSLATI ON 133
FOR MANUALS LOGIN TO USERS AREA ON WWW.RIPPLENET.CO.UK/INFO/CONTACT -US.HTML
133
6
Page 7
SITE
Control Panel
How to access
You can access the Control Panel by logging into Joomla!'s back-end. After you log in, the first screen you
will see is the Control Panel. If you want to access the Control Panel from another area in the back-end,
simply go to Site > Control Panel.
Description
The Control Panel provides access to many default Joomla! functions and features. From the Control Panel,
you can create and manage articles, sections, and categories. Other features available in the Control Panel
are the media, menu, language, and user managers. You can also access your site's Global Configuration
from here.
Screenshot
Icons
The icons available to you in control panel are:
Add New Article. This will take you to a new article creation page where you can create new content,
select a section and category, and then save the article. Its useful for quick and easy additions to your site's
content.
Article Manager. This will take you directly to the Article Manager where you can manage all of your
current articles.
7
Page 8

Category Manager. As you might guess, this takes you to the Category Manager. You can create new
categories, and publish/unpublish current ones. You can also change which section each category is
published in.
Front Page Manager. Similar to the Article Manager, this icon will take you to the Front Page Manager so
that you can manage all of the articles published to the Front Page.
Global Configuration. Perhaps one of the most important areas in your Joomla! back end is the Global
Configuration. The global configuration has parameters that, when adjusted, will effect your entire Joomla!
site. Here you can change many options including, but certainly not limited to: FTP Layer, Site Time Zone,
Site Language, Server Configurations, Session settings, and Meta Data.
Language Manager. Following suit with all of the other 'managers' in the control panel, the Language
Manager allows you to manage installed languages by setting one to be the site's default language.
Media Manager. The Media Manager will allow you to manage files on your web server. You can delete
existing files or upload different ones from your hard drive. You can also create new directories on your
web server's file system.
Menu Manager. The Menu Manager icon takes you to the Menu Manager. Here you can manage the
current menus by creating new ones, deleting current ones, or directly managing each menu's subsequent
menu items.
Section Manager. The Section Manager icon directs you to the Section Manager. You can create new
sections, and publish/unpublish current ones.
User Manager. The User Manager does just what you might guess by it's title. It manages users. You can
create new users, delete existing ones, change passwords, change language and time preferences, and even
change which WYSIWYG editor the user has access too. Lastly, but perhaps most importantly, you can
change the user's user group, giving the user different access levels and different abilities in your site.
Quick Tips
Use the 'Add New Article' button to quickly open a new article edit page to create articles quickly. Use the
'Front Page Manager' button to quickly get to the front page manager and publish/unpublish or modify any
front page articles.
8
Page 9
User Manager
How to access
You can access the User Manager by clicking on the User Manager icon in the Control Panel, or by clicking
on 'User Manager' in the 'Site' menu on the back-end of your Joomla! installation.
Description
In this screen you have the ability to look at a list of your users and sort them in different ways. You can
also edit and create users.
Screenshot
Column Headers
In the table containing the users from your Joomla! site, you will see different columns. Here you can read
what they mean and what is displayed in that column.
Checkbox. You can select this box to select an item. You will need to do this for several actions, including
editing and deleting.
Name. The (full) name of the user.
Username. The username of the user is displayed here. When a user wants to log in, he has to fill in this
username.
Logged in. In this column, you can see whether the user is logged in or not. A green check is shown when
the person is currently logged in. The column is left blank when the user is logged out.
Enabled. In this column you can see whether the user is enabled or disabled. A green check is shown when
the user is enabled, a red 'X' sign when the user is disabled. A disabled user did not activate their account by
clicking on the link in the e-mail sent after registration. A disabled user could also be a user who was
blocked by an Administrator or a Super Administrator. Click on the icon to toggle between enabled and
disabled.
Group. The user's Group. The following Groups are available:
·
Registered User: Normal visitors who register at the site. Can view Menu Items that have Access
Level of Registered. Cannot edit or submit articles.
·
Author: Can submit new articles for approval in the front end only. A Publisher or higher must
approve. Cannot edit existing articles.
9
Page 10
·
Editor: Can submit new articles or edit existing articles from the front end only. A Publisher or
higher must approve.
·
Publisher: Can submit, edit, or publish articles from the front end only.
·
Manager, Administrator and Super Administrator: Can do all of the above plus can log into the back
end with increasing rights.
E-Mail. The e-mail address from the user is displayed here.
Last visit. Here you can see the date on which the user last logged in.
ID. Here you can see the ID number. You can not change this number.
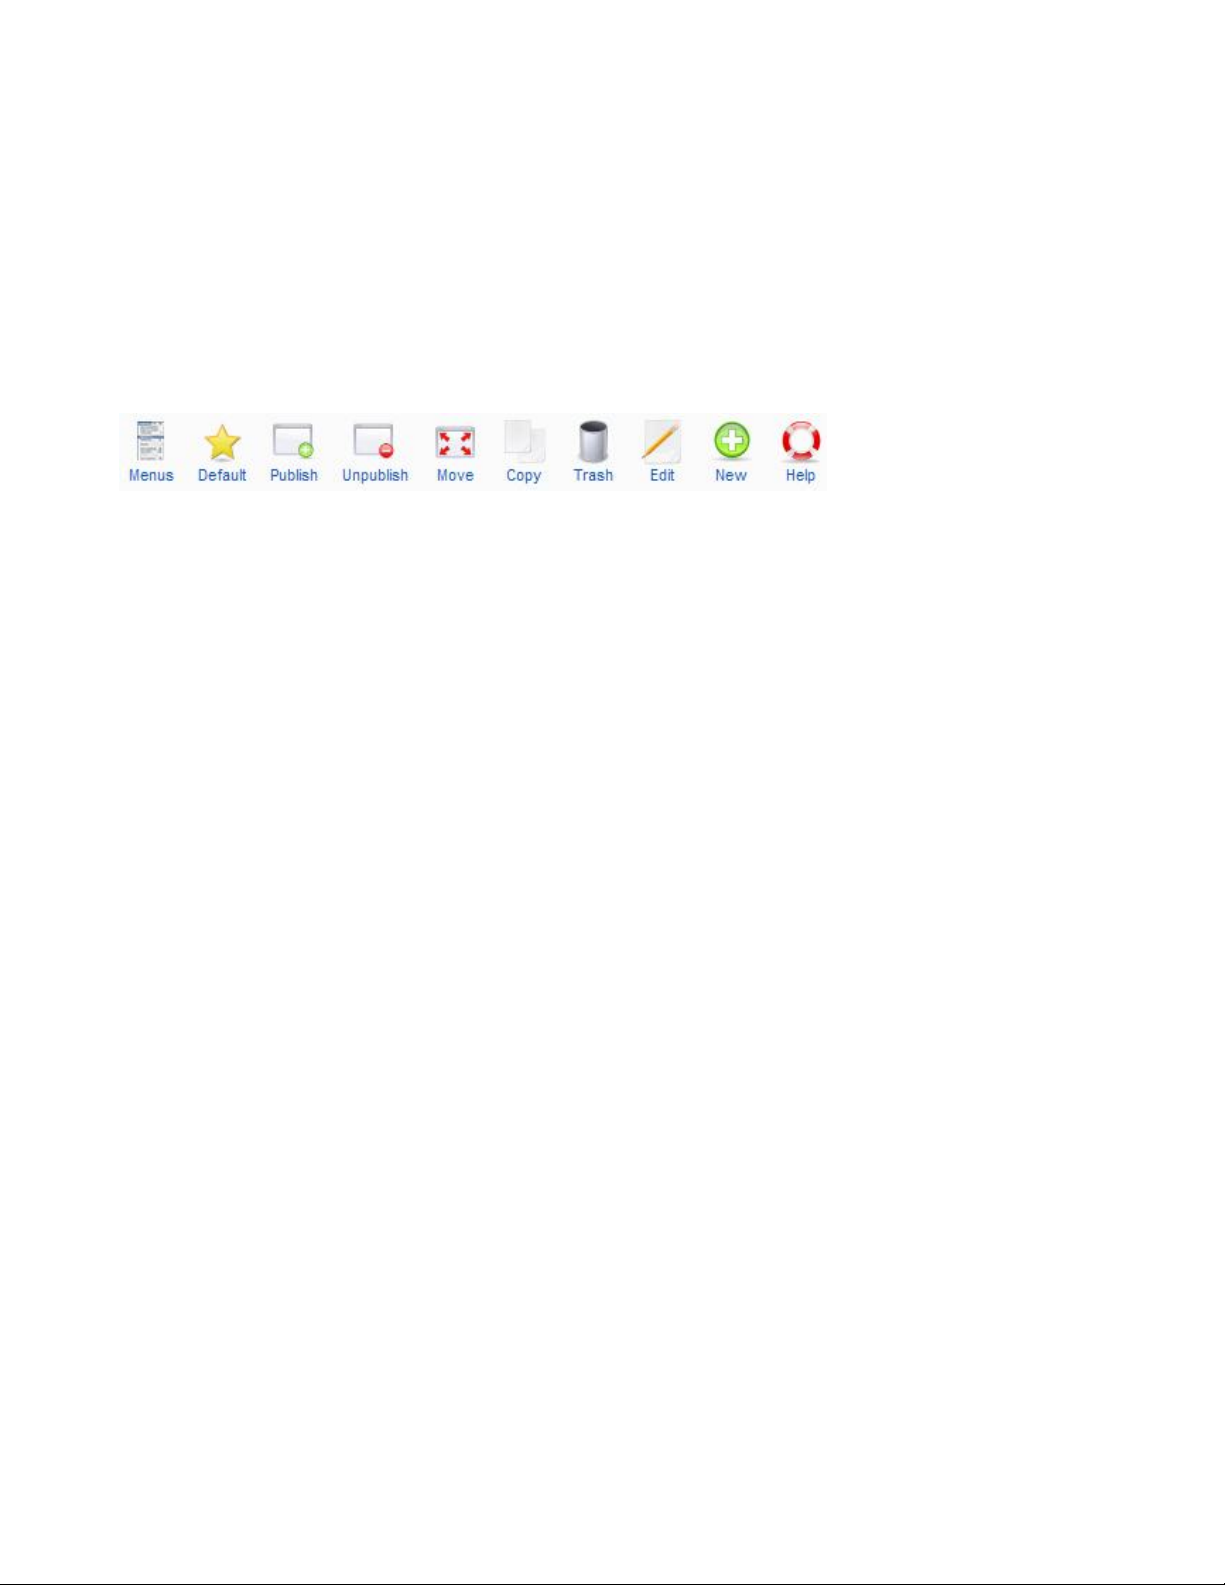
Toolbar
At the top right you will see the toolbar:
The functions are:
Logout. Select one or more users who are currently logged in and click on this button. The users will loose
there logged in status.
Delete. Select one or more and click on this button. The selected will be deleted.
Edit. Select one and click on this button. You will enter the Edit page.
New. Click on this button to create a new one. You will enter the New page.
Help. Open this Help Screen.
Quick Tips
·
Click on the name of a user to edit the user's properties.
·
Click on the e-mail address of a user to send this user an e-mail.
·
Click on the green check or red 'X' in the Enabled column to toggle between Enabled and Disabled
status.
·
Click on the Column Headers to sort the users by that column, ascending or descending.
10
Page 11
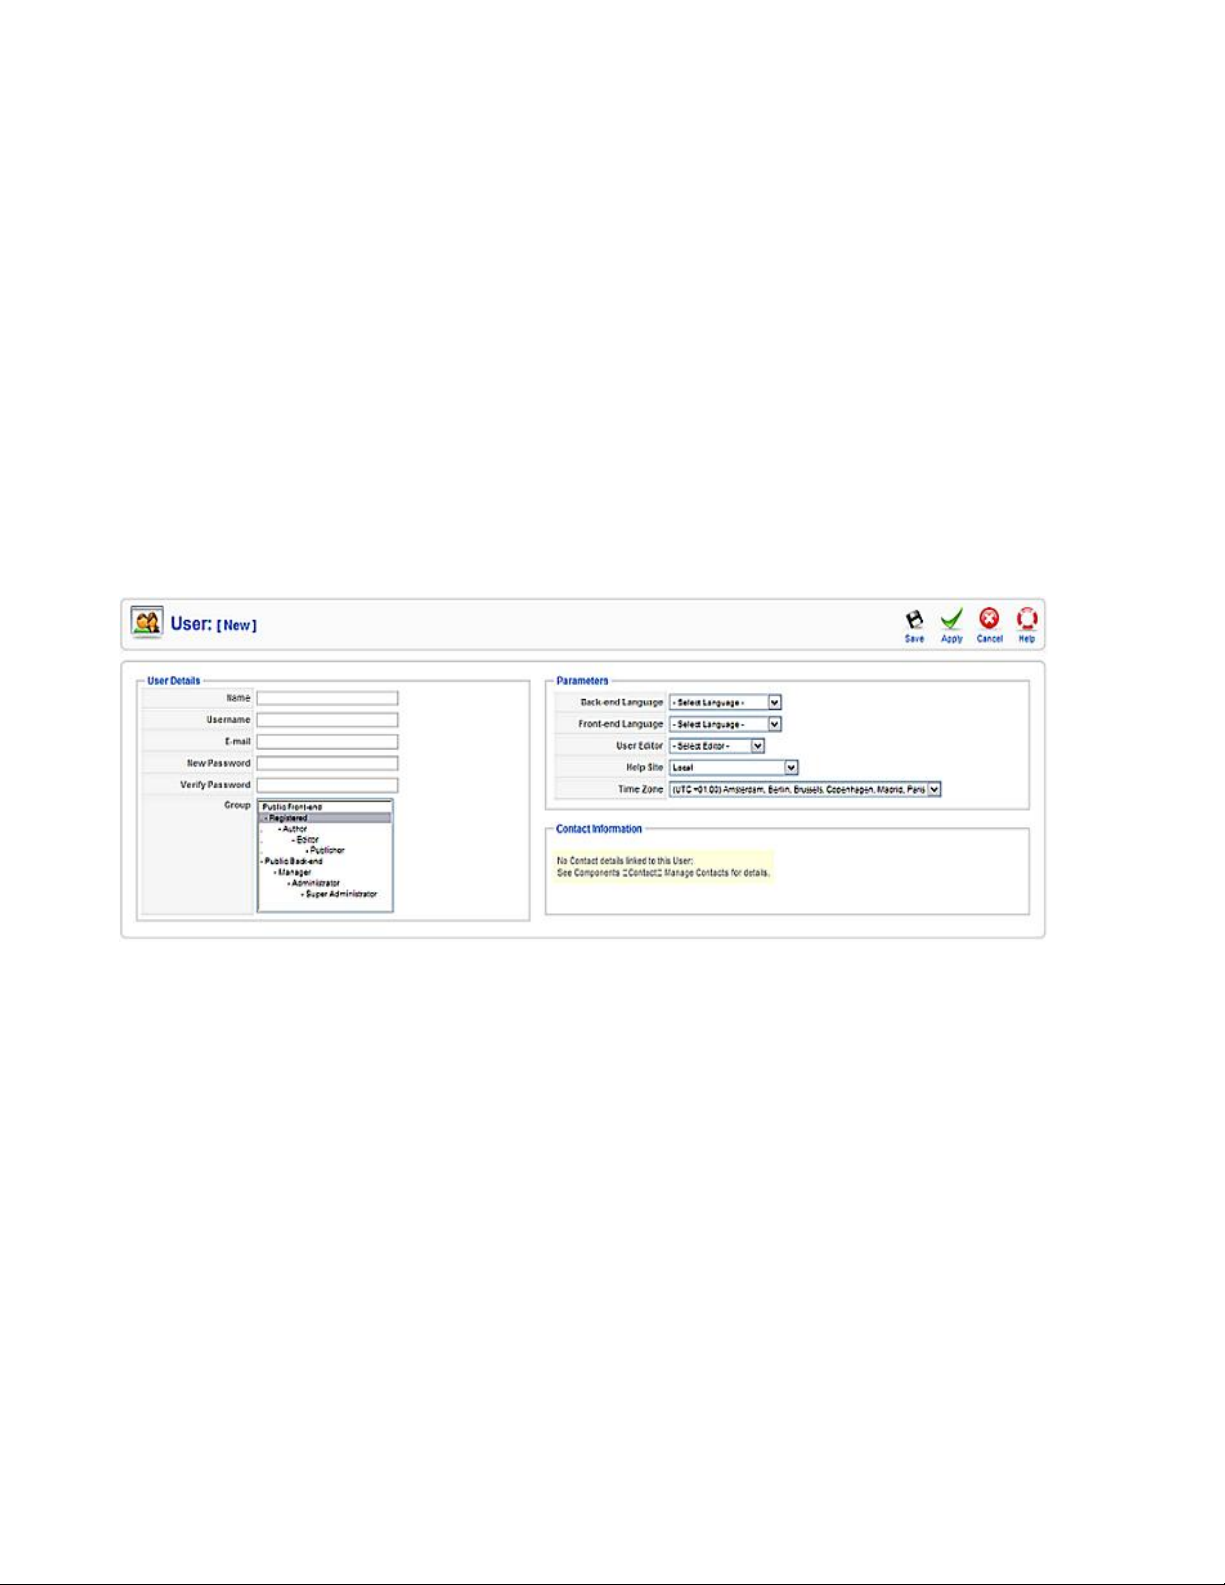
User Manager - New/Edit
How to access
You can access the User Manager New/Edit screen through the User Manager. Go to the User Manager by
clicking on the User Manager icon in the Control Panel, or by clicking on 'User Manager' in the 'Site' menu
in the back-end of your Joomla! installation. Click on the name of a user, select a user and click on the Edit
button, or click on the New button in the User Manager to access the New/Edit screen.
Description
In this screen, you have the ability to create a new user (if you clicked on the 'New' button in the User
Manager), or edit an existing user (if you selected a user and clicked on the 'Edit' button in the User
Manager, or clicked on the name of a user).
Screenshot
User details and parameters
You will see different fields where you can fill in or edit information of the user. These are:
Name. The (full) name of the user.
Username. The username of the user is displayed here. When a user wants to log in, he has to fill in this
username.
E-Mail. The e-mail address from the user is displayed here.
New password. Fill in a (new) password. Although this field is not required, the user will not be able to log
in when no password is set.
Verify password. Fill in the password from the field above again, to verify it. This field is required when
you filled in the New password field.
11
Page 12
Group. The user's Group. The following Groups are available:
·
Registered User: Normal visitors who register at the site. Can view Menu Items that have Access
Level of Registered. Cannot edit or submit articles.
·
Author: Can submit new articles for approval in the front end only. A Publisher or higher must
approve. Cannot edit existing articles.
·
Editor: Can submit new articles or edit existing articles from the front end only. A Publisher or
higher must approve.
·
Publisher: Can submit, edit, or publish articles from the front end only.
·
Manager, Administrator and Super Administrator: Can do all of the above plus can log into the back
end with increasing rights.
Block User. Here you can select whether to disable this user or not. Only available when editing
Administrators or Super Administrators.
Receive System E-mails. Here you can select whether to let this user receive the system e-mails or not.
Only available when editing Administrators or Super Administrators.
Register Date. Here you can see the registered date. Only shown when editing a user.
Last visit. Here you can see the date on which the user last logged in.
Back-end Language. Here you can select the back-end language of the user. All installed languages for the
back-end will be displayed in the drop-down box. Default is the language set in Language Manager.
Front-end Language. Here you can select the front-end language of the user. All installed languages for the
front-end will be displayed in the drop-down box. Default is the language set in Language Manager.
User Editor. Here you can select the front-end and back-end editor of the user. All installed editors will be
displayed in the drop-down box. Default is the WYSIWYG editor set in the Global Configuration.
Help Site. Set the help site of the user. Default is the Help Server set in the Global Configuration.
Time Zone. Set the time zone of the user. Default is the Time Zone set in the Global Configuration.
Contact information. If you linked a contact to this user, the contact information will be showed here.
Toolbar
At the top right you will see the toolbar:
The functions are:
Save. Save it and return to the main screen of the Manager.
Apply. Save it, but stay in the same screen.
12
Page 13

Cancel. Go back to the main screen of the Manager, without saving the modifications you made.
Help. Open this Help Screen.
Quick tips
·
Name, Username and e-mail address are required
·
If you did not fill in a particular language, editor, help site and/or time zone, the default settings from
the Global Configuration, Language Manager and/or Template Manager are set.
13
Page 14
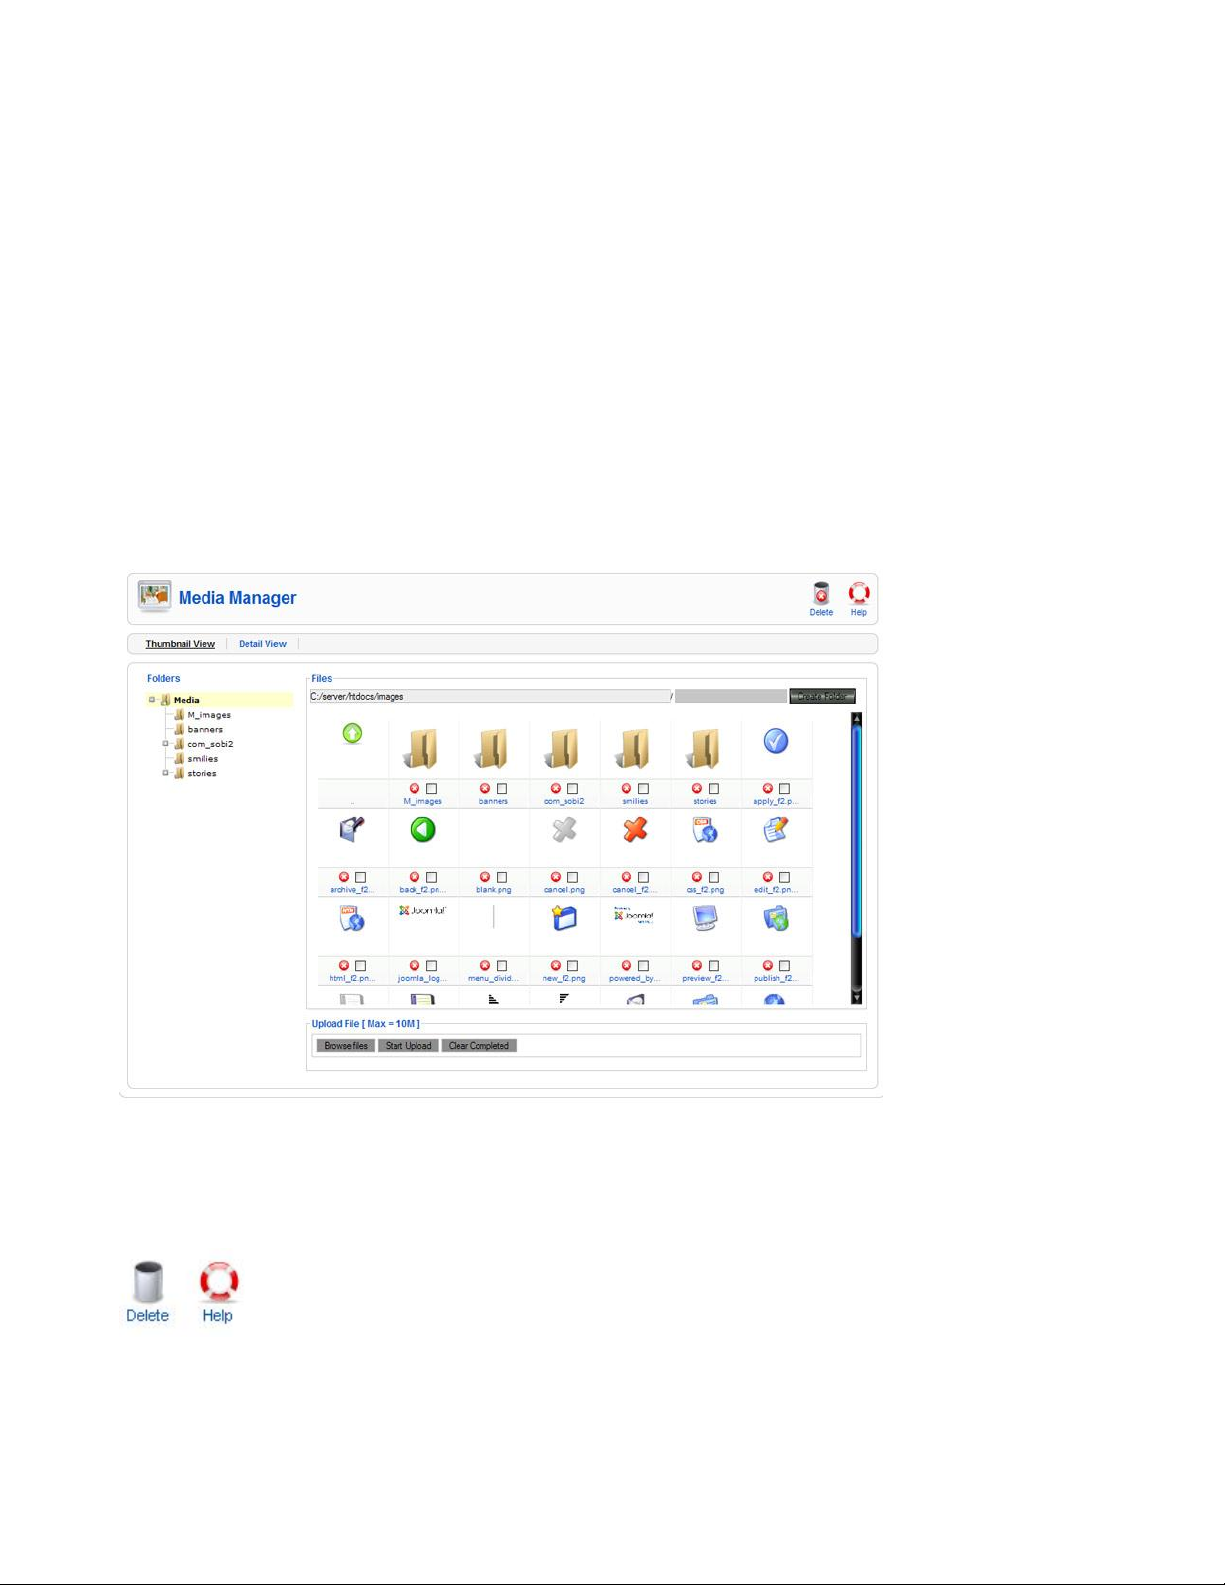
Media Manager
How to access
You can access the Media Manager through the Control Panel, or by going to Site > Media Manager.
Description
The Media Manager is a very useful tool for uploading or deleting files in the /images/ directory on your
web server. You can upload new files, delete existing ones, and create sub-directories. The Media Manager
offers two views: thumbnails view and details view. The first (thumbnails view) will show a preview of the
image files. The second (details view) will show the file name, dimensions, and file size. There is also a
handy 'delete' button next to each file.
Screenshot
Toolbar
At the top right you will see the toolbar:
The functions are:
Delete. Select one or more and click on this button. The selected will be deleted.
14
Page 15

Help. Open this Help Screen.
Functions
Switching Views
To alternate views between thumbnails and details simply select the view you want by clicking "Thumbnails
View" or "Details View".
Uploading Files
If you would like to upload images or other files to the /images/ directory (or any of the sub directories)
simply open the directory you want to upload in by clicking on it in the file navigation utility on the right
side of the screen. Near the bottom of the Media Manager, there is an area marked Upload File [Max 10M].
Underneath that heading are three buttons: "Browse", "Start Upload", and "Clear Completed". To upload a
file, start by using the "Browse" button to find the file you would like to upload, and then click "Open".
(You can do this several times so long as the overall file size accumulation doesn't exceed your max file
upload size). Once you have all the files you want queued, hit the "Start Upload" button. The files will be
uploaded to the selected directory.
Create A Sub Directory
If you want to create a sub directory, you can do so using the Media Manager. Navigate to the directory you
want the soon-to-be sub directory to be located in. In the upper right hand side of the Media Manager, there
is a text field area next to a button labeled "Create Folder". Type the name of the desired sub directory into
this text field, and then click the "Create Folder" button. The page will refresh and the sub folder will have
been created.
Quick Tips
The Media Manager's maximum upload size can be changed to an amount other than 10M in the Global
Configuration. You can upload multiple files at the same time. Click on 'Start Upload' to upload all images
displayed beneath it. Click on 'Clear completed' to delete the completed files from the uploading list. The
images will not be removed from your /images directory.
15
Page 16
MENUS
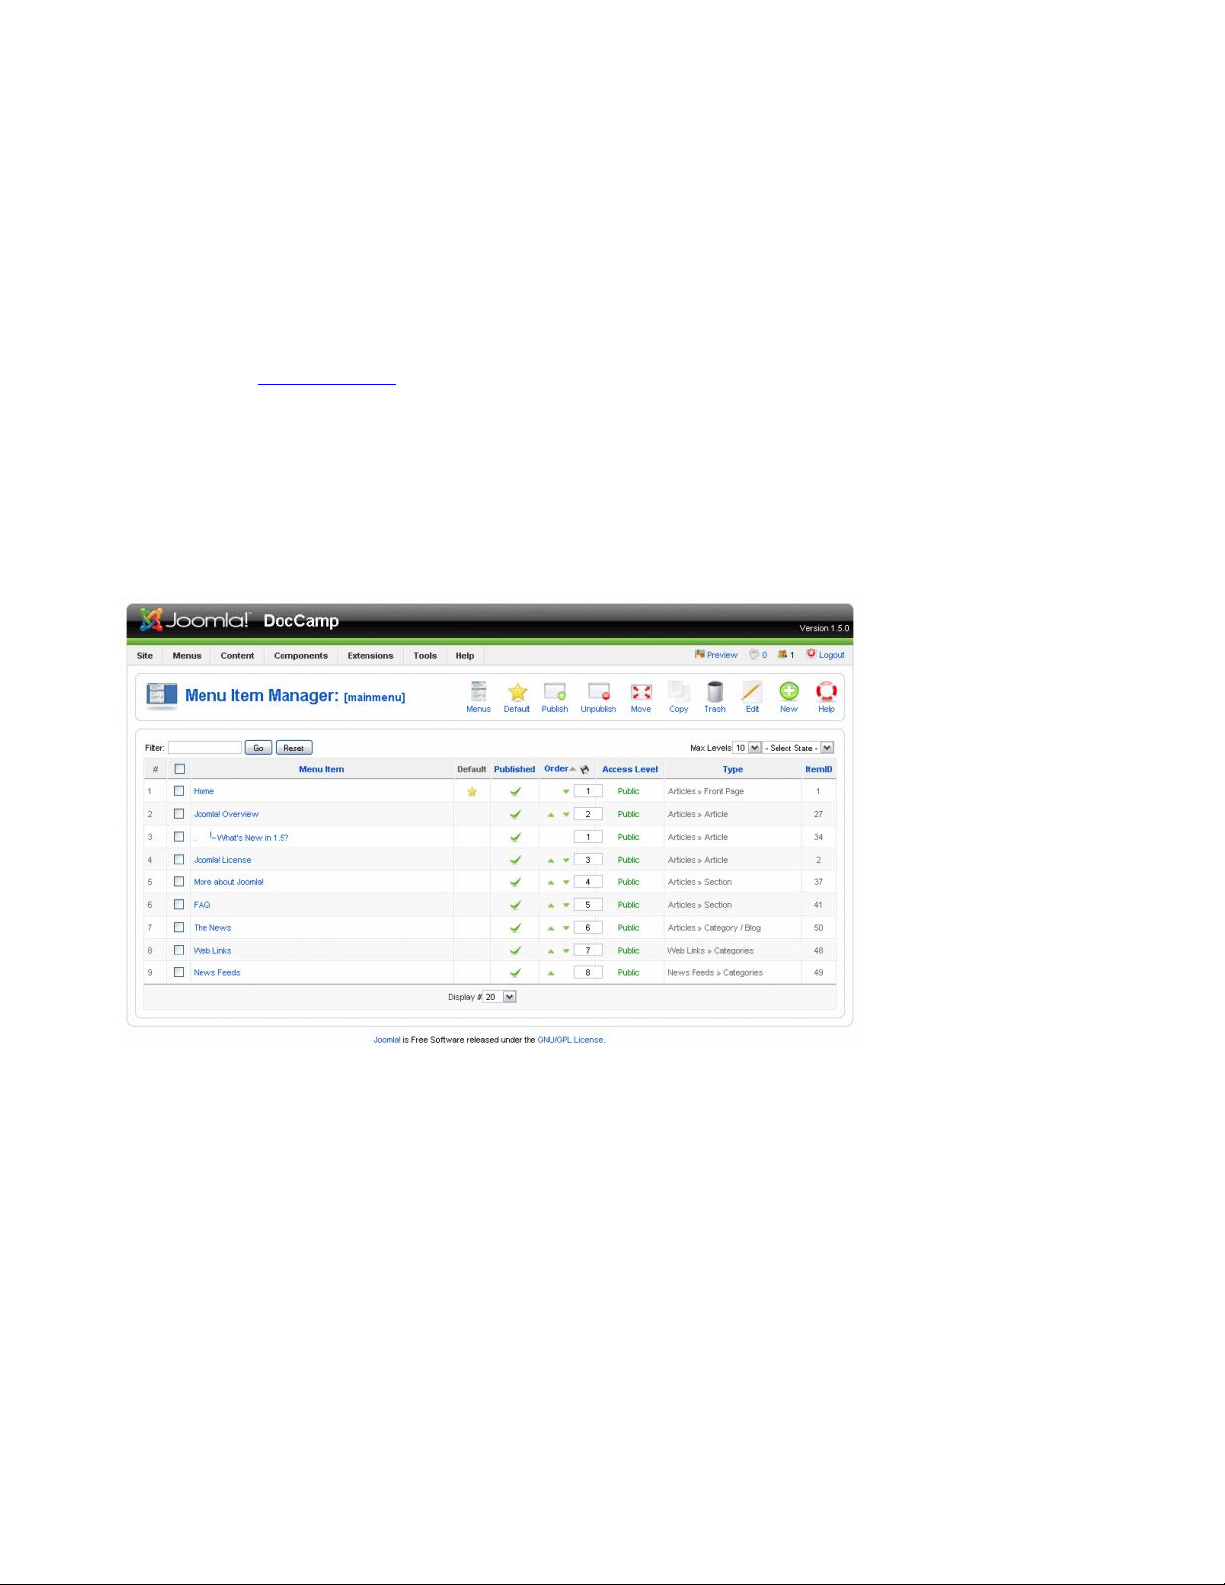
Menu Item Manager
How to access
Select Menus → [name of the menu] from the drop-down menu on the back-end of your Joomla!
installation. For example, if a Menu is called "Main Menu", select Menus → Main Menu. Or you can
navigate to the Menu Manager and click on the icon in the Menu Items column.
Description
The Menu Item Manager lists the menu items contained in a menu created using the Menu Manager.
Screenshot
Column Headers
·
#. An indexing number automatically assigned by Joomla! for ease of reference.
·
Menu Item. The name of the Menu Item.
·
Default. Indicator of Default Template.
·
Published. Whether the item has been published or not. You can change the Published state by
clicking on the icon in this column.
·
Order. The order to display items. If the list is sorted by this column, you can change the order by
clicking the arrows or by entering the sequential order and clicking 'Save Order'. Note that the
display order on a page is set in the Parameters - Advanced section for each Menu Item. If that order
is set to use something other than 'Order' (for example, 'Title - Alphabetical'), then the order value in
this screen will be ignored. If the Menu Item Order parameter is set to use 'Order', then the items will
display on the page based on the order in this screen.
·
Access Level. Who has access to this item. Current options are:
o
Public. Everyone has access
16
Page 17
o
Registered. Only registered users have access
o
Special. Only users with author status or higher have access
You can change an item's Access Level by clicking on the icon in the column.
·
Type. The Menu Item Type for this Menu Item.
·
ItemID. Here you can see the ID number. You can not change this number.
Toolbar
At the top right you will see the toolbar:
The functions are:
·
Menus. Click on this button to go to the Menu Manager.
·
Default. Select a Menu Item which you want to be the homepage of your site, and click on this
button.
·
Publish. To publish one or more items, select them and click on this button.
·
Unpublish . To unpublish one or more items, select them and click on this button.
·
Move. Select one or more items and click on this button to move them. A new screen will display
showing the possible "Move to" locations on the left and the list of item(s) being moved on the right.
To complete the move, select the desired "Move to" location and press the Move button. To cancel
the operation, press Cancel.
·
Copy. Select one or more items and click this button to copy them. A new screen will display
showing the possible "Copy to" locations on the left and the list of item(s) being copied on the right.
To complete the copy, select the desired "Copy to" location and press the Copy button. To cancel the
operation, press Cancel.
·
Trash. Select one or more Articles and click on this button to move them to the Trash Manager.
Note that Articles can be restored from the Trash Manager as long as they are not permanently
deleted. See Trash Manager for more information.
·
Edit. Select one item and click on this button to open it in edit mode. If you have more than one item
selected, the first item will be opened. You can also open an item for editing by clicking on its Title
or Name.
·
New. Click on this button to create a new item. You will enter the New page for this item.
·
Help. Opens this Help Screen.
Quick Tips
·
Select an item and click on the Default button to set your Home page.
·
Set different filter options to only show some of the menu items.
17
Page 18

Menu Item Manager - New/Edit
How To Access
To access the New Menu Creation wizard, navigate to the Menu Item Manager for the desired menu and
press the New button on the toolbar.
Description
In this screen, you will select the Menu Item Type for this Menu Item. The Menu Item Type determines the
type of page that will display when this menu choice is selected by the User.
Screenshot
If you install one or more Joomla! extensions, these extensions may add new Menu Item Types. In this case,
your list will have additional types.
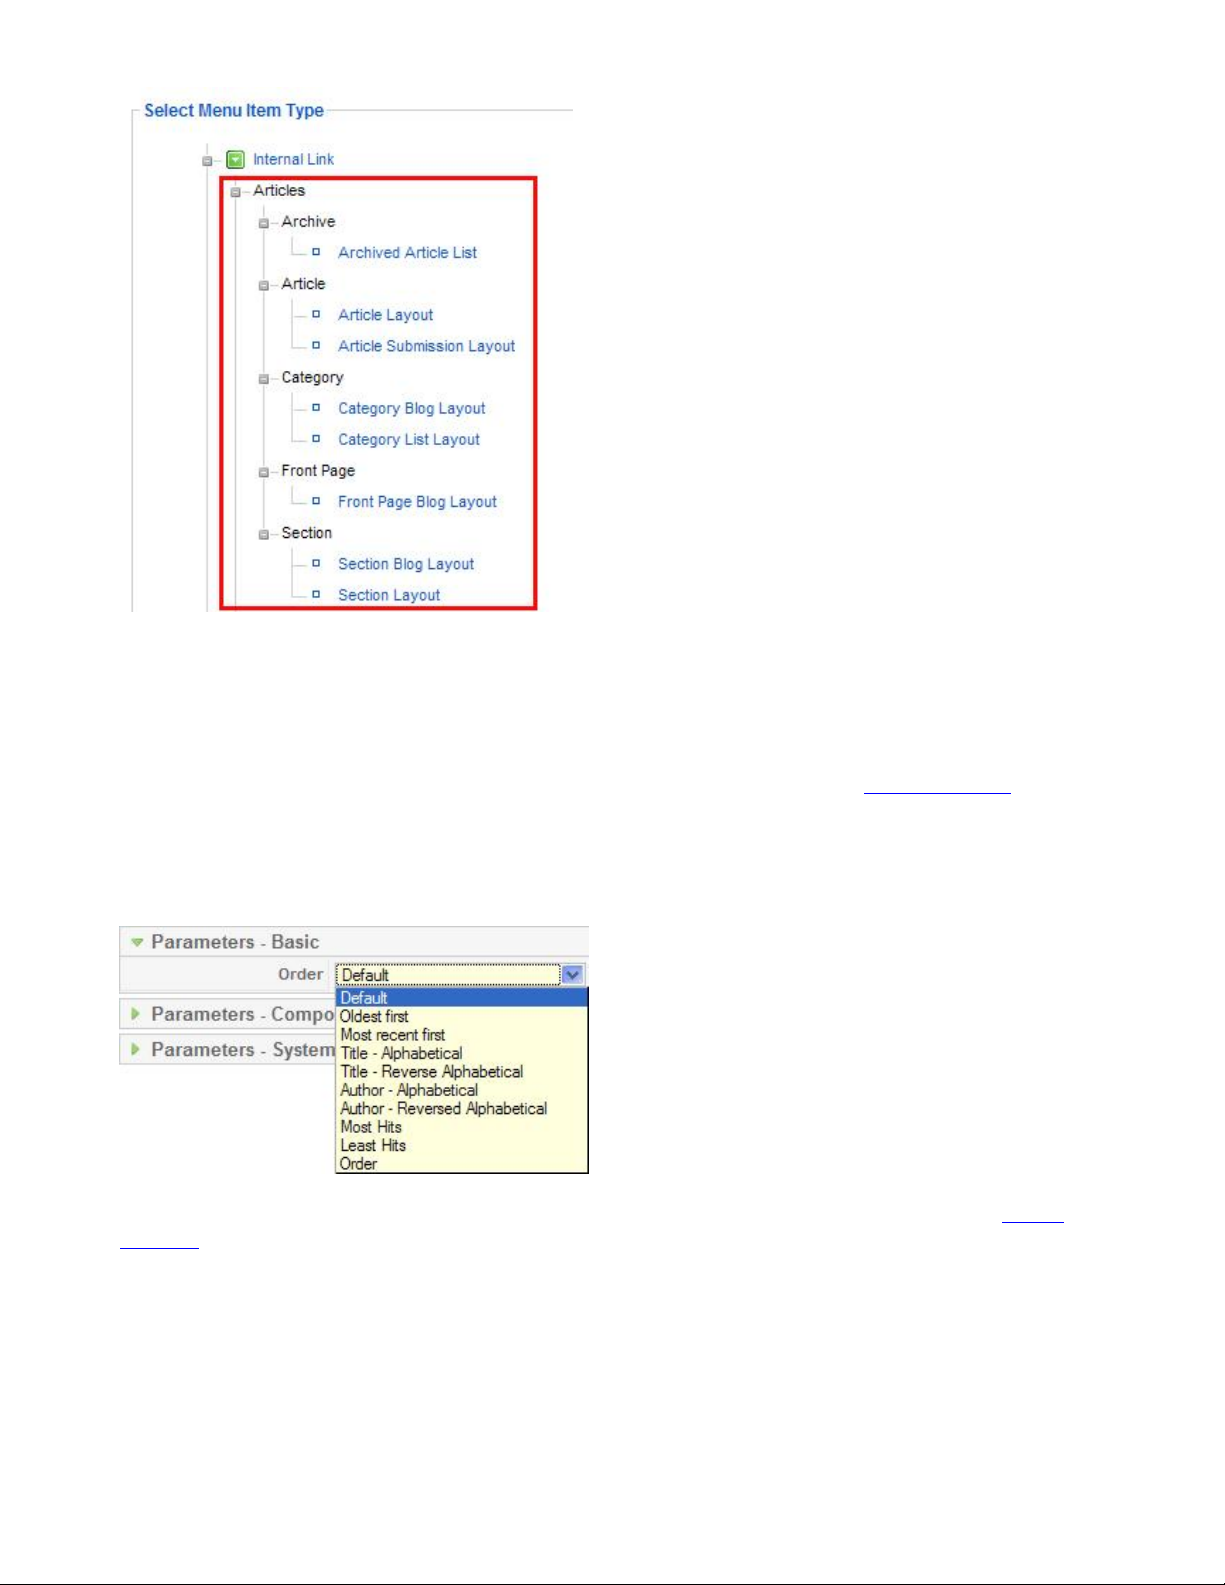
Menu Item Types
Menu Item Types are organized into four groups: Internal Link, External Link, Separator, and Alias.
Internal Links are the most commonly used and will display pages on your web site. External Links are used
to display links to external web sites. Separators are used to place a graphic or other separator between
menu options. Alias Item Types are used to point back to an already existing Menu Item.
Internal Link - Articles
When the Articles link is selected, it expands to show the options shown below.
18
Page 19
Each of these is described below.
Archived Article List
Used to show a list of Articles that have been Archived and can be searched by date. Archived articles are
no longer published but are still stored on the site. Articles are Archived using the Article Manager screen.
Note that Articles assigned to the "Uncategoried" Section will not show on the Archived Article List layout.
Parameters - Basic This Menu Item Type Archived Article List allows you to set the sort order of Archived
Articles, as shown in the screenshot below.
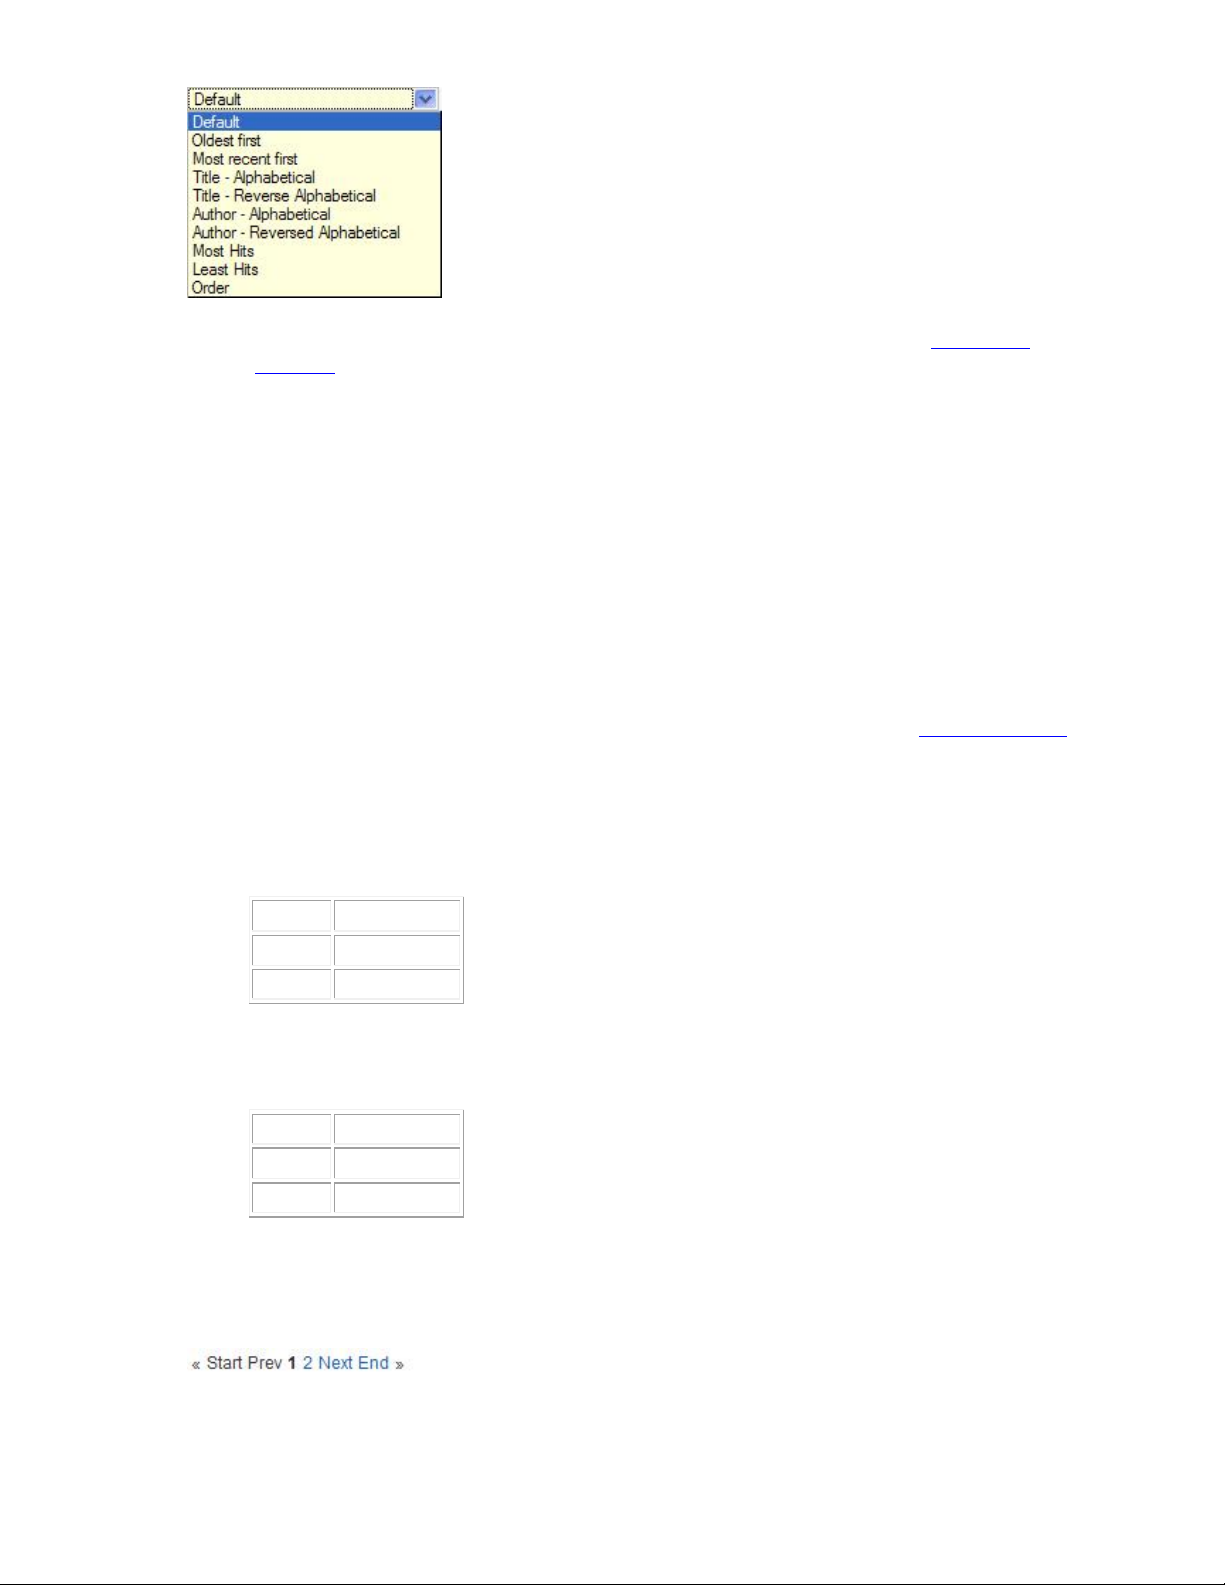
The Default order is most recent first. The Order option sorts Articles by the Order column in the Article
Manager.
Article Layout
Used to show a single article on the page. Note: This layout replaces the Static Content and Link Content
used in Joomla! version 1.0.
Parameters - Basic The Article Layout has one Parameter, the Article to include in the layout, as shown
below.
19
Page 20
Press the Select button to select the desired Article for this layout.
Article Submission Layout
Allows users to submit an article. This only works for users who are members of the Authors, Publishers, or
Editors groups. Members of the Registered or Public groups will not be able to submit articles even if this
page is visible to them. If the page is visible to a user without the correct access level, they will get an error
message when trying to load the page.
This type has no Basic or Advanced Parameters.
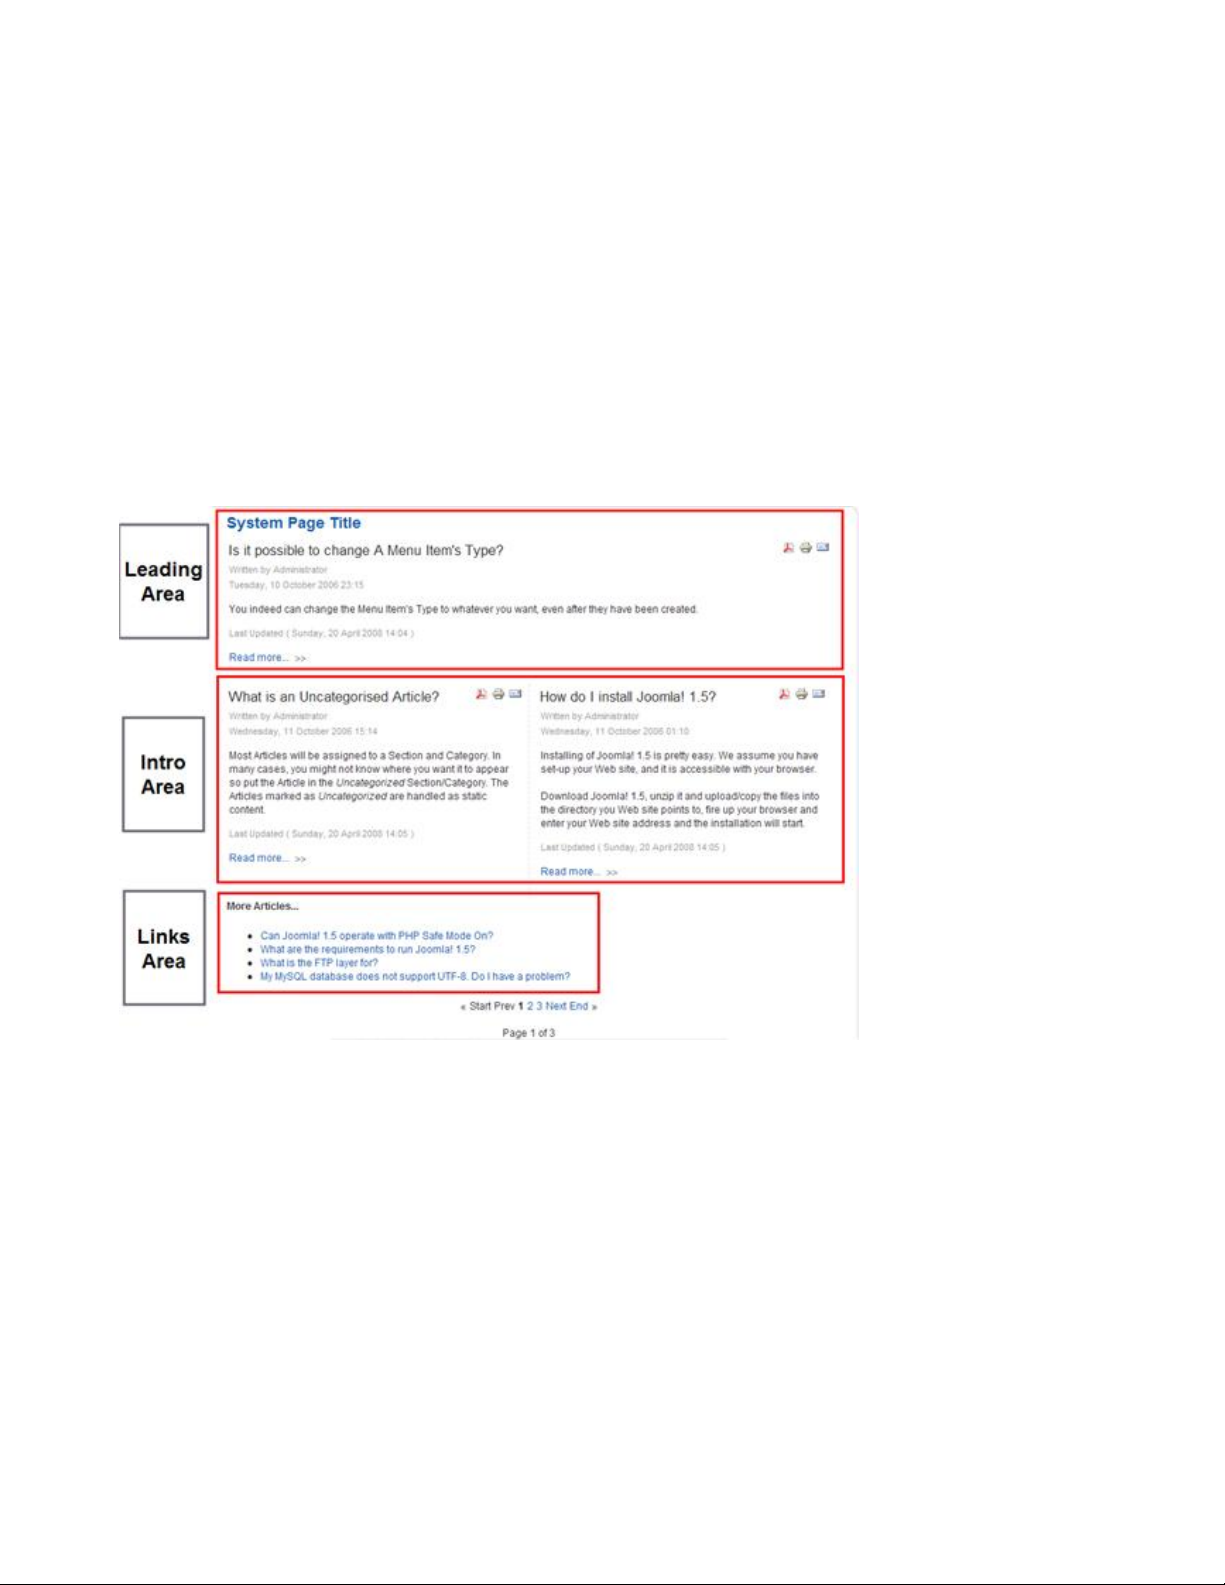
Category Blog Layout
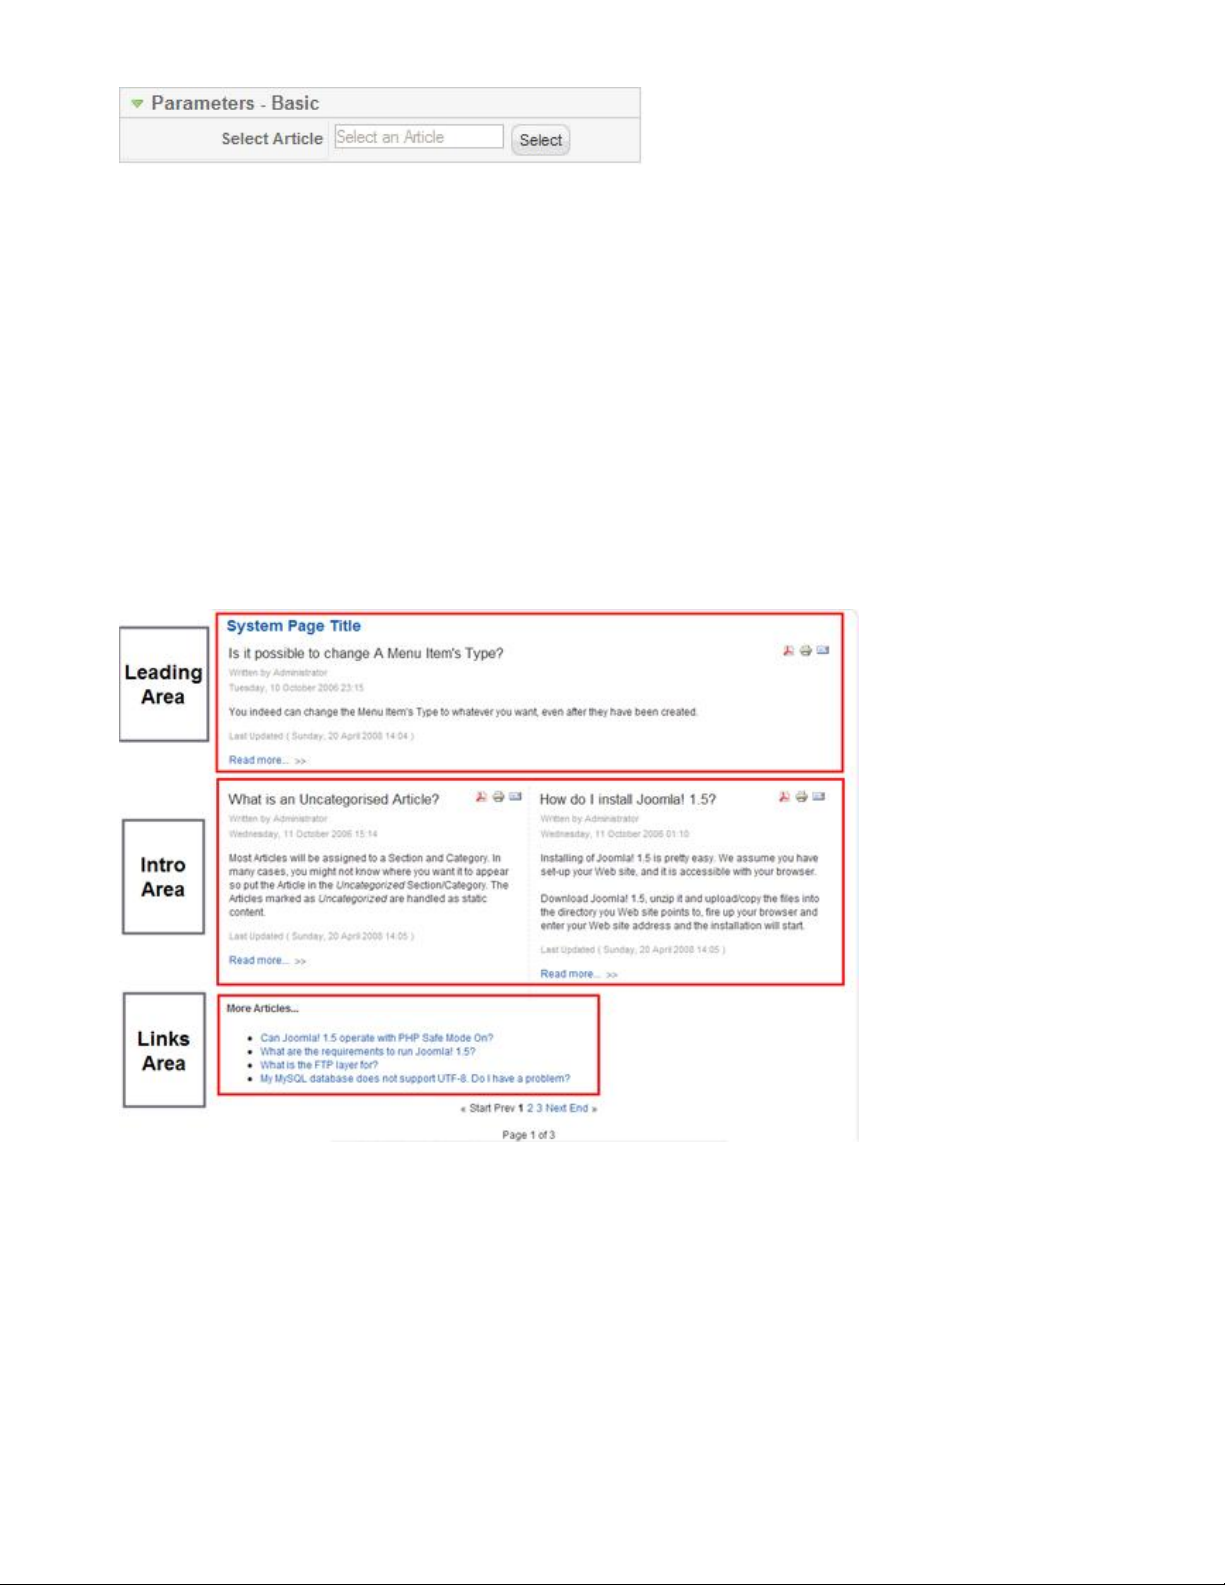
Used to show articles belonging to a specific Category, in a blog layout.
A Blog Layout in Joomla! has 3 main areas: Leading, Intro, and Links. These are shown in the diagram
below.
Articles in the Leading Area always display in one column, using the full display width. Articles in the Intro
Area may display in one, two, or three columns, depending on the Columns setting. The parameters below
control the number of Articles in each area and the order in which they display. If an Article has a "Read
more..." break, only the text before the break (called the Intro Text) will display, along with a "Read
more..." link.
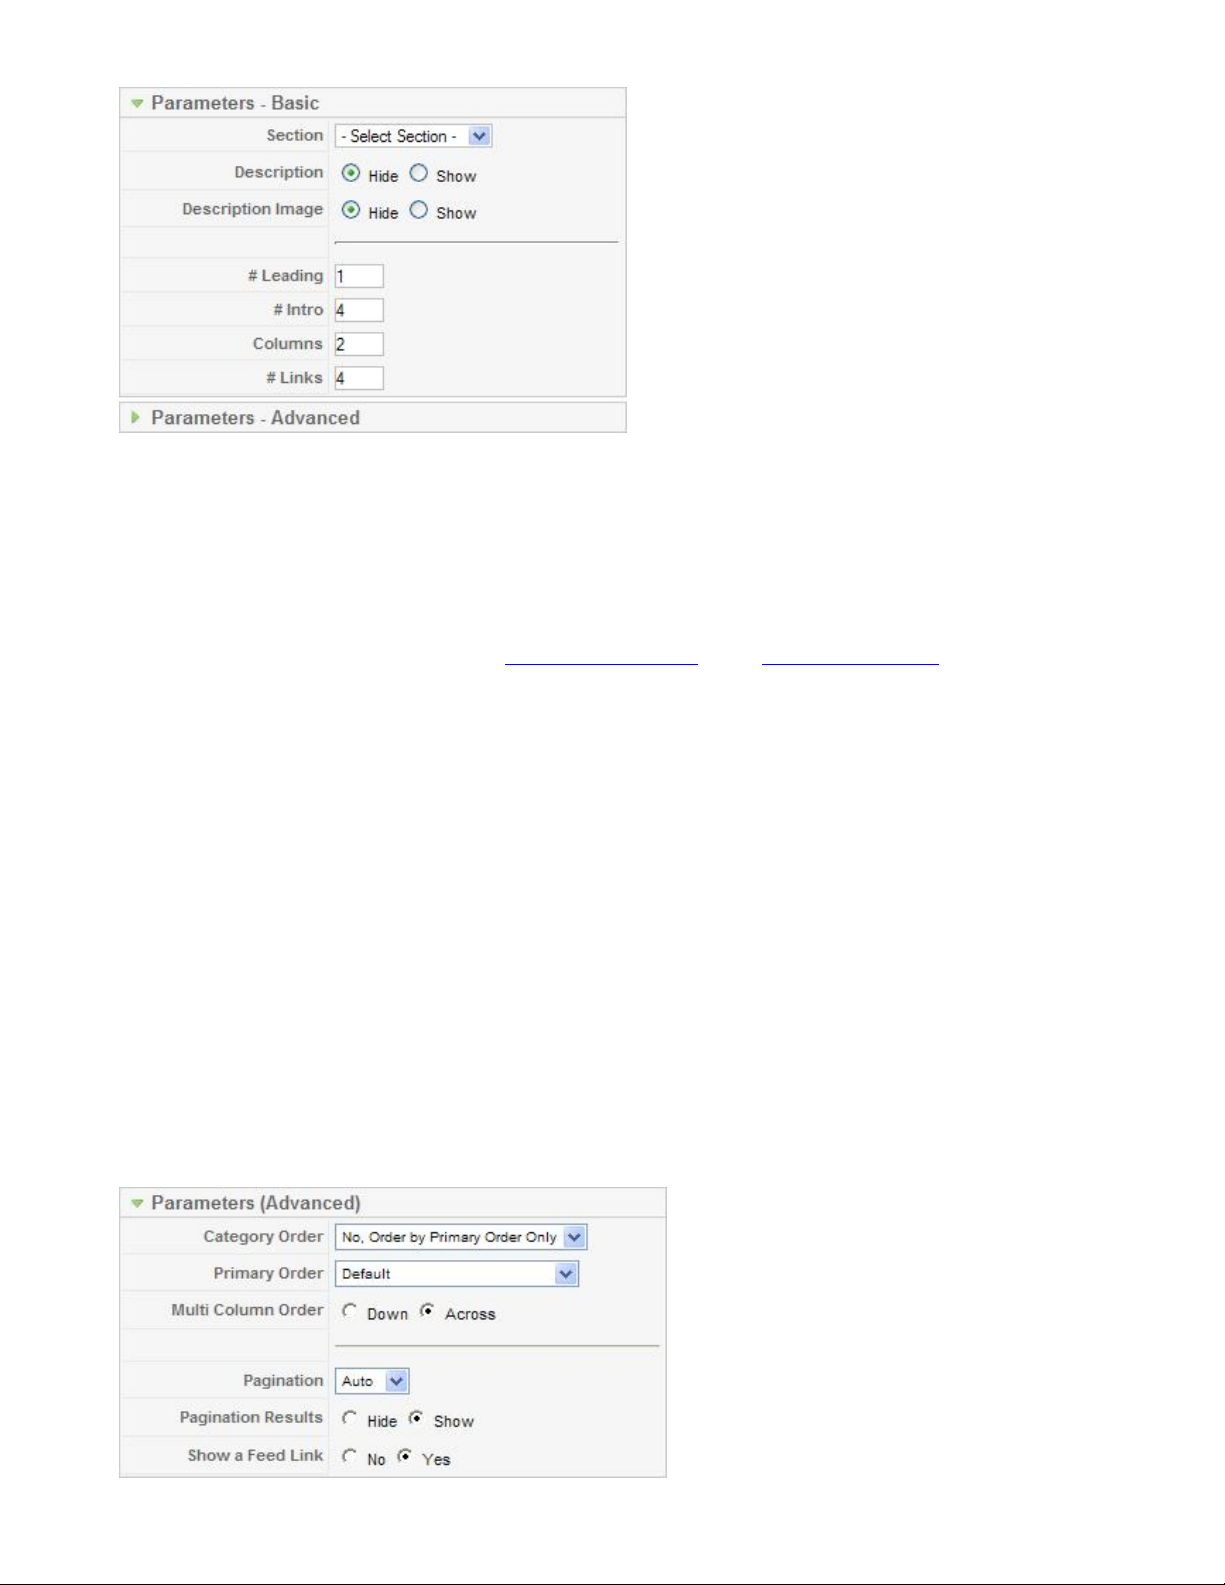
Parameters - Basic The Category Blog Layout has the following Basic Parameters, as shown below.
20
Page 21
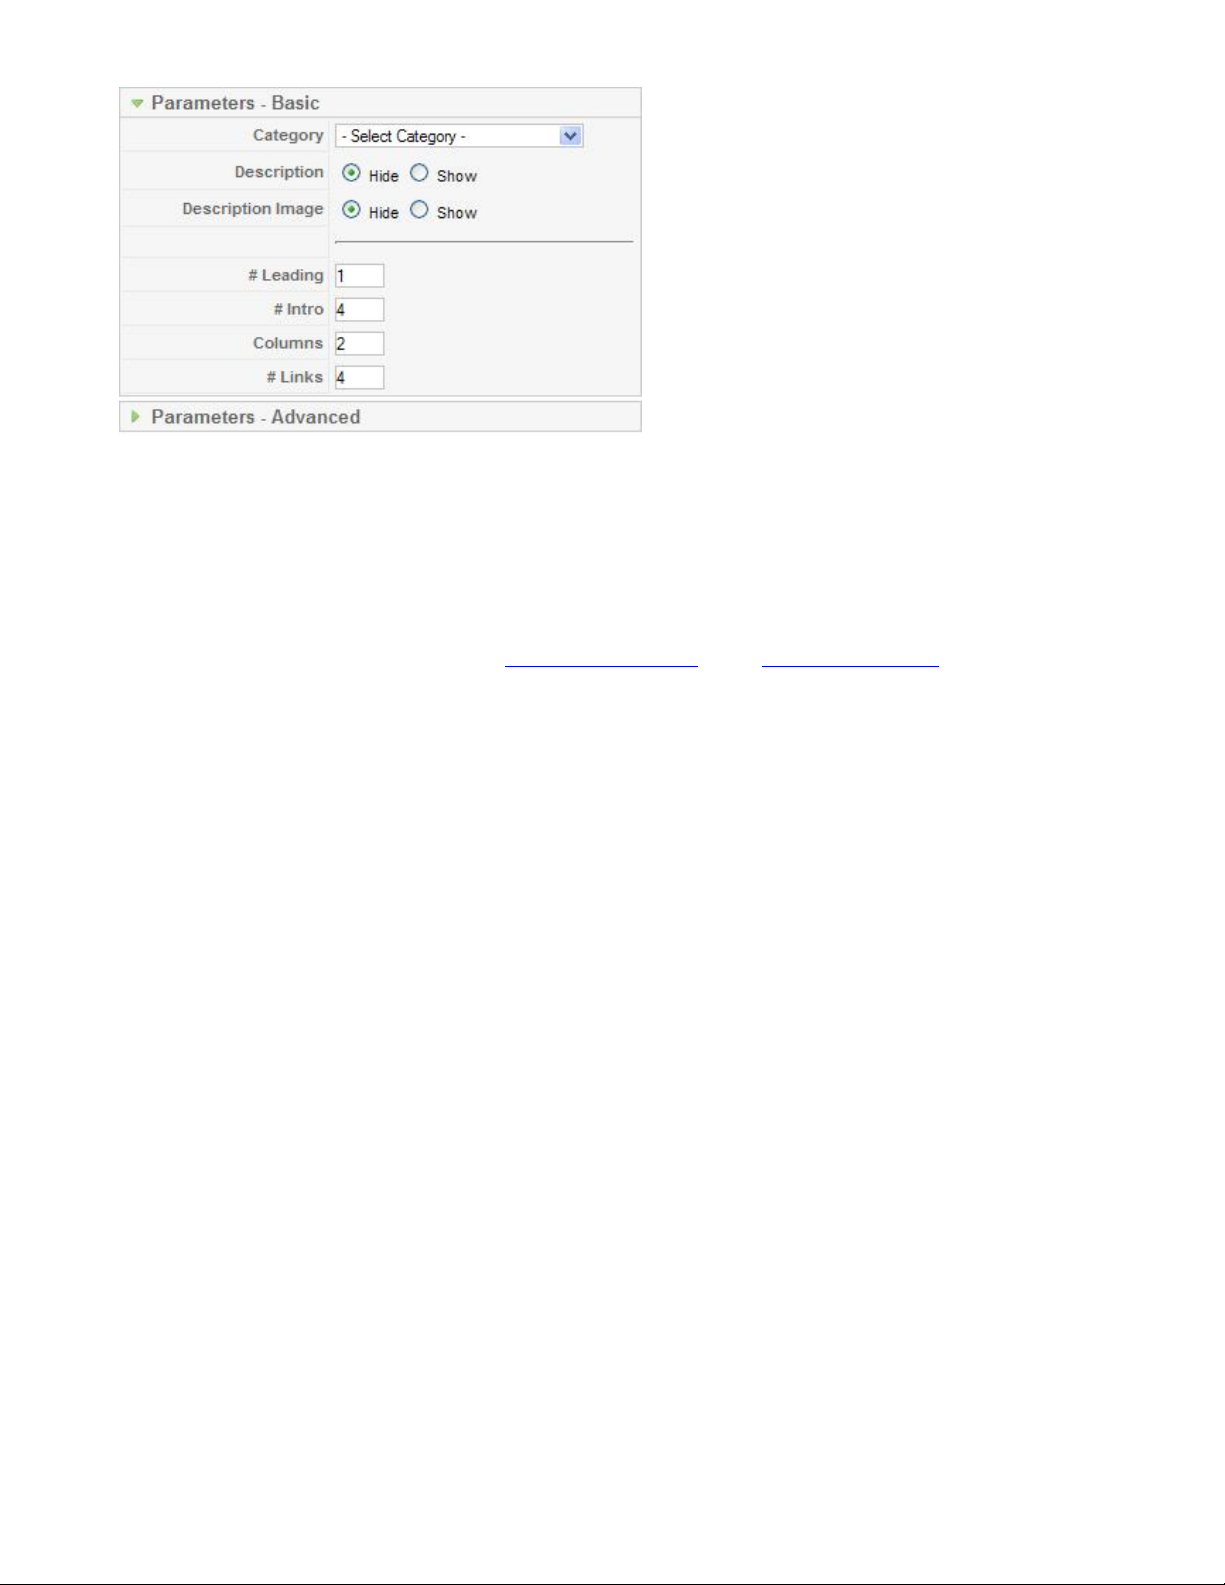
·
Category. Category selected for this Layout.
·
Description. Hide or Show the Category and Section Descriptions on the Layout. If 'Show' is
selected, the Description will display above the first Article, just below the Page Title.
·
Description Imag e. Hide or show the Description Image on the Layout. If 'Show' is selected, the
Image for this Category or Section will display on the left or right of the Description, depending on
the Image Position specified in the Category Edit Screen or the Section Edit Screen .
·
# Leading. Number of Articles to show using the full width of the main display area. "0" means that
no Articles will show when using the full width. If an Article has a "Read more..." break, only the
part of the text before the break (the Intro text) will display.
·
# Intro. Determines the number of Articles to display after the leading Article. These Articles will
display in the number of columns set in the Columns parameter below. If an Article has a "Read
more..." break, only the text before the break (Intro text) will display, followed by a "Read more..."
link. The order order in which to display the articles is determined by the Primary Order parameter
in the Parameters - Advanced section below.
·
Columns. The number of columns to use in the Intro Text area. This is normally between 1 and 3. If
1 is used, the Into Text Articles will display using the full width of the display area, just like the
Leading Articles.
·
# Links. The number of Links to display in the 'Links' area of the page. These links allow a User to
link to additional Articles, if there are more Articles than can fit on the first page of the Blog Layout.
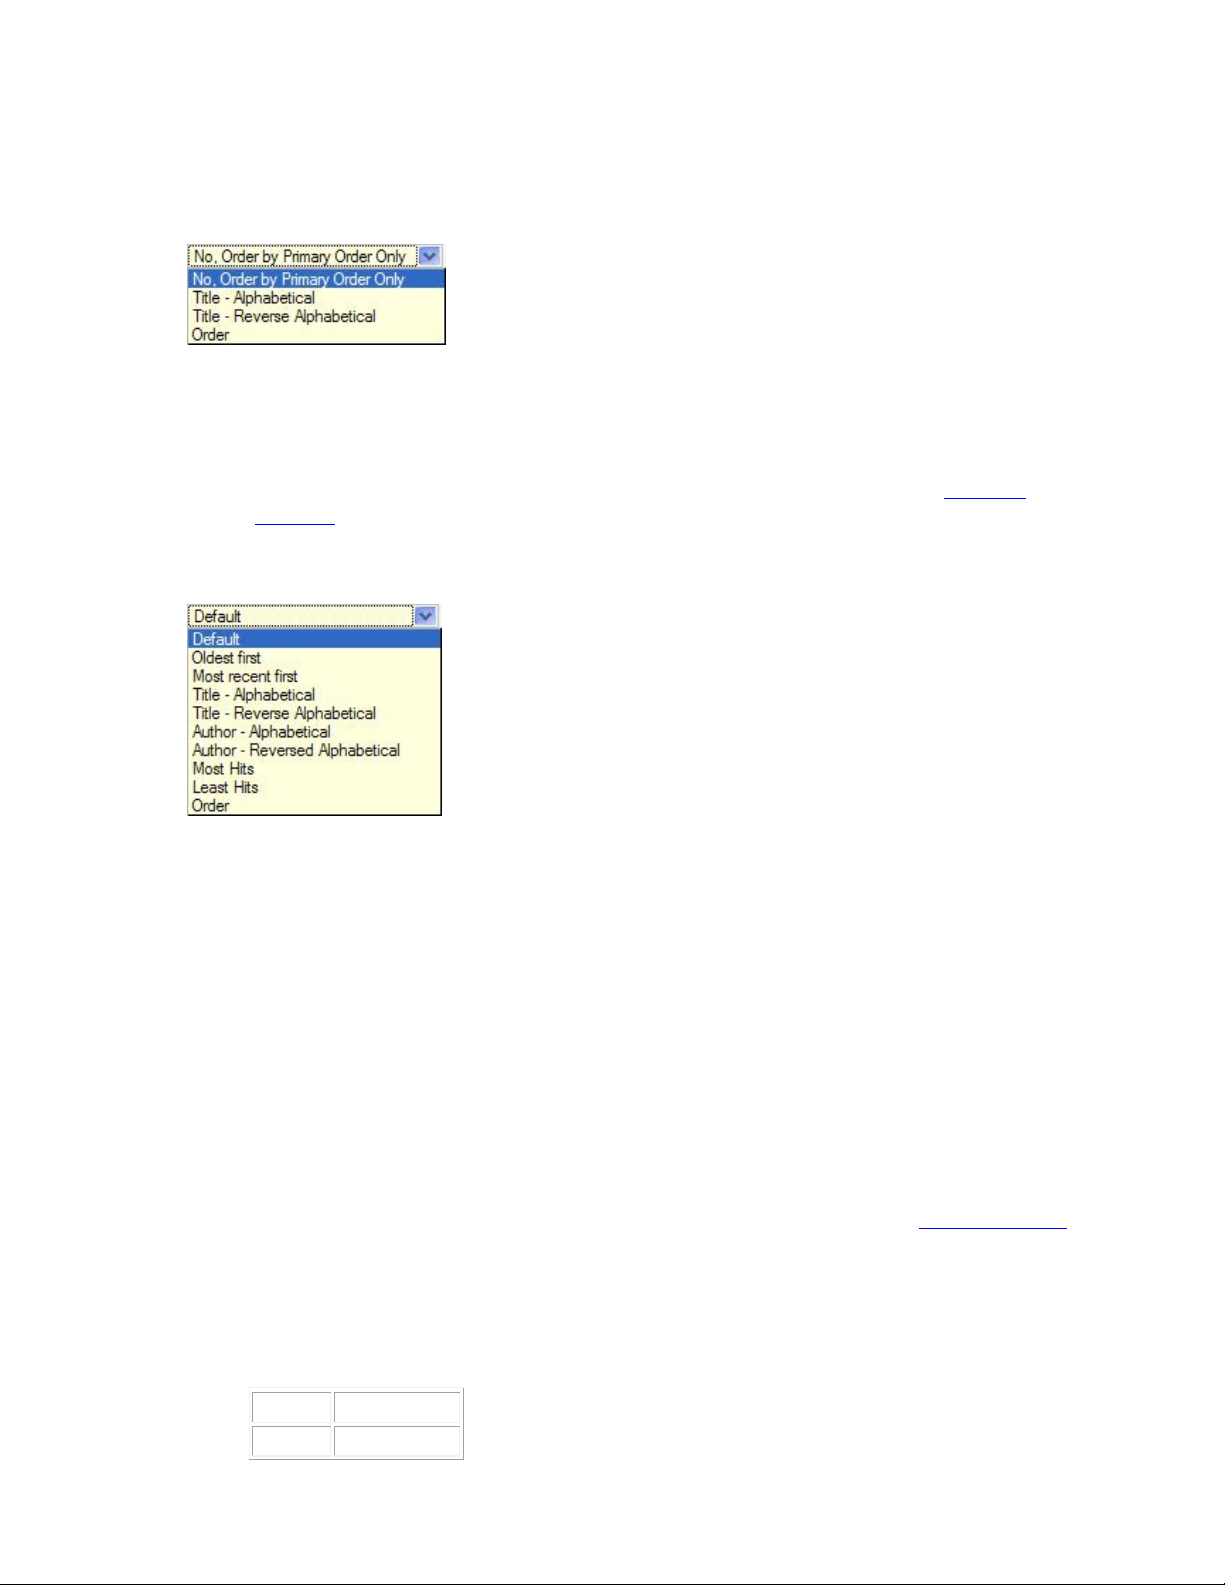
Parameters - Advanced The Category Blog Layout has the following Advanced Parameters, as shown
below.
21
Page 22
·
Category Order. Order of Categories in this Layout. The following options are available.
o
No. Order by Primary Order Only: Articles are ordered only by the Primary Order, without
regard to Category.
o
Title - Alphabetical: Categories are displayed in alphabetical order (A to Z)
o
Title - Reverse Alphabetical: Categories are displayed in reverse alphabetical order (Z to A)
o
Order: Categories are ordered according to the Order column entered in the Category
Manager.
·
Primary Order. Order of Articles within a Category. The following options are available.
o
Default: Same as "Most recent first"
o
Oldest first: Articles are displayed starting with the oldest and ending with the most recent.
o
Most recent first: Articles are displayed starting with the most recent and ending with the
oldest.
o
Title - Alphabetical: Articles are displayed by Title in alphabetical order (A to Z)
o
Title - Reverse Alphabetical: Articles are displayed by Title in reverse alphabetical order (Z
to A)
o
Author - Alphabetical: Articles are displayed by Author in alphabetical order (A to Z)
o
Author - Reverse Alphabetical: Articles are displayed by Author in reverse alphabetical order
(Z to A)
o
Most Hits: Articles are displayed by the number of hits, starting with the one with the most
hits and ending with the one with the least hits
o
Least Hits: Articles are displayed by the number of hits, starting with the one with the least
hits and ending with the one with the most hits
22
Page 23
o
Order: Articles are ordered according to the Order column entered in the Article Manager.
·
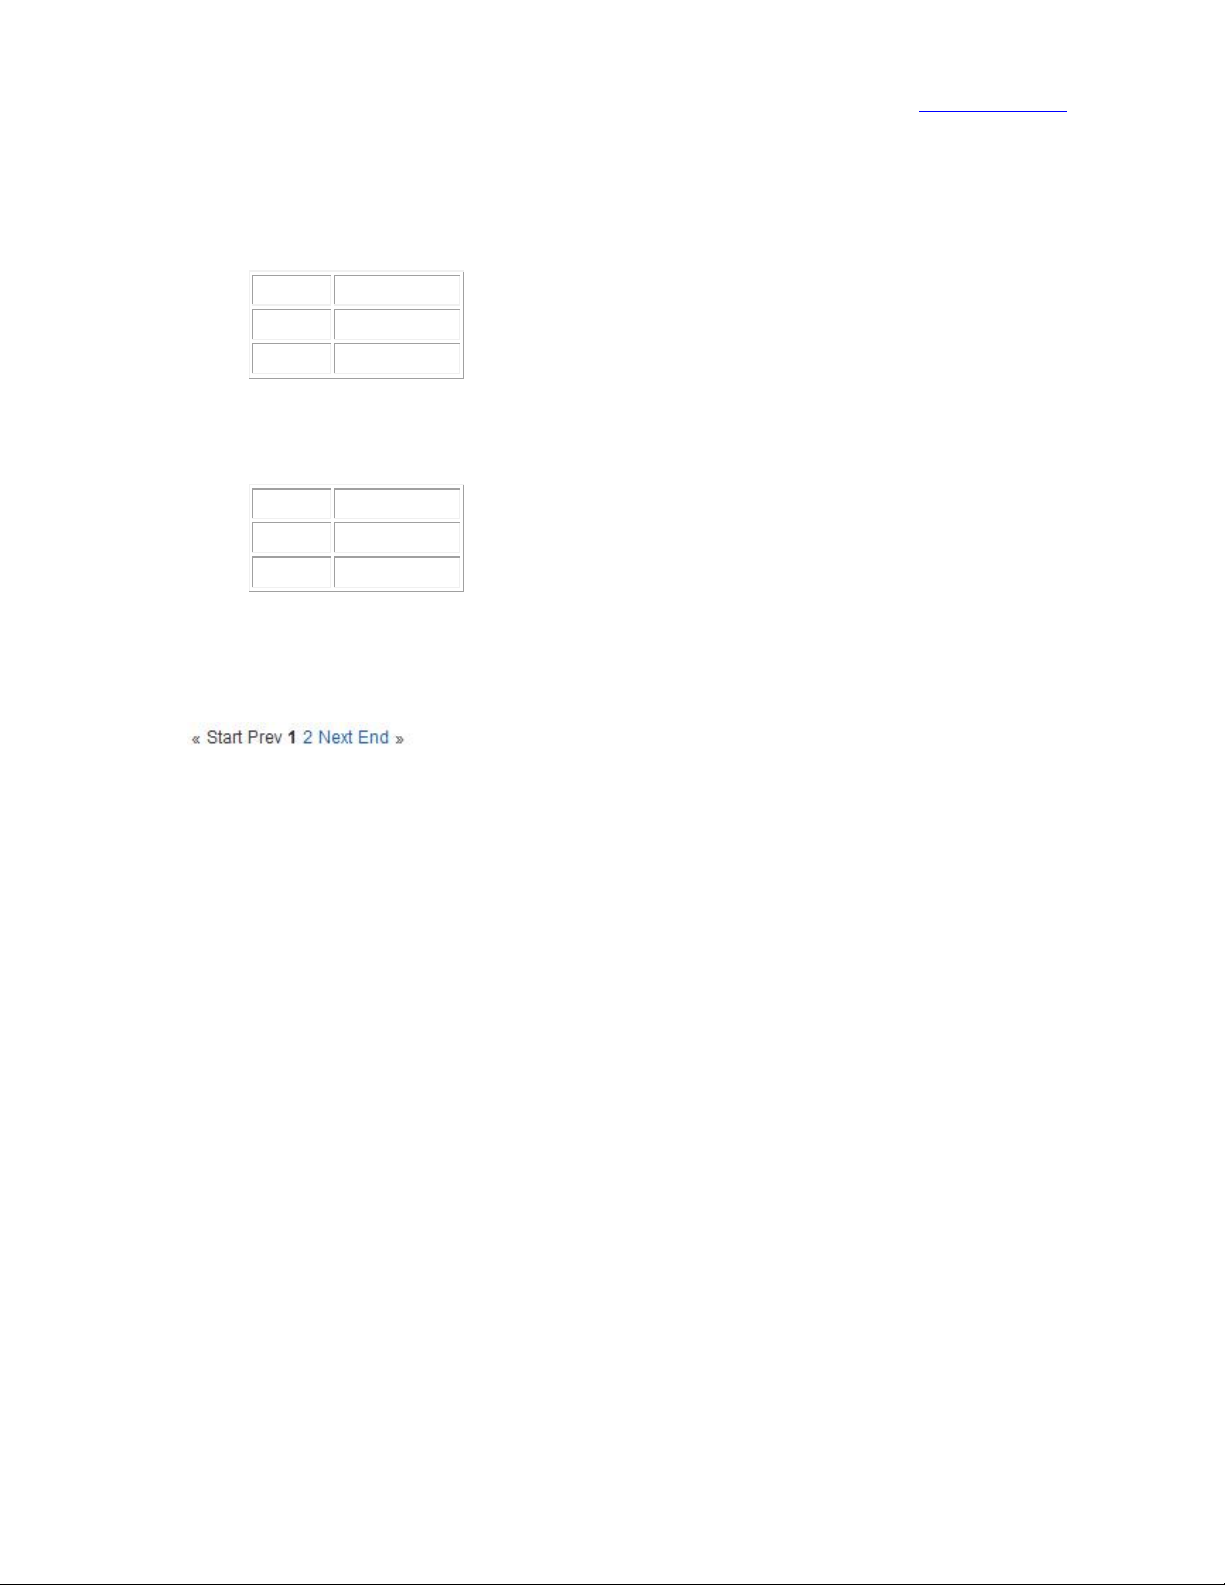
Multi Column Order. In multi-column blog layouts, whether to order articles Down the columns or
Across the columns.
o
Down. Order articles going down the first column and then over to the next column, for
example:
article 1 1 (continued)
article 2 article 4
article 3 article 5
o
Across. Order articles going across the columns and then back to the first column, for
example:
article 1 1 (continued)
article 2 article 3
article 4 article 5
·
Pagination. Hide or Show Pagination support. Pagination provides page links at the bottom of the
page that allow the User to navigate to additional pages. These are needed if the Articles will not fit
on one page. An example is shown below.
The following options are available.
o
Auto: Pagination links shown if needed.
o
Show: Pagination links shown if needed.
o
Hide: Pagination links not shown. Note: In this case, Users will not be able to navigate to
additional pages.
·
Pagination Results. Hide or Show the current page number and total pages (e.g., "Page 1 of 2") at
the bottom of each page.
·
Show a Feed Link. Hide or Show an RSS Feed Link.
Category List La yout
Used to show articles belonging to one Category, in a list layout. A list layout lists each Article's Title and
allows the User to link to the Article. An example is shown below:
23
Page 24
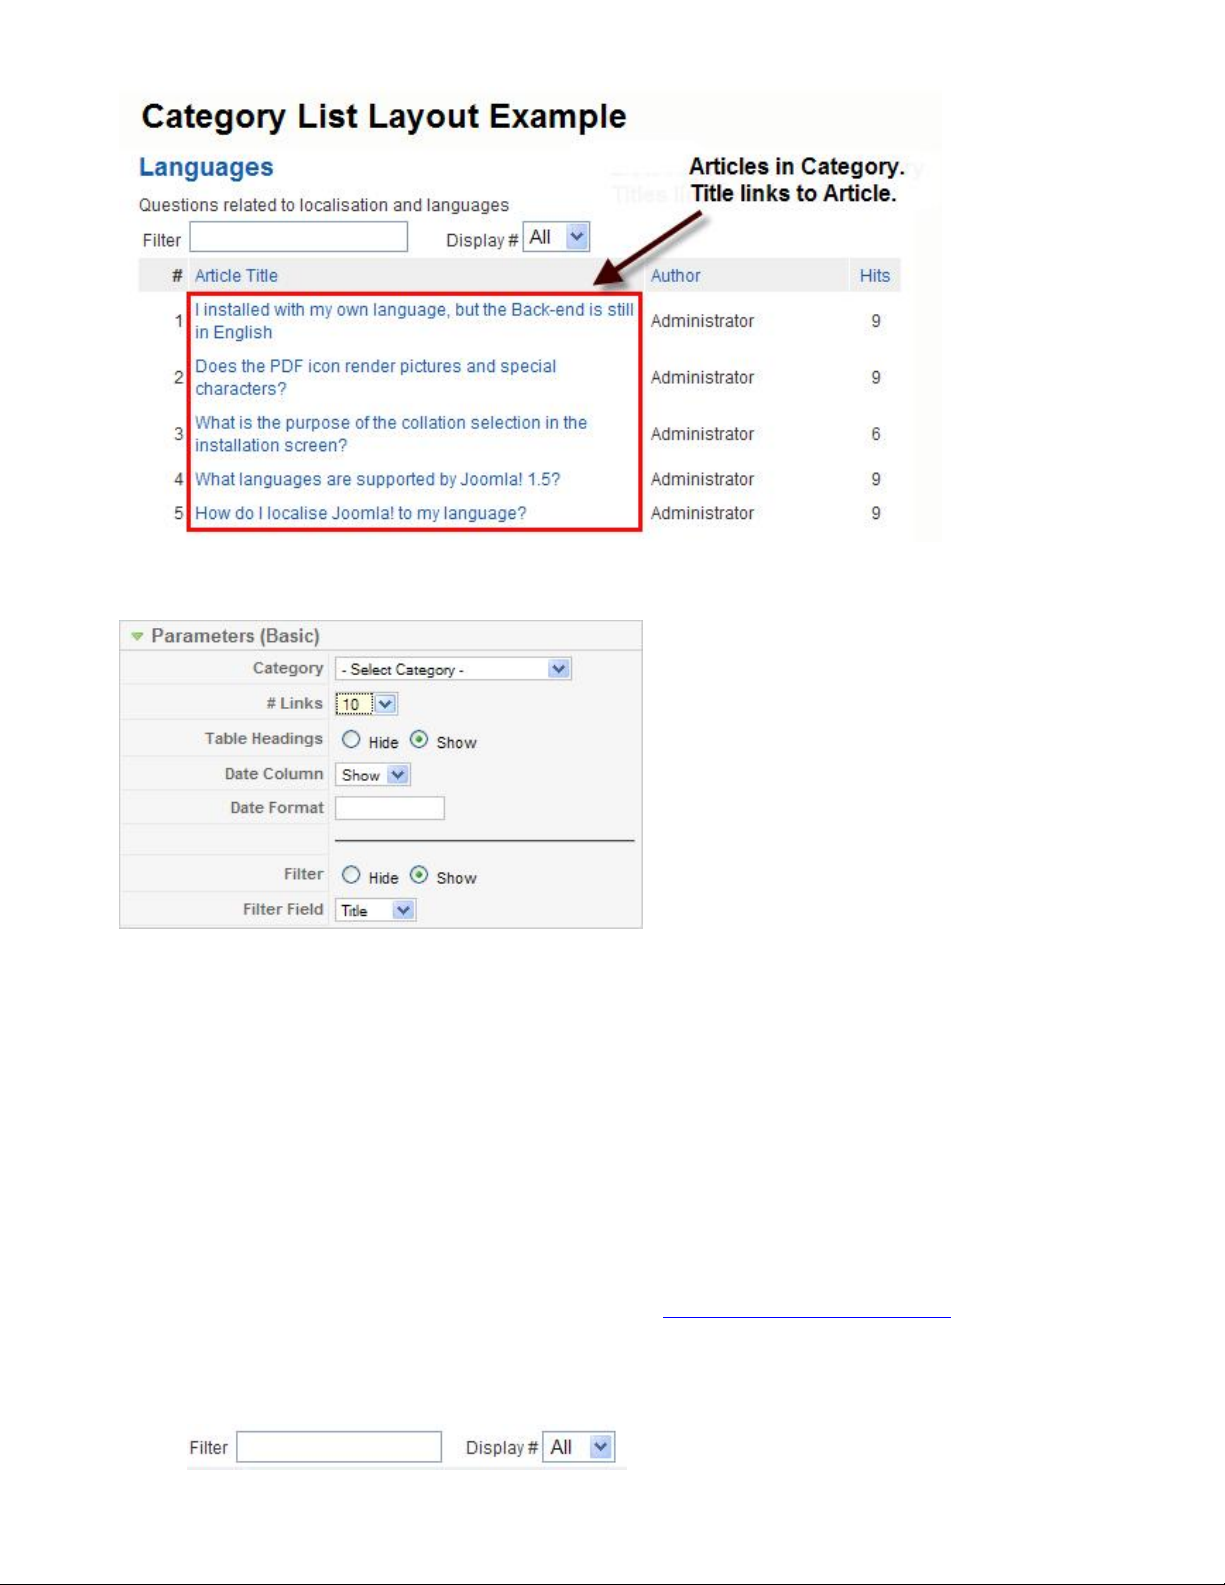
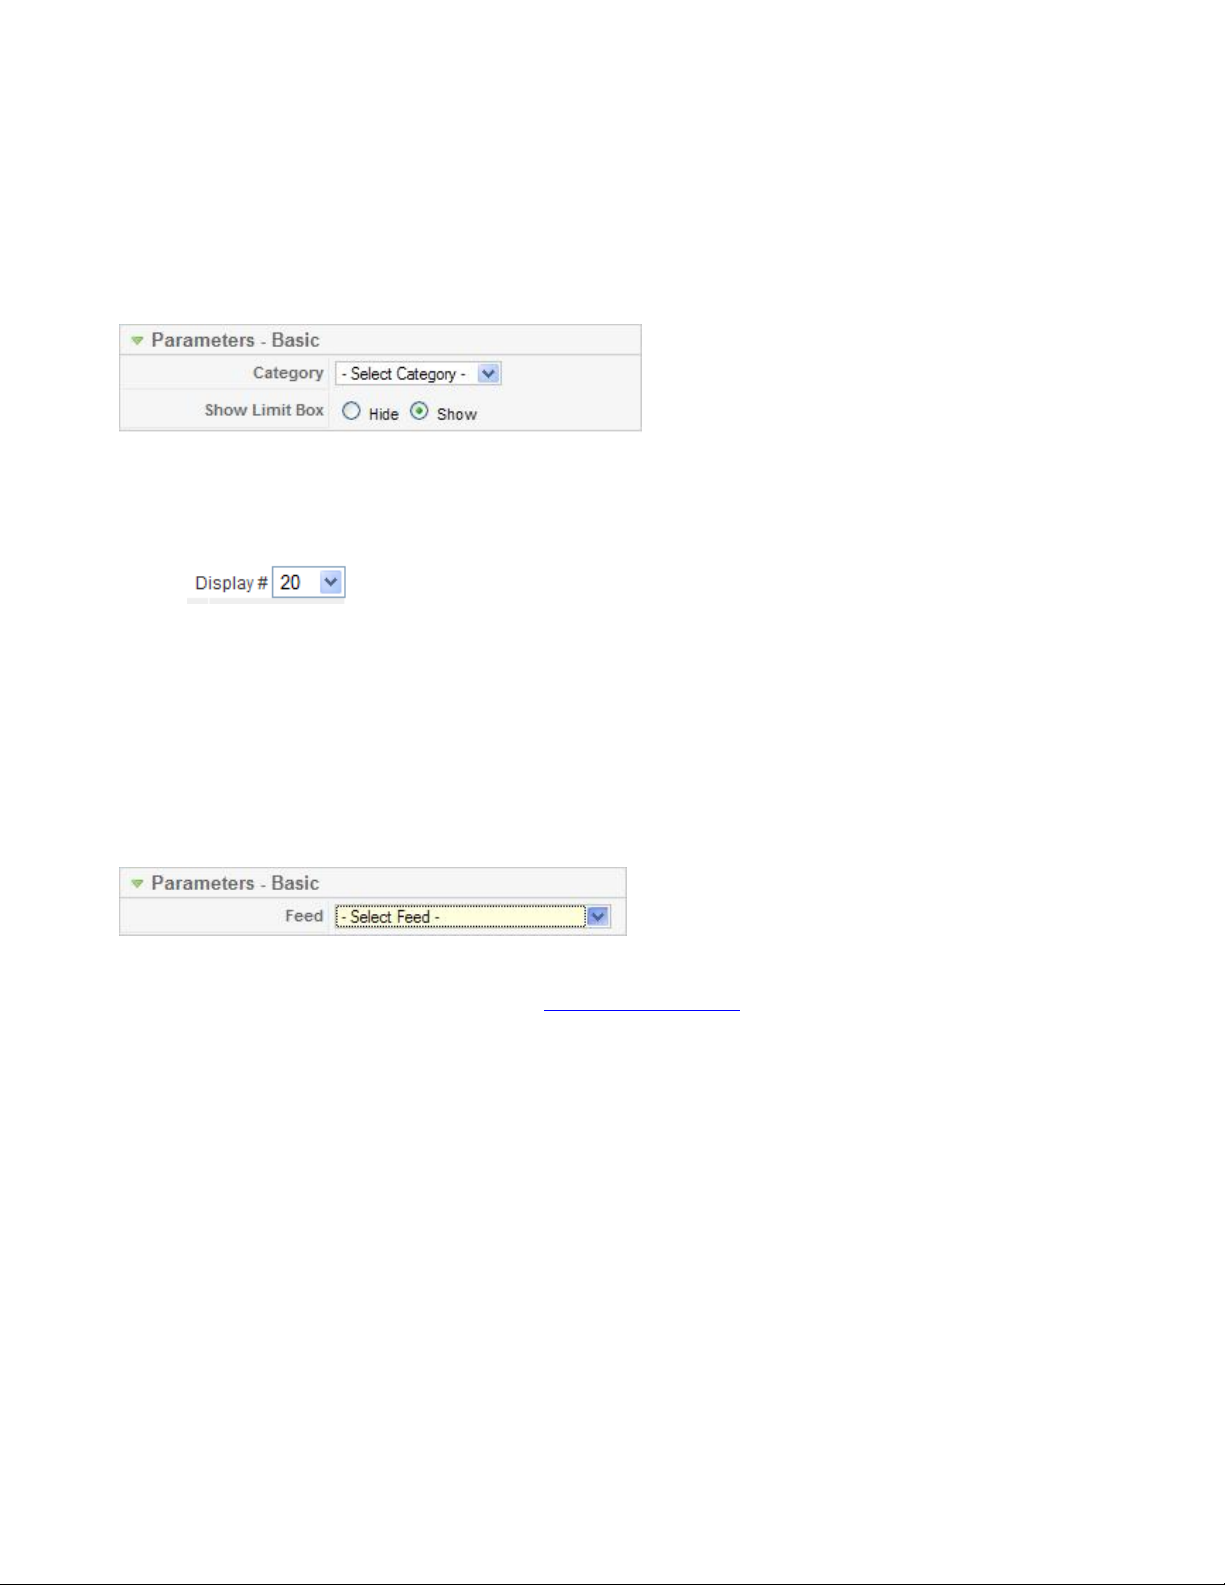
Parameters - Basic The Category List Layout has the following Basic Parameters, as shown below.
·
Category. Category selected for this Layout.
·
# Links. The number of Articles to display in the initial view. If a Category has more than this
number of Articles, only this many links will show on the first page. In this case, the User can either
change the "Display #" in the drop-down list box or use the "Next" link to show the next page of
Articles.
·
Table Headings. Hide or Show column headings above the fields for the item.
·
Date Column. Hide or Show the Created Date for the Article in a column between the Title and
Author.
·
Date Format. The format of the Created Date. You may leave this blank to use the default date
format from your Language file. This value uses the PHP strftime Command Format.
·
Filter. Hide or show a Filter form. A Filter allow the user to limit what Articles are displayed. An
example is shown below.
24
Page 25

·
Filter Field. Field to use for filtering Articles. Available options are Title, Author, and Hits.
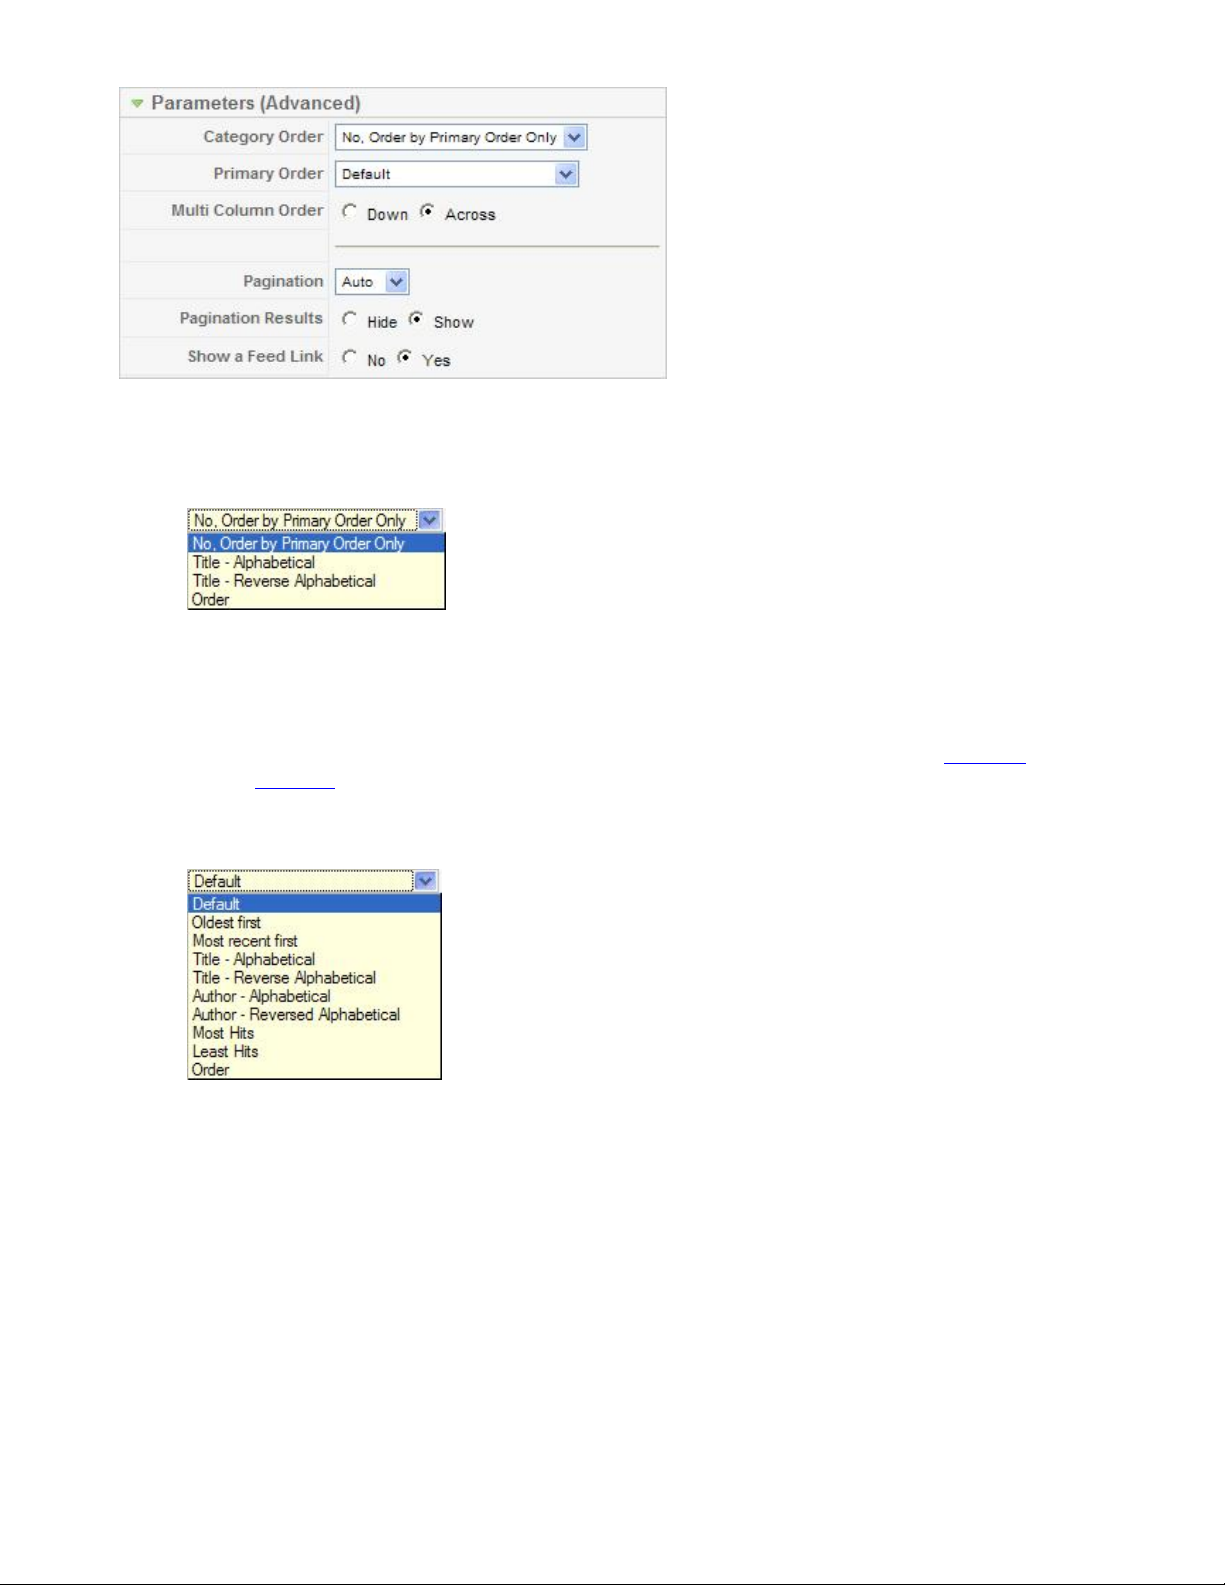
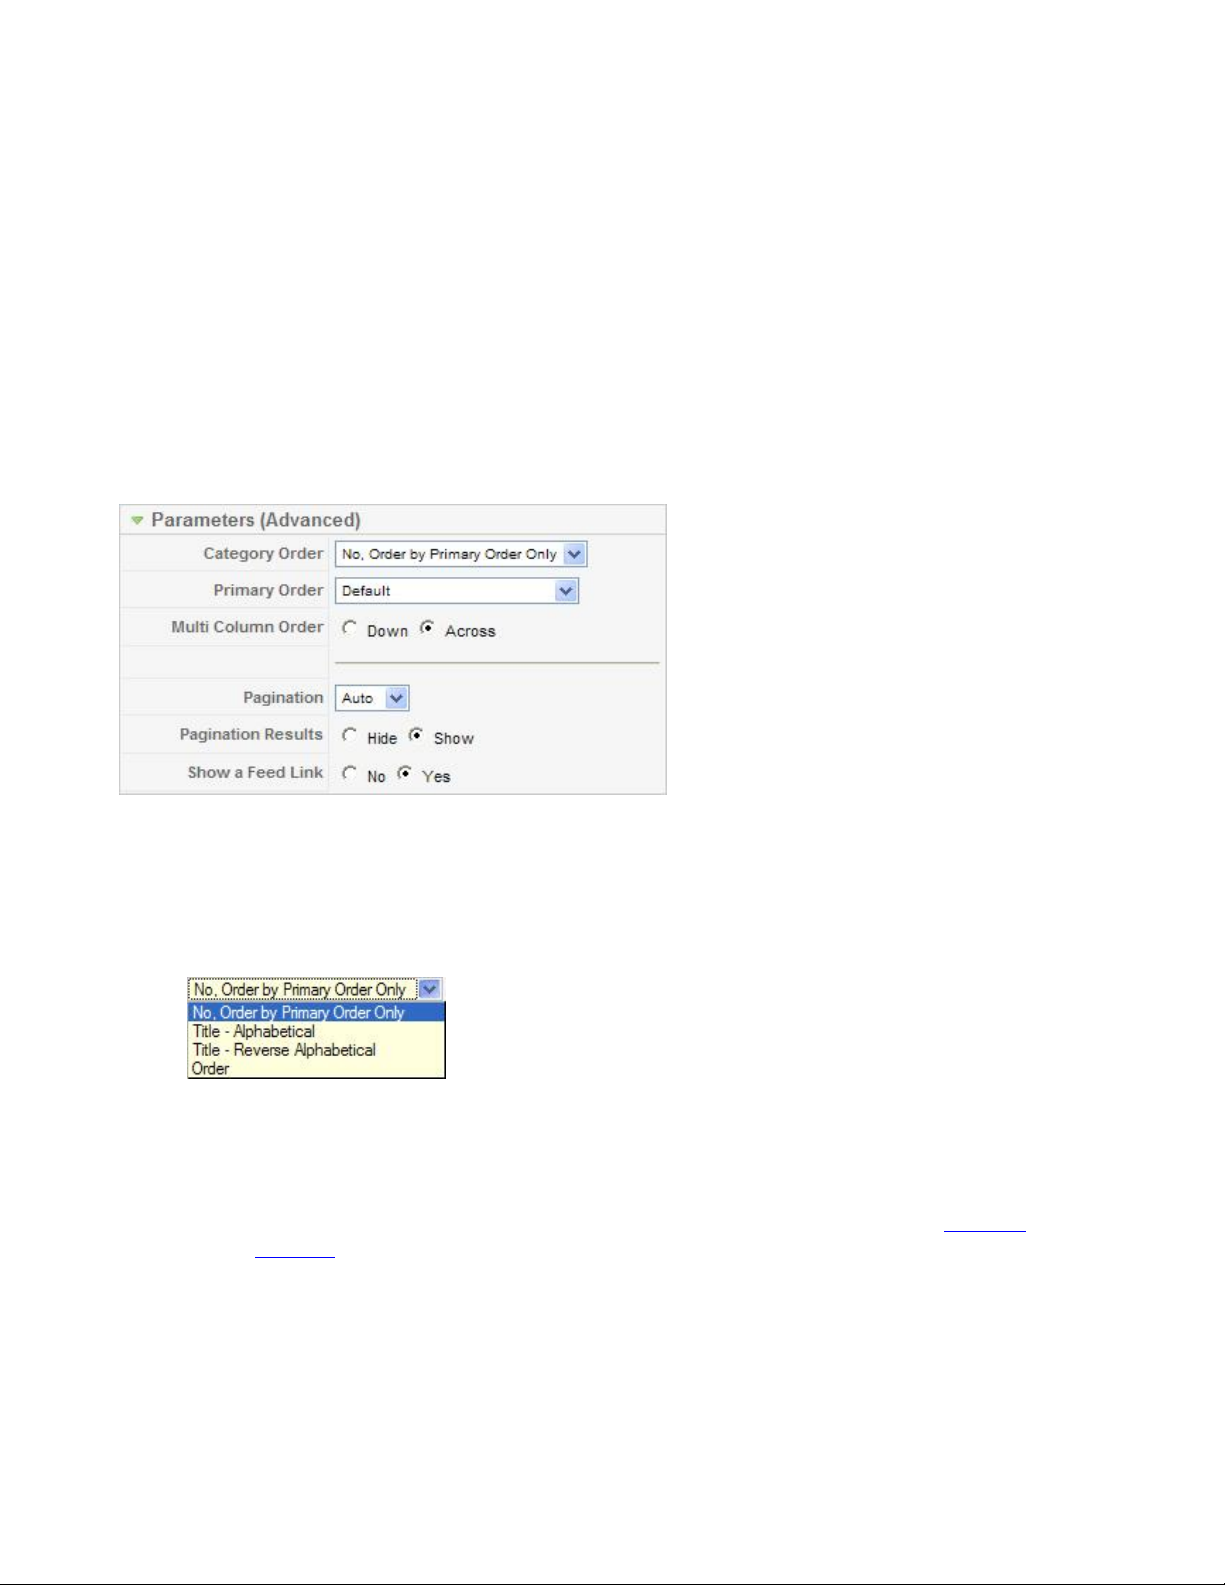
Parameters - Advanced The Category List Layout has the following Advanced Parameters, as shown
below.
·
Primary Order. Order of Articles within a Category. The following options are available.
o
Default: Same as Most Recent First. Articles are displayed starting with the most recent and
ending with the oldest.
o
Oldest first: Articles are displayed starting with the oldest and ending with the most recent.
o
Most recent first: Articles are displayed starting with the most recent and ending with the
oldest.
o
Title - Alphabetical: Articles are displayed by Title in alphabetical order (A to Z)
o
Title - Reverse Alphabetical: Articles are displayed by Title in reverse alphabetical order (Z
to A)
o
Author - Alphabetical: Articles are displayed by Author in alphabetical order (A to Z)
o
Author - Reverse Alphabetical: Articles are displayed by Author in reverse alphabetical order
(Z to A)
o
Most Hits: Articles are displayed by the number of hits, starting with the one with the most
hits and ending with the one with the least hits
o
Least Hits: Articles are displayed by the number of hits, starting with the one with the least
hits and ending with the one with the most hits
o
Order: Articles are ordered according to the Order column entered in the Article Manager.
·
Pagination. Hide or Show Pagination support. Pagination provides page links at the bottom of the
page that allow the User to navigate to additional pages. These are needed if the Articles will not fit
on one page. An example is shown below.
The following options are available.
o
Hide: Pagination links not shown. Note: In this case, Users will not be able to navigate to
additional pages.
25
Page 26

o
Show: Pagination links shown if needed.
·
Display Select: Show or Hide the Display # drop-down list box. This allows you to limit the number
of Articles listed on one page.
·
Show a Feed Link. Hide or Show an RSS Feed Link.
Front Page Blog Layout
Used to show all Articles that have been published to the Front Page, in a Blog Layout.
A Blog Layout in Joomla! has 3 main areas: Leading, Intro, and Links. These are shown in the diagram
below.
Articles in the Leading Area always display in one column, using the full display width. Articles in the Intro
Area may display in one, two, or three columns, depending on the Columns setting. The parameters below
control the number of Articles in each area and the order in which they display. If an Article has a "Read
more..." break, only the text before the break (called the Intro Text) will display, along with a "Read
more..." link.
Parameters - Basic The Front Page Blog Layout has the following Basic Parameters, as shown below.
·
# Leading. Number of Articles to show using the full width of the main display area. "0" means that
no Articles will show when using the full width. If an Article has a "Read more..." break, only the
part of the text before the break (the Intro text) will display.
26
Page 27
·
# Intro. Determines the number of Articles to display after the leading Article. These Articles will
display in the number of columns set in the Columns parameter below. If an Article has a "Read
more..." break, only the text before the break (Intro text) will display, followed by a "Read more..."
link. The order order in which to display the articles is determined by the Primary Order parameter
in the Parameters - Advanced section below.
·
Columns. The number of columns to use in the Intro Text area. This is normally between 1 and 3. If
1 is used, the Into Text Articles will display using the full width of the display area, just like the
Leading Articles.
·
# Links. The number of Links to display in the 'Links' area of the page. These links allow a User to
link to additional Articles, if there are more Articles than can fit on the first page of the Blog Layout.
Parameters - Advanced The Category Blog Layout has the following Advanced Parameters, as shown
below.
·
Category Order. Order of Categories in this Layout. The following options are available.
o
No. Order by Primary Order Only: Articles are ordered only by the Primary Order, without
regard to Category.
o
Title - Alphabetical: Categories are displayed in alphabetical order (A to Z)
o
Title - Reverse Alphabetical: Categories are displayed in reverse alphabetical order (Z to A)
o
Order: Categories are ordered according to the Order column entered in the Category
Manager.
·
Primary Order. Order of Articles within a Category. The following options are available.
27
Page 28
o
Default: Articles are ordered according to the Order column entered in the Front Page
Manager.
o
Oldest first: Articles are displayed starting with the oldest and ending with the most recent.
o
Most recent first: Articles are displayed starting with the most recent and ending with the
oldest.
o
Title - Alphabetical: Articles are displayed by Title in alphabetical order (A to Z)
o
Title - Reverse Alphabetical: Articles are displayed by Title in reverse alphabetical order (Z
to A)
o
Author - Alphabetical: Articles are displayed by Author in alphabetical order (A to Z)
o
Author - Reverse Alphabetical: Articles are displayed by Author in reverse alphabetical order
(Z to A)
o
Most Hits: Articles are displayed by the number of hits, starting with the one with the most
hits and ending with the one with the least hits
o
Least Hits: Articles are displayed by the number of hits, starting with the one with the least
hits and ending with the one with the most hits
o
Order: Articles are ordered according to the Order column entered in the Article Manager.
·
Multi Column Order. In multi-column blog layouts, whether to order articles Down the columns or
Across the columns.
o
Down. Order articles going down the first column and then over to the next column, for
example:
article 1 1 (continued)
article 2 article 4
article 3 article 5
o
Across. Order articles going across the columns and then back to the first column, for
example:
article 1 1 (continued)
article 2 article 3
article 4 article 5
·
Pagination. Hide or Show Pagination support. Pagination provides page links at the bottom of the
page that allow the User to navigate to additional pages. These are needed if the Articles will not fit
on one page. An example is shown below.
The following options are available.
28
Page 29
o
Auto: Pagination links shown if needed.
o
Show: Pagination links shown if needed.
o
Hide: Pagination links not shown. Note: In this case, Users will not be able to navigate to
additional pages.
·
Pagination Results. Hide or Show the current page number and total pages (e.g., "Page 1 of 2") at
the bottom of each page.
·
Show a Feed Link. Hide or Show an RSS Feed Link.
Section Blog Layout
Used to show Articles belonging to one Section, in a Blog Layout.
A Blog Layout in Joomla! has 3 main areas: Leading, Intro, and Links. These are shown in the diagram
below.
Articles in the Leading Area always display in one column, using the full display width. Articles in the Intro
Area may display in one, two, or three columns, depending on the Columns setting. The parameters below
control the number of Articles in each area and the order in which they display. If an Article has a "Read
more..." break, only the text before the break (called the Intro Text) will display, along with a "Read
more..." link.
Parameters - Basic The Section Blog Layout has the following Basic Parameters, as shown below.
29
Page 30
·
Section. Section selected for this Layout.
·
Description. Hide or Show the Category and Section Descriptions on the Layout. If 'Show' is
selected, the Description will display above the first Article, just below the Page Title.
·
Description Imag e. Hide or show the Description Image on the Layout. If 'Show' is selected, the
Image for this Category or Section will display on the left or right of the Description, depending on
the Image Position specified in the Category Edit Screen or the Section Edit Screen.
·
# Leading. Number of Articles to show using the full width of the main display area. "0" means that
no Articles will show when using the full width. If an Article has a "Read more..." break, only the
part of the text before the break (the Intro text) will display.
·
# Intro. Determines the number of Articles to display after the leading Article. These Articles will
display in the number of columns set in the Columns parameter below. If an Article has a "Read
more..." break, only the text before the break (Intro text) will display, followed by a "Read more..."
link. The order order in which to display the articles is determined by the Primary Order parameter
in the Parameters - Advanced section below.
·
Columns. The number of columns to use in the Intro Text area. This is normally between 1 and 3. If
1 is used, the Into Text Articles will display using the full width of the display area, just like the
Leading Articles.
·
# Links. The number of Links to display in the 'Links' area of the page. These links allow a User to
link to additional Articles, if there are more Articles than can fit on the first page of the Blog Layout.
Parameters - Advanced The Section Blog Layout has the following Advanced Parameters, as shown below.
30
Page 31
·
Category Order. Order of Categories in this Layout. The following options are available.
o
No. Order by Primary Order Only: Articles are ordered only by the Primary Order, without
regard to Category.
o
Title - Alphabetical: Categories are displayed in alphabetical order (A to Z)
o
Title - Reverse Alphabetical: Categories are displayed in reverse alphabetical order (Z to A)
o
Order: Categories are ordered according to the Order column entered in the Category
Manager.
·
Primary Order. Order of Articles within a Category. The following options are available.
o
Default: Same as "Most recent first"
o
Oldest first: Articles are displayed starting with the oldest and ending with the most recent.
o
Most recent first: Articles are displayed starting with the most recent and ending with the
oldest.
o
Title - Alphabetical: Articles are displayed by Title in alphabetical order (A to Z)
o
Title - Reverse Alphabetical: Articles are displayed by Title in reverse alphabetical order (Z
to A)
o
Author - Alphabetical: Articles are displayed by Author in alphabetical order (A to Z)
o
Author - Reverse Alphabetical: Articles are displayed by Author in reverse alphabetical order
(Z to A)
o
Most Hits: Articles are displayed by the number of hits, starting with the one with the most
hits and ending with the one with the least hits
o
Least Hits: Articles are displayed by the number of hits, starting with the one with the least
hits and ending with the one with the most hits
o
Order: Articles are ordered according to the Order column entered in the Article Manager.
·
Multi Column Order. In multi-column blog layouts, whether to order articles Down the columns or
Across the columns.
o
Down. Order articles going down the first column and then over to the next column, for
example:
article 1 1 (continued)
article 2 article 4
31
Page 32

article 3 article 5
o
Across. Order articles going across the columns and then back to the first column, for
example:
article 1 1 (continued)
article 2 article 3
article 4 article 5
·
Pagination. Hide or Show Pagination support. Pagination provides page links at the bottom of the
page that allow the User to navigate to additional pages. These are needed if the Articles will not fit
on one page. An example is shown below.
The following options are available.
o
Auto: Pagination links shown if needed.
o
Show: Pagination links shown if needed.
o
Hide: Pagination links not shown. Note: In this case, Users will not be able to navigate to
additional pages.
·
Pagination Results. Hide or Show the current page number and total pages (e.g., "Page 1 of 2") at
the bottom of each page.
·
Show a Feed Link. Hide or Show an RSS Feed Link.
Section Layout
Used to show Articles by Category in one Section, in a list layout. This layout shows a list Categories in the
Section. An example is shown below:
Each Category links to a page that is similar to a Category List Layout, providing links to each Article in
that Category. Note that you cannot directly set parameters to control the display of these Category List
Layouts from within this screen. However, it is possible to do this using separate Menu Items for each
Category. See the article How to control Category List layouts when drilling from a Section Layout for
more information.
Parameters - Basic The Section Layout has the following Basic Parameters, as shown below.
32
Page 33

·
Section. Section selected for this Layout.
·
Description. Hide or Show the Section Description. If 'Show' is selected, the Description will
display at the top of the page, just under the Title.
·
Description Imag e. Hide or show the Description Image on the Layout. If 'Show' is selected, the
Image for this Category or Section will display on the left or right of the Description, depending on
the Image Position specified in the Category Edit Screen or the Section Edit Screen.
·
Category List - Section. Hide or Show the list of Categories in this Section. Normally, you will
want this set to 'Show'. If this is set to 'Hide', no Categories will display and Users will be unable to
navigate to the Articles in a Category.
·
Empty Categories in Section Show or Hide Categories that contain no Articles.
·
# Category Items. Hide or Show the number of Articles in each Category.
·
Category Description Hide or Show the Description for each Category.
Parameters - Advanced The Section Layout has the following Advanced Parameters, as shown below.
·
Category Order. Order of Categories in this Layout. The following options are available.
o
No. Order by Primary Order Only: Articles are ordered only by the Primary Order, without
regard to Category.
o
Title - Alphabetical: Categories are displayed in alphabetical order (A to Z)
o
Title - Reverse Alphabetical: Categories are displayed in reverse alphabetical order (Z to A)
33
Page 34

o
Order: Categories are ordered according to the Order column entered in the Category
Manager.
·
Primary Order. Order of Articles within a Category. The following options are available.
o
Default: Same as "Most recent first"
o
Oldest first: Articles are displayed starting with the oldest and ending with the most recent.
o
Most recent first: Articles are displayed starting with the most recent and ending with the
oldest.
o
Title - Alphabetical: Articles are displayed by Title in alphabetical order (A to Z)
o
Title - Reverse Alphabetical: Articles are displayed by Title in reverse alphabetical order (Z
to A)
o
Author - Alphabetical: Articles are displayed by Author in alphabetical order (A to Z)
o
Author - Reverse Alphabetical: Articles are displayed by Author in reverse alphabetical order
(Z to A)
o
Most Hits: Articles are displayed by the number of hits, starting with the one with the most
hits and ending with the one with the least hits
o
Least Hits: Articles are displayed by the number of hits, starting with the one with the least
hits and ending with the one with the most hits
o
Order: Articles are ordered according to the Order column entered in the Article Manager.
·
Show a Feed Link. Hide or Show an RSS Feed Link.
Parameters - Component for Articles
All Articles Layouts have the same options under Parameters - Component. For each of these components,
you may select one of three options: No/Hide, Yes/Show, or Use Global. An example of this section is
shown below.
34
Page 35

These values work with the values set in the Article Manager/Parameters and the values set in the Article
Manager New/Edit to determine the action on the page. The parameters in all three places work together in a
hierarchy, as follows.
1. The value from the Parameters - Advanced section of the Article Manager New/Edit is examined. If
this value is set to Yes/Show or No/Hide, then that action is taken and no further checking is done.
2. If the value above is set to "Use Global" then the value from the Parameters - Component section of
the Menu Item Type (this screen) is examined. If this value is set to Yes/Show or No/Hide, then that
action is taken and no further checking is done.
3. If both of the values above are set to "Use Global" then the value from Article Manager/Parameters
is used to determine the result.
The individual Parameters are described below.
·
Show Unauthorized Links. (No/Yes/Use Global). Whether or not to show links that the User is not
authorized to access. If set to No, Users will only see Menu Items that they may access. If set to Yes,
35
Page 36

every User will see all Menu Items, whether or not they can access them. In this case, if an
unauthorized user selects a Menu Item that they cannot access, a Login screen will display.
·
Show Article Title. (No/Yes/Use Global) Whether or not to show the title of the article.
·
Title Linka ble. (No/Yes/Use Global) Whether or not the Title of the Article will be a hyperlink to
the Article.
·
Show Intro Text. (Hide/Show/Use Global) Whether or not the Intro Text will display.
·
Section Name. (Hide/Show/Use Global) Whether or not the Section Name will display.
·
Section Title Linkable. (No/Yes/Use Global) Whether or not the Title of the Section will be a
hyperlink to the Section page.
·
Category Title. (Hide/Show/Use Global) Whether or not the Category Title will display.
·
Category Title Linkable. (No/Yes/Use Global) Whether or not the Title of the Category will be a
hyperlink to the Category page.
·
Author Name. (Hide/Show/Use Global) Whether or not to display the Author Name.
·
Created Date and Time. (Hide/Show/Use Global) Whether or not to display the date and time the
Article was created.
·
Modified Date and Time. (Hide/Show/Use Global) Whether or not to display the date and time the
Article was last modified.
·
Show Navigation. (Hide/Show/Use Global) Whether or not to show a navigation link (e.g., Next,
Previous) between Articles.
·
Read More... Link. (Hide/Show/Use Global) Whether or not to show the "Read More..." link to link
from the part of the Article before the "Read More..." break to the rest of the Article.
·
Article Rating/Voting. (Hide/Show/Use Global) Whether or not to display the Article
Rating/Voting module.
·
Icons. (Hide/Show/Use Global) Whether the PDF, Print, and E-mail buttons for the Article will
display as Icons or Text. If set to Hide, these buttons will display as Text ("PDF", "Print", and "Email"). If set to Show, they will display as Icons. Note that these buttons only display if the
individual options are set to Show.
·
PDF Icon. (Hide/Show/Use Global) Whether or not to display a button to allow the Article to be
rendered in a new window in PDF format. This allows the User to view, print, or save the Article as
a PDF file.
·
Print Icon. (Hide/Show/Use Global) Whether or not to display a button to allow the Article to be
printed. This allows the User to print the current Article in a printer-friendly format.
·
E-mail Icon. (Hide/Show/Use Global) Whether or not to display a button to allow a link to the
Article to be e-mailed. This displays a form that allows the user to send an e-mail with a link to the
current Article.
36
Page 37

·
Hits. (Hide/Show/Use Global) Whether or not to display the number of hits for an Article.
·
For each feed item show. (Hide/Show/Use Global) If set to Hide, only the intro text of each feed
item will display. If set to Show, the full text of the feed item will display.
Internal Link - Contacts
When the Contacts link is selected, it expands to display the options shown below.
Each of these is described below.
Contact Category Layout
Used to show all of the published Contacts in a given Category. Note that Contact Categories are separate
from Article Categories. Contacts and Contact Categories are entered by selecting Components/Contacts.
See Contact Manager and Category Manager for more information.
Parameters - Basic
The Contact Category Layout has the following Basic Parameters, as shown below.
·
Category. Category selected for this Layout.
·
Contact Image. Image for this Page. Image must be located in the folder "images/stories".
·
Image Align. Align the image on the left or right side of the page.
·
Limit Box. Hide or Show the Limit Box, shown below.
37
Page 38

This allows the User to limit the number of items that will display per page.
·
Show a Feed Link. Hide or Show an RSS Feed Link.
Standard Contact Layout
Used to show the details of a single Contact.
Parameters - Basic
The Standard Contact Layout has the following Basic Parameters, as shown below.
·
Contact. Select the desired Contact from the drop-down list box.
·
Drop Down. Hide or Show a drop-down list box that allows a User to select a different Contact
from the same Category.
·
Show the Category in Breadcrumbs. Hide or Show the Contact Category in the Breadcrumbs
display.
Parameters - Component for Contacts
All Contacts Layouts have the same options under Parameters - Component. An example of this section is
shown below.
38
Page 39

These settings work with the settings in the Contacts: Global Configuration and the Contact Manager -
New/Edit . The setting in the Contact Manager - New/Edit takes priority. If the setting there is 'Use Global',
then the setting here takes effect. If both of these settings are 'Use Global', then the setting in Contacts:
Global Configuration takes effect.
·
Icons/Text. What to display next to the Contacts fields. Options are Icons/Text/None/Use Global.
·
Address Icon. Icon to use for Address. Select an image file in the drop-down list box. These images
are located in the 'images/M_images' folder.
39
Page 40

·
E-mail Icon. Icon to use for E-mail. Select an image file in the drop-down list box. These images
are located in the 'images/M_images' folder.
·
Telephone Icon. Icon to use for Telephone. Select an image file in the drop-down list box. These
images are located in the 'images/M_images' folder.
·
Mobile Icon. Icon to use for Mobile phone. Select an image file in the drop-down list box. These
images are located in the 'images/M_images' folder.
·
Fax Icon. Icon to use for Fax. Select an image file in the drop-down list box. These images are
located in the 'images/M_images' folder.
·
Miscellaneous Icon. Icon to use for Miscellaneous. Select an image file in the drop-down list box.
These images are located in the 'images/M_images' folder.
·
Show Table Headings. Hide or Show the column headings (Name, Address, and so on) in the
Contact Category Layout.
·
Show Contact Position. Hide or Show the Contact's Position.
·
Show E-mail Address. Hide or Show the Contact's E-mail address.
·
Show Telephone Number. Hide or Show the Contact's Telephone number.
·
Show Mobile Number. Hide or Show the Contact's Mobile phone number.
·
Show Fax Number. Hide or Show the Contact's Fax number.
·
Enable vCard. Whether or not to enable vCard support for Contacts. vCard is a special file format
for electronic business cards. This allows contact information to be sent in a standard way via e-mail.
·
Banned E-mail. Enter any e-mails to be banned from the site. E-mail addresses containing any of
the listed text will be banned. Separate different words with semi-colons ';'. For example, the entry
"spam;junk" would ban e-mail addresses such as "myspam@.com" or "aeddie@junkisgood.com".
·
Banned Subject. Enter any e-mail subject words to be banned from the site. Separate different
words with semi-colons ';'. For example, the entry "spam;junk" would ban e-mail subjects such as
"This is not spam" or "I Like Junk".
·
Banned Text. Enter any e-mail text words to be banned from the site. Separate different words with
semi-colons ';'. For example, the entry "spam;junk" would ban e-mail content such as "This is not
spam" or "I Like Junk".
·
Session Check. Whether or not to check for the existence of a Session Cookie on the User's
computer. If set to 'Yes', Users without Cookies enabled will not be able to send e-mails.
·
Custom Reply. Whether or not to use the Custom Reply. Setting this to 'No' allows integration to
other systems.
Internal Link - News Feeds
When the News Feeds link is selected, it expands to display the options shown below.
40
Page 41

Each of these is described below. Note that News Feed Categories are separate from Article Categories.
News Feeds and News Feed Categories are entered by selecting Components → News Feeds. See News
Feeds Manager and Category Manager for more information.
Category List La yout
Used to show a list of all News Feed Categories.
Parameters - Basic
The Category List Layout has the following Basic Parameters, as shown below.
·
Limit Box. Hide or Show the Limit Box, shown below.
This allows the User to limit the number of items that will display per page.
·
Description. Hide or Show the News Feed Description Text, entered below. If 'Show' is selected, the
Description text will be displayed just below the Page Title.
·
Description Text. The text to display as the News Feed Description.
·
Image. Image for this Page. Image must be located in the folder "images/stories".
41
Page 42
·
Image Align. Align the image on the left or right side of the page.
Category Layout
Used to show a list of News Feeds in a Category.
Parameters - Basic
The Category Layout has the following Basic Parameters, as shown below.
·
Category. Category selected for this Layout.
·
Limit Box. Hide or Show the Limit Box, shown below.
This allows the User to limit the number of items that will display per page.
Single Feed Layout
Used to show a single News Feed.
Parameters - Basic
The Single Feed Layout has the following Basic Parameter, as shown below.
·
Feed. The News Feed for this page. Select one of the available News Feeds from the drop-down
menu. News Feeds are added using the News Feeds Manager.
Parameters - Component for News Feeds
All News Feed Layouts have the same options under Parameters - Component. An example of this section is
shown below.
42
Page 43

These settings work with the settings in the News Feeds : Global Configuration. If a parameter here is set to
'Hide' or 'Show' then that action is taken. If a parameter here is set to 'Use Global', then the setting in News
Feeds : Global Configuration is used.
·
Table Headings. Hide or Show column headings above the fields for the item.
·
Name Column. Hide or Show the Feed Name column.
·
# Articles Column. Hide or Show the number of Articles in the News Feed.
·
Link Column. Hide or Show the News Feed link.
·
Category Description Hide or Show the Description for each Category.
·
# Category Items. Hide or Show the number of Articles in each Category.
·
Feed Image. Hide or Show the image of the News Feed.
·
Feed Description. Hide or Show the description text of the News Feed.
·
Item Descript ion. Hide or Show the Description/Intro Text of an item.
·
Word Count. The maximum number of words to display in the Item Description. A value of 0 will
display all of the text.
Internal Link - Polls
When the Polls link is selected, it expands to display the Poll Layout. This is used to show the results of a
Poll, as shown below.
43
Page 44

Parameters - Basic
The Poll Layout has the following Basic Parameter, as shown below.
·
Poll. Select the desired Poll from the drop-down list box. Polls are entered using the Poll Manager .
Internal Link - Search
When the Search link is selected, it expands to display the Search layout. This is used to show the Search
form and the Search results as shown below.
Parameters - Basic
The Search Layout has the following Basic Parameters, as shown below.
44
Page 45
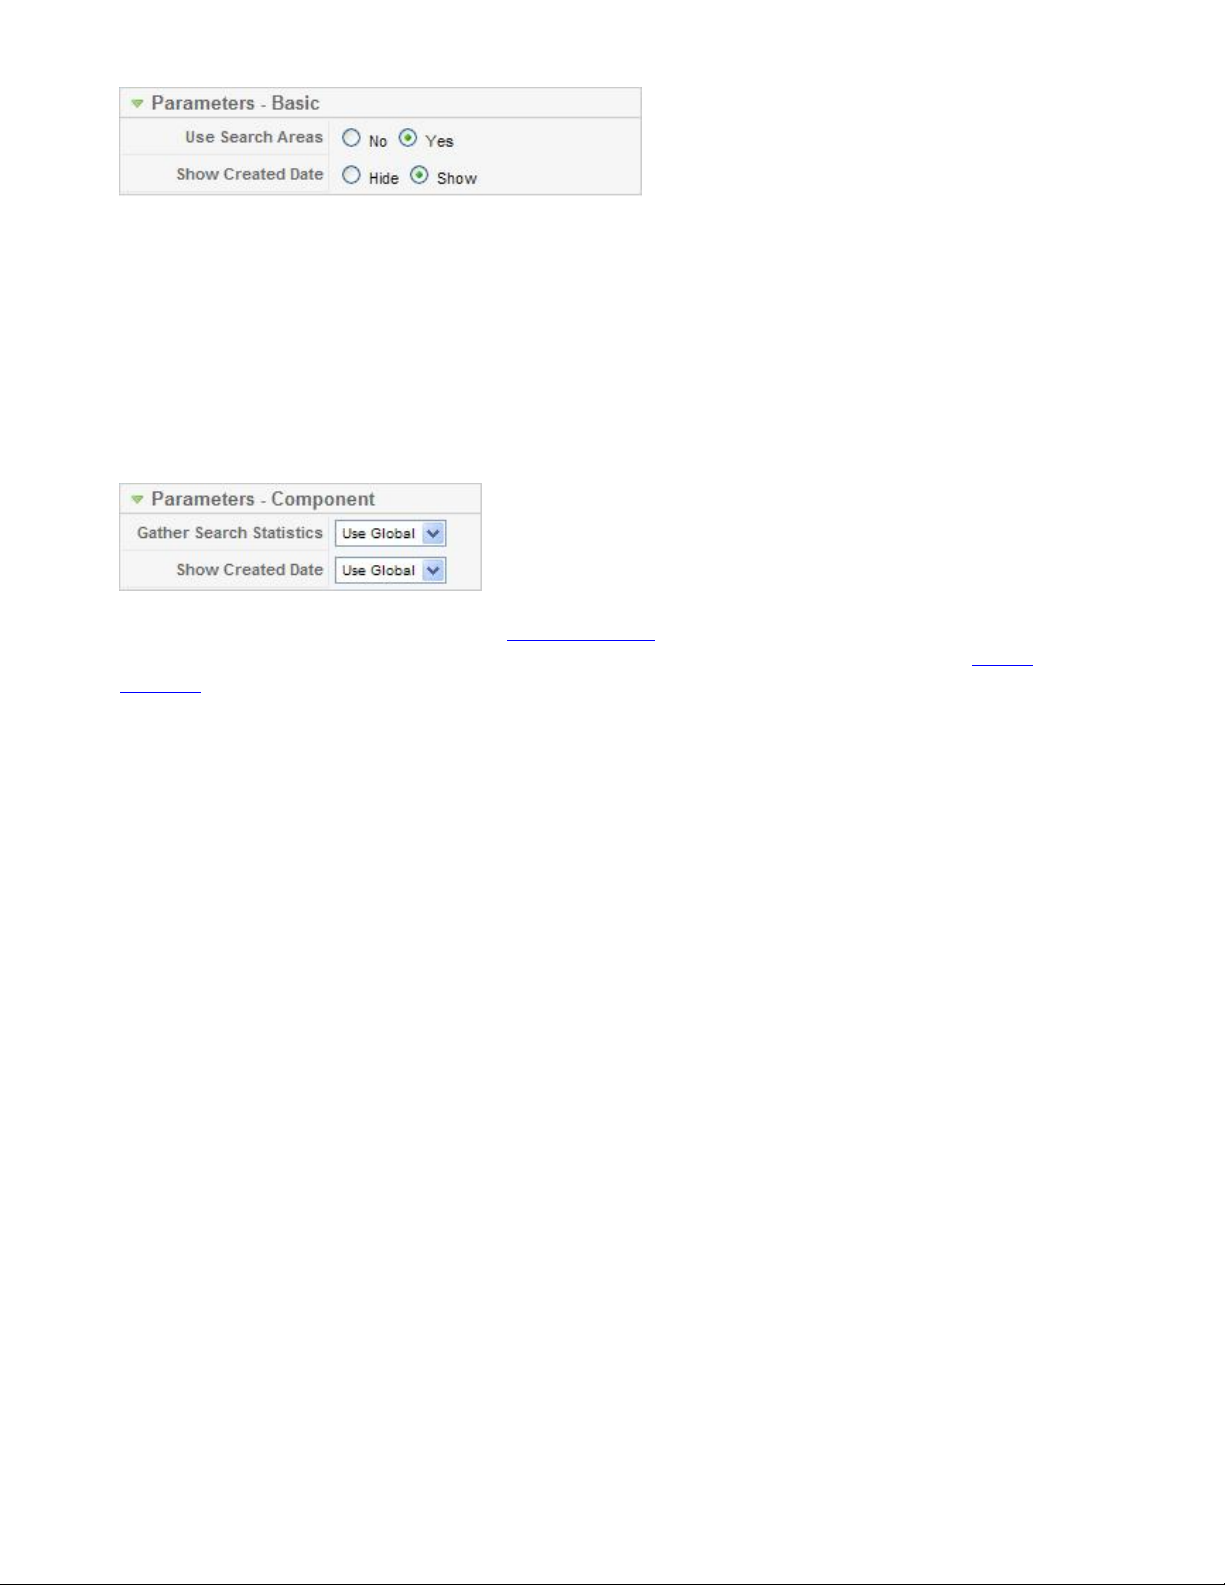
·
Use Search Areas. Whether or not to show the Search Areas check boxes. These check boxes allow
a User to limit the search to any combination of Articles, Web Links, Contacts, Categories, Sections,
and News Feeds.
·
Show Created Date. Hide or Show the Date and Time the Article was created when displaying the
Search results.
Parameters - Component
Search Layout has the following options under Parameters - Component:
These setting work with the settings in the Search Statistics. If a parameter here is set to 'Yes', 'No', 'Show',
or 'Hide', then that action is taken. If a parameter here is set to 'Use Global', then the setting in Search
Statistics is used.
·
Gather Search Statistics. Whether or not to enable the gathering of Search Statistics. Yes/No/Use
Global.
·
Show Created Date. Whether to Hide or Show the Created Date for an Article. This parameter can
be overridden at the Menu Item and Article level.
Internal Link - User
When the User link is selected, it expands to display the options shown below.
45
Page 46

Each of these is described below.
Default Logi n Layout
Allows a user to login to the site, as shown below.
Parameters - Basic
The Default Login Layout has the following Basic Parameters, as shown below.
46
Page 47
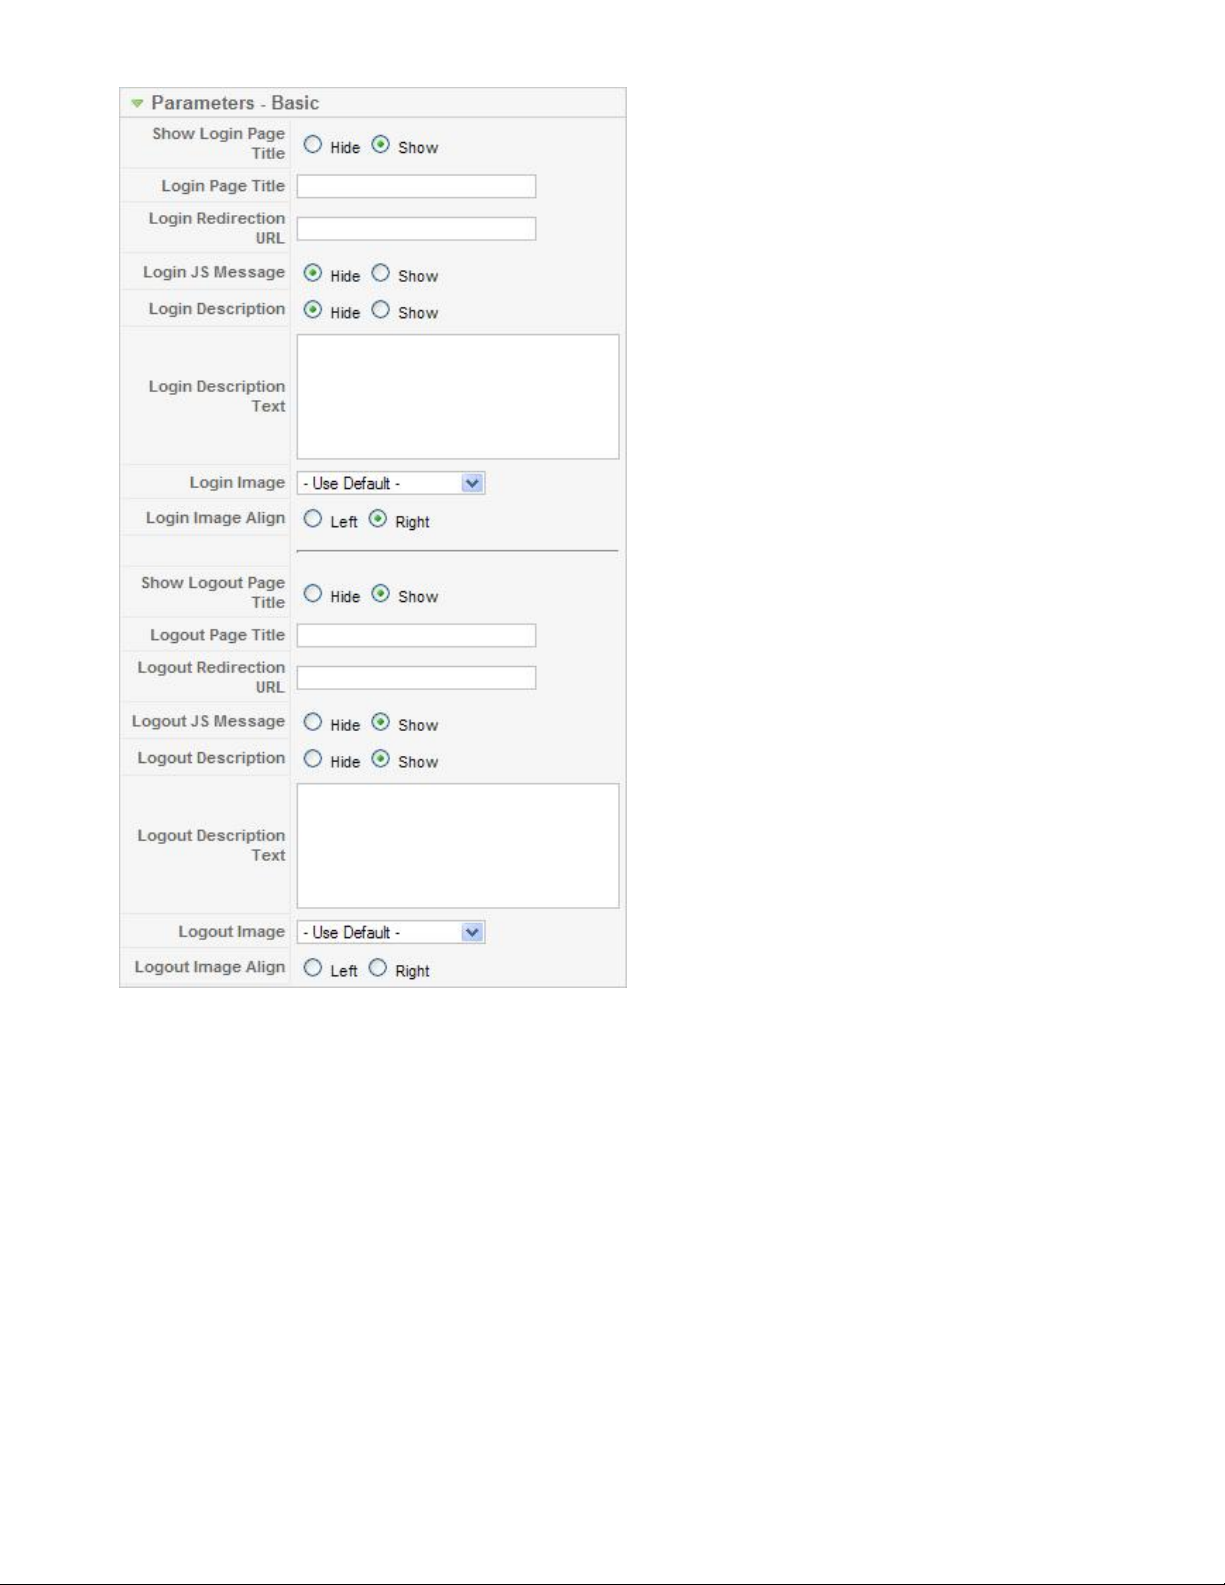
·
Show Login Page Title. Hide or Show the Title of this Page.
·
Login Page Title. Title to display as the Page Title. If blank, the Title of the Menu Item will be used.
·
Login Redirection URL. The URL of the Page that the User will be redirected to after a successful
login. If blank, the Front Page will be used.
·
Login JS Message. Hide or Show the JavaScript pop-up that indicates a successful login.
·
Login Description. Hide or Show the Login Description Text, entered below.
·
Login Description Text. Text to display on a successful login. If blank, the variable
"_LOGIN_DESCRIPTION" will be used.
·
Login Image. Image for the Login Page. This must be in the "images/stories" folder.
·
Login Image Align. Align image to the left or right of the page.
·
Show Logout Page Title. Hide or Show the Logout Page Title.
·
Logout Page Title. Text to display at the top of the Page. If blank, the Menu Item Title will be used.
·
Logout Redirection URL. The URL of the Page the User will be directed to after a successful
logout. If blank, the Front Page will be used.
·
Logout JS Message. Hide or Show the JavaScript pop-up that indicates a successful logout.
·
Logout Description. Hide or Show the Logout Description Text, entered below.
·
Logout Description Text. Text to display on a successful logout. If blank, the variable
"_LOGOUT_DESCRIPTION" will be used.
47
Page 48

·
Logout Image. Image for the Logout Page. This must be in the "images/stories" folder.
·
Logout Image Align. Align image to the left or right of the page.
Default Registration Layout
Allows a user to register for the site, as shown below.
This Layout has no unique Parameters.
Default Remind Layout
Allows the user to receive an e-mail with their username, as shown below.
This Layout has no unique Parameters.
Default Reset Layout
Allows the user to reset their password, as shown below.
This Layout has no unique Parameters.
48
Page 49

Default User Layout
Shows a welcome message when the User enters the registered zone. This Layout has no unique Parameters.
User Form Layout
Allows a User to edit their account details, choose a new password, change the language for both the Backend and Front-end, and modify their time zone. Users with publishing permissions may choose a text editor.
Users with administrator permissions may choose the Help Site they want to use in the back-end. The layout
for users in the Registered and Author groups is shown below.
This Layout has no unique Parameters.
Internal Link - Web Links
When the 'Web Links' link is selected, it expands to display the options shown below.
49
Page 50

Each of these is described below.
Web Link Category List Layout
Shows a list of all the Web Link Categories. The User may click on a Category to see the links for that
Category.
Parameters - Basic
The Web Link Category List Layout has the following Basic Parameters, as shown below.
·
Image. Image for this Page. Image must be located in the folder "images/stories".
·
Image Align. Align the image on the left or right side of the page.
·
Show a Feed Link. Hide or Show an RSS Feed Link.
Category List La yout
Shows a list of all of the Web Links in a Category.
Parameters - Basic
The Category List Layout has the following Basic Parameters, as shown below.
·
Category. Web Link Category for this Page. Select a Web Link Category from the drop-down list
box. Note that these Categories are different from Article Categories and are entered from the
selection Components/Web Links/Categories.
·
Show a Feed Link. Hide or Show an RSS Feed Link.
Web Link Submission Layout
Shows a form that allows a Registered User to submit a Web Link, as shown below.
50
Page 51

This only works for users who are members of the Authors, Publishers, or Editors group. Members of the
Registered or Public groups will not be able to submit articles even if this page is visible to them. If the page
is visible to a user without the correct access level, they will get an error message when trying to load the
page.
Parameters - Component for Web Links
All Web Links Layouts have the same options under Parameters - Component. An example of this section is
shown below.
These settings work with the settings in the Web Links: Global Configuration. The a parameter here is set to
'Hide' or 'Show' then that action is taken. If a parameter here is set to 'Use Global', then the setting in Web
Links: Global Configuration is used.
·
Description. Hide or Show the Web Links Introduction below. If this value is set to 'Show' and the
Web Links Introduction field below is empty, then the text from the Web Links: Global
Configuration parameter will be used instead.
51
Page 52

·
Web Links Introduction. Optional text to display above the first Category on the Web Link
Category List Layout.
·
Hits. Whether to Hide or Show the number of hits for each Web Link.
·
Link Descriptions. Hide or Show the Link Description for each Web Link.
·
Other Categories. (This doesn't appear to have any effect on any of the layouts.)
·
Table Headings. Hide or Show column headings above the fields for the item.
·
Target. How to open the link. Options are:
o
Parent Window with Browser Navigation. Open the link in the current browser window,
allowing Back and Forward navigation.
o
New Window with Browser Navigation. Open the link in a new browser window, allowing
Back and Forward navigation.
o
New Window without Browser Navigation. Open link in a new browser window, not allowing
Back and Forward navigation.
·
Icon. The Icon to be displayed to the left of the Web Links URL. Select an image file from the dropdown list box. The images are listed from the 'images/M_images' folder.
Internal Link - Wrapper
When the Wrapper link is selected, it expands to display the Wrapper layout. This is used to show an
external web site inside a page in your web site, using an HTML IFrame. The external web site is contained
inside the Wrapper. You can navigate to different pages in the wrapped web site, all inside the page of your
web site. The example below shows the Joomla! web site inside a Wrapper.
Parameters - Basic
52
Page 53
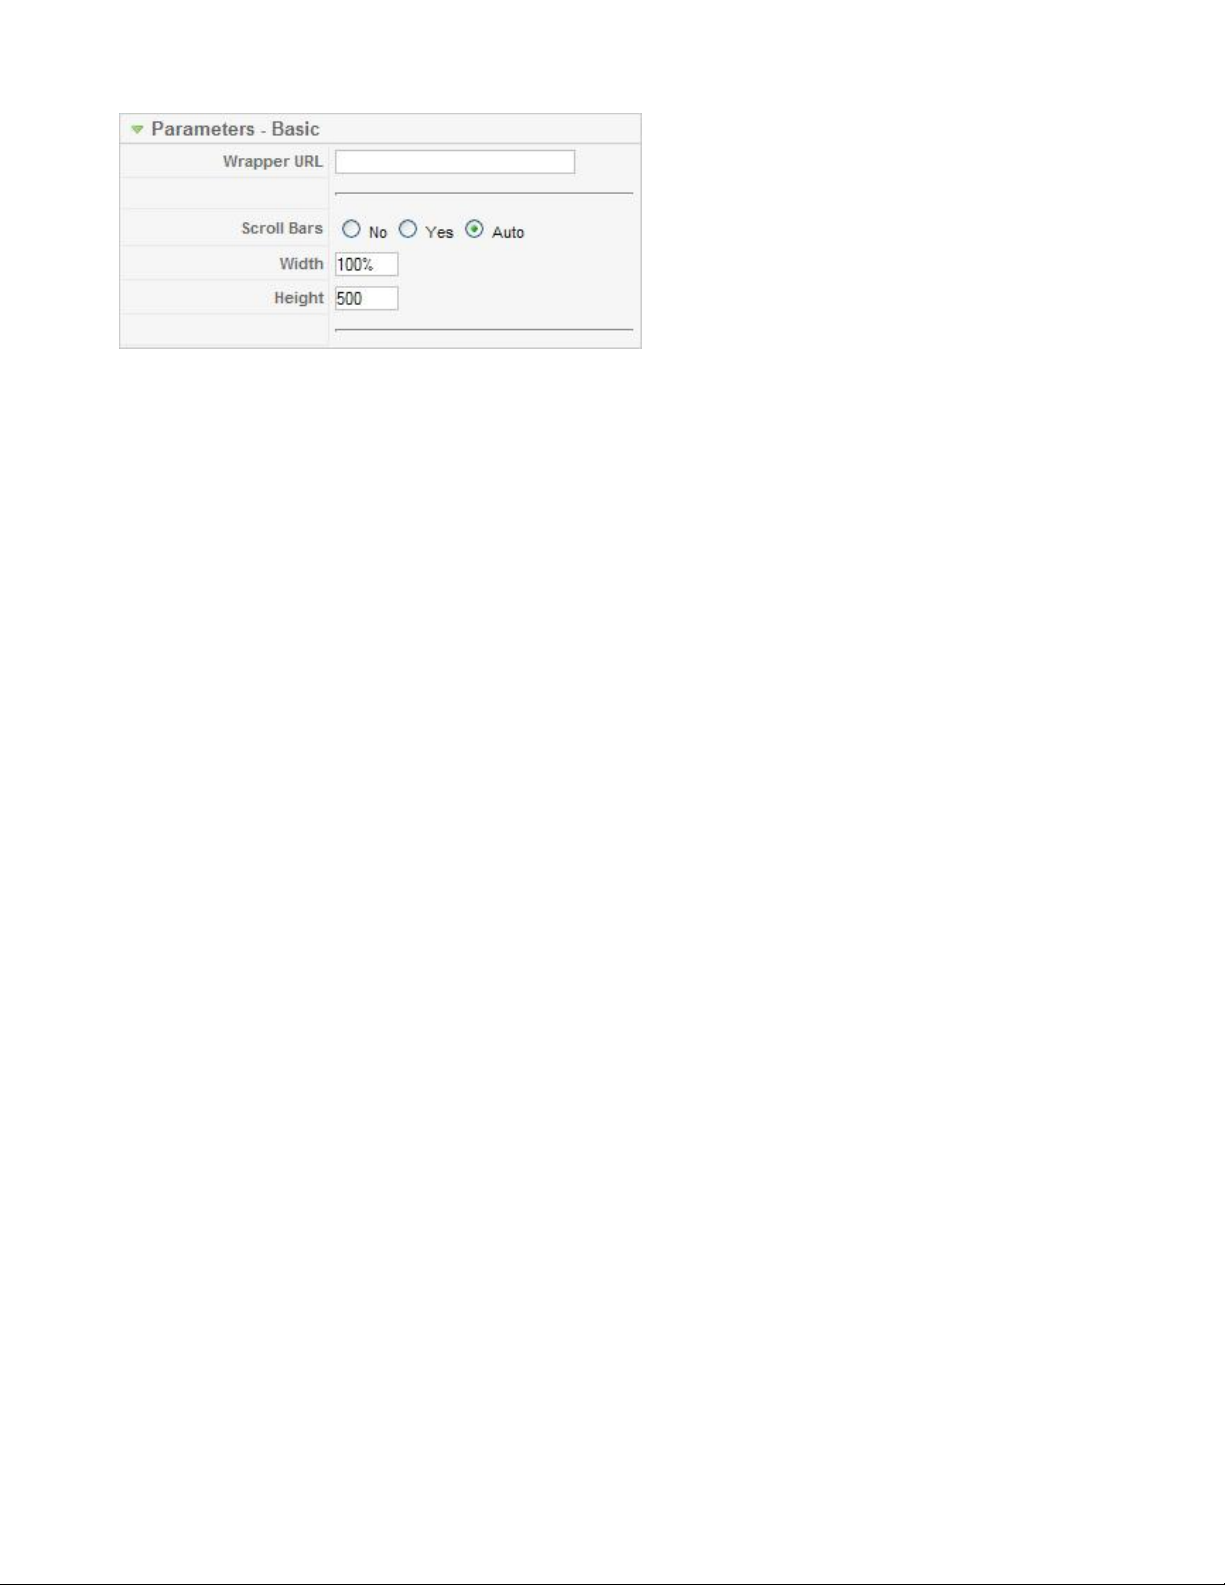
The Wrapper Layout has the following Basic Parameters, as shown below.
·
Wrapper URL. URL for the web site to open inside the Wrapper IFrame.
·
Scroll Bars. Whether or not to include horizontal and vertical scroll bars. Auto will add the scroll
bars automatically when needed.
·
Width. Width of the IFrame Window. You can enter in a number of pixels or enter in a percentage
by including a "%" at the end of the number. For example, "550" means 550 pixels. "75%" means
75% of the page width.
·
Height. Height of the IFrame window, either in pixels or percent (by adding "%" to the number).
External Link
This Menu Item Type is used to create a menu choice that links to an external web site or page.
Parameters - Basic The External Link has one Basic Parameter.
·
Menu Image. Optional image to display to the left or right of the Menu Item. Image must be in the
folder "images/stories".
Separator
This Menu Item type creates a Menu Placeholder or a Separator within a Menu. These can be used to break
up a long Menu.
Parameters - Basic The Separator has one Basic Parameter.
·
Menu Image. Optional image to display to the left or right of the Menu Item. Image must be in the
folder "images/stories".
Alias
This Menu Item Type creates a Link to an existing Menu Item. It allows you to have identical Menu Items
on two or more different Menus without duplicating the settings. So, for example, if you change a parameter
of a Menu Item that has an Alias linked to it, the Alias will automatically acquire the same change.
Parameters - Basic The Alias has one Basic Parameter.
·
Menu Item. The Menu Item that this Alias links to. Select the Menu Item from the drop-down list
box.
Menu Item Details and Parameters - System
53
Page 54

When any of the Menu Item Types listed above are selected, a details screen similar to the one below
displays.
The 'Menu Item Details' and the 'Parameters - System' parts are the same for each Menu Item. These are
documented below. The 'Parameters - Component' part is different for each Internal Link group -- Articles,
Contacts, News Feeds, Polls, Search, User, Web Links, and Wrapper. Therefore, these are documented in
each group's section above.
The Parameters - Basic section is different for each Menu Type. Also, some Menu Types contain a
Parameters - Advanced section, which is also different for each Menu Type. These are documented for each
individual Menu Type above.
Menu Item Details
·
Title. The Title for this item. This may or may not display on the page, depending on the parameter
values you choose.
·
Alias. The internal name of the item. Normally, you can leave this blank and Joomla! will fill in a
default value. The default value is the Title or Name in lower case and with dashes instead of spaces.
You may enter the Alias manually. The Alias should consist of lowercase letters, and no blank
spaces are allowed. Use a hyphen (-) instead. The Alias will be used in the URL when SEF is
activated.
·
Link. The internal link to the web page. Joomla! fills this in for you. No entry is allowed.
·
Display in. Menu where this Menu Item will display. Normally, no entry is needed, since this
defaults to the current Menu. However, this may be changed to any Menu using the drop-down list
box. Note that if you change this to a different menu, when you press "Save" you will be returned to
the Menu Item Manager for the new parent Menu.
·
Parent Item. Used to determine whether a Menu Item is a top-level item or a submenu item. Select
'Top' (the default value) if this is a top-level Menu Item. Otherwise, select the Menu Item that is this
item's parent.
54
Page 55

·
Published. Whether or not this item is published. Select Yes or No from the radio button group to set
the Published state for this item.
·
Order. Indicates the order of this Menu Item in the Menu. The default Order is to add the Menu
Item to the end of the Menu. This Menu Item will moved to the order position just after the Menu
Item selected from the drop-down list. Note that the Order of Menu Items can also be changed in the
Menu Item Manager.
·
Access Level. Who has access to this item. Current options are:
o
Public: Everyone has access
o
Registered: Only registered users have access
o
Special: Only users with author status or higher have access
Enter the desired level using the drop-down list box.
·
On Click, Open in. Controls whether the page is opened in the Parent Window with Browser
Navigation, in a New Window with Browser Navigation, or in a New Window without Browser
Navigation. For Menu Items that reference pages inside your web site, you will mostly use the first
option, which is the default. Links to external web pages normally use one of the "New Window"
options so the user can see the external link without leaving your site.
Parameters - System
This section, shown below, allows setting additional parameters.
These are described below.
·
Page Title. Optional entry for Page Title. The Page Title displays in the title area of browser
window. If this is left blank, the Menu Title is used. If the Show Page Title parameter is set to 'Yes',
this title also displays as the title of the page.
·
Show Page Title. Whether or not to display the Page Title. If this is set to Yes, then a Page Title will
display on the page above the first Article. The title that displays will either be the Page Title set in
Parameters - System above, if entered, or the Menu Item Title (if the Page Title is blank). Note that
this does not work on the Article, Section Table, and Category Table layouts.
·
Page Class Suffix. Optional entry. Allows you to enter a CSS class suffix that will be attached to all
classes of this page. This allows you to create customized CSS styles that will apply just to selected
pages. You would then modify the "template.css" file of your template to apply styling to this new
class.
o
Enter this parameter with a leading space to create a new CSS class for each element. Enter
the parameter without a leading space to change the CSS class name for each element.
55
Page 56

o
See the tutorial Using Class Suffixes in Joomla! 1.5 for more information.
·
Menu Image. Optional image to display to the left or right of the Menu Item. Image must be in the
folder "images/stories".
·
SSL Enabled. Whether or not this page should use SSL (Secure Sockets Layer) and the Secure Site
URL. This is used to encrypt the information sent between the browser and the web site.
Quick Tips
·
Parameters for Articles and Contacts can be set at 3 different levels:
1. the individual Article or Contact New or Edit screen (Article:[Edit] or Contact:[Edit]).
2. the Menu Item that displays the Article or Contact (this screen).
3. the Global Configuration screen, accessed using the Parameters button on the Article
Manager and Contact Manager screens.
The parameter set for the individual Article or Contact always takes first priority. If the individual
parameter is set to "Use Global", then the parameter set in the Menu Item takes priority. If both of
these are set to "Use Global", then the parameter in the Global Configuration takes priority.
·
Parameters for News Feeds, Search, and Web Links work in a similar way, except that they are only
set in this screen and in the Global Configuration screens. No parameters are set for individual items
of these types. As with Articles and Contacts, the Menu Item setting takes priority over the Global
Configuration setting.
·
Use the Global Configuration parameters whenever possible. This way, if you want to change a
parameter setting for all content items, you can just change it once in the Global Configuration and it
will automatically be reflected in all affected content items.
·
Often on the Front Page component, Joomla! users do not want their Articles to display in 2 columns,
which is the default value. The first Article displays in one column (using the full width), but
subsequent Articles display in 2 columns. This can be adjusted by changing the values of the
Parameters - Basic for the Front Page.
·
If you are trying to manually change the order of articles on the Front Page or in a Blog or List
Layout, make sure that you have the Primary Order and Category Order parameters set correctly in
the Parameters - Advanced Section. If these parameters are set incorrectly, changing the order
manually will have no effect on the order on the web page.
Toolbar
·
Cancel. Go back to the main screen of the Manager, without saving the modifications you made.
·
Help. Opens this Help Screen.
56
Page 57

Menu Manager – New/Edit
How to access
Go to the Menu Manager by clicking on the Menu Manager icon in the Control Panel, or by clicking on
'Menu Manager' in the 'Menus' menu. After that, click on the 'New' button in the toolbar, or select a menu
and click on the 'Edit' button.
Description
You can add or modify menus in this screen.
Screenshot
Column Headers
·
Unique Name. The identification name used by Joomla! to identify this menu. It must be unique.
Spaces are not recommended.
·
Title. The name of the item. For a Menu Item, the Title will display in the Menu. For an Article,
Section, or Category, the Title may optionally be displayed on the web page. This entry is required.
You can open the item for editing by clicking on the Title.
·
Description. The description for the item. Section and Category descriptions for Articles may be
shown on web pages, depending on the parameter settings. These descriptions are entered using the
same editor that is used for Articles. Note that Section and Category descriptions may not be edited
from the front end.
·
Module Title. The title that will be given to the mod_mainmenu module in the Module Manager. If
left blank, a module will not be created and you will not be able to show this menu in the front-end.
This will only be displayed when creating a new menu.
Toolbar
At the top right you will see the toolbar:
57
Page 58

The functions are:
·
Save. Save it and return to the main screen of the Manager.
·
Cancel. Go back to the main screen of the Manager, without saving the modifications you made.
·
Help. Opens this Help Screen.
Quick Tips
·
Hover your mouse over the 'i' icon next to the input box, and extra information will be shown.
·
If you forgot to create a module for this menu, you can do so by using the Module Manager, found
by going to Extensions -> Module Manager. Click on 'New', and then on 'Menu'. Fill in a title and
select the Menu in the Module Parameters.
·
It is a good idea to give a descriptive title for new menus. This is how the menu will be identified in
the Backend Menus menu. It is also a good idea to fill in the Description field with information
about the menu. This is how the menu's module will be referred to in the Module Manager.
·
When you create a new menu, use only alphanumeric characters without spaces in the Unique Name
field. It is a good idea to use only a-z, 0-9 and underscore (_) characters. Please read the tooltips as
well.
58
Page 59

Menu Manager
Description
The Menu Manager controls how Joomla!'s menus will look and act.
Screenshot
Column Headers
·
Title. The name of the item. For a Menu Item, the Title will display in the Menu. For an Article,
Section, or Category, the Title may optionally be displayed on the web page. This entry is required.
You can open the item for editing by clicking on the Title.
·
Menu Type. The type column in the menu manager will actually be the Unique Name of the menu.
·
Menu Items. An icon that links to the Menu Item Manager. Clicking this icon takes you directly to
the Menu Items for the selected Menu, where you can add or edit Menu Items.
·
Published. Whether the item has been published or not. You can change the Published state by
clicking on the icon in this column.
·
Unpublish ed. The unpublished column shows the the number of items that aren't published or
publicly available.
·
Trashed. The trashed column shows the number of items that have been deleted, but not purged
from the trash manager.
·
Modules Column. Because all menus are also modules, and can have more than module associated
with them, this column lists the number of modules associated with the menu.
59
Page 60
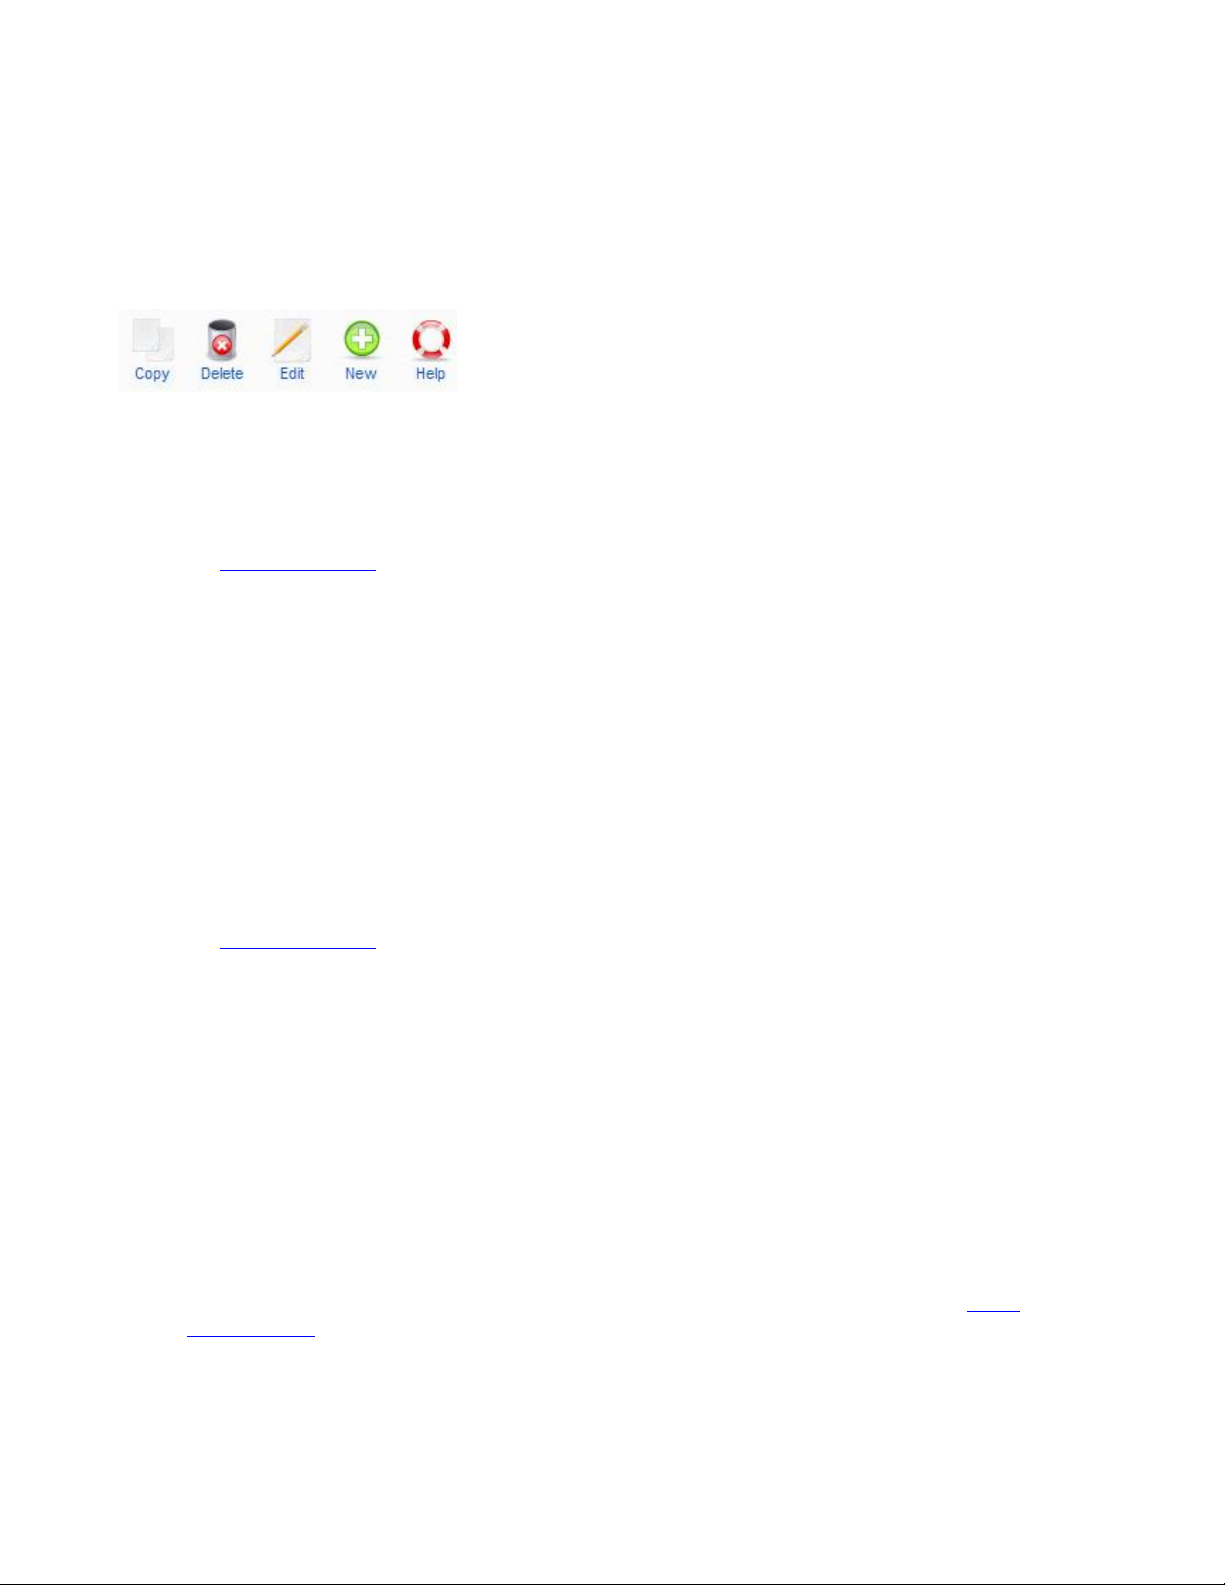
·
ID. The ID number. This is a unique identification number for this item assigned automatically by
Joomla!. It is used to identify the item internally, for example in internal links. You can not change
this number.
Toolbar
At the top right you will see the toolbar:
The functions are:
·
Copy. To copy a menu, select the radio button next to it and click the "Copy" button. You can than
then enter in a new title and module name for the new menu. The title is what the menu will be
referred to as in the Menu Manager. Module Name is what the menu will be referred to as in
the Module Manager.
·
Delete. To delete a menu, select the radio button, and then the "Delete" button. You will be given
one last chance to change your mind. If you're sure you want to delete the menu, click the delete
button one last time.
·
Edit. The "Edit" button allows you to change the unique name, title, description, and module name
for the selected menu.
·
New. To create a new menu, click the "New" button. You can enter a unique name, a title,
description, and the name for the module that will also be created with the menu.
Quick Tips
·
It is expedient to give a descriptive title for new menus because, later, you will see it in the Backend
Menus menu. It is a good idea to fill in the Description field with information about the menu. If you
enter a short title in the Module title field, you can identify the menu's module using that title in
the Module Manager.
·
Though you can create a copy of a selected menu by clicking the Copy toolbar button, you can make
another instance in the Module Manager as well.
·
When you create a new menu, use only English alphanumeric characters without space in the
Unique Name field. It is a good idea using only a-z, 0-9 and underscore (_) characters. Please read
the tooltips as well.
·
If you don't enter a Module title, no module will be created and the menu cannot be displayed in the
front end. However you can use the Module Manager later to create a new mod_mainmenu module,
and assign it to the menu.
·
If you delete an existing menu, do not forget that all the menu items of the respective menu will be
also deleted.
·
The Main Menu has your default menu item, so it should not be deleted. The default menu item is
your home page, and your site will not function if it is deleted. If you change the default menu item,
make sure that you don't delete that menu item either! The menu with the default menu item is
marked with an asterisk (*) in the Menus menu. More information can be found at the Menu
Manager page
60
Page 61
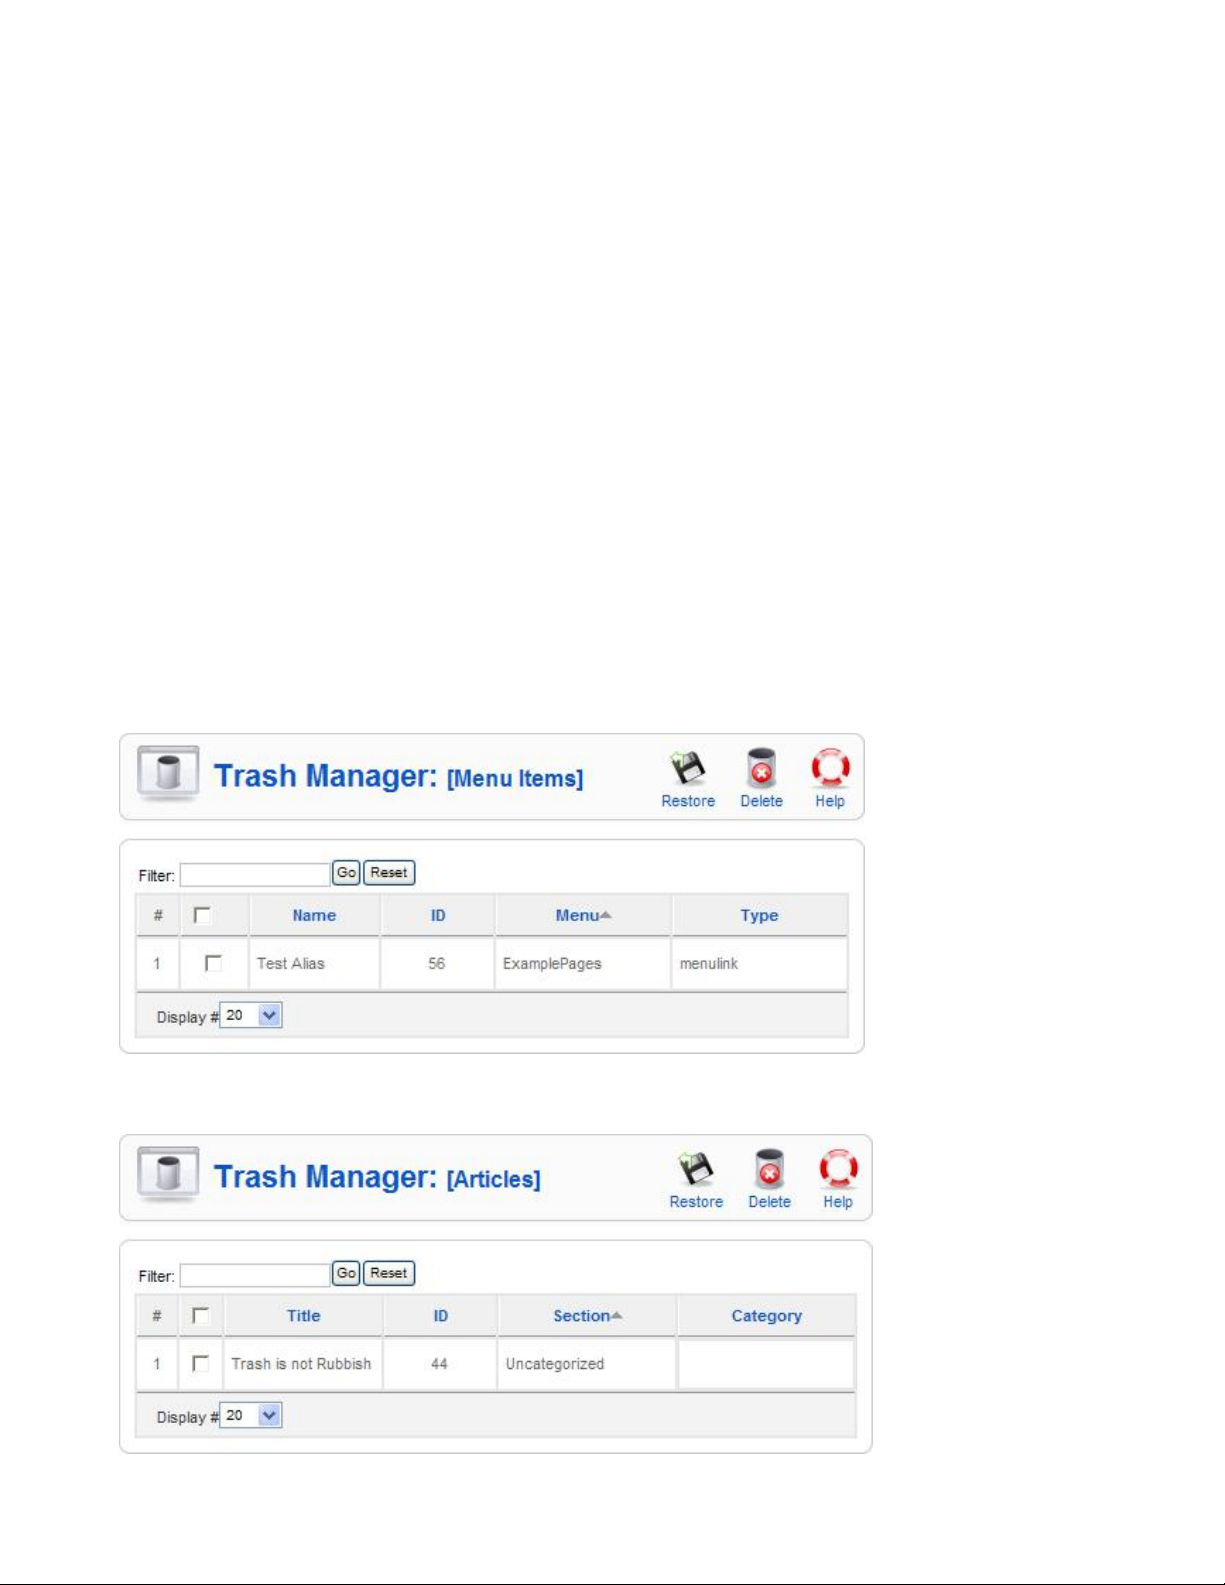
Trash Manager
How to Access
Menu Items
Select Menus --> Menu Trash from the drop-down menu in the Back-end of your Joomla! installation.
Articles
Select Content --> Article Trash from the drop-down menu in the Back-end of your Joomla! installation.
Description
These screens are holding areas where Menu Items and Articles are stored before they are permanently
deleted from your Joomla! database. From here, you can either permanently delete the items or restore them
to the site.
Screenshot
Menu Items
Articles
61
Page 62
Column Headers
Menu Items
·
#. An indexing number automatically assigned by Joomla! for ease of reference.
·
Checkbox. Check this box to select one or more items. To select all items, check the box in the
column heading. After one or more boxes are checked, click a toolbar button to take an action on the
selected item or items. Many toolbar actions, such as Publish and Unpublish, can work with multiple
items. Others, such as Edit, only work on one item at a time. If multiple items are checked and you
press Edit, the first item will be opened for editing.
·
Name. The Name of the Menu Item.
·
ID. The unique ID number automatically assigned to this item by Joomla!. This number cannot be
changed.
·
Menu. The Name of the Menu where this Menu Item belongs to.
·
Type. The Type of the Menu Item.
Articles
·
#. An indexing number automatically assigned by Joomla! for ease of reference.
·
Checkbox. Check this box to select one or more items. To select all items, check the box in the
column heading. After one or more boxes are checked, click a toolbar button to take an action on the
selected item or items. Many toolbar actions, such as Publish and Unpublish, can work with multiple
items. Others, such as Edit, only work on one item at a time. If multiple items are checked and you
press Edit, the first item will be opened for editing.
·
Title. The Title of the Article.
·
ID. The unique ID number automatically assigned to this item by Joomla!. This number cannot be
changed.
·
Section. The Section this Article belongs to.
·
Category. The Category this Article belongs to.
Toolbar
At the top right you will see the toolbar:
·
Restore. To Restore one or more items, select them using the Check Box and then click this button.
A second screen will display with two options: Restore or Cancel. To Restore, press the Restore
button. A dialog box will then display with the options "OK" or "Cancel". Press "OK" to Restore the
selected items.
·
Delete. To delete one or more items, select them and click this button. A second screen will display
with two options: Delete or Cancel. To delete the items permanently, press the Delete button. The
selected items will be deleted.
·
Help. Opens this Help Screen.
62
Page 63

Quick Tips
·
You can keep Menu Items and Articles in the Trash Manager as long as you like. Don't delete these
items unless you are sure that you will not need them again.
·
Articles in the Trash Manager are not the same as Archived Articles. Articles in the Trash Manager
are not available for viewing or editing in the site. Archived Articles may be viewed using the
Archive Layouts and may be edited.
63
Page 64

CONTENT
Content Category Manager - New / Edit
How to Access
Navigate to the Category Manager. To add a new Category, press the 'New' icon in the toolbar. To edit an
existing Category, click on the Category title or click the Category's checkbox and then click on the Edit
icon in the toolbar.
Description
This is where you can add a new Category to a Section or edit an existing Category. Categories are used to
organize the Articles within a Section. Sections and Categories allow you to display related Articles together
on a page and to filter Articles in the Article Manager. All Articles are assigned either to a Category that
you create or to the special Category called 'Uncategorized'.
Screenshot
64
Page 65

Details
·
Title. The Title for this item. This may or may not display on the page, depending on the parameter
values you choose.
·
Alias. The internal name of the item. Normally, you can leave this blank and Joomla! will fill in a
default value. The default value is the Title or Name in lower case and with dashes instead of spaces.
You may enter the Alias manually. The Alias should consist of lowercase letters, and no blank
spaces are allowed. Use a hyphen (-) instead. The Alias will be used in the URL when SEF is
activated.
·
Published. Whether or not this item is published. Select Yes or No from the radio button group to set
the Published state for this item.
·
Section. Section for this Category. Select the Section from the drop-down list box. This is a required
field.
·
Category Order. The order this Category will display in the Category Manager. Use the drop-down
list box to change the Order. You can select 'First' or 'Last' to make this the first or last Category.
You can also select a Category from the list. In this case, the current Category will be listed just after
the Category you select. Note that the Order can also be changed in the Category Manager screen.
·
Access Level. Who has access to this item. Current options are:
o
Public: Everyone has access
o
Registered: Only registered users have access
o
Special: Only users with author status or higher have access
Enter the desired level using the drop-down list box.
·
Image. Image for this Page. Image must be located in the folder "images/stories".
·
Image Position. Position of the Image on the page. Select Left or Right from the drop-down list box.
·
Description. The description for the item. Section and Category descriptions for Articles may be
shown on web pages, depending on the parameter settings. These descriptions are entered using the
same editor that is used for Articles. Note that Section and Category descriptions may not be edited
from the front end.
TinyMCE editor
The default editor for both front-end and back-end users in Joomla! is the TinyMCE editor. Ripplenet have
installed the JCE editor, which is better suited to pages that have embedded coding.
TinyMCE is a WYSIWYG (what you see is what you get) editor that allows users a familiar wordprocessing interface to use when editing Articles and other content. The 3-row toolbar below provides many
standard editing commands:
·
Top Row.
o
Buttons in the upper left allow you to make text bold, italic, underlined, or strikethrough.
Next to that are buttons for align left, right, center, and full.
65
Page 66

o
o
o
·
Second Row.
o
o
o
o
o
o
o
o
o
o
o
o
o
·
Third Row.
o
o
o
o
o
o
o
Styles. Caption and System Pagebreak styles can be set. Highlight the desired text and select
the style. This will allow this text to be formatted based on CSS rules.
Format. Select pre-defined formats for Paragraph, Address, Heading1, and so on.
Font Family. Select the desired font.
Unordered List, Ordered list, Outdent (move left) and Indent (indent right).
Undo (Ctrl+Z) and Re-do (Ctrl+Y).
Insert/Edit Link. To insert or edit a link, select the linked text and press this button. A popup
dialog displays that lets you enter details about the link.
Unlink. To remove a link, highlight the linked text and press this button.
Insert/Edit Image. To insert and image, place the cursor in the desired location and press this
button. A popup dialog displays that lets you enter in the Image URL and other information
about how the image will display.
Cleanup Messy Code. This button allows you to clean up HTML code, perhaps from HTML
text that you copied in from another source.
Edit HTML Source. A popup displays showing the HTML source code, allowing you to edit
the HTML source code.
Find and Find/Replace.
Insert Date, Time, or Emotions.
Insert Embedded Media. To insert embedded media (such as Flash), place the cursor at the
desired location and press this button. A popup dialog will display that allows you to enter
the Type, File or URL, and other information about the media.
Direction Left to Right and Direction Right to Left. These buttons allow you to enter or
change the text direction, for example for languages that read right to left.
Insert New Layer, Move Forward, Move Backware, Toggle Absolute Position. For working
with layered items.
Select Text Color.
Insert Horizontal Ruler.
Remove Formatting.
Toggle Guidelines/Invisible elements.
Subscript, Superscript, Insert Custom Character, Horizontal Rule.
Insert New Table, Table Row Properties, Table Cell Properties, Insert Row Before, Insert
Row After, Delete Row, Insert Column Before, Insert Column After, Delete Column, Split
Merged Table Cells, Merge Table Cells.
Toggle Full Screen Mode.
Edit CSS Style. A popup dialog box displays that allows you to enter CSS style information
for the selected text.
JCE editor
Buttons
Name / Description Icon
Advanced Code Editor
Code Editor (HTML, PHP, CSS,
Javascript) with syntax highlighting
Advanced Link
Advanced Link editor. Create and
edit links to files, external sites, email
addresses and internal Joomla!
66
Page 67

articles / components.
Anchor
Creates anchor links
Bold
Makes selected text bold.
Shortcut Key - CTRL+B
Bullet List
Create a bullet (unordered) list
Character Map
Open a character map dialog for
inserting miscellaneous characters.
Cut, Copy, Paste
Cut, copy and paste text and html
with automatic Office cleanup.
Includes Paste as Plain Text option.
Code Cleanup
Directionality
Set the text direction on a selection
Emotions
Insert emoticons
File Manager
Upload and insert links to various file
types with optional file icon, date and
modified time values.
Optional plugin that requires a
subscription to download.
Font BackColour
Set the font background color on the
text selection
Font ForeColour
Set the font color on the text selection
Font Select
Apply a font family to the text
selection
Font Size Select
Apply a font size to the text selection
Format Select
Format the text selection with the
selected block element
Fullscreen
Toggle full-screen edit mode
Help
Open the Help window
Horizontal Rule
Insert a horizontal rule
HTML
Basic HTML editor
Image Manager
Advanced image insert with file
67
Page 68

browser
Image Manager Extended
Advanced image insert with file
browser,image thumbnailing,
resizing, rotating, image popups and
tooltips. Optional plugin that requires
a subscription to download.
Indent
Increase indent
Italic
Italicises selected text
Shortcut Key: CTRL+I
Justify Center
Center Align the text selection or
element
Justify Full
Justify the text selection
Justify Left
Left Align the text selection or
element
Justify Right
Right Align the text selection or
element
Layers
Create and position div layers
Media Manager
Upload and insert media files such as
flash, quicktime, windows media and
flash video. Optional plugin that
requires a subscription to download.
New Document
Clears the editor contents to create a
new document
Non-Breaking
Insert a non-breaking space
Numbered List
Creates a numbered (ordered) list
Outdent
Decrease indent
Preview
Preview the editor contents
Print
Print the editor contents
Article (Read More / Pagebreak)
Create Joomla! Readmore and
Pagebrek breaks
Redo
Redo the last action
Remove Format
68
Page 69

Remove block and style formatting
from a selection
Search Replace
Perforn a search and replace on the
editor contents
Spell Checker
Run a spell check on the editor
contents
StrikeThrough
Create a strikethough on a text
selection
Style Select
Select list of Joomla! template css
styles.
Applied to selected block element or
span.
Styles
Edit an elements styles
Subscript
Position text selection below the
baseline
Superscript
Position text selection above the
baseline
Tables
Create and edit tables
Template Manager
Create and insert reusable code
snippets.Optional plugin that requires
a subscription to download.
Underline
Underline a text selection
Undo
Undo the last action
Unlink
Remove a link from a selection
Visual Aid
Visual Characters
XHTML Xtras
Insert and edit Abbreviation, Citation,
Acronym, Deletion and Insertion
elements and edit the advanced
properties of an element such as
events, title, id, style, class, dir, lang,
accceskey and tabindex
69
Page 70

No editor
If 'No editor' is selected for a User, then a simple text editor displays. This allows you to enter in raw,
unformatted HTML. You can use the toolbar 'Preview' button to preview how the HTML will display.
Note that the 'No Editor' option can be useful if you are entering in 'boilerplate' or custom HTML, for
example to create a PayPal link. TinyMCE automatically re-formats and strips some HTML when a file is
saved. This can cause complex HTML to not work correctly.
If this happens, you can temporarily change the editor to 'No Editor' and create the desired content. Note
that if you wish to edit this content in the future, you should be careful to change your editor to 'No Editor'.
Otherwise, if you open and save the content with TinyMCE, you may lose your custom HTML.
Image Button
An Image button is located just below the edit window, as shown below:
·
Image. This button provides an easy way to insert an image into an Article. Images may be inserted
from the 'images/stories' folder and may also be uploaded. When you click the Image button, a
window pops up, as shown below:
o
Directory. The current directory on the host server. This is the 'images/stories' directory
under your Joomla! home directory. Use the drop-down list box to select a subdirectory.
o
Up. Navigate to the parent directory. Note that the top directory for this function is
'images/stories'. You can not navigate to a higher directory.
o
Insert. Insert the selected image. The insert point will be the current cursor position. You
will see the image display inside the edit window.
o
Cancel. Cancel the operation and close the popup window.
o
Thumbnail Browse Area. Click on an image thumbnail to select the image. Click on a
folder icon to navigate to that subdirectory.
70
Page 71

o
Image URL. Click on one of the image thumbnails and the URL for the image will be
entered for you.
o
Align. Select the desired alignment (left or right) from the drop-down list box.
o
Image Description. Enter a description for the image.
o
Image Title. Enter a Title for this image. This displays when a User hovers the mouse on the
image.
o
Caption. If checked, image title will display as a caption below the image.
o
Browse files. Click this button to browse to an image file to upload from your local computer.
A file dialog will open allowing you to select a file.
o
Start Upload. Once you have selected a file, press this button to upload the file to your
Joomla! 'images/stories' folder. When the upload is done, a 'Completed' message will display.
The thumbnail for the new image will now show in the thumbnail area.
o
Clear Completed. Clears the 'Completed' message.
Toolbar
In the upper right you will see the toolbar:
The functions are:
·
Save. Save it and return to the main screen of the Manager.
·
Apply. Save it, but stay in the same screen. If you have been working on a screen for a long time and
don't want to risk losing your work, pressing Apply saves your work and lets you continue working.
If, for example, you lost your Internet connection, your work will be saved up this point.
·
Close. Return to the previous screen without saving your work. If you press Close while adding a
new item, this new item will not be created. If you were modifying an existing item, the
modifications will not be saved.
·
Help. Opens this Help Screen.
71
Page 72

Content Category Manager
How to Access
Select Content --> Category Manager from the drop-down menu on the back-end of your Joomla!
installation. Or click on the "Category Manager" icon in the Control Panel.
Description
The Category Manager is where you can edit existing Categories and create new ones. Articles in Joomla!
are organized into Sections and Categories. Categories are the second level of organization underneath
Sections. Every Section contains one or more Categories. The special Section 'Uncategorized' has a special
Category also called 'Uncategorized'. These are built into Joomla!.
Screenshot
Column Headers
Click on the column heading to sort the list by that column's value.
·
#. An indexing number automatically assigned by Joomla! for ease of reference.
·
Checkbox. Check this box to select one or more items. To select all items, check the box in the
column heading. After one or more boxes are checked, click a toolbar button to take an action on the
selected item or items. Many toolbar actions, such as Publish and Unpublish, can work with multiple
items. Others, such as Edit, only work on one item at a time. If multiple items are checked and you
press Edit, the first item will be opened for editing.
·
Title. The name of the item. For a Menu Item, the Title will display in the Menu. For an Article,
Section, or Category, the Title may optionally be displayed on the web page. This entry is required.
You can open the item for editing by clicking on the Title.
72
Page 73

·
Published. Whether the item has been published or not. You can change the Published state by
clicking on the icon in this column.
·
Order. The order to display items. If the list is sorted by this column, you can change the order by
clicking the arrows or by entering the sequential order and clicking 'Save Order'. Note that the
display order on a page is set in the Parameters - Advanced section for each Menu Item. If that order
is set to use something other than 'Order' (for example, 'Title - Alphabetical'), then the order value in
this screen will be ignored. If the Menu Item Order parameter is set to use 'Order', then the items will
display on the page based on the order in this screen.
·
Access Level. Who has access to this item. Current options are:
o
Public: Everyone has access
o
Registered: Only registered users have access
o
Special: Only users with author status or higher have access
You can change an item's Access Level by clicking on the icon in the column.
·
Section. The Section this item belongs to. Clicking on the Section Title opens the Section for editing.
See Section Manager - Edit.
·
# Active. The number of active Articles within this Section or Category. Active articles include
published and unpublished articles but not Articles that have been moved to Trash.
·
# Trash. The number of Articles from this Section or Category that are currently in Trash. These
articles can be seen in the Article Trash screen. An Article in Trash is still stored on the site and may
be either Restored or Deleted permanently.
·
ID. The ID number. This is a unique identification number for this item assigned automatically by
Joomla!. It is used to identify the item internally, for example in internal links. You can not change
this number.
·
Display #. The number of items to display on one page. If there are more items than this number,
you can use the page navigation buttons (Start, Prev, Next, End, and page numbers) to navigate
between pages. Note that if you have a large number of items, it may be helpful to use the Filter
options, located above the column headings, to limit which items display.
Toolbar
At the top right you will see the toolbar:
The functions are:
·
Publish. To publish one or more items, select them and click on this button.
·
Unpublish . To unpublish one or more items, select them and click on this button.
·
Move. Select one or more items and click on this button to move them. A new screen will display
showing the possible "Move to" locations on the left and the list of item(s) being moved on the right.
73
Page 74
To complete the move, select the desired "Move to" location and press the Move button. To cancel
the operation, press Cancel.
·
Copy. Select one or more items and click this button to copy them. A new screen will display
showing the possible "Copy to" locations on the left and the list of item(s) being copied on the right.
To complete the copy, select the desired "Copy to" location and press the Copy button. To cancel the
operation, press Cancel.
·
Delete. To delete one or more items, select them and click this button. The selected items will be
deleted.
·
Edit. Select one item and click on this button to open it in edit mode. If you have more than one item
selected, the first item will be opened. You can also open an item for editing by clicking on its Title
or Name.
·
New. Click on this button to create a new item. You will enter the New page for this item.
·
Help. Opens this Help Screen.
List Filters
Filter by Partial TitleYou can filter the list of items either by entering in part of the title or the ID number.
You can also select a Published state.
·
Filter. In the upper left corner just above the column headings is a Filter field and two buttons, as
shown below:
If you have a large number of items on the list, you can use this filter to find the desired item(s)
quickly. Enter either part of the title or an ID number and press 'Go' to display the matching items.
You can enter in whole words or part of a word. For example, "ooml" will match all titles with the
word "Joomla!" in them.
Filter by Section or Published State
In the area in the upper right, above the column headings, there are two drop-down list boxes as shown
below:
The selections may be combined. Only items matching both selections will display in the list.
·
Select Section. Use the drop-down list box to select the desired Section. Only items in this Section
will display. You may also select 'Uncategorized'.
·
Select State. Use the drop-down list box to select the published state: Published or Unpublished. For
Articles, you may also select Archived.
Quick Tips
74
Page 75

·
Click on the Title of a Category to edit it.
·
Click on the green check mark or the red X in the Published column to toggle between Published and
Unpublished.
·
Click on the Column Headers to sort the Categories by that column. Click a second time to sort
descending (Z to A).
75
Page 76
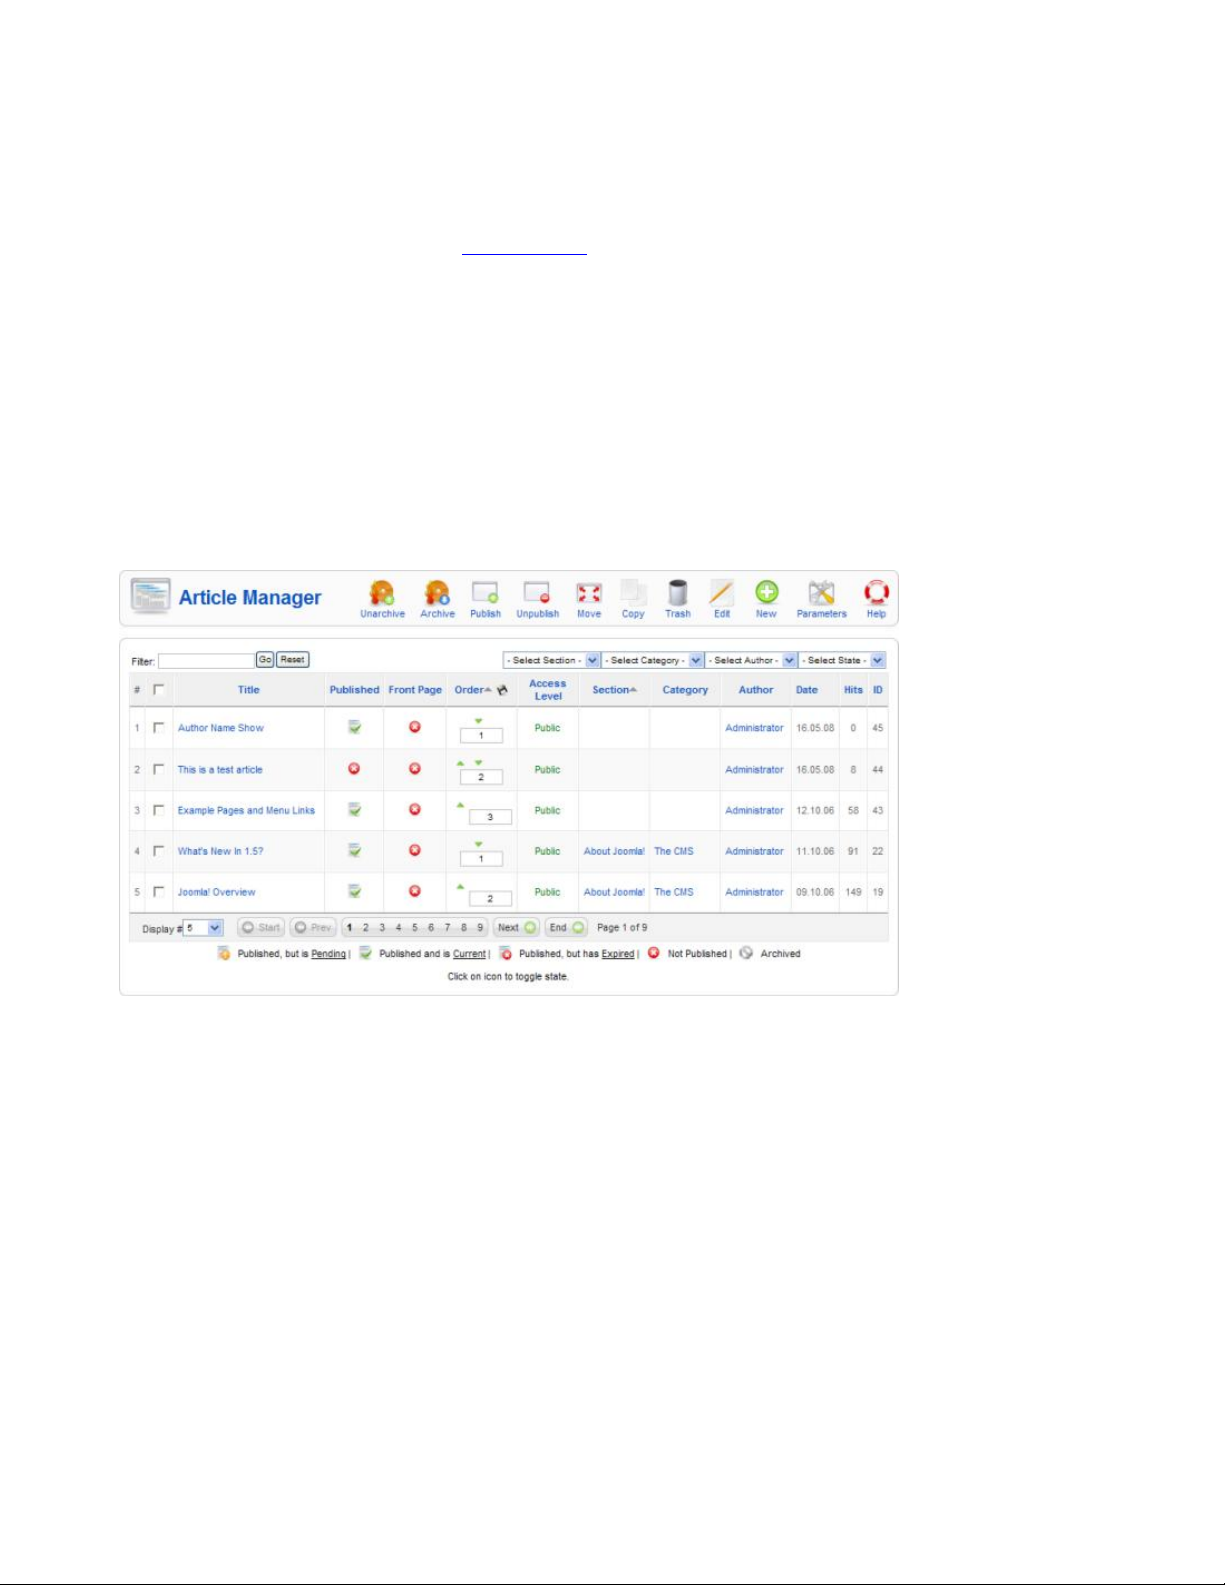
Article Manager
How to access
Click the Article Manager icon in the Control Panel, or click 'Article Manager' in the 'Content' menu in the
Back-end of your Joomla! installation.
Description
The Article Manager is the place in the back-end where you can add and manage all of the articles for your
web site.
Screenshot
Column Headers
Click on the column heading to sort the list by that column's value.
·
#. An indexing number automatically assigned by Joomla! for ease of reference.
·
Checkbox. Check this box to select one or more items. To select all items, check the box in the
column heading. After one or more boxes are checked, click a toolbar button to take an action on the
selected item or items. Many toolbar actions, such as Publish and Unpublish, can work with multiple
items. Others, such as Edit, only work on one item at a time. If multiple items are checked and you
press Edit, the first item will be opened for editing.
·
Title. The name of the item. For a Menu Item, the Title will display in the Menu. For an Article,
Section, or Category, the Title may optionally be displayed on the web page. This entry is required.
You can open the item for editing by clicking on the Title.
76
Page 77

·
Published. The Article's Published status. The possible values are shown under the main window, as
shown below:
You can toggle the Published state on and off by clicking on the icon in this column. A status of
Pending means that an Article's Start Publishing Date is in the future. You can hover on the icon to
see an Article's Start and Stop Publishing dates.
·
Front Page. Whether or not the Article will show on the Front Page. You can change an Article's
published state by clicking on the icon in the column.
·
Order. The order to display items. If the list is sorted by this column, you can change the order by
clicking the arrows or by entering the sequential order and clicking 'Save Order'. Note that the
display order on a page is set in the Parameters - Advanced section for each Menu Item. If that order
is set to use something other than 'Order' (for example, 'Title - Alphabetical'), then the order value in
this screen will be ignored. If the Menu Item Order parameter is set to use 'Order', then the items will
display on the page based on the order in this screen.
·
Access Level. Who has access to this item. Current options are:
o
Public: Everyone has access
o
Registered: Only registered users have access
o
Special: Only users with author status or higher have access
You can change an item's Access Level by clicking on the icon in the column.
·
Section. The Section this item belongs to. Clicking on the Section Title opens the Section for editing.
See Section Manager - Edit.
·
Category. The Category this item belongs to. Clicking on the Category title opens the Category for
editing. See Category Manager - Edit.
·
Author. Name of the Joomla! User who created this item. Clicking on the Author opens the User for
editing. See User Manager - Edit.
·
Date. The date this Article was created. This date is added automatically by Joomla!, but you may
change it in the Parameters - Article section of the Article Manager - New/Edit.
·
Hits. The number of hits for an Article. A hit is the number of times a page has been viewed. Hits
can be reset to 0 in the Article Manager - New/Edit screen.
·
ID. The ID number. This is a unique identification number for this item assigned automatically by
Joomla!. It is used to identify the item internally, for example in internal links. You can not change
this number.
·
Display #. The number of items to display on one page. If there are more items than this number,
you can use the page navigation buttons (Start, Prev, Next, End, and page numbers) to navigate
between pages. Note that if you have a large number of items, it may be helpful to use the Filter
options, located above the column headings, to limit which items display.
Toolbar
77
Page 78
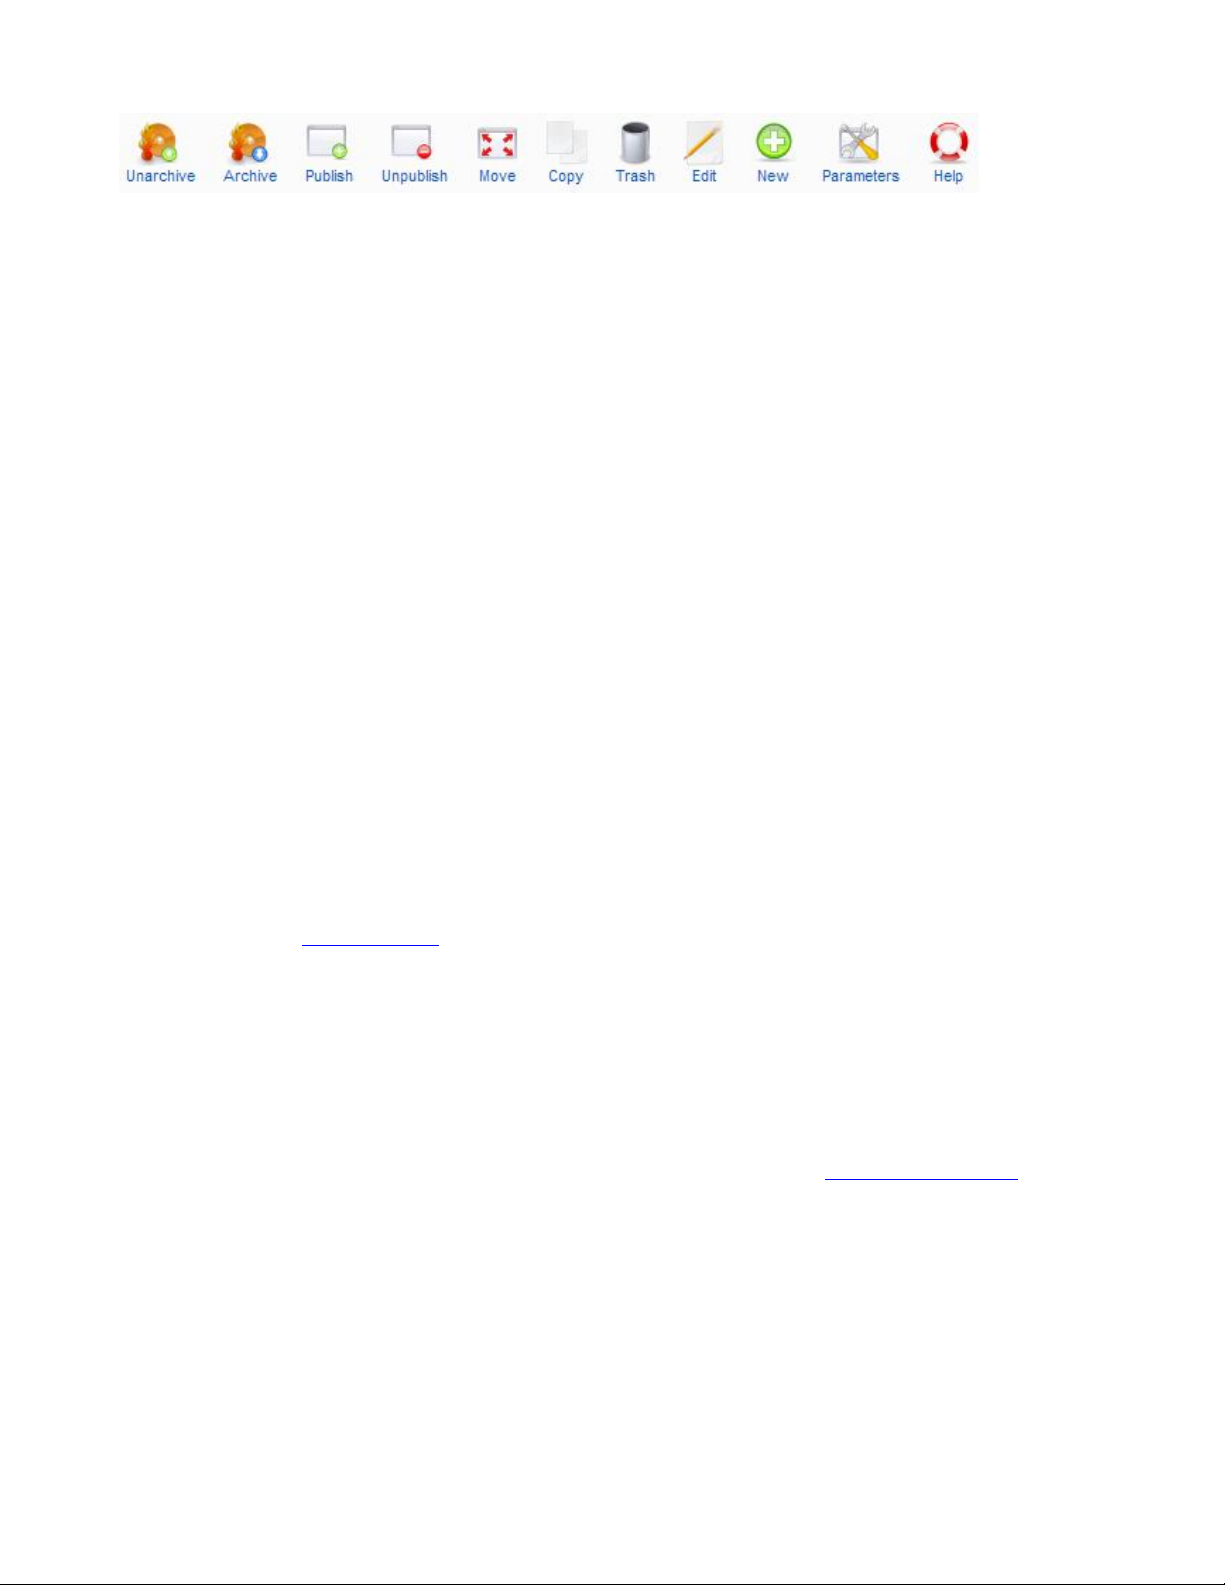
At the top right you will see the following toolbar:
The functions are:
·
Unarchive. To remove one or more Articles from Archived status, select them and press this button.
Archived Articles are retained on the site and are available for viewing on Menu Items with a Type
of Archive Layout. Note that when an Article is unarchived, its status is changed to 'Not Published'.
Also, if an Article does not have a status of 'Archived', this button has no effect.
·
Archive. To change one or more Articles to Archived status, select them and press this button.
Archived Articles are retained on the site and are available for viewing on Menu Items with a Type
of Archive Layout. They can not be published to other pages while set to Archived status.
·
Publish. To publish one or more items, select them and click on this button.
·
Unpublish . To unpublish one or more items, select them and click on this button.
·
Move. Select one or more items and click on this button to move them. A new screen will display
showing the possible "Move to" locations on the left and the list of item(s) being moved on the right.
To complete the move, select the desired "Move to" location and press the Move button. To cancel
the operation, press Cancel.
·
Copy. Select one or more items and click this button to copy them. A new screen will display
showing the possible "Copy to" locations on the left and the list of item(s) being copied on the right.
To complete the copy, select the desired "Copy to" location and press the Copy button. To cancel the
operation, press Cancel.
·
Trash. Select one or more Articles and click on this button to move them to the Trash Manager.
Note that Articles can be restored from the Trash Manager as long as they are not permanently
deleted. See Trash Manager for more information.
·
Edit. Select one item and click on this button to open it in edit mode. If you have more than one item
selected, the first item will be opened. You can also open an item for editing by clicking on its Title
or Name.
·
New. Click on this button to create a new item. You will enter the New page for this item.
·
Parameters. Click this button to open the Global Configuration window. This window allows you to
set default parameters for Articles. This default parameter will take effect if the corresponding Menu
Item parameter and Article parameter are both set to 'Use Global'. See Global Configuration below.
·
Help. Opens this Help Screen.
List Filters
Filter by Partial Title
You can filter the list of items either by entering in part of the title or the ID number. Or you can select a
combination of Section, Category, Author, and Published State.
78
Page 79

·
Filter. In the upper left corner just above the column headings is a Filter field and two buttons, as
shown below:
If you have a large number of items on the list, you can use this filter to find the desired item(s)
quickly. Enter either part of the title or an ID number and press 'Go' to display the matching items.
You can enter in whole words or part of a word. For example, "ooml" will match all titles with the
word "Joomla!" in them.
Filter by Section, Category, Author, Published State
In the upper right area, above the column headings, are 4 drop-down list boxes as shown below:
The selections may be combined. Only items matching all selections will display in the list.
·
Select Section. Use the drop-down list box to select the desired Section. Only items in this Section
will display. You may also select 'Uncategorized'.
·
Select Category. Use the drop-down list box to select the desired Category. Only items in this
Category will display. You may also select 'Uncategorized'.
·
Select Author. Use the drop-down list box to select the desired Author. Only Articles with this
Author will display.
·
Select State. Use the drop-down list box to select the published state: Published or Unpublished. For
Articles, you may also select Archived.
Global Configuration
This pop-up screen is shown when the User clicks the 'Parameters' button on the Toolbar.
79
Page 80

Screenshot
80
Page 81

Column Headers
·
Show Unauthorized Links. (No/Yes). Whether or not to show links to Articles that the User is not
authorized to access. If set to No, Users will only see links to Articles that they may access. If set to
Yes, every User will see all Article links, whether or not they can access them. In this case, a link to
the User Login page will display below the Article Title.
·
Show Article Title. (No/Yes) Whether or not to show the title of the article.
·
Title Linka ble. (No/Yes) Whether or not the Title of the Article will be a hyperlink to the Article.
·
Show Intro Text. (Hide/Show) Hide or Show an Article's Intro Text when the 'Read more...' link is
selected. Intro Text is the part of the Article before a 'Read more...' break. If this parameter is 'Show',
when the User selects the 'Read more...' link, the entire article will display, including the Intro Text.
If this parameter is 'Hide', when the User selects the 'Read more...' link, only the part of the Article
after the 'Read more...' link will display.
·
Section Name. (Hide/Show) Whether or not the Section Name will display.
·
Section Title Linkable. (No/Yes) Whether or not the Title of the Section will be a hyperlink to the
Section page.
·
Category Title. (Hide/Show) Whether or not the Category Title will display.
·
Category Title Linkable. (No/Yes) Whether or not the Title of the Category will be a hyperlink to
the Category page.
·
Author Name. (Hide/Show) Whether or not to display the Author Name.
·
Created Date and Time. (Hide/Show/Use Global) Whether or not to display the date and time the
Article was created.
·
Modified Date and Time. (Hide/Show) Whether or not to display the date and time the Article was
last modified.
·
Show Navigation. (Hide/Show) Whether or not to show a navigation link (e.g., Next, Previous)
between Articles.
·
Read More... Link. (Hide/Show) Whether or not to show the "Read More..." link to link from the
part of the Article before the "Read More..." break to the rest of the Article.
·
Article Rating/Voting. (Hide/Show) Whether or not to display the Article Rating/Voting module.
·
Icons. (Hide/Show) Whether the PDF, Print, and E-mail buttons for the Article will display as Icons
or Text. If set to Hide, these buttons will display as Text ("PDF", "Print", and "E-mail"). If set to
Show, they will display as Icons. Note that these buttons only display if the individual options are set
to Show.
·
PDF Icon. (Hide/Show) Whether or not to display a button to allow the Article to be rendered in a
new window in PDF format. This allows the User to view, print, or save the Article as a PDF file.
·
Print Icon. (Hide/Show) Whether or not to display a button to allow the Article to be printed. This
allows the User to print the current Article in a printer-friendly format.
81
Page 82

·
E-mail Icon. (Hide/Show) Whether or not to display a button to allow a link to the Article to be emailed. This displays a form that allows the user to send an e-mail with a link to the current Article.
·
Hits. The number of hits for an Article. A hit is the number of times a page has been viewed. Hits
can be reset to 0 in the Article Manager - New/Edit screen.
·
For each feed item show. (Intro Text/Full Text) If set to Intro Text, only the intro text of each feed
item will show. If set to Full Text, the whole article will show in the newsfeed.
Filtering Options (HTML)
Web sites can be attacked by users entering in special HTML code. Filtering is a way to protect your
Joomla! web site. Joomla! 1.5 brings new filtering options to give you more control over the HTML that
your content providers are allowed to submit. You can be as strict or as liberal as you desire, depending on
your site's needs.
It is important to understand that filtering occurs at the time an article is saved, after it has been written or
edited. Depending on your editor and filter settings, it is possible for a user to add HTML to an article
during the edit session only to have that HTML removed from the article when it is saved. This can
sometimes cause confusion or frustration. If you have filtering set up on your site, make sure your users
understand what types of HTML are allowed.
The default setting, as of Joomla! version 1.5.9, is that all users except members of the Super Administrator
group will have "black list" filtering on by default. This is designed to protect against markup commonly
associated with web site attacks. So, if you do not set any filtering options, the Super Administrator will
have no filtering done, and all other users will have "black list" filtering done using the default list of
filtered items. If you create a filter here, this overrides the default, and the default filter is no longer in effect.
Only one filter option is allowed per site.
There are two steps to setting up filtering:
1. Decide on the user groups that will receive filtering. This will normally include the highest level
group you want to filter and all of the groups below that level. For example, if you want to filter
Publishers and below, this would include Publisher, Editor, Author, and Registered.
2. Enter the type and extent of the desired filtering.
For example, if you want filtering only for Author, Registered user, and guests, select "Author",
"Registered", and "Public Front End" for the Filter Groups and then select the desired type of filtering. This
will apply to members of the Author, Registered and public groups but not to "higher" groups, such as
Editors, Publishers, and so on.
The default filtering is overridden by entering in the following fields:
·
Filter Groups. This sets the user groups that you want filters applied to. Use Ctrl+Click to select
multiple groups. Groups that are not selected will have no filtering done.
Important Note: There is a bug, as of version 1.5.8, such that you must specify at least two groups
for the filtering to take place. If you only specify one group, no filtering will happen. This is easy to
work around. Just be sure to always specify at least two groups here.
·
Filter Type. Black List (Default), White List, No HTML.
o
Black list means allow all HTML tags and attributes except those listed.
o
White list means allow only the listed tags and attributes.
82
Page 83

o
No HTML means allow no HTML markup at all. All HTML is removed from an Article
when it is saved.
·
Filter Tags. The extra tags to exclude in a Black List, or the only tags to allow in a White List.
·
Filter Attributes. The extra tag attributes to exclude in a Black List, or the only tag attributes to
allow in a White List.
Default Filters
The default filter method in Joomla! is 'Black List'. The default 'Black List' contains the following tags to
exclude:
'applet', 'body', 'bgsound', 'base', 'basefont', 'embed', 'frame', 'frameset', 'head', 'html', 'id', 'iframe',
'ilayer', 'layer', 'link', 'meta', 'name', 'object', 'script', 'style', 'title', 'xml'
The default 'Black List' contains the following attributes to exclude:
'action', 'background', 'codebase', 'dynsrc', 'lowsrc'
You can 'Black List' (disallow) additional tags and attributes by adding to the Filter tags and Filter attributes
fields, separating each tag or attribute name with a space or comma. If you select a Filter Type of "Black
List", this list will always be used, plus any additional tags and attributes you add.
Please note that these settings work regardless of the editor that you are using. Even if you are using a
WYSIWYG editor, the filtering settings may strip additional tags and attributes prior to saving information
in the database.
Filter Examples
Example One:
To allow people in your Author group to only submit content with basic HTML tags, use the following
settings:
·
In the Filter groups box, select Registered and Author.
·
Select White List as the Filter type
·
Set the Filter tags to: p, b, i, em, br, a, ul, ol, li, img
·
Set the Filter attributes to: href, target, src
83
Page 84

In this example, no filtering will be done for members of the Editor, Publisher, Manager, Administrator, and
Super Administrator groups.
Example Two:
To apply the default black-list filtering to all groups except for Admin and Super Admin, use the following
settings:
·
In the Filter groups box, select all groups except Admin and Super Admin.
·
Select Black List as the Filter type.
·
Leave the Filter Tags and Filter attributes fields empty.
In this example, no filtering will be done for members of the Administrator and Super Administrator groups.
Example Three:
If you allow others you do not know (and therefore have no reason to trust) to submit articles on your
Joomla! Web site, the safest (and most restrictive) filtering is as follows:
·
In the Site → Global Configuration → System, set "New Registration Type" to "Author".
·
In the Filter groups box, select Registered and Author.
·
In the Filter Type, select "No html".
This will not allow an author to use any HTML inside an article's content. In this example, no filtering will
be done for members of the Editor, Publisher, Manager, Administrator, and Super Administrator groups.
84
Page 85

Developers Notes
The filtering parameters in config.xml have the new parameter menu="hide". This hides the filters from the
Menu Item's Component pane as you do not want cascading overrides to occur at the menu item level.
Quick Tips
·
In Joomla! versions prior to 1.5, there were separate processes for creating a Static Content Item and
normal Content Items. Both processes are now done just by adding Articles. Normal Content Items
are now just called Articles, and Static Content Items are now called Uncategorized Articles.
·
To create a static content item, create a new Article in the same way as for normal content and assign
it to the 'Uncategorized' Section and Category. You can then use the Menu Item Type called Article
Layout to show the Article in a page.
·
Joomla! 1.5 changes the method you must use to create the 'Read more...' link. When you are adding
or editing an article, just press the 'Read more...' button located at the bottom of the screen, next to
Image and Pagebreak buttons. This inserts a 'Read more...' break in the Article. The text before the
break will display as the Intro Text, and the text after the break will display when the 'Read more...'
link is pressed.
85
Page 86

Front Page Manager
How to Access
Select Content --> Front Page Manager from the drop-down menu in the back-end of your Joomla!
installation. You can also click on the "Front Page Manager" icon in the Control Panel.
Description
The Front Page Manager is the place where you control which Articles are displayed on the Front Page and
in what order they are displayed. The Front Page is often the Home page of a web site, but it can be any
page in the site. The Front Page is created using a Menu Item with the Front Page layout.
Screenshot
Column Headers
Click on the column heading to sort the list by that column's value.
·
#. An indexing number automatically assigned by Joomla! for ease of reference.
·
Checkbox. Check this box to select one or more items. To select all items, check the box in the
column heading. After one or more boxes are checked, click a toolbar button to take an action on the
selected item or items. Many toolbar actions, such as Publish and Unpublish, can work with multiple
items. Others, such as Edit, only work on one item at a time. If multiple items are checked and you
press Edit, the first item will be opened for editing.
·
Title. The name of the item. For a Menu Item, the Title will display in the Menu. For an Article,
Section, or Category, the Title may optionally be displayed on the web page. This entry is required.
You can open the item for editing by clicking on the Title.
·
Published. The Article's Published status. The possible values are shown under the main window, as
shown below:
86
Page 87

You can toggle the Published state on and off by clicking on the icon in this column. A status of
Pending means that an Article's Start Publishing Date is in the future. You can hover on the icon to
see an Article's Start and Stop Publishing dates.
·
Order. The order in which to display the Articles on the Front Page. If the list is sorted by this
column, you can change the order by clicking the arrows or by entering the sequential order and
clicking 'Save Order'. Note that the display order on the Front Page is set in the Parameters Advanced section for the Front Page Blog Menu Item. To sort Front Page Articles using this Order
value, set the Category Order to "No. Order by Primary Order Only" and set the Primary Order to
"Default". If these Parameters are set to other values (for example, "Oldest First" or "Title
(Alphabetical)"), then the Articles will be sorted that way and this column will be ignored.
·
Access Level. Who has access to this item. Current options are:
o
Public: Everyone has access
o
Registered: Only registered users have access
o
Special: Only users with author status or higher have access
You can change an item's Access Level by clicking on the icon in the column.
·
ID. The ID number. This is a unique identification number for this item assigned automatically by
Joomla!. It is used to identify the item internally, for example in internal links. You can not change
this number.
·
Section. The Section this item belongs to. Clicking on the Section Title opens the Section for editing.
See Section Manager - Edit.
·
Category. The Category this item belongs to. Clicking on the Category title opens the Category for
editing. See Category Manager - Edit.
·
Author. Name of the Joomla! User who created this item. Clicking on the Author opens the User for
editing. See User Manager - Edit.
·
Display #. The number of items to display on one page. If there are more items than this number,
you can use the page navigation buttons (Start, Prev, Next, End, and page numbers) to navigate
between pages. Note that if you have a large number of items, it may be helpful to use the Filter
options, located above the column headings, to limit which items display.
Toolbar
At the top right you will see the toolbar:
The functions are:
·
Archive. To change one or more Articles to Archived status, select them and press this button.
Archived Articles are retained on the site and are available for viewing on Menu Items with a Type
87
Page 88

of Archive Layout. They can not be published to other pages while set to Archived status. Note that
Articles assigned to the "Uncategorized" Section will not show on the Archived Article List layout.
·
Publish. To publish one or more items, select them and click on this button.
·
Unpublish. To unpublish one or more items, select them and click on this button.
·
Remove. To remove one or more Articles from the Front Page, click on the checkbox for each
Article and press the Remove button. The removed Articles may still be available on other pages.
This only removes them from the Front Page.
·
Help. Opens this Help Screen.
List Filters
Filter by Partial Title
You can filter the list of items either by entering in part of the title or the ID number. You can also select a
combination of Section, Category, Author, and Published State.
·
Filter. In the upper left corner just above the column headings is a Filter field and two buttons, as
shown below:
If you have a large number of items on the list, you can use this filter to find the desired item(s)
quickly. Enter either part of the title or an ID number and press 'Go' to display the matching items.
You can enter in whole words or part of a word. For example, "ooml" will match all titles with the
word "Joomla!" in them.
Filter by Section, Category, Author, Published State
In the area in the upper right, above the column headings, there are 4 drop-down list boxes as shown below:
The selections may be combined. Only items matching all selections will display in the list.
·
Select Section. Use the drop-down list box to select the desired Section. Only items in this Section
will display. You may also select 'Uncategorized'.
·
Select Category. Use the drop-down list box to select the desired Category. Only items in this
Category will display. You may also select 'Uncategorized'.
·
Select Author. Use the drop-down list box to select the desired Author. Only Articles with this
Author will display.
·
Select State. Use the drop-down list box to select the published state: Published or Unpublished. For
Articles, you may also select Archived.
Quick Tips
88
Page 89

·
Only the Articles that have already been added to the Front Page will display on this screen. Articles
can be added to the Front Page in the Article Manager or when an Article is added or edited in
Article Manager - New/Edit.
·
You can control the number of columns, number of articles, and other features of the Front Page
layout in the Menu Item Manager - New/Edit - Front Page Blog Layout.
89
Page 90

Section Manager: New / Edit
How to Access
Navigate to the Section Manager. To add a new Section, press the "New" icon in the toolbar. To edit an
existing Section, click on the Section's Title, or click the Section's checkbox, and click on the "Edit" icon in
the toolbar.
Description
There is where you can add a new Section or edit an existing Section. Sections in Joomla! are used to
organize Articles. Sections are the top-level of organization, and each Section contains one or more
Categories. Sections and Categories allow you to organize your Articles and display related Articles
together on a page. All Articles are assigned either to a Section you create or to the special Section called
'Uncategorized'.
Screenshot
90
Page 91

Details
·
Scope. No entry allowed. Displays the scope of this screen, which is "Content".
·
Title. The Title for this item. This may or may not display on the page, depending on the parameter
values you choose.
·
Alias. The internal name of the item. Normally, you can leave this blank and Joomla! will fill in a
default value. The default value is the Title or Name in lower case and with dashes instead of spaces.
You may enter the Alias manually. The Alias should consist of lowercase letters, and no blank
spaces are allowed. Use a hyphen (-) instead. The Alias will be used in the URL when SEF is
activated.
·
Published. Whether or not this item is published. Select Yes or No from the radio button group to set
the Published state for this item.
·
Order. The order this item will display in the Manager screen. Use the drop-down list box to change
the Order. You can select 'First' or 'Last' to make this the first or last item. Or you can select an item
from the list. In this case, the current item will be listed just after the item you select. Note that the
Order can also be changed in the Manager screen.
·
Access Level. Who has access to this item. Current options are:
o
Public: Everyone has access
o
Registered: Only registered users have access
o
Special: Only users with author status or higher have access
Enter the desired level using the drop-down list box.
·
Image. Image for this Page. Image must be located in the folder "images/stories".
·
Image Position. Position of the Image on the page. Select Left or Right from the drop-down list box.
·
Description. The description for the item. Section and Category descriptions for Articles may be
shown on web pages, depending on the parameter settings. These descriptions are entered using the
same editor that is used for Articles. Note that Section and Category descriptions may not be edited
from the front end.
TinyMCE editor
The default editor for both front-end and back-end users in Joomla! is the TinyMCE editor. Ripplenet have
installed the JCE editor, which is better suited to pages that have embedded coding.
TinyMCE is a WYSIWYG (what you see is what you get) editor that allows users a familiar wordprocessing interface to use when editing Articles and other content. The 3-row toolbar below provides many
standard editing commands:
·
Top Row.
91
Page 92
o
o
o
o
·
Second Row.
o
o
o
o
o
o
o
o
o
o
o
o
o
·
Third Row.
o
o
o
o
o
o
o
Buttons in the upper left allow you to make text bold, italic, underlined, or strikethrough.
Next to that are buttons for align left, right, center, and full.
Styles. Caption and System Pagebreak styles can be set. Highlight the desired text and select
the style. This will allow this text to be formatted based on CSS rules.
Format. Select pre-defined formats for Paragraph, Address, Heading1, and so on.
Font Family. Select the desired font.
Unordered List, Ordered list, Outdent (move left) and Indent (indent right).
Undo (Ctrl+Z) and Re-do (Ctrl+Y).
Insert/Edit Link. To insert or edit a link, select the linked text and press this button. A popup
dialog displays that lets you enter details about the link.
Unlink. To remove a link, highlight the linked text and press this button.
Insert/Edit Image. To insert and image, place the cursor in the desired location and press this
button. A popup dialog displays that lets you enter in the Image URL and other information
about how the image will display.
Cleanup Messy Code. This button allows you to clean up HTML code, perhaps from HTML
text that you copied in from another source.
Edit HTML Source. A popup displays showing the HTML source code, allowing you to edit
the HTML source code.
Find and Find/Replace.
Insert Date, Time, or Emotions.
Insert Embedded Media. To insert embedded media (such as Flash), place the cursor at the
desired location and press this button. A popup dialog will display that allows you to enter
the Type, File or URL, and other information about the media.
Direction Left to Right and Direction Right to Left. These buttons allow you to enter or
change the text direction, for example for languages that read right to left.
Insert New Layer, Move Forward, Move Backware, Toggle Absolute Position. For working
with layered items.
Select Text Color.
Insert Horizontal Ruler.
Remove Formatting.
Toggle Guidelines/Invisible elements.
Subscript, Superscript, Insert Custom Character, Horizontal Rule.
Insert New Table, Table Row Properties, Table Cell Properties, Insert Row Before, Insert
Row After, Delete Row, Insert Column Before, Insert Column After, Delete Column, Split
Merged Table Cells, Merge Table Cells.
Toggle Full Screen Mode.
Edit CSS Style. A popup dialog box displays that allows you to enter CSS style information
for the selected text.
JCE editor
Buttons
Name / Description Icon
Advanced Code Editor
Code Editor (HTML, PHP, CSS,
Javascript) with syntax highlighting
92
Page 93
Advanced Link
Advanced Link editor. Create and
edit links to files, external sites, email
addresses and internal Joomla!
articles / components.
Anchor
Creates anchor links
Bold
Makes selected text bold.
Shortcut Key - CTRL+B
Bullet List
Create a bullet (unordered) list
Character Map
Open a character map dialog for
inserting miscellaneous characters.
Cut, Copy, Paste
Cut, copy and paste text and html
with automatic Office cleanup.
Includes Paste as Plain Text option.
Code Cleanup
Directionality
Set the text direction on a selection
Emotions
Insert emoticons
File Manager
Upload and insert links to various file
types with optional file icon, date and
modified time values.
Optional plugin that requires a
subscription to download.
Font BackColour
Set the font background color on the
text selection
Font ForeColour
Set the font color on the text selection
Font Select
Apply a font family to the text
selection
Font Size Select
Apply a font size to the text selection
Format Select
Format the text selection with the
selected block element
Fullscreen
Toggle full-screen edit mode
Help
Open the Help window
Horizontal Rule
Insert a horizontal rule
93
Page 94

HTML
Basic HTML editor
Image Manager
Advanced image insert with file
browser
Image Manager Extended
Advanced image insert with file
browser,image thumbnailing,
resizing, rotating, image popups and
tooltips. Optional plugin that requires
a subscription to download.
Indent
Increase indent
Italic
Italicises selected text
Shortcut Key: CTRL+I
Justify Center
Center Align the text selection or
element
Justify Full
Justify the text selection
Justify Left
Left Align the text selection or
element
Justify Right
Right Align the text selection or
element
Layers
Create and position div layers
Media Manager
Upload and insert media files such as
flash, quicktime, windows media and
flash video. Optional plugin that
requires a subscription to download.
New Document
Clears the editor contents to create a
new document
Non-Breaking
Insert a non-breaking space
Numbered List
Creates a numbered (ordered) list
Outdent
Decrease indent
Preview
Preview the editor contents
Print
Print the editor contents
Article (Read More / Pagebreak)
Create Joomla! Readmore and
Pagebrek breaks
94
Page 95

Redo
Redo the last action
Remove Format
Remove block and style formatting
from a selection
Search Replace
Perforn a search and replace on the
editor contents
Spell Checker
Run a spell check on the editor
contents
StrikeThrough
Create a strikethough on a text
selection
Style Select
Select list of Joomla! template css
styles.
Applied to selected block element or
span.
Styles
Edit an elements styles
Subscript
Position text selection below the
baseline
Superscript
Position text selection above the
baseline
Tables
Create and edit tables
Template Manager
Create and insert reusable code
snippets.Optional plugin that requires
a subscription to download.
Underline
Underline a text selection
Undo
Undo the last action
Unlink
Remove a link from a selection
Visual Aid
Visual Characters
XHTML Xtras
Insert and edit Abbreviation, Citation,
Acronym, Deletion and Insertion
elements and edit the advanced
properties of an element such as
events, title, id, style, class, dir, lang,
accceskey and tabindex
95
Page 96

No editor
If 'No editor' is selected for a User, then a simple text editor displays. This allows you to enter in raw,
unformatted HTML. You can use the toolbar 'Preview' button to preview how the HTML will display.
Note that the 'No Editor' option can be useful if you are entering in 'boilerplate' or custom HTML, for
example to create a PayPal link. TinyMCE automatically re-formats and strips some HTML when a file is
saved. This can cause complex HTML to not work correctly.
If this happens, you can temporarily change the editor to 'No Editor' and create the desired content. Note
that if you wish to edit this content in the future, you should be careful to change your editor to 'No Editor'.
Otherwise, if you open and save the content with TinyMCE, you may lose your custom HTML.
Image Button
An Image button is located just below the edit window, as shown below:
·
Image. This button provides an easy way to insert an image into an Article. Images may be inserted
from the 'images/stories' folder and may also be uploaded. When you click the Image button, a
window pops up, as shown below:
o
Directory. The current directory on the host server. This is the 'images/stories' directory
under your Joomla! home directory. Use the drop-down list box to select a subdirectory.
o
Up. Navigate to the parent directory. Note that the top directory for this function is
'images/stories'. You can not navigate to a higher directory.
o
Insert. Insert the selected image. The insert point will be the current cursor position. You
will see the image display inside the edit window.
o
Cancel. Cancel the operation and close the popup window.
o
Thumbnail Browse Area. Click on an image thumbnail to select the image. Click on a
folder icon to navigate to that subdirectory.
96
Page 97

o
Image URL. Click on one of the image thumbnails and the URL for the image will be
entered for you.
o
Align. Select the desired alignment (left or right) from the drop-down list box.
o
Image Description. Enter a description for the image.
o
Image Title. Enter a Title for this image. This displays when a User hovers the mouse on the
image.
o
Caption. If checked, image title will display as a caption below the image.
o
Browse files. Click this button to browse to an image file to upload from your local computer.
A file dialog will open allowing you to select a file.
o
Start Upload. Once you have selected a file, press this button to upload the file to your
Joomla! 'images/stories' folder. When the upload is done, a 'Completed' message will display.
The thumbnail for the new image will now show in the thumbnail area.
o
Clear Completed. Clears the 'Completed' message.
Toolbar
At the top right you will see the toolbar:
The functions are:
·
Save. Save it and return to the main screen of the Manager.
·
Apply. Save it, but stay in the same screen. If you have been working on a screen for a long time and
don't want to risk losing your work, pressing Apply saves your work and lets you continue working.
If, for example, you lost your Internet connection, your work will be saved up this point.
·
Close. Return to the previous screen without saving your work. If you press Close while adding a
new item, this new item will not be created. If you were modifying an existing item, the
modifications will not be saved.
·
Help. Opens this Help Screen.
97
Page 98

Section Manager
How to Access
Click on the Section Manager icon in the Control Panel or click on 'Section Manager' in the 'Content' menu
in the back-end of your Joomla! installation.
Description
Articles in Joomla! are organized into Sections and Categories. Sections are the top-level of organization
and Categories go under Sections. The Section Manager is the place where you can edit existing Sections
and create new ones. For example, a web site might have the following organization:
·
People
o
Volunteers, Staff, Board Members
·
Projects
o
Major Projects, Small Projects
·
Events
o
Local Events, National Events
In this example, 'People', 'Projects', and 'Events' would be the Sections. The sub-topics under each Section
(for example, 'Volunteers', 'Staff', and 'Board Members') would be the Categories for each Section. When an
Article is added, it would be assigned a Section (for example 'People') and a Category (for example, 'Board
Members').
You can have an many or as few Sections and Categories as you need. Joomla! has a built-in Section and
Category called 'Uncategorized'. This allows you to create Articles without creating or assigning any
Section or Category. You just assign the Article to the 'Uncategorized' Section.
Sections are used for two reasons. The first reason is for organizing Articles on your web pages. The Section
Blog Layout and Section Layout allow you to display multiple Articles on a page for a given Section. So, in
the example above, you could have a page for 'People' that shows Articles related to this Section. A second
reason to use Sections is to help manage your Articles in the back-end Article Manager. If you have a large
number of Articles, you can filter by Section so you only see the Articles from one Section.
Screenshot
Column Headers
98
Page 99

Click on the column heading to sort the list by that column's value.
·
#. An indexing number automatically assigned by Joomla! for ease of reference.
·
Checkbox. Check this box to select one or more items. To select all items, check the box in the
column heading. After one or more boxes are checked, click a toolbar button to take an action on the
selected item or items. Many toolbar actions, such as Publish and Unpublish, can work with multiple
items. Others, such as Edit, only work on one item at a time. If multiple items are checked and you
press Edit, the first item will be opened for editing.
·
Title. The name of the item. For a Menu Item, the Title will display in the Menu. For an Article,
Section, or Category, the Title may optionally be displayed on the web page. This entry is required.
You can open the item for editing by clicking on the Title.
·
Published. Whether the item has been published or not. You can change the Published state by
clicking on the icon in this column.
·
Order. The order to display items. If the list is sorted by this column, you can change the order by
clicking the arrows or by entering the sequential order and clicking 'Save Order'. Note that the
display order on a page is set in the Parameters - Advanced section for each Menu Item . If that order
is set to use something other than 'Order' (for example, 'Title - Alphabetical'), then the order value in
this screen will be ignored. If the Menu Item Order parameter is set to use 'Order', then the items will
display on the page based on the order in this screen.
·
Access Level. Who has access to this item. Current options are:
o
Public: Everyone has access
o
Registered: Only registered users have access
o
Special: Only users with author status or higher have access
You can change an item's Access Level by clicking on the icon in the column.
·
# Categories. The number of Categories within this Section. Categories are added in the Category
Manager .
·
# Active. The number of active Articles within this Section or Category. Active articles include
published and unpublished articles but not Articles that have been moved to Trash.
·
# Trash. The number of Articles from this Section or Category that are currently in Trash. These
articles can be seen in the Article Trash screen. An Article in Trash is still stored on the site and may
be either Restored or Deleted permanently.
·
ID. The ID number. This is a unique identification number for this item assigned automatically by
Joomla!. It is used to identify the item internally, for example in internal links. You can not change
this number.
·
Display #. The number of items to display on one page. If there are more items than this number,
you can use the page navigation buttons (Start, Prev, Next, End, and page numbers) to navigate
between pages. Note that if you have a large number of items, it may be helpful to use the Filter
options, located above the column headings, to limit which items display.
Toolbar
At the top right you will see the toolbar:
99
Page 100

The functions are:
·
Publish. To publish one or more items, select them and click on this button.
·
Unpublish . To unpublish one or more items, select them and click on this button.
·
Copy. Select one or more items and click this button to copy them. A new screen will display
showing the possible "Copy to" locations on the left and the list of item(s) being copied on the right.
To complete the copy, select the desired "Copy to" location and press the Copy button. To cancel the
operation, press Cancel.
·
Delete. To delete one or more items, select them and click this button. The selected items will be
deleted.
·
Edit. Select one item and click on this button to open it in edit mode. If you have more than one item
selected, the first item will be opened. You can also open an item for editing by clicking on its Title
or Name.
·
New. Click on this button to create a new item. You will enter the New page for this item.
·
Help. Opens this Help Screen.
List Filters
Filter by Partial TitleYou can filter the list of items either by entering in part of the title or the ID number.
You can also select a Published State.
·
Filter. In the upper left corner just above the column headings is a Filter field and two buttons, as
shown below:
If you have a large number of items on the list, you can use this filter to find the desired item(s)
quickly. Enter either part of the title or an ID number and press 'Go' to display the matching items.
You can enter in whole words or part of a word. For example, "ooml" will match all titles with the
word "Joomla!" in them.
Filter by Published StateIn the area in the upper right, above the column headings, there is a drop-down
list box that allows you to filter the Sections by Published state.
·
Select State. Use the drop-down list box to select the published state: Published or Unpublished. For
Articles, you may also select Archived.
Quick Tips
·
You can enter a section's edit mode by simply clicking on its title.
·
Click on the green check mark or the red X in the Published column to toggle between the states
Published and Unpublished.
100
 Loading...