

Page 1
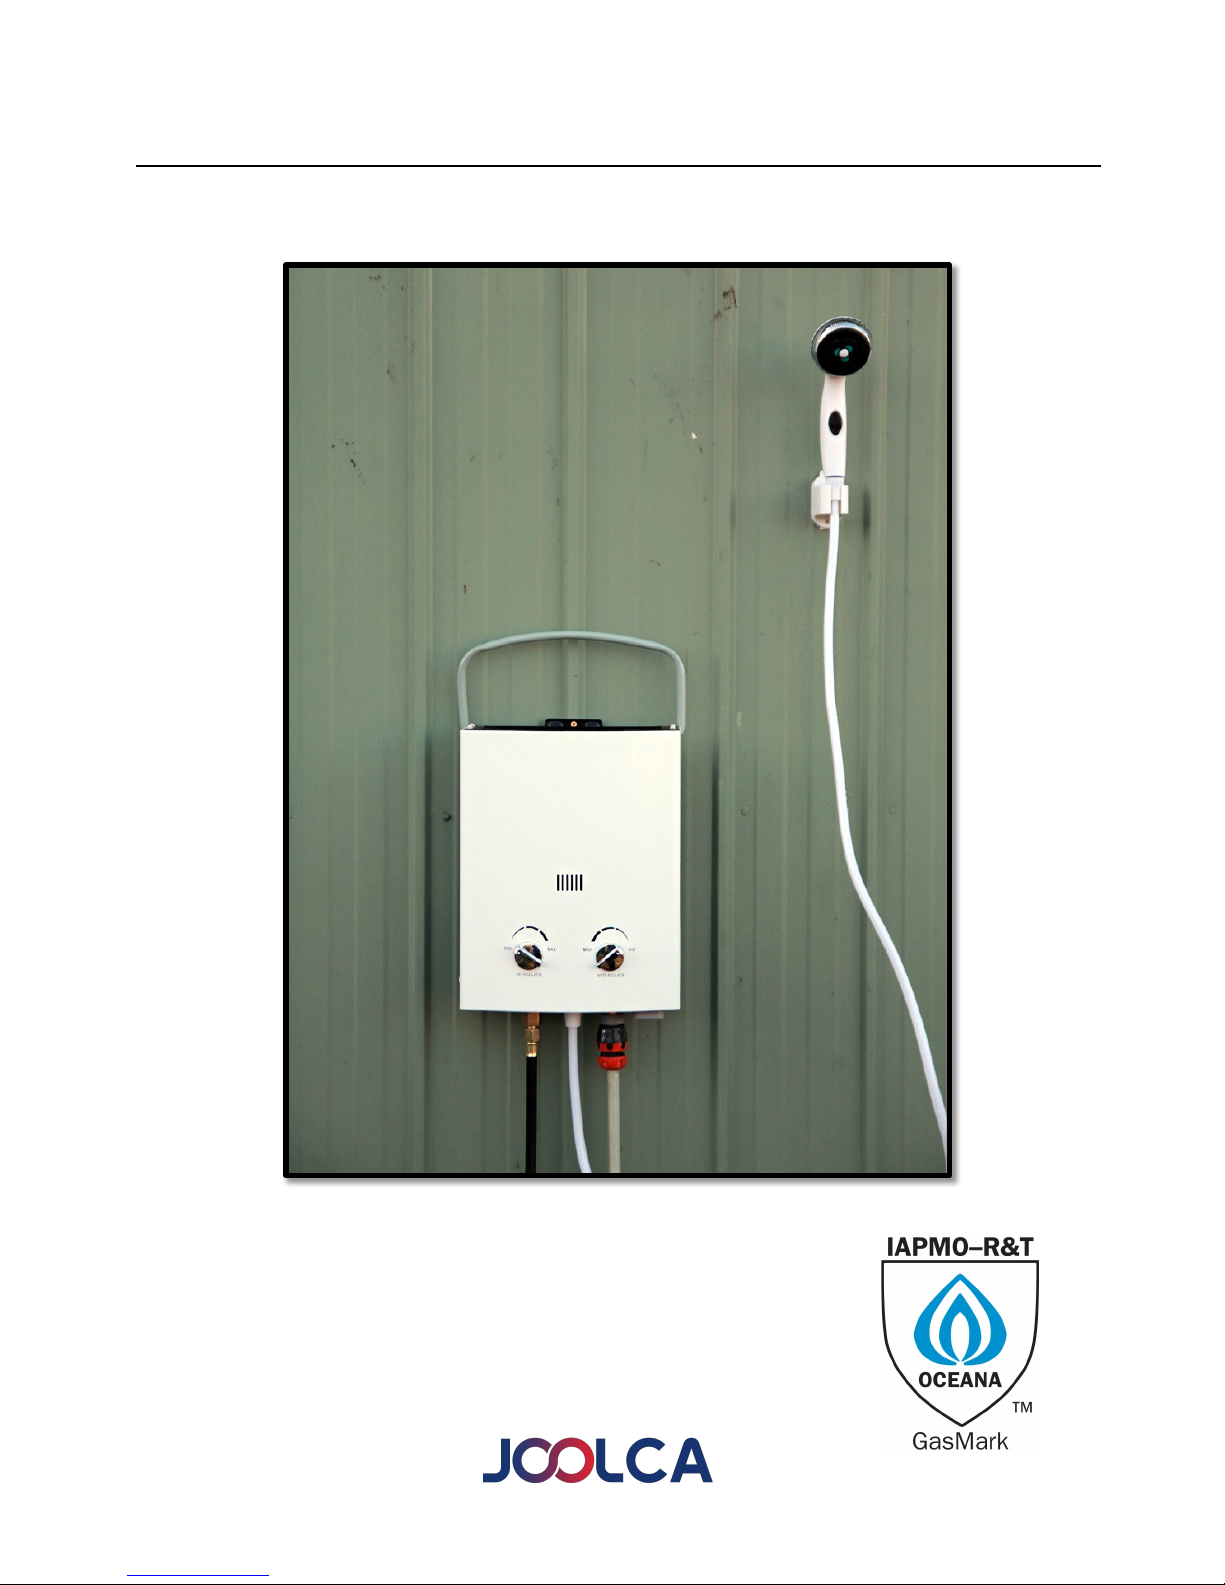
PORTABLE WATER HEATER
!
!
!
OPERATION GUIDE
!
!
!
!
!
!
!
!
!
!
!
!
!
!
!
!
!
!
!
!
!
!
!
!
!
!
!
!
!
!
!
!
!
!
!
!
!
!
!
!
!
!
!
!
!
!
!
!
!
!
!
MODEL NUMBER: PWH5L
!
!
!
!
!
!
!
!
!
CUSTOMER SERVICE ON THIS APPLIANCE
AUSTRALIA 1300 669 500
WWW.JOOLCA.COM.AU
!
!
!
!
!
CERT: GMK10121
Page 2
IMPORTANT!
!
!
It is IMPORTANT that you read these instructions carefully and understand
the operation and safety features of this appliance. Familiarise yourself with
the appliance before connecting it to the gas container. Keep these
instructions for future reference.
!
!
IMPORTANT!
!
!
This appliance is designed to be used with a source water temperature of
20°C or below. If the temperature of the outlet water exceeds 50°C the
burners will shut off. You will be required to turn the water flow off and back
on to reignite the burners.
!
!
!
!
!
!
!
!
CAUTION! THIS APPLIANCE IS NOT INTENDED FOR THE SUPPLY OF DRINKING WATER.
!
WARNING! THIS APPLIANCE IS INTENDED FOR THE SUPPLY OF HEATED WATER FOR THE
PURPOSE OF WASHING AND CLEANING ONLY.
!
WARNING! CHECK AND CONFIRM SAFE WATER TEMPERATURE BEFORE USING THIS
APPLIANCE. WATER FROM THIS APPLIANCE MAY BE VERY HOT.
!
CAUTION! THIS APPLIANCE MUST BE PROTETED FROM RAIN
Page 3

!
GENERAL WARNINGS
!
!
This appliance shall only be used with the
Australian Approved 1200mm Propane gas
hose & regulator assembly supplied with the
appliance and must be connected only to a
Propane gas cylinder certified to AS2469
standards fitted with POL connections only.
!
This appliance is to be stored in a dry &
well-ventilated location free from direct
sunlight. Do not store when still connected
to the cylinder. Make sure that the cylinder
is disconnected and is stored in a wellventilated area, free from direct sunlight,
heat and ignition sources. If being stored
indoors, ensure that the location complies
with the standard AS/NZS1596.
!
This appliance must only be serviced by an
authorized service agent, return to your
place of purchase for service & repair.
!
DANGER!
!
!
• This appliance is designed for outdoor
use only.
• Use only in well ventilated areas.
• Do not use the appliance if it has a leak,
or has worn, deteriorated or damaged
seals.
• Accessible parts may be very hot. Keep
young children away.
• It may be hazardous to attempt to fit
other types of gas containers or
cartridges.
• This appliance shall only be used in an
above ground open-air situation with
natural ventilation, without stagnant
areas, where gas leakage and products
of combustion are rapidly dispersed by
wind & natural convection.
• Do not use adaptors or modify the
appliance to fit other connectors or
cylinders
• When using this appliance children must
be supervised by an adult at all times
• Never leave appliance unattended when
operating.
• Do not use as a cooking appliance or
modify for any other reason.
!
!
CARBON MONOXIDE HAZARD
!
!
This appliance can produce carbon monoxide,
which has no odour. Using it in an enclosed
space (For example, caravan, tent, car, mobile
home) may cause DEATH.
IMPORTANT
• Avoid twisting & kinking the Propane Gas
hose.
• If you smell gas immediately turn the gas
off at the cylinder and move the
appliance & cylinder to a well-ventilated
area outside, keeping well away from
sources of heat such as naked flames &
pilot lights.
• Do not attempt to move or relocate the
appliance when it is operating.
Extinguish the burner & allow to cool.
Disengage the gas cylinder then move
the appliance.
!
!
CHECKING FOR GAS LEAKS
!
!
• Check that all connections are tight and
that the gas cylinder connection has been
tightened before you turn the cylinder gas
valve on.
• NEVER check for leaks with a flame or
pilot light.
• Using soapy water coat all connections, if
bubbles appear turn the cylinder gas
control off and retighten the connection
before re-testing.
• Inspect the appliance regularly for signs of
wear, leaks or incorrect operation. If
symptoms such as flaring of the burners,
issues with lighting, damages to hoses or
connections or leaks from seals or gas
controls are identified do not attempt to
repair, contact customer service on 1300
669 500.
• To check if gas remains in the cylinder,
disconnect from the appliance and hold
the cylinder in a vertical position then
shake from side to side, if there is a sound
or feel of liquid movement inside the
cylinder contains gas.
Page 4
!
• When changing gas cylinders ensure
this is conducted outside in a wellventilated location free from people,
animals & ignition sources such as
naked flames, pilot lights & electrical
equipment such as heaters or elements.
!
!
SAFETY INSTRUCTIONS
!
!
This appliance must only be used in an
above ground open-air situation with natural
ventilation, without stagnant areas, where
gas leakage is rapidly dispersed by wind and
natural convection.
!
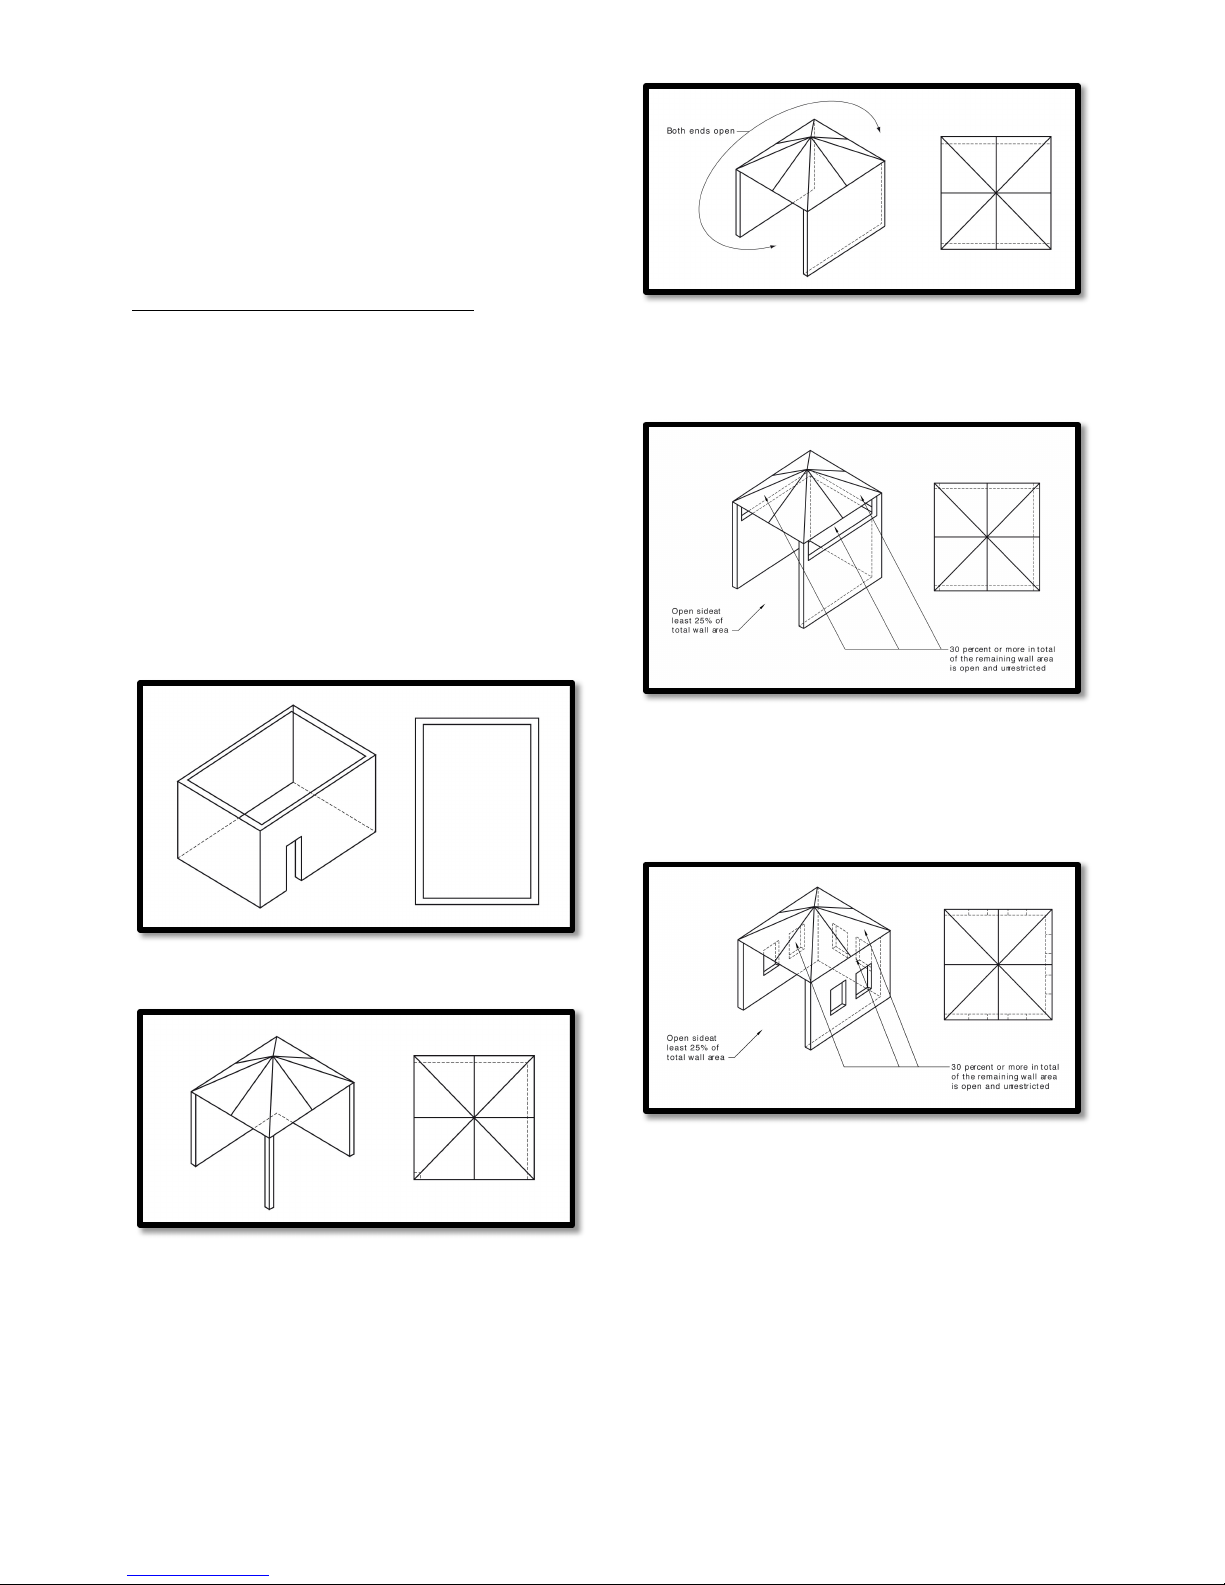
The following figures are diagrammatical
representations of outdoor areas suitable for
use with this appliance. Rectangular areas
have been used in these figures – the same
principles apply to any other shaped areas.
!
!
!
!
!
!
!
!
!
!
!
!
!
!
!
!
FIGURE D1 – Outdoor Area Example 1
!
!
!
!
!
!
!
!
!
!
!
!
!
!
FIGURE D2 – Outdoor Area Example 2
FIGURE D3 – Outdoor Area Example 3. With
both ends open.
!
!
!
!
!
!
!
!
!
!
!
!
!
!
!
!
!
FIGURE D4 – Outdoor Area Example 4. With
the open side at least 25% of total wall area
and 30% or more in total of the remaining wall
area is open and unrestricted.
!
!
!
!
!
!
!
!
!
!
!
!
!
!
!
!
FIGURE D5 – Outdoor Area Example 5. With
the open side at least 25% of the total wall
area and 30% or more in total of the remaining
wall area is open and unrestricted.
Page 5
!
HANGING THE APPLIANCE
!
OUTDOOR USE ONLY – The appliance
must be used outdoors only and is to be
operated no closer than 500mm from the
sides and 1000mm from above to all
combustible surfaces, fabrics, flammable
materials & people
The appliance is designed to be hung
upright against a non- combustible
vertical surface. Do not operate from a
non-upright position. Doing so can be
dangerous and will damage the appliance.
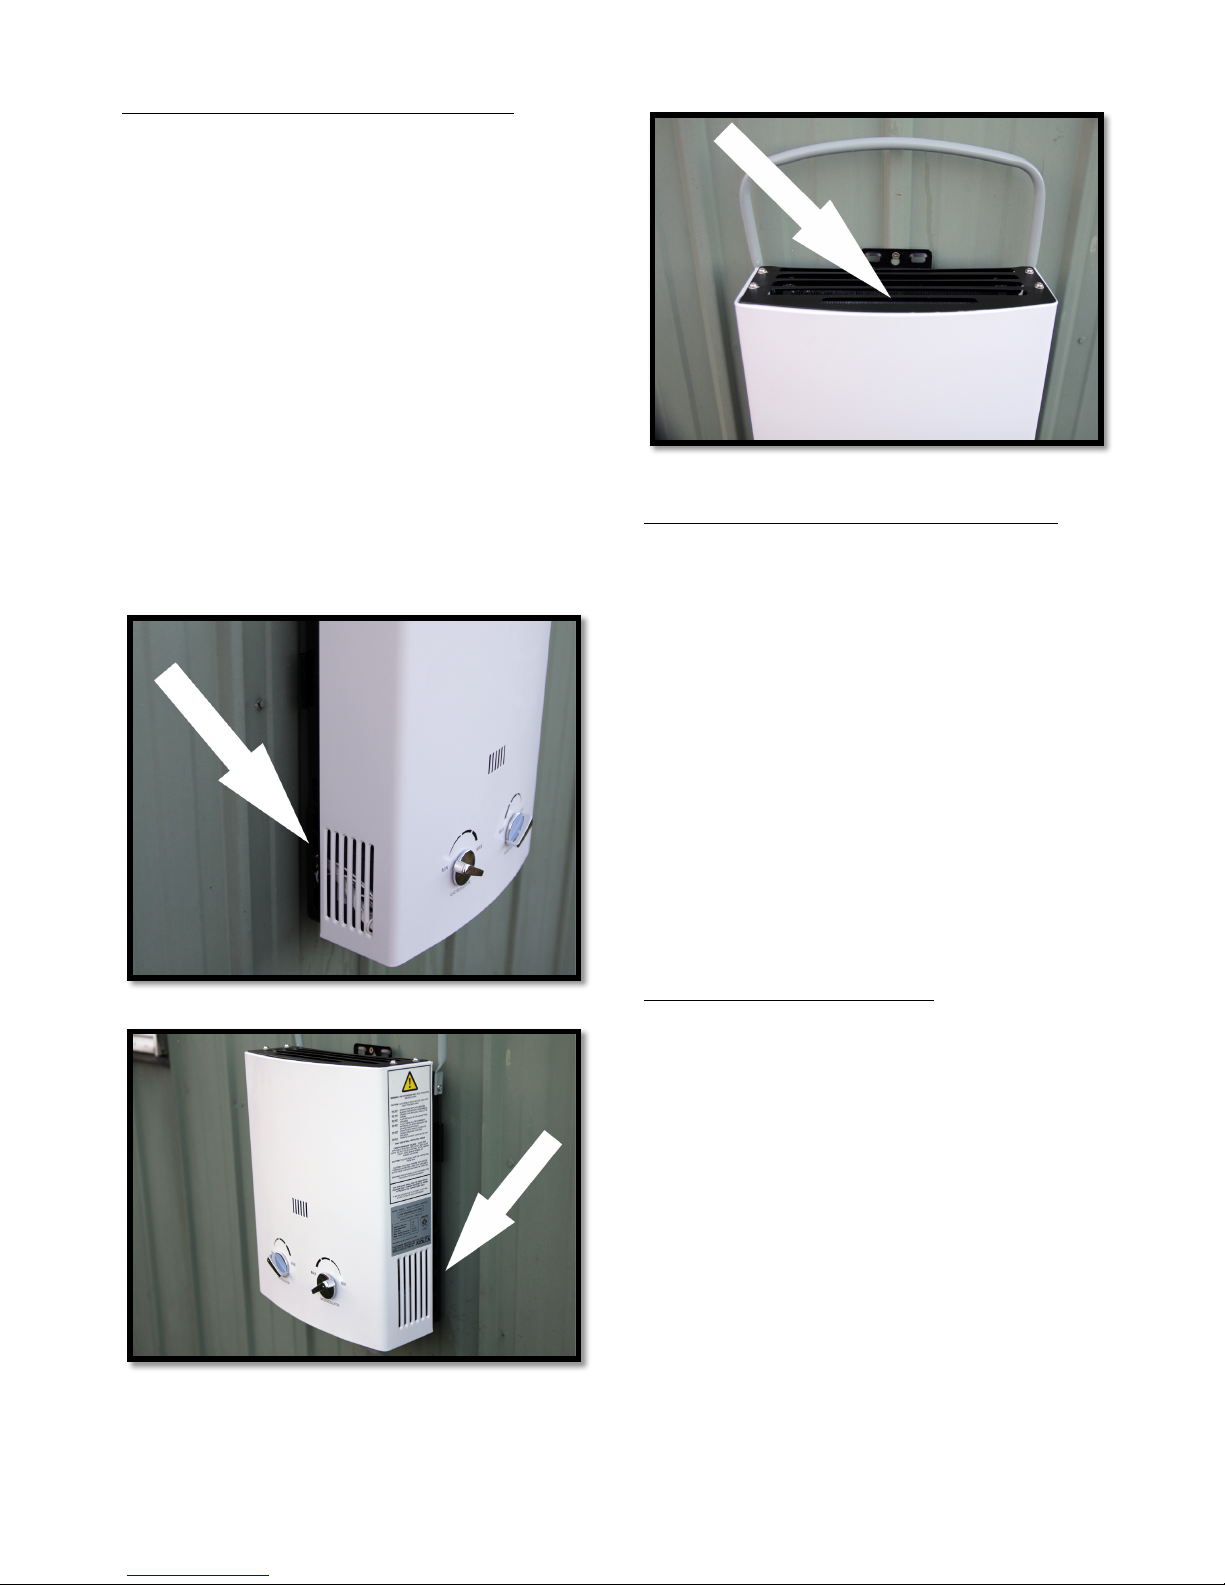
During operation ensure that both air inlets
and the top exhaust are kept free from
obstructions and closure
Air inlet – Left side
Air inlet – Right side
Air Exhaust – Top Side
APPLIANCE PERFORMANCE
Important – This appliance is designed to
be used with a source water temperature of
20°C or below. If the temperature of the
outlet water exceeds 50°C the burners will
shut off; you will be required to turn the
water flow off and back on to reignite the
burners.
This appliance is designed to raise the
outlet water temperature by a maximum
(average) of 25°C above the source water
temperature and can be adjusted by the
gas regulator and water regulator
control knobs located at the front of the
device.
SAFETY FEATURES
The appliance is equipped with the
following safety features:
Over temperature sensor – the appliance
will not allow the burner to remain in
operation once the outlet water
temperature reaches 50°C. To relight the
burner you will need to turn the water flow
off and back on.
Water flow sensor – water must be
flowing through the system to allow the
burner to ignite. In the case that the water
supply is restricted or ceases, for example
if you close the water flow at the shower
nozzle, the burner will be extinguished and
will not relight until the water flow
recommences.
Page 6
!
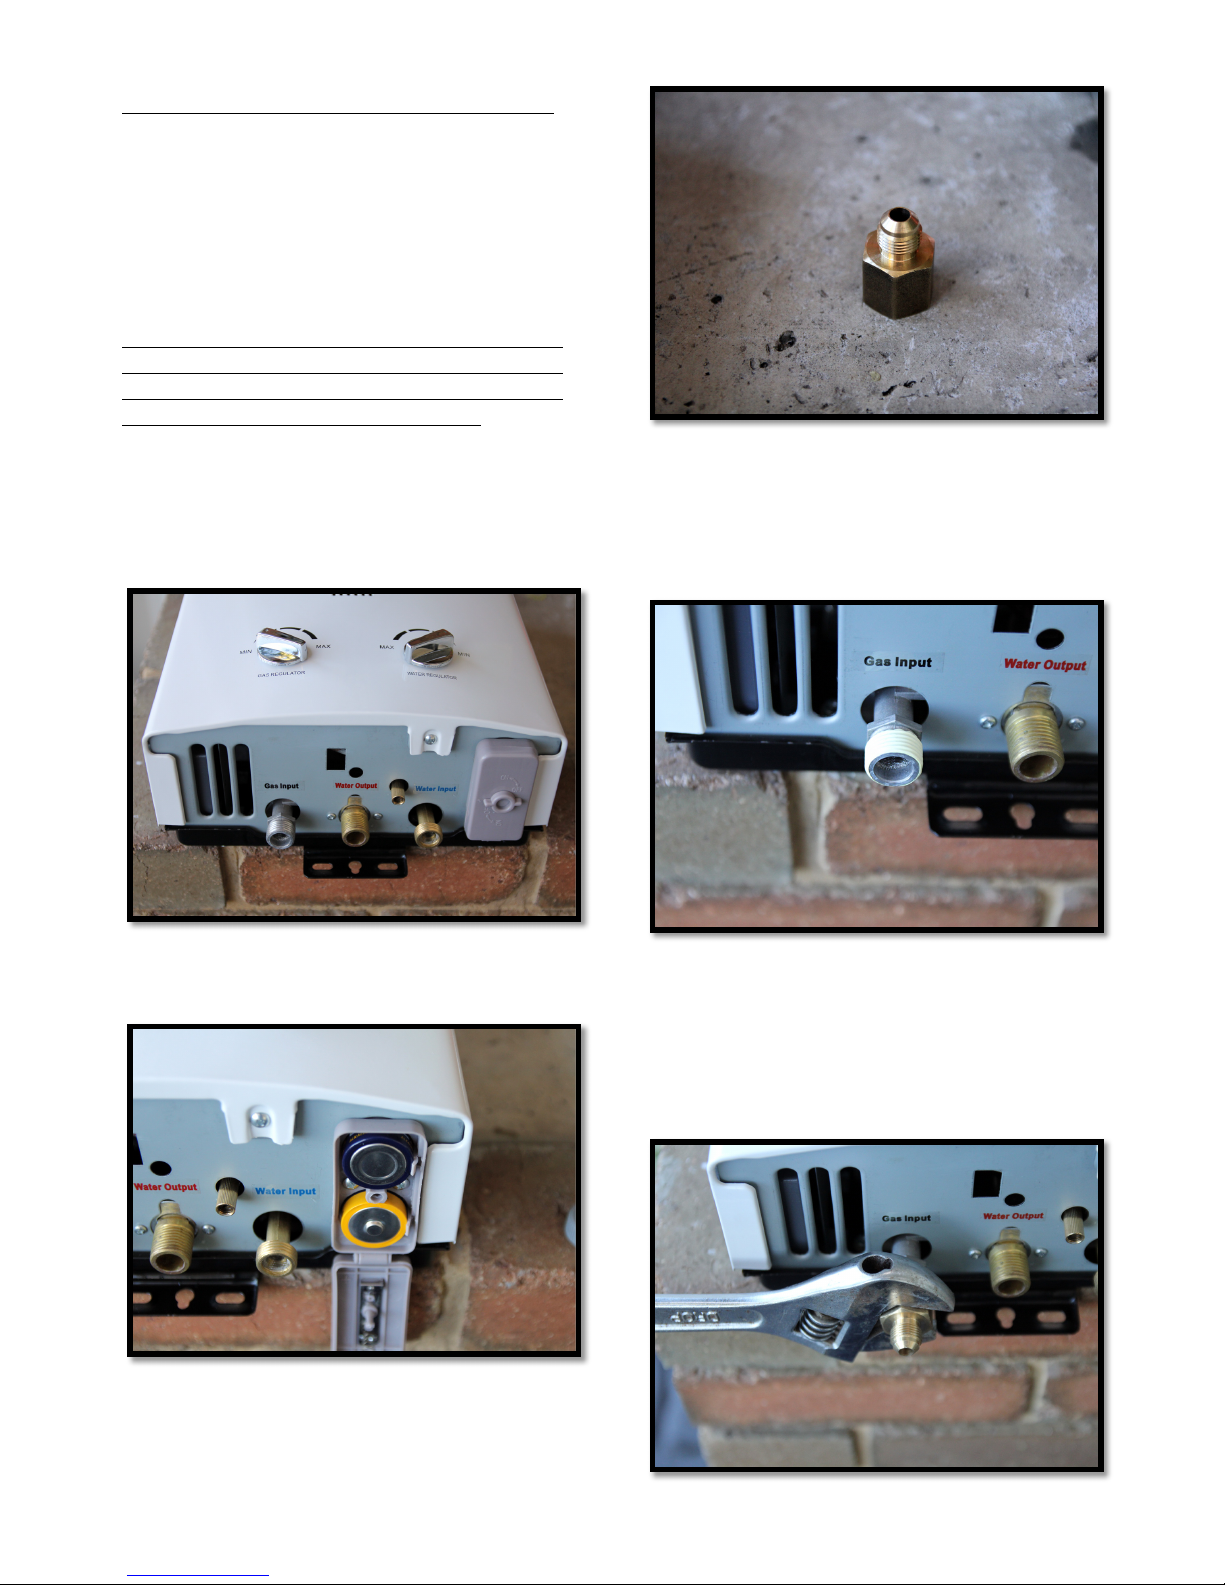
PREPARING THE APPLIANCE
Before using the appliance, it is important
to prepare the appliance by installing the
proper adaptors to suit our intended use.
In this example, we will be preparing the
portable water heater to be used with a
garden hose water input.
To use with other water input sources such
as a low voltage pump, please consult the
pump instruction manual or call customer
service on 1300 669 500 for advice.
1) Remove the heater along with all the
components from the box and place them
on a table in front of you. Notice that
there is a gas input, hot water output, cold
water Input as well as a battery box.
2) Insert two ‘D’ batteries into the ‘battery
box’ and close the battery box lid.
3) Find the supplied gas inlet adaptor for
the ‘gas input’ pipe.
4) Using the supplied Teflon tape, wrap
two rotations on the thread of the ‘gas
input’ pipe. Wrap the Teflon tape in the
same direction that the adapter is screwed
on - clockwise.
5) Fit and tighten the adapter fitting with a
spanner, taking care not to over tighten as
this could break or crack the inlet pipe. The
‘gas input’ is now ready to be connected
to the gas regulator hose – which we’ll
leave for later.
Page 7
!
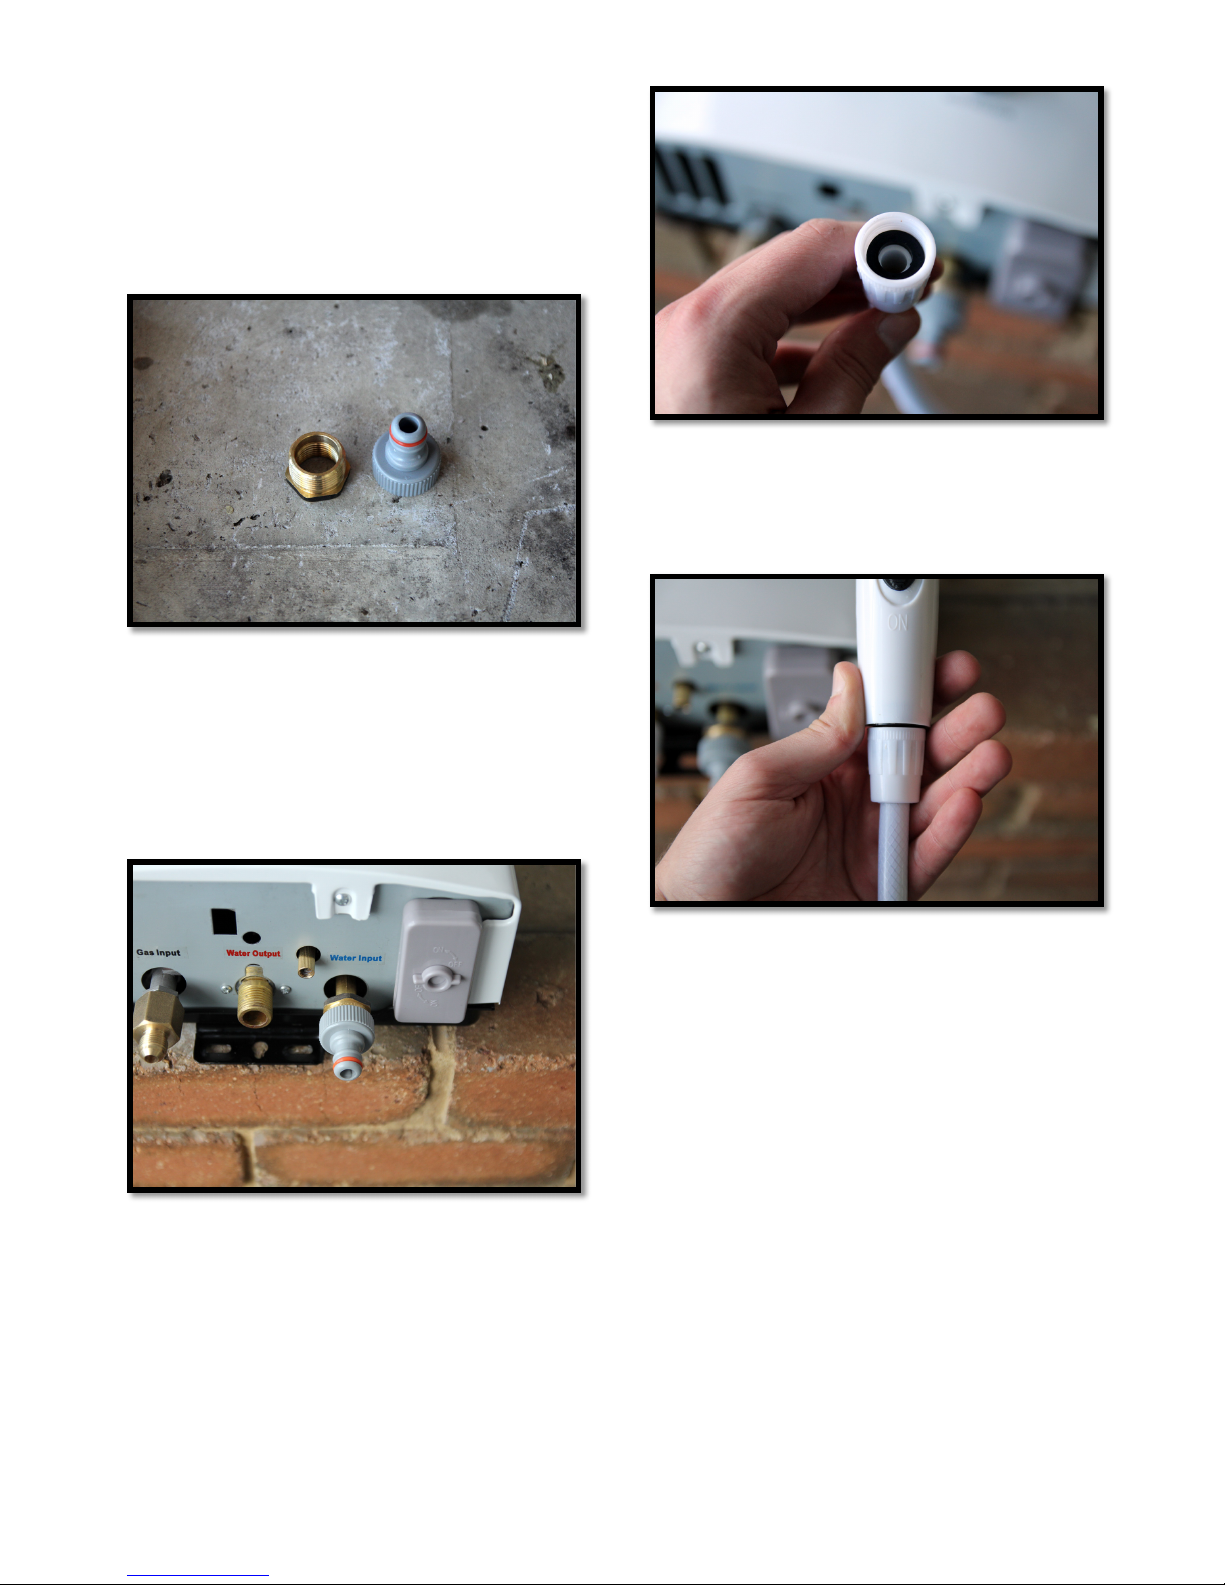
6) For garden hose water supply use,
install a male garden hose attachment to
allow for a ‘snap on’ connection to a
garden hose. First, install a reducer
fitting to increase the ‘water input’ size
from ½” to ¾” to suit the ‘quick fitting’
attachment.
7) Wrap the ‘water input’ thread with two
rotations of Teflon tape before installing
the reducer fitting. Tighten the adapter
connection with a spanner taking care not
to over tighten as this could break or
crack the inlet pipe. Finally, connect the
male garden hose attachment.
8) Attach the showerhead to the supplied
2m flexible shower hose. Find the two
supplied washers. Place the first washer in
one end of the threaded fitting of the
included 2m flexible hose. The second
washer will be kept for later.
9) Attach to the included hand shower
nozzle. Note that you can also apply
Teflon tape to this threaded connection to
avoid leaks.
Page 8
!
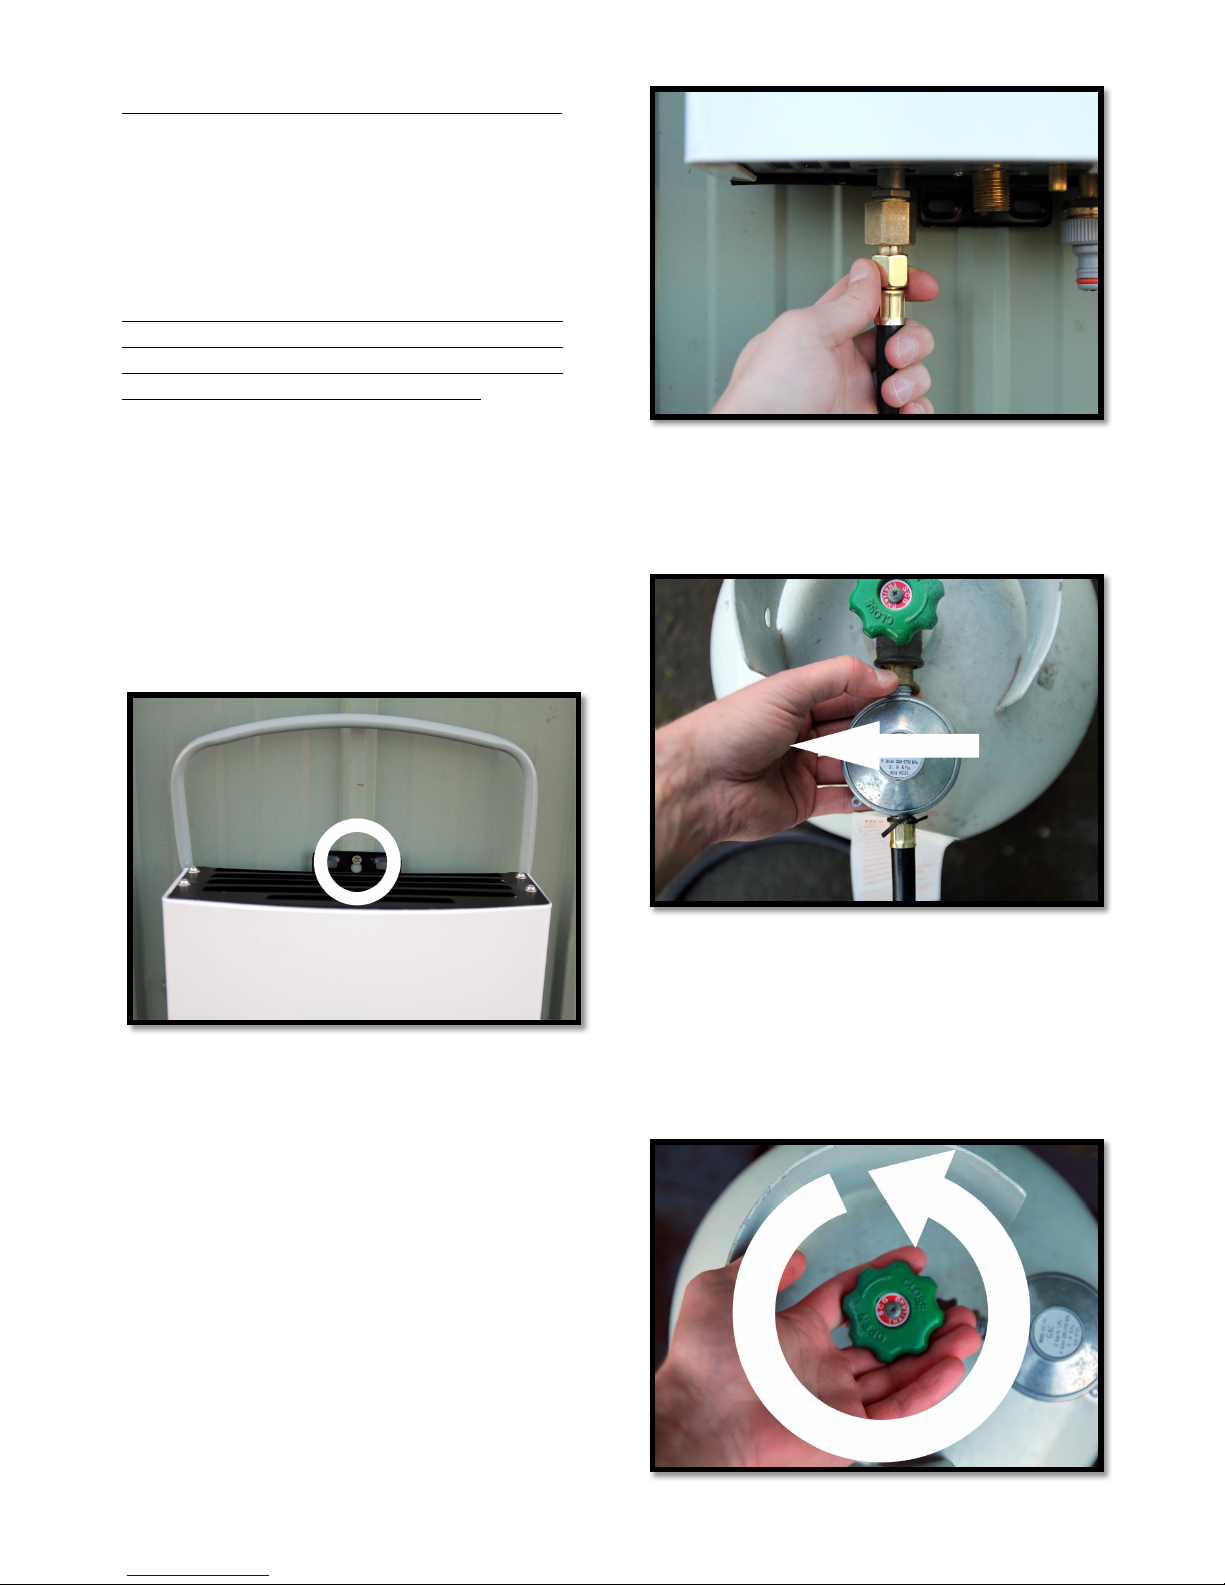
OPERATING THE APPLIANCE
Now that the appliance has been prepared
with the proper adapter fittings
and connections for our intended use (with
a garden hose water supply) we can set it
up for operation.
To use with other water input sources such
as a low voltage pump, please consult the
pump instruction manual or call customer
service on 1300 669 500 for advice.
1) Find a suitable sturdy, non-combustible
vertical surface to hang the appliance. The
surface should be at least 500mm clear
from the sides and 1000mm from the top
of all combustible surfaces, fabrics,
flammable materials & people.
Hang the appliance on a suitable vertical
surface by the top tab attached to the
back cover of the heater.
The appliance is ready to be connected to
gas and water hoses.
Note: that there is also a bottom tab
available to hang the appliance from if
needed.
2) Attach the flexible hose and regulator
to the ‘gas inlet’. Tighten this connection
with a spanner, taking care not to over
tighten as doing so may damage the pipe.
3) Connect the other end of the flexible
hose and gas regulator to the POL Propane
gas cylinder. Hand-tighten the connection in
an anti- clockwise direction.
4) Turn the gas cylinder on (open) in an
anti-clockwise direction one full turn, and
then check the connections for leaks with
soapy water. DO NOT use a flame. If a
leak is detected, turn the cylinder valve off
(close) and retighten all connections and
retest.
Page 9
!
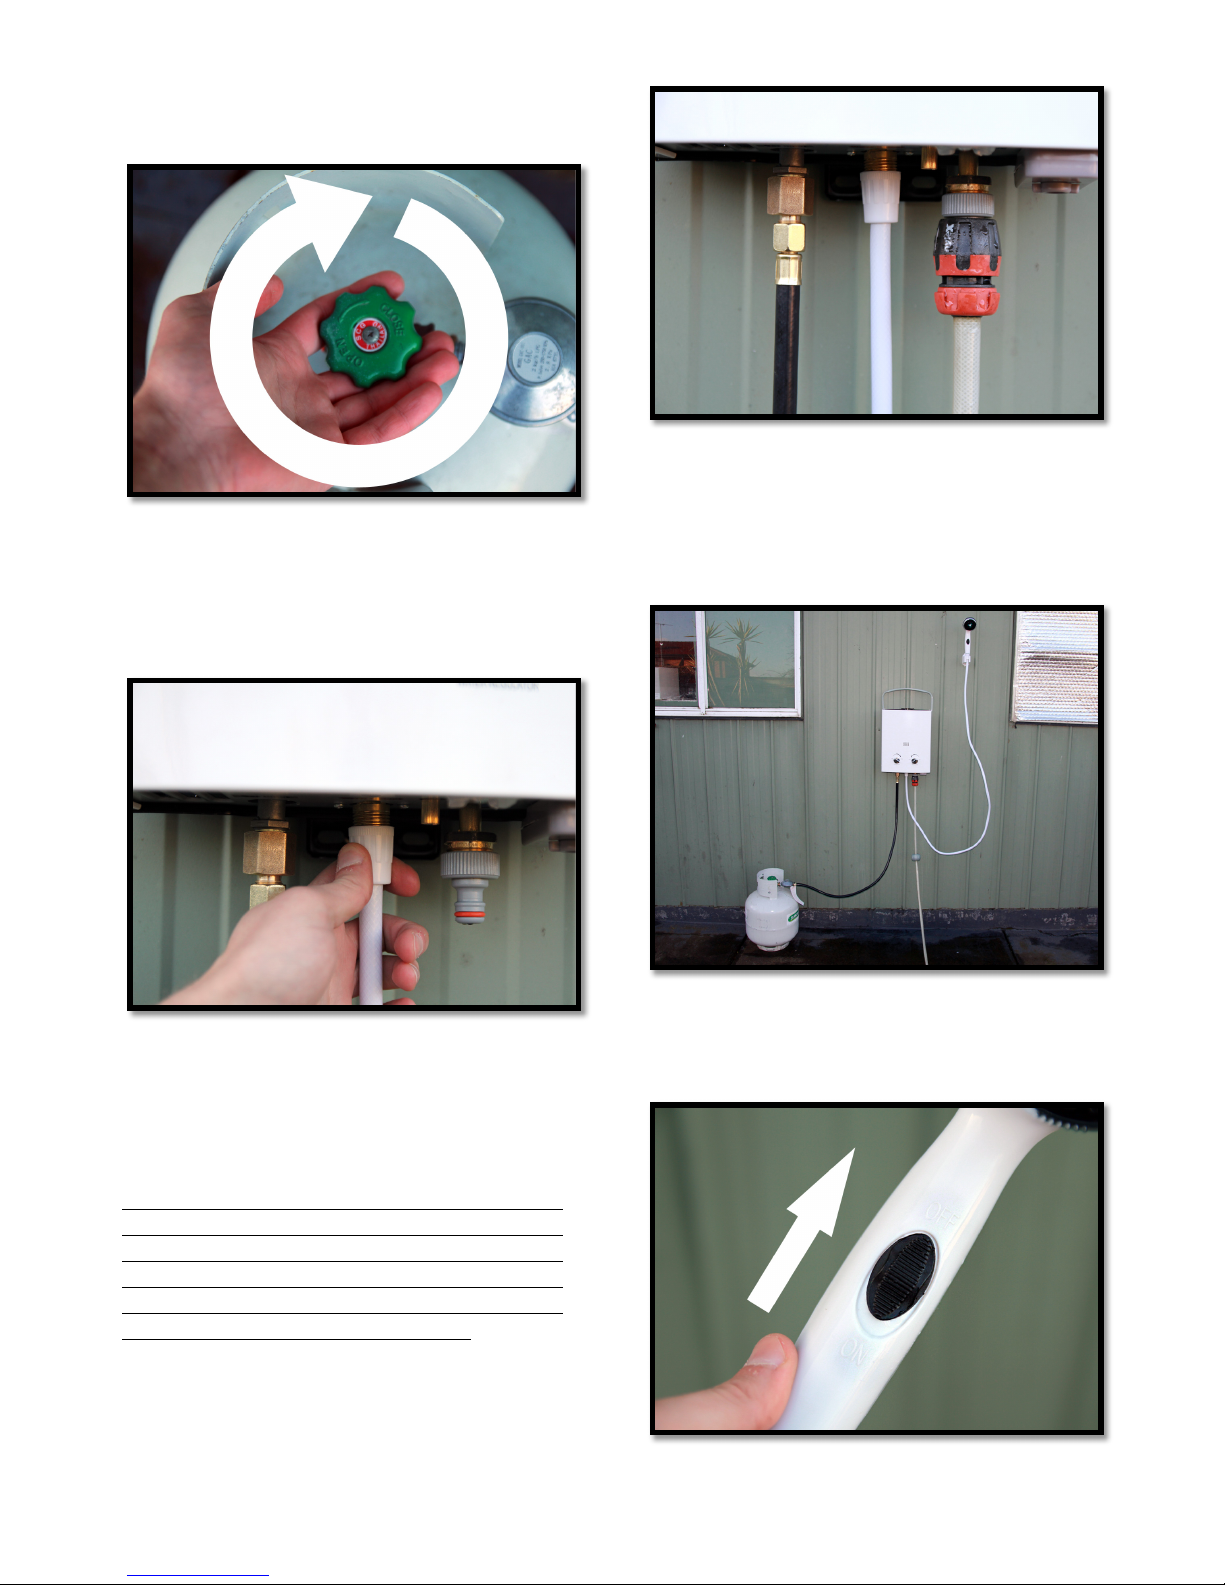
5) Once you determine that there are no
leaks present with the gas valve open, turn
the cylinder valve to the off (close) position.
6) Take the second washer from earlier and
place it inside the threaded fitting on the
loose end of the shower nozzle hose. Attach
this fitting to the ‘water outlet’ connection.
You may use Teflon tape to avoid leaks.
7) Prepare a garden hose with a ‘quick
fitting’ plug and attach is to the male garden
hose fitting already installed on the ‘water
inlet’ pipe.
This appliance is also compatible with other
forms of water supply including low voltage
water pumps. For information on how to
connect to this please consult your pump
accessory instruction manual or contact
customer service on 1300 669 500.
Our heater is now set up and ready for use.
Notice: the positioning of the gas cylinder
away and to the side of the appliance; never
place the gas cylinder directly beside or
above the appliance.
8) Ensure that the flow regulation switch on
the shower nozzle handle is in the ‘off’
position.
Page 10
!
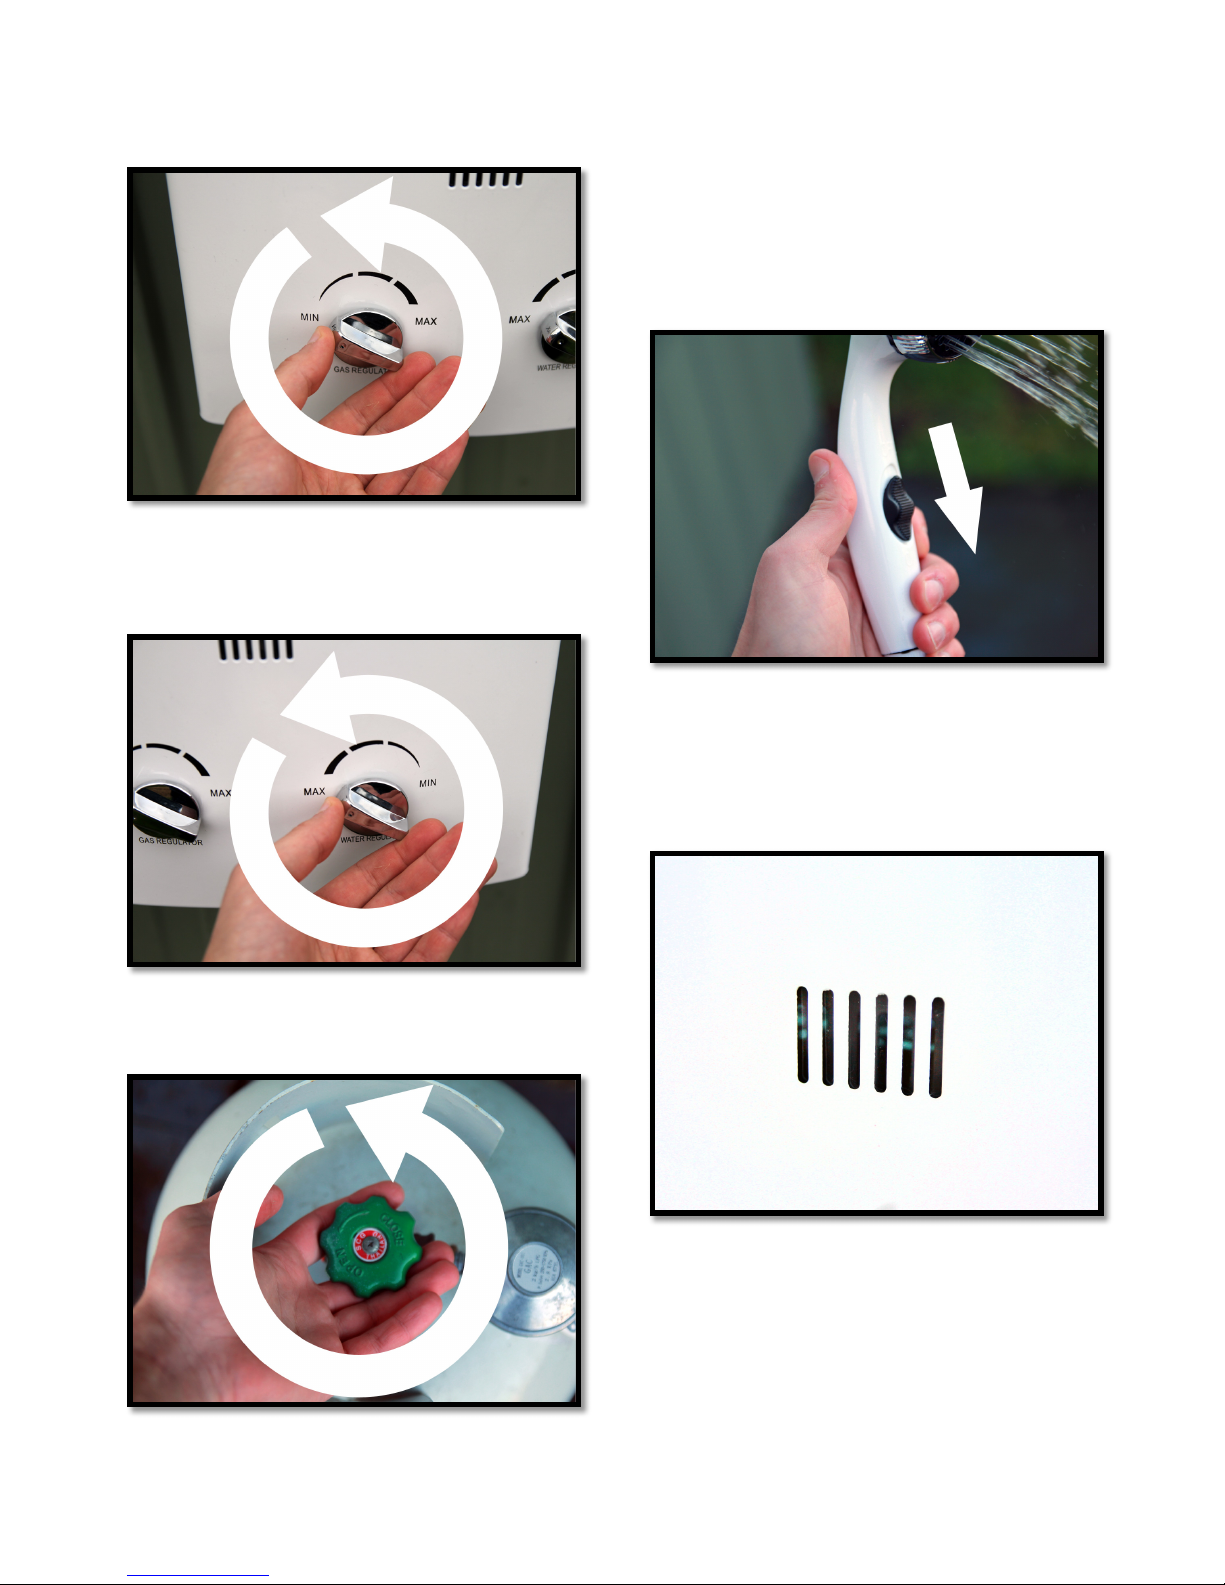
9) IMPORTANT: It is important that when
starting the appliance that the gas regulator
is set to the ‘min’ position.
10) IMPORTANT: It is important that when
starting the appliance that the water
regulator is set to the ‘max’ position.
11) Turn the gas cylinder on in an anticlockwise direction one (1) full turn
12) Open the valve for our water supply.
Water should not start to flow out of the
shower nozzle as it is still in the ‘off’
position.
13) When ready, slide the flow regulation
switch on the shower nozzle to the ‘on’
position. Water will start to flow through the
nozzle within a few seconds.
Note: You should hear a series of clicks
and then the burner should ignite. The
burner flame can be seen operating through
the ‘viewing window’ located at the front of
the appliance.
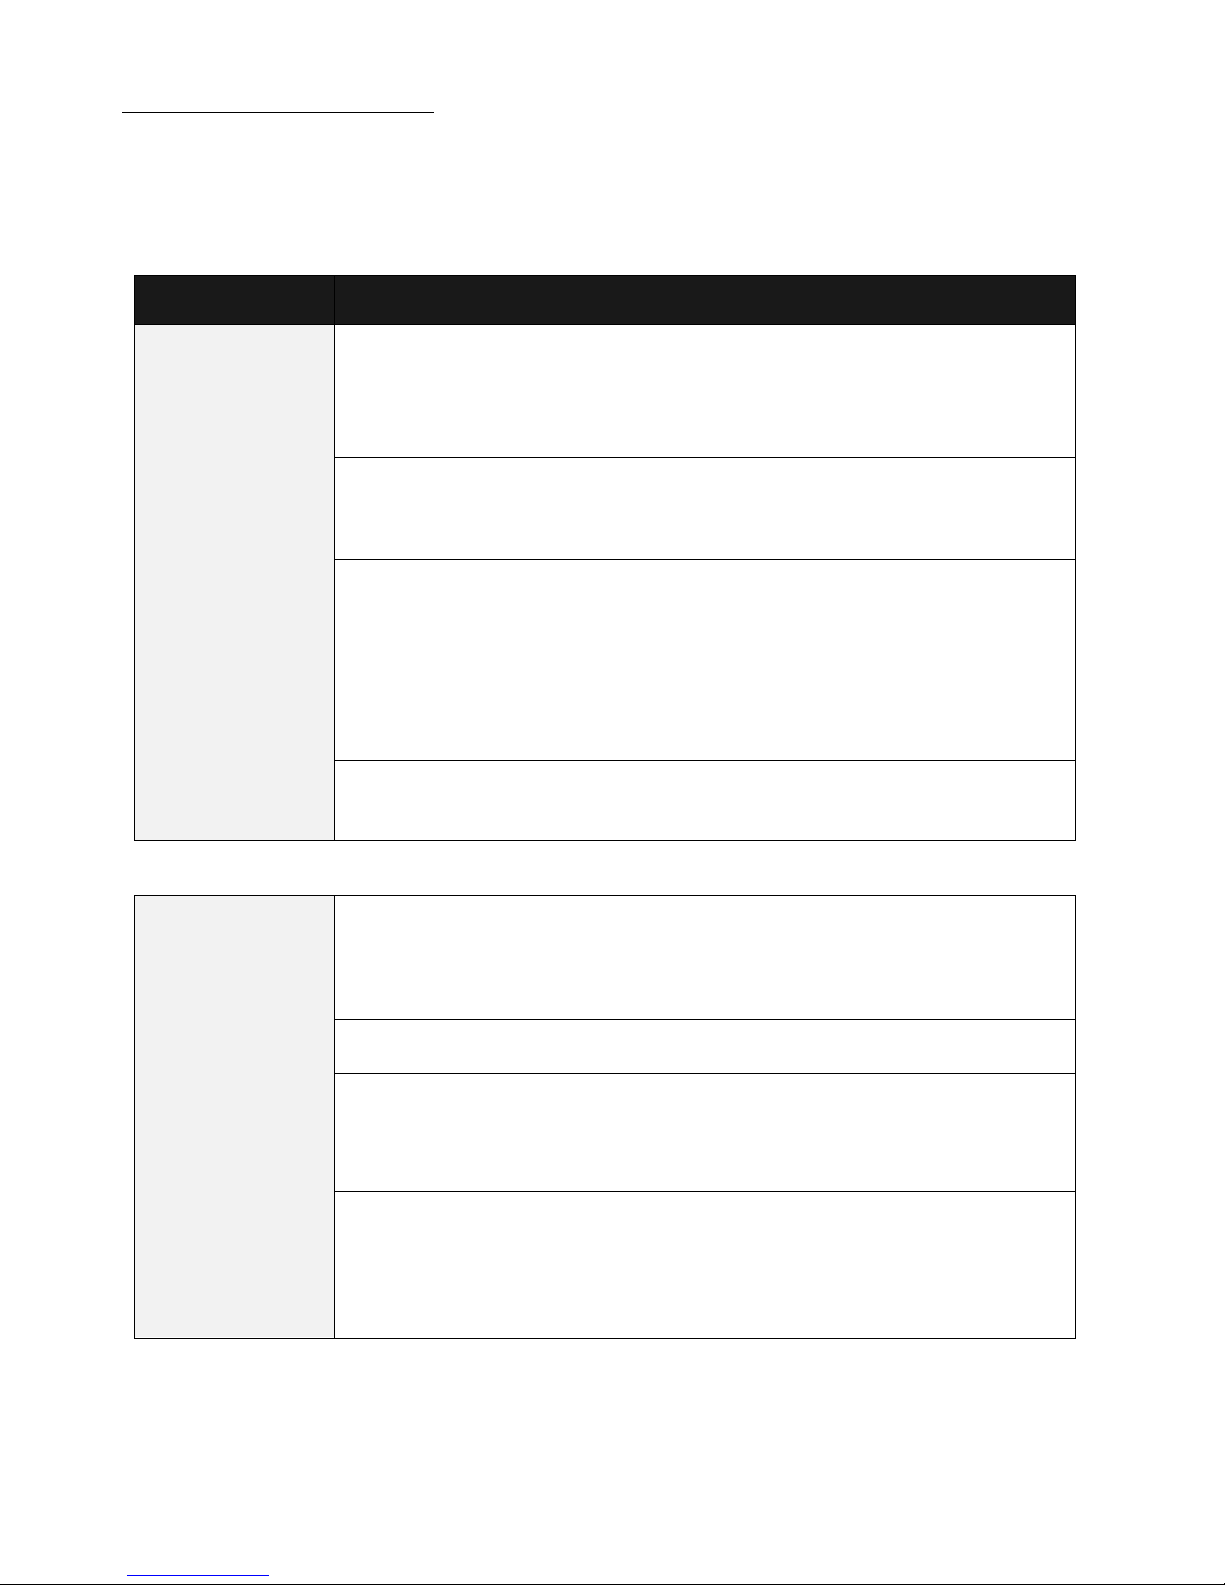
14) Adjust the temperature of the water
flowing from the showerhead by turning the
‘gas regulator’ and ‘water regulator’ knobs.
Note: For higher temperatures increase the
gas regulator control and decrease the
water regulator control
Page 11
!
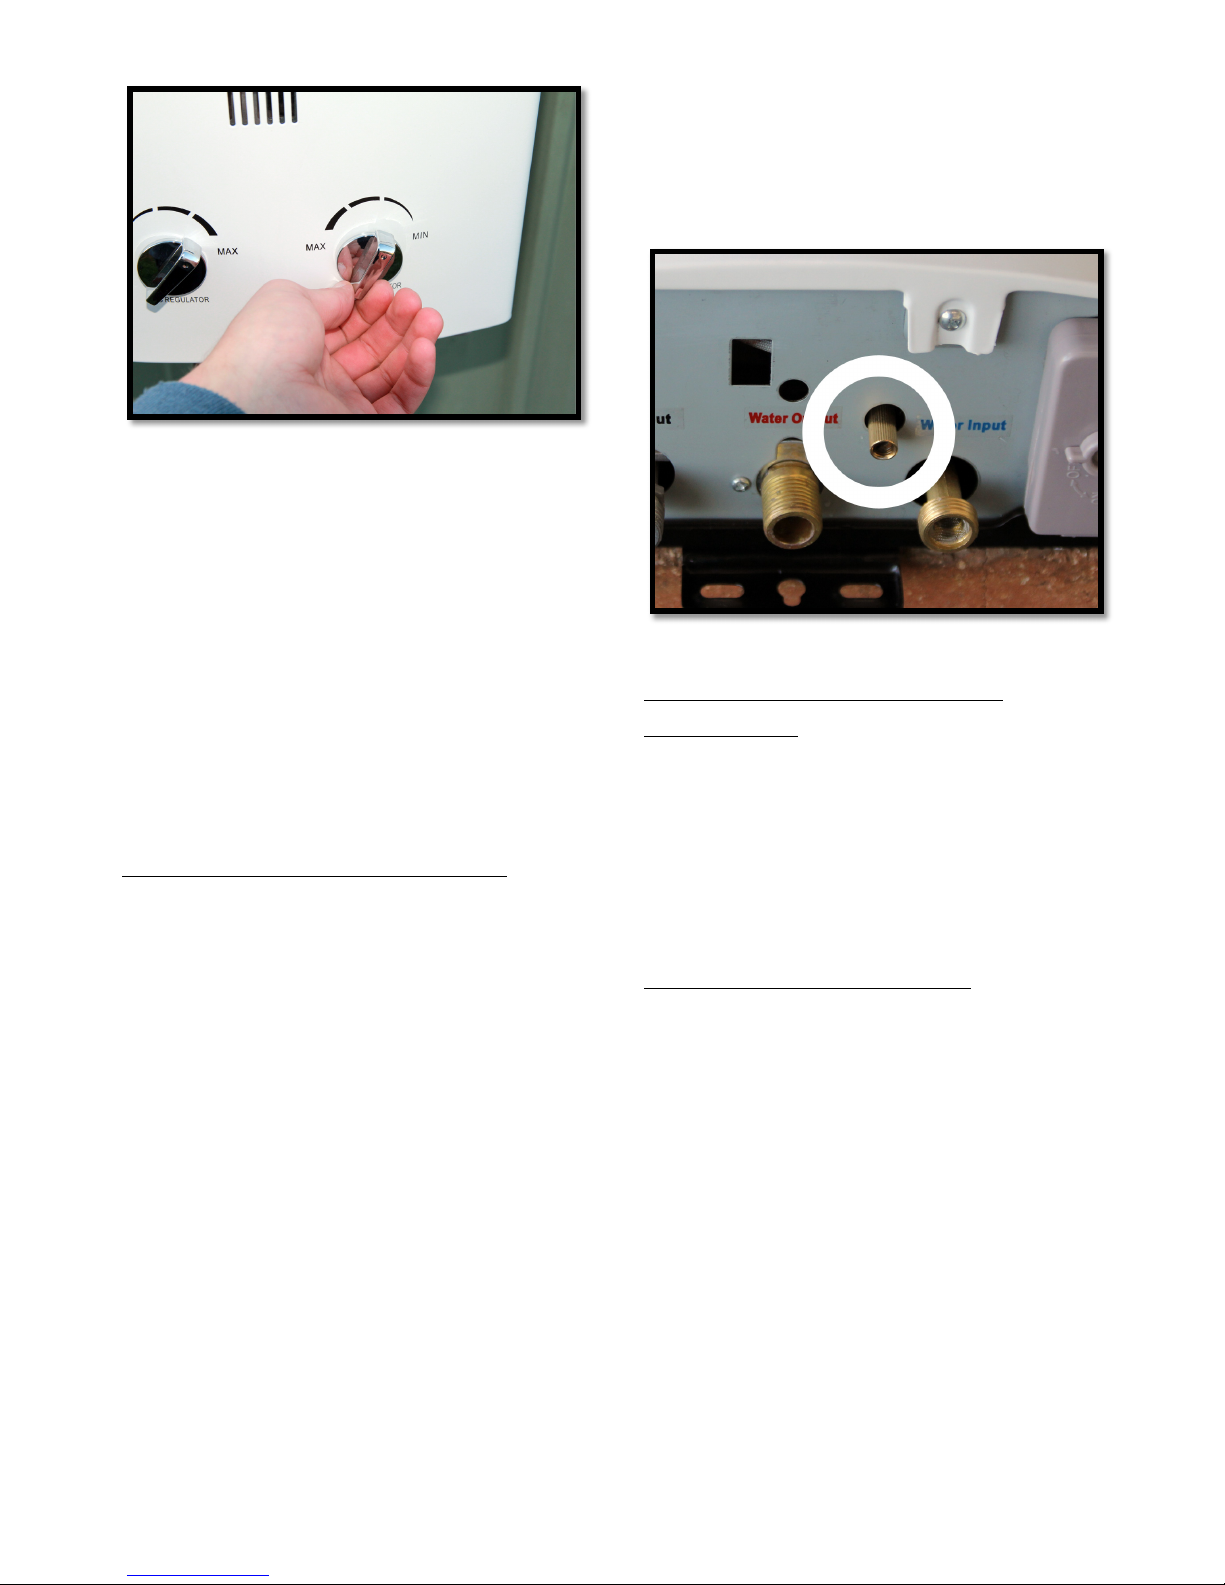
Warning! Take care to test the temperature
of the water flowing from the showerhead,
as it may be hot enough to cause injury.
The water flow can be stopped at any time
by sliding the regulation switch on the
showerhead to the ‘off’ position. The burner
will extinguish.
To reignite the burner, slide the flow
regulation switch to the ‘on’ position, water
will commence to flow and the burner will
ignite within 5 seconds
STORING THE APPLIANCE
1. With the appliance operating turn the
cylinder gas valve in a clockwise
direction to the ‘off’ (close) position. The
burner will continue to operate until all
gas has been bled from the hose and
regulator assembly.
2. Turn off the water supply at the garden
hose tap. Disconnect the ‘quick fitting’
garden hose attachment from the ‘water
inlet’
3. Disconnect the regulator and hose
assembly from the appliance and gas
cylinder and store away
4. Disconnect the showerhead and hose
from the ‘water outlet’, hold the shower
head approximately 1 metre from the
ground and allow all water to drain out
before rolling up and storing away
5. To ensure the draining of water after
use, open the drain valve (ribbed
cylindrical stem next to the water input
valve). Make sure to close the drain
valve once water has been drained.
DISCONNECTING FROM
CYLINDER
1. Check that the appliance is fully
extinguished, the gas cylinder control
valve is in the fully ‘off’ position and all
surfaces are cool
2. Loosen the connection to the gas
cylinder in a clockwise direction.
CARE INSTRUCTIONS
Using warm soapy water with a mild
detergent wipe down all surfaces and areas
of the appliance, taking care not to allow
water to enter the burner outlets
Before each use, check that the screen filter
on the ‘gas inlet’ and ‘water inlet’ pipes is in
place and cleaned of any particles.
• DO NOT submerge the appliance in
a sink or bowl.
• DO NOT use abrasive cleaners or
bleach.
Page 12
!
TROUBLE SHOOTING
!
!
This guide should be followed in case of failure of the appliance to operate correctly. If
symptoms persist contact Customer Service on 1300 669 500
!
DO NOT ATTEMPT TO REPAIR OR MODIFY THE APPLIANCE
!
!
Problem!
!
Cause!
The Appliance
will not light at
all.
Make sure you have new batteries installed in the correct position.
Check the cap of the battery case for instructions on how they should
be installed.
Check for sufficient water pressure. The unit must have a minimum of
25 kPa of sustained water pressure to activate the burners.
There is the possibility of finding some kind of epoxy or debris within
the water regulator. Check that the water inlet filter screen is clean. To
flush the system you can reverse the hookup by taking the water inlet
pipe and hooking it up to the water outlet side and back. If the gas
cylinder is contaminated by air, turn the unit on and off several times to
purge the air from the gas.
Check that the shower flow water regulator is in the open position
Water flows
through the unit,
but is not hot!
New batteries may be required for the ignition switch. Verify that the
batteries are aligned in the proper polarity (+/-). Check the battery case
for instructions on how to install the batteries properly.
Check that the water pressure is at least 25 kPa to activate the burners
Ensure that the Liquid Propane regulator is threaded all of the way to
the unit and that you have an adequate amount of gas in your propane
bottle.
Verify that you have hooked up both the incoming and outgoing water
supply properly. The showerhead should be attached to the water
outlet (located at the center) and the water inlet should be attached to
your incoming connection (located at the far right) as labeled.
Page 13
!
CERT: GMK10121
Water is not hot
enough
Adjust the gas regulator and water regulator to meet your desired
temperature. To Increase temperature; turn the gas regulator control from
minimum to maximum and turn the water regulator control from
maximum to minimum.
Check source water temperature. If the source water temperature is too
cold then you may need to ‘cycle’ the water through the system back
into the source reservoir then through the appliance again to meet your
desired temperature.
Check if there is a blue flame in the ‘viewing window’. If you see a
yellow flame it could mean a breakdown in the gas regulator. Please
call Joolca Customer Service directly if this happens, do not attempt to
use it.
The unit starts
for a short
amount of time
and then shuts
off
Check your Gas Cylinder to ensure it is not empty. If using a new
cylinder; try to cycle the unit on and off by using the showerhead
switch several times to purge the air from the gas lines.
Do not expose the water heater to strong winds.
This unit activates at a sustained water pressure of 25 kPa. If your
supply water pressure is below the minimum the unit will not ignite.
SPECIFICATIONS
!
!
Model Number
PWH5L
Injector Size mm
0.62
Total NGC MJ/h
28
TPP kPa
2.75
Min. Water Pressure
25 kPa
Max. Water Pressure
900 kPa
Size mm
400 x 395 x 130
Weight
4.2 kg
This Portable Water Heater is distributed by Joolca Pty Limited
CUSTOMER SERVICE ON THIS APPLIANCE
AUSTRALIA 1300 669 500
WWW.JOOLCA.COM.AU
 Loading...