

User’s Manual
7” Touch Screen
Windows CE 6.0

User’s Manual
2

User’s Manual
3
Table of Contents:
Package Contents................................................ 4
Device Overview.................................................. 5
Using Battery Power............................................ 6
Main Menu........................................................... 7
Home Screen....................................................... 8
Settings ................................................................ 9
Setting Volume..................................................... 10
Setting Back-Light................................................. 11
Setting Time & Date............................................... 12
Setting Power........................................................ 13
Moving Around...................................................... 14
eBooks .................................................................. 15
Viewing Images...................................................... 16
Playing Audio........................................................... 18
Playing Video.......................................................... 19
Flash and Games …………………………………… 20
Windows CE Desktop............................................ 21
Using Internet .......................................................... 22
PC Connectivity...................................................... 24

User’s Manual
4
Package Contents
Device TF Card Ear Phone
Manual Leather like Cover
Charger USB Cable Battery

User’s Manual
5
Device Overview
LCD &
Up
Down
Power / Charging
Indication
Speakers
USB
PC

User’s Manual
6
Using Battery Power
The device is designed to work with a removable battery. A
fully charged pack will provide several hours of battery life.
Additional battery packs are optional and can be purchased
separately.

User’s Manual
7
Main Menu:
The Main Menu screen is the
first screen that appears on
starting the JWin700 device
after the boot-up sequence.
The Main Menu offers large
icons of different category of
content in the device storage.
The device storage card has
a respective folder for each
category having files and
folder related to that.
“Home” icon will take you to
the device root or home.
“WindowsCE” will switch the
device in a Windows CE Tablet mode where you can use the
device as a PC having windows
desktop.
“Power” button will display a dialog box
having options for “Power Off”, “Standby” or “Restart”.
While browsing the different content, you can always come to
this Main Menu screen by tapping the “M” icon.

User’s Manual
8
Home Screen:
The “Home” screen is root of
the device from where you
can access the files and
folders both on the device
internal flash or the storage
card.
The Home also lets you
access the settings or going
back to the menu by tapping
the “M” icon at the bottom.
You can also come to the
Home any time by tapping
the blue “Home” icon at the
bottom of the screen.
All the files and folder including “Settings” and “Help” etc you
see below the “Storage Card” is what is present in the “Home”
folder in the built-in flash of the device.
If you connect your device with a PC using the USB cable, you
can view, modify, delete or add more files here by accessing
the /JTOS/Home/ folder of the device.
It is recommended to keep only important and light files like
samples or reference files of frequent use in the Home folder.
For all heavy content, use the storage card.
User’s Manual
9
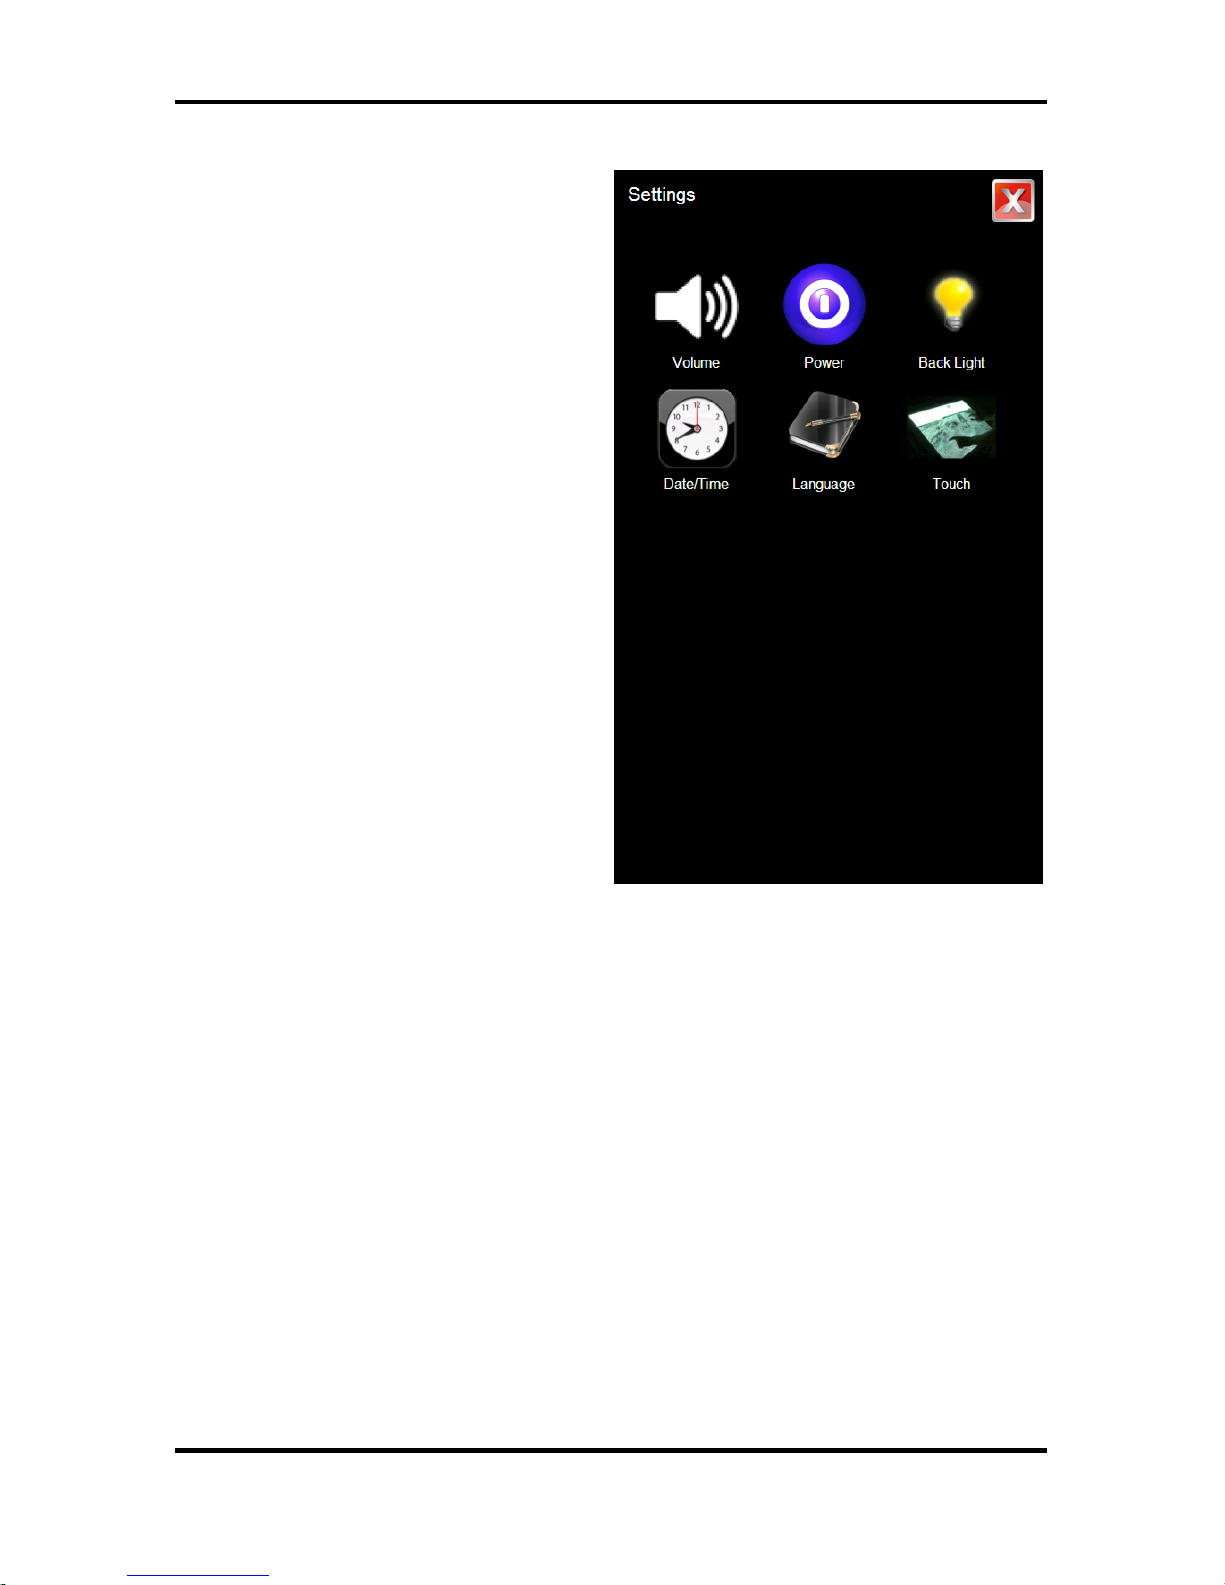
Settings:
You can change the different
device hardware and
software related settings by
tapping the Settings icon in
the main menu or Home
screen.
The Settings menu as shown
in the this image allows to
change the setting
parameters of the:
1. Volume
2. Power
3. Back Light
4. Date and Time
5. Language
6. Touch Screen Calibration
Each of these items are explained in following sections.

User’s Manual
10
Setting – Volume:
Adjust the volume level by
tapping the + or – sign or use
the slider by dragging it to the
required level.
Select the “Mute” option if
you want to turn off the
volume completely.
Every time you tap the screen
of the device any-where,
there is touch sound. You can
set the volume level of this
touch sound by selecting any
of the following three options
of the “Touch Tone Options”:
1. Off
2. Medium
3. Loudest
Once your are done with the volume setting, exit the volume
setting by tapping the red close button on the top-right corner.
Exit the volume setting screen will save the volume setting
permanently even if your restart the device.
Tip: Keep the volume low for longer battery backup time.

User’s Manual
11
Setting - BackLight:
The TFT LCD panels operate
using special light at the back
of the panel that adds
brightness to the display.
More is the intensity of this
light, brighter will be the
image.
Since the back-light also
consumes lot of current, so
this is also important in
regard to the battery backup
time. Keep the back-light dim
for longer battery time.
Auto Back-light Off feature
will turn of the Back-light after
detecting no activity of touch for some time. This means the
device currently is not being used and turning off the back-light
will save battery power. You can adjust this time enough to
make sure the back-light does not turn off while you are reading
a page at your pace.

User’s Manual
12
Setting – Date & Time:
Increase or decrease the
individual Date or Time value
and close the screen by
tapping the red close button
on the top-right corner when
you are done with the setting.
The date and time are
displayed in the Main Menu
screen and the time is also
displayed in the top-left
corner while moving around
the files and folders in the
device.

User’s Manual
13
Setting - Power:
In order to save power or
increase the battery back-up
time, it is recommended to let
the system go in stand-by or
sleep mode if idle for some
time.
In standby mode, the LCD is
completely Off and major part
of the processing is Off too.
However, once resumed or
waked, the system will
continue same place where it
was made to sleep.
In order to turn the device
from sleep or standby mode,
simply press the power button on top of the device just once.
Setting the System Standby to “Never” will never make it sleep
even if the device is not used or unattended for unlimited time.

User’s Manual
14
Moving Around:
Moving around the device
content is simply opening
files and folders and using
the “Back” icon to go back to
the previous folder.
Tap any file or folder once to
open it.
The files that show up are the
one that are supported. File
formats that are not
supported will not appear
even if they are present in the
SD Card.
Hidden files and folders will
also not appear in the list.
You can scroll up or down the file/folder list using the green Up
and Down buttons on the bottom of the screen or tapping inside
scroll bar grey area.
You can go to the home location any time by tapping the blue
“Home” button on the bottom of the screen. Tap the “M” icon to
go the graphical start-up main menu screen.
The top grey bar shows your current folder location or complete
folder path.

User’s Manual
15
eBooks:
Different file formats are
supported for reading eBooks
and more formats support
can be added by installing
additional WinCE eReader
software.
The supported formats
include:
- Text Files (.txt)
- PDF Documents
- Word Documents
- HTML Files
- MobiPocket eBooks (.mobi, .pdb)
- Comics/Magazines with MMCE Reader (.cbr, .cbz)
The device will open each format using its respective Reader
software automatically. Lots of free eBooks are pre-loaded with
the device in .mobi format.
Note: For languages other than English, save the text files as
Unicode format.

User’s Manual
16
Viewing Images:
In order to view an image, or
picture or scan page of a
book, simply tap once on any
of the image file while
browsing your device.
Once you tap an image file, it
will be opened in the Image
Viewer software in full-screen
mode by default.
Drag your finger on the image
in left or right direction to view
the next and previous images
respectfully in the same
folder.
You can also view the next and previous images by using the
up/down keys on the right side of the device.
In full screen mode, tap the image once to get into the menu
mode. In menu mode, you can see other operational buttons as
described below:
The purple Zoom-In and Zoom-Out buttons will let you zoom the
image for any desired size. This zooming will only will be for
viewing and will not effect the original saved image.

User’s Manual
17
In the menu-mode, if the image size is bigger than the screen,
then drag your finger on the image for panning.
Tap the Zoom-100% button to view the image in its original or
actual size or resolution.
Tap the Full-Screen button to view image in full screen with no
buttons. If the image is larger than the screen, it will stretch to fit
itself to the screen. And if the image is of smaller size, it will
remain in its original size displayed in the centre of the screen.
Tap the Slideshow button to show all the images in the existing
folder one by one automatically after some time interval. Tap
the screen once in the slide show to stop it and come back the
menu mode.
Tap the Rotate Screen button to rotate the device view from
Portrait to Landscape or the opposite. Exiting the Image viewer
will take back the device back to Portrait mode. All images are
opened by default in the image viewer as portrait irrespective of
their size and orientation.
The image formats supported currently are:
Bitmaps (.bmp)
Jpeg (.jpg)
Giff (.gif)
PNG (.png)

User’s Manual
18
Playing Audios:
Tap on any audio file while
browsing the device and the
audio will be opened in an
audio player.
The progress bar will show
the position and progress of
the audio playing. You can
drag the slider to forward or
rewind the audio.
Once the audio is finished,
the next audio in the same
folder will automatically be
played.
Use the volume slider to
adjust the volume. Click on the “Speaker” icon to mute the
audio.
Tap the blue “Next” and “Previous” buttons to play the next or
previous audio file in the same folder. If there is no more next or
previous file, the same audio will play from the start again.
Use the green “Play” or “Pause” button to Play/Pause the audio
any time. The supported audio formats are MP3 and WMA.

User’s Manual
19
Playing Videos:
The device supports playing video clips in different video file
formats.
Tap on any MP4 video file while browsing the device and the
video would be open and played in Microsoft Video player.
Tapping the video screen will play/pause the video. To get back
from full-screen mode to normal mode, press one of the two
hardware up/down buttons on the side of the device.
For playing other vast variety of Video formats, use the TCMP
Video player in the Extra folder of the storage card.
The TCMP player offers a wide selection of formats and
settings to make video playback very professional on these
device.
You can enjoy high quality, high frame-rate and high resolution
videos on this device using the built-in hardware video
acceleration feature.

User’s Manual
20
Flash and Games:
The device supports playing
flash (.swf) files using its own
Flash player.
Tapping any flash file will
play the file in the flash
player.
The “M” menu icon at the lower left corner allows to do the
following:
- Change orientation of player from landscape/portrait
- Play/pause the flash animation
- Exit the flash player.
The G-sensor hardware of the device converts titling of the
device physically to respective Left/Right/up/Down keys, which
helps existing flash games to be played with moving the device
physically in different directions.
Games requiring mouse can be played by touch screen and
games requiring the keyboard can be played by connecting an
external USB keyboard.
The device comes pre-loaded with hundred of free flash games
of different categories.

User’s Manual
21
Windows CE Desktop:
The WindowsCE icon in the
Main Menu or Home screen
will take you to the Windows
CE 6.0 desktop mode.
From here you can use the
device more like a tablet PC.
You can still access your
eBooks from here and do
some other things as well.
You can also connect an
external USB Mouse,
Keyboard or Hard-drive.
You can switch back to Main
Menu by restarting the
device.
The icons in task bar system tray at the bottom right can let you
change the screen orientation to landscape/portrait.
Also the system-tray shows the battery icon, time, wifi
connectivity, volume and soft keyboard selection icons.

User’s Manual
22
Using Internet:
You can go online and surf the
Internet using the device built-in
Wifi hardware.
You have to go to the Windows CE
Desktop mode to use the Internet.
Windows CE is based on low
storage and memory
resources and is not
recommended for viewing
very heavy and complex
websites.
The Wifi icon on the desktop
or Control panel will let you
turn the Wifi connection ON
or OFF. Keep the Wifi OFF if
not using Internet to save
battery power. The Wifi
hardware consumes lot of
current and will reduce the
battery power at a very high
rate.
Once you turn the Wifi ON,
an internet connection icon will appear at the bottom task bar
system tray. Also, a window will popup automatically to show
the available wireless connection near you.

User’s Manual
23
Select your desired wireless connection by double tapping it.
Once you select your wireless connection, a window of
“Wireless Network Properties” will appear as show in the image
here.
If your wireless connection has a security password then
uncheck the “The key is provided automatically” selection. This
will enable the “Network key” box where you could enter your
network password or key. Use the software keyboard by
tapping the keyboard icon on the bottom right corner of the
taskbar.
Once you are done with the password entry, tap the OK button
and then the “Connect” button.
Once the system goes online, the Wifi connectivity icon in the
system tray will show online status.

User’s Manual
24
PC Connectivity:
You can connect your device with your PC using the supplied
standard 1 to 1 USB cable.
You might need to install the driver if asked. The drivers are
located in the CD which comes with the package. If the CD is
lost, you can also download the drivers from our website.
You will also need Microsoft ActiveSync installed. That also
comes with the CD. Windows Vista or Windows7 users would
need to install the Windows Mobile Device Centre.
You will see your device as a WinCE device or a Mobile Device
with other Drives in your “My Computer” window on your PC.
Once connected you can also copy files to your device Home
folder or the storage card placed in your device.
Copying files to the storage card once connected with a PC is
much slower than copying files directly on a storage card
inserted in your PC.
If your device fails to connect with the PC, please confirm the
following:
1. Connect with the left USB port of the device
2. If using a Desktop PC, connect at the back or rear end
of the PC. USB ports on the front have some time less
current.

User’s Manual
25
3. Use the supplied short USB cable. Avoid using long
USB cables
4. Do not use any USB HUB or extension cable.
5. The drivers or ActiveSync is installed
6. If Vista/Windows7 on your PC then WMDC is also
installed.
7. If the PC has other USB devices attached also,
remove them.
8. Restart the PC and the device.
 Loading...