


©2017 Johnson Level & Tool 1
330′ Laser Distance Meter w/Angle Sensor
and Bluetooth
®
Model No. LDM330
Instruction Manual
Congratulations on your choice of this JLX®branded Laser Distance Meter from Johnson. JLX
®
tools represent the highest quality tools Johnson has to offer, designed for professional users
looking to work smarter, faster and more efficiently. This Bluetooth
®
equipped LDM also
features an integrated angle sensor for simplifying complex measurements and functions as
a pocket-sized digital level. We suggest you read this instruction manual thoroughly before
using the instrument and save this instruction manual for future use.
This is a Class II laser tool and is manufactured to comply with CRF 21, parts 1040.10 and
1040.11 as well as international safety rule IEC 285. The laser also complies with EMC Test
according to EN61000-6-3; 2001+A11:2004, EN 6100-6-1:2011, EN 6100-4-2,
EN 61000-4-3, EN 60825, FCC Test according to PART 15.
1746i-4_Manuals 6/5/17 1:37 PM Page 1

2 ©2017 Johnson Level & Tool
Table of Contents
1. Kit Contents
2. Features and Functions
3. Safety Instructions
4. Location/Content
of Warning Labels
5. Location of Parts/Components
6. Battery Installation
7. Operating Instructions
8. Using the Bluetooth®App
9. Tips from the Pros
10. Care and Handling
11. Troubleshooting Guide
12. Technical Specifications
13. Product Warranty
14. Warranty Registration
15. Accessories
1. Kit Contents
Description Qty.
Laser Distance Meter 1
“AAA” Alkaline Batteries 2
Wrist Strap 1
Soft-Sided Pouch 1
Quick Start Guide 1
1746i-4_Manuals 6/5/17 1:37 PM Page 2

©2017 Johnson Level & Tool 3
2. Features and Functions
• Nine (9) measurement modes: Length (Single or Continuous),
Area/Square, Volume/Cube, 1-Point Pythagoras, 2-Point Pythagoras,
3-Point Pythagoras, 3-Point Partial Pythagoras, Digital Level and Stake-out
• Displays in English or metric units with decimals or fractions
(English units only)
• ISO 16331-1 tested* to typical accuracy of +/- 1/16″
(0.0625″, or 1.5mm)
• Bluetooth
®
enabled for syncing with the Johnson Measure-UpTMapp
(iOS or Android)
• High-speed microprocessor for quick, accurate calculations
• IP 54 protection – sealed from dust and rainwater
* This tool is tested in accordance with ISO 16331-1 “Laboratory
procedures for testing surveying and construction instruments –
Part 1: Performance of handheld laser distance meters.” This standard
is used to calculate accuracy under varying ambient lighting conditions.
For more detailed test results, see the Technical Specifications section of
this operator’s manual.
1746i-4_Manuals 6/5/17 1:37 PM Page 3

4 ©2017 Johnson Level & Tool
3. Safety Instructions
Please read and understand all of the following instructions, prior
to using this tool. Failure to do so, may void the warranty.
DANGER!
Class II Laser Product
Max. Power Output: ≤ 1mW
Wavelength: 650nm
THIS TOOL EMITS LASER RADIATION.
DO NOT STARE INTO BEAM.
AVOID DIRECT EYE EXPOSURE.
ATTENTION IMPORTANT
• Read all instructions prior to operating this laser tool. Do not remove any labels from the tool.
• Do not stare directly at the laser beam. Serious eye injury may result.
• Do not project the laser beam directly into the eyes of others.
• Do not set up laser tool at eye level or operate the tool near a reflective surface as the
laser beam could be projected into your eyes or into the eyes of others.
• Do not place the laser tool in a manner that may cause someone to unintentionally look
into the laser beam.
• Do not attempt to view the laser beam through optical tools such as telescopes as serious
eye injury may result.
• Do not operate the tool in explosive environments (i.e., in the presence of gases or
flammable liquids).
• Keep the laser tool out of the reach of children and other untrained persons.
• Always turn the laser tool off when not in use or left unattended for a period of time.
• Remove the batteries when storing the tool for an extended time (more than 3 months) to
avoid damage to the tool should the batteries deteriorate.
• Do not attempt to repair or disassemble the laser tool. If unqualified persons attempt to
repair this tool, warranty will be void.
• Use only original Johnson
®
parts and accessories purchased from your Johnson
®
authorized dealer. Use of non-Johnson® parts and accessories will void warranty.
1746i-4_Manuals 6/5/17 1:37 PM Page 4

©2017 Johnson Level & Tool 5
4. Location/Content of Warning Labels
Error Code Label
The LDM may return an error code during use, as
indicated by the display showing “ERR X,” where
“X” represents a number from 1 to 6.
The error codes are as follows:
1.
Laser Range
– The measurement distance is
outside the range listed in the specifications.
2.
Weak Signal
– The reflected laser signal is too
weak, either due to high ambient lighting at the
target or poor target reflectivity.
3.
Display Range
– The measurement distance,
area or volume exceeds the number of units the
display is capable of showing.
4.
Low Battery
– The batteries need to be replaced.
5.
Temperature
– The tool is either above the
maximum or below the minimum safe operating
temperature range.
6.
Ambient Light
– The tool is being used in too
bright of an environment to operate properly.
QR Code:
Use a smartphone to scan the QR code to
be taken directly to Johnson Level & Tool’s
Operator’s Manual Page.
1746i-4_Manuals 6/5/17 1:37 PM Page 5

6 ©2017 Johnson Level & Tool
5. Location of Parts/Components
LCD Screen
Subtraction Button
Addition Button
Power Button
Press for:
• Power on
• Set units of
measurement
Press and hold for:
• Power off
Measure Button
Press for:
• Power on
• Measure
Press and hold for:
• Continuous mode
Timer Button
Press for:
• Set the timer
(2, 5, 10 seconds)
Functions / Sound Button
Press for:
• Area measurement
• Volume measurement
• 2-Point Pythagoras
measurement
• 1-Point Pythagoras
measurement
Press and hold for:
• Sound (High, Low, Off)
Reference /
Bluetooth
®
Button
Press for:
• Adjust the
measurement
reference
Press and hold for:
• Enable / disable
Bluetooth
®
Clipboard Button
Press for:
• Save current
measurement to
the clipboard
Press and hold for:
• Review saved
measurements
• Clear saved
measurements
Laser Emitted Window
Laser Receiving
Window
1746i-4_Manuals 6/5/17 1:37 PM Page 6

©2017 Johnson Level & Tool 7
Not all features found on the LCD screen are found in every Johnson
Level & Tool Laser Distance Meter. See the notes below for further
information.
Notes:
* Feature available in the LDM330 only.
† Feature available in the LDM195 and LDM330 only.
∆ Feature found in the LDM130 and LDM330 only.
‡ Feature found in the LDM130, LDM195 and LDM330 only.
1. Measurement Reference Position
2. Measuring Mode
3. Memory (recent measurements)*
4. Active Laser Indicator
5. Add and Subtract‡
6. Maximum Display
7. Indirect Measuring Mode
(Pythagoras Measurements)‡
8. Minimum Display
9. Stake-out Direction Indicator†
10. Main Screen –
Current Measurement
11. Countdown Timer*
12. Bluetooth
®
Indicator∆
13. Battery Status Indicator
14. Secondary Screens
(prior 2 measurements)
LCD Screen
1746i-4_Manuals 6/5/17 1:37 PM Page 7

8 ©2017 Johnson Level & Tool
6. Battery Installation
To install batteries in the Laser Distance Meter:
1.
Unlock the battery cover located at the bottom of
the back of the instrument by lifting the metal
bar up and over by 180°.
2. Remove the battery cover by sliding the cover
towards the bottom of the instrument, as indicated by the arrows, and lifting the cover up.
3. Insert 2 “AAA” batteries into the battery compartment according to the polarity illustrated inside.
4. Replace the battery cover.
5. Lock the battery cover by replacing the metal bar until it is lying flush
with the battery cover.
Current Battery Status
To check the current battery life, press and hold both the and
buttons simultaneously for one second. The battery icon will display
for approximately 10 seconds.
When the batteries are low, the battery icon will automatically display.
Battery has 100% power
Battery has approximately 60% power
Battery has approximately 25% power
Battery has approximately 5% power,
and new batteries are needed
Unlocked Battery Cover
Locked Battery Cover
1746i-4_Manuals 6/5/17 1:37 PM Page 8

©2017 Johnson Level & Tool 9
7. Operating Instructions
IMPORTANT: It is the responsibility of the user to ensure proper
maintenance of the Laser Distance Meter. Conduct periodic test
measurements to ensure the instrument is measuring accurately
and consistently. This is most important if the instrument has been
exposed to extreme temperatures or moisture. Always confirm
accuracy before and during important measurements. Keep the
Laser Distance Meter optic lens clean and inspect for damage.
The Laser Distance Meter is designed to withstand a drop from
3 feet (1 meter). If dropped from a higher distance, the tool’s
calibration may be affected and it should be tested for accuracy.
Power On/Off the Laser Distance Meter
Press either the button or the button to power on the
instrument.
Press and hold the button to power off the instrument.
Automatic Shutoff
Laser will turn off after remaining idle for 2 minutes. Press the
button to re-enable the laser.
Unit will turn off after remaining idle for 5 minutes.
Notes:
• Use only alkaline batteries.
• Remove the batteries when storing the instrument for an extended
time (more than 3 months) to avoid damage to the tool should the
batteries deteriorate.
1746i-4_Manuals 6/5/17 1:37 PM Page 9

10 ©2017 Johnson Level & Tool
Volume Control
The Laser Distance Meter has three volume settings: high, low and
off. When the instrument is powered on, it will default to the most
recently used volume setting.
To change the volume setting, press and hold the button.
The unit will cycle through the three settings (S1 = high, S-2 = low,
Off = mute) until you release the button.
Bluetooth
®
Mode
When the instrument is first turned on, the Bluetooth
®
setting will be
off. To turn it on, press and hold the button until the Bluetooth
®
icon ( ) flashes at the top of the LCD screen. To turn it off, press
and hold the button until the Bluetooth®icon disappears from the
LCD screen.
Measuring Modes
The Laser Distance Meter has 9 measuring modes. When the instrument
is powered on, it will default to the Length measuring mode.
1. Length (Single or Continuous)
2. Area/Square
3. Volume/Cube
4. 1-Point Pythagoras
5. 2-Point Pythagoras
6. 3-Point Pythagoras
7. 3-Point Partial Pythagoras
8. Digital Level
9. Stake-out
1746i-4_Manuals 6/5/17 1:37 PM Page 10
©2017 Johnson Level & Tool 11
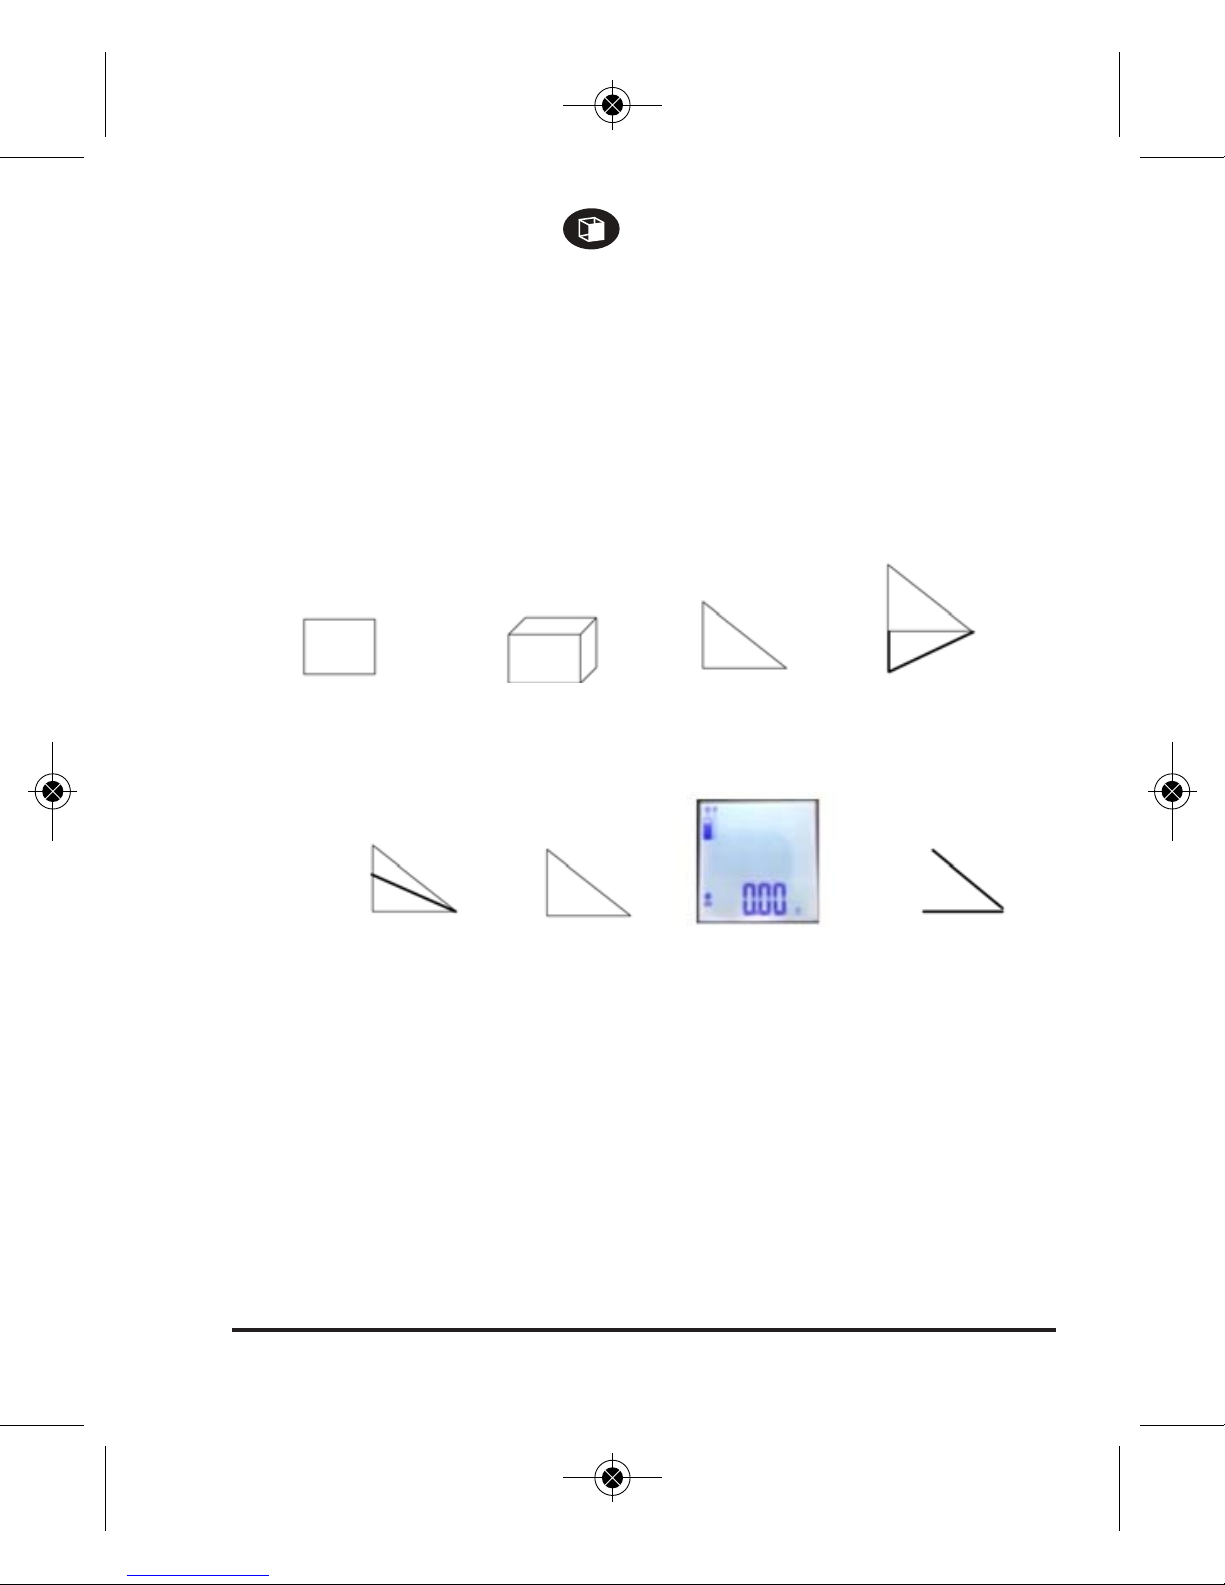
To select a mode, press the button. When there is no measuring
mode icon shown near the top left of the LCD screen, the instrument
is in the Length measuring mode. The selected measuring mode icon
will display near the top left of the LCD screen for the Area, Volume,
Pythagoras and Digital Level measuring modes. When in the stake-out
mode, the main display will have a flashing symbol and will read
0.00, with the hundredths decimal place flashing.
+
_
Length (Single or Continuous): No icon displays when the tool is in Length mode.
Area/Square Volume/Cube
Digital Level
2-Point
Pythagoras
1-Point
Pythagoras
3-Point
Pythagoras
3-Point Partial
Pythagoras
Stake-Out
1746i-4_Manuals 6/5/17 1:38 PM Page 11

12 ©2017 Johnson Level & Tool
Units of Measure
The Laser Distance Meter has 7 units of measure.
1. Feet in decimal format (e.g., 6.637 ft)
2. Inches in decimal format (e.g., 79.646 in)
3. Feet and inches in 1/32″ (e.g., 6′7” 21/32)
4. Inches in 1/32″ (e.g., 79″ 21/32)
5. Inches in 1/16″ (e.g., 79″ 11/16)
6. Inches in 1/8″ (e.g., 79″ 5/8)
7. Meters (e.g., 2.023 m)
To select a unit of measure before making a measurement, press the
button. The word “Unit” will display in the center of the LCD screen,
and the unit of measure will display at the bottom right of the LCD
screen. Continue to press the button to scroll through the different
units of measure. OR after taking a measurement, press the
button repeatedly to scroll through the various units of measurement.
Note: The screen will only display feet and meters in a decimal format
in Area or Volume modes.
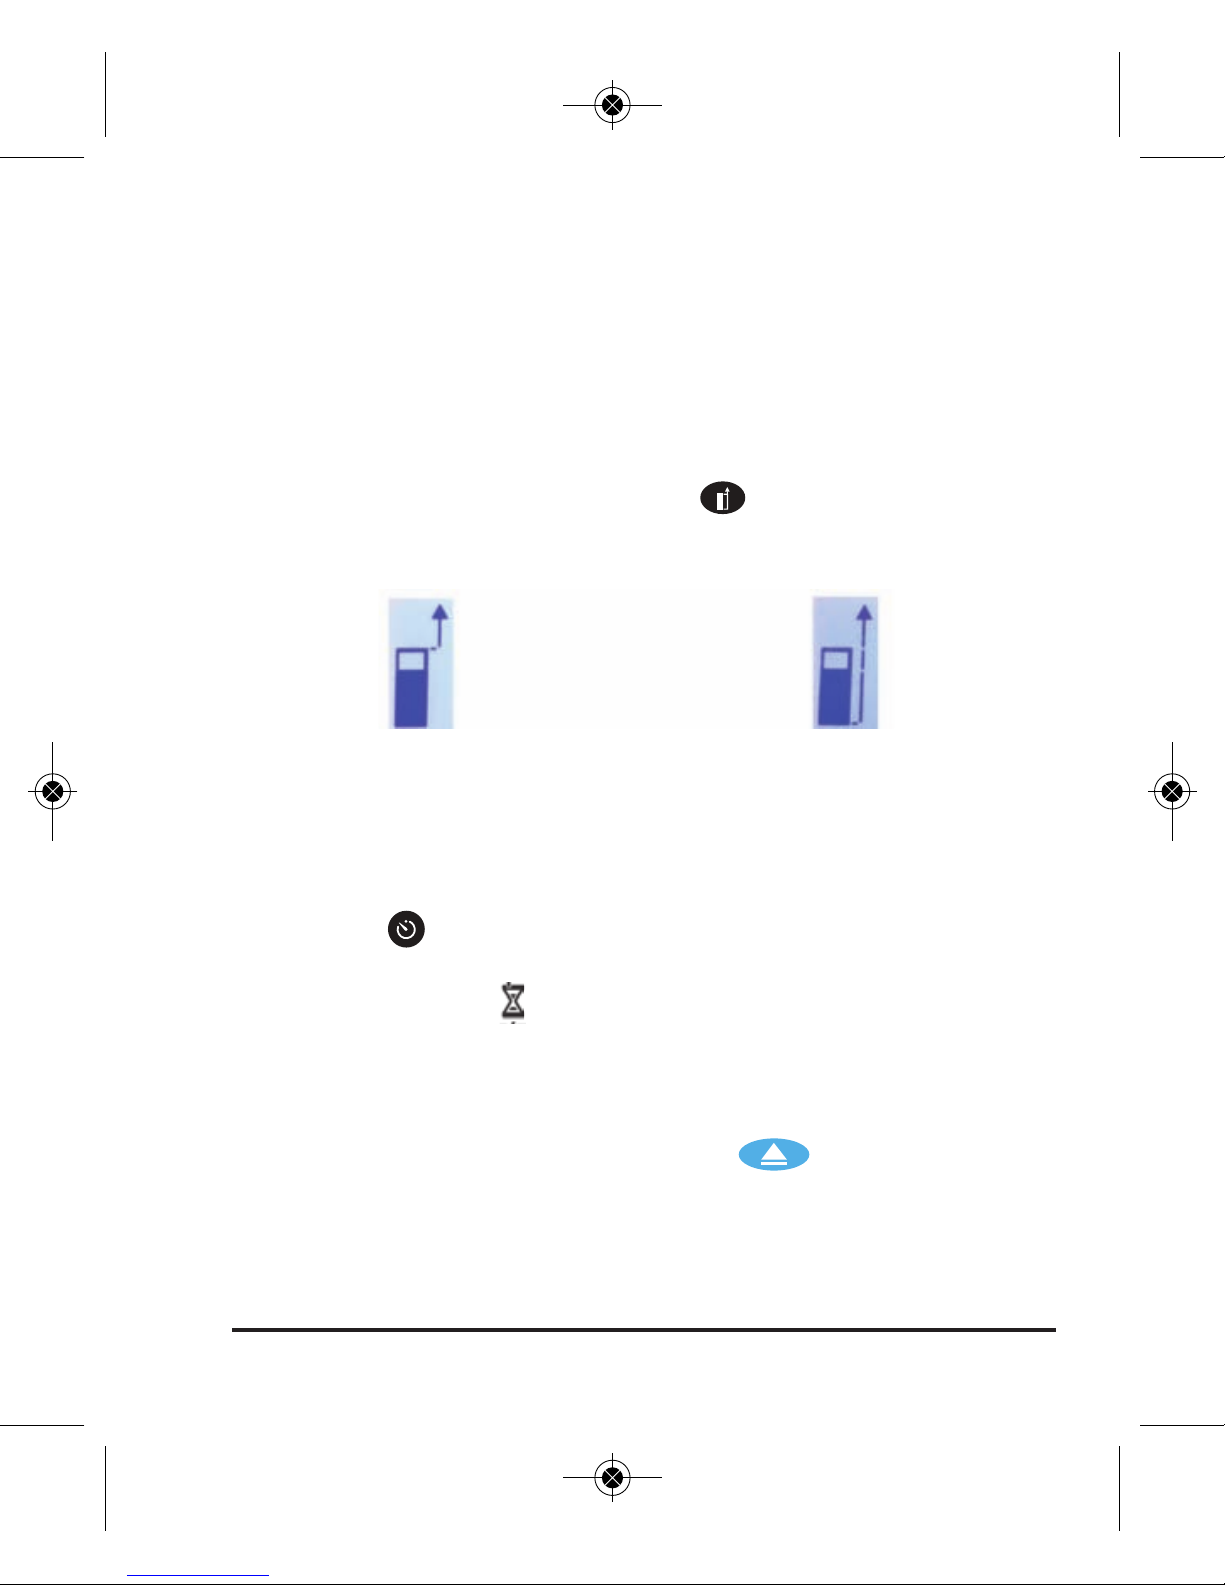
Measurement Reference Position
Note: Setting the measurement reference correctly is critical to
obtaining an accurate measurement, as it establishes the place where
a reading of zero (0) is located. If the wrong reference position is
selected, the measurement will be off by the length of the tool
(4.6″ / 4 3/5″).
1746i-4_Manuals 6/5/17 1:38 PM Page 12
©2017 Johnson Level & Tool 13
Front of Unit Zero
Reference Position
Back of Unit Zero
Reference Position
The Laser Distance Meter has two reference positions for
measurement, which establish the place where a reading of zero (0)
is located. When the instrument is first turned on, it will default to the
most recently used position.
1. Front of the unit
2. Back of the unit
To select the desired position, press the button. The laser indicator
icon at the top left of the LCD screen will display the selected position.
Using the Timer
1. Press the button to toggle between the timer settings
(2 seconds, 5 seconds, 10 seconds or off).
2. The hourglass icon ( ) will appear at the top of the LCD screen,
with the number of seconds (2, 5 or 10) indicated to the left.
3. Aim the Laser Distance Meter so that the laser dot is on the
selected target.
4. Keep your position stable and press the button.
5. The number of seconds displayed on the LCD screen will count
down to zero, and the measurement will appear on the main display.
1746i-4_Manuals 6/5/17 1:38 PM Page 13

14 ©2017 Johnson Level & Tool
Using the Clipboard
The clipboard feature can be used to store up to 20 measurements.
To save a measurement to the clipboard:
1. After taking your measurement, press the button.
2. The clipboard icon ( ) will appear at the top center of the LCD
screen. The number shown in the icon corresponds to the
measurement number (1 through 20).
3. Press the button to exit the clipboard and make your next
measurement.
To view measurements saved to the clipboard:
1. Press and hold the button.
2. The clipboard icon ( ) will appear at the top center of the LCD
screen, showing the most recently saved measurement.
3. Click the or button to scroll through earlier/later saved
measurements.
4. Click the button to exit the clipboard.
To clear all measurements from the clipboard:
1. Press and hold the button to view the clipboard.
2. Press and hold the button again. “CLA” will appear on the LCD
screen, and all saved measurements will be erased.
1746i-4_Manuals 6/5/17 1:38 PM Page 14

©2017 Johnson Level & Tool 15
Length Measurement Mode – Single
1. After turning on the instrument, it will default to the Length mode.
If the mode has been changed and you wish to return to the Length
mode, press the button until the measuring mode icon on the
LCD screen disappears.
2. After selecting the desired unit of measure and reference position,
aim the Laser Distance Meter so that the laser dot is on the
selected target.
3. Keep your position stable and press the button.
4. The measurement will appear on the main display, and the laser
will turn off.
5. Press the button again to take your next Length measurement.
Length Measurement Mode – Continuous
1. After selecting the desired unit of measure and reference position,
aim the Laser Distance Meter so that the laser dot is on the
selected target.
2. Keep your position stable and press and hold the button.
The Laser Distance Meter will enter continuous length
measurement mode.
3. Move the instrument as necessary to the proper distance.
4. Press the button or button to pause the measurement.
The laser will turn off.
5. To exit the continuous mode and return to the single length
measurement mode, press the button while the tool is paused.
1746i-4_Manuals 6/5/17 1:38 PM Page 15

16 ©2017 Johnson Level & Tool
Area/Square Measurement Mode
1. Press the button once until the Area/Square mode icon ( )
displays near the top left of the LCD screen.
2. After selecting the desired unit of
measure and reference position, aim
the Laser Distance Meter so that the
laser dot is on the selected target to
measure the length.
3. Keep your position stable and press the button. The length
measurement will appear above the main display.
4. Aim the Laser Distance Meter so that the laser dot is on the
selected target to measure the width.
5. Keep your position stable and press the button again. The
length and width measurements will appear on the secondary
screen and the calculated area will appear on the main screen.
The laser will turn off.
6. Press the button again to take your next Area measurement.
1746i-4_Manuals 6/5/17 1:38 PM Page 16
©2017 Johnson Level & Tool 17
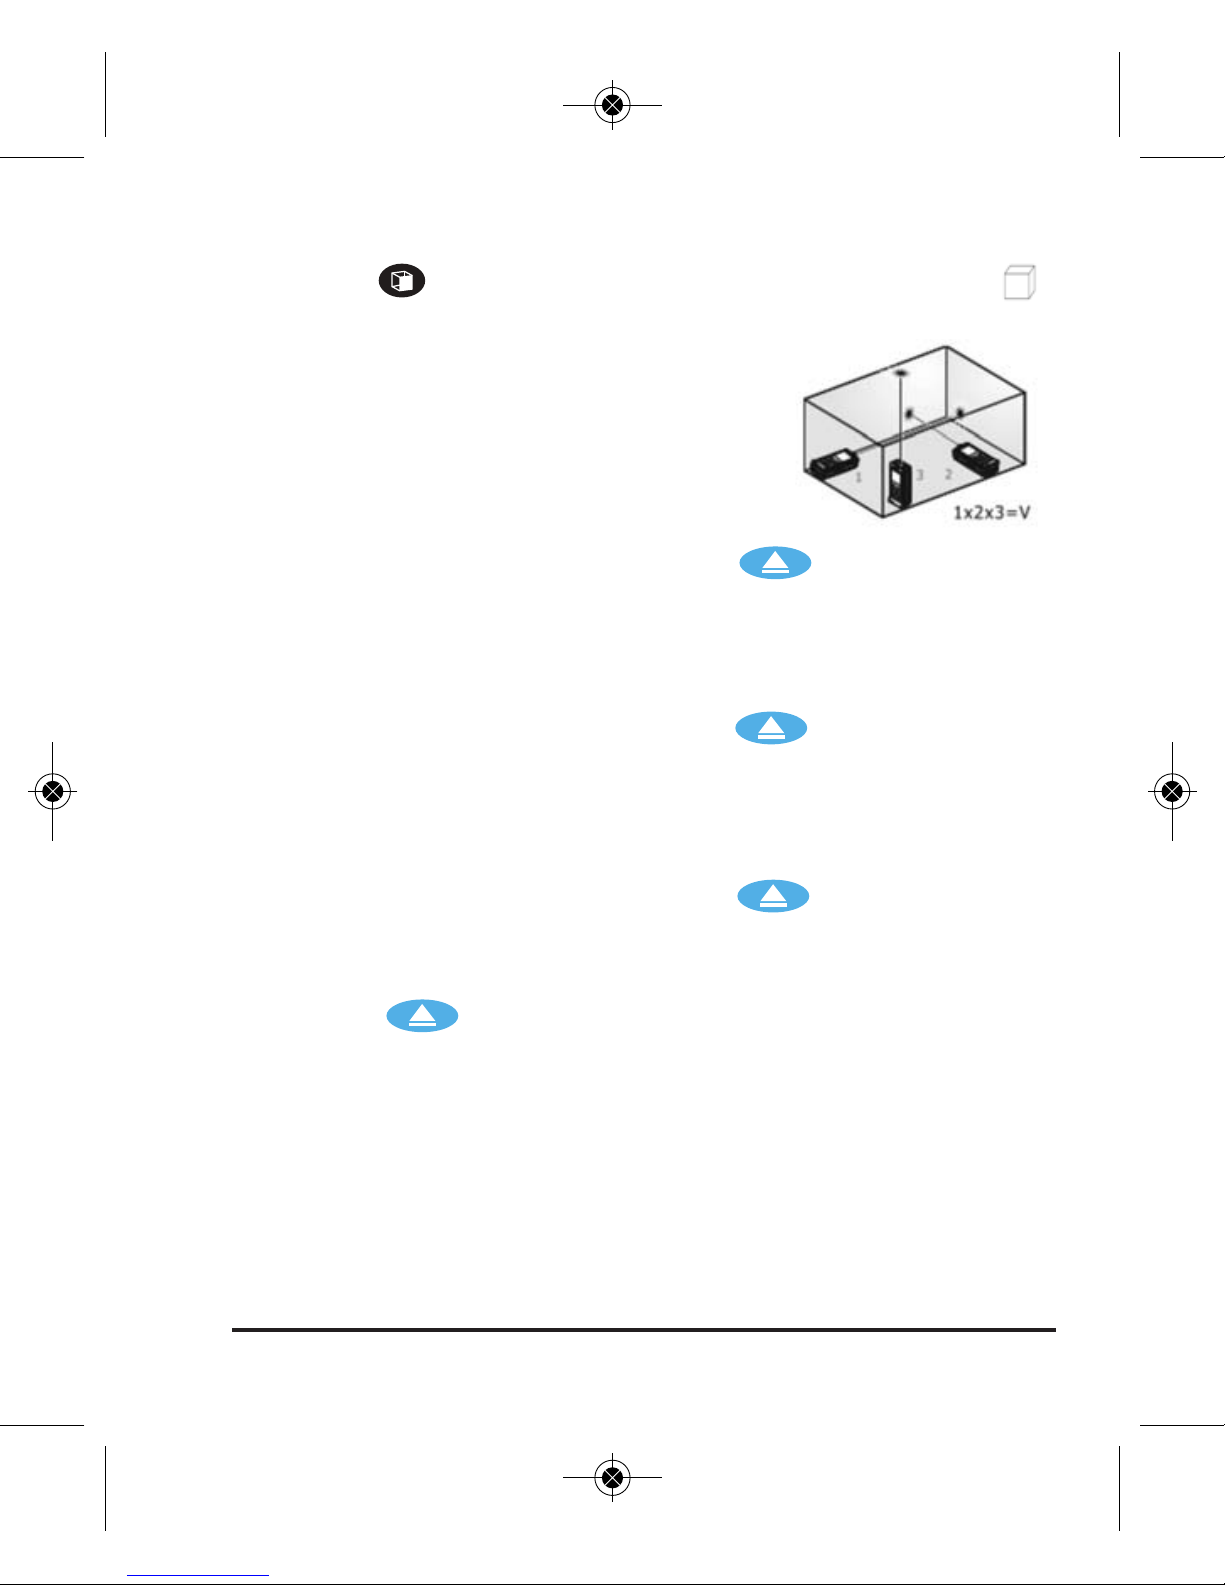
Volume/Cube Measurement Mode
1. Press the button 2 times until the Volume/Cube mode icon ( )
displays near the top left of the LCD screen.
2. After selecting the desired unit of
measure and reference position, aim the
Laser Distance Meter so that the laser
dot is on the selected target to measure
the length.
3. Keep your position stable and press the button. The length
measurement will appear above the main display
4. Aim the Laser Distance Meter so that the laser dot is on the
selected target to measure the height.
5. Keep your position stable and press the button again. The
length and height measurements will appear above the main screen.
6. Aim the Laser Distance Meter so that the laser dot is on the
selected target to measure the width.
7. Keep your position stable and press the button again. The
height and width measurements will appear above the main screen,
and the calculated volume will appear on the main screen.
8. Press the button again to take your next Volume
measurement.
1746i-4_Manuals 6/5/17 1:38 PM Page 17

18 ©2017 Johnson Level & Tool
2-Point Pythagoras Measurement Mode
2-Point Pythagoras measurement mode
refers to a measurement mode based off
the Pythagorean Theorem (A2 + B2 =
C2). If you know 2 lengths (but not the
third), this formula allows you to calculate
a missing dimension of a triangle. The
Laser Distance Meter uses this theorem to indirectly measure lengths
that are otherwise not directly measureable, enhancing the utility of
the tool.
Typically, the Laser Distance Meter is used to measure a height shown
above as “B” when there is no target at the top surface at which to
aim the laser, such as a tall wall. The measurement can be taken by
standing back at some distance “A” and taking measurements of “C”
(on the side of the wall) and “A” (aimed level at the wall).
To use the 2-Point Pythagoras measurement mode:
1. Press the button 3 times until the Pythagoras mode icon ( )
displays at the left of the LCD screen.
2. After selecting the desired unit of measure and reference position,
aim the Laser Distance Meter so that the laser dot is on the selected
target to measure the length of the hypotenuse (represented by “C”
in the figure above and indicated by the flashing lines on the
LCD screen).
3. Keep your position stable and press the button. The “C”
measurement will appear above the main display.
1746i-4_Manuals 6/5/17 1:38 PM Page 18

©2017 Johnson Level & Tool 19
4. Aim the Laser Distance Meter so that the laser dot is on the
selected target to measure the length of the base (represented by
“A” in the figure above).
5. Keep your position stable and press the button again. The “A”
and “C” measurements will appear above the main screen. The
indirect height will appear on the main screen (represented by “B”
in the figure above). The laser will turn off.
6. Press the button to clear the display and take your next
2-Point Pythagoras measurement.
3-Point Pythagoras Measurement Mode
Similar to the 2-Point Pythagoras measurement
mode, the 3-Point Pythagoras measurement
mode indirectly measures lengths that are
otherwise not directly measureable.
Typically, the Laser Distance Meter is used to measure a height shown
above as “B” when there is no target at the top surface at which to
aim the laser, such as a tall wall, and it is not possible to aim the laser
from the ground level. The measurement can be taken by standing
back at some distance “A” and taking measurements of “C” and “D”
(on the side of the wall) and “A” (aimed level at the wall).
To use the 3-Point Pythagoras measurement mode:
1. Press the button 4 times until the 3-Point Pythagoras mode
icon ( ) displays at the left of the LCD screen.
2. After selecting the desired unit of measure and reference position,
aim the Laser Distance Meter so that the laser dot is on the selected
target to measure the length “C” in the figure above.
1746i-4_Manuals 6/5/17 1:38 PM Page 19

20 ©2017 Johnson Level & Tool
3. Keep your position stable and press the button. The “C”
measurement will appear above the main display.
4. Aim the Laser Distance Meter so that the laser dot is on the
selected target to measure the length “D” in the figure above.
5. Keep your position stable and press the button again. The “D”
and “C” measurements will appear above the main display.
6. Aim the Laser Distance Meter so that the laser dot is on the
selected target to measure the length of the base (represented by
“A” in the figure above).
7. Keep your position stable and press the button again. The “A”
and “D” measurements will appear above the main screen. The
indirect height will appear on the main screen (represented by “B”
in the figure above). The laser will turn off.
8. Press the button to clear the display and take your next
3-Point Pythagoras measurement.
3-Point Partial Pythagoras Measurement Mode
Similar to the 2-Point and 3-Point Pythagoras
measurement mode, the 3-Point Partial
Pythagoras measurement mode indirectly
measures lengths that are otherwise not
directly measureable.
Typically, the Laser Distance Meter is used to measure a partial
height, shown above as “B”, when there is no target at the top
surface at which to aim the laser, such as a tall wall. The measurement
can be taken by standing back at some distance “A” and taking
measurements of “C” and “D” (on the side of the wall) and “A”
(aimed level at the wall).
1746i-4_Manuals 6/5/17 1:38 PM Page 20

©2017 Johnson Level & Tool 21
To use the 3-Point Partial Pythagoras measurement mode:
1. Press the button 5 times until the 3-Point Partial Pythagoras
mode icon ( ) displays at the left of the LCD screen.
2. After selecting the desired unit of measure and reference position,
aim the Laser Distance Meter so that the laser dot is on the selected
target to measure the length “C” in the figure above.
3. Keep your position stable and press the button. The “C”
measurement will appear above the main display.
4. Aim the Laser Distance Meter so that the laser dot is on the
selected target to measure the length “D” in the figure above.
5. Keep your position stable and press the button again. The “C”
and “D” measurements will appear above the main display.
6. Aim the Laser Distance Meter so that the laser dot is on the
selected target to measure the length of the base (represented by
“A” in the figure above).
7. Keep your position stable and press the button again. The “D”
and “A” measurements will appear above the main screen. The
indirect height will appear on the main screen (represented by “B”
in the figure above). The laser will turn off.
8. Press the button to clear the display and take your next
3-Point Partial Pythagoras measurement.
1746i-4_Manuals 6/5/17 1:38 PM Page 21

22 ©2017 Johnson Level & Tool
1-Point Pythagoras Measurement Mode
This Laser Distance Meter is equipped with
an angle sensor that can be used to both
quickly check an angle (like a digital level) or
to make more advanced 1-point Pythagoras
calculations with only one measured length reference. The 1-Point
Pythagoras mode uses mathematical relationships to calculate a
distance that cannot otherwise be measured directly by measuring the
angle of the tool and the length of a triangle hypotenuse.
To use the 1-Point Partial Pythagoras measurement mode:
1. Press the button 6 times until the Pythagoras mode icon ( )
displays near the top left of the LCD screen and the current value
for the angle is displayed as XX.X°.
2. After selecting the desired unit of measure and reference position,
aim the Laser Distance Meter so that the laser dot is on the selected
target to measure the length of the hypotenuse. Hold the Laser
Distance Meter so that the bottom edge of the tool is roughly
horizontal for the most accurate results.
3. Keep your position stable and press the button. The angle
measured will appear above the main display.
4. A length result will be shown on the main screen, and the triangle
in the Pythagoras Measurements indicator will flash one leg of the
triangle. The measurement result shown corresponds to that length
of the triangle you measured (height, width or hypotenuse). Press the
or button to toggle through the different sides of the triangle.
5. Press the button to clear the display and take your next
1-Point Pythagoras measurement.
1746i-4_Manuals 6/5/17 1:38 PM Page 22

©2017 Johnson Level & Tool 23
Stake-out Measurement Mode
The Stake-out mode is used when it is necessary to measure a
repeating distance interval, such as when installing fence posting
every 8 feet. It is important to have the volume enabled when
using the stake-out mode, as the tool will beep to guide you to
the correct distance.
To use the stake-out mode:
1. Set your desired unit of measurement and measurement reference
position, as described earlier in this manual.
2. Press the button 7 times to enter the stake-out mode. The main
display will have a flashing symbol and will read 0.00,
with the hundredths decimal place flashing. This number
indicates your desired stake-out distance.
3. If you wish to increase or decrease the set stake-out distance by
hundredths of a decimal point (the flashing number), press the
button to increase the set stake-out distance or press the button
to decrease the stake-out distance.
4. If you wish to increase or decrease the set stake-out distance by
whole numbers, first press the button. The whole number on
the main display will begin flashing. Press the button to increase
the set stake-out distance or press the button to decrease the
stake-out distance.
5. Aim the Laser Distance Meter so that the laser dot is on the
selected target.
6. While keeping your position stable, press and hold the
button.
+
_
1746i-4_Manuals 6/5/17 1:38 PM Page 23

24 ©2017 Johnson Level & Tool
7. The Laser Distance Meter will begin beeping steadily, and 3
numbers will appear on the LCD screen.
• The top number indicates the set stake-out distance that
you have set.
• The middle number indicates the number of stake-out
points between the unit and the selected target.
• The bottom number on the main display indicates the
distance between the unit and the selected target.
8. A + or – symbol will flash on the main display
to guide you forward or backward, respectively,
to the first stake-out point. As you approach the
stake-out point, the middle number on the LCD
screen will continually update until it reaches a
whole number (the stake-out point). The unit
will beep at regular intervals until you reach
the first stake-out point, at which time it will emit a long beep.
9. Continue following the main display as described in steps 7 and 8
above until you have measured all of your stake-out points.
1746i-4_Manuals 6/5/17 1:38 PM Page 24

©2017 Johnson Level & Tool 25
Digital Level Measurement Mode
The Digital Level measurement mode provides an
angle measurement.
This laser distance meter can be used as a digital level to measure a
vertical angle, shown above as “C.” There are many benefits to using
this mode. Over short distances, it can be used for spot checking level
of floors, countertops, etc. Over long distances, it can be used to
check the angle of rafters or the relative height of two walls, etc. by
using the laser beam as a reference.
To use the Digital Level measurement mode:
1. After selecting the desired reference position, press the button 8
times until the Digital Level mode icon ( ) displays at the left of
the LCD screen.
2. The angle will show in the main display and will update
continuously as you move the Laser Distance Meter.
1746i-4_Manuals 6/5/17 1:38 PM Page 25
26 ©2017 Johnson Level & Tool
Measurement Addition and Subtraction
To add consecutive measurements, complete the following steps:
1. Complete your first measurement
2. Press the button. The first measurement will appear above the
main display.
3. Complete your second measurement. The second measurement will
appear above the main display, and the sum of the two
measurements will appear in the main display.
4. Repeat step 3 above as necessary to add further measurements.
To subtract consecutive measurements, complete the following steps:
1. Complete your first measurement
2. Press the button. The first measurement will appear above the
main display.
3. Complete your second measurement. The second measurement
will appear above the main display, and the difference of the two
measurements will appear in the main display.
4. Repeat step 3 above as necessary to subtract further
measurements.
1746i-4_Manuals 6/5/17 1:38 PM Page 26

©2017 Johnson Level & Tool 27
Calibrating the Angle Sensor
This Laser Distance Meter is equipped with highly accurate digital
angle sensors for using the 1-Point Pythagoras measurement mode.
This sensor should be calibrated regularly for the most accurate
results possible.
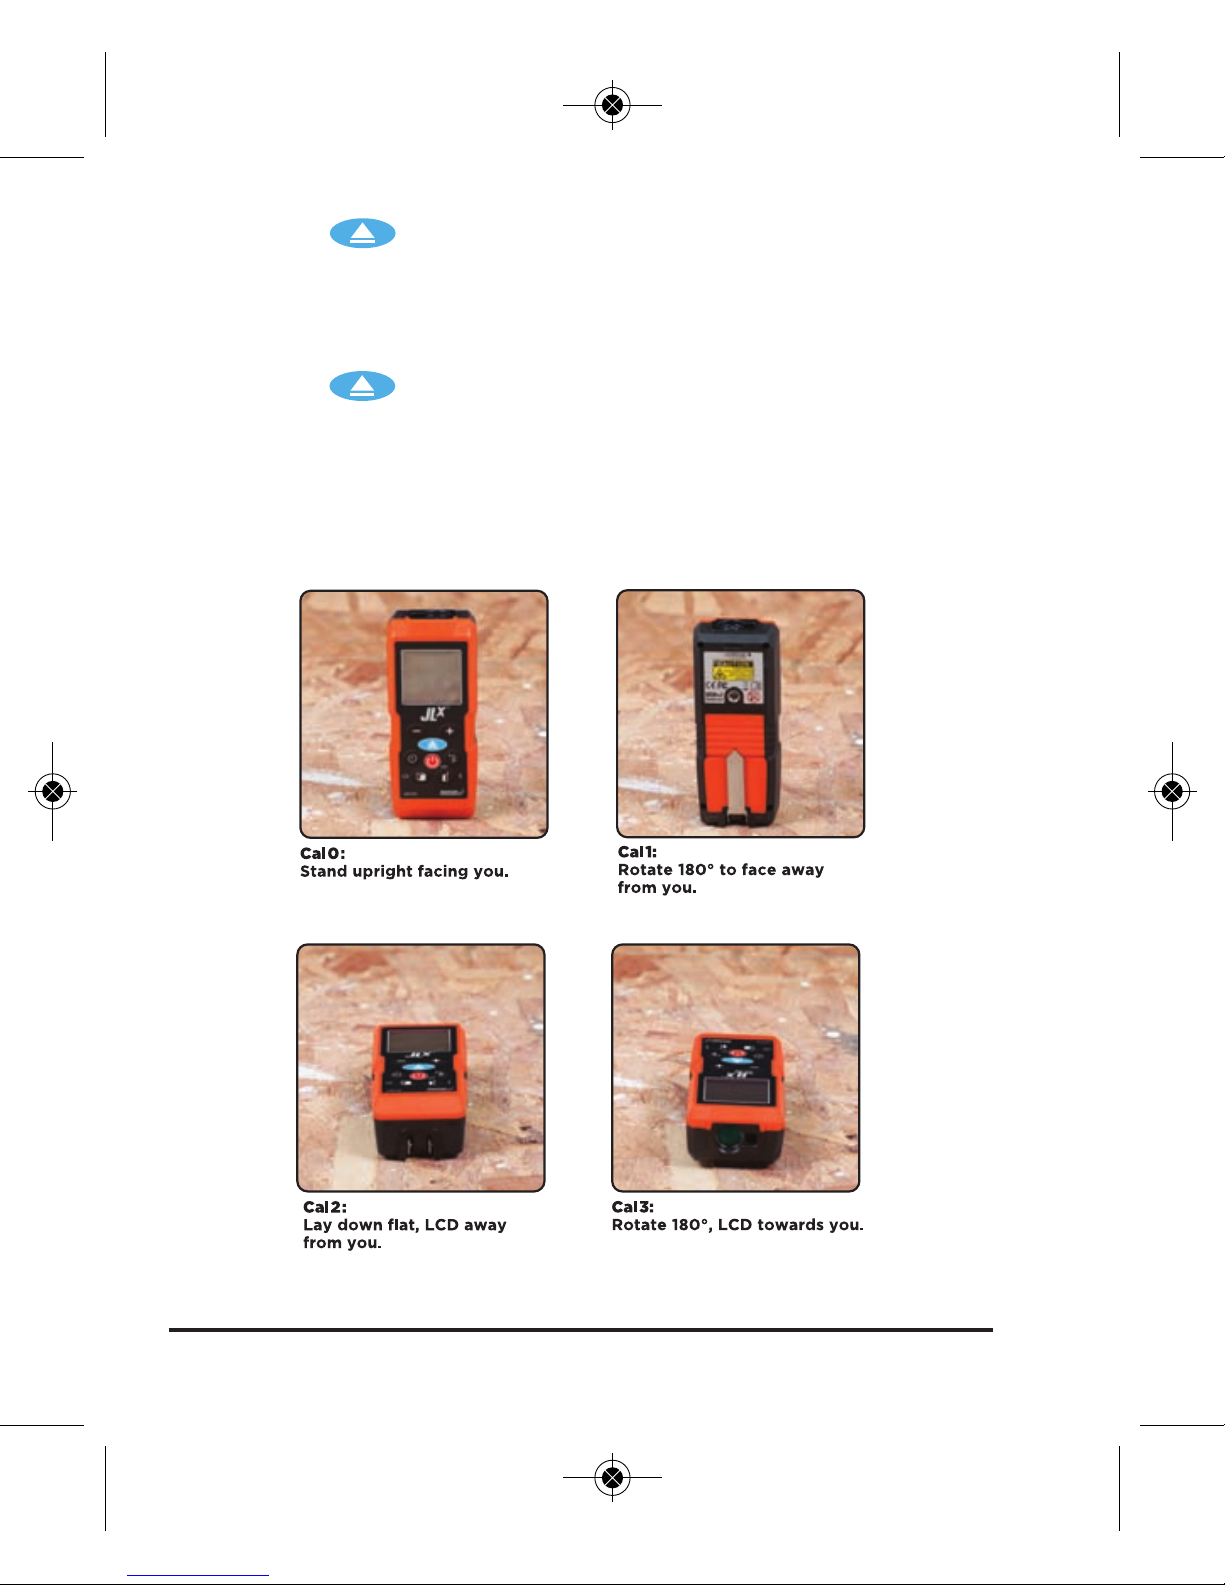
To calibrate the angle sensor:
1. Find a fairly level horizontal surface such as a countertop, desk,
wood floor, etc. The surface does not need to be perfectly level but
should be within approximately 2° of level.
2. With the Laser Distance Meter powered off, hold down both the
button and the button simultaneously.
3. Release the button.
4. When “CAL0” appears on the screen, release the button.
5. With “CAL0” on the screen, position the Laser Distance Meter
upright on the surface so that the laser beam is pointing towards
the sky and the screen is facing you.
6. Press the button and then release the Laser Distance Measure
so that it is balancing vertically in an upright position. On the screen,
“CAL0” will change to “CAL 1”, followed by “OK.”
7. Rotate the Laser Distance Meter 180 degrees so it is upright with
the laser beam pointing towards the sky and the screen is facing
away from you.
8. Press the button. “CAL 2” will appear on the screen followed
by “OK.”
9. Lay the Laser Distance Meter down so that the laser beam is facing
away from you and the screen is facing the sky.
1746i-4_Manuals 6/5/17 1:38 PM Page 27
28 ©2017 Johnson Level & Tool
10. Press the button. “CAL 3” will appear on the screen followed
by “OK.”
11. Rotate the Laser Distance Meter 180 degrees so the laser beam
is pointing towards you and the screen is facing the sky.
12. Press the button. “CAL 4” will appear on the screen followed
by “OK.”
13. The Laser Distance Meter will power down, and calibration of the
angle sensor will be complete.
1746i-4_Manuals 6/5/17 1:38 PM Page 28
©2017 Johnson Level & Tool 29
8. Using the Bluetooth®Measure-UpTMApp
This LDM features Bluetooth®for integration with your Android or
iOS smartphone or tablet. The app allows you to photograph and
dimension your jobsite. The dimensioned drawings can be saved or
exported to email or other popular messaging apps.
To get started, you’ll need a device running iOS or Android. Download
the free Measure-Up
™
app from the App Store or the Play Store.
Power up the LDM and press and hold the Bluetooth
®
button
until the Bluetooth®indicator on the LDM screen flashes. Keep the
LDM in length mode the entire time you use it with the app.
Ensure your smartphone or tablet’s Bluetooth®is enabled, then open
the Measure-Up™app and select the Bluetooth®pairing icon .
Select the laser distance meter from the list of Bluetooth
®
devices.
You may need to hit the refresh button in the App to see the
device. The next time you pair the same LDM, you can omit this step
– you will be prompted to reconnect to the last device, if it is enabled
and within range.
Use the camera icon to take a picture of your jobsite. It is
recommended to hold your device in landscape mode for taking the
picture because it will maximize the screen area available for
dimensioning your drawing. Accept the photo, then begin adding
dimension lines. Select the dimension icon to begin drawing the
dimension lines. You can draw arrows, rectangles (for area) or cubes
Camera
Camera
LDM Bluetooth/
Refresh
Camera
Convert Connect bluetooth
Dimension Audio
Camera
LDM Bluetooth/
Refresh
1746i-4_Manuals 6/5/17 1:38 PM Page 29

30 ©2017 Johnson Level & Tool
(for volumes). You can adjust the corners of the rectangles or cubes to
adjust for any perspective distortion in your photo by dragging the
ends of the line segments. Select the check mark icon to finish your
dimension lines.
Next, take your measurements one at a time on the LDM. The LDM
should stay in length mode, even for areas or volumes - the app will
calculate these. Each measurement taken will appear on the top right
of the display in the app. Click and drag the dimension in the app to
the appropriate dimension line in the app to snap the dimension to the
dimension line.
To append a voice, text, or video message to the picture, click the
button and select video , audio or text .
Check mark
Camera
LDM Bluetooth/
Refresh
Convert Connect bluetooth
Dimension Audio
Check mark
Video
Camera
LDM Bluetooth/
Refresh
Convert Connect bluetooth
Dimension Audio
Check mark
Video
Record Text
Camera
LDM Bluetooth/
Refresh
Check mark
Camera
LDM Bluetooth/
Refresh
When you have completed your image, press to save it. To exit
without saving, press . You can return to your image in the app
later, or you can export it by pressing . It can be emailed, or sent
via many popular messaging or storage apps.
Check mark
Camera
LDM Bluetooth/
Refresh
1746i-4_Manuals 6/5/17 1:38 PM Page 30

©2017 Johnson Level & Tool 31
9. Tips from the Pros
• Take more than one measurement in situations where accuracy
is critical.
• Take 3-4 measurements from the same position to compare the
consistency of each reading.
• To accurately measure objects lacking
an inside corner from the rear of the
instrument, use a scrap piece of
drywall or other flat material to extend
the corner. Butt the Laser Distance
Meter up to the material (as shown).
• If error message ERR 2 appears, place
a white sheet of paper or reflective
presse over the targeted measuring
surface to improve the return signal.
• Be aware that, when outdoors, the
working range of the tool decreases
due to ambient light.
• To make the laser beam more visible, aim it down in front of you
and then follow it with your eyes as you move it towards the
desired target.
• When making Pythagoras measurements, make sure that during
your second measurement you hold the tool as flat as possible for
the most accurate measurements.
• Calibrate the angle sensor every day that you plan to take 1-point
Pythagoras measurements or on days when the temperature
varies considerably.
1746i-4_Manuals 6/5/17 1:38 PM Page 31

32 ©2017 Johnson Level & Tool
• Use 2-point or 3-point Pythagoras measurements when possible;
they are generally more accurate than 1-point Pythagoras
calculations.
• Use the corner hook and corner extension to simplify
measurements.
• When working outside, a tripod will help stabilize the Laser
Distance Meter for greater accuracy, particularly when longer
measurements are needed.
• Use the self-timer to reduce the vibrations caused by pressing the
button, especially when longer measurements are needed.
10. Care and Handling
• This Laser Distance Meter unit is a precision tool that must be handled
with care.
• Avoid exposing unit to shock vibrations and extreme temperatures.
• Remove the batteries when storing the unit for an extended time (more than
3 months) to avoid damage to the unit should the batteries deteriorate.
• Avoid getting the unit wet.
• Keep the laser unit dry and clean, especially the laser output window.
Remove any moisture or dirt with a soft, dry cloth.
• Do not use harsh chemicals, strong detergents or cleaning solvents to clean
the unit.
1746i-4_Manuals 6/5/17 1:38 PM Page 32

©2017 Johnson Level & Tool 33
11. Troubleshooting Guide
This section is designed to help you diagnose and troubleshoot
common problems that prevent the Laser Distance Meter from
working properly.
If the Laser Distance Meter returns an ERR code (display shows ERR
plus a number from 1 to 6), please
refer to Section 4
of this manual
for possible resolutions. If your Laser Distance Meter fails to operate
in any other way, please refer to the following troubleshooting guide
for some suggestions on how to diagnose the problem.
Symptom
Will not turn on
Possible Cause
Batteries missing or
depleted
Polarity reversed
Solution
Change the batteries
Check battery polarity
Turns off after a short
time
Batteries depleted Change the batteries
Measurement seems
incorrect
Incorrect reference used
Angle sensor requires
calibration
Set the reference
position to the front rear
edge of the tool, as
appropriate
Calibrate the angle
sensor (refer to the
Calibrating the Angle
Sensor
section of this
manual)
1746i-4_Manuals 6/5/17 1:38 PM Page 33

34 ©2017 Johnson Level & Tool
12. Technical Specifications
Laser Wavelength 650 nm
Laser Classification II
Maximum Power Output ≤1mW
Typical Accuracy*
±1/16″
over the full working range
Accuracy at Unfavorable
Conditions**
±3/16″
over the full working range
Angle Sensor Accuracy 0°, 90° – 0.2°; all others – 0.5°
Typical Measuring Range* 2″ - 330′
Typical Interior Range* 2″ - 330′
Range at Unfavorable
Conditions** 2″ - 135′
Bluetooth
®
Yes
Angle Sensor No
Operating Modes Single, Continuous, Area, Volume,
1-Point Pythagoras, 2-Point Pythagoras,
3-Point Pythagoras, 3-Point Partial
Pythagoras, Stake-out
Units ft, in, m, 1/8″, 1/16″, 1/32″
Power Supply 2 “AAA” alkaline batteries (included)
Battery Life Minimum 10 hours/10,000 measurements
1746i-4_Manuals 6/5/17 1:38 PM Page 34

©2017 Johnson Level & Tool 35
Operating
Temperature Range 23°F - 104°F
Storage
Temperature Range -4°F - 160°F
Dimensions 4.6″ x 1.9″ x 1.2″
Weight 4.38 oz. including batteries;
3.63 oz.excluding batteries
IP Rating IP 54
*Tested per ISO 16331-1.
**Per ISO16331-1, unfavorable conditions are designed to simulate bright sunlight and
give an approximate indication of the working range of the tool outdoors on a bright,
sunny day. Overcast or darker days will offer a longer working range.
1746i-4_Manuals 6/5/17 1:38 PM Page 35

36 ©2017 Johnson Level & Tool
13. Product Warranty
Johnson Level & Tool offers a two year limited warranty on each of its products.
You can obtain a copy of the limited warranty for a Johnson Level & Tool
product by contacting Johnson Level & Tool's Customer Service Department,
as provided below, or by visiting our web site at www.johnsonlevel.com. The
limited warranty for each product contains various limitations and exclusions.
Do not return this product to the store/retailer or place of purchase.
Non-warranty repairs and course calibration must be done by an authorized
Johnson®service center or Johnson Level & Tool's limited warranty, if
applicable, will be void and there will be NO WARRANTY. Contact one of our
service centers for all non-warranty repairs. A list of service centers can be
found on our web site at www.johnsonlevel.com or by calling our Customer
Service Department. Contact our Customer Service Department for Return
Material Authorization (RMA) for warranty repairs (manufacturing defects
only). Proof of purchase is required.
NOTE: The user is responsible for the proper use and care of the product. It is the
responsibility of the user to verify the calibration of the instrument before each use.
For further assistance, or if you experience problems with this product that are not
addressed in this instruction manual, please contact our Customer Service Dept.
In the U.S., contact Johnson Level & Tool’s Customer Service Department at
888-9-LEVELS.
In Canada, contact Johnson Level & Tool’s Customer Service Department at
800-346-6682.
1746i-4_Manuals 6/5/17 1:38 PM Page 36

©2017 Johnson Level & Tool 37
14. Warranty Registration
Please register within 30 days of purchase. Registering ensures we
have your information on file for warranty service even if you lose your
receipt, and lets us contact you if there is ever a product recall. We will
never sell your information and only send you marketing information if
you opt-in.
To register, go to www.johnsonlevel.com/register.
15. Accessories
Johnson®accessories are available for purchase through authorized
Johnson
®
dealers. Use of non-Johnson®accessories will void any
applicable limited warranty and there will be NO WARRANTY. If you need
any assistance in locating any accessories, please contact our
Customer Service Department.
In the U.S., contact Johnson Level & Tool’s Customer Service
Department at 888-9-LEVELS.
In Canada, contact Johnson Level & Tool’s Customer Service
Department at 800-346-6682.
1746i-4_Manuals 6/5/17 1:38 PM Page 37

38 ©2017 Johnson Level & Tool
1746i-4_Manuals 6/5/17 1:38 PM Page 38
 Loading...