

Page 1

®
1746H-All 11/3/08 2:04 PM Page 1
Two-Sided Laser Detector with Clamp
Model No. 40-6780
Instruction Manual
This product features a high sensitivity, a double-faced display, low power
consumption, and good reliability. It can be used with the Acculine Pro
40-6662 and 40-6602 laser levels.
1. Technical Specifications
Detecting Range: Up to 300’ (90m)
Detecting Accuracy: 0.019” ≤ 50 ft. (0.5mm ≤ 15m)
0.039” ≤ 100 ft. (1mm ≤ 35m)
0.059” ≥ 100 ft. (1.5mm ≥ 35m)
Automatic Shut-off: 6 minutes
Power Supply: 9V battery
Sound Indicator: fast tone, double tone and solid tone
LCD: Up arrow, Down arrow,Center sign
LED Indication: Up, Middle, Down
Dimensions: 5.905" x 2.992" x 1.142" (150 x 76 x 29mm)
Weight: 0.386 lb. (0.175kg)
Others: Rain and dust resistant
©2008 Johnson Level & Tool 1
®
Page 2
1746H-All 11/3/08 2:04 PM Page 2
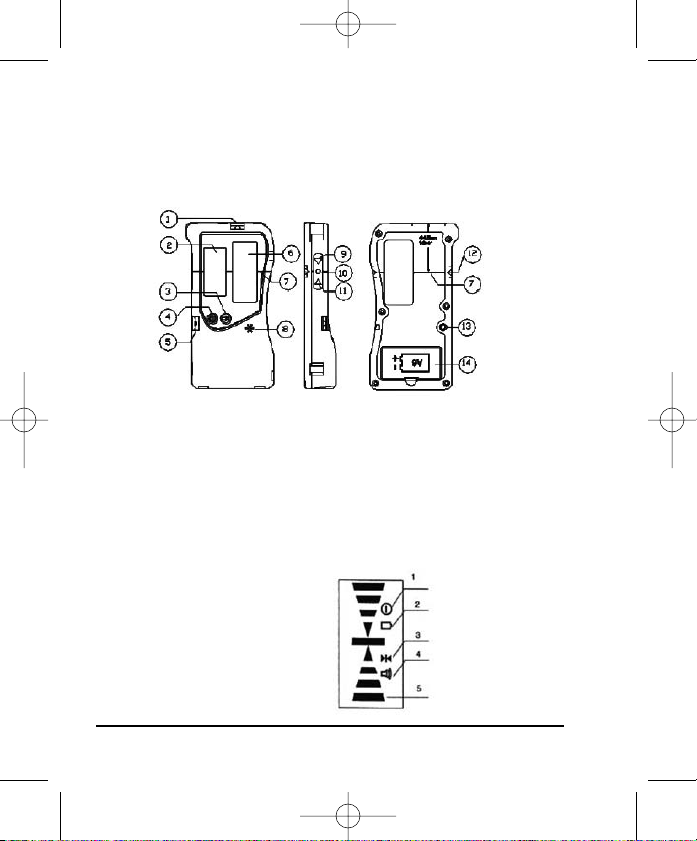
2. Components
With this laser detector, a line generated pulsed Acculine Pro Laser
can be used both indoors with bright light and/or outdoors in the
sunlight where the beams are not visible.
1. Horizontal Vial
2. Reception Window
3. Sound On/Off Key
4. Power On/Off Key
5. Vertical Vial
6. Display Window
7. Front On Grade Mark
Display Window Symbols
1. Power On
2.
Low Voltage
3. Coarse/Fine
4. Sound On
5. Position Indication Arrows
2 ©2008 Johnson Level & Tool
8. Beeper
9. Top Indicator Light
10. Middle Indicator Light
11. Bottom Indicator Light
12. Rear On Grade Mark
13. Rod Bracket Thread
14. Battery Door
Page 3
1746H-All 11/3/08 2:04 PM Page 3
3. Operation Instructions
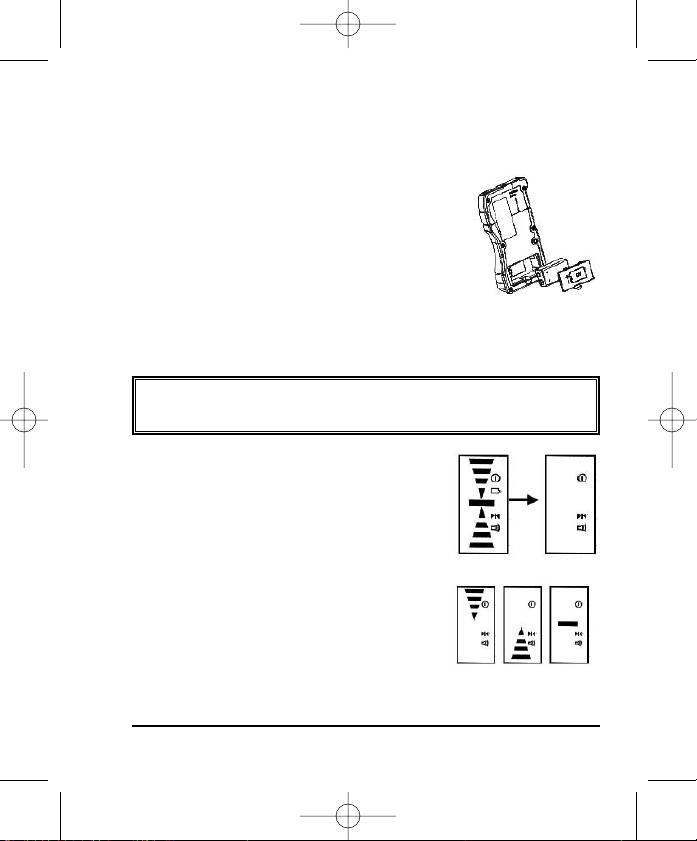
1. Battery Installation
Open the battery door, and put in one 9V battery according to the
polarity shown inside. Then snap the battery door
back.
Note:
• Remove the ba
stored for a long time.
• Replace the battery when the low voltage
indicator shows a low battery.
2. Operating Instructions
ttery when the unit is being
IMPORTANT
the pulse mode.
A. Press the P
will beep twice and all the symbols will be
displayed on the display window. After
0.5 seconds the detector will enter its
detecting mode.
B. Detecting the horizontal laser signal: Put
the detector in a vertical position and center
the bubble in the horizontal vial with the
reception windo
arrow shown on the display window and a lit
red light indicates the laser signal is below the detectors on grade
©2008 Johnson Level & Tool 3
: This detector will only work when the laser is in
ower on/off key: The detector
w facing the laser. A down
Page 4
1746H-All 11/3/08 2:04 PM Page 4
mark. An up arrow plus a yellow lit light indicates the laser signal is
above the detectors on grade mark. A middle sign plus a lit green light
indicates the laser signal is on grade.
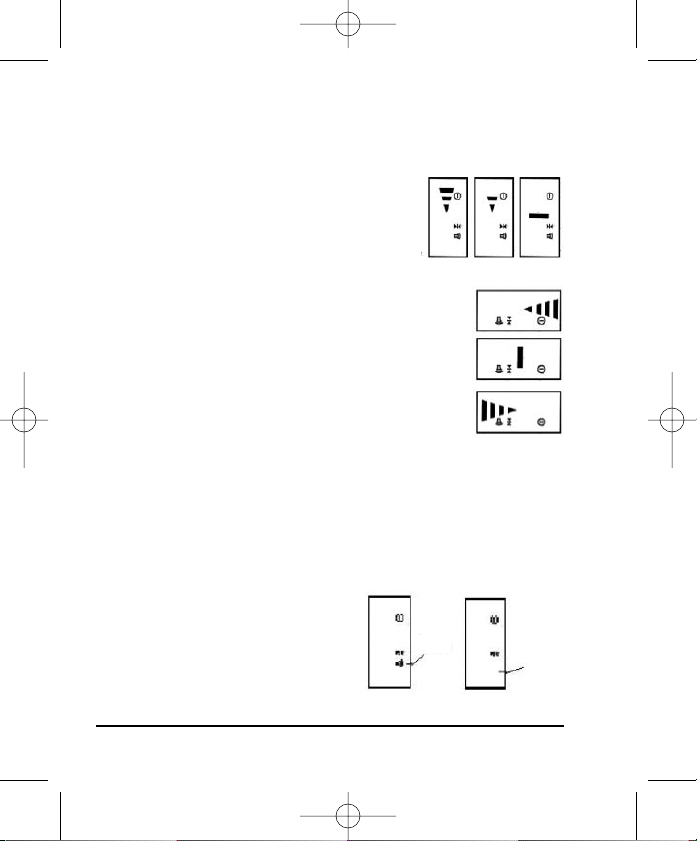
Note: When the laser signal moves towards the
center position,
the displayed up or down
arrows will decrease in size, until the center
single line appears.
C. Detecting the vertical laser signal: Put the
detector in a horizontal position (center the bubble
in the horizontal vial) with the reception windo
w
and indicator lights facing up. Have the reception
window face the unit to receive the vertical laser
signal. Left arrow shown on LCD plus a lit red light
indicates the laser signal is on the left side of center.
A middle sign with a lit green light indicates the
laser signal is on the middle position. A right arrow plus a lit
yellow light indicates the laser signal is on the right side of center.
D. Press the Power on/off key to power off the detector. The
detector will beep twice for off.
3. Sound Function
Pressing the sound key when the unit
wered-on. This will switch the
is po
unit between sound on and sound off,
Sound
On
Sound
Off
note the sound sign indication on LCD.
4 ©2008 Johnson Level & Tool
Page 5
1746H-All 11/3/08 2:04 PM Page 5
Sound function on:
• If the laser signal is on the top (left) side, then the detector will
give a fast tone.
• If the laser signal is on the bottom (right) side, then the detector
will give a double tone.
• If the laser signal is on the middle, then the detector will have a
solid tone.
4. Automatic Shut-Off Function
When not receiving a laser signal and with no operation of the keys
for six continuous minutes,
the unit will power off automatically to
preserve battery life.
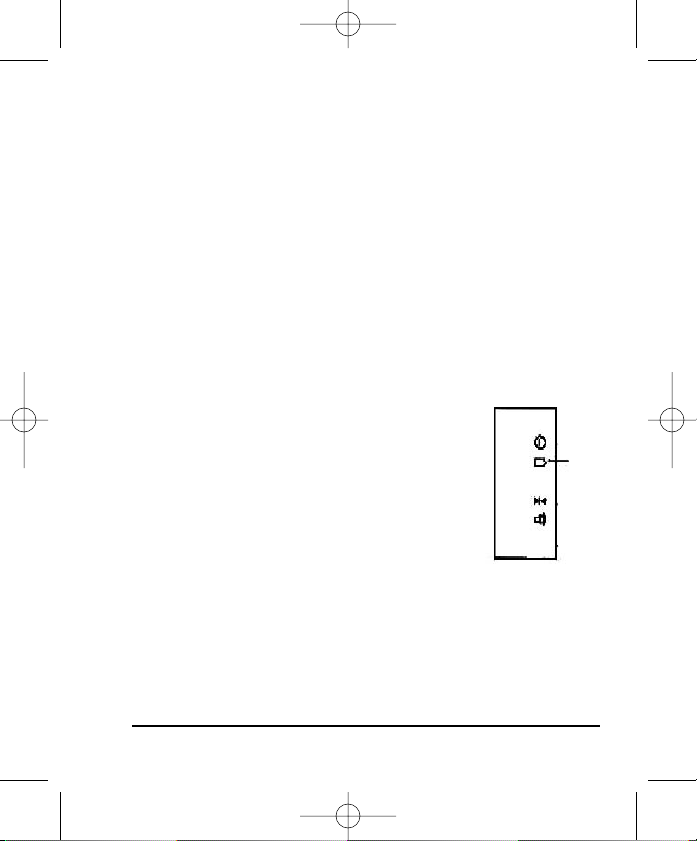
5. Low Battery Indicator Function
• When the power indicator sign is blinking, it
tes that the battery is low and should
indica
be replaced.
• A very low battery will result in an automatic
power-off, which requires the user to
replace before continued operation.
Blink
©2008 Johnson Level & Tool 5
Page 6
1746H-All 11/3/08 2:04 PM Page 6
6 ©2008 Johnson Level & Tool
Page 7

®
1746H-All 11/3/08 2:04 PM Page 7
Detector láser bilateral con abrazadera
Modelo No. 40-6780
Manual de instrucciones
Este producto presenta un alto nivel de sensibilidad, un panel con dos caras,
un consumo bajo de energía y buena fiabilidad. Se puede usar con los niveles
láser 40-6662 y 40-6602 de Acculine Pro®.
1. Especificaciones técnicas
Margen de detección: hasta 300 pies (90 m)
Exactitud de detección: 0.019” ≤ 50 pies (0.5mm ≤ 15m)
Apagado automático: 6 minutos
Fuente de alimentación: Batería de 9 V
Indicador sonoro: pitido rápido, pitido doble y pitido fuerte
Pantalla de cristal líquido:
Indicación LED: arriba, al medio y abajo
Dimensiones: 5.905" x 2.992" x 1.142" (150 x 76 x 29mm)
Peso: 0.386 libras (0,175 kg)
Otros: Impermeable y resistente al polvo
©2008 Johnson Level & Tool 7
0.039” ≤ 100 pies (1mm ≤ 35m)
0.059” ≥ 100 pies (1.5mm ≥ 35m)
flecha hacia arriba, flecha hacia abajo y señal del centro
Page 8

1746H-All 11/3/08 2:04 PM Page 8
2. Componentes
Gracias a este detector láser, se puede usar un láser pulsado generado en línea Acculine Pro al interior con luz brillante y al exterior con
la luz del sol en donde no se vean los rayos.
1. Ampolla horizontal
2. Ventana de recepción
3. Botón de activación y
desactivación del sonido
4. Botón de encendido y apagado
5. Ampolla vertical
6. Ventana de la pantalla
7. Marca de nivel frontal
Símbolos de la ventana de la pantalla
1. Encendido
2. Bajo voltaje
Exactitud basta y fina
3.
4. Sonido activado
5. Flechas indicadoras de posición
8 ©2008 Johnson Level & Tool
8. Alerta sonora
9. Luz indicadora superior
10. Luz indicadora del medio
11. Luz indicadora inferior
12. Marca de nivel posterior
13. Rosca del soporte de la varilla
14. Puerta del compartimiento
de las baterías
Page 9

1746H-All 11/3/08 2:04 PM Page 9
3. Instrucciones de operación
1. Instalación de las baterías
Abra el compartimiento de la batería y coloque una batería de 9 V de
acuerdo con la polaridad que se muestra en el
interior. Cierre el compartimiento de la batería.
Aviso:
• Retire la ba
por un período largo.
• Remplace la batería cuando el indicador de
bajo voltaje indique que la batería está baja.
2. Instrucciones de operación
IMPORTANTE: Este detector sólo funcionará cuando el láser esté el
modo de pulsos.
A. Presione el botón de encendido y apagado:
El detector emitirá una alarma sonora dos
veces y todos los símbolos a
ventana de la pantalla. Después de 0,5 segundos el detector entrará en modo de detección.
B. Detección de la señal láser horizontal:
Coloque el detector de forma vertical y centre
la burbuja en la ampolla vertical con la ventana
de recepción mirando hacia el láser
hacia abajo en la ventana de la pantalla y una
luz roja encendida indican que la señal láser está por debajo de los
tería cuando guarda el instrumento
parecerán en la
. Una flecha
©2008 Johnson Level & Tool 9
Page 10

1746H-All 11/3/08 2:04 PM Page 10
detectores de la marca de nivel. Una flecha hacia arriba y una luz
amarilla encendida indican que la señal láser está por encima de los
detectores de la marca de nivel. Una señal al medio y una luz verde
encendida indican que la señal láser está a nivel.
Aviso: Cuando la señal de láser se mueva hacia
la posición central,
las flechas hacia arriba y
hacia abajo mostradas se harán más pequeñas
hasta que aparezca una sola línea al centro.
C. Detección de la señal láser vertical: Coloque el
detector de forma horizontal (centre la burbuja en
la ampolla horizontal) con la ventana de recepción
y las luces indicadoras mirando hacia arriba.
Haga
que la ventana de recepción apunte hacia el instrumento para que reciba la señal láser vertical. La
flecha izquierda en la pantalla de cristal líquido y
una luz roja encendida indican que la señal láser
está en el lado izquierdo del centro. Una señal al medio y una luz
verde encendida indican que la señal láser está en la posición del
medio. La flecha derecha y una luz amarilla encendida indican
que la señal láser está en el lado derecho del centro.
D. Presione el botón de encendido y apagado para apagar el detec-
tor. El detector emitirá dos alarmas sonoras al apagarse.
10 ©2008 Johnson Level & Tool
Page 11

1746H-All 11/3/08 2:04 PM Page 11
3. Función de Sonido
Al presionar el botón de sonido cuando
el instrumento está encendido le permitirá activar y desactivar el sonido.
Observe la señal de indicación de
sonido en la pantalla de cristal líquido.
Sonido activado:
• Si la señal láser está en el lado superior (izquierda), el detector
emitirá un pitido rápido.
Si la señal láser está en el lado inferior (derecha), el detector
•
emitirá un pitido doble.
• Si la señal láser está en el medio, el detector emitirá un pitido
fuerte.
4. Función de apagado automático
Si el detector no recibe una señal láser y no se manipulan los
botones durante 6 minutos,
este se apagará automáticamente para
conservar la vida útil de la batería.
5. Función de indicador de batería baja
• Cuando el símbolo indicador de batería
parezca de forma intermitente en la pan-
a
talla, quiere decir que la batería está baja y
que debe cambiarse.
• Una batería muy baja ocasionará que se
apague automáticamente, el usuario tendrá
que cambiar la batería para seguir usando el
instrumento.
©2008 Johnson Level & Tool 11
Sonido
activado
Sonido
desactivado
Parpadeo
Page 12

1746H-All 11/3/08 2:04 PM Page 12
12 ©2008 Johnson Level & Tool
Page 13

®
1746H-All 11/3/08 2:04 PM Page 13
Détecteur laser à deux côtés avec pince
Modèle nº 40-6780
Manuel d’instructions
Ce produit se distingue par sa haute sensibilité, son écran à deux faces, sa
faible consommation d'énergie et sa fiabilité élevée. Il est compatible avec les
niveaux laser Acculine Pro®40-6662 et 40-6602.
1. Caractéristiques techniques
Portée de détection: Jusqu'à 90 m (300 pi)
Précision de détection: 0,5 mm ≤ 15 m (0,019 po ≤ 50 pi))
Arrêt automatique: 6 minutes
Alimentation électrique: Pile de 9 V
Avertissement sonore:
Écran ACL: Flèche dirigée vers le haut, flèche dirigée vers le
Indication DEL: Haut, centre, bas
Dimensions:
Poids: 0,175 kg (0,386 lb)
Autres: À l’épreuve de la pluie et de la poussière
©2008 Johnson Level & Tool 13
1 mm ≤ 35 m (0,039 po ≤ 100 pi)
1,5 mm ≥ 35 m (0,059 po ≥ 100 pi)
Tonalité à cadence rapide, à deux fréquences et continue
bas et ligne centrale
15cm x 7,6cm x 2,9cm (5,906po x 2,992po x 1,142po)
Page 14

1746H-All 11/3/08 2:04 PM Page 14
2. Composants
Grâce à ce détecteur laser,la ligne générée par le laser à impulsions Acculine
Pro peut être utilisée autant à l’intérieur avec un bon éclairage qu’à l’extérieur
à la lumière du soleil, là où les faisceaux ne sont pas visibles.
1. Fiole horizontale
2. Fenêtre de réception
3. Touche d’avertissement sonore
activée/désactivée (ON/OFF)
4. Touche marche/arrêt (ON/OFF)
5. Fiole verticale
6. Fenêtre d’affichage
7. Marque de niveau frontale
Voyants de la fenêtre d’affichage
1. Mise sous tension
2.
Pile faible
3. Macrométrique/micrométrique
4. Avertissement sonore activé
5. Flèches d’indication de position
14 ©2008 Johnson Level & Tool
8. Signal sonore
9. Voyant supérieur
10. Voyant central
11. Voyant inférieur
12. Marque de niveau arrière
13. Filetage du support de fixation
14. Couvercle du compartiment
de la pile
Page 15

1746H-All 11/3/08 2:04 PM Page 15
3. Consignes d'utilisation
1. Installation de la pile
Retirez le couvercle du compartiment de la pile et insérez une pile 9
V en respectant la polarité indiquée dans le
compartiment. Replacez ensuite le couvercle.
Remarques:
• Retirez la pile si vous rangez l’a
une période prolongée.
• Lorsque le voyant de pile faible s’affiche,
remplacez la pile.
2. Consignes d'utilisation
ppareil pour
IMPORTANT
est en mode pulsé.
ouche marche/arrêt: Le détecteur émet
A. T
deux bips et tous les voyants s’afficheront sur
la fenêtre d’affichage. Le détecteur passe en
mode détection après 0,5 seconde.
B. Détection du signal laser horizontal:
Placez le détecteur en position verticale, la
fenêtre de réception faisant face au laser
centrez la bulle de la fiole. Si une flèche
dirigée vers le bas s’affiche sur la fenêtre d’affichage et qu’un voyant rouge s’allume, le signal laser est en dessous des détecteurs de la marque de niveau. Si
©2008 Johnson Level & Tool 15
: Ce détecteur fonctionne uniquement lorsque le laser
, et
Page 16

1746H-All 11/3/08 2:04 PM Page 16
une flèche dirigée vers le haut s’affiche et qu’un voyant jaune s’allume, le signal laser est au-dessus des détecteurs de la marque de
niveau. Si la ligne centrale s’affiche et qu’un voyant vert s’allume, le
signal laser est de niveau.
Remarque: Lorsque le signal laser s’approche
de la marque de niveau,
les flèches rétrécissent
jusqu’à ce que la ligne centrale s’affiche.
C. Détection du signal laser vertical: Placez le
détecteur en position horizontale,
la fenêtre de
réception et les voyants orientés vers le haut (centrez la bulle de la fiole horizontale). Assurez-vous
que la fenêtre de réception est face à l’appareil afin
de recevoir le signal laser vertical. Si une flèche
dirigée vers la gauche s’affiche sur l’écran ACL et
qu’un voyant rouge s’allume, le signal laser est à
gauche du centre. Si la ligne centrale s’affiche et qu’un voyant
vert s’allume, le signal laser est au centre. Si une flèche dirigée
vers la droite s’affiche et qu’un voyant jaune s’allume, le signal
laser est à droite du centre.
D. Appuyez sur la touche marche/arrêt pour mettre le détecteur
hors tension. Le détecteur émet deux bips lorsqu’il est mis hors
tension.
16 ©2008 Johnson Level & Tool
Page 17

1746H-All 11/3/08 2:04 PM Page 17
3. Fonction d’avertissement sonore
Appuyez sur la touche d’avertissement
sonore lorsque l’appareil est sous tension. Cette touche permet d’activer et
de désactiver l’avertissement sonore,
comme indiqué sur l’écran ACL.
Fonction d’avertissement sonore activé:
• Si le signal laser est trop haut ou trop à gauche, le détecteur émet
une tonalité à cadence ra
pide.
• Si le signal laser est trop bas ou trop à droite, le détecteur émet
une tonalité à deux fréquences.
• Si le signal laser est au centre, le détecteur émet une tonalité
continue.
4. Fonction d’arrêt automatique
L’appareil s'éteint automatiquement s’il ne reçoit aucun signal laser
ou si les touches ne sont pas utilisées pendant six
tives, afin de préserver la durée de vie de la pile.
5. Fonction d’indication de pile faible
• Lorsque le voy
ant d’alimentation clignote
à l’écran, la pile est faible et doit être
remplacée.
• Une pile très faible entraîne un arrêt automatique
de l’appareil et l’utilisateur doit la remplacer
avant de pouvoir utiliser l’appareil de nouveau.
Avertisseme
nt sonore
activé
Avertisseme
nt sonore
désactivé
minutes consécu-
Clignot
ement
©2008 Johnson Level & Tool 17
Page 18

1746H-All 11/3/08 2:04 PM Page 18
18 ©2008 Johnson Level & Tool
 Loading...