

Page 1
6657H-English_Manuals 1/28/13 1:45 PM Page 1
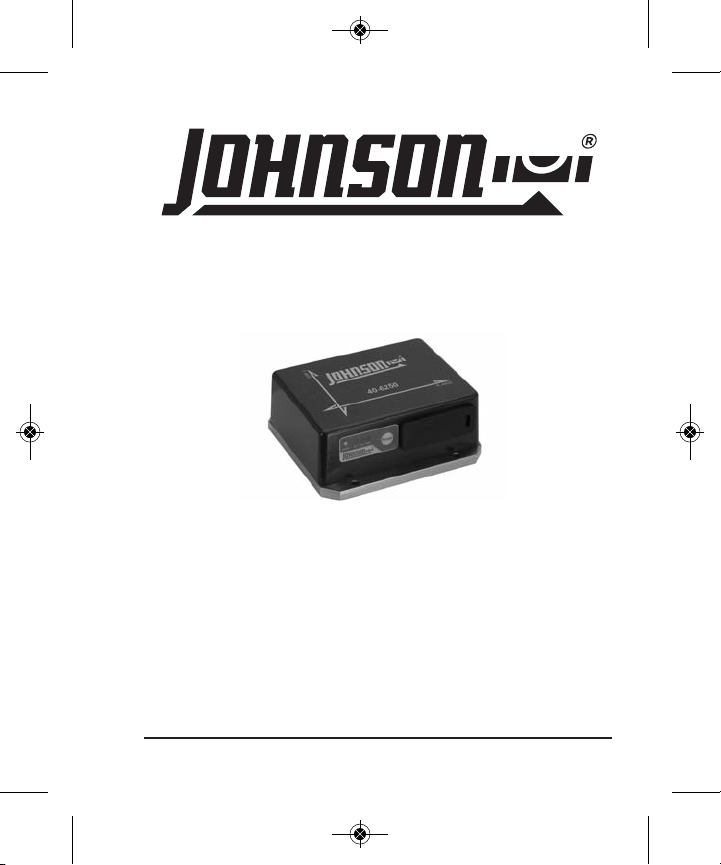
Machine Mountable Electronic Level
with Bluetooth
Model No. 40-6250
Instruction Manual
Congratulations on your choice of this Machine Mountable Electronic
Level with Bluetooth. We suggest you read this instruction manual
thoroughly before using the instrument. Save this instruction manual
for future use. Additional copies are available at
www.johnsonlevel.com.
Bluetooth is a trademark of Bluetooth SIG, Inc.
©2013 Johnson Level & Tool - Rev. 2 1
Page 2

6657H-English_Manuals 1/28/13 1:45 PM Page 2
Table of Contents
1. Kit Contents
2. Features and Functions
3. Safety Instructions
4. Location of Parts/Components
5. Operating Instructions
6. Using the Remote
Control/Receiver
7. Technical Specifications
8. Care and Handling
9. Product Warranty
10. Warranty Registration
1. Kit Contents
Model No. 40-6250 Qty.
Sensor/Slaver (includes 3 AA batteries) 1
Remote Control/Receiver (includes 3 AA batteries) 1
DC 5V adapter 1
Remote cable & PC cable 1
Instruction manual 1
Carrying case 1
2. Features and Functions
• Use for new machinery installation and relocation
• Measures level in X and Y axis to within a maximum accuracy of
0.01 degrees
• Operation range is ± 10 degrees of level
• Reads slope in %, mm/m, and in/ft
• Remote control features large LCD screen that reads in X or Y axis
• Green backlit screen reads digitally and graphically
• Reads via cable outlet or wireless Bluetooth
• Bluetooth supported operating range 32’
2 ©2013 Johnson Level & Tool - Rev. 2
Page 3
6657H-English_Manuals 1/28/13 1:45 PM Page 3
3. Safety Instructions
Please read and understand all of the following instructions, prior
to using this tool. Failure to do so, may void the warranty.
ATTENTION IMPORTANT
• Read all instructions prior to operating this tool. Do not remove any labels from tool.
• Always turn the tool off when not in use or left unattended for a period of time.
• Remove the batteries when storing the tool for an extended time (more than 3 months)
to avoid damage to the tool should the batteries deteriorate.
• Do not attempt to repair or disassemble the tool. If unqualified persons attempt
to repair this tool, warranty will be void.
• Use only original Johnson
authorized dealer. Use of non-Johnson®parts and accessories will void warranty.
®
parts and accessories purchased from your Johnson
®
©2013 Johnson Level & Tool - Rev. 2 3
Page 4
6657H-English_Manuals 1/28/13 1:45 PM Page 4
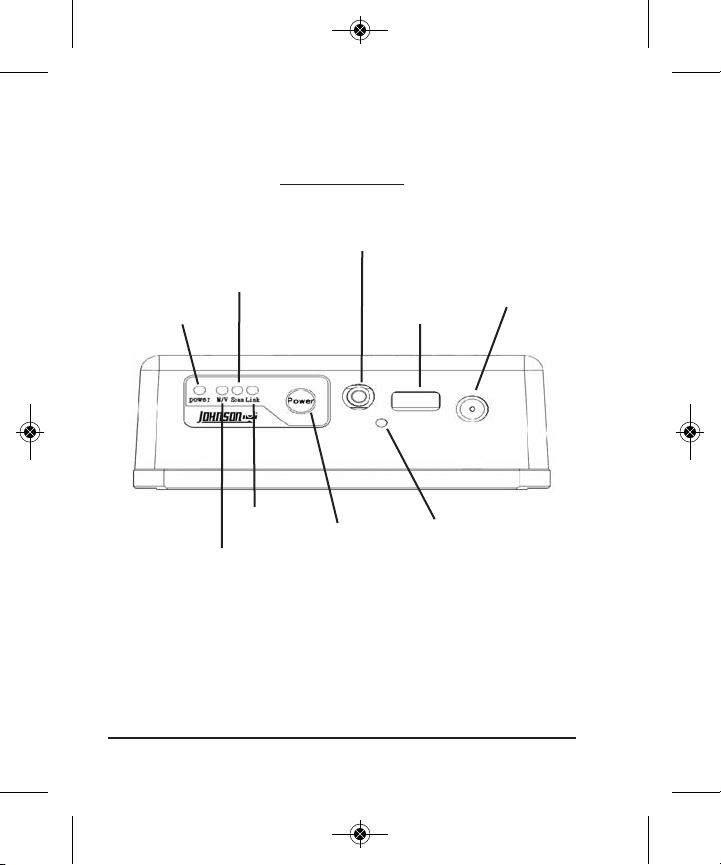
4. Location of Parts/Components
Sensor/Slaver
Remote Control/Receiver Port
Scan Channel Light
Red Power Light
Link Light
Power Button
Data Transfer
Light
4 ©2013 Johnson Level & Tool - Rev. 2
Data
Transfer Port
Out Supply
Port
Dust-proof
Lid Port
Page 5

6657H-English_Manuals 1/28/13 1:45 PM Page 5
5. Operating Instructions
Sensor/Slaver
Battery Installation
The Sensor/Slaver requires 3 “AA”
alkaline batteries to operate. Locate
the battery door on bottom as shown in
photo. Loosen screws, remove cover and install the batteries with
correct polarity. Securely re-install battery door.
Power On and Off
Hold the power button for one second
to power on the Sensor/Slaver. An
audible beep and visual LED light will
confirm the power is on.
Hold the power button for one second
to power down the Sensor/Slaver. An audible beep and visual LED
power light will confirm the power is off.
Remote Control/Receiver
Battery Installation
The Remote Control/Receiver requires 3 “AA” alkaline batteries to
operate. Locate battery door, remove cover and install the batteries
with correct polarity. Securely re-install battery door.
©2013 Johnson Level & Tool - Rev. 2 5
Page 6

6657H-English_Manuals 1/28/13 1:45 PM Page 6
6. Using the Remote Control/Receiver
Remote Display
1. Power Button (POW)
a. Hold for one second to power up Sensor/Slaver with beep.
b. Hold for two seconds to turn off Remote Control/Receiver
with beep.
2. Measure Button (MEAS)
a. Push button to enable measuring and lock control pad
with beep and visual LED is lit.
b. Push button again to disable measuring and unlock control
pad with beep and visual LED is off.
6 ©2013 Johnson Level & Tool - Rev. 2
Page 7

6657H-English_Manuals 1/28/13 1:45 PM Page 7
Note: All operation buttons will be non-responsive, except buttons 1,
2, & 7. Push the MEAS button again so light turns off to utilize
buttons 3, 4 and 5 below.
Begin measuring only after the link light of the Remote
Control/Receiver and Sensor/Slaver are illuminated. If there is a
delay in the illumination or the units are not connected, power down
and then power up again.
3. Resolution Button (SEN/DEG)
Pushing this button will switch resolutions
a. 0.002º - 0.01º - 0.1º - 1º - 0.002º
b. Degree - Minute - Second
4. Function Button (mm, m; in/ft; CHN)
Pushing this button will switch functions
a. Percentage of Slope (%)
b. mm / M
c. in / ft
d. Channel Select (A-B-A)
5. Absolute, Relative and Degree Button (ABS/REL, WARN)
a. Absolute and Relative: switch between absolute and
relative value
b. Degree Alert Set-Up
1. When degrees stop to X1 and Y1, press MEAS to
pause measure.
2. Press and hold this button until 3 beeps are heard to set
alarm mode for 1 degree, LCD will display “1”.
©2013 Johnson Level & Tool - Rev. 2 7
Page 8

6657H-English_Manuals 1/28/13 1:45 PM Page 8
3. Then press MEAS and move sensor to another
desired X2 and Y2.
4. Pause MEAS again and hold same button until 3
beeps are heard for set degree 2, LCD will display “2”.
5. Remote Control/Receiver will beep when Sensor/Slaver is
out of range (1 and 2).
6. To disable alert, press this button to enable 1 and 2.
Note: X & Y axis must be set independently. Preset minimum and
maximum alarm prior to setting on surface to be leveled.
6. Lock and Quiet Button (LOCK/QUIET)
a. Lock: to lock control pad
b. Quiet: to disable beeper
Note: All operation buttons will be non-responsive, except buttons
1 & 6 - locking button.
7. Select Axis, Backlight and Calibration Button
(X/Y BACKLED)
a. Select Axis: press to switch display between X, Y, X n Y
b. Backlight: hold for 2 seconds to turn on/off backlight
c. Calibration: if this function is not working, please do not
operate, it could cause level displacement. If the precision
of the instrument is not correct and cannot be corrected,
please send it back to Johnson Level & Tool for test and
maintenance.
8 ©2013 Johnson Level & Tool - Rev. 2
Page 9

6657H-English_Manuals 1/28/13 1:45 PM Page 9
Calibration Procedure:
1. Put sensor on a flat plate (±3°)
2. Power up sensor and remote. Red LED power light is on both
devices.
3. Hold the X/Y back LED icon for 5 seconds to enter
calibration mode. There will be five beeps.
4. The LCD screen is flashing except for the number 1. This
means you have entered calibration step 1.
5. Press the X/Y back LED icon again to enter calibration
step 2. First beep acknowledges the button press. The three
additional beeps indicate it has entered the 2nd stage of
calibration.
6. Rotate the sensor 180°, then press the X/Y back LED icon
button again (see below illustration).
7. The “2” will disappear and calibration is finished.
Y
Johnson
40-6250
40-6250
Johnson
X
Rotate 180º Clockwise
©2013 Johnson Level & Tool - Rev. 2 9
X
Y
Page 10

6657H-English_Manuals 1/28/13 1:45 PM Page 10
7. Technical Specifications
Operation Range -10º to +10º
Axis X axis, Y axis
Resolution 0.002º, 0.01º, 0.1º, 1º
Repeatability < 0.005º (2δ)
Absolute Accuracy (25ºC) < 0.01º(±3º) < 0.04º (±10º)
Temperature Drifting < 1” / ºC (0º) < 1.5” / ºC (±3º)
Response Time < 2S
Operation Temperature 14ºF to 122ºF (-10ºC to +50ºC)
Storage Temperature -4ºF to 140º F (-20ºC to +60ºC)
Weight 1.575 lbs (0.714kg)
Dimension 5.25” x 2.75” x .95”
134mm x 70mm x 24mm
Communication from Electronic Level - Remote Control Electronic Level to Bluetooth Output *1 - Cable Output *2
Remote Control or Bluetooth Output *1 -
Cable Output *1 - PC Output *1
Power Supply Remote Control/Receiver: 3 AA batteries
Sensor/Slaver: DC 5V or 3 AA batteries
Range for Bluetooth 32ft (10m)
LCD Backlight Color Green
Battery Life Remote Control/Receiver: 8 hours
Sensor/Slaver: 8 hours
RoHS Compliance, EU Instruction 91/338/EEC,
EU Instruction 94/62/EC, WEEE for EU/EG/EE, Chinese RoHS
10 ©2013 Johnson Level & Tool - Rev. 2
Page 11

6657H-English_Manuals 1/28/13 1:45 PM Page 11
8. Care and Handling
• Store instrument in a safe and dry climate controlled environment
at standard room temperature.
• Do not throw, knock, or shake the instrument as this may damage
the inner circuit boards.
• Remote Control/Receiver IS NOT water resistant. Should the
instrument come into contact with water, be sure to wipe
immediately with a dry towel and discontinue use until fully dry.
• Sensor/Slave IS NOT water resistant. Should the instrument come
into contact with water, be sure to remove the batteries
immediately in order to avoid a short circuit and replace them
only after the instrument is completely dry. Be sure to wipe
immediately with dry towel and discontinue use until fully dry.
• Avoid use outdoors. Rain and water contact with the power
supply unit could result in electronic wire or instrument burn down.
• Store the instrument in a clean, dust free environment.
• Do not disassemble or modify the product, doing so will void your
warranty.
• Do not use stimulative chemicals, or corrosive cleaning solvents
to wash instrument.
• Do not in any way try to alter the instrument’s functionality or
aesthetics.
©2013 Johnson Level & Tool - Rev. 2 11
Page 12

6657H-English_Manuals 1/28/13 1:45 PM Page 12
9. Product Warranty
Johnson Level & Tool offers a one-year limited warranty on our Machine
Mountable Electronic Level with Bluetooth. You can obtain a copy of the limited
warranty for a Johnson Level & Tool product by contacting Johnson Level &
Tool's Customer Service Department, as provided below, or by visiting our
web site at www.johnsonlevel.com. The limited warranty for each product
contains various limitations and exclusions.
NOTE: The user is responsible for the proper use and care of the product. It is the
responsibility of the user to verify the calibration of the instrument before each use.
For further assistance, or if you experience problems with this product that are not
addressed in this instruction manual, please contact our Customer Service Dept.
In the U.S., contact Johnson Level & Tool’s Customer Service Department at
888-9-LEVELS.
In Canada, contact Johnson Level & Tool’s Customer Service Department at
800-346-6682.
10. Warranty Registration
Product Warranty Registration can be completed by sending your
name along with a scanned copy of your proof of purchase to
jlt@johsonlevel.com or by calling 1-888-9-LEVELS. You will need to
locate the serial number for your product that is located inside the
battery compartment of the Remote Control/Receiver. PLEASE NOTE
THAT IN ADDITION TO ANY OTHER LIMITATIONS OR CONDITIONS
OF JOHNSON LEVEL & TOOL'S LIMITED WARRANTY, WE MUST
HAVE YOUR REGISTRATION COMPLETED WITHIN 30 DAYS OF
YOUR PURCHASE OF THE PRODUCT OR ANY LIMITED WARRANTY
THAT MAY APPLY SHALL NOT APPLY AND THERE SHALL BE
NO WARRANTY.
12 ©2013 Johnson Level & Tool - Rev. 2
 Loading...