

Page 1
ACCESSORY KIT INSTALLATION MANUAL
PROPANE CONVERSION – MODEL: S1-1NP0703
FOR USE WITH SINGLE PACKAGE GAS/ELECTRIC UNITS
SERIES: PCG*A and PHG*A
!
WARNING
This conversion kit shall be installed by a qualified service agency in accordance with these instructions and all applicable codes
and requirements of the authority having jurisdiction. If the information in these instructions is not followed exactly , a fire, an explosion or production of carbon monoxide may result causing property damage, personal injury or loss of life. The qualified service
agency is responsible for the proper installation of this kit. The installation is not proper and complete until the operation of the
converted appliance is checked as specified in these instructions supplied with the kit.
!
CAUTION
The conversion of new certified central heating gas appliances must conform to directions outlined in this instruction. Installation
must be made in accordance with American National Standard National Fuel Gas Code, ANSI Z223.1 — latest edition, unless
superseded by local codes.
For Canadian installations, the conversion shall be carried out in accordance with the requirements of the Provincial authorities
having jurisdiction and in accordance with the CAN1-B149.1 and.2 installation codes.
The manufacturer accepts no responsibility for malfunctions due to improper conversions.
GENERAL
This kit is intended for the conversion of new equipment only.
The kit is for converting the unit from natural gas to propane gas
operation at altitudes below 2,000 feet.
All unit installations above 2,000 feet (610 meters) require an
additional kit installation which contain labels and instructions.
Field furnished orifices must be purchased from Source 1 parts
department.
The instructions in this manual cover the gas conversion of the
unit when it is equipped with a White Rodgers gas valve. The
Installation Instructions supplied with the unit is to be used for
all other aspects of the unit installation.
!
WARNING
Improper installation, adjustment, service or maintenance
can cause injury or property damage; therefore, only a qualified installer or qualified service personnel should perform
this conversion.
IMPORTANT
These instructions are for the use of qualified individuals specially trained, experienced and certified in the installation of
this type of equipment and related systems components.
Installation and service personnel are required by some
states to be licensed. Persons not qualified shall not install
this equipment nor interpret these instructions.
This is a safety alert symbol. When you see this symbol on
labels or in manuals, be alert to the potential for personal
injury.
Understand and pay particular attention to the signal words
DANGER, WARNING, or CAUTION.
DANGER indicates an imminently hazardous situation, which, if
not avoided,
WARNING indicates a potentially hazardous situation, which, if
not avoided,
CAUTION indicates a potentially hazardous situation, which, if
not avoided
used to alert against unsafe practices and hazards involving
only property damage.
DESCRIPTION PART NUMBER QTY
Propane Gas Burner Orifice, #54 029-26831-000 4
Gas Line Pressure Switch 024-27688-001 1
Tapped Gas Pipe Nipple 029-22152-000 1
Wire Harness 025-47185-000 1
White Rogers 36J Valve Spring Kit 025-25463-000 1
Label, Propane Conversion 035-24122-001 1
Accessory Kit Installation Manual 035-24605-001 1
Wire Tie 025-27642-000 1
An overpressure protection device, such as a pressure regulator, which conforms to the National Fuel Gas code, ANSI
Z223.1 (U.S.) or CAN-B149.1 or.2 (Canada) and acts to limit
the downstream pressure to value that does not exceed 0.5
PSI (14" w.c.), must be installed in the gas piping system
upstream of the furnace. Failure to do so may result in a fire
or explosion or cause damage to the furnace or some of its
components.
will result in death or serious injury.
could result in death or serious injury.
may result in minor or moderate injury. It is also
CONTENTS OF KIT
!
WARNING
Johnson Controls Unitary Products 035-24605-001-A-0316
Page 2
035-24605-001-A-0316
FURNACE CONVERSION
!
CAUTION
The gas supply shall be shut off prior to disconnecting the
electrical power before proceeding with the conversion.
NOTICE
Do not remove the Low NOx screens from the heat
exchanger tubes.
1. Shut off gas supply at shutoff valve upstream of the unit or
at meter as required.
2. Remove the access panel to the gas heat compartment.
3. Carefully remove the wires from the gas valve, and note
their location so they may be properly replaced. Remove
the screws that hold the manifold to the manifold brackets,
and slide the manifold off the burners.
4. Remove the main burner orifices from the manifold, and
retain for future use.
5. Install the propane main burner orifices in the manifold, and
tighten them. After installing a propane orifice in each location, any leftover orifices may be discarded.
6. Reinstall the manifold in the assembly by reversing the
removal process.
7. Reconnect the wires to the proper terminals on the gas
valve.
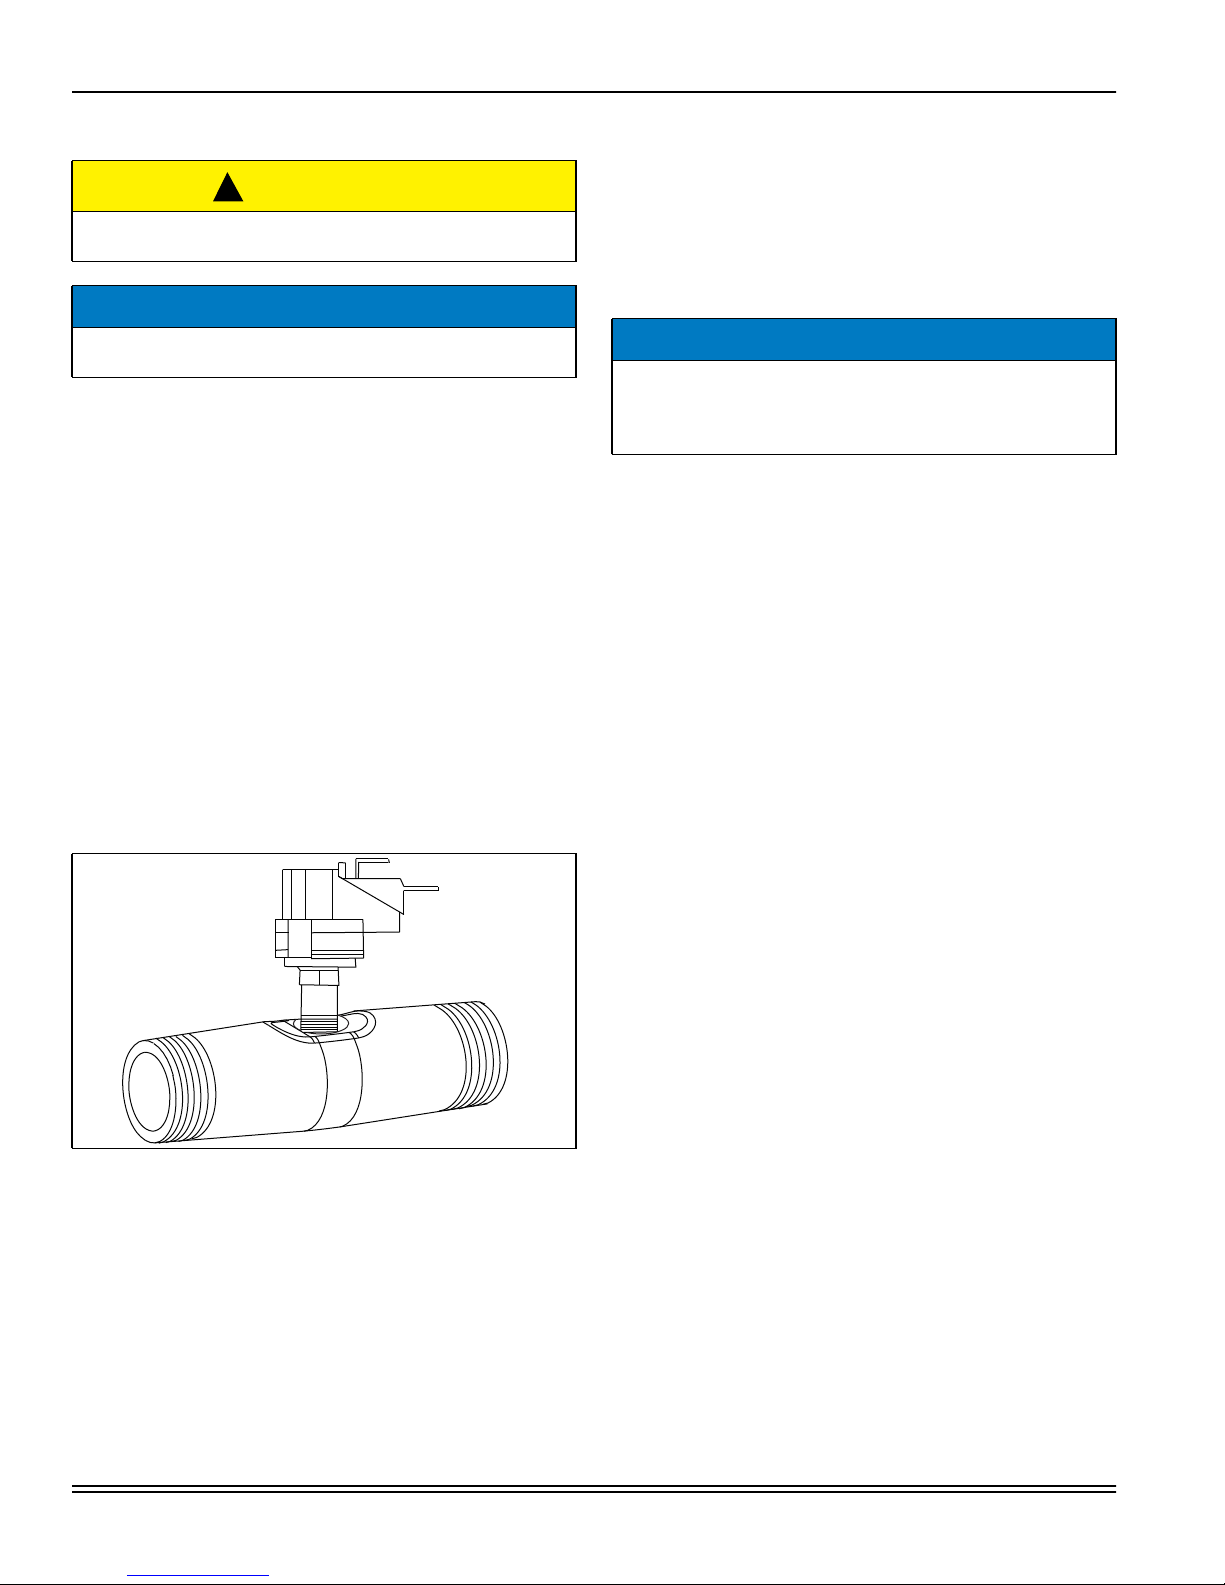
8. When installing gas piping, insert tapped gas pipe nipple
(supplied with kit) into inlet fitting of gas valve. Tighten until
the 1/8 inch tapped hole in the gas pipe nipple is located in
the side facing outward toward where the door is to be
installed.
9. Install (thread) the gas line pressure switch (supplied with
kit) into the 1/8 NPT tapped hole in nipple applying pipe
joint compound to the switch fitting prior to installation.
Using a 7/16 inch open end wrench, tighten the switch making sure the connection does not leak. Electrical connections should be facing the right.
10. Rotate the tapped gas pipe nipple a 1/4 turn so the pressure switch is positioned on top of the gas pipe. Refer to
Figure 1.
NOTICE
The gas line pressure switch will cause the furnace to lock
out if the gas supply pressure drops below 6” w.c. The ignition control will display a fault code 7 and will reset after one
hour.
11. Disconnect the wire from the flame sensor.
12. Using the wire harness (supplied with kit) connect the wire
from the flame sensor into the insulated male connector;
connect the two 1/4” insulated terminals to the pressure
switch; and connect the remaining insulated flag terminal to
the flame sensor.
13. Convert the gas valve for LP (propane) gas operation by
following the instructions and using the components supplied in the envelope. Apply the label supplied in the kit to
the gas valve to show that it has been converted.
14. Ensure that all gas connections are tight.
15. Turn on gas supply to unit, and check all gas connections
with suitable leak detector.
16. Install the propane gas conversion label as described in the
LABELS section of this instruction.
17. Refer to the unit installation instructions to complete the
installation before continuing with these procedures.
LABELS
1. Remove conversion rating plate label from the shipping
box.
2. On the gas appliance conversion label, write the following:
a. Kit number, located on the outside of the kit box.
b. Stamp or write in the name of the organization making
conversion, address, city, state, month, and year.
3. Remove label backing, and affix label adjacent to the rating
plate.
FIGURE 1: Tapped Gas Pipe Nipple
2 Johnson Controls Unitary Products
A0243-001
Page 3
035-24605-001-A-0316
TESTS AND ADJUSTMENTS
!
DANGER
PROPANE AND HIGH ALTITUDE CONVERSION KITS
Make sure that the correct kit and/or gas orifices for the altitude and the type of gas is used for the furnace installation.
Only use natural gas in furnaces designed for natural gas.
Only use propane (LP) gas for furnaces that have been properly converted to use propane (LP) gas. Do not use this furnace with butane gas.
Incorrect gas orifices or a furnace that has been improperly
converted will create an extremely dangerous condition
resulting in premature heat exchanger failure, excessive
sooting, high levels of carbon monoxide, personal injury,
property damage, a fire hazard and/or death.
High altitude and propane (LP) conversions are required in
order for the appliance to satisfactorily meet the application.
An authorized distributor or dealer must make all gas conversions.
In Canada, a certified conversion station or other qualified
agency, using factory specified and/or approved parts, must
perform the conversion.
The installer must take every precaution to insure that the furnace has been converted to the proper gas orifice size when
the furnace is installed. Do not attempt to drill out any orifices
to obtain the proper orifice size. Drilling out a gas orifice will
cause misalignment of the burner flames, causing premature
heat exchanger burnout, high levels of carbon monoxide,
excessive sooting, a fire hazard, personal injury, property
damage and/or death.
the manometer, as it will reference atmospheric pressure. Refer
to Figure 2 for inlet pressure port location.
1. Turn gas and electrical supplies on, and follow the operating instructions to place the unit back in operation.
TABLE 1: Inlet Gas Pressure Range
INLET GAS PRESSURE RANGE
Natural Gas Propane (LP)
Minimum 4.5” W.C. (1.12 kPa) 8.0” W.C. (1.99 kPa)
Maximum 10.5” W.C. (2.61 kPa) 13.0” (3.24 kPa) W.C.
IMPORTANT
The inlet gas pressure operating range table specifies what
the minimum and maximum gas line pressures must be for
the furnace to operate safely.
The gas line pressure
• 7” W.C. (1.74 kPA) for Natural Gas
• 11” W.C. (2.74 kPA) for Propane (LP) Gas
in order to obtain the BTU input specified on the rating plate
and/or the nominal manifold pressure specified in these
instructions and on the rating plate.
2. Once the correct gas inlet pressure has been established,
refer to Table 1, turn the gas supply to OFF, and turn the
electrical supply switch to OFF; then remove the flexible
tubing from the gas valve pressure tap, and tighten the set
screw using the 3/32” (2.4 mm) hexagonal wrench.
3. Turn the electrical and gas supplies back on, and with the
burners in operation, check for gas leakage around the gas
valve pressure port for leakage using an approved non-corrosive gas leak detection fluid, or other non-flammable leak
detection methods.
MUST BE a minimum of
Inlet and manifold gas pressure may be measured by connecting the “U” tube manometer to the gas valve with a piece of tubing. Follow the appropriate section in the instructions below.
Refer to Figure 2 for the locations of the pressure ports on the
gas valve.
Turn gas off at the ball valve or gas cock on gas supply line
before the gas valve. Find the pressure ports on the gas
valve marked Out P and In P.
1. The manifold pressure must be taken at the port marked
OUT P.
2. The gas inlet line pressure must be taken at the port
marked IN P.
3. Using a 3/32” (2.4 mm) hexagonal wrench, loosen the set
screw by turning it 1 turn counter clockwise. DO NOT
REMOVE THE SET SCREW FROM THE PRESSURE
PORT.
Read the inlet gas pressure
Connect the positive side of the manometer to the IN P Tap on
the gas valve. Do not connect any tubing to the negative side of
Read the manifold gas pressure
Connect the positive side of the manometer to the OUT P Tap
on the gas valve. Do not connect any tubing to the negative
side of the manometer as this is the port where it references
atmospheric pressure. Refer to Figure 3 for connection details.
IMPORTANT
The cover screw for the pressure regulator must be removed
entirely to gain access to the adjustment screw. Loosening or
tightening the cover screw does not adjust the flow of gas.
1. Refer to Figure 2 for location of pressure regulator adjustment cap, and adjustment screw on main gas valve.
2. Turn gas and electrical supplies on, and follow the operating instructions to place the unit back in operation.
3. Adjust manifold pressure by adjusting gas valve regulator
screw for the appropriate gas per the following:
Johnson Controls Unitary Products 3
Page 4

035-24605-001-A-0316
SINGLE STAGE GAS VALVE MODELS
1. Refer to Figure 2 for location of pressure regulator adjustment cap, and adjustment screw on main gas valve.
2. Turn gas and electrical supplies on, and follow the operating instructions to place the unit back in operation.
3. Adjust manifold pressure by adjusting gas valve regulator
screw for the appropriate gas per the following table.
TABLE 2:
Gas Heating Value
Gas Heating Value
An overpressure protection device, such as a pressure regulator, must be installed in the gas piping system upstream of
the furnace and must act to limit the downstream pressure to
the gas valve so it does not exceed 0.5 PSI (14” w.c.) (3.48
kPa). Pressures exceeding 0.5 PSI (14” w.c.) (3.48 kPa) at
the gas valve will cause damage to the gas valve, resulting in
a fire or explosion or cause damage to the furnace or some of
its components that will result in property damage and loss of
life.
FIGURE 2: Gas Valve
Nominal Manifold Pressure - Single Stage Valve
Manifold Pressures (in wc)
Altitude (feet)
0-7999 8000-8999 9000-9999
(BTU/cu ft.)
2500 (LP) 10.0 8.2 7.5
Manifold Pressures (kpa)
Altitude (meters)
0-2437 2438-2742 2743-3048
(MJ/cu m)
OUTLET
PRESSURE
PORT
INLET
WRENCH
BOSS
INLET
PRESSURE
PORT
93.2 (LP) 2.49 2.03 1.86
!
DANGER
OFF
ON
ON/OFF SWITCH
(Shown in ON position)
VENT PORT
OUTLET
MAIN REGULATOR
ADJUSTMENT
A0226-001
MANIFOLD PRESSURE “U” TUBE CONNECTION
OUTLET
PRESSURE TAP
1/4” TUBING
U-TUBE
MANOMETER
MANIFOLD
PIPE
3.5 IN
WATER
COLUMN
GAS
PRESSURE
SHOWN
A0223-002
FLAME
SENSOR
GAS VALVE
GAS
BURNERS
FIGURE 3: Reading Gas Pressure
The following tests must be performed at the time of conver-
sion:
1. Connect a manometer to the manifold pressure tap on the
gas valve. Connect a power supply and a propane gas supply to the unit, if not already connected.
2. Turn on the propane gas supply, and bleed air from the gas
supply lines at a point as close to the inlet of the gas valve
as is practical. Move gas valve switch to the “ON” position.
3. Set the thermostat to call for “HEAT” or connect a jumper
between “R” and “W” on the ignition control board to simulate a call for heat.
4. Make sure unit electrical disconnect switch is in the “OFF”
position, and then energize the power supply to the disconnect switch.
5. Turn unit electrical disconnect switch “ON.” Verify that the
combustion blower starts and that the ignitor starts sparking.
6. Main burner ignition may be delayed on the first ignition
cycle due to air in the gas manifold.
7. Observe several ignition cycles. The main burners must
ignite without delayed ignition or burning at the orifices.
8. Adjust the manifold pressure in accordance with Table 2
with gas supplied to the unit at a pressure of 1 1 to 14 inches
WC.
NOTICE
INLET GAS PRESSURE MUST BE AT
11-14” WC AT FURNACE.
SET MANIFOLD PRESSURE PER TABLE 2.
9. With main burners ignited, check for gas leaks, especially
in the following locations: gas valve inlet and outlet connections, manifold union in the burner compartment, and main
burner orifices where they thread into the manifold. Repair
any leaks found, and recheck. DO NOT CHECK WITH
OPEN FLAME.
10. With main burners off, disconnect the manometer, and
tighten pressure tap set screw. Check for gas leaks at this
plug.
11. Remove jumpers, and replace access panel.
4 Johnson Controls Unitary Products
Page 5

TWO STAGE GAS VALVE MODELS
INLET
WRENCH
BOSS
INLET
PRESSURE
PORT
ON OFF
SWITCH
LOW STAGE REGULATOR
ADJUSTMENT
OUTLET
OUTLET
PRESSURE
PORT
VENT
PORT
HIGH STAGE REGULATOR
ADJUSTMENT
035-24605-001-A-0316
1. Refer to Figures 4 and 5 for location of regulator cover
screws and regulator adjustment screws on main gas
valve.
2. To convert the two stage gas valve from natural gas to L.P.
gas, remove power from equipment, and verify that gas is
turned off.
3. Remove the high pressure regulator cover screw (from
side marked HI).
4. Remove regulator adjustment screw (from beneath where
the cover screw was mounted).
5. Remove Natural Gas regulator spring from regulator
sleeve.
NOTICE
Do NOT remove or replace the spring on the low pressure side.
TABLE 3:
Gas Heating Value
Gas Heating Value
Nominal Manifold Pressure - Two Stage Valve (Low Fire)
First Stage Manifold Pressures (in wc)
Altitude (feet)
0-7999 8000-8999 9000-9999
(BTU/cu ft.)
2500 (LP) 4.1 3.8 3.5
First Stage Manifold Pressures (kpa)
Altitude (meters)
0-2437 2438-2742 2743-3048
(MJ/cu m)
REGULATO R
COVER SCREW
PLASTIC REGULATO R
ADJUSTMENT SCREW
REGULATO R SPRING
93.2 (LP) 1.03 0.95 0.87
NOTICE
The high stage regulator adjustment must be set first before
setting the low stage regulator adjustment.
A0228-001
FIGURE 5: Two Stage Gas Valve
:
IMPORTANT
If gas valve regulator adjustment screw is turned in (clockwise), manifold pressure is increased. If adjustment screw is
turned out (counterclockwise), manifold pressure is
decreased.
!
WARNING
The manifold pressure must be checked with the cover
screw installed over the regulator adjustment screw. If not,
the manifold pressure setting could result in an over-fire
condition. A high manifold pressure will cause an over-fire
condition, which could cause premature heat exchanger failure. If the manifold pressure is too low, sooting and eventual
clogging of the heat exchanger could occur. Be sure that
regulator cover screw is installed and burner box to gas
valve pressure reference hose is connected.
HI
FIGURE 4: High Pressure Regulator Spring
kit) into the high pressure regulator sleeve.
7. Replace the regulator adjustment screw.
Johnson Controls Unitary Products 5
6. Insert the L.P. regulator spring (provided in the conversion
8. Set staging jumper on control board to off. Disconnect thermostat wiring from control board.
LO
9. Install temporary low voltage jumper wire from R to W1 and
W2 on ignition control board.
!
WARNING
Low fire manifold pressure must be set only after setting the
A0227-001
high fire manifold pressure.
10. Restore power to equipment allowing it to operate high fire.
11. Adjust manifold pressure to appropriate high fire LP pressure. Refer to Table 2.
12. Replace high pressure adjustment cover screw. Confirm
high fire LP pressure.
Page 6
035-24605-001-A-0316
13. Remove power from equipment.
14. Remove low voltage jumper from W2. Verify that R to W1 is
jumpered.
NOTICE
The unit switches to low fire after lighting in high fire and the
flame is established for 10 seconds.
15. Restore power to equipment allowing it to operate low fire.
16. Adjust manifold pressure to appropriate low fire LP pressure. Refer to Table 3.
17. Replace low pressure adjustment cover screw. Confirm low
fire LP pressure.
18. Remove power from equipment. Remove temporary low
voltage jumper wire. Set staging jumper back to its correct
position and connect thermostat wiring.
19. Re-calculate the furnace input to make sure the specified
input on the rating plate is not exceeded. Refer to the
appropriate gas calculating procedures “CALCULATING
THE FURNACE INPUT (NATURAL GAS) or (L.P. GAS)”
and the calculation formulas on page 7.
20. After the correct BTU (kW) input has been established, turn
the gas valve to OFF, and turn the electrical supply switch
to OFF. Disconnect the manometer from the gas valve by
removing the flexible tubing from the gas valve pressure
tap. Tighten the pressure tap plug using the 3/32” (2.4 mm)
hexagonal wrench. Turn the electrical and gas supplies
back on.
21. With the burners in operation, check for gas leakage
around the gas valve pressure port for leakage using an
approved gas detector, a non-corrosive leak detection fluid,
or other leak detection methods.
22. Attach the WARNING label (provided in the kit) to the gas
valve where it can be readily seen. Attach the small round
L.P. label to the top of the regulator cover screw. Refer to
LABELS procedure on page 8.
CALCULATING THE FURNACE INPUT
(NATURAL GAS)
NOTICE
Burner orifices are sized to provide proper input rate using
natural gas with a heating value of 1030 BTU/Ft
heating value of the gas is significantly different, it may be
necessary to replace the orifices.
1. Turn off all other gas appliances connected to the gas
meter.
2. At the gas meter, measure the time (with a stop watch) it
takes to use 2 cubic ft. (0.0566 m
3. Calculate the furnace input by using one of the following
equations.
3
) of gas.
CALCULATING THE FURNACE INPUT
(PROPANE GAS)
3
. If the
NOTICE
Burner orifices are sized to provide the proper input rate
using propane gas with a heating value of 2500 BTU/Ft
the heating value of the gas is significantly different, it may
be necessary to replace the orifices with different size orifices. Follow the procedure below to calculate the furnace
input.
1. Turn off all gas appliances connected to the gas meter.
2. Start the furnace.
3. Use a stop watch to measure the time it takes for the furnace to burn 1 cubic ft. of gas.
4. Calculate the furnace input by using one of the following
equations.
3
. If
6 Johnson Controls Unitary Products
Page 7

035-24605-001-A-0316
In the USA use the following formula to calculate the furnace input.
For natural gas multiply the heat content of the gas BTU/SCF or Default 1030 BTU/SCF (38.4 MJ/m
3
), times 2 cubic ft. (0.056 m) of
gas measured at the gas meter, times a barometric pressure and temperature correction factor of 0.960; times 3600, then divided by
the time (In seconds) it took to measure 2 cubic ft. (0.056 m) of gas from the gas meter.
For propane (LP) gas multiply the heat content of the gas BTU/SCF or Default 2500 BTU/SCF (93.13 MJ/m
3
), times 1 cubic ft.
(0.028 m) of gas measured at the gas meter, times a barometric pressure and temperature correction factor of 0.960; times 3600,
then divided by the time (In seconds) it took to measure 1 cubic ft. (0.028 m) of gas from the gas meter.
The formula for US input calculation using a cubic foot gas meter:
BTU/ft3 x 2 cu.ft. x 0.960 x 3600
Seconds it took to measure the 2 cu.ft. of gas Seconds it took to measure the 1 cu.ft. of gas
NATURAL GAS INPUT CALCULATION PROPANE (LP) GAS INPUT CALCULATION
EXAMPLE: EXAMPLE:
1030 x 2 x 0.960 x 3600
90.5 108
Natural Gas Propane Gas
BTU/SCF 1030 BTU/SCF 2500
= BTU/H
= 78,666.90
BTU/ft3 x 1 cu.ft. x 0.960 x 3600
2500 x 1 x 0.960 x 3600
= BTU/H
= 80,000.00
In Canada you will use the following formula to calculate the furnace input if you are using a cubic foot gas meter.
For Natural Gas multiply the Heat content of the gas MJ/m
3
(or Default 38.4), times 2 cubic ft. of gas x 0.028 to convert from cubic
feet to cubic meters measured at the gas meter, times a barometric pressure and temperature correction factor of 0.960; times 3600,
then divided by the time it took to measure 2 cubic ft. (0.056 m) of gas from the gas meter.
For Propane (LP) Gas multiply the Heat content of the gas MJ/m
3
(or Default 93.13), times 1 cu. ft. of gas x 0.028 to convert from
cubic feet to cubic meters measured at the gas meter, times a barometric pressure and temperature correction factor of 0.960; times
3600, then divided by the time it took to measure 1 cubic ft. (0.028 m) of gas from the gas meter.
The formula for metric input calculation using a cubic foot gas meter:
3
x 2 cu.ft. x 0.028 x 0.960 x 3600
MJ/m
Seconds it took to measure the 2 cu.ft. of gas
NATURAL GAS INPUT CALCULATION
EXAMPLE:
38.4 x 2 x 0.028 x 0.960 x 3600
Natural Gas
BTU/SCF 1030 = 38.4 MJ/m
PROPANE (LP) GAS INPUT CALCULATION
EXAMPLE:
93.13 x 1 x 0.028 x 0.960 x 3600
Propane Gas
BTU/SCF 2500 = 93.13 MJ/m
90.5
3
108
3
In Canada use the following formula to calculate the furnace input if you are using a gas meter that measures cubic meters.
For Natural Gas multiply the Heat content of the gas MJ/m
a barometric pressure and temperature correction factor of 0.960; times 3600, then divided by the time it took to measure 0.10 m
gas from the gas meter.
For Propane (LP) Gas multiply the Heat content of the gas MJ/m
meter, times a barometric pressure and temperature correction factor of 0.960; times 3600, then divided by the time it took to measure 0.10 m
3
of gas from the gas meter.
= MJ/H x 0.2777 = kW x 3412.14 = BTU/H
= 82.12 x 0.2777 = 22.80 x 3412.14 = 77,796.80
= 83.44 x 0.2777 = 23.17 x 3412.14 = 79,063.70
3
(or Default 38.4), times 0.10 m3 of gas measured at the gas meter, times
3
(or Default 93.13), times 0.10 m3 of gas measured at the gas
3
of
The formula for metric input calculation using a cubic foot gas meter:
MJ/m3 x m3 x 0.960 x 3600
Seconds it took to measure the 0.10
NATURAL GAS INPUT CALCULATION
EXAMPLE:
38.4 x 0.1 x 0.960 x 3600
160
Natural Gas
BTU/SCF 1030 = 38.4 MJ/m
PROPANE (LP) GAS INPUT CALCULATION
EXAMPLE:
93.13 x 0.1 x 0.960 x 3600
387
Propane Gas
BTU/SCF 2500 = 93.13 MJ/m
m
3
3
of gas
3
= MJ/H x 0.2777 = kW x 3412.14 = BTU/H
= 82.94 x 0.2777 = 23.03 x 3412.14 = 78,581.60
= 83.17 x 0.2777 = 23.09 x 3412.14 = 78,805.20
DO NOT ADJUST the manifold pressure regulator if the actual input is equal to or within 8% less than the furnace input specified on
the rating plate or if the furnace rise is above the specified rise range on the rating plate.
If the actual input is significantly higher than the furnace input specified on the rating plate then replace the gas orifices with the gas
orifices of the proper size for the type of gas you are using.
Johnson Controls Unitary Products 7
Page 8

LABELS
1. Remove conversion rating plate label from the shipping
box. Check the natural gas to propane box. If in Canada,
check the appropriate box for respective conversion station.
2. Place the conversion rating plate label as close to the rating plate as possible.
3. On the gas appliance conversion label, write the following:
a. Kit number, located on the outside of the kit box.
b. Stamp or write in the name of the organization making
conversion, address, city, state, month, and year.
4. Remove label backing and affix label adjacent to the rating
plate.
Subject to change without notice. Published in U.S.A. 035-24605-001-A-0316
Copyright © 2016 by Johnson Controls, Inc. All rights reserved. Supersedes: 035-24120-001-C-1015
York International Corp.
5005 Y ork Drive
Norman, OK 73069
 Loading...