

Johnson Controls METASYS VAV110, METASYS VAV111, METASYS VAV101, METASYS VAV100, METASYS VAV141 Technical Manual
...Page 1

Application Specific Controllers Technical Manual 636.3
VAV Controller Section
Technical Bulletin
Issue Date 0309
Variable Air Volume (VAV) Controller
Introduction Page 5
Description 5
OEM Applications 8
Standards Compliance *
Coordination of Factory Mounted VAV Systems
8
8
Configuring the Controller 11
Using HVAC PRO for Windows Configuration Tool 11
Defining a VAV Control Device Object in Metasys Software 13
Installation Procedures 17
Tools Needed 17
Environmental Information 17
Mounting the Controller 18
Power Line Wiring Transient Noise Precautions 21
I/O and Communication Lines Wiring Transient Noise Precautions 23
* Indicates those sections where changes have occurred since the last printing.
© 2009 Johnson Controls, Inc. 1
Code No. LIT-6363040
Page 2

Wiring Details Page 25
Power Source and Loads 26
Grounding and Isolation 27
I/O and Communication Terminals 29
Power, Zone Bus, and N2 Connections 36
Analog Inputs 36
Binary Inputs 38
Binary Outputs 38
Analog Outputs 38
Zone Bus
Wiring to RLY50/002 Relays
39
39
Wiring Sensors and Actuators 40
Networking the Controller 45
N2 Bus Overview 45
Installing the N2 Bus 46
Zone Bus Commu nications 49
Application Examples 51
Single Duct Applications 51
Dual Duct Applications 63
Downloading/Commissioning 71
Via Zone Bus 71
Via N2 Bus
71
Incremental Valve Actuator Stroke Time
Incremental Damper Actuator Stroke Time
Zone Terminal Setup for Balancing Contractors
* Indicates those sections where changes have occurred since the last printing.
2 VAV Controller—Variable Air Volume (VAV) Controller
72
73
73
Page 3

Troubleshooting Page 75
Hardware Installation Inspection 75
Tools Needed for Troubleshooting 75
Installation Checkout 76
Troubleshooting the VAV Controller with HVAC PRO for Windows 81
Troubleshooting the N2 Bus and Networked VAV Controller 82
Zone Bus Troubleshooting -- HVAC PRO for Windows 83
Ordering Information 85
Johnson Controls Code Numbers 85
Vendor Code Numbers
87
Specifications *89
* Indicates sections where changes occurred since the last printing.
VAV Controller—Variable Air Volume (VAV) Controller 3
Page 4

4 VAV Controller—Variable Air Volume (VAV) Controller
Page 5

12FIntroduction
Description
The Variable Air Volume (VAV) Controller is an electronic device for
digital control of single duct, dual duct, fan powered, and supply/exhaust
VAV box configurations. See 50HFigure 1. You may use the VAV as a
standalone controller or connected to the Metasys network through a
Network Control Module (NCM) or Companion system.
When connected to the Metasys Network, the VAV provides all point and
control information to the rest of the network. The devices communicate
through an N2 Bus.
Each VAV Controller application uses a different sequence of operation,
all of which are covered in the HVAC PRO for Windows User’s Manual
(FAN 637.5).
VAV Controller—Variable Air Volume (VAV) Controller 5
Page 6
T
R
1 2 3 4 5 6
1 2 3 4 5 6
ANALOG INPUTS
1 2 3 4 5 6 1 2 3 4
ANALOG INPUTS
COMMON
BINARY INPUT
BINARY COM
BINARY INANALOG INPUTS BINARY OUTPUTS
R
DSI
P5
Z BUS
P6
TO
ZONE
STAT
BINARY OUTPUT
1 2 3 4 5 6 7 8
1 2 3 4 5 6 1 2 3 4
1 2 3 4 5 6
ANALOG INPUTS
1 2 3 4 5 6
COMMON
ANALOG INPUTS
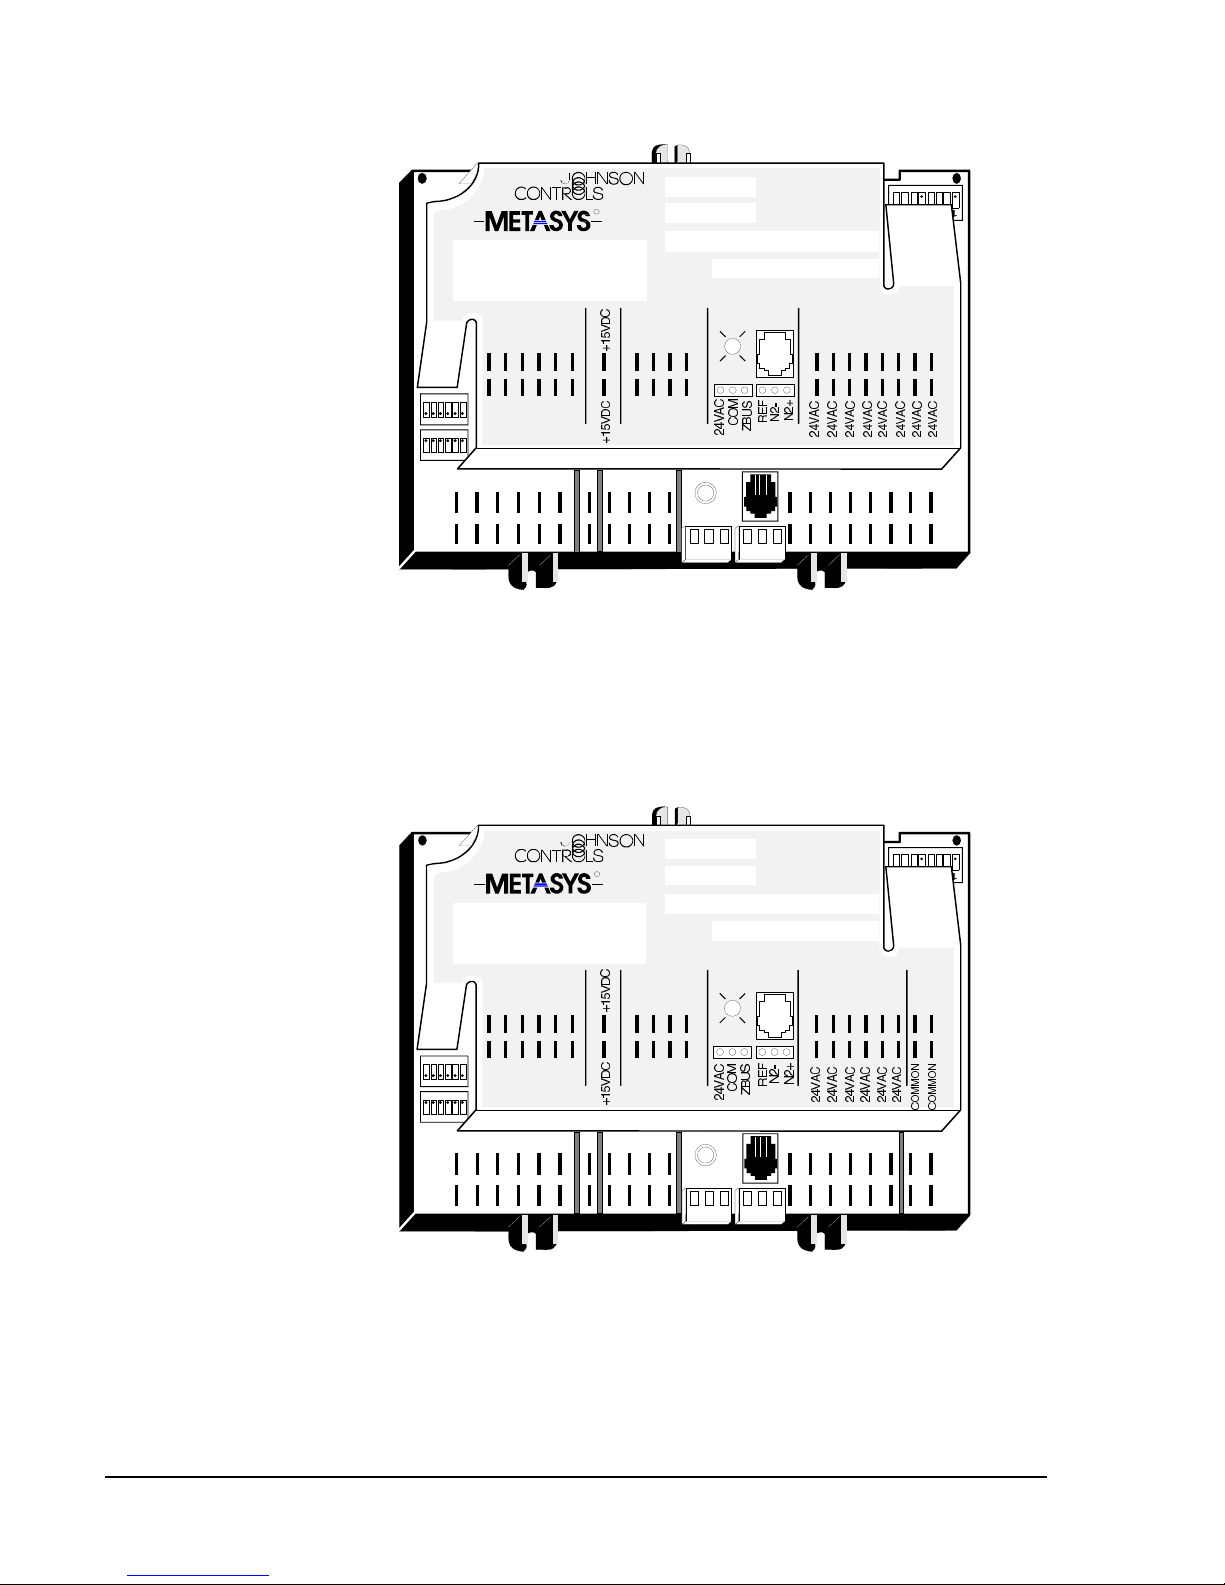
Figure 1: VAV110 (top) and VAV111 (bottom) Controller
6 VAV Controller—Variable Air Volume (VAV) Controller
BINARY INPUTANALOG INPUTS
BINARY COM
BINARY IN
DSI
Z BUS
BINARY OUTPUT
TO
1 2 3 4 5 6
ZONE
STAT
BINARY OUTPUTS
ANALOG
OUTPUT
1 2
ANA OU
110-111
Page 7
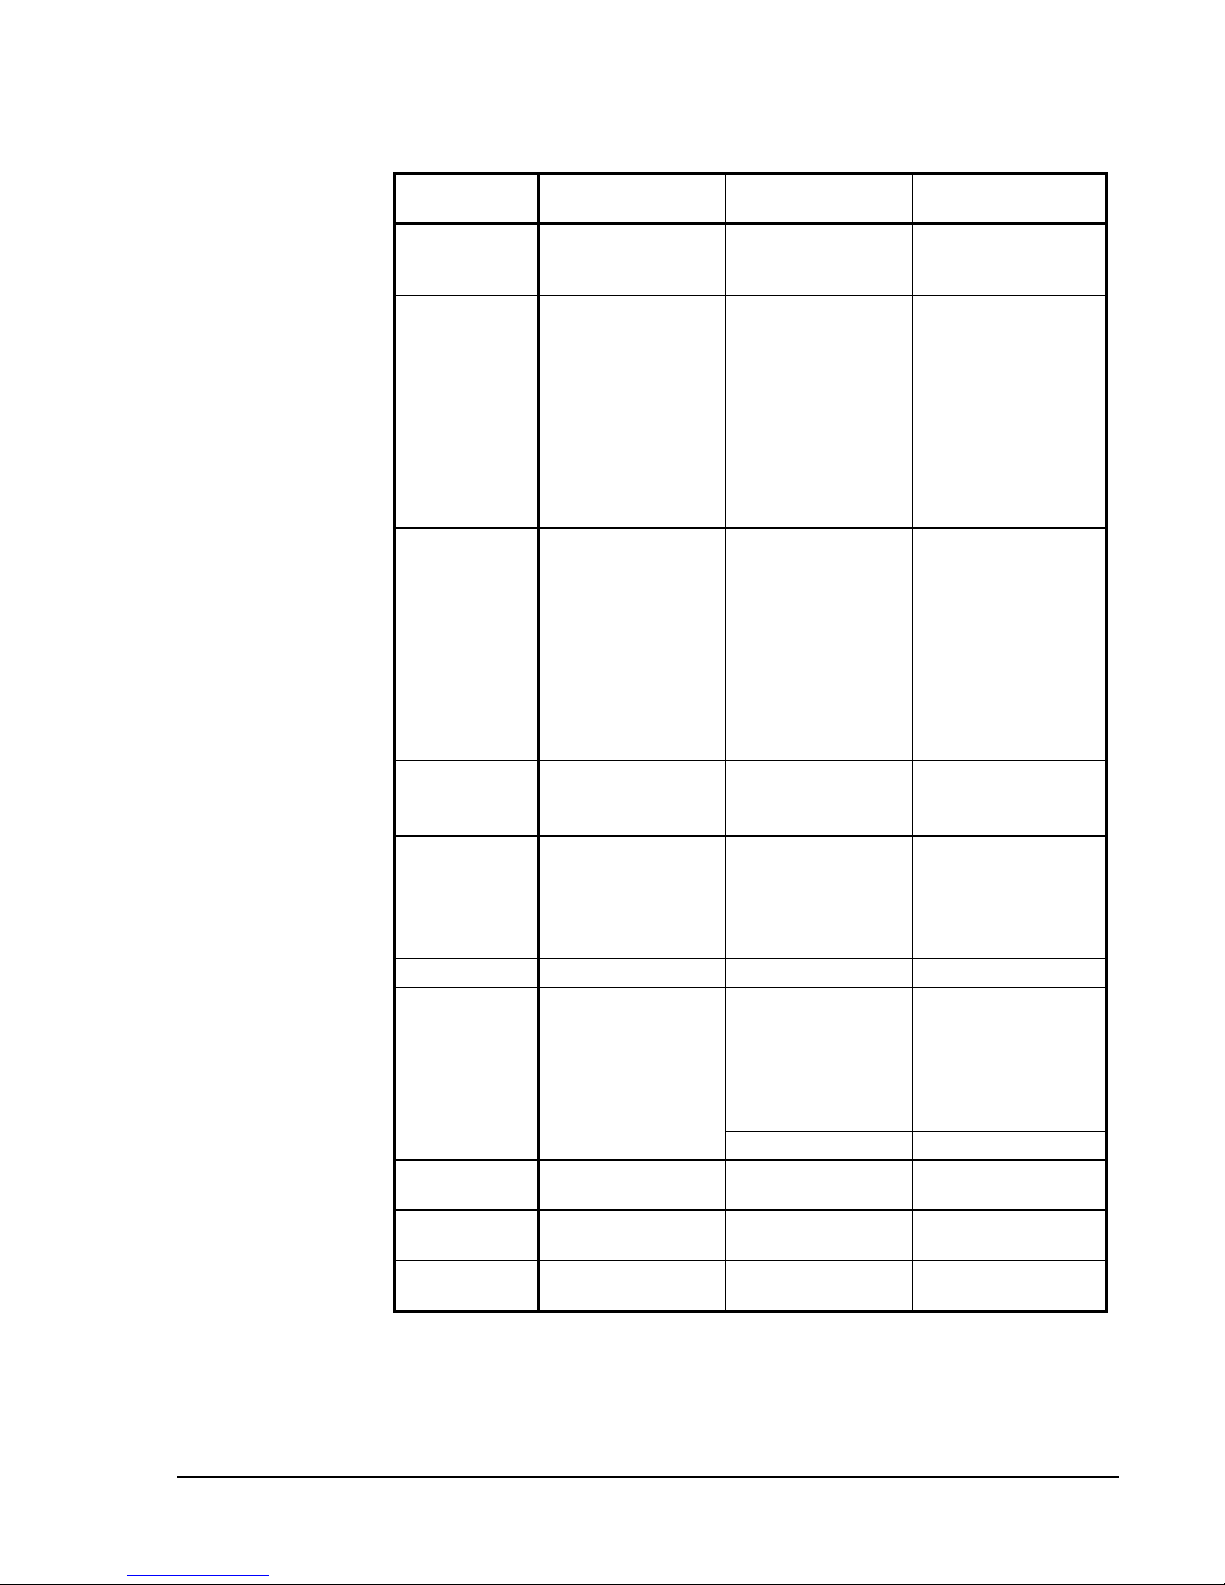
Table 1: VAV Controller Model Features
Feature VAV100/101
(Discontinued)
Ambient
Temperature
Rating
Analog Inputs
Binary Inputs
Analog
Outputs
Binary
Outputs
N2 Bus
Zone Bus
24 VAC Power
Terminations
I/O
Terminations
N2
Terminations
* VAV Controller model feature differences
32 to 122F
(0 to 50C)
6
RTD temperature
elements (1000 ohm
nickel, platinum, or
silicon)
2k ohm setpoint
potentiometers
0 to 10 VDC or
0 to 2 VDC
transmitters
4
(4) Dry contacts
(1) Momentary push
button from zone
sensor for temporary
occupancy mode
BI 4 may be used as
an accumulator input
for frequencies less
than 100 Hz.
0/2
0 to 10 VDC
@ 10 mA
8/6
24 VAC Triacs
@ 0.5 amperes
Not Isolated * Isolated Isolated
Discrete connections
at controller
8-pin phone jack on
controller
6-pin phone jack at
zone sensor
LED Indication * LED Indication *
Quick Connects
(Spade Lugs) *
Quick Connects
(Spade Lugs)
Fixed Screw Terminal
Block *
VAV110/111 VAV140/141
32 to 122F
(0 to 50C)
6
RTD temperature
elements (1000 ohm
nickel, platinum, or
silicon)
2k ohm setpoint
potentiometers
0 to 10 VDC or
0 to 2 VDC
transmitters
4
(4) Dry contacts
(1) Momentary push
button from zone
sensor for temporary
occupancy mode
BI 4 may be used as
an accumulator input
for frequencies less
than 100 Hz.
0/2
0 to 10 VDC
@ 10 mA
8/6
24 VAC Triacs
@ 0.5 amperes, or
0.8 amperes if total
power is limited
Discrete connections
at controller
8-pin phone jack on
controller
6-pin phone jack at
zone sensor
Removable Screw
Terminal Block
Quick Connects
(Spade Lugs)
Removable Screw
Terminal Block
32 to 122F
(0 to 50C)
6
RTD temperature
elements (1000 ohm
nickel, platinum, or
silicon)
2k ohm setpoint
potentiometers
0 to 10 VDC or
0 to 2 VDC
transmitters
4
(4) Dry contacts
(1) Momentary push
button from zone
sensor for temporary
occupancy mode
BI 4 may be used as
an accumulator input
for frequencies less
than 100 Hz.
0/2
0 to 10 VDC
@ 10 mA
8/6
24 VAC Triacs
@ 0.5 amperes, or
0.8 amperes if total
power is limited
Discrete connections
at controller
8-pin and 6-pin phone
jack on controller *
6-pin phone jack at
zone sensor
Removable Screw
Terminal Block
Fixed Screw Terminal
Block *
Removable Screw
Terminal Block
VAV Controller—Variable Air Volume (VAV) Controller 7
Page 8

3F4F5FOEM
Applications
6F7F8FStandards
Compliance
9F10F11FCoordination of
Factory
Mounted VAV
Systems
When providing VAVs for projects which use Trane or TITUS
terminal boxes, consider using the AS-VAVDPTx-1 product (refer to
Building VAVDPT Applications Application Note (LIT-6363042) in the
Application Specific Controllers Technical Manual (FAN 636.3). Trane
and TITUS are both Original Equipment Manufacturers (OEMs) who
provide VAV terminal boxes for projects. Trane typically provides the
damper actuator with their terminal box, and TITUS provides the damper
actuator with their QFPC Series Fan Powered Box. The VAVDPT comes
in two models, which include a VAV Controller and a DPT-2015 Velocity
Pressure Transducer. The DPT is mounted and prewired to the cover of
the VAV. Refer to the OEM Reference Manual (FAN 638).
The VAV Controller complies with the following standards:
z FCC Part 15, Subpart J, Class A
z IEEE 472, IEEE 518
z IEEE 587 Category A
z UL 916 Listed
z VDE 0871 Class B
A factory mounted VAV box control system requires close coordination
between a variety of different disciplines. Refer to the OEM Reference
Manual (FAN 638) for factory manufacturer’s details. Although the
responsibilities may differ per city or region, the following parties are
usually involved on the job:
z controls contractor
z mechanical contractor
z local VAV box manufacturer’s representative
z balancing contractor
z electrical contractor
Typically, the mechanical contractor is the focal point for coordinating the
entire process. The basic responsibilities under the domain of the
mechanical contractor are:
1. Purchasing the VAV box system. Most specifications include the
OEM mounting fees and enclosures for the control system in the
mechanical contractor’s price. Mounting fees vary per box
manufacturer but ranges can be found in the OEM Reference Manual
(FAN 638).
2. Providing the release schedule for the VAV boxes to the job.
3. Contracting, or working closely with, the balancing contractor to
ensure the system is set up per the mechanical prints.
Note: The owner often directly hires the balancing contractor. This
ensures neutrality in dealing with other contractors involved in the
project.
8 VAV Controller—Variable Air Volume (VAV) Controller
Page 9

In conjunction with the mechanical contractor, the controls contractor’s
responsibilities include:
1. Coordination of the control system release schedule to the box
manufacturer to ensure the mechanical system delivery schedule can
be met. Coordination with the local box manufacturer representative is
normally required.
2. Coordination with the electrical contractor to ensure the following
steps are covered.
z 24 VAC power is provided at each VAV Controller.
z N2 Bus wiring is pulled and terminated.
z Valve actuator wiring is pulled and terminated.
z Zone sensor cables are pulled. The use of phone cable for
terminating zone sensor wiring allows basically anyone to
terminate zone sensors in certain locales.
z If desired, the N2 address switches can be set by the electrical
contractor.
3. Initial loading of the HVAC PRO for Windows configuration files is
done once the electrical contractor’s functions are completed in
preparation for the final system balancing.
4. Training of the balancing contractor to ensure the balancing contractor
knows how to use the Zone Terminal (ZT) or HVAC PRO for
Windows Commissioning mode so they can perform the final system
balancing.
5. Mounting and terminating the cable connections for the zone
temperature sensor. Set the N2 address switch if the electrical
contractor was not contracted to perform this function.
6. Configuring, downloading, and commissioning the controller.
VAV Controller—Variable Air Volume (VAV) Controller 9
Page 10

10 VAV Controller—Variable Air Volume Controller
Page 11

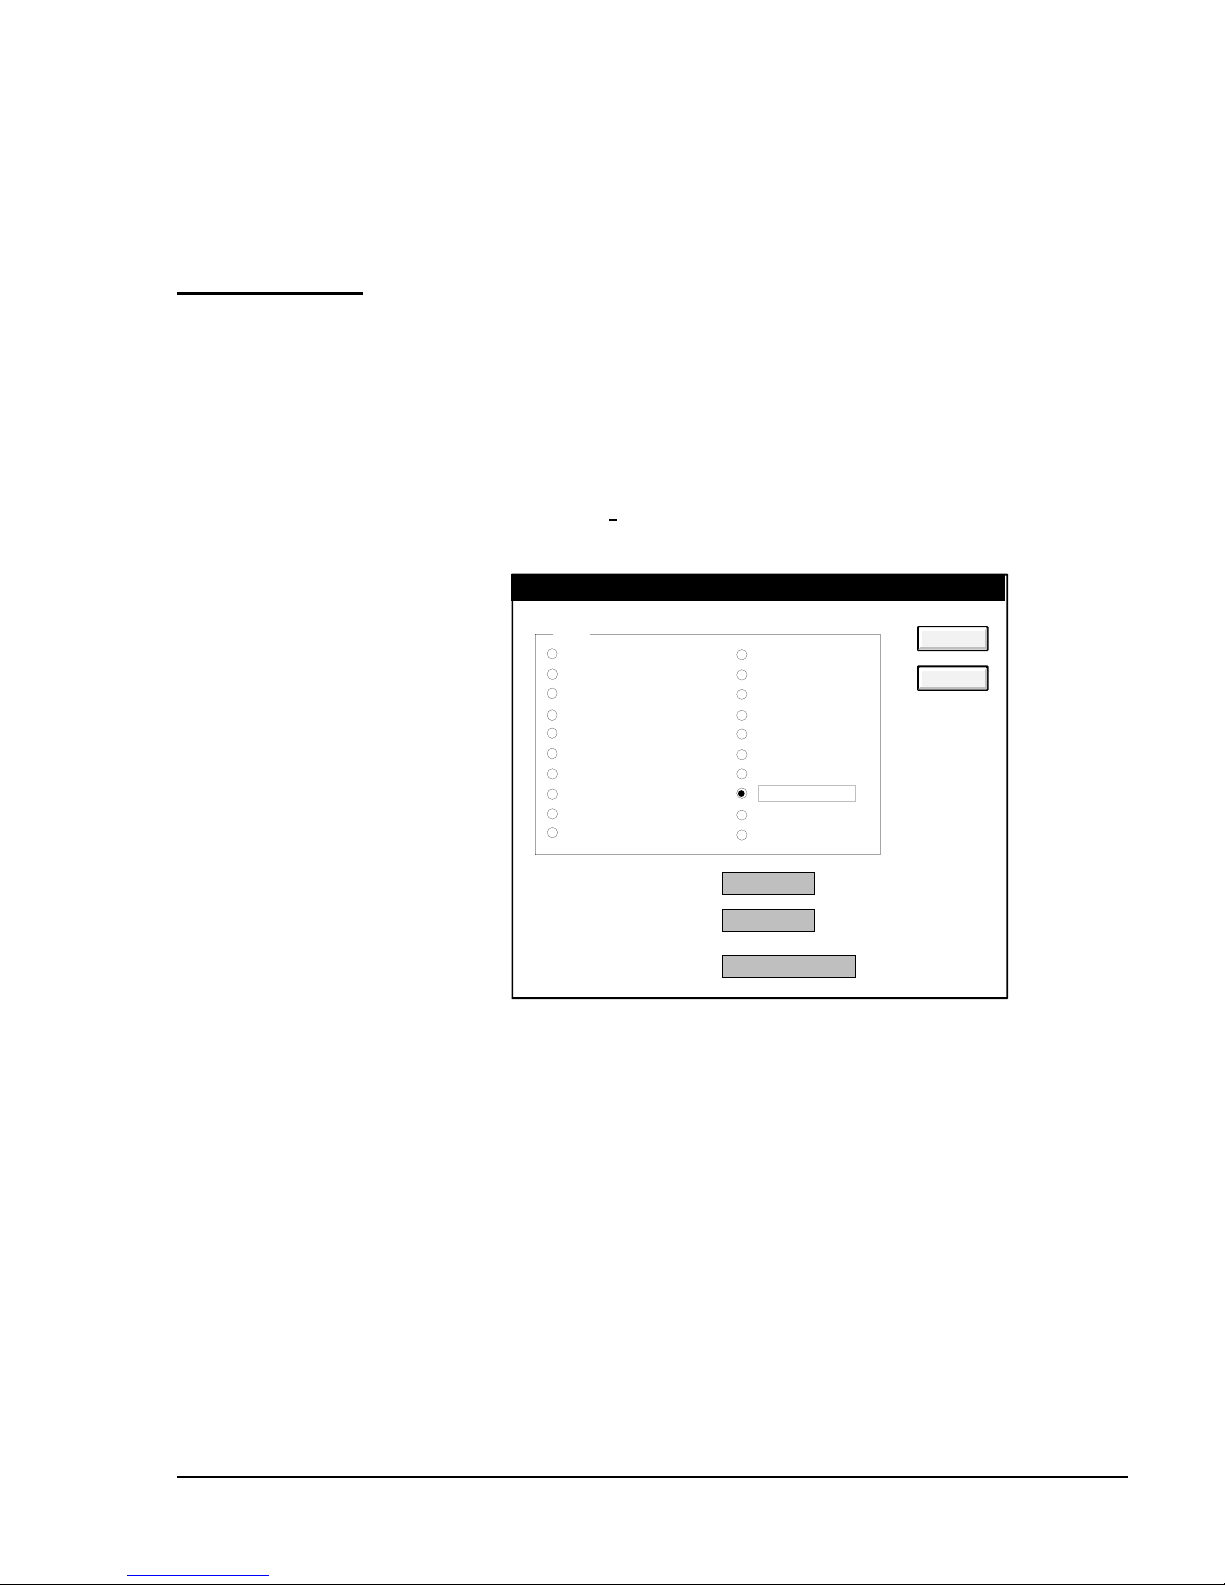
12F13F14FConfiguring the Controller
Using
HVAC PRO
for Windows
Configuration
Tool
Use HVAC PRO for Windows to configure the VAV. VAV110/111 and
VAV140/141 models require HVAC PRO for Windows. HVAC PRO for
Windows also works with the VAV100/101 models. This easy-to-use
software tool configures, commissions, and downloads the VAV
Controller’s data base.
51HFigure 2 illustrates the HVAC PRO for Windows configuration process.
Refer to the HVAC PRO for Windows User’s Manual (FAN 637.5) for
specific information when configuring the VAV Controller.
VAV Controller—Variable Air Volume (VAV) Controller 11
Page 12
Sta rt HVAC PRO for Wind ows
Sele ct F il e -Ne w
1. Select VAV Applications.
2. Select Single or Dual Duct.
Complete Q/A Session
Complete Configuration Process
1. Fill in job information.
- O p tion - Jo b In fo rma tio n
2. Review and change inputs/outputs.
3. Review and change default parameters.
Save Co nfiguration
1. File - Save As
2. Select device type.
Download Controller
1. Attach MM-CVT101-1 Converter
or AS-CBLPRO-2.
2. Select Download - Current Configuration.
Comm ission Controller
1. Attach MM -CVT101-1 Converter
or A S-C BLP RO - 2 .
2. Select Commission - Current Configuration.
3. Sele c t Bus ty p e , c o mm. po rt, a n d
N 2 a ddre ss (if N2 Bus ).
4. Select OK.
5. View / Adjust parameter values.
3. Enter file name for configuration file.
3. S elec t Bus type, c o mm . p o rt, a n d
N 2 address (if N2 Bus).
4. Select OK.
6. Re v ie w contr o ller in fo rma t io n .
7. Exit Co mm is s ioning.
8. If adjustments were made, save
changes to controller and to file.
9. Unplug MM-CVT101-1 or AS-CBLPRO-2..
PRO FLO 40
Figure 2: Steps in Configuring a VAV Controller Using
12 VAV Controller—Variable Air Volume Controller
Exit HVAC PRO for Windows
HVAC PRO for Windows
Page 13
Note: You can load and commission the controller either locally with the
AS-CBLPRO-2 interface at the zone sensor (Figure 15) or from a
central location where the N2 has been pulled, controller’s field
hardware addressed, and an MM-CVT101-1 interfaced to the laptop.
15F16F17FDefining a VAV
Control Device
Object in
Metasys
Software
Using a Metasys Network system, you need to define a VAV Controller
device object by entering data into the Attribute menu as seen on the
Operator Workstation.
1. Go to the Network Map.
2. Double-click the system name in which you want to add the new VAV
object.
3. Click New in the Item pull-down menu.
4. Click on Type: N2 devices in the Item New dialog box.
VAV - Item New
Type
Accumulator
Analog data
Analog input
Analog output digital
Analog output setpoint
Binary data
Binary input
Binary output
MS data
MS input
Hardware system name:
MS output
Control system
DL/LR group
LC group
PID loop
Fire Zone
L2 devices
N2 devices
S2 devices
Card Reader
OK
CANCEL
Hardware object name:
Copy of (System\Object):
ITEM NEW
Figure 3: Item New Dialog Box
Note: The Hardware System and Hardware Object text fields are not
used for this object type.
5. Click OK to display the Add N2 Device dialog box.
VAV Controller—Variable Air Volume (VAV) Controller 13
Page 14

c
j
Hardware -- Add N2 Device
Device Type
A
HU
D
600
DCM
DR
9100
DX91 00
IFC-2020
LCD
VAV
OK
CANC
EL
n2dv
Figure 4: Add N2 Device Dialog Box
6. Highlight VAV.
7. Click OK to display the VAV Definition window (52HFigure 5).
VAV Definition
Item Ed
Towe
it View Action Go To Accessory
r_ I
Floor
1
Bookmark
Help
System Nam e
Ob
ject
Name
Expanded I
NC
Graphic Symbol #
Ope
Name
rating Instr.
D
#
Hardware
NC #5
1
1
Hardware
N2 Trunk Numbe
N2 Device
Po
ll Priorit
Addres
y
Comm Disabled
Flag
r
s
1
0
3
s
Auto Dialou
N
t
N
windob
Figure 5: VAV Control Device Object Definition Window
Note that some of the fields in the window are blank and some are already
filled in. You must fill in the blank attribute fields of required attributes.
An N2 device address from 1 to 255 must also be specified. Attribute
fields that are already filled in contain default values that may be accepted
or changed.
14 VAV Controller—Variable Air Volume Controller
Page 15
Table 2 explains the blank attributes. The Operator Workstation User’s
Manual (FAN 634) describes the general procedures for entering and
modifying data.
Table 2: Blank VAV Object Attributes
Attribute Description Entry Values . . .
Object Name
Expanded ID
Identifies the object
(i.e., ILC). The object name
cannot be duplicated in the
system.
Further identifies the object
(i.e., LC Device 1)
1 to 8 alphanumeric
characters
0 to 24 alphanumeric
characters
(Optional)
8. To save the new VAV object, select Save from the Item pull-down
menu. The object is added to the NCM data base.
9. Upload the NCM to make an archive copy of the new object following
the instructions in the Operator Workstation User’s Manual (FAN
634), the Advanced User’s Guide tab, the Uploading and Downloading
Data Bases chapter, the Uploading from the NCM section.
Modifying and
Monitoring the
VAV Object
Once you have defined the VAV object, you can modify or monitor its
attribute values online using the VAV object Focus window. See the
Operator Workstation User’s Manual (FAN 634) for more information on
using Focus windows.
VAV Controller—Variable Air Volume (VAV) Controller 15
Page 16

16 VAV Controller—Variable Air Volume Controller
Page 17

18F19F20FInstallation Procedures
Instructions for the installation of the VAV Controller and its accessory
devices are detailed in this section. The types and numbers of components
(sensors and actuators) selected for use with the VAV vary according to
application. Analyze the proposed installation for logical places to locate
these devices and draw up an inventory based on that study. Information
on types of accessory devices available is in the Ordering Information
section of this technical bulletin.
Most VAV installation should be coordinated with the VAV box
manufacturer for factory mounting. The OEM Reference Manual
(FAN 638) describes the steps and pricing to coordinate a factory mount
solution.
Tools Needed
21F22F23FEnvironmental
Information
Tools needed for a typical installation include:
HVAC PRO for Windows currently released software
IBM PC-compatible laptop computer
Windows 3.x or Windows 95
two screwdrivers (1/8 in. and 1/4 in. flat-blade)
AS-CBLPRO-2 (Zone Bus communication tool)
MM-CVT101-0 (N2 Bus communication tool)
AS-ZTU100-1 (Zone Bus interface to application specific controllers)
The installation site of the VAV Controller must meet the following
environmental standards.
The atmosphere must be free of explosive vapors or escaping gases.
The atmosphere must be free of exposure to corrosive chemical or salt
vapors, which might damage electrical equipment.
The temperature must be maintained between 32 to 122F (0 to 50C)
with the relative humidity (non-condensing) maintained between 10 and
90%.
The power line must be “clean,” without electrical noise transients that
are often present in industrial environments. Commercial and
residential buildings typically have clean power, but may not, depending
on the location, nearby equipment, etc. Follow the power line wiring
transient noise precautions.
VAV Controller—Variable Air Volume (VAV) Controller 17
Page 18

24F25F26FMounting the
Controller
Factory Mounting
Typically the most cost effective and highest quality installation of the
VAV Controller, EDA-2040 Damper Operator, and DPT-2015 Velocity
Pressure Transducer can be accomplished by the box manufacturer. The
OEM Reference Manual (FAN 638) describes the relationship, pricing, and
process to accomplish factory mounting of the VAV control system at most
of the key box manufacturers.
If the job cannot be factory mounted, check with the VAV box
manufacturer to determine if a control enclosure for the VAV Controller
and Actuator/Velocity Pressure Transducer combination is already
available on the VAV box. If there is not an available enclosure, the
common packaging for the VAV Controller is an enclosure provided by the
contractor or the Johnson Controls EN-EWC10, EN-EWC15, BZ1000, or
AS-ENC enclosure. The controller requires a flat mounting surface area to
match its dimensions:
6.5 x 6.4 x 2.2 in./165 x 163 x 56 mm (H x W x D) without enclosure
6.8 x 7.3 x 4.7 in./173 x 185 x 119 mm (H x W x D) with the
AS-ENC100-0 enclosure
7 x 13 x 6 in./180 x 330 x 150 mm (H x W x D) with the
EN-EWC10-0 and EN-EWC15-0 enclosure
Make sure you allow enough room to install the enclosure and conduit for
wiring terminations to the controller. 53HFigure 7 shows a common packaging
configuration for the VAV Controller.
18 VAV Controller—Variable Air Volume Controller
Page 19

TM
+15VDC
+15VDC
24VAC
24VAC
TRACS
COMMON
COMMON
COMMON
COMMON
Low Voltage
Wiring Trough
COMMON
vavpwer
Figure 6: EWC10 Enclosure with VAV Controller
and 50 VA Transformer
Mounting the
VAV into a
Universal
Packaging
Module
Field Mounting
The VAV can be directly mounted into an EWC10/15 enclosure. You may
also purchase the VAV premounted in a EWC10 enclosure with a
50 VA transformer. Refer to the Application Specific Controllers
Technical Manual (FAN 636.3) for instructions on mounting the enclosure
to a wall.
To mount the VAV in the EWC10:
1. Orient the VAV so that its terminals face the low voltage wiring
trough (Figure 6).
2. Align the three mounting holes in the base of the controller with the
holes in the back of the enclosure. On the side with four mounting
holes, use the two outside holes for mounting in the EWC. See the
Universal Packaging Module Technical Bulletin (FAN 636.3) for a
more detailed explanation.
3. Secure the controller with three No. 8 x 1 in. screws. For best results,
use a plastite-type thread. A thread-forming or sheet metal thread type
may also be used.
Position the controller (or controller’s enclosure) on the mounting surface
before installation to ensure the calculated mounting area is correct. You
can make precise measurements for distance between controller terminals
and sensor/actuator mounting points on the VAV terminal. Confirm
electrical power source and conduit requirements prior to mounting.
VAV Controller—Variable Air Volume (VAV) Controller 19
Page 20

(
)
You can install a VAV Controller into a control panel or an AS-ENC100-0
enclosure.
Do not use this knockout.
Otherwise, controller wil l
be in the way of wiring.
2
Top / Bottom
3
3
VAV Controller
1
VAV Enclosure
5
vavencl2
Cover
4
Side
Figure 7: Installing the VAV Controller in an Enclosure Kit
Mount the VAV in any convenient location using the predrilled mounting
holes. The controller must be mounted on a wall or panel where it can be
easily wired through the enclosure cover. Mount the VAV vertically for
best DPT (differential pressure transmitter) performance. The same
instruction applies to remote location packages. Refer to
54HFigure 7 when
installing a VAV Controller.
1. Secure the VAV inside the enclosure kit , using three screws
through the mounting tabs on the sides of the controller board base.
2. Position the VAV and enclosure so that it rests firmly against the
mounting surface.
3. Using a flat-blade screwdriver and pliers, remove the necessary wire
passage knockouts .
Note: Do not use knockouts on the opposite sides of enclosure, as you
will not be able to remove the VAV board.
4. Attach the enclosure cover after installing wiring.
20 VAV Controller—Variable Air Volume Controller
Page 21

27F28F29FPower Line
Wiring
Transient Noise
Precautions
Surge Levels
The standard VAV Controller, when powered by any typical separate
isolation transformer or step-down transformer, operates reliably in an
electrical environment defined as Location Category A by the IEEE 587
Standard, that is, when installed more than 30 feet/9 meters from
electrical distribution panels or major bus and feeder systems in industrial
plants.
IEEE 587 Location Category A power line surge/noise level is specified at
6 kV, 500A (Normal Mode Ringwave).
In addition, the VAV Controller actually exceeds this category
specification by meeting these surge levels as well:
IEEE-587 style Common Mode Pulse: 1.5 kV, 3 kA
IEEE-587 style Normal Mode Pulse: 3 kV, 3 kA
IEEE-472 style Common Mode Ringwave: 1.5 kV
IEEE-472 style Normal Mode Ringwave: 500V
You must take further precautions to prevent unwanted Binary Output
cycling or other possible controller malfunctions, such as resetting, when
the controller is installed within 30 feet/9 meters of electrical distribution
panels or major bus and feeder systems in industrial plants. This electrical
environment is defined as Location Category B by the IEEE 587 Standard.
To prevent electrical noise from adversely affecting the controller:
1. Connect an MOV (Metal Oxide Varistor) across the VAV supply
transformer primary. The MOV must be rated appropriately for the
line voltage.
2. Use the list in Table 3 to select the correct MOV sold through your
electronics parts distributor.
The VAV Controller meets the following power line surge/noise standards
when you correctly apply the MOV as described.
IEEE-577 Common Mode Pulse 1.5 kV, 3 kA
Normal Mode Pulse 6 kV, 3 kA
Normal Mode Ringwave 6 kV, 500A
IEEE-472 Common Mode Ringwave 1.5 kV
Normal Mode Ringwave 500V
VAV Controller—Variable Air Volume (VAV) Controller 21
Page 22

Table 3: MOV Selection
Power Transformer Primary Voltage
Minimum Continuous
Voltage Rating
Minimum Energy Rating
Minimum Peak Current
(8 x 20 second pulse)
UL Recognized
Harris
Iskra
Malda
Mallory
Marcon
Oneida (CKE)
Panasonic
Phillips
Siemens
Stetron
Thomson
* Indicates the preferred model if several are listed.
120 VAC 208 to 240 VAC 277 VAC 347 VAC
130 to 135 VRMS 250 to 280 VRMS
Only 250V types listed
30 Joules 55 Joules 80 Joules 85 Joules
4,000 Amperes 4,000 Amperes 4,000 Amperes 4,000 Amperes
Required Required Required Required
V130LA10A
V130LA20A*
V130LA20B*
V130K14
V130K20*
D6321ZOV131RA15*
D6521ZOV131RA20*
D6921ZOV131RA09
VSAC14DK201U
VSAC20DK201U*
TNR15G211KM
TNR23G201KM*
TNR23G211KM*
OZ130LA10A
OZ130LA20A*
OZ130LA20B*
OZ21L221
0216NR14-3
0216NR20-4*
ERZ-C14DK201U
ERZ-C20DK201U*
2322-595-51316 2322-595-52516 2322-595-53016 2322-595-53816
S14K130
S20K130*
0216NR14-3
0216NR20-4*
0216NR20DB*
VE17M00131K
VD24M00131K
V250LA20A
V250LA40A*
V250LA40B*
V250K14
V250K20*
D6321ZOV251RA90*
D6521ZOV251RA130*
D6921ZOV251RA72
VSAC14DK391U
VSAC20DK391U*
TNR15G391KM
TNR23G391JM*
TNR23G391KM*
OZ250LA20A
OZ250LA40A*
OZ250LA40B*
ERZ-C14DK391U
ERZ-C20DK391U*
S14K250
S20K250*
0390NR14-3
0390NR20-4*
0416NR14-3
0416NR20-4*
VE17M00251K
VD24M00251K
300 to 320 VRMS 385 VRMS
None None
V300K14
V300K20*
D6321ZOV301RA105*
D6521ZOV301RA150*
D6921ZOV301RA80
VSAC14DK471U
VSAC20DK471U*
TNR15G471K
TNR23G471K*
OZ21L471 None
ERZ-C14DK471U
ERZ-C20DK471U*
S14K300
S20K300*
0620NR14-3
0620NR20-4*
VE17M00301K
VD24M00301K
V385K14
V385K20*
None
VSAC14DK621U
VSAC20DK621U*
None
ERZ-C14DK621U
ERZ-C20DK621U*
S14K385
S20K385*
0620NR14-3
0620NR20-4*
None
22 VAV Controller—Variable Air Volume Controller
Page 23

I/O and
Communication
Lines Wiring
Transient Noise
Precautions
The I/O wiring and N2 Bus must be clean, without electrical noise
transients from nearby lightning, heavy equipment switching, or inductive
loads being driven.
For the N2 Bus, the Transient Eliminator, model TE/JC04C12, made by
Advanced Protection Technologies (APT) is recommended. Refer to the
Metasys Network Technical Manual (FAN 636), the N2 Communications
Bus Technical Bulletin (LIT-636018) for more information.
VAV Controller—Variable Air Volume (VAV) Controller 23
Page 24

24 VAV Controller—Variable Air Volume Controller
Page 25

30F31F32FWiring Details
Take special precautions and follow certain grounding procedures when
installing the VAV Controller.
!
CAUTION: Possible Equipment Damage or Electrical Shock.
To avoid damaging equipment or possible electrical
shock, ensure that all power supplies to the system
have been disconnected prior to wiring installation.
The CMOS (Complimentary Metal Oxide
Semiconductor) circuits used in the controller are
static sensitive. Use static protection (anti-static mats
and/or grounding straps) when working on or near
internal circuitry.
Follow these precautions:
z Make all wiring connections in accordance with the National Electrical
Code (NEC) as well as within local regulations.
z Locate equipment and route the wiring so that signal wiring is twisted
pair, and separated from power wiring to the maximum extent possible.
To establish tight, reliable electrical connections, use the correct wire
sizes for the terminals.
z Make all wiring connections to the VAV Controller using only copper
conductors.
z The N2 must be daisy-chained. The use of Y or T connections without a
repeater installed in the T tap may cause loss of communications.
z Do not run N2 Bus, Zone Bus, Analog Input (AI), Binary Input (BI), or
Binary Output (BO) wiring in the same conduit as line voltage wiring
(above 30 VAC), or with wiring that switches power to highly inductive
loads such as contactors, coils, motors, or generators.
z Do not run non-shielded N2 Bus wiring in the same conduit or bundle as
24 VAC power wiring.
z You may run Zone Bus, Analog Input, Analog Output, and Binary Input
wiring in the same bundle or conduit where convenient. If the Binary
Output wiring is not wired through other switches or contacts, you may
also bundle it with the other I/O wiring where convenient.
VAV Controller—Variable Air Volume (VAV) Controller 25
Page 26
Power Source
and Loads
Use a separate isolation transformer or step-down transformer for each
VAV Controller. Refer to Standards Compliance in the Introduction
section of this technical bulletin. The power transformer used must comply
with:
z CSA 22.2 No. 205
z NEMA ICS 2, Part 2, 230
Limit the power to each VAV to 3 amperes or less. However, if you use
one low voltage power trunk to power multiple controllers, follow these
precautions:
z Ensure polarity is maintained at each 24 VAC connection.
z As per NEC code, you must enclose 24 VAC power trunks with
greater than 4 amperes (100 VA) in conduit.
Note: See NEC Article 725/Class 2 (30 VRMS Max) and (100 VA Max).
Any individual binary output (triac) can drive up to 800 mA when you
limit the total 24 VAC power draw. You must limit the power draw of a
controller and its load to avoid heat dissipation problems. You must limit
the total 24 VAC power draw of a VAV Controller installed in an
enclosure to a maximum of 40 VA. You must limit the total 24 VAC
power draw of a VAV Controller mounted in an open air environment to a
maximum of 75 VA.
When you determine the system load, consider all the actual loads as well
as the basic load of the controller. The following tables assist you in
determining the total 24 VAC power draw of your system.
Table 4: VAV Power and Load Specifications
System Loads Power Draw
VAV Controller with sensors/transmitters 10 VA (400 mA)
BO Load
Relay, Contactor, Solenoid, Incremental Actuator*
Maximum allowable load for any individual binary output
(triac) is 19 VA** (800 mA at 24 VAC)
Minimum required load for each binary output (triac)
used is 1.2 VA (50 mA at 24 VAC)
Note: Relay loads less than 50 mA may cause
triac/relay chattering. If necessary, use a
1000 ohm 2W resistor across the binary output.
AO Load
Actuator
Maximum allowable load for each AO is 10 mA with a
minimum load resistance of 1000 ohm.
Zone Terminal or CBLPRO 1.2 VA (50 mA)
*Actuator VA requirements are found in Table 5.
**With total controller power draw limited as described previously.
Refer to specific product
documentation.
Refer to Table 5.
26 VAV Controller—Variable Air Volume Controller
Page 27
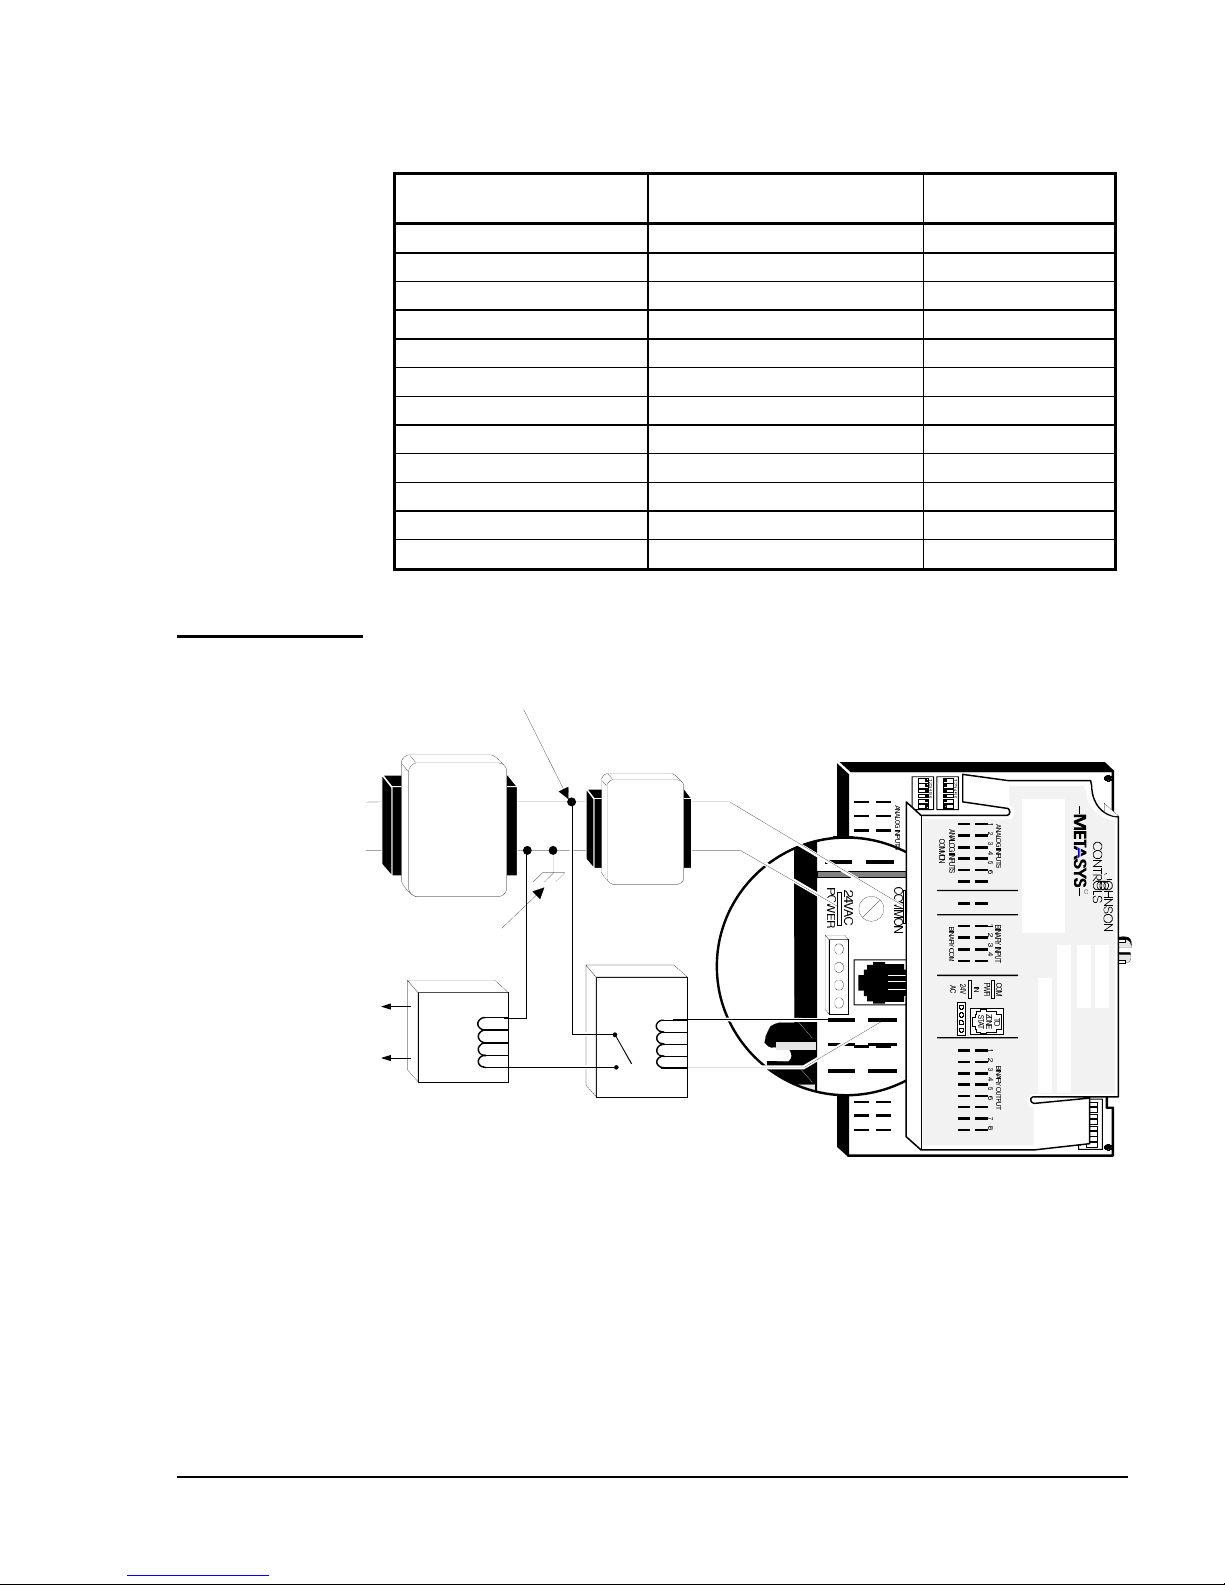
Table 5: Actuator VA Requirements
Actuator Type VA Requirements
for 24 VAC Supply
EDA-2040 (ATP-2040)
VA-7150
VA-7200
VA-8020
VA-8050
J Series Electric Zone Valve
M9100-A, M9200-A
M9100-G, M9200-G
VA-7152
VA-7202
VA-8022
VA-8052
Incremental 3 VA
Incremental 2.7 VA
Incremental 5.5 VA
Incremental 4 VA
Incremental 6 VA
On-Off 7 VA
Floating 6.5 VA
Proportional (Voltage or Current) 6.5 VA
Voltage (0 to 10 VDC) 4.7 VA
Voltage (0 to 10 VDC) 7.5 VA
Voltage (0 to 10 VDC) 4 VA
Voltage (0 to 10 VDC) 6 VA
33F34F35FGrounding and
Isolation
VAV100/101
On unit mounted controls, OEMs typically minimize
wiring between digital controls and equipment interface
relays by using one leg of the stepdown transformer
as common.
Isola tio n
Transformer
L
P
ower
Transformer
24/24
N
ZBUS
AREF
24VAC
24VAC
24VAC
24VAC
24VAC
24VAC
24VAC
24VAC
+15VDC
N2+
N2-
See the
below Figure 9
To
Load
CAUTION
Contactor
+15VDC
ZBUS
AREF
N2+
N2-
Isola tio n
Relay
VAV100 / 101
Figure 8: Transformer and Relay Isolation Wiring Diagram for Series
100/101 VAV Controllers
R
visoxfmr
VAV Controller—Variable Air Volume (VAV) Controller 27
Page 28

All VAV100/101 connections must be isolated from earth ground to protect
the CBLPRO, laptop PC, or other system components from damage. Due
to OEM system designs and/or electrical codes, the VAV may become
earth grounded unless you take isolation measures. Typically, the VAV
box manufacturer supplies a step-down isolation transformer as part of
their mounting service.
!
CAUTION: Potential Equipment Damage and Improper
Functioning. Do not earth ground the 24 VAC high
side of the VAV’s transformer or any of the VAV’s
BO terminals. If you do, the VAV’s N2 Bus
communications will cycle online and offline. You
will also damage all of the interface components that
are connected, including the CBLPRO, laptop PC,
Companion PC, and MM-CVT101.
Depending on the primary voltage of the power transformer and the
prevailing electrical code, the 24 VAC secondary might be earth grounded.
Earth ground on one side of the secondary destroys hardware by creating a
short circuit path through the CBLPRO and laptop PC serial card during a
download. Earth ground on either side of the secondary can disrupt the
isolation required for N2 communication integrity.
N2 Bus Isolation
VAV 100/101
Power
Transformer
Isolation
VAV100/101
Load Isolation
VAV100/101
36F37F38FVAV110/111 and
VAV140/141
The box manufacturer supplies fan or electric heat relays that might also be
earth grounded. This also disrupts the isolation required for N2
communication integrity.
Note: The Troubleshooting section of this technical bulletin contains a
detailed process that will reduce installation errors by ensuring
proper isolation.
If the secondary of the power transformer is grounded, you must use a
separate 24 VAC to 24 VAC isolation transformer such as the Y65GS
(see Figure 8).
If VAV output loads are grounded, such as a driven contactor or solenoid
coil, you must use a separate isolation relay for each load (see Figure 8).
28 VAV Controller—Variable Air Volume Controller
Page 29

L
N
See
To
Load
P
Transformer
CAUTION
Contactor
ower
below
24VAC
COM
ZBUS
REF
N2-
N2+
BO1
Figure 9: Transformer Wiring Diagram for
Series 110/111 VAV Controllers
!
CAUTION: Some local electric codes require the secondary
common of stepdown transformers be connected to
earth ground (typically on units powered by more than
150 VAC). You may have a maximum of one single
earth ground connection, which must be at the
transformer secondary common, whether one or
multiple controllers are powered by the same
transformer
+15VDC
TRIACS
24VAC
24VAC
24VAC
ZBUS
COMMON
COMMON
COMMON
COMMON
COMMON
+15VDC
COM
REF
N2-
N2+
TM
transeri
Power
Transformer
Isolation
VAV110/111 and
VAV140/141
Load Isolation
VAV110/111 and
VAV140/141
39F40F41FI/O and
Communication
Terminals
You may connect the Series VAV110/111 and VAV140/141 power
transformer secondary directly to earth ground. If you elect to do so, the
grounded side must connect to the Common power input terminal of the
controller. You do not need a separate isolation transformer for these
controllers.
If VAV output loads such as contactor or solenoid coils are grounded, you
must use a separate isolation relay for each load.
The VAV terminal designations, which identify sensor, actuator, and power
connection points, are illustrated in Figures 10 through 12 and Tables 6
through 8. Use the HVAC PRO for Windows Configuration Tool to assign
the inputs and outputs for a specific application. The filename.PRN file
identifies these connections after you assemble the configuration.
You may make connections to the VAV by connecting single wires to the
individual screw or spade terminals.
VAV Controller—Variable Air Volume (VAV) Controller 29
Page 30

R
VAV100
ANALOG INPUTS
1 2 3 4 5 6 1 2 3 4
1 2 3 4 5 6
ANALOG INPUTS
COMMON
1 2 3 4 5 6
BINARY INANALOG INPUTS
24VAC
COMMON
BINARY INPUT
Z BUS
BINARY COM
BINARY INANALOG INPUTS BI NA RY OUTP UTS
DSI
P5
BINARY OUTPUTS
BI NARY OU TPUT
TO
1 2 3 4 5 6
ZONE
STAT
P6
7 8
24VAC
COMMON
VAVterm6
R
VAV101
ANALOG INPUTS
1 2 3 4 5 6 1 2 3 4
1 2 3 4 5 6
ANALOG INPUTS
COMMON
1 2 3 4 5 6
24 VAC
BINARY COM
24 VAC
COMMON
COMMON
24 VAC
COMMON
BINARY INPUT
BINARY INANALOG INPUTS BIN ARY OUT PUTS
BI NARY OU TPUT
TO
1 2 3 4 5 6
ZONE
STAT
ANALOG
OUTPUT
1 2
ANA OUT
Figure 10: VAV100/VAV101 Terminal Designations
30 VAV Controller—Variable Air Volume Controller
P5
BINARY INANALOG INPUTS
24VAC
COMMON
BINARY OUTPUTS
ANA OUT
24VAC
COMMON
VAVterm3
Page 31

Table 6: VAV100/101 Terminal Identification
Series 100/101 Controller
Terminal Description Terminal Description
AI COM
AI COM
AI COM
AI COM
AI COM
AI COM
+15 VDC
BI CM
BI CM
BI CM
BI CM
24 VAC POWER
ZBUS
N2A+
24 VAC
24 VAC
24 VAC
24 VAC
24 VAC
24 VAC
24 VAC/AOCM*
24 VAC/AOCM**
VAV100 has eight BOs.
*
VAV101 has six BOs and two AOs.
**
Analog Input
Common
Analog Input
Common
Analog Input
Common
Analog Input
Common
Analog Input
Common
Analog Input
Common
+15 Volts DC
Binary Input
Common
Binary Input
Common
Binary Input
Common
Binary Input
Common
Transformer High
Side
Zone Bus
N2 Bus +
24 Volts AC
24 Volts AC
24 Volts AC
24 Volts AC
24 Volts AC
24 Volts AC
24 Volts AC/
AO Common
24 Volts AC/
AO Common
AI 1
AI 2
AI 3
AI 4
AI 5
AI 6
+15 VDC
BI 1
BI 2
BI 3
BI 4
24 VAC COMMON
AREF
N2A–
BO 1
BO 2
BO 3
BO 4
BO 5
BO 6
BO 7/AO 1*
BO 8/AO 2**
Analog Input 1
Analog Input 2
Analog Input 3
Analog Input 4
Analog Input 5
Analog Input 6
+15 Volts DC
Binary Input 1
Binary Input 2
Binary Input 3
Binary Input 4
Transformer Low
Side
N2 Reference and
ZBus Common
N2 Bus –
Binary Output 1
Binary Output 2
Binary Output 3
Binary Output 4
Binary Output 5
Binary Output 6
Binary Output 7/
Analog Output 1
Binary Output 8/
Analog Output 2
VAV Controller—Variable Air Volume (VAV) Controller 31
Page 32

R
VAV110
ANALOG INPUTS
1 2 3 4 5 6 1 2 3 4
1 2 3 4 5 6
ANALOG INPUTS
COMMON
1 2 3 4 5 6
BINARY IN PUT
Z BUS
BINARY COM
BINARY INANALOG INPUTS BINARY OUTPUTS
DSI
P5
TO
ZONE
STAT
P6
BINARY OUTPUT
1 2 3 4 5 6 7 8
C1
BINARY INANALOG INPUTS
DSI
P5
P6
BINARY OUTPUTS
VAVterm5
R
ANALOG
OUTPUT
1 2
ANA OUT
VAV111
ANALOG INPUTS
1 2 3 4 5 6 1 2 3 4
1 2 3 4 5 6
ANALOG INPUTS
COMMON
1 2 3 4 5 6
BINARY INPUT
Z BUS
BINARY COM
BINARY INANALOG INPUTS BINARY OUTPUTS
DSI
BINARY OUTPUT
TO
1 2 3 4 5 6
ZONE
STAT
Figure 11: VAV110/VAV111 Terminal Designations
32 VAV Controller—Variable Air Volume Controller
BINARY INANALOG INPUTS
BINARY OUTPUTS
ANA OUT
DSI
VAVterm2
Page 33

Table 7: VAV 110/111 Terminal Identification
Series 110/111 Controller
Terminal Description Terminal Description
AI CM
AI CM
AI CM
AI CM
AI CM
AI CM
+15 VDC
BI CM
BI CM
BI CM
BI CM
24 VAC POWER
COMMON
ZBUS
REF
N2N2+
24 VAC
24 VAC
24 VAC
24 VAC
24 VAC
24 VAC
24 VAC/AO CM
24 VAC/AO CM
Analog Input
Common
Analog Input
Common
Analog Input
Common
Analog Input
Common
Analog Input
Common
Analog Input
Common
+15 Volts DC
Binary Input
Common
Binary Input
Common
Binary Input
Common
Binary Input
Common
Transformer High
Side
Transformer Low
Side
Zone Bus
N2 Reference
N2 Bus N2 Bus +
24 Volts AC
24 Volts AC
24 Volts AC
24 Volts AC
24 Volts AC
24 Volts AC
24 Volts AC/AO
Common
24 Volts AC/AO
Common
AI 1
AI 2
AI 3
AI 4
AI 5
AI 6
+15 VDC
BI 1
BI 2
BI 3
BI 4
BO 1
BO 2
BO 3
BO 4
BO 5
BO 6
BO 7/AO 1
BO 8/AO 2
Analog Input 1
Analog Input 2
Analog Input 3
Analog Input 4
Analog Input 5
Analog Input 6
+15 Volts DC
Binary Input 1
Binary Input 2
Binary Input 3
Binary Input 4
Binary Output 1
Binary Output 2
Binary Output 3
Binary Output 4
Binary Output 5
Binary Output 6
Binary Output 7/
Analog Output 1
Binary Output 8/
Analog Output 2
VAV Controller—Variable Air Volume (VAV) Controller 33
Page 34

R
TO
TO
ZONE
ZONE
STAT
BUS
AI2
A
COMACOM
Z BUS
+15
+15
BI
BI1
VDC
VDC
COM
DSI
24
BI
BI2
BI3
COM
BI4 BO1
BO2 BO3 BO4 BO5
VAC
24
BO6 BO7 BO8
VAC24VAC24VAC
VAV140
1 2 3 4 5 6
1 2 3 4 5 6
A
AI1 AI3 AI4 AI5 AI6
COM
4
BO6 BO7
A
AI1
COM
A
AI3 AI4 AI5 AI6
AI2
COM
+15
A
VDC
COM
DSI
A
AI1 AI2 AI3 AI4 AI5 AI6 BI1 BI2 BI3 BI4 BO1 BO2 BO3 BO4 BO5 BO6 BO7 BO8
COM
COM
A
COM
A
+15
+15
VDC
VDCBICOM
BI
+15
BI1
COM
VDC
BI
BI2 BI3 BI4 BO1
COM
COM
Z
24
BUS
VAC
BI
COM
REF N2-N2
24
BO2 BO3 BO4 BO5 BO6 BO7 BO8
VAC
+
24
VAC
C
24
VAC
24
VAC
BO6
24
VAC
24
VAC
24
BO8
VAC
24
VAC
24
VAC
24
BO7 BO8
VAC
VAV141
4
BO6 AO1
A
AI1 AI3 AI4 AI5 AI6
COM
A
AI2
COM
+15
A
VDC
COM
DSI
A
AI1 AI2 AI3 AI4 AI5 AI6 BI1 BI2 BI3 BI4 BO1 BO2 BO3 BO4 BO5 BO6 BO7 BO 8
COM
COM
A
COM
A
+15
VDC
+15
BI1
VDC
+15
VDCBICOM
BI
BI2 BI3 BI4 BO1
COM
COM
24
VAC
COM
Z
BUS
COM
BI
BI
REF N2-N2
24
BO2 BO3 BO4 BO5 BO6 AO1 AO2
VAC
+
24
VAC
C
24
VAC
24
VAC
24
VAC
24
VAC
BO6 AO1
COM
A
AO2
A
COM
24
VAC
A
AO2
COM
Figure 12: VAV140 and VAV141--Terminal Strip Models
34 VAV Controller—Variable Air Volume Controller
vavterm4
Page 35

Table 8: Series 140/141 Controller
Terminal Description
AI1
A COM
AI2
AI3
A COM
AI4
AI5
A COM
AI6
+15 VDC
+15 VDC
BI1
BI COM
BI2
BI3
BI COM
BI4
BO1
24 VAC
BO2
BO3
24 VAC
BO4
BO5
24 VAC
BO6
BO7/AO1
24 VAC/A COM
BO8/AO2
24 VAC
COM
Z Bus
REF
N2N2+
Analog Input 1
Analog Input Common
Analog Input 2
Analog Input 3
Analog Input Common
Analog Input 4
Analog Input 5
Analog Input Common
Analog Input 6
+15 Volts DC
+15 Volts DC
Binary Input 1
Binary Input Common
Binary Input 2
Binary Input 3
Binary Input Common
Binary Input 4
Binary Output 1
24 Volts AC
Binary Output 2
Binary Output 3
24 Volts AC
Binary Output 4
Binary Output 5
24 Volts AC
Binary Output 6
Binary Output 7/Analog Output 1
24 Volts AC/Analog Output Common
Binary Output 8/Analog Output 2
24 VAC Power–Transformer High Side
Common–Transformer Low Side
Zone Bus
N2 Reference
N2 Bus N2 Bus +
VAV Controller—Variable Air Volume (VAV) Controller 35
Page 36

42F43F44FPower, Zone
Bus, and N2
Connections
The 24 VAC power connection to VAV100/101 is at the quick connects
identified as 24 VAC Power and Common. The 24 VAC power connection
to VAV110/111 or VAV140/141 is at the far left two positions of the 3position screw terminal block. The removable terminal block also allows
you to disconnect power to the VAV without disrupting the 24 VAC that is
daisy-chained to other controllers.
Zone Bus may be hard-wired to the VAV Controller instead of using the
phone jack as described later in this technical bulletin. The Zone Bus
connection to VAV100/101 is at the far left position of the 4-position
terminal block identified as ZBUS/COM-N2 REF/N+/N2-. The Zone Bus
connection to VAV110/111 or VAV 140/141 is at the far right position of
the 3-position screw terminal block identified as 24 VAC/COM/ZBUS.
For all VAVs, the other side of the two wire Zone Bus, the common side,
may be connected to any available Common terminal.
The N2 connection to VAV100/101 is at the 4-position screw terminal
block identified as ZBUS/COM-N2 REF/N2+/N2-. The N2 connection to
VAV110/111 or VAV140/141 is at the 3-position screw terminal block
identified as REF/N2-/N2+. The N2 screw terminal block is removable to
allow you to disconnect the communication trunk without disrupting the
N2 that is daisy-chained to other controllers.
45F46F47FAnalog Inputs
The six analog input terminals, their power supply, and their common
points occupy the terminal strip. These inputs may be of two types:
resistive or voltage. The VAV Controller processes and controls the
configured control strategy. It reads the analog inputs through the analog
input DIP switches located directly above the analog input terminals.
You use these switches and HVAC PRO for Windows to select the type of
analog input. Use T for all RTD temperature sensors and setpoint
potentiometers. Use 10V for DPT-2015 differential pressure transmitters.
For 3-wire voltage transmitters such as the DPT-2015 Series, use the
15 VDC power supply terminals next to the inputs for AI 6. You can
source 90 mA from 15V supply. The following table shows each
configuration.
Table 9: Analog Input Configurations
AI Type
Voltage (V)
Voltage (V)
Resistance
Slaving
Range
0 to 2 VDC V 2 V
0 to 10 VDC V 10 V
(T)1000 ohm Nickel,
Platinum, Silicon,
2k Potentiometer
(T)1000 ohm Nickel,
Platinum, Silicon,
2k Potentiometer
Switch Position-Set
SW1 SW2
T 2 V
V 2 V
36 VAV Controller—Variable Air Volume Controller
Page 37

The VAV Controller has two sets of DIP switches. One set is for
configuring the analog input points, and the other for setting the address of
the controller. Use Tables 9 and 10 to set the SW1 and SW2 analog input
DIP switches.
Refer to the Networking the Controller section of this technical bulletin for
instructions on setting the N2 address DIP switches.
R
SW2
SW1
10V
2V
T
1 2 3 4 5 6
O
N
1 2 3 4 5 6
O
N
ANALOG INPUTS
1 2 3 4 5 6 1 2 3 4
ANALOG INPUTS
COMMON
BINARY INPUT
BINARY COM
ARY IN
24 VAC
COMMON
24 VAC
COMMON
24 VAC
COMMON
24 VAC
COMMON
ZONE
STAT
TO
BINARY OUTPUT
1 2 3 4 5 6
BINARY OUTPUT S
ANALOG
OUTPUT
1 2
ANA OUT
aiswtch
V
ANALO
Analog Input Switches
Figure 13: Setting the Analog Input DIP Switches
The AI switches are factory set with AI 1, 2, and 3 as resistive inputs and
AI 4, 5, and 6 as 0 to 10 VDC inputs. However, you may configure them
to any combination. Use the following table to set the switches. For
example, if you connect a 10 VDC input to AI 4, set SW1-4 to Off and
SW2-4 to On.
Table 10: Analog Input DIP Switch Settings
Hardware
Point
AI 1
AI 2
AI 3
AI 4
AI 5
AI 6
SW1-1 SW2-1 ON OFF OFF OFF OFF ON
SW1-2 SW2-2 ON OFF OFF OFF OFF ON
SW1-3 SW2-3 ON OFF OFF OFF OFF ON
SW1-4 SW2-4 ON OFF OFF OFF OFF ON
SW1-5 SW2-5 ON OFF OFF OFF OFF ON
SW1-6 SW2-6 ON OFF OFF OFF OFF ON
Switch
Temperature
(Resistive
Input)
2 VDC
(0 to 2 VDC
Input)
10 VDC
(0 to 10 VDC
Input)
VAV Controller—Variable Air Volume (VAV) Controller 37
Page 38

48F49F50FBinary Inputs
51F52F53FBinary Outputs
There are four dry contact binary inputs on the controller. They are located
in the center of the terminal strip. The VAV Controllers have an available
momentary binary input option. This input is connected at the zone sensor
input to initiate a temporary occupancy or boost mode of operation.
The binary inputs on the VAV Controllers are inactive when open. They
are active when a contact closure to BI Common is applied. BI 4 may be
used as an accumulator input for frequencies less than 100 Hz.
There are six or eight binary outputs (depending on the selected model) on
the controller. Binary outputs are triacs on the controller hardware. These
outputs switch the transformer’s low side (or common) to the output.
Each binary output must be connected between the BO terminal and
24 VAC terminal since it is low side switching.
IMPORTANT: Chattering Relays Driven by Binary Outputs.
Chattering may occasionally occur in relays from
manufacturers other than Johnson Controls due to a
low load condition across the binary output triac. The
chattering relays are audible, and arcing may be visible
at the contacts.
The minimum holding current for the triac is 50 mA.
To eliminate chattering, use a 360 ohm, 5W resistor
across the binary output, or use the AS-RLY100-1
Relay Kit.
There have been a few instances where loads have met
the 50 mA current requirement, but still chattered. To
date, the exceptions are Honeywell damper actuator
(Model ML6161) and Finder relay (Model 60.12). In
these instances we recommend a
1000 ohm, 2W resistor in parallel across the load.
54F55F56FAnalog Outputs
There are two analog outputs on the VAV101, VAV111, and VAV141
Controller. The load is connected between the analog output and analog
output common terminals. Each output is controlled to generate a
proportional voltage output of 0 to 10 VDC to common. The maximum
load for each output is 10 mA with a minimum load resistance of
1000 ohm.
38 VAV Controller—Variable Air Volume Controller
Page 39

M
M
A
-
e
57F58F59FZone Bus
Wiring to
RLY50/002
Relays
The Zone Bus allows you to connect CBLPRO or the Zone Terminal to the
VAV Controller. With CBLPRO connected, use HVAC PRO for Windows
for commissioning downloading and uploading. The Zone Bus is available
for connection at Metastat or a zone temperature sensor.
Connect power to the relay module and the transformer through the conduit
knockouts in each box. Wire the module according to the following
diagram, an example of a VAV140/141 wired to an RLY50/002. All BOs
must be isolated from earth ground. VAV110/111 connections are similar.
Note 1
High Voltag
A
B
CO
NC
NO
CO
NC
NO
BO 1
24 V
BO 2
BI 3
BICOM
BI 4
VAV
A
B
COILS
TRIAC
HAND
OFF
HOA
COM
Note 2
Low Voltage
S-RLY50-0 / AS-RLYOO2
vavrelay
Note 3
Note 1: Separate low voltage and line wiring with line voltage on the right.
Note 2: Hand operation using the H-O-A (Hand-Off-Auto) switch requires 24 VAC to the COILS terminal
and COM to the TRIAC terminal to energize the relay.
Note 3: The Hand or Off position signals the binary input connected to those terminals. These switches
can be hardwire “OR”ed and connected to one BI. This switch uses the HOA COM terminal,
which is isolated from the relays.
Note 4: Choose BIs desired for H-O-A feedback.
Figure 14: VAV140/141 Wired to RLY50/002
!
CAUTION: Possible Equipment Damage or Electrical Shock.
Disconnect power circuit before wiring Relay Kit.
You can obtain a DPDT (Double-Pull, Double-Throw) relay configuration
by connecting the BO signal to two terminals on the Relay Kit terminal
block (e.g., B and C).
If you require a phone jack at a remote RLY kit, add an AS-CBLCON-0.
For additional information, refer to the Grounding and Isolation section of
this technical bulletin.
VAV Controller—Variable Air Volume (VAV) Controller 39
Page 40

60F61F62FWiring Sensors
and Actuators
Use 18 AWG/1.5 mm2 twisted pair wire for all sensor and output wiring.
Shielding is not required but, if used, earth ground the shield at the
transformer or the controller. You may use 24 AWG/0.6 mm diameter wire
in some applications. However, the length of wire is reduced due to the
resistance. To minimize sensor error caused by field wiring, the total
resistance of all resistive sensor wiring should be less than 3 ohm.
!
CAUTIONS: Potential Controller Malfunctioning.
..Do not run AI, BI, AO, BO, ZBus, or N2 Bus wiring in the same conduit
as wiring carrying
30 VAC or more.
Do not run AI, BI, AO, BO, ZBus, or N2 Bus wiring
in the same conduit as wiring that switches power to
highly inductive loads (such as contactors, coils,
motors, or generators).
Input and Load
Impedances
Table 11: Sensor Wire Sizes and Lengths
Sensor Type Run Length Wire Size
Feet Meters AWG mm2
AI Temperature
AI Voltage
BI Voltage/Contact
Single BO at 0.1 ampere
Single BO at 0.5 ampere
Zone Bus
Zone Thermostat
* Note: If an AS-CBLPRO-1 and a Zone Terminal are used, the cable length must be limited
to 50 feet/15 meters.
500 150 18 1.5
500 150 18 1.5
500 150 24 to 18 0.6 mm diameter
to 1.5 mm
500 150 18 1.5
100 30 18 1.5
500 150 18 1.5
100* 30* Eight conductor
phone cable
Eight conductor
phone cable
2
Table 12: Input and Load Impedances
Function
AI Voltage
AI Voltage
AI Temp/Pot
BI DC Sense
AO Voltage
BO AC Triac
Range
DC Input
Impedance
Sensor or
Load
Impedance
0-2 VDC 470k ohm 0-5k ohm
0-10 VDC 128k ohm 0-5k ohm
1000 ohm Si, Ni, Pt,
or 0-2k ohm potentiometer
0-15 VDC, 2.5V Trig 47k ohm 0-5k ohm
0-10 VDC @ 10 mA maximum N/A 1K-10M ohm
24 VAC @ 50-800 mA* N/A *30-480 ohm
3540 ohm 0-2k ohm
40 VAV Controller—Variable Air Volume Controller
Page 41

Temperature
Sensors
DC Supply Out
14.6-17 VDC @ 90 mA N/A 162-10M ohm
* With total controller power draw limited as described previously.
ANALOG INPUTS
1 2 3 4 5 6 1 2 3 4
1 2 3 4 5 6
ANALOG INPUTS
COMMON
1 2 3 4 5 6
CBLPRO
9-pin or 25-pin
Adapter
Laptop PC
6-pin to 8-pin
Metastat
Laptop PC
9-pin or 25-pin
Adapter
Zone Bus
CBLPRO
or
Zone Bus
6-pin to 6-pin
R
BINARY I NPUT
BINARY COM
BINARY I NANALOG INPUTS BINARY OUTPUTS
Z BUS
DSI
P5 P6
TO
ZONE
STAT
or
8-pin
to
8-pin
BINARY OUTPUT
1 2 3 4 5 6 7 8
vavconn2
Figure 15: VAV Interconnection
To make all of the necessary wiring terminations between the VAV
Controller and the TE-6410 Series Metastat, use phone cable that has
preterminated 8-pin RJ-45 connectors. These cables are available from
Anixter. Refer to the Vendor Code Numbers in the Ordering Information
section of this technical bulletin for specific information regarding cables.
Connect one end of the cable to the Zone Bus connector on the controller
and the other end to the 8-pin connector on the back of the sensor as shown
in Figure 15. In addition to the 8-pin RJ-45 connection, the TE-6410
Metastat also has a 6-pin RJ-12 connection under its cover. This allows
remote connection of the CBLPRO (used during commissioning) or the
Zone Terminal (used for system monitoring).
For VAV140/141 Series Controller, there is an additional 6-pin jack for
Zone Bus communication. You may permanently connect a Metastat to the
8-pin jack of the controller and simultaneously connect a laptop PC,
CBLPRO, or Zone Terminal to the Zone Bus via the 6-pin jack.
VAV Controller—Variable Air Volume (VAV) Controller 41
Page 42

S
Phone Jack
Polarization
Figure 16 illustrates the polarization of the 6-pin and 8-pin phone jacks on
the VAV Controller or Metastat. Terminal 1 is to the extreme left as you
face the jack opening, tab notch down.
PHONEJK
8-pin
6-pin
Figure 16: Phone Jack Polarization
The following table defines the pin usage for each jack.
Table 13: Phone Jack Pin Identification
8-Pin Jack
(VAV Controller to Metastat)
Pin Signal Pin Signal
1
2
3
4
5
6
7
8
AI 3 Heating Setpoint
AI 2 Warmer, Cooler, or
Cooling Setpoint
AI 1 Temperature Sensor
AI 1 Sensor Common
24 VAC
24 VAC/ZnBs Common
AI 2/3 Common
Zone Bus
6-Pin Jack (VAV140/141 Controller
to CBLPRO or ZT and CBLPRO or
Zone Terminal to Metastat)
1
2
3
4
5
6
Not used
24 VAC
24 VAC/ZBus Common
Not used
Zone Bus
Not Used
Note: Refer to the Vendor Code Numbers in the Ordering Information
section of this technical bulletin for information on cables.
42 VAV Controller—Variable Air Volume Controller
Page 43

B
Fabricating an
Interconnection
Cable
You must construct any fabricated interconnection cable so the same color
wire on both ends of the cable align with Pin 1 in the plug. This provides a
consistent field assembly of the cable. Figure 17 illustrates the
interconnection cable.
ZBUS
AI2/3 COM
COM
24VAC
AI1COM
AI1
AI2
AI3
8 7 6 5 4 3 2 1
Controller
Phone Plug
CBLFA
Metastat
Phone Plug
8
7
6
5
4
3
2
1
Figure 17: Interconnection Cable
Note: This is not typical of pre-assembled phone cable purchased in retail
stores. A telephone system cable is wired opposite the zone sensor
requirements.
VAV Controller—Variable Air Volume (VAV) Controller 43
Page 44

n
Sharing a Sensor
1 2 3 4 5 6
O
N
1 2 3 4 5 6
O
N
You may use one sensor as a master input to multiple VAV Controllers
instead of mounting and wiring separate zone sensors for each controller.
This application is especially beneficial when you have a mechanical
system that uses more than one terminal unit to serve the same area, for
example, a large conference room or open office space.
Note: The practical limitation to this application is four VAV Controllers
to one sensor.
Set for
ANALOG INPUTS
1 2 3 4 5 6 1 2 3 4
1 2 3 4 5 6
ANALOG INPUTS
COMMON
1 2 3 4 5 6
2 VDC and
Voltage
TM
BINARY I NPUT
BINARY INANALOG INPUTS BI NARY OUTPUT S
TO
ZONE
STAT
Z BUS
24 VAC
DSI
P5
P6
BINARY OUTPUT
1 2 3 4 5 6 7 8
1 2 3 4 5 6
O
N
1 2 3 4 5 6
O
N
ANALOG INPUTS
1 2 3 4 5 6 1 2 3 4
1 2 3 4 5 6
ANALOG INPUTS
COMMON
1 2 3 4 5 6
N2 -
N2 +
N2 REF
Sensor +
Sensor -
Note: Route sensor wiring and N2 wiring together. Since the VAV Controller is a self-terminating
device, end-of-line termination for the N2 Bus is not required.
Set for
2 VDC and
Temperature
TM
BINARY I NPUT
BINARY INANALOG INPUTS BI NARY OUTPUT S
TO
ZONE
STAT
Z BUS
24 VAC
DSI
P5
P6
BINARY OUTPUT
1 2 3 4 5 6 7 8
Metastat
8-pin Connectio
on Back
sensors2
Figure 18: Example of Sharing a Sensor Among VAV Controllers
Figure 18 shows the wiring and analog input switch settings for
two controllers that use one zone sensor. To ensure the noise immunity of
the VAV Controllers, pull the N2 Bus wiring with the sensor wiring
between controllers that share the same zone sensor.
Notes: This configuration shifts the AI value by one degree for each added
controller. Compensate for this temperature shift by entering an
offset of -1°F (for each added controller) through the AI Offset
Table. You can find this table in the Commissioning mode of
HVAC PRO for Windows.
On the HVAC PRO for Windows Analog Input Modify screen,
verify that both controllers are set to the same temperature sensor
type.
If the master zone sensor uses the Zone Bus connection, only the
master controller can be loaded and commissioned from the sensor
connection.
44 VAV Controller—Variable Air Volume Controller
Page 45

63F64F65FNetworking the Controller
N2 Bus
Overview
Wiring the
Controller to an
NCU
N2 Bus
Characteristics
If you are familiar with the N2 Bus, go to the next section of this technical
bulletin: Installing the N2 Bus.
A hardware connection between the N2 Communications Bus and the
NCM of the Network Control Unit (NCU) is required if the NCM is to
service N2 devices. Refer to Table 14 for terminal locations and to the N2
Communications Bus Technical Bulletin for termination resistor values.
When installed in a Metasys Network, the VAV Controller receives
commands from the Network Control Module (NCM) or Companion on the
N2 Bus, and transmits status reports in return. The maximum electrical
limitation on the N2 Bus is 255 devices. However, the number of
controllers on the N2 Bus is a data base memory issue at the NCU or
Companion. Refer to the N2 Communications Bus Technical Bulletin
(FAN 636) and either the Metasys Companion Technical Manual (FAN
628.1) or the Metasys Technical Manual (FAN 636) to determine practical
limitations to the number of controllers on the N2 Bus.
The N2 Bus connections are electrically isolated from other series
VAV110/111 and VAV140/141 Controller circuitry by optical and
magnetic coupling.
For runs of up to 5,000 feet/1,500 meters, use 22 AWG/0.6 mm diameter or
higher twisted pair wire. (Electrically, 26 AWG wire works, but it is too
fragile and prone to nicks and breaks.) Runs longer than
5,000 feet/1,500 meters require use of a bus repeater. An N2 network may
be extended to a maximum length of 15,000 feet/4,500 meters, using two
repeaters.
The N2 Bus is a daisy chain communications line. Essentially, it consists
of three wires, which carry three signals: N2+, N2–, and REF. The N2+
and N2– lines carry the actual data signals. The REF line provides a
common reference so that each connected device is capable of electrically
receiving and transmitting data by creating a common voltage reference
among all the devices connected together by the N2 lines. Three lines are
required for optimum reliability. It is important that the N2+ and N2– lines
must be twisted pair lines, which allows most induced noise (commonmode noise) from external sources to affect both lines equally, thereby
canceling the noise.
Note: Do not run N2 Bus wiring in the same conduits as line voltage
wiring (above 30 VAC) or wiring that switches power to highly
inductive loads (such as contactors, coils, motors, or generators).
VAV Controller—Variable Air Volume (VAV) Controller 45
Page 46

66F67F68FInstalling the
N2 Bus
Setting the N2
Address
Set the N2 address and test for N2 voltage, polarity, and isolation before
actually wiring the VAV Controller for operation. Refer to the ASC and
N2 Bus Networking and Troubleshooting Guide
(LIT-6363003) in the Application Specific Controllers Technical Manual
(FAN 636.3) for more information.
The switches located in the upper right corner of the VAV are set to the
same number as was assigned to the module through software. The
Metasys (or Companion) Facility Management System (FMS) uses this
address for polling and commanding. The numbers are in binary format
and vertically arranged with the least significant digit to the right.
For example, if the controller address is 17 (decimal), the binary
representation is 00010001–Switches 1 and 16 must be set to the On
position (1 + 16 = 17), as shown in Figure 19.
N
O
ANALOG INPUTS
1 2 3 4 5 6 1 2 3 4
1 2 3 4 5 6
ANALOG INPUTS
COMMON
1 2 3 4 5 6
R
BINARY INPUT
BINARY COM
BINARY INANALOG INPUTS BINARY OUTPUTS
Z BUS
DSI
P5 P6
TO
ZONE
STAT
BINARY OUTPUT
1 2 3 4 5 6
1 2 3 4 5 6 7 8
OFF
ANALOG
OUTPUT
1 2
ANA OUT
Address Switches
dipswtch
Figure 19: Setting the N2 Address DIP Switches
IMPORTANT: When setting the N2 Address, do not use address “0.”
46 VAV Controller—Variable Air Volume Controller
Page 47

N2 Wiring to the
Network Control
Module
R
ANALOG INPUTS
1 2 3 4 5 6 1 2 3 4
1 2 3 4 5 6
ANALOG INPUTS
COMMO N
1 2 3 4 5 6
BINARY INPUT
BINARY COM
BINARY INANALOG INPUTS BIN ARY OUTPUTS
DSI
BINARY OUTPU T
TO
1 2 3 4 5 6 7 8
ZONE
STAT
Z BUS
NCU
(TB1 o n C o m m u n ication
Terminal Board)
HRD
GRD
SFT
SFT
3
6
GRD
5
N2-12
GRD
4
N2+
To
Next
N2
De vice
N2 REF
N2 -
N2 +
REF
N2 +
N2 -
N2 REF
Note: Since the VAV Controller is a self-terminating device, end-of-line termination for the
N2 Bus is not required.
Figure 20: Connecting the VAV Controller to an NCM
Table 14: Terminal Locations
TB1 Terminal Function Number VAV Connection
Chassis Ground
Soft Ground
N2B Ref Ground
Soft Ground
-N2B Connection
+N2B Connection
6 None
5 None
4 AREF
3 None
2 N2 Bus: N21 N2 Bus: N2+
REF N2- N2+
n2wire1a
VAV Controller—Variable Air Volume (VAV) Controller 47
Page 48

a
e
N2 Wiring to
Companion
A hardware connection between the N2 Communications Bus and the
Companion PC/Panel/LTD is required to service N2 devices. An
MM-CVT101-0 Communications Converter is required to network to the
PC Companion. See Figure 21 for terminal locations. Refer to the Metasys
Companion Technical Manual (FAN 628.1) for information specific to the
CVT101 or Companion Panel/LTD.
C ompanion PC Version
R
RS232-to-N2Bus
Converter
(N2 Bus Terminal)
REF
N2 -
N2 +
ANALOG INPU TS
1 2 3 4 5 6 1 2 3 4
1 2 3 4 5 6
ANALOG INPU TS
COMMON
1 2 3 4 5 6
N2 REF
N2 -
N2 +
BINARY INPUT
Z BUS
BINARY COM
BINARY INANALOG INPU TS BINARY O UTPUTS
DSI
TO
ZONE
STAT
BINARY OUTPUT
1 2 3 4 5 6 7 8
N2 +
N2 -
N2 REF
To
Next
N2
Devic
n2wire2
Figure 21: Connecting the VAV Controller to Companion
48 VAV Controller—Variable Air Volume Controller
Page 49

69F70F71FZone Bus
Communications
Zone Bus
Description
The Zone Bus is a 2-wire communications bus that allows a computer to
communicate with the VAV to download the VAV’s data base and to
communicate with Zone Terminals and M100 Actuators. A third wire is
used for 24 VAC power to the CBLPRO, Zone Terminal, and CBLCON.
The bus interface sustains no damage in presence of fault voltages of
24 VAC.
M100C Actuators must be powered with separate transformers; therefore,
only the Zone Bus and Common wires need to be pulled.
The Zone Bus has the following specifications:
Table 15: Zone Bus Specifications
Type
Speed
Recommended Cable Type
Maximum Bus Length
Range of Addresses
Voltages
Logic High-Voltage
Logic Low-Voltage
Data Transmission
Multidrop serial communications bus
1200 baud (bits per second)
18 AWG/1.5 mm
24 AWG/0.6 mm diameter with no shield
(unshielded telephone cable)
500 feet/150 meters with 18 AWG/1.5 mm
50 feet/15 meters with 24 AWG/0.6 mm diameter cable
0 to 63
4 VDC minimum (approximately)
1 VDC maximum (approximately)
1 Start Bit (low level)
8 Data Bits (least significant bit first)
1 Stop Bit (high level)
2
with shield (Beldon 8760) or
2
cable or
The VAV110/111 and VAV140/141 Series Controllers contain an LED
that blinks to indicate Zone Bus activity with or without external
connection. When a PC via CBLPRO communicates with the controller,
the blink rate may appear to be more steady. See Table 37: Zone Bus LED
Indications in the Troubleshooting section of this document for more
information.
VAV Controller—Variable Air Volume (VAV) Controller 49
Page 50

CBLPRO
Description
CBLPRO (AS-CBLPRO) is an interface device for use between a computer
running HVAC PRO for Windows and application specific controllers such
as the VAV Controller. It is used for data base downloading, uploading, or
commissioning via the Zone Bus communication port.
When used with a Zone Bus device, such as the VAV or ZT, the CBLPRO
is strictly an electrical interface between the serial RS-232 port of the
computer and the Zone Bus. CBLPRO operates on 24 VAC drawn from a
VAV over the wire used to make the Zone Bus connections. The data rate
on both the RS-232 and the Zone Bus is 1200 baud.
The connection to the RS-232 COM port of the computer is by means of a
DB9 or DB25 connector supplied with the CBLPRO. After connecting it,
make sure the CBLPRO is about a foot or more away from the computer
monitor and system unit.
IMPORTANT: In some cases, a computer monitor or PC will give off
electromagnetic noise that may disturb CBLPRO
communications. Therefore, do not position the
CBLPRO near the monitor or PC.
Zone Bus communications to the application specific controllers or ZT may
also be monitored with a CBLCON (AS-CBLCON-0). This device has a
red and green LED whose purposes are described in the following table.
Table 16: CBLCON LEDs
Red LED--
Power
OFF OFF
ON OFF
ON ON
ON Blinking
Green LED--
COMM
Cause
No power to VAV
Zone Bus wire open
Zone Bus wire shorted to Common or 24 VAC, or
CBLCON-0 switch in download position
Normal communications
50 VAV Controller—Variable Air Volume Controller
Page 51

72F73F74FApplication Examples
Single Duct
Applications
The following examples are created by answering configuration questions
using HVAC PRO for Windows to identify terminal locations of the inputs
and outputs. Refer to the HVAC PRO for Windows User’s Manual (FAN
637.5), the VAV Controller section, for detailed information regarding
controller configuration.
VAV Controller—Variable Air Volume (VAV) Controller 51
Page 52

a
Select the VAV Control Strategy
1. Pressure Independent
2. Pressure Dependent without Feedback
3. Pressure Dependent with Feedback
4. Pressure Independent (User Defined Flow)
Select the Damper Output Type
1. Binary Outputs (Incremental Control)
2. Analog Outputs (Proportionall Control)
Define Diagnostics:
1. None
2 . A c tu a to r R u n tim e
3 . Mo v in g Avg . F lo w Er ro r
4. Moving Avg. Zone Temperature Error
5. Runtime and M oving Avg. Flow Error
6. Runtime and M oving Avg. Zone Temp Error
7. M ov ing A vg . F llow a nd Z o ne T e m p Er ro r
8. All of the Above
Select Fan Type
1. None
2. Series/On-Off
3. Series/Proportional
4. Parallel/Temperature
5. Parallel/Flow
Is there an exhaust box?
1. No
2. Yes
Type of Heating
1. None
2. Baseboard Heat Only
3. Box Heat Only
4. Both Baseboard and Box Heat
Select Type of Baseboard Heat
Select Type of Box Heat
1. Incremental
2. Proportional
3. N o rm a lly O p en Va lv e
4. Norm ally Closed Valve / Single Stage
5. 2-Stages
6. 3-Stages
1. Incre men ta l
2. Normally Ope n V a lve
3. Nor mally C los e d V a lve
Is lighting required?
1. No
2. Ye s
Power fail restart logic?
1 . No
2 . Yes
Use box supply tem perature for Warmup/Cooldown
during unoccupied mode?
1. No
2. Ye s
Select the Damper Output Type
1. Binary Outputs (Incremental Control)
2. Analog Outputs (Proportionall Control)
Define Setpoint Type
1. Separate Heating and Cooling Setpoints
2. Single Setpoint with Bias
D e fin e Re mote AI p o in ts
1. None
2. R e mote Setp o in t
3. Warm er/Cooler Adjust
D e fine Re mo te AI P o ints
2. Cooling/Heating Setpoints
3. Warmer/Coo ler A d jus t
Define Occupied Mode
1. Software (N2) Command
2. Hardware BI Point
3. Both with BI Backup
4. Both can Activate
Define Standby Mode
1. Software (N2) Command
2. Hardware BI Point
3. Both with BI Backup
4. Both can Activate
Define Shutdown Mode
1. Software (N2) Command
2. Hardware BI Point
3. Both with BI Backup
4. Both can Activate
Do you want the Temporary
Occupied feature?
1. No
2. Y e s
Do you want Boost mode?
1. N o
2. Ye s
Check Parameters and IO Points,
then save the Configuration File.
1. None
chart
Figure 22: HVAC PRO for Windows Single Duct Configuration
52 VAV Controller—Variable Air Volume Controller
Page 53

Hardware Point
Assignment
Table
The following table shows the HVAC PRO for Windows hardware point
assignments and options for single duct configurations.
Table 17: Single Duct Point Assignments and Options
Point
Type
Analog
Inputs
Warmer/Cooler Adjust Potentiometer
Cooling Setpoint Potentiometer
AI 3 Unused Heating Setpoint Potentiometer
Rename
AI 4 Actuator Feedback on Pressure
CFM on Pressure Independent None
Unused Rename
AI 5 Proportional Series Fan CFM None
Exhaust Box CFM None
Unused Rename
AI 6 Unused Box Supply Temperature for
Binary
Inputs
BI 2 Unused Rename
Standby
BI 3 Unused Rename
Shutdown Box Open
BI 4 Unused Rename
Momentary
BI
Continued on next page . . .
Point
Name
HVAC PRO for Windows
Configuration
HVAC PRO for Windows
Configuration Options
Assignments and Defaults
AI 1 Zone Temperature None
Unused Rename
None
Dependent
Standalone Warmup in Pressure
Dependent with Feedback and
Independent Path
BI 1 Unused Rename
Shutdown Box Closed
BI 5 Unused Temporary Occupancy Mode
Rename
Occupied
Boost Mode
VAV Controller—Variable Air Volume (VAV) Controller 53
Page 54

Point
Type
(Cont.)
Binary
Outputs
BO 3 Parallel and Series On-Off Fans None
Exhaust Box Open Unused
Unused Rename
BO 4 Exhaust Box Close None
Baseboard Heat On-Off None
First Stage Box Heat*** None
Unused Rename
BO 5 Baseboard Incremental Open None
Box Heat Incremental Open None
First Stage Box Heat** None
Second Stage Box Heat*** None
Lights On for VAV101 None
Unused Rename
BO 6 Baseboard Incremental Close None
Box Heat Incremental Close None
On-Off/Single Stage Box Heat None
Second Stage Box Heat** None
Third Stage Box Heat*** None
Lights Off for VAV101 None
Unused Rename
Analog
Outputs
** 2-Stages Box Heat
*** 3-Stages Box Heat
Point
Name
HVAC PRO for Windows
Configuration
HVAC PRO for Windows
Configuration Options
Assignments and Defaults
BO 1 Supply Damper Open None
BO 2 Supply Damper Close None
BO 7 Baseboard Incremental Open
on VAV100
Lights On for VAV100 None
Unused Rename
BO 8 Baseboard Incremental Close
on VAV100
Lights Off for VAV100 None
Unused Rename
AO 1 S66 Output for
Proportional Series Fan
Unused Rename
AO 2 Proportional Box Heat None
Unused Rename
None
None
None
54 VAV Controller—Variable Air Volume Controller
Page 55

Note: The examples contained in this technical bulletin do not reflect all
of the possible questions and answers. These examples are
provided as a basic overview of wiring locations you might expect
to see.
Table 18: Single Duct Wiring Example 1
Questions and Configuration Selections
HVAC PRO for Windows Questions Configuration Selections
Control Strategy
Fan Type
Exhaust Box Required
Baseboard Heat Type
Box Heat Type
Lighting Integration
Pressure Independent
Series/On-Off
Not Available
None
3-Stages
Yes
Note: The OEM box manufacturer typically supplies the fan relays and
electric heat relays.
DPT1
H
T
G
Discharge
DA1
R
C
1
R1
TE
1
vav1
Plenum
Supply
Figure 23: Single Duct Wiring Example 1
Mechanical Flow Diagram
VAV Controller—Variable Air Volume (VAV) Controller 55
Page 56

120/24VAC
120VAC 24VAC
P
ower
Transformer
TE1
Room
Sensor
DPT1
OUT 1
COM 2
VDC 3
BINARY INANALOG INPUTS
Fan
Relay
24 VAC
IN
DSI
DA1
Damper
Actuator
Stage 1
Relay
24 VAC
IN
BINARY OUTPUTS
Stage 2
24 VAC
Relay
IN
R1
Lighting
Relay
ON
COM
OFF
Stage 3
Relay
24 VAC
C
IN
Figure 24: Single Duct Wiring Example 1
Pressure Independent Configuration
Table 19: Single Duct Wiring Example 1 Bill of Materials
Component Description Part Number
C1
TE1
R1
DA1 and DPT1
Digital Controller AS-VAV110-1
Metastat TE-6400 Series
Lighting Relay GE-RR7
Actuator/Flow Sensor ATP-2040
Note: Box OEM manufacturers typically supply fan relays and electric
heat relays.
56 VAV Controller—Variable Air Volume Controller
vavwe1a
Page 57

The following table illustrates the selections made through HVAC PRO for
Windows for this example.
Note: The examples contained in this technical bulletin do not reflect all
of the possible questions and answers. These examples are
provided as a basic overview of wiring locations you might expect
to see.
Table 20: Single Duct Wiring Example 2
Questions and Configuration Selections
HVAC PRO for Windows Questions Configuration Selections
Control Strategy
Fan Type
Exhaust Box Required
Baseboard Heat Type
Box Heat Type
Lighting Integration
Pressure Independent
None
Yes
None
Proportional
Not Available
H
T
G
C1
DA2
VA1DA1
TE1
DPT2
VAV2
DPT1
Exhaust Box
Figure 25: Single Duct Wiring Example 2
Mechanical Flow Diagram
VAV Controller—Variable Air Volume (VAV) Controller 57
Page 58

120/24VAC
120VAC 24VAC
Power
Transformer
TE1
Room
Sensor
DPT1
OUT 1
COM 2
VDC 3
DPT2
OUT 1
COM 2
VDC 3
BINARY INANALOG INPUTS
DSI
BINARY OUTPUTS
DA1
Damper
Actuator
DA2
EXH
Figure 26: Single Duct Wiring Example 2
VA1
Proportional
Valve
Actuator
vavwe2a
Table 21: Single Duct Wiring Example 2 Bill of Materials
Component Description Part Number
C1
TE1
DA1 and DPT1
VA1
DA2 and DPT2
Digital Controller AS-VAV111-1
Metastat TE-6400 Series
Actuator/P Sensor
Valve Actuator VA-8022 Series
Actuator/DP Sensor ATP-2040
58 VAV Controller—Variable Air Volume Controller
ATP-2040
Page 59

The following table illustrates the selections made through HVAC PRO for
Windows for this example.
Note: The examples contained in this technical bulletin do not reflect all
of the possible questions and answers. These examples are
provided as a basic overview of wiring locations you might expect
to see.
Table 22: Single Duct Wiring Example 3
Questions and Configuration Selections
HVAC PRO for Windows Questions Configuration Selections
Control Strategy
Fan Type
Exhaust Box Required
Baseboard Heat Type
Box Heat Type
Lighting Integration
Pressure Dependent Without Feedback
Not Available
Not Available
On-Off
Incremental
Yes
H
T
G
DA1
R1
C1
VA2
TE1
VA1
B
A
S
E
B
D
VAV3
Figure 27: Single Duct Wiring Example 3
Mechanical Flow Diagram
VAV Controller—Variable Air Volume (VAV) Controller 59
Page 60

120/24VAC
120VAC 24VAC
P
ower
Transformer
C1
TE1
Zone
Sensor
BO 1
24VAC BO 2
N2+
BINARY OUTPUTS
BO 3
BO 6
BO 4
BO 5
24VAC
24VAC
24VAC
BO 7
24VAC
BO 8
24VAC
BINARY INANALOG INPUTS
+15VDC
BI 1
BI 2
AI 1
AI 3
AI 4
AI 5
AI 6
AI CM
AI CM AI 2
AI CM
AI CM
AI CM
AI CM
+15VDC
BI 3
COM MO N
COM MO N
COM MON
DSI
BI 4
COM MON
N2-
REF
COM
ZBUS
24VAC
DA1
Damper
Actuator
VA1
Basbd
Heat
VA2
Box
Heat
Figure 28: Single Duct Wiring Example 3
Table 23: Single Duct Wiring Example 3 Bill of Materials
Component Description Part Number
C1
TE1
VA1
VA2
DA1
R1
Digital Controller AS-VAV110-1
Metastat TE-6400 Series
Baseboard Valve Actuator J Series
Box Heat Valve Actuator VA-8020
Damper Actuator EDA-2040-nn
Lighting Relay GE-RR7
R1
Lighting
Relay
ON
COM
OFF
vavwe3a
C
60 VAV Controller—Variable Air Volume Controller
Page 61

0
The following table illustrates the selections made through HVAC PRO for
Windows for this example.
Note: The examples contained in this technical bulletin do not reflect all
of the possible questions and answers. These examples are
provided as a basic overview of wiring locations you might expect
to see.
Table 24: Example 4--Pressure Independent with Parallel Fan
HVAC PRO for Windows Questions Configuration Selections
Control Strategy
Fan Type
Exhaust Box Required
Baseboard Heat Type
Box Heat Type
Lighting Integration
Pressure Independent
Parallel Fan Temp Controlled
No
Analog Output
Incremental
No
R
Plenum
H
Supply
DPT1
DA1
C
1
T
G
VA1
Discharge
TE1
VA2
B
A
S
E
B
D
vav1
Figure 29: Mechanical System Flow Example 4
Pressure Independent w/Parallel Fan
VAV Controller—Variable Air Volume (VAV) Controller 61
Page 62

TE1
Zone
Sensor
VAV111-1
DA1
BINARY OUTPUTS
Fan
Relay
VA1
Incremental
Box Heat
Actuator
Proportional
Valve Actuato
Baseboard
DPT1
OUT 1
COM 2
VDC 3
BINARY INANALOG INPUTS
DSI
Box Damper
Actuator
Figure 30: Single Duct Fan Powered Box Wiring Example 4
VA2
vavwe6a
Table 25: Fan Powered Box Wiring Example 4 Bill of Materials
Component Description Part Number
C1
TE1
DPT-1/DA-1
VA-1
VA-2
VAV w/6 BOs and 2 AOs AS-VAV111-1
Temperature Sensor TE-6400 Series
Delta P Transducer/Damper
Actuator
Valve Actuator Box Heat VA-8020-1
Electro-pneumatic Transducer
Baseboard Heat
Note: Box OEM manufacturers typically supply fan relays and electric
heat relays.
62 VAV Controller—Variable Air Volume Controller
ATP-2040
EP-8000-2
Page 63

75F76F77FDual Duct
Applications
The following examples are created by answering configuration questions
using HVAC PRO for Windows to identify terminal locations of the inputs
and outputs. Refer to the HVAC PRO for Windows User’s Manual (FAN
637.5), the VAV Controller section, for detailed information regarding
controller configuration.
VAV Controller—Variable Air Volume (VAV) Controller 63
Page 64

Select VAV Control Strategy
1. Pressure Independent
2. Constant Vol ume
3. Sing le D uct C o n v e rs io n
4. Ind. C o ld Deck with D e p . H ot Dec k
DPT Locality
1. Hot and Co ld D eck
2. Ho t Deck a nd Total Flow
3. Co ld Deck an d To t al Flow
Select Dam per O utput
1. Incremental
2. Proportional
Select Damper Output
1. In cr emental
2. Proportional
Is Discharge Lo w Limit Required?
1. No
2. Yes
Is Discharge Low Limit Required?
1. No
2. Ye s
Bu mp les s F low T ra n sfe r B e tw e e n Hot/Cold D e c ks
1. N o
2. Y es
Select Damper
1. Increm en tal
2. Pro po rtio na l
Is there an Exhaust Box?
1 . N o
2. Yes
Select Damper Type
1. Sep a r a te Dampe r s
2. Linked Damp ers
Select Damp er Output
1. Incremental
2. Proportional
Is Discharge Low Limit Required?
1 . N o
2. Y e s
Is Discharge Low Limit Required?
1 . N o
2. Y es
Select Dam per Output
1. Incremental
2. Proportional
Bum pless Flow Transfer Between H ot/Cold De cks
1. N o
2. Ye s
Is There an Exhaust Box?
1 . No
2 . Y es
Select Baseboard Heat Type
1. None
2. Incre mental
3. Normally Open Valve
4. Norma lly Closed Valve
Is Lighting Requ ired?
1. No
2. Yes
P o wer Fa il Res ta rt L ogic
1. No
2. Yes
Figure 31: HVAC PRO for Windows Dual Duct
Configuration Flowchart (Part One of Two)
Is There an Exhaust Box
1. No
2. Yes
Select Baseboard Heat Type
1. Non e
2. In c r ementa l
3 . Norma lly Op e n Valve
4. Norma lly Closed Valve
Is Lighting Requ ired?
1. No
2. Yes
P o wer Fa il R esta rt L ogic
1. No
2. Yes
chart b
64 VAV Controller—Variable Air Volume Controller
Page 65

Define Remote AI Points
1. None
2. Cooling/Heating Setpoints
3. Warmer/ Cooler Adjust
Define "Occupied" Mode
1. Software (N2) Command
2. Hardware BI point
3. Both with BI Backup
4. Both can Activate
Define "Standby" Mode
1. Software (N2) Command
2. Hardware BI point
3. Both with BI Backup
4. Both can Activate
Def i ne " S hu t d ow n " M ode
1. Software (N2) Command
2. Hardware BI point
3. Both with BI Backup
4. Both can Activate
Do You Want the Temporary Occupied Feature
1. No
2. Yes
Do You Want Boost Mode
1. No
2. Yes
Go Check Parameters and IO Points
Then Save the Configuration File
charta
Figure 32: HVAC PRO for Windows Dual Duct
Configuration Flowchart (Part Two of Two)
VAV Controller—Variable Air Volume (VAV) Controller 65
Page 66

Table 26: Dual Duct Hardware Point Assignments and Options
Point Type Point
Name
Analog Inputs
AI 2 Unused Rename
Cooling Setpoint
Warmer/Cooler Adjust
AI 3 Unused Rename
Heating Setpoint
AI 4 Cold Deck Delta P None
Supply Delta P None
AI 5 Hot Deck Delta P None
Unused Rename
AI 6 Discharge Air Temp None
Exhaust Delta P None
Unused Rename
Binary Inputs
BI 2 Unused Rename
Standby
BI 3 Unused Rename
Shutdown Box Open
BI 4 Unused Rename
Shutdown Box Closed
Momentary BI
Boost
Binary Outputs
Cold Deck Open None
BO 2 Damper Close None
Cold Deck Close None
BO 3 Heating/Cooling Changeover None
Hot Deck Open None
BO 4 Unused Rename
Hot Deck Close None
BO 5 Unused Rename
Exhaust Open None
BO 6 Unused Rename
Exhaust Close None
AI 1 Zone Temperature None
BI 1 Unused Rename
BI 5 Unused Rename
BO 1 Damper Open None
BO 7 Unused Rename
Basebd Heat None
Basebd Open None
Lights On None
BO 8 Unused Rename
Basebd Close None
Lights Off None
HVAC PRO for Windows Configuration
Assignments and Defaults
HVAC PRO for Windows
Configuration Options
Occupied
Temp Occupancy
66 VAV Controller—Variable Air Volume Controller
Page 67

The following table illustrates the selections made through HVAC PRO for
Windows for this example.
Note: The examples contained in this technical bulletin do not reflect all
of the possible questions and answers. These examples are
provided as a basic overview of wiring locations you might expect
to see.
Table 27: Dual Duct Wiring Example 1 Questions and
Configuration Selections
HVAC PRO for Windows Questions Configuration Selections
Control Strategy
Discharge Air Low Limit
Exhaust Box Required
Baseboard Heat Type
Lighting Integration
Constant Volume/Separate Dampers
No
No
No
No
Hot Deck
Cold Deck
DA2
DPT2
DPT1
DA1
C1
Figure 33: Dual Duct Wiring Example 1
Mechanical Flow Diagram
TE1
VAV4
VAV Controller—Variable Air Volume (VAV) Controller 67
Page 68

120/24VAC
DPT1
Flow Sensor
OUT 1
COM 2
VDC 3
120VAC 24VAC
Flow Sensor
Power
Transformer
DPT2
OUT 1
COM 2
VDC 3
BINARY INAN ALO G INPUTS
TE1
RM-T
RM-SP
BINARY OUTPUTS
DSI
DA1
Damper
Actuator
DA2
Damper
Actuator
Figure 34: Dual Duct Wiring Example 1
Table 28: Dual Duct Wiring Example 1 Bill of Materials
Component Description Part Number
C1
TE1
DA1 and DPT1
DA2 AND DPT2
Digital Controller AS-VAV110-1
Metastat TE-6400 Series
Cold Deck ATP-2040-nn
Hot Deck ATP-2040-nn
vavwe4a
68 VAV Controller—Variable Air Volume Controller
Page 69

2
The following table illustrates the selections made through HVAC PRO for
Windows for this example.
Note: The examples contained in this technical bulletin do not reflect all
of the possible questions and answers. These examples are
provided as a basic overview of wiring locations you might expect
to see.
Table 29: Dual Duct Wiring Example 2
Questions and Configuration Selections
HVAC PRO for Windows Questions Configuration Selections
Control Strategy
Discharge Air Low Limit
Exhaust Box Required
Baseboard Heat Type
Lighting Integration
Pressure Independent
Yes
No
No
Yes
Hot Deck
Cold Deck
DA2
DPT2
DA1
DPT1
C1
R1
Figure 35: Dual Duct Wiring Example 2
Mechanical Flow Diagram
TE1
VAV5
TE
VAV Controller—Variable Air Volume (VAV) Controller 69
Page 70

120/24VAC
120VAC 24VAC
Power
Transformer
TE1
Room
Sensor
DPT1
OUT 1
COM 2
VDC 3
DPT2
OUT 1
COM 2
VDC 3
BINAR Y INANALOG INPUTS
DSI
TE2
BINARY OUTPUTS
DA1
Damper
Actuator
DA2
Damper
Actuator
Figure 36: Dual Duct Wiring Example 2
vavwe5a
R1
Lighting
Relay
ON
COM
OFF
C
Table 30: Dual Duct Wiring Example 2 Bill of Materials
Component Description Part Number
C1
TE1
TE2
DPT1 and DA1
DPT2 and DA2
R1
Digital Controller AS-VAV110-1
Metastat TE-6400
Discharge Air TE-6000 Series
Cold Deck ATP-2040-nn
Hot Deck ATP-2040-nn
Lighting Relay GE-RR7
70 VAV Controller—Variable Air Volume Controller
Page 71

78F79F80FDownloading/Commissioning
We recommend that you connect the zone sensor prior to performing the
initial configuration download. Even if you do not permanently install the
zone sensor at this time, terminate the N2 Bus wiring and pull it back to the
equipment room location of the NCM or Companion System. Refer to
HVAC PRO for Windows User’s Manual (FAN 637.5) for upload features.
Via Zone Bus
81F82F83FVia N2 Bus
Downloading and commissioning via the Zone Bus requires the use of the
CBLPRO interface and a laptop or PC running the HVAC PRO for
Windows software. You can connect to the Metastat 6-pin connector or
directly at the controller. VAV140/141 models have a spare 6-pin
connector making it unnecessary to disconnect the Metastat or zone sensor
during download/commissioning. Communication rate is 1200 baud over
the Zone Bus.
HVAC PRO for Windows allows you to perform downloading and
commissioning over the N2 Bus. Because the communication rate is
9600 baud, performing downloading and commissioning over the N2 Bus
saves a great deal of time in loading the initial controller configuration files
and parameters into the controller prior to the balancing contractor’s final
testing.
To perform the downloading and commissioning process over the N2 Bus,
we recommend that you create a job file spreadsheet similar to the one
illustrated in the following table.
Table 31: Example File per N2 Trunk for Pressure Independent Job
Filename
Size 8
Size 10
N2
Address
1 300 800 300 300 80
2 300 1200 300 300 120
Cooling
Min CFM
Cooling
Max CFM
Heating
Min CFM
Heating
Max CFM
Damper
Deadband
You should develop a separate filename for each size box with a different
configuration style. For example, if the inlet is 8 inches in diameter,
“Size 8” would be a logical filename (Table 31). This allows you to have
your base set of requirements in place before you adjust the CFM setpoint
schedule per the mechanical prints.
VAV Controller—Variable Air Volume (VAV) Controller 71
Page 72

84F85F86FIncremental
Valve Actuator
Stroke Time
The stroke time of an incremental valve actuator is important because the
controller uses it to position the actuator in reference to an analog 0-100%
open position command. If the stroke time is grossly inaccurate, the
controller drives the actuator under an incorrect assumption of total stroke
time and causes inaccurate positioning, particularly at the near closed or
near full open positions. If possible, measure the actual stroke time of the
incremental actuator with water flow through the valve. Some valves have
1/2, 5/16, or 3/4 inch strokes, which require different stroke times.
If you do not measure the actual stroke time, you at least need to know the
approximate stroke time of the valve and enter that in the HVAC PRO for
Windows configuration tool. Conservatively, you can add up to 20% to the
nominal time. Always add to the stroke time, never subtract. The
controller modulates the valve based on a calculated stroke time of 150%
of the stroke time you specify. This is done to compensate for variations in
water system pressure, actuator wear, and manufacturing tolerances.
The VAV controller has a built-in overdrive algorithm that drives the
actuator closed for an additional 50% of the entered stroke time when a
0 or 100% open command is issued. This ensures that the valve is fully
closed or open. This fully opens or closes the valve, but does not correct
the mid-stroke position errors due to a grossly incorrect valve stroke time.
Refer to the following table for approximate stroke times.
Table 32: Approximate Stroke Times
Incremental Valve
Actuators
VA-8050-1
VA-8051-1
VA-8050-1
VA-8051-1
VA-8020-1
VA-8050-1
VA-8051-1
1/2 in. stroke 65 sec (1.1 min)
1/2 in. stroke 65 sec (1.1 min)
3/4 in. stroke 90 sec (1.5 min)
3/4 in. stroke 90 sec (1.5 min)
5/16 in. stroke 90 sec (1.5 min)
5/16 in. stroke 45 sec (0.75 min)
5/l6 in. stroke 45 sec (0.75 min)
Stroke Time
Note: There may be no correlation between valve position and controller
output (0 to 100%). If you require correlation, use proportional
control or actuators with position feedback.
72 VAV Controller—Variable Air Volume Controller
Page 73

87F88F89FIncremental
Damper
Actuator Stroke
Time
90F91F92FZone Terminal
Setup for
Balancing
Contractors
The position accuracy of the VAV box damper is dependent upon the
actuator stroke time entered. It is important that the true damper actuator
stroke time be entered. The listed actuator times of 1, 2, or 5.5 minutes are
for 90 degrees of rotational travel. If a VAV box has 45 or 60 degrees of
travel, the stroke time must be adjusted. Multiply the listed stroke time by
0.5 for 45 degrees of travel by 0.667 for 60 degrees of rotation.
Drive times that are inaccurate cause the controller to calculate a software
damper position that is not synchronous to the actual damper position.
This error is particularly noticeable at the very end of the travel when the
controller thinks the damper is fully closed, but is physically open. If a box
has 45 or 60 degree travel, it is highly recommended that the entered stroke
time used in HVAC PRO for Windows be tested under field conditions to
verify that the box can be driven fully closed and open.
For simplicity, program a Zone Terminal to access only those values
required for testing and balancing processes. For each box configuration
style, determine which parameters the test and balance will require. Build
a controller display file for each configuration. Up to three display files
can be combined into one ZT load file. For example, a single duct box with
reheat might require the values shown in Table 33.
Table 33: Parameters for Balancing a
Single Duct Box with Reheat
Parameter name Function Purpose
Supply Setpt
Supply Flow
Supply Box Area
Supply Mult
Supply Delta P
Damper Command
Occ Clg Max
Occ Clg Min
Occ Htg Min
Occ Htg Max
Occ Setpt
Occupied Status
view display present flow setpoint
view display present flow rate
view & adjust verify & correct box inlet area
view & adjust calibration of flow measurement
view secondary information
view secondary information
view & adjust verify & correct flow setpoint
view & adjust verify & correct flow setpoint
view & adjust verify & correct flow setpoint
view & adjust verify & correct flow setpoint
view & adjust change present control point
view verify mode
Once you load the base configuration files into each controller, the
balancing contractor can use a Zone Terminal to officially set the CFM
schedules.
VAV Controller—Variable Air Volume (VAV) Controller 73
Page 74

74 VAV Controller—Variable Air Volume Controller
Page 75

93F94F95FTroubleshooting
Hardware
Installation
Inspection
96F97F98FTools Needed
for
Troubleshooting
We recommend that once the mechanical contractor starts receiving
delivery of the VAV boxes with factory mounted controls, arrangements
are made to pull a sample of the shipment and bench test it by loading a job
configuration before all the boxes are mounted in the ceiling.
It can also be advantageous to keep a box off to the side for use in training
the balancing contractor on a bench setup, rather than a live box mounted
in the ceiling.
!
CAUTION: Equipment Damage Hazard. Before starting, make
sure power is switched off.
Tools needed for typical troubleshooting include:
ASC and N2 Bus Networking and Troubleshooting Guide
(LIT-6363003)
Digital Multimeter (DMM)
100k ohm resistor
double banana plug (optional; shown in Figure 37; available from local
electronics store or ITT Pomona Stock No. 34F856 or 3F845), 1/4 watt
for earth ground voltage tests
100k ohm, 1/4 watt
Use double banana plug for all tests that require
a 100k ohm resistor placed in parallel with DMM.
Steps:
1. Connect 100k ohm resistor under plug's prongs.
2. Insert banana plug into DMM.
banana
3. Connect leads of DMM into banana plug.
Figure 37: Double Banana Plug Used with 100k ohm Resistor
VAV Controller—Variable Air Volume (VAV) Controller 75
Page 76

99F100F101FInstallation
Checkout
Inspect the mounted VAV to ensure proper installation. Refer to the
appropriate illustrations in the section of this technical bulletin titled
Installation Procedures and to the engineering drawings.
1. Check that the mounting screws holding the subassembly onto the base
frame are secure.
2. Verify that accessory equipment is connected and labeled correctly.
3. Ensure that the controller terminal connections are secure.
4. Verify that the N2 connections are secure and labeled correctly.
5. Verify that the VAV switches are appropriately positioned. (Refer to
the Wiring Details and Networking the Controller sections of this
technical bulletin.)
6. Verify that there are no unwanted earth ground connections to the
controller following the procedures below.
No earth ground connections are allowed when wiring a Series
VAV100/101 Controller. Although a single earth ground connection to the
common terminal of Series VAV110/111 and VAV140/141 Controller is
allowed, you may not want to use one. The same procedure as described in
the following text for VAV100/101 may be used when no earth ground
connections to VAV are intended.
Isolation and
Grounding
VAV100/101
This section will help you ensure proper isolation within your system.
These procedures are not required, but are recommended to reduce
installation errors. Use the following procedures to ensure proper isolation.
Test the:
field device wiring for proper isolation
transformer for isolation and correct polarity termination
connected field devices, transformer, and VAV for proper isolation
transformer and VAV for proper VA load requirements
76 VAV Controller—Variable Air Volume Controller
Page 77

Field Device
Wiring Isolation –
VAV100/101
This section assists you in measuring field wiring terminated to the VAV.
If you are confident that the field wiring has no earth grounds, you may go
to the following section called Power Transformer Isolation - VAV100/101.
A field device that is earth grounded becomes apparent when you test the
entire controller.
Before you terminate the field wires to the VAV, measure the
resistance of each wire to earth ground using an LED test circuit
(preferred) or a DVM. For the LED test circuit, assemble the test
circuit illustrated in Figure 38. Then, connect the circuit from each
input to earth ground and then to each output to ground. For the DVM
test, connect the DVM from each input to earth ground and then to each
output to ground (Figure 38).
If the LED turns On (or you read a value less than 1 Megohm at any
input or output), the circuit is improperly isolated. Replace or repair
the wiring or the field device; or, for a binary output, add an isolation
relay. Repeat the DVM test only.
If the LED does not turn On (or you read a value greater than
1 Megohm), the circuit may be properly isolated. (It will not be
isolated if there are earth grounds that exist at higher voltages.)
A value of infinite ohms indicates a completely isolated circuit at
approximately zero volts. Connect this wire to the appropriate VAV
terminal and check the next wire.
Field Device
IN / OUT
IN/OUT COM
or
DVM
VAV
LED Test Circuit (Preferred Method)
(+)
10 mA
Red
470 ohm
1/4 watt
Battery
9V
Figure 38: Testing for an Isolated Circuit
(-)
IS OCIR CT
VAV Controller—Variable Air Volume (VAV) Controller 77
Page 78

102FPower
Transformer
Isolation –
VAV100/101
Before connecting the transformer to the VAV, connect the input
power to the primary leads of the 24 VAC transformer.
Note: If you ground the secondary of the power transformer, you
must use a separate 24 VAC to 24 VAC isolation transformer
(such as the Y65GS.)
Measure the voltage of each secondary transformer lead to earth
ground with the DVM in parallel with a 100k ohm 1/4 watt resistor
(Figure 39; if using double banana plug, insert plug into DVM).
- If you read 5 VAC or greater, the transformer is earth grounded.
You need an isolation transformer in order to isolate the
connections from earth ground and protect system components.
Wire a separate 24 VAC to 24 VAC isolation transformer (such as
the Y65GS) to the VAV.
- If you read less than 5 VAC, the circuit is properly isolated.
Usually a value less than 0.10 VAC indicates a completely isolated
circuit.
Line
Voltage
24 VAC
100K ohm
1/4 watt
DVM
100K ohm
1/4 watt
DVM
TRANSFM1
Figure 39: Testing the Transformer
Determine the polarity of the transformer’s leads by using a DVM
referenced to earth ground without the 100k ohm resistor. Connect the
transformer’s secondary lead with the higher voltage potential to the
24 VAC terminal on the VAV. Connect the transformer’s secondary
lead with the lower potential to the 24 VAC Common terminal on the
VAV.
78 VAV Controller—Variable Air Volume Controller
Page 79

Load Isolation –
VAV100/101
If the field wires are not yet connected (because you skipped the section
called Field Device Wiring Isolation - VAV100/101), disconnect
one 24 VAC wire and terminate the field wires. Reconnect the 24 VAC
wire.
Note: If you ground the contactor or solenoid coils to be driven by the
VAV, you must use a separate isolation relay for each load.
Connect the leads of the DVM in parallel with the 100k ohm resistor
from the DC power supply (+15 VDC) output terminal of the VAV to
earth ground (Figure 40). This tests whether the field devices, the
VAV, and the transformer assembly are properly isolated.
VAV
24 VAC
Line
Voltage
24 VAC
24 VAC CO M
Field Wiring*
15 VDC
100k ohm
1/4 watt
DVM < 5 VDC/VAC = OK (Isolated)
DVM
DVM > 5 VD C/VAC = E arth Grounded
*AIC OM, B ICOM , ZB US CO M, A OC OM, BO CO M
GRDLOOP
Figure 40: Testing for Ground Loops
If you read 5 VDC/VAC or greater, the circuit is improperly
isolated. Follow these steps:
1. Remove all the field wires and N2 Bus wires from the VAV, but
leave the transformer wires attached. With the DVM still
connected, reconnect each set of field wires, one at a time, until you
read 5 VDC/VAC or greater. At this point, you have discovered
one cause of the ground loop. Correct the problem.
2. Continue to reconnect each set of field wires until all ground loops
are found and corrected. You’ll know that all grounds are corrected
when you read less than 5 VDC/VAC on the DVM.
3. However, if you check all the field wires and you still read greater
than 5 VDC/VAC, the transformer secondary is earth grounded. In
this case, wire a 24 VAC to 24 VAC isolation transformer to the
VAV and measure again. If the value is still 5 VDC/VAC or
greater, replace the VAV.
Note: Binary outputs are often the cause of ground loops. Therefore, we
recommend that you test the binary outputs of the VAV before
testing other points.
VAV Controller—Variable Air Volume (VAV) Controller 79
Page 80

z If you read a value less than 5 VDC/VAC, the circuit is properly
isolated. A value of less than 0.10 VDC/VAC indicates a completely
isolated circuit.
z Connect the DVM across the 24 VAC and the 24 VAC Common
terminal of the VAV. Read the voltage with all typical loads
energized.
A reading of 24 VAC is required when the line voltage is nominal.
If you read a value less than 20 VAC, make sure the primary voltage
matches the transformer’s voltage rating. For details, refer to the
Power Source and Loads section of this technical bulletin and
recalculate the VA requirements for the VAV Controller.
You have completed the VAV isolation tests. If you plan to connect this
VAV to the N2 Bus for communication to other devices, refer to the
Application Specific Controllers Technical Manual (FAN 636.3), the
Introduction tab, the ASC and N2 Bus Networking and Troubleshooting
Guide Technical Bulletin.
80 VAV Controller—Variable Air Volume Controller
Page 81

103F104F105FTroubleshooting
the VAV
Controller with
HVAC PRO for
Windows
The following table indicates symptoms and corrections for typical control
system malfunctions (primarily in pressure independent applications). We
recommend that you use HVAC PRO for Windows Commissioning mode
during all troubleshooting procedures.
Table 34: VAV Controller Troubleshooting Symptoms and Corrective Actions
Symptom Possible Cause Corrective Action
VAV Controller CFM
readings are not within
10 percent of balancing
contractors readings or
flow readings are not
repeatable.
No change in the CFM
value while you are
manually overriding the
damper by changing the
temperature setpoint or
issuing a direct override
to the damper command.
The damper actuator
cycles excessively.
Series fan is not running.
Velocity Pressure
Transducer out of calibration
by more than 20 percent.
Damper does not seal.
Box Multiplier Constant
and/or Box Area parameters
are not set correctly.
One or both airflow pickup to
DPT tubing connections are
crossed, plugged, or open.
The ductwork configuration
upstream of the airflow
pickup is disturbing the air
flow across the pickup.
Damper linkage is slipping or
linked incorrectly.
Main system is not supplying
enough air.
The Supply Deadband
and/or Heating/Cooling Prop
Bands are too narrow.
Electrical noise is present on
zone temperature signal.
Unit is not in Occupied
mode.
Unit in initial startup.
Command Auto Zero mode using HVAC PRO for Windows
and read the offset value for the DPT sensor. If the value is
greater than 20 percent of the sensor range, you need to
replace or manually calibrate the transducer.
Override damper closed and verify.
Verify the numbers displayed in the HVAC PRO for Windows
parameters screen against the information on the box, or check
the OEM Reference Manual (FAN 638) for the recommended
numbers per box type.
Check that the high or upstream side of the pickup connects to
the DPT high side, and the downstream side of the pickup
connects to the DPT low side. Check that the tubing is not
plugged and that the test taps are capped.
Turns, transitions, and flex duct should be no closer than
one duct diameter upstream from the airflow pickup. The
takeoff should be at least three duct diameters upstream from
the pickup.
Inspect the linkage while the actuator is being commanded to
ensure tight connection.
If the VAV box actuator is linked correctly and you cannot
obtain the maximum CFM setpoint, check the Central System
Static Pressure to ensure enough primary air is being provided
to properly balance the system.
Check the Supply Deadband value to ensure that it is greater
than (48*(box inlet area))ft
If the cycling persists after changing the supply deadbands,
check the heating and cooling prop bands to see if they are
greater than 4°F/-15.5°C. If not, increase the prop band values
to at least 4°F/-15.5°C and add an integration timer of 400.
Diagnose with HVAC PRO for Windows data graphing. If
present, reroute wire or use twisted pair and/or shielded cable.
Check HVAC PRO for Windows parameter table to ensure
occupied status shows on.
Before the series fan is commanded on, the damper fully
closes to ensure the fan does not turn backwards.
2
/(4.5*(box inlet area))m2.
VAV Controller—Variable Air Volume (VAV) Controller 81
Page 82

106F107F108FTroubleshooting
the N2 Bus and
Networked VAV
Controller
You need to troubleshoot the N2 Bus if the Metasys system is not
properly communicating with the VAVs. This section first presents a
troubleshooting table. Table 35 covers VAV or N2 communication
problems and suggests which actions to take.
Second, specific troubleshooting tests are given. Before trying one of these
tests, you may be able to determine the cause of the problem by asking
yourself the following questions:
z Are the N2 Bus wires securely terminated to each VAV?
z Is the N2 polarity correct?
z Is the VAV powered and ready to respond?
z Are the end-of-line device settings correct?
z Have you cycled power on a VAV after changing its N2 address?
z Is the W3 loop back jumper on the Companion Panel/LTD fully
pushed down on Pins 1 and 2?
z Are the VAVs configured properly with the correct number of points?
!
CAUTION: Electrical Shock Hazard. To avoid electrical shocks
when troubleshooting, always measure the REF to
earth ground voltage with the DMM. If line voltage is
measured, have a qualified electrician locate the fault.
109F110F111FTable 35: N2 Bus Troubleshooting Symptoms and
Corrective Action
Symptom Possible Cause Action
N2 Bus is
offline.
VAV cycles
online and
offline.
VAV does not
come online.
EOL jumpers and/or W3 jumper on
MM-CVT101 or Companion Panel/LTD
are not installed.
MM-CVT101 is not plugged into PC or
9 VDC source.
N2 Bus polarity is incorrect. Rewire N2 Bus wires for
A read-only point is defined in the
Companion data base as a read/write
point (AO or BO).
A Companion process is using an
unconfigured point (i.e., not listed in
HVACPRO.SYM file).
Two or more VAVs have the same
address.
The address of the VAV was changed
without its power being cycled afterw ard.
The ten second delay after downloading
the VAV has not yet expired
(HVAC PRO Revision 1.0 or earlier).
Install EOL jumpers and W3
jumper properly.
Plug MM-CVT101 into PC or
plug it into a 9 VDC source.
proper polarity.
Delete the AO or BO point and
read it as an AI or BI point to
the Companion data base.
Delete the use of the
unconfigured point in the
Companion process.
Change each duplicate VAV
address to a unique number.
Cycle power on the VAV.
Wait until the delay expires or
cycle power on the VAV.
82 VAV Controller—Variable Air Volume Controller
Page 83

112F113F114FZone Bus
Troubleshooting
-- HVAC PRO
for Windows
Table 36 lists and describes the errors that may occur while using the
HVAC PRO for Windows commissioning tool with the VAVs over the
Zone Bus. The cause of the error is often a loose or improper connection
between the CBLPRO (AS-CBLPRO), laptop PC, and the controller. A
defective COM port on the laptop could also be at fault. Other times, a
defective controller can cause an error.
Note: It takes ten seconds for a VAV Controller to reset and resume
communication after being downloaded.
An effective troubleshooting technique is to use a CBLCON and observe
its LEDs, which will indicate the problem. You may also try exchanging
the component that you believe is defective with a working component of
the same type.
A noisy wire adjacent to the Zone Bus can also cause communication
errors. Noise can be periodically induced into the Zone Bus, thereby
causing sporadic communication failures between the laptop and the VAV.
Most often, noisy lines cause intermittent disruption, not total loss of
communication.
For more information on the HVAC PRO for Windows, refer to the
HVAC PRO for Windows User’s Manual (FAN 637.5).
Table 36: Communication Errors on Download
Error Number
or Description
1
5
11
14
15
16
Hardware
Communication
Error
17
18
Undefined
command
Invalid
message size
Invalid
command
Not ready The VAV cannot process this
Bad E
No
communication
Controller is still in reset mode.
Bad CRC The Cyclical Redundancy Check of
Invalid
response
Cause
The device is being sent a message
that contains an invalid command.
The size of the message sent does
not correspond to the type of
message sent.
The command issued is not valid for
the data type.
message at this time. For example,
the EEPROM is not functioning
properly.
2
Write A problem with the EEPROM exists. Return the VAV for repair or
Some hardware problem exists,
such as a loose connection or a
failed component.
Resetting takes ten seconds after a
download.
the message received is incorrect
due to an error in transmission.
The message received is not what
the HVAC PRO for Windows Load
Utility expected.
Description
Solution
Check for tight and proper
connections between the laptop
PC, CBLPRO, and the VAV.
Cycle power on the VAV. If
problem persists, return VAV for
repair or replacement.
replacement.
Check for tight and proper
connections between the laptop
PC, CBLPRO, and the VAV.
Wait ten seconds for the reset
period to expire before trying to
commission the controller.
Check for tight and proper
connections between the laptop
PC, CBLPRO, and the VAV.
VAV Controller—Variable Air Volume (VAV) Controller 83
Page 84

The green LED on the VAV110/111 and VAV140/141 Series Controllers
may be used to troubleshoot problems with the Zone Bus.
Table 37: Zone Bus LED Indications
LED Status Indication
Off
On
Blinking
There is no power to the ASC.
The Zone Bus is shorted to Common or 24 VAC.
Normal communication is taking place.
84 VAV Controller—Variable Air Volume Controller
Page 85

115F116F117FOrdering Information
Johnson
Controls Code
Numbers
Controllers
Sensors/
Transmitters
Table 38: Controller Code Numbers
Code Number Description
AS-VAV110-1
AS-VAV111-1
AS-VAV140-1
AS-VAV141-1
AS-VAVDPT1-1*
AS-VAVDPT2-1*
* Refer to Building VAVDPT Applications Application Note (LIT-6363042) in the
Application Specific Controllers Technical Manual (FAN 636.3).
VAV Controller with eight Binary Outputs (Quick Connects)
VAV Controller with six Binary Outputs and two Analog Outputs
(Quick Connects)
VAV Controller with screw terminals and eight BOs
VAV Controller with screw terminals, six BOs and two AOs
AS-VAV110-1 Control and DPT-2015-1 for Trane Single Duct
Applications
AS-VAV111-1 Control and DPT-2015-1 for Trane Single Duct
Applications
Table 39: Sensor/Transmitters Code Numbers
Code Number Description
DPT-2015-1*
HE-6300
HE-6310
TE-6000 Series
TE-6100-11,
TE-6100-12 Series
TE-6300 Series
TE-6400 Series
* DPT Transmitters are typically supplied as part of the actuator assembly (ATP Series)
or a controller assembly (VAV DPT Series).
Velocity Pressure Transducer
(1.5 in. W.C.)
Wall Mount Humidity Sensor 0 to 5 VDC with 12 to 30 VDC
Duct Mount Humidity 0 to 5 VDC with 12 to 30 VDC
Temperature Sensor RTD Resistance
Zone Temperature Sensor
(for T-4000 Cover)
Temperature Sensor Nickel, Platinum, Silicon
Metastat Zone Temperature
Sensor Series
1 to 5 VDC with 15 VDC Supply
Supply
Supply
Nickel, 1000 ohm with Phone
Jack
Resistance
Type
VAV Controller—Variable Air Volume (VAV) Controller 85
Page 86

Damper Actuator
Assemblies
Valve Actuator
Assemblies
Table 40: Damper/Actuator Code Numbers
Code Number Description
EDA-2040-21 or -22
EDA-2040-61 or -62
ATP-2040-212
ATP-2040-612
M100C Series
M9000-500 Series
M9100-G Series
M9100-H Series
M9200-G Series
M9200-H Series
2-minute Rotation Time 24 VAC Incremental
6-minute Rotation Time 24 VAC Incremental
EDA-2040-1 and DPT-2015-1 with
Cable
EDA-2040-2 and DPT-2015-1 with
Cable
Zone Bus Damper Actuators Zone Bus Addressable
Valve Linkage Assembly for M9100
and M9200 Direct Mount Actuators
Direct Mount Actuators Proportional - Voltage or
Direct Mount Actuators Proportional - Voltage or
Direct Mount Actuators Proportional - Voltage or
Direct Mount Actuators Proportional - Voltage or
24 VAC Incremental
1 to 5 VDC Transmitter
24 VAC Incremental
1 to 5 VDC Transmitter
Current
Current
Current
Current
Table 41: Valve Actuator Code Numbers
Code Number Description Ty pe
VA-715x Series
VA-7200 Series
VA-8020 Series
VA-8022 Series
VA-8050 Series
VA-8051 Series
VA-8052 Series
VG-5000 Series
EP-8000-1
and -2
Valve Actuator Incremental or
0-10 VDC Proportional
Valve Actuator Incremental or
0-10 VDC Proportional
Valve Actuator Assemblies 1/2 in. 24 VAC
Triac/Incremental
Valve Actuator Assemblies 1/2 in. 0-10 VDC
Valve Actuator Assemblies
1/2 in., 3/4 in., 1 in., and 1-1/2 in."
Valve Actuator Assemblies
1/2 in., 3/4 in., 1 in., and 1-1/2 in."
Valve Actuator Assemblies
1/2 in., 3/4 in., 1 in., and 1-1/2 in."
Valve/Actuator Assemblies
1/2 in., 3/4 in., and 1 in.
Electric to Pneumatic Transducer
for Pneumatic Valves
24 VAC
Triac/Incremental
24 VAC
Triac/Incremental/ with
Feedback
0-10 VDC
24 VAC On/Off
Incremental 0-10 VDC
0 to 10 VDC to
Pneumatic High or Low
Volume
86 VAV Controller—Variable Air Volume Controller
Page 87

Accessories
Table 42: Accessories Code Numbers
Code Number Description
AS-CBLPRO-2
AS-ENC100--0
AS-TBKIT-0
AS-XFR050-0
AS-ZTU100-1*
EN-EWC10-0
EN-EWC15-0
MM-CVT101-0
P32 Series
TE-6001-961
WS-WINPRO-0
WS-WINPRO-6
Y65XX-X Series
* Note: The AS-ZTU100-1 supports both AS-VAVxxx-0 and AS-VAVxxx-1 models.
The AS-ZTU100-0 supports AS-VAVxxx-0 models only.
Zone Bus Communication Tool
VAV System Enclosure for Field Installed Systems (Sheet Metal)
Five Replacement N2 Bus and Five Power Terminal Block Connectors
Transformer (50 VA)
Zone Terminal
Enclosure (UPM)
Enclosure with 50 VA Transformer (UPM)
RS-232/RS-485 Converter for N2 Download/Commissioning with
HVAC PRO for Windows
Air Flow Switch
Momentary Button Kit for Temporary Occupancy or Boost Modes
(for TE-6100-11,12 only)
Configuration Tools Software (includes HVAC PRO for Windows)
Configuration Tools Software Upgrade
(includes HVAC PRO for Windows)
Transformer Option (24/120/220/277-480 VAC to 24 VAC)
118F119F120FVendor Code
Numbers
The following tables list code numbers and descriptions for VAV
Controller equipment requirements. This equipment is available from:
Anixter
4701 W. Schroeder Drive
Brown Deer, WI 53223
(414) 355-0222 (in Milwaukee)
1-800-242-5575 (structure wiring)
1-800-447-8565 (wire and cable)
Use the following table to order preconfigured cables from the factory.
Table 43: Preconfigured Cables
Description Cable Length Part
Feet Meters Number
RJ45 Straight-through Cable Assembly Non-plenum
Non-keyed plugs
24 Gauge/0.6 mm diameter
8 Conductor
Solid Wire
RJ45 Straight-through Cable Assembly Plenum
Non-keyed plugs
24 Gauge/0.6 mm diameter
8 Conductor
Solid Wire
25 7.5 889158
50 15 889161
100 30 889166
25 7.5 889315
50 15 889318
100 30 889324
VAV Controller—Variable Air Volume (VAV) Controller 87
Page 88

Use the following table to order cable components for creating your own
cables.
Table 44: Cable Components
Description Part Number
1000 ft/300 m Roll of Non-plenum Rated
24 Gauge/0.6 mm diameter
8 Conductor
Solid Wire
1000 ft/300 m Roll of Plenum Rated
24 Gauge/0.6 mm diameter
8 Conductor
Solid Wire
8-position Non-keyed Plugs for Solid Cable
(Bag of 25)
Hand Tool with 8-position Die Set for
24 AWG/0.6 mm diameter Solid Wire
CM-00424BAG-3
CMP-0042EAC-3
074683 Stewart
060612
88 VAV Controller—Variable Air Volume Controller
Page 89

Specifications
Table 45: General Specifications
Product Name
Product Code Numbers
Power Input
Power Draw
Ambient Operating
Conditions
Ambient Storage
Conditions
Dimensions (H x W x D)
Shipping Weight
Processor
Word Size
EEPROM Size
ROM/EPROM Size
RAM Size
Interfaces
Inputs/Outputs
Standard Compliance
Agency Listings
Variable Air Volume (VAV) Controller
AS-VAV100-0, AS-VAV101-0;
AS-VAV110-1, AS-VAV111-1;
AS-VAV140-1, AS-VAV141-1
20-30 VAC @ 10 VA
VAV with sensors/transmitters: 10 VA (400 mA)
32 to 122F/0 to 50C
10 to 90% RH
-40 to 158F/-40 to 70C
10 to 90% RH
6.5 x 6.4 x 2.2 in./165 x 163 x 56 mm without enclosure
6.8 x 7.3 x 4.7 in./173 x 185 x 119 mm with the AS-ENC100-0 enclosure
1.4 lb./0.64 kg
80C652 @ 11 MHz
8 bit
8k byte (2k byte for VAV 100/101)
64k byte
8k byte
N2 and Zone Bus
8 Analog Inputs (0-10 VDC)
4 Binary Inputs
0/2 Analog Outputs (0-10 VDC)
8/6 Binary Outputs (24 VAC Triacs)
IEEE 472
IEEE 518
IEEE 587 Category A
FCC Part 15, Subpart J, Class A
UL 916, Energy Management Listed, Class PAZX
VDE 0871 Class B
UL 916 Listed and CSA Certified as part of the Metasys Network.
VAV Controller—Variable Air Volume (VAV) Controller 89
Page 90

Table 46: Input/Output Specifications for VAV 100/101
Function Reso-
AI-Voltage
AITemperature
AITemperature
AITemperature
AIPotentiometer
ACCUM-DC
BI-DC Sense
AO Voltage
BO-AC Triac
DC Supply
Out
N2 Bus
Zone Bus
State of Outputs During PWR. Fail = Disables when 24 VAC PWR drops below 18 VAC
State of Outputs After PWR. is Restored = Remain disabled for 10 seconds minimum, and then come on per
Restart Configuration.
* NM = normal mode, CM = common mode.
CM Cap is a common mode capacitor connected from the I/O point to a separate ground plane.
** To interface to TTL outputs such as demand meters, use an open collector output to drive the +15 VDC pull-up resistor and
contact cleaning current capacitor.
Sam-
lution
pling
Time
14 bit 1.5 sec
14 bit 1.5 sec
15 bit 1.5 sec
16 bit 1.5 sec
17 bit 1.5 sec
32 bit 10 ms
(100 Hz)
1 bit 10 ms N/A 0-15 VDC,
8 bit 1.5 sec N/A 0-10 VDC @
N/A 1.5 sec N/A 24 VAC
N/A N/A N/A 14.6-17 VDC
N/A N/A N/A 5000 ft/
N/A N/A N/A 500 ft/150 m N/A N/A PTC +
Accu-
Range DC Input
racy
20 mV
0.5F
0.7F
1.3F
0.1F
N/A 0-15 VDC,
0-2 V or
0-10 VDC
1000 ohm Si 3540 ohm 0-2k ohm NM ResCap
1000 ohm Ni 3540 ohm 0-2k ohm NM ResCap
1000 ohm Pt 3540 ohm 0-2k ohm NM ResCap
0-2k ohm
Potentiometer
2.5 V Trig **
2.5 V Trig **
10 mA maximum
@ 50-500 mA
@ 90 mA
1500 m
Sensor/
Impedance
470k ohm 0-5k ohm NM ResCap
3540 ohm 0-2k ohm NM ResCap
47k ohm 0-5k ohm NM ResCap
47k ohm 0-5k ohm NM ResCap
N/A 1k-10M ohm No Special
N/A 48-480 ohm Opto +
N/A 162-10M ohm Opto +
N/A N/A PTC +
Load
Impedance
Noise
Protection*
+ CM Cap
+ CM Cap
+ CM Cap
+ CM Cap
+ CM Cap
+ CM Cap
+ CM Cap
Parts
CM Cap
CM Cap
Tranzorb
Tranzorb
Noise/Surge
Standard
Tested To*
IEEE-587
a) CM Ringwave:
1.5k V
b) NM Bi-Wave:
1.5k V, 3k A
IEEE-472
a) CM Ringwave:
1.5k V
b) NM Ringwave:
500V
IEEE-587
CM Ringwave: 1.5k V
NM Ringwave: 500V
IEEE-472
CM Ringwave: 1.5k V
NM Ringwave: 500V
90 VAV Controller—Variable Air Volume Controller
Page 91

Table 47: Input/Output Specifications for VAV 110/111 and VAV 140/141
Function Reso-
lution
AI-Voltage
AITemperature
AITemperature
AITemperature
AIPotentiometer
ACCUM-DC
BI-DC Sense
AO Voltage
BO-AC Triac
DC Supply
Out
N2 Bus
Zone Bus
State of Outputs During PWR. Fail = Disables when 24 VAC PWR drops below 18 VAC
State of Outputs After PAR. is Restored = Remain disabled for 10 seconds minimum, and then come on per
Restart Configuration.
* NM = normal mode, CM = common mode.
CM Cap is a common mode capacitor connected from the I/O point to a separate ground plane.
** To interface to TTL outputs such as demand meters, use an open collector output to drive the +15 VDC pull-up resistor and
contact cleaning current capacitor.
14 bit 1.5 sec
14 bit 1.5 sec
15 bit 1.5 sec
16 bit 1.5 sec
17 bit 1.5 sec 0-2k ohm
32 bit 10 ms
1 bit 10 ms N/A 0-15 VDC,
8 bit 1.5 sec 0-10 VDC @
N/A 1.5 sec N/A 24 VAC
N/A N/A N/A 14.6-17 VDC
N/A N/A N/A 5000 ft/1500 m N/A N/A PTC + Opto +
N/A N/A N/A 500 ft/150 m N/A N/A PTC +
Sampling
Time
(100 Hz)
Accu-
Range DC Input
racy
20 mV
0.5F
0.7F
1.3F
N/A 0-15 VDC,
0-2 V or
0-10 VDC
1000 ohm Si 3540 ohm 0-2k ohm NM ResCap +
1000 ohm Ni 3541 ohm 0-2k ohm NM ResCap +
1000 ohm Pt 3542 ohm 0-2k ohm NM ResCap +
Potentiometer
2.5 V Trig **
2.5 V Trig **
10 mA maximum
@ 50-500 mA
@ 90 mA
Sensor /
Impedance
470k ohm 0-5k ohm NM ResCap +
3543 ohm 0-2k ohm NM ResCap +
47k ohm 0-5k ohm NM ResCap +
47k ohm 0-5k ohm NM ResCap +
N/A 1k-10M ohm No Special
N/A 48-480 ohm CM Cap
N/A 162-10M
Load
Impedance
ohm
Noise
Protection*
CM Cap
CM Cap
CM Cap
CM Cap
CM Cap
CM Cap
CM Cap
Parts
CM Cap
Tranzorb
Tranzorb
Noise/Surge
Standard
Tested To*
IEEE-587
a) CM Ringwave:
1.5k V
b) NM Bi-Wave:
1.5k V, 3k A
IEEE-472
a) CM Ringwave:
1.5k V
b) NM Ringwave:
500 V
IEEE-587
CM Ringwave: 1.5k V
NM Ringwave: 500 V
IEEE-472
CM Ringwave: 1.5k V
NM Ringwave: 500 V
VAV Controller—Variable Air Volume (VAV) Controller 91
Page 92

Notes
Controls Group FAN 636.3
507 E. Michigan Street Application Specific Controllers Manual
P.O. Box 423 Printed in U.S.A.
Milwaukee, WI 53201
92 VAV Controller—Variable Air Volume Controller
 Loading...