

Page 1
24-7701-136, Rev. B
FANs 216, 1628.3
Installation Instructions HH-6705
Issue Date 0316
TRUERH
HH-6705 Duct Humidistat
nstallation
I
IMPORTANT: Use this HH-6705 Series Duct
Humidistat only as an operating
control. Where failure or malfunction
of the HH-6705 Humidistat could
lead to personal injury or property
damage to the controlled equipment
or other property, additional
precautions must be designed into
the control system. Incorporate and
maintain other devices, such as
supervisory or alarm systems or
safety or limit controls, intended to
warn of or protect against failure or
malfunction of the
HH-6705 Humidistat.
IMPORTANT: Utiliser ce HH-6705 Series Duct
Humidistat uniquement en tant que
dispositif de régulation. Lorsqu'une
défaillance ou un dysfonctionnement
du HH-6705 Humidistat risque de
provoquer des blessures ou
d'endommager l'équipement
contrôlé ou un autre équipement, la
conception du système de contrôle
doit intégrer des dispositifs de
protection supplémentaires. Veiller
dans ce cas à intégrer de façon
permanente d'autres dispositifs, tels
que des systèmes de supervision ou
d'alarme, ou des dispositifs de
sécurité ou de limitation, ayant une
fonction d'avertissement ou de
protection en cas de défaillance ou
de dysfonctionnement du
HH-6705 Humidistat.
Series
Tools Required
• hole saw with 1-3/4 in. (45 mm) diameter blade
• drill with 3/32 in. (mm) drill bit
• 1/4 in. (7 mm) and 1/8 in. (3 mm) flat-blade
screwdrivers
• gasket, sealer, or other material to seal the area
between the unit and the duct
ocation Requirements
L
IMPORTANT: To avoid damage to the circuit board
and components, do not mount the
unit in a location where high
concentrations of corrosive vapors
are present.
Place the humidistat in a location that complies with
the following:
• Position: The humidistat is designed for duct
mounting in any position, except with the probe tip
pointed up.
• Duct Diameter: Recommended minimum diameter
(round ducts) or width (square ducts) is 12 in.
(305 mm).
• Air Stratification (when the unit is mounted on the
discharge side of the fan): Recommended location
is at least 8 ft (2.4 m) downstream from the
humidification equipment, where duct air and water
vapor are sufficiently mixed. Avoid areas where the
probe may be exposed to condensation.
Parts Included
• HH-6705-9N0GP duct humidistat
• No. 6-32 x 1/4 in. binder-head cover screw
• 3 in. (76 mm) outside diameter steel washer
© 2016 Johnson Controls, Inc. 1
Part No. 24-7701-136, Rev. B www.johnsoncontrols.com
Code No. LIT-216605
Page 2
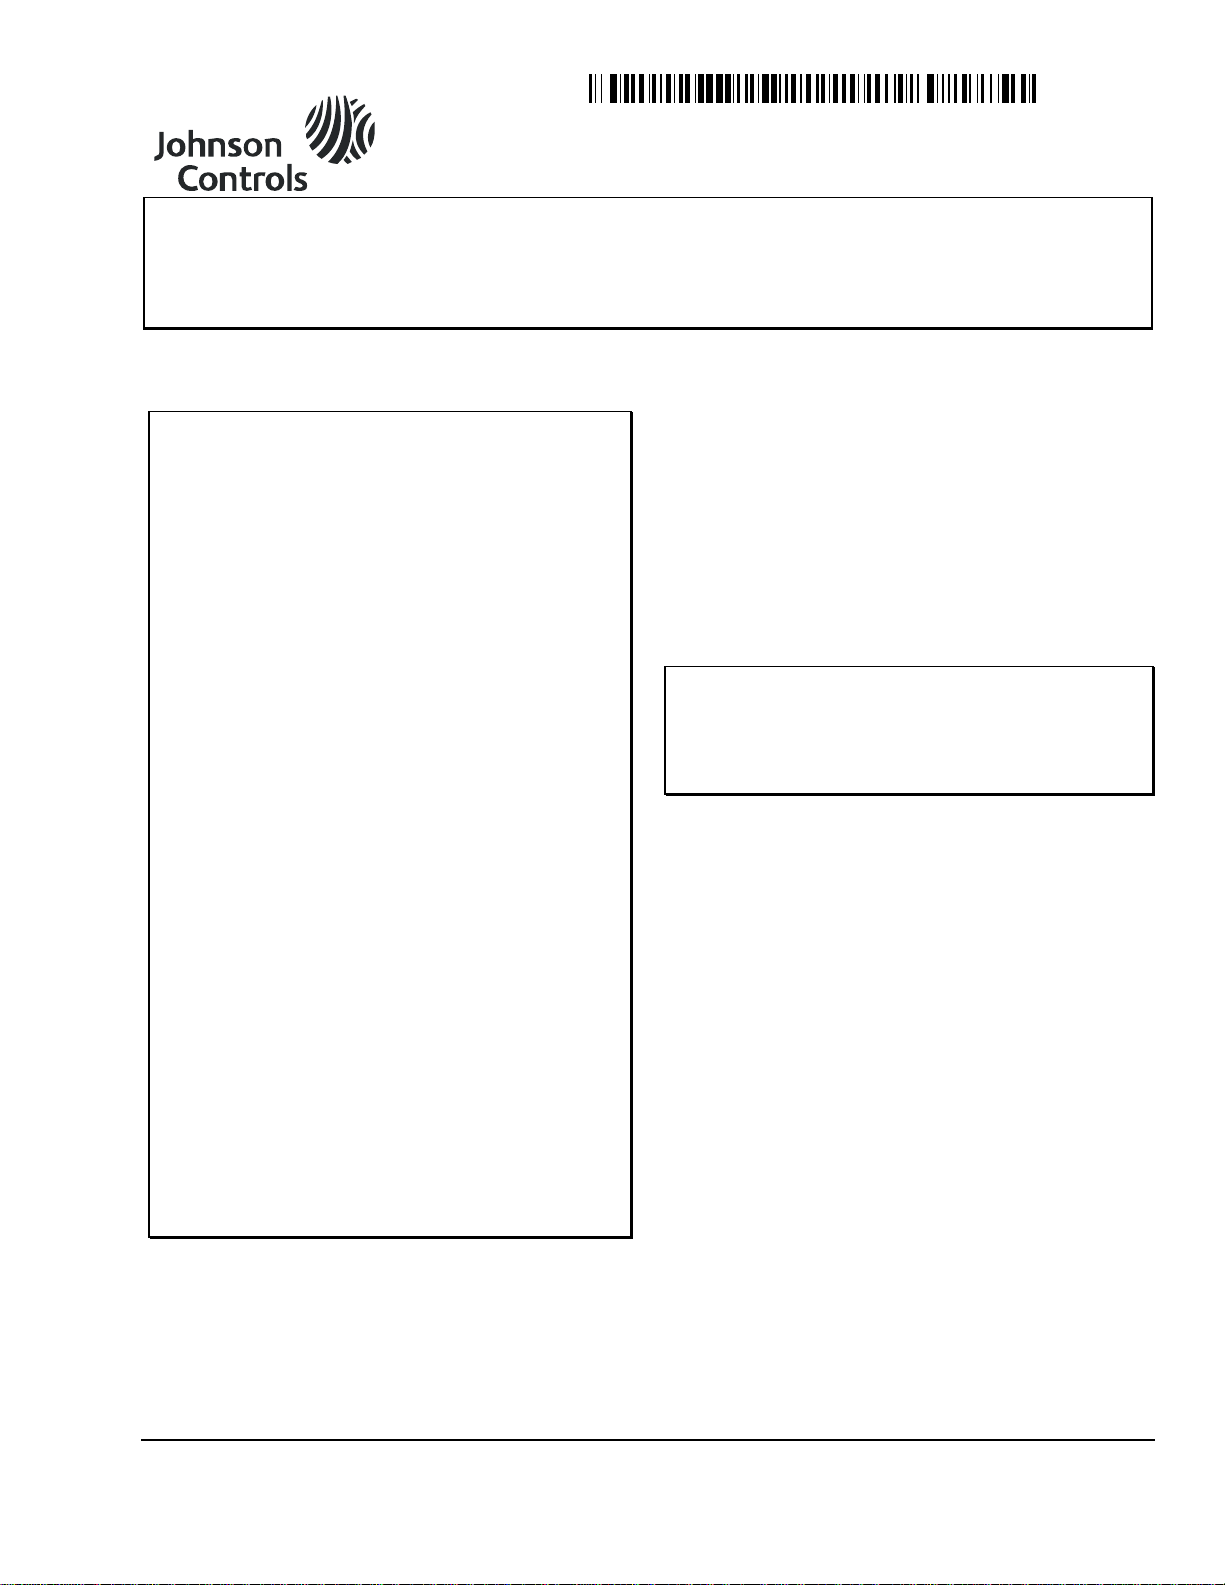
etpoint
30
50
Mounting Hole
Mounting Hole
Setpoint
Potentiometer
70
90
Cover
Duct
Washer
S
The setpoint is adjustable from 30 to 90% Relative
Humidity (RH). Use a 1/8 in. (3 mm) flat-blade
screwdriver to adjust the setpoint potentiometer
located under the cover. (See Figure 1.)
Figure 1: Adjusting the Setpoint
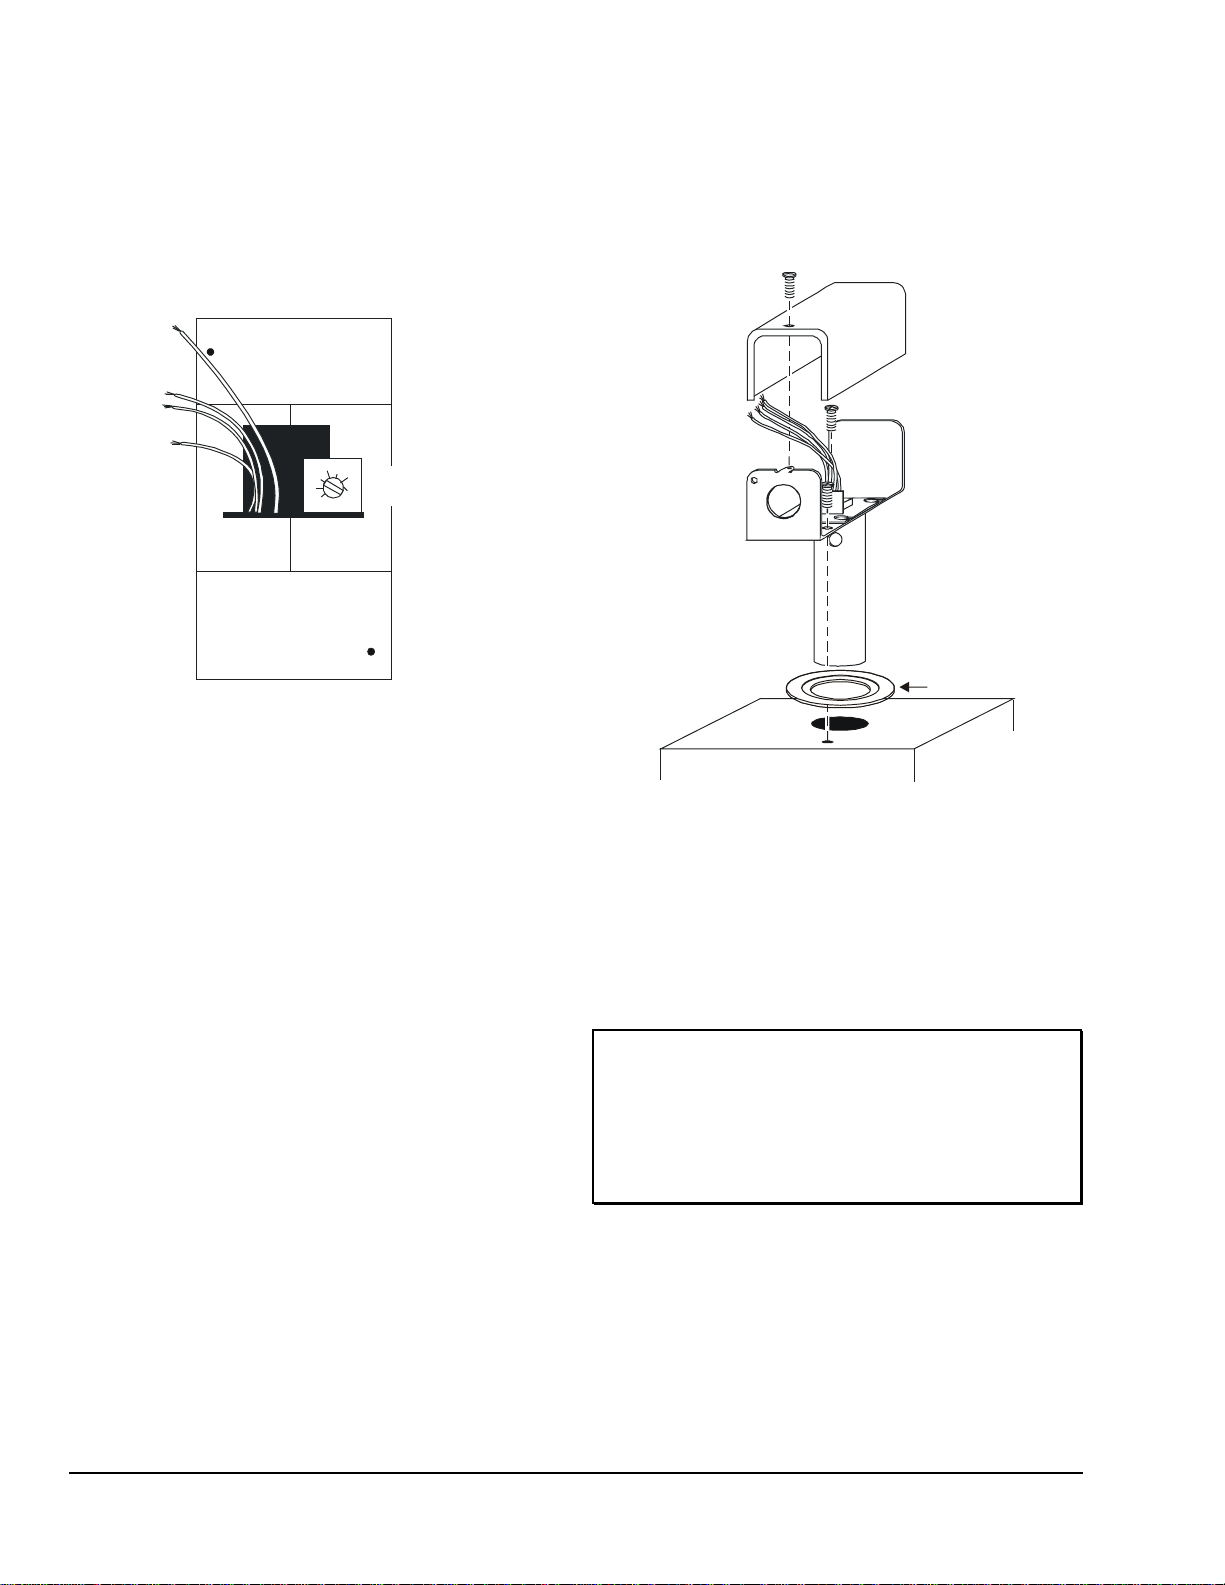
ounting
M
Mount the humidistat as follows:
1. Remove any excess insulation from the duct that
prevents the probe from extending a minimum of
3 in. (76 mm) into the airstream.
2. Use the hole saw to make a 1-3/4 in. (44.5 mm)
hole in the duct for inserting the probe.
Note: If the duct hole is larger, use the 3 in. (76 mm)
washer provided when installing the
humidistat. (See Figure 2.)
3. Loosen the cover screw, and lift the cover off the
unit. (See Figure 2.)
Figure 2: Mounting the Humidistat
4. Insert the probe into the duct, and mark the holes
for the two mounting screws.
5. Remove the unit, and drill a 3/32 in. (2.4 mm) hole
for each mounting screw.
6. Use a gasket, sealer, or other means to seal the
area around the hole between the unit and duct.
IMPORTANT: Seal any holes created during
installation to help reduce drafts and
for more accurate humidity readings.
Use the washer provided, in addition
to one of the materials in Step 6 if
the duct hole is larger than 1-3/4 in.
(44.5 mm).
7. Reinsert the probe, and secure the housing to the
2 TRUERH Series HH-6705 Duct Humidistat Installation Instructions
duct using two No. 6 sheet metal screws
(not provided).
Page 3

W
!
Wire Color
Designation
iring
roubleshooting
T
If the humidistat is not functioning properly:
WARNING: Risk of Electric Shock.
Disconnect the power supply
before making electrical
connections. Contact with
components carrying
hazardous voltage can cause
electric shock and may result in
severe personal injury or death.
AVERTISSEMENT: Risque de décharge
électrique.
Débrancher l'alimentation
avant de réaliser tout
branchement électrique. Tout
contact avec des composants
porteurs de tensions
dangereuses risque d'entraîner
une décharge électrique et de
provoquer des blessures
graves, voire mortelles.
Observe the following when wiring the humidistat:
• Do not run low voltage wiring in the same conduit
as line voltage wiring or other conductors that
supply highly inductive loads.
1. Check all supply voltage connections and output
wiring to make sure the wiring is correct.
2. Move the setpoint up and down to ensure the
humidistat is responding. (The relay should switch
on and off when the setpoint is adjusted above and
below the humidity level being sensed.)
Note: The humidity in the duct must be within the
30 to 90% RH setpoint range before the
HH-6700 responds.
3. If the troubleshooting suggestions fail to remedy
the problem, replace the unit.
dditional Information
A
There are no accessories for the HH-6705-9N0GP
humidistat. See Table 2 for product specifications.
• Use 18 or 24 AWG wire.
• Make all wiring connections in accordance with the
National Electrical Code and all local regulations.
The power requirements of the HH-670 Series are
20 to 30 VDC at 33 mA or 20 to 30 VAC, 50/60 Hz at
45 mA (1.35 VA maximum). Make wiring connections
using four color-coded, 6 in. (152 mm) 18 to 24 AWG
lead wires. Designations are indicated in Table 1.
Table 1: Wire Designations
Red Input Power
Black Common
Yellow Relay Contact
Yellow Relay Contact
TRUERH Series HH-6705 Duct Humidistat Installation Instructions 3
Page 4

T
RH
Series HH-6705 Duct Humidistat
0 to 100% RH, non-condensing; 86°F (30°C) maximum dew point
1.5 lb (0.7 kg)
European Single Point of Contact:
NA/SA Single Point of Contact:
APAC Single Point of Contact:
CHINA
Building Efficiency
All other marks herein are the marks of their respective owners. © 2016 Johnson Controls, Inc.
Table 2: Specifications
Product
Power Requirements
Output
Relay Contact Rating
Humidity
Ambient Operating
Conditions
Survival Operating
Conditions
Ambient Storage
Conditions
Materials
Dimensions
Shipping Weight
The performance specificati ons are nominal and conform to acceptable industry standards. For application at condi tions beyond these
specifications, consult the local Johnson Controls office. Johnson Control s, Inc. shall not be liable f or damages resulting from misapplication
or misuse of its products .
RUE
20 to 30 VDC at 33 mA or 20 to 30 VAC, 50/60 Hz at 45 mA (1.35 VA maximum), Class 2
Single-Pole, Single-Throw (SPST), normally open relay contact:
Opens at setpoint on increasing RH
Closes at 5% RH below setpoint on decreasing RH
Maximum: 4 ampere at 24 VAC; pilot duty 42.4 VA at 24 VAC, Class 2
Minimum: 100 mA at 5 VDC
Element: All-Polymer
Setpoint: Adjustable from 30 to 90% RH
Sensing Range: 0 to 100% RH, non-condensing
Differential: Fixed 5% RH
32 to 122°F (0 to 50°C)
-22 to 140°F (-30 to 60°C)
0 to 100% RH, non-condensing; 86°F (30°C) maximum dew point
-40 to 176°F (-40 to 80°C)
0 to 100% RH, non-condensing; 86°F (30°C) maximum dew point
Metal cover and housing with polymeric duct probe
Overall (H x W x D): 4.44 x 2.19 x 7.87 in. (113 x 56 x 200 mm)
Probe (D x L): 1.62 x 6.12 in. (41 x 155 mm)
JOHNSON CONTROLS
WESTENDHOF 3
45143 ESSEN
GERMANY
JOHNSON CONTROLS
507 E MICHIGAN ST
MILWAUKEE WI 53202
USA
Metasys® and Johnson Controls® are registered trademarks of Johnson Controls, Inc.
4 TRUERH Series HH-6705 Duct Humidistat Installation Instructions
JOHNSON CONTROLS
C/O CONTROLS PRODUCT
MANAGEMENT
NO. 22 BLOCK D NEW DISTRICT
WUXI JIANGSU PROVINCE 2 14142
507 E. Michigan Street, Milwaukee, WI 53202
Page 5

TRUERH Series HH-6705 Duct Humidistat Installation Instructions 5
 Loading...