

Page 1

Technical Bulletin E-Link Gateway
E-Link Gateway Commissioning and Troubleshooting
Technical Bulletin
Product Code
Number
Description
YK-ELNK100-0
Circuit Board with Serial
Communications, BACnet MS/TP,
Modbus RTU, and N2
YK-ELNK101-0
Circuit Board with LONWORKS
FTT10 Communications
YK-ELNKE00-0
YK-ELNK100-0 in an Enclosure
YK-ELNKE01-0
YK-ELNK101-0 in an Enclosure
YK-ELNKOLK-0
OptiView/Latitude Installation Kit
YK-ELNKSTK-0
IPU-II Installation Kit (Installation
Kit not available in Europe)
Issue Date May 19, 2011
The Johnson Controls® Equipment Link (E-Link)
Gateway is an economical and versatile
communications device that provides a connection
between YORK® equipment, such as chillers and
Remote Terminal Unit (RTUs), and open standard
protocols. Specifically, the E-Link Gateway provides
access to BACnet® Multidrop Serial Bus/Token
Passing (MS/TP), N2, Modbus® RTU, and
LONWORKS® FTT10 Building Automation System
(BAS) protocols. The E-Link Gateway has been
designed with the same physical dimensions and
power requirements as the MicroGateway, which
enables it to be used in many instances as a direct
replacement part.
IMPORTANT: The E-Link Gateway does not
support the ISN, American Standard Code for
Information Interchange (ASCII), or YORKTalk I
protocols.
The E-Link Gateway has four serial ports, one of
which can host an optional LONWORKS FTT10
ProtoCessor module. Ports 1 and 4 are designated
for BAS networking, and Port 2 is used to connect to
the equipment. Port 3 provides access for auxiliary
monitoring and control.
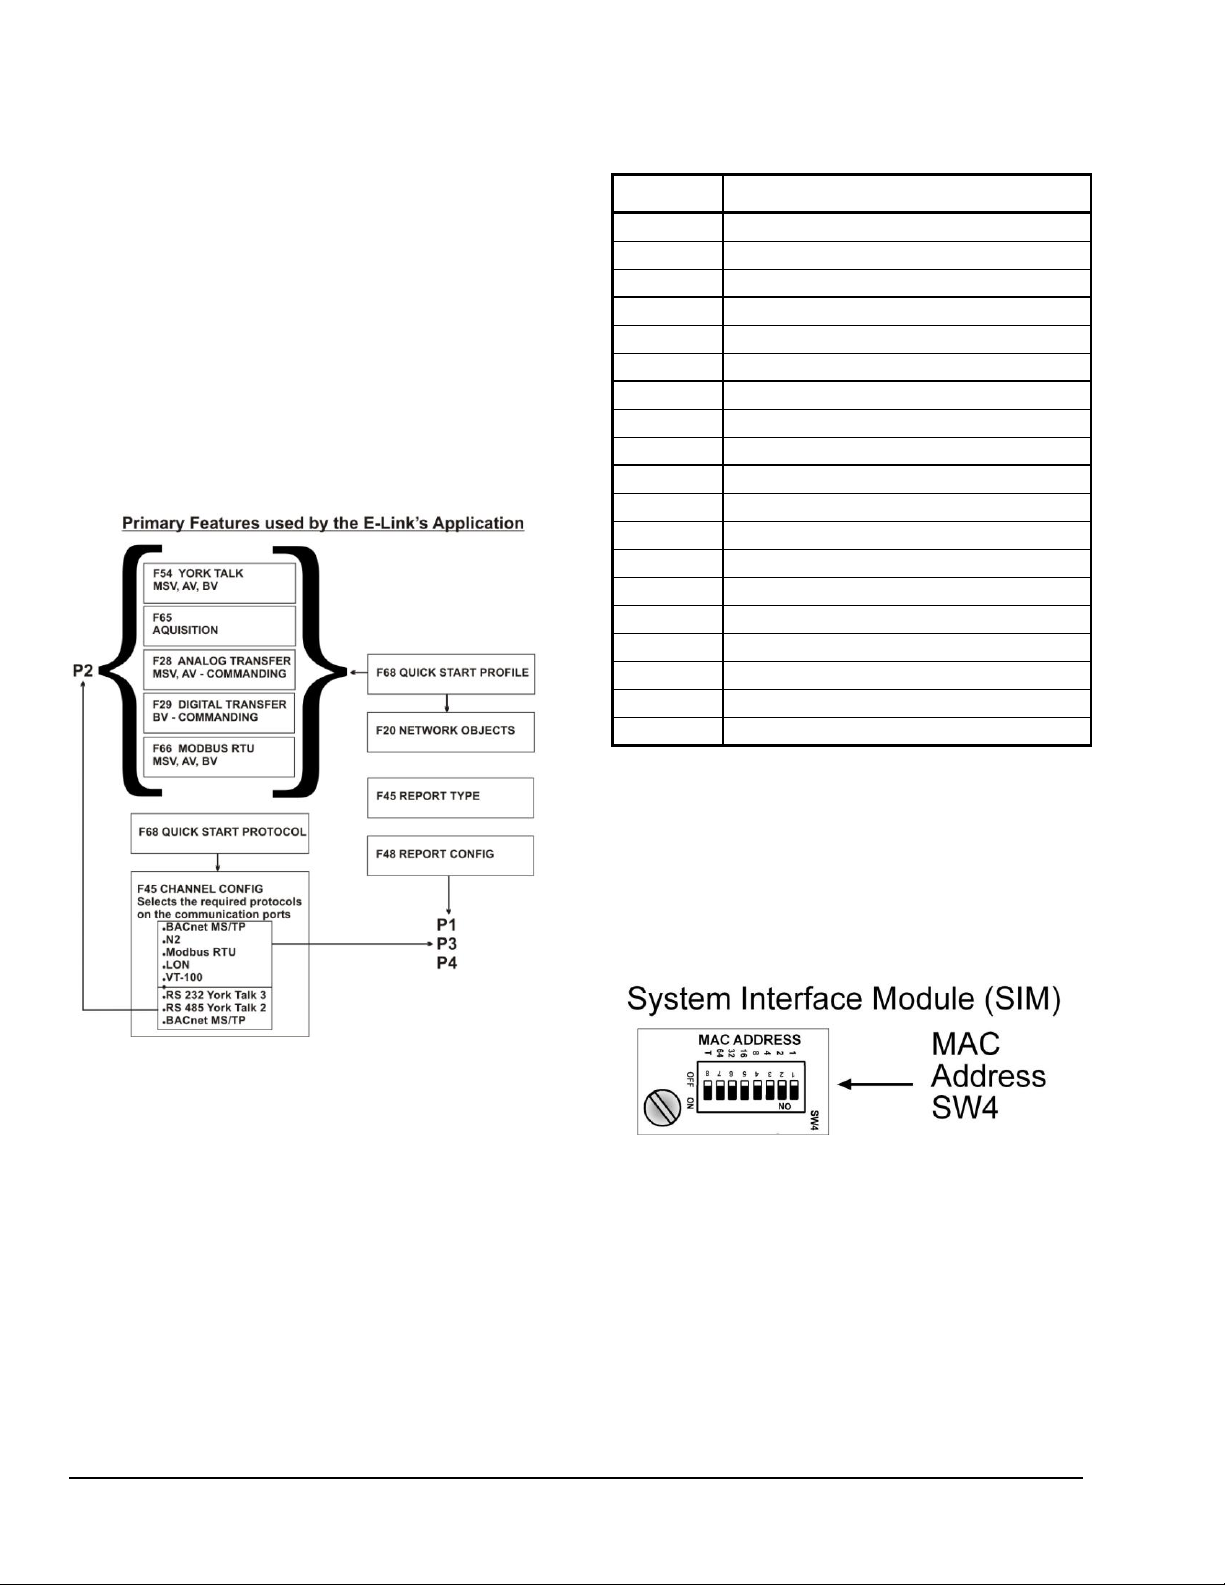
To simplify installation and setup, the E-Link
Gateway is pre-configured with a series of chiller
and rooftop profiles that you can choose by selecting
the correct DIP switch settings.
Table 1: E-Link Gateway Product Code Numbers
The E-Link Gateway consists of two boards. The
IPU-II (processor module) is mounted on the System
Interface Module (SIM) (interface module). Do not
separate these boards in the field.
The circuit board measures 102 x 152 mm (4 x 6 in.)
and the dimensions of the enclosure are
152 x 279 x 63 mm (6 x 11 x 2-1/2 in.).
The E-Link Gateway can be powered from these
voltage sources:
12 VDC (circuit board)
24 VAC (circuit board)
Functional Overview
The E-Link Gateway is available as a stand-alone
circuit board or as a circuit board mounted within a
metal enclosure (Table 1).
© 2011 Johnson Controls, Inc. 1
Code No. LIT-12011238 www.johnsoncontrols.com
110 VAC (in an enclosure)
220 VAC (in an enclosure)
User Selections and Indicators
Each communication port is serviced by two
Light-Emitting Diodes (LEDs):
The red LED flashes to indicate that the port is
transmitting data.
The green LED flashes to indicate that the port
is receiving data.
These LEDs are connected to the actual TX and RX
signal lines and only indicate electrical activity by the
specific port. The LEDs do not indicate error-free
data reception or transmission.
Page 2
Port 1
Port 2
Port 3
Port 4
BACnet
MS/TP
YORK Talk III
BACnet
MS/TP
LONWORKS
FTT10
Modbus
RTU
Server
YORK Talk II
Modbus RTU
Server
N2
BACnet
MS/TP
N2
Modbus RTU
Client
VT-100
Port 1
Port 2A
Port 2B
Port 3
Port 4
RS-485
RS-485
RS-232
RS-485
TTL/FTT-10A
Type
Description
STD
A standard production Application that is
released through the normal process.
CUS
A custom Application that is released and
supported by the regional System Integration
Services (SIS) or Custom Solutions
organizations.
ENG
An engineering Application as used during the
development process.
The status and power LED provides information
about current operation and the presence of
electrical power.
Three DIP switches enable you to set the E-Link
Gateway’s MAC address, the desired equipment
profile, and the output protocol. Use the momentary
push button to activate the chosen selection.
Port 1, Port 2A, and Port 3 have End-of-Line (EOL)
switches that allow their respective RS-485 networks
to be correctly biased and terminated.
Port Configuration
From a functional perspective, the E-Link Gateway
offers four communication ports. Each port is Quick
Start configurable to support the protocols listed in
Table 2.
Table 2: Port Configuration
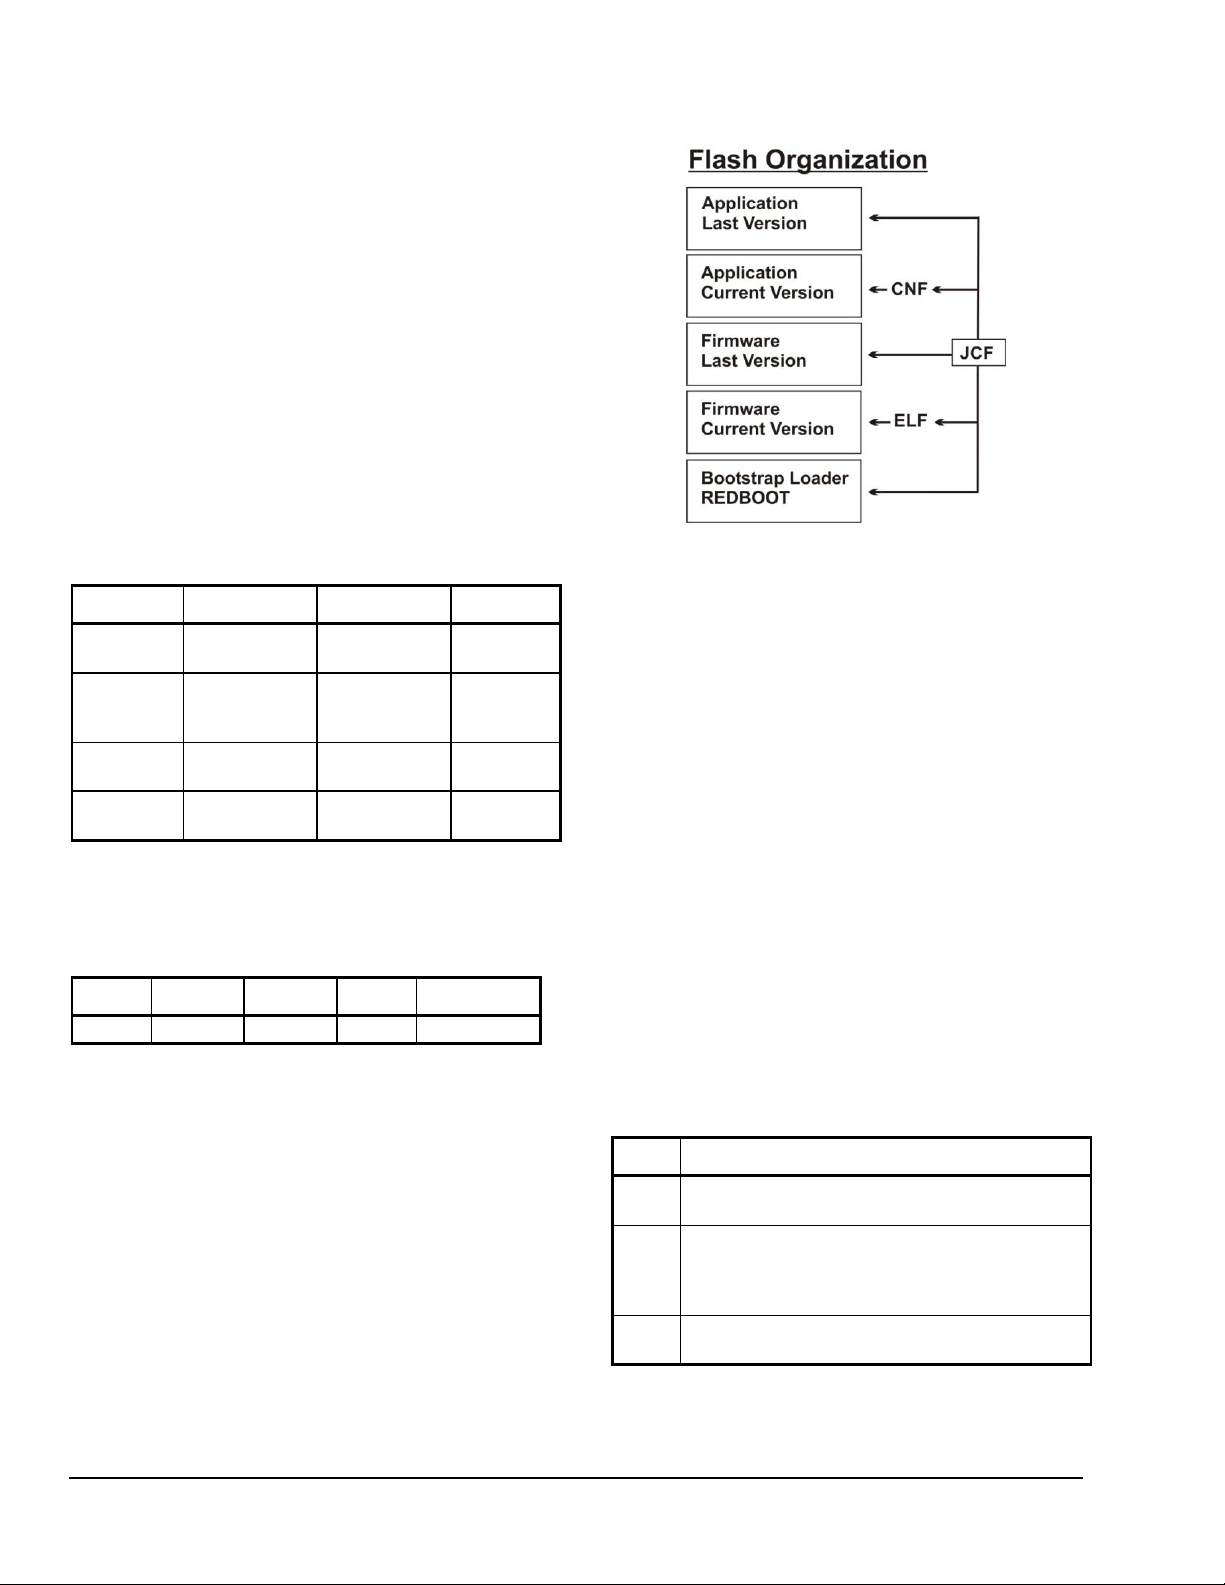
Figure 1: Flash Memory Organization
The Firmware file contains the object engine, the
operating system, and all the parts required to
support the various communication protocols. The
Application file contains the preprogrammed Quick
Start configurations of the supported field
equipment.
The E-Link Gateway’s ports support specific driver
technologies as described in Table 3.
Table 3: Port Drivers
Software Revision Control
The E-Link Gateway software consists of two
primary parts; the Firmware (ELF) and the
Application (CNF). Both of these parts are delivered
from the factory as a Johnson Combined File (JCF)
shown in Figure 1. A label on the E-Link Gateway
defines the version of JCF loaded in the factory.
The JCF is factory loaded and, due to its data
format, cannot be reloaded in the field.
Each part of the JCF, with the exception of
REDBOOT, can be reloaded individually in the field.
The Firmware file uses an ELF extension, whereas
the Application uses a CNF extension.
Every time a new Firmware file is built, the file is
renamed using the following convention:
FIRMWARE REV: PPPP.FFFF.MMMM.BBBB-CCC,
where PPPP is the platform; FFFF is the major
functionality; MMMM is the minor functionality; BBBB
is the build number; and CCC is the Feature,
Section, and Page (FSP) mix.
The Application file, when modified, is also renamed
using a 12-character string that adheres to the
following convention:
APPLICATION REVISION: TTT.MMMM.BBB, where
TTT is the Application type shown in Table 4,
MMMM is the major release, and BBB is the build
number.
Table 4: Application Types
2 E-Link Gateway Commissioning and Troubleshooting Technical Bulletin
Page 3
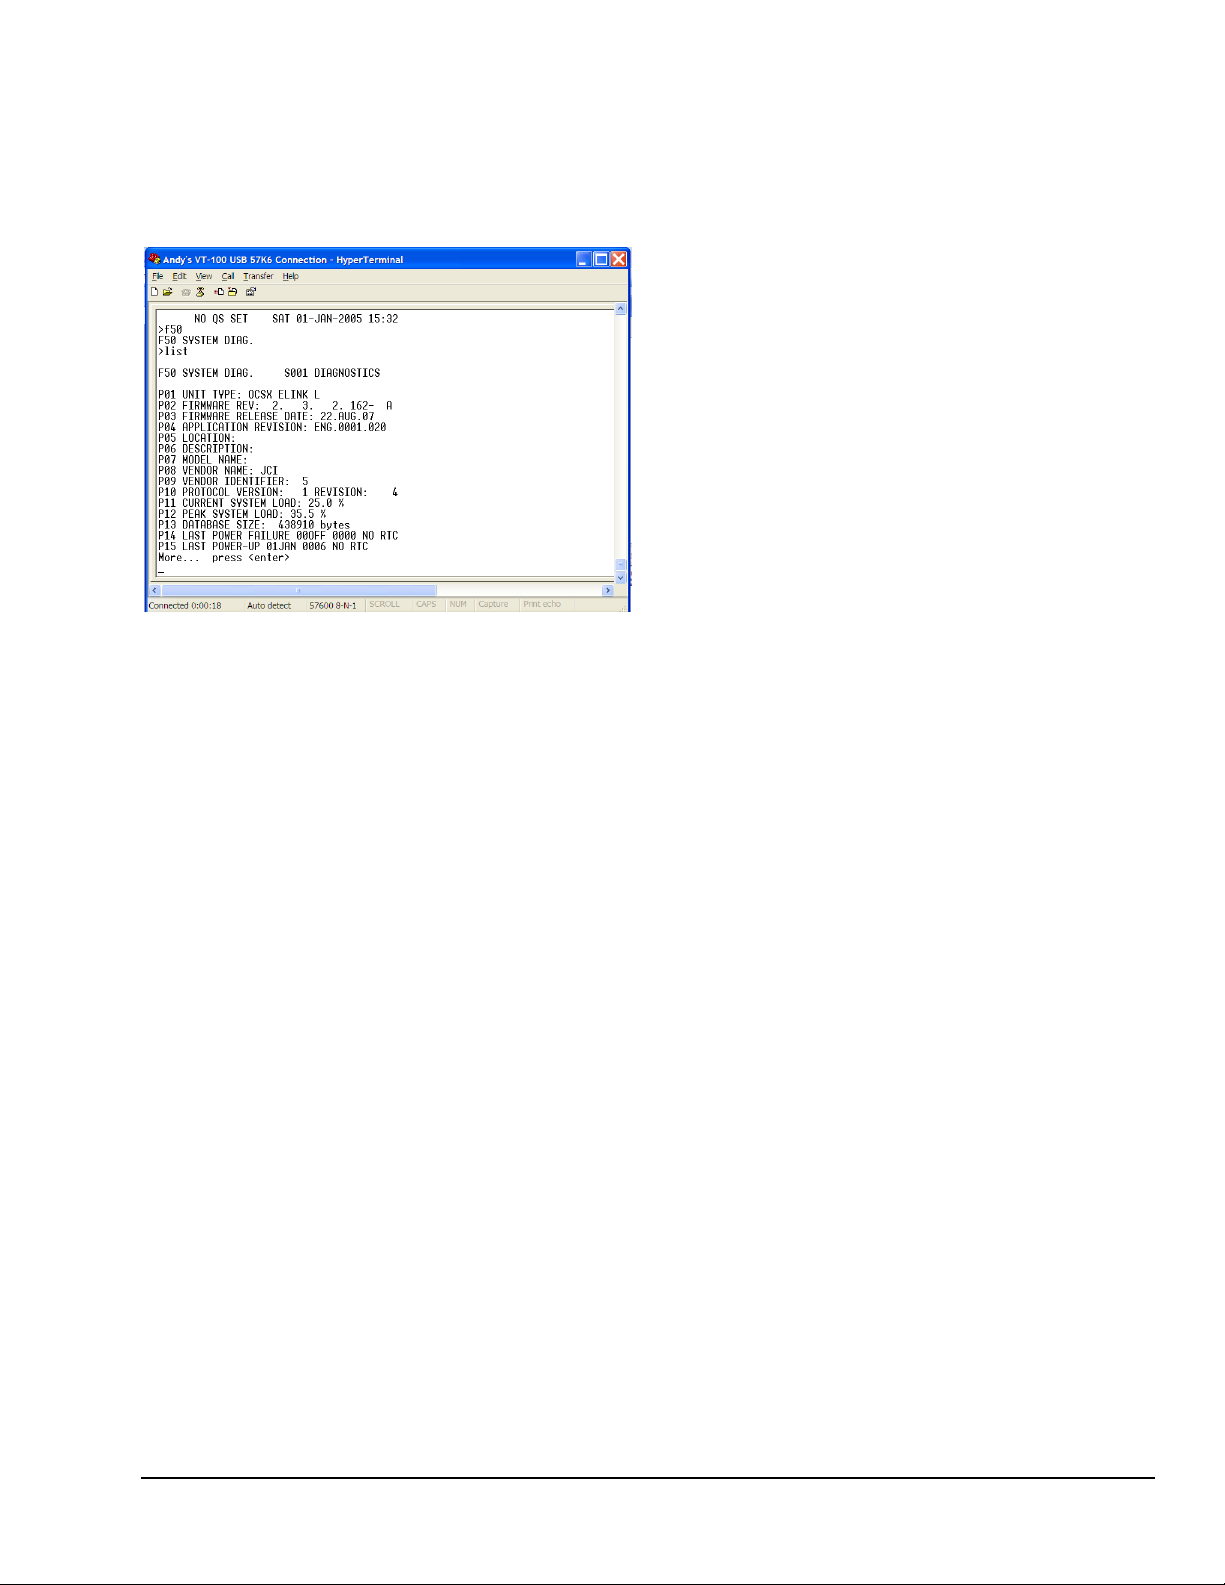
Figure 2 shows an example of the output you see
after logging on to an E-Link Gateway and selecting
System Diagnostics. The actual Firmware revision
and Application revision relate to the current release.
Figure 2: Terminal View of System Diagnostics
Quick Starts
The Quick Start feature provides a simple method of
configuring an E-Link Gateway for a specific type of
equipment and output protocol. No external devices
(laptops) are required because the Quick Start
feature is self-contained and is invoked by setting
specific addresses on a set of switches. A push
button activates the functionality.
When activating a LONWORKS FTT10 Quick Start,
cycle the power on the E-Link Gateway to activate
the Quick Start and the LONWORKS FTT10
ProtoCessor. (The LONWORKS FTT10 ProtoCessor
does not recognize the push button as a trigger to
reset and load the correct conversion file.)
Field Maintenance
Implement a field edit if you need to correct an
E-Link Gateway’s Quick Start script. Two Quick
Starts have been reserved for this purpose, allowing
the E-Link Gateway’s Application to be adjusted to
address a profile issue, a protocol selection issue, or
both.
User Access
Use a computer with a VT-100 interface to view,
track, debug, make changes, or access the
operation of the E-Link Gateway. To invoke this
function, set Way 8 of the MAC address switch to
ON and connect a computer with a VT-100
emulation program to Port 3.
User Reports
Certain parameters require adjustments on site.
Users that have established a VT-100 interface on
Port 3 can edit parameters. Any edits that may have
been made are saved to flash memory when you
exit the User Report or the User Report has timed
out. Only parameters previously defined in a User
Report can be edited and saved to flash memory.
Loading New Firmware and Application
If the E-Link Gateway’s Firmware and Application
require reloading, the preferred way is to establish a
VT-100 terminal session and then use an X-modem
utility to transfer the file. When using a
Microsoft® Windows® Operating System (OS)
based computer, X-modem capabilities already
come packaged within the HyperTerminal®
Application, so proprietary tools are not required.
Applications
The E-Link Gateway’s Applications are designed to
provide connectivity to an established base of YORK
chillers that use YORK Talk II and III as their internal
protocol. Native BACnet and Modbus RTU protocol
speaking equipment can also use the E-Link
Gateway to offer N2 and LONWORKS FTT10
communications. An example of this type of
equipment is the YPAL rooftop unit.
BAS Networks
An E-Link Gateway can be connected to a BAS
network after it has been Quick Started and is then
ready to provide data. The E-Link Gateway acts as a
server and the BAS system must initiate any
requests.
The information required by the BAS is partially
dependent on the protocol; but in all cases, the BAS
must know the E-Link Gateway’s network address
(the address that uniquely identifies it on the
network) and which internal data it can access.
MS/TP
The E-Link Gateway supports dynamic device
binding. The BAS integrator requires the Device
Object address (also known as the Device Object
instance or the DE address) for device binding. This
literal address allows the BAS system to connect to
the E-Link Gateway using an automatic discovery
process (a WHO-IS, I-AM exchange) that
establishes the E-Link Gateway’s Media Access
Control (MAC) address. The MAC address is then
used in all future requests.
E-Link Gateway Commissioning and Troubleshooting Technical Bulletin 3
Page 4
The E-Link Gateway’s Device Object address is
generated automatically and is based on adding
5,000 to the MAC address switch setting.
Sometimes the integrator may require the E-Link
Gateway to have a specific Device Object address
(due to site-specific policy); and in these cases, the
E-Link Gateway must be site-configured. User
Report 1 allows you to enter a specific Device Object
address.
N2 and Modbus RTU
In case of both N2 and Modbus RTU, the E-Link
Gateway is identified on the network by its MAC
address, which you can set to any address between
1 and 127 using switches. Although these protocols
have a wider address space, the MAC address
switch limits them to 127. You can set the MAC
address using software, which is discussed in a later
section.
Changes to MAC address switches are updated live,
so take care to align any Client Application with the
E-Link Gateway’s MAC address.
LONWORKS FTT10
Press the service pin on the ProtoCessor to identify
the E-Link Gateway on the LONWORKS FTT10
network, which is the easiest way to determine the
Neuron® ID for third-party configuration tools. For
Network Automation Engine (NAE)-based systems,
the XIF resource file makes it simple to discover the
device.
Equipment Point Maps provide the data that a BAS
system can access. These maps are available on
the Johnson Controls Portal. The Point Maps are
presented as spreadsheets, which define the
parameters, their associated variable addresses,
and a brief description of what the data actually
represents for each type of equipment.
Figure 3 shows an example of an OptiView Point
Maps spreadsheet. The GPIC Object Type defines
the object within the OptiView micro panel that is
associated with this parameter.
Figure 3: OptiView Point Maps Spreadsheet
Figure 4 shows an example of an YCAS Point List
spreadsheet. The ENG PAGE REF refers to the
actual YORK Talk Feature (F54) page reference.
The N2 address is the N2 Open address that is
associated with that particular parameter. Columns 1
to 10 of the Points list description indicate if a
parameter is standard, optional, or not available and
refer to the version of firmware/Erasable
Programmable Read Only Memory (EPROM) listed
as items 1 to 10 at the top of the spreadsheet.
Each protocol references these variables in different
ways. BACnet protocol uses the Multistate Value
(MSV), Analog Value (AV), and Binary Value (BV)
objects. N2 uses the Analog Data Input (ADI),
Analog Data Float (ADF), and Binary Data (BD)
objects. Modbus RTU protocol uses registers.
LONWORKS FTT10 uses Standard Network Variable
Type (SNVT). Each protocol contains different
amounts of information. BACnet protocol is the most
data-rich and Modbus RTU protocol is the most
basic.
Figure 3, Figure 4, and Figure 5 show examples of
Point Maps available on the Johnson Controls
Portal.
4 E-Link Gateway Commissioning and Troubleshooting Technical Bulletin
Figure 4: YCAS Point List Spreadsheet
Figure 5 shows how a chiller’s Point Map is mapped
to provide the required BACnet object ID references
and their BACnet object names.
Page 5
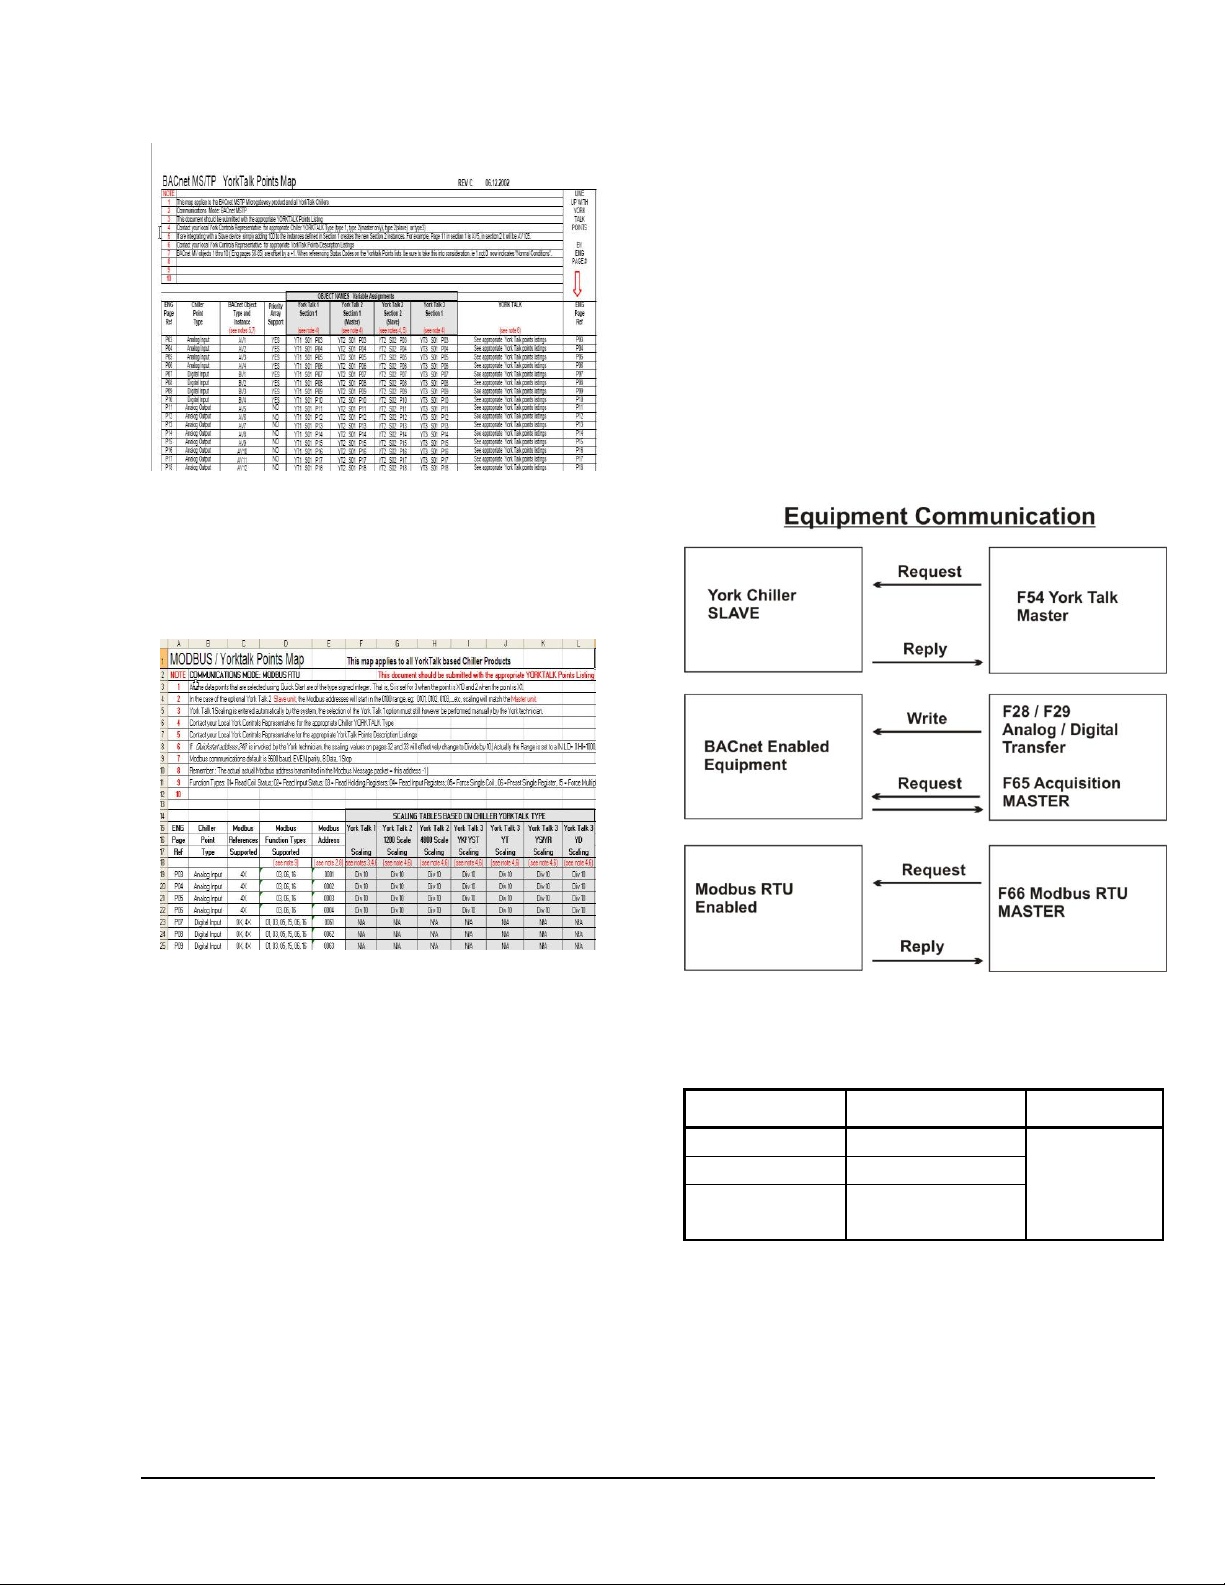
Figure 5: Point Maps and Object ID/References
INPUT
Normalized Data
OUTPUT
YORK Talk Data
AV, MSV, BV
N2, Modbus
RTU, BACnet,
and
LONWORKS
FTT10
BACnet Data
AV, MSV, BV
Modbus RTU
Data
AV, MSV, BV
Figure 6 shows how a chiller’s Point Map is mapped
to provide the required Modbus RTU addresses,
supported function codes, and associated scaling.
When applied with BACnet enabled equipment
(YPAL), the Acquisition Feature (F65) is used to
read the Present Value (PV) of objects resident
within the equipment and assign them to AV, MSV,
or BV objects. Analog and Digital Transfers (F28
and F29) are used to write data to the equipment.
For Modbus RTU-enabled equipment, the Modbus
RTU Feature (F66) polls the equipment to request
data from and write data to it. As in previous cases,
all the data retrieved from the equipment is assigned
to AV, MSV, and BV objects.
Figure 7 shows the three major client features that
are used in the E-Link Gateway. Table 5 shows the
normalizing variables and the output protocols.
Theory of Operation
The E-Link Gateway is designed to express
equipment data from one protocol (typically, YORK
Talk, BACnet, or Modbus RTU) into a BAS protocol.
To normalize the data received from or sent to the
equipment, three standard BACnet object types (AV,
BV, and MSV) are used. Although the E-Link
Gateway contains more complex objects, these
serve no function in a Gateway Application.
The E-Link Gateway is based on the ConneXsys
object engine that uses FSP as its programming
method.
The E-Link Gateway always serves as a manager
with respect to the equipment that it supports. In the
case of the YORK Talk Feature (F54), the E-Link
Gateway polls the chiller panel to request data f rom
and write data to it.
Figure 6: Point Maps and Modbus RTU
Addresses
E-Link Gateway Commissioning and Troubleshooting Technical Bulletin 5
Figure 7: Client Features
Table 5: Normalizing Variables and Output
Protocols
Equipment Profiles
These are defined as collections of data points,
which provide a BAS system access to certain
equipment functionality when exposed on a network.
Page 6
Feature
Description
F01
MULTI STATE VALUE
F04
ANALOG VALUE
F06
BINARY VALUE
F09
BINARY OUTPUT
F20
NETWORK OBJECTS
F28
ANALOG TRANSFER
F29
DIGITAL TRANSFER
F45
CHANNEL CONFIG
F48
REPORT CONFIG
F49
USER TYPE
F50
SYSTEM DIAG
F54
YORK TALK
F60
SYSTEM STRUCTURE
F65
ACQUISITION
F66
MODBUS RTU
F67
QUICK START PROTOCOL
F68
QUICK START PROFILE
F69
MSV COMPANION
F70
QUICK START CONTINUATION
E-Link Gateway Application
To provide flexibility, the E-Link Gateway does not
hardcode the equipment profiles but allows them to
be easily configured by factory-designated
resources. These profiles are stored as E-Link
Gateway Applications that can be restored using a
BACnet atomic write service or by an X-modem
transfer. The assigned Application revision number
reflects the state of the profile.
Principle of Operation
The E-Link Gateway Application links features
together to create a predefined behavior that is
executed once every system cycle. Figure 8 and
Table 6 show the Firmware Features used.
Table 6: Features
Figure 8: Features
Accessing the E-Link Gateway
You must first establish communications with the
E-Link Gateway to access the Application. This is
done by connecting a computer to Port 3 through a
converter that provides an RS-485 interface.
Next, the protocol on Port 3 must be set to Terminal
mode. This is accomplished by setting the T-switch
(Way 8) of the MAC switch to ON (Figure 9).
Figure 9: MAC Address Switch
Any VT-100 emulation program can be used to
access the Applications, but the HyperTerminal
software provides a well-proven tool for Windows
OS users.
Note: All screen captures in this document were
taken via the HyperTerminal software.
6 E-Link Gateway Commissioning and Troubleshooting Technical Bulletin
Page 7

Password
Access Levels
5555
General access to all FSP functionality.
You can make queries into the E-Link
Gateway for troubleshooting activities.
Any changes are not saved to flash
memory.
1111
Gains access to User Report 1
2222
Gains access to User Report 2
3333
Gains access to User Report 3
4444
Gains access to User Report 4
Set the terminal emulation software to the following
settings once the computer and E-Link Gateway are
connected:
Baud rate = 57,600
Parity = None
Data format = 8 bits, 1 stop bit
Set terminal for Half Duplex mode of operation
Set for a linefeed after a carriage return
System Levels
A system of hierarchical levels offers access to the
FSP of an E-Link Gateway. There are four primary
system levels:
Advisory Level
Feature Level
Section Level
Page/Data Entry Level
Access all FSP data via a series of key presses from
a terminal.
All commands consist of lowercase characters.
Uppercase characters are reserved for text entry.
Commands are executed by pressing the <CR> key.
Logging On
Once the terminal program has been activated, you
can then establish a session with the E-Link
Gateway. Send either a logon or login command to
initiate the session.
The program prompts you to enter a password upon
entering the logon/login command. You can use the
general password (default 5555) to investigate the
system for general troubleshooting activities.
Additional passwords are available for logon access.
Table 7 summarizes the available passwords,
access levels, and functionality.
Table 7: Password Access Levels
Advisory Level
The Advisory Level is the default of the E-Link
Gateway and consists of the unit name, the current
date/time, and one of the following messages:
System Unconfigured
System Halted
System Monitor
Only these operations may be performed at Advisory
Level:
Password Access
Alarm review (not applicable for standard E-Link
Gateway operation)
Terminal Command Structure
The E-Link Gateway’s terminal command set is
based on two types of commands: base commands
and extended commands.
Base commands comprise a single character and
provide the basic navigation through the E-Link
Gateway. They can also take the form of a string of
base command characters.
Extended commands comprise complete words and
provide more flexible methods of interrogating the
E-Link Gateway. Extended commands cannot be
strung together.
Once a session is activated, there are two ways to
terminate the session. The first way is simply to
execute the logout or logoff command. Invoking
either of these results in the following action by the
E-Link Gateway:
Link closed
Reversing database changes...
Restarting system...
The second way to terminate the session is a period
of inactivity. If there is no keyboard activity for
20 minutes, the session expires and you must log on
again.
Help Command
The help command (Figure 10) accesses the E-Link
Gateway’s help screen and is accomplished by
typing help at the prompt. Users can invoke the help
command any time they are at the prompt.
E-Link Gateway Commissioning and Troubleshooting Technical Bulletin 7
Page 8
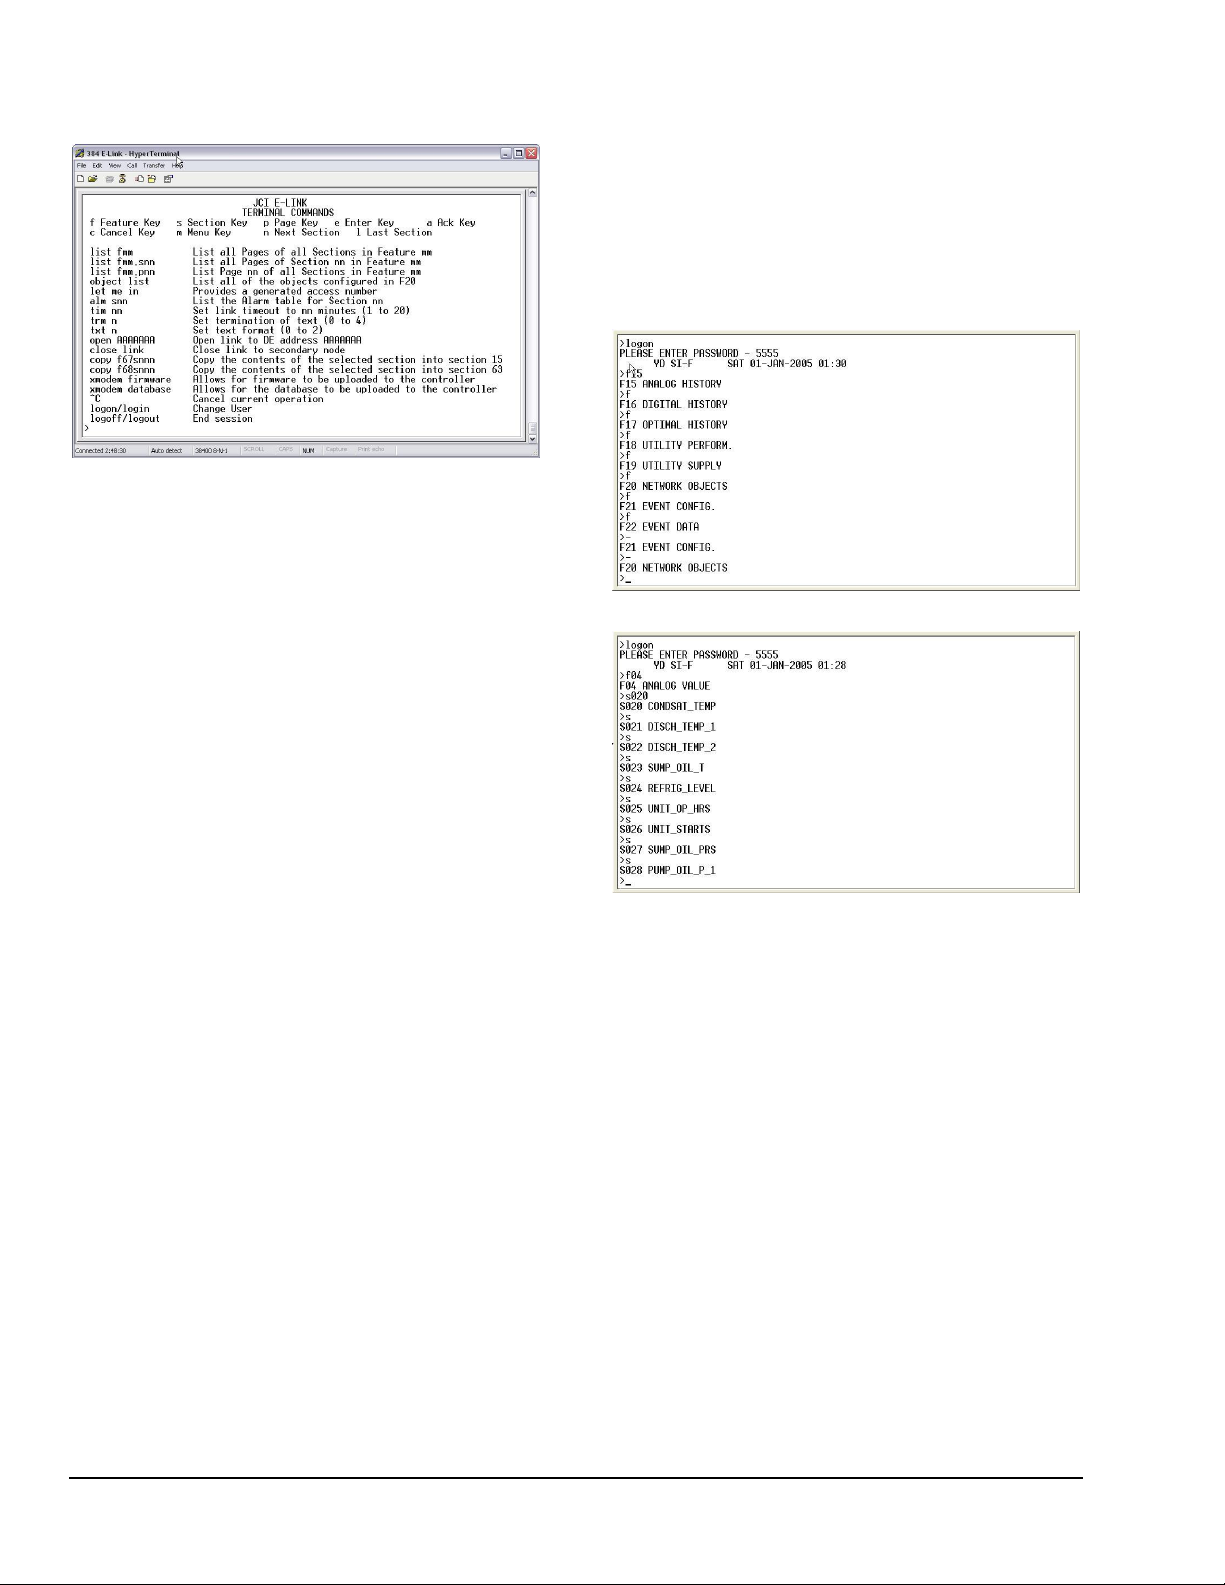
Figure 10: Terminal Commands
General Navigation Commands
The E-Link Gateway’s Terminal interface supports a
series of easy-to-use generic commands that allow
access to the hierarchically presented data. Data in
the E-Link Gateway is addressed by referencing a
Feature, a Section, and a Page.
The section cycles back to section 1 upon reaching
the maximum section of a particular feature. If you
enter a section number beyond the limit of a
particular feature, then you are prompted with error
07 – Section number out of range.
Figure 11 and Figure 12 show two basic ways of
viewing different Features and Sections.
Figure 11: Features List
Basic FSP commands can be appended to achieve
a higher degree of functionality. This guide focuses
on the fundamentals, as these are sufficient to
enable all functions. As you become more familiar
with the navigation, more elaborate sequences can
be used.
You can only access the E-Link Gateway’s features
after entering a valid password. Although the
password can be changed in F60, the E-Link
Gateway’s Applications do not allow you to save the
password; therefore, the default password 5555 is
always valid.
Feature Command
Feature Command (f) – The feature command can
be issued in two ways. The first method is to enter
fnn, where nn is the specific two-digit feature
number.
The second method is to type f, which advances the
Application to the next feature in sequence. The
feature cycles back to F01 upon reaching F99. You
can type a minus symbol at the Feature level to
select the previous feature.
Section Command
Section Command (s) – The section command can
be issued in two ways. The first is simply to enter the
command snnn, where nnn is the specific three-digit
section number.
The second method is to type s, which advances the
Application to the next section.
Figure 12: Sections List
You can type a minus symbol at the Section level to
select the previous section.
Page Command
Page Command (p) – The page command can be
issued in two ways. The first is simply entering pnn,
where nn is the specific two-digit page number. The
number of valid pages per section varies by the
particular feature that has been selected.
If you select a page number beyond the limit of a
particular section, then you are prompted with
error 08 – Page number out of range.
The second method is to type p. The E-Link
Gateway advances to the next page in sequence of
the currently selected feature and section. Upon
reaching the last page for a particular section, the
page cycles back to page 1. You can type a minus
symbol at the Page level to select the previous
page.
8 E-Link Gateway Commissioning and Troubleshooting Technical Bulletin
Page 9
“t…......t”
Represents an ASCII text entry.
“v……v”
Represents either a Real or an Integer
value.
Real Value: 8 digits may be entered.
A decimal point or minus sign reduces
the effective length by 1.
Integer Values: Only positive values
are accepted. If a Real Value is
entered, error 02 – Invalid data is
returned.
“ssss”
Represents a point address (for
example, 4001 or 3064).
“m…m”
Represents a menu selection (for
example, ON, OFF, FIR).
Enter Command
Enter Command – The Enter command is issued to
begin editing a particular field in a given Feature,
Section, and Page. The editing process follows the
following steps:
1. Issue the required FSP command to bring the
required page into focus.
2. Type e and press Enter. The page is returned as
before except that the contents of the
user-enterable data field are replaced with an
appropriate data entry prompt (see Table 8).
Table 8: Data Entry Prompts
If you need to adjust one of these fields, the m
command cycles through all available enumerations.
Next Section Command
Next Section Command (n) – The n command takes
you to the next section of the selected feature. The
command can be used to examine the same page
across multiple sections.
For example, viewing p07 (Defaults and Engineering
Units) on all F04 objects could be done by first
viewing p07 then typing n and pressing enter for the
number of sections that need to be viewed.
Other Commands
Last Command (l) – The l command takes you to the
last section of the current feature.
List Command – This command is used to view a list
of E-Link Gateway parameters sorted by the way the
command is constructed. For example:
list f04 – This command lists all Pages of all
Sections in F04 (Figure 14).
Once you edit a field, type e and press Enter to
close it. Some pages have multiple editable fields,
which are sequentially opened and closed using e.
Figure 13 illustrates the editing sequence for all data
types. It also shows how the e command is used to
open an edit session, move through all available
editable fields, and close the session.
Figure 13: Editing Sequence
Menu Command
Menu Command (m) – The menu command selects
the next selection of the menu enumeration. Certain
fields are menu-driven, depending on the feature.
Figure 14: List of All Pages of All Sections
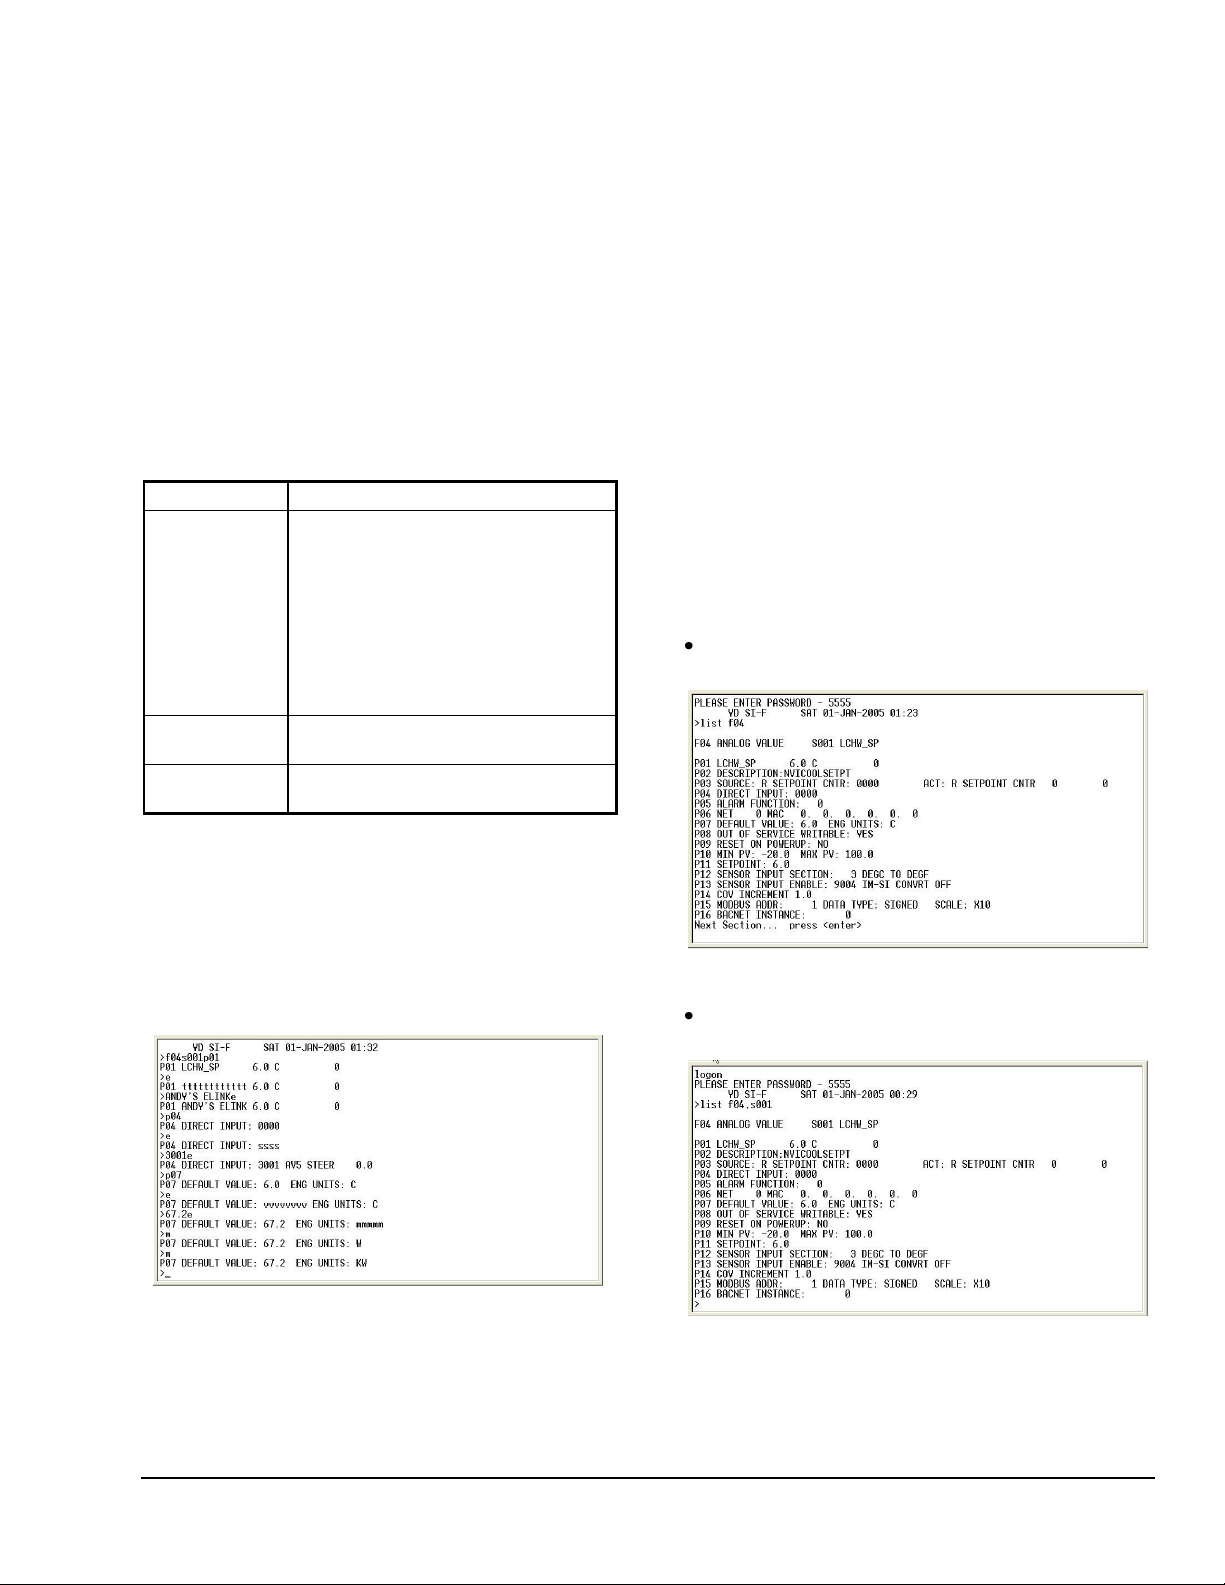
list f04,s001 – This command lists all Pages of
Section 001 in Feature 04 (Figure 15).
Figure 15: List All Pages of Section 001 in
Feature 04
E-Link Gateway Commissioning and Troubleshooting Technical Bulletin 9
Page 10
Transfer
list f04,p01 – This command lists Page 01 of all
Sections in Feature 04 (Figure 16).
Figure 16: List Page 01 of All Sections in
Feature 04
Note: Enter Control+C (^C) to terminate any List
Command.
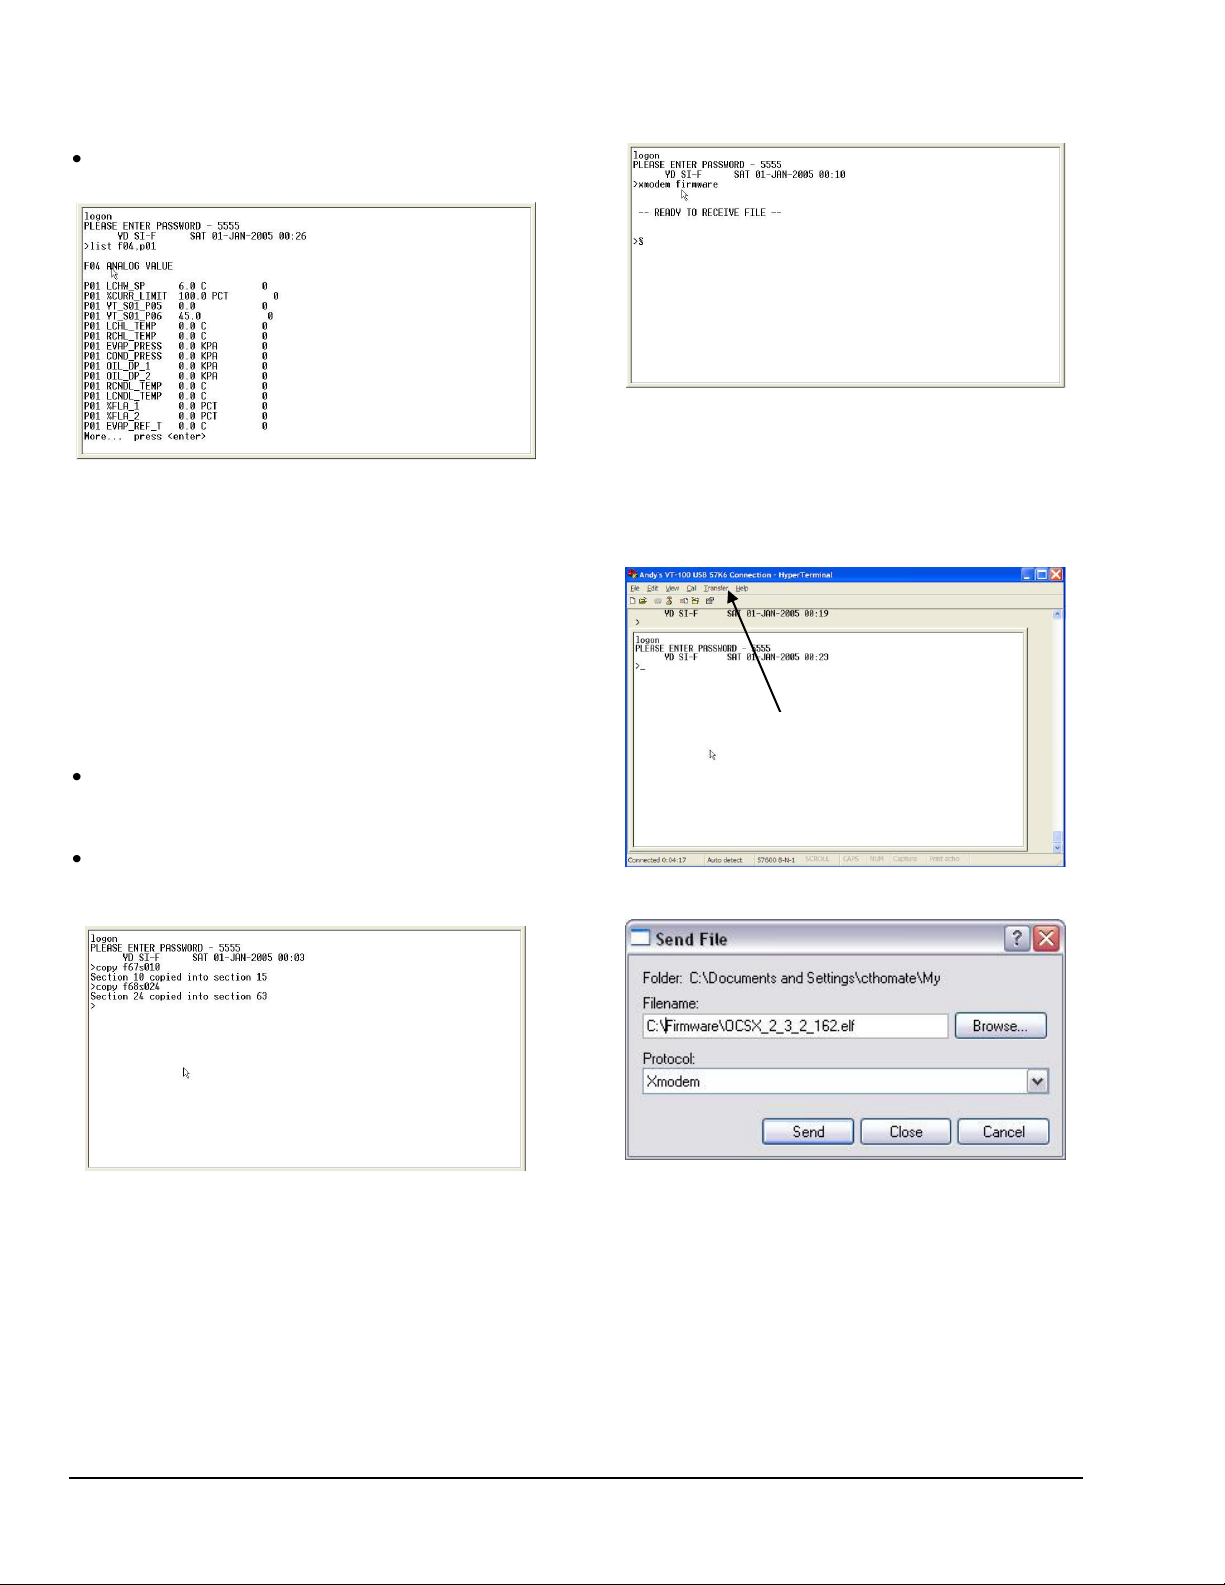
Copy Commands
Two commands are used to copy the contents of a
given Quick Start section of either F67 or F68 into
the last available section supported by that Quick
Start feature (Figure 17). (See the Quick Starts
section for additional information.)
Figure 18: X-Modem Firmware
The HyperTerminal software has a Transfer
selection that allows you to access a Send File
window (Figure 19 and Figure 20). The filename
(*.ELF) and desired protocol (Xmodem) must be
entered in this window.
copy f67snnn is used to copy the contents of
section nnn (where nnn is the three-digit section
number) into section 15, the last section of F67.
copy f68snnn is used to copy the contents of
section nnn (where nnn is the three-digit section
number) into section 63, the last section of F68.
Figure 17: Copy Commands
X-modem Firmware
The E-Link Gateway Firmware can be re loaded in
the field using a VT-100 terminal session. The
command for initiating the load is xmodem
firmware.
Figure 19: Transfer Option
Figure 20: Send File Window
Figure 21 shows the progress of transferring data to
the E-Link Gateway.
A prompt indicates when the E-Link Gateway is
ready to receive the Firmware file (Figure 18).
10 E-Link Gateway Commissioning and Troubleshooting Technical Bulletin
Page 11
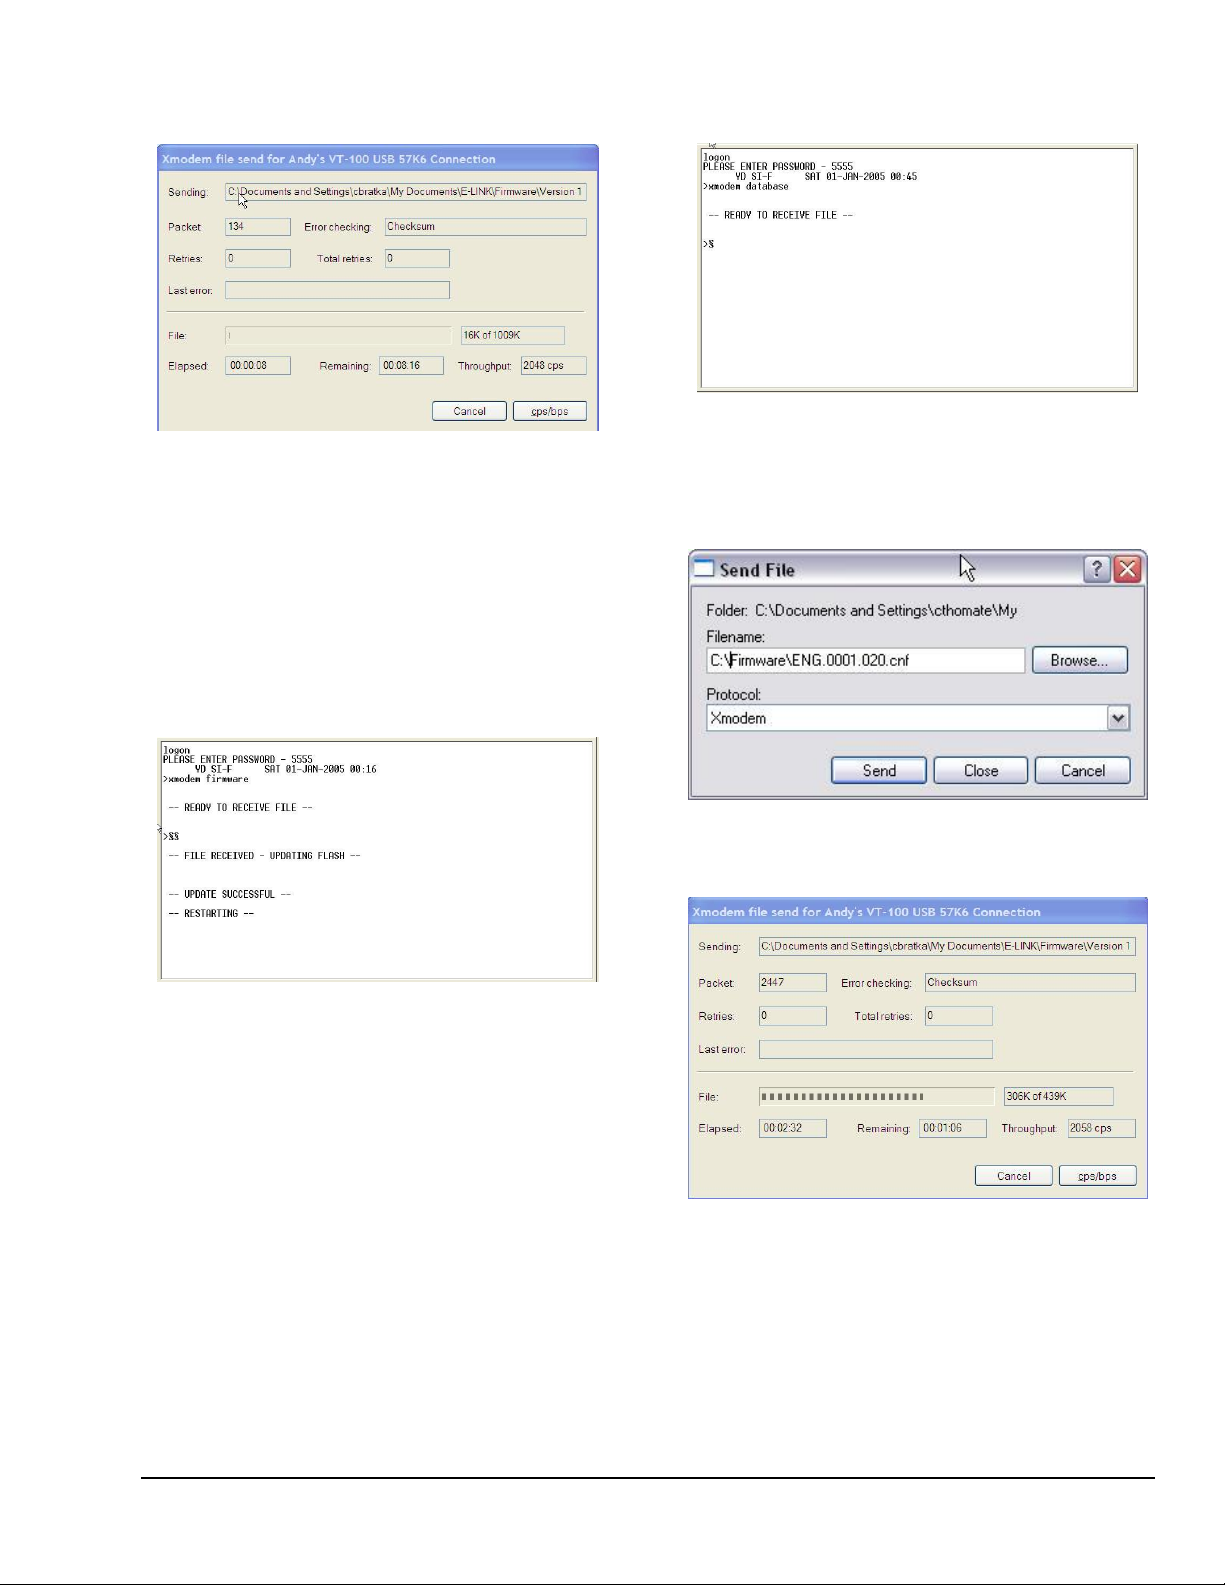
Figure 21: Data Transfer Progress
The system writes the new file to flash memory and
then restarts after the E-Link Gateway receives the
completed Firmware file. The current session is
closed because the E-Link Gateway is going through
a warm start.
Figure 21 shows the HyperTerminal software
feedback during the process of updating the
Firmware. You must wait until RESTARTING
appears and the E-Link Gateway has reset to
perform any other tasks.
Figure 23: Ready to Receive File Message
The HyperTerminal software has a Transfer
selection that allows you to access a Send File
window (Figure 24), in which the filename (*.CNF)
and desired protocol (Xmodem) must be entered.
Figure 24: Send File Window
Figure 25 shows the progress of transferring data to
the E-Link Gateway.
Figure 22: Messages during Firmware Update
X-modem Database
The E-Link Gateway’s Application can be reloaded
in the field through a VT-100 terminal interface. The
command for initiating the load is xmodem
database. You are prompted when the E-Link
Gateway is ready to receive the Application file
(Figure 23).
E-Link Gateway Commissioning and Troubleshooting Technical Bulletin 11
Figure 25: Data Transfer Progress
The system writes the new file to flash memory and
then restarts after the E-Link Gateway receives the
completed Application file. The current session is
closed because the E-Link Gateway is going through
a warm start.
Page 12

Object ID
Engineering
Units
Present
Value
Object Name
NV Name
Figure 26 shows the HyperTerminal software
feedback during the process of updating the
Application. You must wait until the RESTARTING
message appears and the E-Link Gateway has reset
to perform any other tasks.
Figure 26: Messages during Application Update
Object List Command
The object list command requires an established
VT-100 session to be active. The object list
command is used to display all the objects that have
been activated in F20 (Figure 27).
Figure 28: Let Me In Command
Quick Starts
Quick Start is the method used in the field to set up
and configure the operation of the E-Link Gateway.
The desired modes of operation are selected on two
DIP switches. Each bank of switches is used to
invoke a specific behavior.
APP GROUP A switches are used to select the
required equipment profile. APP GROUP B switches
are used to select the desired output protocol. The
binary weight of each switch (its address) is
associated with a unique instance of two Application
editor features.
Figure 27: Object List Command
Let Me In Command
The let me in command is used to generate an
access code which can be used to obtain a
password from an authorized support center. The
system creates a password that stays active for a
period of 120 minutes after the command is entered.
Figure 28 shows the different codes that are
generated each time the let me in command is
entered.
Two features (F67 and F68) are associated with
APP GROUP A and APP GROUP B and allow you
to create a script that, when executed, modifies the
E-Link Gateway’s base configuration.
Base Configuration
The base configuration is contained within the
factory-installed Application and is designed to set
up objects (Features) within the E-Link Gateway that
can later be modified by executing a Quick Start.
The E-Link Gateway does not use Battery Random
Access Memory (BRAM); so any time the power is
cycled, the base configuration that is stored in flash
memory is copied into Synchronous Dynamic
Random Access Memory (SDRAM) ready for
execution. Therefore, there is always a known
starting point for the Quick Start features to work
from.
Quick Start Execution
To invoke a Quick Start, set a desired address on
the Application switches and press a momentary
invoke push button or cycle power. When this action
occurs, the base configuration is loaded from flash
memory into SDRAM, and then modified according
to the Application edits that are associated with the
selected Quick Start settings.
12 E-Link Gateway Commissioning and Troubleshooting Technical Bulletin
Page 13

Code
Meaning
“ ”
Nothing has been configured.
“OK ”
The script has been configured
correctly (the specified address
and the entered data are
compatible).
“INVALID FEATURE”
An invalid Feature number has
been entered, or the specified
feature does not exist or does
not contain any user-editable
data.
“INVALID SECTION”
An invalid Section number has
been entered, or the specified
section does not exist or does
not contain any user-editable
data.
“INVALID PAGE”
An invalid Page has been
entered.
“INVALID FI”
An invalid Field has been
entered.
“INVALID WRITE”
There is a data type mismatch
between the referenced point
and the configured value.
“INVALID DATA”
There is a data type mismatch
between the point being
referenced and the configured
value.
In most cases, the base configuration has all the
desired objects fully configured but disabled. The
Quick Start feature creates the desired functionality
by enabling the required functionality in the objects.
Every time a new Quick Start is invoked, the
unedited base configuration is reloaded from flash
memory before being modified by the Quick Start
script.
Quick Start features F67 and F68 use a collection of
one-line statements that can be programmed to alter
the contents of the Base Configuration. There is a
simple correspondence between the feature’s
section number and the binary weight of the
Application switch.
For example, if APP Group A switches are set to 4,
then the script defined in Section 4 of F68 is
executed, and it determines the equipment port’s
behavior. If APP Group B switches are set to 10,
then the script defined in Section 10 of F67 is
executed, and it determines the output protocol that
is used.
F67 (Quick Start Protocol) and F68 (Quick Start
Profile)
P01 TT…TT ENABLE PTS SSSS SSSS SSSS
SSSS
The enable points in F67/F68 are designed to allow
you to programmatically control the execution of a
particular Quick Start section. When ALL
configured ENABLE Points are ON, then that
particular F67/F68 Quick Start is executed. You may
configure one, two, or all three of the enable points.
Only the configured ENABLE points need to be ON
for the section to be enabled. If any F70 continuation
sections are assigned to this F67/F68, they are also
activated the same way as the initial switch settings
would have activated them.
For example, F02, S001, P01, Fi1 = OUTSIDE AIR,
assigns OUTSIDE AIR to the F02 object’s name.
If the referenced E-Link Gateway Property is a real
number (such as an object’s Relinquish Value), and
if the text section of the statement is of the form X.X,
the text value is converted into an Intel Real number
and replaces the value of the Relinquish value
property. For example, F04, S001, P07, Fi2 = 23.4,
assigns 23.4 to be the F04 object’s Relinquish Value
property.
If the E-Link Gateway Property is an integer or
enumeration, such as an object’s engineering units,
and if the text section of the statement is of the form
X, then the text value is converted into an integer
and applied to the current engineering unit selection
property. For example, F04, S001, P01, Fi 3 = 4,
assigns ohms to the F04’s object’s engineering
units.
Each line of the script has an associated status that
informs the users whether the script has any syntax
errors. If OK appears, then the script has been
correctly configured and executes. The errors shown
in Table 9 can be reported.
Table 9: Data Entry Prompts
A generic F67/F68 Quick Start statement is as
follows:
FNN SNNN PNN FINN = TTTTTTTTTTTT S..S
The Feature, Section, Page, and field (Fi)
parameters are used to uniquely identify any piece
of editable RAM resident data within the E-Link
Gateway. The 12-character ASCII string defines
what data should be assigned to the selected
property. S..S represents the status of this line of
script.
If the referenced E-Link Gateway Property is a
character string, such as an object’s name or
descriptor, then whatever has been configured in the
text section on the right side of the statement
overwrites the current contents.
The number of possible scripts contained by each of
the Quick Start features is shown in Table 10.
E-Link Gateway Commissioning and Troubleshooting Technical Bulletin 13
Page 14

F67 ~ Protocol
F68 ~ Equipment Profile
20 Pages (scripts)
98 Pages (scripts)
F68
Sect #12
F70 , Sect #1
F68, Sect #12
F70, Sect #2
F68, Sect #12
Table 10: Data Entry Prompts
ENABLE Points can be selected with an F67/F68
section designated, but they are not acted upon
while the F70 has either an F67 or an F68 section
configured.
If the number of scripts supported by the standard
Quick Start feature is not enough to support the
desired behavior, then you can use the Continuation
feature to extend its capacity.
F70 Quick Start Continuation Feature
The Quick Start continuation feature is designed to
provide you with the ability to increase the number of
F67 or F68 Quick Start profile scripts that can be
executed.
The feature is organized in the same way as F68 or
F67, but in addition to the script pages, it has two
steering addresses located on P01. This allows it to
be associated with other F67 or F68 sections, which
extend the overall script capacity that can be
executed for a given Quick Start setting.
The size of the F70 script text field has been
increased to 30 characters, allowing the automatic
manipulation of data (such as the object names of
F01, F04, and F06), which have also been increased
to 30 characters in length. The state text in F01 can
also be manipulated by using this extended scripting
capability.
The Continuation feature is no more than a place
holder for scripts that may be chained together with
other F67 and/or F68 sections.
P01 allows an F67 or an F68 section number to be
entered that associates that particular F70 section
with another section of F67 or F68.
If several F70 sections have the same section
number configured, then they collectively form an
expanded script that consists of the original F67 or
F68 section followed sequentially by any others that
have been referenced within F70 sections.
For all F70 sections where the F67 and F68 section
selections are not designated, and if ALL configured
ENABLE Points are ON, then that corresponding
F70 Quick Start is executed.
For the ENABLE Points, the Quick Start is only
activated once, upon first seeing all designated
ENABLE Points as ON. The operation resets only
Custom Quick Start
A user logged on with a level 5 password may edit
any single section of F67 and F68. The let me in
command is used to generate a password for saving
these changes to flash memory.
Only F67 Section 15 and F68 Section 63 are able to
be saved in this way. To assist with this process, two
commands are available to copy an existing Quick
Start script into the last section of each of these
features. By using these commands, the amount of
required data entry is minimized.
Two commands are used to copy the contents of a
given Quick Start section of either F67 or F68 into
the last available section supported by that Quick
Start feature:
copy f68snnn copies the contents of the
after ALL designated ENABLE PTS are OFF.
Validation has been added to F70, P01 so that the
F67 and F68 sections cannot be set if any ENABLE
Points are configured.
14 E-Link Gateway Commissioning and Troubleshooting Technical Bulletin
copy f67snnn copies the contents of the
Figure 29: F70 Assigning F68 Continuations
selected section of this feature into the last
custom section (that is, section 63).
selected section of this feature into the last
custom section (that is, section 15).
Page 15

Flash Rate
Indication
LED OFF
No Application loaded. The E-Link
Gateway is not configured, the system
is in HALT or MONITOR mode, or the
loaded Application does not match the
host hardware.
(The green Power LED should be used
as an indication of whether power is
currently applied.)
1 FLASH
Terminal mode has been invoked.
2 FLASHES
The communication between the
E-Link Gateway and the equipment
using F54, F65, and F66 has been lost.
3 FLASHES
A F67 or a F68 configuration error has
been detected.
LED ON
Set during rebooting. No errors
received with an F67/F68 patched
Application or with a custom SIS
developed Application.
Continuous
FLASH
No errors with the standard Factory
loaded Application. The E-Link
Gateway is operating as expected.
After selecting the Quick Start that requires editing,
and copying it into the last section of F68 and or F67
using the previously described commands, you can
then make functional changes by editing an existing
line of script or adding new script lines.
To invoke a Custom Quick Start, set the APP Group
A and/or APP Group B switches to 63 and 15,
respectively. The E-Link Gateway resets.
Algorithmic Password
If you type let me in when connected to an
E-Link Gateway in Terminal mode, the system
generates an access string and automatically
creates and stores a password that allows any
custom Quick Start to be saved to flash memory.
Concurrently with this process, the system starts a
120-minute down-timer which, on expiration,
terminates the validity of the generated password. If
you type let me in during the countdown period, the
system automatically terminates the active
password, requiring another password to be
generated.
LED Operation
The E-Link Gateway uses a series of LEDs to
provide a visual indication of its current operating
status. The IPU-II has a Power and Status LED, and
the SIM has two LEDS assigned to each port.
The green Power LED indicates that the E-Link
Gateway is supplied with an input source of power. It
does not indicate that this voltage source is within
specification to allow the E-Link Gateway to operate
correctly, just that a power source is present.
The red Status LED is used to indicate the E-Link
Gateway’s operating conditions (as shown in
Table 11). The Status LED flashes continuously
when the system is operating correctly. This flash
rate is defined as 500 ms on, followed by 500 ms off.
An error flash rate is defined as code sequence of
500 ms on, followed by 500 ms off to indicate the
applicable code, which is then followed by a 2,000
ms delay before the sequence is repeated.
Table 11: Status LED (Red) Flash Rate Indicators
The Status LED flashes quickly when the Quick Start
activation push button is pressed, which indicates
you have requested the E-Link Gateway to be
reinitialized. The Status LED is set to on when the
push button is released, which indicates a reboot.
Each Port has an associated green and red LED,
which are used to indicate the port’s communication
status. The LEDs are connected directly to the
driver’s hardware lines and are therefore a reflection
of the electrical activity of that port.
When the green RX LED is on, it indicates that this
Port is receiving data electrically. It does not imply
that the quality of this data is good or whether it is
actually being directed to this Port. In an RS-485
Application, the green RX LED is an indicator of all
network activity. When the green RX LED is off, it
indicates that the Port is not receiving any data.
When the red TX LED is on, it indicates that this Port
is transmitting data electrically. It does not imply
that the quality of this data is good. It simply means
that this Port is outputting data. When the red TX
LED is off, it indicates that the E-Link Gateway is not
transmitting any data.
E-Link Gateway Commissioning and Troubleshooting Technical Bulletin 15
Page 16

User Reports
Password
User Report
1111
(1) BACNET BAS PARAMETERS
2222
(2) YPAL DEST DE
3333
(3) MODBUS SCALING and
EQUIPMENT INTERFACE
4444
(4) GENERAL DIAGNOSTICS and
PORT CONFIGURATION
P01
DE INSTANCE:
VVVVVVV
MMMM
Fi1
Fi2
Fi3
User reports allow you to edit advanced site-specific
parameters that are not set within a Quick Start
selection (for example, the setting of Max Managers
or Device object instance).
To access the User reports, you must establish a
physical connection and terminal session with the
E-Link Gateway. Once the terminal connection is
established, type logon and press Enter. The E-link
Gateway responds with PLEASE ENTER
PASSWORD.
Table 12 shows the valid passwords and
corresponding user types:
Table 12: Valid Passwords and User Reports
Once the password has been entered, the E-Link
Gateway responds with:
USER USER n (n = 1, 2, 3, or 4)
TT….TT (name of the report)
Figure 30: BACnet Parameters
P01, Fi2 is used to manually set the Device Object
address in circumstances when the automatically
created device address is not suitable. This
circumstance may occur because the address is not
unique or because the site requires some particular
numbering policy.
Table 13: P01 Fi Descriptions
TT … TT (name of report)
Select Option
>
Enter 1 or 2 and press Enter to view a list of all the
pages of the selected report.
Any changes that are made in any of the reports are
saved to flash memory once you have logged off
from the report or the report has timed out.
User Report 1 allows certain BACnet BAS
parameters to be viewed and edited. These
parameters are primarily used to facilitate on-site
setup, avoid protocol conflicts (the same addresses),
or optimize network performance (adjust timeouts).
Figure 30 shows all the BACnet BAS parameters
that may be user-adjusted in the report.
P01, Fi3 normally defaults to AUTO, which creates
the address automatically, but it may be changed to
MAN allowing you to enter a manual address in Fi2.
If Fi3 is set to AUTO, the DE instance is created
algorithmically by adding the unit’s MAC address to
the value of the DE Modifier multiplied by 100.
So, Fi2 = DE Modifier x 100 + nnn where nnn is the
MAC address switch setting.
For example, if the unit’s MAC address is 3, and the
DE Modifier is 50, then the DE instance is
(50x100) + 3 = 5003.
If Fi3 is set to MAN, the DE instance must be
entered manually in field 2. Valid entries must be in
the range 0 to 4,194,303 decimal.
If the entry in Fi2 is > 4,194,303, then the value is
forced to 0.
16 E-Link Gateway Commissioning and Troubleshooting Technical Bulletin
Page 17

P02
DE NAME
TT….TT
MMMM
Fi1
Fi2
Fi3
P03
LOCATION
TT..TT
Fi1
Fi2
P04
DESCRIPTION
TT..TT
Fi1
Fi2
P05
APDU TIMEOUT
VVVVV
Fi1
Fi2
P06
DESCRIPTOR PROPERTY
VISIBLE
MMM
Fi1
Fi2
P07
MG BACKWARD COMPATIBLE
MMM
Fi1
Fi2
P02 is used to manually set the E-Link Gateway’s
BACnet name in situations where there may be
duplication or the site policy dictates this.
Table 14: P02 Fi Descriptions
Fi3 normally defaults to AUTO, which creates the DE
NAME automatically. The DE NAME can be
changed to MAN allowing you to enter a
user-created name, in Fi2.
If Fi3 is set to AUTO, then the Device Object’s name
is created algorithmically by appending the text
entered in F60, P01 and the controller’s DE
instance. This action provides network uniqueness
as required by BACnet.
P02, Fi2 = F60 P01 (text) + VVVVVVV (DE Instance)
For example, if the DE Instance is 5003 and the text
entered on P01 of F60 is YPAL RTU, then the
Device Object’s name is YPAL RTU 5003.
If Fi3 is set to MAN, then the DE NAME must be
entered manually in field 2. A valid entry is any
alphanumeric string of no more than 20 characters.
P03, Fi2 is a text placeholder that allows you to
define the Location of the E-Link Gateway. This
BACnet property can be retrieved by requesting the
Location property of the Device Object.
Table 15: P03 Fi Descriptions
If you enter 0, this value is automatically set to
3,000. If you enter any value less than 500, it is set
to 500, and any value greater than 60,000 is reset to
60,000.
Table 17: P05 Fi Descriptions
P06, Fi2 is a user-adjustable value to enable (YES)
or disable (NO) the use of BACnet Descriptor
Property. The default is NO. The use of the
LONWORKS BAS protocol automatically sets the
default state to enable (YES).
Table 18: P06 Fi Descriptions
P07, Fi2 is used to determine if the selected Quick
Start profile should be backward compatible with the
MicroGateway’s BACnet implementation of
Multi-State Value objects, and its support of the
Modbus Function 17 service. In most cases, the
answer is NO (disabled), which is the default
selection in this report. However, for old equipment
profiles, set this flag to YES (enabled).
Table 19: P07 Fi Descriptions
P04, Fi2 is a text place holder used to define the
E-Link Gateway’s Application. This BACnet property
can be retrieved by requesting the Description
property of the Device Object.
Table 16: P04 Fi Descriptions
P05, Fi2 is used to configure the time in milliseconds
after which a returning acknowledgement (a simple
ACK) or result (a complex ACK) is considered to
have failed. The default value of this parameter is
3,000, but can be edited to any value between 500
and 60,000. To ensure optimum network
performance, this parameter should be set to the
same value in all intercommunicating devices.
P08 is non-adjustable; it is for information only. It
tells you all port configuration changes are to be
performed in User report 4, 02 Port Config Section.
E-Link Gateway Commissioning and Troubleshooting Technical Bulletin 17
Page 18

P01
F65S001 DEST DE ADDRESS
VVVVVVV
Fi1
Fi2
P02
F65S002 DEST DE ADDRESS
VVVVVVV
Fi1
Fi2
P03
GROUP DEST DE ADDRESS
VVVVVVV
Fi1
Fi2
USER REPORT 2 is used to set the BACnet
address of the YPAL unit.
Figure 31 shows the YPAL BACnet address
configuration screen.
Figure 31: YPAL BACnet Address Configuration
P01 and P02 of this report are used to configure
F65’s section 1 and section 2 addresses. These
addresses define the BACnet address of the YPAL
unit.
This address is used by F57 (the Group feature) and
the F28 (Analog Transfer feature) to determine
where to send the data.
Table 22: P03 Fi Descriptions
USER REPORT 3 provides a mechanism of altering
the Modbus RTU scaling of chiller parameters (run
hours and number of starts), as well as editing the
timeouts for F66 Modbus clients.
After an extended period of run time, certain chiller
variables can exceed the maximum resolution of a
Modbus RTU Register (65,353). To mitigate this, you
can scale the value appropriately. For example,
selecting X0.1 effectively divides the number of run
hours or starts by 10, and extends the maximum
value that can be represented.
Figure 32 displays the available Modbus RTU
reports that can be generated using password 3333.
Table 20: P01 Fi Descriptions
Table 21: P02 Fi Descriptions
These pages must be set up the same way, as they
are used to identify the YPAL on the BACnet
network. F65 uses this address in the BACnet
device auto discovery process (WHO IS --- I-AM
transaction).
Both P01, Fi2 and P02, Fi2 enable you to enter a
number between 0 and 4,194,303 that represents
the YPAL’s Device Object address. Each BACnet
device must have a unique Device Object address
on the network.
P03, Fi3 is used to set the destination address of the
YPAL, to which write commands are sent. This
address must be the same as P01 and P02.
Figure 32: Available Modbus Reports
Figure 33 - Report Option 01 - displays the Modbus
RTU scaling parameters that can be field-modified to
change the resolution of the equipment YORK Talk
Section 1 Modbus Points.
18 E-Link Gateway Commissioning and Troubleshooting Technical Bulletin
Page 19

P01
–
P09
YT-S1, P022, M016, 4016SCALE:
MMMMMMM
Fi1
Fi2
Offset
Selection
Function
0
X10
Multiply the value by 10
1
X100
Multiply the value by 100
2
X1000
Multiply the value by 1000
3
X1
Multiply the value by 1
4
X0.1
Multiply the value by 0.1
5
X0.01
Multiply the value by 0.01
6
X0.001
Multiply the value by 0.001
7
X0.0001
Multiply the value by
0.0001
Table 24: Multipliers
Figure 33: YT Section 1 – Modbus RTU Scaling
Figure 34 - Report Option 02 - displays the Modbus
RTU scaling parameters that can be field-modified to
change the resolution of the equipment YORK Talk
Section 2 Modbus Points.
Figure 34: YT Section 2 – Modbus RTU Scaling
For both 01 and 02 report selections, P01 through
P09 represent the Modbus RTU scaling that is
applied to the corresponding YORK Talk
engineering Pages and returns the scaled value to a
Modbus RTU client.
Figure 35 - Report Option 03 - displays the Modbus
RTU scaling parameters that can be field-modified to
change the equipment interface Modbus
communication timeout parameter.
Figure 35: Modbus Equipment Interface
P01 through P05 are user-adjustable values for the
F66 Modbus RTU Timeout Property. The default is
set to 250 ms.
P06 is a user-adjustable value to set the MODBUS
addressing schema F02, F04, and F06 points and
how the gateway responds to the BAS system for
MODBUS registers that are not mapped in the
equipment database. The selections are:
Table 23: P01 through P09 Fi Descriptions
For P01 through P09, Fi2 enables you to select a
scaling factor that may be selected. Table 24 shows
the available multipliers for the scaling factor.
MANUAL, the default value, sets the MODBUS
addressing schema to the manual addressing
that is set in the F02, F04, and F06 points; with
an "error" returned to the BAS system for any
MODBUS registers not mapped in the
equipment database.
E-Link Gateway Commissioning and Troubleshooting Technical Bulletin 19
Page 20

ALGORITHMIC sets the MODBUS addressing
P01
REF
TT..TT
Fi1
Fi2
P02
CUSTOM DATABASE
MMM
Fi1
Fi2
P03
FIRMWARE REV
2.3.2.163-A
Fi1
Fi2
P04
FIRMWARE RELEASE DATE
16-SEP-07
Fi1
Fi2
schema to the use algorithmic MODBUS
addressing for the F02, F04, and F06 points;
with an "error" returned to the BAS system for
any MODBUS registers not mapped.
MANUAL LEGACY sets the MODBUS
addressing schema to use manual MODBUS
addressing that set in the F02, F04, and F06
points; with a value of "0" returned to the BAS
system for any MODBUS registers not mapped
in the equipment database.
P07 is non-adjustable; it is for information only. It
tells you all port configuration changes are to be
performed in User report 4, 02 Port Config Section.
USER REPORT 4 is the Support report and is
specifically designed to assist with the debugging
process. It provides a convenient location for
Firmware versions, released dates, and general
status information. It provides a combination of both
editable and non-editable pages.
Within this user access level, there are two reports
that can be selected: General Diagnostic and Port
Configuration.
Figure 37: General Diagnostic Report Parameters
P01, Fi2 is used to document an SIS custom
Application or a local Technical or Field Support
Center (FSC) sanctioned bug fix. Fi2 allows you to
enter a 30-character text string. This text represents
an FSC incident number, an SIS reference number
(CMS [Contract Management System] number), or
possibly a Purchase Order (PO) number.
Table 25: P01 Fi Descriptions
Figure 36 shows the available reports that can be
generated using password 4444.
Figure 36: Password 4444 Reports
General Diagnostic Report
Figure 37 – Report Option 01 - displays all the
parameters contained in the General Diagnostic
report.
P02, Fi2 indicates whether a custom SIS created
Application is currently active. This flag can only be
set in F50, P45 by a developer using the E-Link
Gateway’s Manager password. This flag cannot be
set in the Field as a result of a FSC bug fix.
Table 26: P02 Fi Descriptions
P03 and P04 display the revision and the date when
the Firmware was compiled and released.
Table 27: P03 Fi Descriptions
Table 28: P04 Fi Descriptions
20 E-Link Gateway Commissioning and Troubleshooting Technical Bulletin
Page 21

P05 displays the Application Revision; this is the
P05
APPLICATION REVISION
ENG.001.023
Fi1
Fi2
P06
APP GROUP A:
MMM
Fi1
Fi2
P07
APP GROUP B:
MMM
Fi1
Fi2
P08
IM-SI CONVRT
MMM
Fi1
Fi2
P09
JCF REF
SSM3456JCF0005BL.BIN
Fi1
Fi2
P10
LON PROFILE
*.XIF
Fi1
Fi2
P01,05,
P08,P12
Ports,
1, 2, 3
and 4
MM
BPS
(P01)
ACT:
(P01)
MMMMM
(P01)
Fi1
Fi2
Fi3
Fi4
Fi5
revision of the Application and may be configured in
F45, P04, by a developer that has access to the E-
Link Gateway’s Manager password.
Table 29: P05 Fi Descriptions
P06 and P07 display the decimal value of APP
Group switch A and APP Group switch B,
respectively. These pages effectively announce
what Quick Starts are active.
Table 30: P06 Fi Descriptions
Table 31: P02 Fi Descriptions
Port Configuration Report
The Port Configuration report provides a status of all
the communication ports and a means of software
setting the configuration for each port. The switches
of the Protocol switch bank, switch bank B, must be
set to OFF for any changes in the ports to be
persistent. All port settings must be configured from
the User report due to the disabling of the automatic
setup by the protocol QS (all the switches set to
OFF).
Figure 38 – Report Option 02 - displays all the
parameters contained in the Port Configuration
report.
P08 displays a flag that indicates whether the
routine that converts imperial units to metric is
currently active. If Fi2 is set to OFF, then the routine
is currently inactive. This is important for LONWORKS
implementations.
Table 32: P08 Fi Descriptions
P09 displays the version of the JCF image at the
time the Application was created.
Table 33: P09 Fi Descriptions
P10 displays the LON PROFILE that is presently
active. This is a read-only field that is generated by
the type of equipment that has been Quick Started.
Table 34: P10 Fi Descriptions
Figure 38: Port Configuration Report
Where PNN = P01, P05, P08, and P12, the
parameters are used to display the currently
selected protocol on Ports 1, 2, 3, and 4,
respectively.
Table 35: P01 Fi Descriptions
E-Link Gateway Commissioning and Troubleshooting Technical Bulletin 21
Page 22

Table 36: Port Protocol Selections
Offset
Baud Rate
0
Terminal
1
Modbus I/O
2
LON
3
Modbus Server
4
API 5 Modbus Client
6
BACNET MS/TP
7
YORKTalk 3
8
YORKTalk 2 V6
9
YORKTalk 2 V4
10
YORKTalk 3 SRVR
11
YORKTalk 2 SRVR
12
N2
13
Disabled
141Monitor Port 1
151Monitor Port 2
161Monitor Port 4
P02,P06,P09,P13
Ports,1,2,3
and 4
BPS:
MMMMM
Fi1
Fi2
Fi3
Offset
Baud Rate
0
1200
1
4800
2
9600
3
19,200
4
38,400
5
57,600
6
76,800
7
AUTO (Port 1 Only)
P02,P05,P08,P11
PARITY:
MMM
SBITS:
M
Fi4
Fi5
Fi6
Fi7
Offset
Parity
0
NONE
1
EVEN
2
ODD
3
IGNR
Offset
Stop Bit
0
1
1
2
The captured file should then be sent to the Support
Group for processing.
Any selections of the monitor modes made with a
5555 password is automatically reversed after 60
minutes.
P01 - Fi3 through Fi5 are only used by Port 1. When
Fi2 is set to AUTO on P02, Fi5 is system generated
and displays the negotiated baud rate for Port 1.
When Port 1 is set to a baud rate other than AUTO
on P02, the selected baud rate is displayed.
The valid displayed baud rates for Port 1 are 1200,
4800, 9600, 19,200, 38,400, 57,600, and 76,800.
P02, P06, P09, and P13 display the baud rate,
parity, and stop bits that are assigned to the
communication ports.
Table 37: P02 – Fields Descriptions
1. These selections are for Port 3 Only.
Selections 14, 15, and 16 allow you to capture a
communication’s log of the specified port using a
terminal connected to Port 3.
When any of the Monitor Port selections are chosen,
Port 3 is set automatically to 57,600 baud, no parity,
and 1 stop bit. From this point forward, when Port 3
is not in the override terminal mode (for example,
SW8 of the MAC address switch is not on), then
every byte received or transmitted from the
monitored communication port is echoed out of
Port 3. Setting SW8 to on allows you to edit F45
Port 3 settings and, if required, to terminate the
monitoring mode.
HyperTerminal Software Settings:
To capture the log file with hyperterm, certain
configuration properties must be set.
Settings Tab > Emulation:
From the drop-down menu, select Viewdata.
Settings Tab > Select ASCII Setup:
Append line feeds to incoming line ends must be
unchecked.
Under the Transfer menu select Capture Text.
Browse Select the folder to create the capture file
folder. Select All Files (*.*) for the save as type.
Name the file with a .BIN extension. Select Save.
Select Start. To stop the capture, from the Transfer
menu, select capture text. Select Stop.
Table 38: Fi3 Baud Rate Selections
Table 39: P02 Fields Description Continued
Table 40: Fi5 Parity Selection (Ports 1, 2, 3, 4)
Table 41: Fi7 Stop Bit Selection (Ports 1, 2, 3, 4)
22 E-Link Gateway Commissioning and Troubleshooting Technical Bulletin
Page 23

P03, P07, P10, and P14 provide a means for
P03,P07,P10,
P14
MAC
ADDR =
MMMM
MANUAL
MAC =
VVV
Fi1
Fi2
Fi3
Fi4
P04,P11
VVV
Fi1
Fi2
software setting the MAC addresses for Ports 1, 2,
3, and 4, respectively.
Table 42: P03 MAC Address Configuration
Fi2 defaults to AUTO, which means the MAC address
is obtained from the setting on the MAC address switch
(SW4).
If the MAC address is changed during normal system
operation and P03 is set to AUTO, then the DE
INSTANCE and DE NAME are automatically updated.
To set a manual MAC address, set Fi2 to MAN and
enter the desired MAC address in Fi4.
P04 and P11, Fi2 allows you to set the Max Managers
parameter on Port 1 and Port 3, respectively. The Max
Managers parameter defines the highest MAC address
of any Manager node on the MS/TP network. The
default value is 127, but you can set it to any value
between 1 and 127. If you enter a value of 0, it is
automatically changed to 127. If you enter a number
greater than 127, it is reset to 127.
Only AV and BV objects that have their SOURCE
set to R-Setpoint, R-Setup Flag, or Network can
accept a value from a network write command. As
the data within the E-Link Gateway is represented
as BACnet objects, the BACnet priority array
provides a very convenient way in which to manage
all the write requests.
Writing Values to the E-Link Gateway
The E-Link Gateway is a multi-port device that
enables different communication protocols to
concurrently read and write values. To facilitate a
predictable outcome from any write sequence,
priority arbitration has to be used. Figure 39 shows
the port organization and data flow within the E-Link
Gateway.
Only AV and BV objects that have their SOURCE
set to R-Setpoint, R-Setup Flag, or Network can
accept a value from a network write command. As
the data within the E-Link Gateway is represented
as BACnet objects, the BACnet priority array
provides a very convenient way in which to manage
all the write requests.
Table 43: P04 Fi Descriptions
MAX MANAGERS:
To ensure most efficient communications, set the
Max Managers value no larger than the highest
MAC address of any node on the MS/TP network.
P15 through P18 are non-adjustable, and for
information only. They tell you all BAS port
configuration changes are only persistent when
Switch Group B is set with all switches off and that
the adjustment of the Max Managers parameter is
persistent regardless of Switch Group B setting.
Writing Values to the E-Link Gateway
The E-Link Gateway is a multi-port device that
enables different communication protocols to
concurrently read and write values. To facilitate a
predictable outcome from any write sequence,
priority arbitration has to be used. Figure 39 shows
the port organization and data flow within the E-Link
Gateway.
Figure 39: Port Organization and Data Flow
All BACnet commands, sent to objects with their
SOURCE set to R-Setpoint or R-Setup Flag, are
placed in the Priority array at the commanded
priority level, and then saved to flash memory after a
timeout expires.
BACnet write commands, sent to objects with their
SOURCE set to NETWORK, are placed in the
Priority array at level 16. The last command received
takes precedence. In this configuration, the value
received from the network is not maintained after a
power cycle.
E-Link Gateway Commissioning and Troubleshooting Technical Bulletin 23
Page 24

LONWORKS communication is provided by interfacing
Offset
PROTOCOL
FUNCTION
0
Terminal
Allows a VT-100 session
1
Modbus I/O
Supports YORK Modbus
RTU I/O cards
2
LON
Allows BACnet
communications over TTL
3
Modbus Server
Serves up data to a
Modbus RTU Client
4
API
Passes control to another
Application (Café
interface)
5
Modbus Client
Acts as a general purpose
Modbus RTU Client (F66)
6
BACNET MS/TP
Allows BACnet
communications over
RS-485
7
YORKTalk 3
Acts as a YORK Talk 3
Client to an OptiView
chiller
8
YORKTalk 2 V6
Acts as a YORK Talk 2
Client to Small Tonnage
chillers
9
YORKTalk 2 V4
Acts as a YORK Talk 2
Client to Small Tonnage
chillers
10
YORKTalk 3
SRVR
Acts as a Server to a
YORK Talk 3 Client
11
YORKTalk 2
SRVR
Acts as a Server to a
YORK Talk 2 Client
12
N2
Serves up data to a N2
Client
13
Disabled
the ProtoCessor to the E-Link Gateway using
BACnet services. From a writing perspective, it can
be considered as a BACnet write command at
priority 16.
Any N2 or Modbus RTU writes are placed in the
Priority array at level 16, and the last command
received takes precedence.
Figure 40 shows the behavior of a Modbus RTU
device writing on Port 1 and Modbus RTU or N2 on
Port 3.
Figure 42: BACnet Device Data Flow with
Network Object Source
Protocols
Each E-Link Gateway’s port is configured by using a
Quick Start selection. The script that is executed
edits the appropriate pages within F45 selecting the
protocol to be assigned to each port.
Table 44: Source Selections
Figure 40: Modbus RTU Device Data Flow
Figure 41 shows the behavior of a BACnet device
writing on Port 1 and N2 or Modbus RTU on Port 3.
Figure 41: BACnet Device Data Flow
Figure 42 shows the behavior of a BACnet device
writing on Port 1 and N2 or Modbus RTU on Port 3
when the SOURCE of the object is set to
NETWORK.
24 E-Link Gateway Commissioning and Troubleshooting Technical Bulletin
Page 25

Port Policy
N2
E-Link Gateway
Objects
Function
ADI
F01
Integer
ADF
F04
Float Internal value
BD
F06
Byte
Any port may be set to any selection in Table 46 as
long as no two ports are the same.
The exceptions to this policy are BACnet MS/TP and
Modbus RTU Server, which allow four concurrent
instances. If you try to configure more than one
instance of N2, the system automatically resets the
new selection to its previous setting.
The numerically lowest port is active when you
configure more than one instance of the other
protocol selections.
In many cases, when you select a protocol on a
particular port, a default baud rate, parity, and the
number of stop bits are automatically assigned.
Normal Operation Port 3 Override: T Switch On
If SW8 of the MAC address switch is on, then the
protocol on Port 3 is automatically forced to Terminal
at 57K6 baud; with no parity.
If SW8 of the MAC address switch is off, then the
protocol on Port 3 is set to the configuration in F45
on Port 3, and uses the baud rate and parity that are
assigned to this port.
Port 2 Override: All MAC Switches On
Note: The Port 2 Override is not designed for
normal system operation. It is reserved for hardware
debugging.
If SW1 through SW8 of the MAC address switch are
all set to on, then the protocol on Port 2 is forced to
Terminal at 57K6 baud; with no parity.
If SW8 the MAC address switch is off, then the
protocol on Port 2 is set to the configuration in F45
on Port 2. SW1 through SW7 = DON’T CARE.
IMPORTANT: Invoking this function breaks the
communication link with the Equipment.
Figure 43: Default Protocols
N2
The E-Link Gateway’s N2 Server uses the N2 Open
protocol to access the Present Value (P01) of the
following features: F01, F04, and F06. The N2
interface can be configured to operate at any of the
available baud rates in F45; however, in practice,
only 9600 baud is used by the Quick Starts. The N2
protocol uses no parity, 8 data bits, and 1 Start and
1 Stop bit, which are automatically set by the Quick
Starts.
In an N2-centric world, all data is referenced using
objects. The E-Link Gateway supports three of the
N2 object types: ADF, ADI, and BD. These are
virtual points which align well with the gateway
functionality offered by the E-Link Gateway
(Table 45).
Table 45: N2 Objects
A star (*) displayed at the end of F45, P07, and P08
indicates that the current port’s protocol selection
has been overridden to Terminal.
If a port override is invoked, a Port 2 override always
takes priority over a Port 3 override, and a Port 3
override always takes priority over a Terminal setting
on Port 4. Likewise, a terminal setting on Port 1
usurps control from any other ports.
Figure 43 shows the default protocols selected on
the ports when all the Quick Starts are set to off.
Network Visibility
Any E-Link Gateway data that is required to be
visible on an N2 network must be represented by a
valid section address and be exposed in F20. If an
object is not exposed in F20 but accessed by an N2
Manager, an N10 error occurs.
E-Link Gateway Commissioning and Troubleshooting Technical Bulletin 25
Page 26

N2 Addressing
Attribute 1
Attribute 2
Error
ADI
Reliability
Overridden
Present
Value (PV)
N10, if section
out of range or
not in F20
ADF
Reliability
Overridden
Present
Value
N10, if section
out of range or
not in F20
BD
Reliability
Overridden
Present
Value
N10, if section
out of range or
not in F20
AI
Not Supported
N10
BI
Not Supported
N10
AO
Not Supported
N10
BO
Not Supported
N10
Out of
Service = F
Out of
Service = T
Source
ADJUST
OVERRIDE
ADI
PV not
changed,
An ACK is
returned
PV Writable
Any
ADF
PV Writable
PV Writable
R-Setpoint
ADF
PV Writable
PV Writable
Network
ADF
PV not changed
ACK returned
PV Writable
Any other
BD
PV Writable
PV Writable
R-Setup Flg
BD
PV Writable
PV Writable
Network
BD
PV not changed
ACK returned
PV Writable
Any other
AI
PV not changed, ACK returned
Any
BI
PV not changed, ACK returned
Any
AO
PV not changed, ACK returned
Any
BO
PV not changed, ACK returned
Any
The E-Link Gateway uses the corresponding
BACnet object instance as the N2 object address.
For example, AV102 is mapped to ADF102 and
BV50 is mapped to BD50.
Reading N2 Values
All of the supported objects return Reliability,
Overridden status, and Present Value when polled.
N2 Reliability is derived in the same way as it is for
the corresponding BACnet object, whereas the
Overridden state is set by the N2 Manager
performing the override command.
Table 46: N2 Attributes and Errors
Table 47: N2 Attributes and Errors
An overridden object must be taken out of service
before writing to its PV.
Writing to N2 Objects
An N2 Manager may perform an Adjust, or an
Override, on any of the objects shown in Table 47.
Note: If an object cannot be taken out of service,
an N11 error occurs in the N2 Server.
Limit Checking
When Adjusting or Overriding an ADI or ADF object,
any new value is first checked to ensure that it is
within allowable limits.
In the case of the ADI object, the network value is
first checked to determine if it exceeds the maximum
number of states as configured on P10. If it does, an
N10 error occurs. If it does not, the new value
replaces the PV.
In the case of the ADF object, the network value is
checked to determine if it is outside the limits
configured on P10. If so, an N10 error occurs.
Otherwise, the new value replaces the PV.
In the case of the BD object, the network value is
checked to determine whether it is anything other
than a 0 or 1. If it is, an N10 error occurs. Otherwise,
the new value replaces the PV.
26 E-Link Gateway Commissioning and Troubleshooting Technical Bulletin
Page 27

Modbus RTU
Function Codes
F01
F04
F06
01– Read Coil Status
X
02– Read Input Status
X
03– Read Holding Register
X X X
04- Read Input Registers
X X X
05- Force Single Coil
X
06- Preset Single Register
X
X
15- Force Multiple Coils
X
16- Preset Multiple Registers
X
X
The E-Link Gateway’s Modbus RTU Server provides
a means for a third-party Modbus RTU Client to
access the PV of the following features: F01, F02,
F03, F04, F05, F06, F07, F08, and F09. However,
only F01, F04, and F06 are used within the E-Link
Gateway’s Application.
The Modbus RTU interface can be configured to
operate at any of the available baud rates, parities,
and stop bits that are selectable in F45. However, in
practice, only certain selections that were used by
the Modbus MicroGateway are supported by the
Quick Starts.
Note: Unlike BACnet and N2, Modbus RTU data
does not need the referenced objects to be exposed
in F20 to make them network visible.
Modbus RTU Addressing
The E-Link Gateway references all its Modbus RTU
data using 16-bit registers. These registers are
expressed as decimal values within the E-Link
Gateway’s interface. Hexadecimal values are used
within the Modbus RTU messages. All data
addresses in a Modbus RTU message are zerobased. The first occurrence of a data item has an
address value of 0 in the message, but is defined as
Register 1 from a user perspective.
Algorithmic Addressing
In case of F02, F03, F05, F07, and F09 (and
optionally selectable in F45 Page 46 for F01, F04,
and F06), the address that references the PV of
these features is obtained by combining the feature
number and the section number using the following
rule:
4. This HEX number FFNNN is then converted into
a decimal to create XXNNN.
Note: 1 is added to the converted value to
take into account the inherent offset.
Examples
To reference the PV of F02, S001, use Modbus RTU
register 0201H. If you are using a typical Modbus
RTU Client (for example, F66), convert this HEX
address into a decimal number (513 + 1 = 514).
To reference the Present Value of F07, S110, use
Modbus RTU register 076EH. If you are using a
typical Modbus RTU Client (for example, F66),
convert this HEX address into a decimal number
(1902 + 1 = 1903).
Manual Addressing
The E-Link Gateway also uses a mechanism within
F01, F04, and F06 objects that allows you to
override the default algorithmic addressing method
and to specify a specific Modbus RTU register
address to be used by a given section. A separate
page has been provided in these objects to specify
this address. This value is represented as a decimal
number and is defaulted to 0 to indicate that no
Modbus RTU address is available.
Services
Table 48 shows the supported Modbus RTU
Function codes listed by Feature used by the E-Link
Gateway’s Application.
Table 48: N2 Attributes and Errors
The feature number expressed as a HEX value
is appended with the section number also
expressed as a HEX value to form a single
16-bit HEX address. The Feature and Section
numbers are both converted into Hex and then
appended to form a single address.
Some Applications require expressing the Modbus
RTU address as a decimal number. In this case, the
FSP address is calculated as follows:
1. The Feature number (ff) is converted into a HEX
number so as to create FF. As this applies to
Features 1 through 9, the decimal
representation is also the HEX representation.
2. Next, the Section number (nnn) is converted
into a HEX number, to create NNN.
3. The two parts are then appended together to
form a single HEX number FFNNN.
Data Presentation
When the E-Link Gateway receives a request for the
PV of F02, F04, F07, F08, and F09, it responds by
returning a signed integer that is its P01 value
multiplied by 10. For example, if an F04, P01 value
is 32.7, then the Server returns 327.
E-Link Gateway Commissioning and Troubleshooting Technical Bulletin 27
Page 28

An F04 may also be configured individually to scale
its data using different data types and scale
multipliers.
If the P01 value of any of the previously mentioned
features is less than -32,768 (or greater than
32,767), then the E-Link Gateway Modbus RTU
Server responds with an Illegal Data Value
exception code.
If the Server receives a request for the PV of an F01
or an F03, it responds by returning an unsigned
integer (for example, its P01 value) unmodified in
any way. If the P01 value is less than 0 or greater
than 65,535, the Server responds with an Illegal
Data Value exception code.
LONWORKS ProtoCessor
The E-Link Gateway provides LONWORKS access by
the addition of a LONWORKS ProtoCessor module.
This is a two port device that has one of its ports
dedicated to interfacing with the host (the E-Link
Gateway), whereas the other port is used to connect
to the LONWORKS network.
The E-Link Gateway uses electrical TTL signals on
Port 4 to connect to the LONWORKS ProtoCessor
module. BACnet MS/TP is used to transfer data
between the two components.
The first E-Link Gateway Application supports the 12
LONMARK® profiles stored on the ProtoCessor
module.
BACnet/ LONWORKS FTT10
The E-Link Gateway is essentially a BACnet device
that uses BACnet objects to represent its data. It
supports both Client and Server functionality and
uses MS/TP for its data link. Whereas the E-Link
Gateway supports many other standard and
nonstandard BACnet objects, (AI, BI, AO, SCHD,
CAL, NTF, YSV F03, and so on), its Application only
uses the AV, BV, and MSV for both internal
manipulation and for exposing data onto a BACnet
network. LONWORKS is provided by the addition of
an optional ProtoCessor module that translates
between BACnet and LONWORKS.
Network Visibility
Any E-Link Gateway data that is required to be
visible on BACnet or LONWORKS FTT10 networks
must be represented by a valid section address and
be exposed in F20. If an object is not exposed in
F20 but accessed by a BACnet system, an Object
not Supported error occurs.
BACnet Addressing
In most cases, the E-Link Gateway uses the section
number of the associated Feature as the BACnet
instance. For example, 4102 maps to AV102 and
6050 to BV 50. A mechanism is included within F01,
F04, and F06 that enables a specific BACnet
instance to be configured, and so replaces the
Feature’s section number.
The functionality of the E-Link Gateway from a
BACnet perspective is fully defined within its
Protocol Implementation Conformance Statement
(PICS)/BACnet Interoperability Building Blocks
(BIBBS) statement.
OPTIVIEW.XIF
YDOPTI.XIF
YORK2.XIF
YPAL.XIF
KSSSOPTI.XIF
KVSDOPTI.XIF
KYDOPTI.XIF
KYIAOPTI.XIF
KYSTOPTI.XIF
R2YORK2.XIF
R2PAL.XIF
STCWUXI.XIF
The ProtoCessor BACnet network is limited to one
other device, that of the E-Link Gateway. When the
LONWORKS Quick Start is invoked, all the BACnet
network communication parameters on Port 4 are
prefixed to the following values:
Baud Rate = 38.4 K Baud
Max Managers = 3
E-Link Gateway’s Port 4 Device Object’s
Instance (DE) = 100
E-Link Gateway’s MAC address = 1 (The
ProtoCessor uses a MAC address of 2)
Max info frames = 1
The BACnet Description property is made non
BACnet writable, but can still be changed by the
Quick Starts.
28 E-Link Gateway Commissioning and Troubleshooting Technical Bulletin
Page 29

BV Value
SNVT_switch Components
State
Value
0 0 0
1 1 100
LONWORKS Profile Selection
The selection of an equipment profile is performed
automatically by the ProtoCessor reading a
proprietary BACnet text property within the E-Link
Gateway. This property is configured by selecting a
GROUP A Quick Start, which writes the desired
profile name into F45, S001, P45. Once the profile is
selected, it represents the data that a LONWORKS
user may access from this piece of equipment.
Note: Whereas a Network Variable (NV) may be
defined in a profile, it may not always be supported
by the equipment. You must reference the specific
Point Maps for the equipment to determine if the
point is actually available.
LONWORKS Point Mapping
The E-Link Gateway has been organized so that
only objects that are required to be made network
visible are added to the Device
object_list_property. The ProtoCessor reads this
standard BACnet property to determine what objects
need to be translated into LONWORKS SNVTs.
Each standard AV, BV, and MSV object used by the
E-Link Gateway contains all the information needed
to enable these objects to be represented on the
LONWORKS network. On determining what objects
need to be exposed, the object’s
BACnet_Description_Property provides a string
descriptor that is used to map this object to the
appropriate location within the profile.
Objects
Certain objects added into the DE
object_list_property are writable. These objects
are known as Network Variable Inputs (NVI) and are
explicitly defined by the profile. The ProtoCessor can
also verify that the objects are writable within the
E-Link Gateway by the first three characters of the
Description property.
Quick Start 9 and 11 – APP GROUP B
These two Quick Starts are used to convert Imperial
to SI units when the data is sourced from the
equipment and then from SI to Imperial when the
data is coming from the LONWORKS network.
These Quick Starts are used if the equipment is
deployed in markets that require Imperial data to be
displayed locally on the micro panel. The E-Link
Gateway’s Application converts these values into SI
units before transferring them to the ProtoCessor
module.
Quick Start 10 and 12 – APP GROUP B
These two Quick Starts are used to pass through the
equipment values without any conversion.
These Quick Starts are used if the equipment is
deployed in markets that require SI data to be
displayed locally on the micro panel. The E-Link
Gateway transfers raw values from the equipment
without any modification.
SNVT Data
Most of the SNVTs used within the E-Link Gateway
profiles are simple data types (for example,
unsigned long). However, Snvt_switch is a
two-element structure that combines a binary and an
unsigned short to support a more complex behavior.
When exposing a data value as a Network Variable
Output (NVO) of type SNVT_switch, the
ProtoCessor reads the value from the associated
BACnet BV object which offers a Boolean value of 0
or 1. If a SNVT_switch NVO is specified in the
profile but a BV object is not exposed in the E-Link
Gateway’s object_list_property, then the NVO is
set to a NULL (0xFF).
The ProtoCessor reads the BV object’s PV,
assigning it to the SNVT_switch according to
Table 49.
The LONWORKS protocol requires that all data is
expressed in SI units. Equipment can represent its
data in both Imperial and SI units and, therefore, the
E-Link Gateway must be capable of converting from
Imperial to SI units and vice versa.
Switching from Imperial to SI can often be easily
accomplished through a software switch. However,
in older chiller models, this process may require the
replacing of Erasable Programmable Read-Only
Memory (EPROM).
Table 49: BV Values
E-Link Gateway Commissioning and Troubleshooting Technical Bulletin 29
Page 30

SNVT_switch Components
BV Value
State
Value
0 0 0
1
X-Don’t
Care
1
Likewise, the ProtoCessor writes the SNVT_switch
data to the BV object according to Table 50.
Table 50: SNVT Switch Data
LONWORKS Status
The ProtoCessor does not activate its LONWORKS
FTT10 output until it has completely processed the
configuration data obtained from the E-Link
Gateway. From a LONWORKS perspective, the
ProtoCessor should appear offline. If the
ProtoCessor were to make the FTT10 side active too
soon, then the LONWORKS network has the option of
asking for data that could not be answered.
Handling 8040 LONMARK® Profile
As well as providing the data that is defined within
the profile, subscribing to the LONMARK 8040 profile
requires some mandatory Configuration Properties
to be supported are:
nciChillerEnable
nciMAXSendTime
nciMinSendTime
nciCapacityLim
nciCoolsetPt
The E-Link Gateway’s implementation handles the
functionality of nciChillerEnable, nciCapacityLim,
and nciCoolSetPt internally and, therefore, any
LONWORKS FTT10 commands applied to these
parameters are overwritten immediately.
nciMaxSendTime is the maximum time period
before certain NVO values are transmitted. In
the case of the E-Link Gateway’s OPTIVIEW
configuration, the applicable NV should be:
nvoActiveSetpt – nvolvgCndWTemp
nvoActualCapacity – nvoEntCndWTemp
nvoEntCndWTemp – nvoEntCHWTemp
nciMinSendTime is the minimum time period
before the objects can be retransmitted.
.
30 E-Link Gateway Commissioning and Troubleshooting Technical Bulletin
Page 31

Switch
Settings
Client
Features
Used
Sections
Used
Poll
Interval
Port 2
Protocol
Port 2
Baud
Rate
Port
Hardware
Port 2
Parity
Functionality
1
F54 3 5s
YORK Talk
3
19K2
RS-232
ODD
YK with SSS
Imperial (Version J)
2
F54 3 5s
YORK Talk
3
19K2
RS-232
ODD
YK with VSD
Imperial (Version J)
3
F54 3 5s
YORK Talk
3
19K2
RS-232
ODD
YT with SSS
Imperial (Version J)
4
F54 3 5s
YORK Talk
3
19K2
RS-232
ODD
YT with VSD
Imperial (Version J)
5
F54 3 5s
YORK Talk
3
19K2
RS-232
ODD
YS / YR with SSS
Imperial (Version J)
6
F54 3 5s
YORK Talk
3
19K2
RS-232
ODD
YK with SSS Metric
(Version J)
7
F54 3 5s
YORK Talk
3
19K2
RS-232
ODD
YK with VSD Metric
(Version J)
8
F54 3 5s
YORK Talk
3
19K2
RS-232
ODD
YT with SSS Metric
(Version J)
9
F54 3 5s
YORK Talk
3
19K2
RS-232
ODD
YT with VSD Metric
(Version J)
10
F54 3 5s
YORK Talk
3
19K2
RS-232
ODD
YS / YR with SSS
Metric (Version J)
11
F54 1 15 s
YORK Talk
2 V6
1200
RS-485
ODD
YORK Talk II, 1200,
1 Sect (Version 2)
12
F54 1 15 s
YORK Talk
2 V6
4800
RS-485
ODD
YORK Talk II, 4800,
1 Sect (Version 2)
13
F54
1 & 2
15 s
YORK Talk
2 V6
4800
RS-485
ODD
YORK Talk II, 4800,
2 Sects (Version 2)
14
F54 5 5s
YORK Talk
3
19K2
RS-232
ODD
YD Imperial
(Version J)
15
F54 5 5s
YORK Talk
3
19K2
RS-232
ODD
YD Metric
(Version J)
16
F65,
F28
1 & 2,
1 to 45
N/A
BACnet
MS/TP
38K4
RS-485
NONE
YPAL IPU-I
(Version 2)
17
F54
3 & 4
5s
YORK Talk
3
19K2
RS-232
ODD
YK with SSS
Imperial (Version K)
18
F54
3 & 4
5s
YORK Talk
3
19K2
RS-232
ODD
YK with VSD
Imperial (Version K)
19
F54 3 5s
YORK Talk
3
19K2
RS-232
ODD
YT with SSS
Imperial (Version K)
20
F54
3 & 4
5s
YORK Talk
3
19K2
RS-232
ODD
YT with VSD
Imperial (Version K)
21
F54 3 5s
YORK Talk
3
19K2
RS-232
ODD
YR /YS/YN with SSS
Imperial (Version K)
22
F54
3 & 4
5s
YORK Talk
3
19K2
RS-232
ODD
YK with SSS Metric
(Version K)
Continued on next page. . .
E-Link Gateway Application Summary Highlights
Table 51: Equipment Profile Application Highlights
E-Link Gateway Commissioning and Troubleshooting Technical Bulletin 31
Page 32

Switch
Settings
(Cont.)
Client
Features
Used
Sections
Used
Poll
Interval
Port 2
Protocol
Port 2
Baud
Rate
Port
Hardware
Port 2
Parity
Functionality
23
F54
3 & 4
5s
YORK Talk
3
19K2
RS-232
ODD
YK with VSD Metric
(Version K)
24
F54 3 5s
YORK Talk
3
19K2
RS-232
ODD
YT with SSS Metric
(Version K)
25
F54
3 & 4
5s
YORK Talk
3
19K2
RS-232
ODD
YT with VSD Metric
(Version K)
26
F54 3 5s
YORK Talk
3
19K2
RS-232
ODD
YR/YS/YN with SSS
Metric (Version K)
27
F54 6 5s
YORK Talk
3
19K2
RS-232
ODD
YST with Imperial
(Version K)
28
F54 7 5s
YORK Talk
3
19K2
RS-232
ODD
YIA with Imperial
(Version K)
29
F54 6 5s
YORK Talk
3
19K2
RS-232
ODD
YST with Metric
(Version K)
30
F54 7 5s
YORK Talk
3
19K2
RS-232
ODD
YIA with Metric
(Version K)
31
F66
1 to 5
N/A
Modbus
RTU
9600
RS-485
Wuxi STC Models:
YEWS-D1, YEAS,
YGAS
32
F54 5 5s
YORK Talk
3
19K2
RS-232
ODD
YD Imperial
(Version K)
33
F54 5 5s
YORK Talk
3
19K2
RS-232
ODD
YD Metric
(Version K)
34 to 62
Reserved for the
future
Conversion Routines
F13, Section #1
DEG F TO DEG C
F13, Section #2
PSI TO KPA
F13, Section #3
DEG C TO DEG F
F13, Section #4
LBH TO KGH
F13, Section #5
KGH TO LBH
F13, Section #6
GPM TO LPM
F13, Section #7
LPM TO GPM
F13, Section #8
BTUL TO KJKG
F13, Section #9
KJKG TO BTUL
F13, Section #10
WC TO PA
F13, Section #11
PA TO WC
F13, Section #12
CFM TO M3HR
F13, Section #13
M3HR TO CFM
F13, Section #14
IN TO MM
F13, Section #15
KPA TO PSI
F13, Section #16
SPARE
Table 52: Conversion Routines
32 E-Link Gateway Commissioning and Troubleshooting Technical Bulletin
Page 33

BO Reference
Function
Where Used
BO1
YT COMS FAIL
F54
BO2
BACNET FAIL
F65
BO3
MODBUSFAIL
F66 (future)
BO4
IM-SI CONVRT
F04
BO5
TRANS.TIMER
F28
BO6
ACQUIS_FAIL
F65
BO7
USER RPT ENA
F48
Table 53: BO References and Functions1
1. BO-004 (9004) when ACTIVE enables the conversion from Imperial to Metric units. This flag is set to TRUE in the Output Protocol
Quick Starts, 9 and 12.
Troubleshooting an E-Link Gateway
LEDs
Whenever possible, the E-Link Gateway’s LEDs
should be used for visual troubleshooting. In many
instances, the LEDs are sufficient in diagnosing
problems. (See the LED Operation section for
additional information on the behavior of the various
LEDs.)
The Status LED provides a simple indication of the
E-Link Gateway’s operation, indicating conditions such
as whether communications between the E-Link
Gateway and the equipment have failed, if a custom
Application is being used, and if Port 3 has been
overridden.
The red and green communication LEDs located on
the SIM visually display the electrical activity on each
of the port lines. There is no intelligence behind how
these LEDs are driven. They provide an analog
representation of the port’s signals and sometimes
offer indication of a malfunction. For example, if the
green LED is always dimly illuminated, it could indicate
an incorrectly biased network or electrical noise
coupled onto the network.
Software Troubleshooting
In many cases, the E-Link Gateway must be debugged
by actually interrogating the Applications. In this
circumstance, Port 3 is temporarily used to provide a
VT-100 access to the system. (See the Accessing the
E-Link Gateway for the actual mechanics of invoking
this functionality.)
Using Port 3 to access the E-Link Gateway’s
Applications means that any connectivity normally
used by Port 3 is temporarily disabled. Proper
authorization to disable Port 3 should be obtained
before proceeding.
Access and the syntax used to navigate through the
E-Link Gateway’s Applications are described in the
Accessing the E-Link Gateway section. This section
focuses only on the actual troubleshooting steps and
not the mechanics.
In some instances, the data being presented by the
network is questioned, and it becomes necessary to
follow it from input to output.
Expected Network-Visible Data
For a selected Quick Start, there is an expected list of
points that should be available to the network.
Accessing the object list command displays the list of
points and this list can be compared against the lists
shown in an earlier section of this document. If the
standard Application is used, the two lists should be
the same.
The object list command provides a snapshot of the
points’ Present values at a given point in time, so this
can be used to correlate the data that the E-Link
Gateway is delivering versus the data that the network
device is retrieving.
Interpreting the Object List Data
The object list command returns the Object ID, Object
Name, PV, and Engineering Units of any point that is
in the BACnet Object_List_Property. So if the
network protocol is BACnet, there is a one-to-one
correspondence with this list and what the BACnet
device should be seeing.
N2
The E-Link Gateway’s N2 protocol implementation
only supports the retrieval of the PV and the point’s
status, so the Name and Engineering units are
superfluous. Each point’s analog and binary values
(ADF and BD objects) correlate directly with what is
being displayed by the object list command.
In the case of the ADI objects, the N2 values are
always one less than that what is being displayed by
the Object list command.
E-Link Gateway Commissioning and Troubleshooting Technical Bulletin 33
Page 34

Modbus RTU
As with N2 Applications, the Name and Engineering
units are superfluous in a Modbus RTU Application.
Only the PV has any relevance. When correlating
values being retrieved by a Modbus RTU Manager
and those displayed by the object list command, the
following should be considered.
Registers displaying equipment CODES always have
a value that is one less than that what is being
displayed by the Object list command.
Any analog value displayed by a Modbus RTU
Manager must be processed according to the applied
scaling. For example, the object list value is returned
to a Modbus RTU network multiplied by the scale
factor configured within the referenced object.
LONWORKS
When correlating the values retrieved by a LONWORKS
system with the values displayed by the object list
command, the following information should be
considered.
SNVTs displaying equipment codes always have a
value that is one less than that what is being displayed
by the Object list command. Both analog and binary
values follow the PVs that are shown in the object list.
Reviewing the E-Link Gateway’s Input Data
Sometimes it is helpful to view the raw data that is
actually being retrieved by the E-Link Gateway. In the
case of Applications that use the YORK Talk protocols,
F54 should be interrogated.
Viewing F54, P02 provides an easy way of observing
the integrity of the E-Link Gateway to chiller
communications. Continuously refreshing P02 is a
good way of ensuring that the link is reliable.
If the long-term stability of the communication’s link is
suspect, then BO-001 (9001) will trend using F16
(Digital History). As the E-Link Gateway does not use
any Battery Backed up RAM, all histories are lost after
a power cycle.
To view the value of a specific point, the Point Maps
must first be used to determine which F54 page
contains the point address. This page also displays the
point’s value. Continually refreshing the page provides
real time update.
The value of one or more points may be trended over
time using F15 (Analog History). This trend could be
useful if erroneous behavior of a point is suspected. As
the E-Link Gateway does not use any Battery Backed
up RAM all histories are lost after a power cycle.
34 E-Link Gateway Commissioning and Troubleshooting Technical Bulletin
Page 35

Symptom
Probable Cause
Solution
The Power LED is OFF.
No power to the unit.
Malfunctioning power supply.
Ensure input voltage is on.
Check input voltage (24 VAC, 12 VDC,
110 VAC or 220 VAC).
Replace the E-Link Gateway.
STATUS LED is OFF.
No Application configuration is loaded, the
E-Link Gateway is UNCONFIGURED, or the
system is in HALT or MONITOR mode or the
loaded Application does not match the host
hardware.
(The Green Power LED should be used as an
indication of whether power is currently applied
to the unit).
XMODEM in Application CNF file.
Replace the E-Link Gateway.
1 FLASH
Terminal mode has been invoked.
Set SW8 on the MAC address switch to
OFF.
2 FLASHES
The communications between the E-Link
Gateway and the equipment using (F54, F65,
and F66) have been lost.
Check to see if the equipment is powered
on and operational.
Check that the correct Quick Start has been
invoked.
Check that the wiring between the E-Link
Gateway and the equipment is in place.
3 FLASHES
A F67 or a F68 configuration error has been
detected.
Power cycle the E-Link Gateway.
XMODEM in Application CNF file.
Replace the E-Link Gateway.
LED ON
Set during rebooting.
NO ERRORS with a F67/F68 patched.
Application or with a custom SIS developed
Application.
Wait until the E-Link Gateway has
initialized.
CUSTOM Application.
Port 1 Red and Green
LEDs never flash (observe
for 30 seconds).
The BAS device is not making any requests.
The Port is not setup correctly.
Incorrect wiring (RX and TX swapped).
Defective Port 1 circuit.
Ensure BAS device is online and
communicating.
Check that the correct Quick Start has been
invoked on APP Group B.
Ensure wiring is correctly installed.
Replace the E-Link Gateway.
Continued on next page . . .
Table 54: Troubleshooting Guide
E-Link Gateway Commissioning and Troubleshooting Technical Bulletin 35
Page 36

Symptom (Cont.)
Probable Cause
Solution
Port 2 Red and Green LEDs
never flash (observe for 30
seconds).
The Port is not set up correctly.
Equipment micro panel is not communicating.
Incorrect wiring (RX and TX swapped).
Defective Port 2 driver.
Check that the correct Quick Start has been
invoked on APP Group A.
Ensure the equipment is configured
correctly.
Ensure wiring is correctly installed.
If Port 2A is being used replace the RS-485
driver. If Port 2 B is being used replace the
E-Link Gateway.
Port 3 Red and Green LEDs
never flash (observe for 30
seconds).
The BAS device is not making any requests.
The Port is not set up correctly.
Incorrect wiring (RX and TX swapped).
Defective Port 1 driver.
Ensure BAS device is online and
communicating.
Check that the correct Quick Start has been
invoked on APP Group B.
Ensure wiring is correctly installed.
Replace the RS-485 driver.
Port 4 Red and Green LEDs
never flash (observe for 5
seconds).
The Port is not set up correctly.
Just the Red LED is flashing:
Defective ProtoCessor.
Defective Port 4 circuitry.
Check that the correct Quick Start has been
invoked on APP Group A.
Check that the ProtoCessor is either not
present or is badly seated.
Replace the ProtoCessor.
Replace the E-Link Gateway.
BAS system is unable to
communicate, but the E-Link
Gateway appears to be
working.
Communication wiring is incorrect.
The port is not setup correctly (incorrect
protocol, baud rate, stop bits, and others).
The E-Link Gateway’s MAC address is not
unique, or does not match that which is
configured in the BAS system.
For BACnet systems, the E-Link Gateway’s
Device Object address does not match that
which is configured in the BAS system.
Correct the wiring.
Check that the correct Quick Start has been
invoked on APP Group A.
Change the E-Link Gateway’s MAC
address or the BAS system’s configuration.
Change the E-Link Gateway’s Device
Object address in User Report 1 or change
the BAS system’s configuration.
The communications
between the BAS system
and the E-Link Gateway are
slow or unreliable.
The network wiring has been installed
incorrectly (wrong cable, too close to high noise
sources, and others).
The network cable’s shields have not been
grounded.
The network is terminated in more places than
at its ends.
The Port’s drivers are defective.
Reinstall the cable per the recommended
wiring instructions.
Ground the shields.
Terminate only at the two network
extremes.
For Port 2A and Port 3, change out the
RS-485 drivers. For Port 1 change out the
E-Link Gateway.
BAS system is
communicating, but values
appear to be suspect.
BAS system is referencing the incorrect data.
Modbus RTU Scaling is not configured
correctly.
Align the BAS system addressing scheme
with the Point Maps.
Adjust the scaling in the User Report.
Building Efficiency
507 E. Michigan Street, Milwaukee, WI 53202
Metasys® and Johnson Controls® are registered trademarks of Johnson Controls, Inc.
All other marks herein are the marks of their respective owners. © 2011 Johnson Controls, Inc.
36 E-Link Gateway Commissioning and Troubleshooting Technical Bulletin
 Loading...