

Page 1
V-Tube Technologie
24 Bit Digital Modeling Amplifier
Tecnología Válvula-V
Amplificador digital de 24 bits
con modelado integrado
User’s Guide/Manual de Instrucciones
please visit Johnson Amplification on the World Wide Web at http://www.johnson-amp.com
Visite la página web de Johnson Amplification en la dirección http://www.johnson-amp.com
Page 2
ADVERTENCIA
PARA SU SEGURIDAD Y PRO
TECCION, LEA LO SIGUIENTE:
MANTENGA SIEMPRE A MANO ESTAS INSTRUCCIONES
OBSERVE Y CUMPLA CON LO INDICADO EN TODOS LOS AVISOS
SIGA TODAS LAS INSTRUCCIONES
LIMPIE LA UNIDAD SOLO CON UN TRAPO HUMEDO.
NUNCA BLOQUEE NINGUNA DE LAS ABERTURAS DE VENTILACION.
INSTALE LA UNIDAD DE ACUERDO CON LAS INSTRUCCIONES DEL
FABRICANTE.
NUNCA INSTALE ESTE APARATO CERCA DE FUENTES DE CALOR
COMO CALENTADORES, RADIADORES, HORNOS, O DE OTROS
APARATOS (INCLUYENDO AMPLIFICADORES) QUE GENEREN
CALOR.
UTILICE SOLO LOS ACCESORIOS / COMPLEMENTOS
ESPECIFICADOS POR EL FABRICANTE.
DESCONECTE DE LA CORRIENTE ESTE APARATO DURANTE LAS
TORMENTAS CON APARATO ELECTRICO O CUANDO NO LO VAYA A
USAR DURANTE UN PERIODO DE TIEMPO LARGO.
AGUA Y HUMEDAD: No utilice este aparato demasiado cerca del agua (p.e. cerca de una
piscina, fregadero, lavadora o en un sótano húmedo). Evite que pueda caer ningún objeto o
líquidos dentro de la carcasa a través de las aberturas.
FUENTE DE ALIMENTACION: Este aparato debe ser conectado a una toma de
alimentación solo del tipo descrito en este manual o marcado en la propia unidad.
TOMA DE TIERRA O POLARIZACION:Tome las precauciones necesarias para que la
toma de tierra o polarización del aparato no queden anuladas.
PROTECCION DEL CABLE DE ALIMENTACION: Coloque los cables de
alimentación de tal forma que no puedan ser pisados y que queden enganchados o aplastados
por cosas colocadas sobre o contra ellos, con un cuidado especial en los receptáculos de
entrada y conectores, y en el punto en el que los cables salen de las unidades.
REPARACIONES: Para reducir el riesgo de incendios o descargas eléctricas, el usuario
nunca debe tratar de hacer reparaciones en la unidad fuera de lo descrito en las
instrucciones. Debe dirigir cualquier otra reparación al servicio técnico cualificado.
PARA LAS UNIDADES EQUIPADAS CON RECEPTACULO DE FUSIBLE
ACCESIBLE DESDE EL EXTERIOR: Sustituya el fusible solo por otro del mismo tipo y
características eléctricas.
INSTRUCCIONES DE SEGURIDAD
AVISO PARA LOS USUARIOS SI SU UNIDAD ESTA EQUIPADA CON UN
CABLE DE ALIMENTACION.
PRECAUCION: ESTA UNIDAD DEBE SER CONECTADA A TIERRA.
Los filamentos del cable de alimetnación están coloreados de acuerdo al siguiente
código:
VERDE y AMARILLO - Tierra AZUL - Neutral MARRON - Activo
Dado que los colores del cable de alimentación de esta unidad puede que no se
correspondan con las marcas de color identificativas de su enchufe,haga lo siguiente:
• El filamento que tiene color amarillo y verde debe ser conectado a la terminal
del conector marcada con la letra E,o con el símbolo de tierra o de color
verde o de color amarillo y verde.
• El filamento con color azul debe ser conectado a la terminal marcada con una
N o de color negro.
• El filamento de color marrón debe ser conectado a la terminal marcada con
una L o de color rojo.
Puede que para este aparato necesite usar un cable de alimentación o un conector
distintos,dependiendo de la fuente de alimentación disponible en su instalación. Si debe
cambiar el enchufe, contacte con un técnico cualificado y que este haga referencia a la
tabla siguiente. El filamento verde/amarillo debería ser conectado directamente a la
carcasa de la unidad.
PRECAUCION: Si se elimina la toma de tierra,determinadas condiciones de avería de la
unidad o del sistema al que esté conectada pueden hacer que haya cargas de voltaje de línea
entre el chasis y la toma de tierra.Esto podría producir daños graves o incluso la muerte si
tocase simultáneamente la carcasa y la toma de tierra.
Línea
Neutral
Toma tierra
CONDUCTOR
L
N
Marrón
Azul
Verde/Amarill.
Negro
COLOR CABLE
Blanco
Verde
AVISO SOBRE EL ENCHUFE PARA U.K.
El uso de un conector cortado de otro cable no es seguro. Descarte este tipo de
conexiones. BAJO NINGUNA CIRCUNSTANCIA DEBE INSERTAR UN
CABLE CORTADO O DAÑADO EN UN ENCHUFE DE CORRIENTE DE 13
AMP. No utilice un enchufe de corriente sin que esté colocado la tapa del fusible. Puede
conseguir recambios de estas tapas de fusible en su tienda local. Los fusibles de recambio
son de 13 amps y DEBEN estar aprobados por la ASTA con el standard BS1362.
Los símbolos de aquí arriba están reconocidos internacionalmente como de
advertencia de los riesgos potenciales con aparatos eléctricos.El rayo dentro de un
triángulo equilátero implica que dentro de la unidad existen voltajes peligrosos.El
símbolo de exclamación dentro del triángulo equilátero indica que es necesario que el
usuario lea el manual de instrucciones de la unidad.
Estos símbolos también le advierten que dentro de la unidad no hay ninguna pieza que
pueda ser reparada por el propio usuario.No abra el aparato. Nunca intente hacer ningún
tipo de reparación por sus propios medios.Consulte cualquier posible reparación
únicamente a un Servicio Técnico cualificado.La apertura del chasis por cualquier razón
anulará la garantía del fabricante.No permita que la unidad se humedezca. Si cae algún
líquido en el aparato,apáguelo inmediatamente y llévelo al distribuidor o servicio técnico.
Desconecte la unidad durante las tormentas para evitar daños.
PRECAUCION CON LA PILA DE LITIO
¡ATENCION!
Este producto puede contener una pila de litio.Existe peligro de explosión si la pila es
reemplazada de forma incorrecta.Sustituya esta pila solo por una Eveready CR 2032 o
una equivalente.Asaegúrese de que la pila sea instalada con la polaridad correcta.
Elimine las pilas gastadas de acuerdo a las instrucciones del fabricante de la pila.
ADVARSEL!
Lithiumbatteri - Eksplosjonsfare.Ved utskifting benyttes kun batteri som anbefalt av
apparatfabrikanten. Brukt batteri returneres apparatleverandøren.
ADVARSEL!
Lithiumbatteri - Eksplosionsfare ved fejlagtig håndtering. Udskiftning må kun ske med
batteri av samme fabrikat og type.Levér det brugte batteri tilbage til leverandøren.
VAROITUS!
Paristo voi räjähtää,jos se on virheellisesti asennettu. Vaihda paristo ainoastaan
laitevalmistajan suosittelemaan tyyppin.Hävitä käytetty paristo valmistajan ohjeiden
mukaisesti.
VARNING!
Explosionsfara vid felaktigt batteribyte.Använd samma batterityp eller en ekvivalent typ
som rekommenderas av apparattillverkaren.Kassera använt batteri enligt fabrikantens
instruktion.
COMPATIBILIDAD ELECTROMAGNETICA
Esta unidad cumple con las Especificaciones de producto indicada en la Declaración
de Conformidad.Esto hace que la unidad esté sujeta a las dos condiciones siguientes:
• esta unidad no puede producir interferencias molestas ni dañinas,y
• esta unidad debe recibir cualquier interferencia recibida,incluyendo las que
puedan causar errores no deseados.Debe tratar de evitar el uso de esta
unidad dentro decampos electromagnéticos significativos.
• utilice solo cables de interconexión con blindaje.
INSTRUCCIONES DE SEGURIDAD IMPORTANTES
IMPORTANT SAFETY INSTRUCTIONS
WARNING
FOR YOUR PROTECTION, PLEASE READ THE FOLLOWING:
KEEP THESE INSTRUCTIONS
HEED ALL WARNINGS
FOLLOW ALL INSTRUCTIONS
CLEAN ONLY WITH A DAMP CLOTH
DO NOT BLOCK ANY OF THE VENTILATION OPENINGS, INSTALL IN
ACCORDANCE WITH THE MANUFACTURERS INSTRUCTIONS.
DO NOT INSTALL NEAR ANY HEAT SOURCES SUCH AS RADIATORS, HEAT
REGISTERS, STOVES; OR OTHER APPARATUS (INCLUDING AMPLIFIERS)
THAT PRODUCE HEAT.
ONLY USE ATTACHMENTS/ACCESSORIES SPECIFIED BY THE MANUFACTURER.
UNPLUG THIS APPARATUS DURING LIGHTNING STORMS OR WHEN
UNUSED FOR LONG PERIODS OF TIME
WATER AND MOISTURE:Appliance should not be used near water (e.g. near a bathtub,
washbowl,kitchen sink, laundry tub, in a wet basement,or near a swimming pool, etc). Care
should be taken so that objects do not fall and liquids are not spilled into the enclosure
through openings.
POWERSOURCES: The appliance should be connected to a power supply only of the
type described in the operating instructions or as marked on the appliance.
GROUNDING ORPOLARIZATION: Precautions should be taken so that the grounding
or polarization means of an appliance is not defeated.
POWERCORD PROTECTION: Power supply cords should be routed so that they are
not likely to be walked on or pinched by items placed upon or against them,paying particular
attention to cords at plugs,convenience receptacles, and the point where they exit from the
appliance.
SERVICING:To reduce the risk of fire or electric shock,the user should not attempt to
service the appliance beyond that described in the operating instructions. All other servicing
should be referred to qualified service personnel.
FOR UNITS EQUIPPED WITH EXTERNALLY ACCESSIBLE FUSE RECEPTACLE: Replace fuse with same type and rating only.
MULTIPLE VOL T A GE INPUT:This equipment may require the use of a different line
cord,attachment plug, or both, depending on the available power source at installation.
Connect this equipment only to the power source indicated on the equipment rear panel.To
reduce the risk of fire or electric shock,refer servicing to qualified service personnel or
equivalent.
SAFETY INSTRUCTIONS
NOTICE FOR CUSTOMERS IF YOUR UNIT IS EQUIPPED WITH A
POWER CORD.
WARNING:THIS APPLIANCE MUST BE EARTHED.
The cores in the mains lead are coloured in accordance with the following code:
GREEN and YELLOW - Earth BLUE - Neutral BROWN - Live
As colours of the cores in the mains lead of this appliance may not correspond with
the coloured markings identifying the terminals in your plug,proceed as follows:
• The core which is coloured green and yellow must be connected to the terminal in the plug marked with the letter E,or with the earth symbol, or coloured
green,or green and yellow.
• The core which is coloured blue must be connected to the terminal marked N
or coloured black.
• The core which is coloured brown must be connected to the terminal marked
L or coloured red.
This equipment may require the use of a different line cord,attachment plug, or both,
depending on the available power source at installation. If the attachment plug needs
to be changed,refer servicing to qualified ser vice personnel who should refer to the
table below. The green/yellow wire shall be connected directly to the unit's chassis.
WARNING: If the ground is defeated,certain fault conditions in the unit or in the
system to which it is connected can result in full line voltage between chassis and
earth ground.Severe injury or death can then result if the chassis and earth ground are
touched simultaneously.
U.K. MAINS PLUG WARNING
A moulded mains plug that has been cut off from the cord is unsafe.Discard the mains
plug at a suitable disposal facility.NEVER UNDER ANY CIRCUMSTANCES
SHOULD YOU INSERT A DAMAGED OR CUT MAINS PLUG INTO A 13
AMP POWER SOCKET. Do not use the mains plug without the fuse cover in place.
Replacement fuse covers can be obtained from your local retailer.Replacement fuses
are 13 amps and MUST be ASTA approved to BS1362.
The symbols shown above are internationally accepted symbols that warn of potential
hazards with electrical products.The lightning flash with arrowpoint in an equilateral
triangle means that there are dangerous voltages present within the unit.The exclamation point in an equilateral triangle indicates that it is necessary for the user to refer
to the owner’s manual.
These symbols warn that there are no user serviceable parts inside the unit. Do not
open the unit.Do not attempt to ser vice the unit yourself. Refer all servicing to qualified personnel.Opening the chassis for any reason will void the manufacturer’s warranty.Do not get the unit wet. If liquid is spilled on the unit, shut it off immediately and
take it to a dealer for service. Disconnect the unit during storms to prevent damage.
LITHIUM BATTERY WARNING
CAUTION!
This product may contain a lithium battery.There is danger of explosion if the battery is
incorrectly replaced.Replace only with an Eveready CR 2032 or equivalent. Make sure
the battery is installed with the correct polarity.Discard used batteries according to
manufacturer’s instructions.
ADVARSEL!
Lithiumbatteri - Eksplosjonsfare.Ved utskifting benyttes kun batteri som anbefalt av
apparatfabrikanten. Brukt batteri returneres apparatleverandøren.
ADVARSEL!
Lithiumbatteri - Eksplosionsfare ved fejlagtig håndtering. Udskiftning må kun ske med
batteri av samme fabrikat og type.Levér det brugte batteri tilbage til leverandøren.
VAROITUS!
Paristo voi räjähtää,jos se on virheellisesti asennettu. Vaihda paristo ainoastaan laitevalmistajan suosittelemaan tyyppin.Hävitä käytetty paristo valmistajan ohjeiden
mukaisesti.
VARNING!
Explosionsfara vid felaktigt batteribyte.Använd samma batterityp eller en ekvivalent typ
som rekommenderas av apparattillverkaren.Kassera använt batteri enligt fabrikantens
instruktion.
ELECTROMAGNETIC COMPATIBILITY
This unit conforms to the Product Specifications noted on the Declaration of
Conformity.Operation is subject to the following two conditions:
• this device may not cause harmful interference,and
• this device must accept any interference received,including interference that
may cause undesired operation. Operation of this unit within significant electromagnetic fields should be avoided.
• use only shielded interconnecting cables.
I
Page 3

DECLARATION OF
CONFORMITY
Manufacturers Name: Johnson Amplification
Manufacturers Address:8760 S. Sandy Parkway
Sandy, Utah 84070, USA
declares that the product:
Product Name:
Johnson Mirage JT50
Product Options: None
conforms to the following Product Specifications:
Safety: EN 60065 (1993)
IEC 65 (1985) with
Amendments 1, & 2
EMC: EN 55013 (1990)
EN 55020 (1991)
Supplementary Information:
The product herewith complies
with the requirements of the Low
Voltage Directive 72/23/EEC and
the EMC Directive 89/336/EEC as
amended by Directive 93/68/EEC.
Johnson Amplification
Vice-President of Engineering
8760 S. Sandy Parkway
Sandy, Utah 84070, USA
Tel: 801-566-8800
Fax:801-566-7005
Effective May 19, 1999
European Contact:Your local Johnson
Amplification Sales and Service Office or
Harman Music Group
8760 S. Sandy Parkway
Sandy, Utah 84070, USA
Tel: 801-568-7642
Fax:801-568-7638
DECLARACION DE
CONFORMIDAD
Nombre del Fabricante: Johnson Amplification
Dirección del Fabricante:8760 S.Sandy Parkway
Sandy, Utah 84070, EE.UU.
declara que el producto:
Nombre :
Johnson Mirage JT50
Opciones del Producto: Ninguna
cumple las siguientes Especificaciones de Producto:
Seguridad: EN 60065 (1993)
IEC 65 (1985) con las
Enmiendas 1 & 2
EMC: EN 55013 (1990)
EN 55020 (1991)
Información complementaria:
El producto cumple los requisitos
de la Normativa de Bajo Voltaje
72/23/EEC y la Directiva EMC
89/336/EEC enmendada por la
Directiva 93/68/EEC.
Johnson Amplification
Vicepresidente de diseño
8760 S. Sandy Parkway
Sandy, Utah 84070, EE.UU.
Tel: 801-566-8800
Fax:801-566-7005
En vigor desde Mayo 19, 1999
Contacto Europeo: Su distribuidor o ser vicio
técnico oficial local de Johnson Amplification o
Harman Music Group
8760 S. Sandy Parkway
Sandy, Utah 84070, EE.UU.
Tel: 801-568-7642
Fax:801-568-7638
II
Page 4

Índice
Información de Seguridad ........................................................I
Declaración de Conformidad....................................................II
Garantía....................................................................................III
Índice .......................................................................................III
Sección 1 - Introducción
Felicidades................................................................................1
Elementos incluidos..................................................................1
Características del aparato........................................................1
Inicio Rápido............................................................................2
Un Recorrido Guiado por el JT50/JT100...................................3
El Panel Superior......................................................................3
El Panel Trasero........................................................................4
Acerca del JT50/JT100..............................................................5
La Sección de Amplificación .....................................................5
La Sección de Efectos................................................................5
Selección de Preset...................................................................5
Sección 2 - Utilización del JT50/JT100
Preparación..............................................................................6
Conexiones ...............................................................................6
Alimentación.............................................................................7
Creación o Edición de un Preset ...............................................7
Selección de un Preset ..............................................................7
Selección de un Modelo de Amplificación ................................7
Ajuste de los Controles de Amplificación ..................................8
Adición de Efectos ....................................................................8
Efectos de Modulación/Tono.....................................................8
Puerta de Ruido........................................................................9
Retardo.....................................................................................9
Reverberación...........................................................................10
Almacenamiento/Copia de un Preset .........................................10
Sección 3 - Otras Funciones
Opciones de Pedal de Disparo..................................................11
JT3............................................................................................11
J8..............................................................................................11
Calibración del Pedal de Expresión J8......................................12
Auriculares...............................................................................12
Salida Directa...........................................................................12
Bucle de Efectos.......................................................................13
Reinicialización del JT50/JT100................................................13
Sección 4 - Apéndice
Lista de Presets .........................................................................14
Especificaciones técnicas..........................................................14
En Johnson Amplificationestamos muy orgullosos de nuestros productos y
respaldamos cada uno de los que vendemos con la siguiente
Garantía:
1. Deberá devolvernos por correo esta tarjeta de registro de garantía dentro de los diez
días siguientes a la fecha de compra para que tenga validez.
2. Johnson Amplification garantiza que este producto, solo cuando se use dentro de
EE.UU., está libre de defectos en materiales y mano de obra bajo condiciones de uso y
mantenimiento normales.
3. La responsabilidad de Johnson Amplification por esta garantía queda limitada a la
reparación o sustitución de los materiales defectuosos que muestren evidencias de
fallos, asumiendo que el producto sea devuelto a Johnson Amplification CON
AUTORIZACIÓN DE DEVOLUCIÓN, en cuyo caso quedarán cubiertas todas las piezas y
mano de obra durante un periodo de un año. Para obtener un número de Autorización
de Devolución póngase en contacto con Johnson Amplification por teléfono. La
compañía no será responsable de ningún daño emergente producido por el uso del
producto en cualquier circuito o montaje.
4. La prueba de compra se considera responsabilidad del comprador.
5. Johnson Amplification se reserva el derecho a realizar cambios en el diseño, adiciones
o mejoras en este producto sin por ello incurrir en ninguna obligación de instalar lo
mismo en los productos fabricados previamente.
6. El consumidor pierde los beneficios de esta garantía si la carcasa del producto es
abierta y modificada por cualquier persona que no sea un técnico certificado por
Johnson Amplification o si el producto es utilizado con voltajes de CA fuera del rango
sugerido por el fabricante.
7. Lo anterior invalida cualquier otra garantía, expresa o implícitas, y Johnson
Amplification ni asume ni autoriza a ninguna persona a asumir ninguna obligación o
responsabilidad relativa a la venta de este producto. En ningún caso Johnson Amplification
o sus vendedores serán responsables por los daños emergentes especiales o de cualquier
retraso en la ejecución de esta garantía debido a causas más allá de su control.
Johnson Amplification es una marca registrada de Harman Music Group Incorporated
Nota: La información contenida en este manual está sujeta a cambios en cualquier momento
sin previo aviso. Parte de la información contenida en este manual podría ser también
inexacta debido a cambios no documentados del producto o del sistema operativo desde que
esta versión del manual fue terminada. La información contenida en esta versión del manual
de usuario sutituye a todas las versiones anteriores.
Table of Contents
Safety information.....................................................................I
Declaration of Conformity.........................................................II
Warranty...................................................................................III
Table of Contents......................................................................III
Section 1 - Introduction
Congratulations.........................................................................1
Included Items..........................................................................1
Product Features.......................................................................1
Quick Start................................................................................2
A Guided Tour of the JT50/JT100..............................................3
The Top Panel...........................................................................3
The Rear Panel .........................................................................4
About the JT50/JT100 ...............................................................5
The Amp Section.......................................................................5
The Effects Section....................................................................5
Preset Selection.........................................................................5
Section 2 - Using the JT50/JT100
Getting Started...........................................................................6
Making Connections..................................................................6
Powering...................................................................................7
Creating or Editing a Preset......................................................7
Selecting a Preset......................................................................7
Selecting an Amp Model............................................................7
Adjusting the Amp Controls .......................................................8
Adding Effects ...........................................................................8
Modulation/Pitch Effects...........................................................8
Noise Gate.................................................................................9
Delay.........................................................................................9
Reverb ......................................................................................10
Storing/Copying a Preset...........................................................10
Section 3 - Other Functions
Footswitch Options....................................................................11
JT3............................................................................................11
J8..............................................................................................11
J8 Expression Pedal Calibration................................................12
Headphones..............................................................................12
Direct Output............................................................................12
Effects Loop..............................................................................13
Resetting the JT50/JT100..........................................................13
Section 4 - Appendix
Preset List.................................................................................14
Specifications............................................................................14
We at Johnson Amplification are very proud of our products and back-up each one
we sell with the following
Warranty:
1. The warranty registration card must be mailed within ten days after purchase date to
validate this warranty.
2. Johnson Amplification warrants this product, when used solely within the U.S., to be
free from defects in materials and workmanship under normal use and service.
3. Johnson Amplification liability under this warranty is limited to repairing or replacing
defective materials that show evidence of defect, provided the product is returned to
Johnson Amplification WITH RETURN AUTHORIZATION, where all parts and labor will be
covered up to a period of one year. A Return Authorization number may be obtained
from Johnson Amplification by telephone. The company shall not be liable for any
consequential damage as a result of the products use in any circuit or assembly.
4. Proof-of-purchase is considered to be the burden of the consumer.
5. Johnson Amplification reserves the right to make changes in design, or make additions
to, or improvements upon this product without incurring any obligation to install the
same on products previously manufactured.
6. The consumer forfeits the benefits of this warranty if the product’s main assembly is
opened and tampered with by anyone other than a certified Johnson Amplification
technician, or if the product is used with AC voltages outside of the range suggested by
the manufacturer.
7. The foregoing is in lieu of all other warranties, expressed or implied, and Johnson
Amplification neither assumes nor authorizes any person to assume any obligation or
liability in connection with the sale of this product. In no event shall Johnson
Amplification or its dealers be liable for special consequential damages or from any
delay in the performance of this warranty due to causes beyond their control.
Johnson Amplification is a registered trademark of the Harman Music Group Incorporated
Note: The information contained in this manual is subject to change at any time without
notification. Some information contained in this manual may also be inaccurate due to
undocumented changes in the product or operating system since this version of the manual
was completed. The information contained in this version of the owner’s manual supersedes
all previous versions.
III
Page 5

Sección-1
Introducción
Felicidades por la compra del Johnson Mirage
JT50/JT100!
Y gracias por elegir Johnson Amplification.
El Johnson Mirage JT50 y JT100 son extremadamente versátiles y
fáciles de usar y proporcionan algunos de los sonidos de amplificador
más buscados del mundo. Con 12 modelos diferentes de amplificación
de alta calidad, una amplia gama de efectos de modulación y tono,
retardo y reverberación diferentes y la interfaz más fácil de usar a su
disposición, los amplificadores de la serie Mirage fijan un nuevo
standard de lo que debería ser un amplificador con modelado. Este
Manual de Instrucciones le ayudará a saber cómo sacar todo el partido
del JT50 y del JT100. Léalo con atención y familiarícese con los
controles de su amplificador. Seguro que tendrá interminables horas
de satisfacción sonora si lo hace.
Su Mirage ha sido cuidadosamente montado y embalado en fábrica.
Antes de seguir adelante, asegúrese de que están incluidos los
siguientes elementos:
• (1) Manual de Instrucciones
• (1) Amplificador Johnson Mirage JT50 o JT100
• (1) Tarjeta de Garantía de Johnson Amplification
• (1) Cable de Alimentación Extraíble
Dedique un par de minutos a rellenar la tarjeta de registro de
garantía y asegúrese de guardar todos los materiales de embalaje.
La garantía es su salvavidas para el improbable caso de que la
unidad tenga que se reparada, y los materiales del embalaje son los
que debería usar para devolvernos la unidad.
Una vez más, gracias por su compra y estamos seguros de que
disfrutará de su JT50/JT100.
Características del Mirage
JT50/JT100:
• Etapa de Potencia de 50 w (JT50) o 100 w Stereo (JT100)
• Altavoces de 12” Johnson Premium
• Modelado de Tecnología Válvula-V Digital
• 12 Modelos de Amplificación Diferentes
• 3 Efectos simultáneos
• 24 Bits A/D/A
• 24 Bits DSP
• Salida Directa Compensada de Auriculares/Altavoces
• Acceso de Módulo Instantáneo
• Pedal de Control Opcional JT3 y J8
• Interfaz de Usuario Sencilla
1
Johnson Mirage User’s Guide Section One - Introduction
Section-1
Introduction
Congratulations on your purchase of the Johnson
Mirage JT50/JT100!
And thank you for choosing Johnson Amplification.
The Johnson Mirage JT50 and JT100 are extremely versatile and
easy to use, and deliver several of the most sought after amp tones
in the world. With 12 different high quality amp models, a host of
various modulation and pitch shifting effects, delay, reverb, and the
easiest to use interface at your command, the Mirage Series amps
set a new standard for what a modeling amp should be. This User’s
Guide will help you in understanding how to get the most out of the
JT50 and JT100. Please read it carefully and familiarize yourself with
the controls on your amp. You’re sure to have endless hours of
audio satisfaction by doing so.
Your Mirage was carefully assembled and packaged at the factory.
Before you proceed any further, make sure the following items are
included:
• (1) User’s Guide
• (1) Johnson Mirage JT50 or JT100 Amplifier
• (1) Johnson Amplification Warranty Card
• (1) Detachable Power Cord
Please take a moment to fill out the warranty registration card, and
be sure to save all packing materials. The warranty is your safeguard
in the unlikely event that the unit requires servicing, and the packing
materials should be used to return the unit.
Once again, thank you for your purchase, and we are sure you will
enjoy your JT50/JT100.
Mirage JT50/JT100
Features:
• 50 Watt (JT50) 100 Watt Stereo (JT100) Power Amp
• 12” Johnson Premium Loud Speaker(s)
• Digital V-Tube Technology Modeling
• 12 Different Amp Models
• 3 Effects at Once
• 24 Bit A/D/A
• 24 Bit DSP
• Headphone/Speaker Compensated Direct Out
• Instant Module Access
• Optional JT3 and J8 Foot Controller
• Simple User Interface
Manual del Johnson Mirage Sección Uno - Introducción
Page 6
Quick Start
The JT50 and JT100 come with 21 pre-programmed user Presets. These
Presets were designed to provide you with a wide array of sounds perfect
for a variety of musical applications. The straight forward controls makes
Preset selection and fine tuning the effects a breeze. Programming menus
have been replaced with clearly labeled knobs making Preset creation easy.
For those of you who prefer to burn now and read later, we’ve included
this Quick Start section to get you up and running.
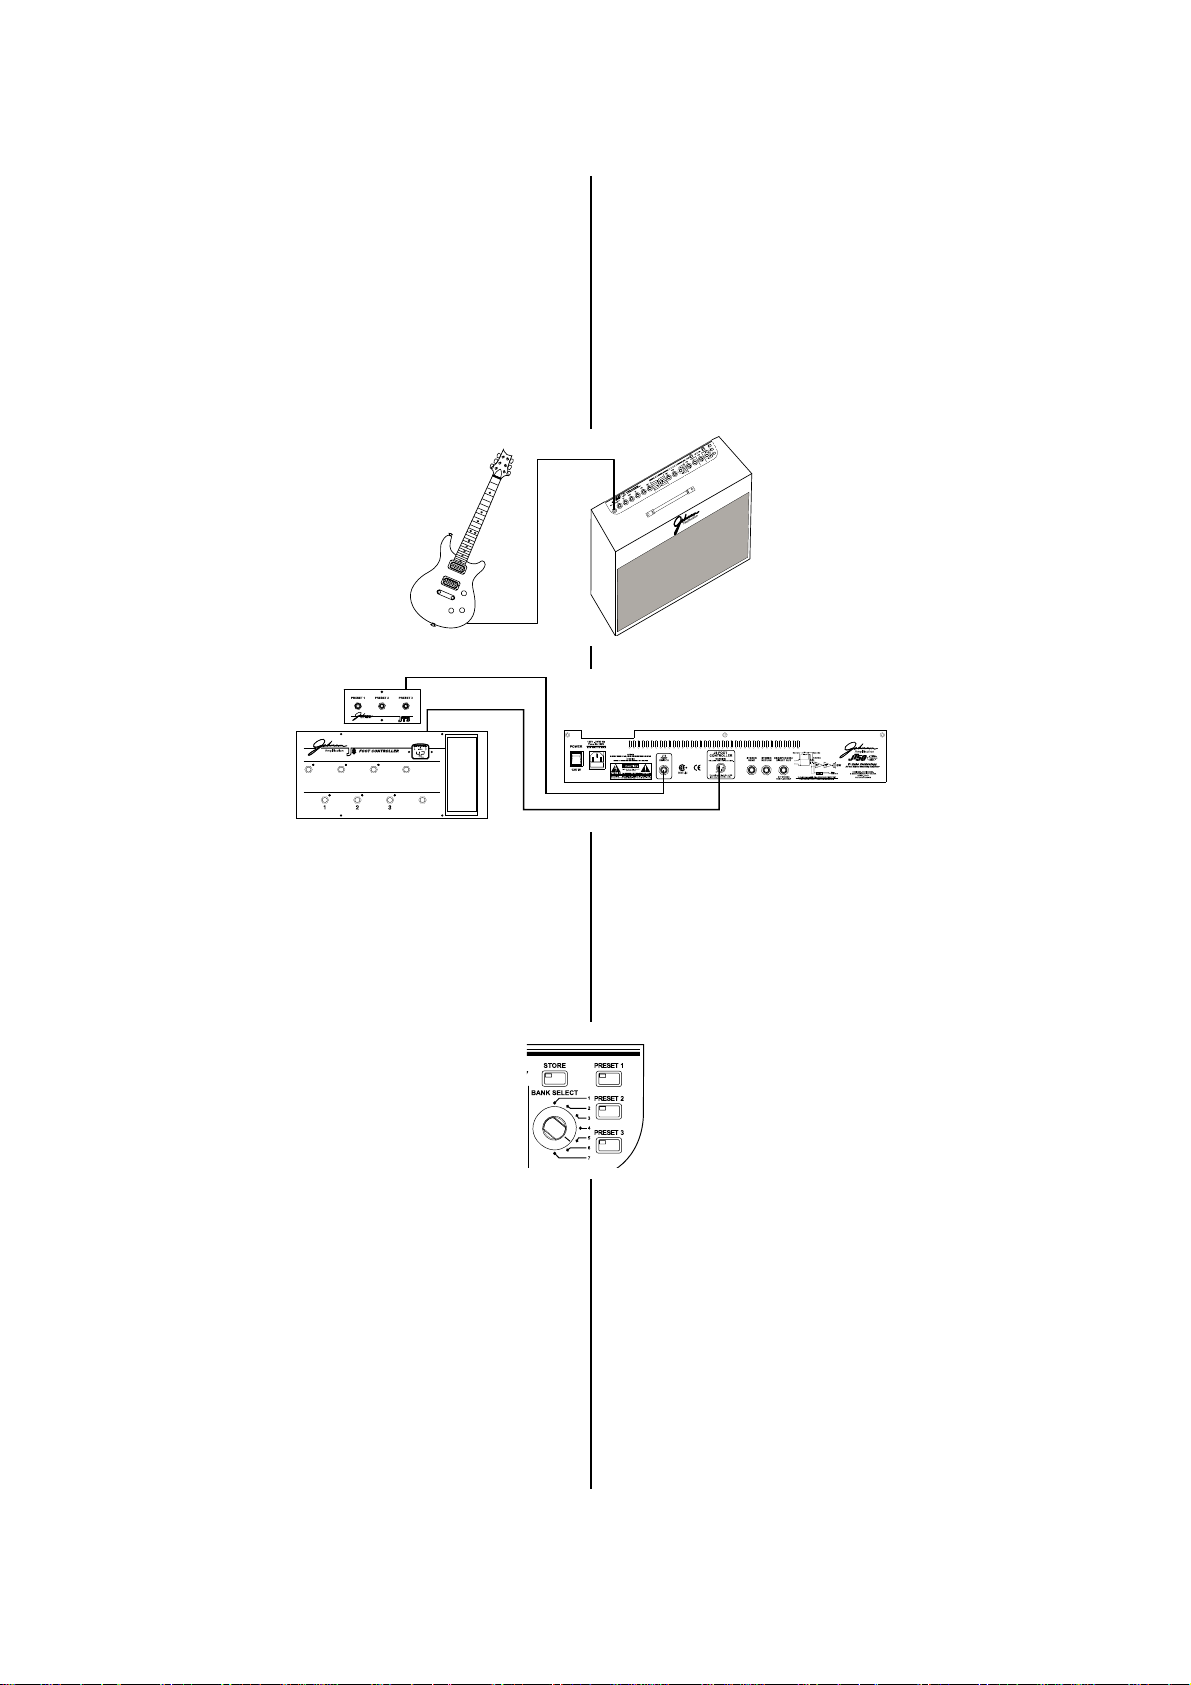
Making Connections:
Connect your instrument to the input jack on
the top panel of the Mirage JT50 or JT100.
Optional Foot Controller Connections:
Connect the optional JT3 footswitch or J8 foot
controller to the designated jacks on the rear
panel.
Warning: Do not connect anything but the J8 foot controller to the
J8 controller jack on the rear panel of the Mirage.
Doing so may damage the device.
Apply Power:
Turn the Master Volume on the JT50/JT100 all the way down. Turn the
power switch to the on position. Gradually increase the master volume
control to achieve the desired level.
Select Preset:
Use the Bank Select knob and the Preset 1, 2, and 3 buttons to
audition the different presets. Once you have found presets that
suit your taste, you can alter the sounds to meet your specific
needs.
Each of the effects will have specific knobs, which will vary the values of
their associated parameters. The amp section has a Gain, Bass, Mid,
Treble, and Preset Level knob, as well as a 12 position knob to select your
Amp Type. The Mod/Pitch Effects section has a Speed/Level and Depth/Gate
knob along with a 7 position knob to choose from the 6 types of Effects or
Effects bypass. The Delay section has a Level/Time, and Feedback knob and
includes a Tap-It/Shift button to synchronize the delay time with the tempo
of the music. The Reverb section has a Level/Type knob which varies the
Level of reverb in your mix. You can adjust any of these parameters to your
liking, and your adjustments and creations can be stored to any of the 21
User Preset Locations.
Inicio Rápido
El JT50 y JT100 vienen con 21 Presets de usuario pre-programados. Estos
Presets han sido diseñados para darle una gran variedad de sonidos perfectos
para una amplia gama aplicaciones musicales. Los controles de manejo directo
hacen que la selección de los Presets y la afinación precisa de los efectos sea
muy sencilla. Los menús de programación han sido sustituidos por mandos
giratorios claramente marcados lo que hace muy sencilla la creación de Presets.
Para los que prefieran empezar ahora y leer más tarde, hemos incluido esta
sección de Inicio Rápido para que puedan empezar ahora mismo.
Conexiones:
Conecte su guitarra al conector jack de entrada
que hay en el panel superior del Mirage JT50 o
del JT100.
Conexiones del Controlador de Pedal
Opcional:
Conecte el pedal de disparo opcional JT3 o la
pedalera J8 a los conectores jack específicos
del panel trasero.
Aviso: No conecte nada excepto el controlador de pedal J8 al
conector jack de controlador J8 del panel trasero del
Mirage. El hacerlo puede dañar la unidad.
Encendido:
Gire el Volumen General del JT50/JT100 hasta abajo del todo. Cambie el
interruptor de alimentación a la posición de encendido (on). Aumente
gradualmente el control de volumen general para conseguir el nivel deseado.
Selección de Preset:
Use el mando giratorio de Selección de Banco y los botones de
Preset 1, 2 y 3 para escuchar los distintos presets. Una vez que
haya encontrado el que le guste, puede alterar los sonidos para
adecuarlos a sus necesidades específicas.
Cada uno de los efectos tiene mandos giratorios específicos, que varian los
valores de sus parámetros asociados. La sección de amplificación dispone
de mandos de Ganancia, Graves, Medios, Agudos y Nivel de Preset, así como
un mando giratorio de 12 posiciones para seleccionar su tipo de
Amplificador. En la sección de Efectos Mod/Tono tiene los mandos de
Velocidad/Nivel y Profundidad/Puerta junto con un mando de 7 posiciones
para elegir entre los 6 tipos de Efectos o anulación de Efectos. La sección
de Retardo tiene los mandos de Nivel/Tiempo y de Realimentación e incluye
un botón Marcación/Cambio para sincronizar el tiempo de retardo con el
tempo de la música. La sección de Reverberación tiene un mando
Nivel/Tipo que varía el Nivel de reverberación de la mezcla. Puede ajustar
cualquiera de estos parámetros a su gusto y puede almacenar sus ajustes y
creaciones en cualquiera de las 21 Posiciones de Preset de Usuario.
2
Mod /
Pitch
Delay Reverb Bank Up
(Hold) Tuner
Bank Down
Manual del Johnson Mirage Sección Uno - IntroducciónJohnson Mirage User’s Guide Section One - Introduction
Page 7

Un Recorrido Guiado por
el Mirage JT50/JT100
El Panel Superior
1.
Entrada -
En este conector jack de 1/4” es donde debe conectar su
guitarra al Mirage JT50/JT100.
2. Volumen General - Este mando giratorio se usa para controlar el
volumen general de salida del JT50/JT100.
3. Controles de Amplificación - Estos mandos giratorios controlan la
Ganancia, Ecualización y Niveles de cada Modelo de Amplificación. Los
controles de EQ de los amplificadores de la serie Mirage usan los mismos
puntos de EQ que los famosos amplificadores que emulan. Si elige el Black
Face como Modelo de Amplificación, los controles de tono del Mirage
responderán exactamente igual que si estuviera usando el mítico
amplificador Black Face.
3a) Ganancia - Este mando controla la cantidad de ganancia de
distorsión (drive) de cada Modelo de Amplificación.
3b) Agudos - Este control giratorio se usa para aumentar o
disminuir la cantidad de realce de agudos.
3c) Medios - Este mando giratorio se usa para aumentar o
disminuir la cantidad de realce del rango medio.
3d) Graves - Este mando giratorio se usa para aumentar o
disminuir la cantidad de realce de graves.
3e) Nivel - Este mando giratorio se usa para ajustar el nivel de
volumen de cada preset.
4. Tipo de Amplificador - Este mando se usa para elegir entre los
Modelos de Amplificación que tiene disponibles en el JT50/JT100. Cada
una de las 12 posiciones del mando da acceso a distintos tipos de Modelo.
El puntero del mando indica el Modelo seleccionado en ese momento.
5) V elocidad/Nivel - Este mando ajusta la velocidad a la que se realiza el
barrido del efecto de Modulación seleccionado. Cuando el efecto de Cambio de
Tono está seleccionado, este mando ajustará el intervalo del cambio de tono. En
el JT50, este mando también actúa como un control de Nivel para los Efectos de
Modulación si se usa junto con el botón de Marcación/Cambio.
Nota: El JT100 incluye un mando de Nivel que controla el nivel de
los Efectos seleccionados. Vea la página 9 para más información
acerca del ajuste del Nivel Mod/Tono del JT50.
6) Profundidad/Puerta -
Este mando ajusta la profundidad o intensidad
del efecto de modulación. Cuando está seleccionado el efecto Cambio de
Tono, este mando ajusta la cantidad de desafinación añadida al tono
modificado. Este mando también actúa como un control de Umbral de
Puerta de ruidos cuando se usa junto con el botón Marcación/Cambio. Vea
la página 9 para más información sobre los ajustes de Puerta.
7) Selección de Mod/Tono- Este mando se usa para elegir uno de los
distintos tipos de efectos de Modulación y Cambio de Tono disponibles en
el JT50/JT100. Los efectos Mod/Tono incluyen Chorus, Cambiador de Fase,
Flanger, Trémolo, Vibrato y Cambio de Tono. El puntero del mando indica
el efecto Mod/Tono seleccionado. Si gira este mando hasta la posición
inferior anulará la sección Mod/Tono.
8) Nivel/Tiempo - Este mando ajusta el volumen del efecto de Retardo.
Este mando también ajusta el tiempo de Retardo si se usa junto con el
botón Marcación/Cambio. Vea la página 9 para más información sobre los
ajustes del Tiempo de Retardo.
9) Realimentación - Este mando ajusta el número de repeticiones del
Retardo.
3
A Guided Tour of the
Mirage JT50/JT100
The Top Panel
1. Input - This 1/4” jack is where you connect your instrument to the
Mirage JT50/JT100.
2. Master Volume - This knob is used to control the overall output
volume on the JT50/JT100.
3. Amp Controls - These knobs control the Gain, Equalization and Levels
for each Amp Model. The EQ controls on the Mirage Series amplifiers use
the same authentic EQ points as the famous amps that are being emulated.
If you choose the Black Face as your Amp Model, the tone controls on the
Mirage will respond exactly as if you were using that vintage Black Face
Amplifier.
3a) Gain - This knob controls the amount of distortion gain
(drive) for each Amp Model.
3b) Treble - This knob is used to increase or decrease the
amount of treble enhancement.
3c) Mid - This knob is used to increase or decrease the
amount of mid-range enhancement.
3d) Bass - This knob is used to increase or decrease the
amount of bass enhancement.
3e) Level - This knob is used to set the volume level of each
preset.
4. Amp Type - This knob is used to select the Amplifier Models that the
JT50/JT100 have available. Each of the 12 positions of this knob will access
a different type of Amp Model. The pointer on the knob indicates the
currently selected Amp Model.
5) Speed/Level - This knob adjusts the rate that the selected Modulation
effect sweeps back and forth. When the Pitch Shift effect is selected, this
knob will adjust the interval of the shifted pitch. On the JT50, this knob
also functions as a Level control for the Modulation Effects when used in
conjunction with the Tap-It/Shift button.
Note: The JT100 includes a Level knob which controls the selected
Effects level. See page 9 for information on adjusting the
Mod/Pitch Level for the JT50.
6) Depth/Gate -
This knob will adjust the depth or intensity of the
modulation effect. When the Pitch Shift effect is selected, the Depth
knob will adjust the amount of detune added to the shifted pitch. This knob
also functions as a Gate Threshold control when used in conjunction with
the Tap-It/Shift button. See page 9 for more information on Gate
adjustments.
7) Mod/Pitch Select- This knob is used to select one of the different
types of Modulation and Pitch Shifting effects available in the JT50/JT100.
The Mod/Pitch effects include Chorus, Phaser, Flanger, Tremolo, Vibrato
and Pitch Shift. The pointer on the knob will indicate the currently selected
Mod/Pitch effect. Rotating this knob to the bottom position will bypass the
Mod/Pitch effect section.
8) Level/Time - This knob adjusts the volume of the Delay effect. This
knob also adjusts the Delay time when used in conjunction with the TapIt/Shift button. See page 9 for more information on Delay Time
adjustments.
9) Feedback - This knob adjusts the number of Delay repeats.
12 3 4 567 891113
10 12
14
Johnson Mirage User’s Guide Section One - Introduction
Manual del Johnson Mirage Sección Uno - Introducción
Page 8

10) Tap It/Shift - This button is used to set up the Delay time of the
Delay effect. Tapping this button in time with the music will synchronize the
Delay repeats with the tempo of the song. This button also functions as a
shift key to change the function of the knobs labeled with Shift functions.
11) Reverb Level /Type- This knob adjusts the volume of the reverb
effect. This knob is also used to select Reverb Types when used in
conjunction with the Shift key. See page 10 for more information on
Selecting Reverb Types.
12) Store - This button is used to store your custom settings to one of the
User Bank and Preset locations. The store button will light when changes
have been made to a Preset indicating that changes will be lost if they are
not stored. Once the Store button has been pressed, the Store button will
flash indicating that you need to select the location to store the settings to.
Use the Bank Select knob to choose the Bank and the 1, 2, or 3 buttons to
choose the Preset, and then press the Store button again.
13) Bank Select - This knob is used to select the Banks of Presets. There
are 7 different Banks to choose from and each Bank contains three
different Presets. The pointer on the knob will indicate the currently
selected Bank.
Note: The J8 Footcontroller can override the Bank Select Switch.
14) Preset 1, 2, 3 Buttons - These three buttons are used to select
Presets within the currently selected Bank. Each Preset can have different
stored settings for Amp Type, Gain, EQ, Level, and Effects. The Preset
button will light to indicate which Preset is currently active. If none of the
Preset buttons are lit, the active Preset does not reside in the selected
Bank.
The Rear Panel
1) Power Switch - Engages or disengages power to the Mirage
JT50/JT100.
2) Power Receptacle - Connect the detachable power cord to this jack.
The rectangular drawer under the receptacle is the
fuse holder. Use only the fuse size and rating as specified on the back of
your amp.
3) JT3 Foot Switch Jack - This TRS jack is for connecting the optional
Johnson JT3 foot switch. The JT3 requires a stereo cable with a 1/4” TRS
plug for connecting to the JT50/JT100.
4) J8 Foot Controller Jack - This 5 pin DIN jack is for connecting the optional
Johnson J8 foot controller only. THIS IS NOT A MIDI CONNECTION.
Connecting a MIDI device to this jack could damage the device.
5) Stereo Send - This stereo TRS jack is used to connect from the
JT50/JT100 to the inputs of an external effect device.
6) Stereo Return - This stereo TRS jack is used to connect from the
outputs of an external effect device to the JT50/JT100 . It is an input to the
power amp of the JT50/JT100.
* Note: The effect loop of the Mirage JT50/JT100 is designed for
use with rack mount effects only. The Loop send level may not be
suitable for pedal type effects and may overdrive their input
stage.
7) Headphone Jack - This stereo TRS jack is used to connect a pair of
stereo headphones. It can also be used as a speaker compensated output
for direct to mixing console connections.
10) Marcación/Cambio - Este botón se usa para ajustar el tiempo de
Retardo del efecto de Retardo. Si va pulsando este botón siguiendo el
ritmo de la música, sincronizará las repeticiones de Retardo con el tempo
de la canción. Este botón también actúa como una tecla de cambio para
variar la función de los mandos marcados con funciones de cambio.
11) Nivel de Reverberación/Tipo- Este mando ajusta el volumen del
efecto de reverberación. También se usa para elegir los Tipos de
Reverberación cuando se utiliza con la tecla de Cambio. Vea más
información sobre la Selección de Tipos de Reverberación en la página 10.
12) Almacenamiento - Este botón se usa para guardar sus propios
ajustes en una de las posiciones de Banco de Usuario y de Preset. El botón
Store se iluminará cuando realice cambios en un Preset para indicarle que
los perderá si no los almacena. Una vez pulsado el botón Store, volverá a
parpadear indicando que debe seleccionar la posición en la que guardar
los cambios. Use el mando Bank Select para elegir el Banco y los botones
1, 2 y 3 para elegir el Preset y pulse el botón Store otra vez.
13) Selección de Banco - Este mando se utiliza para seleccionar los
Bancos de Presets. Hay 7 Bancos diferentes entre los que elegir y cada
Banco contiene tres Presets distintos. El puntero del mando indicará el
Banco seleccionado en ese momento.
Nota: El controlador de pedal J8 puede sustituir al Interruptor de
Selección de Banco.
14) Botones de Preset 1, 2, 3 -
Estos tres botones se usan para elegir
Presets dentro del Banco seleccionado en ese momento. Cada Preset
puede tener diferentes ajustes guardados para el Tipo de Amplificador,
Ganancia, Ecualización, Nivel y Efectos. El botón de Preset se iluminará
para indicar el Preset que está activo. Si ninguno de los botones está
encendido, es que el Preset activo no reside en el Banco seleccionado.
El Panel Trasero
1) Interruptor de Encendido - Enciendo o apaga el Mirage
JT50/JT100.
2) Conector de Alimentación - Conecte el cable de alimentación
extraíble en este conector. El hueco rectangular que está debajo del
enchufe es el hueco para el fusible. Use sólo un fusible del tipo y tamaño
que viene especificado en la parte posterior de su amplificador.
3) Toma de Pedal de Disparo JT3 - Este jack TRS es para la conexión
del pedal de disparo opcional Johnson JT3. El JT3 requiere un cable stereo
con un enchufe de 1/4” TRS para la conexión con el JT50/JT100.
4) Toma de pedalera J8 - Esta toma DIN de 5 puntas es para conectar
sólo el controlador de pedal Johnson J8.
NO ES UNA CONEXION MIDI. Si
conecta una unidad MIDI a este jack podría dañar la unidad.
5) Envío Stereo - Este conector TRS stereo se usa para una conexión
desde el JT50/JT100 a las entradas de una unidad de efectos externa.
6) Retorno Stereo - Este jack stereo TRS se usa para hacer conexiones
desde las salidas de una unidad de efectos externa al JT50/JT100. Esta
toma entra directamente a la etapa de potencia del JT50/JT100.
* Nota: El bucle de efectos del Mirage JT50/JT100 está diseñado
sólo para su uso con efectos de tipo rack. El nivel de envío del
Bucle puede no ser adecuado para efectos de pedal y podría
sobrecargar su fase de entrada.
7) Jack de Auriculares -
Esta toma TRS stereo se usa para la conexión
de un par de auriculares stereo. También puede usarlo como salida de
altavoz compensada para realizar conexiones directas a mesa de mezclas.
4
12 3 4 567
Manual del Johnson Mirage Sección Uno - IntroducciónJohnson Mirage User’s Guide Section One - Introduction
Page 9

About the Mirage
JT50/JT100
The Johnson Mirage JT50 and JT100 are extremely versatile and easy to
use. For ease of operation, the JT50 and JT100 have been divided in to
two sections: the Amp section and the Effects section.
The Amp Section
The Amp Section is located on left half of the control panel. This section
includes the Master Volume, Gain, Tone, and Level control knobs, and the
Amp Type selector switch. The first six knobs control Master Volume
(main amp volume control), Gain (amp drive or distortion), Treble, Mid,
and Bass (tone controls), and Level (preset level). The Amp Type selector
switch selects 1 of the 12 amp models in the JT50/100. Each click of this
switch selects a new model. Together, these knobs provide you the control
to shape your basic tone.
Effects Section
The Effects Section is located on the mid-right half of the control panel.
This section includes the Modulation/Pitch, Delay, and Reverb effects
controls. Each of these sections has knobs dedicated to adjust various
aspects of their effects. The Modulation/Pitch section also uses a selector
switch to select one of 6 different effects per preset. These effects are
Chorus, Phaser, Flanger, Vibrato, Tremolo, Pitch/Detune, or Bypass for no
effect. The Speed/Level and Depth/Gate knobs control Speed and Depth in
all effects except Pitch/Detune where Speed controls Pitch Shift amount
and Depth controls Detune amount. A third control is the Level control for
each effect. See page 9 for more information on accessing the Level
function on the JT50.
The Delay section includes the Level/Time and Feedback knobs and a TapIt/Shift button. The Level knob controls the output level of the delay. The
Feedback knob controls the number of delay repeats. The Tap-It/Shift
button sets the delay time by tapping in the tempo. This is great for
synchronizing your delay time with the beat of the music by tapping this
button in tempo with the song. To bypass the delay, turn the Delay Level
knob to 1. See page 9 for more information on accessing the Delay Time
Parameter.
The Reverb section has a single Level/Type knob to control the output level
of the reverb. To bypass the reverb, turn the Reverb Level knob to 1. See
page 10 for more information on accessing the Reverb Type Parameter.
Preset Section
The Preset Section located on the far right side of the control panel. This
section includes the Bank Select switch, Preset buttons, and Store button.
The Bank Select switch selects 1 of the 7 banks available. The Preset 1-3
buttons select 1 of the 3 presets available in the selected Bank. Recalling
a Preset is done by selecting a Bank and/or pressing one of the 3 flashing
Preset buttons. The Amp and Effect knobs will not necessarily represent
the sound you hear when selecting a new preset. Turning a knob at least
one whole value will update the parameter to the knobs current position.
Any changes made to Presets must be stored to a Bank and Preset
location using the Store Button if you want to recall them later.
See page 10 for more information on saving or copying presets.
Acerca del Mirage
JT50/JT100
Los Johnson Mirage JT50 y JT100 son extremadamente versátiles y fáciles
de usar. Para facilitar su manejo, los JT50 y JT100 han sido divididos en
dos secciones: la sección de Amplificación y la sección de Efectos.
Sección de Amplificación
La Sección de Amplificación está en la mitad izquierda del panel de control.
Incluye los mandos de control de Volumen General, Ganancia, Tono y Nivel
y el selector de Tipo de Amplificación. Los seis primeros mandos controlan
el volumen master (control principal de volumen del amplificador), la
ganancia (drive o distorsión del amp), agudos, medios y graves (controles
de tono) y nivel(nivel de preset). El selector de Tipo de Amp elige 1 de los
12 modelos de amplificación del JT50/JT100. Con cada clic elige un nuevo
modelo. Juntos, estos mandos dan control para modelar su tono básico.
Sección de Efectos
La Sección de Efectos se encuentra en la parte central derecha del panel
de control. Incluye los controles de efectos Modulation/Pitch, Delay y
Reverb. Cada una de estas secciones tiene mandos giratorios específicos
para el ajuste de los distintos aspectos de sus efectos. La sección
Modulación/Tono también usa un interruptor selector para elegir entre 6
aspectos distintos por preset. Estos efectos son Chorus, Modulador de
Fase, Flanger, Vibrato, Trémolo, Tono/Desafinación o Anulación para no
tener efecto. Los mandos Speed/Level y Depth/Gate controlan la Velocidad
y Profundidad en todos los efectos excepto en el de Tono/Desafinación,
donde Speed controla la cantidad de Cambio de Tono y Depth controla la
cantidad de Desafinación. Un tercer control es el de Nivel para cada efecto.
Vea la página 9 para más información acerca de cómo acceder a la
función Nivel en el JT50.
La sección de Retardo incluye los mandos Level/Time y Feedback y un
botón Tap-It/Shift. El mando Level controla el nivel de salida del retardo. El
mando Feedback controla el número de repeticiones del retardo. El botón
Tap-It/Shift ajusta el tiempo de retardo al marcar el tempo pulsando el
botón. Esto es bueno para sincronizar su tiempo de retardo al ritmo de la
música pulsando este botón en el tempo con la canción. Para anular el
retardo, gire el mando Level hasta 1. Vea la página 9 para más información
acerca de cómo acceder al Parámetro Tiempo de Retardo.
La sección Reverberación tiene un solo mando giratorio Level/Type que
controla el nivel de salida de la reverberación. Para anular la
reverberación, gire el mando Level hasta 1. Vea
la página 10 para más información acerca de
cómo acceder al Parámetro Tipo de
Reverberación.
Sección Preset
La Sección Preset está en la parte derecha del panel de control. Incluye el
interruptor Bank Select, los botones Preset y el botón Store. El interruptor
Bank Select elige 1 de los 7 bancos disponibles. Los botones Preset 1-3
seleccionan 1 de los 3 presets disponibles en el Banco seleccionado. Para
cargar un Preset, elija un Banco y/o pulse uno de los 3 botones Preset
parpadeantes. Los mandos Amp y Effect no representarán necesariamente
el sonido que escuche cuando seleccione un nuevo preset. Si gira un
mando al menos un valor completo actualizará el parámetro a la
posición actual de los mandos. Cualquier cambio en los Presets
puede ser guardado en una posición de Banco y Preset usando el
botón Store si quiere cargarlos más tarde. Vea la página 10 para
más información sobre guardar o copiar presets.
5
Johnson Mirage User’s Guide Section One - Introduction Manual del Johnson Mirage Sección Uno - Introducción
Page 10

Section 2 - Using the
Mirage JT50/JT100
Getting Started
Making Connections
The Mirage JT50 and JT100 include the necessary options to use the amps
live, at home, or in studio applications. The following diagrams outline a
few of these set up options.
Plug and Play
The JT50/JT100 come ready to play from the factory. Just connecting your
guitar to the input is the only connection required to get great sounds.
Direct Out
The Headphone output on the JT50 and JT100 provides a speaker
compensated direct output for connecting to a recording console, or a
house PA system. This type of a set up allows you to deliver your sound to
the mixer without the use (or ambient noise) of a microphone. The direct
out is a stereo signal at a single 1/4” TRS jack. To access the stereo direct
out signal, you need to use a stereo Y cord with a TRS male 1/4” plug.
Connect the male TRS plug to the headphone jack on the JT50/JT100. Then
connect each end of the Y to individual channels on the mixer. Using the
Headphone Direct Out disables the speaker(s) in the JT50/JT100. To
enable the speaker while using the direct out, press the Tap-It/Shift button
while inserting the plug into the Headphone jack.
Sección 2 - Uso del
Mirage JT50/JT100
Preparación
Conexiones
Los Mirage JT50 y JT100 incluyen todo lo necesario para usarlos en
directo, en casa o en aplicaciones de estudio. Los siguientes diagramas le
describen algunas de estas opciones de configuración.
Conectar y Tocar
Los JT50/JT100 vienen listos de fábrica para tocar. El conectar su guitarra
a la entrada es la única conexión necesaria para tener grandes sonidos.
Salida Directa
La salida de Auriculares del JT50 y JT100 le ofrece una salida directa
compensada de altavoz para la conexión a una mesa de grabación o a un
sistema casero de PA. Este tipo de configuración le permite enviar su
sonido a la mesa de mezclas sin tener que usar (ruido ambiente) un
micrófono. La salida directa es una señal stereo en un único conector TRS
de 1/4”. Para acceder a la señal stereo de salida directa, deberá usar un
cable stereo en Y con una clavija TRS macho 1/4”. Conecte la clavija TRS
macho a la toma de auriculares del JT50/JT100. Después conecte cada
extremo de la Y a canales individuales del mezclador. El uso de la Salida
Directa desactiva los altavoces del JT50/JT100. Para activar el altavoz
mientras usa la salida directa, pulse el botón Marcación/Cambio mientras
inserta el conector en el jack
de Auriculares.
6
Salida
stereo
Entradas de
la etapa de
potencia
Cable stereo en "Y"
con conector de
auriculares
Salidas de la etapa de potencia
Power amplifier outputs
Power amplifier
inputs
Stereo
outputs
Stereo "Y" cable
with phones connector
Manual del Johnson Mirage Sección Dos - Uso del Mirage JT50/JT100Johnson Mirage User’s Guide Section Two - Using the Mirage JT50/JT100
Page 11

Foot Controller Connections
The Mirage JT50 and JT100 provide the option of being controlled
remotely with the JT3 Footswitch or J8 Footcontroller. On the rear panel
you will find a single 5 pin DIN jack for connecting the optional J8 foot
controller. Simply use the cable provided with the J8 to connect it to the
controller input on the JT50/JT100. The J8 provides several access options
and adds a tuner and Wah capabilities to the Mirage Amps. See page 11 for
more information on using the J8 with the Mirage. The JT3 can be
connected to the JT3 jack on the back of the JT50/JT100 using a 1/4”
stereo TRS cable. See page 11 for more information.
Warning: Do not connect anything other than the J8 to the J8
controller jack on the back of the JT50/JT100. Doing so may
damage the device.
Powering the JT50/JT100
Once the necessary connections have been made, turn the master volume
on the JT50/JT100 all the way down (counterclockwise). Turn the power
switch located on the rear panel to the “on” position. Begin playing the
guitar and gradually increase the master volume until the desired level is
achieved.
Creating or Editing a
Preset
The Mirage JT50 and JT100 have made preset creation very simple. The
layout of the Amp and Effects on the control panel make editing as easy as
turning a knob. When creating a Preset in the Mirage JT50/JT100, you
must start by selecting an existing Preset. It is not possible to start with a
blank Preset.
Selecting a Preset
The JT50/JT100 come with 21 different Presets from the factory. To select a
preset, simply rotate the Bank Select knob and press one of the 1-3 Preset
buttons located on the far right side of the control panel. Once you have
selected a Preset as your starting point, you can choose an Amp Type, set
the Gain, EQ, and Level of the amp, add your choice of Modulation or Pitch
Shifting Effects, and tailor the Delay and Reverb to create that classic tone
you’ve been looking for, or your own signature sound.
Selecting an Amp Model
The 12 Amp Models available with the JT50/JT100 can be selected by
rotating the Amp Type knob until the pointer lines up with the desired
Model. The Amp Models available are as follow:
Marshall® is a registered trademark of Marshall Amplification Plc.
Vox® is a registered trademark of Korg UK. Fender, Matchless, and
Mesa Boogie, are trademarks of their respective companies and are in no
way associated with Johnson Amplification.
Conexiones de Controlador de Pedal
Los Mirage JT50/JT100 dan la opción de ser controlados de forma remota con
el Pedal de Disparo JT3 o con la pedalera J8. En el panel trasero encontrará
un único conector DIN de 5 puntas para la conexión de la pedalera opcional
J8. Simplemente use el cable suministrado con el J8 para conectarlo a la
entrada de controlador del JT50/JT100. EL J8 le ofrece diversas opciones de
acceso y añade funciones de afinador y Wah a los Amplificadores Mirage. Vea
la página 11 para más información sobre el uso del J8 con el Mirage. El JT3
puede ser conectado al jack JT3 de la parte posterior del JT50/JT100 usando
un cable stereo TRS de 1/4”. Vea la página 11 para más información.
Aviso: No conecte nada aparte del J8 al la entrada controlador
J8 de la parte trasera del JT50/JT100. Si lo hace puede dañar la
unidad.
Encendido del JT50/JT100
Una vez que haya hecho las conexiones necesarias, gire el mando de
volumen general del JT50/JT100 hasta abajo del todo (a la izquierda).
Coloque el interruptor de alimentación del panel trasero a la posición de
encendido (on). Empiece a tocar la guitarra y aumente gradualmente el
volumen general hasta que alcance el nivel deseado.
Creación o Edición de un
Preset
Los Mirage JT50 y JT100 hacen que la creación de presets sea muy simple.
La distribución del Amplificador y los Efectos en el panel de control hacen
la edición tan sencilla como girar un mando. Para crear un Preset en el
Mirage JT50/JT100, ha de empezar seleccionando un Preset ya existente.
No es posible empezar con un Preset en blanco.
Selección de un Preset
Los JT50/JT100 vienen con 21 Presets diferentes de fábrica. Para elegir un
preset, simplemente gire el mando Bank Select y pulse uno de los botones
Preset 1-3 que están situados en la parte derecha del panel de control. Una
vez que haya elegido un Preset como punto de partida, puede elegir un
Tipo de Amplificador, ajustar la Ganancia, Ecualización y Nivel del
Amplificador, añadir su elección de Modulación o Efectos de Cambio de
Tono y diseñar el Retardo y la Reverberación para crear ese sonido clásico
que buscaba o su propio sonido personal.
Selección de un Modelo de Amplificación
Los 12 Modelos de Amplificador disponibles con el JT50/JT100 pueden ser
seleccionados simplemente con girar el mando Amp Type hasta que el
puntero apunte al Modelo de Amplificador deseado. Los Modelos de
Amplificador disponibles son los siguientes:
Marshall® es una marca registrada de Marshall Amplification Plc. Vox®
es una marca registrada de Korg UK. Fender, Matchless y Mesa Boogie,
son marcas registradas de sus respectivas compañías y no están en modo
alguno asociadas con Johnson Amplification.
7
Mod /
Pitch
Delay Reverb Bank Up
(Hold) Tuner
Bank Down
Blues Combo - un sonido de combo distorsionado
Black Face - basado en un‘65 Fender Twin Reverb
Tweed - basado en un ‘57 Fender Tweed Deluxe
Boutique - basado en un Matchless DC30
Hot Rod Combo - basado en un Mesa Boogie Mark II C
Johnson Clean - un ajuste de combo limpio
Johnson Dirty - un agradable y chirriante combo
Johnson Gain - un suave sonido de tipo solista
Rectified - basado en un Mesa Dual Rectifier
Brit Modern - basado en un Marshall JCM900
Brit Master - basado en un Marshall Master Volume
Brit Class A - basado en un Vox AC30 (limpio otra vez)
Blues Combo - a driving distorted combo tone
Black Face - based on a ‘65 Fender Twin Reverb
Tweed - based on a ‘57 Fender Tweed Deluxe
Boutique - based on a Matchless DC30
Hot Rod Combo - based on a Mesa Boogie Mark II C
Johnson Clean - a clean combo setting
Johnson Dirty - a nice crunchy combo
Johnson Gain - a smooth singing lead tone
Rectified - based on a Mesa Dual Rectifier
Brit Modern - based on a Marshall JCM900
Brit Master - based on a Marshall Master Volume
Brit Class A - based on a Vox AC30 (clean gain)
Manual del Johnson Mirage Sección Dos - Uso del Mirage JT50/JT100Johnson Mirage User’s Guide Section Two - Using the Mirage JT50/JT100
Page 12

Ajuste de los Controles de Amplificación
Después de haber seleccionado el Tipo de Amplificador a usar, puede
ajustar la Ganancia, Graves, Medios, Agudos y Nivel que se adecúen a su
aplicación. Estos controles de Amplificación tienen como patrón los Tipos
de Amplificador que emulan, dándole los mismos puntos de Ecualización
que si usara realmente esos Amplificadores. En otras palabras, el ajustar
los controles de tono para el Tipo Brit Master, producirá la misma
distorsión y respuesta tonal que si hubiera ajustado estos controles en un
Amplificador Marshall Master Volume.
Adición de Efectos
Después de seleccionar el Tipo de Amplificador y ajustar la Ganancia y
Tono a su gusto, puede añadir hasta tres efectos para completar su sonido.
Puede elegir uno de los Efectos de Modulación o Cambio de Tono y
combinarlo con Retardo y Reverberación. Cada Efecto puede ser ajustado
con precisión para adecuarse a sus necesidades.
Efectos de Modulación/Cambio de Tono
El grupo de efectos de Modulación y Cambio de Tono incluye Chorus,
Cambiador de Fase, Flanger, Trémolo, Vibrato y Cambio de Tono. Sólo
puede usar a la vez uno de estos efectos. Para seleccionar un efecto de
este grupo, gire el mando de selección de 7 posiciones hasta que el
puntero apunte al tipo de Efecto deseado. Los efectos de Modulación y
Cambio de Tono pueden ser anulados girando el mado Effect
completamente a la derecha hasta la posición Bypass. Todos los efectos de
Modulación y Cambio de Tono tienen tres parámetros que puede editar. Lo
siguiente es una descripción de los parámetros disponibles para cada uno
de los efectos de este grupo:
Chorus
Un Chorus es un efecto que divide la señal entrante y añade un breve
retardo a la señal. Esta señal retardada (determinada por el control de
profundidad) es entonces ”modulada”, es decir, el retardo es acortado y
alargado. Esta señal retardada modulada es después mezclada de nuevo
con la señal original. El tiempo de retardo cambiante hace que la señal
retardada que afinada o fuera de tono respecto de la señal original. Esto
tiende a hacer que la guitarra suene más gruesa y dulce.
Velocidad - El mando giratorio Speed ajusta la velocidad o de
modulación del Chorus.
Profundidad - El mando giratorio Depth ajusta la intensidad
del efecto Chorus.
* Nivel - Level ajusta el volumen del efecto Chorus.
Flanger
Un Flanger es un efecto que divide la señal entrante y añade un breve
retardo a la señal. Este tiempo de retardo es luego acortado y alargado a
una velocidad constante. La diferencia entre Chorus y Flanger es que el
Flanger usa un tiempo de retardo menor que el Chorus y que el Flanger
añade algunas repeticiones a este breve tiempo de retardo. Esto da a la
guitarra un sonido zumbante distintivo.
Velocidad - El mando giratorio Speed ajustará la velocidad a la
que el Flanger realiza el barrido hacia arriba y abajo.
Profundidad - El mando giratorio Depth ajusta la cantidad de
intensidad del efecto Flanger.
* Nivel - Level ajusta el volumen del efecto Flanger.
Modulador de Fase
Un modulador de Fase es un efecto que divide la señal entrante y modula
la fase de la señal antes de mezclarla con la señal original. Esto hace que
algunas frecuencias sean anuladas. Conforme cambia la fase, son
canceladas distintas frecuencias dando un cálido tipo de sonido oscilación.
Velocidad - El mando giratorio Speed ajusta la velocidad a la
que es modulada la fase.
Profundidad - El mando giratorio Depth ajusta la cantidad de
intensidad del cambio de fase.
* Nivel - Level ajusta el volumen del efecto Cambio de Fase.
Trémolo
Un Trémolo es un efecto que modula el volumen de la señal entrante a un
ritmo constante. La señal entrante irá oscilando entre un sonido más suave
y más fuerte. Sería como tener un mando giratorio de volumen motorizado
en sus guitarras que abriera y cerrara el volumen a una velocidad
constante.
Velocidad - El mando giratorio Speed ajusta cómo de rápido
fluctuará el volumen.
Profundidad - El mando giratorio Depth ajustará la cantidad
de fluctuación del volumen
* Nivel - Sin función
Adjusting the Amp Controls
After you have selected the Amp Type that you wish to use, you can adjust
the Gain, Bass, Mid, Treble, and Level to suit your application. These Amp
controls are patterned after the Amp Types that they are emulating, giving
you authentic EQ points just like you were actually using those Amps. In
other words, setting the tone controls for the Brit Master Amp Type, will
render the same distortion and tonal response as if you had set these
controls on a Marshall Master Volume Amp.
Adding Effects
After you have selected your Amp Type and adjusted the Gain and Tone to
suit your taste, you can add up to three effects to complete your sound.
You can choose one of the Modulation or Pitch Shifting Effects and
combine that with Delay and Reverb. Each Effect can be fine tuned to suit
your needs.
Modulation/Pitch Shifting Effects
The Modulation and Pitch Shifting effects group includes Chorus, Phaser,
Flanger, Tremolo, Vibrato and Pitch Shifting. Only one of these effects can
be used at a time. To select an effect from this group, rotate the 7 position
select knob until the pointer is aimed at the desired Effect type. The
Modulation and Pitch Shift effects may be bypassed rotating the Effect knob
fully clockwise to the Bypass position. All of the Modulation and Pitch Shift
effects have three parameters that may be edited. The following is a
description of the available parameters for each of the effects in this group:
Chorus
A Chorus is an effect that splits the incoming signal, and adds a short delay
to the signal. This delayed signal (determined by the depth control) is then
“modulated”, which is to say that the delay is shortened and lengthened.
This modulated delayed signal is then mixed back with the original signal.
The changing delay time takes the delayed signal in and out of tune with
the original signal. This tends to make the guitar sound thicker and
sweeter.
Speed - The Speed knob adjusts the rate or how fast the Chorus
modulates.
Depth - The Depth knob adjusts the amount of intensity of the
Chorus effect.
* Level - The Level adjusts the volume of the Chorus effect.
Flanger
A Flanger is an effect that splits the incoming signal, and adds a short delay
to the signal. This delay time is then shortened and lengthened at a steady,
rate. The difference between a Chorus and a Flanger is that a Flanger uses
a shorter delay time than a Chorus, and a Flanger adds several repeats to
this short delay time. This gives the guitar a distinct up and down
whooshing sound.
Speed - The Speed knob will adjust rate that the Flanger will
sweep up and down.
Depth - The Depth knob adjusts the amount of intensity in the
Flanger effect.
* Level - The Level adjusts the volume of the Flanger effect.
Phaser
A Phaser is an effect that splits the incoming signal, and then modulates the
phase of the signal before mixing it back in with the original signal. This
causes certain frequencies to be canceled. As the phasing changes,
different frequencies get canceled resulting in a warm sort of twisting
sound.
Speed - The Speed knob adjusts the rate the phase is being
changed at.
Depth - The Depth knob adjusts the amount of intensity in the
phasing.
* Level - The Level adjusts the volume of the Phaser effect.
Tremolo
A Tremolo is an effect that modulates the volume of the incoming signal at
a steady, even pace. The incoming signal will go back and forth between
getting louder and softer. It would be kind of like having a motor on your
guitars volume knob which opened and closed the volume at an even rate.
Speed - The Speed knob adjusts how fast the volume will
fluctuate.
Depth - The Depth knob will adjust the amount of volume
fluctuation
* Level - No function
Johnson Mirage User’s Guide Section Two - Using the Mirage JT50/JT100 Manual del Johnson Mirage Sección Dos - Uso del Mirage JT50/JT100
8
Page 13

Vibrato
Un Vibrato es un efecto que modula la frecuencia o tono de toda la señal
entrante. Esto hará que la señal que afinada y se desafine ligeramente a un
ritmo constante.
Velocidad - El mando giratorio Speed ajusta la rapidez a la
que es modulada la señal.
Profundidad - El mando Depth ajusta la cantidad de cambio
de tono
* Nivel - Sin función
Tono/Desafinación
El cambio de tono es un efecto que hace una copia de la señal entrante y
luego cambia el tono de la copia a una nota diferente. Esto produce una
armonía paralela. Cuando toca una nota el modificador de tono toca
simultáneamente una nota mayor o menor. Es como tener otro guitarrista
en el grupo. El Desafinador es un efecto que puede ser añadido al cambio
de tono para desafinarlo ligeramente y hacerlo sonar más como si fueran
realmente dos guitarristas tocando.
Velocidad - El mando giratorio Speed ajusta el intervalo del
cambio de tono. Determinará la cantidad de cambio producido en la nota
de entrada por arriba o por abajo. El modificador de Tono del JT50 y
JT100 puede cambiar el tono una octava arriba o abajo.
Profundidad - El mando Depth ajusta la cantidad de
desafinación entre 0 y -20 centésimas (1/100 de semitono).
* Nivel - Level ajusta el volumen del tono modificado y de la
desafinación.
* Nivel Mod/Tono del JT50: El nivel de los efectos Mod/Tono
puede ser ajustado en el JT50 manteniendo pulsado el botón Tap-It/Shift y
girando el mando Mod Speed. El botón Tap-It/Shift dejará de parpadear
para indicar que el mando Mod Speed es ahora un control de Nivel de
Modulación. Para salir del control de Nivel, pulse el botón Tap-It/Shift.
Puerta de Ruido
El JT50/JT100 incluye una Puerta de Ruido con Umbral ajustable. Las
puertas de ruido se usan para eliminar zumbidos y ruidos mientras no esté
tocando. El único parámetro que se puede ajustar en la puerta de ruidos es
el Umbral. Este Umbral es la fuerza o nivel de volumen al cual se abrirá o
cerrará la puerta. Cuando la señal sobrepase el umbral, la puerta se abrirá
permitiendo que se escuche el sonido. Cuando la señal quede por debajo del
umbral, la puerta se cerrará no permitiendo el paso de nada. El valor ideal
para el umbral es conseguir que la puerta se abra tan pronto como toque
una cuerda y que se cierre en cuanto deje de tocar.
Ajuste del Umbral de Puerta
1. Pulse el botón Tap-It/Shift. Este botón dejará de parpadear
para indicarle que el mando Depth/Gate es ahora un Umbral
de Puerta.
2. El giro del mando Depth/Gate cambiará el valor del Umbral
de Puerta.
3. Pulse otra vez el mismo botón Tap-It/Shift para salir del modo
de edición de Umbral de Puerta.
Retardo
El Retardo es un efecto que graba una porción de la señal entrante y
después la reproduce un breve momento después. Puede repetir la
grabación una vez sólo o varias. Este tipo de efecto es llamado también eco
porque básicamente produce un eco de la señal original. Los Mirage JT50
y JT100 incluyen un Efecto de Retardo de claridad cristalina con hasta 2.5
segundos de retardo disponibles. Puede editar dos parámetros asociados
con el retardo mediante los mandos de retardo, y el tiempo de retardo
puede ser ajustado con el botón Tap It.
Nivel/Tiempo - El mando giratorio level del retardo ajusta el
volumen del efecto de retardo.
Tiempo de Retardo - El Tiempo de Retardo puede ser
ajustado manualmente pulsando el botón Tap It/Shift. El botón Tap It/Shift
dejará de parpadear para indicarle que el mando Level/Time es ahora un
control de Tiempo de Retardo. Puede ajustar el tiempo de Retardo desde
un mínimo de 50 milisegundos a un máximo de 2.5 segundos. Para salir
del control de Tiempo de Retardo, pulse el botón Tap It/Shift.
Realimentación - El mando giratorio feedback ajusta la
cantidad de veces que será repetida la señal retardada.
Marcación - El botón Tap it se usa para ajustar el tiempo de
retardo o la cantidad de tiempo entre repeticiones. Si pulsa este botón a la
vez que la música sincronizará las repeticiones del retardo con el ritmo de
la música.
9
Vibrato
A Vibrato is an effect that modulates the frequency, or pitch of the entire
incoming signal. This will take the whole signal slightly in and out of tune
at a steady pace.
Speed - The Speed knob adjusts how fast the signal is being
modulated.
Depth - The Depth knob adjusts the amount of pitch change.
* Level - No function
Pitch/Detune
Pitch shifting is an effect that will make a copy of your incoming signal,
and then shift the pitch of the copy to a different note. This results in
parallel harmony. As you play one note the pitch shifter is simultaneously
playing a note higher, or lower with you. It’s like having another guitarist in
the band. The Detuner is an effect that can be added to the shifted pitch to
take it slightly out of tune to make it sound more as if it were really two
guitarists playing.
Speed - The Speed knob adjusts the interval of the pitch shifter.
It will determine how far above or below the input note the shifted pitch
will be. The Pitch Shifter in the JT50 and JT100 is capable of shifting the
pitch one octave up or down.
Depth - The Depth knob adjusts the amount of detuning from 0
to - 20 cents.
* Level - The Level adjusts the volume of the shifted pitch and
detune.
* JT50 Mod/Pitch Level: The level of the Mod/Pitch effects may
be adjusted in the JT50 by pressing and holding the Tap It/Shift button and
turning the Mod Speed knob. The Tap It/Shift button will stop flashing
indicating the Mod Speed knob is now a Mod Level control. To exit the
Mod Level control, press the Tap It/Shift button.
Noise Gate
The JT50/JT100 include a Noise Gate with an adjustable Threshold. A Noise
Gate is used to eliminate hum and noise while you are not playing. The
Noise Gate Threshold is the only parameter available for adjustment. The
Threshold is the strength, or volume level at which the gate will open or
close. When your signal exceeds the threshold, the gate will open allowing
sound to be heard. When your signal falls below the threshold, the gate
closes allowing nothing to come through. The ideal setting for the
threshold is to have it open as soon as you strike a string, and close when
you stop playing.
Adjusting the Gate Threshold
1.
Press the Tap-It/Shift button. The Tap It/Shift button will stop
flashing indicating the Depth/Gate knob is now a Gate
Threshold.
2. Turning the Depth/Gate knob will change the Gate Threshold
value.
3. Press the same Tap-It/Shift button again to exit the Gate
Threshold edit mode.
Delay
Delay is an effect that will record a portion of the incoming signal and then
play it back a short time later. It can repeat the recording just once or
several times. This type of effect is also referred to as an echo because it
basically echoes the original signal. The Mirage JT50 and JT100 include a
crystal clear Delay Effect with up to 2.5 seconds of delay available. Two
parameters associated with the delay can be edited with the delay knobs,
and the delay time can be set by using the Tap It button.
Level/Time - The delay level knob adjusts the volume of the
delay effect.
Delay Time - The Delay Time can be manually adjusted by
pressing the Tap It/Shift button. The Tap It/Shift button will stop flashing
indicating the Level/Time knob is now a Delay Time control. You can
adjust the Delay time from a minimum of 50 milliseconds to a maximum of
2.5 seconds. To exit the Delay Time control, press the Tap It/Shift button.
Feedback - The feedback knob adjusts how many times the
delayed signal will repeat.
Tap It - The tap it button is used to set the delay time, or the
amount of time between repeats. Tapping this button in time with the music
will synchronize the repeats of the delay with the beat of the music.
Manual del Johnson Mirage Sección Dos - Uso del Mirage JT50/JT100Johnson Mirage User’s Guide Section Two - Using the Mirage JT50/JT100
Page 14

Reverberación
La Reverberación es un efecto que simula el entorno acústico de una sala
real. Le da al oyente la sensación de que la música está siendo ejecutada
en una gran sala o en una pequeña. Cuando un sonido se escucha en una
sala, se refleja miles de veces en las superficies de la sala como las
paredes y el suelo. Cada reflexión alcanza al oyente en momentos
diferentes. Esto hace que el sonido tenga una determinada calidez y
profundidad. Los JT50/JT100 le ofrecen dos tipos de reverberación para
elegir. Son los siguientes:
Reverberación de Sala
La reverberación Hall simula las cámaras de eco usadas para añadir
reverberación en las grabaciones antiguas. La cámara de eco era una
habitación vacía con superficies muy reflexivas. Se colocaba un altavoz en
un extremo de la habitación y un micrófono en el otro. La señal fuente
era alimentada al altavoz y el micrófono captaba aquello y devolvía el
ambiente de la sala sobre la grabación.
Reverberación de Muelle
La reverberación de muelle es otro efecto diseñado para probar y recrear
el ambiente de una reverberación acústica usando un muelle real. La
señal era alimentada en un extremo del muelle haciendo que este
vibrara. La señal era captada después en el otro extremo del muelle y se
mezclaba con la señal.
Nivel/Tipo - El mando giratorio Level ajusta el volumen del
efecto de reverberación.
Tipo de Reverberación - El Tipo de Reverberación puede ser
seleccionado pulsando el botón Tap It/Shift. Este botón dejará de
parpadear para indicarle que el mando Level/Type actúa como un selector
de Tipo de Reverberación. Los valores por debajo de 5 en el mando
Level/Type seleccionan la Reverberación de Sala y los valores por encima
eligen la Reverberación de Muelle. Para salir de la selección de Tipo de
Reverberación, pulse el botón Tap It/Shift.
Almacenamiento/Copia de
un Preset
Una vez que haya editado un preset, deberá guardar su nuevo sonido para
poderlo cargar más tarde. En caso contrario el JT50/JT100 borrará las
ediciones que haya hecho y volverá al sonido original del preset. Puede
guardar sus modificaciones en cualquiera de la 21 posiciones de memoria
de usuario. Cuando haya hecho todas las ediciones que quiera y esté
contento con el sonido que ha creado, siga los pasos indicados en esta
sección para guardar su nuevo sonido.
Nota: El cambiar los presets o desconectar el JT50/JT100 antes
de guardar sus ediciones, hará que se borren todas las
ediciones que haya hecho.
Para almacenar o copiar un preset
1. Pulse una vez el botón Store. El botón Store empezará a
parpadear.
2. Use el mando giratorio Bank Select para elegir el Banco en el
que quiera guardar sus modificaciones. Después dentro de
un banco elija el Preset en el que vaya a almacenar el sonido
pulsando el botón Preset deseado. El botón Preset se
iluminará.
3. Cuando haya elegido el Banco y el Preset deseados, pulse el
botón Store otra vez. Su sonido será guardado y podrá
cargarlo cada vez que seleccione el Banco y el Preset.
Para copiar un Preset en otra posición, primero tiene que elegir el Preset
que desea copiar y después ha de seguir los pasos 1-3 anteriores.
Para detener la función de almacenamiento, pulse el botón Tap-It/Shift o
espere 5 segundos y saldrá del modo Almacenamiento.
Reverb
Reverb is an effect that simulates the acoustic environment of an actual
room. It gives the listener the illusion that the music is being performed in
a large or small room. When a sound is heard in a room it reflects
thousands of times off of the surfaces in the room such as the walls and the
floor. Each reflection reaches the listener at different times. This results in
giving the sound a certain warmth and depth. The JT50/JT100 provide two
types of reverb to chose from. They are as follows:
Hall Reverb
The Hall reverb simulates the echo chambers used to add reverb to early
recordings. The echo chamber was an empty room with highly reflective
surfaces. A speaker was placed at one end of the room and a microphone
at the other. The source signal was fed into the speaker and the mic
would return the rooms ambience to the recording.
Spring Reverb
A Spring reverb is another effect designed to try and recreate the
ambiance of an acoustic reverb using an actual spring. The signal was fed
in to one end of the spring causing the spring to vibrate. The signal was
then taken out of the other end of the spring and mixed back in to the
signal.
Level/Type - The Level knob adjusts the volume of the reverb
effect.
Reverb Type - The Reverb Type can be selected by pressing the
Tap It/Shift button. The Tap It/Shift button will stop flashing indicating the
Level/Type knob is acting as a Reverb Type selector. Values below 5 on the
Level/Type knob will select the Hall Reverb, and values above 5 will select
the Spring Reverb. To exit the Reverb Type selection, press the Tap It/Shift
button.
Storing/Copying a Preset
After you have edited a preset, you must save your new sound in order to
recall it later. Otherwise the JT50/JT100 will erase the edits that you had
made and revert back to the original sound of the preset. You can save
your modifications to any one of the 21 user memory locations. When you
have made all of the edits that you intend to, and you are happy with the
sound that you have created, follow the steps outlined in this section to
store your new sound.
Note: Changing presets or turning the power off to the
JT50/JT100 before storing your edits will erase all edits that
you had made.
To store or copy a preset
1. Press the Store button once. The Store button will start
flashing.
2. Use the Bank Select knob to select the Bank that you wish to
store your modifications to. Then select the Preset within that
Bank where the sound sill be stored by pressing the desired
Preset button. The Preset button will light.
3. When the desired Bank and Preset have been selected, press
the Store button again. Your sound will be stored and can be
recalled every time that you select that Bank and Preset.
To copy a Preset to another Preset location, you must first select the Preset
you wish to copy, and then follow the steps 1-3 listed above.
To abort the store function, press the Tap-It/Shift button or wait for 5
seconds and Store mode will be exited.
Johnson Mirage User’s Guide Section Two - Using the Mirage JT50/JT100 Manual del Johnson Mirage Sección Dos - Uso del Mirage JT50/JT100
10
Page 15

Section 3 - Other
Functions
Foot Control Options
The Mirage has two different optional foot controllers, the JT3 and the J8.
These foot controllers offer you the ability of changing presets on the fly or
bypassing effects within a preset. The JT50/JT100 include individual jacks
on the rear panel for each of these foot controllers.
JT3
The JT3 is a three button footswitch. The three switches are configured to
select the 3 Presets within the Bank. A 1/4” TRS stereo cable is required to
connect the J3.
J8
The J8 is the dedicated foot controller for the JT50/JT100. In addition to
providing extensive control of the JT50/JT100, the J8 also adds a tuner, a
Wah effect, and a volume pedal to the functionality of your JT50/JT100. The
J8 features 8 switches, an LED display, and an Expression Pedal. The
switches will turn effects on and off within a program, select Presets 1, 2,
or 3, and change Banks. The J8 uses a standard MIDI type cable to
connect to the Mirage.
Note: The MIDI cable must have a 5 conductor cable with all 5
pins connected. Standard MIDI transmissions use only 3 of the 5
pins. Therefore, many MIDI cords only have 3 conductor cable.
Effect Foot Switches
The 3 Effect foot switches (located on the top row of switches) correspond
to the 3 effect types available on the JT50/JT100 (Mod/Pitch, Delay, and
Reverb). These switches turn these effects on and off on the fly. Each
switch has an LED directly above it to indicate the status of the effect.
Preset Foot Switches
The 3 Preset foot switches (located on the bottom row) will access one of
the three Presets in the currently selected Bank. Each of these switches has
an LED directly above it to indicate the active Preset.
Bank Foot Switches
The Bank Up and Bank Down foot switches (the top and bottom switches
on the far right) will advance or decrement through the seven user Banks.
Each successive press of the Bank Switches will advance or decrease to the
next bank which will be shown in the J8’s Display. Once a new Bank has
been selected, the three Preset switches will flash asking you to select a
Preset within that Bank. The LED display will show the new Bank number
at this time. The JT50/JT100 will wait 5 seconds for you to select a Preset
within that Bank. If no Preset selection is made within 5 seconds, the
JT50/JT100 will revert back to the last Bank and Preset that had been
active
Sección 3 - Otras
Funciones
Opciones de Control de Pedal
El Mirage tiene dos controladores de pedal opcionales distintos, el JT3 y el J8.
Estas pedaleras le ofrecen la posibilidad de cambiar presets sobre la marcha
o anular los efectos dentro de un preset. El JT50/JT100 incluye tomas
individuales en el panel trasero para cada uno de estos controladores.
JT3
El JT3 es un pedal de disparo de tres botones. Los tres interruptores están
configurados para seleccionar los 3 Presets dentro del Banco. Para
conectar el J3 deberá tener un cable stereo 1/4” TRS.
J8
El J8 es la pedalera especifica del JT50/JT100. Además de ofrecerle un
control extensivo del JT50/JT100, el J8 también añade un afinador, un
efecto Wah y un pedal de volumen al resto de funciones de su JT50/JT100.
El J8 dispone de 8 interruptores, una pantalla LED y un Pedal de
Expresión. Los interruptores activar y desactivar los efectos dentro de un
programa, seleccionan los Presets 1, 2 o 3 y cambian los Bancos. El J8 usa
un cable de tipo MIDI standard para la conexión con el Mirage.
Nota: El cable MIDI ha de ser un cable de 5 conductores con las 5
puntas conectadas. Las transmisiones MIDI standard sólo usan 3
de las 5 puntas. Por tanto, muchos cables MIDI sólo tienen cables
de 3 conductores.
Pedales de Disparo de Efectos
Los 3 pedales de disparo de Efectos (situados en la fila superior de
interruptores) corresponden a los 3 tipos de efectos disponibles en el
JT50/JT100 (Mod/Pitch, Delay y Reverb). Estos interruptores activan y
desactivan estos efectos sobre la marcha. Cada interruptor tiene un LED
encima para indicar el estado del efecto.
Pedales de Disparo de Preset
Los 3 pedales de disparo de Preset (situados en la fila inferior) dan acceso
a uno de los tres Presets del Banco seleccionado en ese momento. Cada
uno de estos interruptores tiene un LED justo encima para indicar el
Preset activo.
Pedales de Disparo de Banco
Los pedales de disparo Bank Up y Bank Down (interruptores superior e
inferior de la parte derecha) avanzarán o retrocederán por los 7 Bancos
de usuario. Con cada pulsación de los Interruptores de Banco avanzará o
retrocederá al siguiente banco, lo que se mostrará en la Pantalla del J8.
Una vez que haya seleccionado un nuevo Banco, los tres interruptores de
Preset parpadearán para pedirle que elija un Preset dentro del Banco. La
pantalla LED mostrará el nuevo número de Banco. EL JT50/JT100 esperará
5 segundos a que elija un Preset dentro del Banco. Si no elige un Preset en
5 segundos, el JT50/JT100 volverá al último Banco y Preset que estuvieron
activos.
11
Modulac. /
Tono
Retardo Reverb Banco arriba
(Si lo mantiene
pulsado) Afinador
Banco abajo
Manual del Johnson Mirage Sección Tres - Otras FuncionesJohnson Mirage User’s Guide Section Three - Other Functions
Page 16

Afinador
El interruptor Bank Up también activa el afinador. Para activar el afinador,
mantenga pulsado el interruptor Bank Up durante 2 segundos. Una vez que
el modo de afinación esté activo, en la pantalla del J8 aparecerá “
tu.” En
ese momento, cualquier nota que toque aparecerá en la pantalla. Los 7
LED que están encima de la pantalla le indican si la nota está sostenida,
bemolada o afinada. Cuando esté encendido el LED verde central, la nota
estará afinada. Si están encendidos los LED de la izquierda, la nota está
baja y ha de subirla más. Si están encendidos los LED de la derecha es que
su nota está sostenida y ha de bajar su tono. Para salir del modo de
afinación, pulse simplemente cualquier pedal de disparo.
Pedal de Expresión
Puede usar el pedal de expresión del J8 como pedal de volumen o pedal
wah wah. En el funcionamiento normal del JT50/JT100, el Pedal de
Expresión del J8 será un pedal de volumen. Para cambiar la función a un
wah, simplemente pise a tope el pedal y pulse el interruptor que está bajo
la puntera. Esto activará el wah. Para desactivar el efecto wah, repita este
procedimiento de pedal pisado para que el pedal de expresión vuelva a
controlar otra vez el volumen.
Calibración del Pedal de Expresión J8
Siga estos pasos al conectar el J8 al amplificador por primera vez:
1. Comience con su amplificador apagado.
2. Usando el cable de 5 puntas DIN incluido, conecte desde la salida del
controlador que está en la parte trasera del J8 a la entrada de
controlador de pedal J8 de la parte trasera de su amplificador.
3. Encienda el amplificador.
4. En los amplificadores de la serie Mirage, el J8 entra en un modo de
calibración la primera vez que es conectado. La pantalla del J8 mostrará
brevemente 1.X (número de versión de software) seguido de Pb.
5. Coloque el pedal atrás del todo (puntera arriba)y pulse cualquier pedal
de disparo.
6. La pantalla mostrará ahora PF. Pulse a tope el pedal de expresión
(puntera abajo) y después pulse cualquier pedal de disparo.
Si el pedal de disparo no funciona con el JT50/JT100, puede que deba
recalibrarlo. Para recalibrar el pedal de expresión del J8, haga lo
siguiente:
1. Comience con su amplificador apagado.
2. Mantenga pulsado el botón Preset 1 mientras enciende el amplificador.
3. Cuando -- aparezca en la pantalla del J8, deje de pulsar el botón
Preset 1 y pulse el botón Tap-It/Shift.
4. La pantalla del J8 mostrará “Pb” (pedal arriba). Pise hacia atrás el
pedal (puntera arriba) y pulse cualquier botón del J8.
5. La pantalla del J8 mostrará “ Pf” (pedal abajo). Pise el pedal de
expresión hacia delante (puntera abajo) y pulse cualquier botón. El
pedal de expresión del J8 estará ya calibrado. La pantalla volverá al
número de canal y banco actualmente en uso.
Si aparece en la pantalla “Er”, es que se habrá producido un error en el
proceso de calibración. Siga los pasos 1-5 otra vez.
Auriculares
Para aquellos momentos en que quiera subir el volumen sin que le echen
de casa, el JT50/JT100 incluye un conector de Auriculares. Simplemente
conecte un par de auriculares stereo a la toma de Auriculares del panel
trasero y el altavoz será desactivado automáticamente. El Volumen General
del JT50/JT100 ajusta el nivel de los Auriculares.
Salida Directa
El Mirage le ofrece la posibilidad de conectar salidas directas compensadas
de altavoz a su sistema PA casero o a una mesa de grabación. Esto elimina
la necesidad de colocar un micrófono delante de su altavoz. Para usar esta
función, deberá tener un cable stereo de 1/4” en “Y”. Conecte el cable
stereo en Y a la toma de Auriculares del panel trasero del JT50/JT100.
Conecte los otros extremos de la Y a dos canales del mezclador y ajuste
panoramas opuestos para cada canal. Esto dará a su mesa de mezclas una
señal stereo compensada de altavoces. Si conecta una clavija en la toma de
Auriculares desactivará automáticamente el altavoz interno del JT50/JT100.
Para activar el altavoz mientras usa Auriculares/ Salida Directa, mantenga
pulsado el botón Tap-It/Shift mientras inserta el conector en este jack.
Si enciende el JT50/JT100 mientras hay una conexión en los Auriculares/
Salida Directa, el altavoz será desactivado automáticamente. Si mantiene
pulsado el botón Tap-It/Shift mientras enciende la unidad, activará el
altavoz.
Tuner
The Bank Up switch will also activate the tuner. To activate the tuner, press
and hold the Bank Up switch for 2 seconds. Once the tuner mode is
activated, the J8 display will read “
tu.” At that point, any note played will
register in the display. The 7 LEDs above the display will provide an
indication as to whether the note is flat, sharp, or in tune. When the single
green LED in the center is lit, the note is in tune. If LEDs to the left are lit,
your note is flat and must be tuned up. If LEDs to the right are lit, your
note is sharp and must be tuned down. To exit the tuner mode, simply
press any footswitch.
Expression Pedal
The expression pedal on the J8 can be used as a volume pedal or a wah
wah pedal. In normal operation of the JT50/JT100, the J8’s Expression
Pedal will be a volume pedal. To change the function to a wah, simply rock
the pedal all the way forward (toe down) and apply pressure on switch
under the toe. This will activate the wah. To disengage the wah effect, just
repeat this toe down procedure and the expression pedal will control the
volume again.
J8 Expression Pedal Calibration
Follow these steps when connecting the J8 to the amplifier for the first
time:
1. Begin with the power turned off on your amplifier.
2. Using the supplied 5-pin DIN cable, connect from the controller output
jack on the back of the J8 to the J8 Foot Controller jack on the back of
your amplifier.
3. Power up the amplifier.
4. On the Mirage series amplifiers, the J8 will enter a calibration mode the
first time it is connected. The J8 display will briefly flash 1.X (software
version number) followed by Pb.
5. Rock the J8's expression pedal back (toe up position) and press any
footswitch.
6. The display will now read PF. Rock the expression pedal forward (toe
down position) and press any foot switch.
If the Expression Pedal fails to work with the JT50/JT100, it may need to be
recalibrated . To recalibrate the J8's expression pedal do the following:
1. Begin with the power off.
2. Press and hold the Preset 1 button while turning the power on.
3. When -- appears in the display of the J8, release Preset 1 button and
press the Tap-It/Shift button.
4. The display on the J8 will read “Pb” for pedal back. Rock the
expression pedal back (toe up) and press any button on the J8.
5. The display on the J8 will now read “ Pf” for pedal forward. Rock the
expression pedal forward (toe down) and press any button. The J8's
expression pedal is now calibrated. The displays will return the to bank
and channel number currently in use.
If “Er” appears in the display, an error has occurred in the calibration
procedure. Follow steps 1-5 again.
Headphones
For those times when you want to turn it up without getting thrown out of
the house, the JT50/JT100 include a Headphone jack. Simply connect a
pair of stereo headphones to the rear panel Headphone jack, and the
speaker will automatically be disabled. The JT50/JT100’s Master Volume
adjusts the Headphone level.
Direct Output
The Mirage provides you with the option of running speaker compensated
direct outputs to your house PA system or a recording console. This
eliminates the need to mic your speaker. To utilize this feature, you will
need a 1/4” stereo “Y” cord. Connect the stereo Y cord to the Headphone
jack on the rear panel of the JT50/JT100. Connect both of the other ends
of the Y to two channels of the mixer, and pan those two channels opposite
of each other. This will provide your mixing console with a speaker
compensated stereo signal. Connecting a plug to the Headphone jack will
automatically disable the internal speaker of the JT50/JT100. To enable the
speaker while using the Headphone/Direct Out, press and hold the TapIt/Shift button while inserting the plug into this jack.
If the JT50/JT100 is powered up while a connection is made to the
Headphone/Direct Out, the speaker will be automatically disabled. Holding
the Tap-It/Shift button while engaging the power will enable the speaker.
Manual del Johnson Mirage Sección Tres - Otras FuncionesJohnson Mirage User’s Guide Section Three - Other Functions
12
Page 17

El Bucle de Efectos
El JT50/JT100 le proporciona los medios para añadir su procesador de
efectos favorito a la ruta de la señal al incluir un bucle de efectos. En el
panel trasero del JT50/JT100 encontrará una única toma Loop Send y un
única entrada Loop Return. El bucle de efectos del JT50/JT100 es un bucle
envío/retorno TRS stereo que usa conectores TRS (punta-anillo-lateral). Si
lo usa en el JT50, sólo oirá la imagen stereo izquierda/derecha de los
efectos en la salida de auriculares. La izquierda y la derecha son después
sumadas juntas en el altavoz del JT50. Si usa el bucle en el JT100, se
mantiene la imagen izquierda/derecha en la salida de auriculares y en los
dos altavoces del JT100. La punta (T) es el envío/retorno izquierdo y el
anillo (R) es el envío/retorno derecho. Necesitará dos cables stereo de
1/4” en “Y” para usar los envíos y retornos stereo.
Envío Stereo - El envío de efectos es una salida desde el preamplificador
del JT50/JT100. Puede conectarlo a la entrada de una
unidad de efectos externa que le guste. Puede que tenga
que ajustar el nivel de entrada del procesador de efectos
externo para evitar su saturación.
Retorno Stereo - El retorno de efectos es una entrada que va a la etapa
de potencia del JT50/JT100. Debería conectarla a la
salida de una unidad de efectos externa.
Nota: El bucle de efectos del Mirage JT50 y JT100 está diseñado
sólo para uso con efectos de tipo rack. El uso de pedales de
efectos en este bucle no está recomendado ya que
generalmente no están diseñados para controlar la salida de
nivel de línea producida en la salida de envío del Bucle.
Reinicialización del
Mirage JT50/JT100
Esto es un proceso de reinicialización que restaurará al JT50/JT100 a sus
sonidos originales de fábrica.
¡Aviso! Este proceso restaurará TODOS los presets de usuario del
Mirage a las condiciones de fábrica. Asegúrese de que realmente
quiere borrar sus Presets y restaurar todos los Presets de Fábrica
antes de continuar con este proceso.
Para realizar una reinicialización de fábrica, siga estos pasos:
1. Apague el aparato.
2. Mantenga pulsado el botón Preset 1 mientras enciende la
unidad. Cuando todos los botones Preset estén iluminados,
suelte el botón Preset 1 y pulse una vez el botón Store.
Una vez que haya hecho esto habrá restaurado el JT50/JT100 a los Presets
originales de Fábrica.
Para detener el proceso de reinicialización, apague y vuelva a encender
otra vez el JT50/JT100.
13
The Effects Loop
The JT50/JT100 provides you with the means of adding your favorite effects
processor to the signal path by including an effects loop. On the rear panel
of the JT50/JT100 you will find a single Loop Send jack and a single Loop
Return jack. The JT50/100 effects loop is a stereo TRS send/return loop
utilizing TRS (tip-ring-sleeve) jacks . When used in the JT50, you will only
hear left/right stereo imaging of effects in the headphone output. Both left
and right are then summed together through the JT50's speaker. When
using the loop in the JT100, left/right imaging are maintained through both
the headphone output and the JT100's 2 speakers. The tip (T) is the left
send/return and the ring (R) is the right send/return. You will need 2 1/4”
stereo “Y” cords to utilize the stereo sends and returns.
Stereo Send - The effect send is an output from the JT50JT100’s preamp.
These would be connected to the input of an external effect
device of your choosing. The input level of the external
effects processor may need to be adjusted to prevent
clipping.
Stereo Return - The effect return is an input to the power amp of the
JT50/JT100. This would be connected to the output of
an external effect device.
Note: The Mirage JT50 and JT100 effect loop is designed for use
of rack mount type effects only. Use of effect pedals in the
Loop is not recommended as they are not generally designed
to handle the line level output produced at the Loop send jack.
Resetting the Mirage
JT50/JT100
This is a reset procedure which will restore the JT50/JT100 to its original
factory sounds.
Warning! This procedure will reset ALL user presets in the
Mirage to factory conditions. Be sure that you want to erase
your Presets and restore all Factory Presets before continuing
with this procedure.
To perform a factory reset, follow these steps:
1. Turn the power off.
2. Press and hold the Preset 1 button down while turning the
power back on. When all the Preset buttons light, release the
Preset 1 button and press the Store button once.
You have restored the JT50/JT100 to the original Factory Presets.
To abort the reset procedure, turn the JT50/JT100 off and then on again.
Johnson Mirage User’s Guide Section Three - Other Functions Manual del Johnson Mirage Sección Tres - Otras Funciones
Page 18

Section 4 - Appendix
Mirage Factory Preset List
Bank 1 Bank 5
1. Match This 1. Solo Stack
2. Voxy Verb 2. Flangey Johnson
3. Johnson Gain Solo 3. Octo Bassy
Bank 2 Bank 6
1. True Blackface 1. Modern Rockabilly
2. British Steel 2. Guitar Organ
3. Johnson Clean Chorus 3. Electro 12 String
Bank 3 Bank 7
1. Singing Boogie 1. Chorus Amongus
2. Rockin’ Phase Tweed 2. Buster Brown
3. Bluesy Slider 3. Super Solo
Bank 4
1. Recto-Fire
2. Twin Leslied
3. Vox Triplets
Sección 4 - Apéndice
Lista de Presets de Fábrica del
Mirage
Banco 1 Banco 5
1. Match This 1. Solo Stack
2. Voxy Verb 2. Flangey Johnson
3. Johnson Gain Solo 3. Octo Bassy
Banco 2 Banco 6
1. True Blackface 1. Modern Rockabilly
2. British Steel 2. Guitar Organ
3. Johnson Clean Chorus 3. Electro 12 String
Banco 3 Banco 7
1. Singing Boogie 1. Chorus Amongus
2. Rockin’ Phase Tweed 2. Buster Brown
3. Bluesy Slider 3. Super Solo
Banco 4
1. Recto-Fire
2. Twin Leslied
3. Vox Triplets
14
Especificaciones técnicas
Entradas
Entrada: 1/4” (6.3 mm) no balanceada
Impedancia de Entrada: 470 k Ohmnios
Retorno de Bucle: 1/4” Stereo TRS
Impedancia de Retorno de Bucle: 470 k Ohmnios
Nivel máximo de Retorno: +18 dBu
Salidas
Envío de Bucle: TRS stereo de 1/4” (6.3 mm)
Impedancia de Envío de Bucle: 680 Ohmnios
Máximo Nivel de Envío: +18 dBu
Auriculares: TRS stereo de 1/4”
Impedancia de Auriculares: 10 Ohmnios mínimo
Conexiones de Controlador
Controlador J8: DIN de 5 puntas
Interruptor JT3: TRS de 1/4"
Etapa de Potencia
Salida Mono de Etapa de Potencia del JT50: 50 Watios RMS. a 8 ohmnios
Salida Stereo de Etapa de Potencia del JT100: 100 Watios RMS. (50 por
canal) a 8 ohmnios
Sección DSP
Señal-Ruido: Mayor que 98 dB (medición A) ref=señal máxima, 22kHz
ancho de banda de medida
Conversor A/D: 24 bit
Conversor D/A: 24 bit
Alimentación
Voltaje de alimentación: 100, 120, 230 o 240 V CA 50/60 Hz
Consumo: 125 Watios
Capacidad de Memoria
Usuario: 21 Presets
Dimensiones: 292 (profundo) x 594 (ancho) x 457 (alto) mm.
Peso Neto: 19,5 kgs.
Specifications
Inputs
Input: 1/4” unbalanced
Input Impedance: 470 k Ohm
Loop Return: 1/4” Stereo TRS
Loop Return Impedance: 470 k Ohm
Maximum Return Level: +18 dBu
Outputs
Loop Send: 1/4” Stereo TRS
Loop Send Impedance: 680 Ohm
Maximum Send Level: +18 dBu
Headphone: 1/4” Stereo TRS
Headphone Impedance: 10 Ohm minimum
Controller Connections
J8 Controller: 5 pin DIN
JT3 Switch: 1/4 TRS
Power Amp
JT50 Power Amp Output Mono: 50 Watts RMS. into 8 ohms
JT100 Power Amp Output Stereo: 100 Watts RMS. (50 per channel) into 8
ohms
DSP Section
Signal to Noise: Greater than 98 dB (A-weighted) ref=max signal, 22kHz
measurement bandwidth
A/D Converter: 24 bit
D/A Converter: 24 bit
Power
Power Requirements: 100, 120, 230 or 240 VAC 50/60 Hz
Power Consumption: 125 Watts
Memory Capacity
User: 21 Presets
Dimensions: 11.5” (D) x 23.4” (W) x 18” (H)
Net Weight: 43.2 lbs.
Manual del Johnson Mirage Sección Cuatro - ApéndiceJohnson Mirage User’s Guide Section Four - Appendix
Page 19

15
Johnson Mirage User’s Guide Section Four - Appendix Manual del Johnson Mirage Sección Cuatro - Apéndice
Page 20

8760 S. Sandy Parkway
Sandy, Utah 84070
Telephone/Teléfono 801-566-8800
FAX 801-566-7005
International Distribution/Distribución Internacional
8760 S. Sandy Parkway
Sandy, Utah 84070, USA
Telephone/Teléfono 801-568-7642
FAX 801-568-7638
Johnson Amplification, and Mirage are trademarks of the/
Johnson Amplification y Mirage son marcas registradas de
Harman Music Group Incorporated
Copyright 1999
the Harman Music Group Incorporated
Printed in USA 5/99
Manufactured in the USA/Fabricado en EE.UU.
Mirage JT50/JT100 Manual 18-6304-A
Please Visit Johnson Amplification on the World Wide Web at:
Visite la página Web de Johnson Amplification en:
http//www.johnson-amp.com
 Loading...