

Page 1
The
M
ALISTM
El
ectrosur ical
y em
Bi
olar
C®-III
Service Manual
~~
PROFESSI
RAYNHAM,
·
CMC
is I regisll<ed noarnarlt
ONAL, IN
MA
02767-0350 USA
~
if
•
01
JoMscn
.........."o/
Lecnln;ll.
& .Jotr\sorI
C.
Malis. IolD.
Proleucn:l~
II'IC.
Page 2
TABLE
' .0 Scope .......................
2.0
Warranty ..................
3.0
Service and Repair ....................................
4.0
Warnings
5.0
Funct
5.1 Product Description ................................ 1
5.2
5.3
5.4 Footpedal Controls ....................
5.5
5.6
6.0 Technical Description ................................. ... 4
6.1 Printed Circuit Boards ............................
6.2
6.3
6.4
6.5 Operational Performance ....... .............
6.6
6. 7
6.8
7.0 Replacing Internal Fuses ............................ 14
8.0 Maintenance .
9.0 Routine Cleaning ......•................................. 15
10.0 Sterilization ..... .......................... ................ 15
11
.0
Block
12.0 Schematics .........
13.0
PCB
Parts
14.0
OF
CONTENTS
........
.......................
...............................
..
..
IFe
IFe
IFe
and Cautions .............................
ional Description
of
Controls and Indicators .....................
Generator Controls ........................... ...... 1
Remote Control Set Controls .................. 2
__
Indicators ............. ............................ _ ... _
Connections ............................................ 4
Theory of Operation ................................ 5
Master List of Card
Connector Signals
Test
Points ............. ...............................
Calibration .......................................... .. 12
Technical Specifications ............. .......... 13
Trouble Shooting Guide ........................ 14
......
Diagrams ......................................... 16
Layouts and Assemblies ................... 34
List ...................................................
..
.............
......................... ............... 15
....
..................................
......
.....••..
IFe
_.
........... 2
..
..
10
11
..
12
20
46
3
4
1.0 SCOPE
This
manual
allow a qualified Service Techn ician to perform
maintenance
under
warranty, please refer to Section 2.0 .
contains the necessary information
and repair in
the
field.
If
the unit is still
to
mproper
i
IN LIEU
EXPRESS OR IMPLIED , INCLUDING ANY
RANTY
FOR
use
determined
for
incidental
1
3.0
For
tor
and
representative directly
Service,
The
Include with the unit a repair purchase order number,
the
serial
description
The
Replacements are
4.0
service.
OF
OF
A PARTICULAR
of
the
device for
THE
ABOVE WARRANTIES
ALL OTHER WARRANTIES, EITHER
MERCHANTABILITY OR FITNESS
PURPOSE
any
surgical procedure shall
by the
user
. Codman shall not be liable
or
conseque~tiaJ
. Suitability for
damages
SERVICE AND REPAIR
service
sales representative coordinates the return to:
Codman
c/o Johnson & Johnson Professional, I
4969
Philadelphia, PA
MAllS
Johnson
325 Paramount Drive
Raynham, MA 02767-0350
or
repairs
footpedal,
to
the
MALIS CMS-III genera-
contact
your local Cadman
or
through Cadman Customer
1-800-225-0460.
Repair Service
Wakefield
number of the generator,
of
the problem.
CMG-rrr Remote Control is not repairable.
& Johnson Professional, Inc.
Street
19144
and
available from:
WARNINGS AND CAUTIONS
4.1 WARNINGS
00
not
attemp
the
generator by using a 3-prong to 2-prong adaptor.
The
generator must be properly grounded to
operator
can
be achieved only
tacle
marked
Always
ate type and value fuse (see Technical Specifications).
The
user. Unauthorized modifications
cause
replace the
unit should not
it
t to bypass the grounding prong
and patient safety. Grounding reliability
when
connected
"Hospital
to
malfunction
Only"
system's
be
modified in any way
or
or
" Hospital Grade
fuse with the appropri-
to
fail in use.
the unit
WAR·
of any kind.
nc.
a written
ensure
to
a receJr
by
may
ARE
be
sales
on
".
any
2.0 WARRANTY
The
MALIS
(catalog no. 80-1170) is warranted for one full year
date
from
Set
which
CMC-1I1
materials and workmanship. This warranty
apply
failure
ing
to
unauthorized parts
abuse,
Bipolar Electrosurgical System CMC-III
of
purchase, except
is warranted for
is
warranted
where
to
the
service is required
operate
Instruction Manual, (ii) Buyer's use
misuse
to
be free from defects in both
or
maintain the Equipment accord-
or
consumables, (iii) accident,
, modification or misapplication,
the
six
months. The
due
Remote Control
to
MALIS
shall not
(i) Buyer 's
of
or
(iv)
4.2 CAUTIONS
Continuous power
remote control, must
a 4O-second rest period.
Close proximity of
Electrosurgical Units producing EXCESSIVE RF
CURRENT
produce
power
We
recommend the
CAL
electrosurgical device
RADIATION
voice annunciation and possibly output
.
SEPARATION
output
be
this
user
of
, by
either
footpedal
limited to
unit
and its cables with
may
insure MAXIMUM PHYSI·
this
unit from any other
and
its cables .
cause
20
seconds, with
this
unit
or
some
to
Page 3
5.0 FUNCTIONAL DESCRIPTION
OF CONTROLS
5.1
PRODUCT DESCRIPTION
The
MAUS
(catalog no. 8()'1170) includes:
1.
The
2. A wireless
settings
lation functions;
3. An Adapter Cable to allow the use
Irrigator
with the
The generator
footswitch (catalog no.
tootswitch (catalog no. 80-1149) both available
separately. The generator is equipped with a voice
synthesizer that provides an audible indication of
changes
option, it also announces the operating mode and
power
performed. With the exception of the generator,
above system components may also be ordered
separately.
MAUS
insulated and
separately, as
cords.
Irrigation
CODMAW
designed
and
the
In bipolar coagulation,
onty in
requirements.
should
so
all
current
of
the
no
current
ground.
dent
upon
meet, as
immersed.
lel.
and
major
shunting
bowed
blades
be
mainly
lowest
vides
the
tips
with
shunting.
The
MAUS
provides
cutting
shifting
automatically
the
high
Bipolar
Generator;
Remote
as
well
as
and/or a MALIS Bipedal Electric Footswitch
CMC-IJI
to
setting
Bipolar
The
Irrigator together.
the
be isolated
separated forceps.
The
well
the
or
are
possible
the
the
of
all
the
power
.
is
compatible with both a pneumatic
the
power settings. At the surgeon's
each
Cutting
non
are
System
Module
to
flow
the
angled
between
best
(catalog no. 80-1164).
Floorstand
accommodate
isolated output
The
flow
from
current
tip
size
as
the
11
the
forceps
forceps
in
the
so
still
well
generator
maintenance
least
decrease
Bipolar
higher
tissues
low
impedance
to
match
cut
AND INDICATORS
Electrosurgical System CMC-III
Control
operating
8(H173)
time cutting
Forceps
insulated
reusable
may
for
the
output
from
ground
takes
place between
either
geometry
and
medium
are
deep
saline.
the
tips
separated ,
the
tips
Electrosurgical System CMC-III
energy
, including
the
settings.
for
changing power
the
cutting
and
or
coagulation is
and
forceps
and
disposable bipolar
be
used
MALIS
the
CMC-III
electrical difference is
and
in the lower power
of
the
bipolar generator
as
There
the
blades
output
should
side
of
will now
angle
in which they are
are
in
saline,
If
the
almost
the
with
little shunting. The
impedance pro-
01
power
in coagulation
output
dense
of
the
micro cutting
power
requirements
and
of
a MALIS
an electric
standard
are available
with
the
MALIS
The
CMC-IIIIII is
Generator
much
as
possible.
the
two
be
virtually
the
forceps
be
depen
at
which
virtualty paral-
there
will
forceps
meet
current
needed
are
while
flow
at
the
forceps
due
for
fibrous layers ,
coagu-
to
the tips
rapid
aU
tips
be
the
will
to
of
the
-
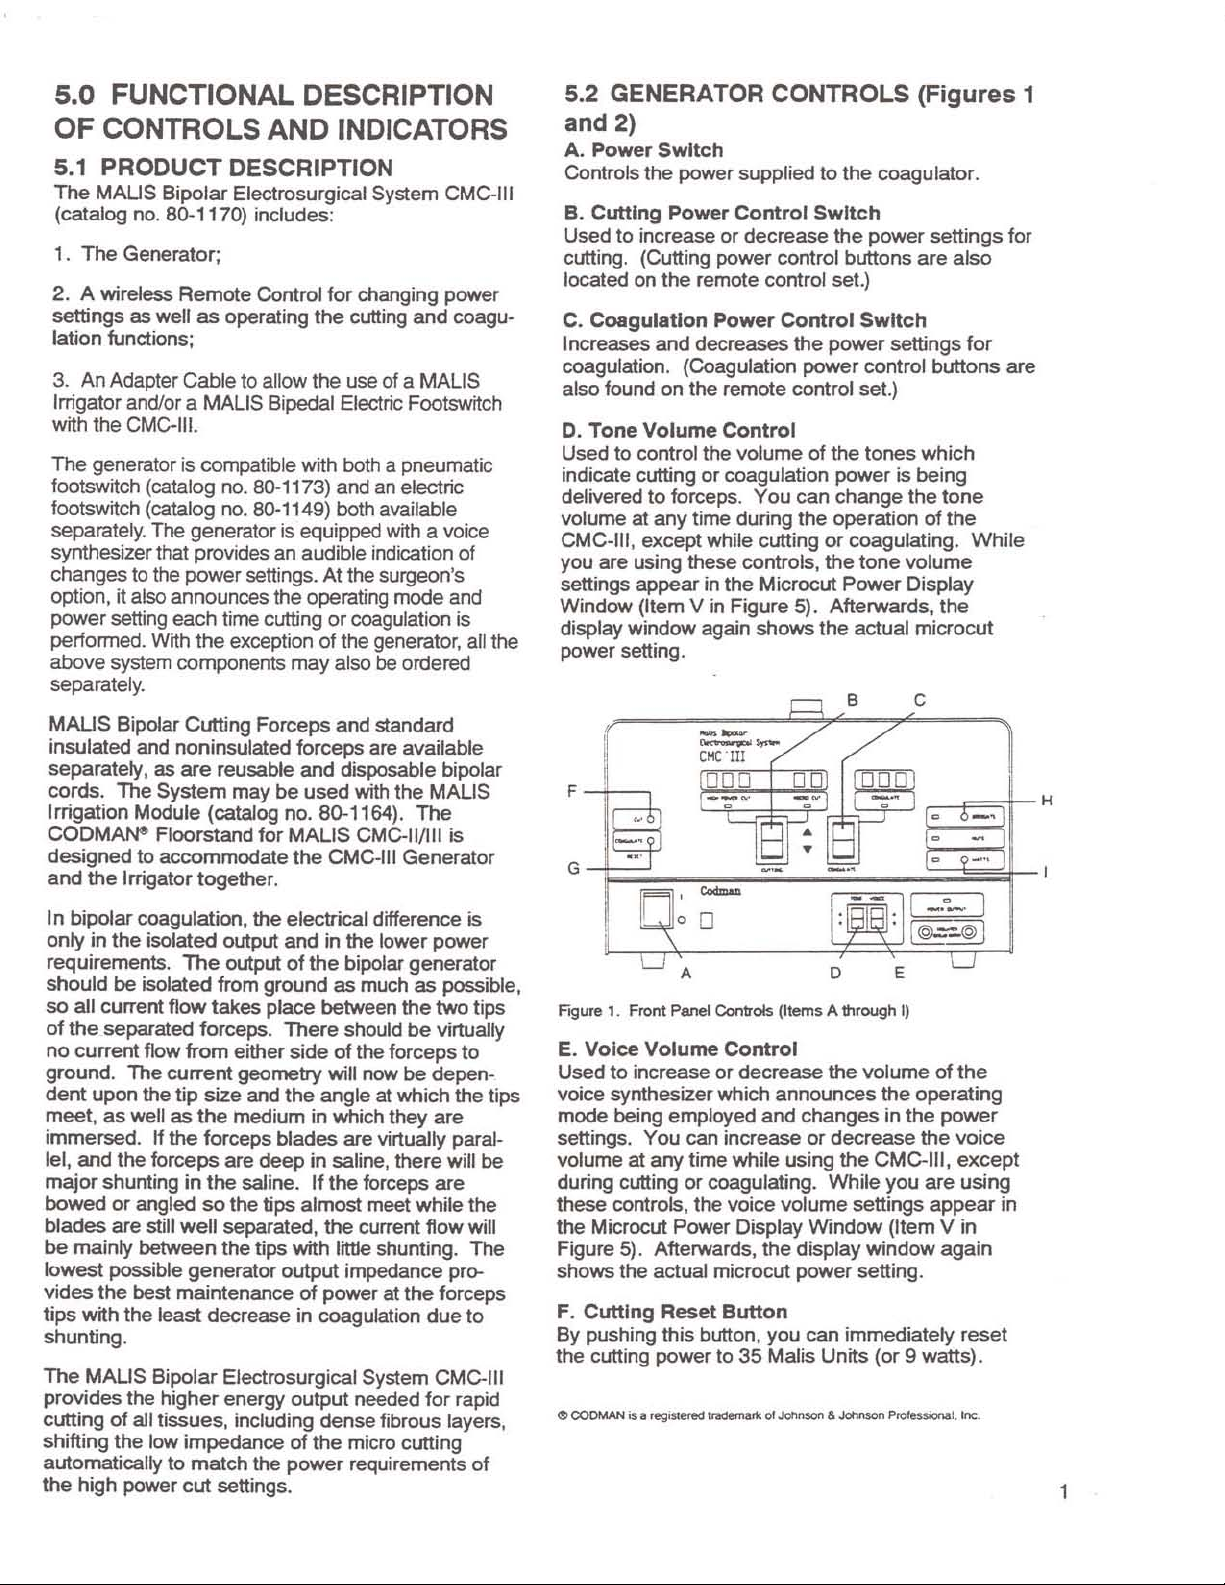
5.2 GENERATOR CONTROLS
and 2)
A.
Power
Controls
B.
Cutting
Used
cutting . (Cutting power control
located on
C.
Coagulation
Increases
coagulation. (Coagulation
also
D.
Tone
Used
indicate cutting
delivered
volume at
CMC-III ,
you
are
settings
Window
display
power setting.
Switch
the
power supplied
Power
to
increase
the
and
found on
Volume
to
control the
to
forceps.
any
except
using these controls,
appear
(Item V in
window
Control
or
decrease
remote control set.)
Power
decreases
the
remote control set.)
Control
volume
or
coagulation
time during
while cutting
in
the
Figure
again
--
CHe·1lI
--
--.
0 0 0
Switch
Control
the
power
of
You
can
the
Microcut
5).
shows
to
the
coagulator.
the
power
buttons
Switch
power
control
the
tones
power
change
operation
or
coagulating.
the
tone
Power
Afterwards,
the
actual
B C
-
]~
-..
0
0
A
Figure 1. Front Panel Controls (Items A through
E.
Voice
Volume
Used
to
increase or
voice synthesizer which
mode
being employed
settings.
volume at
during cutting
these controls.
the
Figure
shows
F.
By
the cutting
You
any
Microcut Power
5). Afterwards,
the
actual microcut
Cutting
pushing
Reset
this
power
Control
decrease
can
increase
time
while
or
coagulating.
the
voice
Display
Button
button ,
to
35
and
the
you
Malis
D
the
volume
announces
changes
or
decrease
using
the
While
volume
Window
display
power
can
immediately
Units
settings
window
setting.
the
in
CMC-III,
you
(or 9
(Figures
settings
are
also
settings
is
volume
E
I)
the
(Item V in
for
buttons
which
being
the
tone
of
the
Display
the
microcut
0
0
I
I
©.::.@I
of
the
operating
power
the
voice
except
are
using
appear
again
reset
watts).
1
for
are
While
"
I
in
1
Page 4
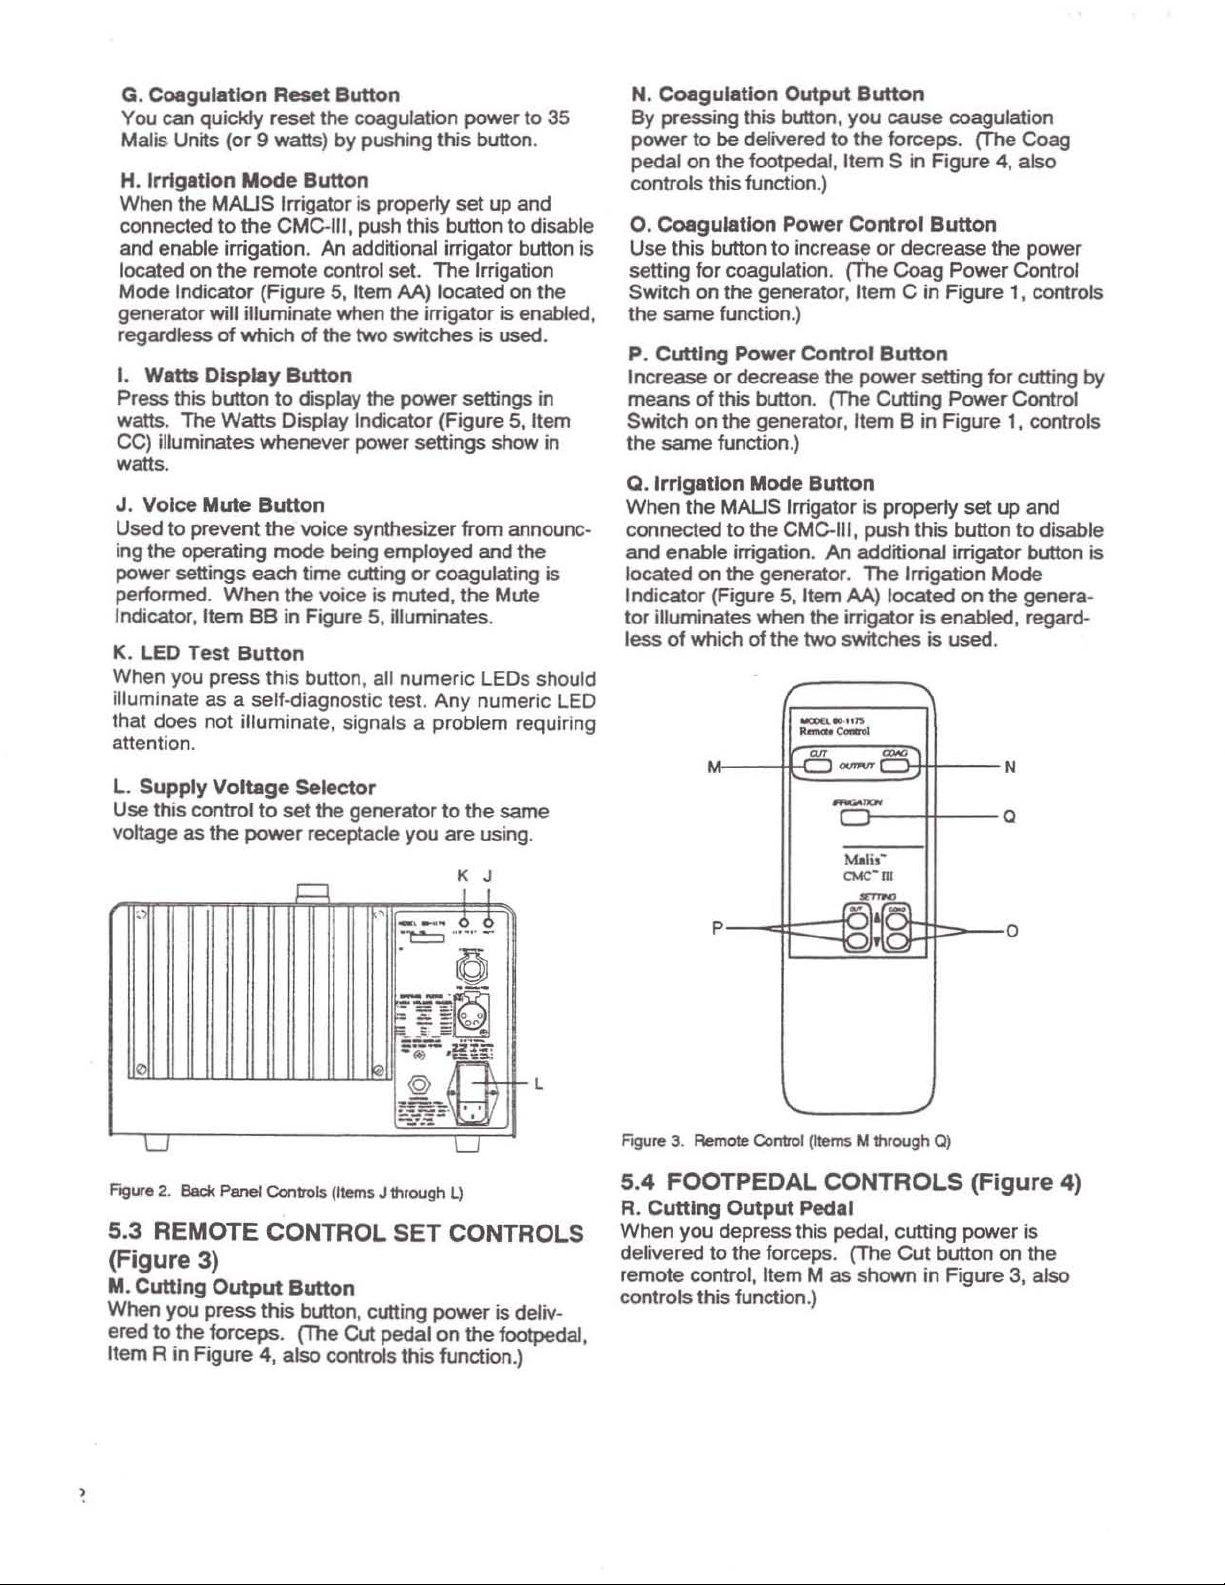
G.
Coagulation
You can quickly reset the coagulation power
Malis Units (or 9 watts) by pushing this button.
H.
Irrigation
When the
connected
and enable irrigation. An additional irrigator button
located
Mode Indicator (Figure
generator
regardless
I.
Watts
Press this button
watts. The
CC) illuminates whenever power settings show
watts.
J.
Voice
Used to prevent
ing the operating mode being employed and the
power settings
performed.
Indicator,
K. LED Test
When
illuminate
that does not illuminate,
attention .
L. Supply
Use this control
voltage as
MAUS
on
will illuminate when the irrigator is enabled,
Display
Mute
Item
you
press this button, all numeric LEOs should
as a self-diagnostic test. Any numeric LED
Voltage
the
Reset
Mode
to
the
the
remote control set.
of
which
to
Watts
Button
the
each
When
BS
Button
Sutton
Irrigator is properly set up and
CMC-III, push this button to disable
5,
of
the two switches is
Button
display the
Display Indicator (Figure 5, Item
voice synthesizer from announc -
time cutting or coagulating
the
voice is muted, the Mute
in Figure 5. illuminates.
Button
Selector
to
set the generator
power
receptacle you
=
to
The
Irrigation
Item AA) located on the
used
.
power
Signals a problem requiring
settings in
to
the
same
are
using.
K J
I
35
in
is
Coagulation
N.
By pressing this button. you
power to
pedal on the footpedal, Item S in Figure 4, also
controls this function.)
O.
is
Use this button
setting for coagulation.
Switch on the generator, Item C in Figure 1, controls
the
P.
Cutting
Increase
means
Switch on
the same function.)
Q.
lrrlgatlon
When
connected
and enable irrigation.
located on the generator.
Indicator (Figure 5,
tor
illuminates when the irrigator
less
be
Coagulation
same function.)
or
of
this button. (The Cutting
the generator, Item B in Figure
the
MAUS
of
which of the
Output
delivered
Power
to
increas~
Power
decrease the
Mode
Irrigator is property set
to
the
CMC-III, push this button
Button
cause
to
the forceps. (The Coag
Control
or
(The
Control
Button
Item AA) located on
two
Button
power
An
additional irrigator button is
The
switches is used.
coagulation
Button
decrease the power
Coag
Power
setting for cutting by
Power
Irrigation Mode
the
is
enabled. regard-
_-.,,'"
--
=
~
-
-
Mali,-
<><C. m
p
"""",&
~
~
Control
Control
1,
controls
up
and
to
genera-
N
a
o
disable
LJ
Figure 2.
Bad<
Panel Controls (Items J through L)
LJ
5.3 REMOTE CONTROL SET CONTROLS
(Figure 3)
M.
Cutting
When you
ered
Item R
Output
press
to
the forceps. (The Cut pedal on
in
Figure 4, also controls this function.)
Button
this
button, cutting power
is
the
footpedal.
deliv-
FIgUre
3. Remote Control pte
ms
M through Q)
5.4 FOOTPEDAL CONTROLS (Figure
R.
Cutting
When you depress this pedal. cutting power
delivered to the forceps. (The
remote control,
controls this function.)
Output
Item M
Pedal
Cut
button on the
as
shown in Figure 3, also
is
4)
Page 5
CUT
R $
Fig
ure
4.
Pneumatic
S.
Coagulation
Coagulation
you
depress
remote control,
controls this function.)
FootpedaJ
Output
power
this pedal. [The Coag button on the
is delivered to the forceps when
Item
COAG
Contr
ols (Items R and
Podol
N as shown in Figure
S)
3,
also
lor
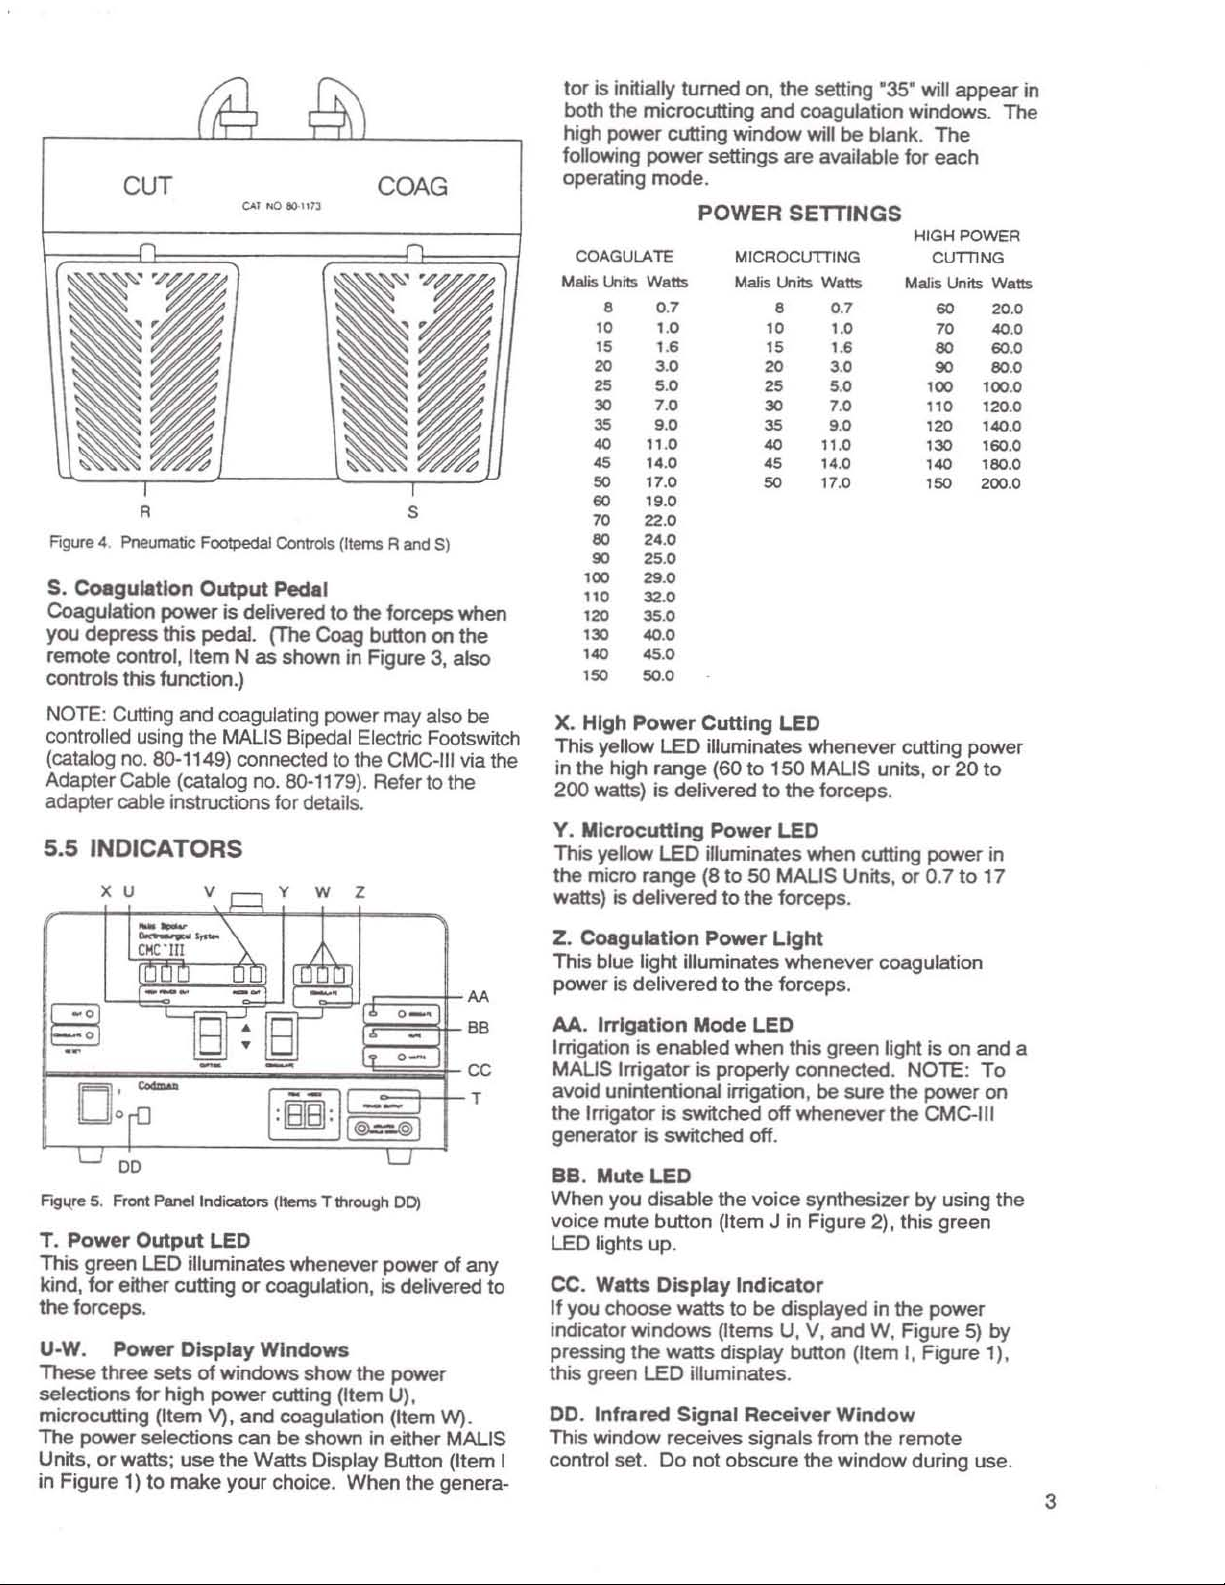
is initially turned on, the setti
both the microcutting
high power cutting
following
operating
power
mode
POWER
COAGULATE
Malis Units Watts Malis Lklits Watts
0.7
•
10
15 I .•
20
25 5.0
30 7.0
35 9.0
40
45
SO
60
70
80
90
100
110
120
130
140
150
11
14.0
17
19
22
24
25
29
32
35
"'
45
SO
1.0
3.0
.0
.0
.0
.0
.0
.0
.0
.0
.0
.0
.0
.O
and
window
settings
.
are
MICAOCUTTING
•
10
15
20
2$
30
35
'"
..
50
coagulatkm windows. The
will be blank.
available
SEmNGS
0.7
1.0
I .•
3.0
5.0
7.0
9.0
11.0
14
.0
17
.0
ng
-35
- will appear in
for
MarIS
The
each
HIGHPOWEA
ClfTilNG
Units Watts
60
20
70
"'
80
60
90
100
110
120
130
''''
150
80
100
120
140.0
160.
180
200
.0
.0
.0
.0
.0
.0
.0
.0
0
NOTE: Cutting
controlled
(catalog no. So-" 49) connected to the
Adapter Cable (catalog no. 80-1179
adapter cable instructions for detail
and coagulating power
using
the
MALIS
Bipedal
).
s.
5.5 INDICATORS
x u
........
--
O!C'
~-.
I11
V,
~~
.\
i=\
-.
v
w z
-
§
U
:~
D:
;-
LJ
DO
FJgl(re
S. Front Panellndicator.i (Items Tthrough
T.
Power
This
kind,
the
forceps
U-W. Power Display Windows
These
selections
microcutting (Item V).
The
Units,
in Figure 1) to
Output
green
LED illuminates whenever power
for
either cutting
.
three
for
power
selections can
or
watts;
sets
high
make
of
use
[;IEiI
Ei
I
; I
I
~~
LED
or
coagulation, is delivered
windows
power
and
the
your
show
the power
cutting (Item
coagulation (Item W) .
be
shown in either MALIS
Watts
Display Button (Item I
choice.
When
may
also be
Electric Footswitch
CMC·JIJ
Refertothe
0 _
via the
AA
BB
-
0 _
cc
T
1
LJ
DO)
of
any
to
U)
I
the
genera-
X.
High
Power
This yellow
in the high
200 watts) is delivered
Y.
Mlcroeuttlng
This yellow
the
micro
watts) is delivered to the forceps .
Z.
Coagulation
This blue light illuminates
power is
AA.
Irrigation is enabled
MAUS
avoid unintentional irrigation , be
the
generator is switched
BB.
When
voice mute
LED
CC.
If
you
indicator
pressing
this green
DO.
This window receives signals from
control set.
delivered
Irrigation
Irrigator is property connected.
Irrigator is switched
Mute
you
lights up.
Watts
choose
windows
the
Infrared
LED
range
LED
range
Cutting
illuminates whenever cutting
(60 to
Power
illuminates
(8
Power
Mode
to
to
when
LED
150
to
the forceps .
LED
50
MALIS
Light
whenever
the
forceps.
LED
this
off
whenever
off
.
MALIS
when
Units, or
green
sure
LED
disable
button
Display
LEO illuminates.
the
voice
synthesizer
(Item J in Figure 2), this green
Indicator
watts to be displayed in the
(Items U, V, and W. Figure
watts
display button (Item I. Figure 1),
Signal
Do
Receiver
not obscure the
Window
window
units,
or
cutting
the
power
0.7
coagulation
light
is
NOTE: To
the
power on
the CMC-III
by
power
remote
during use.
power
20
to
in
to
17
on
and a
using the
5)
by
3
Page 6
Tone
Indicators
The
CMc..1II
power
tones
lation and cutting. A
indicates coagulation.
A higher frequency
You
the
Voice
The
the
removing
change
announces
Cut
footpeda/)
"Cutting·. It also
before
coagulating
voice
the
In addition,
the setf·diagnostic feature
shown
"Memory
"Internal
is delivered
are
can
control
tone
volume
Indicator
voice
power
your
the
switch
the
volume
volume
below.
Error"
Power
employed
indicator
setting
(on either
the
generator
the
(not
shown)
generator produces a
to
the forceps.
to
differentiate between coagu-
low
minor
the
volume
control (Item 0 in Figure 10).
(not
shown)
enables
and
mode
eyes
from
power
each
01
setting. the voice indicator
new
setting. When you use the
the
voice announces either "Microcut"
announces
delivers either cutting
power
to
the forceps.
control (Item E in Figure 1)
the
voice.
voice
indicator functions
Indicates an internal
must
Operating
Indicates
power
pressed simuttaneousty
Indicates
footpedals were pressed
simultaneousty
Error" Operating malfunction
tone
whenever
Two
different
frequency major chord
chord indicates cutting.
of
the
tone
indicator with
you to
check
of
operation without
the surgical site.
remote control set
the
power
You
for
the five conditions
be replaced
maffunction
the
setting controls were
that
or
As
or
setting
or
can use the
to
change
as
part
fuse
two
front panel
both
adjust
you
the
of
or
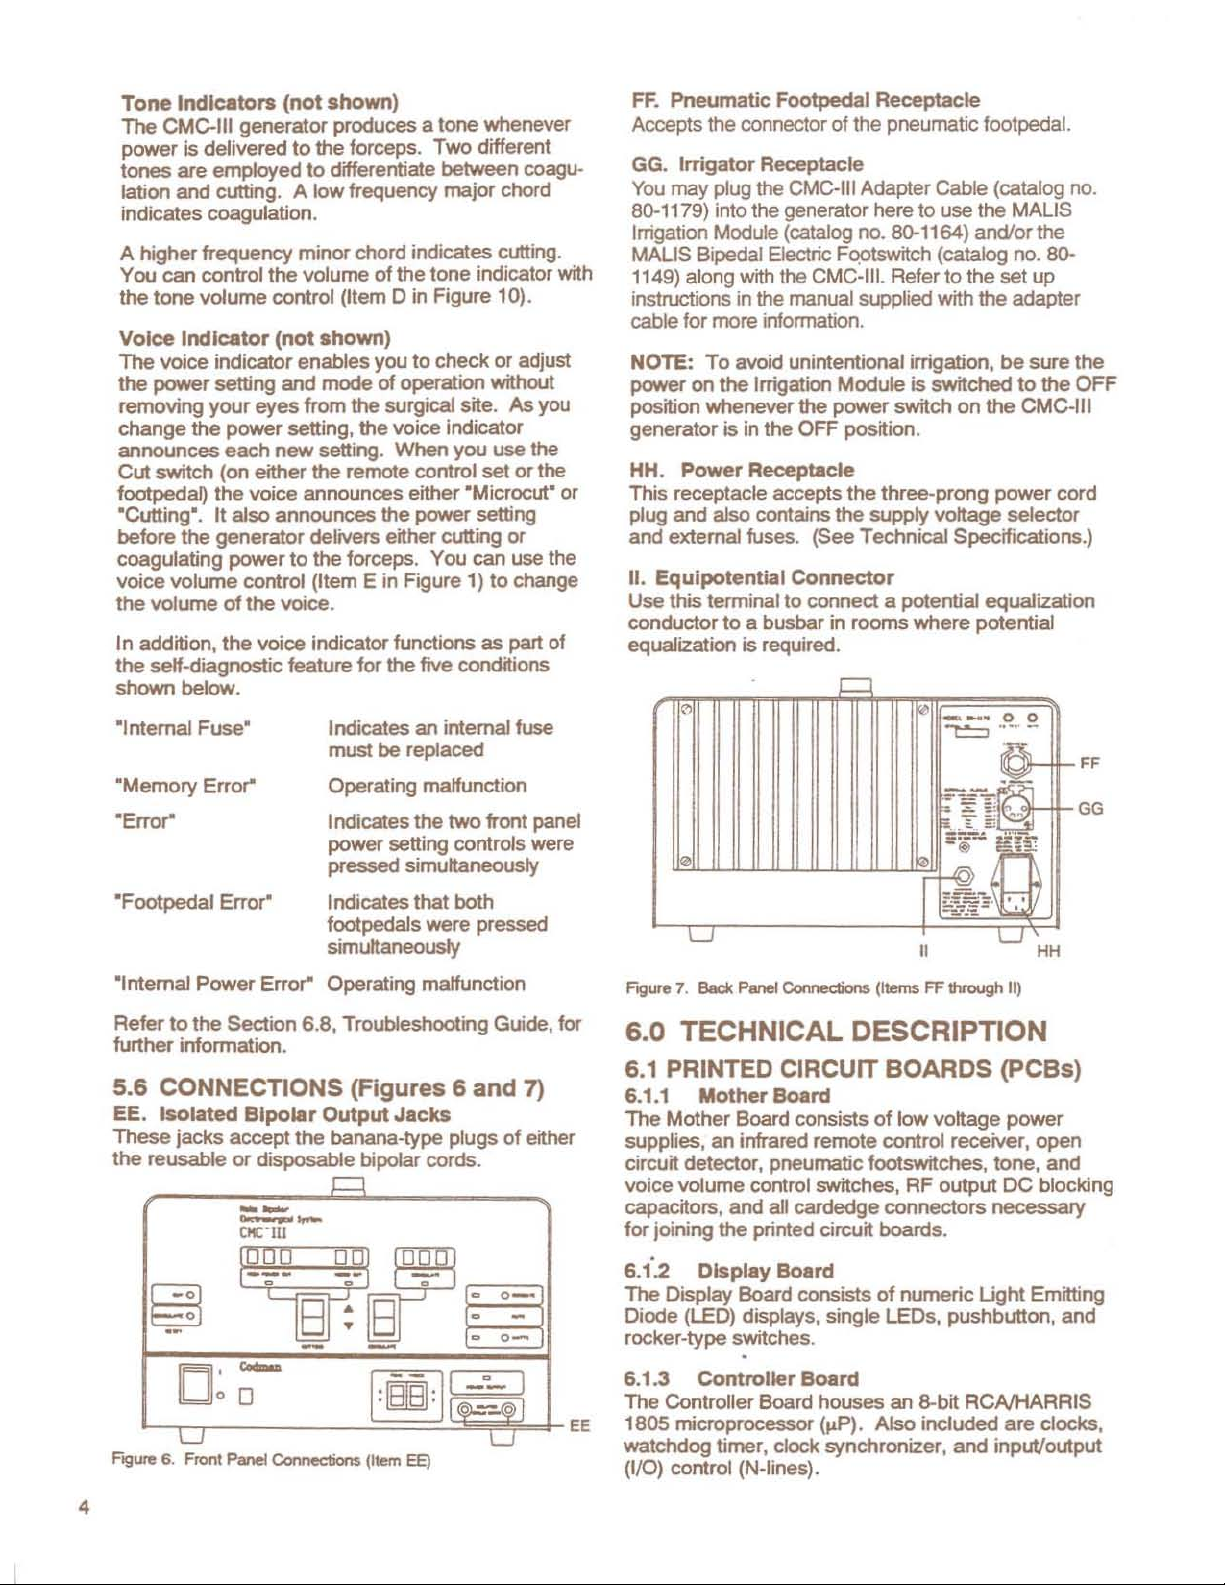
FF.
Pneumatic
Accepts the connector
GG.
Irrigator
You may plug the CMC·III Adapter Cable (catalog no.
80-1179) into the generator here to use the MALIS
Irrigation Module (catalog no. 80-1164)
MAliS
1149) along with the
instructions in the manual supplied with the adapter
cable
NOTE:
power
position
generator is in the
HH.
This receptacle accepts
plug and also contains the
and external fuses . (See Technical
II.
Use
conductor
equalizabon
Bipedal Electric Foptswitch (catalog no.
for more information.
To
on the Irrigation
whenever
Power
Equipotential
this terminal to connect a potential equalization
Footpedal
Receptacle
CMC·111.
avoid unintentional irrigation,
the
OFF
Receptacle
Connector
to
a busbar in rooms
is required.
Receptacle
of
the pneumatic footpeda!.
Refer
to
Module
power
position.
the
is
switched
switch
three-prong
supply
voltage
Specifications
where
and/or
the
set
be
on
the
power
selector
potential
the
80-
up
sure
to
the
CMC·III
cord
c:
__
11"11
""t::::::l
·00
~ -~
-
AL
~-.~
..
:ii:i: ...
, "
:::;
11011
~!=
Fi~
f
-:".":.
",
LJ
HH
LJ
Figure 7. Back Panel
Corlnedion$
liE·
"
(Items FF through II)
the
OFF
.)
FF
GG
to
the
Refer
further
Section
information.
6.8, Troubleshooting Guide,
5.6 CONNECTIONS (Figures 6 and 7)
EE.
These
the
reusable
lsolated
jacks accept
Bipolar
or
disp0sa.b4e bipotar cords.
--
OC·1lI
--
Output
the
banana·type plugs
~
Jacks
T~@
I.ffill
~ I ~.
4
L,,-------==="''-'=-
6.
LJ
Front
Panel
F'9ure
Connections (Item EE) (I/O) control (N.lines).
..
of
for
either
6.0 TECHNICAL DESCRIPTION
6.1
PRINTED CIRCUIT BOARDS (PCBs)
6.1.1
The
supplies,
circuit detector, pneumatic footswitches, tone, and
voice
capacitors,
for
6.12
The
Diode (LED)
rocker·type switches.
Mother
Mother
an
volume
joining
Display Board
Display Board consists
Board
Board consists
infrared remote control receiver. open
control switches.
and
all cardedge
the
printed circuit boards.
displays,
• I 6.1.3 Controller Soard
The Controiler Board houses an
''''F'ir'-J-
U
EE
1805 microprocessor
watchdog
timer, clock synchronizer,
single
(JtP).
of
low
voltage
RF
output
connectors
of
numeric
LEOs, pushbutton,
B-M
Also
included are clocks,
power
DC
necessary
Ught
RCNHARRIS
and
inpuVoutput
blocking
Emitting
and
Page 7

6.1.4
The
EPROM
audio fitters, amplifiers,
controls for voice and
6.
The
switching-type
principle of voltage transfer and isolation from
line (mains) sources.
6.1.6 AF Power
The
amplifier, coagulation waveform generator,
output steering, short circuit detection, and isolated
bias supplies.
Sound
Sound Board consists of a Digitaiker™,
, digital tone generators, steering logic,
1.5
High
High Voltage
RF Amplifier Board consists
Board
Voltage
Power
power
Amplifier
and
two electronic volume
tones
.
Power
supply utilizing the f1yback
Supply
Supply Board is an
Board
of
a bridge-type RF
Boord
RF
off
-line
power
6.2 THEORY OF OPERATION
NOTE
: Refer
schematic, Sections 8.0 and 9.0, respectively.
6.2.1
6.2.1.1
Four
low voltages are supplied
(a)
+5
VDC @ 2 Amps (regulated);
(b)
+15
(e)
+18 VDC @ 1 Amp (unregulated);
(d)
·18
VDC@O
6.2.1.2 Infrared Remote Control Receiver
The
Infrared Remote Control Receiver monitors
aaivity
transmitter,
processing.
from
Mother
Low
VOC@
the
and
to
each board's block diagram
Board
Voltage Power Supplies
on
the mother board:
1 Amp (regulated) ;
and
,
.l Amp (unregulated).
infrared remote control handheld
sends the
serial
data to the
and
IlP
for
6.2.1.6
The
primarily
elements
The
high cutting voltage duri
tips from breaking down components in
It
also
This circuit
mode.
Operation is
A small (
Khz is generated
wave, buffered by
transformer TS02
signal. The primary
form a parallel resonant circuit . Signal 20KHZlN
path to a filter, buffer U603B, detector,
comparator U603A. Providing there is essentially an
open across
open), the parallel resonant circuit acts
the
flow
20
KHZlN. During
U603A toggles
to
U503
off RF power
under 5000 ohms, the secondary winding of T502
acts to reflect
winding of T502 and lower
resonant circuit, thereby
wave to
signal level is detected by
comparator
amplifier to operate.
Open Circuit Detector
Open Circuit Detector circuitry is located
on
the Mother Board, with interfacing
on
the
RF Power Amplifier
open circuit detector helps prevent excessively
ng
periods of
eliminates the occurrence of
is
active only during the high power cut
as
follows:
<3
V p oP) audio signal of approximately
by
U602 in the form
Q600
and
capacitor coupled to
and
C529. This is
of
TS02 and capacitor C529
the
secondary winding of TS02 (forceps
of
the
20
Khz
sine wave from
this
period
on
and asserts the
on
the RF Amplifier Board, thereby shutting
If
the forceps should see resistance
this
impedance back
pass from
U603A
20
KHZOUT
to change state and allow
of
the
Q of
aflowing the
0600
Board
.
open
forceps
the
RF path .
AF
interference.
01
a sine
the
20KHZOUT
is
and
threshold
to
impede
20KHZOUT
open forceps,
?WRDIS
to
the
the
20
to
20
KHZIN.
and 0601, causing
signal
primary
parallel
Khz
sine
the
This
20
RF
a
to
6.2.1.3 Pneumatic Footswitches
Air
pressure
preSSUriZe their respective
sent
to
6.2.1.4 Tone
The
Tone and Voice Volume Control Switches are
located
through
these
switches are sent
6.2.1.5
A capacitive
of
the
RF Amplifier and the forceps
circulatory current that occurs during cutting
coagulating to prevent muscle tissue react ion.
from
the cut and coag footpedals
air
the
J.l.P
for
processing .
and Voice
on
the
front
of
the front panel
DC Blocking Capacitors
DC
block is inserted between the
Volume
the
Mother Board, protruding
of
the
to
the
switches. Signals are
Control Switches
CMC·1I1.
"p
Signals from
for processing.
to
limit DC
or
output
Time delay is built into
continuous application
periods of open circuit. After approximately
seconds of open circuit at the forceps, RF power is
extinguished.
L504 and C530,
series resonant circuit that acts
RF power waveform from saturating
with
interfering
6.2.2
6.
LED101 through LE01
through U108, respectively . Data from
Display
2.2.1
Oata Bus
from control signals supplied
Ulll
. The latched information is decoded (hexa-
decimal to 7 segments) and drives the numeric LED
displays.
the
Front Panel Numeric LEOs
(D8{O
..
the
detector circuit to allow
of
RF power during short
on
the
RF Amplifier
low level detection circuitry.
Board
08
are driven by U101
1}) are
la1ehed
by
Board
to
prevent the 1
T502
the
into
Ul0l·Ul08
Ul09, Ul10, and
0.5
, is a
Mhz
and
808ft
5
Page 8

Steering
suppty control signals to U101 through
N1 signal
and
Microcut and
significant
displays.
The N1. N2.
combine,
LED display.
and
numeric
requested.
6.2.2.2 Front Panel Single LEOs
The
are combined, selectively,
LPCUT.
FTPoON
RF
signal turns
requested.
LED
signal turns
display
6.2.2.3
The UP/DN
control rocker switches,
CUTSTRB
control switch,
produced by
5102.
Irrigator control
is produced
CUTRST
switch .
the
6.2.
LPop
CGop
klgic
, consisting of
selects
Coag
displays, the decimal points used on the
bytes
respectively, to select
FTPOON
LED
HPCUT. LPCUT. COAG. and FTPDON. signals
or
COAG
signal
output
power
when
irrigation is requested. The WATTS LED
mode
Front
signal
The
IRIGSW
the
Coag
displays, as well
on
the Cut, Microcut, and Coag
HPCUT
The
signals
display when RF
on
The
on
is
signal
the
. LPCUT. and COAG signals
HPCUT. LPCUT. COAG. BLINK.
mode display
turns on the Generator LED when
is
requested.
the
Mute LED when voice muting is
IRGLEo
the
Watts
requested.
Panel Switches
is produced
is produced by
5101
.
Coag RF
signal is produced by the
switch
by
the
watts
signal is produced
S105.
Coag
2.4
High
microcut
High
coag decimal poi
The
Reset
On-Card
switch,
going
decimal point
going
COAGRSTsignai
Signals
signal indicating seled.ion of the
signal indicating
Ul09
through
U1
most
significant byte of the Cut
as
the
the
proper numeric
combine to flash the selected
power
to
tum
signal
LEO
when the watts
by
5101 and
The
COAGSTRB signal is
pO¥ler
,
5103
. The
switch,
by
5106
.
nt
output is
on
the HPCUT,
LED~amp
The
MUTELEo
turns
on
the
RF power
5102.
the
Cut RF power
control switch,
WATISW
SlO4
. The
the
Cut
Reset
is produced by
seledion
08.
.
the
The
Ull1,
The
two
The
Irrigate
signal
of
least
the
6.2.3.2 Memory
The memory
addressing
consists
2805 EEPROM (O.5k-bytes)
the
J.lP.
during
latched tnto U207
provide enabling/disabling signals
devices
6.2.3.3 Clock Generator
clock generator includes a
The
and
two
dividing provides continual.
4
from
proximately eight
controller board.
6.2.3.4 Watchdog Timer
The
watchdog timer, U206,
the
J.lP
(a)
power
(b)
no
signal.
within 1
This guards against unit matfunctioning due
hang·ups
tions.
6.2.3.5 Clock Synchronizer
The
f,1P
the external clock generator. A flip-flop, U231 B,
whose output changes only with a rising clock edge
the
on
The
clock frequency
timer signals a ·clear'"
(U231B) and
Mhz
starts running synchronously with
generator.
6.2.3.6 Select
clock input.
500
and 500
circu;t
to
of
one
Upper
the
Timing Pulse A (TPA)
to
avoid conflicting with
ripple dividers, U202
Mhz
to .25Hz in divide--by·two steps. Ap-
when one
up; or,
to
to
2.5 seconds, continuaJly.
and
internal
Khz clock
the
Khz
has
fully demultiplexed 16-bit
allow 64k-bytes
27128
8-M
U206
temporary low supply voltage condi·
clock
of
EPROM (16k-bytes).
addressing
and
U208.
taps
are used
of
the
following
, pin 6,
divider is synchronized with
is
supplied with a
is
the equivalent
the
J.lP.
to
.p.
the
clocks are aligned
Out
and
and
phase
provides
watchdog
When
both
the
rising
of
data. Memory
a fl4.byte RAM in
(of
16
period
U201D
to
one
stable a Mhz
U203. RipP'e
coherent division
by
devices
occurs
of
the
synchro
edges
the
one
bits) occurs
, and is
and
U233C
all
the
memory
another.
crystal
on
the
a reset pulse
:
input
(WDI)
to
IJP
500
Khz
clock.
the
intemal
watchdog
circuit
of
both the 4
and
the
IJ.P
master clock
to
6.2
.3
Controller
6.2.3.1 Microprocessor
The
microprocessor has
bus
(OB{O
..
7}),
appropriate
MRW\), a
flag-line inputs (EF1 to EF4), extemal interrupt
(INTIJ, internal countdown time
random
U205,
(N1
to
timing
device
access
provides
N7).
Board
an
a·bit bidirectional data
16-bit memory addressing
indicators (TPA,
1/0 selection
memory (RAM).
one-ot-eight operation of I/O devices
lPB, MRD
(N
.lines), 4 extemal
r,
and
An
N-line decoder,
6
(641<)
64-byte
\.
and
Data
to
be
output
into U212.
MRo
6.2.3.7 Select
Data
through U216.
when
chronous.
U213. U214
. and
TPB
to
be
input
U217
the
N3, N5. N6, and MWR
from
the 8-bit
, and
signals are
In
to
the
8-bit data
. U218. U219.
data
bus
U215
when
synchronous
bus
are transmitted
U237. and
signals
are latched
the NS, N6,
.
U238
are syn-
Page 9

6.2.3.8 Digital-to-Analog Converter (CAC)
The
OAe
takes information from
to
and converts it
the
High
Voltage Power Suppty . Eight bits of hexa-
decimal data corresponds to
as
is
data,
into the
synchronous.
output
wtth
6.2.3.9 Randomizer Control
While pseudorandomization
coagulation)
the
EPROM
the
~P
by the
S-bit
counter, U225. U225 is clocked
Therefore, each
inputs represents a delay
increments
The
delay is
tion waveform bursts. When U225 is finished down-
counting a given
EFl
applied to the
DAC
from
N=hexadecimal value input to
by
providing delays not otherwise obtainable
~P
itself. When
data
bus are loaded into an 8-bit binary down-
(j.LS)
flag line input.
analog voltage information used by
DAe
when the N4 and
The
value of the 4.
the
DAC
will be (NJ256)'
is primarily maintained by a data table in
and
controlled by the
N7
data
byte latched into the counter
in one-microsecond
(e.g.; hex 10=10
used
to
control
data
byte, it signals the
the
S-bit data bus
256
units of decimal
.
HEX
data are loaded
MRD
\ signals are
75
vec reference
(4
.75 VDC).
CAe
.
data
(necessary for
~p,
U225 assists
is asserted, data from the
down
at 1 Mhz.
J.lS,
hex
the
start
38=59
of
the coagula-
~P
)lS).
via the
When
the
U229
divider ratio is
by a 488 Hz clock , the output
is 8 Mhz ,
division of the shifted 8 Mhz
the
Mhz
Mhz
6.2
The
(FETs) require a 1 Mhz signal . However, due
tum
what
to
prevent both halves of the bridge
at
the
from the 8
two
by
The
together through
and
Mhz
and
01Mhz
edges are
bridge amplffier operation.
6.2
.3.13 On-Card Signals
± 4% at a change
1
Mhz
Split-Phase Dead
shifter circuit is locked
during the cutting mode .
.3.12 1
AF
off delay propagation
shorter duty
outputs of U230A and
U2348. They are combined (ORed) with the 1
and 1MhZ\ outputs
U232C to form
Mhz
Split-Phase
Power
same time and reducing efficiency. Eight
through U230A, U230B,
and
Amplifier bridge field -effect-transistors
cyde
(37% on,
Mhz
shifter circuit
U2330
of
two
37%
0\1Mhz
shifted
. The
1SOO
from
changed
of
the
rate
of
waveform
Zone
to
one
Dead
nature
of
63%
is
sequentially divided
and
U230B
and delayed through U234A
U231A
duty
cycle waveforms,
C1Mhz
each
other for proper
and shifted
PLL
VCO, U228,
488
Hz. Further
is handled by
Generator. The 8
frequency near 8
Zone
Generator
FETs
, a some-
off)
is required
from
turning on
U231A
are
through U232A
and
to
ANDed
0\1
Mhz
to
the
Mhz
1 Mhz.
rising
RF
6.2.3.10 Coagulation Waveform Control
The
coag
waveform
shift registers,
form a
the
control,
a
input).
mined by
U227. The final digital waveform
Power
waveshape .
(a) 2.0
(b)
(e)
(d) 1.0
U226
mode
6.2.3.11 8
16
-bit
word
ShiM...oad input (pin 15)
U226
0.5
J.lS
rate
(due
The
logic level of
the
fixed
Amplifier
liming
'"
low;
0.5
'"
",low;
'"
and
since
high;
high;
U227
they are
Mhz
1.5
generator consists of
U226
and U227, wired together to
. After receiving a start pulse
from
the randomizer
and
U227 output pulses from pin 13 at
to
a 2 Mhz signal
the
output pulses is deter·
inputs (A through
is
to
form a damped coagulation
is as follows :
(e)
1.0",
(Q
1.0
(g)
0.5
are
locked out during the cutting
not
required.
Shifter
two
to
the clock
H)
of U226 and
used
by
low;
'"
high;
",low.
S-bit
the RF
The coagulation waveform requires that the base
frequency
The base
locked-loop (PLL), U228 ,
oscillator (VCO)
8 Mhz from the
fed back
second reference input is connected
reference
signed
of 1 Mhz
waveform
to
one
clock. The
to
divide
be
shifted approximatety ± 4%.
is synthesized with a phase-
whose
output is approximately 8 Mhz .
veo
is divided down by U229 and
reference input of
U229 divider has been de-
at
a ratio that provides a near 62.5
voltage controlled
the
PLL
The
to
a 62.5
Khz
Khz output.
to
The
Low
EFI
EF2
ME\
N4
N5
N6
N7
RLYDLY
TPA
TPB
6.2.4
6.2
The
U301, pin 4, from N3 and simultaneous data from
8-bit data
determines which word is
word
U203
buffered and filtered
6.2
Tone
One
modes
tone
whenever there is no
Digitalker is accessed.
Sound
.4.1
Digitalker, U301, is
list.
. Digital voice aud io
.4.2
generators consist of
tone,
. U30SC determines which of the two other
oscillators are used.
going signal
troller, U225, to external flag 1 input on
Low
going signal
external flag 2
Low going signal to
of internal
1/0 select
64
of
I/O select
select
I/O
Output select
High
going signal, after
voltage relay
high
High going signal
tion of high order
High going signal
tion of low order
Board
Digitalker
bus
. Information written
The
word list
by U303.
Tone
Generator
390
Hz, is shared
from
the randomizer con-
from A to
mput
on
IlP
~p
indicating selection
byte
RAM
DAC
or
ADC
of
randomizer
delay
from
~P
indicating selec-
memory
from
memory
started
to
be
is
stored in
from
U305,
by
The
footpedaJ activity
address bytes
IlP
indicating selec-
address bytes
by a write pulse
to
the
sel
ected
the
U301, pin 39, is
U306, and U307 .
both cut and coag
tones
are squelched
0 converter
controller
, to control
Digitalker
from the
EPROM ,
or
the
~P
to
to
the
7
Page 10

6.2.4.3 Volume Control
U309 and
devices.
detennine selection of either
(voice). The
direction
signal strobes
function.
U304
The
power-up to quiet down
generators. U301, pin 6, generates an interrupt
extemal flag line
oigitalker
6.2.5
6.2.5.1
U310
are electronic volume control
The
TONEVOL
VOLUPoN
of
volume: either up
U309 and U310
The
outputs of U309 and
for
final amplification to the speaker.
oL
Y signal provides a small time delay upon
3,
and TALKVOL signals
U309 (tone) or U310
signal determines the
or
down. The N3\
for
the
oigitalker and tone
EF3,
of
the
J.l.P
volume control
U31
0 are fed to
when the
is active.
High
Voltage
General
Power
Supply
Board
to
oAC
vottage (from the controller board) is first
buffered by U404B, and then
locations: U404A and U401
6.2.5.2 Voltage Sensing
U4018
DC voltage from C405. The·reSultant output signal
from
flip-flop U405A.
the PWM
U40SA is lhen applied
input.
DAC reference voltage causes shutdown of the PWM
controller,
preclude sporadic duty cycle pulses from occurring
and causing premature shutdown
6.2.5,3 Current Sensing
compares DAC voltage and scaled down high
U401
B,
VCNTl,
controUer, U403, The output
Scaled down high DC voltage that exceeds
U403. Synchronizing (SYNC)
is applied
VCNlL
to
is applied
B.
to
is combined with
U403, pin 9,
the
of
to
data
of
the
U403.
two
input on
SYNC
flip-flop
shutdown
is
used
to
from
the
K401
Relay
voltages
auto-switch mechanism is employed
connection
K400 has a
primary of
when
voltage is presented
08400,
When
energizes and forces
capacitors C401 and
doubler system. Relay K400 initially defaults to the
220/240 mode
inrush current limiting. R400 and R401 provide
voltage balancing due
C401 and C402. R402 provides a shorter discharge
time for C401 and C402 when
Unloaded off-line voltage is approximately 330 VOC.
High DC voltage monitoring is provided by optoisolator
are maintained: isolated for off-line; and earth, for
post-off-line
Unregulated high
off-line side (isolated) to
ground referenced) via FET
transformer
modulation (PWM) controller,
T400
by PWM at
flyback energy
T400's isolated secondary winding, R404, R405,
C403, and
prevent destructrve voltages from destroying
Flyback energy
C405, Regulated
RF Power Amplifier. R449 and
snubber protection for 0402.
Input
to
several sources, and combined before being input
U403, pin 9.
voltage regulation from several
breaks both the AC and off-line DC
simultaneously for safety. A line voltage
to
select proper
to
low
Tl01
operates
TI01
U400.
C404
the
PWM
either 1001120
120
VAC coil connected across the
voltage transformer, T701,
is operated
to
as
a full wave bridge rectifier.
is operated
the
C402 to operate
for
safely. RT400 and RT401 provide
to
Two
separate
and
chassis.
DC voltage is transferred from the
T400,
0400
125
Khz, During O4oo's off time,
is transferred from T
comprise
is
rectified by
DC
voltage is now available to the
controller, U403, is derived from
The
purpose of U403 is to maintain
or
220/240 VAC. Relay
at
2201240 VAC, no AC
K400; and
at
100/120 VAC, K400
diode bridge, 08400, and
unequal leakage currents
the
is controlled
two
the
d~
as
a voltage
K401
is de-energized.
DC
grounding systems
post-oft-line side (earth
0400
and flyback
by
pulse width
U403, and pulses
4OO's
primary to
snubber circuits
0402
and filtered by
C440 provide
volts to
as
225VDC.
8
so
that
bridge,
0400.
much
to
as
DC pulse current through
and monitored through current transformer, T
and then
the reference set by the
controller, U403, is shutdown. Comparator U401A's
trip point is modified by
voltages up to 3
voe,
prevent excessive high
periods of light or
are less
applied to U401A. If peak current exceeds
VOC, U404A acts linearty; above 3
U404A clamps.
no
than
125
vec. With
vec (greater than 125 vec at
overshoot problem is minimal.
Additional over-current protection is provided by
U409. When current exceeds
in
of
the high vottage power supply,
U403, shuts down and a signal, SCMONI, is transmit-
ted
to
the
j.lP
for error control handling (error code
02). The purpose of this additional circuit
prevent destruction of
Amplifier.
6.2.5.4
The PWM controller's
voltage for
drives U406,
~Iation
•
A'
T402,
isolation.
6.2.5.5 Normal
The
discontinuous mode for light loads.
primary current starts at zero, and secondary current
drops to zero during each cycle. The flyback
former operates in the continuous mode
or
to
transient load conditions,
operation
at
the start of each cycle, where
immediately steps up, then ramps
on pedestal waveform).
lsolaled FET
FET
driver, U402, Clock signal, SYNC,
Q404, and T403.
between off-line and post-oft-line sides.
drive signal from the output
U402, and FET
Operation (Flyback Mode)
ftyback transformer, T400, operates in
is
characterized by nonzero primary current
0400
and
T400
oAC
voltage,
U404A
The
purpose of this circuit
DC
voHage overshoot during
load while output
DAC
the
10
the
power supply and RF
(0400)
clock provides an isolated bias
0400.
Drive
T403
of
T402 also provides
the
At
oAC
voltages above 3
output) ,the
amps
the
PWM controller,
provides
U403 drives 0401 ,
That
The
continuous mode
the
primary current
linearly (i.e., ramp
is isolated
PWM
reference
DC
voltages
at
the
is
to
the
is, T400's
for
heavier
401
,
is
output
The
trans-
to
of
Page 11

62.5.6
ACIN_ 120/240
DACOUT Buffered
PWM Pulse wktth modu lated signal from PWM
SYNC Buffered clock signal from
VCNTL Signal
+15V/ISO Isolated 15 vott bi
6.2,6
6.2.6.1
The RF Bridge
Each vertical
driven at 1 Mhz. The drive signals ate
0 \1 Mhz. (See description under Controller Board).
Each
bottom
supplied from the coag waveform generator to
top
haff-legs
marked
horizontal bridge across
vertical elements.
62
.6.2 Coag Waveform Generator
voltage
DC
controlkld by
0501
rated and allows pass·through of the voltage from
the High
mode,
Controller Board) modulates the
High Voltage Power Supply. The modulated DC
the
voltage
C509 into a decaying
forming
RF bridge amplifier.
bridge amplifier
PWRDIS signal under conditions
circuit at the forceps.
6.2.6.3 RF Output Steering
The RF
saturating
series with
comprises two sepatate windings; one
ance
cut modes
power cut
ing secondary windi
K502, and the
high power
with the coag/low power cut winding
desired higher impedance.
On-Catd Signals
VAC
input to diode bridge
DAC
output voltage
controller
ler
, U403
comparator
FET
RF
Power
RF Bridge Amplifier
Amplifier is
hatf·leg
alternate half-leg (i.e
leftltop
BRIDGE .
. When in
the
is
right) is driven in phase. Voltage is
of
the
to
power the
the
Voltage
coag waveform signal (see description in
filtered by L501 , L502, L503, C508, and
to power
from output of voltage sense
driver
Amplifier
of
the "H" is an
bridge
The
load, T501 , is placed
the
coag waveform signal driving
the
cut mode, 0501 is fully satu-
Power
Supply. During
DC
FET
PWM
as
supply
Board
of
the "
.,
top left/bOttom right;
amp
~op
middle of
RF
Bridge Amplifier is
voltage waveform, thus
for
H"
bridge design .
FET
01
left;
the
voltage supplied by
the damped sinusoidal signal through
Cut
-off of DC voltage to
is
provided by U503 and the
of
short and open
output transformer , T501 ,
by a
DC
blocking capacitor, C528 , in
the
primary winding. T501's secondary
is
prevented from
low imped-
and
one high impedance. Coag
ate very low impedance
is somewhat higher
ngs
CUmL
cut
secondary wind ing is added
Y signal. When required,
«300
is controlled by relays K501 ,
and
«20
ohms). Switch.
to
achieve the
control-
power
suitably
Mhz
and
the
top
right),
as
the
two
the
coag
the
the
RF
low power
ohms); high
the
in
series
in
The high power cut winding added
coa9'low power cut winding, instead of a tap-type
connection. limits the amount
generated in the high power cut winding when
coagulation
energy
and outside
coag
noise filtering is
consisting
The coag noise filter also provides proper matching
between
cord, and
former TS02
the
Open
Mother Board description.
62
.6.4
Two short circuit detection circuits are used; one
each
for
Current through the forceps
coagflow
The sense current , in the form
rectified, filtered , and detected by opto-isolators
U513
outputs
in
U514
as
long
The outputs
signal
to
the RF bridge amplifier
the
100
again
until
the
signal
An
LED marked "short circuit" is used during testing
to confirm operation.
detection is
from destroying the RF Power Amplifier and forceps.
6.2.6.5
Isolated Bias Supplies of 7.5 VOC are required for
the upper hatves
coag waveform generator. These stages
respect
have
the
6.2.6.6
BRIDGE
ISO+7V(n) Isolated
ISOGND(n) Isolated grounds
PWRDIS Signal from output
mode
is used. This excessive noise
can
create interference problems both inside
the
metal
case
pro*d
01
L505
, L506, L507, C531 , and C532.
RF output transformer T501 .
biologlcalloading at
and L504, C529 and C530 are part of
Circuit Detector, and
Short
Circuit Oetection
coagllow power cut and high power cut.
power
or
U515 when the threshold is exceeded. The
of
to
as
PWRDIS. During the
ms
for
a shorted condition.
short circuit is removed.
is
also shared by the Open Circuit Detector.
cut, or RS24 for high power cut.
U513
or
U515 cause
operate at 100 millisecond (ms) intelVais
excessive short circuit current
of
U514 are ORed together
period, RF power is restored
The purpose of short circuit
to
prevent excessively high
Isolated Bias Supplies
of
the RF bridge amplifier and the
to
earth ground when operating, and must
Isolated Bias Supplies.
On
-Card Signals
Modulated DC vottage (during coag)
from coag waveform generator fitter to
RF
bridge amplifier
7.5 vec bias power supplies
to
RF bridge amplifier and coag
waveform generator
plies to
waveform generator
detectors to disable
RF
of
of
the
the
is
sensed by R525 for
of
100
is
cut
This
of
bridge amplifier and coag
series with the
high voltage energy
the
CMC-1I
by
a low
forceps. Trans-
is
explained in the
a small voltage,
the
ms
off
. At
The
bias power sup-
of
RF
1.
Further
pass
filter
the
forceps
one-shot timers
is
present.
to
form the
period, voltage
the
end
of
to
test
cycle continues
PWRDIS
RF
currents
"'float" with
short circuit
output
is
9
Page 12

SCRES1
Short circuit current through R525 to IRRIG Low going signal from 1/0 indicating
of
input
coagllow power cut short circuil selection
detector
SCRES2
SCRES3
SCRES4
Short circuit current through R525 to selection
input
01
coag/low
detector
Short circuit current through A524 to
input
of
high power cut short circuit
detector
power
Short circuit current through A524
input
of
high power cut short circuit
detector
6.3 MASTER LIST OF CARD CONNEC·
TOR SIGNALS
o
to
5
vec
AlDIN
BUNK
COAG
COAGFTSW
COAGRST
COAGSTAB
COAGWVFM
CUOFTSW
CUTRST
CUTALY
CUTSTAB
DAC
DB[O
EF3
FTPDON
HPCUT
HVRLY
IRIGLED
IRIGSW
IRRECV
10
digital converter (ACC)
1
Hz
High going signal from I/O indicating
selection of
Low
going signal
depression of coag footswitch
Low
going signal to 1/0 indicating
depression of
Low
going signal
selection of coag power switch
Digital signal
(RFAMP) representing the coagula·
tion waveform
Low
going signal
depression
Low
going signal to I/O indicating
depression of
Low
going signal from 1/0 indicating
seledion
of
T501 via cut control relays
Low
going signal
selection of cut power switch
o
to
5 VOC signal from the digital to
analog
..
7]
Bidirectional
Low
going signal from Digitalker to
external flag 3 input on
High
going signal from I/O indicating
depression of any footpedal
High going signal from 1/0 indicating
selection
Low
going signal from 1/0 indicating
selection
located
High
going signal from 1/0 indicating
selection
Low
going signal
depression of
Digital signal from infrared receiver
to
f.1P
signal to the analog to
signal; 75% on, 25% off
roag
mode
to
1/0 indicating
the
coag reset switch
to
1/0 indicating
to
RF Power Amplifier
to
I/O indicating
of
cut footswitch
the
cut reset switch
of high power cut winding phase
to
1/0 indicating jacks
converter (DAC)
8-8it
Data Bus
of
high power cut mode
of
high voltage mains relay,
on
the
HVPS
of
irrigate LED
the
board
to
I/O indicating
irrigation switch
cut short circuit
to
to
the HVPS
f.1P
of
external irrigator
LPCUT
LT
MRD
MUTELED High going signal from 1/0 indicating
MUTESW
MWR High going signal
NOHV
N1·N2 Output select
High going signal from 1/0 indicating
01
Jow
power
Low going signal
indicating selection
High going signal
a memory read function
selection of
Low going signal
depression
a memory write function
Low going signal to 1/0 indicating
unregulated htgh voltage
present on the High
Supply (HVPS) board
mute
of
the
for
cut
mode
to
Display board
of
LED
test mode
from
,...p
indicating
LED
to
I/O
indicating
mute
switch
from
IlP
indicating
DC
is
Voltage
displays on display
Power
board
N3
OCMONI
PWMON Low going signal to
PWADIS Additional low going signal from
Q1MHZ
Output select
volume controls; input
Low going signal to 1/0 indicating
open forceps condition
selection
(PWM)
supply
output
AMP
Digital 1
to
of
to
for
Digitalker
select
HVPS
of
pulse width modulator
IC
to
stan
output voltage
RFAMP
open circuit
disable
Mhz
signal with a 37% ·on-
RF
detector
output
and
for
indicating
to
I/O
RF
duty cycle
Q\1MHZ
RFPWR1 RF output
RFPWR2 RF output
SCMONI
TALKVOL
TONEDN
TONEUP
TONEVOL
UP/DN Signal
Same
as
Q1
MHZ
, but 180"'
power
power
jacks
Low going signal
overcurrent condition
Low going signal
on Sound board indicating selection
of voice volume control
Low going signal
depression of
Down switch
Low going signal to 1/0 indicating
depression of
switch
Low going signal
on
Sound board indicating selection
of tone
cut or ceag
and
volume control
to
1/0 indicating selection
low for
the
the
power
down
to
patient output
to
patient output
to
I/O
to
volume
to
1/0 indicating
Tone
Tone
to
volume
control; high
out
indicating
on
the
controls
Volume
Volume
controls
of
HVPS
Up
of
for
an
an
up
Page 13

VOICEDN
VOICEUP
VOLUPDN Digital signal to volume controls on
WATTS LED High going signal from
WATTSW
20KHZIN 20 Khz (approximate) sine wave from
20KHZOUT
+200V 0
Low going signal to I/O indicating
depression of the Voice Volume Down
switch
L
ow
going signal to I/O indicating
depression of the
switch
Sound board representing volume
direction
selection of watts LED
Low going signal to I/O indicating
depression of the Watts switch
of
output
20
input
to
to
RF AMP
open circuit detector filter
Khz (approximate) sine wave
of
open circuit detector
225
VDC @ 2 Amps from HVPS
Voice Volume Up
110
indicating
10
fiNer
6.4 TEST POINTS
Eleven test points are available to facilitate trouble
shooting.
of
the controller board on P203 (Figure 8). Activate
test functions by grounding (momentarily or constantly, refer
ate pin. Note that some test points provide dual
function capability.
6.4.1
Momentarily grounding this pin provides a complete,
sequential test
For
All test pins are easily accessed al the top
to
each section for details) the appropri-
Pin
*1
Power
Up,
Display
of
see
Test/Power
aU
LEOs, lamps, and numeric LEOs.
6.4.4, Calibrate On/Off.
Up
Its purpose is to zero out the high voltage available to
RF
the
DC, however, remains on the High Voltage Power
Supply board and must
Removing the ground turns off LED
announces "output power is on".
6.4.4 Pin
Grounding this pin enables the calibration function by
announcing "calibrate output power
Section 6.6, Calibration, for details.
6.4.5 Pin
This test point can
problem with the EEPROM. This can occur during
first time power-up with a blank
the
grounded, the unit announces "recycle memory" and
reprograms the
in
nounces "memory is correct" (assuming no EEPROM
problems) and then reinitializes the CMC·III. With
error condition, the unit announces "internal memory
error" and flashes "01" in the microcut display.
6.4.6 Pin
Grounding this test point causes an instantly
lated checksum of the EEPROM
the checksum stored within the
compared values show
coag displays.
unit announces "internal memory is correct." When
this test point is ungrounded, the unit reinitializes.
6.4.7 Pin #7
Grounding this test point causes the unit
"internal power recycle on." This mode is available
for factory use only. It is recommended that this test
point NOT BE ACCESSED.
Power Amplifier. Unregulated high voltage
be
approached with caution.
201
and the unit
#4
Calibrate
#5
Factory
be
EEPROM malfunctions. When momentarily
EEPROM. Transferring data is seen
the coag display. When finished, the unit an-
#6
RAM
If
the compared sums are equal, the
Factory
ON/OFF
".
Refer
to
Profile
activated only when there is a
EEPROM, or when
Read
calcu-
to
be compared with
EEPROM. The
on
the high power cut and
Test
to
announce
an
Figure 6. Controller Board Layout
6.4.2
Momentarily grounding this point provides a complete.
sequential test of
voice/tone volume control1unctions. For
Down,
6.4.3
Grounding this point turns off the PWM controller IC
on the High Voltage Power Supply. The message
·output power is
on. This test mode allows full functioning of the
CMC-III except for output power.
Pin
#2
Sound
all Digitalker words, tones, and
see
Calibrate On/Off.
Pin
*3
Deactivate
off'
Test/Power
PWM
announces and LED
Down
Power
201
turns
6.4.8 Pin #8 DAC
Voltmeter test point. OAC reference input voltage
should be 4.75
6.4.9 Pin
Voltmeter test point. DAC output voltage. When
calibrate mode, this voltage can be compared against
the displayed
display. The
display/255} * (DAC reference voltage).
#9
DAC value shown on the numeric LED
DAC output
6.4.10 Pin #10 ACC
Not used.
6.4.11
Grounding this test point allows operation of the
CMC-lll with the High Voltage
removed.
Supply board connectors, J403 and P404, be can·
nected together to provide
voltage power supply transformer,
point must
the High Voltage Power Supply connected.
Pin
#11
It requires that the two High Voltage Power
be
ungrounded for normal operation with
Reference
VOC, ± .05 volts.
DAC
Output
VOltage
Input
NOHV
Bypass
Power
AC
power to the low
should be [DAC
Supply board
T70l.
This test
in
11
Page 14

6.5 OPERATIONAL PERFORMANCE
The
MALIS
may
be
ohm
and
ammeter
test set
values
that
these
may
vary
tolerances,
Bipolar
tested
400
or
equivalent
up
in the accompanying figure shows typical
for
each power setting. It should be noted
are
depending
and
--
CMC-I
( )
'--
=
=
O:a...
Electrosurgical System CMC-III
for operational performance using 50
ohm
noninductive test loads and
electrosurgical analyzer. A
typical
meier
II
0 0
values
on
and that output
line voltage, load resistor
accuracy
.
=
~
0
U
...
50ohm l
micro
tut
00
i!Hl
uc!;v
-.
00waII
rerisIor fot
"""'"
m
2.SO
w
c
re.<
;!lor for
aa
non·j!ldocti\'i:
<
?-
and
R;
~ ~"".400
-<
non·
powuM
oo.,g.
power
hiSh.
y \
RF
Ammeter
Figure
9.
Tnt
S.,t
Typical
(For reference only)
Power
Setting
Mode
(Melle Units) (Wens)
•
10
15
2<l
25
30
35
40
45
SO
60
70 22
60
90
100
110
120
130
140 45.
lSO
Up
Output
0.7
1.0
1..
3.
5.
7.
9.
11
.
14
.
17.
19
.
..
.
25
.
29
.
32.
35.
40
.
SO
.
(0-1
8fl1)S)
vs. Power Setting
Co.g.
Output
(RF emp)
0.
.
.
.
.32
.
."
.
.53
.56
.62
.
0.
0.76
0.60
0."
0.
0,
1.00
Output
Current
12
15
1.
..
,.
..
66
..
71
89
95
Into 50
output
ohms
(Wett.)
AF
Power
0.72
1.1
1..
2.9
5.1
7.2
9.3
11.5
14.1
16.8
19.2
21.3
23.3
25,2
28.9
32.0
353
39
.'
45
.1
SO
.O
Cut
Output
Power Setting
Mode
(Mill.
Units)
/
/
/
Micro-
C"'
\
\
\
/
/
/
100 100 .
c"'
110 120
\
120
130
\
\ 140
lSO
(WItts)
,
10
15 1 .•
20 3
25
30 7
35 9
40
45 14 .53
SO
60
70
60
90
11
17
20
40 .32
60 .39
60
140
160
160
200
Output
(RFAmp)
0.7 .
1.0 .15
5 .32
12
1.
24
.
.
,.
.43
...
.56
.22
.45
SO
55
.
.
59
.63
.67
.
71
Current
Output
0.
2.9
5.1
7.2
9.3
11.5
14
16.8
20
40
60
60.0
100.
120.00
140.00
160.00
180.00
200.00
6.6 CALIBRATION
Anyone,
settings may be
the
memory) associated with
adjustments may
the
The
pin
grounded, the message
announces,
panel numeric LED windows.
the
mode; the other
DAC
increased by momentarily grounding pin 1
or
decreased by momentarily
P203
changed by no
original factory supplied settings) .
or
aU,
of
the CMC-IIJ's 40
calibrated individually by changing
target
DAC
calibration
be
calibration mode.
calibration mode may be invoked by grounding
4
of
P203 (refer to Section 6.4.4).
and
two
Malis Unit setting
corresponds
calibration value.
(as a safety precaution,
more
value
each
performed with the CMC-III in
·calibrate output power"
numbers
of
the previously
The
DAC
than ± 15
power
(as
stored
setting.
appear
One
to
grounding
DAC
steps
on
of
the
the
setting's target
value
settings
from
DAe
With
the
selected
may
pin 2 of
Powel
(Watts)
72
\
1.1 \
1.'
\
Into
50
/
/
.1 /
.0
\
.0
\
.0
\
Into
00
400
I
/
/
output
in
value
this pin
front
numbers
be
of
P203,
may
the
Ohms
Ohms
is
be
12
Page 15

The output power associated with a setting's new
DAC value may be confirmed by measuring
target
in
the unit's output current as described
Operational
control
Therefore, use the front panel rocker switches to
change from one power output setting to the
use the foot pedal
If
errors occur during calibration,
wishes to restore the original factory set
targets, momentarily ground pin 5 of P203
the standard
When calibration
from pin
then reinitializes at Malis
microcut and coagulate modes.
Perlormance. Note that the remote
is not functional during the calibration mode.
to
activate the output.
or
DAC calibration values.
is
complete, remove the ground
4.
The unit announces "calibration
Unit settings of 35
Section 6.5,
if the user
DAC
to
oW
in
next,
reload
both
6.7 TECHNICAL SPECIFICATIONS
Power
100
voltage selector
120 ± 10% VAC with 120 selected
voltage selector
220 ± 10% VAC with 220 selected on the supply
voltage selector
240
voltage selector
SO/60Hz 400 Watts
Requirements
±.
10% VAC with 100 selected
±.
10% VAC with 240 selected on the supply
on
the supply
on
the supply
Fuses
External
Internal
Mother Board: Two
High Voltage Power
Supply Board: F400: 4.0 Amp Type T
For 100 or 120 VAC operation:
Two 4.0 Amp Type T
220 or 240 VAC operation:
For
Two 2.5 Amp Type T
(F600, F601) 3.0 Amp Type F
(AGC)
One
250 VAG
250 VAG
(F602) 0.5 Amp Type F (AGC)
F401:
(MOL)
(MOL)
250 VAC for 100/120V
operation
2.5 Amp Type T
250 VAG for 220/240V
operation
2.0 Amp Type F (AGC)
250 VAG
(125 VAC)
(250 VAC)
(MOL)
(MOL)
and
F402: 1.0 Amp Type T
250 VAG for 220/240V
operation
0.6 Amp Type T
250 VAG for 220/240V
operation
(MOL)
(MOL)
AC Leakage Current
10
,.tA
Less than
normal or reversed,
Output
Coagulate: Damped Aperiodic, centered at 1 MHz
Cut: Sinusoidal, 1 MHz
Output
Coagulate (20 settings) .72-50 watts into 50 ohm
noninductive resistor load
Micro
noninductive resistor load
Cutting (10 settings) 20-200 watts into 400 ohm noninductive resistor load
Output
Visual: Three-digit indicators, except micro cut,
which is two-digit
Aural:
Waveforms
Power Range
Cut (10 settings) .72-16.8 watts into 50 ohm
Setting
Voice annunciator (synthesizer)
with power ON or OFF, polarity
with ground open or connected.
Indications
Power Controls
AC: ON/OFF Switch
Output: Panel mounted three-position rocker
RF
types
Panel Connectors
Bipolar: Two high voltage jacks
Cooling
Convection; no fan
Weight
21
lb.
(10.4kg)
Dimensions
8'/2H x
21.6H x 32.4W x 43.2D centimeters
12
3/.W
x 17D inches
Minimum Operating Temperature
50'F (10'C)
Remote
Two 1.5v AAA alkaline batteries
Control
Power Source
13
Page 16

6.8 TROUBLE SHOOTING GUIDE
Symptoms
a,
1. Unit
2.
3.
does
not
operate
(Power-on indicator light)
Low
power output
Erratic power output a. Loose
Blown
b.
Loose wire at power cord plug
c.
No
a.
Low
b.lncorrect
c. lntemal calibration change
between
b.lntermittent break
4.
No
power output
Excessive leakage current
5.
Excessive power output a.lntemal calibration change
6.
Voice indicator announces
7.
"Internal fuse". Power Setting
Display flashes "00"
a. Broken wire in forceps cord
a,Shorted output transformer
a.
Blown internal fuse
Probable
fuse
power
at
wall
line voltage
test load
or
dirty connections
forceps
Cause
outlet
cord
and
in
forceps cord
jacks
Correction
a. Replace
b.
Check
c.
Check electrical service
a. Adjust to 120, 220,
volts nominal, as appropriate
b.
Use
load for coag and microcut;
400
c. Return for service and
recalibration
a. Gently clean plug surfaces
with abrasive
b.
Replace forceps cord
a.
Replace forceps cord
a. Check for shorting to core case.
Retum for
recalibration
a.
Retum for service and
recalibration
a.
Replace internal fuse
plug
50
ohm
ohm
fuse
for
wiring
nonir.ductive
for
regular
cloth
service and
or
240
cut
B.
Voice indicator announces 0.. Operating malfunction
"Memory error"
Voice indicator announces a. Two front
9.
"Error" pressed simultaneously
10. Voice indicator announces a. Two footpedals pressed
"Footpedal error" simultaneously
Voice indicator announces
11.
"Internal
power error"
a.
Operating malfunction
panel setting controls
7.0 REPLACING INTERNAL FUSES
Significant changes in the supply voltage setting,
such as from
change in two internal fuses. Fuses
are located on the power supply board . Figure 10
shows the location of the power supply board in the
CMC-Ill
1. Disconnect the generator from the power supply.
2. Remove the six
ers holding the cover
11
chassis.
0/120V to 220/240V, require a
F400 and F402
Phillips head screws and wash-
in place. Remove the cover.
0.. Return for service
a.
Use care when pressing controls
a. Use care when depressing
footpedal
a. Return for
service
3. Remove the Phillips head screw
Figure
10) that holds the power supply board to the
metal bracket.
14
(Item A in
A
Figure
10.
Power Supply Board
Page 17

4.
Firmly pull
can be disengaged
side. Do not
of
the
chassis; it
voltage
5.
Remove fuses
replace
Section 6.7,
the
attempt
wiring.
with
appropriate
Technical
power
is
F400
supply board
from
the
to
pull the board completely out
still connected
and
type and value
Specifications).
G
8
.
,Ct..
' A! lDCVINV"::
l-SA.! AT
U"
.....
~"..::
u:o...
A;
loell
UA'Ar~
F'9ure 11.
6.
ing the pins on the
connectors.
seat
7.
bracket
washers.
WARNING:
on
must
fused
generator.
Changing
Slide
the board
property in
Replace the
Replace
the
power
also be
for
the electrical outlet before turning on the
8.0 MAINTENANCE
2W"::
~""
Intemal Fuses
back
bottom
Push
the
the
connectors.
screw
the
The
supply
receptacle
set
to
the
into
of
board
holding the board
cover
power
at
the
correct voltage and property
upward
card holders on either
via
the
F402 (see Figure 11);
on
Power
Supply Board
the card holders, ensur-
supply
fuses
until
(see
the board align with their
down firmly until
and six screws
setting drum, located
rear
of
the
the
to
the
and
generator,
pins
rt
Cleaner (J&J Medical catalog no. 3415). If tips
or
become pitted
Codman Repair
8.2
Bipolar
low
or
erratic performance
tact between the bipolar forceps
isolated bipolar
oxidized surfaces impede current flow.
sive
cloth
to
bipolar
dence
NOTE: Pulling plugs from
CMC·1I1
and
plugs by holding
generator with
8.3
Storing the pneumatic footpedal with the pneumatic
tubing tightly wrapped around it
tubing.
tubing.
the footpedal upon evidence
8.4
Storing the electric footswitch with the footswttch
tightly wrapped around it may result in
cord.
cord
of
deterioration.
by
cause
Pneumatic Footpedal
leave
Inspect the tubing before
Electric Footswitch
Leave
misaligned, retum the forceps to
Service for repair
or
replacement.
Cord
may
be
due
cord
plugs
output
gently clean plug
before
grasping
intermittent operation.
the
sufficient slack to prevent stress
sufficient slack to prevent stress
j3cks
on
the
surfaces. Inspect
each use; replace it
the
jacks
the
cord
may
the
plug with one
other.
may
each
of
deterioration.
generator
of
damage
Disconnect
hand
damage the
use
damage
com.
NOTE:
during use.
positive mechanical action.
Inspect the footswitch cord before use
tion.
vinyl covered
Replace the footswitch assembly
manufacturer.
DO
NOT
IMMERSE the footswitch in liquIds
The
pedals should operate freely with a
for
Do
not operate if the vinyl cover is damaged. The
footswitch is not a repairable item.
as
supplied
to
poor
and
. Badly
Use
an
upon
the
MAUS
the
and
the
on
and
replace
on
deteriora-
by
con-
abra-
evi·
cords
the
the
rord
to
the
the
the
the
8.1
Bipolar
Proper
essential
Malis
cutting and coagulation forceps
elimination
MAUS
dence
tional
can
if
levels lower
state
at
normally occurs is
Remove
keep
of
Johnson
care and
states the
·While
CMC-III
of
waveform modifications, the MALIS
be
used with
required) while
generators.
lower
working
current between
Forceps
maintenance
to efficient cutting and coagulation. Dr.
following:
some
sticking
of
the
initial overvoltage spike in the
waveform
sticking
settings, pitting
coagulum
& Johnson
and
less
reducing
than
heavily-irrigated spark
surfaces
and
charring
greatly reduces
charring. Coupled
irrigation (or no irrigation
sticking and charring
Because
greatly
deposits
forceps
Medical's
the generator is effective
of
the
reduced.·
as often as necessary to
clean. This ensures
tips. We recommend
of
the bipolar forceps is
of
the
bipolar
is unavoidable, the
the
inci-
with
addi-
CMC-1I1
gap
and solid
forceps
Electro-Surgicaf
tips
which
the
Tip
at
to
flow
all,
8.5
Power Cord
Never
use
extension cords, three-prong
power plug adaptors,
with
the
MALIS
inspect
insulation.
the
the
power
If
necessary, replace
same
type, length, gauge, and insulation.
or
CMC-IJI. Before
cord and plug
8.6 Remote Control
The
remote
batteries.
down
and slide
new batteries
Slide
cover
control uses
To
open
on
the
lower
it
down. Remove
as
back
the
portion
illustrated within
on until it
to
two-prong
extra
length
two
1 .5v AA.
battery compartment, press
of
the
the
snaps
power
each
use,
for
frayed
the
power
alkaline
remote's
old
batteries. Insert
the
into position.
rear
compartment.
cords
visually
or
broken
cord
with
cover
15
Page 18

9.0 ROUTINE CLEANING
The
MAUS
cleaned with a
mild
c~aning
that
stick
MAUS
liquid. Subjecting
ture may damage
violate
CMC-III generator cabinet may
damp
doth
or
sponge. Use
solutions to remove stains or adhesives
to
the cabinet. DO
CMC-III generator
the
generator
the
electronic
the
warranty.
NOT
or
remote control in
immerse
to
excessive
components
be
alcohol
the
any
mois
and
or
·
The CMC-III lootpedal
used hospital cleaning liquids .
enter
the
white plastic footpedal connector.
may
be
w-'d
Do
with normally
not aJlow liquid
10.0 STERILIZATION
Never steriliZe the MALIS CMG-Itl generator, pneu-
matic
tootpedaJ
connecting cable. Pla
plastic
room
The Integrated Irrigation Tubing
single-use device, sold sterile.
bag
cameras.
, electric footswitch, remote control, or
ce
the remote into a sterile
similar to those supplied for operating
and
Cord Set is a
Do
not
resterilize.
11.0 BLOCK DIAGRAMS
to
16
 Loading...