

Page 1

Gebruiksaanwijzing
User Manual
Page 2
Nederlands
INHOUD
INLEIDING
GEBRUIKSKLAAR MAKEN
COMFORT
REMMEN
VERSNELLINGEN
WIELEN
VEILIGHEID
ONDERHOUD
GARANTIEBEPALINGEN
....................................................
....................................................
....................................................
....................................................
....................................................
....................................................
....................................................
....................................................
....................................................
2
2
3
5
6
8
8
9
10
Let op: via www.johnny-loco.com kan de ets direct verzekerd worden!
1
Page 3
Nederlands
INLEIDING
Gebruiksaanwijzing
Gefeliciteerd met de aankoop van de
Johnny Loco Cruiser. Met de nieuwe
Johnny Loco Cruiser heb je een
fijn stukje blinkend staal aangeschaft
waarvan je vele jaren kunt genieten. En
niet alleen voor het dagelijkse flaneren
over de boulevards. Hij is met veel zorg
ontworpen met aandacht voor comfort,
gebruiksgemak en veiligheid. Wanneer je
ergens heen moet, kun je maar beter goed
voor de dag komen, nietwaar?
Wij raden je aan deze gebruiksaanwijzing
goed door te lezen voor je het eerste ritje
op je nieuwe fiets maakt. Met behulp van
dit serviceboekje, voorzien van duidelijke
tekeningen en praktische aanwijzingen,
kun je nóg meer plezier beleven aan
je fiets. Wij proberen onze producten
steeds verder te verbeteren. Daarom
horen wij het graag als je opmerkingen
hebt over het ontwerp, het gebruik, deze
gebruiksaanwijzing of andere zaken. Je
kan hiermee terecht bij onze Consumenten
Service ([email protected]).
Belangrijk
• Deze handleiding geldt alleen voor
Johnny Loco Cruisers met een
serienummer dat bij ons bekend staat. Dit
serienummer is onder de trapas in het frame
geslagen.
• Lees deze gebruiksaanwijzing zorgvuldig
door voor gebruik en bewaar deze goed.
• Laat je cruiser geregeld door een
specialist onderhouden. Op onze website
is een lijst van deze specialisten binnen
handbereik, maar iedere fietsenspecialist
is in staat om het algemene onderhoud
naar behoren uit te voeren.
• Bij nalatig onderhoud vervalt de garantie
op de cruiser. Het garantieformulier
geeft hierover meer uitgebreide
informatie.
• Johnny Loco is een geregistreerde
merknaam.
Kennismaking
Ervaar eerst wat de remmen en versnellingen kunnen en of de stand van je stuur en
zadel goed is afgesteld.
• Bepaalde onderdelen moeten na verloop
van tijd opnieuw worden afgesteld. Je
kunt dit het beste laten verzorgen door de
specialist.
• Mocht je het zelf willen doen, dan is
dit boekje een belangrijk hulpmiddel. Wij
raden je aan te overleggen met de
specialist voor het afstellen van je fiets.
GEBRUIKSKLAAR
MAKEN
Indien je de Johnny Loco Cruiser ontvangen
hebt via een transporteur en niet via een
dealer, dan volgen hier de richtlijnen voor
de juiste montage/afstelling van de diverse
onderdelen.
Om het ook in de toekomst mogelijk te
maken je stuur en zadel af te kunnen
stellen is het belangrijk de onderdelen in te
vetten met zuurvrije vaseline. De ketting
is al voorzien van vet en hoeft dus voor
eerste gebruik niet meer ingeolied worden,
bovendien zorgt overmatig oliën er alleen
voor dat er zand aanhecht en extra slijtage
optreed. Vanzelfsprekend kun je iedere
rijwielspecialist vragen om je fiets rijklaar
te maken. Voor de specialist is dit in een
handomdraai gebeurd.
2
Page 4
Nederlands
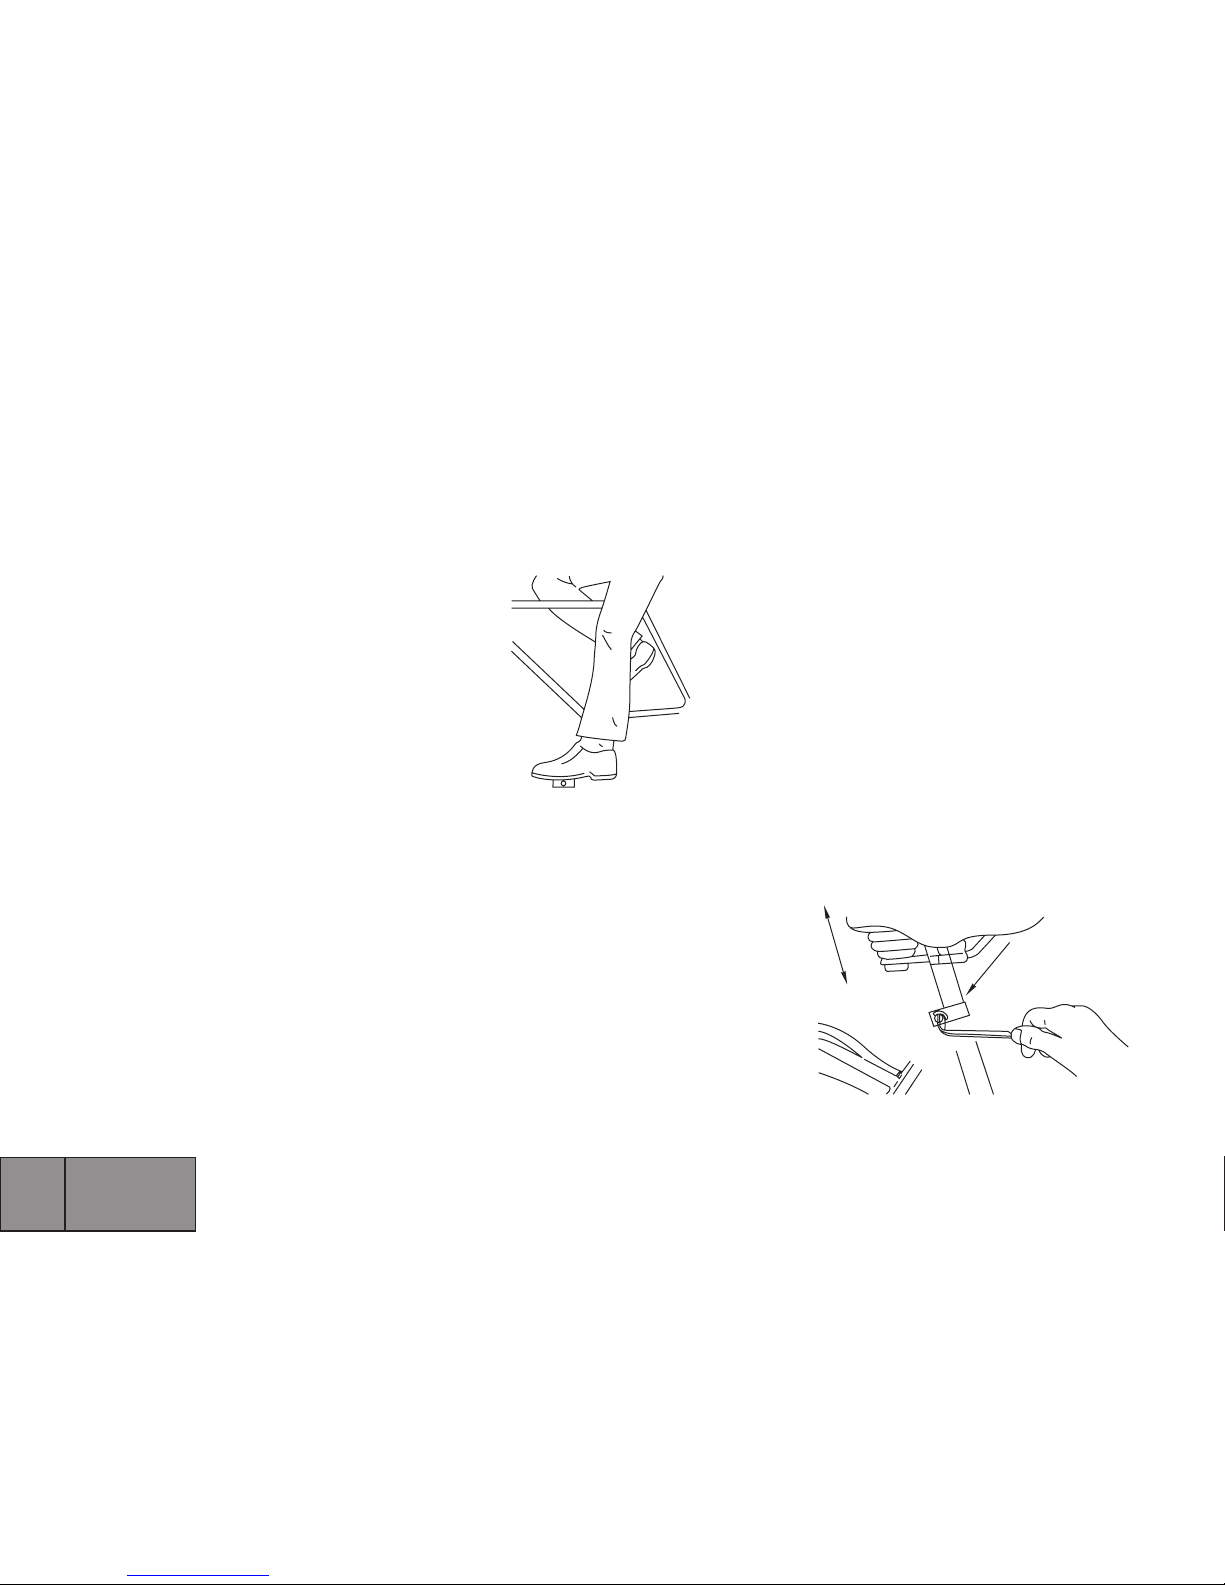
de pedaal, moet het been nét niet gestrekt
kunnen worden.[ 1 ] ‘Te hoog’
veroorzaakt schuiven over het zadel en
protest van de rug. ‘Te laag’ veroorzaakt
irritatie in de knieholten.
Tips
• Voor dames geeft een horizontale stand
van het zadel (of punt iets naar beneden)
het meeste comfort. Bij de heren geeft
een zadel met de punt iets omhoog
afgesteld het meeste comfort.
• Let er bij parkeren op, dat het zadel
niet tegen een ruwe muur gezet wordt, om
beschadiging te voorkomen.
• Een zadel met lederen dek kan, als
het nat wordt, afgeven. U dient hiermee
rekening te houden met uw kleding.
[1]
De pedalen
Rechts
Draai het rechterpedaal (voorzien van de
letter R op het topje van de schroefas) met
de hand in de rechtercrank, dus aan de
kettingzijde. Draai hierna de pedaal vast
met een 15 mm steeksleutel. Let op: Bij
het vastdraaien altijd naar voren draaien,
in de rijrichting( met de klok mee). Bij het
losdraaien dus altijd tegen de rijrichting in
draaien.
Links
Draai het linkerpedaal (voorzien van de
letter L op het topje van de schroefas) met
de hand in de linkercrank. Draai hierna de
pedaal vast met een 15 mm steeksleutel.
Let op: Bij het vastdraaien altijd naar
voren draaien, in de rijrichting(tegen de
klok). Bij het losdraaien dus altijd tegen de
rijrichting in draaien.
COMFORT
Het zadel
Aan de basis van het zitcomfort staan zadel
en stuur. Er is een simpele regel voor
de juiste hoogte van het zadel. Met het
pedaal in de laagste stand, en de voet op
Afstelling
Steek de zadelpen in de zitbuis (minimaal
80 mm). Zet de zadelpen vast met een
5 mm inbus sleutel. Plaats nu het zadel.
• Voor het instellen van de hoogte dient
de zadelpenbout iets losgedraaid te
worden.
• De veiligheidsstreepjes met
waarschuwingsopschrift mogen na de
afstelling nooit zichtbaar zijn [2]. De
zadelpen heeft dan voldoende lengte in de
buis (80 mm) om breuk te voorkomen.
• Door het losdraaien van de
zadelstropbout kunt u het zadel kantelen
alsmede voor- en achterwaarts verstellen
[3].
• Na alles afgesteld te hebben draait u
alle bouten en moeren weer vast.
• Controleer regelmatig tussen de ritten
door of moeren en bouten goed zijn
aangedraaid.
[2]
3
Page 5
Nederlands
Het stuur
Ook het stuur speelt voor een prettige
zit een belangrijke rol. Door de stuurpen
hoger of lager in te stellen en de hoek van
de stuurbuis aan te passen, wordt de positie
van de rug en de druk van de handen op
de handvatten bepaald.
Tips
Een cruiser is een fiets met een
comfortabele zithouding. Dit betekent dat
de ergonomie van het frame en de diverse
onderdelen is ingericht op rechtop zitten.
Stel dus het stuur zodanig af dat het boven
het zadel uitsteekt, ga nu op de fiets zitten
en controleer of je houding klopt. Als je
voorover gebogen pas bij het stuur kunt,
stel dan de stuurpin wat hoger en pas de
hoek van de stuurbocht aan. Omdat niet
geleund wordt op de handvatten kunnen
deze best een beetje omhoog staan.
Afstelling
Steek de stuurpen minimaal zo ver in de
balhoofdhuis dat het merkteken niet meer
zichtbaar is (70 mm). Zet de stuurpenbout
stevig vast met een 6 mm inbus sleutel.
Bij alle cruiser modellen wordt de stuurpen
via de expander vastgeklemd in de voorvork.
De stuurpen kan als volgt worden versteld:
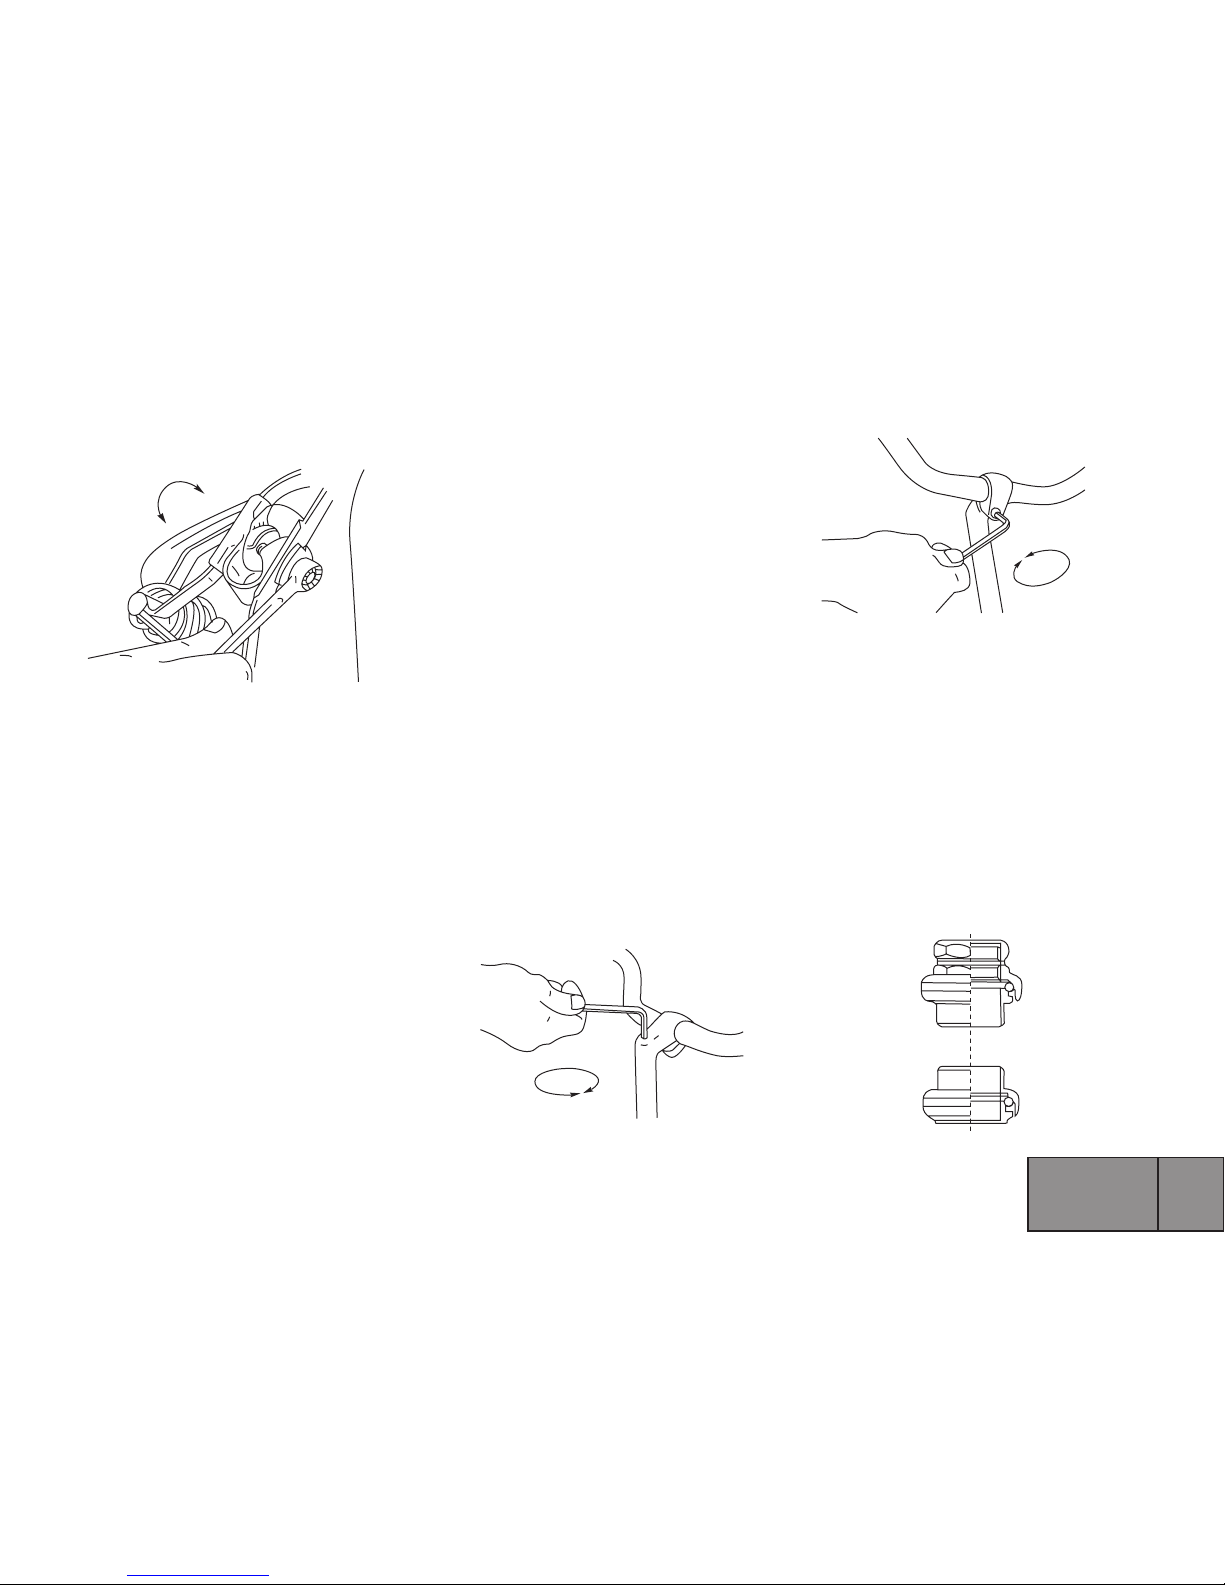
• Expanderbout circa 4 slagen losdraaien
met 6 mm inbussleutel ( soms heeft de bout
een tik naar beneden nodig om de expander
los te maken uit het stuurhuis). [4].
• Gewenste hoogte instellen en de bout
weer goed vastdraaien met bijgeleverde
inbussleutel.
• Controleer op goed vastzitten van het
stuur. Ook de hoek van de stuurbocht kan in
een gewenste stand worden gezet. Draai de
klembout ruim een slag los [5]. Stuurbocht
verdraaien en bout weer goed vastdraaien.
Balhoofdstel
De voorvork is bevestigd in het frame
door middel van het balhoofdstel [6]):
twee (kogel)lagerringen aan de boven
en onderkant van de balhoofdbuis van
het frame. Een goede afstelling van het
balhoofd is belangrijk. Schade (bv. ‘putjes’
in de kogelbaan) treden vrijwel altijd op
wanneer het balhoofd niet juist is afgesteld.
Het is daarom goed om regelmatig
even te controleren of er inderdaad sprake
van speling is.
[3]
[4]
[5]
[6]
4
Page 6
Nederlands
Afstellen en onderhoud
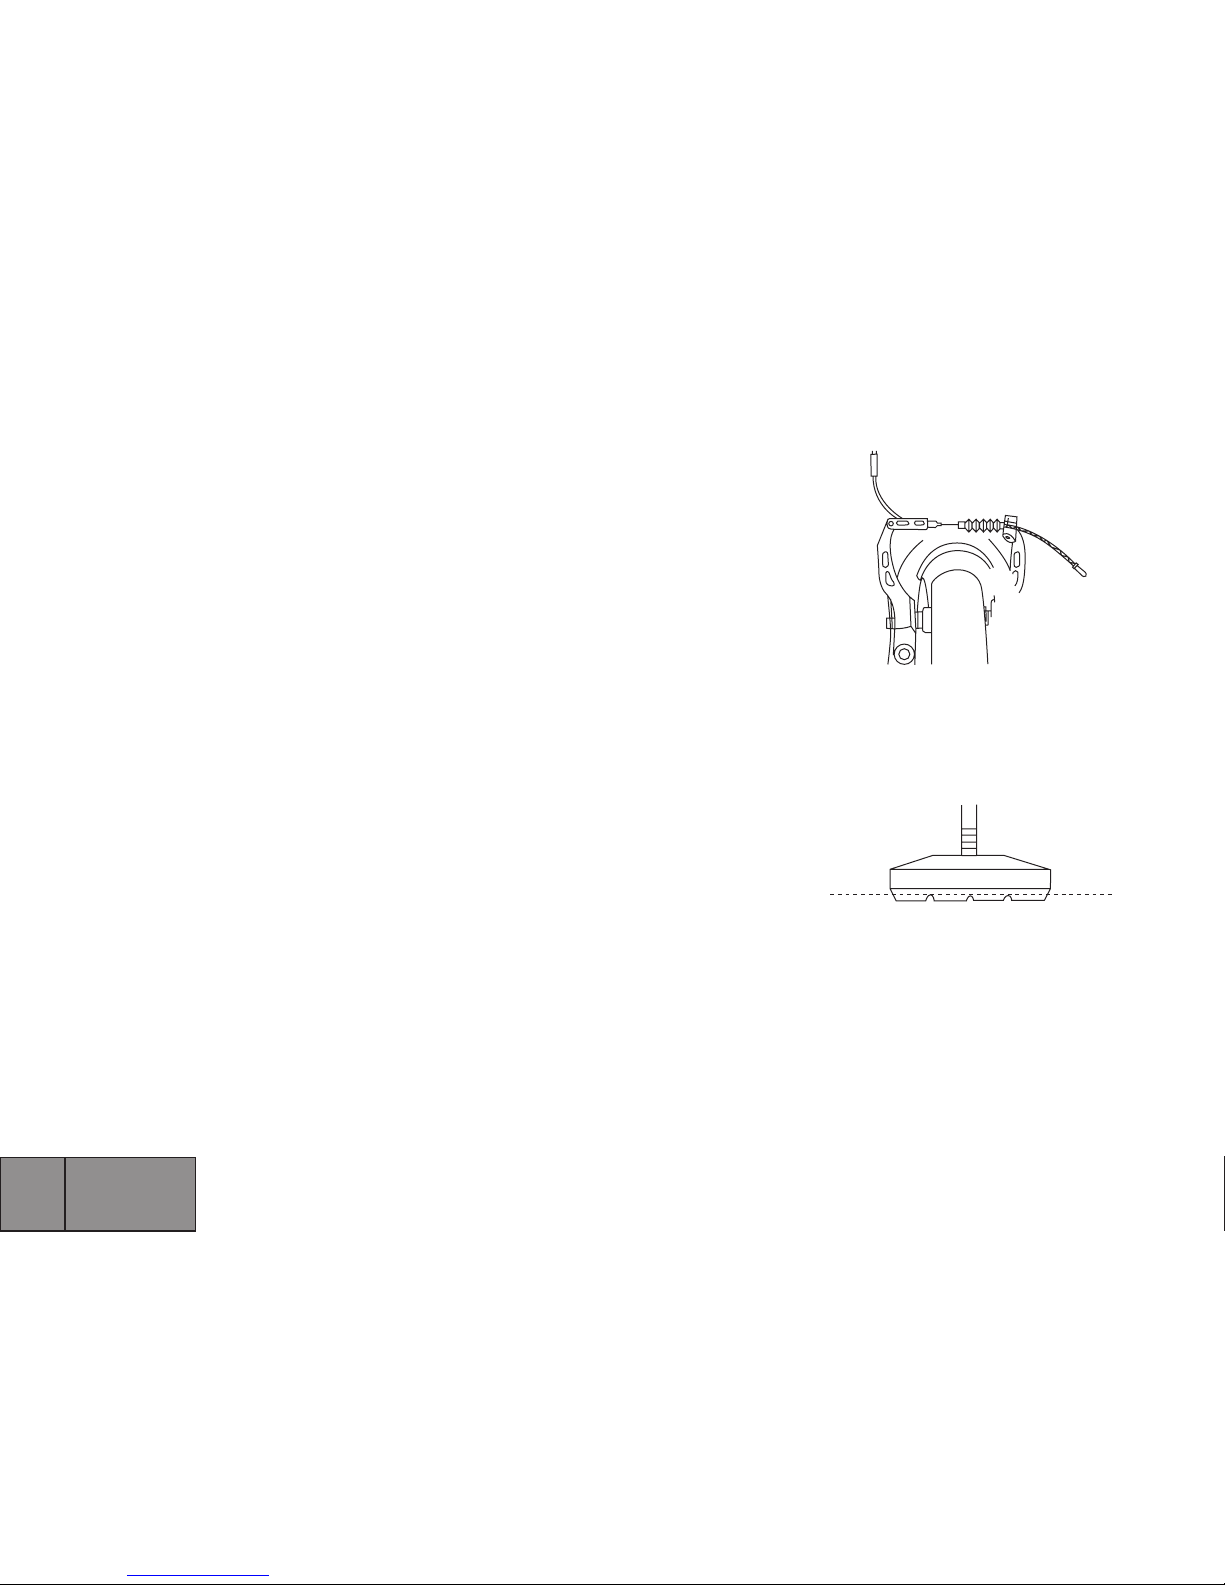
• De remblokjes zijn aan vervanging toe
als de schuine inkepingen zijn weggesleten
[8].
Velgen hebben een eigen karakter en de
gemonteerde blokjes vormen daarmee een
veilige eenheid. De specialist heeft het
juiste type remblokjes altijd op voorraad.
[7]
[8]
Belangrijk
• Boutjes en moertjes dienen goed vast te
zitten.
• Kabels mogen geen knikken of rafels
vertonen.
• De gevoelsmatige ervaring waarover je al
gauw beschikt, geeft je beslist een seintje
als na verloop van tijd de remkracht
minder wordt. Er is dan sprake van een
niet goed afgestelde rem of slijtage, waar
je beslist niet zomaar mee door kunt blijven
rijden. Tijd om in te (laten) grijpen! Voor de
enthousiaste doehetzelver geven wij enkele
instructies.
Terugtraprem
Een correctie aan de terugtraprem is
voorbehouden aan de specialist.
V-brake (velgrem)
De V-brake [7] maakt gebruik van de
ouderwetse cantilever-armen, maar deze
zijn langer en zorgen daardoor voor meer
remkracht. De remkabel van de V-brake
loopt via een speciale kabelgeleider (buis).
Tips
Speling in het balhoofd kun je controleren
door de fiets met het voorwiel tegen een
muur of hek te duwen in stilstand, grove
speling is dan direct merkbaar. Bezoek
voor controle en afstelling regelmatig de
specialist.
REMMEN
Op de cruisers heeft Johnny Loco een drietal
remtypen gemonteerd: de V-Brake
(velgrem), de coasterbrake (terugtraprem)
en de rollerbrake. Hoogwaardig van
kwaliteit en met minimale zorg voor
onderhoud. Remmen heeft alles te
maken met vertrouwd raken, ervaring en
gevoel. Bij nat weer is je remweg langer
(blokjes) en bij lange(re) afdalingen is het
veiliger om pompend te remmen teneinde
oververhitting van de remmen te
vermijden.
Tips
Stel de hoek van de remgrepen zodanig af
dat met gestrekte armen en handen op het
stuur de vingers de remgrepen raken.
5
Page 7
Nederlands
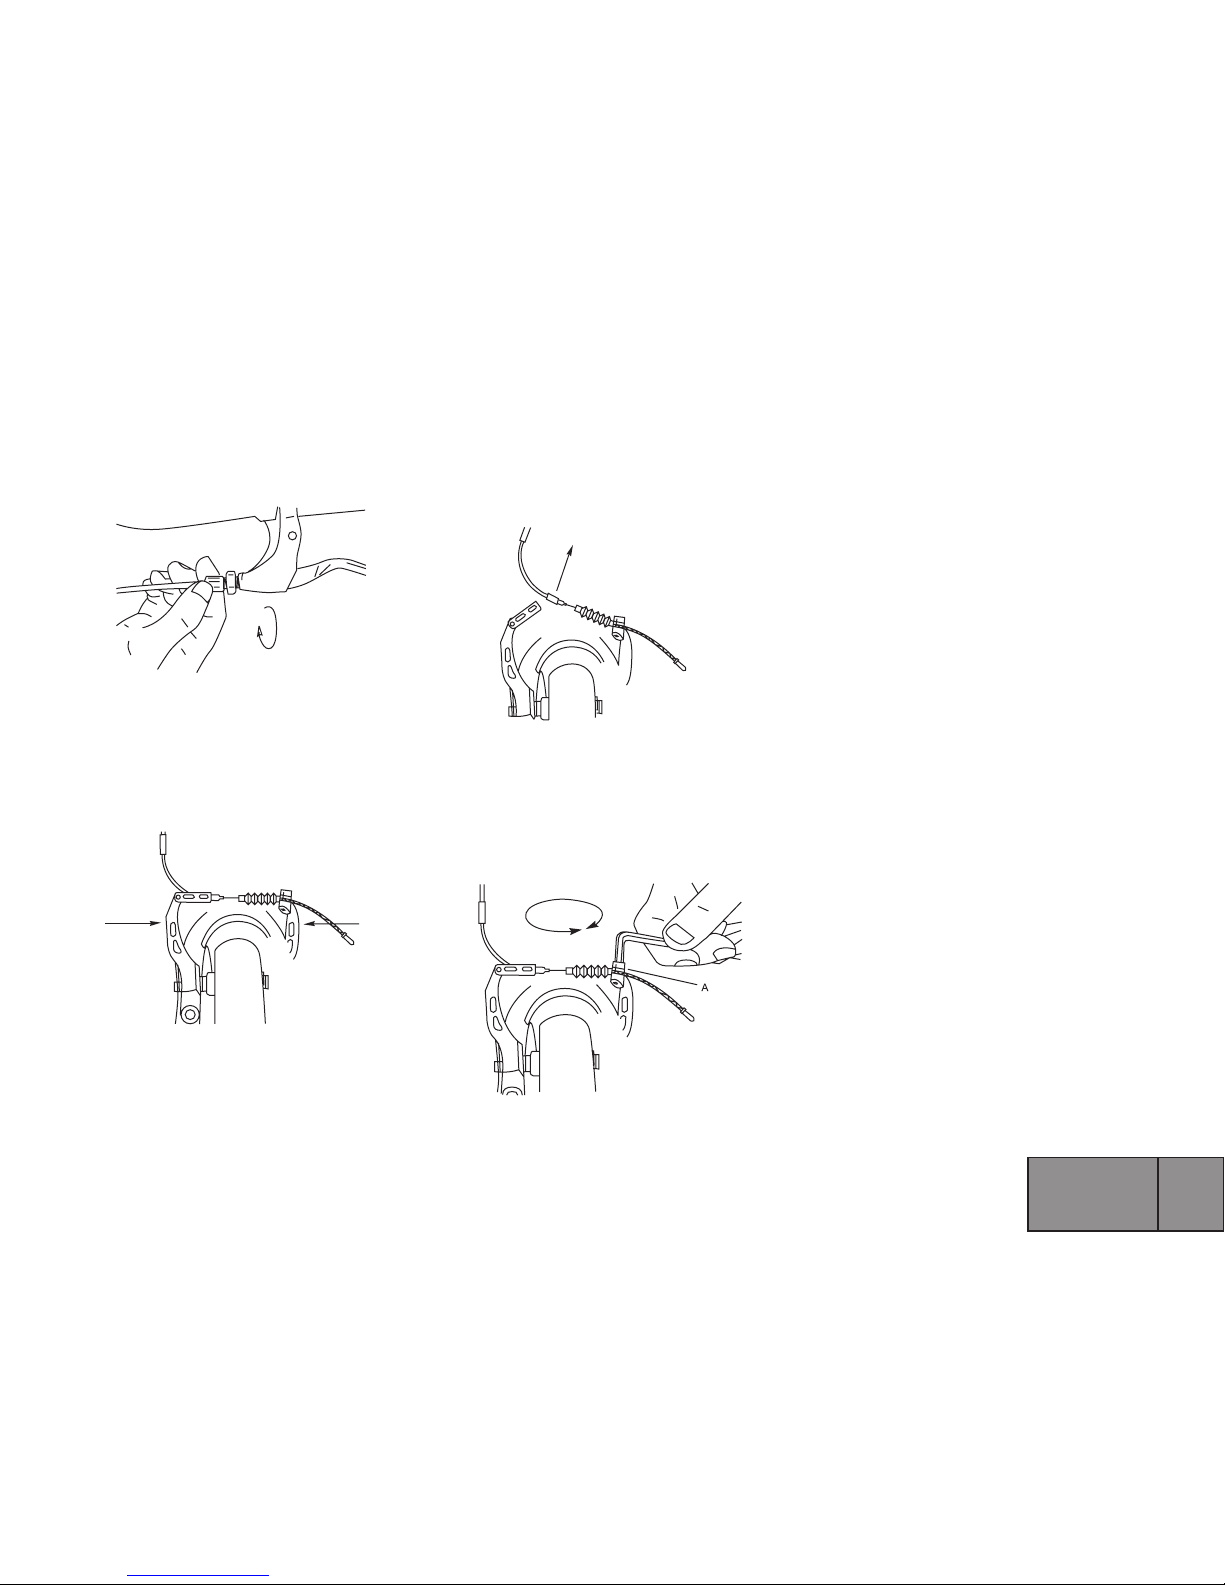
• Draai de kabelstelschroef van de
remgreep naar binnen om de kabel te
ontspannen [9].
• Duw de remdelen naar elkaar toe [10].
• Haal de remkabel los [11]. Nu kun je
gemakkelijk de bouten losdraaien waarmee
de blokjes vastzitten. Bij montage en
afstelling van de nieuwe blokjes dien je uit
te komen op 1-2 mm van de velg.
• Maak de remkabel weer vast. De
remmen hebben de juiste afstelling als de
remgrepen niet verder dan de helft tot
drie-kwart kunnen worden ingeknepen. Kun
je ze verder inknijpen, dan bijstellen door
de kabelstelschroeven aan te draaien die
aan de remgrepen zitten.
• Indien de rem niet strak genoeg staat
afgesteld, kunt je bij de V-brake met de
inbussleutel ook de kabelklembout (A)
losdraaien en de kabel iets optrekken [12].
Diezelfde bout geeft ook toegang om de
kabel eventueel te vervangen.
Rollerbrake
De Nexus ‘Rollerbrake’ vergen weinig
onderhoud en hebben een optimale
afdichting tegen stof en vocht.
Als de remgrepen bij het remmen
het stuur raken, dient de kabel te
worden opgespannen. Dit kan met de
kabelstelschroef op de remgreep.[9]
Rollerbrakes moeten na verloop van tijd
gesmeerd worden, laat dit doen door de
specialist.
VERSNELLINGEN
Benut de zwaarste versnellingen uitsluitend voor afdalingen of bij wind in de rug.
Het is beter om in een lichte dan in een
zware versnelling te fietsen. Om trefzeker
te kunnen schakelen en het mechanisme
te ontzien, is het verstandig om tijdens
het schakelen niet met volle kracht door
te trappen. Mocht er een versnelling na
verloop van tijd spontaan ‘doorschieten’
of je ervaart enig gekraak, stel dan direct
de versnelling opnieuw af, of laat dit doen
door een specialist.
[9]
[10]
[11]
[12]
6
Page 8
Nederlands
Derailleur
Deze is in de fabriek afgesteld, maar kan
door onzorgvuldig transport enigszins
ontregeld raken. Mocht dit het geval zijn
en het systeem niet meer optimaal schakelt
laat dit dan bij voorkeur door een specialist
opnieuw afstellen. De ketting is al ingevet
dus het overmatig smeren van de ketting
Shimano nexus7
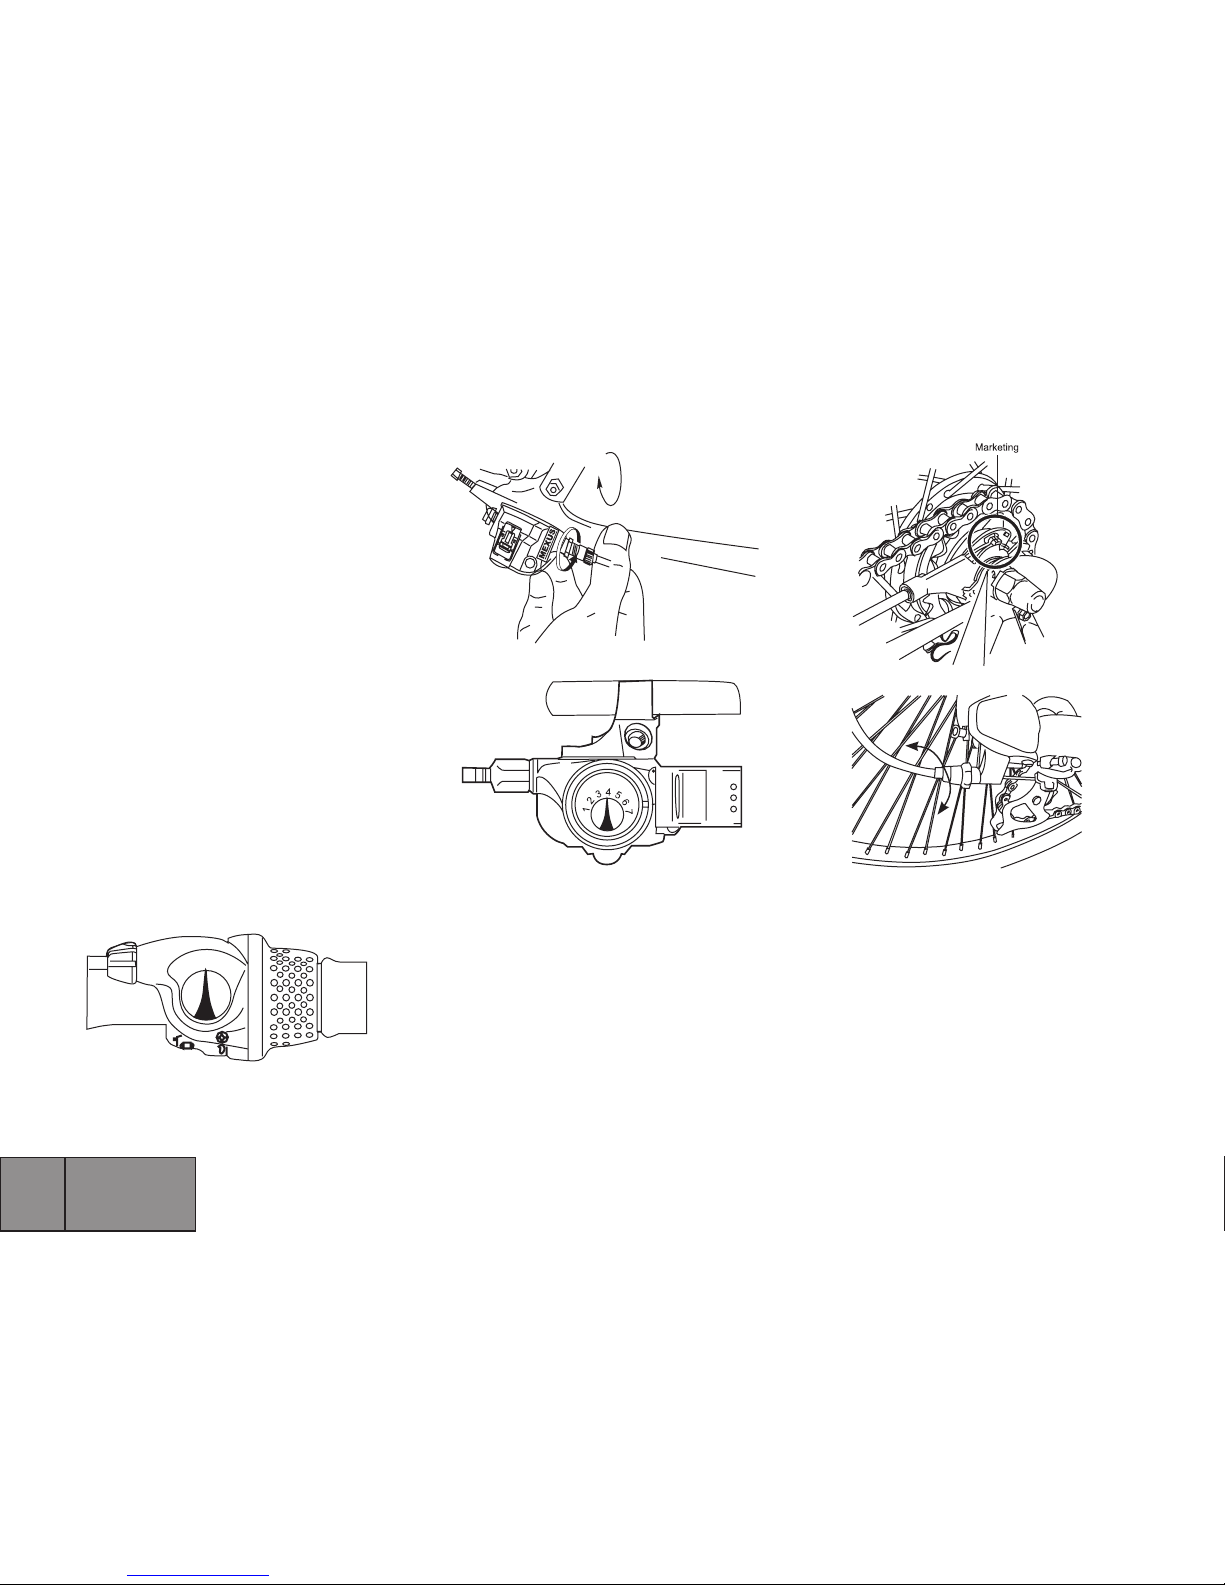
• Zet de Gripshift in stand 4 [15].
• Controleer of de rode markeringen op
de schakel-unit (bij het achterwiel, aan de
kant van de kettingkast) tegenover elkaar
staan. Ga achter de fiets staan om de
rode stippen te kunnen waarnemen. [16]
• Zo niet, stel de stand dan bij met de
stelschroef aan de Gripshift [15]
Belangrijk
• Naven mogen nooit geolied worden.
• Let bij naven op een teveel aan speling.
Dit veroorzaakt onnodige slijtage. Bij
sommige van deze naven kun je zelf de
correctie toepassen.
Afstelling
Shimano nexus3
• Zet de Gripshift in stand 2 [13].
• Controleer of de Schakelstift (de
verbinding tussen kabel en naaf wordt
gevormd door een stift die heen en
weer beweegt tijdens het schakelen) in
het schakelhuis moet de gele punt zich
tussen de 2 markeringslijnen bevinden
op het venster van het schakelhuis bij de
achternaaf.[14]
Indien deze stift zich buiten de lijnen
bevindt, dan deze afstellen in de 2e
versnelling zodanig dat de gele punt weer
binnen de markering valt.
[13]
S
P
E
E
D
1
2
3
[15]
[14]
[16]
[17]
7
Page 9
Nederlands
gaat het probleem niet oplossen.
Hetgeen u zelf kunt doen is de kabel
strakker of losser zetten [17]. Werkwijze:
plaats de fiets op zijn kop (bescherm
stuur en zadel), en begin in versnelling 7.
Schakel nu al draaiend aan de trappers
door naar versnelling 6. Mocht dit niet in
een keer gaan en blijft de ketting haperen
voor het tweede tandwiel, dan moet de
kabel strakker. Strakker betekend dat de
kabelversteller bij het derailleur linksom
gedraaid moet worden. Schakelt het
derailleur wel van 7 goed naar 1 maar niet
terug (van de 1 naar de 7) dan moet de
kabel losser (rechtsom) Voor uitgebreide
documentatie verwijzen wij naar de
Shimano website.
WIELEN
De velg, band, naaf en spaken
vormen samen een licht wiel dat bovendien
sterk is. Het zorgt ervoor zorgt dat je lekker
ontspannen rijdt. Voor een lichte ‘loop’
zijn diverse zaken van belang zoals een
juiste bandenspanning (kijk op de band voor
de aanbevolen bandenspanning, voor de
Schwalbe banden zijn speciale drukmeters
te koop), strak gespannen spaken en een
goed afgestelde, spelingsvrije naaf. Voor
het eerste onderdeel kun je zelf zorgen, de
laatste twee zijn bij de specialist in
goede handen.
Belangrijk
• De spaken moeten enkele weken (100km)
na de aanschaf voor het eerst worden
bijgesteld.
• Heeft het wiel een ‘slag’ of losse spaken.
Ga dan snel langs de specialist. Hij lost
het snel op, waardoor verdere schade kan
worden voorkomen.
• Laat de specialist daarna regelmatig
controleren of de spanning van de spaken
in orde is.
Spaken
Spaken zijn een essentieel onderdeel
van de wielen. Een te slappe afstelling
kan de stabiliteit van de fiets negatief
beïnvloeden, en geeft een verhoogd risico
op blijvende schade aan het wiel. Het
spannen van de spaken is zeer nauwkeurig
werk en kan je alleen over laten aan de
specialist.
Banden
Banden zijn een belangrijk onderdeel
in het comfort van de fiets, ze bepalen
het rijgedrag in een aantal opzichten.
Belangrijk is daarbij de bandenspanning.
Een te lage spanning veroorzaakt onnodige
slijtage en verhoogd risico op breuk en
lekrijden. Ook levert een te lage spanning
een veel hogere rolweerstand op waardoor
het fietsen onnodig zwaar wordt. Een te
hoge bandenspanning geeft het risico van
een klapband, en het verminderd de grip
van de band op het wegdek doordat de fiets
over de weg stuitert. Controleer daarom
regelmatig uw bandenspanning met de
aangegeven spanning op de band.
VEILIGHEID
Algemeen
Een fiets met losgeraakte onderdelen is geen
veilige fiets. Regelmatig even controleren
voorkomt narigheid. De specialist weet
trouwens altijd snel raad als er iets los zit.
Stuur
Om veilig te kunnen sturen is het
belangrijk dat de handvatten goed
vastzitten. Regelmatig even controleren
voorkomt narigheid. Vrachtjes, zoals
boodschappen, horen thuis op de
bagagedrager of in de fietstassen.
Hang voor je eigen veiligheid niets aan je
stuur! Tassen beïnvloeden het stuurgedrag
nadelig.
8
Page 10
Nederlands
Gereedschap
Voor eenvoudige werkzaamheden volstaat
een eenvoudige set gereedschap. Met de
volgende stukken kom je al een heel eind:
een setje steeksleutels (8 t/m 15),
inbussleutels, schroevendraaier, combi-
natietang, een flacon rijwielolie en een
bandenreparatieset. Zorg bij vervanging
dat je ALTIJD originele of gelijkwaardige
onderdelen monteert.
Schoonmaken
Verwijder vuil met een zachte kwast of
borstel. Maak de fiets vervolgens met warm
water vermengd met wat vloeibare zeep
(geen sterke chemische middelen zoals
chloor- bleek, ammonia of soda) en een
zachte katoenen doek schoon.
• Door langdurige blootstelling aan de felle
zon kunnen onderdelen van de cruiser
iets verkleuren.
• Stel de cruiser niet bloot aan
extreme temperaturen.
Checklist
Controleer de volgende punten regelmatig:
• Werken de remmen naar behoren? Zitten
de remblokjes en bouten goed vast?
• Is de spaakspanning correct? Laat
de spaken regelmatig controleren en
eventueel aandraaien door de specialist.
Standaard
Ga nooit op je fiets zitten als de standaard
uitstaat! Voor je eigen veiligheid en voor
het behoud van je fiets.
ONDERHOUD
Vitale delen zoals kabels, spaken en rem-
men, krijgen in de aanloopperiode kans
om zich te ‘zetten’. Voor het zorgvuldig
natrekken en bijstellen moet je regelmatig
langs de specialist gaan. Om ontspannen én
veilig te kunnen blijven rijden, is daarnaast
een grote jaarlijkse beurt noodzakelijk.
Dan worden verborgen draaiende delen
zoals balhoofd en naven opnieuw gesteld
en gesmeerd. Vóór het invallen van de
winter is zo’n beurt zeker geen overbodige
luxe. Goed onderhoud is ook met betrekking
tot de garantie uiterst belangrijk. Lees deze
garantiebepalingen verderop in dit boekje
daarom aandachtig door!
Belangrijk
Omdat gelagerde draaipunten wél water-
afstotend maar niet waterdicht zijn, is het
verstandig om het gebruik van een tuinslang of hogedrukspuit te vermijden.
Bagagedrager
De bagagedrager is zoals de naam al
aangeeft bedoelt voor bagage en niet voor
personen. De maximale belasting van een
(achter)bagagedrager bedraagt 25 kg.
Kinderzitjes
Voor de veiligheid van ouder en kind geven
wij je hierbij enkele adviezen. Een zitje
aan het stuur raden wij af. Het stuurgedrag
wordt nadelig beïnvloed. Met vervoer van
twéé kinderen loop je extra risico’s. Het
totale gewicht kan ervoor zorgen dat je uit
balans raakt bij onverwachte manoeuvres.
• De enig verantwoorde manier om een
kind op de fiets te vervoeren is - in feite een goedgekeurd zitje op de achterdrager,
of aan het frame. Daarvoor kan je het beste
langsgaan bij de specialist. Hij kan zien of
de fiets geschikt is voor zo’n kinderzitje.
• Als je de fiets gaat parkeren, haal dan
eerst het kind uit het zitje alvorens de
fiets op de standaard te zetten. Dit is voor
het behoud van de standaard en het frame.
9
Page 11
Nederlands
• Staan zadel en stuurpen niet hoger dan
de veiligheidsmarkering aangeeft?
• Zitten alle bouten en moeren goed vast?
• Is het loopvlak van de banden niet ver-
sleten en hebben ze geen zwakke plekken
of bobbels? Zijn de banden op spanning?
• Zitten de stuurpen en de stuurbocht
goed vast? Zit er geen speling in het balhoofdstel?
• Zitten de handvatten nog goed vast en
werken de versnellingen nog naar behoren?
• Is de kettingspanning juist?
Diefstal
Beveilig je fiets met een door Johnny Loco
geadviseerd kettingslot en veranker de
cruiser altijd aan een paal of hek.
Daarbij de ketting door het frame en een
van de beide wielen leiden en niet alleen
door het voorwiel.
Verzekering
De cruiser is te verzekeren tegen diefstal.
Deze verzekering is direct af te sluiten via
de website www.johnny-loco.com. Zorg er
dan wel voor dat je het serienummer bij
de hand hebt. Dit serienummer is onder de
trapas in het frame geslagen.
Garantiebepalingen
Artikel 1 Garantie
1.1 Johnny Loco Bicycles B.V. garandeert
dat de Johnny Loco fietsen vrij zijn van
constructieen/of materiaalfouten, één
en ander voor zover dat volgt uit deze
garantiebepalingen.
1.2 De garantie kan uitsluitend worden
ingeroepen door de eerste eigenaar van de
betreffende Johnny Loco fiets.
1.3 De garantie vervalt overeenkomstig het
bepaalde in de artikelen 3.1 en 5.1.
1.4 De garantie is niet overdraagbaar.
1.5 De door Johnny Loco op grond van deze
voorwaarden verstrekte garantie laat
onverlet de mogelijkheid om de verkoper
aan te spreken op grond van de gewone,
wettelijke bepalingen van het Burgerlijk
Wetboek.
Artikel 2 Garantieperiode
2.1 Op alle Johnny Loco frames wordt 5 jaar
garantie gegarandeerd op constructie- en/of
materiaalfouten.
2.2 Op onderdelen die aan slijtage
onderhevig zijn, zoals banden,
ketting, kettingbladen, freewheel,
achtertandwielen, kabels en remblokken
wordt geen garantie gegeven, tenzij
sprake is van constructie- en/of materiaal-
fouten.
Artikel 3 Garantie-uitsluitingen
3.1. In de navolgende gevallen vervalt de
garantie:
a. Onjuist en/of onzorgvuldig gebruik van
de fiets en gebruik dat niet overeenkomstig
de bestemming is;
b. De fiets niet aantoonbaar conform de
handleiding is onderhouden;
c. Technische reparaties niet op vakkundige
wijze zijn verricht;
d. Naderhand gemonteerde onderdelen niet
overeen komen met de technische
specificatie of onjuist gemonteerd zijn;
e. Indien het bewijs van eigendom niet aanwezig is of niet door de verkoper is
ondertekend.
f. De garantiekaart niet, onvolledig of niet
binnen de gestelde termijn is ingestuurd.
3.2. Voorts wordt uitdrukkelijk uitgesloten
aansprakelijkheid van Johnny Loco Bicycles
B.V. voor schade aan (onderdelen van) de
fiets als gevolg van:
a. Foutieve afstelling/spanning van stuur,
stuurpen, zadel, zadelpen, derailleurset,
remmen, snelsluiters van de wielen en
zadels;
b. Niet tijdig vervangen van onderdelen
zoals rem/derailleurkabels, remblokken,
banden, ketting en tandwielen;
c. Klimatologische invloeden zoals normale
verwering van lak of chroomroest.
10
Page 12
Nederlands
Artikel 6 Aansprakelijkheid
6.1 Een door Johnny Loco Bicycles B.V.
gehonoreerde garantieclaim betekent niet
automatisch dat Johnny Loco Bicycles
B.V. ook aansprakelijkheid aanvaard voor
eventueel geleden schade. De aansprake
lijkheid van Johnny Loco Bicycle B.V. strekt
zich nooit verder uit dan is omschreven in
deze garantievoorwaarden.
Artikel 4 Garantie-onderdelen
4.1. Gedurende de garantieperiode zullen
alle onderdelen, waarvan door Johnny Loco
Bicycle B.V. is vastgesteld dat sprake is van
een materiaal- en/of constructiefout, naar
keuze van Johnny Loco Bicycles B.V. worden
gerepareerd dan wel worden vergoed.
Eventuele kosten van (de-)montage zijn
voor rekening van de eigenaar.
4.2. Kosten van transport van de fiets en/of
onderdelen van en naar Johnny Loco Bicycle
B.V. komen voor rekening van Johnny Loco
Bicycle B.V. mits het betrokken onderdeel
voor garantie in aanmerking komt.
4.3 Indien een bepaald onderdeel voor garantie in aanmerking komt en het origineel
niet meer leverbaar is, dan zorgt Johnny
Loco Bicycle B.V. voor een minimaal
gelijkwaardig alternatief.
Artikel 5 Indienen van claim
5.1. Claims onder deze garantie dienen
onder aanbieding van de fiets of het
betreffende onderdeel - ter inspectie via een door Johnny Loco Bicycle B.V.
aangewezen specialist te worden ingediend.
Gelijktijdig dient het bewijs van aankoop
aan de specialist te worden overhandigd.
11
Page 13
English
TABLE OF CONTENTS
INTRODUCTION
PREPARING
COMFORT
BRAKES
GEARS
WHEELS
SAFETY
MAINTENANCE
GUARANTEE
....................................................
....................................................
....................................................
....................................................
....................................................
....................................................
....................................................
....................................................
....................................................
13
13
14
15
17
18
19
19
21
12
Page 14
English
• Make sure your cruiser is serviced by a
specialist frequently. A bicycle specialist will
be able to maintain your cruiser.
• Failure to properly maintain your Johnny
Loco voids your guarantee.
• Johnny Loco is a registered trademark.
Getting acquainted
Take the time to find out what the brakes
and gears are capable of and if the posi-
tions of the handlebars and saddle are
correctly adjusted and tightly fixed.
• Certain parts, require further adjustments
after some time. It is best if you have this
done by a bicycle specialist.
• This manual will be an important source
of help. However, we advise you to consult
a bicycle specialist.
PREPARING
Assembly
If you have received your Johnny Loco
cruiser through a 3rd party and not a bicycle
specialist here you will find a detailed
description of how to proceed. Make sure
all bicycle parts are greased thoroughly
before adjusting/ connecting them. You
can always ask a bicycle specialist to do the
final preparations/ check-up.
INTRODUCTION
Congratulations with the purchase of your
Johnny Loco Cruiser. The new Johnny Loco
Cruiser is a beaming example of superior
quality built to last. This Johnny Loco
Cruiser has been designed with care and
attention to detail in order to provide the
most comfort, user friendliness and safety.
You only have one chance to make the right
impression.
Please read this users manual carefully
before going on your first ride. This user
manual, contains practical tips that will
help you enjoy your Johnny Loco bicycle.
It is our goal to continuously improve our
product. That is why we welcome any
suggestions regarding design, usage, this
manual or any other tips.
Please let us know at support@johnny-loco.
com
Important
• This manual is only applicable for
Johnny Loco Cruisers with a serial number
registered with us. You can find this serial
number under the crank axle.
• Please read this user manual carefully
before your first ride and keep it safe.
The pedals
Right
Turn the right pedal (with the letter R on
top of the screw) manually in the right
crank on the chain side. Then tighten it
with a 15 mm flat key.
Note: while fixing the right pedal always
turn forward (clockwise).
Left
Turn the left pedal (with the letter L on
top of the screw) manually in the left
crank. Then tighten it with a 15 mm
flat key.
Note: while fixing the left pedal always turn
forward (counter clockwise).
13
Page 15
English
COMFORT
Preparing
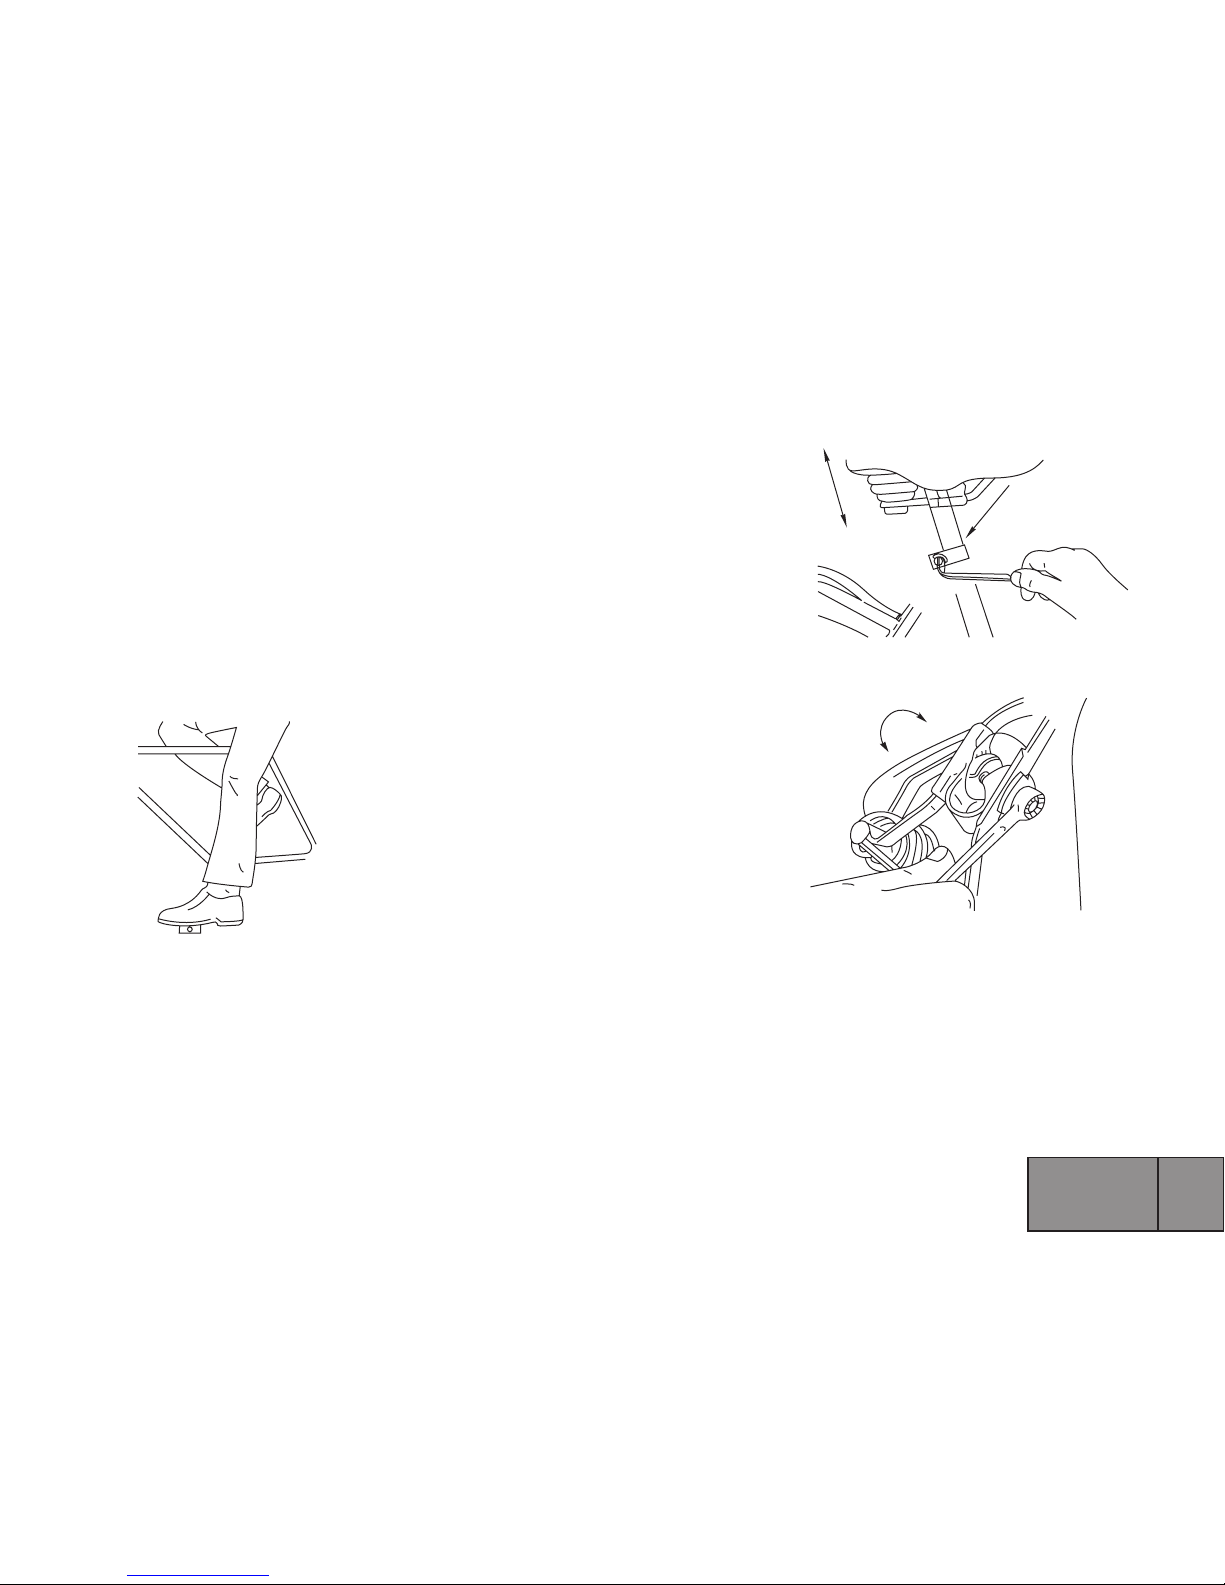
The saddle and handlebars form the basis
of your driving position. There is a simple
rule for the correct height of the saddle.
With the crank in line with the seat tube,
your leg must be stretched but not locked.
[1].Too high a saddle will cause sliding
and strain on your back. Too low a saddle
causes strain in the knees.
Tips
• Ladies will find a horizontal position of
the saddle or the front pointing slightly
downwards the most comfortable. A
saddle with front slightly raised is most
comfortable for men.
• Take care when parking not to put
the saddle against a rough wall, to avoid
damage.
• A saddle covered in leather can, if it is
Wet, bleed color onto other materials. You
should take this into account.
Saddle adjustment
Put the saddle pin in to the frame tube (at
least 80 mm) please look at the safety line.
Adjust the saddle tube carefully with a 5
mm Allen key.
• To adjust the height, the saddle tube
bolt should be loosened.
• The safety marks with the warning note
must no longer be visible after the
adjustment [2].
There will then be sufficient
length in the frame tube (80 mm) to prevent
breakage.
• By loosening the saddle fixing bolt you
can tilt the saddle as well as adjust it
backwards and forwards [3].
• After everything has been adjusted
tighten all the nuts and bolts securely (as
indicated in the torque table in the safety
section.)
• Check regularly between trips if the
nuts and bolts are tight.
Steering
The handlebars position is key to your riding
position. By adjusting the steering tube
position higher or lower, the riding position
changes.
[1]
[2]
[3]
14
Page 16
English
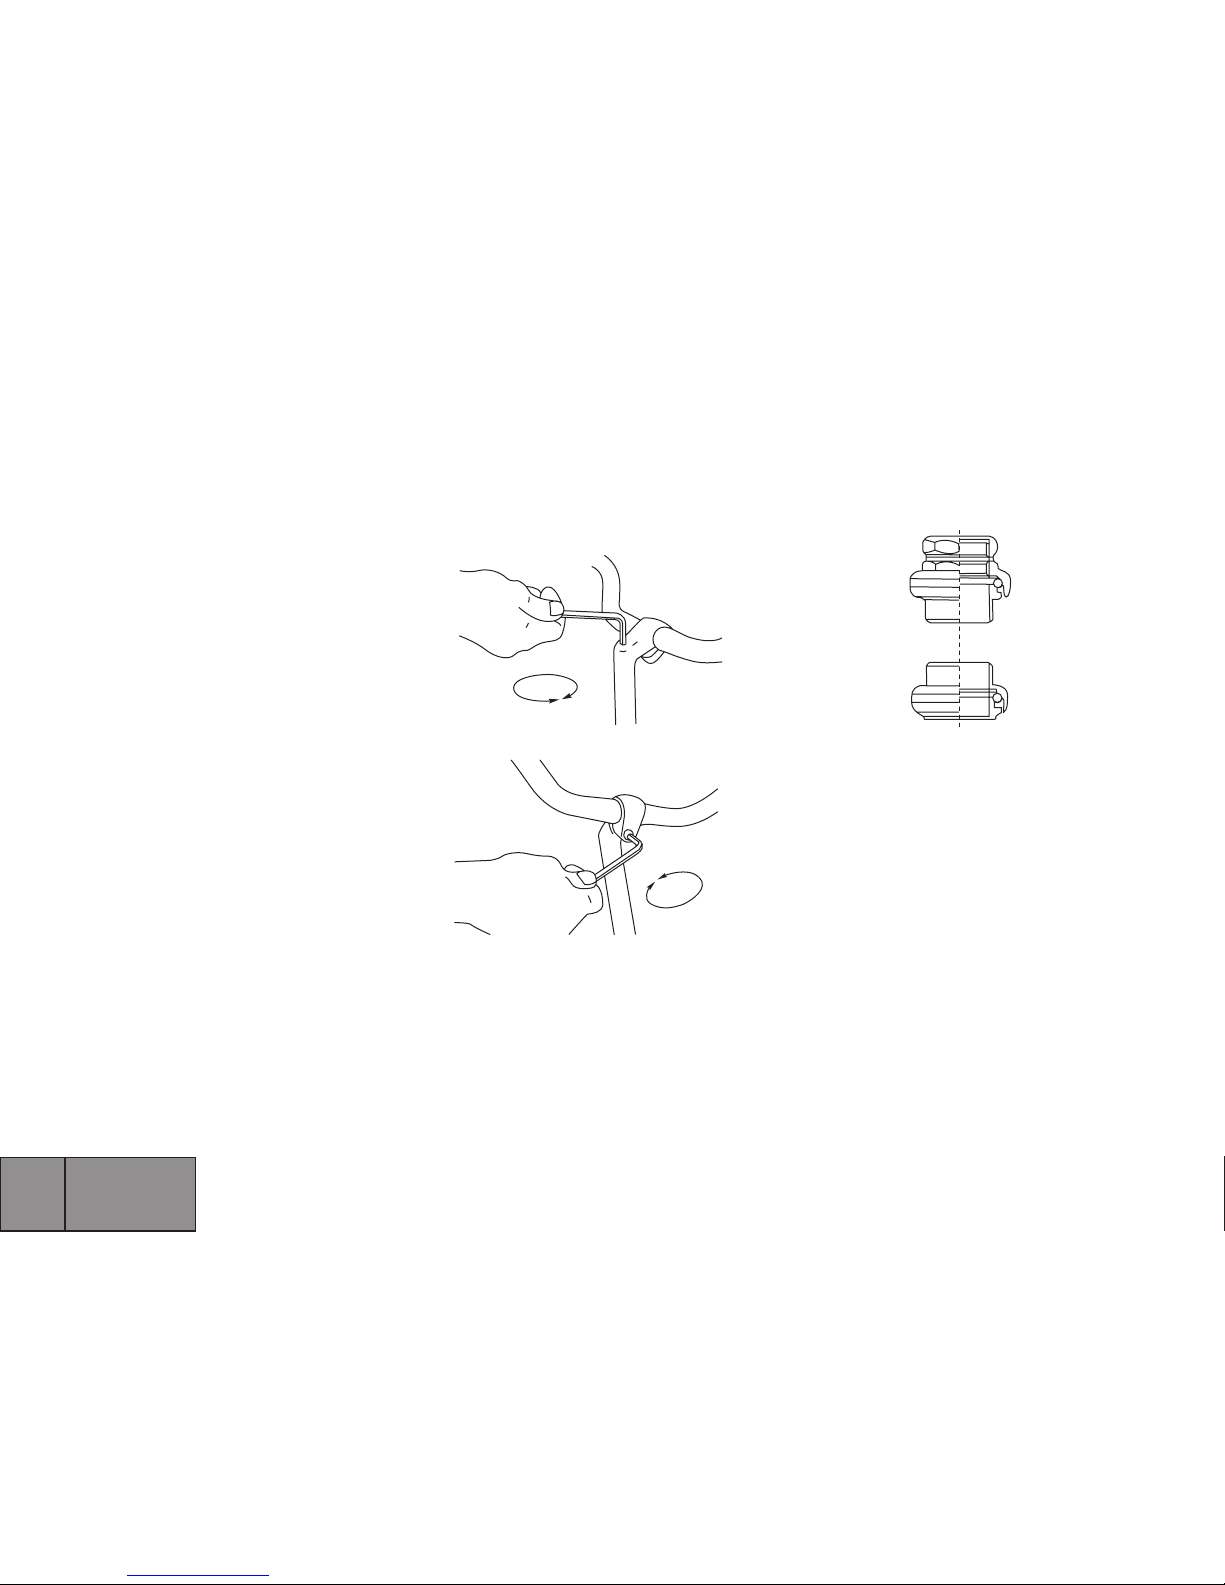
of the handlebars can also be set to the
desired position. Loosen the clamp bolt by a
little more than a turn [5].
Rotate the handlebar tube into position and
tighten the bolt again thoroughly.
Steering head
The front fork is fixed in the frame by
the steering head [6]: Proper adjustment
of the steering head is important. Damage
appears when it is not properly adjusted.
Therefore, it is a good idea to check
Tips
A cruiser is the type of bicycle that offers
a comfortable ride position. This means
that the ergonomics of the frame and all
the different components were designed
for sitting straight up. Make sure that
handlebars are higher than the saddle,
now sit on the bicycle and check if you are
sitting up straight. If you are leaning over
the handlebars just raise the handlebars
until you are able to sit up straight. The
handlebars can be rotated as well. You do
not want to be leaning on them, if this is
happening then rotate them upwards a little
as well.
Adjustment
Put the handle bar pin in to the steering
head in such a way that the safety line is no
longer visible. Properly secure the expander
with a 6 mm Allen key. The steering tube
is clamped in the steering house by the
expander. The steering tube can be adjusted
as follows;
• Loosen the expander bolt by 4 turns with
a 6 mm Allen key ( sometimes it will need a
little tap on the head)[4].
• Set the correct height and secure the
bolt again with the 6 mm Allen key.
• Check that the handlebars are secure
and fix the cap or plug again. The angle
regularly if there is in fact any play/seizing.
Therefore a regular visit to the bicycle
specialist for checks is recommended.
Tips
To check for play/seizing simply place the
bicycle with its front wheel against a wall or
fence and then push on the bicycle, damage
to the groves will be instantly noticeable.
BRAKES
Johnny Loco has 3 different brake
types: the v-brake, the coaster brake and
the roller brake. Braking is all about
knowledge, trust, experience and feel.
During wet weather your braking
distance increases (brake blocks) and on
longer descents it is safer to pump the
brakes to avoid overheating the brakes.
[4]
[5]
[6]
15
Page 17
English
Tips
Make sure that the angle of the brakehandles are reachable while still keeping
your hands on the handlebars.
Important
• Nuts and bolts should be tightened
securely.
• Cables should show no kinks or fraying.
• The intuitive experience that you will
quickly acquire will certainly let you know
if after some time the braking power is
lacking. When there is a brake not adjusted
properly or worn, then you cannot continue
to ride. It is time to act! visit a bicycle
specialist.
Coaster brake
Corrective work on the coaster brake can
only be performed by a specialist.
V-brake
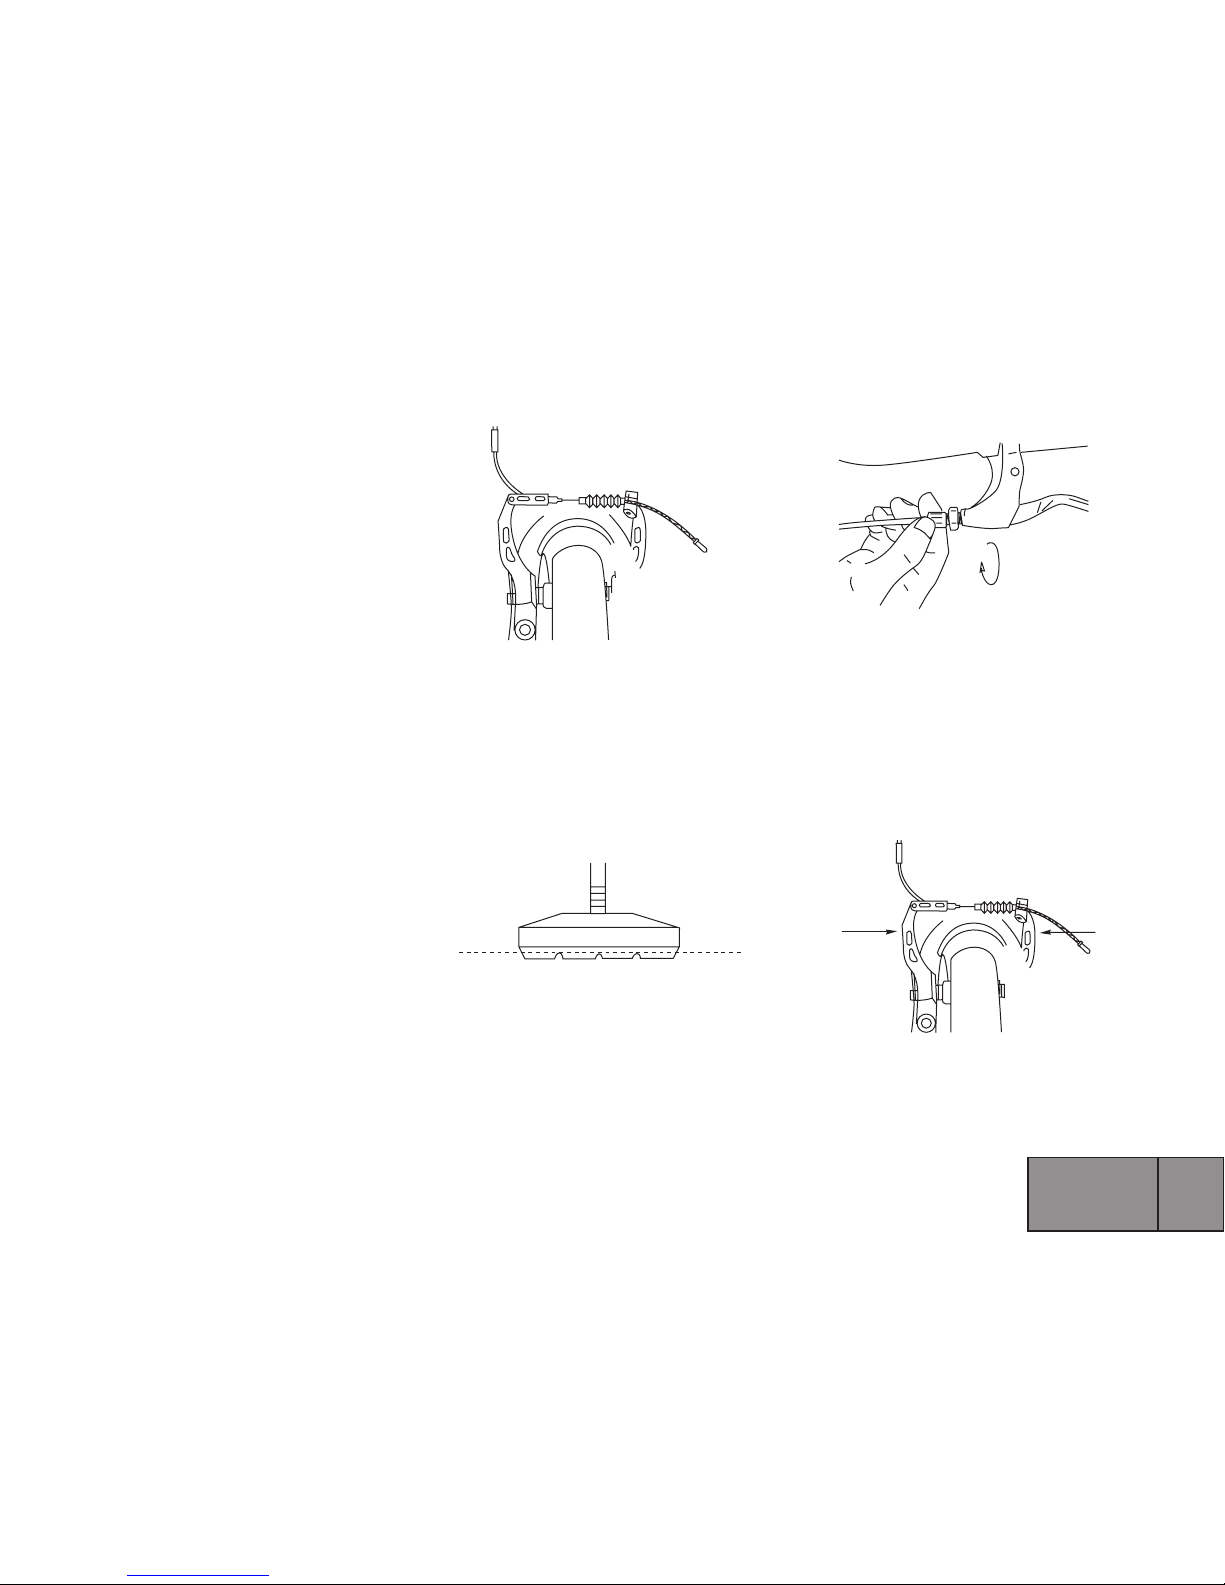
The V-brake [7] uses cantilever arms, but
they are longer and produce more braking
power. The brake cable of the V-brake runs
through a special cable guide (tube).
Adjustment and maintenance
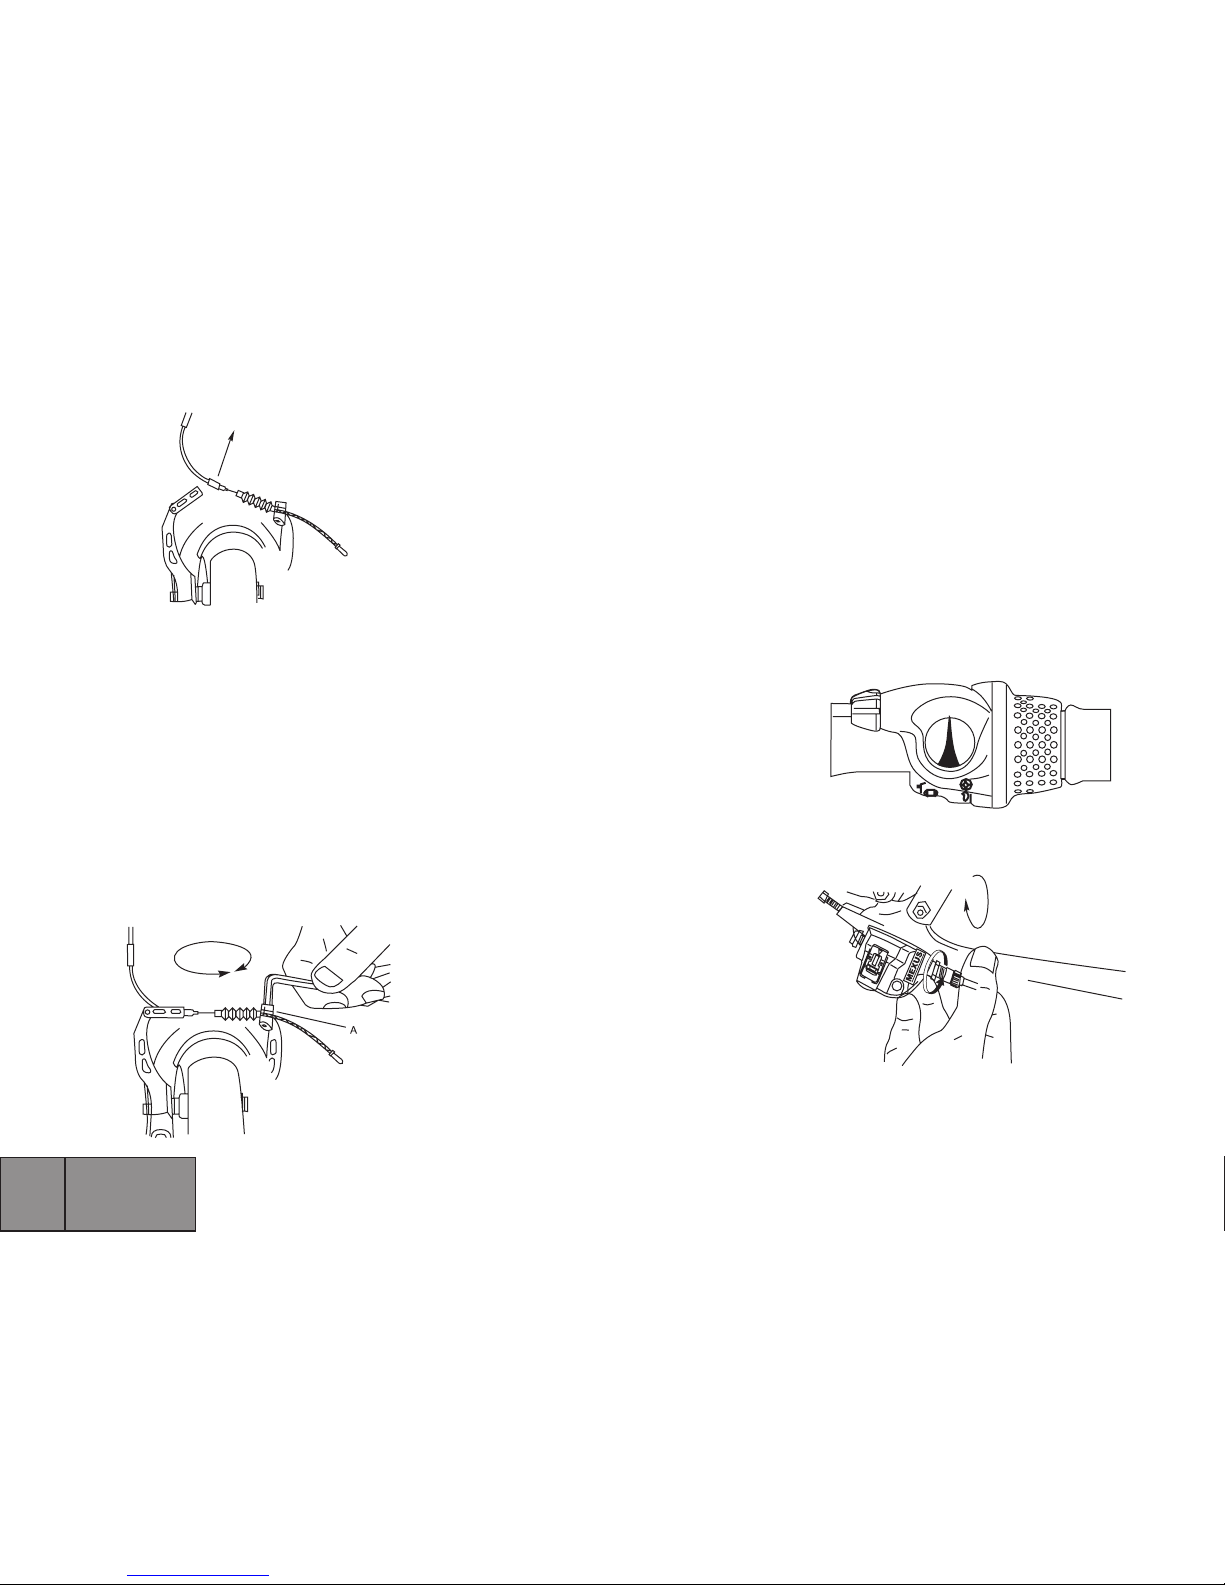
• The brake blocks should be replaced if
the oblique notches have worn away [8].
Rims have their own character and
the blocks fitted form with them a safe
unit. A bicycle specialist has the correct
type of brake blocks in stock.
• Turn the cable setting screw of the
brake lever inward to release the tension
of the cable [9].
• Push the brake blocks towards each
other [10].
• Pull the brake cable free [11]. Now you
can unfasten the bolts holding the blocks
easily. When fitting and adjusting
the new blocks they should end up at 1-2
mm from the rim.
[7]
[8]
[9]
[10]
16
Page 18
English
Adjustment
NEXUS 3-speed hub
• Set the gear change to position 2 [13].
• Check if the Yellow mark inside the change
unit (on the outside of the rear wheel) is
aligned between the two yellow lines on
the window If they are not opposite, set
the position with the setting screw on the
change unit.
• Re-attach the brake cable. The brakes
are adjusted correctly if the brake levers
cannot be moved further than half to
three-quarters of their travel. If you can
move them further, then adjust them by
turning the cable setting screws on the
brake levers.
• If the brake is not set tightly enough for
a V-brake you can loosen the cable clamp
bolt (A) using the Allen key
and pull the cable a little upwards [12].
This bolt also gives access to the cable to
replace it.
Rollerbrake
The Nexus ‘Rollerbrake’ brakes need little
maintenance and are sealed optimally
against dust and moisture. If the brake
levers touch the handlebars when applying
the brakes the cable should be tightened.
This can be done with the cable setting
screw on the brake lever. Rollerbrakes must
be greased with special grease, a job to be
done by the bicycle specialist.
GEARS
Flexible riding
Use the highest gear only on descents or
when the wind is behind you. It is bet-
ter to cycle in a low gear rather than in a
high gear. To be able to change gear with
certainty and to spare the mechanism it is
advisable not to continue peddling with
full power during a gear change. Should in
the course of time your gear jump spontaneously or make a cracking sound then
just ride to a specialist. He can correct the
problem quickly.
Important
• Hubs should never be oiled.
• Hubs should not have too much play. This
causes unnecessary wear.
[11]
[12]
[13]
S
P
E
E
D
1
2
3
[14]
17
Page 19
English
NEXUS 7-speed hub
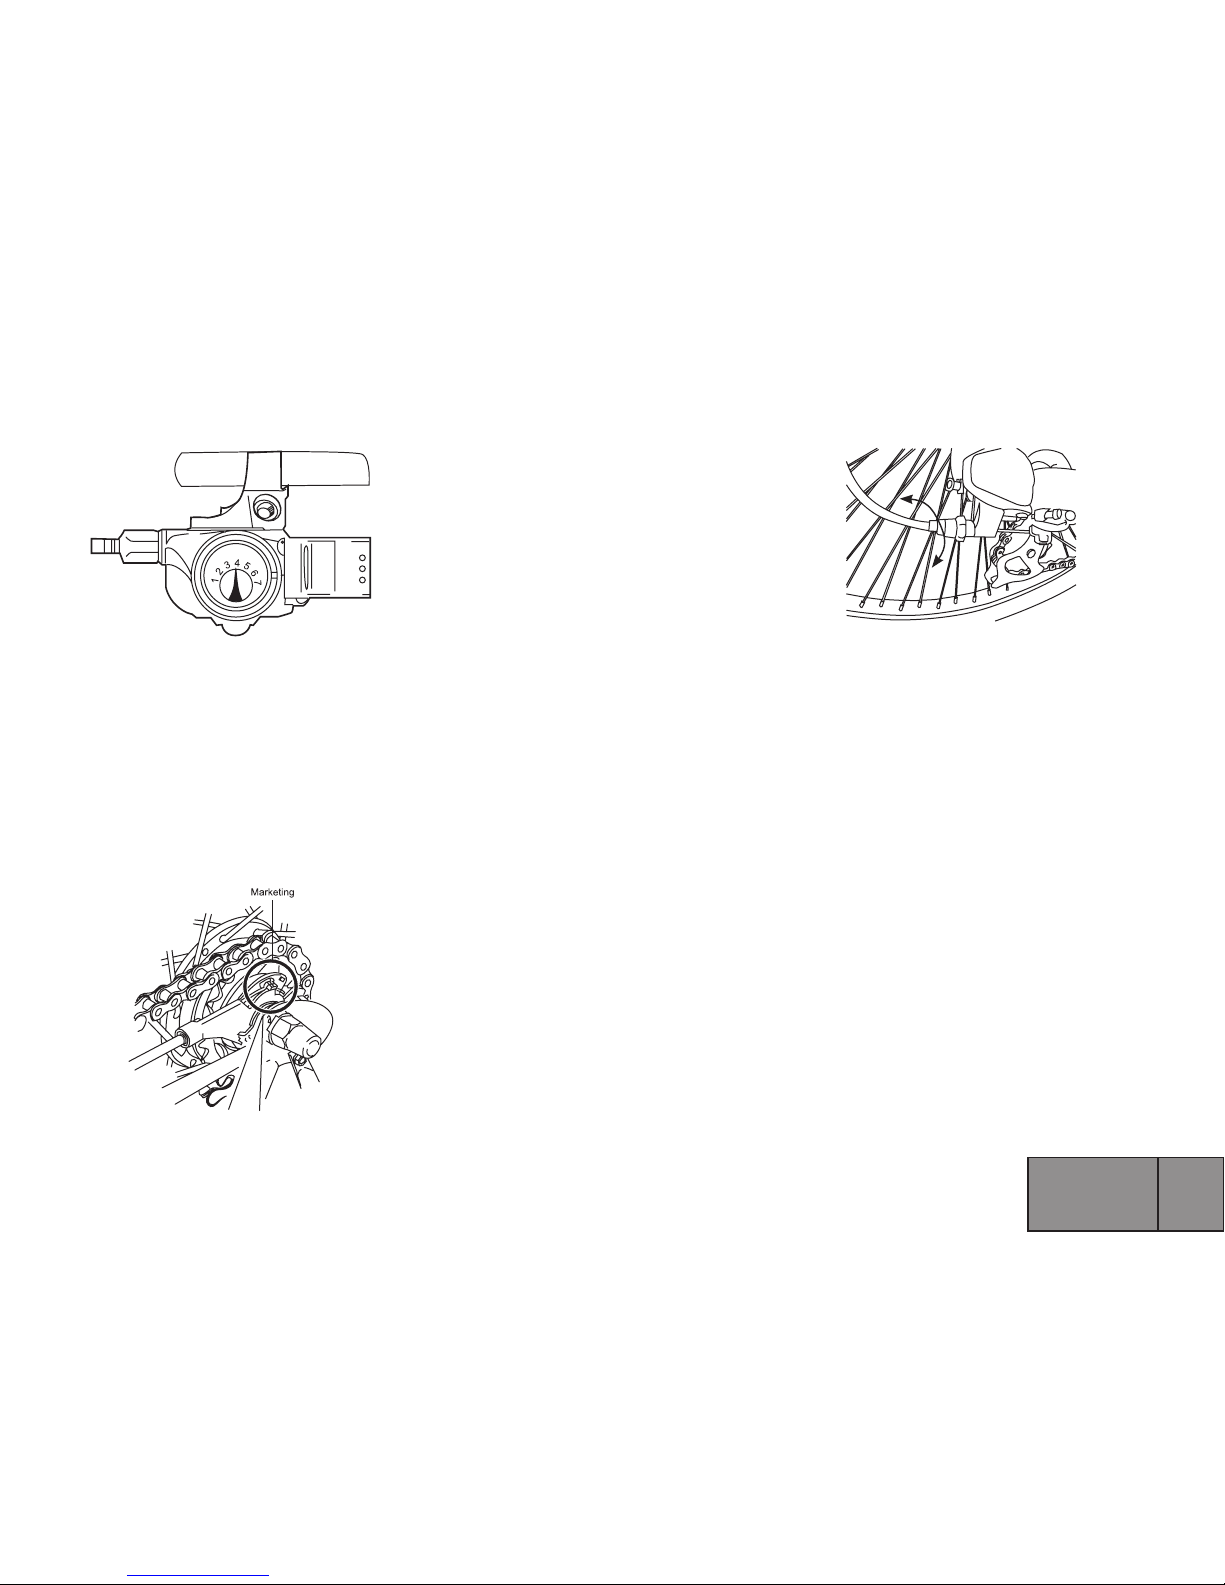
• Set the gear change to position 4 [15].
• Check if the red markings on the change
unit (on the rear wheel hub, on the chain
side) are aligning. To see the red markings you should stand behind the bicycle
[16].
• If they are not opposite, set the position
with the setting screw on the grip shift.[15]
Derailleur
The system is pre-adjusted in the
factory. Even with all the care we take,
sometimes the system will need some
extra adjustment. If the derailleur is not
working properly oil is not going to solve
the problem (chain is pre greased). If the
derailleur is not flawlessly reacting to the
grip shift it needs attention, a bicycle
specialist can always solve the problem. If
you want to adjust it, restrict the work to
adjusting the cable tension in the system
[17]. Place bicycle upside down (protecting
grips and saddle). Start in 7
th
gear, rotate
peddles and shift to 6
th
gear, if the chain is
hesitating to go to 6
th
gear the cable needs
to be tightened turning the adjuster anti
clockwise, if the shifting works good from
7
th
to 1
st
gear but hesitates going back
from 1
st
to 7
th
gear, then the cable should
be loosened by turning the adjuster
clockwise. For complete guides on how to
maintain the system and the adjustments
we advise to check the Shimano website.
WHEELS
The rim, hub and spokes together form
(in combination with the rim tape,
inner tube and tire) an extremely light yet
strong wheel. It is a key part to ensuring
that the bicycle is pleasant to ride. There
are various aspects that are important for
light ‘running’ such as, tires pumped up
correctly (please look at the indicated tire
pressure on the tires), taut spokes and a
properly adjusted hub. You can look after
the first point yourself, the other two should
be handled by a bicycle specialist.
Spokes
Spokes are an important part of your
wheels. If they are too slack the stabil-
ity of the bicycle can be influenced negatively (and may cause critical damage to the
wheel) After the running in period (100 km)
[15]
[16]
[17]
18
Page 20
English
two children. The total weight can cause
you to lose your balance during unexpected
steering manoeuvres.
• The only acceptable way to carry a child
on a bicycle is - in fact - an approved seat
on the rear carrier/ or on the frame.
Therefore, we advise you to visit a bicycle
specialist. He can determine if your bicycle
is suitable for a child seat.
• If you go out with your child and have to
stop to park your bicycle take your child
out of the seat before putting the bicycle
on its stand.
Stand
Never sit on a bicycle with the stand lowered. For your own safety and the protection of your bicycle.
MAINTENANCE
Vital parts such as, cables, spokes and
brakes, get the chance during the breaking
in period to settle. For the careful
tightening and adjustment required you
have to visit a bicycle specialist regularly.
To be able to keep riding with pleasure and
safety a major annual service is necessary.
Your bicycle specialist has not only the tools
and experience to adjust and lubricate such
hidden moving parts as the steering head
SAFETY
A bicycle that has loose parts is not a safe
bicycle. On a regular basis perform a check
to make sure that you are using a safe
bicycle. A bicycle specialist can quickly
determine if your bike is in good working
order or needs a servicing.
Steering
It is important, for safe steering, that
the handlebar grips are fixed firmly.
Checking them regularly will prevent
trouble. Loads, such as shopping, belong on
the carrier rack or in the bicycle basket.
For your own safety do not hang anything on
your handlebars! Bags dangerously influence
the behaviour of the steering.
Luggage carrier
As the name indicates the luggage carrier
is intended for luggage and not for people.
The maximum load for a (rear) luggage
carrier is 25 kg.
Child seats
This is to advise you about the safety of
the parent and child. We recommend you do
not attach a seat on the handle bar. It would
dangerously effect the behaviour of the
steering. You run extra risks when carrying
the spokes should be checked Tightening the
spokes is very precise work. This is why it
has to be done by a bicycle wheel specialist.
Important
• The spokes should be adjusted for the first
time a few weeks approximately after 100
km (80 miles).
• If any spokes are loose or broken please
go to the bicycle wheel specialist. He will
solve it quickly, which will prevent further
damage to the wheel.
• Have the tension of the spokes regularly
checked by a bicycle wheel specialist.
Tires
Tires are an important part in the comfort
of your bicycle. They affect the ride in a
couple of different ways. It is important that
the tire is inflated to the optimal pressure.
A tire that is under-inflated will be prone to
faster tire wear as well as requiring more
strength to pedal due to increased surface
area making contact with the pavement.
Over-inflated tires can lead to flat tires
and loss of traction due to reduced contact
between the tire and the pavement. Check
your tires on a regular basis making sure
that they are filled with the recommended
amount of pressure.
19
Page 21
English
and hubs; his hands, eyes and ears also
allow him to make a timely diagnosis of
small imperfections! Good maintenance
is also important in connection with the
guarantee. You should carefully read the
terms of guarantee further on in this
booklet!
Tools
A simple set of tools will suffice for the
limited work. You will be well on your way
with a set of flat key's (8 to 15 mm),Allen
keys, screwdriver, pliers, a small bottle
of bicycle oil and maybe a punc- ture
repair kit. Ensure that whenever parts
are replaced, the replacements fitted are
original or the equivalent.
Important
Because pivot points with bearings are
water repellent but not watertight, it
is not advisable to use a garden hose or
high-pressure jet cleaner. The alloy
and chrome parts of your bicycle (for example, rims, cranks, hubs and handlebars)
should have preventive treatment with
acid-free petroleum jelly or special grease
to prevent oxidation.
Cleaning
First use a soft brush to remove the dirt.
A plastic soft spiral brush (often used
during the cleaning of central heating
radiators) can be really useful for places
that are difficult to reach (the inner sides
of mudguards). Next go to work with warm
water mixed with a mild liquid soap (NO
strong chemicals such as bleach, ammonia
or soda) and a soft cotton cloth.
• Due too continues exposure to the sun
colored parts of the cruiser can fade.
• Avoid extreme temperatures for the
cruiser.
Checklist
Check regularly:
• Do the brakes work as they should? Are
the brake blocks and bolts secure? Are the
cables intact?
• Are the spokes at the right tension? Have
the spokes been checked and possibly
tightened
• Are the saddle tube and steering tube
not higher than the safety markings?
• All the nuts and bolts tightened securely?
• Is the tread of the tires not worn out
and are there any weak spots or bulges?
Are the tires at the right pressure?
• Are the steering tube and the handlebars
secure? Is there any play in the steering
head?
• Are the hand grips still firmly in place
and do the gears still work flawlessly?
• Is the chain tension correct?
Recommended tighteningTorques
Steering plug bolt 12-15 Nm
Expander bolt with
oblique bobbin 20-23 Nm
Nut for the saddle tube bolt 15-20 Nm
Front wheel hub shaft nuts 20-27 Nm
Theft prevention
Protect your bicycle from theft with a
Johnny Loco approved chain lock. Fasten it
to any street pole or fence, pass the chain
through the frame and one of the wheels.
Do not pass it exclusively through the front
wheel!
Insurance
Your new Cruiser can also be insured for
theft. The insurance is available at www.
johnny-loco.com Make note of the serial
number of your bicycle (You can find this
serial number under the crank axle) and
keep a copy of the serial number separate
from the bicycle.
20
Page 22
English
normal discoloring of paint or chromepitting.
Article 4 Warrantee-parts
4.1 During the warrantee period all parts
which have been identified by Johnny Loco
Bicycle B.V. as suffering from construction
and/or material defects, will be repaired or
reimbursed by choice of Johnny Loco Bicycle
B.V. The eventual costs of (de-) assembly
are to be borne by the owner.
4.2 Cost of transport of the bicycle and/or
parts thereof to and from Johnny Loco
Bicycle B.V. will be borne by Johnny Loco
Bicycle B.V. if the parts in question are
subject to warrantee.
4.3 Should the part in question for warrantee no longer be in stock or deliverable,
Johnny Loco Bicycles B.V. will arrange for at
least an equally valuable alternative part.
Article 5 Claiming Warrantee
5.1 Claims under this warrantee need to be
presented with the bicycle or the related
part thereof for inspection by a Johnny Loco
Bicycle B.V. approved specialist together
with proof of purchase.
Article 6 Responsibility
6.1 A by Johnny Loco Bicycles B.V. accepted
warrantee claim does not automatically
defects have been identified.
Article 3 Warrantee Exclusions
3.1 In the following cases warrantee will
be lost.
a) Improper and/or unjust use of the
bicycle according to the designed purpose.
b) The bicycle has not been maintained
in accordance with user manual instructions.
c) Technical repairs have not been carried
out in a professional manner.
d) The fitting of aftermarket parts which do
not meet technical specifications or have
been incorrectly fitted.
e) Proof of purchase is missing or has not
been signed by the vendor.
f) The warrantee card has not been, or
improperly filled-out or sent within the
given time frame.
3.2 Further responsibility is irrefutably
denied by Johnny Loco Bicycle B.V. for
damage to the bicycle or parts thereof as a
result of:
a) Defective adjustment of handle- bars,
handlebar rod, saddle, saddle rod, gear
change mechanism, brakes, quick-release
mechanism of wheels and saddle;
b) The untimely replacement of parts
such as brake and gear change mechanism
cables, brakes, tyres, chain and cogs;
c) Climatological influences such as
GUARANTEE
Conditions of warrantee
Article 1 Warrantee
1.1 Johnny Loco Bicycles B.V. guarancee
that the Johnny Loco bicycles are free of
construction and/or material defects and
any other points which are covered within
these warrantee conditions.
1.2 The warrantee can only be claimed
by the first owner of the Johnny Loco
bicycle in question.
1.3 The warrantee expires in accordance
with the articles 3 and 5.
1.4 The warrantee cannot be transferred
to a third party.
1.5 The by Johnny Loco granted warran-
tee conditions in no way limit the ability of
the purchaser to address the vendor under
normal legal conditions as defined by local
civil law.
Article 2 Warrantee Period
2.1 On all Johnny Loco bicycle frames
a warrantee of five (5) years is given for
con- struction and/or material defects.
2.2 Their will be no warrantee extended
on normal wear and tear parts such as tires,
chain, chain-blades, freewheel, rear-
sprocket and gears, cables and brake pads
except where construction and/or material
21
Page 23
English
mean that Johnny Loco Bicycles B.V. accepts
any responsibility for any eventual damage
that may have occurred. The responsibility
of Johnny Loco Bicycles B.V. never extends
beyond the conditions as described within
these warrantee conditions. All claims for
responsibility of Johnny Loco Bicycles B.V.
for resulting damage will be categorically
denied.
Johnny Loco Bicycles B.V.
Postbus 10821, 1001 EV Amsterdam, The
Netherlands
email: [email protected]
www.johnny-loco.com
22
Page 24

Johnny Loco Bicycles B.V.
Postbus 10821, 1001 EV Amsterdam, The Netherlands
email: [email protected] www.johnny-loco.com
 Loading...