

Page 1
JOHANNUS Studio 170 Quick Reference Guide
Installation music desk:
- Turn countersunk brass screws into music desk slat by hand till screws stick out 2 mm.
- Place music desk at the right position, with screw points into the pre drilled holes.
- Tight music desk with screw driver. Electric screw driver is not recommended.
- Remove green protection foils from plexiglas part of the music desk.
Installation pedal board:
- Shift pedal board against black pedal front cover. Pedal bolts will stick out 5 mm
- For security reasons mount pedal board to organ with wing nuts.
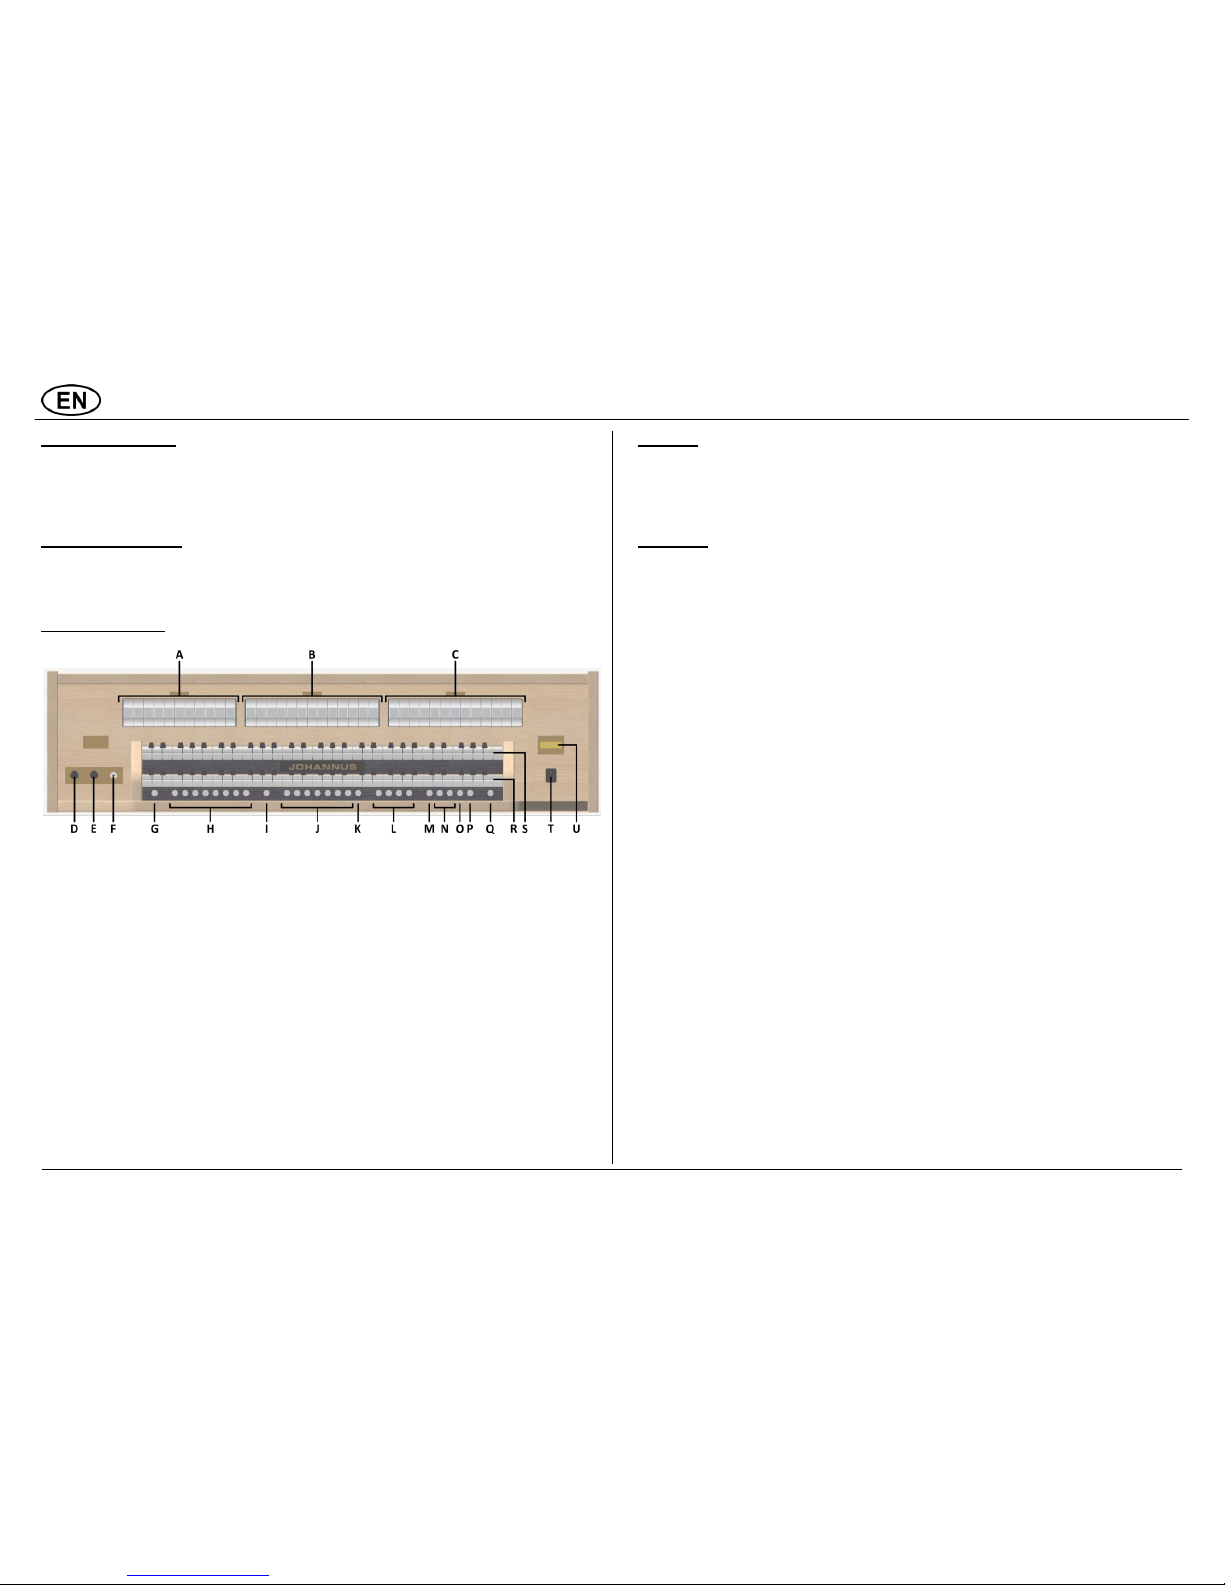
Overview of controls:
A Pedal stops
B Swell stops
C Great stops
D Volume control organ
E Volume control cathedral
F Phones
G SET (programming capture system)
H Capture memory locations
I CH: Chorus
J Pre-programmed memory locations
K RO: Reeds Off
L Intonation styles
M Transposer
N - and + pistons
O ENTER
P MENU
Q 0: Recall / Reset
R Manual Great
S Manual Swell
T On/Off
U Display
Switch on:
Switch on the organ with the on/off piston at the right, next to the manuals. Wait several
seconds. Starting the control functions and the settings will take some time.
The lamps of the 0 piston and the as standard set functions light up. The settings appear on the
display.
Accessories:
Chorus (CH):
Chorus is a function for lightly detuning the organ stops to give it a broader and livelier sound.
Use the CH piston to activate the Chorus function.
Reeds Off (RO):
Reeds Off is a function to switch off all reeds simultaneously. As long as this piston is pressed, no
reeds can be activated. When this function is switched off, the reeds that were on are activated
again. Use the RO piston to activate the Reeds Off function.
Intonation styles (ROM), (SYM), (BAR) en (HIS):
The organ has four intonation styles:
Romantic (ROM), Symphonic (SYM), Baroque (BAR) and Historic (HIS).
Select an intonation style by pressing the ROM, SYM, BAR or HIS piston.
Transposer (TRANS.):
The Transposer function shifts the pitch by half-tone increments (from -8 to +8). The set pitch
can be read on the display (Tr:..).
- Press the TRANS. piston.
- Use the - and + pistons to set the pitch.
- When the transposer change needs to be saved, press the ENTER piston in the time the TRANS.
piston is lit.
Johannus Menu (MENU):
In the Johannus Menu several functions of the organ can be set.
Press the MENU piston to activate the Johannus Menu on the display.
Navigating the menu is done with the - and + pistons.
Confirmation of a choice is done with the ENTER piston.
Cancel or step back in the menu is done with the MENU piston.
Recall / Reset function (0):
The 0 piston cancels registration in two ways:
- A short press on the 0 piston: Only the last change is cancelled.
- A long press on the 0 piston: All registrations are cancelled.
Page 2
Version 1.1
Pre-programmed memory locations:
Pre-programmed memory locations are available by operating pistons PP to T and PL. These
seven memory locations have factory settings (presets) appropriate for the quiet pianissimo to
the loud tutti and the classic plenum.
Calling up a pre-programmed memory location:
Press a pre-programmed memory location (PP-T or PL). The active stops light up.
Capture memory:
Through use of the capture memory, a registration can be made active with just one piston.
The capture memory consists of 75 levels. These levels can be seen on the display (Mem:..).
Each level has eight memory locations (pistons 1 - 8). The 600 capture memory locations are not
pre-programmed and can be programmed by the musician.
Programming a capture memory location:
The current setting of the capture memory location will be lost.
- Select the desired stops.
- Use the - and + pistons to select a level (1-75) on the display.
- Press the SET piston. Hold in the piston.
- Press the desired memory location (1-8).
- Release the SET piston.
Calling up a capture memory location:
- Use the - and + pistons to select the desired level (1-75) on the display.
- Press the desired memory location (1-8). The active stops light up.
Changing Reverb:
- Use the ROM, SYM, BAR, HIS pistons to activate the intonation style the reverberation of which
must be changed.
- Press the MENU piston.
- Use the - and + pistons to select the Reverb Settings function on the display.
- Press the ENTER piston.
- Use the - and + pistons to select the desired Reverb function which has to be changed. There is
a choice of Reverb Program, Reverb Length and Reverb 3D Surround.
- Press ENTER to confirm.
- The line at the top indicates the active intonation style.
- The line at the bottom indicates the setting of the selected reverb function.
- Use the - and + pistons to change the setting.
- Press the ENTER piston to confirm the change and return to the reverb function choice.
- Press the MENU piston twice to exit the Johannus Menu.
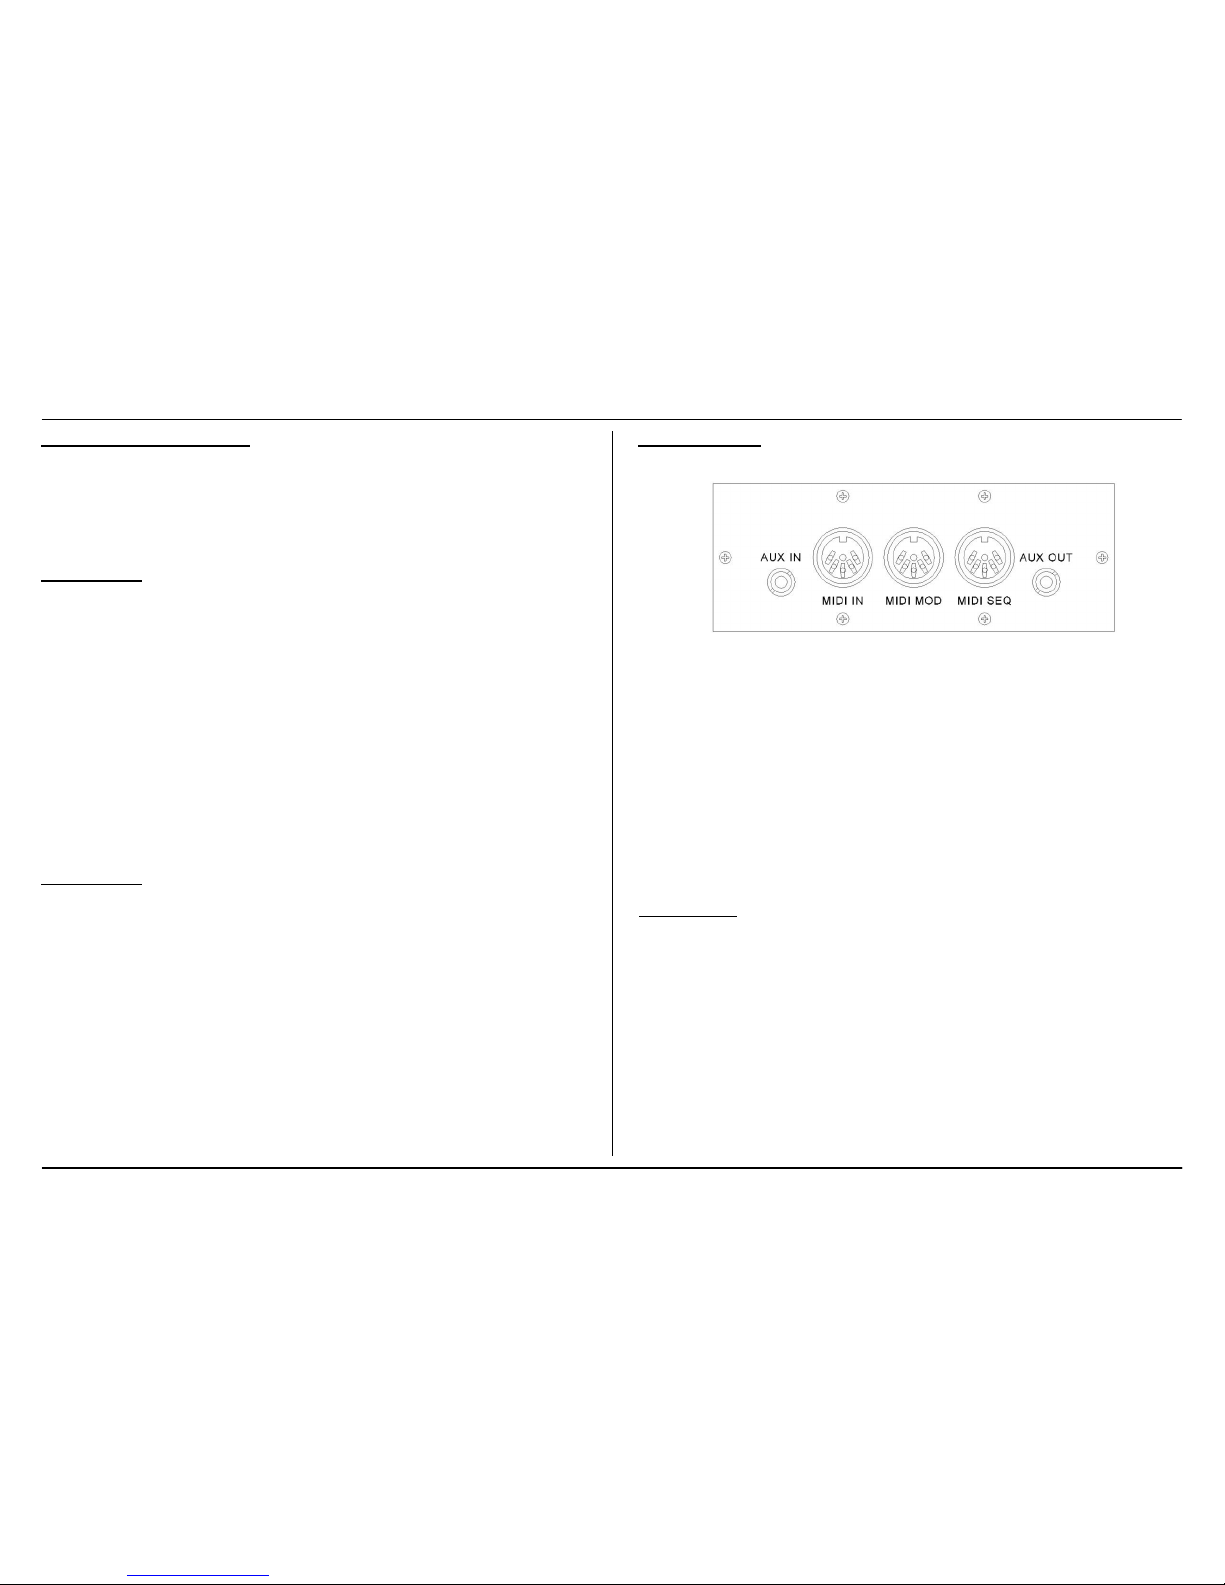
External connections:
The external connections are on the left under the console.
MIDI IN: An input for receiving MIDI codes from other devices.
MIDI MOD: A programmable MIDI output for connecting a module or expander, for example.
MIDI SEQ: A non-programmable MIDI output for connecting a sequencer or PC (with the
optional Johannus Intonat program), for example.
AUX IN: A stereo audio input for playing the sound of an external device through the amplifiers
of the organ. For example, an expander connected to the organ through the MIDI MOD. can be
played through the instrument's loudspeakers.
AUX OUT: A stereo audio output for connecting an external device (e.g. amplifier or recording
device).
PHONES:
The phones connection is at the left next to the manuals.
This connection for a (stereo) headphone is suited for a headphone with an impedance of 30 Ω
or more (see headphone specifications).
Volume controls:
Organ: You can adjust the volume of the organ with the ORGAN volume control.
Cathedral: The reverb volume can be adjusted smoothly with the CATHEDRAL volume control.
Expression pedal: With the expression pedal the volume of the Swell can be changed. Using the
expression pedal also changes the timbre of the Swell stops. By this the effect of a swell box of a
pipe organ is simulated.
For further information see CD User Manual.
© 2011 Johannus Orgelbouw b.v.
 Loading...