

Page 1
JOHANNUS LiVE III
Quick Reference Guide
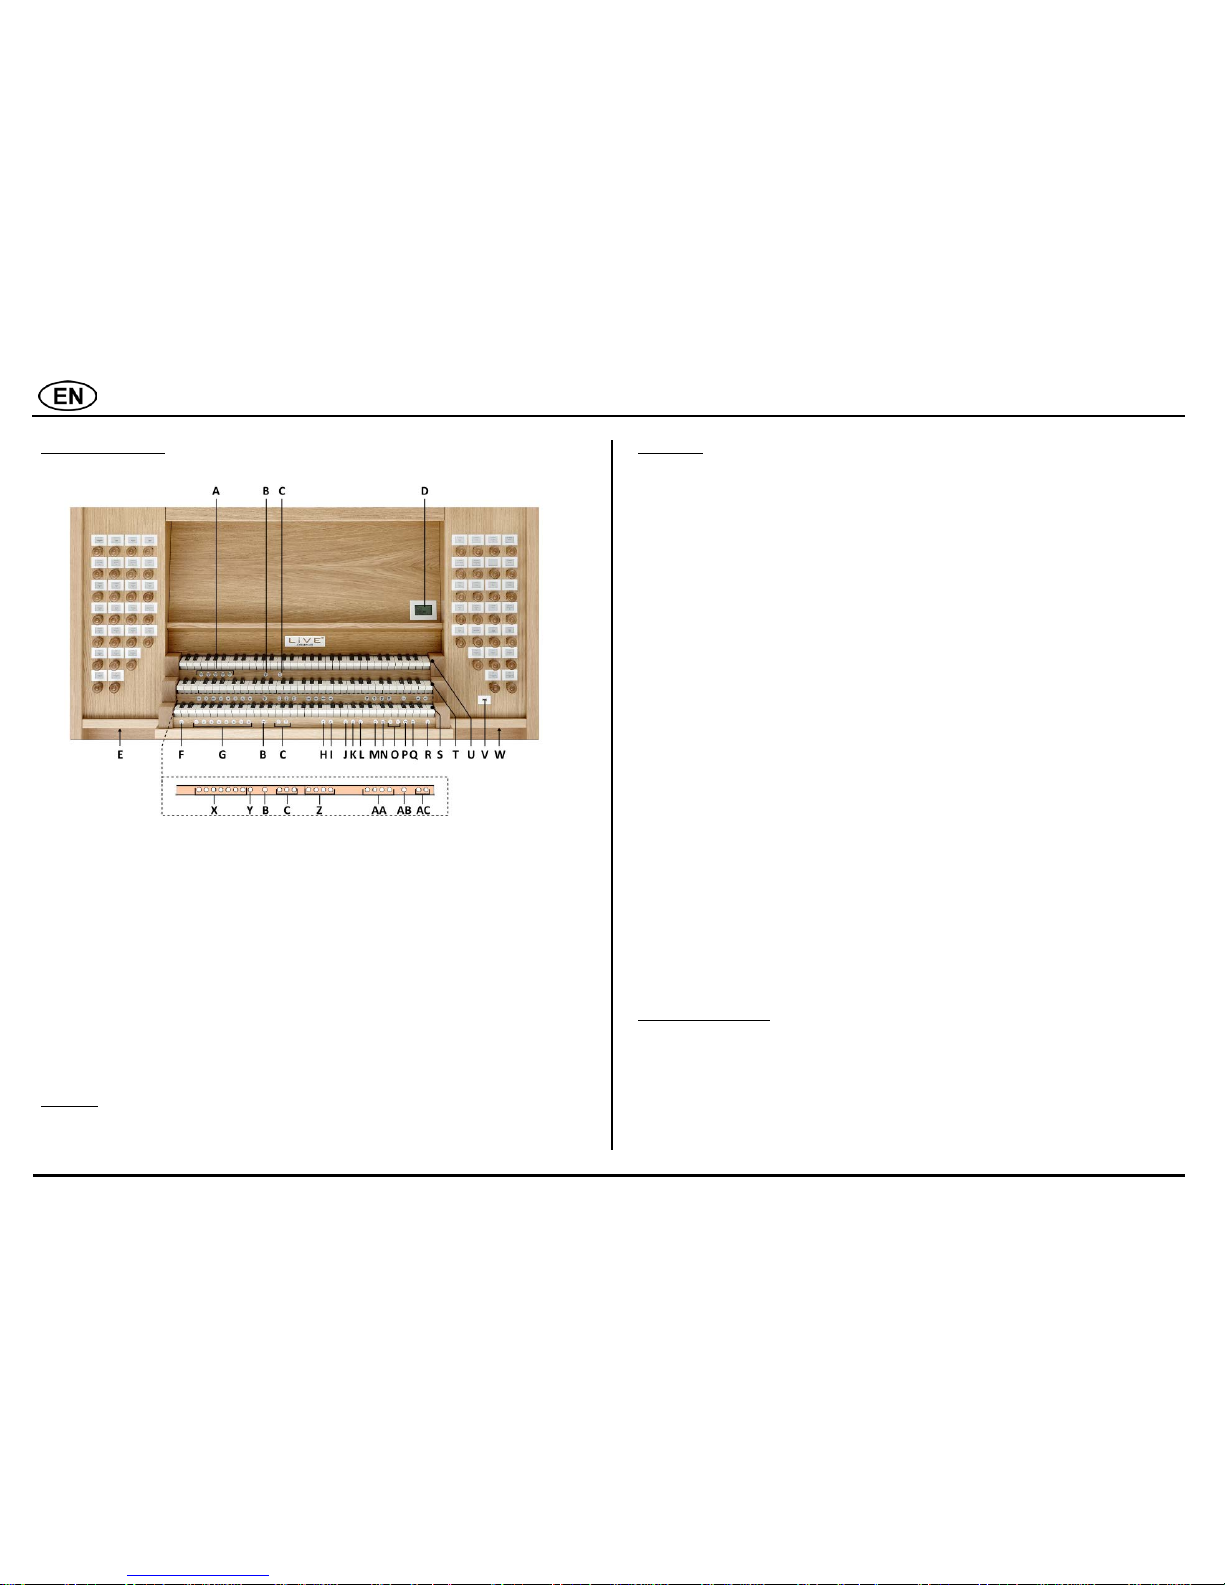
OVERVIEW OF CONTROLS
SWITCH ON
Switch on the organ with the on/off piston at the right, underneath the manuals. Wait several seconds.
The lights of the HR-piston and the as standard set functions light up. T he settings appear on the display.
ACCESSORIES
Reeds Off (RO):
Reeds Off is a function to switch off all reeds simultaneously.
Sequence - and + (SEQ- and SEQ+):
Sequence is a function to call up capture mem ory locations in a sequential way.
All Swells to Swell (S/S):
All Swells to Swell transform s the swell pedal for Manual III to a swell pedal for the whole organ.
If no expression pedal is configured as a swell pedal for Manual III, the S/S piston cannot be activated.
Hand Registration (HR):
Only when the HR-piston is activated you will be able to register m anually. If you are unable to hear an organ
sound, after you have pulled a draw stop and pressed a key, please check if the HR-piston is activated.
Hand Registration + (HR+):
Only when the HR+ piston is activated, you can j oin your own registration to the fixed-, as well as to the capture
memory combinations.
Crescendo (CR) :
Crescendo is a piston to activate the crescendo p edal.
If no expression pedal is configured as a crescendo pedal, the CR-piston cannot be activated.
Manual Bass (MB):
Couples the Pedal monophonic to Manual II. Only the l owest key that is played on Manual II is coupled from the
Pedal to Manual II.
Cantus Firmus (CF):
Couples Manual III monophonic to Manual II. Only the highest key tha t is played on Manual II is coupled from
Manual III to Manual II.
Transposer (T RANS.):
The Transposer function shifts the pitch by half-tone increments (from -8 to +8). The set pitch can be read on the
display (Trans:..).
- Press the TRANS. piston.
- Use the - and + pistons to set the pitch.
Reset function (0):
Pressing the 0-piston cancels all registrations.
JOHANNUS MENU (MENU):
In the Johannus Menu several functions of the organ can be set:
- Press the MENU piston to activate the Johannus Menu on the display.
- Navigate the menu with the - and + pistons.
- Confirm a choice with the ENTER-piston.
- Cancel or step back in the menu with the MENU-piston.
A
Sample banks
P
ENTER
B
Tremulants
Q
MENU C Couplers
R
0: Reset
D
Display S Manual I
E
Headphone connection
T
Manual II
F
SET U Manual III
G
Capture memory locations
V
USB port
H
HR: Hand Registration
W
On/Off piston
I
HR+: Hand Registration +
X
Pre-programmed memory locations
J
CR: Crescendo
Y
RO: Reeds Off
K
MB: Manual Bass
Z
Listening Positions
L
CF: Cantus Firmus
AA
MIDI registers
M
VOL.: General Volume
AB
S/S: All Swells to Swell
N
TRANS.: Transposer
AC
SEQ- and SEQ+ pistons
O
- and + pistons
Page 2
Version 1.0
PRE-PROGRAMMED MEMORY LOCATIONS
Pre-programmed memory locations are available by opera ting pistons PP to T and PL. These seven memory
locations have factory settings (presets) approp riate for the quiet pianissimo to the loud tutti and the classical
plenum. The locations are for each sampleset.
Calling up a pre-programmed memory location:
- Press the HR-piston.
- Press a pre-programmed memory location (PP-T or PL).
CAPTURE MEMO RY
Through use of the capture memory, a registratio n can be made active with just one piston. The capture memory
consists of 50 levels for each sampleset. These levels can be seen on the display (Mem :..). Each level has eight
memory locations (pistons 1-8). The 400 capture m emory locations are not pre-programmed and can be
programmed by the musician.
Programming a capture memo ry location:
Warning: the current setting of the capture memory locati on will be lost.
- Press the HR-piston.
- Select the desired stops.
- Use the - and + pistons to select a level (1- 50) on the display.
- Press the SET piston and hold in the piston.
- Press the desired memory location (1- 8).
- Release the SET piston.
Calling up a capture memory location:
- Press the HR-piston.
- Use the - and + pistons to select the desired level (1- 50) on the display.
- Press the desired memory location (1-8).
SAMPLE BANKS
A sample set is a USB drive containing a professional, authentic set of recordings from an actua l pipe organ. When
you purchase a Johannus LiVE, it comes with two sample sets. You can copy in total five USB drives, containing full
recordings of pipe organs into the Johannus LiVE’s memory. With the pistons ORGAN 1 to ORGAN 5 you can easily
switch between pipe organs. See ‘Overview of Cont rols’, point A.
Upload sample set
- Place the USB drive in the USB port of the orga n.
- Press the MENU piston.
- Use the - and + pistons to select the ‘Upload Organ’ function on the display.
- Press the ENTER piston.
- Use the - and + pistons to select the desired location.
- Press the ENTER piston to confirm. The uploading will start (15-20 min.). Please do not turn off the organ.
- Loading is completed at 100% and you will automa tically return to the main screen. You can play the pipe organ
directly.
LISTENING POSITIONS
The Sampled Listening Position™ is a function which works with LIVE reverb II™ to position the organ sound in the
church. There is choice out of four locations:
- Location Organ Console (CONS.): You are sitting at the console of the organ.
- Location Front (FRONT): You are sitting in front of the church.
- Location Center (CENTER): You are sitting in the middle of the church.
- Location Rear (REAR): You are sitting at the back of th e church.
The pistons CONS., FRONT, CENTER and REAR allow you to choose where to sit in the church to enjoy the sound of
your organ. See ‘Overview of Controls’, point Z.
VOLUME CONTROLS
General Vo lume: The volume of the organ can be adjusted with the VOL.-piston (0-100%).
- Press the VOL.-piston.
- Use the – and + pistons to set the volume.
Expression pedals: In the standard version the organ has two expression pedals. One is configured as a swell pedal
for Manual III, and one is configured as a crescendo pedal. With use of the Johannus Menu, function ‘Expressio n
Pedals’, the function of the expression pedals can be changed.
Using an expression pedal which is set as a swell pedal will, next to the volu me, also change the timbre of the
stops. By this the effect of the swell box shutters of a pipe organ is simulated.
Crescendo pedal:
- The crescendo pedal can be used to activate 20 reg istrations step-by-step. These registrations start with very
quiet (pianissimo) to very loud (tutti).
- If the crescendo pedal is not activated it is indicated on the displays with ‘C resc: Off’.
- Use the CR-piston to activate the crescendo pedal. T he display indicates the actual step.
- Using the Johannus Menu, function 'Expression Pedals', the crescendo pedal can also be configured as a swell
pedal.
- If the crescendo pedal is set as a swell pedal, all functions of the original crescendo pedal are deactivated.
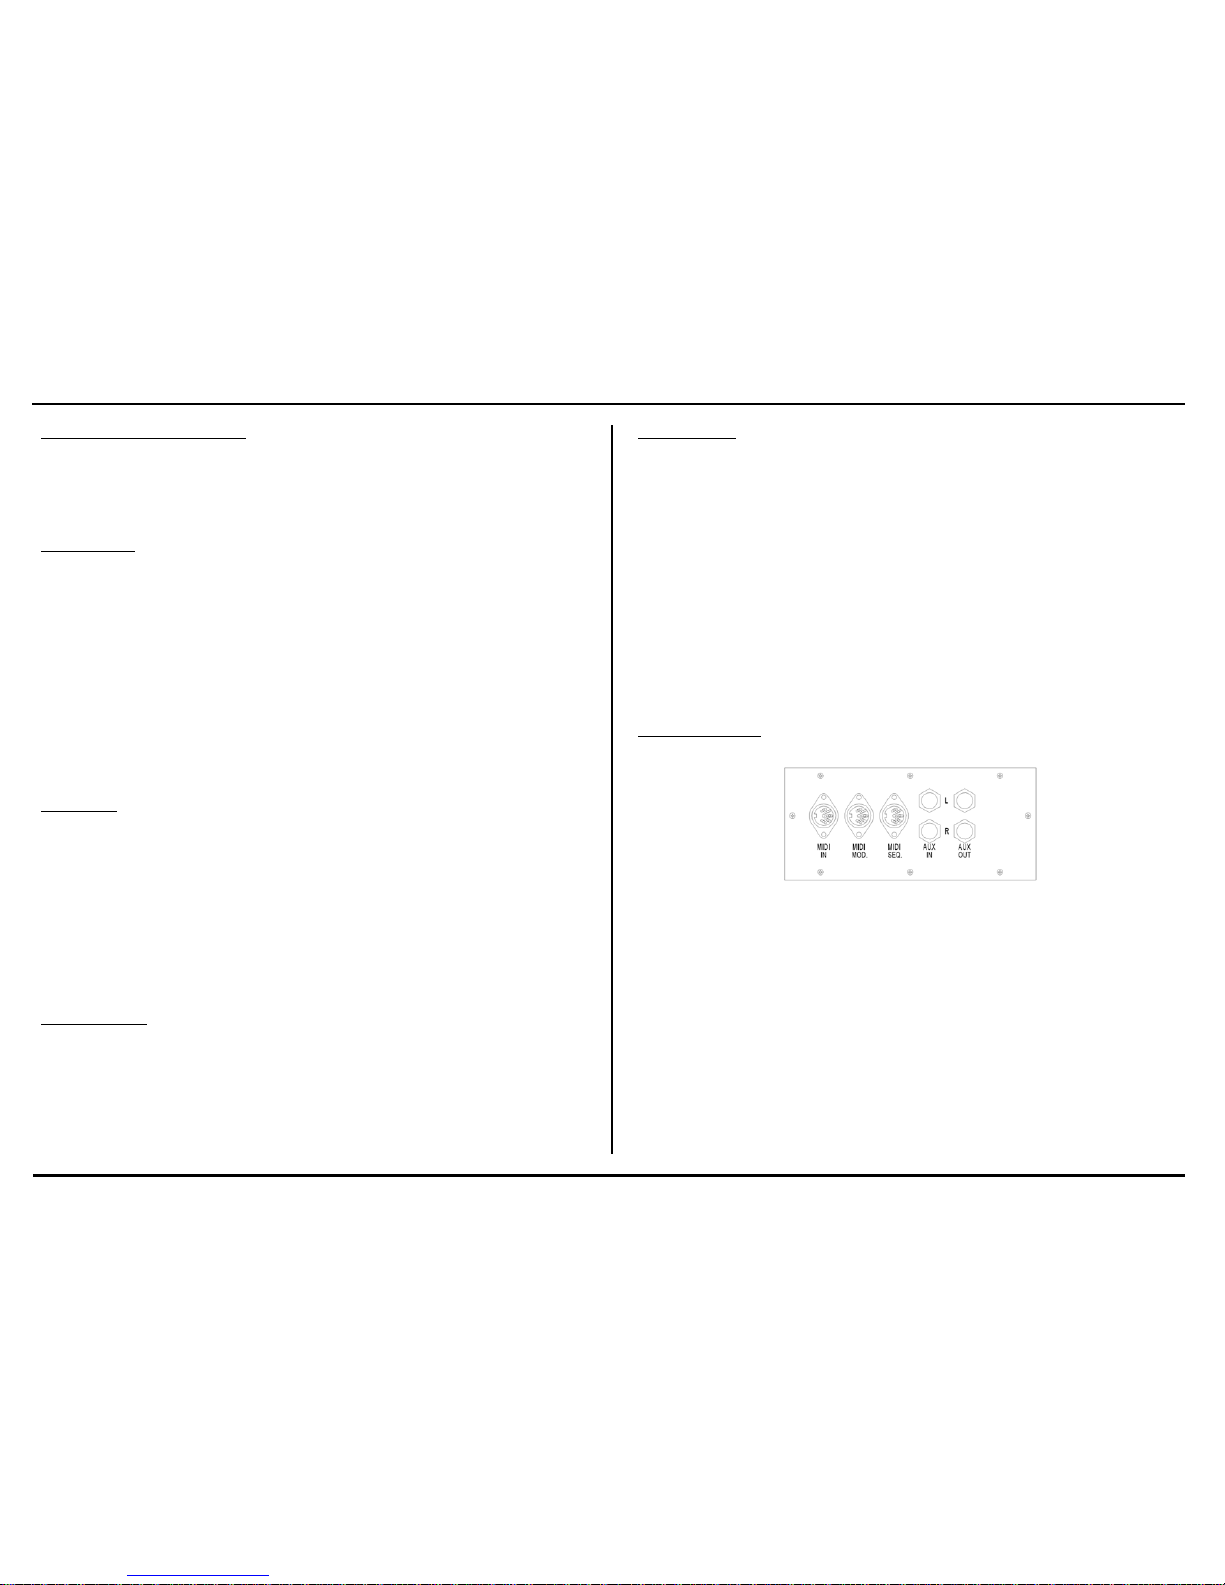
EXTERNAL CONNECTIONS
The external connections are on the left backside o f the organ.
MIDI IN: An input for receiving MIDI codes from other devices.
MIDI MOD: A programmable MIDI output for connecting a module or expander, for example.
MIDI SEQ: A non-programmable MIDI output for connecting the Johannus MIDI Sequencer+ or PC (with the
optional Johannus Intonat program), for example.
AUX IN: A stereo audio input for playing the sound of an external device through the amplifiers of the organ. For
example, an expander connected to the organ throug h the MIDI MOD. can be played through the instrument's
loudspeakers.
AUX OUT: A stereo audio output for connecting an external device (e.g. a mplifier or recording device).
Headphone connection: This connection for a (stereo) headphone is suited for a headphone with an im pedance of
30 Ω or more (see headphone specifications). Location of the connection: see ‘Overview of Controls’, point E.
USB port: This connection is suited for the connection of a USB drive fo r uploading sample sets of new pipe organs.
Location of the connection: see ‘Overview of C ontrols’, point V.
For further information see CD User Manual.
© 2015 Johannus Orgelbouw B.V.
 Loading...