

Page 1
Manual de Instrucciones
Hoyer® Ascend
Para evitar posibles daños, lea
previamente el manual de usuario.
User Instruction Manual
Hoyer® Ascend
To avoid injury, read user manual prior to use.
Manuel de l’utilisateur
Hoyer® Ascend
Afin d’éviter tout accident, veuillez lire
attentivement la notice avant utilisation.
Page 2

Hoyer
®
Ascend
2
English
Contents
1. Hoyer Ascend Patient Lift ...................................................................................... 3
2. Introduction: About Your Lift .................................................................................. 4
3. Assembly and Commissioning Instructions ........................................................... 5
4. Sling Guide ............................................................................................................ 9
5. Lifting with the Hoyer Ascend ................................................................................ 10
6. Safety Precautions ................................................................................................ 11
7. Standard Control Box and Handset ...................................................................... 13
8. Operating Instructions ........................................................................................... 14
9. Charging Instructions............................................................................................. 16
10. Maintenance Schedule & Daily Check List ........................................................... 18
11. Technical Specifications ........................................................................................ 20
12. Warranty ................................................................................................................ 23
Page 3
Hoyer
®
Ascend
3
English
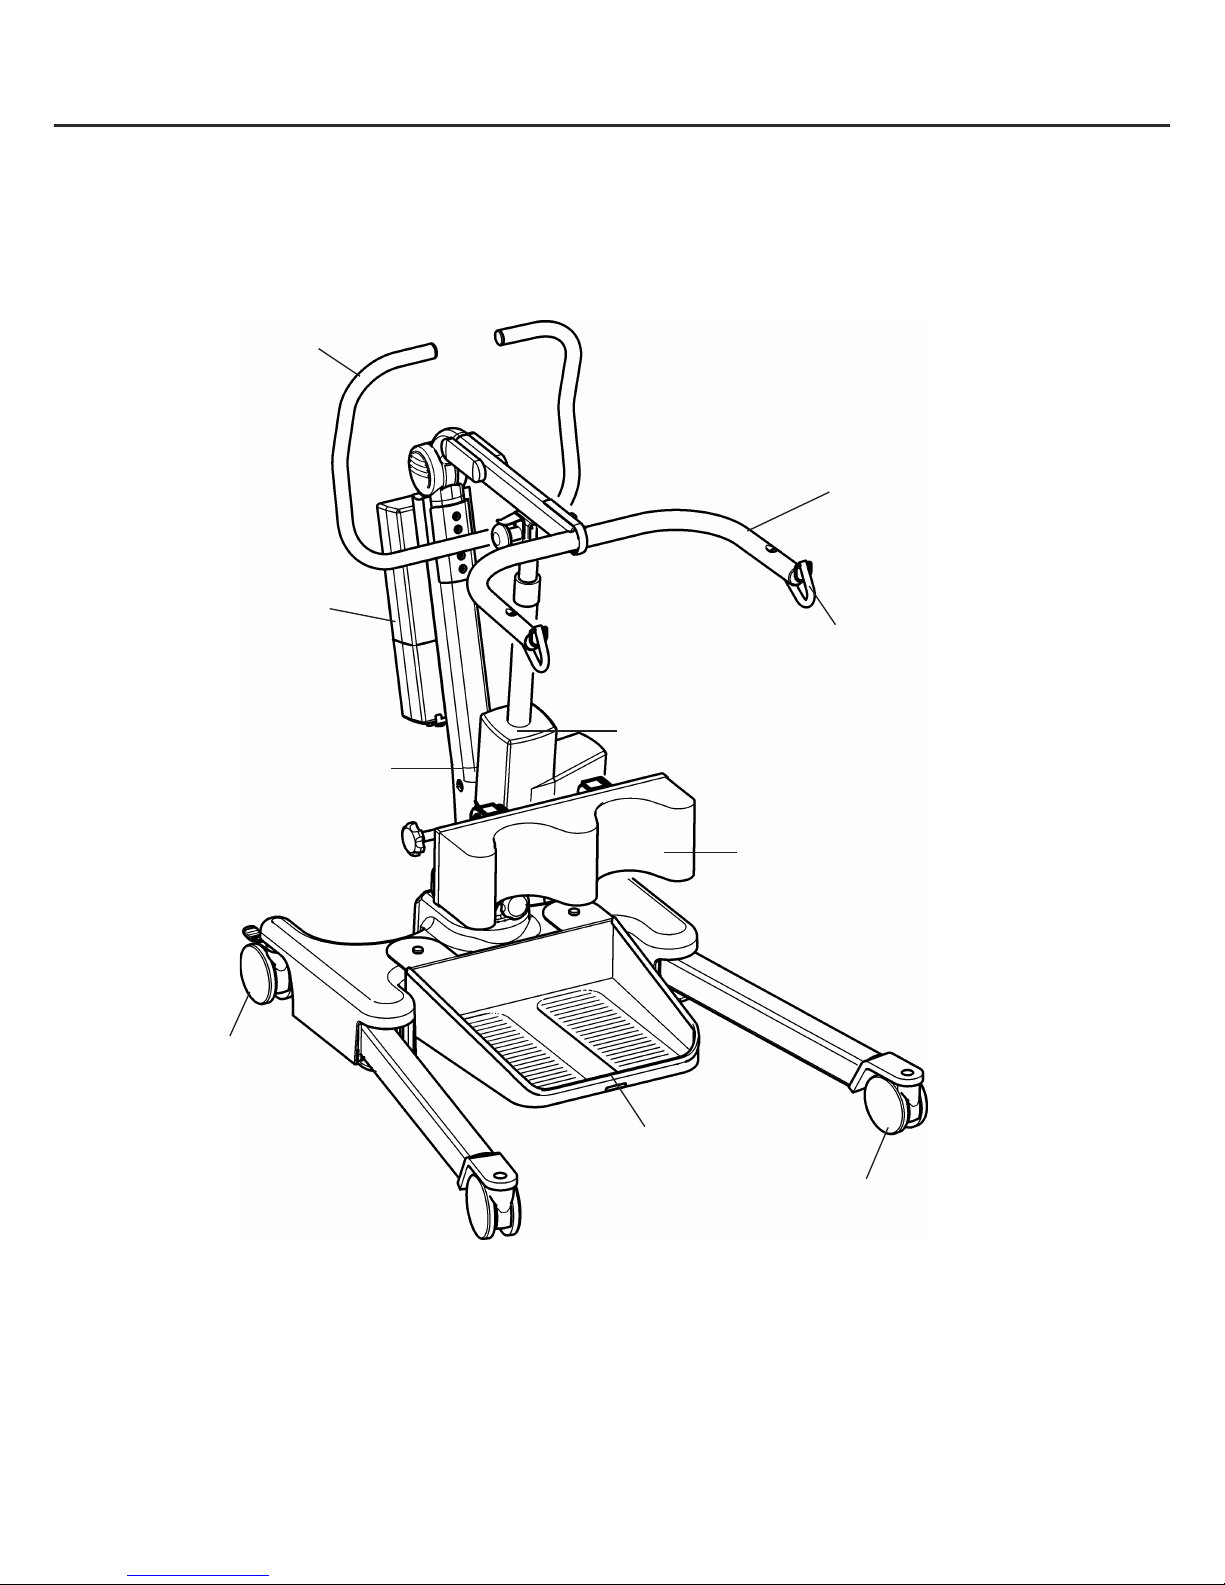
Electric Actuator
1. The Hoyer Ascend Patient Lift
Spreader Bar
Attachment Hook
Spreader Bar
(Cow horns)
Mast Extrusion
Push
Handle
Battery/
Control Pack
Front Castor
(non-braked)
Adjustable Knee Pad
Removable Foot Plate
Rear Castor
(braked)
Page 4

Hoyer
®
Ascend
4
English
2. Introduction: About Your Lift
Each Ascend lift is fully assembled, load tested and certified before being packed/shipped.
The packing consists of a strong, purpose built carton to ensure the safe arrival of the lift. A
number of documents are supplied in a wallet, and packed with each lift and should be kept
safely for future reference:
• TEST CERTIFICATE • USER MANUAL
The TEST CERTIFICATE is an important document and will be required for your insurance
records. It is valid for six months and after it has expired the lift should be inspected and serviced
per the maintenance schedule.
Your authorised dealer can carry out servicing and periodic testing for those countries where this
is a requirement (Europe). Please ensure your lift is included in their maintenance schedule. If
you are at all unsure what your local market servicing requirements are, please check with your
dealer, a local government agency and/or Joerns Healthcare.
Statement of Intended Use
The intended use of this lifting device is for the safe lifting and transfer of an individual from one
resting surface to another (such as a bed to a wheelchair). Joerns Healthcare recommends that
the transfer of a patient is fully risk assessed and conducted safely over a short distance only.
The Hoyer Ascend is suitable for patients in the SITTING position only who have a degree
of weight-bearing ability but require assistance to stand. By removing the foot tray, the Hoyer
Ascend patient lift can also be used as a walking aid following a careful risk assessment.
The Hoyer Ascend is designed to support and promote safe patient handling and transfer for
both the patient and carer.
The Hoyer Ascend stand aid is designed to be used in conjunction with the Hoyer range of
slings. The examples of slings suitable for use with this device are listed as follows:
• Hoyer Standing Sling
• Hoyer Transport Sling
Expected Service Life
Hoyer Professional lifts are designed and tested for a minimum service life of ten (10) years,
subject to the use and maintenance procedures stated in this manual. Use, other than in accordance
with these instructions, may compromise service life.
Page 5
Hoyer
®
Ascend
5
English
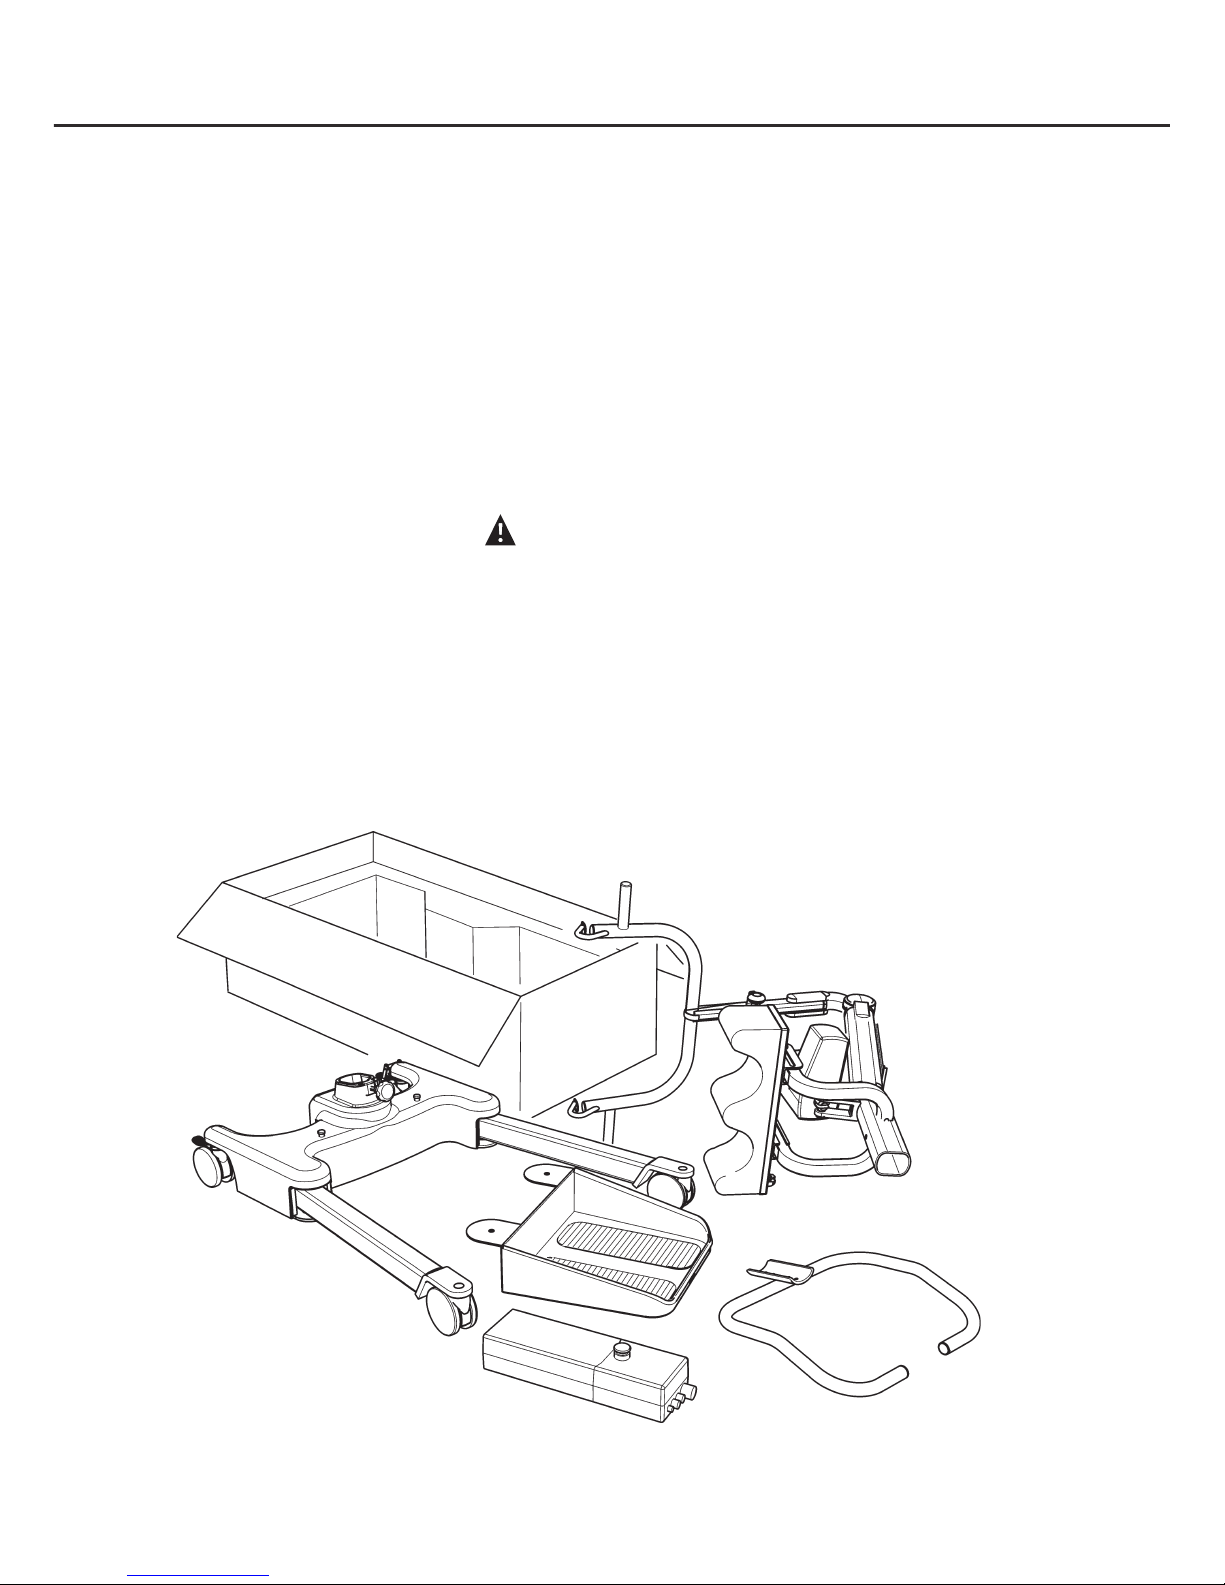
3. Assembly and Commissioning Instructions
Carton Contents
Place the carton in a clear working area and open carefully. The carton contains:
•
HOYER ASCEND LIFT
•
DOCUMENTS
•
HAND CONTROL
•
BATTERY PACK
•
CHARGING LEAD
•
DESK TOP CHARGER/STAND
WARNING
The Hoyer Ascend is heavy and will need to be lifted with care. You may need assistance
to lift the Hoyer Ascend from the carton.
Assembly
Remove all the parts from the carton and place on the floor, taking care to protect the finish from
damage.
Page 6
Hoyer
®
Ascend
6
English
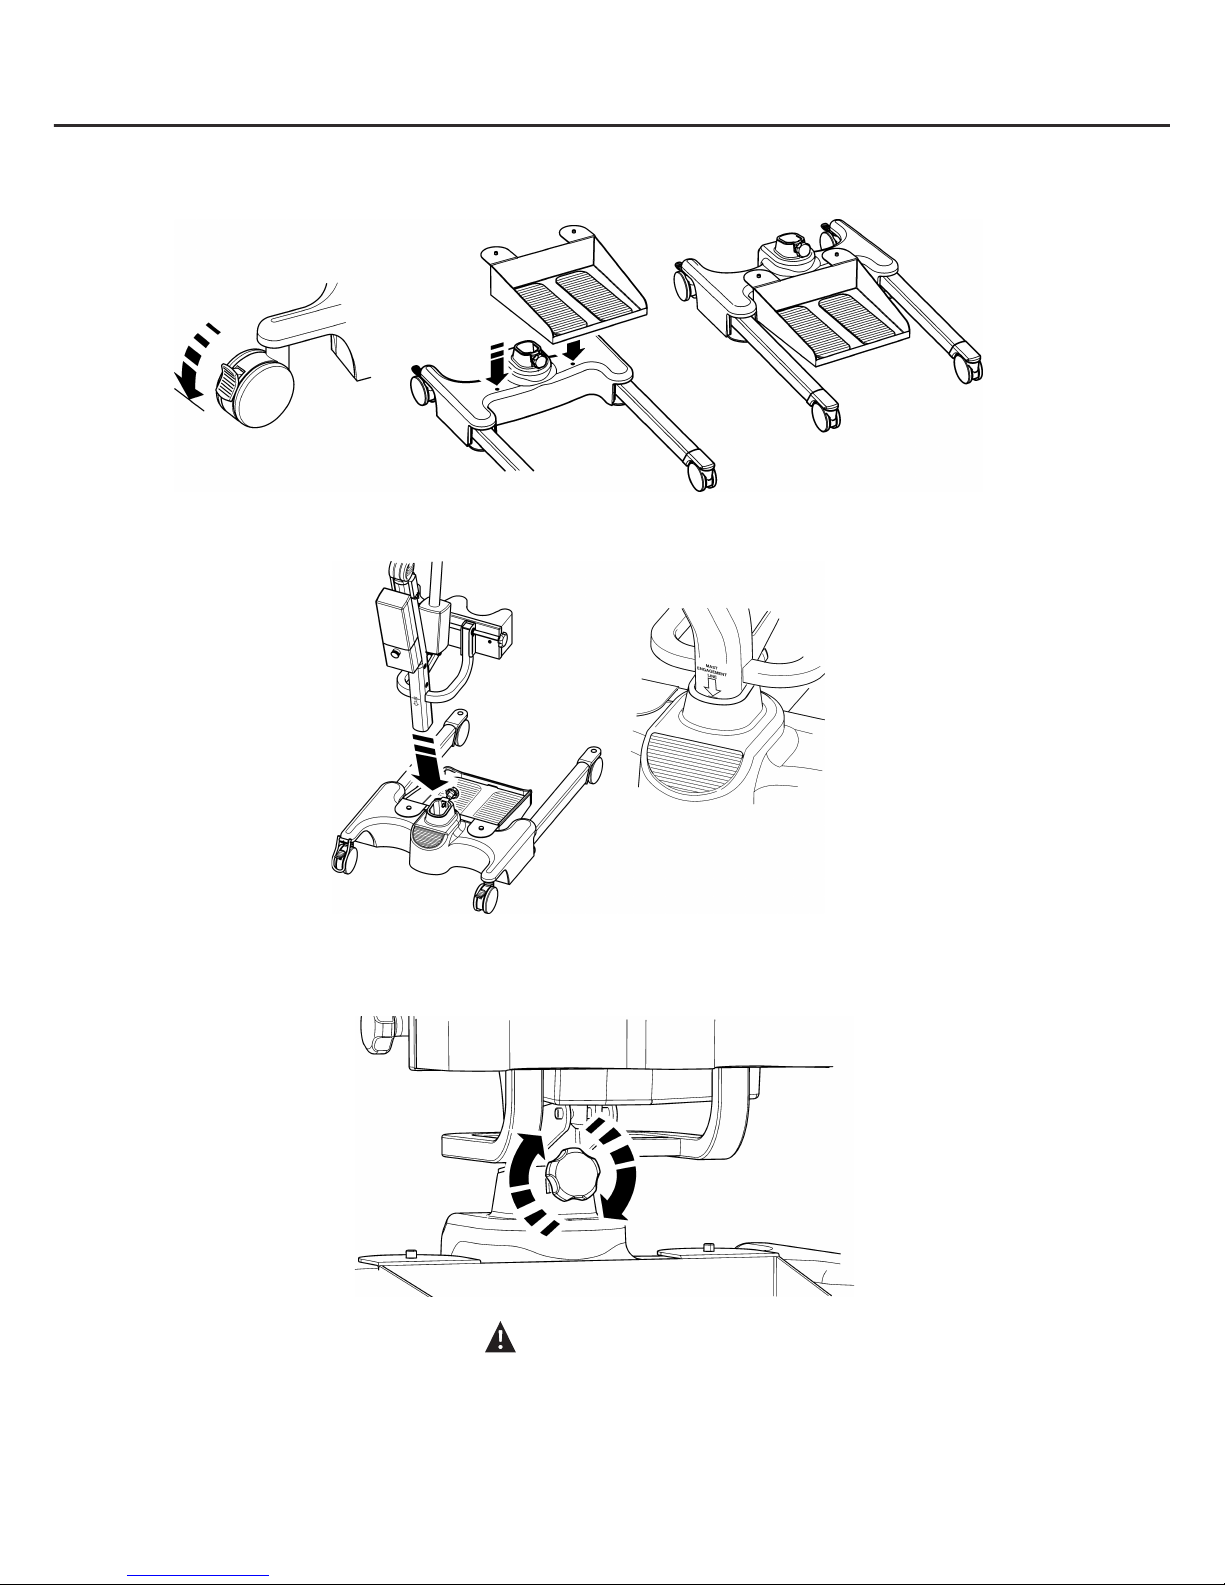
1. Place the chassis in a clear space and apply the rear bakes. Attach the foot tray to the base
using the location holes positioned on the base casting.
2. Fit the mast and boom assembly into the chassis socket.
3. Tighten the mast assembly with the mast-locking device, which is located at the front of the
chassis.
WARNING
Avoid trapping fingers. Keep fingers away from the end of the mast when inserting into
the chassis socket. Full engagement of the mast is indicated by the label on the side of the
mast. The electric leg operation will not function unless the mast is fully engaged.
Page 7
Hoyer
®
Ascend
7
English
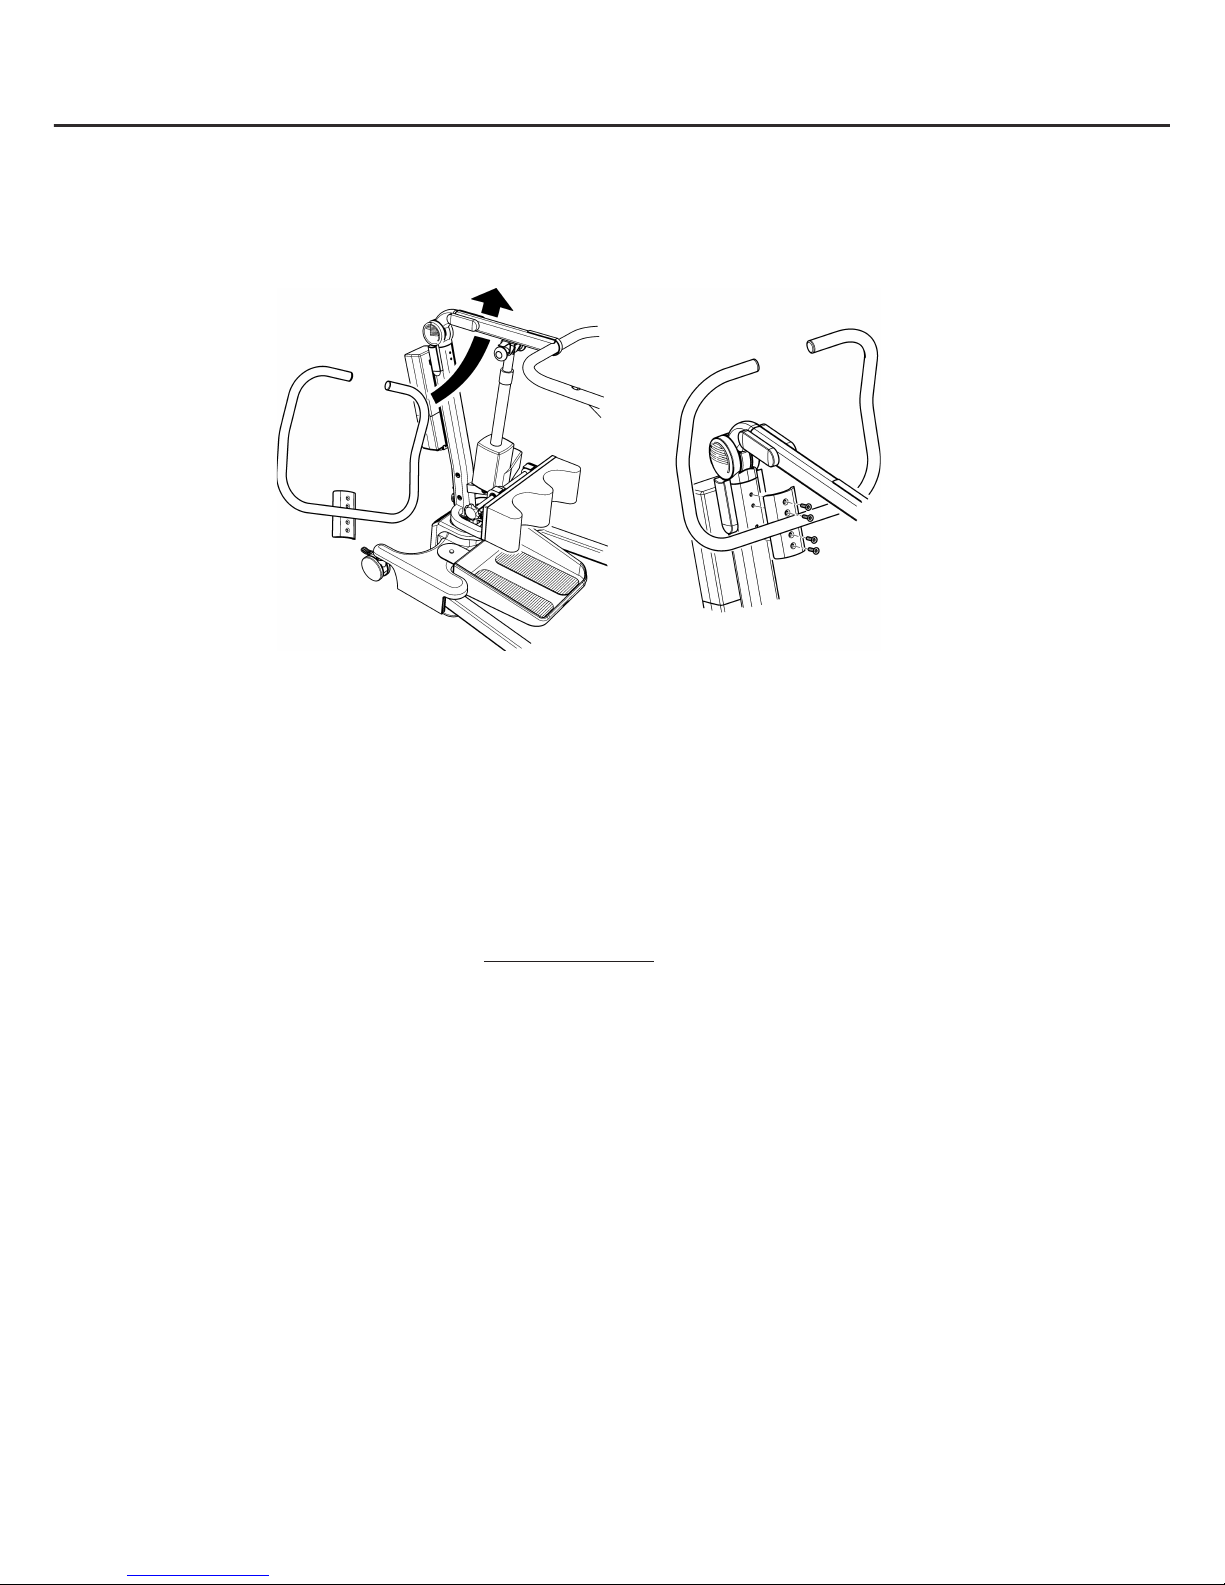
4. Turn the locking knob until hand tight.
5. Line the handle assembly up to the mast, and attach using the fixings provided. The fixings
and wrench needed to attach the handle are kept in the user instruction wallet for safe keeping.
6. Fit power pack to the lift and make sure the latch holding the pack in place is fully engaged.
“Click” in place.
Disassembly
The lift should not be disassembled unless for service, repair or transport if necessary. Therefore
follow the assembly instructions in reverse sequence.
Page 8

Hoyer
®
Ascend
8
English
ALWAYS CHECK THE FOLLOWING BEFORE OPERATION
• The mast is fully locked into position.
• The legs of the lift open and close satisfactorily (This is done via the hand control).
• The red emergency stop button, located on the rear of the control box, is in the OFF (out)
position.
• Push the up and down buttons on the hand control and confirm the boom rises and lowers.
Page 9
Hoyer
®
Ascend
9
English
4. Sling Guide
The Hoyer Ascend is suitable for patients in the SITTING position. The slings suitable for this
device are listed as follows:
• Hoyer Transport
• Hoyer Standing
User Guide For Standaid Slings
The Transport and Standing sling is an easy fit sling, suitable for standing and supporting. It is
not a general purpose sling and patients must be assessed for suitability by a qualified person.
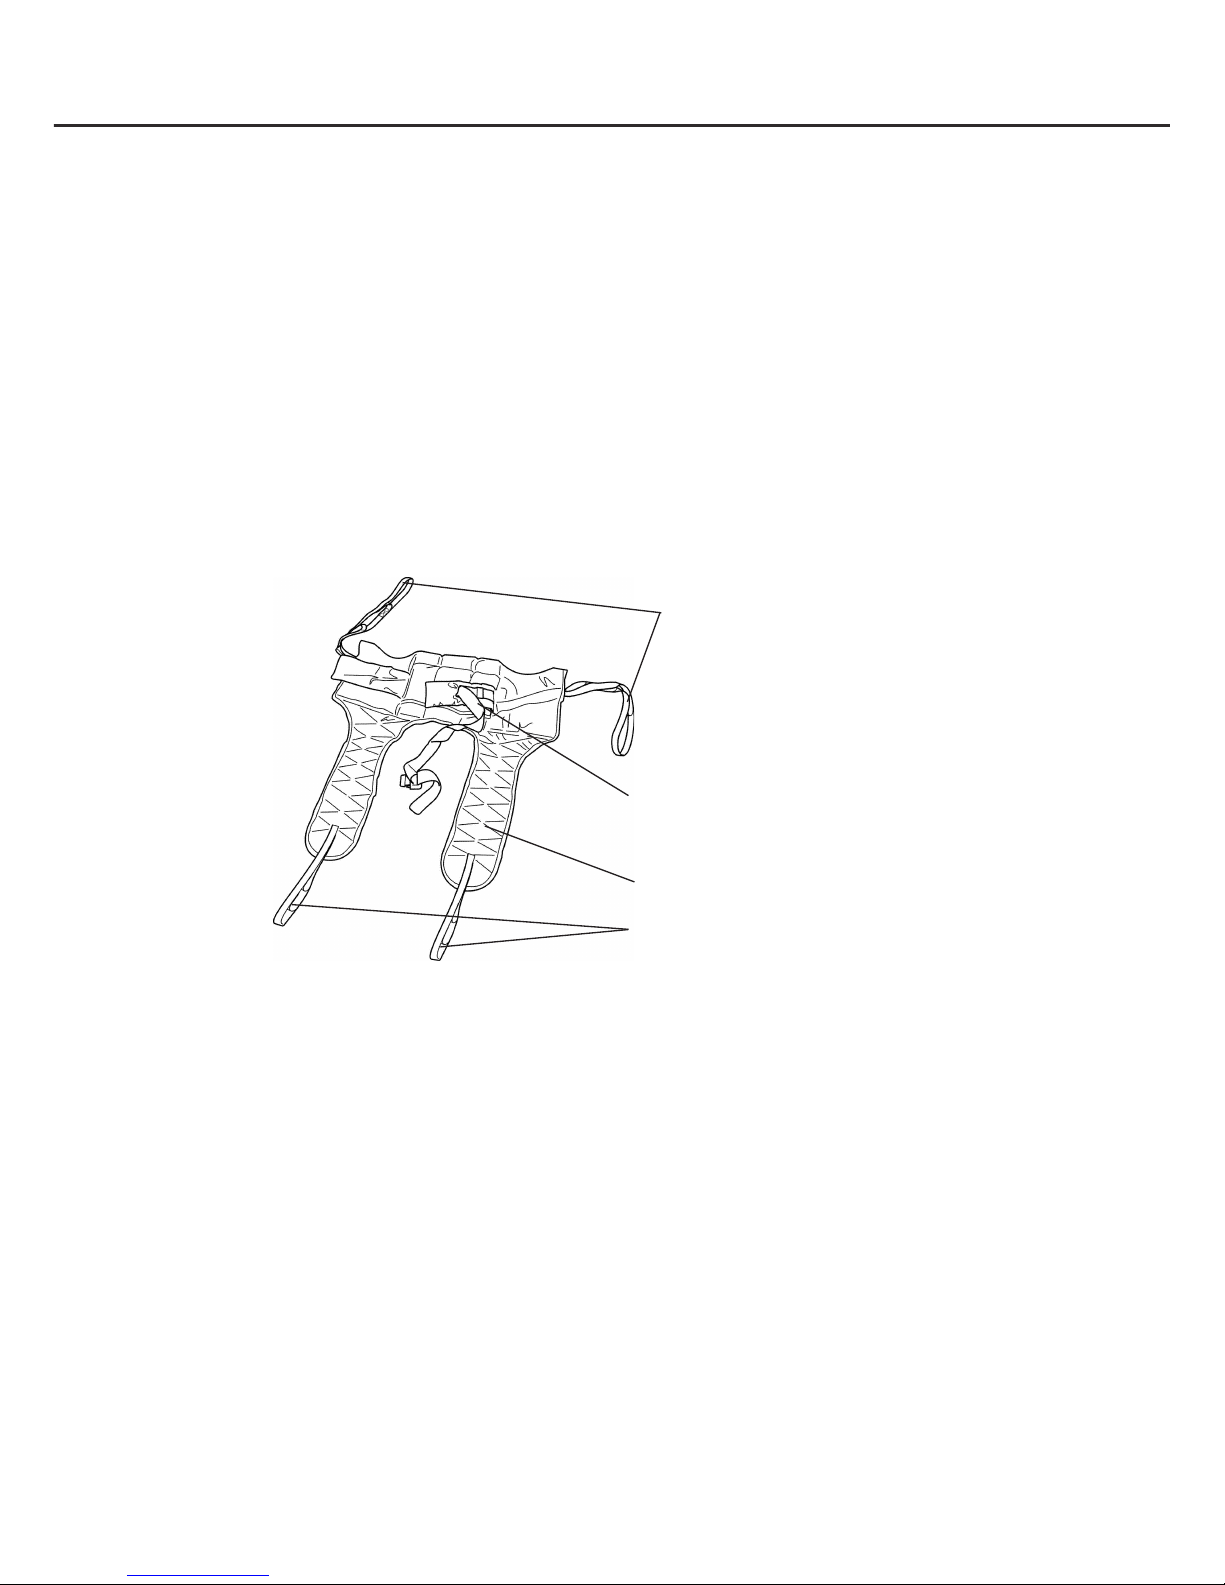
Transport Sling
Feed the sling down the back of the patient leaving the top of the commode aperture at the base of
the spine. Check the roll part of the sling is square across the patient’s back.
Attach the support strap around the chest of the patient. This strap need not be tight. It is there to
hold the sling in position whilst attaching the loops to the Standaid. It may be left off altogether if
preferred. Ensure patient’s arms are on the outside of the sling.
Raise the patient’s leg and feed the leg strap under and up between the legs. Ensure the sling is
not twisted or creased under the thigh. Repeat this procedure for the other leg. Attach the loops
on the roll parts of the sling to the white hooks at the end of the hand grips.
Without crossing the loops on the leg straps, attach to left and right black knobs on the lifting
fork. You would normally use the middle of the three loops. The patient is now ready to be raised
from the seat. Once clear of the seat, the patient will be more comfortable if lowered back in to the
sitting position.
Attachment Loop Straps:
Shoulder
Attachment Loop Straps:
Legs
Chest Supports and Buckle
Leg Supports
Page 10
Hoyer
®
Ascend
10
English
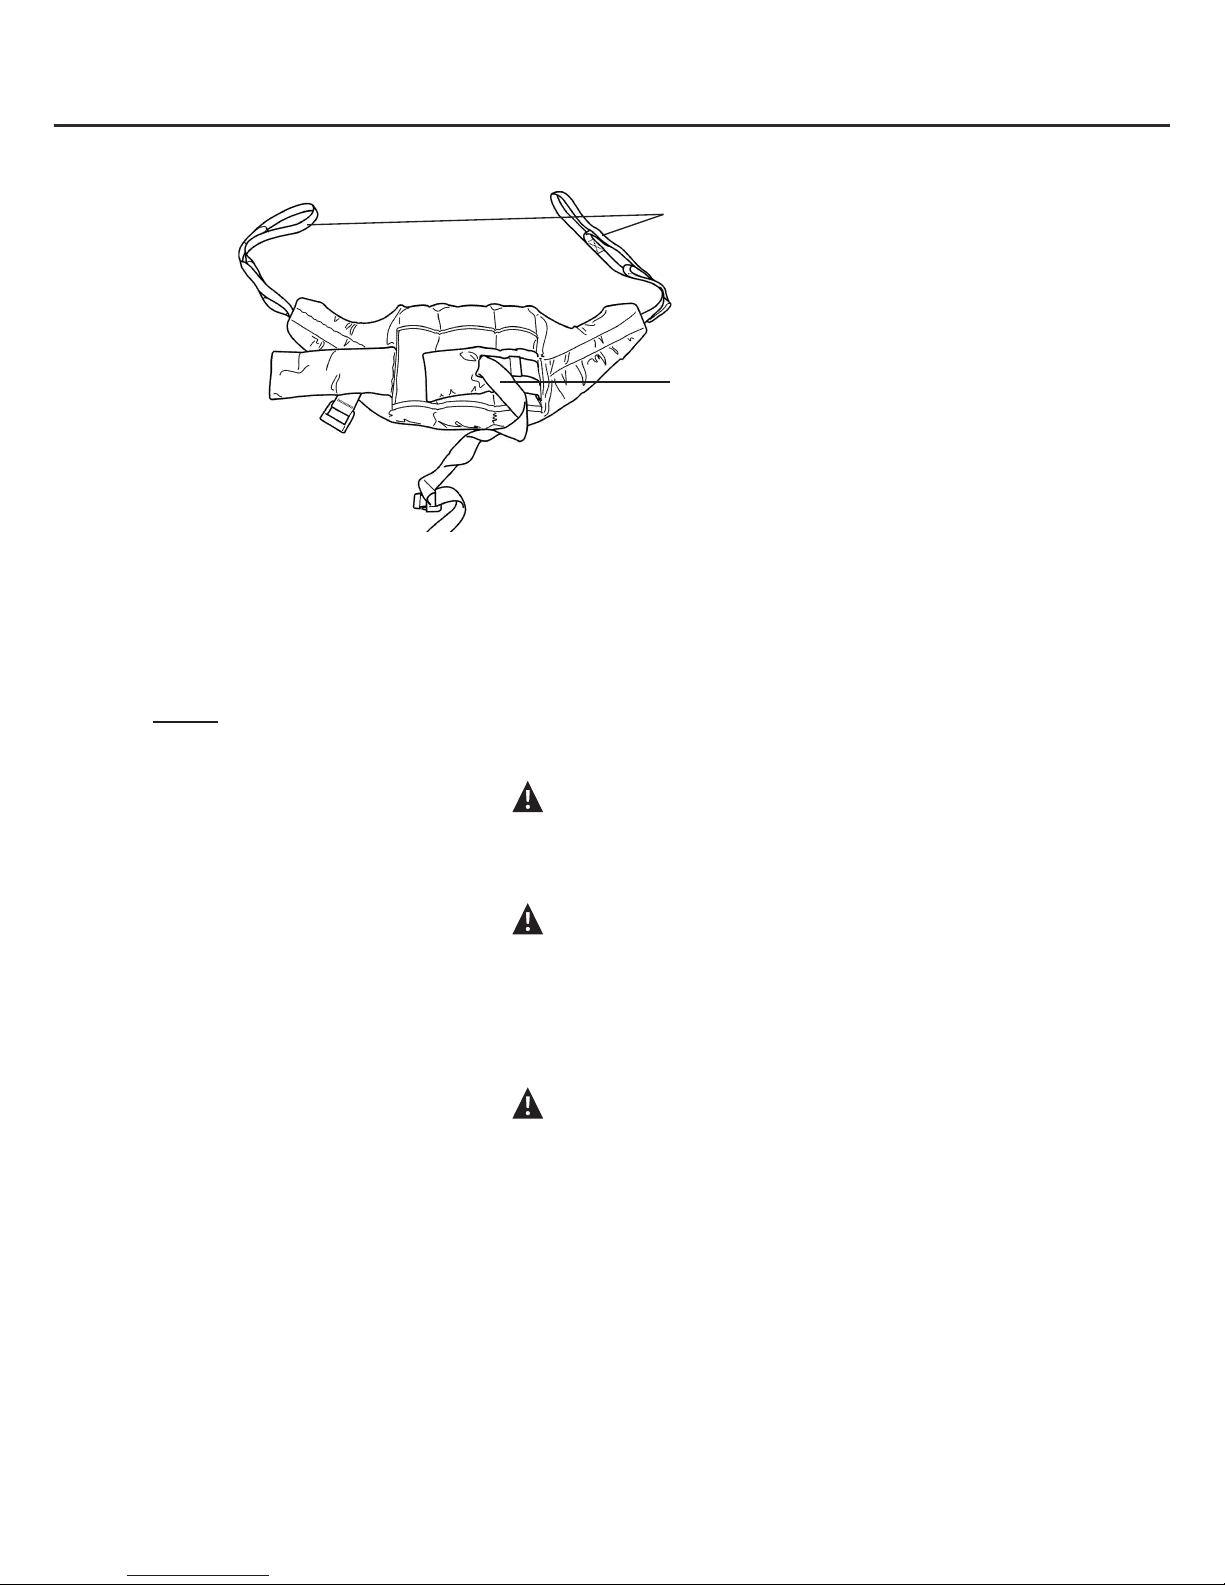
Standing Sling
Place the sling down behind patient’s back between base of shoulder blades and bottom of rib
cage. Attach the support straps around the front of the patient. This strap need not be tight. It is
there to hold the sling in position whilst attaching the sling to the Standaid. It may be left off
altogether if preferred. Ensure that the patient’s arms are outside the sling.
NOTE: For detailed fitting instructions, please refer to the user guide supplied with each
sling.
WARNING
Joerns Healthcare recommends that slings be checked regularly and particularly before
use for signs of fraying or damage. DO NOT use slings that are worn or damaged.
WARNING
HOYER RECOMMENDS THE USE OF GENUINE HOYER PARTS. Hoyer slings and lifters
are not designed to be interchangeable with other manufacturer’s products. Using other
manufacturer’s products on Hoyer products is potentially unsafe and could result in
serious injury to patient and/or caregiver.
WARNING
Refer to maximum weight capacity of lift. Sling capacity is limited by the maximum
capacity of the lift.
5. Lifting with the Hoyer Ascend
Position Standaid so that the patient’s feet fit in the foot tray and knees rest against the knee
pad. Initially attach the longer loops of the sling to the grey hooks at the end of the Standaid
hand grips. The patient’s hands should be placed on the handgrips. (Once the patient is used to
the lift the shorter loops may be used to achieve a more upright position). Then push UP button
on handcontrol to raise the patient to the standing position.
Attachment Loop Straps
Chest Support
Page 11

Hoyer
®
Ascend
11
English
6. Safety Precautions
Please read and follow the safety precautions listed below. The operation and use of Hoyer
patient lifts is simple and straightforward. Following these few basic safety precautions will make
lifting operations easy and trouble free.
READ AND UNDERSTAND THE USER INSTRUCTION MANUAL BEFORE USING YOUR
“ASCEND”
WARNING: Important safety information for hazards that might cause serious injury.
CAUTION: Information for preventing damage to the product.
NOTE: Information to which you should pay special attention.
WARNING
• ALWAYS plan your lifting operations before commencing.
• ALWAYS carry out the DAILY CHECK LIST before using the lift.
• ALWAYS familiarise yourself with the operating control and safety features of a lift before
lifting a patient.
• DO NOT use a sling unless it is recommended for use with the lift.
• ALWAYS check the sling is suitable for the particular patient and is of the correct size
and capacity.
• NEVER use a sling which is frayed or damaged.
• ALWAYS fit the sling according to the instructions provided (user instructions).
• DO NOT exceed the safe working load.
• ALWAYS check the safe working load of the lift is suitable for the weight of the patient.
• ALWAYS carry out lifting operations according to the instructions in the user manual.
• NEVER disconnect or bypass a control or safety feature because it seems easier to operate the lift.
• DO NOT lift a patient with the castor brakes on. Always let the lift find the correct centre of
gravity.
• DO NOT attempt to manoeuvre the lift by pushing on the mast, boom or patient.
• ALWAYS manoeuvre the lift with the handle / foot push pad provided.
• ALWAYS lower the patient to the lowest comfortable position before transfers.
Page 12

Hoyer
®
Ascend
12
English
• DO NOT push a loaded lift at speeds which exceed a slow walking pace
(3 Km/hour 0.8 metres/second).
• DO NOT push the lift over uneven or rough ground. Particularly if loaded.
• DO NOT attempt to push/pull a loaded lift over a floor obstruction.
• NEVER force an operating/safety control. All controls are easy to use and do not require
excessive force.
• The MINIMUM load required to manually lower the hoist using the mechanical emergency
down function is 30 kg.
• DO NOT park a loaded lift on ANY sloping surface.
• DO NOT use electric lifts in a shower.
• DO NOT charge an electric lift in a bathroom or shower room.
• DO NOT lift a patient unless you are trained and competent to do so.
• YOUR lift is for patient lifting. DO NOT use it, or allow it to be used, for any other purpose.
• DO NOT bump the lift down steps, loaded or unloaded.
• DO NOT attempt to negotiate a loaded lift on a slope which exceeds 1:12
(approximately 5 degrees).
• DO NOT attempt to negotiate a slope without a second helper being present.
• DO NOT use in a wet or corrosive environment such as poolside locations.
Page 13
Hoyer
®
Ascend
13
English
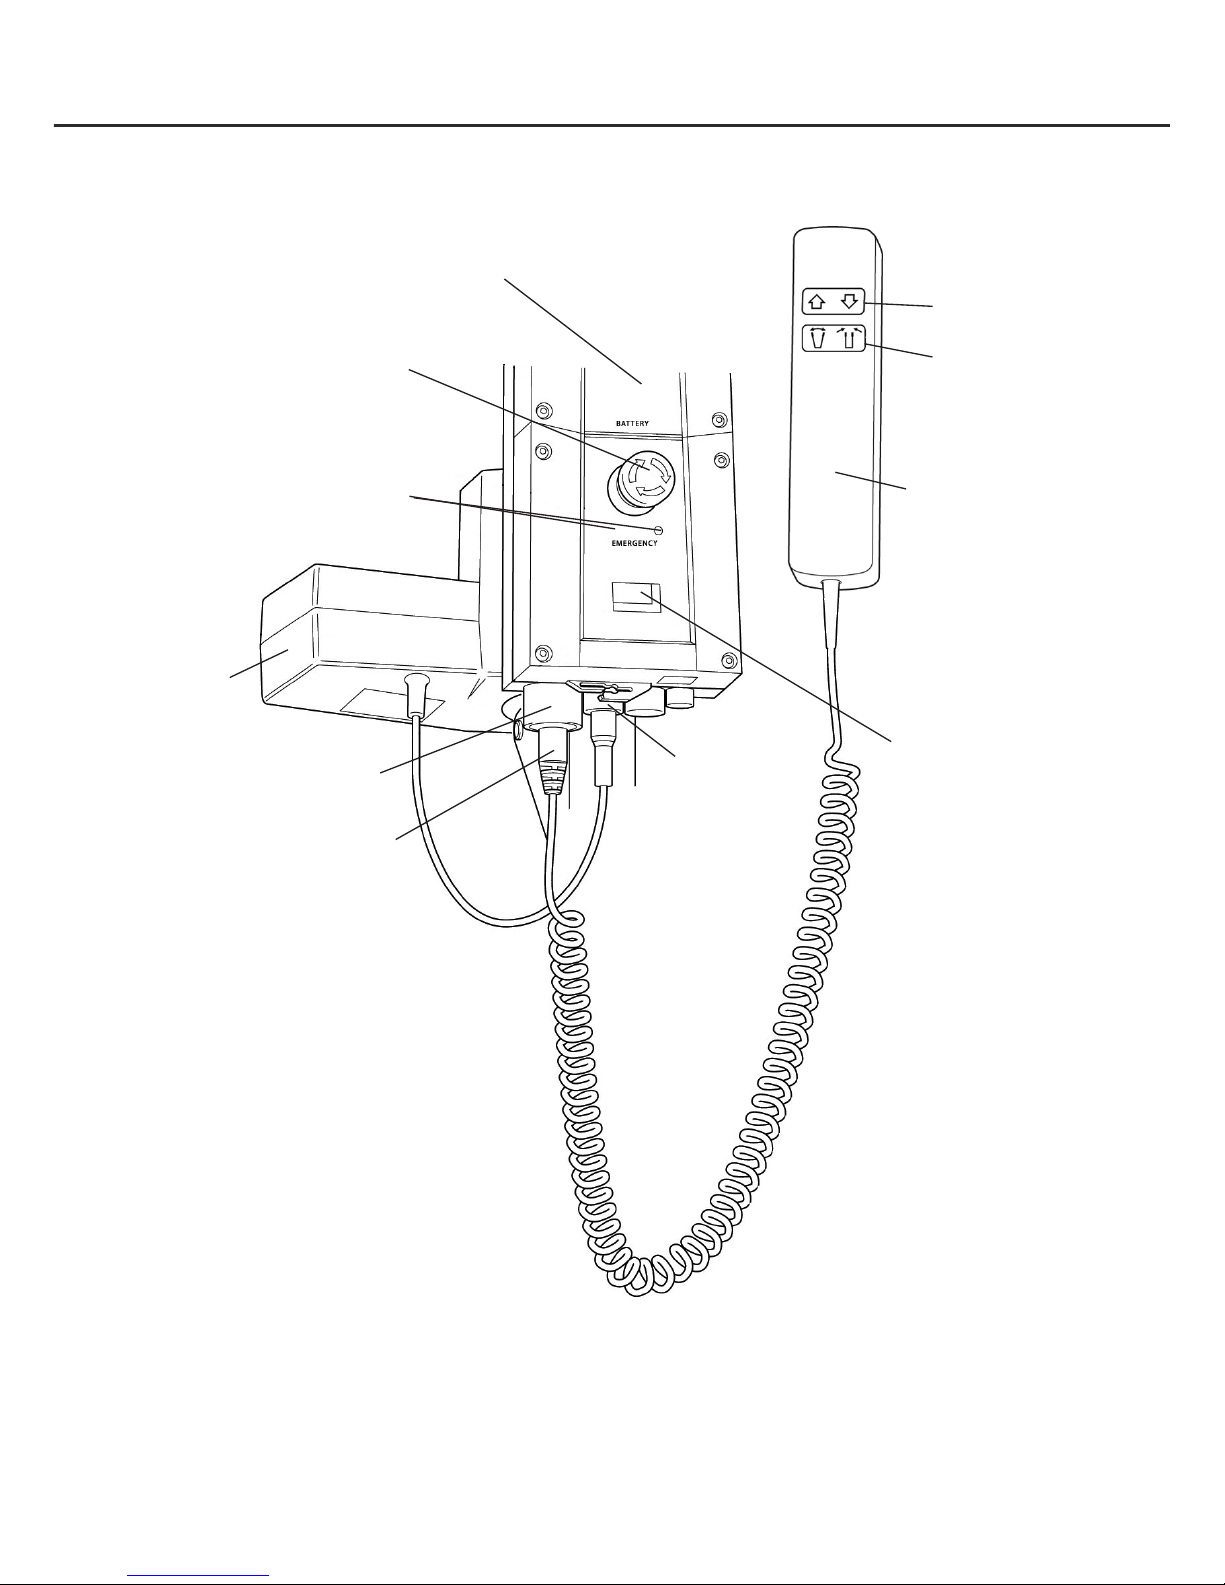
7. Standard Control Box & Handset
Emergency Stop Button
Emergency Raise & Lower
Redundant Controls
LCD
Information
Screen
Handset
Connection
Socket
Actuator
Connection
Socket
Handset
Connection
Plug
Raise & Lower
Buttons
Handset
Actuator
Detachable Battery Pack
Legs Open /
Close Buttons
Page 14

Hoyer
®
Ascend
14
English
8. Operating Instructions
1. Leg adjustment
The legs on the Hoyer Ascend are electrically adjustable for width. The legs can be opened to
enable access around armchairs or wheelchairs. For transferring and negotiating narrow doorways
and passages the lift legs should be in the closed position.
Electric leg adjustment - is achieved by pressing the appropriate buttons on the handcontrol. The
legs will be locked whenever the handcontrol switch is released.
2. Castors and Braking
The lift has two braked castors which can be applied for parking. When lifting, the castors should
be left free and un-braked. The lift will then be able to move to the centre of gravity of the lift. If
the brakes are applied it is the patient that will swing to the centre of gravity and this may prove
disconcerting and uncomfortable.
3. Raising and lowering the boom
The movement of the boom is achieved by a powerful electric actuator, which is controlled by a
simple hand control unit. The handcontrol has two buttons with directional arrows UP and DOWN
áâ. The actuator stops automatically at the limit of travel in both directions. The handcontrol
plugs into a socket at the base of the control box.
4. Emergency Stop
The red Emergency Stop Button is located on the front of the control box and is activated by
pressing in. This will cut all power to the lift and only be reset by twisting the button anticlockwise
and releasing.
5. Mechanical Emergency Down
In the case of a complete electrical failure the electrical actuator is fitted with mechanical lowering
device (RED BOSS). This will only operate when the lift is under load. The device must be pulled
upwards to activate, and a slow descent will commence.
Note: The MINIMUM load required to manually lower the hoist using the mechanical emergency
down function is 30 kg. This is an emergency device and not intended for repetitive use.
6. Electrical Emergency Down/Up
Emergency lower (down) and raise (up) buttons are provided at the front of the control box. This
is operated by inserting a ballpoint pen into the button highlighted áâ. This will bring the boom
up or down should the handcontrol fail at any time.
CAUTION
The battery, charger, hand control, control box and actuator should not to be opened by
unauthorised personnel. (Contact your distributor for warranty and repairs).
Page 15

Hoyer
®
Ascend
15
English
7. Slings
The Hoyer Ascend is suitable for patients in the SITTING position. The slings suitable for this
device are listed as follows:
• Hoyer Transport • Hoyer Standing
8. Knee Pad Adjustment
The Ascend has an adjustable kneepad. The range of travel is 6 inches. Adjustment is achieved
by loosening the knob located on the left hand side of the pad, so to loosen the assembly enough
to move the knee pad in either the upward, or downward position.
9. Removable Footplate
The Ascend has a removable footplate. To remove the foot plate, move to the front of the product,
and lift the footplate upward from the middle of the assemble. NOTE Be careful when lifting the
footplate from its low-seated position.
Page 16

Hoyer
®
Ascend
16
English
9. Charging Instructions
When the power pack needs charging it is removed from the lift and fitted to an off board charging unit.
Joerns Healthcare recommend an additional battery pack is purchased, so that one pack can be
on charge at all times.
1. Remove the power pack from the lift. The pack is retained by a simple latch at the top of the
power pack. Lift the latch and the power pack will be released.
2. Fit the power pack to the charging unit. The location and latching of the power pack to the
charger is the same system as used on the lift.
3. Plug the charger mains plug into a suitable mains outlet and switch the mains supply ON.
4. Charging is automatic and will fully charge the batteries over a period of four (4) hours.
NOTE: Even if the charger is left plugged in for extended periods it will not allow the batteries
to overcharge.
a) Green Light - Indicates main power is on.
b) Yellow Light - Indicates battery is charging.
c) Battery will be fully charged when yellow light goes off.
NOTE: It is recommended that the battery be charged immediately upon receipt.
5. To return the lift to service, switch OFF the mains supply and remove the power pack from the
charger. Fit the power pack to the lift and make sure the latch holding the pack in place is fully
engaged. “Click” in place. The charging of Hoyer electric lifts is simple and straightforward,
but it is important to follow the charging instructions closely. Please pay particular attention to
the following points, they will help you avoid problems with discharged batteries.
WARNING
• The battery, charger, hand control & control box are NOT to be opened by
unauthorised personnel. (Contact your distributor for warranty and repairs).
• DO NOT touch battery/charger terminals.
• KEEP the batteries fully charged. Place the battery on charge whenever it is not in use.
If it is more convenient to do so, place on charge every night. The charger will not allow
the batteries to overcharge.
• NEVER run the batteries completely flat. As soon as the audible warning sounds,
complete the lifting operation in hand and place on charge.
• To avoid possible permanent damage to the battery, the battery should be placed on
charge as soon as the display indicates the half empty battery symbol.
Page 17

Hoyer
®
Ascend
17
English
• NEVER store the battery for long periods without regular charging throughout the storage
period.
• ALWAYS make sure the mains power to the charger is switched off before connecting or
disconnecting the battery pack.
• NEVER leave the battery pack connected with the charger mains power switched off.
• DO NOT leave the charger switched on with the battery disconnected.
• DO NOT use the lift while charging is taking place.
• CHECK the lift is not charging before moving as the electrical connection may be damaged.
• NEVER disconnect the charger plug by pulling on the cable.
• BE CAREFUL not to trip over the charge lead.
• DO NOT charge an electric lift in a bathroom or shower room.
Page 18

Hoyer
®
Ascend
18
English
10. Maintenance Schedule & Daily Check List
All Hoyer products are designed for minimum maintenance, however some safety checks and
procedures are required. A schedule of DAILY tasks are detailed below. Daily checks and a
yearly service, inspection and test will ensure a lift is kept in optimum safe working condition. A list
of spare parts is available upon request.
The LOAD TEST and certification should only be carried out by qualified personnel or an autho-
rised service agent / dealer.
DAILY CHECK LIST: Joerns Healthcare strongly recommends the following checks be carried
out on a daily basis and before using lift.
• MAKE SURE the lift moves freely on its castors.
• EXAMINE the spreader bar (cow horns) is firmly attached to the boom.
• EXAMINE the sling hooks and attachment clips on the spreader bar and boom for
excessive wear.
• MAKE SURE the legs open and close correctly.
• OPERATE the hand control to confirm the boom raises and lowers satisfactorily.
• CHECK the operation of the emergency stop button.
• EXAMINE slings for fraying or other damage. DO NOT use any sling if damaged or if the
sling shows signs of wear.
• CONFIRM the lift is not giving a low battery alarm when the hand control is
operated. If the alarm sounds, DO NOT use and place on charge immediately.
Maintenance, Inspection and Test
Joerns Healthcare recommend a thorough inspection and test of the Hoyer Ascend lift and lifting accessories, slings, scales etc is carried out on a regular basis. Inspection frequency varies depending on locality, so you must check with your dealer or local government agency as
appropriate regarding how often an inspection is required. The examination and test should be
conducted according to the recommendations and procedures provided in this manual. Joerns
Healthcare recommends maintenance, inspection and certified testing is carried out by authorised service agent / dealers only.
Page 19

Hoyer
®
Ascend
19
English
*THESE CHECKS SHOULD INCLUDE:
ü
= Required
Before Use
Initially
Annual
Service
1. BOOM: Check the attachment of the boom to the mast. Make sure there
ü ü ü
is only minimal side movement of the boom and the boom is free to rotate
on the boom bearing.
2. SLING ATTACHMENT POINTS: Examine the sling hooks and attachment
ü ü ü
clips on the spreader bar and boom for excessive wear.
3. MAST: Check the operation of the mast-locking device. Make sure the
ü ü ü
mast fully engages into the socket.
4. ACTUATOR: The actuator should require no maintenance other than
ü
ü
checking for correct operation and listening for unusual noise.
5. KNEE PAD: Check knee pad adjuster is fastened securely.
ü ü ü
6. BATTERIES: The batteries are housed in the power pack and should not
require maintenance other than the regular charging as detailed in the ü
charging instructions. Check that the connections remain clean.
7. LEG ADJUSTMENT: Check the legs operate in both full extensions
ü
ü
(inward/outward).
8. CASTORS: Check all castors for firm attachment to the legs. Check for free
üü ü
rotation of the castor and the wheels.
9. CLEANING: Using a damp cloth, wipe clean with ordinary soap and water
and/or any hard surface disinfectant. Harsh chemical cleaners or abrasives
üü
should be avoided as these may damage the surface finish of the lift.
Avoid wetting any of the electrical parts.
10. BASE AND WHEELS: Ensure base is even and level
ü ü ü
(all four wheels are on the floor).
11. SLINGS: Check for wear and fraying.
ü ü ü
12. LUBRICATION: Lubricate pivot joints with a silicone based oil, including
mast and boom connections, pedal assembly, spreader bar joint
ü
(only if required).
13. HAND SET: Ensure plugged fully into controller.
ü ü
Page 20

Hoyer
®
Ascend
20
English
11. Technical Specification
Safe Working Load .......................................................................... 375 lbs 170 kg
Maximum Overall Length .......................................................... 43.3 inches 1100 mm
Minimum Overall Length ........................................................... 40.8 inches 1035 mm
Maximum Overall Height ........................................................... 66.5 inches 1690 mm
Minimum Overall Height ............................................................ 48.4 inches 1230 mm
Maximum Height to attachment point........................................ 64.7 inches 1644 mm
Minimum Height to attachment point............................................ 37 inches 940 mm
Turning Radius .......................................................................... 51.9 inches 1320 mm
Legs Open - External Width ..................................................... 39.1 inches 995 mm
Legs Open - Internal Width ....................................................... 34.8 inches 885 mm
Legs Closed - External Width .................................................. 24.8 inches 630 mm
Legs Closed - Internal Width .................................................... 20.0 inches 510 mm
Widest Point (between support handles) .................................. 28.9 inches 735 mm
Overall Height of Legs ................................................................. 4.7 inches 120 mm
Ground Clearance ....................................................................... 1.4 inches 35 mm
Front Twin Castors ...................................................................... 4.0 inches 100 mm
Rear Braked Castors ................................................................... 4.0 inches 100 mm
Weights
Mast, Base & Boom Assembly ........................................................... 97 lbs 44.0 kg
Power Pack ....................................................................................... 6.6 lbs 3 kg
Total............................................................................................... 103.6 lbs 47.0 kg
Base Assembly (not inc battery) ..................................................... 42.9 lbs 19.5 kg
Mast & Boom (not inc battery) ........................................................ 45.1 lbs 20.5 kg
NOTE: Manufacturing tolerances apply to all dimensions.
Page 21

Hoyer
®
Ascend
21
English
Electrical Specifications
BATTERIES.....................................................24 volt Rechargeable sealed lead acid type
BATTERY CAPACITY ..................................... 3.2 Ampere hours
CHARGER RATED INPUT .............................100 - 240 V AC// 24 VDC 50/60 Hz
CHARGER RATED OUTPUT .........................29.5 VDC, Max. 19 W
Electric Shock Protection
CHARGER .......................................................CLASS II
LIFT .................................................................INTERNAL POWER SOURCE
Degree of Shock Protection
CHARGER .......................................................TYPE B
LIFT .................................................................TYPE B
Environmental Conditions
Outside this environment functionality and safety may be compromised.
Operating:
Temperature ................................................... 5°C to 35°C
Relative humidity ............................................. 20% to 90% @ 30°C - not condensing
Atmospheric pressure .....................................700 to 1060 hPa
Storage:
Temperature ........................................... ........ 5°C to +50°C
Relative humidity ............................................. 20% to 90% @ 30°C - not condensing
Atmospheric pressure .....................................700 to 1060 hPa
IP RATINGS
Control Box .....................................................IPX4
Actuator ...........................................................IPX4
Off Board Charger .......................................... IPX5
Battery ............................................................ IPX5
Handset .......................................................... IPX5
DUTY CYCLES
Actuator ...........................................................10% (2 min./18 min.)
Charger ..........................................................Approx. 4 hrs.
ACOUSTICS
A-Weighted sound power level ......................55.6 dB (A)
Page 22

Hoyer
®
Ascend
22
English
Key Symbols
The following symbols are used on the charger, control unit and battery:
Type B equipment, as per EN 60601-1
Class 2 equipment
The disposal of the charging and control unit should not be mixed with general
household waste
The disposal of batteries should not be mixed with general household waste.
The disposal of electronics should not be mixed with general household waste
For indoor use
ATTENTION, consult accompanying documents.
WEEE Producers registration number WEE/GG0464R2
Page 23

Hoyer
®
Ascend
23
English
12. Warranty
This warranty covers HoyerPro lifts only. Lifts not covered under this warranty include, but are not
limited to Advance-H, HML400, HPL600WB, HPL600WBSC, HPL402, C-HLA (and variations).
HoyerPro lifts are guaranteed for a period of two years from the date of delivery against defects in
materials and workmanship under normal use and service. This warranty includes all mechanical
and electrical components.
Aluminium structural components and mechanical components on lifts are covered under
warranty for a period of five (5) years from the date of delivery.
Damage caused by use in unsuitable environmental conditions or failure to maintain the product
in accordance with user and service instructions in not covered. Any alteration, modification or
repair unless performed by or authorized in writing by Joerns Healthcare will void this warranty.
Parts
HoyerPro lifts contain various parts that wear from normal use. These parts, such as DC batteries
and casters are not covered under the two-year warranty but are covered for 90 days after date
of delivery.
Joerns Healthcare’s obligation under this warranty is limited to supplying replacement parts,
servicing or replacing, at its option, any product which is found by Joerns Healthcare to be
defective.
Warranty replacement parts are covered by the terms of this warranty until the product’s original
warranty period expires.
When requested by Joerns Healthcare, parts must be returned for inspection at the customer’s
expense. Credit will be issued only after inspection.
Service
Most service requests handled by the facility Maintenance Department with assistance from the
Joerns Healthcare Product Service Department.
Most parts requested can be shipped next day air at the customer’s expense.
Should a technician be required, one will be provided by Joerns Healthcare, at our discretion.
Only the Joerns Healthcare Product Service Department can dispatch authorized technicians.
This warranty is extended to the original purchaser of the equipment.
Page 24

Español
Hoyer
®
Ascend
24
Índice
1. El elevador de pacientes Hoyer Ascend ............................................................... 25
2. Introducción: generalidades sobre el elevador ..................................................... 26
3. Instrucciones de montaje y encargo ..................................................................... 27
4. Guía de eslingas ................................................................................................... 31
5. Elevación con un Hoyer Ascend ........................................................................... 32
6. Precauciones de seguridad ................................................................................... 33
7. Caja de control estándar y control de mano ......................................................... 35
8. Instrucciones de funcionamiento ........................................................................... 36
9. Instrucciones para la carga ................................................................................... 38
10. Plan de mantenimiento y lista de comprobación diaria......................................... 40
11. Especificaciones Técnicas .................................................................................... 42
12. Garantía ................................................................................................................. 45
Page 25

Español
Hoyer
®
Ascend
25
1. El elevador de pacientes Hoyer Ascend
Ganchos para sujeción
de barra extensora
Barra extensora
(cuernos de vaca)
Asa de
empuje
Ruedas traseras
(con freno)
Unidad de
batería y control
Actuador
eléctrico
Almohadillado ajustable
para rodillas
Ruedas delanteras
(sin freno)
Plataforma extraíble
para pies
Extrusión de mástil
Page 26

Español
Hoyer
®
Ascend
26
2.
Introducción:
Generalidades sobre el elevador
El embalaje consta de una caja de cartón resistente, hecha a medida para asegurar que el
equipo llegue intacto a su destino.
Junto con el elevador, se incluye en el embalaje una carpeta que contiene varios documentos,
los cuales debe conservar en un lugar seguro para referencias futuras:
• CERTIFICADO DE VERIFICACIÓN • MANUAL DEL USUARIO
El CERTIFICADO DE PRUEBA es un documento importante y será necesario para sus registros
de seguro. Este certificado tiene una validez de seis meses, tras los cuales el elevador debe
someterse a una inspección y servicio de conformidad con el plan de mantenimiento.
Su representante autorizado puede llevar a cabo tareas de mantenimiento y pruebas periódicas
para aquellos países en donde ello es un requisito (Europa). Por favor, asegúrese de que el
elevador está incluido en los planes de mantenimiento de su proveedor. Si no está completamente seguro de cuáles son los requisitos de mantenimiento de su mercado local, consulte con
el distribuidor, con un organismo de gobierno local o con Joerns Healthcare.
Declaración de uso al que está destinado
El uso previsto para este dispositivo es la elevación y transferencia seguras de un individuo
de una superficie de descanso a otra (como de una cama a una silla de ruedas, por ejemplo).
Joerns Healthcare recomienda que la transferencia de pacientes se lleve a cabo posteriormente
a una evaluación de riesgos, y de manera segura, en una breve distancia solamente.
El modelo Hoyer Ascend solo es adecuado para pacientes en posición SENTADA, con un grado
de capacidad de tolerancia de peso, pero que requieren asistencia para pararse. Al extraer la
bandeja inferior, el elevador de pacientes Hoyer Ascend puede usarse también como apoyo
para caminar, tras haber realizado una exhaustiva evaluación de riesgos.
El sistema Hoyer Ascend es un dispositivo de apoyo diseñado para promover la manipulación
y transferencia seguras del paciente, tanto para el individuo que está siendo transportado como
para la persona a cargo.
El asistente para pararse Hoyer Ascend está diseñado para ser utilizado con la amplia gama de
arneses Hoyer. A continuación citamos ejemplos de arneses adecuados para uso con este dispositivo:
• Hoyer Arnés para estar de pie • Hoyer Arnés para transporte
Vida útil estipulada previa al mantenimiento:
Los elevadores profesionales Hoyer están diseñados y evaluados para durar un período mínimo
de diez (10) años previamente a efectuarse algún tipo de mantenimiento, dependiendo del uso y
cumplimiento con las tareas de mantenimiento establecidas en este manual. El uso diferente al
establecido en estas instrucciones, podría comprometer la vida útil del producto.
Page 27

Español
Hoyer
®
Ascend
27
3. Instrucciones de montaje y encargo
Coloque la caja en una zona de trabajo despejada y ábrala con cuidado. La caja contiene:
• ELEVADOR HOYER ASCEND
• DOCUMENTOS
• CONTROL DE MANO
• UNIDAD DE BATERÍA
• DIODO DE CARGA
• CARGADOR/SOPORTE DE SOBREMESA
ADVERTENCIA
El Hoyer Ascend es pesado y habrá que tener cuidado al levantarlo. Puede que necesite
ayuda para sacar el Hoyer Ascend de la caja.
Montaje
Retire todas las piezas de la caja y colóquelas en el suelo, con cuidado de evitar que el equipo
sufra daños en su superficie.
Page 28

Español
Hoyer
®
Ascend
28
1. Coloque el chasis en un espacio despejado y aplique los frenos traseros. Adherir la bandeja
posa pies a la base utilizando los agujeros de posición que se encuentran en la base.
2. Coloque el conjunto de mástil y pluma en el alojamiento del chasis.
3. Apriete el conjunto de mástil con el dispositivo de bloqueo del mástil, que está situado en la
parte delantera del chasis.
ADVERTENCIA
Evite que queden atrapados sus dedos. Mantenga los dedos alejados del extremo del
mástil al insertarlo en el alojamiento del chasis. La etiqueta en el lateral del mástil
indica el acoplamiento completo del mástil. El funcionamiento de la pata eléctrica no se
producirá a no ser que el mástil esté completamente acoplado.
Page 29

Español
Hoyer
®
Ascend
29
4. Gire el botón de bloqueo y apriételo con la mano
5. Alinear el ensamble de la empuñadura con mástil y adherirlo utilizando las piezas de fijación
proveídas. Las piezas de fijación y la llave de tuercas necesarias para adherir la empuñadura
se encuentran, por razones de seguridad, en la carpeta de instrucciones.
6. Ponga el paquete de alimentación eléctrica en la grúa y cierre el pestillo que asegura el
paquete para que éste no se mueva. Hará un sonido de “clic” cuando esté cerrado.
Desmontaje
El elevador no debe desmontarse excepto para su mantenimiento, reparación y transporte si
fuera necesario. Para ello, siga las instrucciones de montaje en orden inverso.
Page 30

30
Español
Hoyer
®
Ascend
VERIFIQUE SIEMPRE LO SIGUIENTE ANTES DEL FUNCIONAMIENTO
• El mástil está completamente bloqueado en su posición.
• Las patas del elevador se abren y cierran satisfactoriamente. (Esto se realiza mediante el
control de mano).
• El botón rojo de emergencia, situado en la parte posterior del cuadro de control, está en
posición OFF (apagado).
• Pulse los botones hacia arriba y hacia abajo del control de mano y confirme que el larguero
sube y baja.
Page 31

31
Español
Hoyer
®
Ascend
4. Guía de eslingas
El Hoyer Ascend es adecuado para pacientes en las siguientes posiciones: SENTADO. Las
eslingas adecuadas para este dispositivo son las siguientes
• Hoyer Transport
• Hoyer Standing
Guía del usuario para las eslingas Standaid La eslinga Transport y Standing es una eslinga que
se acopla fácilmente, adecuada para estar de pie y para apoyo. No es una eslinga de uso general y una persona cualificada deberá evaluar si su utilización es adecuada para un paciente dado.
Eslinga Transport
Pase la eslinga por debajo de la espalda del paciente dejando la parte superior de la apertura
para el inodoro en la base de la espina dorsal. Compruebe que la parte enrollable de la eslinga
quede cuadrada sobre la espalda del paciente.
Sujete la correa de apoyo alrededor del pecho del paciente. Esta correa no tiene que quedar
apretada. Su función consiste en sujetar la eslinga en su posición mientras se atan los bucles al
Standaid. Puede dejarse sin abrochar si se prefiere. Asegúrese de que los brazos del paciente
queden en la parte exterior de la eslinga.
Levante la pierna del paciente y pase la correa para la pierna por debajo y hacia arriba entre las
piernas. Asegúrese de que la eslinga no quede torcida o arrugada bajo el muslo. Repita este procedimiento para la otra pierna. Sujete los bucles de las partes enrolladas de la eslinga a los ganchos blancos en el extremo de las empuñaduras para la mano.
Sin cruzar los bucles sobre las correas para la pierna, sujete los botones izquierdo y derecho
sobre la horquilla de elevación. Normalmente se utiliza la parte intermedia de los tres bucles. El
paciente está ahora preparado para ser levantado desde la silla. Una vez fuera de la silla, el paciente estará más cómodo si se le baja a la posición de sentado.
Correas de bucle de sujeción:
Hombro
Correas de bucle de
sujeción: piernas
Apoyo para el pecho y hebilla
Soportes para piernas
Page 32

Español
Hoyer
®
Ascend
32
Eslinga Standing
Coloque la eslinga por debajo de la espalda del paciente entre la base de las escápulas del
hombro y la parte inferior de las costillas. Sujete las correas de apoyo alrededor de la parte delantera del paciente. Esta correa no tiene que quedar apretada. Su función consiste en sujetar la
eslinga en su posición mientras se sujeta la eslinga al Standaid. Puede dejarse sin abrochar si
se prefiere. Asegúrese de que los brazos del paciente queden en la parte exterior de la eslinga.
NOTA: Para obtener instrucciones de colocación más detalladas, consulte la guía del
usuario proporcionada con cada eslinga.
ADVERTENCIA
Joerns Healthcare recomienda comprobar las eslingas regularmente y, en especial, antes
del uso por si están deshilachadas o dañadas. NO utilice eslingas que estén desgastadas
o dañadas.
ADVERTENCIA
HOYER RECOMIENDA UTILIZAR PRODUCTOS AUTÉNTICOS HOYER. Por su diseño,
los sistemas de eslinga y elevadores Hoyer no son compatibles con productos de
otros fabricantes. El uso de productos de otros fabricantes con productos Hoyer es
potencialmente inseguro y podría ocasionar lesiones severas al paciente y/o al proveedor
de cuidados.
ADVERTENCIA
Consulte la capacidad de peso máximo del elevador. La capacidad de la eslinga está limitada por la capacidad máxima del elevador.
5. Elevación con un Hoyer Ascend
Coloque el Standaid de manera que los pies del paciente se acomoden en la bandeja para pies
y las rodillas descansen contra el almohadillado para rodillas. Inicialmente, sujete los bucles
más largos de la eslinga a los ganchos grises en el extremo de las empuñaduras para la mano
del Standaid. Las manos del paciente deben colocarse en las empuñaduras. (Una vez que el
paciente está a acostumbrado al elevador, se pueden utilizar bucles más cortos para conseguir
una posición más erguida). Después, pulse el botón UP en el control de mano para levantar al
paciente a la posición de pie.
Correas de bucle de sujeción
Apoyo para el pecho
Page 33

Español
Hoyer
®
Ascend
33
6. Precauciones de seguridad
Por favor, lea y siga las precauciones de seguridad que figuran más abajo. El funcionamiento
y uso del elevador para pacientes Hoyer es sencillo y fácil de comprender. Siguiendo estas
precauciones básicas de seguridad, las operaciones de elevación serán fáciles y no causarán
problemas.
LEA Y COMPRENDA EL MANUAL DE INSTRUCCIONES DEL USUARIO ANTES DE
UTILIZAR SU ELEVADOR “ASCEND”
ADVERTENCIA: Información de seguridad importante para situaciones peligrosas que podrían
causar lesiones graves.
PRECAUCIÓN: Información para prevenir daños en el producto.
NOTA: La información a la que se debe prestar especial atención.
ADVERTENCIA
• Planifique SIEMPRE sus operaciones de elevación antes de comenzar.
• Repase SIEMPRE la LISTA DE COMPROBACIÓN DIARIA antes de utilizar el elevador.
• Familiarícese SIEMPRE con el control de funcionamiento y características de seguridad
del elevador antes de levantar al paciente.
• NO utilice una eslinga a no ser que esté recomendada para su uso con el elevador.
• Verifique SIEMPRE que la eslinga es adecuada para el paciente en particular y que su
tamaño y capacidad son correctos.
• NUNCA utilice una eslinga que esté deshilachada o dañada.
• Encaje SIEMPRE la eslinga de acuerdo con las instrucciones que se indican (instrucciones del usuario)
• NO supere la carga de trabajo de seguridad.
• Compruebe SIEMPRE que la carga de trabajo de seguridad del elevador es adecuada
para el peso del paciente.
• Lleve SIEMPRE a cabo las operaciones de elevación de acuerdo con las instrucciones
en el manual del usuario.
• NUNCA desconecte o deje de realizar un control de seguridad o característica de seguridad porque parezca más fácil para el funcionamiento del elevador.
• NO levante a un paciente con los frenos de las ruedas activados. Deje siempre que el
elevador encuentre el centro correcto de gravedad.
Page 34

Español
Hoyer
®
Ascend
34
• NO intente maniobrar el elevador empujando el mástil, el larguero o al paciente.
• Maniobre SIEMPRE el elevador con el mango / almohadillado de empuje para pies
proporcionado.
• Haga SIEMPRE descender al paciente a la posición cómoda más baja posible antes de
transferirlo.
• NO empuje un elevador cargado a velocidades que superen un ritmo de caminar lento
(3 kilómetros/hora, 0,8 metros/segundo).
• NO empuje el elevador sobre terrenos desnivelados o con baches. Especialmente, si
está cargado.
• NO intente empujar o tirar de un elevador cargado sobre una obstrucción en el suelo.
• NUNCA fuerce los controles de funcionamiento/seguridad. Todos los controles son
fáciles de utilizar y no requieren el uso de fuerza excesiva.
• La carga MÍNIMA necesaria para bajar el elevador de manera manual utilizando la
función mecánica de descenso de emergencia equivale a 30 kg.
• NO aparque un elevador cargado sobre NINGUNA superficie en cuesta.
• NO utilice elevadores eléctricos en una ducha.
• NO cargue un elevador eléctrico en un baño o en una ducha.
• NO levante a un paciente a no ser que esté entrenado y sea competente para hacerlo.
• SU elevador está destinado a levantar pacientes. NO lo utilice, ni permita que se utilice,
para cualquier otro fin.
• NO lleve el elevador dando tumbos hacia abajo en escaleras, tanto si está cargado como
si está descargado.
• NO intente pasar con un elevador cargado por una pendiente que supere 1:12
(aproximadamente 5 grados).
• NO intente pasar con el elevador por una pendiente sin que haya alguien para ayudarle.
• NO lo utilice en un ambiente húmedo o corrosivo, como por ejemplo al lado de una
piscina.
Page 35

Español
Hoyer
®
Ascend
35
7. Caja de control y control de mano
Botón de parada
de emergencia
Controles redundantes de
elevación y descenso de
emergencia
Pantalla LCD de
información
Toma de conexión
del control de mano
Toma de
conexión del
actuador
Enchufe de conexión
del control de mano
Control de
mano
Actuador
Caja de baterías
desmontable
Botones para
subir y bajar
Botón piernas abiertas / cerradas
Page 36

Español
Hoyer
®
Ascend
36
8. Instrucciones de Funcionamiento
1. Ajuste de las patas
Las patas del Hoyer Ascend son ajustables eléctricamente en cuanto a su anchura. Las patas
pueden abrirse para permitir el acceso alrededor de sillas o de sillas de ruedas. Para transferir y para
pasar por pasillos estrechos, las patas del elevador deben estar en posición cerrada.
Ajuste eléctrico de las patas - se consigue pulsando los botones apropiados en el control de mano.
Las patas se bloquearán cuando se suelte el conmutador del control de mano.
2. Ruedas y frenos
El elevador tiene dos ruedas con frenos, que se pueden aplicar para dejarlo aparcado. Cuando
se realice la elevación, las ruedas deben dejarse libres y los frenos sin aplicar. De esta forma,
el elevador podrá mover el centro de gravedad conforme se realiza la elevación. Si se aplican
los frenos, será el paciente el que se mueva hacia el centro de gravedad y esto puede ser
desconcertante e incómodo.
3. Elevación y descenso del larguero
El movimiento del larguero se consigue mediante un potente actuador eléctrico, que está
controlado por un sencillo control de mano. El control de mano tiene dos botones, con flechas
direccionales ARRIBA y ABAJO. El actuador se detiene automáticamente en el límite del
desplazamiento en ambas direcciones. El control de mano se enchufa en un enchufe en la base
del cuadro de control.
4. Parara de emergencia
El botón de parada de emergencia rojo está situado en la parte delantera del cuadro de control
y se activa pulsándolo. Al pulsarlo se interrumpe la alimentación eléctrica al elevador y sólo se
puede desarmar girando el botón en sentido contrario a las agujas del reloj y soltándolo.
5. Descenso mecánico de emergencia
En caso de producirse una interrupción total eléctrica, el actuador cuenta con un dispositivo de
descenso mecánico (CUBO ROJO). El mismo sólo funcionará cuando la grúa está cargada.
Para activarlo, debe tirar del dispositivo hacia arriba, y se iniciará un descenso lento.
Nota: La carga MÍNIMA necesaria para bajar el elevador de manera manual utilizando la
función mecánica de descenso de emergencia equivale a 30 kg.
Page 37

Español
Hoyer
®
Ascend
37
6. Descenso/elevación eléctricos de emergencia
Los botones de descenso (down) y elevación (up) de emergencia están situados en la parte
delantera del cuadro de control. Se accionan insertando la punta de un bolígrafo en el botón
marcado como áâ. Esto hará que el larguero suba o baje si falla el control de mano en
cualquier momento.
PRECAUCION
La batería, el cargador, el control de mano, el cuadro de control y el actuador sólo deben
ser abiertos por personal autorizado. (Comuníquese con su distribuidor para obtener
información sobre garantía y reparaciones).
7. Eslingas
El Hoyer Ascend es adecuado para pacientes en las siguientes posiciones: SENTADO. Las
eslingas adecuadas para este dispositivo son las siguientes
• Hoyer Transport
• Hoyer Standing
8. Ajuste del almohadillado para las rodillas
El Ascend tiene un almohadillado ajustable para las rodillas. El rango de desplazamiento
es de 6 pulgadas (14,7 centímetros). El ajuste se consigue aflojando el botón situado en el
lateral izquierdo del almohadillado, para aflojar el conjunto lo suficiente como para mover el
almohadillado para las rodillas a la posición superior o inferior.
9. Plataforma desmontable para los pies
El Ascend tiene una plataforma para los pies. Para extraer la plataforma para los pies, póngase
en la parte delantera del equipo y levante la plataforma para los pies desde la parte central
del conjunto. NOTA Tenga cuidado al levantar la plataforma para los pies desde la posición de
sentado baja.
Page 38

Español
Hoyer
®
Ascend
38
9. Instrucciones para la carga
Las baterías están situadas en la unidad de alimentación y se cargan por medio de un cargador
de sobremesa.
Cuando haya que cargar la unidad de alimentación, habrá que extraerla del elevador y colocarla
en el cargador de sobremesa.
Joerns Healthcare Ltd recomienda comprar una unidad adicional de batería, para tener una de
las dos unidades cargada en todo momento.
1. Extraiga la unidad de alimentación del elevador. La unidad de está sujeta con un pestillo
simple en la parte superior de la unidad de alimentación. Levante el pestillo y la unidad de
alimentación quedará suelta.
2. Coloque la unidad de alimentación en el cargador. La colocación y sujeción de la unidad de
alimentación al cargador se realiza por el mismo sistema que el empleado en el elevador.
3. Enchufe el cable del cargador a una fuente de alimentación eléctrica y ponga el conmutador en ON.
4. La carga es automática y las baterías quedarán completamente cargadas en un plazo de
ocho a doce horas. Nota: Incluso si el cargador se deja enchufado durante mucho tiempo, no
permitirá que las baterías se carguen en exceso.
a) La luz verde indica el paso de corriente eléctrica.
b) La luz amarilla indica que la batería se está cargando.
c) Cuando la luz amarilla se apaga, la batería se habrá cargado por completo.
Nota: La carga puede tomar hasta cuatro horas en completarse.
Recomendamos cargar la batería en cuanto la reciba.
5. Para volver a poner en funcionamiento el elevador, desconecte de la red poniendo el conmutador
en OFF y retire la unidad de alimentación del cargador. Coloque la unidad de alimentación de
nuevo en el elevador y asegúrese de que el pestillo que la sujeta está completamente cerrado.
Cuando esté correctamente colocada, oirá un “clic”. La carga del elevador eléctrico Hoyer es
sencilla y no tienen por qué surgir complicaciones, pero es importante seguir rigurosamente las
instrucciones de carga. Preste especial atención a los siguientes aspectos; le ayudará a evitar
los problemas que supone la descarga de las baterías.
ADVERTENCIA
• La batería, el cargador, el control de mano y la caja de control NO deben ser abiertos
por personal no autorizado. (Comuníquese con el distribuidor por reparaciones y
reclamos de la garantía).
• NO toque las terminales de la batería ni el cargador.
Page 39

Español
Hoyer
®
Ascend
39
• MANTENGA las baterías completamente cargadas. Ponga la batería a cargar siempre
que no esté utilizando el dispositivo. Si le resultase más práctico, póngala a cargar
durante la noche. El cargador no permitirá que las baterías se sobrecarguen.
• NUNCA permita que las baterías se gasten por completo. No bien suene la alarma de
advertencia, complete la operación de elevación y ponga a cargar la batería.
• A fin de evitar posibles daños permanentes en la batería, debe colocar la batería a cargar
en cuanto la pantalla indique el símbolo de la batería a la mitad.
• NUNCA almacene la batería durante largos períodos de tiempo sin realizar cargas
periódicas durante el período de desuso.
• SIEMPRE compruebe que la toma del cargador a la red de suministro eléctrico esté
apagada antes de conectar o desconectar la batería.
• NUNCA deje la batería conectada con la toma del cargador a la red de suministro eléctrico
apagada.
• NO deje el cargador encendido con la batería desconectada.
• NO use el elevador mientras carga la batería.
• COMPRUEBE que el elevador no se esté cargando antes de desplazarlo, ya que podría
dañar la conexión eléctrica.
• NUNCA desconecte la toma del cargador tirando del cable.
• PROCURE no tropezar con el cable del cargador.
• NO cargue el elevador eléctrico en el cuarto de baño.
Page 40

Español
Hoyer
®
Ascend
40
10. Plan de mantenimiento y lista de comprobación
diaria
Todos los productos Hoyer requieren un mantenimiento mínimo; sin embargo, es necesario
llevar a cabo algunas comprobaciones y procedimientos de seguridad. Las verificaciones diarias,
junto con una inspección de mantenimiento y prueba anual, permiten la conservación del elevador en condiciones óptimas de funcionamiento y seguridad. Si lo pide, le enviaremos una lista de
piezas de repuesto.
La PRUEBA DE CARGA y la certificación sólo deben llevarse a cabo por personal cualificado o
por un agente / concesionario de servicio autorizado.
LISTA DE COMPROBACIÓN DIARIA: Joerns Healthcare recomienda encarecidamente realizar
las siguientes comprobaciones de manera diaria y antes de utilizar el elevador.
• ASEGÚRESE de que el elevador se mueve libremente sobre sus ruedas.
• EXAMINE la barra de extensión (cuernos de vaca) para comprobar que está firmemente
sujeta al larguero.
• EXAMINE los ganchos de la eslinga y los clips de sujeción en la barra de extensión y en el
larguero para ver si tienen un desgaste excesivo.
• ASEGÚRESE de que las patas se abren y cierran correctamente.
• OPERE el control de mano para confirmar que el larguero sube y baja satisfactoriamente.
• EN elevadores movidos por energía eléctrica, verifique el funcionamiento del botón de
parada de emergencia.
• EXAMINE las eslingas para ver si están deshilachadas o tienen otros daños. NO utilice una
eslinga si está dañada.
• CONFIRME que el elevador no está emitiendo una alarma de batería baja cuando se
maneja el control de mano. Si la alarma suena, NO utilice el elevador y póngalo a cargar
inmediatamente.
Mantenimiento, Inspección Y Prueba
Joerns Healthcare recomienda realizar inspecciones y comprobaciones completas y periódicas del elevador Hoyer Ascend, los accesorios de elevación, las eslingas, balanzas, etc. La
frecuencia de la verificación varía de acuerdo con la localidad; compruebe con su distribuidor
local o entidad gubernamental, según corresponda, en lo referente a la frecuencia de
verificación estipulada. Todas las verificaciones y pruebas deben llevarse a cabo según las
recomendaciones y procedimientos explicados en el presente manual. Joerns Healthcare recomienda que el mantenimiento, inspección y comprobación certificada los lleve a cabo un agente
o proveedor de mantenimiento autorizado.
Nota: Estas recomendaciones se dan en cumplimiento de los requisitos de Salud y Seguridad Nº
2307 de 1998: Normas relativas a Operaciones de Elevación y Equipo de Elevación de 1998. Esta
norma es del Reino Unido. Fuera del Reino Unido, revise los requisitos aplicables a su país.
Page 41

Español
Hoyer
®
Ascend
41
*ESTAS VERIFICACIONES DEBEN INCLUIR:
1. BRAZO PRINCIPAL: Compruebe la sujeción del brazo principal al mástil.
Asegúrese de que sólo exista un mínimo movimiento lateral del brazo principal
ü ü ü
y de que el brazo principal esté libre para girar en su rodamiento.
2. PUNTOS DE SUJECIÓN DE ESLINGA: Compruebe que los ganchos y los
broches de sujeción de la eslinga en la barra extensora y brazo principal
ü ü ü
no presenten signos de desgaste.
3. MÁSTIL: Verifique el funcionamiento del dispositivo de bloqueo del mástil.
Asegúrese de que el mástil encaja completamente en el alojamiento.
ü ü ü
4. ACTUADOR: El actuador no requiere más mantenimiento que comprobar
ü
ü
que funciona correctamente y escuchar si hay ruidos inusuales.
5. ALMOHADILLADO PARA RODILLAS: Compruebe que la correa del
almohadillado para rodillas esté ajustada correctamente.
ü ü ü
6. BATERÍAS: Las baterías están alojadas en la unidad de alimentación
eléctrica y no requieren ningún mantenimiento excepto su carga regular
ü
tal y como se detalla en las instrucciones de carga. Compruebe que las
conexiones están limpias.
7. AJUSTE DE LAS PATAS: Compruebe que las patas funcionan en toda
su extensión (hacia dentro / hacia fuera).
ü ü
8. RUEDAS: Compruebe que todas las ruedas están firmemente sujetas a
las patas. Verifique la libre rotación de las ruedas y de sus pivotes.
ü ü ü
9. LIMPIEZA: Limpie con jabón corriente y agua, y/o con cualquier desinfectante
para superficies duras. Deben evitarse limpiadores químicos o abrasivos,
ü ü
ya que pueden dañar el acabado de la superficie del elevador. No moje
ninguna pieza eléctrica.
10. BASE Y RUEDAS: Asegúrese de que la base está uniforme y nivelada
ü ü ü
(las cuatro ruedas en contacto con el suelo).
11. ESLINGAS: Vea si están desgastadas o deshilachadas.
ü ü ü
12. LUBRICACIÓN: Lubrique las bisagras de pivote con aceite de silicona,
incluyendo las conexiones del brazo principal, las piezas de los pedales,
la bisagra de la barra extensora (hágalo sólo si es necesario).
ü
13. CONJUNTO DE MANO: Asegúrese de que está bien enchufado al controlador.
ü ü
Antes del uso
Inicialmente
Mantenimiento
anual
ü
= Recomendado
Page 42

Español
Hoyer
®
Ascend
42
11. Especificaciones técnicas
Carga de trabajo segura ..................................................................... 375 lbs 170 kgs
Longitud total máxima .............................................................. 43.3 pulgadas 1100 mm
Longitud total mínima ............................................................... 40.8 pulgadas 1035 mm
Altura total máxima................................................................... 66.5 pulgadas 1690 mm
Altura total mínima ................................................................... 48.4 pulgadas 1230 mm
Altura máxima de la barra de extensión .................................. 64.7 pulgadas 1644 mm
Altura mínima de la barra de extensión ...................................... 37 pulgadas 940 mm
Radio de giro ............................................................................ 51.9 pulgadas 1320 mm
Patas abiertas - Anchura externa............................................. 39.1 pulgadas 995 mm
Patas abiertas - Anchura interna.............................................. 34.8 pulgadas 885 mm
Patas cerradas - Anchura externa ........................................... 24.8 pulgadas 630 mm
Patas cerradas - Anchura interna ............................................... 20 pulgadas 510 mm
El punto más ancho (entre las manijas de la ayuda) ............... 28.9 pulgadas 735 mm
Altura total de las patas.............................................................. 4.7 pulgadas 120 mm
Distancia al suelo ....................................................................... 1.4 pulgadas 35 mm
Par de ruedas delanteras .............................................................. 4 pulgadas 100 mm
Ruedas traseras con freno ............................................................ 4 pulgadas 100 mm
Pesos
Mástil, base y conjunto de larguero ...................................................... 97 lbs 44.0 kgs
Unidad de alimentación ........................................................................ 6.6 lbs 3.0 kgs
Total 103.6 lbs ................................................................................... 47.0 kgs
Conjunto de la base (sin incluir batería) ............................................ 42.9 lbs 19.5 kgs
Mástil y larguero (sin incluir batería) .................................................. 45.1 lbs 20.5 kgs
NOTA: Para todas las dimensiones se aplican tolerancias de fabricación.
Page 43

Español
Hoyer
®
Ascend
43
Especificaciones Eléctricas
BATERÍAS ....................................................... Selladas y recargables de plomo-ácido de 24 voltios
CAPACIDAD DE BATERÍAS...........................3.2 Ah
ENTRADA MEDIDA DEL CARGADOR ..........100 - 240 V CA// 24 V CC 50/60 Hz Máx.
SALIDA MEDIDA DEL CARGADOR ............... 29,5 V CC, Máx. 19 W
Protección contra descarga eléctrica
CARGADOR .................................................... CLASE II
GRUA ..............................................................FUENTE DE ENERGÍA INTERNA
Grado de protección contra descarga eléctrica
CARGADOR .................................................... TIPO B
GRUA ..............................................................TIPO B
Condiciones Ambientales
Al aire libre, la funcionalidad y seguridad especificadas pueden verse comprometidas.
Funcionamiento:
Temperatura ................................................... 5 °C a 35 °C
Humedad relativa ............................................20% a 90% a 30 °C - no condensada
Presión atmosférica ......................................... 700 a 1060 hPa
Almacenamiento:
Temperatura ........................................... ........ -10 °C a +50°C
Humedad relativa ............................................20% a 90% a 30 °C - no condensada
Presión atmosférica ......................................... 700 a 1060 hPa
CLASIFICACIONES IP
Caja de control ............................................... IPX4
Actuador ..........................................................IPX4
Cargador externo ...........................................IPX5
Batería ............................................................ IPX5
Control de mano ............................................. IPX5
CICLOS DE SERVICIO
Actuador ..........................................................10% (2 min./18 min.)
Cargador ........................................................Aprox. 4 hs.
ACÚSTICA
Nivel de potencia de sonido (escala ponderación A) .....................55.6 dB(A)
Page 44

Español
Hoyer
®
Ascend
44
Explocación De Los Simolos
Los signos enunciados a continuación se utilizan en el cargador, la unidad de control y la batería:
Equipo de tipo B, según EN 60601-1
Equipo de clase 2
El cargador y la unidad de control no deben desecharse junto con los residuos
domésticos
La batería no debe desecharse junto con los residuos domésticos
La electrónica no debe desecharse junto con los residuos domésticos
Para uso bajo techo solamente
ATENCIÓN, consulte los documentos adjuntos.
WEEE número de registro de los productores WEE/GG0464R2
Page 45

Español
Hoyer
®
Ascend
45
12. Garantía
Esta garantía sólo cubre los elevadores HoyerPro. Esta garantía no cubre, ni se limita a, los
siguientes elevadores: Advance-H, HML400, HPL600WB, HPL600WBSC, HPL402, C-HLA (y sus
variaciones).
Los elevadores HoyerPro están garantizados por dos años a partir de la fecha de entrega por
defectos de materiales y fabricación, siempre que se compruebe el uso y mantenimiento normal de
los mismos. Esta garantía incluye todos los componentes mecánicos y eléctricos.
Los componentes mecánicos y estructurales de aluminio de nuestros elevadores están garantizados
por un período de cinco (5) años desde la fecha de entrega.
La garantía quedará anulada si el elevador resultara dañado a consecuencia del uso en
condiciones ambientales inadecuadas, o si el mantenimiento del producto no se realizara según
las instrucciones del manual y las de mantenimiento. Asimismo, la garantía quedará anulada ante
cualquier alteración, modificación o reparación que no sea efectuada o autorizada por escrito por
Joerns Healthcare.
Piezas
Los elevadores HoyerPro contienen varias piezas que sufren desgaste debido al uso cotidiano del
producto. Dichas piezas, como las baterías CC y las ruedas delanteras, no están cubiertas bajo la
garantía de dos años, sino que están cubiertas durante 90 días tras la fecha de entrega.
Joerns Healthcare tiene la obligación, bajo esta garantía, de proporcionar piezas de repuesto, realizar
reemplazos o tareas de mantenimiento, la opción que consideremos más apropiada, en cualquier
producto que Joerns Healthcare detecte como defectuoso.
Las piezas reemplazadas durante el período de garantía están cubiertas por los términos de esta
garantía hasta el vencimiento del período de garantía original del producto.
Si Joerns Healthcare así lo solicitara, las piezas deberán ser entregadas o devueltas con fines de
verificación, y los costes correrán por cuenta del cliente. Cualquier crédito será emitido solamente
después de realizada la verificación.
Mantenimiento
Nuestro Departamento de Mantenimiento local, con la asistencia del Departamento de
Mantenimiento de Productos de Joerns Healthcare, recibe y gestiona la mayor parte de los servicios
de mantenimiento.
La mayoría de las piezas solicitadas serán despachadas por vía aérea al día siguiente de efectuado
el pedido, y los costes correrán por cuenta del cliente.
De ser necesaria la presencia de un técnico, Joerns Healthcare proporcionará uno a nuestra sola
discreción. Solamente el Departamento de Mantenimiento de productos de Joerns Healthcare
puede enviar técnicos autorizados.
Esta garantía se extiende al comprador original del equipo.
Page 46

Francais
Hoyer
®
Ascend
46
Table des matières
1. Lève-personne Hoyer Ascend ............................................................................... 47
2. Introduction: À propos de votre lève-personne ..................................................... 48
3. Instructions de montage et de mise en service..................................................... 49
4. Guide des courroies .............................................................................................. 53
5. Soulever le patient à l’aide du Hoyer Ascend ....................................................... 54
6. Consignes de sécurité ........................................................................................... 55
7. Boîte de commande standard et commande manuelle ........................................... 57
8. Instructions de fonctionnement ............................................................................. 58
9. Instructions de charge ........................................................................................... 60
10. Périodicité d’entretien ............................................................................................ 62
11. Spécifications techniques ...................................................................................... 64
12. Garantie ................................................................................................................. 67
Page 47

Francais
Hoyer
®
Ascend
47
1. Lève-personne Hoyer Ascend
Semelle amovible
Actionneur
électrique
Protège-genou ajustable
Crochets de fixation de la
barre d’écartement
Barre d’écartement
(Cornes de vache)
Partie extrudée
du mât
Roulette arrière
(avec frein enclenché)
Poignée de
manœuvre
Bloc de commande
de la batterie
Rouletter avant
(sans frein
enclenché)
Page 48

Francais
Hoyer
®
Ascend
48
2. Introduction: A propos de votre lève-personne
Chaque lève-personne Ascend a été entièrement assemblé, soumis à des tests de charge et
homologué avant d’être emballé/expédié.
L’emballage de chaque lève-personne comprend une pochette contenant un certain nombre de
documents qui doivent être conservés en lieu sûr au cas où ils devraient être consultés ultérieurement.
• CERTIFICAT D’ESSAI • MANUEL D’UTILISATION
Le CERTIFICAT D’ÉPREUVE est un document important dont vous aurez besoin pour votre
assurance. Il est valide pendant six mois, après cette période le lève-personne doit être inspecté
et entretenu suivant le cycle d’entretien.
L’entretien et les essais périodiques peuvent être effectués par votre revendeur agréé en cas de
besoin (Europe). Assurez-vous que votre lève-personne est inscrit dans le calendrier d’entretien
de votre revendeur. En cas d’incertitude concernant les normes d’entretien locales, veuillez vous
renseigner auprès d’un organisme gouvernemental local et / ou de Joerns Healthcare.
Déclaration d’utilisation prévue
L’usage prévu de cet appareil de levage consiste à lever et à transférer en toute sécurité
un patient depuis un point à un autre (par .ex. depuis un lit vers un fauteuil roulant). Joerns
Healthcare recommande de toujours procéder à une évaluation des risques avant d’entreprendre
le transfert d’un patient, et de limiter le transfert à de courtes distances.
Le lève-personne Hoyer Ascend est prévu pour les patients en position ASSISE seulement,
capables de maintenir un minimum leur poids mais nécessitant une assistance pour se mettre
en position debout. Pour utiliser le lève-personne Hoyer Ascend comme aide à la marche, il
suffit de retirer le cale-pieds après avoir procédé à une évaluation des risques afin de déterminer
l’adéquation du matériel à cet effet.
Le lève-personne Hoyer Ascend est prévu pour assurer et promouvoir la sécurité à la fois du
patient et de l’aide-soignant.
Le lève-personne Hoyer Ascend est prévu pour être utilisé avec les différentes sangles Hoyer.
Les exemples de sangles compatibles avec ce matériel sont énumérés ci-dessous :
• Hoyer Sangle pour la mise en position debout
• Hoyer Sangle pour le transport
Durée de vie prévue
Les lève-personnes Hoyer Professional sont conçus et testés pour une durée de vie minimum de dix
(10) ans, si les consignes d’utilisation et d’entretien énoncées dans le présent manuel sont respectées.
Toute utilisation non conforme aux consignes peut compromettre la durée de vie du matériel.
Page 49

Francais
Hoyer
®
Ascend
49
3. Instructions de montage et de mise en service
Placez la boîte sur une surface bien dégagée et ouvrez-la avec précaution. Elle contient:
• LÈVE-PERSONNE HOYER ASCEND
• DOCUMENTS
• UNE COMMANDE MANUELLE
• BLOC BATTERIE
• FIL DE CHARGE
• CHARGEUR / SUPPORT POUR BUREAU
AVERTISSEMENT
L’appareil Hoyer Ascend est lourd et doit être soulevé avec précaution. Vous aurez
éventuellement besoin d’aide pour soulever l’appareil Hoyer Ascend et le sortir de sa boîte.
Montage
Retirez toutes les pièces de la boîte et placez-les par terre, en prenant soin de protéger le fini.
Page 50

Francais
Hoyer
®
Ascend
50
1. Placez le châssis dans un endroit dégagé et enclenchez les freins arrière. Fixez le cale-pied à
la base à l’aide des trous de fixation scellés dans la base.
2. Enfoncez le mât et la flèche dans la douille du châssis.
3. Resserrez le mât à l’aide du dispositif de verrouillage du mât situé devant le châssis.
AVERTISSEMENT
Évitez de coincer vos doigts. Lorsque vous insérez le mât dans la fente, gardez vos doigts
à l’écart de l’extrémité du mât. L’enclenchement complet du mât est indiqué par l’étiquette
située sur son côté. Le pied électrique ne fonctionnera pas si le mât n’est pas totalement
enclenché.
Page 51

Francais
Hoyer
®
Ascend
51
4. Faites tourner le bouton de verrouillage jusqu’à ce qu’il soit légèrement serré.
5. Alignez la poignée avec le mât et fixez-la à l’aide des attaches fournies. Les attaches et la clé
nécessaires à la fixation de la poignée se trouvent dans la poche du manuel d’utilisation.
6. Replacez le bloc d’alimentation sur le lève-personne et vérifiez que la bride le maintenant est
totalement enclenchée. Enclenchez le bloc.
Démontage
Le lève-personne ne doit être démonté que pour être réparé, entretenu ou transporté. Par
conséquent, suivez les instructions de montage dans l’ordre inverse.
Page 52

Francais
Hoyer
®
Ascend
52
EFFECTUEZ TOUJOURS LES VÉRIFICATIONS SUIVANTES AVANT D’UTILISER
L’APPAREIL:
• Le mât est complètement verrouillé en position
• Les pieds du lève-personne s’ouvrent et se referment de façon satisfaisante (Pour cela, utilisez
la commande manuelle).
• Le bouton rouge d’arrêt d’urgence, situé à l’arrière du boîtier de commande, est en position
OFF (arrêt).
• Appuyez sur les boutons « up » (vers le haut) et « down » (vers le bas) de la commande manuelle pour confirmer que la flèche se lève et s’abaisse.
Page 53

Francais
Hoyer
®
Ascend
53
4. Guide des courroies
L’appareil Hoyer Ascend convient à des patients ASSIS. Les courroies convenant à ce dispositif
sont décrites ci-après:
• Hoyer Transport
• Hoyer Standing
Guide d’utilisation des courroies Standaid
Les courroies de transport et de levée sont faciles à installer et permettent de soulever et de
soutenir le patient. Il ne s’agit pas d’une courroie à usage général et les patients désirant l’utiliser
doivent être évalués par une personne qualifiée.
Courroie de transport
Glissez la courroie le long du dos du patient, en laissant la partie supérieure de l’ouverture du
siège hygiénique à la base de la colonne vertébrale. Vérifiez que la partie flexible de la courroie
est perpendiculaire au dos du patient.
Fixez la sangle de retenue autour de la poitrine du patient. Elle n’a pas besoin d’être serrée. Elle sert
à maintenir la courroie en position lors de la fixation des sangles au Standaid. Vous pouvez totalement l’ignorer, si vous le désirez. Vérifiez que les bras du patient sont à l’extérieur de la courroie.
Soulevez la jambe du patient et faites passer la sangle de retenue en dessous des jambes, puis
faites-la remonter entre ces dernières. Vérifiez que la courroie n’est ni tordue, ni coincée sous la
cuisse. Répétez cette procédure pour l’autre jambe. Attachez les sangles des parties flexibles de
la courroie aux crochets blancs situés à l’extrémité des poignées.
Sans pour autant croiser les boucles des sangles de retenue des jambes, attachez les boutons
noirs gauche et droit sur la fourche de levage. En règle générale, nous vous conseillons d’utiliser
l’anneau du milieu. Le patient est désormais prêt à être soulevé de son siège. Une fois qu’il a été
soulevé de son siège le patient sera plus confortable s’il est rabaissé en position assise.
Sangle de retenue: épaule
Sangle de retenue: jambes
Sangle de poitrine et boucle
Soutien de jambe
Page 54

Francais
Hoyer
®
Ascend
54
Courroie de levée
Faites glisser la courroie le long du dos du patient et installez-la entre le bas des épaules et le
bas de la cage thoracique. Fixez les sangles de retenue autour de la poitrine du patient. Elles
n’ont pas besoin d’être serrées. Elles servent à maintenir la courroie en position lors de sa fixation au Standaid. Vous pouvez totalement les ignorer, si vous le désirez. Vérifiez que les bras du
patient sont à l’extérieur de la courroie.
REMARQUE: Pour toute instruction détaillée sur la mise en place, reportez-vous au guide
d’utilisation fourni avec chaque courroie.
AVERTISSEMENT
Joerns Healthcare vous conseille de vérifier, régulièrement et avant toute utilisation, que
vos courroies ne sont ni effilochées, ni endommagées. N’utilisez JAMAIS une courroie
usagée ou endommagée.
AVERTISSEMENT
HOYER RECOMMANDE TOUJOURS D’UTILISER DES PIECES HOYER AUTHENTIQUES.
Les sangles et appareils de levage Hoyer ne sont pas conçus pour être interchangeables
avec les produits d’autres fabricants. L’utilisation de produits d’autres fabricants avec les
produits Hoyer est potentiellement dangereuse et peut engendrer des blessures graves au
patient et/ou à l’aide soignant(e).
AVERTISSEMENT
Respectez la charge maximale du lève-personne. La charge de la courroie est limitée par
la charge maximale du lève-personne.
5. Soulever le patient à l’aide du Hoyer Ascend
Placez le Standaid de manière à ce que les pieds du patient soient dans le plateau à pied et
ses genoux contre le protège-genou. Commencez par attacher les boucles les plus longues
de la courroie aux crochets gris situés à l’extrémité des poignées du Standaid. Les mains du
patient doivent se trouver sur les poignées. (Une fois que le patient a l’habitude de l’appareil, des
boucles plus courtes peuvent l’aider à se mettre en position plus droite). Appuyez ensuite sur le
bouton UP de la commande manuelle pour soulever le patient en position verticale.
Sangles de fixation à boucles
Sangle de poitrine
Page 55

Francais
Hoyer
®
Ascend
55
6. Consignes de sècuritè
Veuillez lire et suivre les consignes de sécurité ci-dessous. Le fonctionnement et l’utilisation des
lève-personnes Hoyer sont simples et clairs. Si vous suivez ces quelques consignes de sécurité
fondamentales, vous serez en mesure d’utiliser ce lève-personne facilement et sans problème.
AVANT D’UTILISER VOTRE LÈVE-PERSONNE « ASCEND », LISEZ LES INSTRUCTIONS DU
MANUEL D’UTILISATION ET VEILLEZ À BIEN LES COMPRENDRE
AVERTISSEMENT: Consignes de sécurité pour les dangers qui pourraient causer des blessures
graves.
ATTENTION: Information pour éviter des dommages au produit.
REMARQUE: Les informations à laquelle vous devez prêter une attention particulière.
AVERTISSEMENT
• Planifiez TOUJOURS vos opérations de levage avant de commencer.
• Effectuez TOUJOURS les étapes de la LISTE DES VÉRIFICATIONS QUOTIDIENNES avant
d’utiliser le lève-personne.
• Familiarisez-vous TOUJOURS avec les commandes et les dispositifs de sécurité d’un
lève-personne avant de soulever un patient.
• N’UTILISEZ PAS de courroie, à moins que cela ne soit recommandé.
• Vérifiez TOUJOURS que la courroie convient au patient et qu’elle est de taille et de
capacité appropriées.
• N’utilisez JAMAIS une courroie effilochée ou montrant des signes de détérioration.
• Ajustez TOUJOURS la courroie suivant les instructions fournies (consignes
d’utilisation).
• NE dépassez PAS la charge maximale d’utilisation
• Vérifiez TOUJOURS que la charge maximale d’utilisation du lève-personne est compatible
avec le poids du patient.
• Effectuez TOUJOURS le levage en fonction des instructions du manuel d’utilisation.
• Ne débranchez ni n’ignorez JAMAIS une commande ou un dispositif de sécurité sous
prétexte que cela facilite l’utilisation du lève-personne.
• NE soulevez PAS un patient si les freins des roulettes sont enclenchés. Laissez toujours
le lève-personne trouver le centre de gravité correct.
• N’essayez PAS de manœuvrer le lève-personne en poussant le mât, la flèche ou le
patient.
Page 56

Francais
Hoyer
®
Ascend
56
• Manœuvrez TOUJOURS le lève-personne à l’aide du bouton poussoir manuel / à pied fourni.
• Amenez TOUJOURS le patient à la position la plus basse et la plus confortable avant un
transfert.
• NE poussez PAS un lève-personne chargé à des vitesses dépassant une allure de
marche lente (3 kilomètres / heure, soit 0.8 mètres / seconde).
• NE poussez PAS le lève-personne sur un terrain accidenté particulièrement s’il est
chargé.
• N’essayez PAS de pousser / tirer un lève-personne chargé pour surmonter un obstacle
au sol.
• NE forcez JAMAIS une commande de fonctionnement / de sécurité. Toutes les
commandes sont faciles à utiliser et ne nécessitent pas une force excessive.
• La charge MINIMALE requise pour abaisser manuellement le lève-personne à l'aide de
la fonction d'abaissement mécanique d'urgence est de 30 kg.
• NE rangez JAMAIS un lève-personne chargé sur UNE surface inclinée.
• N’utilisez PAS les lève-personnes électriques dans la douche.
• NE chargez PAS un lève-personne électrique dans une salle de bains ou une salle de
douche.
• NE soulevez PAS un patient si vous n’en avez ni l’expérience ni la compétence.
• VOTRE lève-personne est prévu pour soulever des patients. NE l’utilisez PAS, et
n’autorisez personne à s’en servir à d’autres fins.
• NE forcez PAS le lève-personne à descendre des marches, qu’il soit chargé ou non.
• N’essayez PAS de déplacer un lève-personne chargé sur une pente de plus de 1:12 (environ
5 degrés).
• N’essayez PAS de monter ou de descendre une côte sans une autre personne à vos côtés.
• N’utilisez PAS le lève-personne dans un endroit mouillé ou corrosif, tel que les abords
d’une piscine.
Page 57

Francais
Hoyer
®
Ascend
57
7. Boîte de commande standard et commande manuelle
Bouton d’arrêt
d’urgence
Commande
manuelle
Point du chargeur
Indicateur de
batterie
Vérin
Abaissement d’urgence
uniquement
Batterie détachable
Fiche de raccordement de
la commande manuelle
Prise de raccordement de
la commande manuelle
Prise de
raccordement
du vérin
Boutons d’ouverture/
fermeture des jambes
Boutons
d’élévation et
d’abaissement
Page 58

Francais
Hoyer
®
Ascend
58
8. Instructions de fonctionnement
1. Réglage des pieds
La largeur des pieds de l’appareil Hoyer Ascend est réglable. Les pieds peuvent être ouverts
pour faciliter l’accès autour des fauteuils ou des chaises roulantes. Pour permettre les transferts
et le passage par des portes et des endroits exigus, les pieds du lève-personne doivent être en
position fermée.
Le réglage des pieds électriques - est accompli en appuyant sur certains boutons de la commande
manuelle. Les pieds se bloquent lorsque l’interrupteur de la commande manuelle est relâché.
2. Roulettes et freinage
Le lève-personne comporte deux roulettes à frein, qui permettent d’immobiliser l’appareil. Durant
le levage, les roulettes doivent rester libres et ne pas être bloquées. Le lève-personne peut ainsi
se diriger vers son centre de gravité. Si les freins sont enclenchés, le patient peut basculer vers
le centre de gravité, ce qui peut s’avérer déconcertant et inconfortable.
3. Levage et abaissement de la flèche
Le mouvement de la flèche est transmis par un puissant actionneur électrique, qui est lui-même
contrôlé par une simple unité de commande manuelle. La commande manuelle est munie de
deux boutons sur lesquels se trouvent les flèches UP (vers le haut) et DOWN (vers le bas).
L’actionneur s’arrête automatiquement en fin de course dans les deux sens. La commande
manuelle se branche sur une prise située à la base du boîtier de commande.
4. Arrêt d’urgence
Le bouton rouge d’arrêt d’urgence, situé à l’arrière du boîtier de commande, est activé lorsqu’on
appuie dessus. Cela coupe l’alimentation du lève-personne, laquelle n’est rétablie que lorsque le
bouton est tourné dans le sens antihoraire, puis relâché.
5. Descente d’urgence mécanique
Dans le cas d’une panne électrique totale, le vérin électrique est conçu avec un système de descente
mécanique (RED BOSS). Ce système fonctionne seulement si la charge du lève-personne est
minimum. Tirez cet appareil vers le haut pour le faire fonctionner et une descente lente commence.
Remarque: La charge MINIMALE requise pour abaisser manuellement le lève-personne à l'aide
de la fonction d'abaissement mécanique d'urgence est de 30 kg.
Page 59

Francais
Hoyer
®
Ascend
59
6. Descente / Levée électrique d’urgence
Les boutons de descente et de levée d’urgence se trouvent à l’avant du boîtier de commande.
Pour les activer, insérez la pointe d’un stylo à bille dans le bouton portant l’inscription áâ. Cela
permet de faire descendre la flèche en cas de défaillance de la commande manuelle.
AVERTISSEMENT
Seules les personnes autorisées sont habilitées à ouvrir la batterie, le chargeur, la
commande manuelle, le boîtier de commande et l’actionneur. (Contactez votre distributeur
pour tout renseignement sur la garantie et les réparations).
7. Courroies
L’appareil Hoyer Ascend convient à des patients ASSIS. Les courroies convenant à ce dispositif
sont décrites ci-après:
• Hoyer Transport
• Hoyer Standing
8. Réglage du protège-genou
L’appareil Ascend est équipé d’un protège-genou réglable, qui se déplace de 6 pouces. Pour le
déplacer vers le haut ou vers le bas, desserrez le bouton situé à sa gauche.
9. Semelle amovible
Le lève-personne Ascend est équipé d’une semelle amovible. Pour enlever cette semelle,
placez-vous à l’avant de l’appareil et soulevez la semelle à partir du milieu de l’assemblage.
REMARQUE Faites bien attention lorsque vous soulevez la semelle de sa position basse.
Page 60

Francais
Hoyer
®
Ascend
60
9. Instructions de charge
Les batteries sont situées dans le bloc d’alimentation et elles sont rechargées au moyen d’un
chargeur autonome.
Lorsque le bloc d’alimentation doit être rechargé, retirez-le du lève-personne et branchez-le sur
le chargeur autonome.
Joerns Healthcare Ltd recommande l’achat d’un bloc batterie supplémentaire, afin qu’un bloc soit
toujours chargé.
1. Retirez le bloc d’alimentation du lève-personne. Il est retenu par une simple bride située sur
le dessus. Soulevez la bride et le bloc est dégagé.
2. Placez le bloc d’alimentation dans le chargeur. L’emplacement et la fixation du bloc d’alimentation
sur le chargeur sont assurés par le même système qui celui utilisé sur le lève-personne.
3. Branchez le fil / le cordon du chargeur sur une prise de courant appropriée et ACTIVEZ
l’alimentation principale.
4. Les batteries se chargent complètement et automatiquement sur une période de huit à douze
heures.
Remarque : Même si le chargeur reste branché pendant très longtemps, cela n’entraînera
pas la « surcharge » des batteries.
a) Voyant vert - Indique que l'appareil est sous tension.
b) Voyant jaune - Indique que la batterie est en cours de recharge.
c) La batterie est complètement rechargée une fois que le voyant jaune s'est éteint.
Remarque : La charge de la batterie prend 4 heures. Il est conseillé de charger la batterie
dès réception.
5. Pour remettre le lève-personne en service, COUPEZ l’alimentation principale et retirez le bloc
d’alimentation du chargeur. Replacez le bloc d’alimentation sur le lève-personne et vérifiez
que la bride le maintenant est totalement enclenchée. Enclenchez le bloc. Le chargement
des lève-personnes électriques Hoyer est simple et clair, mais vous devez absolument suivre
les instructions à la lettre. Prêtez une attention toute particulière aux points suivants, vous
éviterez ainsi de vous retrouver avec des batteries déchargées.
AVERTISSEMENT
• La batterie, le chargeur, la commande manuelle et la boîte de commande NE doivent
PAS être ouverts par du personnel non autorisé. (Contactez votre distributeur pour
toute information sur la garantie et les réparations).
• NE touchez PAS les bornes de la batterie/du chargeur.
• VEILLEZ à ce que les batteries restent en permanence complètement chargées. Pendant
les périodes de non-utilisation du lève-personne, mettez la batterie en charge. Vous
pouvez également mettre la batterie en charge la nuit. Le chargeur interrompt
automatiquement la recharge dès que les batteries sont pleines. Il n’y a pas de risque
de surcharge
• NE laissez JAMAIS les batteries se décharger complètement. Dès que l’avertisseur
sonore retentit, terminez le levage en cours, puis mettez-les batteries en charge.
• Pour éviter tout endommagement irréversible de la batterie, il convient de mettre celle-ci en
charge dès que l’écran affiche le symbole de la batterie à moitié pleine.
Page 61

Francais
Hoyer
®
Ascend
61
• N’entreposez JAMAIS la batterie pendant une longue période sans le recharger
régulièrement.
• Veillez à TOUJOURS mettre le chargeur hors tension avant de brancher ou de
débrancher le bloc d’alimentation.
• Ne laissez JAMAIS le bloc d’alimentation branché au chargeur si ce dernier est hors
tension.
• NE LAISSEZ PAS le chargeur sous tension si la batterie est débranchée.
• N’UTILISEZ PAS le lève-personne pendant qu’il est en charge.
• VÉRIFIEZ que le lève-personne n’est pas en charge avant de le déplacer afin d’éviter
tout endommagement électrique.
• NE DÉBRANCHEZ JAMAIS le chargeur en tirant sur le câble.
• VEILLEZ à ne pas trébucher sur le câble du chargeur.
• NE RECHARGEZ PAS un lève-personne électrique dans une salle de bains ou une salle
d’eau.
Page 62

Francais
Hoyer
®
Ascend
62
10. Pèriodicitè d’entretien
Tous les produits Hoyer sont conçus de manière à ne nécessiter qu’un entretien minimal; toutefois, certaines vérifications et procédures de sécurité sont nécessaires. Les contrôles quotidiens,
une révision, une inspection et un test annuels sont la garantie d’un état de fonctionnement optimal du lève-personne. Une liste des pièces détachées est disponible sur demande.L’ESSAI DE
CHARGE et la certification doivent être effectués par du personnel qualifié ou un agent / concessionnaire d’entretien autorisé.
LISTE DES VÉRIFICATIONS QUOTIDIENNES: Joerns Healthcare vous conseille vivement
d’effectuer les vérifications suivantes chaque jour et avant d’utiliser le lève-personne.
• ASSUREZ-VOUS que le lève-personne se déplace facilement sur ses roulettes.
• VÉRIFIEZ que la barre d’écartement (cornes de vache) est bien fixée sur la flèche.
• RECHERCHEZ les signes d’usure sur les crochets de la courroie et sur les dispositifs de
suspension latéraux de la barre d’écartement et de la flèche.
• ASSUREZ-VOUS que les pieds s’ouvrent et se referment correctement.
• ACTIONNEZ la commande manuelle ou l’unité hydraulique pour confirmer que la flèche se
soulève et s’abaisse normalement.
• Les appareils électriques ACTIVÉS permettent de vérifier le fonctionnement du bouton
d’arrêt d’urgence.
• INSPECTEZ les courroies afin de déceler tout éventuel signe d’effilochage ou d’usure.
N’UTILISEZ PAS de courroie endommagée.
• ASSUREZ-VOUS que l’alarme de batterie faible ne se déclenche pas lorsque la commande
manuelle est actionnée. Si l’alarme retentit * N’UTILISEZ PAS l’appareil et mettez-le sous
charge immédiatement.
Entretien, Inspection Et Essais
Joerns Healthcare recommande d’effectuer régulièrement une inspection et des essais poussés
du lève-personne Hoyer Ascend et des accessoires, courroies, etc. La fréquence des inspections
varie selon l'endroit. Veuillez vous renseigner auprès de votre revendeur et / ou d’un organisme
gouvernemental local sur la périodicité requise des inspections. Les examens et les essais
doivent être effectués suivant les recommandations et les procédures énoncées dans le présent
manuem. Dans la mesure du possible, Joerns Healthcare recommande que l’entretien, les inspections et les essais certifiés soient effectués uniquement par un agent d’entretien ou un revendeur
agréé.
REMARQUE: Ces recommandations sont conformes aux normes d’Hygiène et de Sécurité N°
2307 de 1998. Réglementations sur les opérations et l’équipement de levage 1998.
Il s’agit d’une réglementation du Royaume-Uni. En dehors du Royaume-Uni, veuillez
vous renseigner sur les règlements de votre pays.
Page 63

Francais
Hoyer
®
Ascend
63
*CES VÉRIFICATIONS DOIVENT INCLURE :
1. FLÈCHE : Vérifiez que la flèche est fixée sur le mât. Assurez-vous que le
ü ü ü
mouvement latéral de la flèche est minimal et qu’elle tourne librement sur
son roulement.
2. POINTS DE FIXATION DE LA COURROIE : Examinez les crochets et les
üü ü
clips de fixation sur la barre d’écartement et la flèche afin de déceler toute
usure excessive.
3. MÂT : Vérifiez le fonctionnement du dispositif de verrouillage du mât.
ü üü
Assurez-vous que le mât s’engage entièrement dans la douille.
4. ACTIONNEUR : Hormis la vérification du bon fonctionnement et la recherche
ü
ü
de bruits inhabituels, l’actionneur ne nécessite en principe aucun entretien.
5. PROTÈGE-GENOU : Vérifiez que le dispositif de réglage du protège-genou
est bien attaché.
ü ü ü
6. BATTERIES : Les batteries sont logées dans le bloc d’alimentation et, à
l’exception de recharges régulières effectuées conformément aux
ü
instructions de charge, elles ne nécessitent en principe aucun entretien.
Vérifiez la propreté des connexions.
7. RÉGLAGE DES PIEDS : Vérifiez que les pieds s’orientent complètement
ü ü
dans les deux directions (vers l’intérieur / l’extérieur).
8. ROULETTES : Vérifiez que toutes les roulettes sont solidement fixées sur
ü ü ü
les pieds. Vérifiez que les roulettes et les roues tournent librement.
9. NETTOYAGE : Nettoyez au savon ordinaire et à l’eau et /ou avec un
désinfectant pour surfaces dures. Les produits de nettoyage chimiques
ü ü
corrosifs ou les abrasifs doivent être évités, car il peuvent endommager
le fini du lève-personne. Évitez de mouiller les pièces électriques.
10. BASE ET ROUES : Assurez-vous que la base est régulière et nivelée
ü ü ü
(les quatre roues reposent sur le sol).
11. COURROIES : Vérifiez qu’elles ne sont pas usées, ni effilochées.
ü ü ü
12. LUBRIFICATION : Huilez les joints pivotants, y compris les pièces reliant le
mât et la flèche, l’ensemble de la pédale, la barre d’écartement et le joint
ü
(si nécessaire).
13. COMBINÉ : Vérifiez qu’il est totalement branché dans le contrôleur.
ü ü
Avant utilisation
Initialement
Révision
annuelle
ü
= Recommandé
Page 64

Francais
Hoyer
®
Ascend
64
11. Spècifications Techniques
Charge maximale d’utilisation ...........................................................375 lbs 170 kgs
Longueur maximale hors tout ....................................................43,3 pouces 1100 mm
Longueur minimale hors tout .....................................................40,8 pouces 1035 mm
Hauteur maximale hors tout ......................................................66,5 pouces 1690 mm
Hauteur minimale hors tout .......................................................48,4 pouces 1230 mm
Hauteur maximale de la barre d’écartement .............................64,7 pouces 1644 mm
Hauteur minimale de la barre d’écartement .................................37 pouces 940 mm
Rayon de braquage ...................................................................51,9 pouces 1320 mm
Pieds ouverts - Largeur externe ................................................39,1 pouces 995 mm
Pieds ouverts - Largeur interne .................................................34,8 pouces 885 mm
Pieds fermés - Largeur externe ...............................................24,8 pouces 630 mm
Pieds fermés - Largeur interne.....................................................20 pouces 510 mm
Le point le plus large (entre les poignées de soutien) ...............28,9 pouces 735 mm
Hauteur des pieds, hors tout .......................................................4,7 pouces 120 mm
Garde au sol ................................................................................1,4 pouces 35 mm
Roulettes jumelées avant ...............................................................4 pouces 100 mm
Roulettes arrière à freins ................................................................4 pouces 100 mm
Poids
Ensemble mât, base et flèche .............................................................97 lbs 44,0 kgs
Bloc d’alimentation .............................................................................6,6 lbs 3,0 kgs
Total................................................................................................103,6 lbs 47,0 kgs
Base (sans la batterie) .....................................................................42,9 lbs 19,5 kgs
Mât et flèche (sans la batterie) .........................................................45,1 lbs 20,5 kgs
REMARQUE: Toutes les dimensions sont indiquées avec une tolérance de fabrication.
Page 65

Francais
Hoyer
®
Ascend
65
Specifications Electriques
BATTERIE ................................................batterie plomb rechargeable sans entretien de 24 volts
CAPACITE DE LA BATTERIE .......................3,2 Ampères heures
PUISSANCE ABSORBEE NORMALE DU CHARGEUR ........100 - 240 V AC// 24 VDC 50/60 Hz
PUISSANCE NOMINALE DU CHARGEUR ............................29,5 VDC, Max. 19 W
Protection contre l’électrocution
CHARGEUR .................................................... CLASSE II
LEVE-PERSONNE .......................................... SOURCE D’ALIMENTATION INTERNE
Degré de protection contre l’électrocution
CHARGEUR .................................................... TYPE B
LEVE-PERSONNE .......................................... TYPE B
Conditions Environnementales
En dehors de cet environnement, le fonctionnement et la sûreté peuvent être compromis.
Fonctionnement :
Température ................................................... 5°C à 35°C
Humidité relative .............................................. 20% à 90% @ 30°C - sans condensation
Pression atmosphérique .................................. 700 à 1060 hPa
Entreposage :
Température ........................................... ........ -10°C à +50°C
Humidité relative .............................................. 20% à 90% @ 30°C - sans condensation
Pression atmosphérique .................................. 700 à 1060 hPa
CARACTERISTIQUES D’IP
Boîtier de commande ..................................... IPX4
Vérin ................................................................IPX4
Chargeur portable ..........................................IPX5
Batterie ........................................................... IPX5
Commande Manuelle .....................................IPX5
CYCLES D’UTILISATION
Vérin ................................................................10% (2 min./18 min.)
Chargeur ........................................................Environ 4 hrs.
ACOUSTIQUE
Niveau de puissance acoustique pondéré A ..55,6 dB (A)
Page 66

Francais
Hoyer
®
Ascend
66
Symboles Cles
Les symboles suivants sont utilisés sur le chargeur, le boîtier de commande et la batterie :
Equipement de Type B selon EN 60601-1
Equipement de Classe 2
Le chargeur et le boîtier de commande ne doivent pas être jetés avec les déchets
ménagers.
La batterie ne doit pas être jetée avec les déchets ménagers.
L’électronique ne doit pas être jetée avec les déchets ménagers.
Utilisation à l’intérieur
ATTENTION, veuillez consultez les documents joints.
WEEE numéro de matricule de producteurs WEE/GG0464R2
Page 67

Francais
Hoyer
®
Ascend
67
12. Garantie
Cette garantie couvre uniquement les lève-personnes HoyerPro. Les lève-personnes
non couverts par cette garantie sont, sans s'y limiter : Advance-H, HML400, HPL600WB,
HPL600WBSC, HPL402, C-HLA (et variations).
Le lève-personne HoyerPro est garantie pour une période de deux ans à compter de la date de
livraison contre tout vice de matériau et de fabrication dans des conditions normales d'utilisation
et d'entretien. La garantie couvre tous les composants mécaniques et électriques.
Les composants structurels en aluminium et les pièces mécaniques du lève-personne sont
couverts par une garantie de cinq (5) ans à compter de la date de livraison.
Tout endommagement dû à des conditions d'utilisation inadaptées ou à l'absence d'entretien
conformément aux consignes d'utilisation et d'entretien n'est pas couvert par la garantie. Toute
transformation, modification ou réparation, à moins d'avoir été effectuée par ou approuvée par
écrit par Joerns Healthcare, a pour effet d'annuler la garantie.
Pièces
Le lève-personne HoyerPro contient des pièces susceptibles de s'user au cours de l'utilisation
normale. Ces pièces, telles que les batteries cc et les roulettes, n'entrent pas dans la garantie de
deux ans, mais sont couvertes pendant 90 jours à compter de la date de livraison.
En vertu de cette garantie, l'obligation de Joerns Healthcare se limite à la fourniture des pièces de
rechange, à la réparation ou au remplacement, à son entière discrétion, de tout produit déterminé
comme étant défectueux par Joerns Healthcare.
Les pièces de rechange sont couvertes par la garantie jusqu'à expiration de la période de
garantie initiale du produit.
À la demande de Joerns Healthcare, les pièces doivent être renvoyées pour inspection aux frais
du client. Un avoir sera remis après l'inspection uniquement.
Révision
La plupart des révisions sont effectuées par le service d'entretien, en collaboration avec le
service après-vente de Joerns Healthcare.
La majorité des pièces peuvent être expédiées par avion dès le lendemain, aux frais du client.
En cas de nécessité, un technicien, pourra, à la discrétion de Joerns Healthcare, être envoyé sur
place. Seul le service après-vente de Joerns Healthcare est habilité à envoyer des techniciens
agréés sur place.
Page 68

© 2017, Joerns Healthcare • 294000.10063 Rev B • DCO17-2511
Joerns Healthcare Inc.
2100 Design Road
Arlington, TX 76014
(T) 800-826-0270 • (F) 800-457-8827
www.joerns.com • email: info@joerns.com
 Loading...