

Page 1
Joerns
Healthcare
User-Service Manual
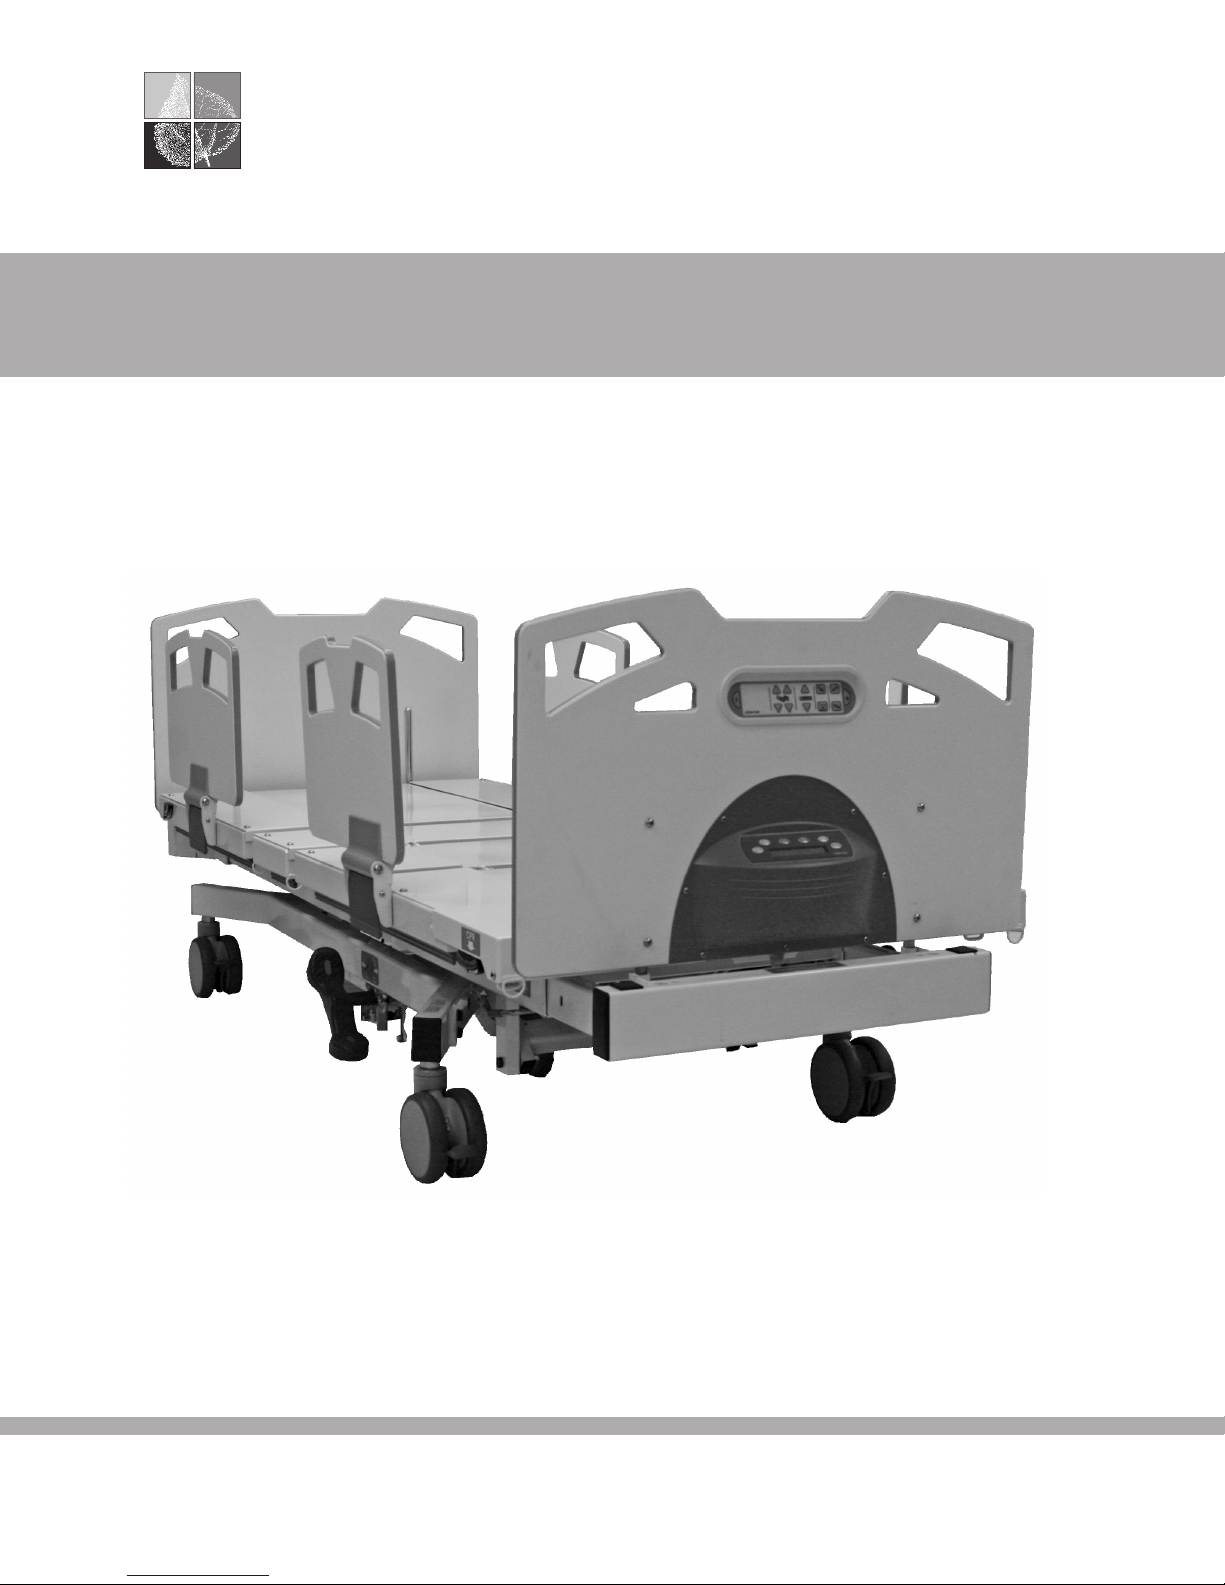
Joerns® Bariatric Bed
Model Bari10A
To avoid injury, read user’s manual before using.
leading bed evolution
Page 2

Joerns® Bariatric Beds
Model Bari10A
Important Precautions
Warning: Possible Injury Or Death. This product
is intended for use as an adjustable mattress
platform that contours for resident/patient comfort
with adjustable height for resident/patient and
caregiver convenience. Use of this product in a
manner for which it was not designed could result
in unproven or unsafe conguration, potentially
resulting in injury or death.
Warning: Possible Injury. Before adjusting bed,
ensure that area under and near bed perimeter is
free of people and obstructions. Failure to do so
could result in injury.
Warning: Possible Injury. Keep bed in lowest
position except when providing care (bathing,
clothing changes, etc.). Bed should be at lowest
convenient height for entry or exit. Failure to do so
could result in injury.
Warning: Possible Injury Or Death. Floor locks
increase bed stability and resident/patient safety.
Floor and caster swivel locks must be locked prior
to any resident/patient transfer or resident/patient
use of the bed. Failure to do so could result in injury
or death.
Warning: Possible Injury Or Death. Residents/
patients may become entangled in pendant cord.
Patients with reduced mental acuity should not be
allowed access to pendant. Unsupervised use of
pendant could result in injury or death.
Warning: Possible Injury Or Death. Bed safe
working load is 1050 pounds. This is total weight
counting resident/patient, mattress, bedding and
any other equipment or persons likely to be on
bed. Do not exceed 1050-pound safe working load.
Exceeding the safe working load could result in
property damage, injury or death.
Warning: Possible Fire Hazard. Use nasal mask
or ½ bed tent oxygen administering equipment.
Oxygen tent should not extend below Mattress
Support Platform. Pendant should not be placed
in an oxygen-enriched environment such as an
oxygen tent. Use of electrical circuits in an oxygenenriched environment could result in a re hazard.
Warning: Possible Shock Hazard. Injury may
result from improper routing of the power cord.
Always follow the proper factory-installed routing
conguration. Failure to do so could result in injury or
death.
Warning: Possible Injury Or Death. Use a mattress
that is properly sized to t Mattress Support Platform,
which will remain centered on Mattress Support
Platform relative to State and Federal guidelines.
Length and width should match Mattress Support
Platform. Use of an improperly tted mattress could
result in injury or death.
Warning: Possible Injury Or Death. If a resident/
patient’s mental or physical condition could lead to
resident/patient entrapment, the Mattress Support
Platform should be left in the at position when
unattended. Failure to do so could result in injury or
death.
Warning: Possible Injury or Death. An optimal
bed system assessment should be conducted on
each resident by a qualied clinician or medical
provider to ensure maximum safety of the resident.
The assessment should be conducted within the
context of, and in compliance with, the state and
federal guidelines related to the use of restraints
and bed system entrapment guidance, including
the Clinical Guidance for the Assessment and
Implementation of Side Rails published by the
Hospital Bed Safety Workgroup of the U.S. Food and
Drug Administration. Further information
can be obtained at the following web address:
http://www.fda.gov/cdrh/beds/.
Warning: Possible Injury Or Death. Use a properly
sized mattress in order to minimize the gap between
the side of mattress and Side Rails/Assist Devices.
This gap must be small enough to prevent resident/
patient from getting his/her head or neck caught in
this location. Make sure that raising or lowering bed,
or contouring the Mattress Support Platform, does
not create any hazardous gaps. Excessive gaps may
result in injury or death.
Warning: Possible Injury Or Death. Do not use any
Side Rails/Assist Devices until you verify they are
locked in place. Failure to lock assist devices may
result in injury or death.
Warning: Possible Shock Hazard. Unplug
power cord from wall outlet before performing
any maintenance, cleaning, or service to the bed.
Failure to do so could result in injury or death.
Note: In case of unexpected movement,disconnect
battery and unplug bed from any outlet.
2
Warning: Possible Injury Or Death. Do not use any
replacement parts not manufactured, marketed, or
provided by Joerns Healthcare on any Joerns bed.
Use of unapproved replacement parts may result in
injury or death.
Page 3

Joerns® Bariatric Beds
Model Bari10A
Warning: Possible Injury Or Death. If using
accessories not manufactured, marketed, or provided
by Joerns Healthcare for Joerns® beds, consult with
the manufacturer for compatibility and limitations prior
to use. Failure to do so may result in injury or death.
Warning: Possible Shock Hazard. Bed power
cord has hospital-grade, 3-pronged grounded plug.
Grounding reliability can only be achieved when
equipment is connected to an equivalent receptacle
marked “hospital-grade”. If external grounding
conductor is in doubt, operate bed from backup
battery. Failure to do so could result in injury.
Warning: Possible Equipment Damage Or Injury
To Staff Members. Service and repair must only be
performed by qualied, authorized Joerns Healthcare
Technical Support personnel.
Warning: Explosion Hazard. Do not use in the
presence of ammable anesthetics, gas or vapors.
Failure to heed this warning could result in equipment
damage, injury or death.
Caution: Stay clear of underneath the bed when
adjusting or moving the bed.
Caution: Mattress Support Platform is not grounded,
nor does it have a potential equalization connection
point. To prevent injury to resident/patient connected
to intravascular or intercardial medical equipment,
alternate measure must be implemented to equalize
the potential between Mattress Support Platform and
medical equipment.
Warning: To reduce the risk of injury, ensure the
Mattress Support Platform is horizontal and in the
lowest position with the siderails fully raised and
locked when moving the bed with a resident/patient
in it. For best maneuverability, push the bed from the
head end.
To avoid injury to the resident/patient and/or user, do
not attempt to move the bed laterally with the steer
engaged. The wheel cannot swivel.
Warning: Medical electrical equipment needs
special precautions regarding EMC and needs to be
installed and put into service according to the EMC
information provided in this manual.
Caution: Particular precaution must be considered
during exposure to strong emission source such as
High Frequency surgical equipment and
similar devices. Do not route High Frequency
cables on or near device. If in doubt, contact a
qualied technician.
Warning: Possible Injury or Death. Make sure
Mattress Support Platform is in non-extended
position (narrow) and all casters are locked during
resident/patient transfers.
Caution: To avoid damage to the siderail
mechanisms, do not move the bed using the
siderails. Use the push/pull handles integrated in
the end panels to move the bed.
Caution: Before transporting bed, unplug bed
from power source, wrap Power Cord around Cord
storage hooks on bed frame below Head Panel and
hang Pendant Cord from Foot Panel. Failure to do
so could result in Power Cord, Pendant Cord, or
bed damage, thereby creating a potential hazard.
Caution: Drainage bag loops are not intended for
use as tie downs.
When assessing the risk for entrapment, you need
to consider your bed, mattress, Head/Foot Panels,
Side Rails/Assist Device and other accessories, as
a system. It is also extremely important to review
the resident/patient’s physical and mental condition
and initiate an appropriate individual care plan to
address entrapment risk. All Joerns bed systems
are evaluated for compliance to the
FDA/CDRH “Hospital Bed System Dimensional and
Assessment Guidance to Reduce Entrapment.”
For more information, call your distributor (contact
information found on page 18).
Warning: The Bari10A should not be used adjacent
to, or stacked with, other equipment due to the risk
of electronic interference. If adjacent or stacked use
is necessary, the bed should be observed to verify
normal operation in the conguration in which it will be
used.
Warning: Using non-approved cables and
accessories may negatively affect the EMC
performance.
Warning: Mobile RF communication equipment can
affect Medical Electrical Equipment.
Save These Instructions
Thank you and congratulations for choosing the
Joerns Bari10A bed. Joerns beds are developed
with safety, comfort and convenience of both
resident/patients and caregivers in mind.
Advanced ergonomic design will provide years of
reliable service in your facility.
3
Page 4

Joerns® Bariatric Beds
Model Bari10A
Table of Contents
Important Precautions ...............................................................................................................2
Entrapment Information .............................................................................................................4
Features and Specications ......................................................................................................5
Assembly ...................................................................................................................................6
Bed Operation ..........................................................................................................................7
Accessories ............................................................................................................................. 11
Scale System...........................................................................................................................13
Cleaning, Inspection and Maintenance ...................................................................................16
Lubrication Servicing ...............................................................................................................17
Troubleshooting .......................................................................................................................18
Appendix Diagrams .................................................................................................................20
Warranty ..................................................................................................................................22
Bed System Entrapment Information
In April 1999, the U.S. Food and Drug
Administration (FDA) in partnership with
representatives from the hospital and post-acute
bed industry, including Joerns Healthcare, national
healthcare organizations, resident advocacy
groups, and other federal agencies formed the
Hospital Bed Safety Workgroup (HBSW). The
workgroup’s goal is to improve the safety of bed
frames for patients and residents in all health
care settings who are most vulnerable to the
risk of entrapment. The efforts of the FDA and
the HBSW culminated in the FDA’s release of
recommended guidelines intended to reduce the
risk of entrapment, including dimensional limits
for critical gaps and spaces between bed system
components and clinical guidance for assessment
and implementation of bed side rails in various
health care settings.
Entrapment zones involve the relationship of
bed components often directly assembled by the
healthcare facility rather than the manufacturer.
Therefore, compliance is the responsibility of
the facility.
As the leading manufacturer of long-term care
beds and a frontrunner in addressing this critical
issue, Joerns Healthcare can offer you the
expertise, assistance and products to bring your
facility into compliance.
Joerns® Compliance Solutions
Matching the right bed components in order to meet
regulatory guidelines can be complex.
That is why Joerns offers a wide array of compliance
options. We assist customers in selecting compliant
accessories recommended for their specic
bed model.
For More Information
To learn more about compliance options with Joerns
products, contact your distributor (contact information
found on page 18) and ask for free informational
publications.
To learn more about entrapment zones, assessment
methods, and guidelines concerning entrapment,
contact your distributor (contact information found
on page 18) or consult the FDA website:
www.fda.gov/cdrh/beds
I.D. Label Symbol Definition
Attention, Consult accompanying documents
Safe Working Load
Type B Applied Parts
Class II Equipment
4
Protective Earth (ground)
Page 5

Joerns® Bariatric Beds
Model Bari10A
Features and Specifications
Joerns® Bari10A Standard Features
• Fully adjustable Mattress Support Platform
with independent back and knee movement,
up/down adjustments, Trendelenburg and
Reverse Trendelenburg positioning and Comfort
Chair positioning
• 36" wide Mattress Support Platform sections
easily expand to 48" wide
• Mattress Support Platform expands from 80" to
88" length
• Height adjustable from 18¾" to 33¾"
• Side Rails on Head and Foot sections fold down
for easy resident/patient access
• Pendant Control for all bed functions
• Staff Control with lockouts and backlighting
• Emergency Manual Release for Mattress Support
Platform
• Emergency Battery Backup System
• Integrated Scale System for resident/patient
weight monitoring
• Quiet DC Motors
• Welded Steel Tubular Frame
• Pan-Style Mattress Support Platform
• Wide Stable Base
• SoftTone Frame Color
• Heavy-Duty Casters
• Bed and Back Section Angle Indicators
• Drainage Bag Loops
• IV Sockets (½" and ¾")
Classifications
UL 60601-1
CAN/CSA C22.2 NO.601.1
IEC 60601-2-38
CAN/CSA C22.2 NO 601.2.38
Environmental Conditions
Operating Conditions
Ambient Temperature: +20°C to +30°C
Relative Humidity: 10% to 95% Non-Condensing
Atmospheric Pressure: 700 hPa to 1060 hPa
Protected Against Splashing Water IPX4
Storage and Shipping Conditions
Ambient Temperature: -30°C to +50°C Relative
Relative Humidity: 10% to 95% Non-Condensing
Atmospheric Pressure: 500 hPa to 1060 hPa
Accessories And Options
Joerns Therapeutic Support Surfaces, IV Rod,
Floor Mat, Patient Helper, Steer Pedal, Dual
Casters
Bed Identication Numbers
When ordering parts or when contacting our
Customer Care Department, please include the
bed’s model and serial numbers, found on the
identication label. The identication label is
located on bed frame under the sleep deck foot
section.
Electrical Specifications
Controller
Power: 115 VAC North American
Frequency: 60 Hz
Current Rating: 5.8 Amps
Classication: Class 1, Type B
Mode of Operation: 10% Maximum duty cycle
Circuit Protection: Auto reset current sensors
Note: Actuators operate on a 24V DC system with
an integral battery backup.
Mechanical Specifications
Description: Dimensions:
Overall Bed ................................Minimum 39"x 90"
Maximum 52"x 98"
Mattress Support Platform ......... Minimum 36"x 80"
Maximum 48"x 88"
Bed Frame Weight ...................................... 700 lbs
Maximum Back Section Angle ......65° to horizontal
Maximum Knee Section Angle .....35° to horizontal
Maximum Knee to Leg Angle............................ 45°
Maximum Height Mattress
Support Surface...................... 33-3/4" Above Floor
Minimum Height Mattress
Support Surface...................... 18-3/4" Above Floor
Safe Working Load ................................... 1050 lbs
5
Page 6
Joerns® Bariatric Beds
Model Bari10A
Assembly
Installation Of Head And Foot Panels
Notice: Make sure the power cord is unplugged
from the power outlet and the control unit battery
is removed prior to disconnecting/connecting any
foot panel cables. Failure to ensure bed is not
powered when disconnecting/connecting the foot
panel cables may result in damage to the bed’s
electronic controls.
1. Conrm that the bed’s power cord is not
connected to the power outlet. Conrm that
the control unit battery has not been installed.
2. Insert head and foot panel support rods into
their respective receptacles in the frame
(Figure 1). Note: Scale system display located
on outside of foot panel must face away from
bed (Figure 1).
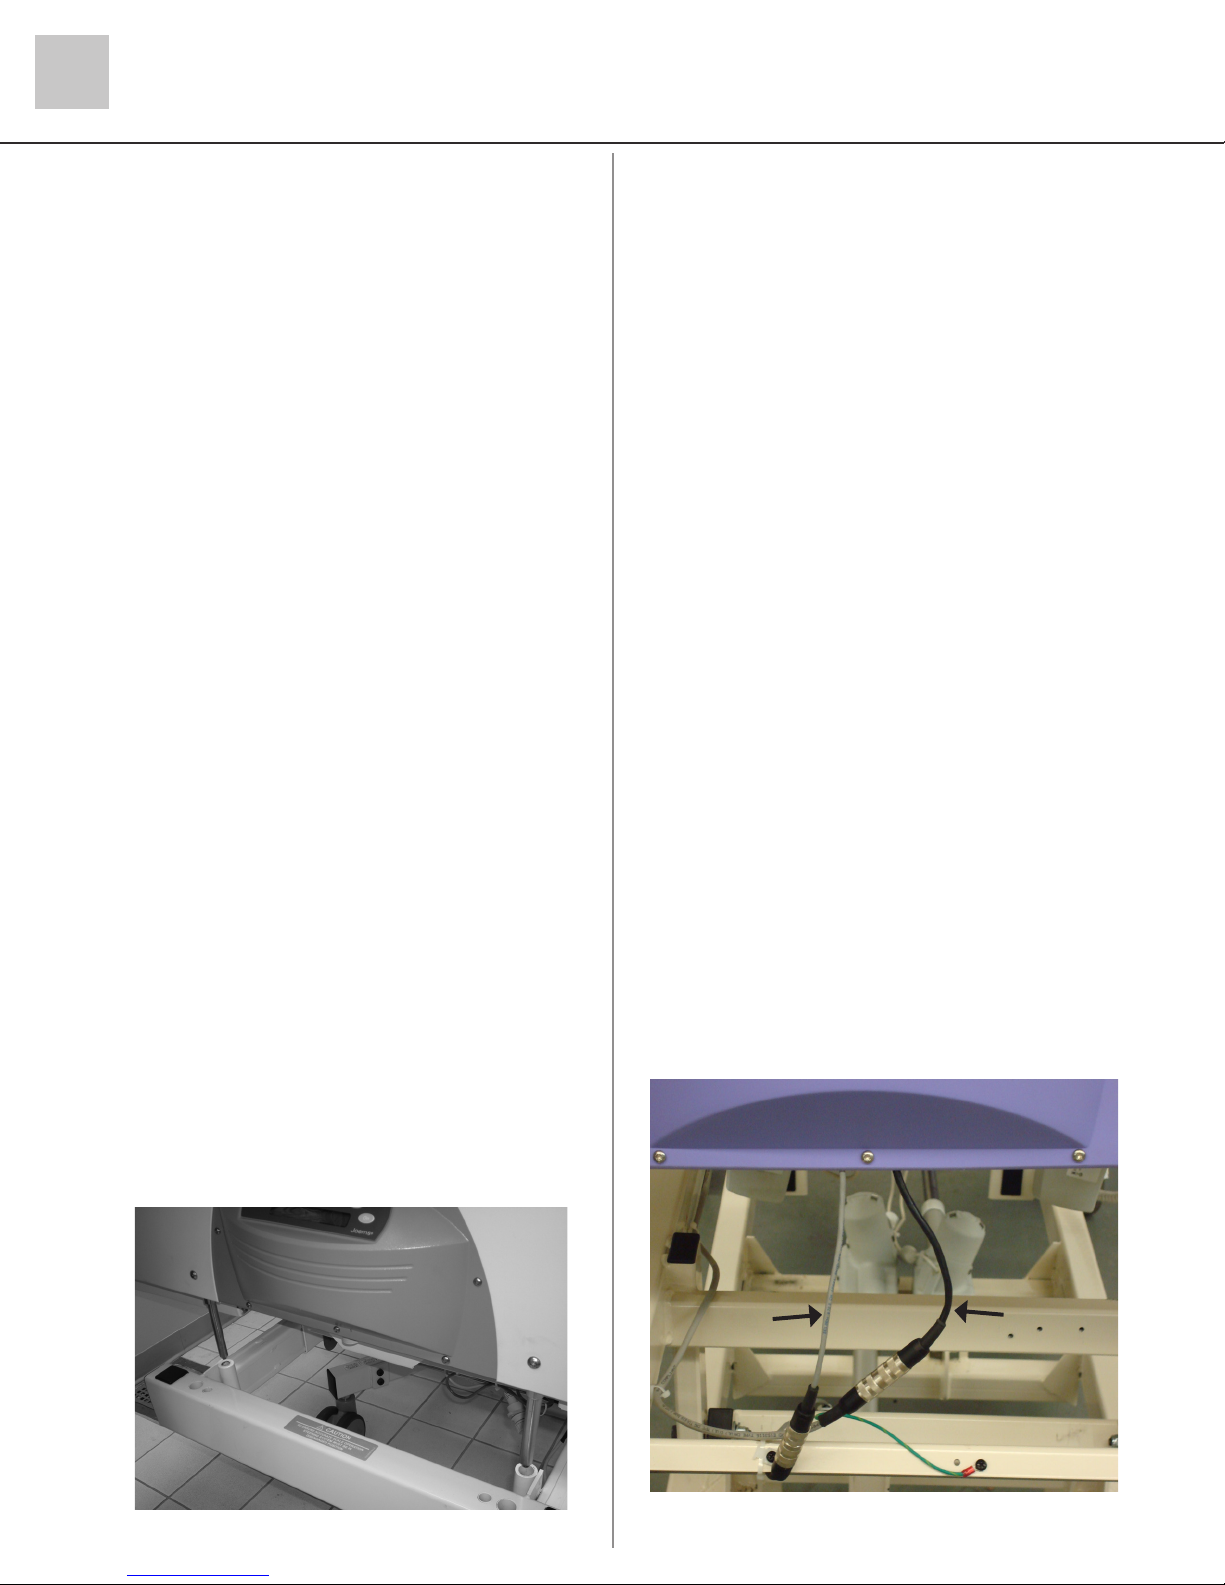
3. Connect cables exiting the bottom of the foot
panel to the appropriate cables on the bed
frame (Figure 2).
4. Power cord supplies power to bed’s actuator
system. Plug power cord into grounded
hospital-grade receptacle (115VAC, 15 amps).
Note: To achieve optimum battery life, keep
the bed plugged in at all times.
5. Slide the battery onto the control unit until the
retention clips snap into position. Conrm the
battery is locked into place by trying to remove
the battery without disengaging the retention
clips.
6. Power cord is the main disconnect device.
To disconnect the mains, unplug power cord.
Backup battery powers the actuators when
cord is unplugged.
7. Whenever bed is cleaned or serviced, it
should be unplugged from wall power.
The battery can still power the bed, so
functions should be locked to keep bed from
accidentally operating. Note: To avoid electric
shock, always plug bed into properly grounded
hospital-grade receptacle.
8. Battery backup is not user-serviceable. If
service is required, contact your distributor
(contact information found on page 18).
Head Panel Removal
1. Head panel easily removes by lifting straight up
(Figure 1).
2. Head panel pins t tightly in respective frame
receptacles. This may cause binding during
removal and replacement.
3. To minimize binding, grasp head panel at both
lower corners and lift evenly.
Foot Panel Removal
Notice: Make sure the power cord is unplugged
from the power outlet and the control unit battery is
removed prior to disconnecting/connecting any foot
panel cables. Failure to ensure bed is not powered
when disconnecting/connecting the foot panel
cables may result in damage to the bed’s
electronic controls.
1. Depress retention clips on back of the battery
with one hand while slowly sliding the battery
backward. Note: Support the weight of the
battery.
2. Unplug the bed from the power outlet.
3. After disconnecting the battery and the power
cord, briey push any pendant or staff control
button in order to de-energize the control system
completely prior to disconnecting/connecting any
other cables.
4. Disconnect foot panel cables (Figure 2).
5. Foot panel pins t tightly in respective frame
receptacles. This may cause binding during
removal and replacement.
6. To minimize binding, grasp foot panel at both
lower corners and lift evenly.
6
Figure 1
Scale
Cable
Figure 2
(Panel removed for clarity)
Control
Cable
Page 7
Joerns® Bariatric Beds
Model Bari10A
Bed Operation
Initial Start Up
1. After positioning bed, always lock all casters.
Bed should be allowed to reach room
temperature before plugging Power Cord into
grounded hospital-grade receptacle.
Caution: It is critically important to lock all four
casters individually to prevent unintended bed
movement.
Resident/Patient Transfer
1. Lock Casters and make sure Mattress Support
Platform is in non-extended position (narrow).
Lower Side Rails and lower resident/patient in
carefully controlled manner, onto bed.
Caution: It is critically important to lock all four
casters individually to prevent unintended
bed movement.
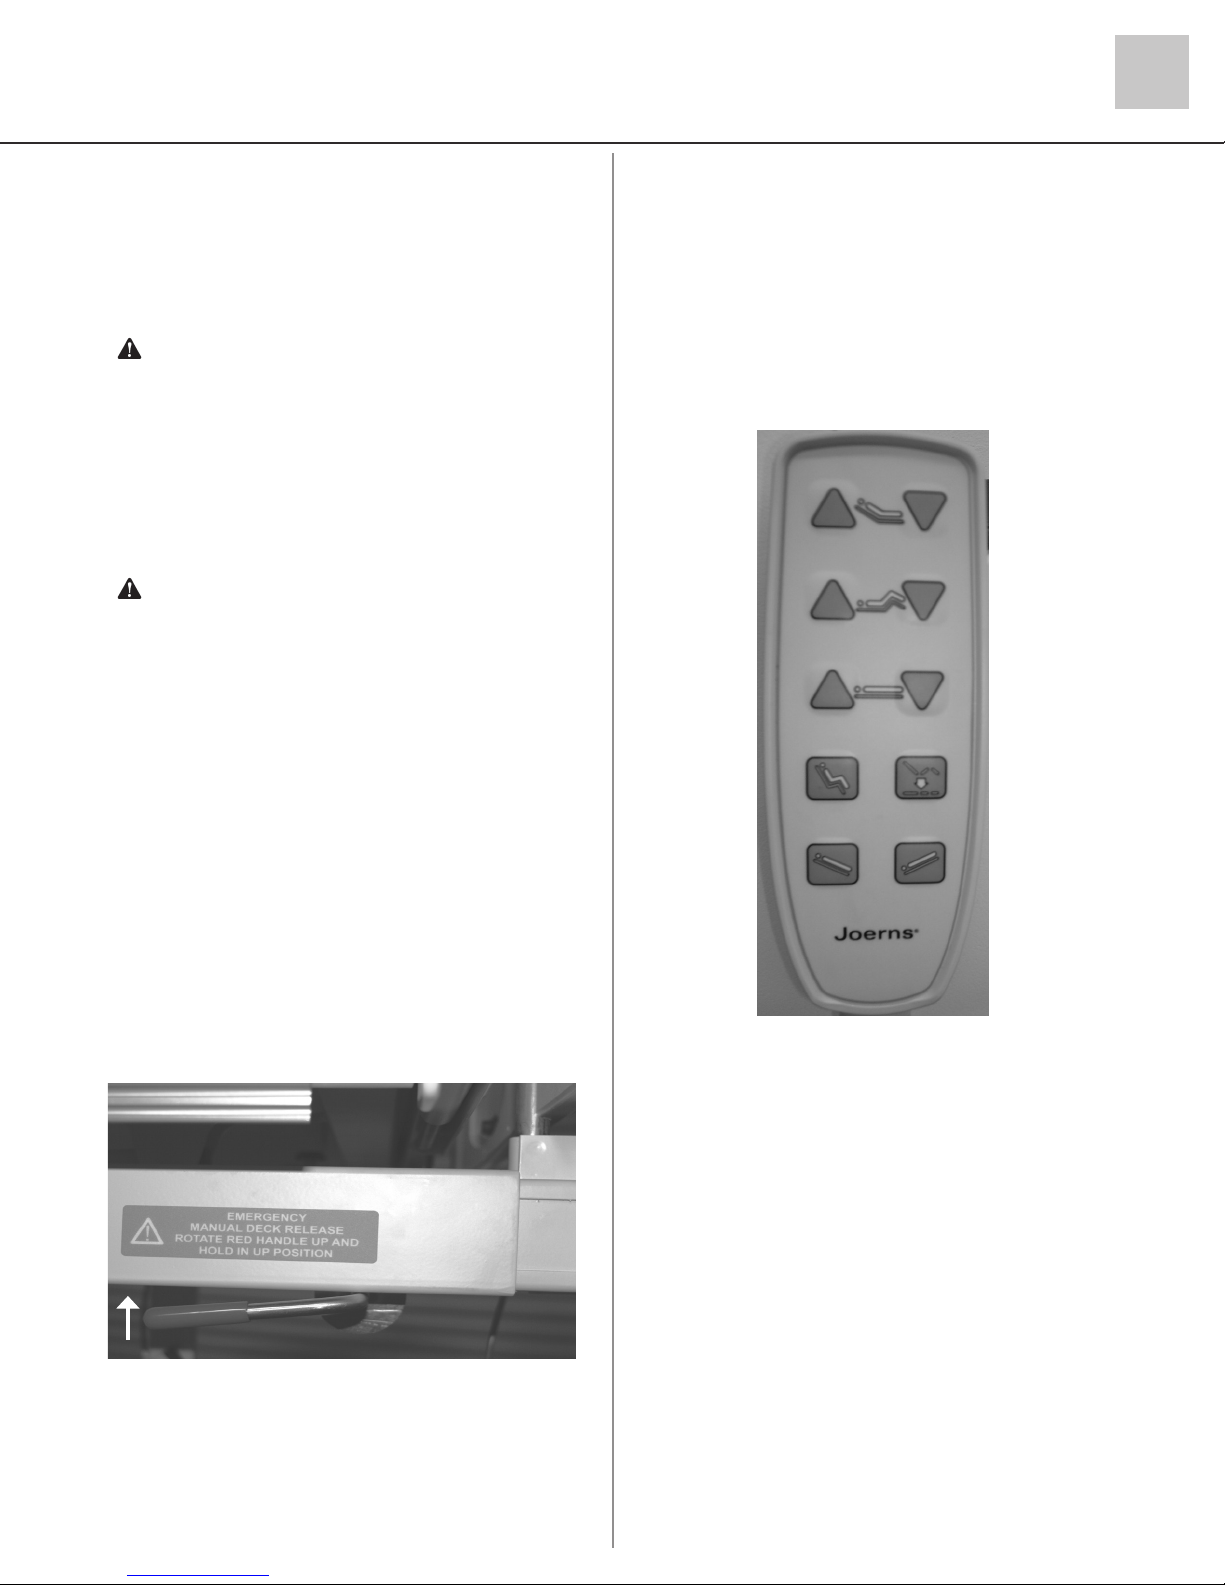
Emergency Manual Mattress Support
Platform Release
1. The quickest way to atten the Mattress Support
Platform is to use the Pendant or Staff Control.
2. To return Mattress Support Platform to at
position in case of power and battery backup
failure, rotate Emergency Manual Mattress
Support Platform Release Lever Up (Figure
3). Hold Emergency Release handle Up until
Mattress Support Platform lowers to desired
position. Release handle if you need to stop
descent.
Pendant Control Operation
1. Your Bari10A bed comes standard with
Pendant Control (Figure 4). Resident/patient
and staff can use the Pendant to adjust all
Mattress Support Platform sections to
desired positions.
2. Pendant has raised push buttons with graphics
and may be hooked on rails or panels for
convenient resident/patient and staff access.
1
2
43
5
6
87
9 10
Figure 3
Figure 4
1. Push button to raise back
2. Push button to lower back
3. Push button to raise knee
4. Push button to lower knee*
5. Push button to raise bed
6. Push button to lower bed
7. Push button for Comfort Chair
8. Push button to lower both head and knee to
at and place bed at low height
9. Push button for reverse Trendelenburg
10. Push button for Trendelenburg
*Note: As a safety feature the control system software
will automatically lock out the knee down function when
in a reverse Trendelenburg or Comfort Chair Position.
The function will unlock when the Mattress Support
Platform is returned to horizontal. This is done to keep
the resident from sliding down in the bed.
7
Page 8

Joerns® Bariatric Beds
Model Bari10A
Staff Control Panel Operation
The Staff Control Panel allows caregiver to
operate the bed from the foot panel without
walking to the bedside (Figure 5). The caregiver
can also individually lock out all functions on both
the Pendant and Staff Control.
1. To lock out a function, press and hold “Lock”
graphic on the panel and push the function to
lock out. Illuminated amber LED indicates that
function is now locked out.
2. To unlock function, press and hold “Lock”
graphic on the panel and push the function to
unlock. Amber LED is no longer illuminated,
signaling that function is now operable.
Warning: Possible Injury Or Death. Use Lockout
to deactivate bed when resident/patient movement
or inadvertent activation of bed functions by resident/
patient or staff member could result in personal
injury.
Side Rails/Assist Devices
1. Bari10A has one Head End Side Rail and
one Foot End Side Rail on both sides of bed
(Figure 7).
2. Side Rails are locked and unlocked by a Latch
Hinge mechanism.
3. Pull bottom of Latch Hinge outwards to lower
Side Rails (Figure 8). Note: Latch Hinge locks
Side Rail only in up position.
4. Lower Side Rails gently.
Figure 5
12
3
1
2
4
5
8
10
7
6
11
9
Figure 7
Figure 6
Staff Control
1. Push button to raise back
2. Push button to lower back
3. Push button to raise knee
4. Push button to lower knee
5. Push button to raise bed
6. Push button to lower bed
7. Push and hold to change lockout status in
combination with another function button.
8. Push button for Comfort Chair
9. Push button to lower both back and knee to
Figure 8
at and place bed at low height
10. Push button for Trendelenburg
11. Push button for reverse Trendelenburg
12. Push button to backlight function buttons
8
temporarily
Page 9

Joerns® Bariatric Beds
Model Bari10A
Casters
1. All (4) Casters securely lock bed in place.
2. All Casters have full swivel/rotation locking in
any position.
3. Simply push Caster Lock Lever (Figure 9)
down to lock and up to unlock (Figure 10).
Caution: It is critically important to lock all four
casters individually to prevent unintended bed
movement.
Steer Pedal (optional) (Figure 11)
A bed equipped with this option has a steer wheel
actuated by lateral steer pedals on either
side of the bed. The steer wheel helps in guiding
the bed along a straight line and helps the bed pivot
around corners.
Steer Pedal Operation (Figure 12)
To engage the steer wheel, fully depress the side
of the pedal identied with a green label and
represented by the ENGAGE green arrow. To
disengage the steer wheel, fully depress the side of
the pedal identied with a red label and represented
by the DISENGAGE red arrow.
Warning: To reduce the risk of injury, ensure the
Mattress Support Platform is horizontal and in
the lowest position with the siderails fully raised
and locked when moving the bed with a resident/
patient in it. For best maneuverability performance,
push the bed from the head end.
Warning: Steer wheel must be disengaged to
use scale.
Caution: To avoid damage to the siderail
mechanisms, do not move the bed using the
siderails. Use the push/pull handles integrated to
the end panels to move the bed.
To avoid injury to the resident/patient and/or user, do
not attempt to move the bed laterally with the steer
mode engaged. The steer wheel cannot swivel.
Single Wheel Caster Optional Dual Wheel
Caster
Figure 9
Figure 11
Left Side from foot of bed
Single Wheel Caster Optional Dual Wheel
Figure 10
Caster
Right Side from foot of bed
Figure 12
9
Page 10

Joerns® Bariatric Beds
Model Bari10A
Mattress Support Platform
Width Extenders
1. The four Mattress Support Platform (MSP)
sections each have a 6" Width Extender on
both sides. (Figure 13).
2. Release Width Extender by pulling latch
handle along the bottom edge of each MSP
section (Figure 14). Note: Width Extenders
lock in either full open or full closed position
and should only be used in these positions.
Side Rails move with the Width Extenders.
Caution: Extend all four sections on each side
prior to adjusting bed position or Side Rails.
Warning: Use Width Extenders only after the
resident/patient is safely positioned in the bed.
Failure to do so could result in injury.
Mattress Support Platform
Length Extender
1. Mattress Support Platform (MSP) Foot Section
has an 8" Length Extender, as does the foot
end of the bed frame (Figure 15).
2. Both MSP Length Extender and the Frame
Length Extender lock in the retracted and
extended positions.
3. Using the MSP Length Extender is a two-step
process:
a. Slide the Frame Extender out rst, by
pulling out the latch knob on the side of
the bed frame (Figure 15). Begin carefully
sliding the extender out and release the
latch knob as soon as the extender starts
to slide, so that it will automatically latch
again at the extended position. Slowly pull
the extender out until the latch pin clicks
into its detent.
b. Reach under the center of the MSP Foot
Section and locate the MSP Extender
latch knob (Figure 16). Pull the knob out to
unlatch the Foot Section Extender. Begin
carefully sliding the extender and release
the latch knob as soon as the extender
starts to slide so that it will automatically
latch again at the extended position.
Slowly pull the extender out until the latch
pin clicks into its detent.
Warning: Possible Equipment Damage. Prior to
use of the MSP Length Extender, the Frame Length
Extender must be fully extended and latched. Failure
to do so will result in foot panel connector damage.
Figure 13
Figure 14
Figure 15 - Arrow indicates Length
Extension Latch
Warning: Possible Equipment Damage. Do
not slide Frame Length Extender past its detent.
Damage to the foot panel cables will result.
10
Figure 16 - Photo taken from angle
underneath bed
Page 11

Joerns® Bariatric Beds
䘀 漀漀琀 倀愀渀攀氀
刀 漀甀琀攀 倀 攀渀搀愀渀琀 䌀 漀渀琀爀漀氀
䌀 漀爀 搀 椀渀猀椀搀攀 匀椀搀攀 刀 愀椀氀猀
Model Bari10A
Bed Movement/Transport
1. Follow these general guidelines when moving
bed (specic patient’s needs may necessitate
such requirements).
a. Fully lower all Mattress Support
Platform sections.
b. If extended, retract Mattress Support
Platform width extensions on both sides.
Note: This may require removing
mattress sections.
c. If extended, retract Mattress Support
Platform Foot extension.
d. Latch all Side Rails in up position.
e. Required: Place an attendant at each
bed end.
f. Caution: Before transporting bed, unplug
bed from power source, wrap Power Cord
around Cord storage hooks below Head
Panel, hang Pendant Cord from Foot Panel,
and route Pendant Cord inside Side Rails
(Figure 17). Failure to do so could result in
Pendant Cord, Power Cord or bed damage,
thereby creating a potential hazard. Ensure
Pendant Cable and Power Cord are off oor
and away from Casters.
g. Unlock Casters.
h. Deploy Steer Wheel if equipped with
optional Steer Pedal.
i. Apply even push/pull force on Head
Panel and/or Foot Panel handholds
(Figure 18). When bed movement/transport
is completed:
• Always apply Caster Locks and
disengage steer wheel, if applicable.
Caution: It is critically important to lock
all four casters individually to prevent
unintended bed movement.
• Always plug bed back into power outlet
so that it is continuously charging.
Caution: Steer wheel must be disengaged to obtain
an accurate resident/patient weight.
Note: International standards require distance
from top of mattress (un-compressed) to top of
Side Rails to be a minimum of 220 mm (8.66
inches). If mattress is thicker than 6.5 inches
(Example: If a professional recommends an air
otation system to treat pressure ulceration),
bed/mattress system would not comply with
International standards. A professional can
assess if clinical benets outweigh the risk of
not meeting standards.
IV Sockets
The IV Sockets at the head and foot of the bed are
rated for 50 lb. maximum vertical or 50 lbs-ft torque.
Drainage Bag Loops
Drainage Bag Loops are rated at 15 lb. maximum
load.
Caution: Drainage Bag Lops are not intended for
use as tie downs.
Pendant
Control Hang on
Foot Panel
Route Pendant Control
Cord inside Side Rails
Figure 17
Accessories
Mattress
1. Bari10A Bed may be equipped with BariMatt
1000 6.5" foam mattress (Figure 19, p.12).
2. Mattress is designed as separate sections,
which t together on Mattress Support Platform
in different arrangements: narrow, sides
extended, and/or length extended.
Important: Patient’s risk for pressure ulceration
determines which mattress should be used.
Assessment of risk for pressure ulceration is
important to avoid injury to patient, and should
only be determined by qualied professionals.
Figure 18
11
Page 12

Joerns® Bariatric Beds
Model Bari10A
F
12
Figure 19
Page 13

Scale System
Bari10A bed may be equipped with Scale System,
fully integrated within Foot Panel (Figure 20).
Scale System Features (Figure 21)
1. Resident/patient’s weight is displayed on a
16-character dot matrix liquid crystal display with
LED backlighting.
2. Resident/patient’s weight may be viewed in both
pounds and kilograms by pushing Weight
Mode button when weight is displayed. Weight
is displayed with a resolution of 0.1 lb or Kg.
3. Monitor resident/patient’s weight relative to
zero by using Weight Change Mode button to
observe variations in weight.
4. Freeze/Resume mode button provides ability
to add or remove pillows, blankets or ancillary
equipment, without affecting resident/patient’s
displayed weight.
Joerns® Bariatric Beds
Model Bari10A
Figure 20
Maximum Weight Capacity
Do not exceed rated safe working load capacity of
bed (1050 pounds).
Scale Accuracy
0.5% of resident/patient weight or 0.5 lb,
whichever is greater, from 250 to 1050 lbs, while
bed is in at position.
Auto Power Down (APD)
Scale System will automatically power down in
60 seconds to conserve battery life and protect
resident/patient personal information.
Averaging
Automatic Digital Filter samples weight data to
lter motion.
Power Supply
Powered by bed controller with integral battery
backup.
Environmental Conditions
Operating Conditions
Ambient Temperature: +20°C to 30°C
Relative Humidity: 10% to 95% Non-Condensing
Figure 21
Caution: Steer Wheel function must be
disengaged to obtain an accurate resident/patient
weight.
Storage and Shipping Conditions
Ambient Temperature: -30°C to +50°C
Relative Humidity: 10% to 95% Non-Condensing
13
Page 14

Joerns® Bariatric Beds
Model Bari10A
Scale System Functions
and Weighing Procedures
Caution: Steer Wheel function must be
disengaged to obtain an accurate resident/patient
weight.
On
Button refreshes display or initiates power for
scale use.
0.0 Zero
With all bed linens in place and without resident/
patient in bed, press and hold Zero button.
Displayed message will read “PLEASE WAIT HANDS OFF”. Be sure nothing touches weightsensitive portion of integrated Scale System while
performing zeroing function. In a few seconds,
display will indicate “WEIGHT = 0.0 LB”.
Lb/Kg
Weight data may be viewed in either pounds or
kilograms. Pressing this button allows you to
switch between display modes quickly and easily.
Both modes will display resident/patient’s weight
within 0.1 units of resolution (0.1 Lb. or 0.1 Kg.).
Weight Mode
If display shuts off before you can view weight data,
simply press the On button to refresh display and
view resident/patient’s weight. Display will indicate
“WEIGHT = XXX.X LB”(or KG).
Caution: After initialization process is complete and
Scale System is still in Weight Change Mode, do
not press Zero button again, or you will lose all
stored resident/patient’s weight history.
Pressing Weight Mode button will switch back to the
Weight Mode allowing you to view resident/patient’s
total weight again.
Caution: If you do not press Freeze/Resume
button before adding/removing items from bed,
the weight of those items will be reected in the
displayed weight.
Note: You can correct any weight discrepancy
described above, by using Weight Mode (for
increases) and Weight Change Mode (for
decreases) buttons, to manually adjust displayed
weight reading. You will need to know the weight of
added/removed items to add/subtract from
total weight.
Freeze/Resume
Freeze/Resume mode button provides ability
to add or remove pillows, blankets or ancillary
equipment, without affecting resident/patient’s
displayed weight.
Press Freeze/Resume button. The display will
read “FREEZE = (resident/patient’s weight).”
Make all necessary adjustments to bed or
resident/patient. When done, press
Freeze/Resume button again to resume
normal weighing.
Weight Change Mode
This mode is used to monitor resident/patient’s
weight changes. Note: To enable this function
initially, press Weight Change Mode button with
resident/patient in bed and then press Zero button
to zero out weight. Display will read
“ WT CHG = (resident/patient weight)”.
Any variation in weight will now be viewed as a
“+” or “-” gure relative to zero.
If Freeze/Resume mode is left unattended for
more than three minutes, display will read “LEFT IN
FREEZE - REFER TO MANUAL.” You must press
Freeze/Resume button to exit this mode.
14
Page 15

Joerns® Bariatric Beds
Model Bari10A
Scale System Calibration
Periodic Calibration Check
1. Important: Following calibration procedure
should only be performed by qualied
maintenance personnel.
2. Load cell has no user serviceable components.
Do not tamper with for any reason.
3. Re-calibration is generally not required, but
should be veried periodically to ensure
accuracy. Joerns Healthcare recommends
checking calibration once every 12 months, or
as your maintenance policy requires.
Calibration Procedure
Note: Make sure nothing is in contact with Scale
System during this procedure. Be sure to remove
your hands from Scale System when noting
displayed calibration results.
1. Disengage Steer Wheel function if so equipped
with optional steer pedal.
2. Press Freeze/Resume button.
3. When display indicates “FREEZE = (weight)”,
press and hold Lb/Kg button. Display will read
“CAL” as right hand digit counts down to enter
CAL MODE.
4. When CAL MODE is shown, press Zero button
to zero the display.
5. Place known calibrated weight onto weighing
surface and compare it to displayed reading.
6. Press Weight Mode button for (+) corrections
and Weight Change Mode button for (-)
corrections to displayed weight. Displayed value
should be within 0.5% of calibrated weight, plus
or minus one digit.
7. Remove weight and re-zero. Repeat Steps 4-6,
until results are satisfactory.
8. When adjustments are completed:
a. Press on button to abort your changes
and exit the CAL mode, (or)
b. Press Freeze button to save all changes
and exit CAL mode.
Calibration Tolerance Table
Low Limit Applied Load (lbs) High Limit
248.7 250 251.4
497.4 500 502.6
746.2 750 753.9
994.9 1000 1005.1
Scale System Care
and Maintenance
Cleaning
1. Mild soap/water recommended for general
cleaning/disinfecting.
2. Exercise caution when cleaning LCD window.
Electrostatic Discharge (ESD)
Integrated circuits and semiconductors on printed
circuit boards may be damaged by electrostatic
discharge (ESD). Be sure to use proper handling
precautions at all times.
Electromagnetic Immunity
Electromagnetic Immunity is always relative
and standards are based on anticipated
environments of usage. If the user notes unusual
device behavior, this could be an indication of
electromagnetic interference. If such behavior is
observed it may be associated with the nearby
usage of radio or tv transmitters, cell phones,
electro-surgical equipment, etc. and the user
should try moving the interfering equipment further
from this device.
15
Page 16

Joerns® Bariatric Beds
Model Bari10A
Cleaning, Inspection
and Maintenance
Warning: Disconnect Bari10A Power Cord from
wall outlet before cleaning.
Warning: Do not use power wash or high pressure
cleaner on any Bari10A part.
Warning: Lock all four Casters when cleaning,
inspecting or performing any maintenance of the
Bari10A. Lower all Mattress Support Platform
sections unless necessary for service access.
Lock all functions on Staff Control. Disconnect
Power and Pendant Cords.
Caution: It is critically important to lock all four
casters individually.
Notice: Make sure the power cord is unplugged
from the power outlet and the control unit battery
is removed prior to disconnecting/connecting any
foot panel cables. Failure to ensure bed is not
powered when disconnecting/connecting the foot
panel cables may result in damage to the bed’s
electronic controls.
If any discrepancies are noted during inspection,
they must be corrected before continuing bed
use. Major service and repair must only be
performed by authorized Joerns Healthcare
Technical Support.
General Cleaning
1. For low level disinfecting, wipe surfaces with a
properly prepared detergent/disinfectant.
2. Do not use abrasive cleaners. Use damp rag
only, when cleaning around electrical connectors
and components.
3. Actuator surfaces must be cleaned of dust and
dirt regularly. Do not attempt to clean exposed
actuator push tubes.
Storage
1. Store in a clean dry area.
2. Plug bed power cord into grounded hospitalgrade electrical outlet. Actuator Control System
backup batteries maintain the longest life if kept
charged and are not allowed to fully discharge.
3. Failure to keep Bari10A bed plugged in, will
discharge backup batteries and shorten their life.
16
1. To ensure maximum life of your Bari10A bed,
follow all warnings and cautions within this
manual and maintain your bed with care, as
outlined below. The maintenance required will
be dictated by your bed’s usage and care,
which should be inspected every six months.
2. To optimize bed longevity:
a. Keep bed clean.
b. Observe bed usage and operation and
report any discrepancies or problems to
your distributor (contact information found
on page 18).
c. Check for loose bolts, nuts or pins, and
report problems. After a week of use,
check all bolts for any looseness, and
make sure all pins are in their normal
location and fastened.
d. Check structural parts for any cracking
(especially welds), bending or hole
enlargement.
e. Check wiring for proper connections and
damage (fraying, kinking or deterioration).
Report any damage to your distributor
(contact information found on page 18).
f. Check Actuators for correct mounting at
attachment points and ensure all related
pins are mounted securely and properly to
frame. Actuators are not serviceable.
Page 17

Lubrication Servicing
Recommended Lubricants
1. Lubricant: Super Lube® Multi-Purpose Aerosol.
2. Grease: Use Super Lube® synthetic grease or
equivalent.
Oiling Points
1. Keep pins and bolts oiled (sample indicated by
arrows in Figure 22).
2. Oil hinge points (sample indicated by arrows in
Figure 23).
Grease Points For Mattress
Support Platform
1. Grease Side and Foot Extensions (sample
indicated by arrows in Figure 24 and 25).
Joerns® Bariatric Beds
Model Bari10A
Figure 22
Figure 23
Figure 24
Figure 25
17
Page 18

Joerns® Bariatric Beds
Model Bari10A
Bari10A Bed Troubleshooting
Pendant and Staff Control Troubleshooting
Problem Solution
If movement does not occur when
Pendant or Staff button is pushed
If adjustment only partially occurs,
stops and beeps
Bed not responding to staff control 1. Check lockout status.
All lockouts indicators ashing 1. Push and hold Hi-Lo up and down on staff control or pendant
Knee Lockout indicator ashes when
attempting articulation
1. Function may be locked. Check Staff Control Function Lockout.
2. Adjustment may already be at maximum or minimum level.
3. Bed is not plugged into wall power outlet and battery has
discharged. Plug bed into wall outlet.
4. Pendant cord may be damaged. Check cord for damage. If cord is
damaged, discontinue bed usage until cord is replaced.
1. Battery may be low. Plug bed into power source.
2. Bed may be overloaded or constrained from moving. Determine
load and check for obstructions.
3. If beeping occurs while raising or lowering bed, Hi-Low Actuators
may have lost synchronization. Lower bed to lowest position.
Release Bed Down button. Press and hold Bed Down button for
ve seconds to recalibrate synchronization. If problems persist,
contact Technical Support.
2. Check connection is fully inserted with cable secured.
3. Check the bed is plugged into power source and control box green light
is illuminated.
4. Unplug bed for 60 seconds and plug back in.
5. If these steps fail to resolve the problem, call Technical Support.
simultaneously until ashing stops (No more then 15 seconds).
2. Unplug bed for 60 seconds and plug back in.
3. If these steps fail to resolve the problem, call Technical Support.
1. Bed is in a reverse Trendelenburg or Comfort Chair Position, level bed
(page 8, Figure 6, button 9).
2. Lower or raise Hi-Lo to end of travel.
3. If these steps fail to resolve the problem, call Technical Support.
Distributor Contact Information
For parts or technical assistance from Stryker call:
USA: 800.327.0770
Canada: 888.233.6888
18
Page 19

Joerns® Bariatric Beds
Problem Possible Cause What to Do
Bed movement with all
casters locked.
Scale System display
is blank after On button
is pushed.
Scale System gives
suspect readings.
Mattress Support
Platform sections do
not extend.
Mattress Support
Platform sections do
not contour.
Actuator push tube will
only move inwards and
not outwards.
Actuator motor makes
sound, but push tube
does not move.
Actuator runs too
slowly or does not
give full power.
1. Braking mechanisms may be worn
on one or more casters.
1. Bed power cord may be unplugged
and integral battery backup has
become drained of power.
2. Unit is defective.
1. Foot Panel cable connection is
loose.
2. Scale System may need calibration.
3. Steer Wheel function is engaged.
1. Latch handles not fully disengaged.
2. Binding.
1. Pendant or Staff Control operation.
2. Staff Control function lockout may
have been activated.
3. Unit may be defective or damaged.
1. Unit may be defective or damaged.
Possible synchronization problems.
1. Unit may be defective or damaged. 1. Remove bed from use and contact
1. Bed may not be plugged in and
is running on integrated battery
backup with low charge.
2. Unit may be defective or damaged.
1. Remove bed from use and contact
Technical Support.
1. Plug in power cord.
2. Contact Technical Support.
1. Check for tight connection.
2. Refer to Page 15 of this Manual.
3. Disengage Steer Wheel function.
1. While actuating the latch handle,
try to extend the mattress support
platform extension. Refer to page 10
of this manual.
2. Wider support platform sections may
require two hands to apply equal pull
force. Contact Technical Support.
1. Refer to Pendant or Staff Control
Troubleshooting on page 18.
2. Refer to page 8 of this manual: Staff
Control Function Lockout.
3. Remove bed from use and contact
Technical Support.
1. Remove bed from use and contact
Technical Support.
Technical Support.
1. Plug in power cord and note any
change in performance.
2. Remove bed from use and contact
Technical Support.
Model Bari10A
Distributor Contact Information
For parts or technical assistance from Stryker call:
USA: 800.327.0770
Canada: 888.233.6888
19
Page 20

Joerns® Bariatric Beds
Model Bari10A
Appendix A - Actuator Wiring Diagram
Staff Control
Hi-lo Head
Staff Control Harness
Hi-lo Foot
Back
Pendant
Knee
7 out
6 out
5 out
4 out
3 out
2 out
1 out
2 in
1 in
Pwr
Power
Cord
20
Page 21

Joerns® Bariatric Beds
Appendix B – Scale System Wiring Diagram
Model Bari10A
ITEM DESCRIPTION
1 Membrane Keypad
2 Scale Display Board
3 Load Cell Assembly
4 Scale Display Assembly
5 Scale Harness
6 Foot End Load Cell Harness
7 Left Side Scale Harness
8 Right Side Scale Harness
9 Staff Control Harness
10 Power Conditioning Board
11 Staff Control Harness
21
Page 22

Joerns® Bariatric Beds
Model Bari10A
Joerns Healthcare Warranty Program
for all Joerns® Bari10A Beds
Joerns Bari10A beds are guaranteed for a period of
one year from the date of delivery, against defects in
materials and workmanship, under normal use
and service.
This one-year warranty includes all mechanical and
electrical components.
Steel structural components on beds are covered
under warranty for a period of 10 years from the
date of delivery.
Welds are covered under warranty1 for the lifetime of
the product.
Damage caused by use in unsuitable environmental
conditions, abuse or failure to maintain the product
in accordance with user and service instructions is
not covered.
Any alteration, modication, or repair unless
performed by or authorized in writing by
Joerns Healthcare, will void this warranty.
Parts
Joerns beds contain various parts that wear from
normal use. These parts, such as DC batteries, are
not covered under the one-year warranty, but are
covered for 90 days after date of delivery.
Joerns Healthcare’s obligation under this warranty is
limited to supplying replacement parts, servicing or
replacing, at its option, any product which is found
by Joerns Healthcare to be defective.
Warranty replacement parts are covered by the
terms of this warranty until the product’s original
one-year warranty period expires.
When requested by Joerns Healthcare, parts
must be returned for inspection at the customer’s
expense. Credit will be issued only after inspection.
Service
Most service requests can be handled by the facility
Maintenance Department with assistance from
Technical Support.
Most parts requested can be shipped next day air at
the customer’s expense.
Should a technician be required, one will be
provided by Joerns Healthcare, at our discretion.
Only the Joerns Healthcare Product Service
Department can dispatch authorized technicians.
This warranty is extended to the original purchaser
of the equipment.
1
Intended product lifetime is 15 years.
Joerns
Healthcare
www.joerns.com • email: info@joerns.com
Distributor Contact
Information
To submit a warranty claim, call
your local Stryker representative
or call Stryker Customer Service at
800.327.0770 or 888.233.6888 for
Canada.
Post Acute, Acute, HomeCare
5001 Joerns Drive
Stevens Point WI 54481
(P) 800.826.0270
(F) 800.457.8827
VA/Government
19748 Dearborn Street
Chatsworth, CA 91311
(P) 800.966.6662
(F) 800.232.9796
© 2010 Joerns Healthcare • 6110087 RevA • 10-1047
Canadian Ofce
1000 Clarke Road, Suite 6
London, ON Canada N5V 3A9
(P) 866.546.1151
(F) 519.451.8662
 Loading...