

Page 1

3-Axis Handheld Stabilizer for Smartphone
V 1.0ENUser Manual
Page 2
Product overview
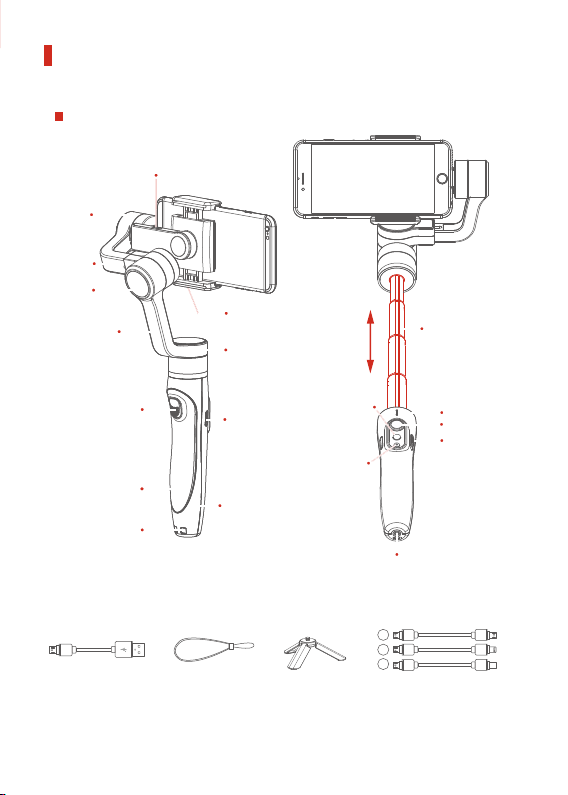
1. Structure
Smartphone shown in illustrations is for reference only
Micro USB port
(smartphone charging port)
Tilt axis
Cross arm
Roll axis
Smartphone
Vertical arm
Trigger button
Built-in battery
Wrist strap hole
2. Included items
holder
Pan axis
Micro USB port
(stabilizer charging port)
Hand grip
Wrist strap Micro USB cable
Bluetooth shutter
release button
Tripod
Function
button
1/4-20 Thread mount
a
b
c
Micro to Micro cable
a.
Micro to Lightning cable
b.
c.
Micro to Type C cable
Telescopic handle
retractable and
extendable
(0-7.2in / 0-183mm)
Status indicator
Joystick
Control slider
1
Page 3
Product setup
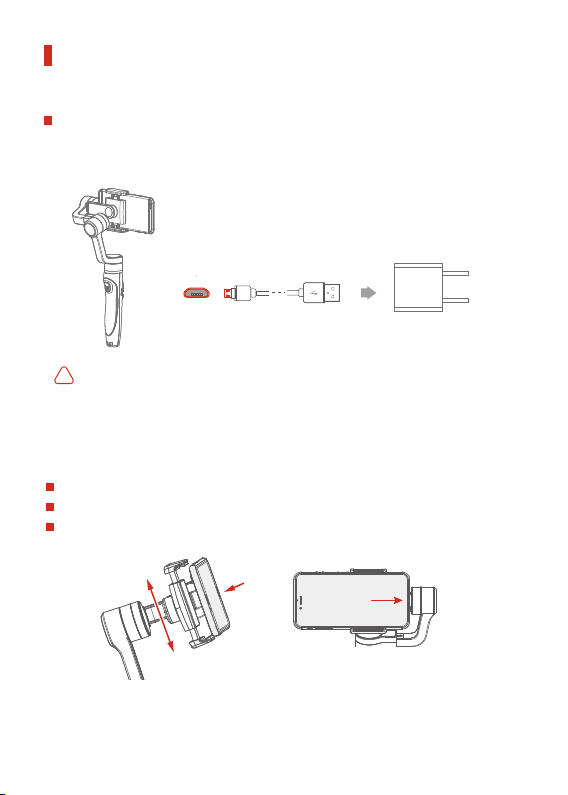
1. Stabilizer charging
Fully charge the battery before powering on the stabilizer for the first time.
Charge the stabilizer with the Micro USB cable.
The indicator is red in charging status. It will turn green when the battery is fully charged.
Micro USB cable
(1) Install the smartphone before powering on the stabilizer.
!
(2) When not in use, turn off the stabilizer and then remove the smartphone.
5V/2A USB charger
(not included)
.
2. Insert smartphone
Stabilizer must be powered off when mounting the phone.
Smartphone holder width range : 2.2-3.3in / 57-84mm
It's recommended to remove your smartphone protective case.
Place smartphone in the holder, push it against the back of the holder and slide it
towards the side of the stabilizer.
2
Page 4
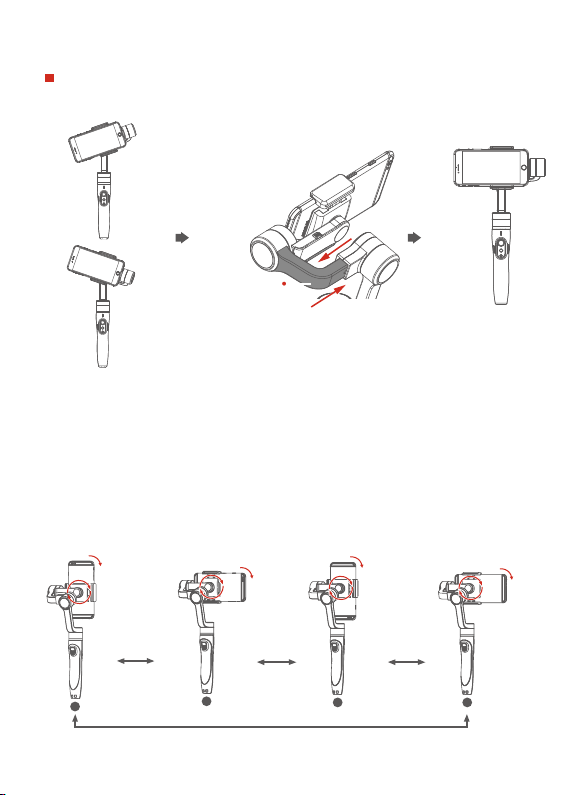
3. Balancing smartphone
When the stabilizer is off, if the smartphone is unbalanced after being mounted,
adjust the cross arm until the phone stays horizontal.
Leftward
Cross arm
Rightward
Best balance
(1)If smartphone tilts to the left, pull cross arm out to the right until phone is horizontal.
(2)If smartphone tilts to the right, push cross arm in to the left until phone is horizontal.
Note: The smartphone must be balanced as explained above to guarantee correct
stabilizer functioning.
4. Smartphone orientation
Simply rotate the phone holder until you reach the orientation that you need.
If the phone obstructs the rotation, reposition the phone.
90°
1
90°
2
90°
3
4
90°
3
Page 5
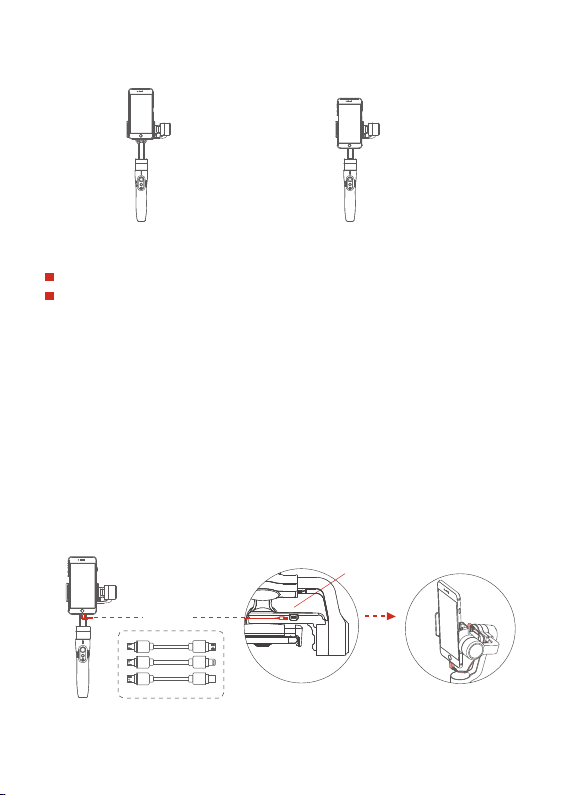
When mounting the phone vertically, consider the phone weight for positioning the holder:
Heavier phone: the holder is positioned in the middle.
Lighter phone: the holder is positioned towards the bottom.
Heavier load
weight:
130-200g
0.29-0.44 lbs
Lighter load
weight:
≤130g
< 0.29 lbs
5. Power on / off
Make sure the smartphone is secure before powering on the stabilizer.
When battery is low, the status indicator will blink red three times every 5 seconds,
charge the stabilizer.
Power on: press and hold the function button until the status indicator turns green and the
stabilizer beeps.
Power off: press and hold the function button until the status indicator changes from a
flashing red to a solid red light and stabilizer beeps.
Note: Turn on the stabilizer only when the phone is mounted, otherwise motors might be
damaged.
Vibrating is normal for the first few seconds after turning on the stabilizer. It will
disappear when the motor's auto-adjustment is done.
6. Smartphone charging
Should you need to charge your smartphone, you can opt to connect the phone to the
stabilizer using the corresponding cable (included).
Micro USB Port
cables
4
Page 6

Controls and operations
1. Status indicator
The current mode of the stabilizer can be identified by the indicator status as follows:
Indicator status
Blue light flashes once
Blue light flashes twice
Constant blue light
Blue light k eeps flashing
Red light keeps flashing Stabilizer powering off
2. Bluetooth shutter release button
By connecting via Bluetooth or App you can trigger pictures and videos on your phone
as follows:
Single click Take a photo
Press & Hold
Note: Single click during video recording allows taking a picture.
You can tap the Bluetooth shutter release button during a single
recording session as many times as you like to take multiple stills.
Troubleshooting: if the stabilizer fails to connect to the App, power off the stabilizer. Press and hold
both the Bluetooth shutter release button and the function button to reset the Bluetooth connection.
3. Joystick control
The stabilizer joystick can control pan (move the joystick
right/left) and tilt (move the joystick up/down).
If the stabilizer is in follow mode, the joystick can control the
roll axis angle (-30° ~ +30°) when moved right/left.
Mode / Status
Pan mode
Follow mode
Lock mode / stabilizer initialization
/ motion control mode
Initialization failure/
malfunction
Low powerRed light flashes three times
ActionsButton
Start video recording / Stop video recording
5
Page 7

4. Other controls and functions
Function button
Single click
Double click
Triple click
Four clicks Both the pan and tilt directions can be rotatedMotion control mode
Five clicks Reset
Trigger button
Press & Hold
Double click Reset to default
Function
Pan Mode
/ Lock Mode
Follow mode
Switching camera lens It needs to be used with the App
Explanation
Single tap to switch between pan mode and lock mode
When in follow mode you can use the joystick left/right to control
the roll axis angle (-30° ~ +30°) or up/down to control the tilt axis
angle. When in follow mode, click the function button once to
return to pan mode
After the reset succeeds or fails, you can click the function button
to restart the stabilizer
Function Explanation
Temporary Lock
In the pan mode or follow mode, holding the trigger button
temporarily locks pan and tilt until released
Centers the camera away from the user on all 3 axes ( pan,
tilt and roll) and switches back to the default pan mode
Function ExplanationControl slider
Sliding up-down Adjust parameters
Adjust phone camera parameters when using the stabilizer App
5. Automatic rotation of the smartphone
From horizontal to vertical:
(1) Hold the stabilizer horizontally parallel to the ground.
(2) Press and hold the trigger button and at the same time click once on the function button.
Form vertical to horizontal (reset):
(1) Hold the stabilizer horizontally parallel to the ground.
(2) Double click on the trigger button.
Note: The automatic rotation function works ONLY if the stabilizer is held horizontally
parallel to the ground.
Vertical Shooting Reset
Single click
Hold the stabilizer in horizontal
6
Press & Hold
Double clicks
Page 8

Operation modes
Pan mode (Default mode) ⸺ The roll and tilt directions are fixed, and the
smartphone moves according to the hand movement direction of the user.
Follow mode ⸺ The roll direction is fixed, and the smartphone moves according
to the hand movement direction of the user.
Lock mode ⸺ The orientation of the smartphone is fixed.
Reset ⸺ Return to pan mode (default mode).
Manual Lock
Smartphone can be manually positioned while in pan mode, follow mode and lock
mode. Both the pan and tilt can be manually set.
Manually move smartphone to desired position,
and hold for half a second. New tilt and/or pan
positions are automatically saved.
Motion Control Mode
The stabilizer can easily create constant speed movement by using the motion control mode.
This mode can be used for recording both regular video and timelapse photography.
For best results, attach the stabilizer to the included tripod to keep it completely still.
1. Set motion speed in the App
To set the motion speed, connect to the App and select desired speed from the motion
control option in the settings menu.
Smart stabilizer rotation speed
30
15
12
seconds
/ turn
18
seconds
/ turn
24
seconds
/ turn
30
seconds
/ turn
1
minute
/ turn
2
minutes
/ turn
4
minutes
/ turn
8
minutes
/ turn
minutes
/ turn
minutes
/ turn
1
hour
/turn
(default)
hours
/ turn
8
4
hours
/ turn
7
Page 9
2. Enter motion control mode by
clicking the function button 4 times
4. Set rotation end position
3. Set rotation start position
Tilt axis
Pan axis
Record the first position (rotation start position)
by manually moving smartphone to desired
position. Hold in position for half a second.
Click the function button to record rotation
start position.
5. The stabilizer moves from rotation start
position to rotation end position
Tilt axis
Pan axis
Record the second position
(rotation end position) by
manually moving smartphone
to desired position. Hold in
position for half a second.
Click the function button to
record rotation end position.
The stabilizer automatically
returns to the start position.
The tilt axis and the pan axis
start to rotate uniformly from
the start to the end position
according to the set rotation
speed.
Exit operations:
When in motion control mode, you can double click the trigger button to reset the stabilizer to the
default mode.
After the auto-rotation is finished, the stabilizer automatically exits auto-rotation mode and enters
follow mode.
Stabilizer reset
Reset stabilizer when:
(1) Smartphone fails to remain level.
(2) The stabilizer has not been used for a long period of time.
(3) The stabilizer is used in extreme temperature variations.
Click the function button five times.
The motors will stop working.
Status indicator turns solid blue.
Note: if the reset is not successful, click the function button to restart. Try the reset process again.
8
Place the stabilizer on a flat, horizontal surface.
The stabilizer will automatically reset after a
few seconds detecting no movement. The blue
light will flash three times to indicate end of the
reset process.
After the reset is successful,
click the function button to
restart.
Page 10

App download and firmware upgrade
1. App download
Android VersioniOS Version
For iOS users: scan the QR code or go to the App Store and search for "Smart Stabilizer".
For Android users: scan the QR code or go to Google Play and search for "Smart Stabilizer".
App Store
Google play
2. Firmware upgrade
Connect the stabilizer to the App to upgrade the firmware.
Updata
Query Update
Stabilizer
Updating...
9
Page 11

Technical specifications
4.65 in
118mm
3.01 in
76.4mm
12.72 in
323mm
7.67 in
194.7mm
Max. tilt range Maximum load weight320°
Max. roll range 320°
Max. pan range
Operation time
Phone compatibility
Weight 428g / 0.94 lbs (Not including the smartphone)
320°
operation time in motion shooting: around 5 hours; operation
time in normal shooting: around 10 hours
smartphones (mobile phone width range: 2.2-3.3in / 57-84mm)
4.35 in
110.5mm
12.72 in
323mm
210g / 0.46 lbs
10
Page 12

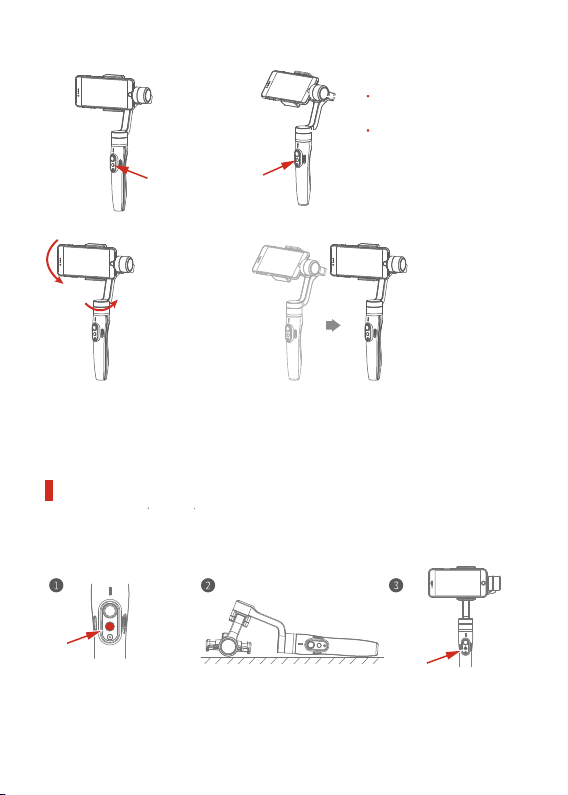
IMPORTANT NOTES
The smartphone must be balanced to guarantee the correct functioning of the stabilizer.
Turn on the stabilizer only when the smartphone is mounted, otherwise motors might be damaged.
Vibrating is normal for the first few seconds after turning on the stabilizer. It will disappear when
the motor's auto-adjustment is done.
Do not force the motors to rotate rapidly since they cannot spin 360°.
Keep the stabilizer away from impact when the telescopic handle is extended. (as shown in Figure a)
When the stabilizer is powered on, don't grab the top part. (as shown in Figure b)
If placing the stabilizer on a flat surface, put the stabilizer on a tripod to ensure it is upright. (as
shown in Figure c)
Keep the stabilizer away from water.
The stabilizer is not compatible with quick chargers.
Power on
Figure a Figure b Figure c
11
Page 13

FAQ
1. The stabilizer can't stabilize or motors are powerless after booting.
Ensure that the smartphone has been mounted and balanced correctly on the stabilizer.
2. Vibration happens when using the stabilizer in normal way.
Default value of motor strength is a bit high so that the stabilizer can work properly in
portrait mode. If the smartphone is lighter in weight, there might be vibrations. If that
happens, connect the stabilizer with the App and adjust the rate of motor strength.
3. "No Stabilizer Found" or "Connection Fail" when trying to connect the stabilizer with
the App.
(1) Forget the stabilizer or cancel pairing in Bluetooth list of the smartphone. Close and
open phone's Bluetooth then search again the stabilizer.
If the stabilizer can't be found in the Bluetooth list, it may be connected with previously
(2)
paired phones. Turn off the Bluetooth of other phones and search again in the App.
(3) Reboot the smartphone if the problem persists.
4. iPhone moves randomly when performing face tracking or object tracking.
(1) Go to the phone control center and make sure the screen rotation is unlocked.
(2) Restore default settings in the App.
Portrait Orientation Lock: Off
DISCLAIMER
Any use for illegal purposes is prohibited. Users are responsible for properly using product.
The manufacturer assumes no liability for any risks related to or resulting from the debug and use of
this product (including the direct, indirect or third-party losses).
Firmware upgrades may cause changes in function descriptions in this user manual. Read the
instructions carefully before upgrading the firmware and use the corresponding user manual.
The manufacturer reserves the right to amend this manual and the terms and conditions of using the
product.
12
Page 14

Certification and Compliance
FCC ID:
This device complies with part 15 of the FCC Rules. Operation is subject to the
following two conditions:
(1) This device may not cause harmful interference, and
(2) this device must accept any interference received, including interference that may
cause undesired operation.
NOTE: This equipment has been tested and found to comply with the limits for a Class B
digital device, pursuant to part 15 of the FCC Rules. These limits are designed to provide
reasonable protection against harmful interference in a residential installation. This
equipment generates, uses and can radiate radio frequency energy and, if not installed
and used in accordance with the instructions, may cause harmful interference to radio
communications. However, there is no guarantee that interference will not occur in a
particular installation. If this equipment does cause harmful interference to radio or
television reception, which can be determined by turning the equipment off and on, the
user is encouraged to try to correct the interference by one or more of the following
measures:
—Reorient or relocate the receiving antenna.
—Increase the separation between the equipment and receiver.
—Connect the equipment into an outlet on a circuit different from that to which the
receiveris connected.
—Consult the dealer or an experienced radio/TV technician for help.
Page 15

twitter.com/jobyinc
facebook.com/jobyinc
© 1996-2019 Vitec Imaging Solutions Spa
Via Valsugana, 100
36022 Cassola (VI) Italy
instagram.com/jobyinc
youtube.com/jobyinc
 Loading...