

Page 1
1
1 von 36136
Manual
Page 2

2
Index
Chapter I Basic Functions........................................................................................... 3
1. Overview............................................................................................................. 3
2. Buttons, Slots and LCD screen........................................................................... 4
Buttons................................................................................................................ 5
Symbols of battery electricity............................................................................... 6
3. Charging the battery ........................................................................................... 6
Charging indicators ............................................................................................. 7
Chapter II.................................................................................................................... 8
Photo ...................................................................................................................... 8
1. Browser............................................................................................................... 9
Picture wall.......................................................................................................... 9
2. Search............................................................................................................... 13
3. Recover............................................................................................................. 14
Chapter III ................................................................................................................. 16
Backup.................................................................................................................. 16
1. Full Backup.................................................................................................... 17
2. Incremental Backup...................................................................................... 18
3. Backup Setup................................................................................................ 20
Chapter IV ................................................................................................................ 23
1. File Manager ................................................................................................. 24
2. Creating Thumbs........................................................................................... 25
3. USB Connection............................................................................................ 25
4. Slide Show .................................................................................................... 26
5. Running Script............................................................................................... 26
6. Firmware Update........................................................................................... 26
Chapter V ................................................................................................................. 27
Tools..................................................................................................................... 27
1. Hard Drive Tools ........................................................................................... 28
2. Memory Card Tools....................................................................................... 29
Chapter VI ................................................................................................................ 30
Setup .................................................................................................................... 30
1. Interface Setup.............................................................................................. 31
2. Backlight Setup ............................................................................................. 31
3. Language Setup............................................................................................ 32
4. Key Sound..................................................................................................... 32
5. Reset............................................................................................................. 32
6. System Information........................................................................................ 32
Appendix A: Safety And Operation ....................................................................... 33
Appendix B: Operation Techniques and Problem Solving.................................... 34
1. Operation techniques .................................................................................... 34
2. Troubleshooting............................................................................................. 34
3. Replacing and Installing the Battery.............................................................. 35
Contact/Service..................................................................................................... 36
2 von 36236
Page 3
Chapter I Basic Functions
1. Overview
3
3 von 36336
Page 4

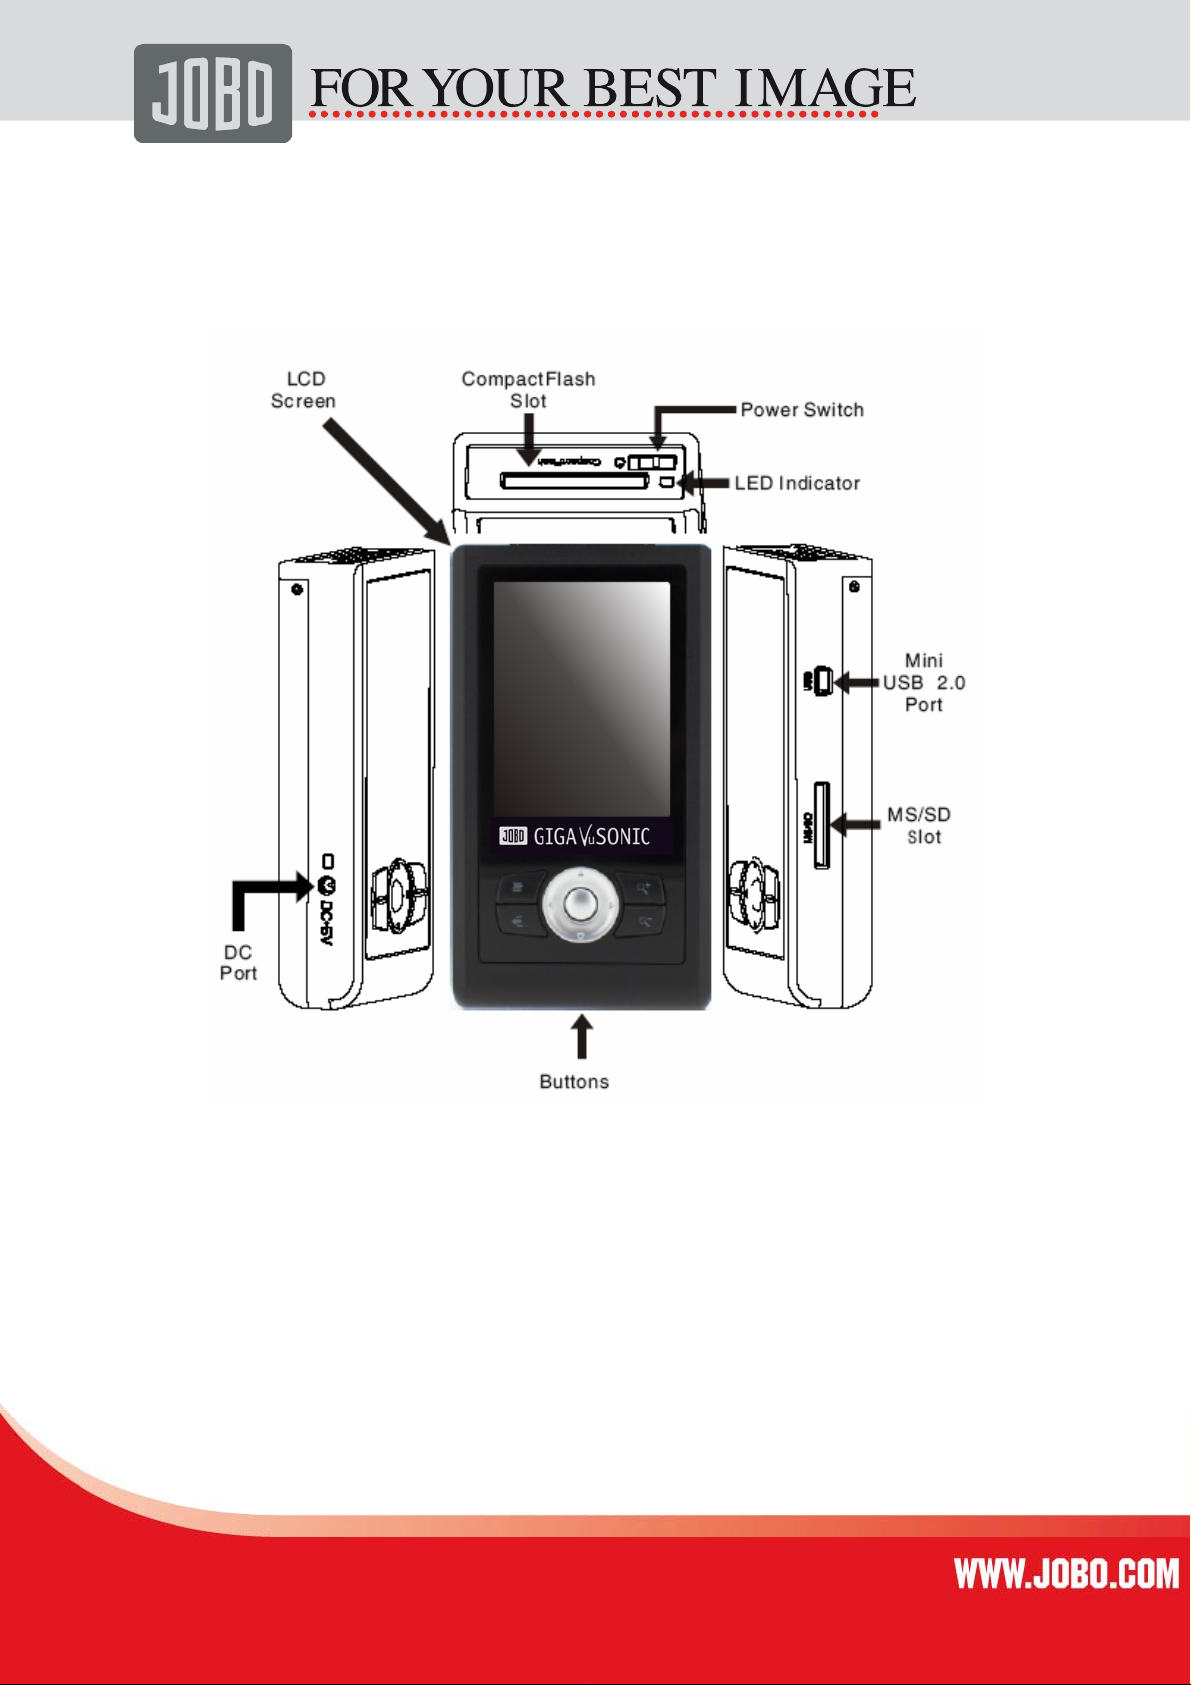
2. Buttons, Slots and LCD screen
Power switch
Start GIGA VU SONIC:
Push and hold the power switch for about 3 seconds till the startup frame
appears, and then release the power switch.
Turn off GIGA VU SONIC:
Push the power switch slightly and select <Yes> in the Message Box.
Forced shutdown of GIGA VU SONIC:
Push and hold the power switch till the “Shutdown In Process” frame appears,
and then release the power switch.
4
LED indicators
Yellow is shown:
An error occurred to the current operation.
Green is shown and flashing:
GIGA VU SONIC is processing data, such as USB connection, backup of
memory card.
CompactFlash slot (CF slot for short)
For insertion of CF memory cards and compatible equipment.
MS/SD slot
For insertion of MS and SD memory cards and compatible equipment.
4 von 36436
Page 5
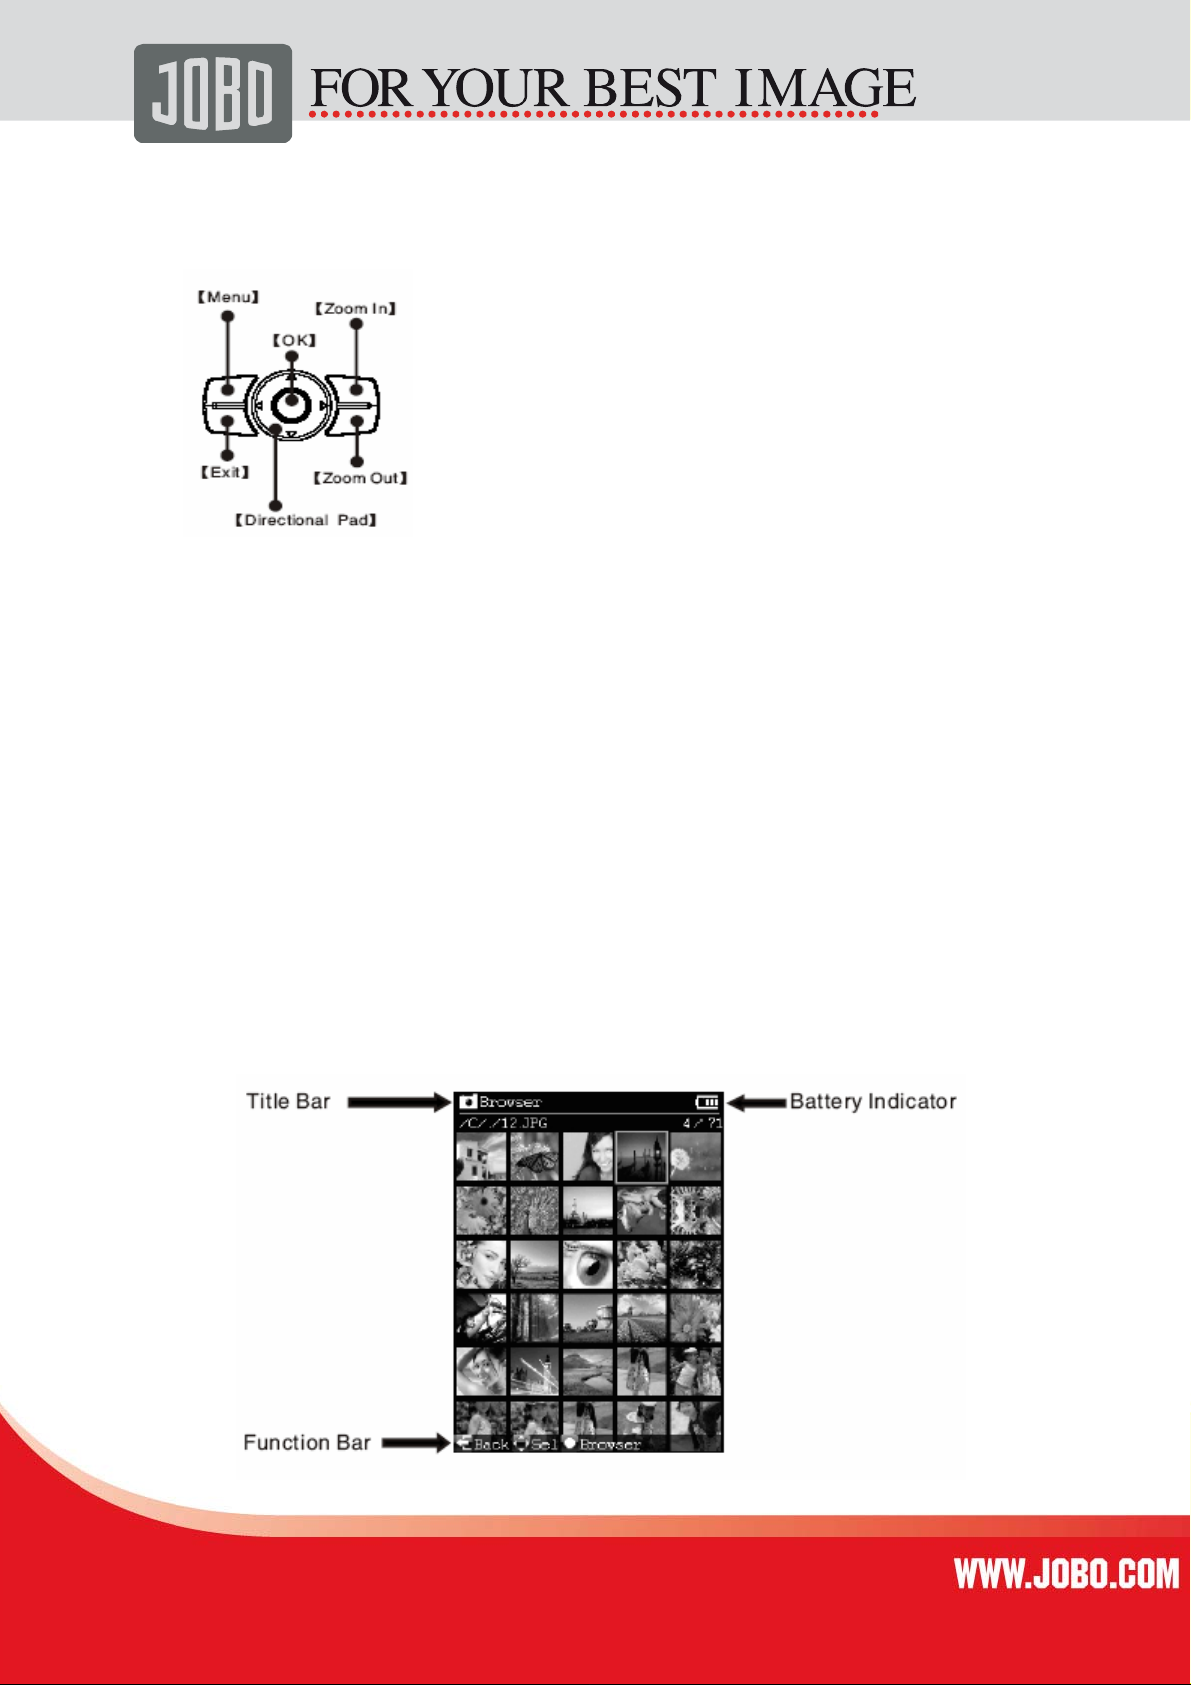
Buttons
5
Button name Function
OK Confirming choice or starting a function.
Directional Pad
Menu When the interface has additional functions,
Exit
Zoom in
LCD screen
GIGA VU SONIC has a 3.2 LCD screen.
Title column:
Indicating current function
Status indication column:
Changing the selected options.
press the button to retrieve the menu.
Exiting the current function mode and
returning to the previous one.
Zooming in and out pictures being browsed
Operating instructions in the current interface Symbols of battery
5 von 36536
Page 6
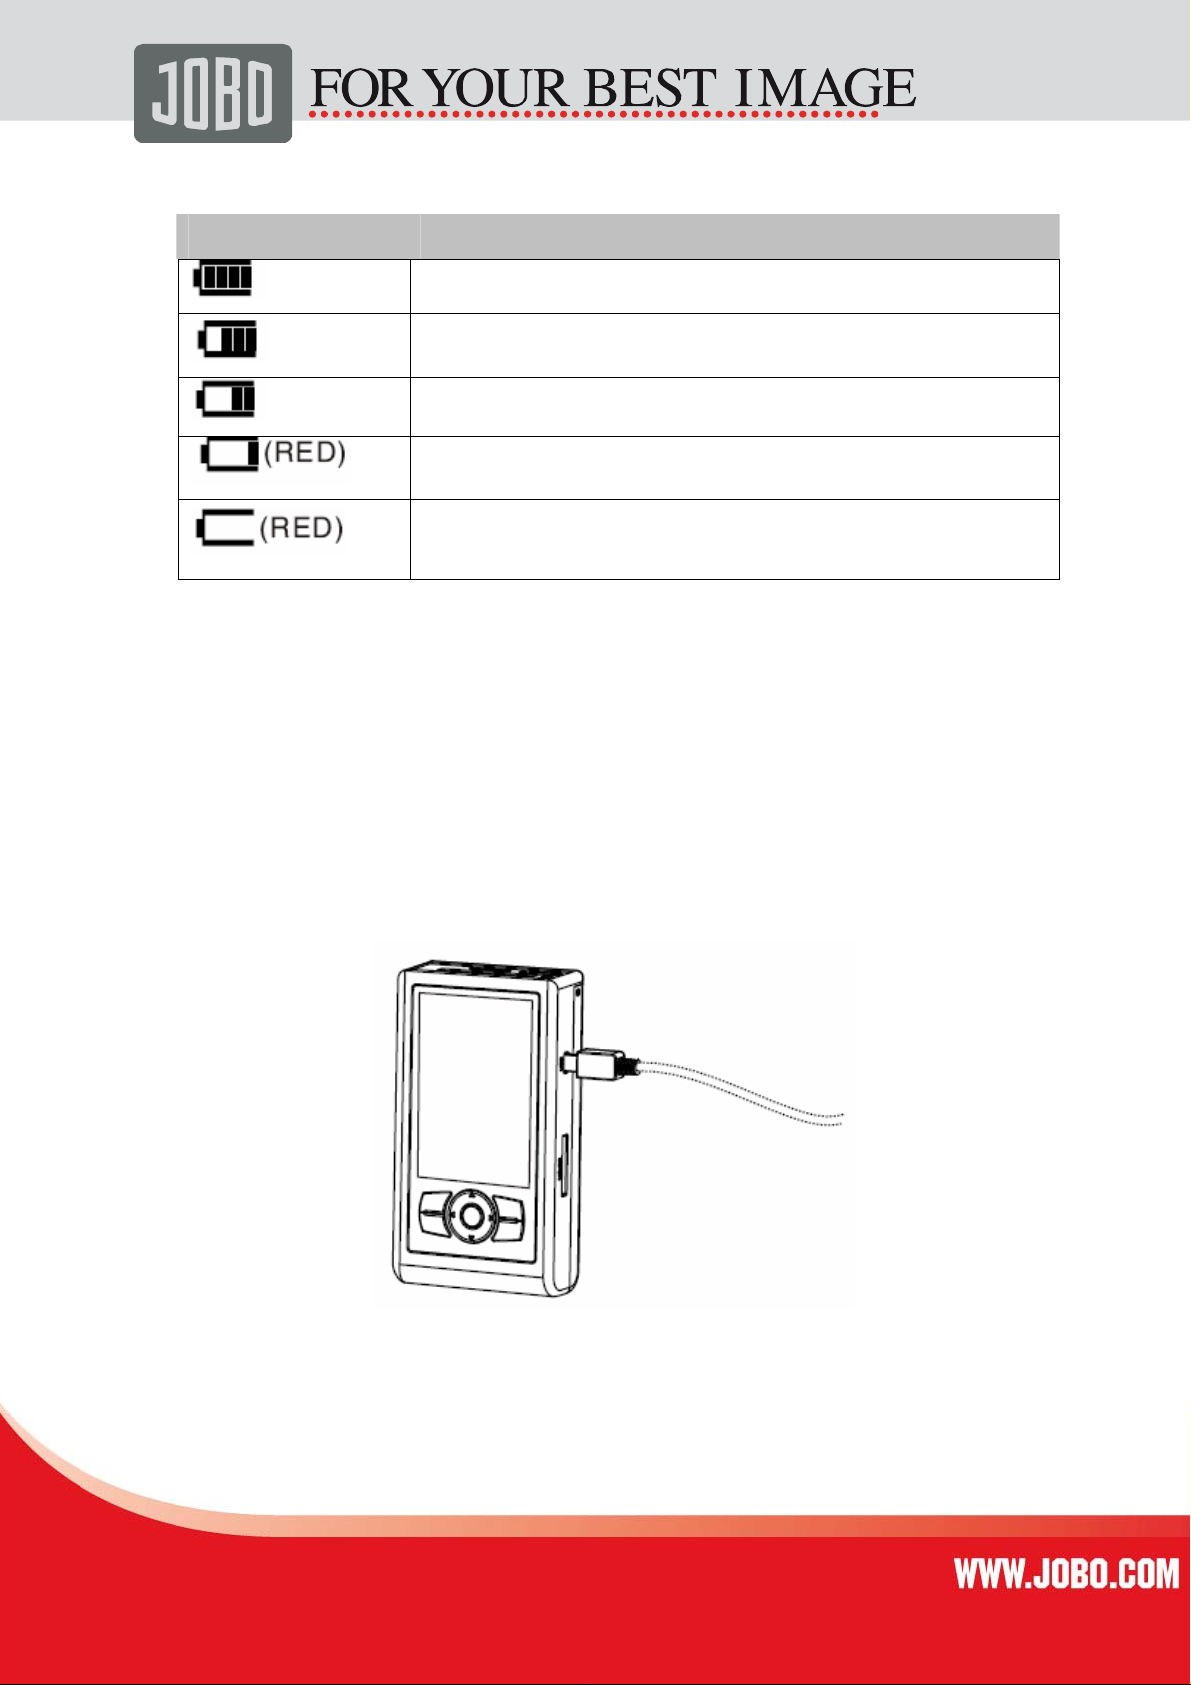
Symbols of battery electricity
Status Indication
6
Electricity is over 75%
Residual electricity is 60%
Residual electricity is 30%
Electricity is used up. Charge it as soon as possible.
Electricity is used up. The unit will shut down
automatically.
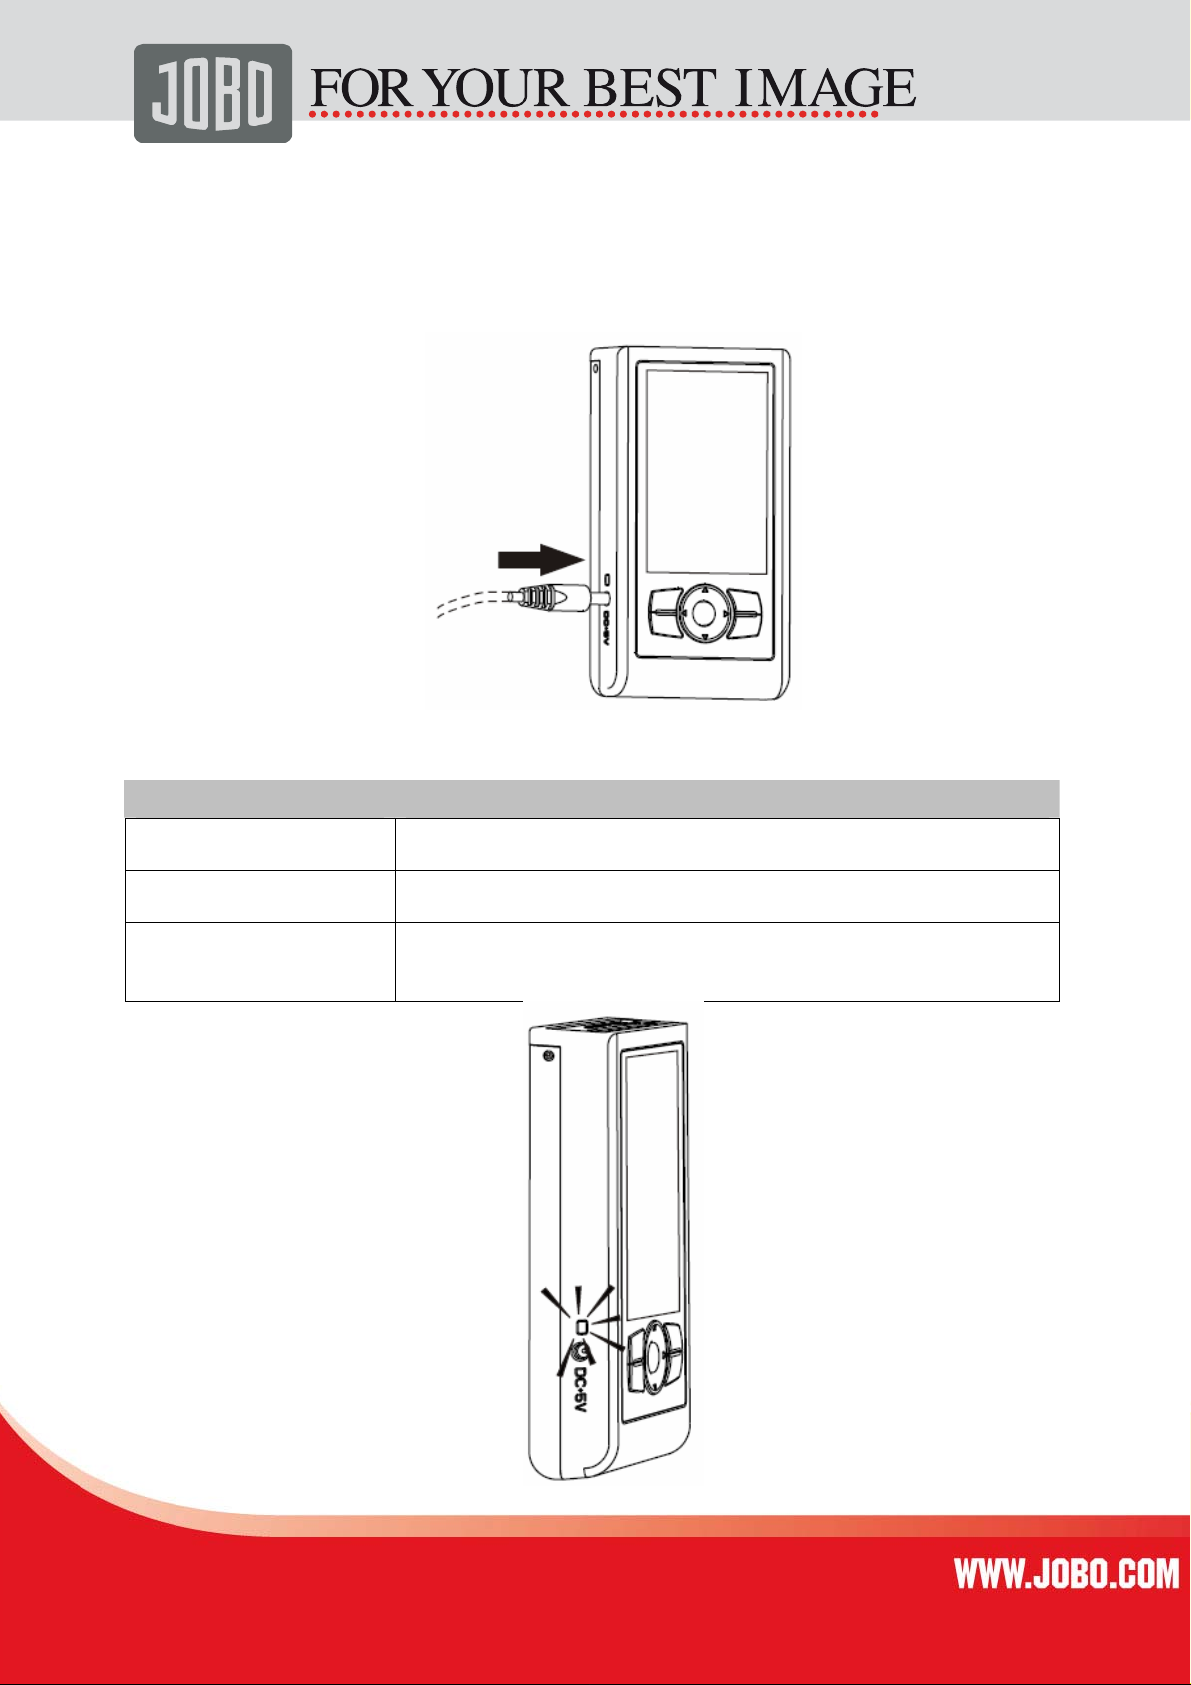
3. Charging the battery
Charging the battery with the USB cable provided:
When the unit is powered off, insert GIGA VU SONIC into USB2.0 interface of Mac or
PC (frontal USB ports and external USB HUB of most PCs cannot supply sufficient
power, so please connect GIGA VU SONIC to USB2.0 port of the host), and the builtin lithium battery will be charged.
6 von 36636
Page 7
7
Charging the battery with the power adapter provided:
When the unit is powered off, insert the power adapter provided into DC port, and the
built-in lithium battery will be charged. When adapters other than those of the original
manufacturer are used, ensure the output index conforms to requirements. Refer to
relevant sections of “Appendix A”.
Charging indicators:
Status Indication
Constant on Charging in process
Extinguished Charging finished
Flashing Malfunction of charging. Refer to relevant sections of
“Appendix B”
7 von 36736
Page 8
Chapter II
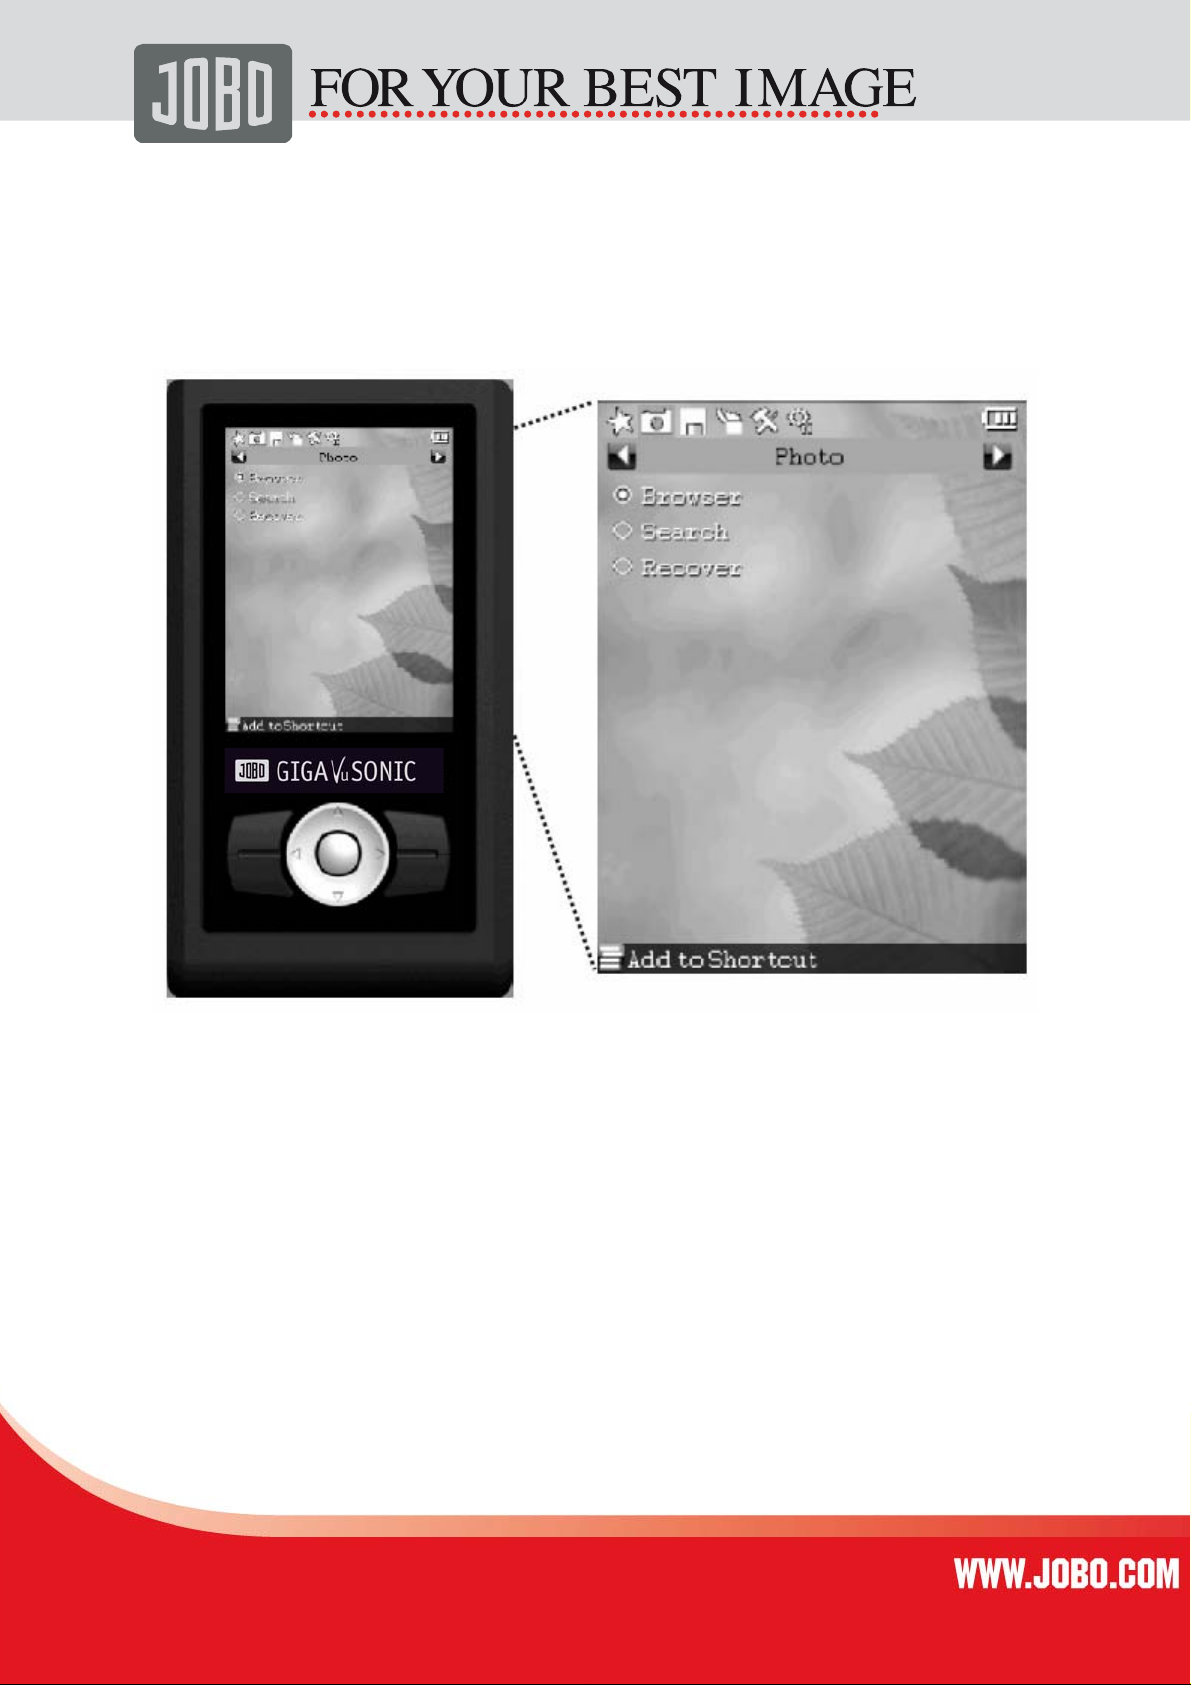
Photo
8
GIGA VU SONIC has built-in picture browser, picture search and picture recovery
tools, etc. These enable you to browse and share digital pictures conveniently, and
even recover your loss due to deleting pictures by mistake.
8 von 36836
Page 9
1. Browser
The built-in picture browser of GIGA VU SONIC allows you to browse your digital
pictures without going through the computer.
Starting picture browser:
Select <Browser> under <Picture> on the main menu.
Selecting folders to browse:
Select the folder you desire to browse in the Folder Selecting Window.
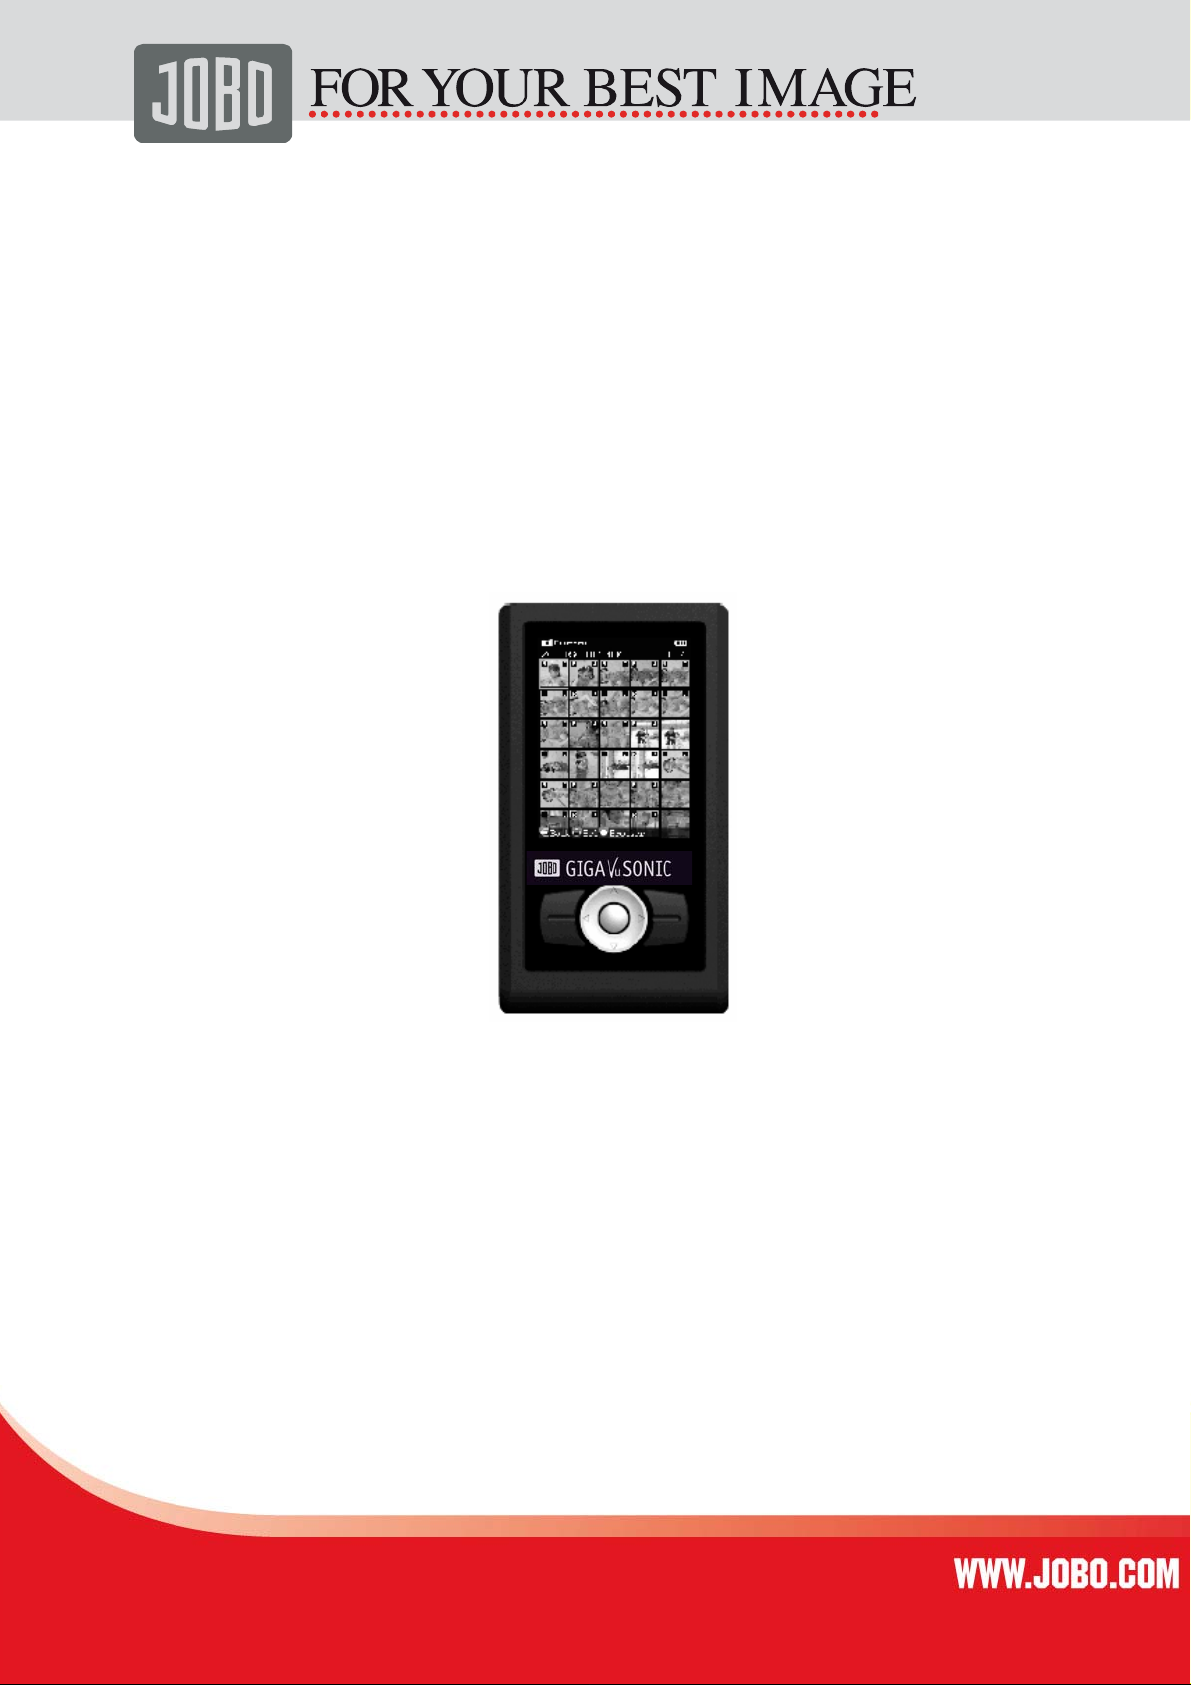
Picture wall:
9
Digital pictures in the selected folder will be displayed horizontally in the form of
thumbnail. You may use the „Direction“ button to change the highlighted pictures.
“R” and “J” marks:
R: The picture contains RAW format data.
J: The picture contains JPG format data.
Changing size of thumbnail:
In the Picture Wall, pressing “Zoom In” and “Zoom Out” buttons can change size of
the thumbnail.
9 von 36936
Page 10
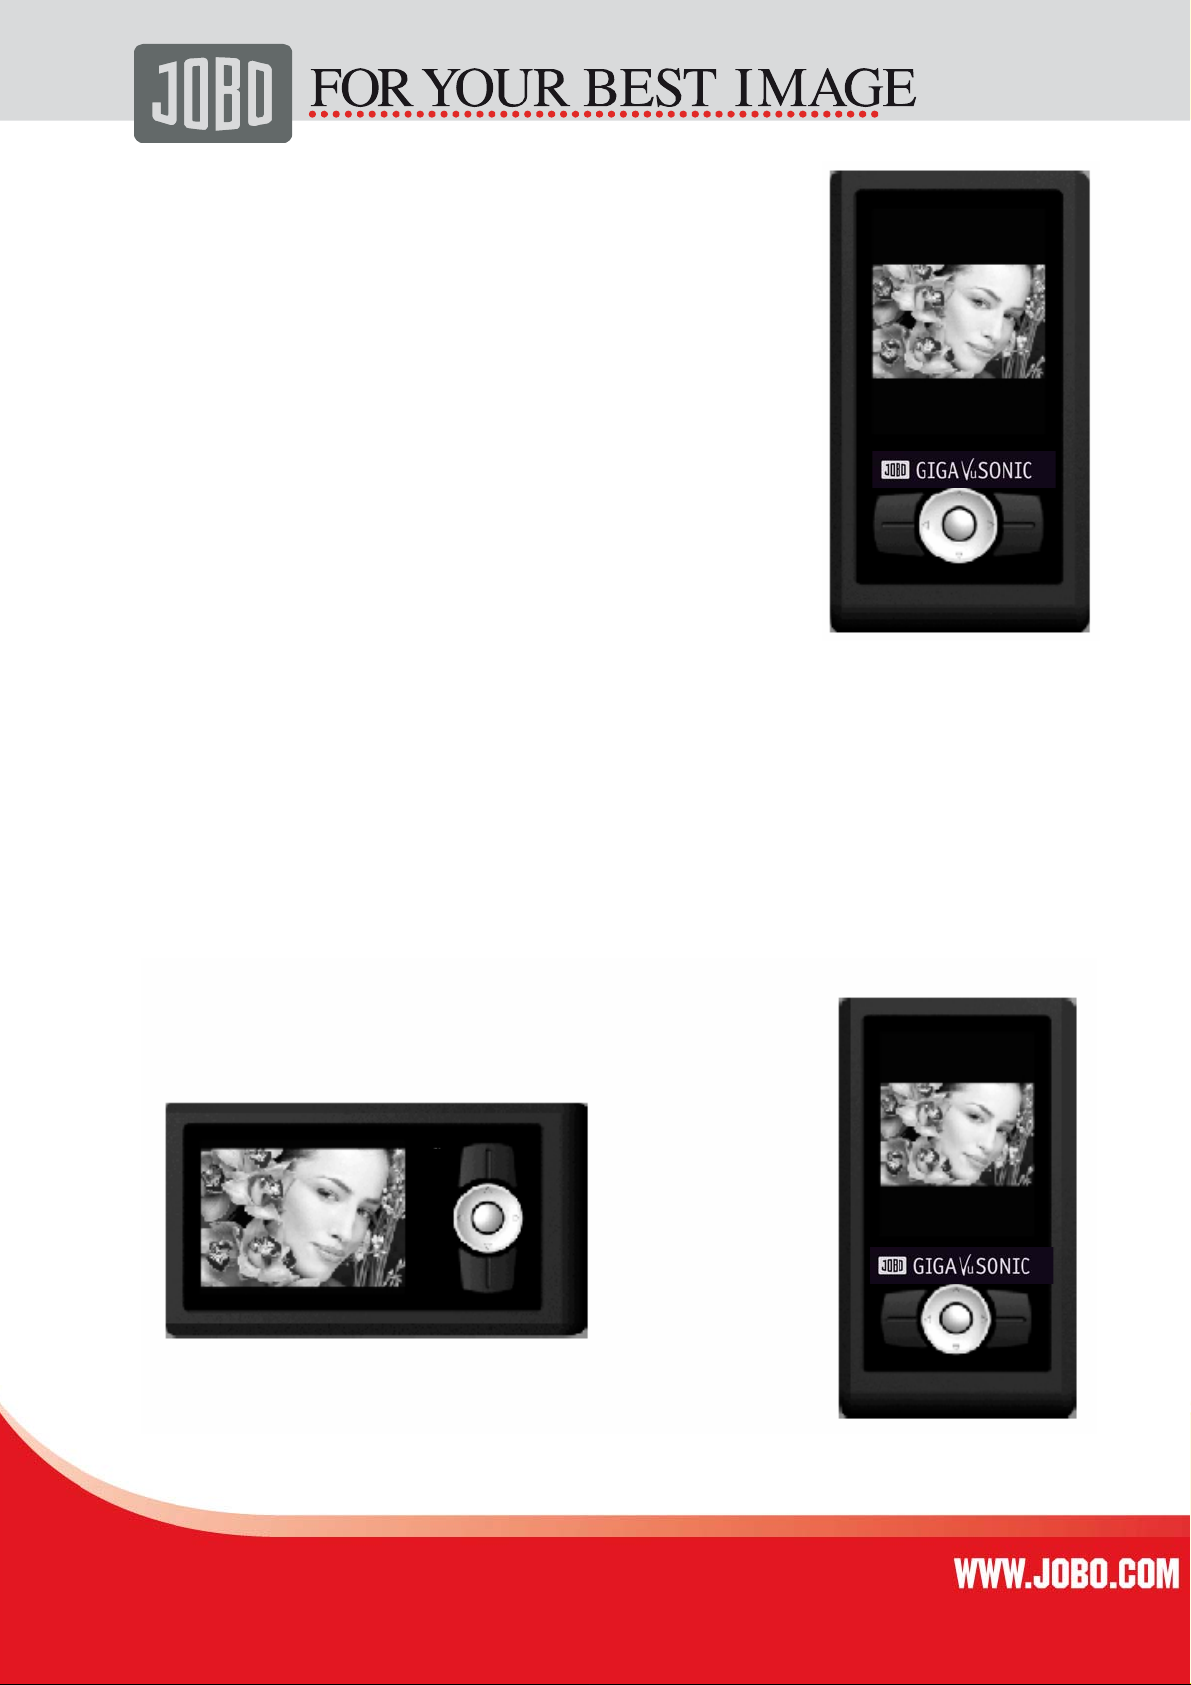
Viewing pictures full screen:
In the Picture Wall, press the “Ok” button to
display the highlighted pictures full screen.
Viewing the previous or next picture:
“Direction” button Left: the previous picture “Direction”
button Right: the next picture
Rotating and enlarging the picture:
10
Every time you press the “Ok” button, the picture will rotate 90
degrees, and automatically zoon in and out to adapt to the screen.
Display control prompt:
Press “Menu” button once to select <Control Prompt>[ <Display>;
likewise, you can select <Off> to turn off control
prompt.
10 von 361036
Page 11
Local enlargement of the picture:
Press “Zoom In” button, and the picture browsed full screen will be
displayed by enlarged central part. Go on pressing “Zoom In” or “Zoom Out” button,
the amplification grades will switch among 1/8, 1/4
and 1/1. Continuously press “Zoom Out” button for a couple of times or
”Exit” button once , it will return to the mode of browsing in full screen.
11
Changing local area of display:
In the mode of local enlargement, press “Direction” button, and you
can change display area of the picture.
11 von 361136
Page 12

Displaying EXIF brief:
In the mode of browsing in full screen, press Up of the ”Direction”
button to display or close EXIF brief, or press “Menu” button to select
<EXIF > <Display Brief>.
12
Displaying Histogram:
In the mode of browsing in full screen, press “Menu” button to select <Histogram>.
Select Function
Close The histogram will not be displayed
Red
Green
Blue
Lum
You may press Down of the “Direction” button to display or conceal the histogram
rapidly.
Display the red Histogram of Component of the picture currently browsed
Display the green Histogram of Component of the picture currently browsed
Display the blue Histogram of Component of the picture currently browsed
Display the Luminance Histogram of Component of the picture currently browsed
12 von 361236
Page 13

13
2. Search
GIGA VU SONIC allows you to browse pictures of designated date quickly.
Searching pictures:
If you want to search the memory card, insert it first into the corresponding slot. b)
Select <Search> under <Picture> on the main menu, and then select the device
(hard drive or memory card). c) In the input interface, press Left or Right of the
“Direction” button to change year or month. The current value increases by one when
Up of the “Direction” button is pressed once, and decreases by one when Down of
the “Direction” button is pressed once. Press “Ok” button, and the unit begins
searching according to designated year and month.
When searching is in process, demonstration thumbnail of the
picture searched out will be displayed under the corresponding date.
Name of the folder being searched will display at the bottom. You can exit
searching by pressing “Exit” button.
After searching is finished, you can press “Ok” button to browse
the picture searched out.
13 von 361336
Page 14

3. Recover
If you delete pictures on the memory card by mistake, the function of recovery will
recover your loss.
With the function, you can recover:
• the deleted pictures on the memory card (such as using deletion function of
the digital camera)
• pictures of designated formats. See the form below:
Camera Format
14
(*Please visit the official website for the list of latest compatible formats)
The function DOES NOT enable you to recover:
• the memory card to which newer data are written after the deletion
• the picture data which are fragmented or covered by other files
• pictures on the hard drive
• files in other formats than those designated
• folder structure on the memory card
14 von 361436
Page 15

Recovering pictures:
a) Insert the memory card to be recovered into the corresponding slot.
b) Select <Recover> under <Picture> on the main menu. Select the memory card to
be recovered on the menu.
c) In the process of recovery, the thumbnail of the picture being recovered appears
on the screen horizontally. You may cancel the recovering operation by pressing
“Exit” button.
d) The picture being recovered will be stored in partition C of the builtin hard drive,
and it will be in the folder named “RECV××××” (× refers to numerical number, which
automatically increases by degree).
15
Browsing the recovered pictures:
After recovering operation is completed, press “OK” button, and you can browse the
picture in picture browser. You may also browse it by selecting the function of
<Picture Browser> on the main menu, and then opening the folder named
“RECV××××” in disk C.
15 von 361536
Page 16

Chapter III
Backup
16
The unit adopts parallel processing system that is the most advanced currently and
can enormously enhance the speed of backup from the memory card to the hard
drive.
16 von 361636
Page 17

17
1. Full Backup
The full backup function can copy all files and folders on the memory card to the hard
drive.
With the function, you can:
• back up multiple types of memory card, such as CF, SD, MS, etc.
• back up the picture data on memory cards of types mentioned above and
other non-system data.
• create new folders in the built-in hard drive and maintain directory structure of
the original card.
The function DOES NOT enable you to:
• back up memory card label and data of system files (such as Recycle Bin of
Windows).
• back up memory cards adopting FAT12 file system.
• back up memory cards capacity of which is less than or equal to 64MB.
Backing up CF memory cards:
Insert CF card into CF slot on the top of GIGA VU SONIC. Select the function of <Full
Backup> on the main menu.
Backing up SD and MS memory cards:
Insert SD and MS memory cards into MS/SD slot on the right of GIGA VU SONIC.
Select the function of <Full Backup> on the main menu.
Backing up multiple memory cards:
In the case of the multiple memory cards of the same type, such as multiple CF
cards, and insert it into the corresponding slot. Select the function of <Full Backup>
on the main menu. After the backup is completed, insert another memory card and
repeat the operation.
In the case of multiple memory cards of different types, such as CF and SD cards,
insert them into the corresponding slots respectively. Select the function of <Full
Backup> on the main menu. Select CF or SD in the Menu of Memory Card Selection.
After the backup is completed, select the function of <Full Backup> again. Select
another memory card in Menu of Memory Card Selection, and go on with the backup.
17 von 361736
Page 18

18
Viewing backup data
After successful backup, press Ok button to start the picture browser and browse
pictures in the backup folder.
If you need to view other types of data, refer to relevant sections of “File Manager”.
2. Incremental Backup
Incremental backup will distinguish differences between the memory card and folders
of the hard drive. It will also copy the files and folders newly added to the memory
card to the hard drive folder, thus reducing data quantity of each backup and avoid
repeated data.
With the function, you can:
• copy data on the memory card to the last successful backup folder (full backup
or incremental backup)
• select an existing folder, and copy the non-repeated data of the memory card
to the folder.
The function DOES NOT enable you to :
• back up memory card label and data of system files (such as Recycle Bin of
Windows)
• memory cards adopting FAT12 file system.
• back up files of the same name but different data.
• synchronize different data of the memory card and the hard drive folder,
namely the data existing in the designated hard drive folder but not on the
memory card will not be rewritten into the memory card.
• make incremental backup in a hard drive folder without any data.
Making incremental backup of CF memory card: Insert CF card into CF slot on the
top of GIGA VU SONIC. Select the function of <Incremental Backup> on the main
menu. Select <Begin Backup> after confirming the incremental folder.
Making incremental backup of SD / MS memory cards: Insert SD and MS memory
card into MS/SD slot on the right of GIGA VU SONIC. Select the function of
<Incremental Backup> on the main menu. Select <Backup> after confirming the
incremental folder.
18 von 361836
Page 19

Changing incremental backup folder:
Select the function of <Incremental Backup> on the main menu. After entering the
function, select <Select>. Select a folder in the Folder Selecting Window.
19
19 von 361936
Page 20

3. Backup Setup
You can change Verify, Folder, Speed and Visual of backup.
20
Changing verification mode:
Under <Backup> on the main menu, select <Backup Setup> [ <Verify>.
Real-Time Verify:
The real-time verification performs CRC verification of data in the course
of file copying. Upon discovery of error, it will be retried. I/O error will be
reported after the retry fails. The real-time verification is supported by
hardware, so it will not influence the copying speed.
The real-time verification is applicable to equipment as follows:
SATA hard drive, CF memory card of UDMA, SD card, MMC card and MS card.
Verify HDD:
After the function of verifying hard drive is selected, for each file copied, CRC
checksum of the file will be recorded (multiple CRC checksums will be recorded for
large files). Whenever all files in a folder are copied, the system will reread the hard
drive, recalculate the CRC checksum of each file and compare it with the checksum
during copying to ascertain the copying operation is fully correct.
When the function is started, it will:
• prevent data from error and loss due to bad sectors of hard drive.
• influence copying speed, extent of which depends on the reading speed of the
hard drive.
20 von 362036
Page 21

Verify Card:
After the verifying memory card function is selected, for each file copied, CRC
checksum of the file will be recorded (multiple CRC checksums will be recorded for
large files). Whenever all files in a folder are copied, the system will reread the
memory card, recalculate the CRC checksum of each file and compare it with the
checksum during copying to ascertain the copying operation is fully correct.
When the function is started, it will:
• detect the data errors on the memory card.
• influence copying speed, extent of which depends on the reading speed of the
memory card.
Changing Speed mode:
Under <Backup> on the main menu, select <Backup Setup>[ <Speed>.
21
Hyper speed:
Hyper speed uses slow operating speed of the hard drive, and renews copying
progress whenever a file is copied.
When the function is started, it:
• will reach an average copying speed of about 16Mbytes/s.
• may not reach an average copying speed of about 16Mbytes/s when a large
quantity of small-sized files are copied.
UDMA66 speed:
UDMA66 speed uses quick operating speed of the hard drive and, in order to speed
up, renews copying progress at an interval of 1 second.
When the function is started, it:
• will reach an average copying speed of 30~40Mbytes/s.
• cannot reach the maximum average speed when backing up CF memory card
of non-UDMA specification.
• cannot reach the maximum average speed when function of verifying hard
drive, verifying memory card or preview of copy is started.
• cannot reach the maximum average speed when battery electricity is small or
ambient temperature is low. It may lead to failure of copying in serious
situation. In this case, charge the battery or retry it by changing into “Hyper
Speed”.
21 von 362136
Page 22

22
Changing Folder Name:
Under <Backup> on the main menu, select <Backup Setup> <Folder>, and
select/deselect a type of name on the menu,you can change this backup folder name
form “COLOR” to something else.
Changing Visual mode
Visual copying is one of GIGA VU SONIC features. When it is started, picture file is
copied, and its preview pictures are displayed on LCD screen.
Turning On/Off visual copying:
Under <Backup> on the main menu, select <Backup Setup> <Visual>, and
select/deselect <Disable Preview> on the menu.
Selecting display mode of preview picture:
Under <Backup> on the main menu, select <Backup Setup> <Visual>, and select
<Preview Style> on the menu and select your favorite mode:
Tile : The preview picture being copied is displayed on the screen by tiled
layout in the form of icon. The arrangement sequence is from the left to the right,
from top to bottom. When the display exceeds the screen bottom, it will
automatically scroll upwards.
Single: The preview picture being copied is displayed in the centre of the
screen in the mode of single picture.
Changing preview picture sizes:
Under <Backup> on the main menu, select <Backup Setup>
<Preview Size> on the menu. Select the following sizes when the tiled layout mode is
started:
Large: 80 pixels x 80 pixels
Medium: 60 pixels x 60 pixels
Small: 40 pixels x 40 pixels
Changing source of preview picture: Under <Backup> on the main menu, select
<Backup Setup >
transferring data, preview picture data are read from the memory card and displayed
on the screen.
<Visual>. Select <Preview Source> on the menu. Card: When
<Visual>, and select
When the function is started:
when reading preview picture data from the memory card, the preview picture will
display error or fail to display if the preview picture data exceed 900Kbytes or spread
on fragments of the file.
22 von 362236
Page 23

23
HDD: After the data transfer is completed, preview picture data are read from the
hard drive and displayed on the screen.
When the function is started:
backup speed will be greatly affected because image decoding cannot be performed
in the course the data are transferred.
Backing up to the designated folder: Under <Backup> on the main menu, select
<Backup Setup> <Path>. The currently set folder is displayed in the dialogue box.
Press “OK” button, and simply select one folder in the Folder Selecting Window.
Chapter IV
Functions
23 von 362336
Page 24

24
1. File Manager
The File Manager allows you to edit (such as copying, cutting, deleting, etc.)
Pictures, files and folders without going through the computer.
Starting File Manager:
Under <Function> on the main menu, select <File Manager>.
Selecting a single file or folder:
Start the File Browser, press Up or Down of the “Direction” button, and move the
highlighted bar to the file or folder to be selected. When the folder is selected, press
Right of the “Direction” button, and you can enter the folder.
Selecting multiple files or folders:
Start the File Manager, open a folder, press Ok button on the option you desire to
select, and will appear on the icon of the selected option. Repeat the operation
above till all options you desire are selected.
The function enables you to:
• select multiple files or folders in the same folder.
• process many an option together, such as copying, etc.
The function DOES NOT enable you to:
• select multiple options from different folders. The last multiple choice in a
different folder will cover all previous multiple choices.
Copying and cutting file or folder:
Start the File Browser, select (single or multiple choice) the file or folder to be
handled, press the “Menu” button, and select <Copy> on the Function Menu. Enter
the target folder, press the “Menu” button, and select <Paste> on the Function Menu.
Deleting file or folder: Start the File Browser, select (single or multiple choice) the
file or folder to be handled, press the “Menu” button, and select <Delete> on the
Function Menu.
Changing the sequencing mode of option display:Start the File Browser, press the
“Menu” button, select <Sort> on the Function Menu, and select the sequencing mode
you need.
Creating a new folder:Start the File Browser, enter the target folder, press the “Menu”
button, and select <New Folder> on the Function Menu. Use the built-in soft
keyboard to enter the folder name, select <Ok>, and the new folder is created.
24 von 362436
Page 25

25
Changing the name of file and folder:Start the File Browser, select the folder to be
renamed (single choice only), press the “Menu” button, and select <Rename> on the
Function Menu. Use the built-in soft keyboard to enter the file name, select <Ok>,
and save the new file name.
2. Creating Thumbs
GIGA VU SONIC can create thumb file for digital pictures in batch. Under “Function”
on the main menu, select <Create Thumbs>, select a folder containing picture files,
and begin creating thumbs.
The function enables you to:
• apparently speed up browsing images in JPG format.
The function does not enable you to:
• create index file for digital pictures in non-JPG format.
3. USB Connection
a) Use the provided USB cable to connect GIGA VU SONIC to USB2.0 port of
Mac or PC (frontal USB ports and external USB HUB of most PCs cannot
supply sufficient power, so please connect GIGA VU SONIC to USB2.0 port
of the host).
b) Under <Functions> on the main menu, select <USB>.
c) After the operating system has installed the driver automatically, you may
access and use GIGA VU SONIC as a “local disk”.
The function enables you to:
• access data on GIGA VU SONIC hard drive
The function DOES NOT enable you to:
• charge GIGA VU SONIC Because USB cable can supply power of 500mA
only, battery electricity is still consumed when USB is connected. Transferring
data through USB connection for long may exhaust the battery so that the unit
shuts down automatically, but this is not a malfunction.
• access the data of the memory card inserted in GIGA VU SONIC slot
25 von 362536
Page 26

26
4. Slide Show
Under <Functions> on the main menu, select <Slide>, select a folder containing
pictures in the Folder Selecting Window, and the pictures in the folder will be
played.
5. Running Script
The unit supports the user to compose interpretation of script and run it, and realize
more extensive and flexible functions. For operation of running the script, refer to the
online Reference Manual of SDL Script Language.
6. Firmware Update
Users may update the firmware of GIGA VU SONIC by themselves.
The function enables you to:
• apply the latest firmware.
• enhance various functions and repair system holes timely.
The function DOES NOT enable you to:
• update the firmware when the battery is running out of power.
• write the firmware whose capacity exceeds 1.7MB into the built-in FLASH.
Updating the firmware to hard drive
The method is recommended for updating because it will not erase the built-in Flash
chip.
a) Download firmware file “*.SEF” from the official website.
b) Ensure name
c) Write the firmware file via USB connection into the root folder of hard drive C.
d)
Shut down GIGA VU SONIC.
e) Restart the unit, and the new firmware will be applied.
26 von 362636
of the firmware is “CSUSTART.SEF” (quotation marks
excluded).
Page 27

27
Updating the firmware to built-in Flash chip
The method is used to write the firmware file into the built-in Flash chip of GIGA VU
SONIC
.
a) Download firmware file “*.SEF” from the official website.
b) Copy the firmware file into the memory card or the built-in hard drive. If
memory card is used, insert it into the corresponding slot.
c) Under “Setup” on the main menu, select <Firmware Updates>. In the
File Selecting Window, select firmware file “*.SEF”.
d) After the updating is completed automatically, shut down GIGA VU
SONIC
e) Restart the unit, and the new firmware will be applied.
.
Chapter V
Tools
27 von 362736
Page 28

28
1. Hard Drive Tools
With built-in hard drive tools of GIGA VU SONIC, you can conveniently view hard
drive information, get to know and optimize performance of your hard drive, and
reduce data loss due to hard drive breakdowns like bad sectors, etc.
Viewing capacity and S.M.A.R.T. information:
Under <Tools> on the main menu, select <Hard Drive> <Info>, and information
about capacity of the hard drive (including usage) is displayed. Press “OK” button to
switch to S.M.A.R.T. information, and it is feasible to operate in opposite order.
S.M.A.R.T.
The full name of S.M.A.R.T. is Self-Monitoring, Analysis and Reporting Technology,
which is mainly used to detect and record the predictable mechanical malfunctions
occurred to the hard drive. This type of predictable malfunction accounts for more
than 60% of total malfunctions of the hard drive. With S.M.A.R.T., warnings can be
issued before occurrence of this type of malfunctions to protect data content against
loss.
Formatting the hard drive:
o Ensure the hard drive is installed properly (refer to the section of “Hard
Drive Installation”).
o Under <Tools> on the main menu, select <Hard Drive> <Format>.
o Select <Format> after confirming the hard drive information.
o After two times of confirmation, select number of partitions. Capacities
of partitions will be evenly allotted as per capacity of the built-in hard
drive (if a hard drive of 120GB is divided into 3 partitions, capacities for
C, D and E partitions will be 40GB respectively, but the actual capacity
is slightly smaller than this value).
o After formatting is completed, turn off GIGA VU SONIC, and new
partitions will be applied when the unit is restarted.
Testing performance of the hard drive:
Under <Tools> on the main menu, select <Hard Drive> <Benchmark>.After
testing is completed, press any button to exit.
You can use the tool to:
• test the maximum reading speed, minimum reading speed and average
reading speed that the hard drive can achieve on GIGA VU SONIC.
28 von 362836
Page 29

29
You CANNOT use the tool to obtain:
• the running speed of hard drive on equipment other than
GIGA VU SONIC.
• the performance announced by the hard drive manufacturer.
• the actual reading and writing performance of hard drive during backup and
USB connection.
2. Memory Card Tools
Testing reading performance of the memory card:Insert the memory card to be tested
into the corresponding slot. Under <Tools> on the main menu, select <Memory
Card> <Benchmark>.After testing is completed, press any button to exit.
You can use the tool to:
• test the maximum reading speed, minimum reading speed and average
reading speed that CF, MS, MMC and SD memory cards can achieve on
GIGA VU SONIC.
You CANNOT use the tool to obtain:
• the running speed of memory card on equipment other than
GIGA VU SONIC.
• the performance announced by the memory card manufacturer.
• the actual reading and writing performance of memory card during backup.
Erasing memory card:
Insert the memory card to be erased into the corresponding slot. Under <Tools> on
the main menu, select <Memory Card> <Erase>.
You can use the tool to:
• delete all data on CF, MS, MMS and SD memory cards.
You CANNOT use the tool to:
• erase memory cards formatted to FAT12.
• change original file system format of the memory card.
• erase memory card that is not formatted.
29 von 362936
Page 30

Chapter VI
Setup
30
30 von 363036
Page 31

1. Interface Setup
Changing color of the system interface:
Under <Setup> on the main menu, select <Interface> <Color>. Press Left and
Right of “Direction” buttons to select your favorite colors. Press “Ok” to confirm
application of new colors.
Setting the picture as wallpaper:
Under <Setup> on the main menu, select <Interface setup> <Wallpaper>.
Select your favorite picture file in the File Selecting Window.
2. Backlight Setup
Changing the automatic shutdown time of system backlight:
31
Under <Setup> on the main menu, select <Backlight Setting> <Off Time>. Press
Left and Right of “Direction” buttons to change the shutdown time of backlight (the
time refers to the total time during which no button is operated). Press “Ok” button to
apply the new setting.
When the interval without any operation reaches the designated value, LCD backlight
will automatically shut down.
With the setting, you can:
• reduce consumption of battery power and prolong battery life. It is, therefore,
recommended that small value should be set for automatic shutdown time of
backlight when the unit is used in the open.
Changing luminance of system backlight:
Under <Setup> on the main menu, select <Backlight Setting> <Brightness>.
Press Left and Right of “Direction” buttons to change the brightness of backlight.
Press “Ok” button to apply the new setting.
With the setting, you can:
• reduce consumption of battery power and prolong service time. It is, therefore,
recommended that small value should be set for luminance of backlight when
the unit is used in the open.
• readjust luminance to adapt to the influence of different environment
31 von 363136
Page 32

3. Language Setup
The unit supports multiple languages. Under <Setup> on the main menu, select
<Language Setting>, and then select the language you need.
The setting can be used to:
• Change the character set of system language, making the existing file or
folder inaccessible or display messy code in the name of the file or folder.
4. Key Sound
Turning the key sound on/off:
• Under <Setup> on the main menu, select <Key Sound>, and press Up and
Down buttons to turn the key sound on/off. Press “Ok” to confirm the
application.
32
5. Reset
Restoring factory settings:
When queer malfunctions occur, you may try to restore all settings to factory settings.
Under <Setup> on the main menu, select <Reset>. Wait for a moment, confirm the
setting and then exit.
The setting will:
• cover ALL of your user-defined settings, such as all settings in the backup
options.
6. System Information
Viewing system information about firmware version: Under <Setup> on the main
menu, select <System Information>.
32 von 363236
Page 33

Appendix A: Safety And Operation
1. Safety of the unit body
• Do not use the device in a moist environment. Do not handle the device with
wet hands. If liquid enters the device, immediately remove the battery, power
off the unit, and return it to the designated dealer for repair. Never use the
device corroded by liquid, otherwise it may lead to short circuit of battery.
Some batteries with short circuit may cause fire.
• Do not let the unit body fall off, bump against or put heavy object on the unit
body. Take the memory card out of the slot when the unit body is transported
and handled.
• Do not place the unit body close to strongly magnetic objects, otherwise the
data may be lost.
• Do not insert incompatible memory card or foreign matter into the slot or DC
charging port by force.
33
• Do not dismantle or modify the casing or circuit of the unit body.
2. Safety of battery
• Users shall not change the battery by themselves. In the case of normal
ageing of battery or damaged battery caused by improper use, the whole
product must be returned to the local dealer or factory for replacement.
• When charging the battery inside PD100S, immediately cut off the power and
remove the battery upon discovery of peculiar smell, extremely high
temperature or smoke from the unit body or the charger. Watch out when
removing the battery to avoid burning yourself by the battery.
• When using a charging adaptor not from the original manufacturer, please
confirm the output standard conform to that of the unit (5V 1A).
• The battery being charged will become slightly hot. Please charge the unit in a
place with good heat dissipation.
3. Safety of maintenance
• Power off the unit when opening the back cover.
• Do not insert or remove the hard drive when the unit is powered on.
33 von 363336
Page 34

Appendix B:
Operation Techniques and Problem Solving
1. Operation techniques
• Prior to important shooting, charge the unit (in the mode of power off) in
advance and test the unit.
• Please select high-speed memory card to achieve ideal backup speed. Test
the memory card when buying it.
• Update the firmware timely.
2. Troubleshooting
The unit won't start:
34
• Charge the battery.
• Keep the unit in appropriate ambient temperature, namely 5- 45.
Copying fails
• Use the <Tools>[ <Hard Drive>[ < Info> to confirm whether there is enough
residual capacity of hard drive. If many a partition is used, change
the<Backup>[ <Backup Setup>[ <Path> to the partition with sufficient capacity.
• Use the <Tools>[ <Hard Drive>[ < Info> to check S.M.A.R.T of the hard drive,
check if the hard drive temperature is within proper range and if there are
malfunctions like bad sectors, etc.
• Reset all settings to the factory settings.
• Charge the battery.
• Confirm the memory card is compatible with the unit.
• Switch SSC switch.
Crashed unit or no response from the button
• Press and hold the power supply button for about 15 seconds, and do not
release the button until shutdown appears.
• If the operation above does not work, open the back cover and remove the
battery by following steps in the section of “Removing the Battery”. When
reinstalling the battery, make sure to install the battery in accordance with the
polarity indicated inside the battery compartment.
34 von 363436
Page 35

3. Replacing and Installing the Battery
Operation described in the section is dangerous to a certain degree. Do not try the
operation unless it is necessary. Consult the local dealer or customer service
department prior to the operation.
Removing the battery
A) Open the back cover of the unit. Refer to relevant sections
of “Hard Drive Installation” for how to open the back cover.
B) Remove the battery from its compartment. If the battery
emits high heat, be careful and avoid burning yourself by
the battery.
Battery installment:
35
1) Confirm the battery polarity by referring to the following diagram:
2) Install the battery as per the polarity indicated inside the battery compartment..
3) Install the back cover.
35 von 363536
Page 36

36
Contact/Service
If you have any questions on or need help with our products please do not hesitate to
get in touch with our Technical Service. You can reach our service people by phone
under the telephone number indicated below from Monday through Thursday from
9:00 am to 4:00 pm and on Friday from 9:00 am to 1:00 pm. Independently of these
service times you can also get in touch by e-mail, fax or mail:
JOBO AG
Kölner Straße 58
D-51645 Gummersbach
Tel. 0049 2261 545-72
Fax: 0049 2261 545-42
E-mail: support@jobo.com
www.jobo.com
36 von 363636
GIGA VU SONIC Manual English V1.0
Copyright © 2008 JOBO
 Loading...