

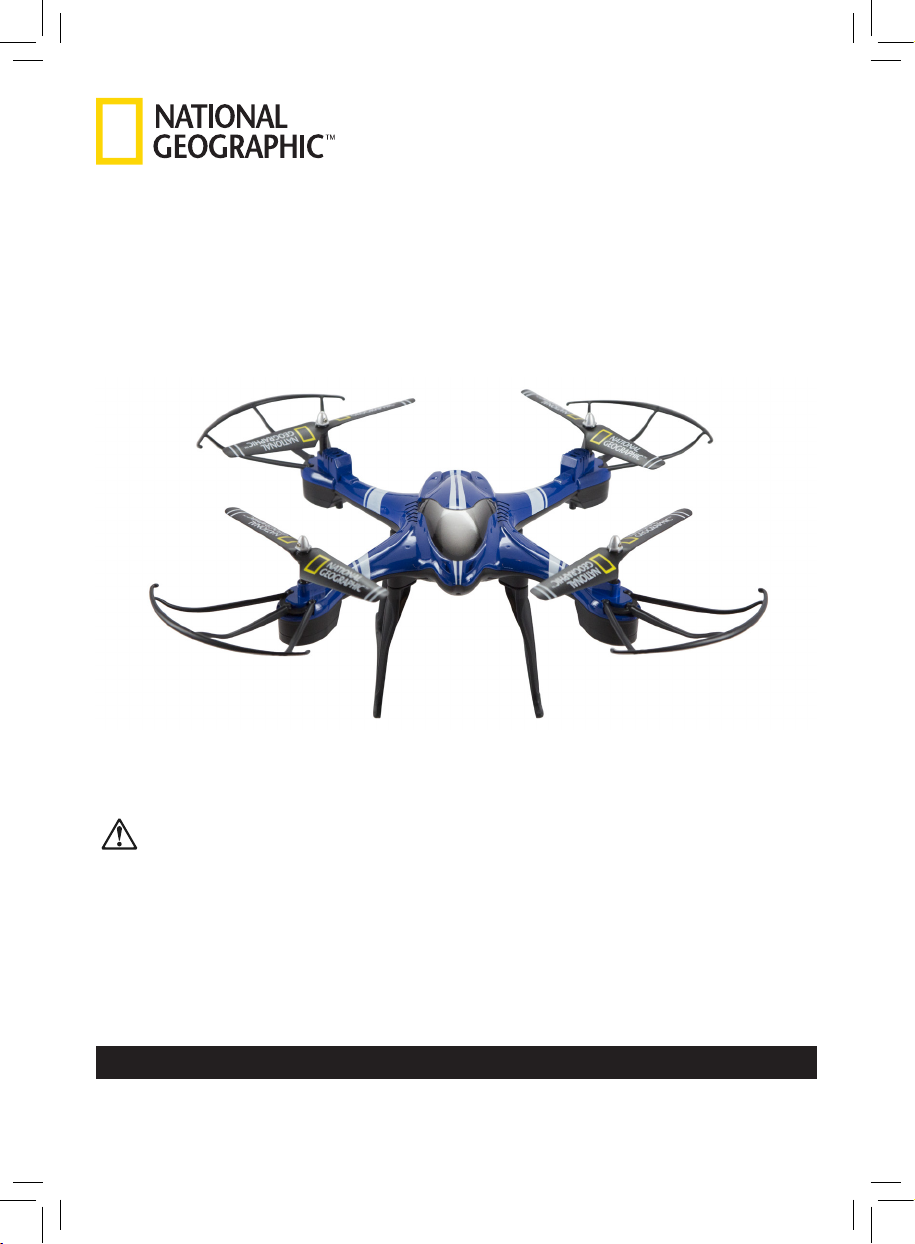
QUADCOPTER DRONE
INSTRUCTION MANUAL
Ages 14 +
STOP: READ THESE INSTRUCTIONS BEFORE FLYING!
WARNING
correctly can result in damage to the product or personal property and cause serious injury. This
is a sophisticated product that must be operated with caution and common sense and requires
some basic mechanical ability. This product is not intended for use by children without direct adult
supervision. DO NOT use with incompatible components or alter this product in any way outside of
the documents provided by JMW SALES, INC. These Safety Guidelines contain instructions for safety,
operation, and maintenance. It is essential to read and follow all of the instructions and warnings
in the Quadcopter Drone user manual, prior to assembly, setup, or use, in order to operate the
product correctly and avoid damage or serious injury.
KNOW BEFORE YOU FLY
KNOW BEFORE YOU FLY
Before you take off, learn how to fly responsibly. Drone registration for this National Geographic Quadcopter Drone is
not required as of June, 2016. Please check website for the most current rules and regulations:
http://knowbeforeyoufly.org/
Before operating your drone, read the ENTIRE user manual to become
familiar with the features of this product. Failure to operate the product

BATTERY INSTALLATION AND CHARGING
SAFETY PRECAUTIONS
BATTERY INSTALLATION AND CHARGING
BATTERY INSTALLATION AND CHARGING
Follow these safety precautions when operating this drone.
Adult supervision required.
Do not turn on the drone unless controller has been turned on first.
Turn off controller and drone when not in use.
Do not touch the spinning blades or fly over another person’s head.
Do not submerge in water. This could damage electronic assemblies.
Keep your face and body as well as all spectators away from the rotors whenever the battery is connected.
Stay clear of buildings, trees, and power lines.
AVOID flying in or near crowded areas.
DO NOT fly close to people, children, or pets.
Maintain a safe pilot-to-drone distance while flying.
Your drone should not be considered a toy, but rather a small, working model. If not operated correctly, the
model could possibly cause injury to you or spectators and damage to property.
Do not alter or modify the model, as doing so may result in an unsafe or unflyable model.
You must check the operation of the model before every flight to insure that the model has remained structurally sound.
Do not operate in bad weather, including extremely high temperatures, heavy snow, high wind, or rain.
Do not fly in restricted air space.
CAUTION: Changes or modifications to this product not expressly approved by the party responsible for
compliance may void the user’s authority to operate the equipment.
BATTERY PRECAUTIONS
To avoid fire, serious injury, and property damage, observe the following safety guidelines when using,
charging, or storing your batteries.
The drone is equipped with a rechargeable 3.7V LiPo battery. Please pay attention to the following cautions.
LiPo BATTERY USAGE
Parental guidance is recommended when installing batteries.
Do not attempt to use this charger with NiCd or NiMH battery packs.
Do not attempt to use a damaged battery.
Disconnect the battery from the charger and carefully move the battery to a fireproof location if the battery
begins to swell or smoke!
Do not attempt to charge a battery if it is swollen or hot.
Do not allow the batteries to come into contact with any kind of liquid.
Do not leave batteries out in the rain or near a source of moisture.
Do not drop the battery into water. If the inside of the battery comes into contact with water, chemical
decomposition may occur, potentially resulting in the battery catching on fire, and may even lead to an explosion.
Electrolytes in the battery are highly corrosive. If any electrolytes make contact with your skin or eyes, immediately
wash the affected area with fresh running water for at least 15 minutes, and then see a doctor immediately.
Land your model immediately when the LEDs flash to indicate that the battery power is low. Recharge the battery before
attempting another flight. A dangerous situation can occur when attempting to recharge an over-discharged battery!
If the battery falls into water with the aircraft during flight, take it out immediately and put it in a safe and
open area. Maintain a safe distance from the battery until it is completely dry. Never use the battery again, and
dispose of the battery properly as described in the Battery Disposal section below.
Do not put batteries in a microwave oven or in a pressurized container.
Do not place loose battery cells on any conductive surface, such as a metal table.
BATTERY INSTALLATION AND CHARGING
BATTERY INSTALLATION AND CHARGING
BATTERY INSTALLATION AND CHARGING
Do not put the loose cells in a pocket, bag, or drawer where they may short-circuit against other items or where
the battery terminals could be pressed against each other.
Never disassemble or modify pack wiring in any way or puncture cells.
ALWAYS keep a supply of sand accessible when charging. Dumping sand on the battery will extinguish a LiPo chemical fire.
ALWAYS KEEP OUT OF REACH OF CHILDREN
Do not dispose of battery into fire or heat.
Do not use or leave battery near a heat source, such as fire or a heater.
Do not drop, strike, impale, or manually short-circuit the battery.
Do not disassemble or alter the battery.
Turn off the power switch and disconnect the battery after use.
BATTERY CHARGING
Do not attach the batteries to wall outlets or car charger sockets directly, and always use the Quadcopter Drone
provided USB charging cable.
Never charge inside a vehicle.
Do not place the charger or any battery on a flammable surface or near combustible materials while in use.
Do not leave the charger unattended while charging. Disconnect the battery and unplug the charger
immediately if either becomes hot! However, it is normal for the charger to get warm.
Do not charge the battery immediately after flight, because the battery temperature may be too high.
Do not charge the battery until it cools down to near room temperature. Charging the battery outside of the
temperature range of 41°F [5°C] – 104°F [40°C] may lead to leakage, overheating, or battery damage.
Always disconnect the battery and remove the charger from the USB port when not in use.
Disconnect the charger when not in use.
Examine the charger regularly for damage to the cord, plug, enclosure, or other parts. Never use a damaged charger.
DO NOT clean the charger with denatured alcohol or other flammable solvents.
A battery when not in use will lose its charge automatically. Charging or discharging too often may reduce the
life of the battery.
BATTERY STORAGE
Keep batteries out of the reach of children and pets.
Do not leave the battery near heat sources such as a furnace or heater. DO NOT leave the batteries inside of a
vehicle on hot days. The ideal storage temperature is 71.6°F [22°C] – 82.4°F [28°C].
Keep the battery dry. Never drop the battery into water.
Keep the battery away from metal objects such as glasses, watches, jewelry, and hairpins.
Never transport a damaged battery or a battery with power level higher than 50%.
BATTERY DISPOSAL
DO NOT place the battery in regular trash containers. Strictly follow your local regulations
regarding the disposal and recycling of batteries.
BATTERY MAINTENANCE
Never use the battery when the temperature is outside the range of 41°F [5°C] – 104°F [40°C]
Never allow the battery temperature to exceed 140°F [60°C].
LiPo

BATTERY INSTALLATION AND CHARGING
CONTROLLER BATTERY INFO
DRONE ASSEMBLY
Battery installation and removal should be performed by an adult.
Use only batteries recommended in this instruction manual.
Be careful to install the batteries with the correct polarity as indicated.
Do not mix old and new batteries.
Remove all batteries when replacing.
Do not mix alkaline, standard, rechargeable, or different types of batteries.
Non-rechargeable batteries are not to be recharged.
Rechargeable batteries are to be removed from the controller before being charged.
Rechargeable batteries are only to be charged under adult supervision.
Only batteries of the same or equivalent type as recommended are to be used.
The supply terminals are not to be short-circuited.
Remove exhausted batteries.
CAUTION: Do not dispose of battery in fire. Battery may explode or leak.
DRONE ASSEMBLY
FRONT
Step 1
Turn the quadcopter over on a flat surface so the bottom of the unit is facing
up. It is recommended that you place a towel or other cloth under the
quadcopter to protect it from getting scratched or scratching surfaces.
Step 2
Insert the landing struts into the bottom of the quadcopter. Struts should
align parallel to each other from front to back of the drone, leaving the
battery compartment unobstructed.
BACK
Step 3
Using the mini-screwdriver that was included with the kit, install 2 of the
10mm screws into the holes provided on the landing struts. Repeat this
process on the opposite side.
Step 4
Turn the quadcopter over so it is standing on its landing struts and install the
blade protectors on each corner. Blade protectors snap into place, and do
NOT require any screws.
NOTE: Blade protectors will help protect the propeller blades from being
damaged during contact with objects or surfaces. In the event a propeller is
damaged, it can be replaced with one of the 4 extra propeller blades supplied
with this kit. Blades are angled differently and numbered on the bottom
(Circled 1 or 2) and must be replaced with the same numbered blade.
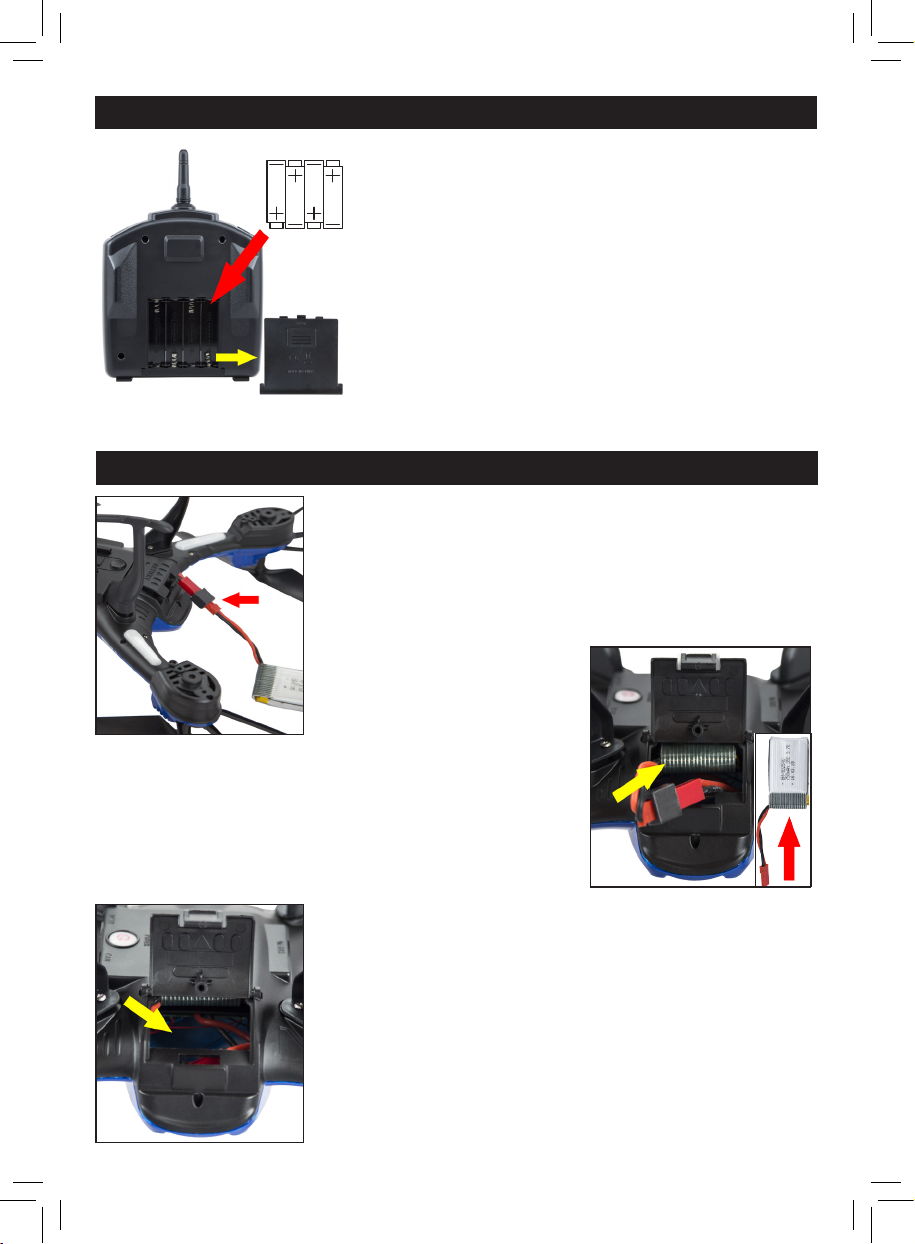
INSTALLING BATTERIES IN THE REMOTE
INSTALLING BATTERIES IN THE REMOTE
BATTERY INSTALLATION AND CHARGING
4X 1.5V AA BATTERIES
BATTERY
COVER
Remove the battery cover on the back of the remote control and
install 4 x AA batteries (not included). Make sure to follow the
diagram on the inside of the battery compartment to ensure that
batteries are installed in the correct direction. Replace the battery
cover on the remote.
BATTERY INSTALLATION AND CHARGING
Step 1
With remote control and drone powered OFF, turn the drone over
on a flat and stable surface. Connect the 3.7V 750mAh LiPo battery
(included) directly into the black connector piece located inside the
drone battery compartment.
Step 2
Insert the battery into the slot located directly inside the battery door
(battery slot is located at the top of the battery compartment when
the drone is upside down). The battery should slide in parallel to the
bottom of the drone and fit snugly inside this compartment.
VERY IMPORTANT: Insert the battery before inserting the cords.
Step 3
Place the connected wires into the battery space directly below the battery
slot. Close and secure the battery door.
NOTE: To facilitate easy removal of the battery, it’s very important to insert
the battery wires after you have already inserted the battery.

Step 4
BATTERY INSTALLATION AND CHARGING
BATTERY INSTALLATION AND CHARGING
Plug the micro-USB end of the USB charging cable directly into the
battery charging port on the side of the drone. Then insert the USB end
of the charging cable into a USB power source (i.e. cell phone adapter).
Step 5
The POWER button will illuminate a red color indicating the drone is
charging. When fully charged the POWER button will no longer be
illuminated.
NOTE: POWER button must be in the off position or the drone will not
charge. The approximate charging time is 60–90 minutes.
BATTERY REMOVAL
Switch off power to the remote control and drone. Turn the drone over
on a flat and stable surface. Open the battery door and gently remove
the connected wires until they are outside of the battery compartment.
The battery can then slide out of the battery slot, and wires can be
disconnected.
DRONE OPERATIONS
WARNING! Drone flight is recommended in a spacious outdoor environment (such as a soccer field), at least 200
feet away from people, animals, and objects. DO NOT operate drone in unsafe conditions including wind, rain, or
snow. Even light wind can severely impact the ability to control and fly the drone, so it’s always recommended to
avoid flying under these conditions.
Step 1
Confirm the battery is installed correctly and securely in battery compartment.
Turn on the drone by pushing the POWER button. The POWER button will
illuminate blue. Flashing lights on the bottom of the drone will indicate that
the drone has power and is waiting to be synced. Place the drone on the ground
a safe distance in front of you. The recommended distance is 10–15 feet.
LIGHTS LIGHTS
POWER

POWER
SYNCED LIGHT
Step 3
SYNC FROM DIRECTLY
BEHIND THE DRONE
throttle lever down, and the sync will be complete. The lights on the bottom of the
drone will now flash slowly, and the SYNCED light on the remote control will be
constantly illuminated (no longer flashing), indicating you are ready for take-off!
To sync, push up the throttle lever on the
remote control until the SYNCED light
flashes rapidly. Then immediately push the
Step 2
To SYNC the drone start by standing DIRECTLY
BEHIND the drone. Turn on the remote control
by pushing the POWER button. The lights on the
bottom of the drone will briefly flash, indicating
the remote control is on and ready to sync. The
SYNCED light on the remote control will also
flash, confirming it’s ready to sync.
Step 4
With the quadcopter powered on and synced to the remote control, reconfirm people and objects are at a safe distance away. Press the TAKE
OFF & LAND button. The quadcopter should immediately rise off the
ground and hover.
NOTE: Do not throw the quadcopter for take-off. It is always
recommended to start from the ground level a safe distance away
(approximately 10 feet from the drone).
Step 5
When ready to land the quadcopter, press the TAKE OFF & LAND button
again and the quadcopter will slowly descend to the ground and land.
NOTE: Do not try to catch the quadcopter as it lands. This could result in
damage to the quadcopter and injury to you.
TAKE OFF & LAND
Step 6
As the battery begins to run out of power the drone lights will flash rapidly,
indicating you should immediately land your drone. The drone will run out of
power approximately 10–20 seconds after the flashing warning lights start
blinking. The drone will then automatically land and the operator will NOT
have control over the drone or its descent once the battery is out of power. It
is always recommended that you immediately land the drone when the battery
is low to prevent damage to the drone.
NOTE: It’s highly recommended that pilot reduces the altitude of the drone
after approximately 7 minutes of flying time. This should allow for a safe and
controlled landing of the drone, before the battery is completely exhausted.
LIGHTS
LIGHTS

Step 7
BATTERY INSTALLATION AND CHARGING
To turn the power OFF on the remote control, hold down the power button for
approximately 1 second. The remote control has a built-in safety feature that requires
the power button to be held down to power off. The remote control lights will turn off,
indicating power has been deactivated.
TO POWER OFF HOLD
FOR 1 SECOND
DRONE OPERATIONAL FEATURES
BUILTIN DRONE FEATURES
1. Altitude Hold – The drone will automatically maintain its current height position at any given time, although small
fluctuations do occur. This allows for a stable flight, without rapid changes in height until the throttle is adjusted.
2. Smart Auto Orientation – Headless Mode is incorporated into the flight system, allowing for the drone to
automatically be oriented in relation to the pilot for easy operation. Regardless of the direction the drone is facing,
the drone will always react to the remote control in the same manner. When you adjust the direction lever left or
right, the drone will fly left or right. The same is true when adjusting the direction lever forward or backward. No
matter the direction your drone is facing, it will fly in the direction you choose on the remote control. For this system
to work properly it is important that you correctly follow the sync sequence and are standing directly behind the
drone during your initial sync.
HOVER UP AND
DOWN
LEFT OR RIGHT
Push the throttle up or
down, and the drone will fly
upward or downward.
Push the direction lever left
or right, and the drone will
turn left or right.
FORWARD AND
BACKWARD
Push the direction lever up or
down, and the drone will fly
forward or backward.
SPINNING
LEFT OR
RIGHT
Push the throttle left or right
to spin the drone in that
direction.

BATTERY INSTALLATION AND CHARGING
TRIM
BATTERY INSTALLATION AND CHARGING
The trim feature helps align the drone during flight and counter any drift, i.e. if it “pulls” in one direction when the
controller is in the centered position. Each time you put in the battery the balance of the drone may be slightly
affected by the exact battery position. Therefore it might need to be adjusted by TRIMMING the drone. If your drone
drifts forward/backward without any control input, you can correct it by pressing the forward/backward TRIM buttons
in the direction you would like it to move to counter any drift. A beeping sound when adjusting TRIM will indicate the
maximum amount of adjustment in the chosen direction has been reached. You can TRIM the drone left/right using
the same process.
FORWARD/
BACKWARD
LEFT/
RIGHT TRIM
TRIM
If the quadcopter keeps flying
forward/backward, you can
correct it by pressing either
of the top trim buttons up or
down.
NOTE: Trim buttons are located on both sides of the remote control for easy access. Adjusting either
side will result in the desired change.
If the quadcopter keeps
rotating to the left/right, you
can correct it by pressing
either of the lower trim
buttons left/right.
ONE-BUTTON 360 DEGREE FLIP
Once you are familiar with the operation of the drone, you can do some pretty amazing tricks and stunts. Start by
flying the drone to a height of more than 10 feet (3 meters). Simply press the FLIP button on the top right of the
remote control and then immediately push the DIRECTION lever in any direction to create a 360° flip in that direction.
FLIP
+
PRESS FLIP BUTTON
TIP: Tricks take a lot of power from the battery. Make sure that you perform them before your battery power is low.
PUSH DIRECTION LEVER
=

E
BATTERY INSTALLATION AND CHARGING
ONE BUTTON RETURN TO HOME
BATTERY INSTALLATION AND CHARGING
BATTERY INSTALLATION AND CHARGING
Pressing the RETURN TO HOME button on the top left of the remote control will
instruct the quadcopter drone to immediately return back to your current position.
NOTE: It will NOT stop when it gets to you, so be prepared to maneuver the drone
safely as it returns to your position.
RETURN TO HOME
SPEED SWITCHES
The quadcopter has the ability to operate at varying speeds. To increase speed, press
the SPEED “+” button while in flight. To decrease the quadcopter’s speed, press the
SPEED “-“ button while in flight. The Speed display will indicate your current speed
setting. The pre-set speed for normal operation is the SPEED 2.
SPEED +
SPEED 2
SPEED -
CONTENTS
Extra batteries can be purchased at https://goo.gl/vK9dJP. Make sure to use ONLY authentic National Geographic
Quadcopter Drone batteries.
We do not recommend buying batteries from third party suppliers as they may not be suitable for safe operation as
they could damage the drone or the USB charging device.
1 DRONE BODY ONE 3.7V 750mAh LiPo
4 SPARE PROPELLER
BLADES
BATTERY
4 BLADE PROTECTORS 2 LANDING STRUTS
1 REMOTE CONTROL 1 USB CHARGING
CABLE
1 MINI-SCREWDRIVER and
EIGHT 10 mm SCREWS

BATTERY INSTALLATION AND CHARGING
TROUBLESHOOTING
Problem Reason Solution
The quadcopter lights are flashing
but it is not responsive to the
remote control.
The blades on the quadcopter turn
but the drone cannot take off.
The quadcopter shakes badly in
flight.
1. The sync between the remote and
the drone is not complete.
2. The battery power is low in either
the drone or the remote.
1. Insufficient battery power. 1. Charge or replace the battery.
2. Blades could be damaged. 2. Inspect and replace damaged
Blades could be damaged or
distorted.
1. Try re-syncing the remote to the
drone. You may need to move closer
to properly sync.
2. Charge or replace batteries if
required.
blades.
Inspect and replace damaged
blades.
The trim buttons are not enough to
keep the quadcopter steady.
The drone is not responding
quickly to remote control.
Battery is not charging. The power button for the drone is in
Power button won’t turn off / is
stuck.
1. Blades could be damaged or
distorted.
2. The environment might be too
windy to safely fly the drone.
3. Battery not centered inside drone. 3. Center the battery inside the slot.
1. Windy conditions may be present. 1. Do not fly the drone until safe
2. Remote control might be too far
from the drone.
the ON position.
The power button is pressed against
the safety.
1. Inspect and replace damaged
blades.
2. Do not fly the drone until safe
conditions are present.
conditions are present.
2. Move closer to the drone, or fly
the drone closer to the pilot, in
order to increase speed on remote
control.
Push power button on the drone
once to turn it into the OFF position.
Push the bottom half of the power
button to get it unstuck or try
rotating the button slightly.

FCC WARNING MESSAGE
This device complies with part 15 of the FCC Rules. Operation is subject to the following two conditions:
(1) this device may not cause harmful interference, and
(2) this device must accept any interference received, including interference that may cause undesired operation.
FCC RADIATION EXPOSURE STATEMENT
This equipment complies with FCC radiation exposure limits set forth for an uncontrolled environment. This
transmitter must not be co-located or operating in conjunction with any other antenna or transmitter.
Note: This equipment has been tested and found to comply with the limits for a Class B digital device, pursuant to
part 15 of the FCC Rules. These limits are designed to provide reasonable protection against harmful interference
in a residential installation. This equipment generates, uses, and can radiate radio frequency energy and, if not
installed and used in accordance with the instructions, may cause harmful interference to radio communications.
However, there is no guarantee that interference will not occur in a particular installation. If this equipment does
cause harmful interference to radio or television reception, which can be determined by turning the equipment off
and on, the user is encouraged to try to correct the interference by one or more of the following measures:
— Reorient or relocate the receiving antenna.
— Increase the separation between the equipment and receiver.
— Connect the equipment into an outlet on a circuit different from that to which the receiver is connected.
— Consult the dealer or an experienced radio/TV technician for help.
Any changes or modifications not expressly approved by the party responsible for compliance could void the user’s
authority to operate the equipment.
© 2016 National Geographic Partners LLC. All rights reserved.
NATIONAL GEOGRAPHIC and Yellow Border Design are trademarks
of the National Geographic Society, used under license.
Visit our website: nationalgeographic.com
JMW SALES,INC.
MADE IN CHINA,
DOP 07-16 NGDRONE
© 2016 JMW Sales, Inc. All Rights Reserved.
1 (855) 437-2665 Customer Service
Made and imported by JMW Sales, Inc.
993 Siskiyou Blvd. Suite 1, Ashland OR 97520
 Loading...