

Page 1
TEMP
TIME
6 i 1 Comb Gril
& Pz Ove
GCCGPO_IM_A.indd 1 18/04/2016 13:06
Page 2
6 i 1 Comb Gril
& Pz Ove
TEMP
TIME
1
Thank you for purchasing the GoChef™ 6-in-1
Combination Grill and Pizza Oven. To get the best,
tastiest results from this appliance, please read
these instructions in full and keep them safe for
future reference.
Contents
Safety Warnings & Advice 2
Your GoChef
™
Grill & Press 4
Using GoChef
™
Grill & Press 5
Before use 5
Lifting & adjusting the Lid/Griddle Pan 5
Closing the Lid/Griddle Pan 5
Switcing On 5
Cleaning & Care 6
Guarantee 6
Technical Information 6
Technical specifications 6
Fuse & mains plug replacement 7
Disposal and the environment 7
GCCGPO_IM_A.indd 1 18/04/2016 13:06
Page 3
2
This appliance is not to be used by persons (including
children) with reduced physical, sensory or mental
capabilities, or a lack of experience and knowledge,
unless they have been given supervision or instruction
concerning the use of this appliance by a person
responsible for their safety.
Only use the Grill & Pizza Oven for its intended purpose
as described in this manual. Do not use attachments
that are not specifically recommended to be used with
this Grill & Pizza Oven.
Always use on a flat, stable, heat-resistant surface. Do
not place on, or near, a gas or electric burner, or inside
or on top of a heated oven or other heat source.
ALWAYS open the Lid/Griddle Pan by holding the
handle only. DO NOT lift by any other means when hot.
Cooking surfaces will get extremely hot during use.
Never touch the cooking surfaces during use.
Intended for indoor household use only. Not intended
for industrial or commercial use.
Do not leave unattended when in use. The Grill & Pizza
Oven should not be operated by an external timer or
separate remote-control system.
Children should be closely supervised while the Grill &
Pizza Oven is in use.
Do not allow the power cord to hang over the edge of a
countertop or the sink, or to come close to any heated
surfaces.
Safety Warnings & Advice
GCCGPO_IM_A.indd 2 18/04/2016 13:06
Page 4
3
Safety Warnings & Advice
Use in a well-ventilated area. Keep at least 4-6 inches
of space all around the Grill & Pizza Oven to allow air to
circulate.
Always allow sufficient room on the work surface for the
Lid (Griddle) to be laid flat should you need to use it in
that position.
Do not use near curtains, wall coverings, clothing, dish
towels or other flammable materials.
Do not move while in use. Always allow to thoroughly
cool before handling.
Do not use near a sink or in any other area where the
non-cooking parts are likely to come into contact with
liquids.
Do not place or drop into water or other liquids. If the
Grill & Pizza Oven falls into water, immediately unplug it
from the electrical outlet before attempting to retrieve it.
Do not allow the power cord to come into contact with
the cooking surfaces during use.
Do not plug or unplug from the mains if your hands are wet.
Do not attempt to repair the Grill & Pizza Oven, its
power cord, or plug if they become damaged. Repairs
must only be made by a qualified service engineer.
Children should not play with the appliance.
Cleaning and maintenance should not be carried out by
children without supervision.
Keep the product, and its cord, out of reach of children
under 8 years of age.
GCCGPO_IM_A.indd 3 18/04/2016 13:06
Page 5
TEMP
TIME
4
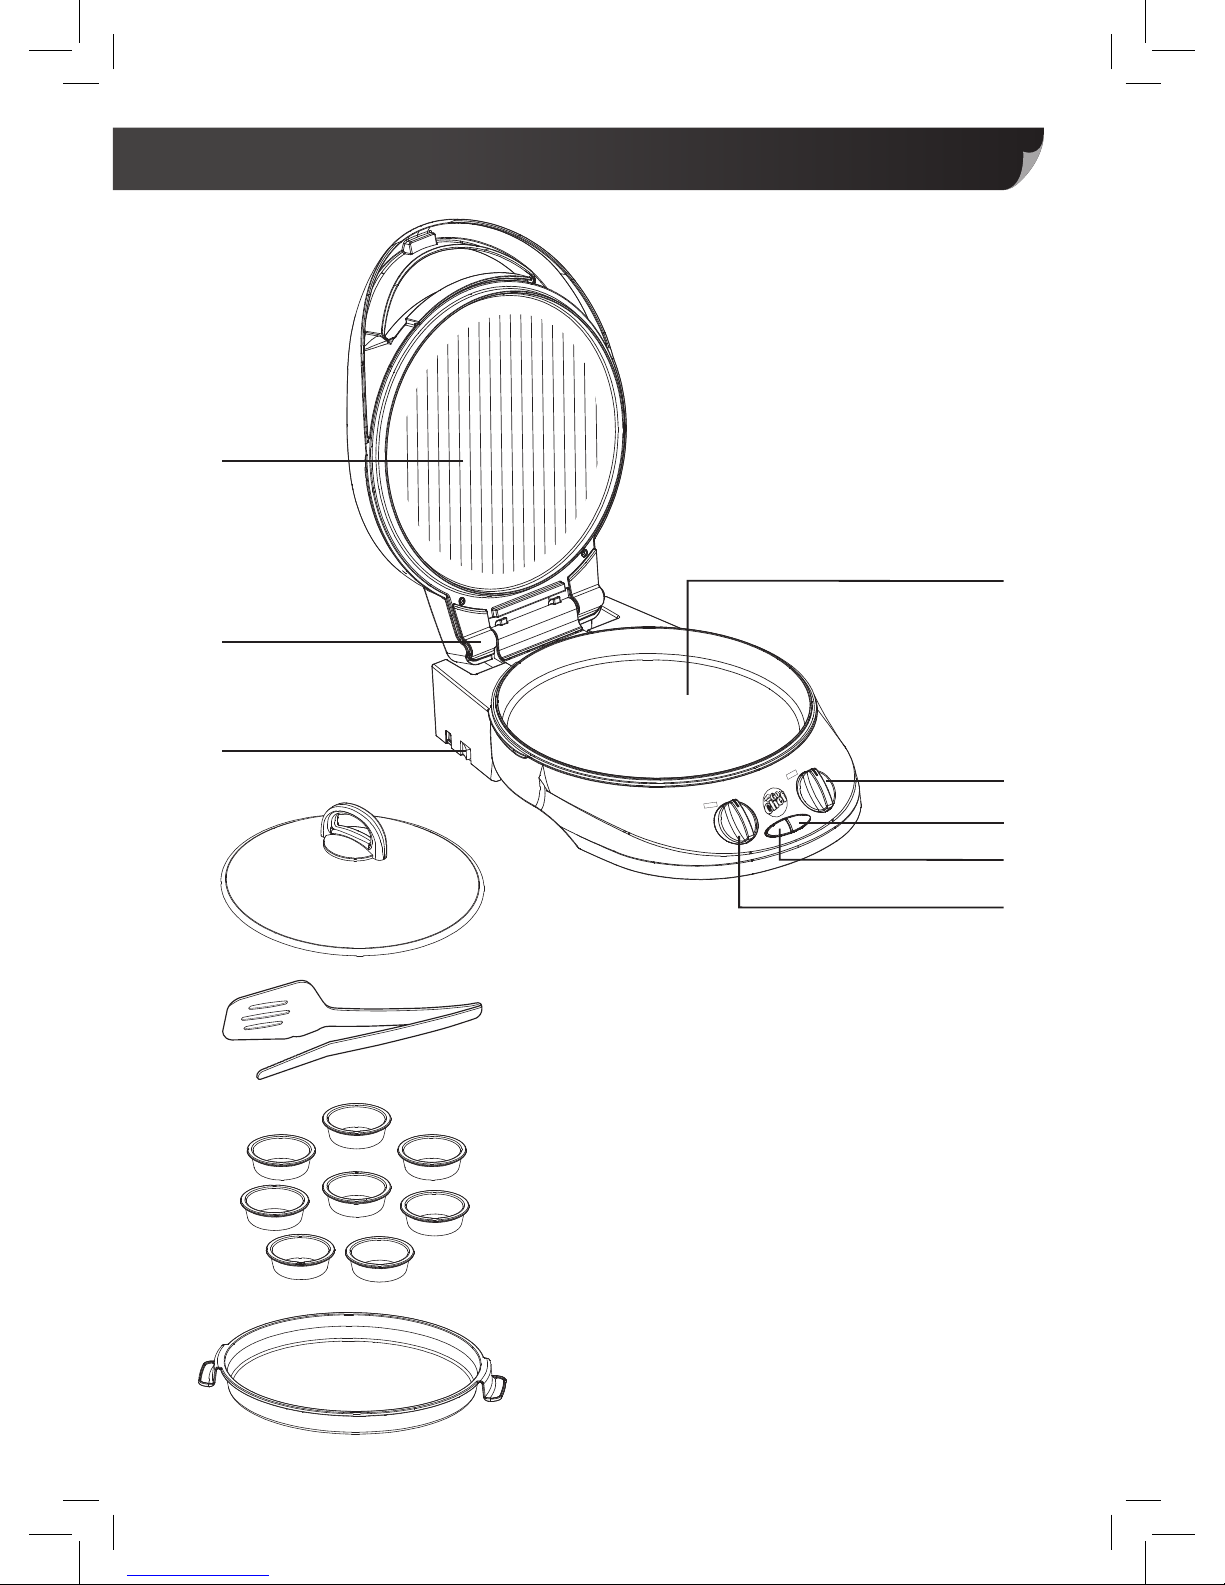
Your GoChef™ Combi Grill & Pizza Oven
1. Main base unit with Flat Pan
2. Lid / Griddle Pan
3. Temperature Dial
4. Timer Dial
5. Temperature Indicator Light
(green -goes off when desired heat is reached)
6. Power Indicator Light (red)
7. Pan Selection Switch
(single or double - single is Flat Pan only)
8. Locking Hinge
9. Glass Ventilation Lid
10. Spatula Tongs
Optional items sold separately:
11. Cake Moulds/Ramekins
12. Removable Pan Liner
2
7
9
10
11
12
8
1
4
5
3
6
GCCGPO_IM_A.indd 4 18/04/2016 13:06
Page 6
TEMP
TIME
TEMP TIME
5
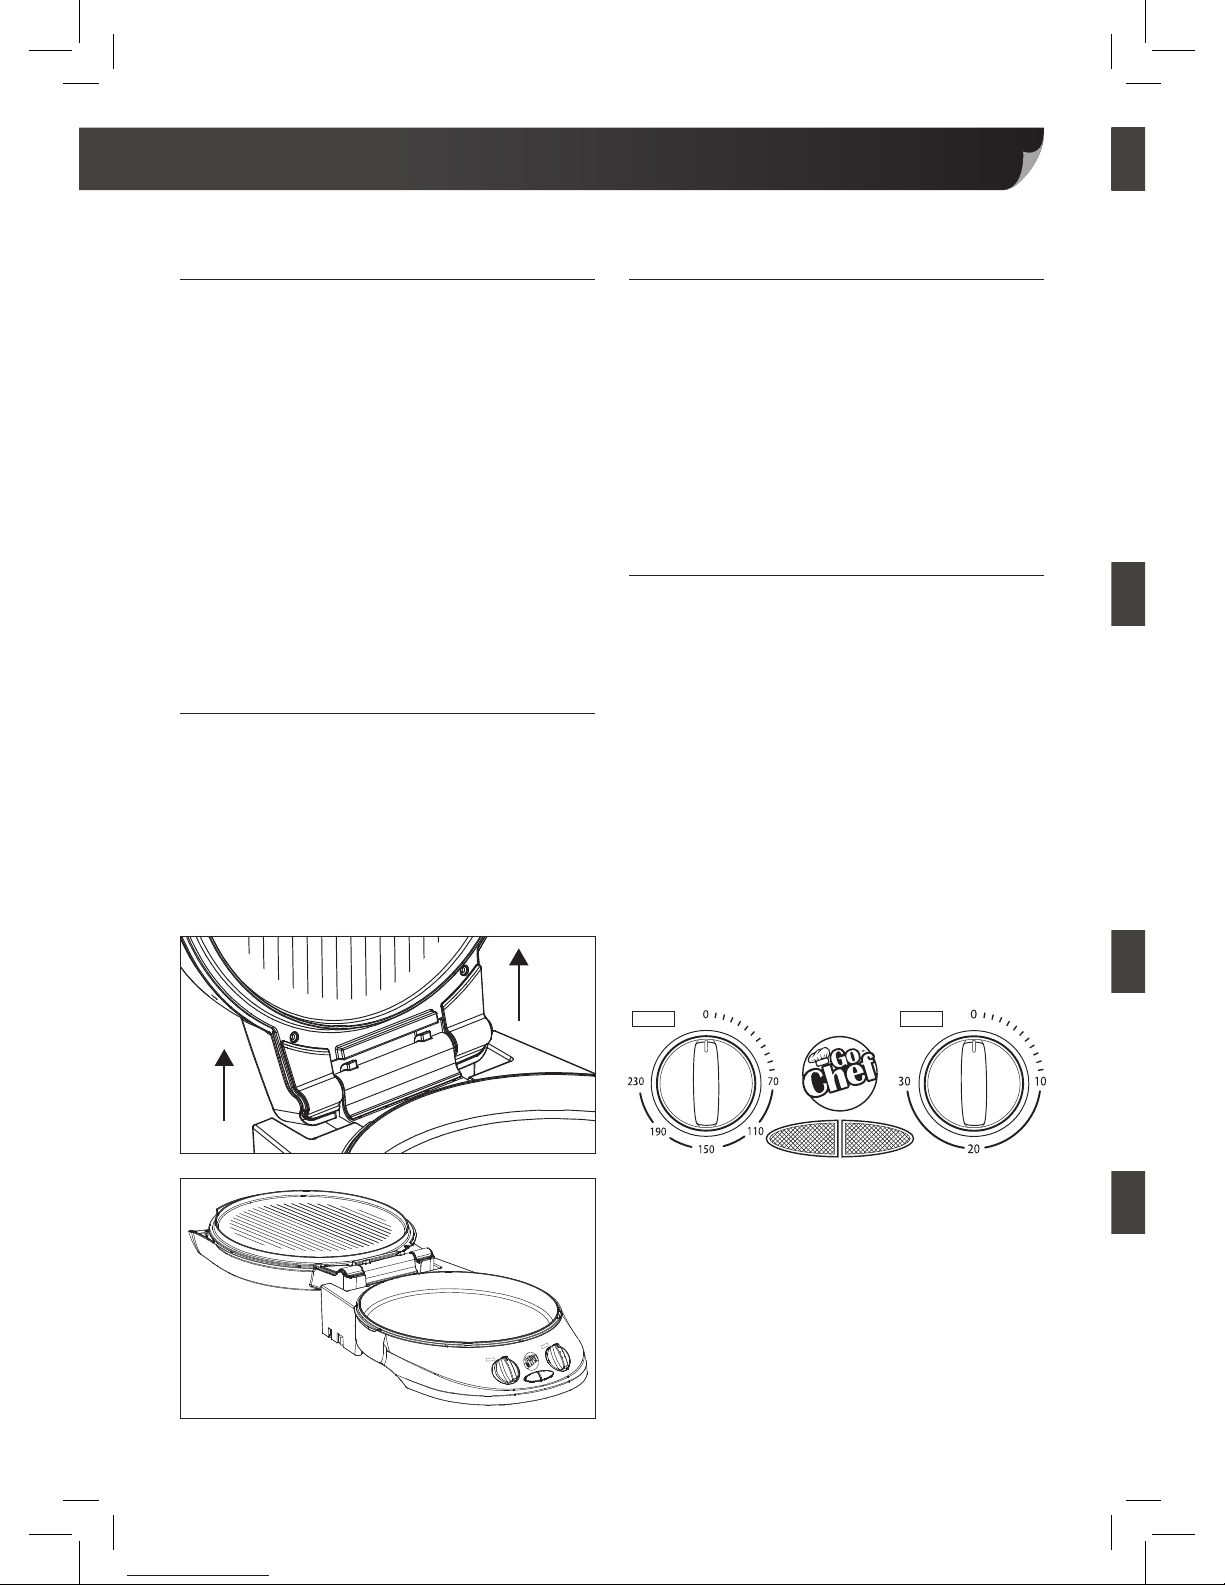
Lifting and adjusting the Lid/
Griddle Pan
To use the Lid/Griddle Pan as a flat cooking
surface, you can open it until it is vertical and
cannot be opened any further, and then lift it
slightly within the casing of the Locking Hinge
(Fig A). This will unlock the hinge and the Lid/
Griddle Pan can be laid flat, resting on the work
surface with the handle as a support (Fig B).
Before first use
Remove all packing materials, foam, plastic
and cable ties. Open the Lid/Griddle Pan until
it is vertical and cannot be opened any further,
then lift it so that the Locking Hinge releases it
and it can be laid flat. Then wipe both cooking
surfaces with a warm, wet cloth to remove any
residual traces of packing materials.
NOTE: The Glass Ventilation Lid is supplied
with the handle fitted to inside for ease of
packaging, please remove central screw and
refit handle to outer surface before use.
Closing the Lid/Griddle Pan
To fold the Lid down flat, reverse the process
as described above. The Locking Hinge should
automatically allow it to drop and just close
completely in one smooth movement.
NOTE: Maintain support of the Lid/Griddle Pan
until it is fully closed, allowing it to fall or slam
shut could damage it.
Switching on
Plug the Grill & Pizza Oven into the mains and
switch on the socket. To turn on, select either
one or two cooking surfaces using the red Pan
Selection Switch at the side, near the base
(selecting the single option will only heat the
Flat Pan). Then choose a temperature you wish
to cook at using the Temperature Dial. Once
you have selected the right temperature, turn
the Timer Dial to the desired cooking time, this
will start the Grill & Pizza Oven heating up.
You may notice that some residual odour may
remain from the manufacturing process but
this will naturally dissipate after first use when
the plates have fully heated*.
Using Your GoChef™ Combi Grill & Pizza Oven
*The Timer Dial operates as a power on
function and so the Grill & Pizza Oven will not
heat up if the timer is not in operation.
NOTE: You will see both indicator
lights come on at first, once the desired
temperature has been reached, the
Temperature Indicator Light (green) will go off.
Fig A
Fig B
GCCGPO_IM_A.indd 5 18/04/2016 13:06
Page 7
6
Unplug and wait for the Grill & Pizza Oven to
cool completely before cleaning.
Use a kitchen towel to wipe any oil, grease
or residue from the cooking surfaces.
Only use clean, warm, soapy water. Do not
use any harsh detergents or scourers
to clean
the cooking surfaces, as these may damage
the non-stick surface. Allow to dry fully
before using again.
Wipe the main body of the Grill & Pizza Oven
with a damp cloth.
Using Your GoChef™ Combi Grill & Pizza Oven
NOTE: For safety reasons, you cannot
operate the Grill & Pizza Oven without the
timer being set. If you wish to cook beyond
the maximum time setting (30 mins) just add
whatever additional time you need using
the Timer Dial once the original 30 mins has
expired.
DO NOT turn the dials anticlockwise beyond
their starting positions as this will break the
dials.
NOTE: Only use plastic or wooden utensils,
like the Spatula Tongs provided, to flip or
move food inside the Grill & Pizza Oven.
Metal utensils may scratch and damage the
non-stick surface.
NOTE: ALWAYS allow to cool before storing.
Oven can be stored vertically to save space.
Cleaning & Care
Guarantee
Technical Information
This product is unconditionally guaranteed for
one year against all defects of workmanship and
materials. This guarantee does not affect your
statutory rights. If you have any problems or
queries about this product please contact JML
customer services.
Technical Specifications
Model AN-3215
Power consumption 1800W
Power supply AC 220-240V ~ 50/60Hz
GCCGPO_IM_A.indd 6 18/04/2016 13:06
Page 8
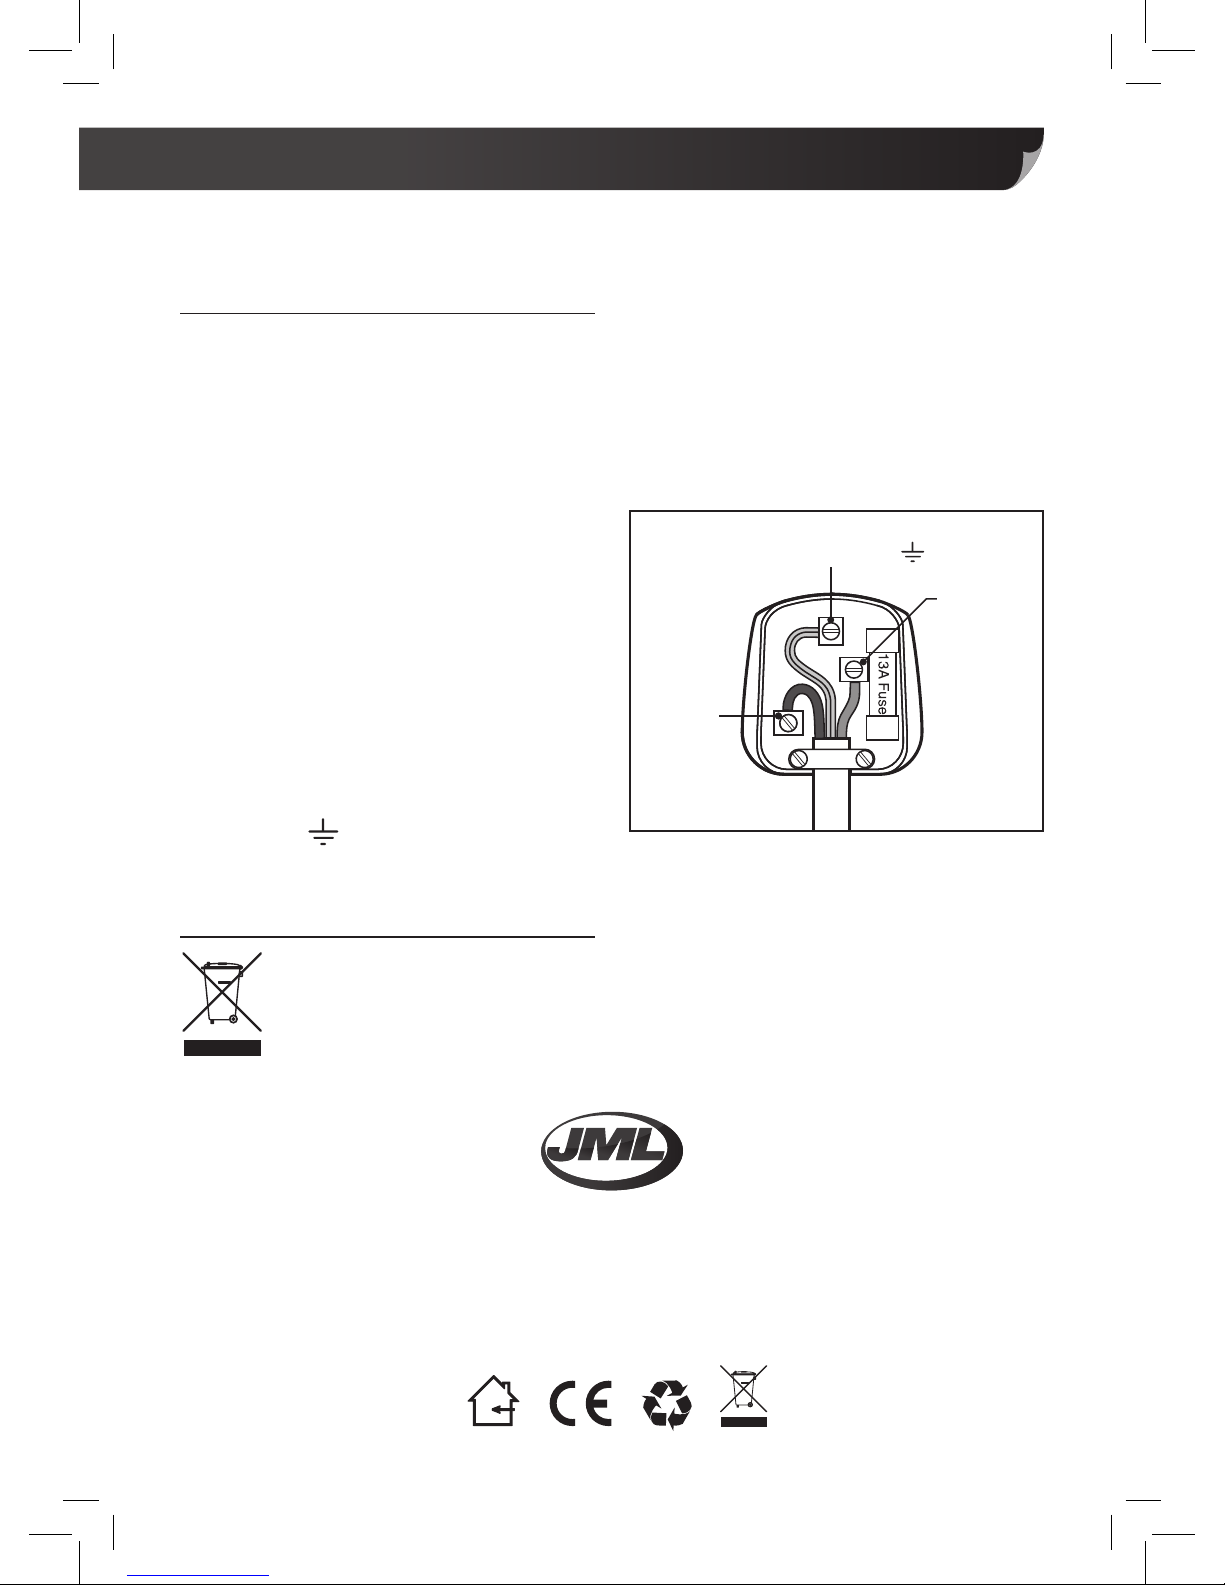
Connect green/yellow
lead to ‘E’ or - Earth
Connect
blue lead
to ‘N’ Neutral
Connect
brown lead
to ‘L’ - Live
N
L
E
Distributed by JML
JML, Unit 1 Eastside, Port of Tyne, South Shields, NE33 5SP
Customer Services: UK: 0800 781 7831 (Freephone) • ROI: 041-978 0003 (Local rate)
Email: [email protected] • Web: www.JMLdirect.com
©JohnMillsLtd/LW/04.16/YA/A • Product code: V08120 • Made in China
Fuse & mains plug replacement
(UK & Ireland only)
This appliance is fitted with a BS 1363 13-amp
plug. If you have to replace the fuse, only use
those that are AS TA or BSI approved to BS
1362 and have a rated current of 13 amps.
Should you need to replace the plug; the
wires in the power cord are coloured in the
following way:
Blue – Neutral
Brown – Live
Green & Yellow – Earth
As the colours of the wires in the power
cord may not correspond with the coloured
markings identifying the terminals in your
plug, proceed as follows:
The wire that is coloured green & yellow
must be connected to the terminal in the
plug that is marked with the letter E or by the
earth symbol
.
Disposal and the environment
This product is covered by the waste electrical and electronic equipment
(WEEE) regulations. It should not be discarded with normal household waste,
but taken to your local collection centre for recycling. For further information,
please contact your local authority or approved disposal agency.
The wire that is coloured blue must be
connected to the terminal that is marked
with the letter N.
The wire that is coloured brown must be
connected to the terminal that is marked
with the letter L.
If the power lead is damaged, it must be
replaced by a qualified electrician.
Technical Information
GCCGPO_IM_A.indd 7 18/04/2016 13:06
 Loading...