

Page 1

1
J
J
J
M
M
M
C
C
C
I
I
I
N
N
N
C
C
C
.
.
.
"Bringing computing ease to your student record
needs"
INSTRUCTIONAL
DOCUMENTATION
STANDARDS AND BENCHMARKS
ELEMENTARY REPORT CARDS
Table of Contents
Elementary Report Card Guide for Teachers Pgs. 2-4
Tying Assignments to Benchmarks to Calculate Results Pgs. 5-8
Printing Elementary Report Cards Pg. 9
JMC Inc
PO Box 328
Lake City, MN 55041
Telephone: 1-800-524-8182
Fax: 1-651-345-2215
Web: http://www.jmcinc.com
Email: support@jmcinc.com or sales@jmcinc.com
Documentation and program copyright © 2010
Page 2
2
Elementary Report Card Guide for Teachers
This is a brief introduction to JMC elementary report cards. For complete instructions
please visit http://www.jmcinc.com/videos/videos.html and watch the instructional video
“Teacher Elementary Report Card Entry.”
1. Go to File: Office to Teacher. This updates your GradeBook with any information
that has been updated in the office. There is no need to do this daily.
2. Go to Edit: Edit Assessments for a Student if you are a:
• Grade level teacher i.e. Kindergarten Teacher or 2nd Grade Teacher.
• Specialist teacher i.e. Art, Music, PE, Computer, etc. who assesses students in
more than one Standard or Benchmark. For example, if you are an Art teacher
who gives an overall course grade and also assesses benchmarks called
“effort” and “works well with other students.”
Go to Edit: Edit Assessments for a Course or Grade if you are a:
• Specialist, Special Ed, or non-grade level teacher who assesses each student in
only one area i.e. you are the Phy Ed teacher who gives an “effort” grade to
each student.
3. A pop-up item may appear stating – “This appears to be… of the screen.” Click OK.
4.
5. Choose your Grade Level if:
• You are a grade level teacher who has all of the Standards and Benchmarks
instanced to your grade level.
Choose the Course(s) you teach if:
• You are a specialist, special ed, or other teacher who does not teach all of the
classes a student takes.
• You are a grade level teacher whose Standards and Benchmarks are instanced
to the courses you teach.
6. If necessary, choose your subject area from the Subject Area pop-up menu.
7. Click on the “Add” or “Add Initial Assessment Set” button on the top of the screen.
8.
9.
10. Click OK.
11. Start entering assessments and comments (if applicable). Please refer to the screen
guides on the next page to guide you through this process.
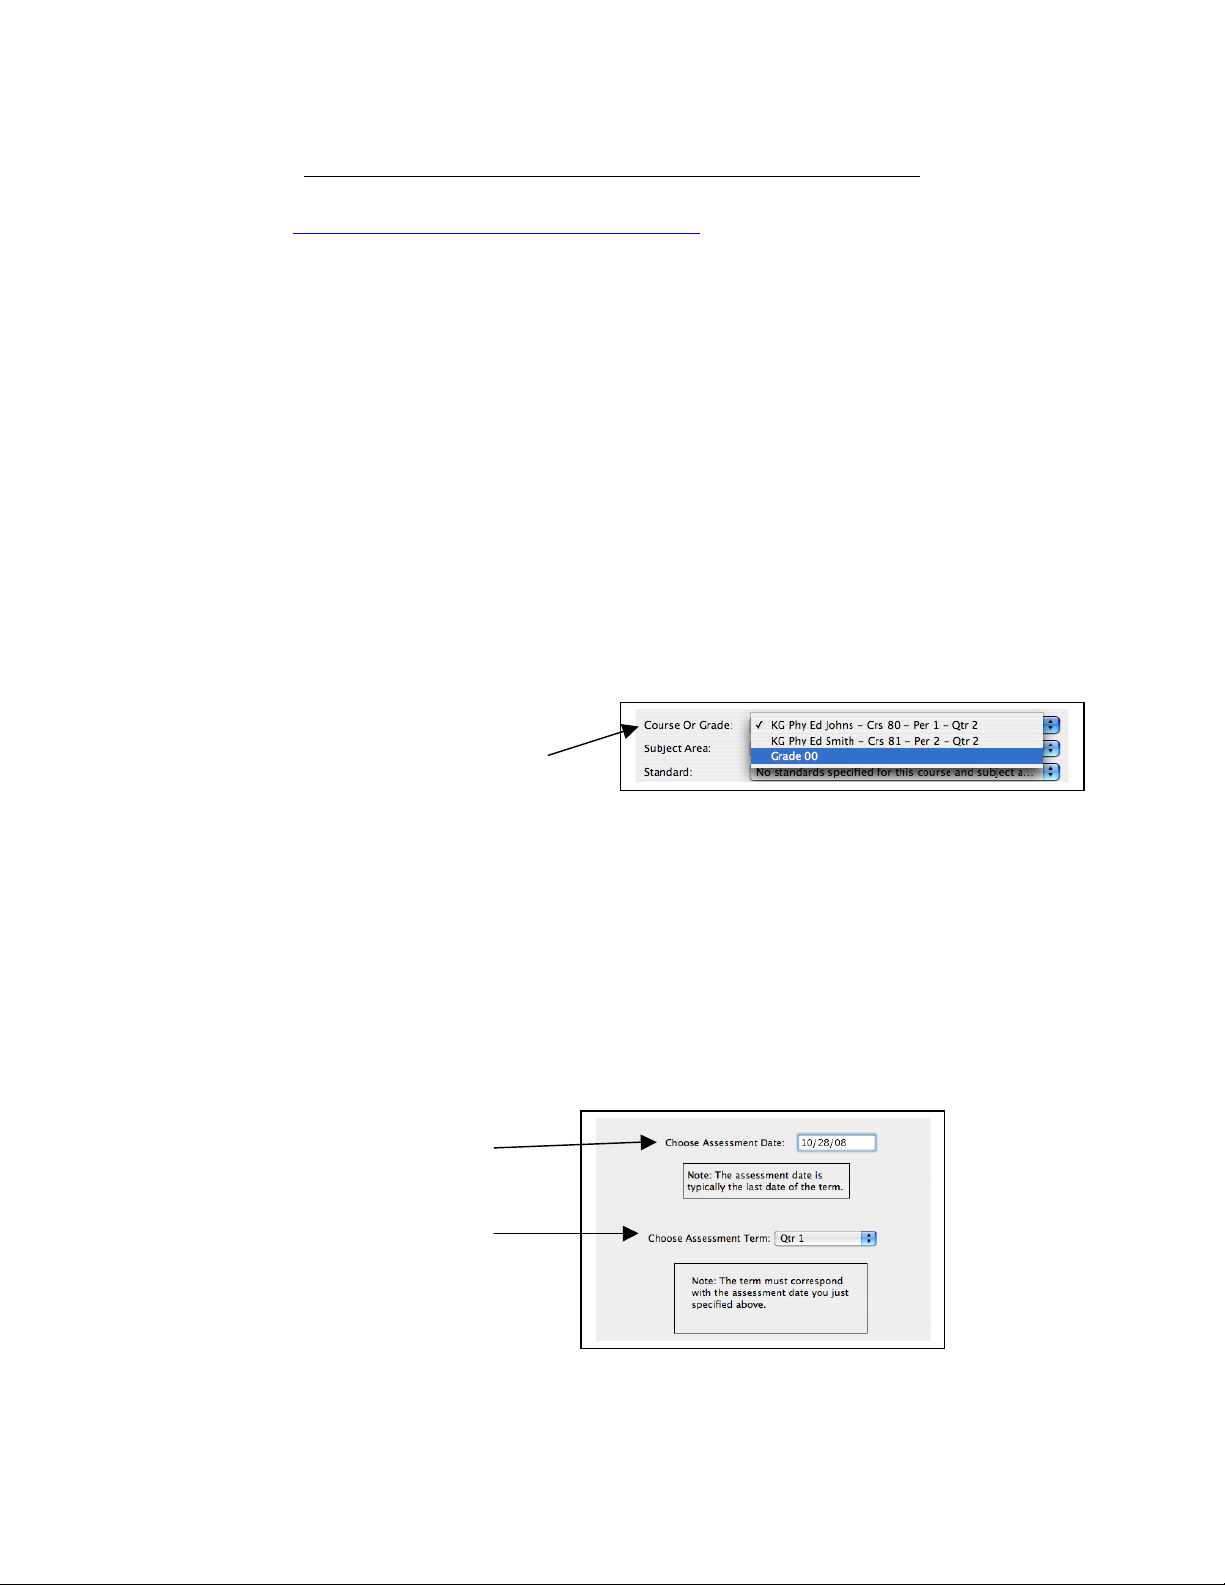
On the top of the screen click on the
“Course or Grade” pop-up menu.
Choose the Assessment Date per
the instructions on the screen.
Choose the Assessment Term per
the instructions on the screen.
Page 3
3
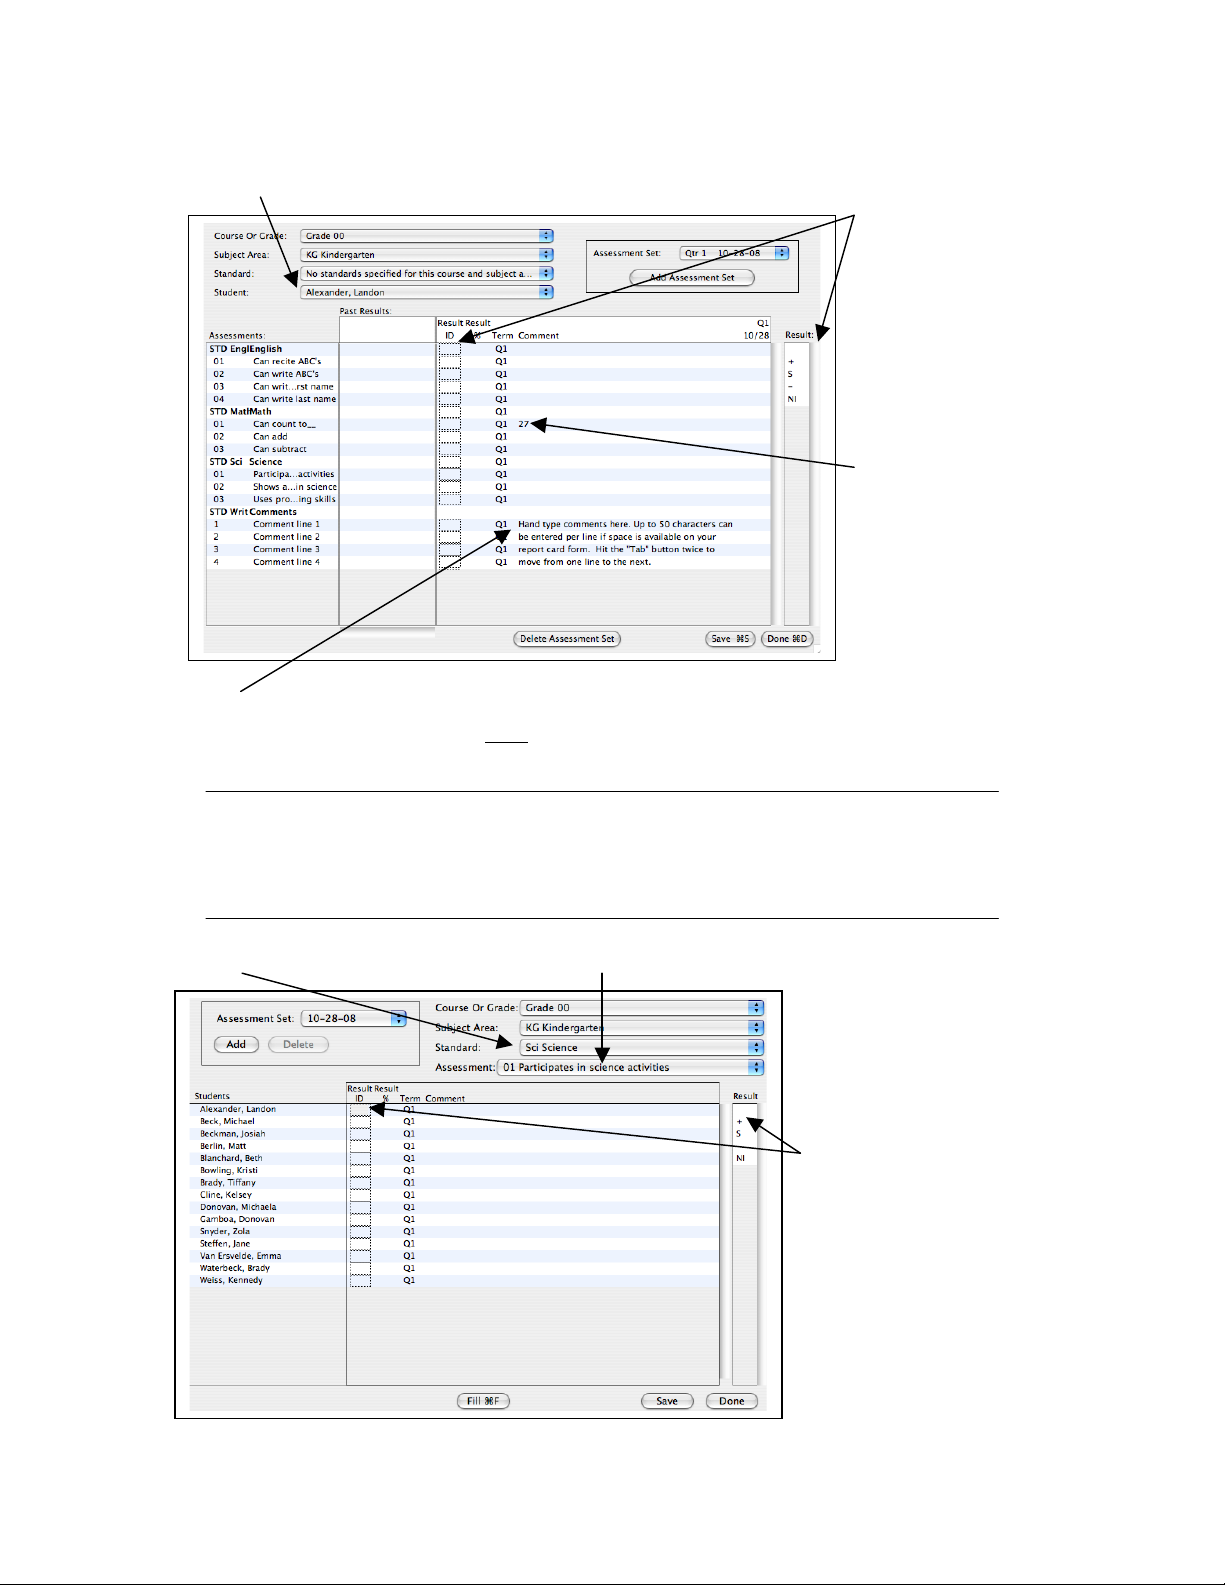
15A. If you have a spot on your report card for “hand-typed”
comments they will be entered only in the comment area for
benchmarks named “Comment Line” or something similar.
Edit Assessments for a Student Screen
12A. Choose the student you want to assess.
Please Note: Hand-typed comments can only be placed in areas that have been designed
to display on your report card form. If you put hand-typed comments into areas that
have not been set up to display those comments, those comments will not display on the
report card forms.
Edit Assessments for a Course or Grade Screen
12B. Choose the Standard. 13B. Choose the Assessment you want to assess.
\
13A. Click on
the result that
the student has
earned for the
Standard or
Benchmark
where the
cursor is
displayed.
14A. Enter in
hand-typed
results in the
comment area
to the right of
the result box.
For example,
this teacher
hand enters the
result for “Can
count to__.”
14B. The students
you are assessing are
listed on the left hand side.
15B. Click on the
result that the
student has earned
for the Standard or
Benchmark where
the cursor is
displayed. For
“hand-typed”
comments refer to
14A and 15A.
Page 4

4
Preparing Course Grades to Send to the Office
If you enter daily assignment, test, and project scores into the JMC GradeBook in the
Score: Assignment Scores you can have these Course Grades displayed on the report
card if the report card is set up to receive and display the course grades. Please note that
this is an abbreviated version of using Course Grades. Please refer to the GradeBook
documentation with questions.
16. Go to Edit: Course Grades. 17. Choose a Course.
Sending Grades to the Office
19. Go to File: Teacher to Office. Make sure
“Standards and Benchmarks” is checked. If
you entered in “Course Grades” (Steps 16-18)
then “Grades” should also be checked.
20. Click OK.
18. Go to the Options menu and click on
“Calculate (The term you are working on) Grades
from Scores…” A pop-up menu will appear. Click
OK. This will import your Course Grade from the
Assignment Scores screen.
Page 5

5
B. Click the “Select
Benchmark” button
when you have the
correct assignment
chosen/highlighted.
This will bring up a
screen (seen on the
next page) allowing
you to attach that
assignment to a
specific benchmark.
Tying Assignments to Benchmarks to Calculate Results
There are four steps to attach assignments to benchmarks to calculate benchmark
results. The following is a list of those steps followed by a detailed explanation.
Step 1: Go to Scores: Categories and Assignments to attach Assignments to
Benchmarks.
Step 2: Go to Scores: Standards and Benchmarks to verify Assignment
weighting within a Benchmark.
Step 3: Go to Edit: Edit Assessments for a Course or Grade or Edit: Edit
Assessments for a Student to calculate Benchmark results.
Step 4: Go to File: Teacher to Office to send your Standards and Benchmarks to
the office.
Step 1: Go to Scores: Categories and Assignments to attach Assignments to
Benchmarks.
A. To attach assignments to benchmarks, follow the necessary steps to
create a category and then assignments underneath that category. Categories can
still be named “Tests, Assignments, Participation” etc. but many teachers find it
helpful to create categories using the names of the benchmarks. That is how it is
organized in this document. Create categories in a way that makes sense to you.
Notes
• If you click the “Select Benchmark” button and
it tells you “no benchmark instances have been
created for this course in the office,” you should
do an “Office to Teacher.” If that does not work,
the office will have to instance benchmarks to this
course for you.
• Assignments may only be attached to one
benchmark.
• You can attach as many assignments to a
benchmark as you would like.
• If you have an assignment/test that applies to
more than one benchmark, you would need to put
the parts of the test in as separate assignments.
Page 6

6
C. Highlight/Choose the benchmark to which you want to attach the
assignment and click “OK.”
D. Now when you highlight/choose an assignment you will see what
benchmark is attached to it.
E. Continue to
add assignments
and attach them
to benchmarks
making sure to
hit the “Select a
Benchmark”
button after you
have created an
assignment.
Your Categories
and Assignments
screen may look
something like
this:
Page 7

7
Step 2: Go to Scores: Standards and Benchmarks to verify assignment
weighting within a Benchmark. This screen will show you, in list order, which
assignments are attached to which benchmarks. This screen will also show how
the benchmarks are weighted for calculating a standard.
A. Choose the Course and Standard with which you want to work.
B. If calculating only benchmarks this screen is used to:
• Review which benchmarks are attached to which assignments.
• Review/change how the assignments are weighted when attached to a
benchmark. Within each benchmark you can set the “Assignment Weights.” By
default the Assignment Weights will be “Equal,” which means each assignment
attached to that benchmark will have equal weight when the benchmark result is
calculated. This can be changed to “By Points,” which means the more points an
assignment is worth the more influence it has when the benchmark is calculated,
or “User Defined.” You can edit the assignment weighting by clicking here.
C. If you are using this screen to calculate standards, please note the
following items. Continue on to Step 3 if you are not calculating a standard.
• Many elementary report cards created in JMC do not print calculated
standard results. They instead print Course Grades (Under Edit: Course Grades).
If there is a question about whether you should calculate Standard results or use a
course grade, you can either go to Edit: Edit Assessments for a Student and see
if there is a box in the results column for the standard in question, or you can
contact your school’s office professional.
• Each benchmark must have “Weight” designated. By default each
weight will be 1 (one) which will make each benchmark equal to the other
benchmarks. You can weight the benchmarks in any way you would like.
• A standard will not calculate unless each benchmark has at least one
assignment attached to it.
Page 8

8
Please note: this screen will look
slightly different on the Edit
Assessments for a Course or
Grade screen.
B. Enter the Assessment
date for the current term.
C. If you want all
assignments (typically not done)
to calculate a benchmark, check
this box.
D. To calculate the
Benchmarks for all the students in
that course, check this box.
Step 4: Go to File: Teacher to Office to send your Standards and Benchmarks to
the office.
Step 3: Go to Edit: Edit Assessments for a Course or Grade or Edit: Edit
Assessments for a Student to calculate Benchmark results.
A. Choose the course you are working with in the “Course or Grade” popup menu and then click the “Add” or “Add Initial Assessment Set” button in the
top right corner.
E. Click the “Calculate Results from Assignment Scores” button.
F. The calculated result will appear like the following screen.
G. To recalculate a benchmark and/or standard, click
Calculated Benchmark
Result
This is calculated from the
percentage the student has
earned by placing the
appropriate result symbol here
from the result cut-offs listed
in the Office program. To
change a result highlight it,
and choose the result from
“Result” column on the right.
Calculated Benchmark
Percentage
This is the percentage
taken from the assignment
scores the student
received for assignments
tied to this benchmark.
Remember, the
assignments can be
weighted for a benchmark
in Step 2.
Calculated Standard
Result
If all of the benchmarks
have a calculated result and
you have the option to enter
a standard result, a standard
result will be calculated
from the benchmark
percentages.
Page 9

9
Macintosh/Apple Version
Windows Version
One Time Step per Grading
Term: To have attendance
information appear on report
cards go to Grades: Reports:
Report Card. Choose the term
for which you are currently
printing report cards. In the box
labeled Q1/Tri1/Sem End, enter
the last day # for the term.
Printing Elementary Report Card Forms
1. Have teachers go to File: Teacher to Office in their (IP) GradeBook making sure
that “Grades” and “Standards and Benchmarks” are checked
2. Bring the Grades into the Office. Go to Grades: Entry: TGE GradeBook Entry
choosing the way in which grades are sent to the Office and the term for which
you want to collect grades.
3. Optional Step: Check to see if teacher(s) successfully sent grades to the office.
Go to Standards and Benchmarks: Student: Edit Standard and Benchmark
Results. Go to a student for whom that teacher sent grades in. If that screen is
blank, grades were not correctly sent in. If there are benchmarks listed with
assessments given, the teacher successfully sent grades to the office.
4.
5. Print off report card forms by going to Standards and Benchmarks: Reports:
Print Standard and Benchmark Transcript.
• Choose who you want to Print. Please note that if you choose to print by
“Advisor” the teachers # needs to be put in the “From” and “To” boxes. The
teacher numbers can be found by going to Attendance: Staff: Teachers and
Rooms. The # in front of the teacher name is their number.
• Hit the Select Form button and choose the form that corresponds with the
students chosen.
• Hit the Print button.
• If nothing shows up on the screen it means that either a student or form was
not chosen correctly.
 Loading...