

Page 1

Directions for the Master Schedule Building
process inside of JMC
The master schedule building process can be broken done into 6 Stages. I have included a
general over view of the 6 Stages and detailed directions for each stage.
1) Courses -- The 1st stage deals with your current course information. In this stage you will remove any
courses that are no longer being used and add new courses for the upcoming school year. YOU DO
NOT NEED TO REMOVE THE EXISTING MASTER SCHEDULE FROM THE PREVIOUS YEAR!
2) Registration -- The 2nd stage deals with loading the students into their courses. The required courses
are quickly bulk loaded and the electives can be entered using Online registration or Add Courses.
3) Analyzing the Registration -- The 3rd stage deals with deciding on how many sections of the courses
you wish to offer and also filling in any constraints you have in your courses.
4)Building the master schedule -- The 4th stage deals with using the Scheduling Aid to build a master
schedule.
5) Conflicts -- The 5th stage involves analyzing your student conflicts.
6) Scheduling the students -- The 6th stage involves scheduling your students into their classes.
If you need any assistance during the master schedule building process please contact JMC through
any of the following avenues:
800 - 524 - 8182 Monday through Friday 8:00 am until 4:30 pm.
support@jmcinc.com
651/345-2215 fax
JMC now has the ability to take control of your computer from our location if you desire.
Page 2
Master Schedule building process in JMC
STAGE 1
COURSES
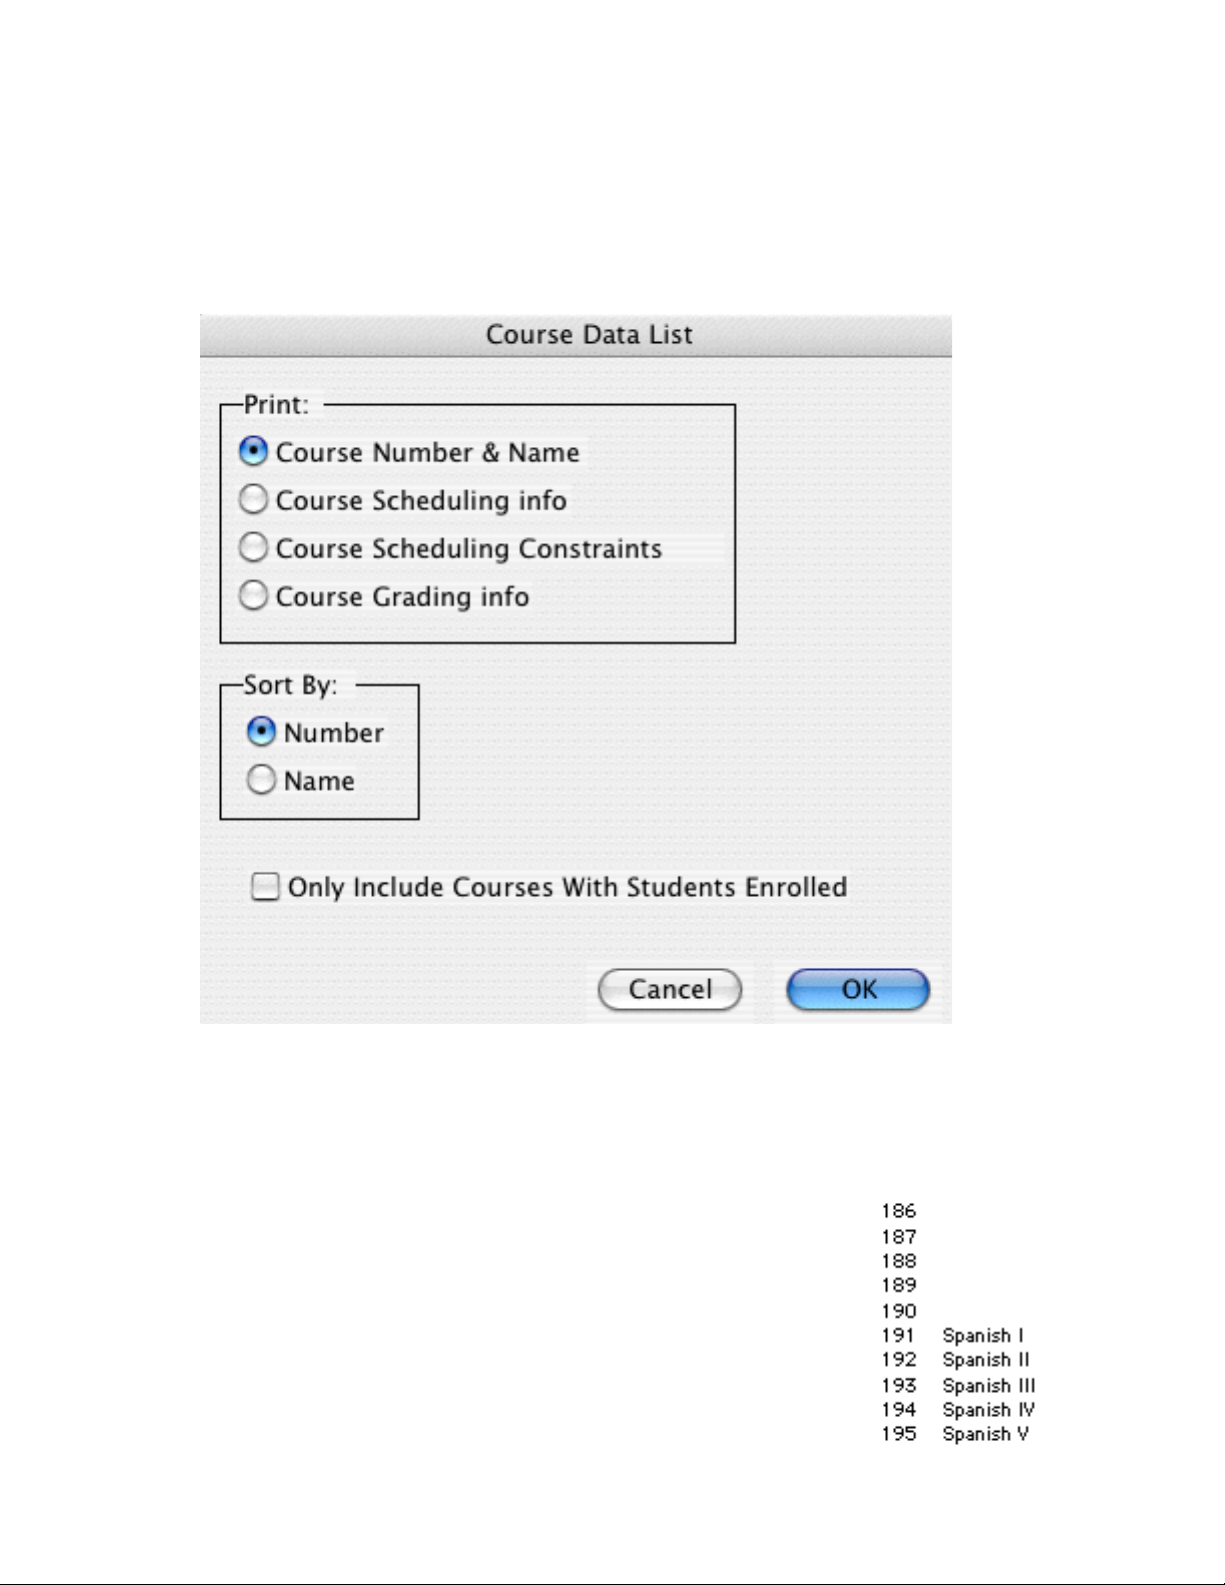
1) On the main screen of the 2008-2009 JMC software select Schedules--Course--Course Data List.
Leave the selection as Name and Number. Sort the report by Name and make sure to uncheck the box
labeled “Only Include Courses with Students Enrolled”. If you receive a blank page that means you left
the box checked.
2) The course data list shows you the current course names and associated numbers inside of JMC. If
you offered a course last year and will not be offering it this year you may remove it by selecting
Schedules--Course--Edit Course Data. You may either enter the name or number of the course in the
Find box in the lower right hand corner of the screen. To remove a course simply highlight and remove
the name.
3) ADDING A COURSE -- If you wish to add a course offering for the
2008-2009 school year please print out the Course Data List in step #1
making sure to Sort By: Number. This time the print out will show you all of
the course numbers and the available numbers are the ones with no name
next to them.
Select Schedules--Course--Edit Data and enter the number you wish to
use in the Find box. To create the course simply click in the blank box to
the right of the words Course Name and enter the name of the new
course. Do not worry about the other information on the screen at this point
in time.
Page 3
use in the Find box. To create the course simply click in the blank box to
the right of the words Course Name and enter the name of the new
course. Do not worry about the other information on the screen at this point
in time.
Master Schedule building process in JMC
STAGE 2
REGISTRATION
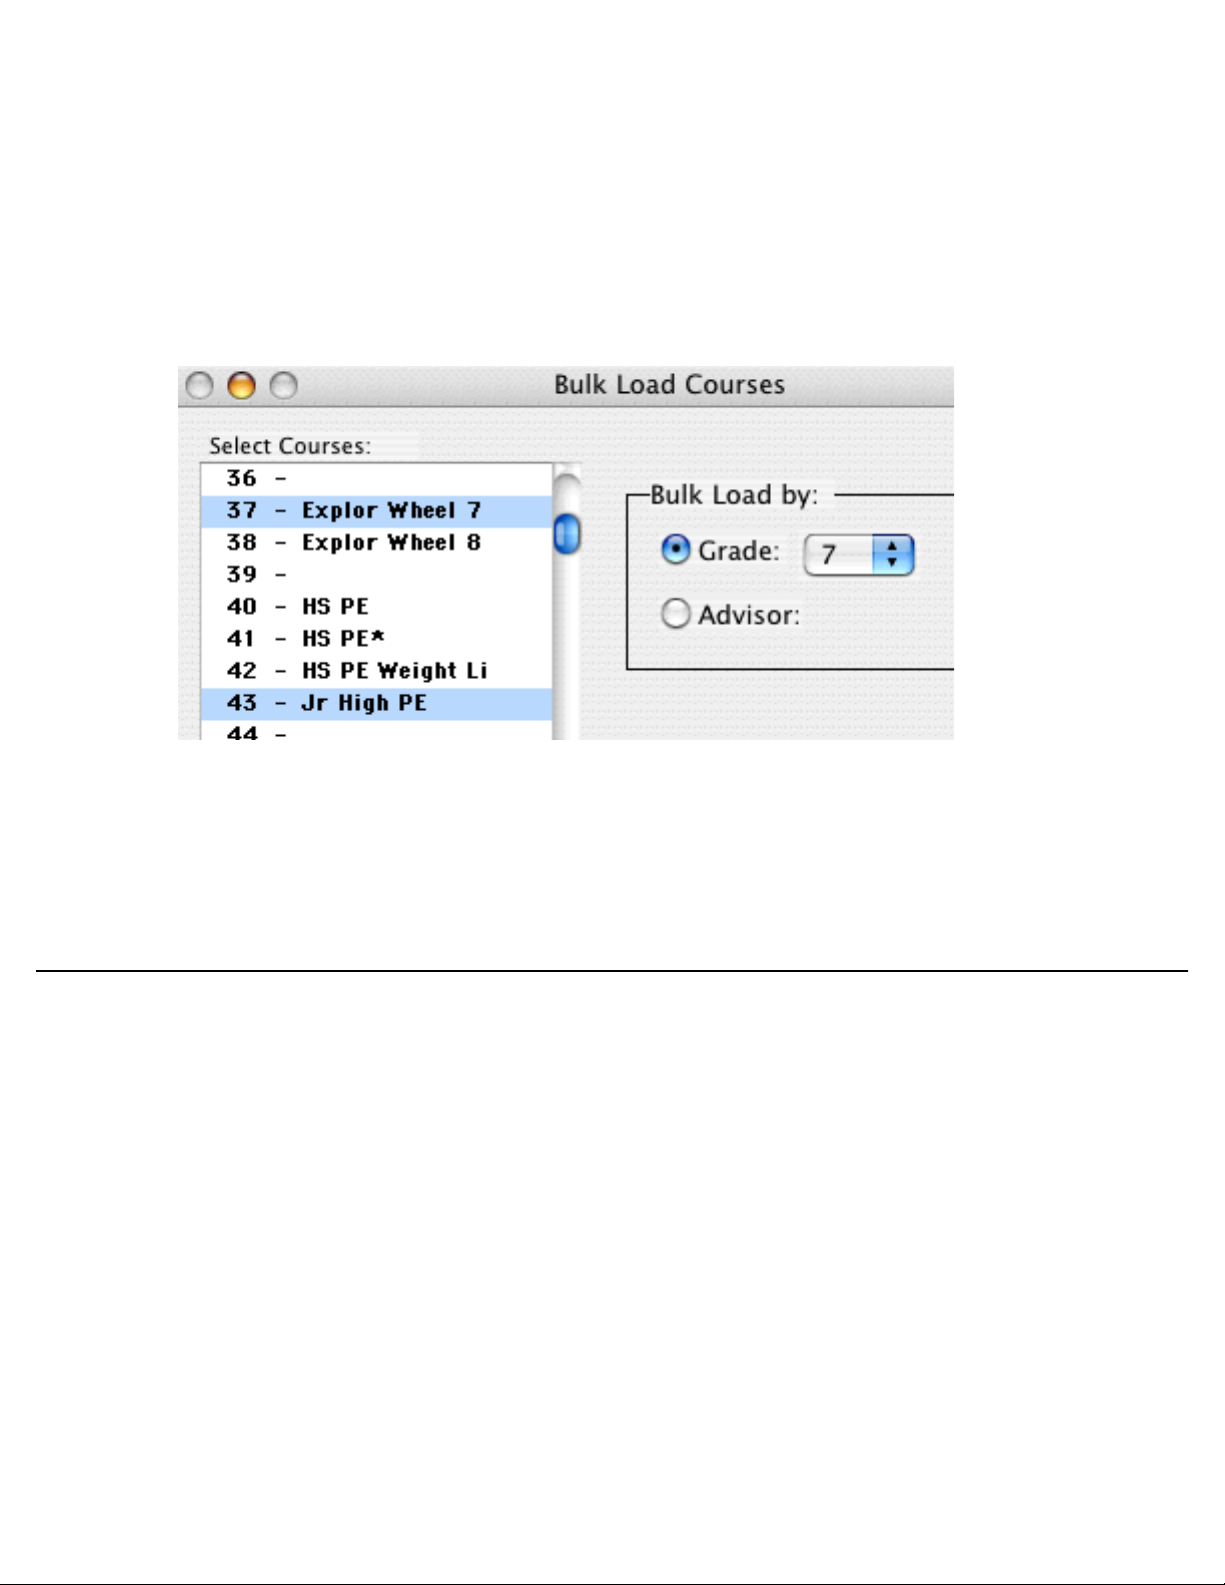
1) REQUIRED COURSES -- The courses that are required or taken by the vast majority of the
students in a grade level can be mass loaded using Schedules--Develop--Bulk Load Courses. Select
the Grade Level or Advisor on the right and then highlight the courses you wish to mass load for the
selected group. NOTE: On Windows simply click on each of the courses you wish to mass load for the
selected group. On Macintosh click on the first course and then hold down the Shift key for multiple
selections.
IMPORTANT NOTE: If you make a mistake and accidentally mass load the incorrect courses for a group
please select Schedules--Course--Drop Courses. Select the courses you incorrectly loaded and the
student registration will be removed. YOU WILL NEED TO REDO ANY GROUPS THAT WERE
ALREADY MASS LOADED INTO THOSE COURSE NUMBERS. Dropping courses only
removes student registration, IT DOES NOT REMOVE THE COURSE DATA.
2) If you wish to check the accuracy of your mass loading please select Schedules--Course--Course
Tally.
3) ELECTIVE COURSES -- There are 3 methods available for loading the electives (choices) for the
student. JMC’s recommendation is to consider Online Registration. Online Registration allows the
student to sign up for the electives themselves saving Office and/or Guidance Professionals the
time-consuming task of entering the electives for each student. DO NOT ENTER ALTERNATIVE
COURSES. You will overload the student and cause conflicts.
The three alternatives for entering electives:
1) Online Registration -- Allows the student to enter his/her electives themselves.
2) Add Courses -- Found under Schedules--Student--Add Courses. This allows for an alphabetical list
of students where you simply click on the course name. You do not need to SAVE after each student.
3) Manual Entry -- Found under Schedules--Student--Edit Schedules. You may either enter the course
number in the CRS column or use the Add Button located at the bottom of the screen.
IMPORTANT NOTE: No matter which of the 3 methods you decide to use, there is one screen which
determines which courses each grade level is allowed to sign up for. If at any time you notice that a
course is not listed as a choice for a certain grade level please select Schedules--Course--Courses To
Add.
AFTER REGISTRATION IS COMPLETE YOU MAY WANT TO PRINT A HARD COPY OF
EACH STUDENTS REGISTRATION by selecting Schedules--Student--Verify Registration.
Page 4

determines which courses each grade level is allowed to sign up for. If at any time you notice that a
course is not listed as a choice for a certain grade level please select Schedules--Course--Courses To
Add.
AFTER REGISTRATION IS COMPLETE YOU MAY WANT TO PRINT A HARD COPY OF
EACH STUDENTS REGISTRATION by selecting Schedules--Student--Verify Registration.
Master Schedule building process in JMC
STAGE 3
ANALYZING REGISTRATION
1) Once registration is complete select Schedules--Course--Course Tally. The Course Tally identifies
how many students have been registered for each of your courses.
Grade Levels
The first column is the course number followed by the course name. The column labeled Total shows
how many students have registered for that specific course. To the right of the Total column are the
grade levels. The column labeled # sec shows how many sections are currently set. The Avg column
shows what the average class size would be considering the amount of students registered and the
current number of sections defined. The Terms column shows what terms are currently set to offer this
course.
2) Identifying mis-registration -- If you notice looking at the course tally that an 8th grader is signed up
for a 12th grade class we know a mistake was made. To get a listing of which students are
representing the numbers on the course tally please select Schedules--Course--Course Registration.
You can remove the student’s mis-registration by selecting Schedules--Student--Edit Schedules.
Click on the incorrect course number and press the spacebar, delete, or back space key to remove it.
3) Deciding on the number of sections -- Looking at the Total column will show you how many
students have signed up for each course. You will use these numbers to determine how many
sections of each course you will be offering.
4) Deciding to not offer a course -- If you find courses in which the interest was not great enough to
justify offering even one section of the course you will want to print out a list of these students so they
can be notified that the course is not going to be offered. Select Schedules--Course--Course
Registration. To remove the course registration for the course that is not going to be offered select
Schedules--Course--Drop Courses.
Page 5

Master Schedule building process in JMC
STAGE 3 - continued
ANALYZING REGISTRATION
1) Setting important course parameters -- For the purpose of scheduling we need to make sure that
the following is set correctly: Term Type and Block Length. Term Type is the length that the majority
of students spend inside of the class. Block Length is how long the course is in comparison to normal
courses. You may have an Automotive course which the students spend both 1st and 2nd period in
the class. This course would be set as a Block Length of 2.
2) Setting the number of Sections-- Each of the lines in the center box represents a section of the
course. If the course is year long and you wish to have one section each semester you would have
two lines listed. One would have the term labeled as Sem 1 and the other as Sem 2. If the course is
a semester long and you would like 3 sections during the year you would have 3 lines listed.
IMPORTANT NOTE: Last year’s master schedule will be appearing in the period column. YOU DO
NOT NEED TO REMOVE LAST YEAR’S MASTER SCHEDULE.
3) Teachers and Rooms -- If you know which Teacher and Room is involved with this course please
select the Teacher and Room using the pop-up menus. If you do not know which Teacher will be
teaching or what room will be used please leave the pop-up menu blank.
Page 6

Master Schedule building process in JMC
STAGE 3 - continued
ANALYZING REGISTRATION
4) Setting Restrictions and Capacity -- If you know of any factors which affect when a course or
Teacher can or can not be used we enter those by clicking on the Constraints Tab under
Schedules--Course--Edit Data.
5) In the picture above notice that I have removed the check marks under period 6 and 7 for the 2
sections assigned to Mrs. Bangston. I have told the computer that it CAN NOT schedule her sections
for periods 6 and 7. It may be a situation where Mrs. Bangston is at the Elementary building at the
end of the day. I have also entered a course capacity limit by clicking on the 0 listed under Cap.
6) In the picture below you notice that I have unchecked the box for the 1st section listed under the
S2 column. I have told the computer that this section must be offered Semester 1.
7) In the example below I have unchecked all of the period boxes except for period 1. I have told
the computer that this section of this course will be meeting period 1.
8) If you would like a print-out showing you all of the constraints you have entered select
Schedules--Course--Course Data List. Select the option named Course Scheduling Constraints.
Page 7

8) If you would like a print-out showing you all of the constraints you have entered select
Schedules--Course--Course Data List. Select the option named Course Scheduling Constraints.
Master Schedule building process in JMC
STAGE 4
Scheduling Aid
IMPORTANT -- Before running the scheduling aid make sure the following is correct: Term Type of
Courses, Block Length of Courses, Number of Sections, Days the course meets, Constraints for
Courses/Teachers.
1) Scheduling Aid -- Select Schedules--Develop--Scheduling Aid. Enter the Grade range you wish to
build the schedule for. Check the box labeled Auto mode. This means the computer will only prompt you
when a Teacher or Room has not been entered for a section.
2) Teacher Load Limit -- Enter the
maximum number of periods the
majority of Teachers can teach. If I had
a 7 period day and knew that the
educators need one prep period I
would enter 6. If you have a Teacher
who actually does teach all 7 periods
then the computer will stop you when
it reaches the 7th section for that
Teacher and make sure that it is ok to
give the Teacher the 7th section.
3) Press on the OK key and the scheduling aid will begin building your master schedule. Every time that you
select Schedules--Develop--Scheduling Aid a back-up copy of the existing master schedule is automatically
placed in the JMC data folder.
4) The scheduling aid will run by itself unless it reaches a situation where a Teacher or Room has not been
selected or the Teacher and Room selected are already used up.
Page 8

Master Schedule building process in JMC
STAGE 4 - continued
Scheduling Aid
5) Teacher and/or Room have been used already. In the example below the Teacher and Room have
already been used. You would need to select a new Teacher or Room and then click on the Next button.
The bottom of the screen
shows when the Teacher is
already being used.
The 5’s listed in Period 4
show that this Teacher is
already teaching 5 days per
week. When you change the
Teacher the bottom will
reflect the new teacher’s
current schedule.
6) If the Teacher or Room had not been assigned it also will stop you and ask you to select the missing
Teacher or Room.
7) When you are finished click on the Done button and your course data will now reflect the new master
schedule.
Page 9

7) When you are finished click on the Done button and your course data will now reflect the new master
schedule.
Master Schedule building process in JMC
STAGE 5
Student Conflicts
1) Big Picture -- Select Schedules--Develop--Student Conflicts. Enter the Grade levels and click on the
View Totals at the bottom of the screen. The Conflict Totals screen will show you how many students
could be scheduled into every course they have requested.
2) Individual Student Conflicts -- Select Schedules--Develop--Student Conflicts. Enter the grade levels
you desire and click on the Print button. You will receive a report of students listing their conflicts. If you need
any assistance reading student conflicts please fax them to us at 651/345-2215.
In the example above the student is requesting 2 courses during the 2nd semester which are offered at the
same time. We would probably remove the Food II course and ask the student for an alternative.
3) Working with individual students -- Select Schedules--Student--Edit Schedules/Grades. Enter the name
or number of the student in the Find box. To remove a course click on the course number and hit your space
bar, delete key, or backspace key.
To add a course click on the Add button in the bottom left hand corner or click in the CRS# column and enter
the number manually. If you wish to check the conflict for the student again you may select Schedules-Develop--Conflicts for a Student.
PLEASE NOTE: You may make minor changes directly inside of the Course Data by selecting Schedules-Course--Edit Data. Any changes are automatically reflected inside of the View Totals report.
IF YOU NEED TO MAKE MAJOR CHANGES TO THE NUMBER OF SECTIONS, TEACHERS,
ROOMS, OR RESTRICTIONS YOU MAY WANT TO RE-RUN THE SCHEDULING AID.
Page 10

Master Schedule building process in JMC
STAGE 6
SCHEDULING STUDENTS
1) At this point the students are registered for their classes and the master schedule is built. To have the
computer place the students into the actual terms and periods you need to select Schedules--Develop-Schedule Students.
2) Load Print -- To see how the courses ended up being loaded please select Schedules--Course-Load Print. This report shows how the students were loaded into the courses.
3) Class Lists -- Class Lists may be printed by selecting Schedules--Course--Class Lists.
4) Student Schedules -- Student Schedules may be printed by selecting Schedules--Student-Print Schedules.
5) Master Schedule -- Select Schedules--Staff--Teacher Utilization. This print out shows the Teachers
with their classes.
6) Locking the Schedule -- Select Schedules--Develop--Locking Options. Enter your zip code for the
Access Code. This prevents someone from re-scheduling every student at once. You may still work
with individual students. IMPORTANT NOTE: If someone does accidentally re-schedule all of the
students do not panic. JMC automatically makes a back-up of the current student schedules whenever
someone re-schedules all students.
7) Study Halls -- If you are using the automatic study halls you need to select Schedules--Study-Edit Data. You need to select the location for each study hall.
If you would like to see the big picture of how many students ended up in study halls select Schedules
--Study--Study Analysis.
For a print out of the students in study halls select Schedules--Study--Study Lists.
 Loading...