

Page 1
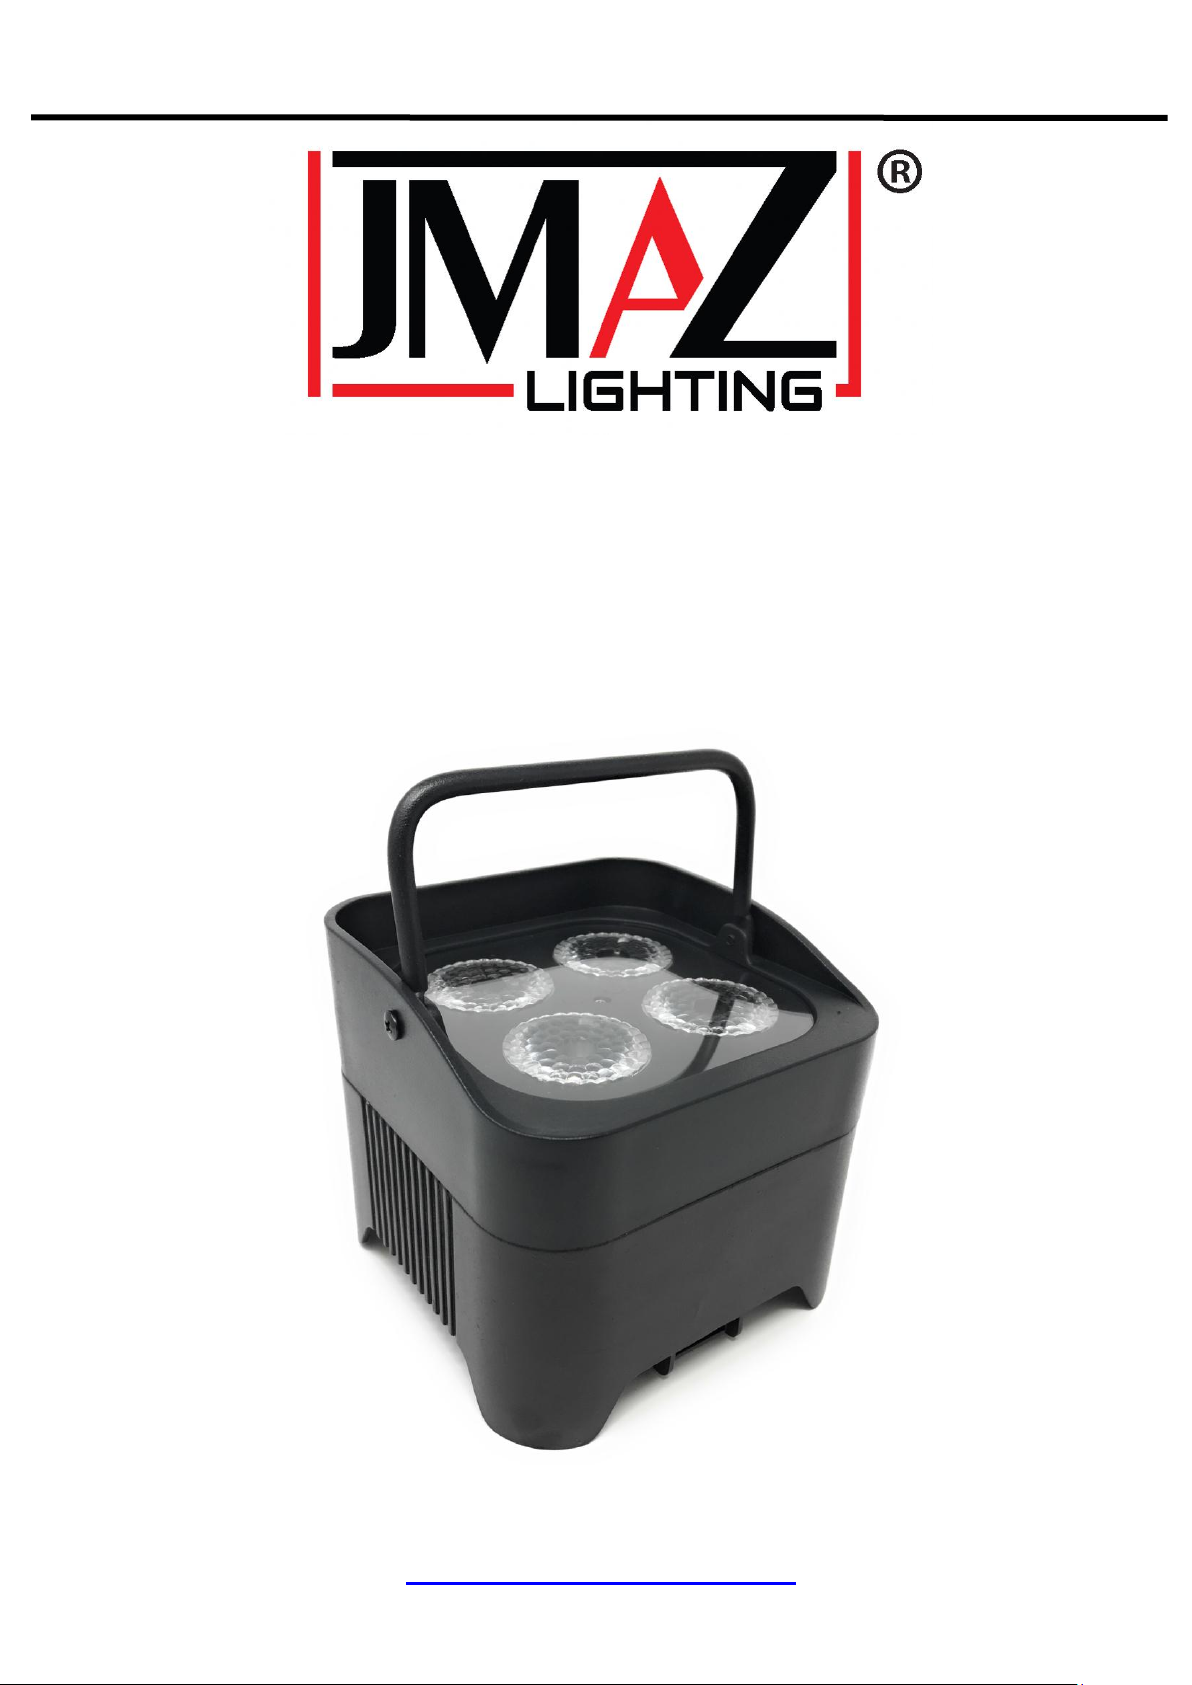
MAD PAR HEX 4S
User Manual
WWW.JMAZLIGHTING.COM
Page 2
2
Congratulations to the purchase of this product. Please read this manual thoroughly prior to using the product in order to
Do not attempt to make any repairs yourself. This would invalid your warranty. Do not make any changes to the product. This would also
recommendations and warnings. This is als o applicable t o all damages in whatever form.
benefit fully from all features.
Read the manual prior to using the product. Follow the instructions in order not to invalidate the warranty. Take all precautions
to avoid fire and/or electrical shock. Repairs must only be carried out by a qualified technician in order to avoid electrical shock.
Keep the manual for future reference.
- Prior to using the product, please ask advice from a
specialist. When the unit is switched on for the first time,
some smell may occur. This is normal and will disappear
after a while.
- The unit contains voltage carrying parts. Therefore do
NOT open the housing.
- Do not place metal objects or pour liquids into the
product. This may cause electrical shock and
malfunction.
- Do not place the product near heat sources such as
radiators, etc. Do not place the unit on a vibrating
surface. Do not cover the ventilation holes.
- The product is not suitable for continuous use.
- Be careful with the mains lead and do not damage it. A
faulty or damaged mains lead can cause electrical shock
and malfunction.
- When unplugging the product from a mains outlet,
always pull the plug, never the lead.
- Do not plug or unplug the unit with wet hands.
- If the plug and/or the mains lead are damaged, they
need to be replaced by a qualified technician.
- If the product is damaged to such an extent that internal
parts are visible, do NOT plug the unit into a mains outlet
and DO NOT switch the product on. Contact your dealer.
Do NOT connect the product to a rheostat or dimmer.
- To avoid fire and shock hazard, do not expose the
product to rain and moisture.
- All repairs should be carried out by a qualified technician
only.
- Connect the product to an earthed mains outlet (220240Vac/50Hz) protected by a 10-16A fuse.
- During a thunderstorm or if the product will not be used
for a longer period of time, unplug it from the mains. The
rule is: Unplug it from the mains when not in use.
- If the product has not been used for a longer period of
time, condensation may occur. Let the unit reach room
temperature before you switch it on.
- Never use the product in humid rooms or outdoors.
- During operation, the housing becomes very hot. Do not
touch it during operation and immediately after.
- To prevent accidents in companies, you must follow the
applicable guide lines and follow the instructions.
- Secure the product with an extra safety chain if the unit is
ceiling mount. Use a truss system with clamps. Make
sure nobody stands in the mounting area. Mount the
effect at least 50cm away from inflammable material and
leave at least 1 meter space on every side to ensure
sufficient cooling.
- This product contains high intensity LEDs. Do not look
into the LED light to prevent damage to your eyes.
- Do not repeatedly switch the product on and off. This
shortens the life time.
- Keep the unit out of the reach of children. Do not leave
the unit unattended.
- Do not use cleaning sprays to clean switches. The
residues of these sprays cause deposits of dust and
grease. In case of malfunction, always seek advice from
a specialist.
- Only operate the product with clean hands.
- Do not force the controls.
- If the product has fallen, always have it checked by a
qualified technician before you switch the product on
again.
- Do not use chemicals to clean the unit. They damage the
varnish. Only clean the product with a dry cloth.
- Keep away from electronic equipment that may cause
interference.
- Only use original spares for repairs, otherwise serious
damage and/or dangerous radiation may occur.
- Switch the product off prior to unplugging it from the
mains and/or other equipment. Unplug all leads and
cables prior to moving the product.
- Make sure that the mains lead cannot be damaged when
people walk on it. Check the mains lead before every use
for damages and faults!
- The mains voltage is 110-240Vac/50Hz. Check if power
outlet match. If you travel, make sure that the mains
voltage of the country is suitable for this product.
- Keep the original packing material so that you can
transport the product in safe conditions
This mark attracts the attention of the user to high voltages that are present inside the housing and that are of sufficient
magnitude to cause a shock hazard.
This mark attracts the attention of the user to important instructions that are contained in the manual and that he should
read and adhere to.
DO NOT LOOK DIRECTLY INTO THE LENS. This can damage your eyes. Persons who are subject to epileptic
attacks should be aware of the effects that this light effect may have on them.
The product has been certified CE. It is prohibited to make any changes to the product. They would invalidate the CE certificate
and their guarantee!
NOTE: To make sure that the unit will function normally, it must be used in rooms with a temperature between 5°C/41°F and
35°C/95°F.
Electric products must not be put into household waste. Please bring them to a recycling centre. Ask your local authorities or your
dealer about the way to proceed. The specifications are typical. The actual values can slightly change from one unit to the other.
Specifications can be changed without prior notice.
prior notice.
invalid your warranty. The warranty is not applicable in case of accidents or damages caused by inappropriate use or disrespect of the
warnings contained in this manual. Beamz cannot be held responsible for personal injuries caused by a disrespect of the safety
Page 3
3
UNPACKING INSTRUCTION
CAUTION: Please consider the respective national norms during the
authorized employee or dealers!
CAUTION:
distance of min 0.5 meter.
CAUTION! Immediately upon receiving the product, carefully unpack the carton, check the contents to ensure that all parts are
present, and have been received in good condition. Notify the shipper immediately and retain packing material for inspection if
any parts appear damage from shipping or the package itself shows signs of mishandling. Save the package and all packing
materials. In the event that the product must be returned to the factory, it is important that the product be returned in the original
factory box and packing.
If the device has been exposed to drastic temperature fluctuation (e.g. after transportation), do not switch it on immediately. The
arising condensation water might damage your device. Leave the device switched off until it has reached room temperature.
POWERSUPPLY
On the label on the backside of the product is indicated on this type of power supply must be connected. Check that the mains
voltage corresponds to this, all other voltages than specified, the light effect can be irreparably damaged. The product must also
be directly connected to the mains and may be used. No dimmer or adjustable power supply.
Always connect the device to a protected circuit (circuit breaker or fuse). Make sure the device has an appropriate
electrical ground to avoid the risk of electrocution or fire.
RECHARGEABLE BATTERY OPERATION
Prior to operating the device off mains for the first time, the rechargeable battery must be fully charged.
1 Switch on the device with the power switch. The operating time of the battery depends on the operating mode and the ambient
temperature. After the operation, switch the device off.
2 For charging the battery, connect the device to a power outlet via the enclosed adapter (12.6Vdc 2A). The device may be
operated during the charging procedure.
3 The device features a protective circuit for charging which prevents overload of the rechargeable battery. However, disconnect
the device from the mains after charging. Otherwise there will be a low current consumption even if the device is switched off.
4 The device will heat up during charging; this is normal.
5 To prevent damage to the battery by deep discharge, recharge a battery completely discharged as soon as possible. Do not
store the unit with the battery completely discharged and regularly recharge the battery in case of long storage.
INSTALLATION
installation! The installation must only be carried out by an
Attention:
• The installation of the product has to be built and constructed in a way that it can hold 10 times the weight for 1 hour
without any harming deformation.
• The installation must always be secured with a secondary safety attachment, e.g. an appropriate catch net. This
secondary safety attachment must be constructed in a way that no part of the installation can fall down if the main
attachment fails.
• Make sure the area below the installation place is free from unwanted persons during rigging, de-rigging and servicing.
• The operator has to make sure that safety-relating and machine-technical installations are approved by an expert
before taking into operation for the first time and after changes before taking into operation another time.
• The operator has to make sure that safety-relating and machine-technical installations are approved by a skilled
person once a year.
• The fixture should be installed in the position where persons cannot reach and where persons may walk by or be
seated.
When installing the device, make sure there is no highly in
inflammable material (decoration articles, etc.) in between a
Page 4
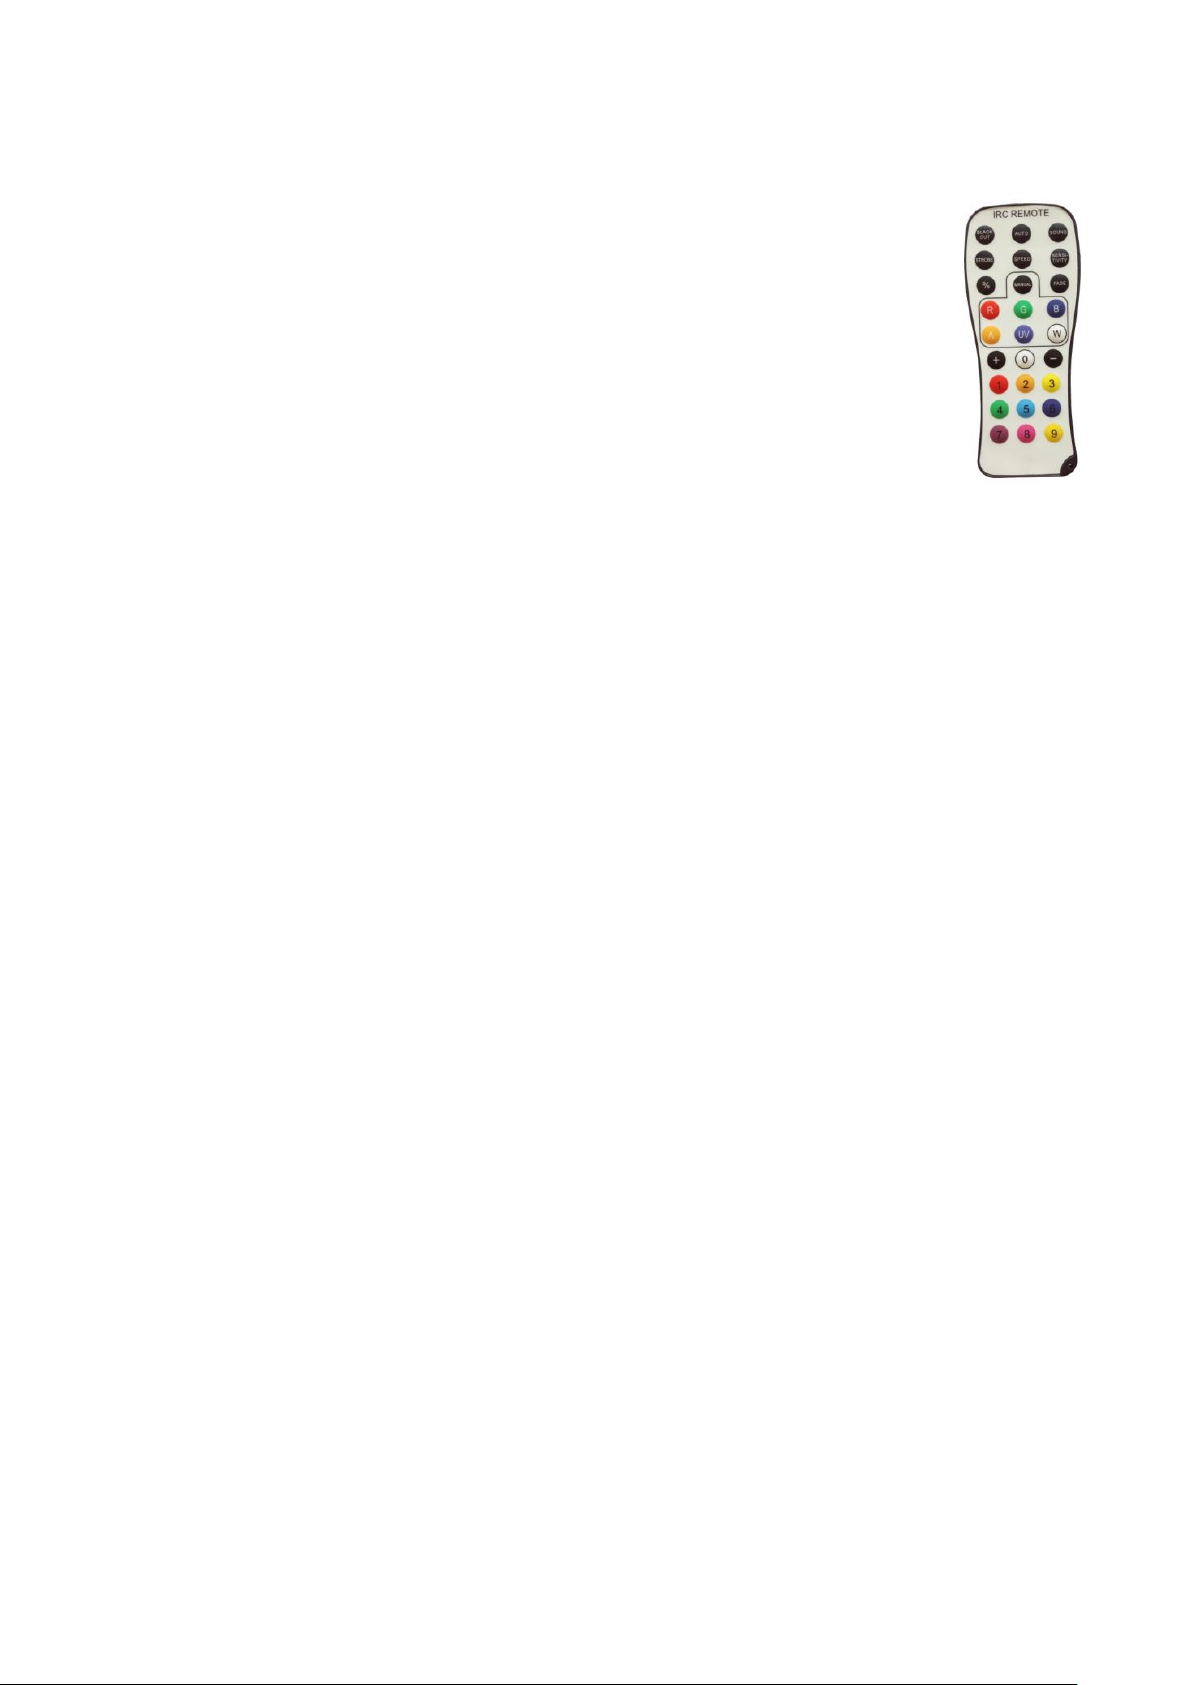
IR Remote control instructions :
BLACK OUT Mode
Press <BLACK OUT> off existing modes. Press <BLACK OUT> return the last modes.
AUTO Mode
Automatic mode will enable you to run the automatic programs on the product.
To turn on Automatic mode:
1. Press <AUTO> on the remote controller.
2. Press <+> or <–> to choose between the different auto programs.
SOUND Mode
Sound-Active mode will enable the product to respond to the music.
To turn on Sound-Active mode:
1. Press <SOUND> on the remote controller.
2. Press <+> or <–> to choose between the different sound programs.
STROBE Mode
To adjust the strobe speed of the automatic program and the sound active program.
1. Press <STROBE> on the remote controller.
2. Press <+> or <–> to either increase or decrease the speed of the program.
3. Press <STROBE> again to turn off the strobe.
FADE Mode
It is a color gradient mode.
1. Press <FADE> on the remote controller.
2. Press <FADE> again to turn off the Fade mode.
3. Press <+> or < - > to either increase or decrease the speed of the program.
MANUAL Mode
1. Press <MANUAL> on the remote controller.
2. Press <R>, <G>, <B>, <W>, <A> or <UV> (red, green, blue,white, amber or uv) to choose your
colour.
3. Press again <R>, <G>, <B>, <W>, < A> or <UV> (red, green, blue, white, amber or uv) to close your
colour. 4. Press <+> or <–> to either increase or decrease the percentage of each colour.
% Mode
Adjust the birghtness of RGBWAUV color , ,press the 1st time , it is 10% brigtness , press the 2nd time ,
it is 20% birghtness ......,press the 10th time , it is 100% bightness .
NUMBER 0~9
To adjust the brightness value of the automatic program, the Sound active program and Manual
Mode.
Press digit <1> to <9> to change different brightness on the device.
The remote control is supplied with a battery inserted. An insulating foil between the battery and
the battery contacts prevents the battery from being discharged during storage. Prior to the first
operation remove the foil from the battery support on the rear side of the remote control. Otherwise
operation of the remote control is not possible.
SENSITIVITY Mode
To adjust sound sensitivity for in Sound-Active mode
1. Press <SENSITIVITY> on the remote controller.
2. Press <+> or <–> to either increase or decrease sound sensitivity.
SPEED Mode
No function
Page 5
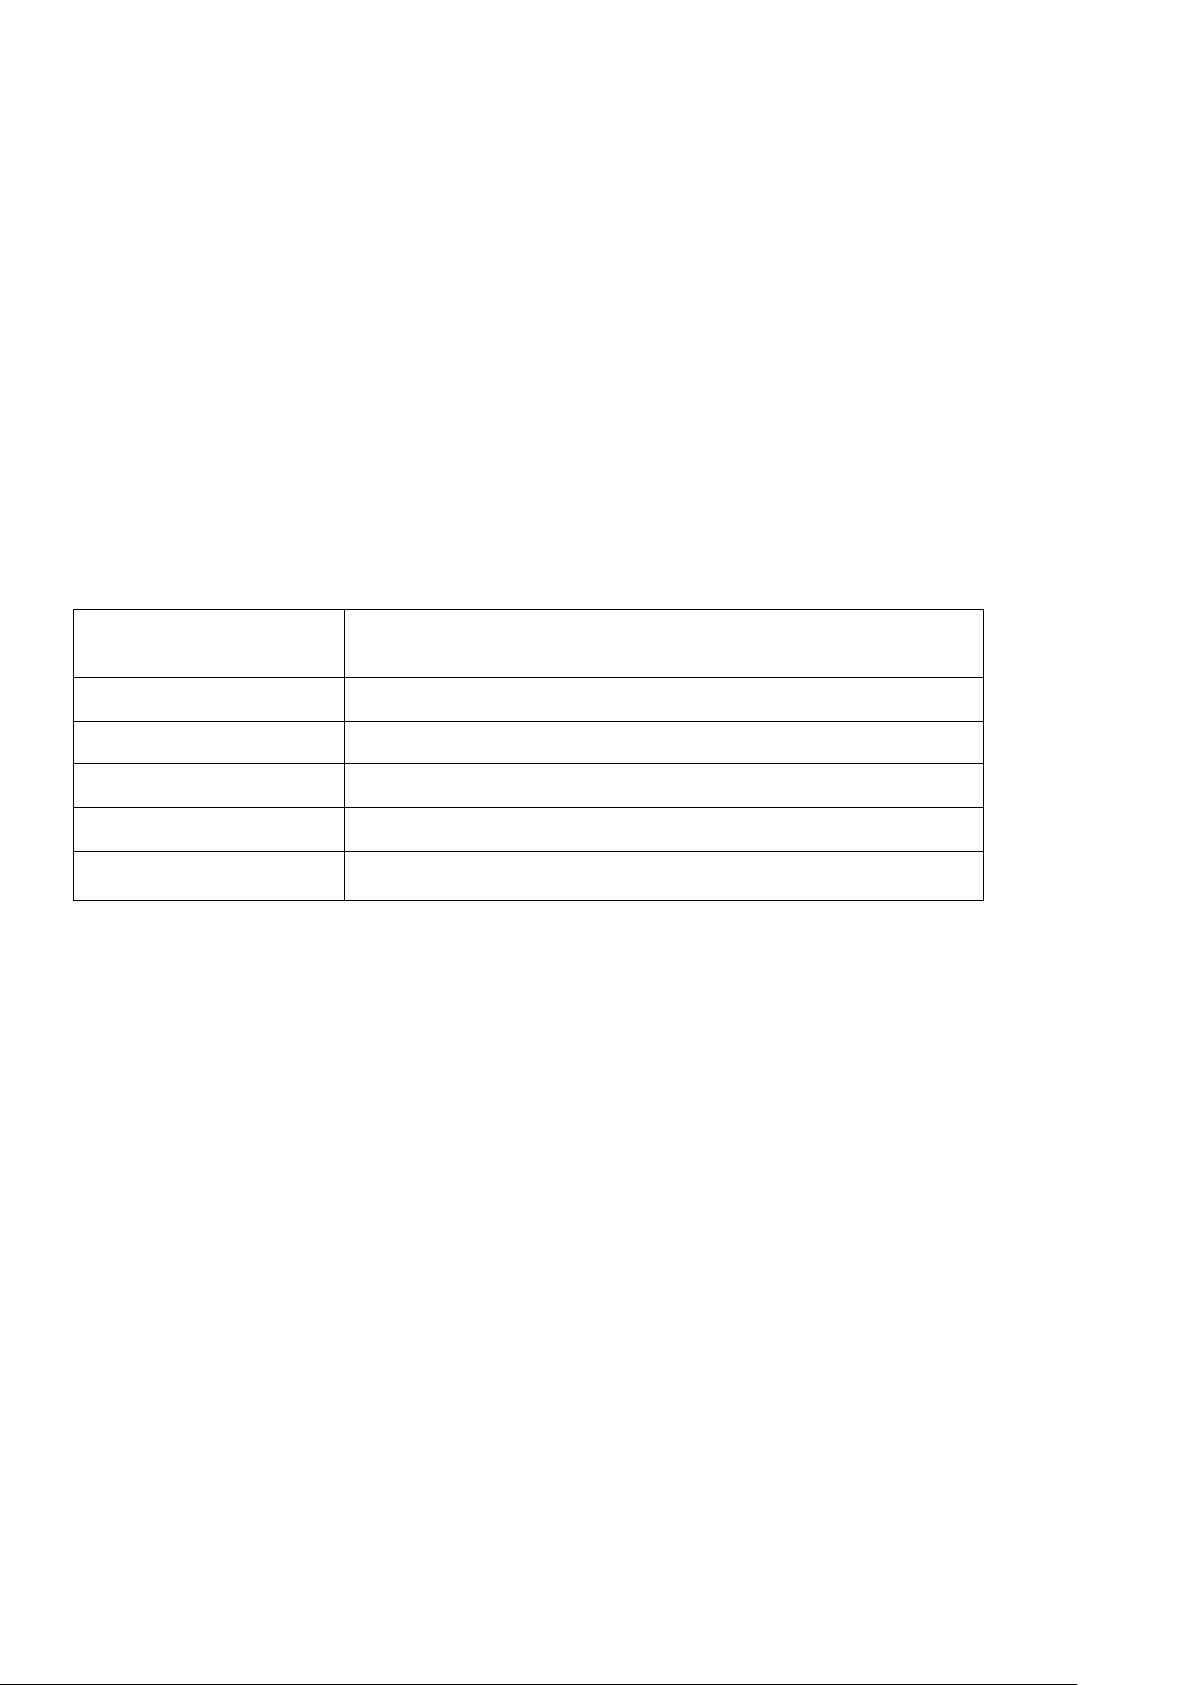
Wireless DMX Control instructions :
Color
Protocol
RED
ELDMX Transmit and receive
GREEN
W-DMX Receive
BLUE
W-DMX G3 Transmit
YELLOW
W-DMX G4 Transmit
PURPLE
GZ Receive * ( * Receiver only)
Set up wireless DMX
The fixture needs to be paired from the wireless DMX transmitter. Follow below steps to pair.
Step 1: Connect the DMX512 controller to the wireless DMX transmitter.
Step 2: Switch on the device , turn on the wireless DMX control on from control panel ‘rfon’
Step 3: Set the device to DMX mode. (AXXX or dXXX)
Step 4: Switch off the device. Press and hold the ‘DMX select’ button whilst switching on the fixture.
Once the fixture turns on the ‘wireless status’ light will be lit white and the unit will be in “setup mode”.
Step 5: The ‘wireless indicator’ will be lit to a specific colour to indicate the protocol being used for
the transmission as shown in TABLE1. Pressing the button will cycle through the colours and once you
want to set the protocol pressing the button for more than 1s will save the protocol. The transmitters,
receivers and transceivers will remember the protocol used even after a power cycle with their built in
memory chip.
Now you need to setup as for WDMX mode or EL mode
Protocols TABLE1
Using W-DMX mode
Transmitters
Pressing the button momentarily will connect to all unconnected receivers in the coverage area.
Pressing the button for more than 3s will disconnect all receivers in the coverage area.
Receivers
Pressing the button for more than 3s will disconnect the device with a transmitter.
NOTE:
The colour of the light will indicate the group as shown in Table2.
The receiver will not connect with a new transmitter unless it is disconnected first.
Page 6
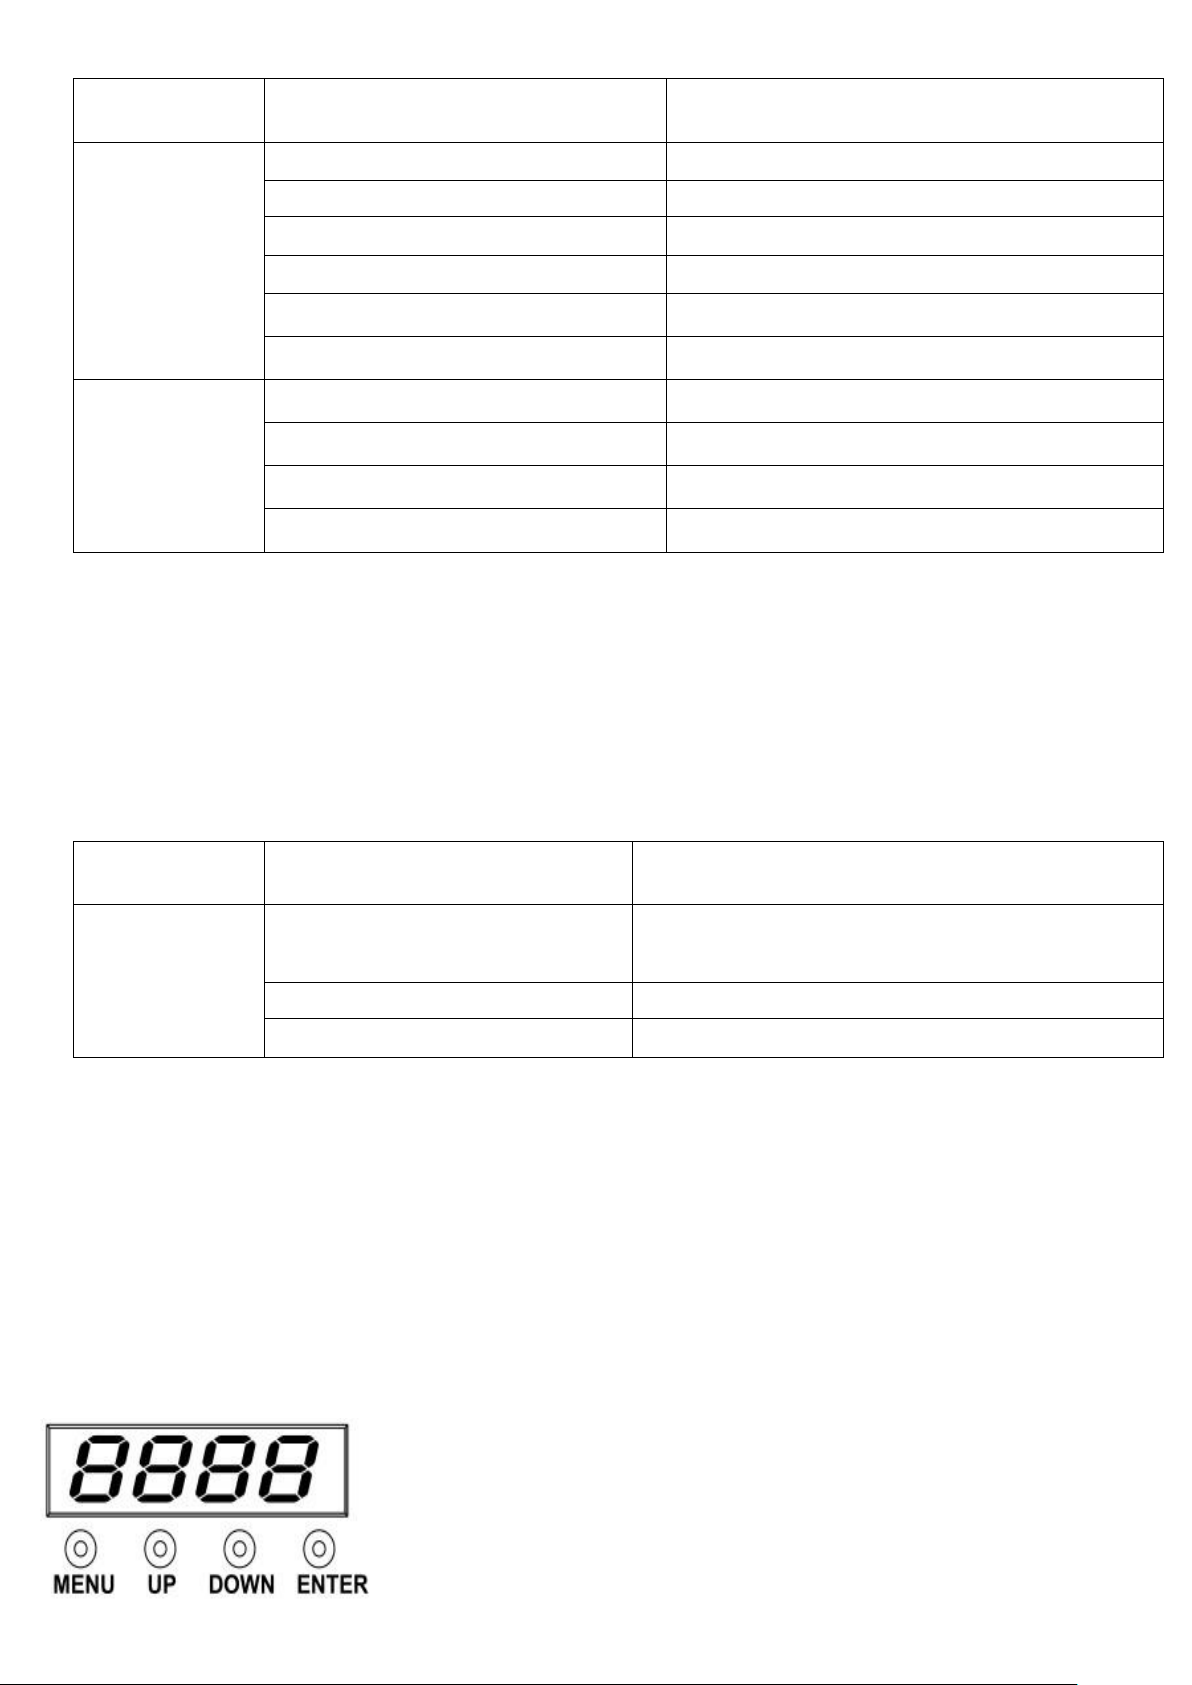
W-DMX Status Indicators TABLE2
Protocol
Action
Description
W-DMX Receive
White
No connection
Red
Deleting Connection
Red Fast Flash
Connection Lost
Green Fast Flash
Connecting to Transmitter
Green Slow Flash
Connected but no DMX signal
Green
Connected with DMX signal
W-DMX Transmit
Red
Deleting All Receivers
Blue Fast Flash
Connecting with the receivers
Blue Slow Flash
No DMX input
Blue
Transmitting DMX
Protocol
Action
Description
ELDMX / GZ
Solid color (red,green,blue
yellow,cyan,magenta,white)
1 of the 7* color groups
(*7th white only in GZ mode,6in WIDMX modes)
Flashing Red
Transmitting DMX
Flashing Green
Receiving DMX
Using EL wireless DMX mode
Changing Channel Group
Pressing the Button will show you the current channel group being used and pressing it again will cycle
through the
groups. The colour of the light will indicate the group as shown in Table3.
Status Indicators TABLE3
Setting DMX512 console channel address:
After starting DMX512 console, etc. LCD display console initialization has been completed, press Program
key, until the top of the light is flashing, then press the button below channel 1, channel 1 indicator light
DMX512 console's address is 10000000, to promote channel faders can be DMX512 console control.
Choose DMX512 address consistent with DIP, light to enter the DMX512 control console for the state. The
products selected as 10000000 DMX512 console take effect.
6.Key Description:
MENU: Access the menu
DOWN: "reduction key" or "key under the selected"; decrease the
value function down menu.
UP: "add key" or "selection on the key"; increase the value
function, shift on the menu
ENTER: Is used to select and confirm/store the current selection
Page 7
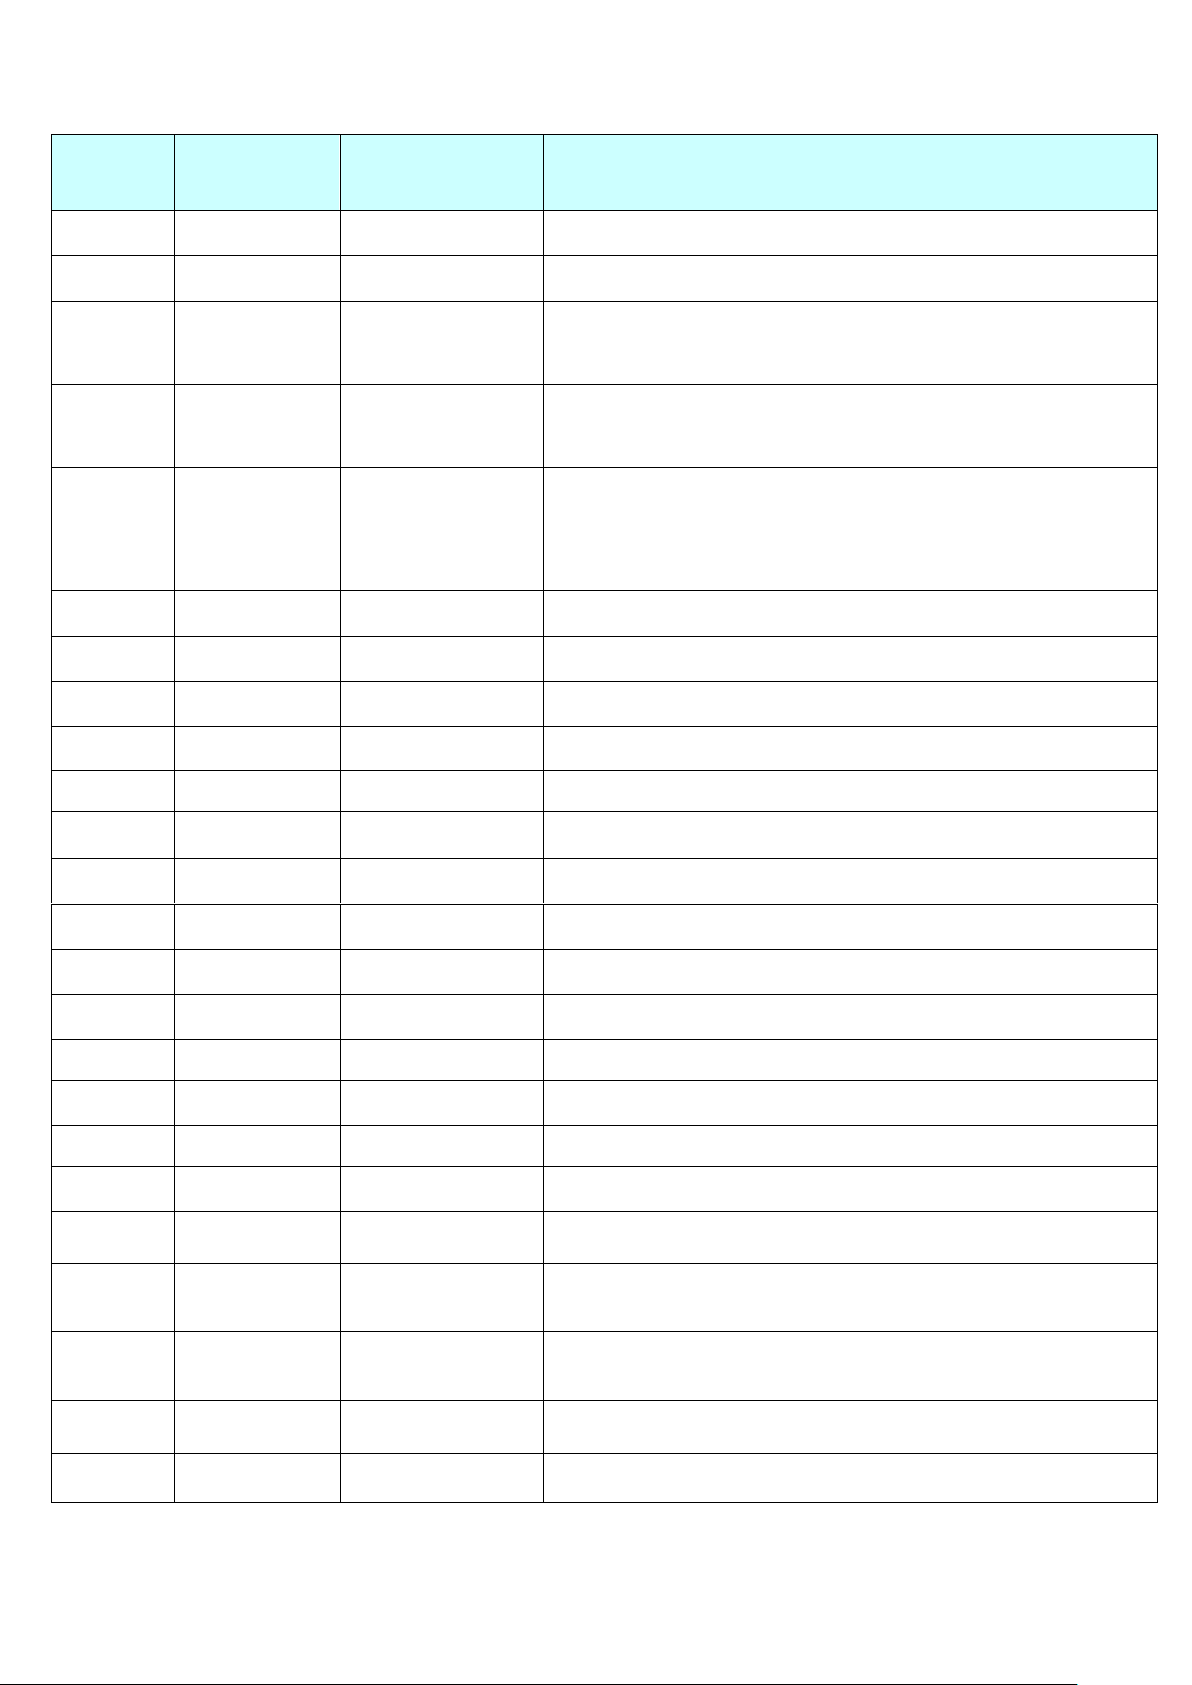
No
Display
Show
Numerical
value
Function and description
1
d001
001- 512
DMX512 address setting -6-channel mode
2
A001
001- 512
DMX512 address setting -10-channel mode
3
_100
000-100
Percentage of electricity displayed
4
S-SL
SL / FA
DMX512 dimming speed setting
SL: slow dimming; FA: fast dimming
5
d-Ho
Ho / oF
DMX signal loss processing mode setting:
Ho: keep the last DMX signal state;
oF: Turn off all LEDs
6
rFon
ON-OF
Wireless dmx control
7
Iron
ON-OF
IR remote control
8
r255
000 - 255
Red dimming ,from dark to bright
9
G255
000 - 255
Green dimming ,from dark to bright
10
b255
000 - 255
Blue dimming ,from dark to bright
11
u255
000 - 255
White dimming ,from dark to bright
12
Y255
000 - 255
Amber dimming ,from dark to bright
13
P255
000 - 255
UV dimming ,from dark to bright
14
I255
000-255
IR remote control brightness
15
FF00
000 - 255
Strobe,speed from slow to fast
16
CL01
000-255
15 kinds static color selectable
17
CC12
00- 15
Color jumping,speed from slow to fast
18
DE15
00- 15
Color Gradual change,speed from slow to fast
19
CP15
00- 15
Color Pulse change,speed from slow to fast
20
SU15
00- 15
Sound control ,Voice sensitivity from low to high.
21
WIFI
/
WIFI APP control mode
22
t 30
00-99
Current temperature display
when not used the dislpay will show : t ---
23
VEr1
/
Version number
24
rSEt
ON-OF
Reset
Menu Display:
Page 8
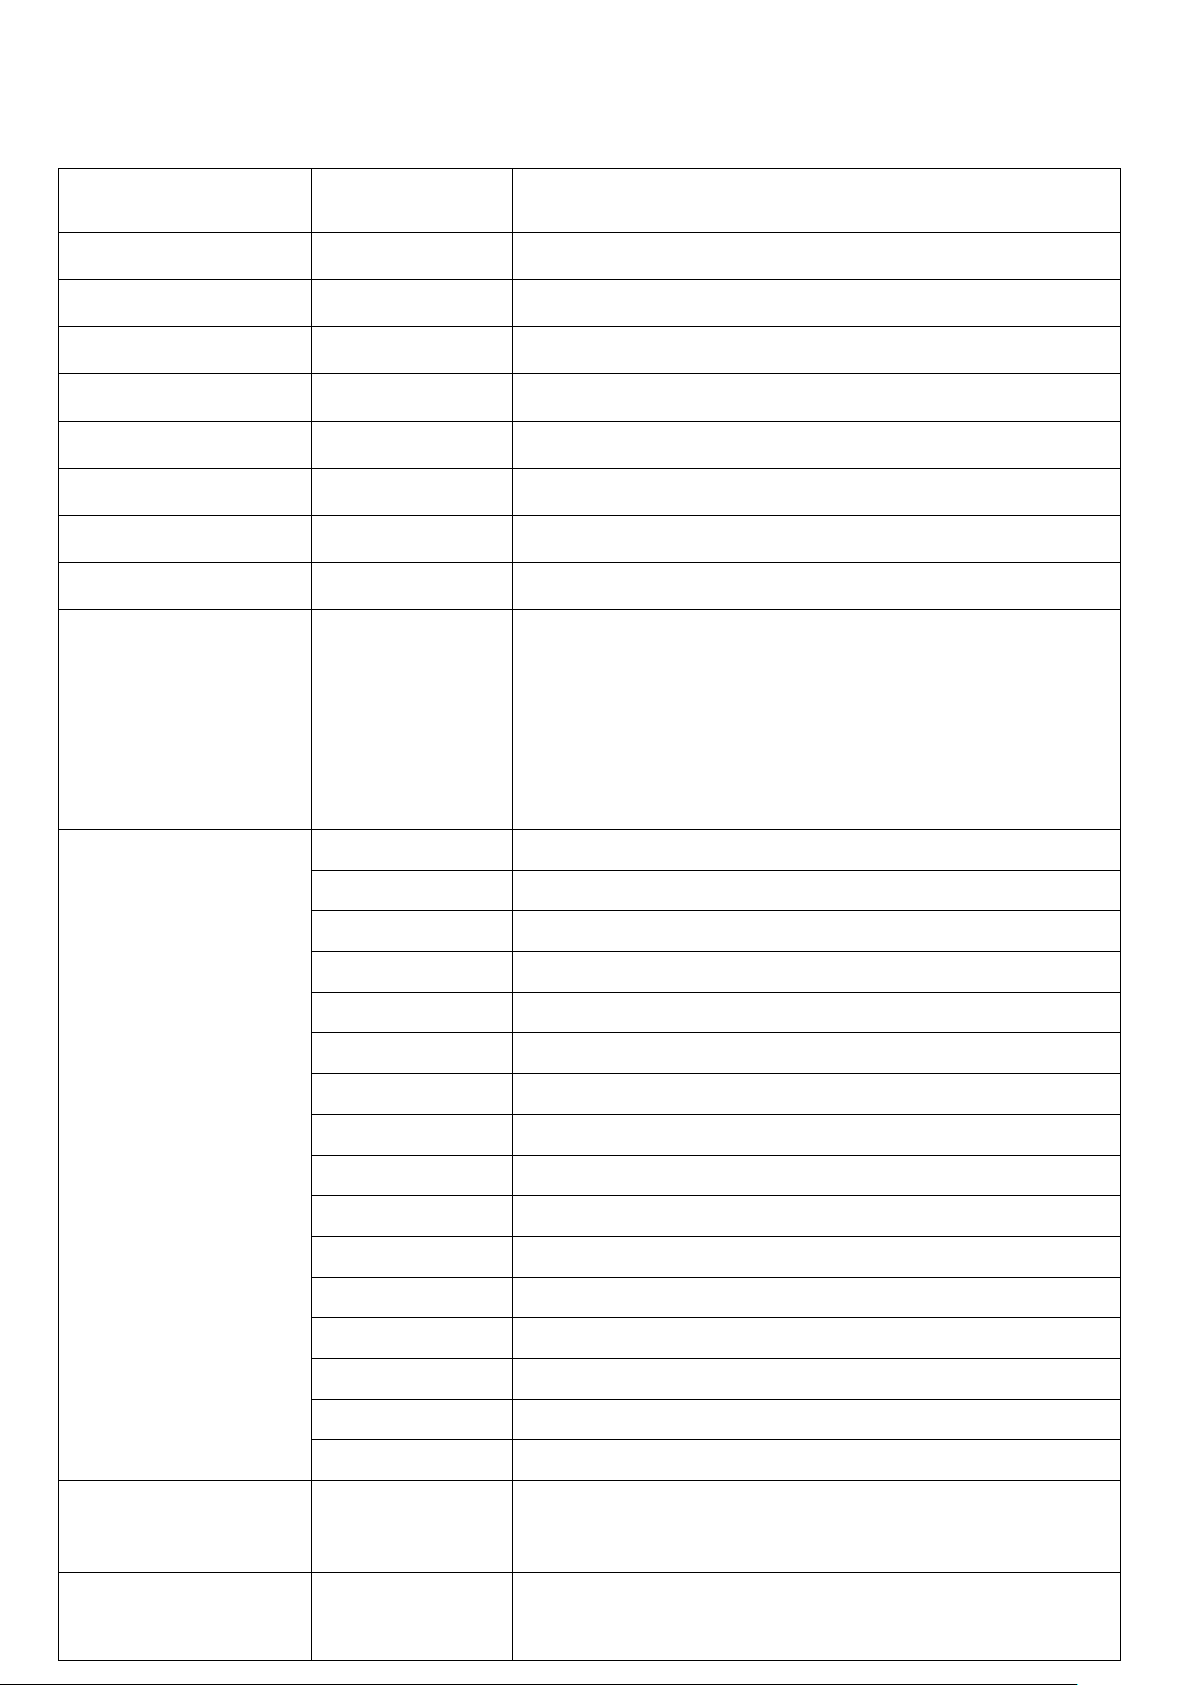
DMX512 Controller Channel Function:
Channel
Function
Description
CH1
R dimming
Red dimming ,from dark to bright
CH2
G dimming
Green dimming ,from dark to bright
CH3
B dimming
Blue dimming ,from dark to bright
CH4
W dimming
White dimming ,from dark to bright
CH5
A dimming
Amber dimming ,from dark to bright
CH6
UV dimming
UV dimming ,from dark to bright
CH7
Master Dimmer
RGBWAUV master dimmer, from dark to bright
CH8
Master strobe
RGBWAUV master strobe ,from slow to fast
CH9
Function selection
0—50:no function
51-100:15 kinds of color output., controlled by CH10
101—150:Color jumping;
151—200:Color Gradual change;
201—250:Color Pulse change;
251-255:Sound control
CH10
((Ch9 set 051-100))
000-015
N Function
016-031
R
032-047
G
048-063
R+G
064-079
B
080+095
R+B+UV
097+111
G+B
113+127
R+G+B+A+UV
129+143
W
145+159
R+W
160+175
G+W
176+191
R+A
192+207
B+W+UV
208+223
R+B+W+UV
224+239
G+B+W
240+255
R+G+B+W+A+UV
CH10
(Ch9 set 101-150)
000-255
Select auto run speed for (CC, dE and CP) from slow to fast
CH10
(Ch9 set 251-255)
000-255
Select sound sensitivity level for sound active mode (SU) form
low to high
10 Channel:
Page 9

6 Channel:
Channel
Function
Description
CH1
R dimming
Red dimming ,from dark to bright
CH2
G dimming
Green dimming ,from dark to bright
CH3
B dimming
Blue dimming ,from dark to bright
CH4
W dimming
White dimming ,from dark to bright
CH5
A dimming
Amber dimming ,from dark to bright
CH6
UV dimming
UV dimming ,from dark to bright
Technical Specifications :
Light Source: 4 x 12W Hex RGBWA+UV LEDs
(6in1 Red Green Blue White Amber and UV LEDs)
Smooth RGBWA+UV Color Mixing Programs
Built-in Wireless DMX Technology
Rapid Recharge Time: 3 hours
6 & 10 DMX Channels Beam Angle: 40°
Master/ Slave DMX in/out via RJ45
Multi-voltage Operation: 110-240V, 50HZ/60HZ
Dimension: 6.88” x 6.88” x 6.67” / 175 x 175 x 195 mm
Weight: 4.6 lbs / 2.1 kgs
Made in P.R.C.
Customer Service
The JMAZ Lighting Customer Service department is dedicated to ensuring that your ordering, purchasing, and
delivery experience is second to none. If you have any problem with your order, please give us an opportunity to
make it right. You can contact JMAZ lighting Customer Service representative via email [email protected]
or call us at (626) 380-0883.
 Loading...