

Page 1
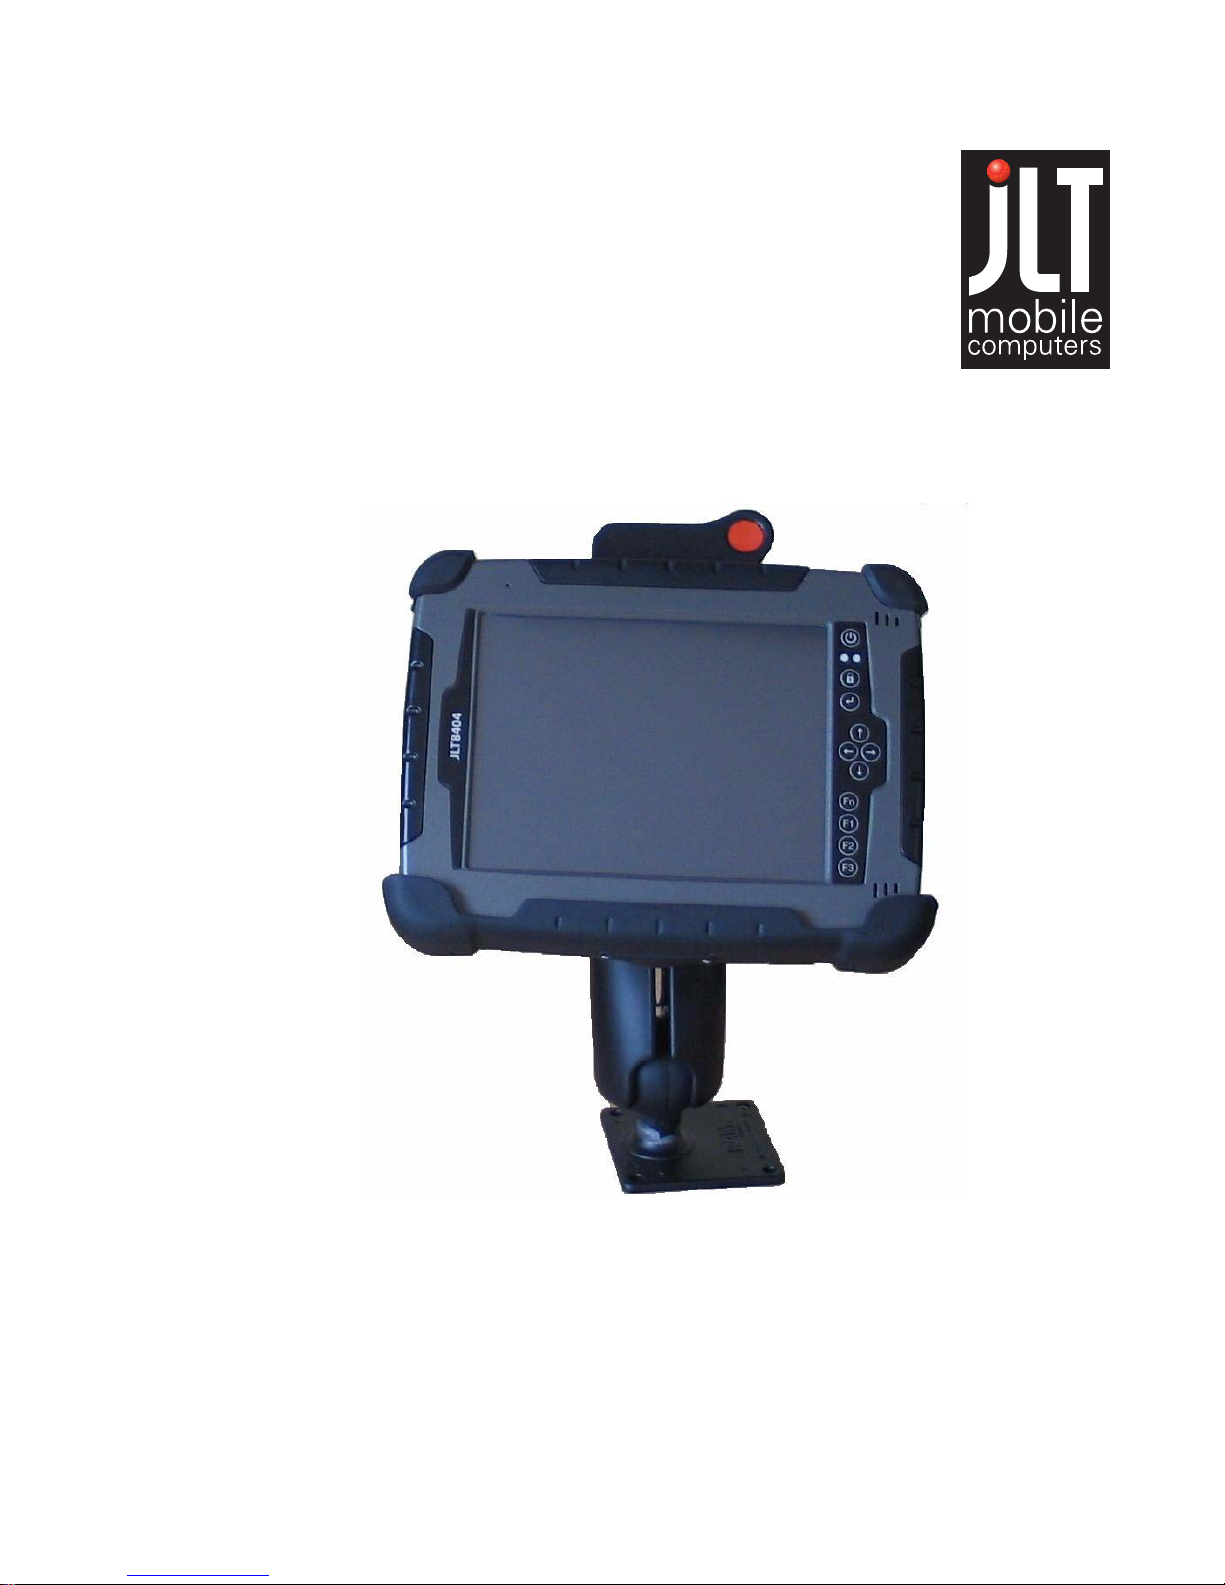
Rugged Industrial PC
JLT8404
Manual
JLT Mobile Computers AB
Isbjörnsvägen 3
SE-352 45 Växjö, SWEDEN
Phone: +46 470 53 03 00
Fax: +46 470 445 29
E-mail: [email protected]
www.jltmobile.com
JLT8404, Manual
Part no: 90052, Rev 1
© 2007, JLT Mobile Computers AB
Page 2

Note!
This equipment has been tested and found to comply with the limits for a Class
B digital device, pursuant to part 15 of the FCC Rules. These limits are
designed to provide reasonable protection against harmful interference in a
residential installation.
This equipment generates, uses and can radiate radio frequency energy and, if
not installed and used in accordance with the instructions, may cause harmful
interference to radio communications. However, there is no guarantee that
interference will not occur in a particular installation. If this equipment does
cause harmful interference to radio or television reception, which can be determined by turning the equipment off and on, the user is encouraged to try to
correct the interference by one or more of the following measures:
- Reorient or relocate the receiving antenna.
- Increase the separation between the equipment and receiver.
- Connect the equipment into an outlet on a circuit different from that to which
the receiver is connected.
- Consult the dealer or an experienced radio/TV technician for help.
Changes or modifications not expressly approved by JLT Mobile Computers
could void the user's authority to operate the equipment.
Page 3

Content
General...............................................................................................3
Rugged Industrial PC..........................................................................3
Features..............................................................................................4
Accessories.........................................................................................4
Function buttons .................................................................................5
Status indication LEDs........................................................................6
Audio...................................................................................................6
Using the Rugged Industrial PC......................................................7
Turning on the Rugged Industrial PC..................................................7
Shutting down the Rugged Industrial PC............................................7
Reset...................................................................................................7
Power settings ....................................................................................7
Screen brightness...............................................................................9
Touch screen......................................................................................9
Battery handling................................................................................10
Low-battery warning.....................................................................10
Remove a battery pack ................................................................11
Insert a battery pack.....................................................................11
Charge a battery pack..................................................................11
Conserve battery power...............................................................11
Bridge battery...............................................................................11
Replacement of hard disc.............................................................12
Replacement of SIM card.............................................................12
External device connections.............................................................13
Docking connector........................................................................13
Power connector ..........................................................................13
Ethernet........................................................................................14
USB 2.0........................................................................................14
Suspend modes................................................................................14
Standby mode..............................................................................14
Turn off monitor............................................................................14
Suspend to Disk mode.................................................................14
Resume from suspend mode.......................................................14
1
Page 4

Maintenance ...................................................................................15
Cleaning...........................................................................................15
Technical specification..................................................................16
Base system.....................................................................................16
2
Page 5
General
Note!
Rugged Industrial PC
This User Manual cover the use of a Rugged Industrial PC with Microsoft
Windows operating system installed, but other operating systems can also be
used. Please contact your supplier for further information.
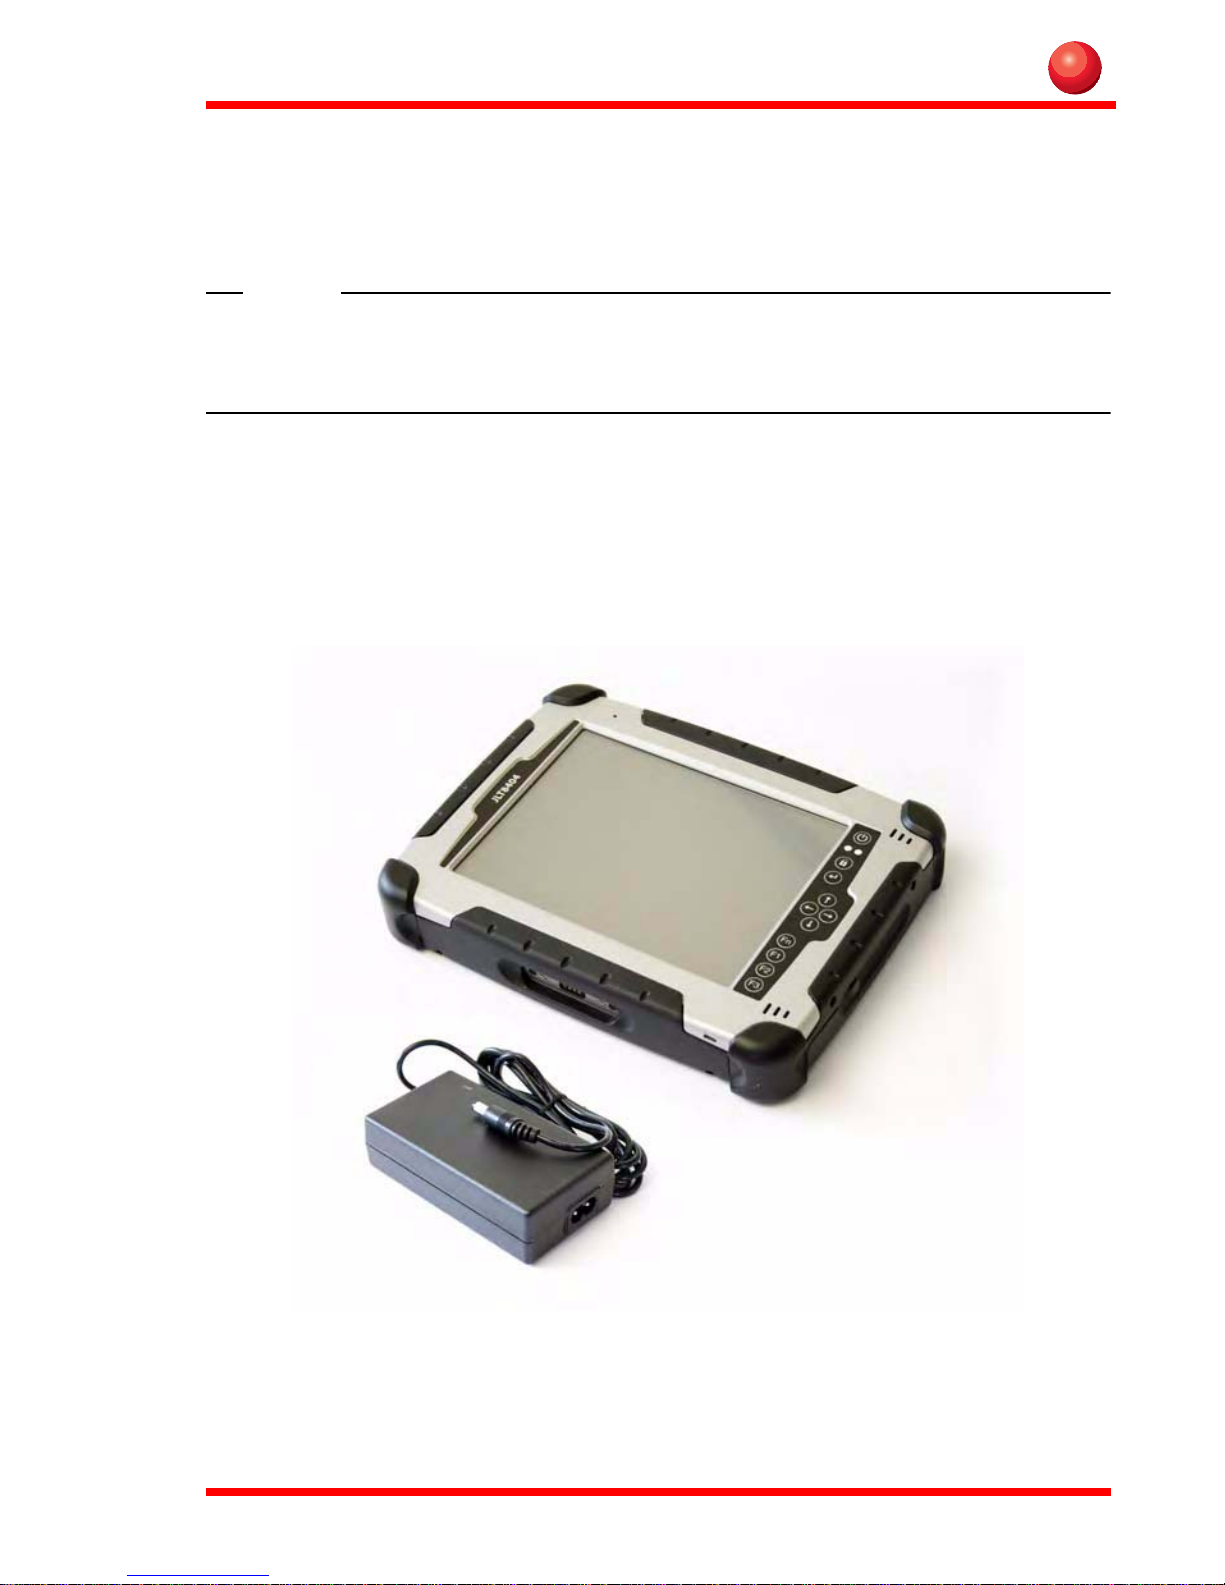
The JLT8404 Rugged Industrial PC is a compact high performance, low weight rugged T ablet PC designed for fieldwork. The Rugged Industrial PC can withstand severe
environmental conditions including vibration, shock, moisture and temperature variations.
The Rugged Industrial PC is suitable for use in harsh environments such as construction sites, warehousing, defense, manufacturing and field service.
The Rugged Industrial PC is delivered with a battery and an AC adapter.
1. Rugged Industrial PC
2. AC adapter
3
Page 6
Features
2
4
•USB
• Docking Connector with Power and USB
• Function buttons
• Lithium/Ion Battery 5200 mAh, hotswap
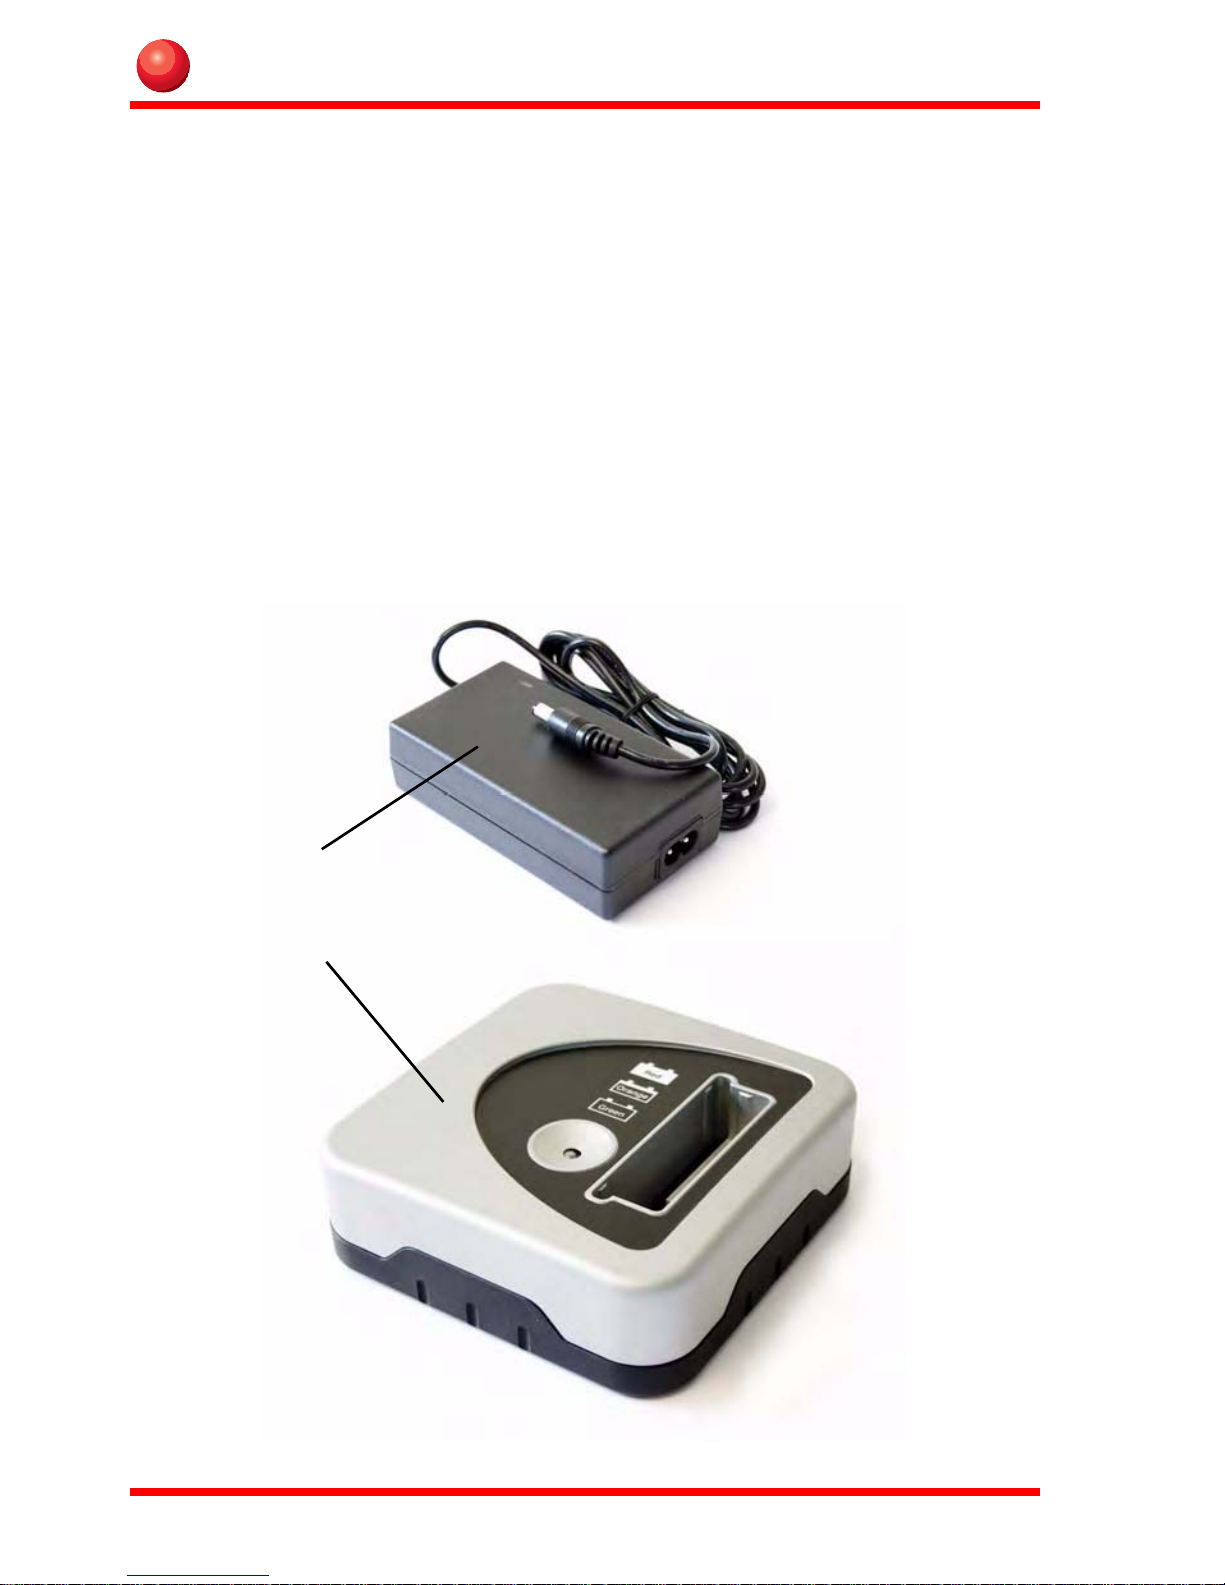
Accessories
1. Vehicle docking (not in picture)
2. AC/DC Adaptor
3. DC/DC Adaptor (not in picture)
4. Battery charger
5. Port replicator (not in picture)
6. Desk mount (not in picture)
4
Page 7
Function buttons
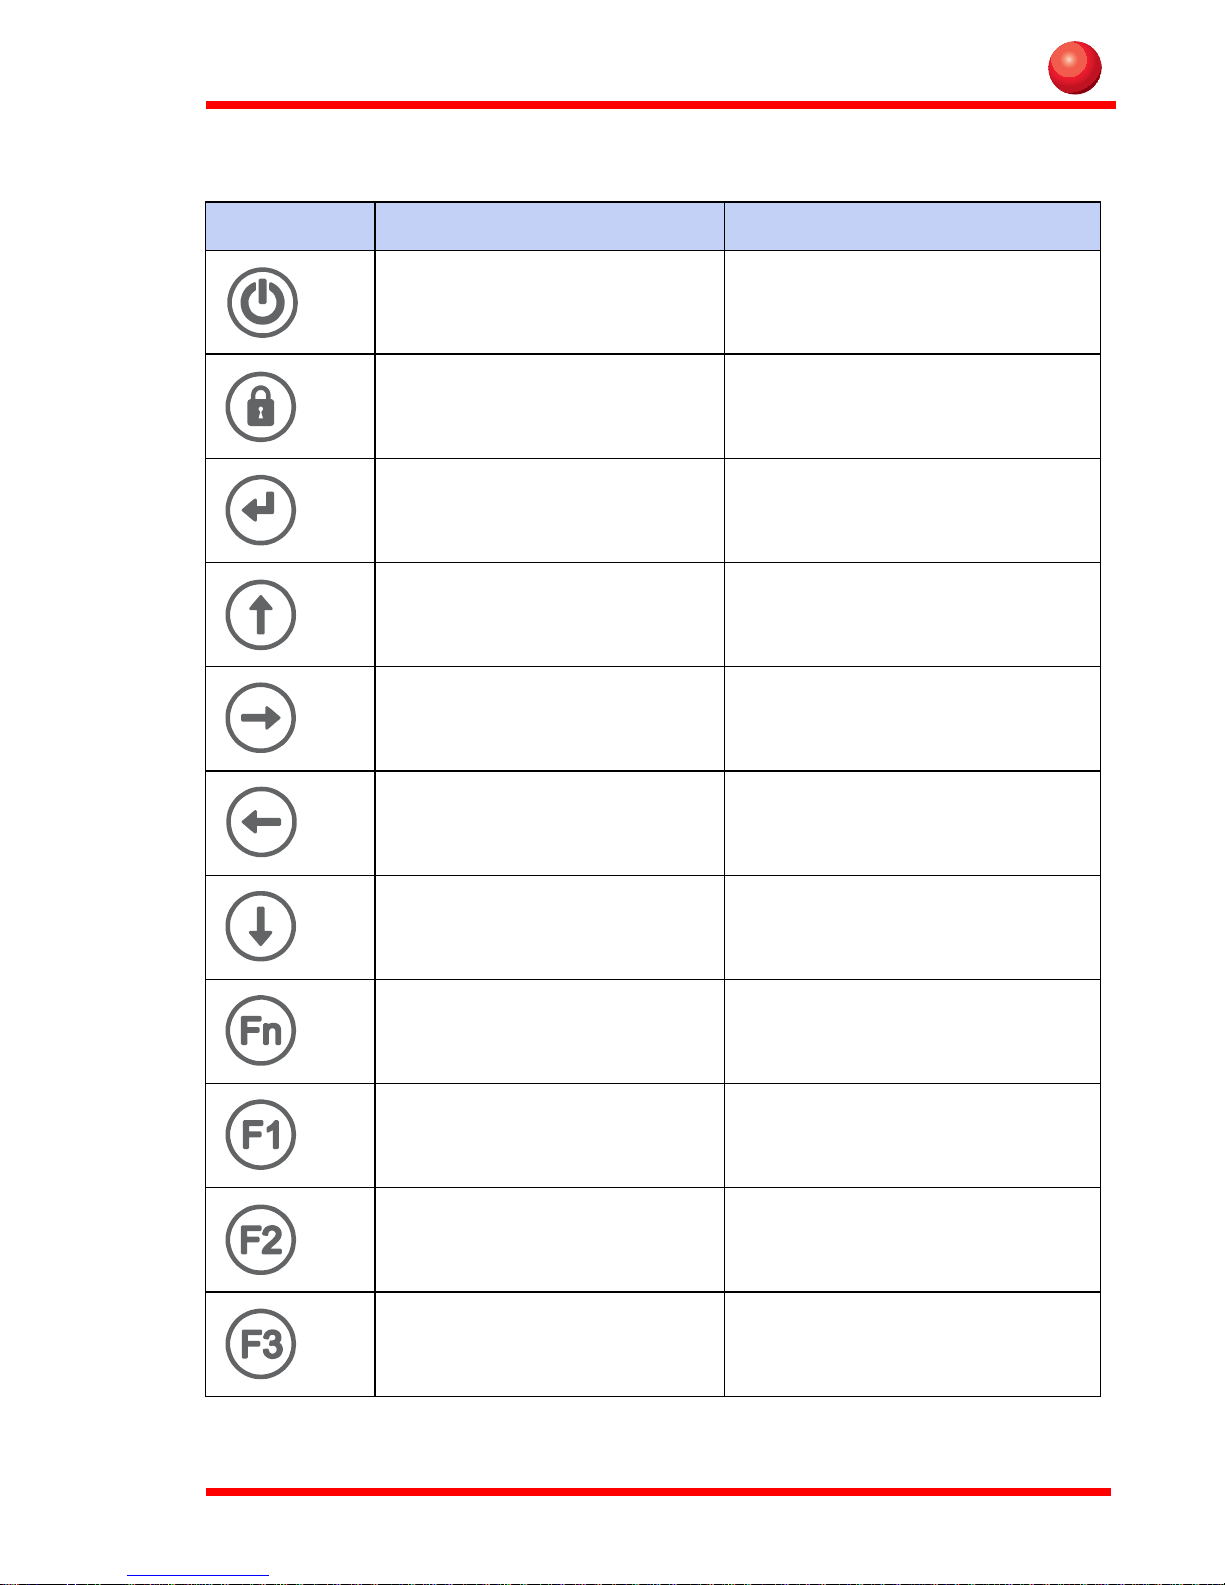
Function + Shift function
Power on/off
Ctrl-Alt-Delete
Enter Escape
Arrow up Increase brightness
Arrow right Tab
Arrow left Shift+Tab
Arrow down Decrease brightness
Fn Reset Fn
Pre-set as Alt-Tab No pre-setting
Pre-set as Internet Explorer No pre-setting
Pre-set as E-mail client No pre-setting
5
Page 8
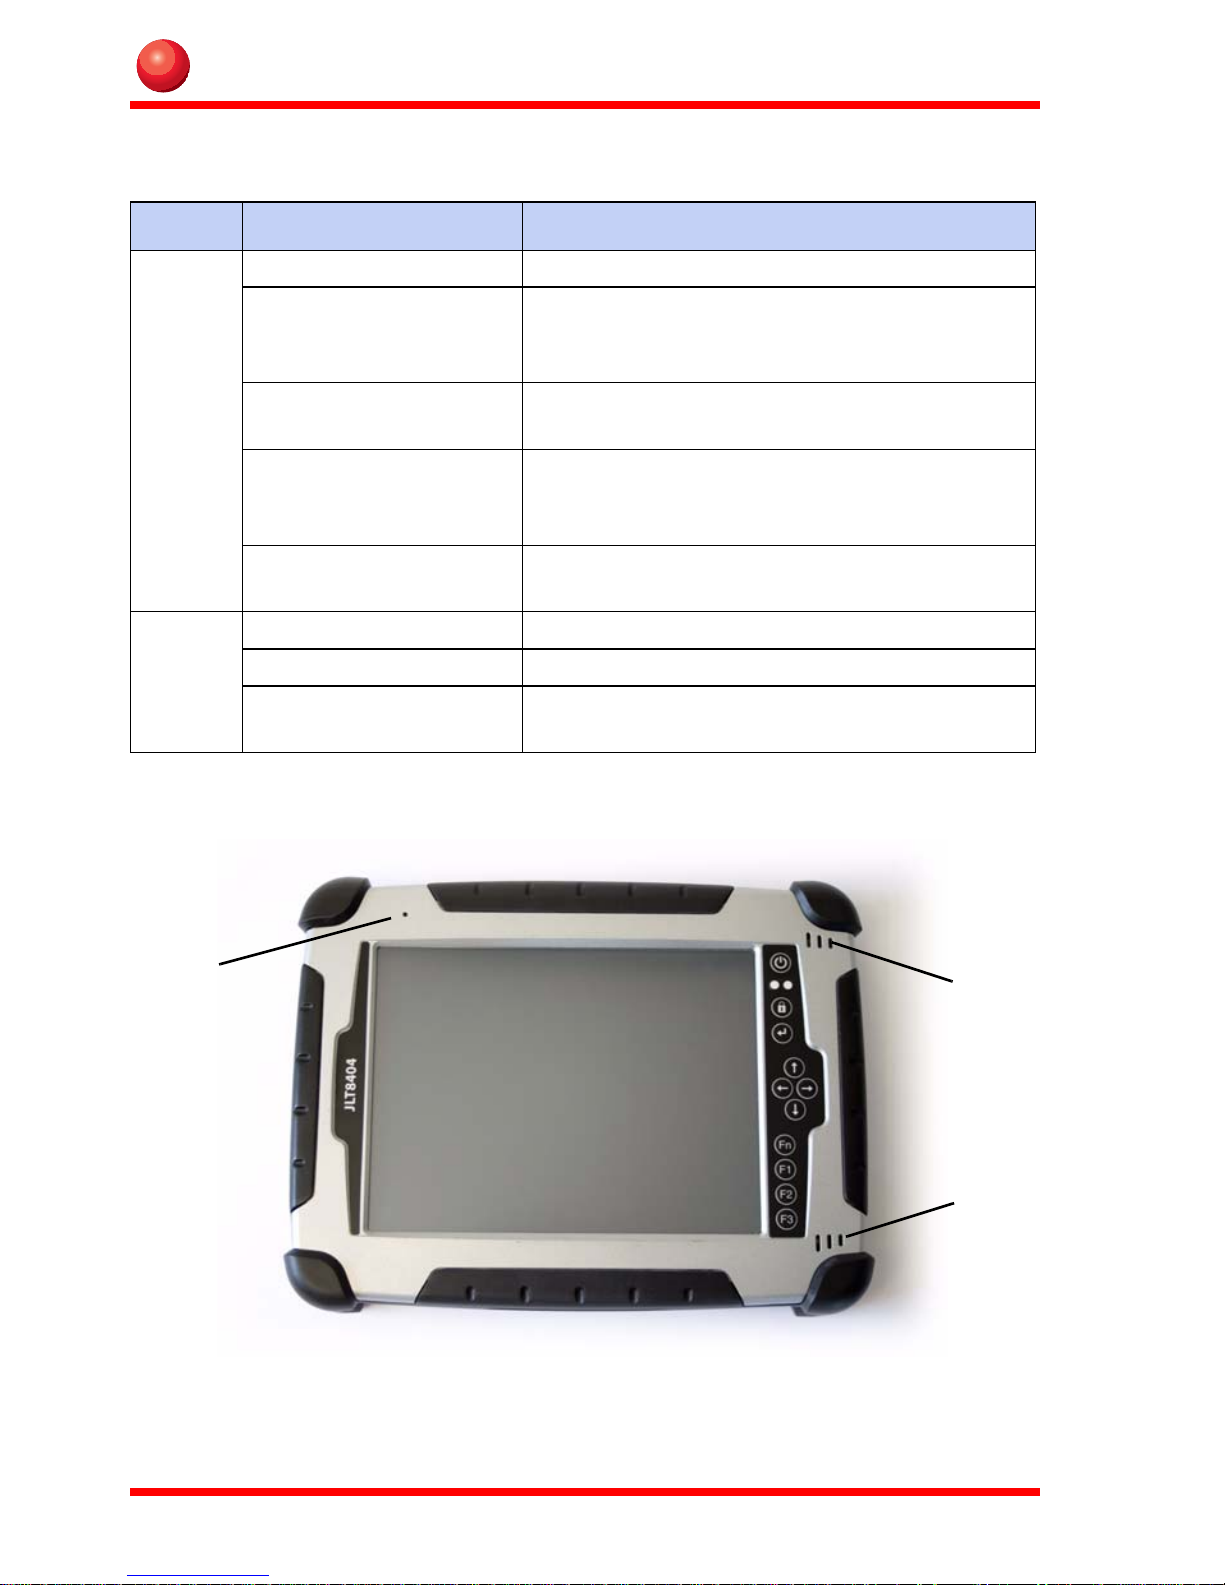
Status indication LEDs
1
2
2
LED State Description
Green/
yellow
Red Continuous Battery is charging.
Continuous green The Rugged Industrial PC is in full function.
Flashing green The Rugged Industrial PC is in standby
mode, notice that the touch screen is
inactive.
Continuous yellow The Rugged Industrial PC is in full function
and the Fn key is activated.
Flashing yellow The Rugged Industrial PC is in standby
mode and the Fn key is activated, notice that
the touch screen is inactive.
Off Rugged Industrial PC is off or in suspend
mode.
Flashing Battery capacity is low.
Off The battery is fully charged or no external
power is available.
Audio
The Rugged Industrial PC is equipped with a microphone (1) and two loudspeakers
(2) integrated in the front panel.
6
Page 9

Using the Rugged Industrial PC
Note!
This chapter covers information about using the Rugged Industrial PC. The use of the
Rugged Industrial PC does not differ from normal PC use.
Turning on the Rugged Industrial PC
To turn on the Rugged Industrial PC press the power on button for one second, see
chapter ”Function buttons” on page 5. The green power LED lights up.
Shutting down the Rugged Industrial PC
Before shutting down the system, save your work and close all running programs.
To shut down the system press the power button or choose Shut Down from the Start
menu.
Reset
If the Rugged Industrial PC is not responding to commands, the system or application
may have crashed. To reset the system press the Ctrl-Alt-Delete button described in
the chapter ”Function buttons” on page 5.
Power settings
To be revised
The Rugged Industrial PC is equipped with an ACPI BIOS which enables the operating system to conserve energy and prolong battery life. For the system to work properly make sure the Power Option Properties have the correct settings according to the
steps below.
To access the Power Option Properties:
1. Open the Control Panel from the Windows Start menu.
2. Select Performance and Maintenance.
3. Select Power Options.
Enable Hibernation (Suspend to disk mode):
1. Select the Hibernate tab.
2. Place a check mark in the checkbox to enable hibernation.
3. Click Apply to save the settings.
Hibernation requires sufficient disk space.
7
Page 10
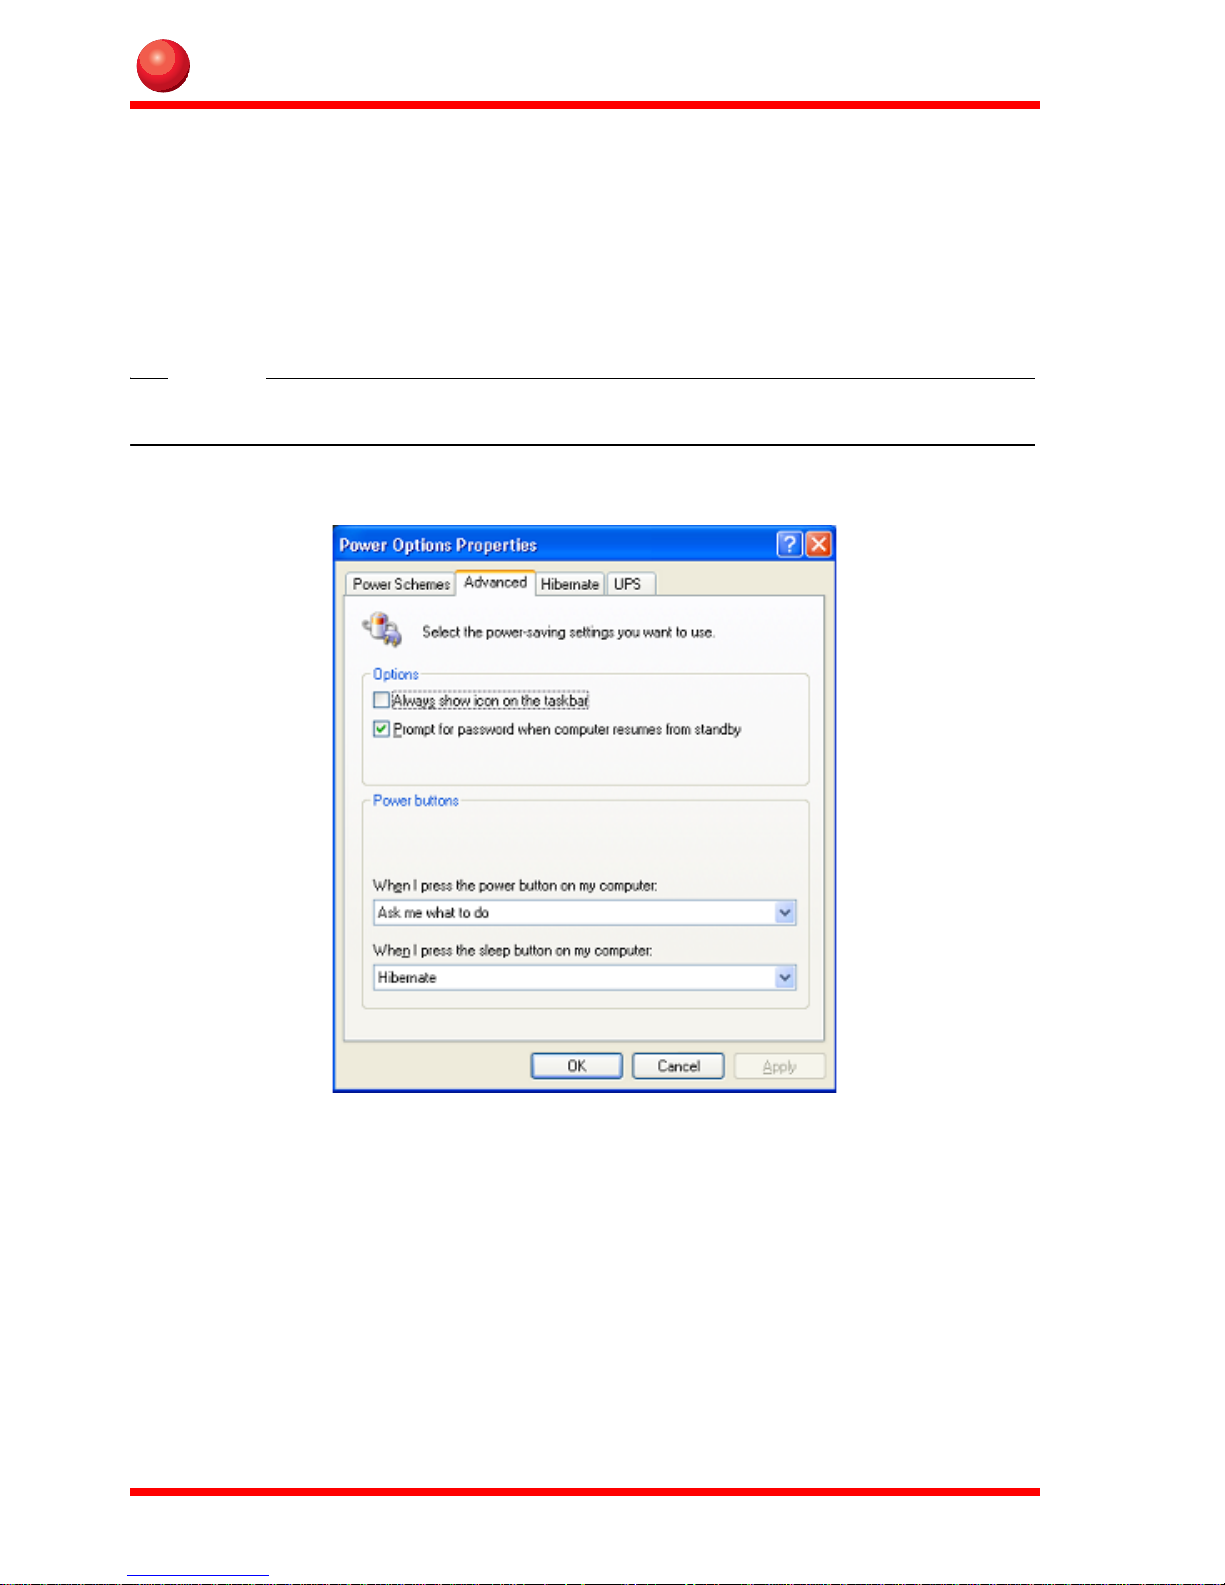
Power buttons:
Note!
1. Select the Advanced tab.
2. Under When I press the power button on my computer: select Ask me what
to do from the drop down list.
3. Under When I press the sleep button on my computer: select Hibernate (Sus-
pend to Disk mode). If there is not enough disk space for Hibernation select Shut
down.
This action will occur when the battery is running critically low.
4. Click Apply to save the settings.
8
Page 11

Screen brightness
Note!
!
WARNING!
The screen brightness has 16 brightness levels and can be adjusted for indoor or outdoor use.
To increase or decrease the screen brightness first activate the Fn button, then press
the Arrow up or Arrow down buttons on the front.
When the brightness is at the lowest level the backlight will be completely turned off.
Battery life is dependent of screen brightness. To prolong battery life, lower
the screen brightness as much as possible.
Touch screen
The Rugged Industrial PC is equipped with a resistive 4-wire Touch Screen for easy
integration, which allows the user to work with gloves.
Do not use sharp objects when operating the touch screen.
Selecting
To select an object on the screen, tap the object once.
Double click
To double click tap the object twice.
Right click
To right click an object, place the pointer over the object. Then press the Shift + Tab
button on the front.
Drag object
To drag an object on the screen, press and hold down on the object while dragging it
to the new position. Release the object when it is in place.
9
Page 12
Calibrate
1
2
When used for the first time or when users work in different angles, the touch screen
may require calibration.
To calibrate the touch screen do the following:
1. Open the Control Panel from the Windows Start menu.
2. Double-tap the Pointer Devices icon.
3. Select the Calibration tab and click the Calibrate button to start calibration.
4. Follow the instructions on the screen.
To test the new settings click the Test button.
Battery handling
When the Rugged Industrial PC is not connected to external power it runs on battery
power.
An internal bridge battery will keep the Rugged Industrial PC running during battery
replacement.
Low-battery warning
The red status LED will start to flash when the Rugged Industrial PC battery is running
low. The operating system will also show the Shut Down Windows dialog box.
When the dialog appears select Cancel and continue to work, change the battery or
connect to external power . The system will repeat to display the Shut Down W indows
dialog every 60-70 seconds.
When the battery is running critically low the system will send a sleep signal to the
operating system. This is repeated every 30-40 seconds. The action of the sleep signal
is described in the chapter “ Power settings” on page 7.
10
Page 13

Remove a battery pack
Note!
Note!
To remove the battery from the Rugged Industrial PC:
1. Turn the Rugged Industrial PC with the backside up.
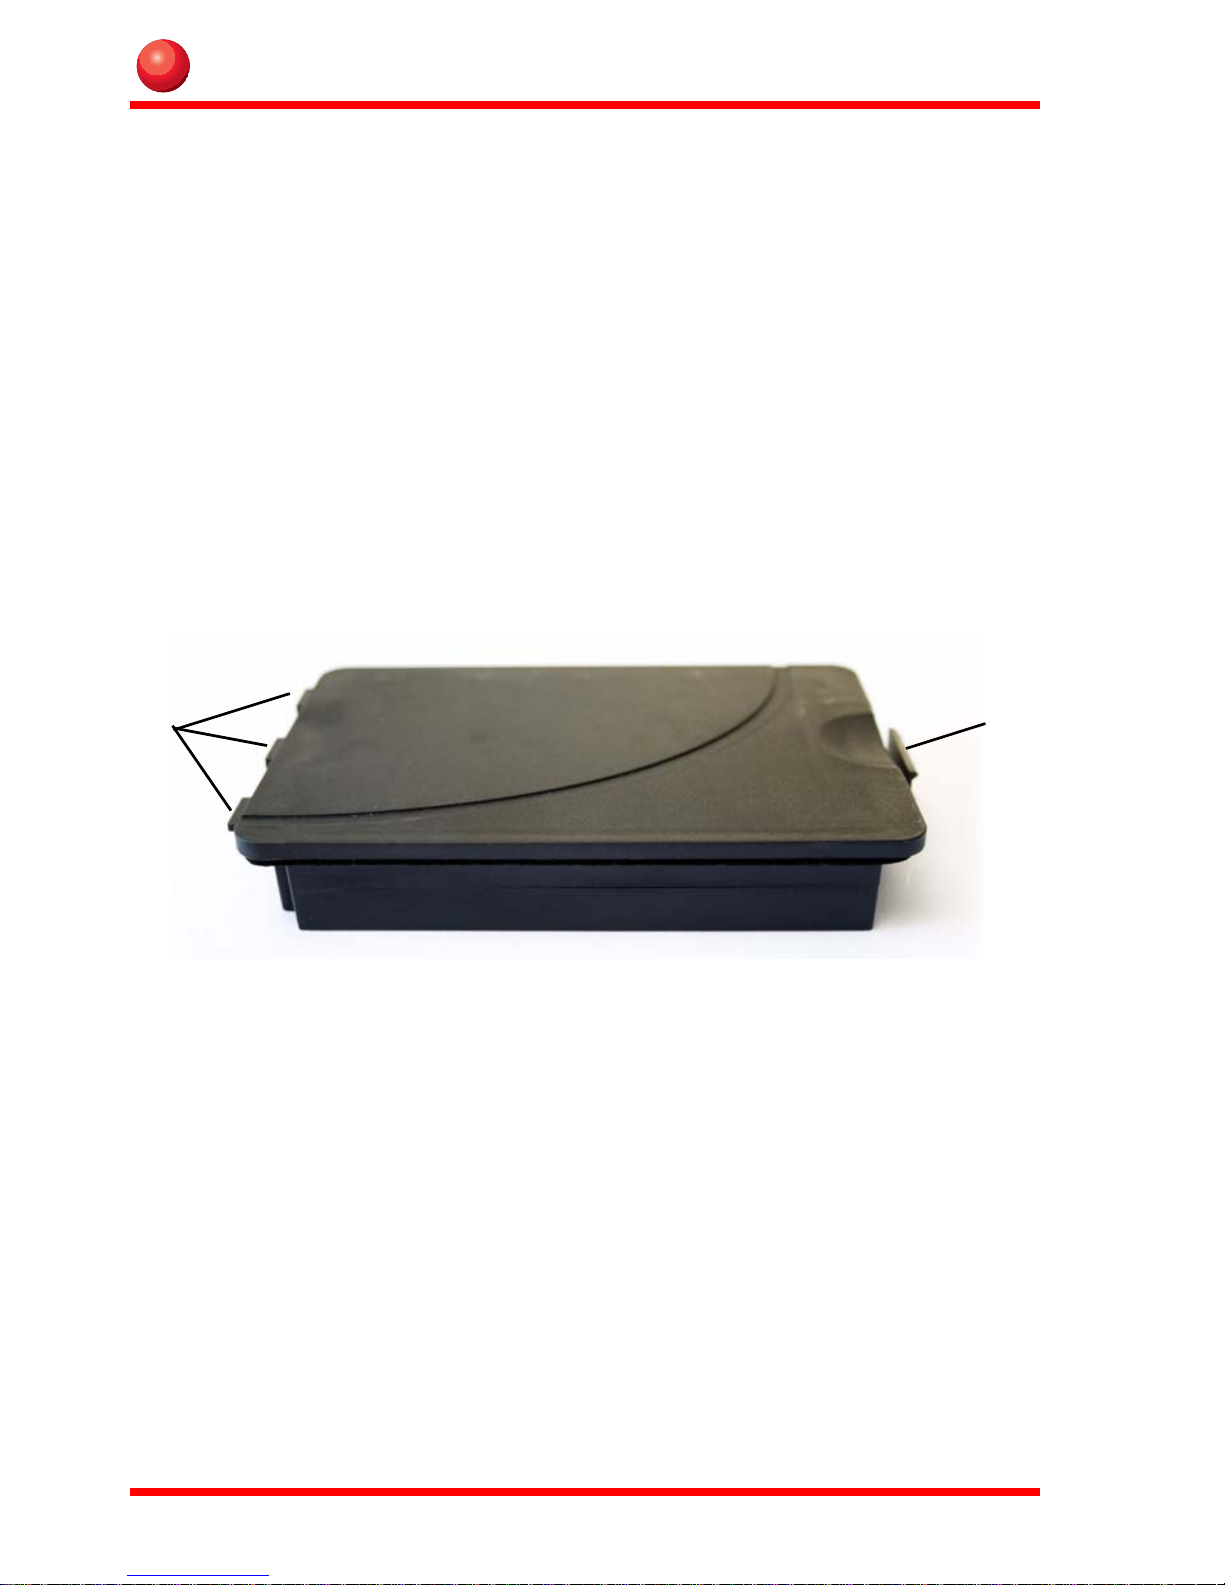
2. To release the battery press and lift the release latch (2) until the battery slides out
from the slot.
Insert a battery pack
To insert a battery pack from the Rugged Industrial PC:
1. Turn the Rugged Industrial PC with the backside up.
2. Slide the three tabs (1) on the battery pack into the three slots in the battery slot.
3. Press the battery pack into the slot until the latch (2) snaps and holds the battery
pack in place. The latch (2) may require some additional pressure to snap into
place and firmly secure the battery
Charge a battery pack
The battery pack is being charged when the Rugged Industrial PC is connected to any
of the specified power sources. The Rugged Industrial PC can charge the battery pack
while in use. While the battery is charging, the red LED on the front is lit.
The first time, or after a long time in storage, the Rugged Industrial PC takes up to 12
hours to be fully charged. Normaly the battery is charged in 6 hours.
A new battery may require up to five charging cycles until it reaches full
capacity.
Conserve battery power
An easy method to prolong battery life is to lower the screen brightness. To adjust the
brightness use the function buttons described in the chapter ”Function buttons” on
page 5.
Bridge battery
The Rugged Industrial PC is equipped with a bridge battery, which is located inside
the Rugged Industrial PC. The purpose of the bridge battery is to supply power when
the battery pack is replaced and provide power to some components when the Field
Tabled PC is turned off.
The bridge battery is designed for short-term use only.
The bridge battery is charged when the AC power source is connected. It is also
charged with power from the battery pack.
11
Page 14
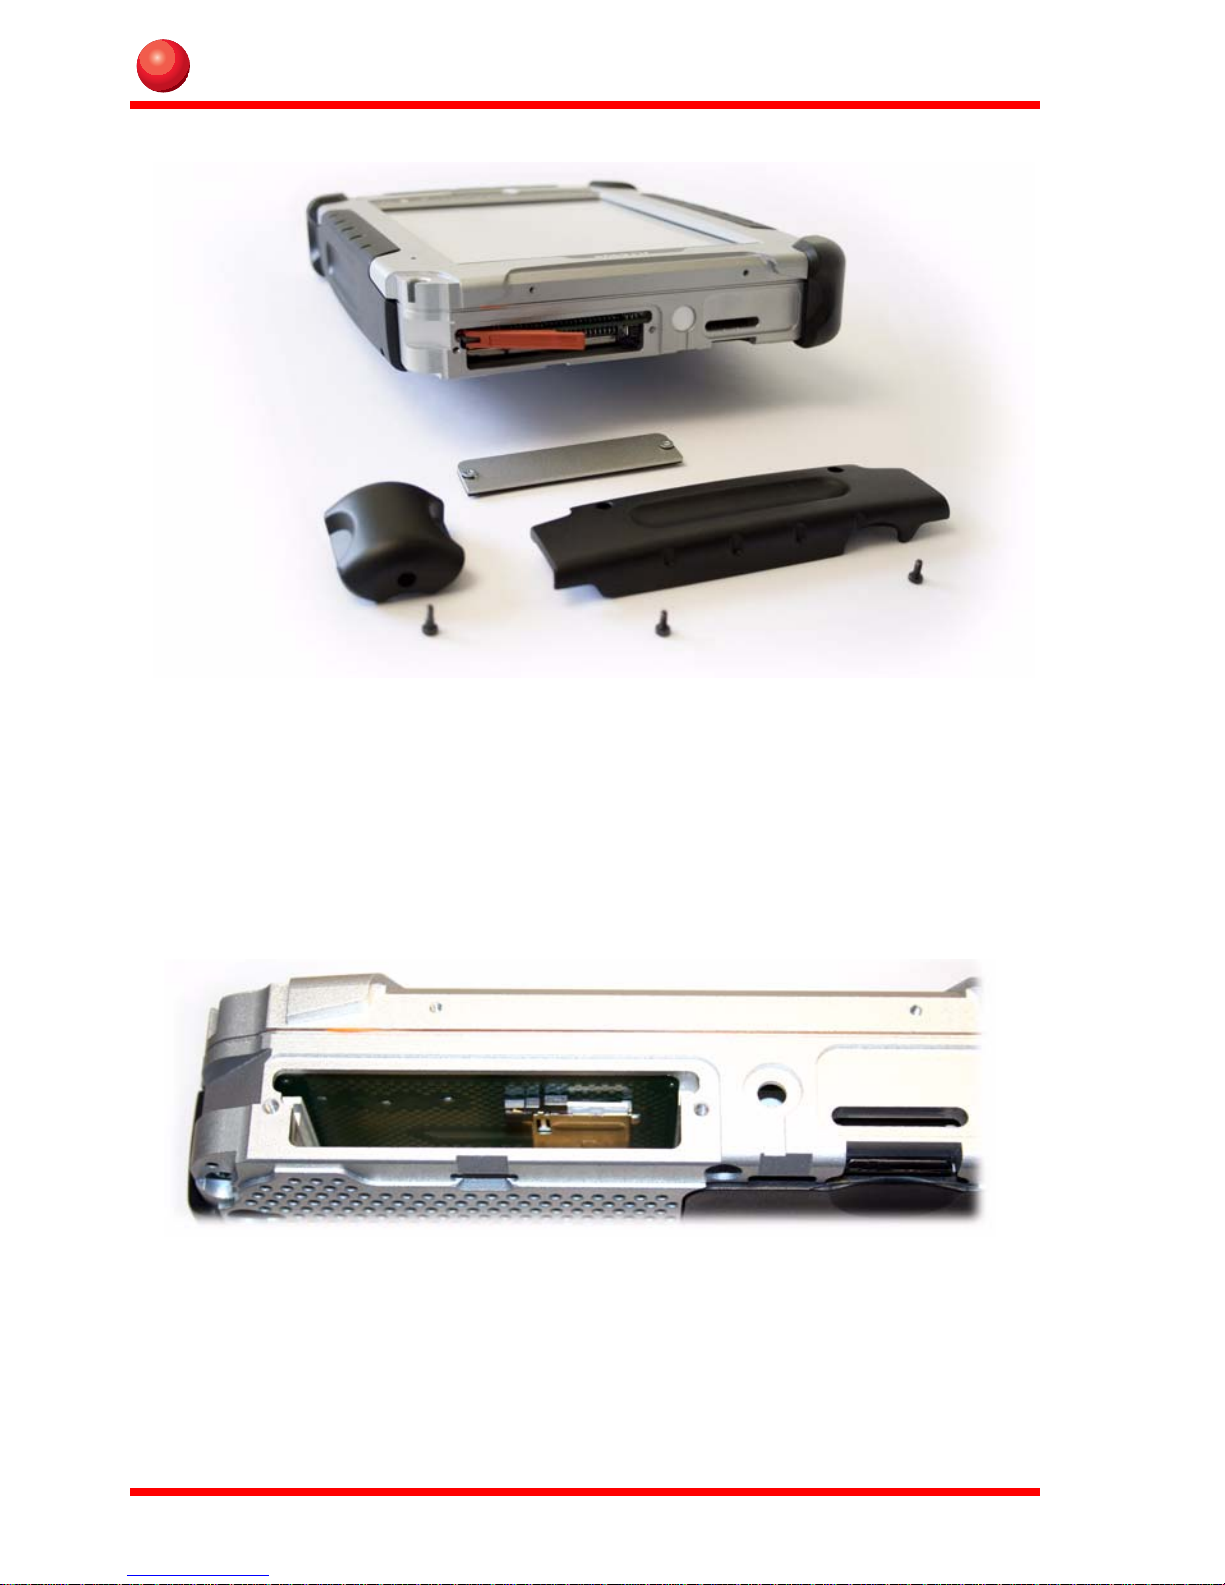
Replacement of hard disc
Tools needed: screwdriver Torx T8 and Torx T10.
1. Unscrew the screw (T8) and remove the upper left corner protector.
2. Unscrew the two screws (T8) and remove the left computer grip.
3. Unscrew the two screws (T10) and remove the lid.
4. Release the lever and remove the hard disc.
Assemble in reverse order.
Replacement of SIM card
Tools needed: screwdriver Torx T8 and Torx T10.
1. Remove the hard disc, see chapter "Replacement of hard disc".
2. Slide the latch over the SIM card holder to the side.
3. Push down the SIM card and let it spring out from the slot.
Assemble in reverse order.
12
Page 15
External device connections
!
Caution!
!
Caution!
1
23
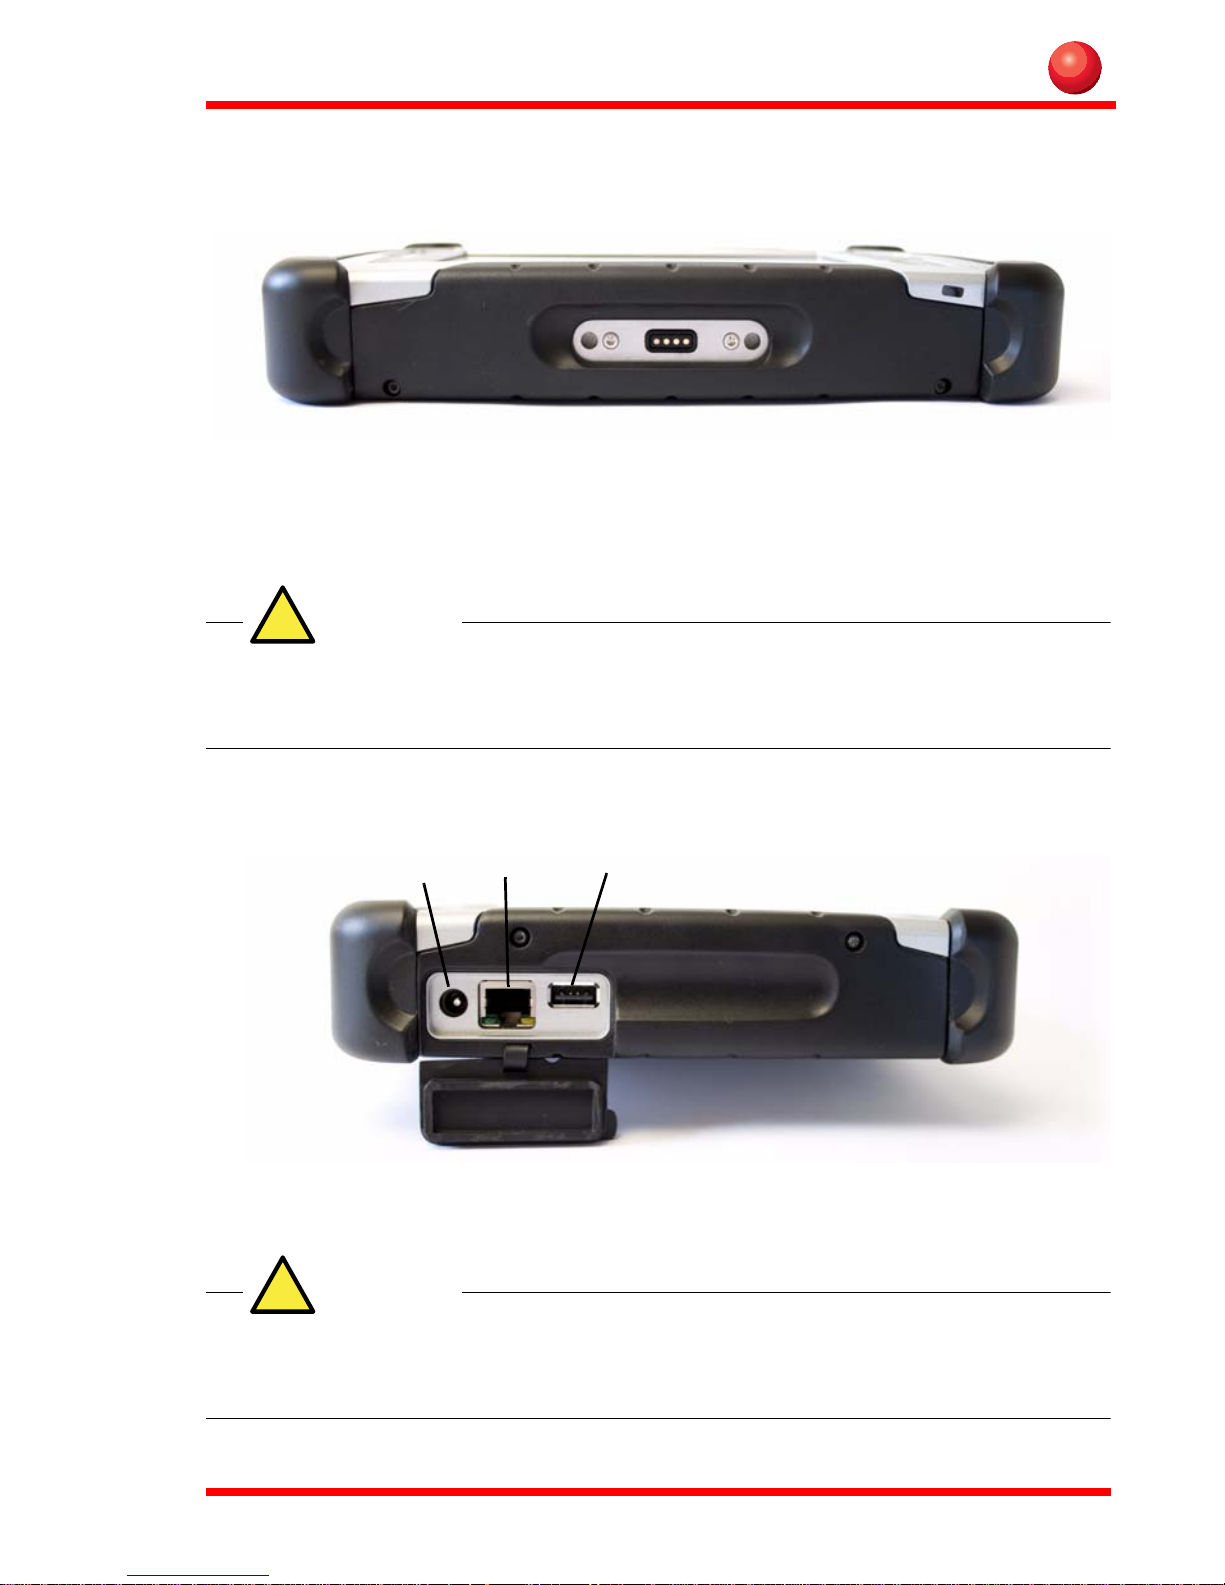
Docking connector
The Docking Connector located at center bottom, is used to connect the different
docks available. The Docking Connector is also used to connect the AC power source,
only connect JLT approved AC adaptor. The connector offers connection support for
power and a second USB device.
The Power connector and the Docking connector must not be used at
the same time.
Power connector
The Power connector (1) is located under the lid on the left side of the Rugged Industrial PC. It is used to connect an external power source to the Rugged Industrial PC.
The Power connector and the Docking connector must not be used at
the same time.
13
Page 16

Ethernet
Note!
Note!
The Ethernet connector (2) is located under the lid on the left side of the Rugged Industrial PC. It is used to connect the Rugged Industrial PC to a network.
USB 2.0
The USB connector (3) is located under the lid on the left side of the Rugged Industrial
PC. It is used to connect different external devices.
Suspend modes
The operating system makes it possible to suspend system operation of the Rugged Industrial PC without closing programs. The suspend modes is used to conserve battery
power.
The Rugged Industrial PC can be configured to suspend operation automatically when
inactive.
Standby mode
The use of standby mode can increase operation time up to 8 hours. In standby mode
power to unnecessary functions is turned off. It takes approximately 10 seconds for
the Rugged Industrial PC to resume operation when in standby mode.
Turn off monitor
By use of the turn off monitor function, operation time can increase up to 3.5 hours.
The Rugged Industrial PC resumes operation instantly, from standby mode, when the
Power button is pressed.
Use of touch screen will not resume operation.
Suspend to Disk mode
In the suspend to disk mode, the current data is saved to the disk and the Rugged Industrial PC is powered off. When the Rugged Industrial PC is in suspend to disk mode
the battery consumption is the same as in the off state.
Since the suspend to disk mode stores information on the disk, make sure
there is sufficient disk space available.
Resume from suspend mode
To resume from the suspend modes, press the Power button described in the chapter
”Function buttons” on page 5.
14
Page 17

Maintenance
!
Caution!
!
WARNING!
The Rugged Industrial PC is maintenance-free, except for normal cleaning. All setting, i.e. date and time etc, should be done through the interface of the operating system, just like on any non-rugged PC.
Cleaning
The display/touch screen should be cleaned with glass cleaning agent, made for that
purpose.
You must avoid oil on the Touch Screen because it can be difficult to
remove.
Keep the Rugged Industrial PC clean and free from dust and dirt by using a soft, lintfree cloth regularly . If available, you can also use compressed air (maximum pressure
2 bar) but some caution is to be observ ed.
No sharp objects or tools should be used when cleaning.
15
Page 18
Technical specification
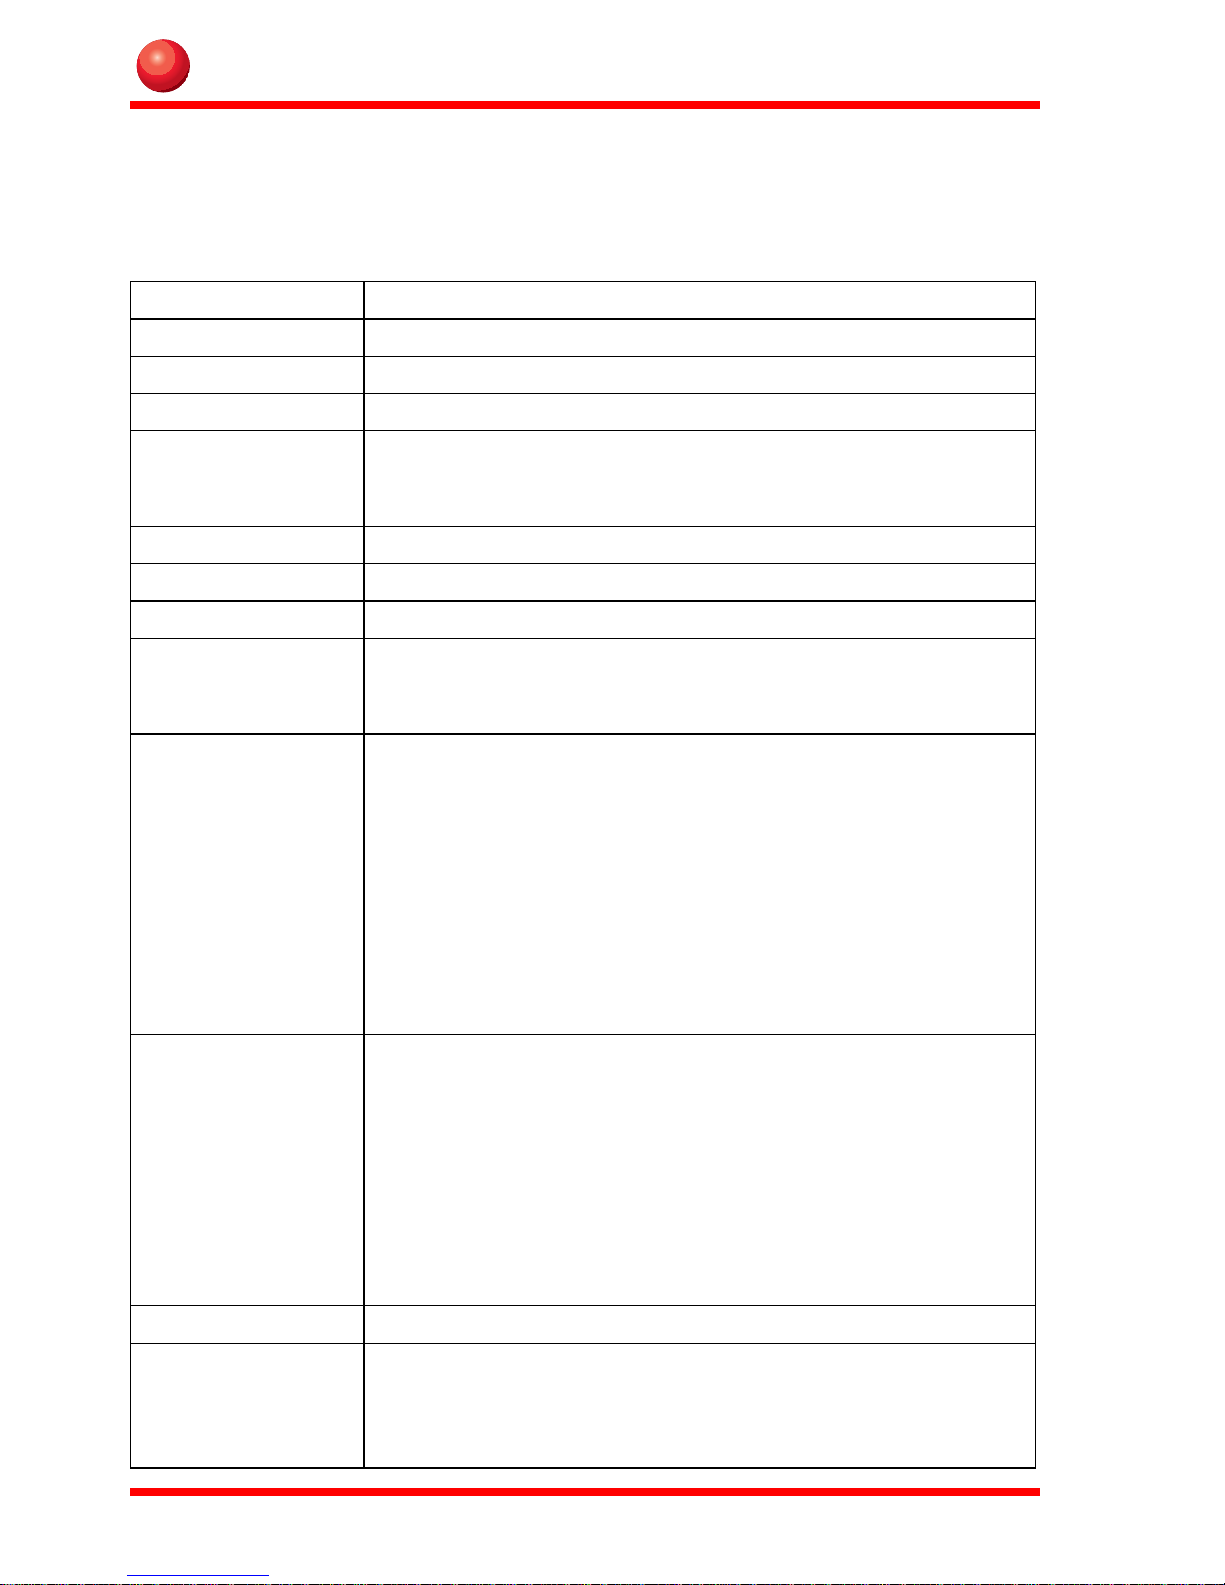
Base system
Operating system: Microsoft Windows XP Pro or XP Embedded
Display: 8.4" colour TFT SVGA 800x600, 320Nits
Processor: Intel Celeron M ULV 373 1.0 GHz
Chipset: Intel 855
Memory: Standard 256 MB (max 1 GB)
Note: Up to 32 MB of graphic memory can be reserved for
processor usage.
Graphics: Intel Extreme Graphics 2 with shared memory
Audio: Built-in loudspeakers, built-in microphone
Pointing device: High resolution resistive touch screen
Storage: Up to 2 Compact Flash type II
One 2.5" HDD 40 GB or
one 2.5" ATA IDE Flash
Interfaces: Wireless LAN, 802.11 a/b/g
Bluetooth 2.0 + EDR, Clas s 1
One USB 2.0
One RJ45 Ethernet (10/100 Base-T)
One DC power connector, Voltage range 9-21 V
One docking connector with USB interface and power
One internal expansion slot, i.e. for extra communication
module
One expansion slot for grip-integrated module using USB
interface
1 1 Control buttons
with the following
functions:
Battery: Primary 5300 mAh, 7.5 V (40 Wh), hot swappable
Increase brightness Arrow-Up
Decrease brightness Arrow-Down
Tab Arrow-Right
Shift + Tab Arrow-Left
Escape Enter
Ctrl-Alt-Delete) Fn (Function)
3 programmable buttons with 2 functions each. 3 functions
are pre-defined; Alt-Tab, IE and Mail. 3 functions are free to
program for the user.
Power Supply: 60 W External Power 18,5V ± 10%
V e h i cl e Do ck 9-36 V 65 W (isolated)*
AC/DC Power adaptor 115/230 V 50/60 Hz*
*Optional accessories
16
Page 19
!
WARNING!
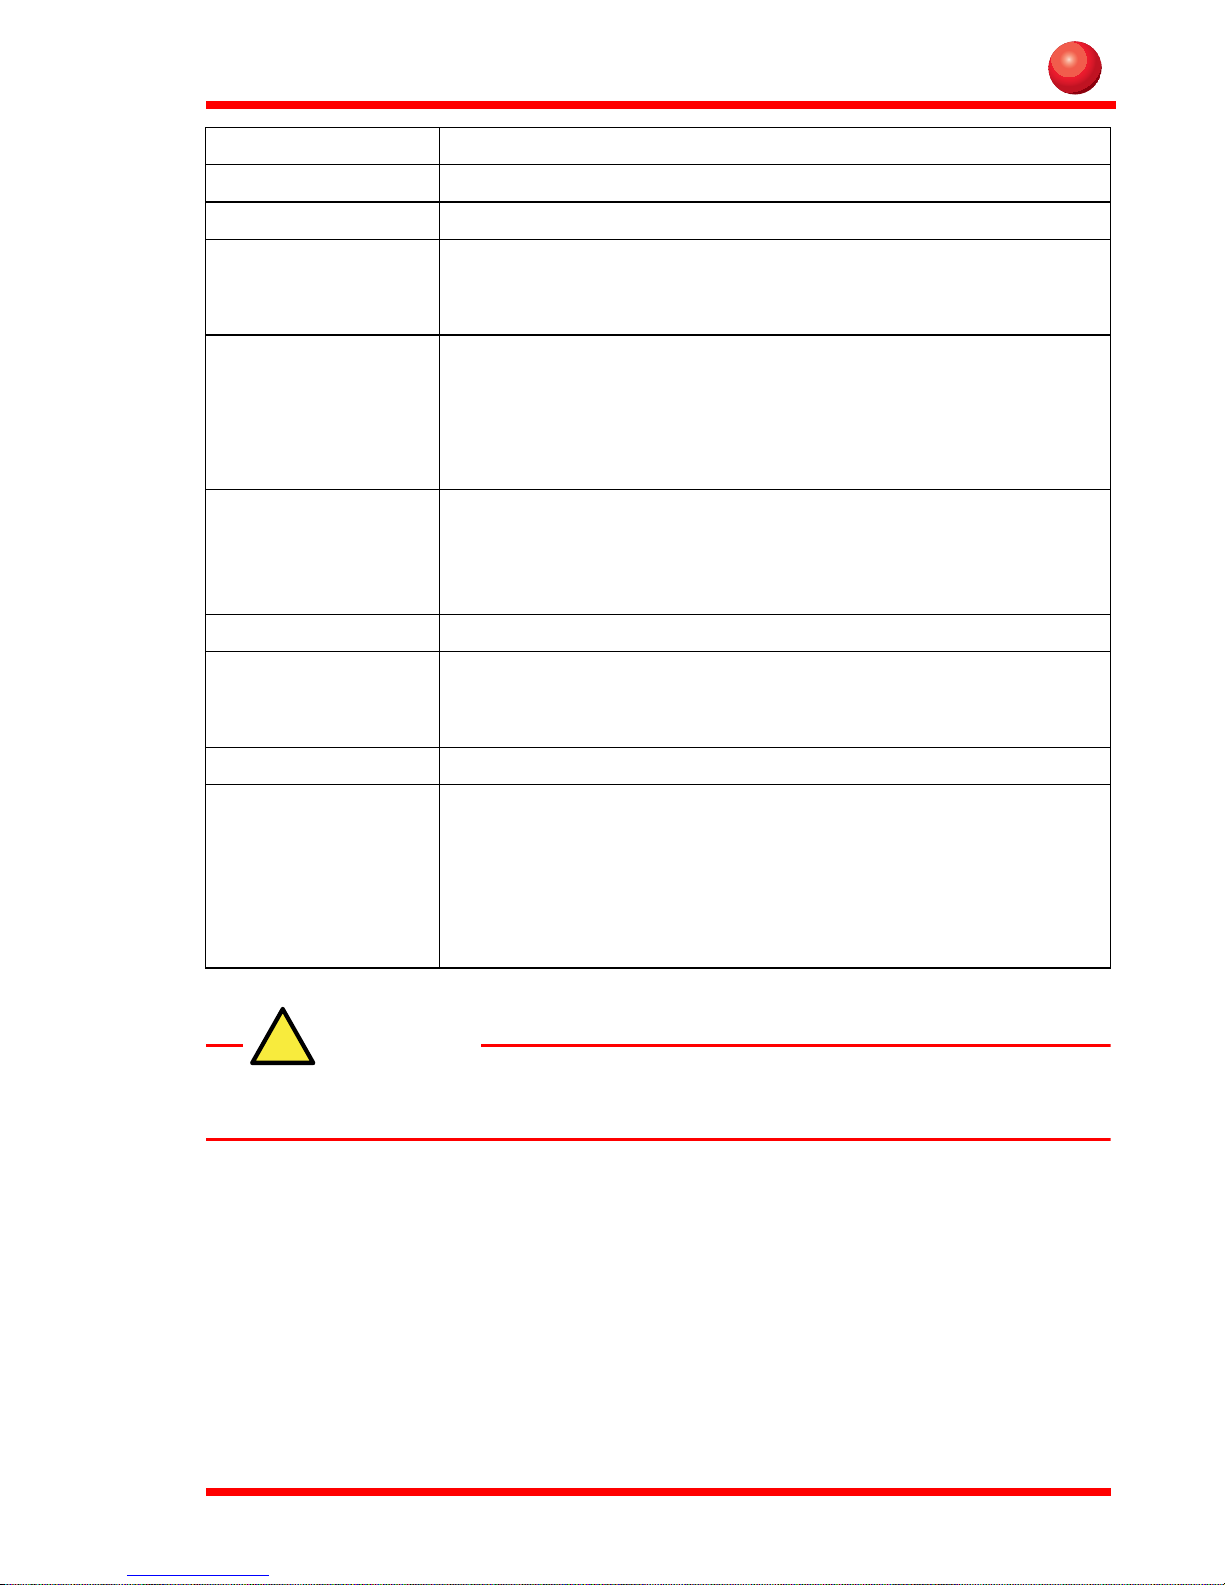
Housing: Aluminum with shock absorbing handles
Dimensions: 261 mm (w) x 199 mm (h) x 45 mm (d)
Weight: 1.9 kg
Stand-alone
Power
Requirements:
Charging Battery
Power
Requirements:
Temperature: Storage -20°C to 60°C (battery dependent)
Environment: IP65 with all lids closed
Vibration 5 - 500 Hz/4.5 g RMS 3 hours X Y Z
Drop test: 3 feet on plywood over concrete, 26 directions (drops)
Option: Vehicle Docking
18,5V ± 10%
40 W (not charging batteries)
18,5V ± 10%
20 W (Powered off)
50 W (Powered on)
Volt age regulator required for vehicles
9.0 V to 11.0 V unit is powered but not charged
Operating (from battery) -20°C to 50°C
Operating (charging) -10°C to 50°C
Non-operating (charging) -20°C to 60°C
Meets Mil Std 810F-514.4
(with rotating drive - 1.0 g RMS)
AC/DC Adaptor
GPS
W-LAN
GSM
Port replicator with 2 serial ports and 3 USB connectors
Storage above 75°C will permanently destroy the batteries.
17
Page 20

18
Page 21

Page 22

JLT Mobile Computers AB
Isbjörnsvägen 3
SE-352 45 Växjö, SWEDEN
Phone: +46 470 53 03 00
Fax: +46 470 445 29
E-mail: [email protected]
www.jltmobile.com
JLT8404, Manual
Part no: 90052, Rev 1
© 2007, JLT Mobile Computers AB
 Loading...