

Page 1
PPS-2 Remote for Mac OS X™
JLCooper makes no warranties, express or implied, regarding this software’s fitness for a particular
purpose, and in no event shall JLCooper Electronics be liable for incidental or consequential damages,
loss of profits, loss of data or data being rendered inaccurate, or losses sustained by third parties even if
JLCooper Electronics has been advised of the possibility of such damages.
Page 2

Introduction! 1
Installation! 1
Setup ! 2
Operation! 5
Frame Rate! 5
Sync Type! 6
Start Time! 7
Stop Time! 8
The Batch Striping List! 9
Batch Stripe Settings! 11
Striping! 12
Batch Striping! 13
Saving and Restoring! 14
Other Menus! 16
Edit Menu! 16
Stripe Menu! 16
Synch Menu! 16
Batch Striping Menu! 17
! PPS-2 Remote for Mac OS X™
! i
Page 3
Introduction
PPS-2 offers the advantages of several synchronizers in one versatile package. It reads
and generates SMPTE time code and converts SMPTE into MIDI Time Code or Direct
Time Lock. It also reads and generates JLCooper's “Smart FSK” sync and converts it
into MIDI Clock with Song Position Pointer. PPS-2 also offers Jam Sync/Regeneration,
Flywheeling and Auto-Merge.
The PPS-2 Remote Software for MAC OS X™ extends these capabilities by offering the
ability to set frame rates, start and stop times and to batch stripe a list timecode starts
and stops of songs, film cues, etc.
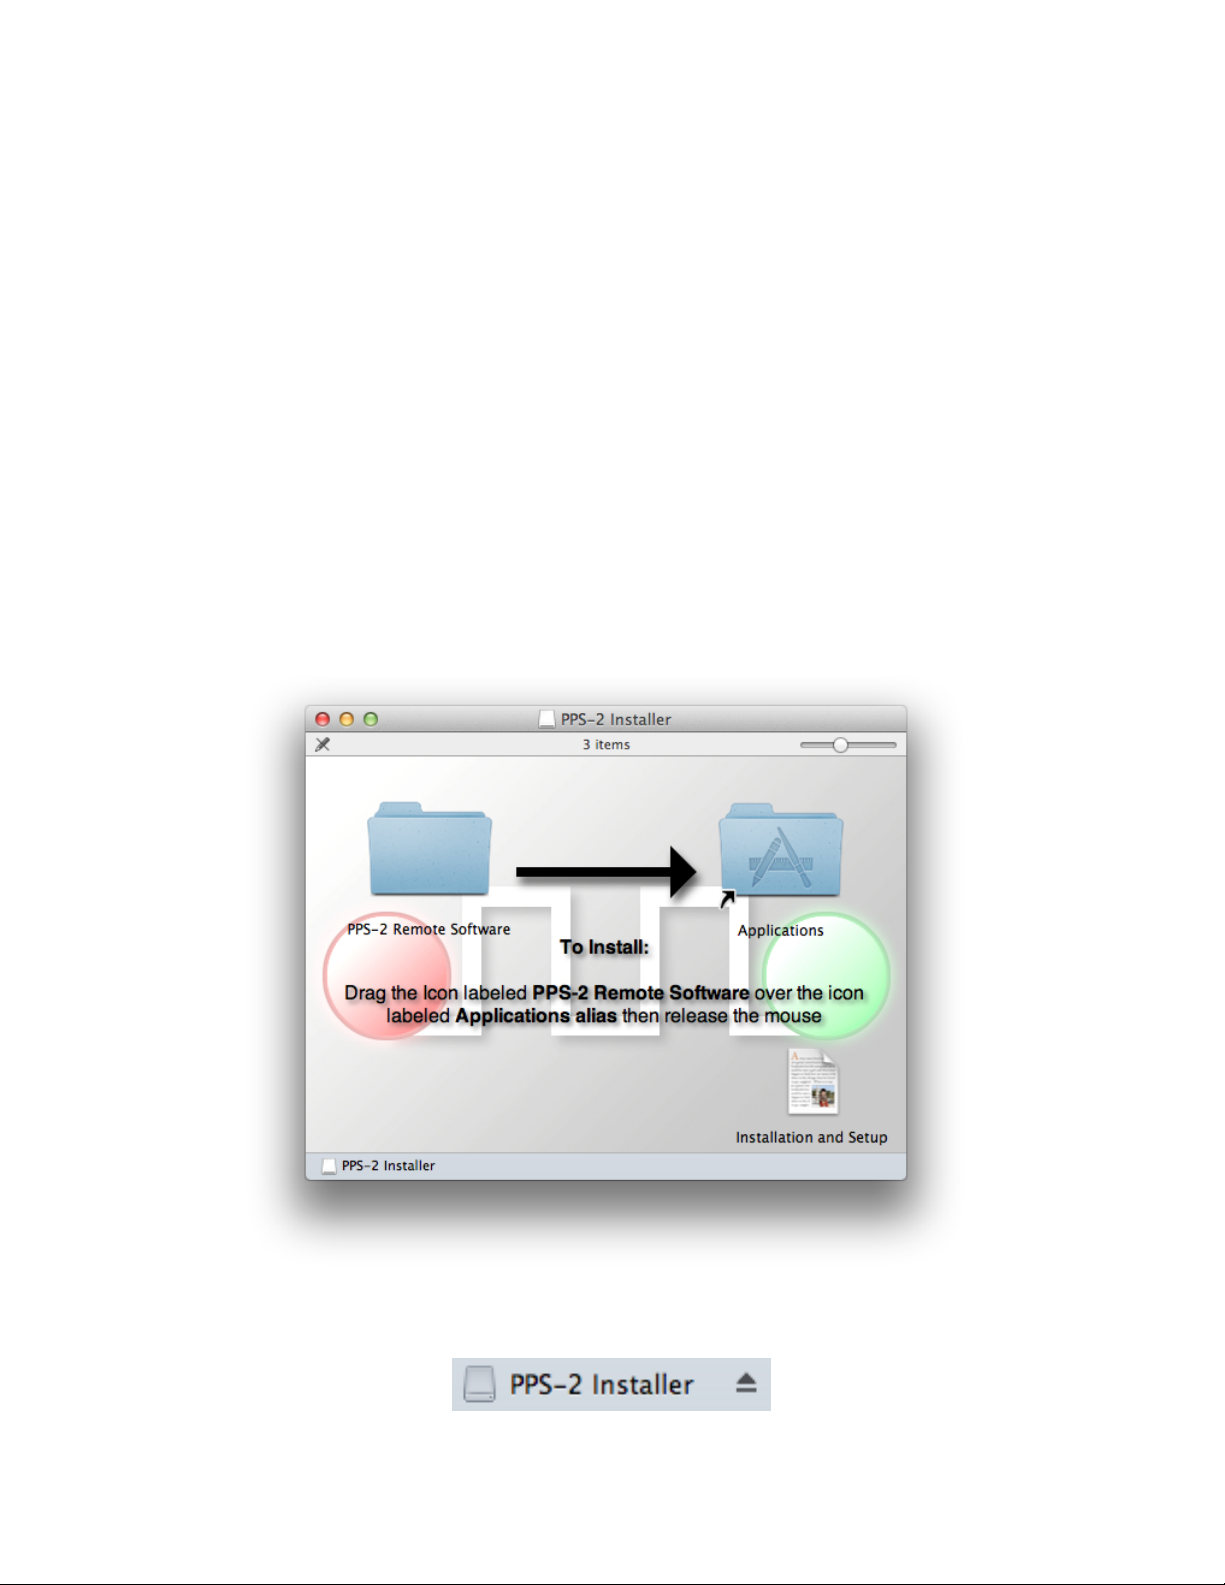
Installation
After downloading the file Install_PPS-2_Remote_Software.dmg, double-click it. In the
window that opens, drag the icon labeled PPS-2 Remote Software over the icon
labeled Applications alias and release the mouse. This will cause the Finder to copy
the software into the Applications folder on your hard drive.
Once the Finder is done copying files, look in the sidebar of any Finder window for the
PPS-2 installer icon. Click the little eject icon next to it to close the installer window.
! PPS-2 Remote for Mac OS X™
! 1
Page 4
Setup
Connect the MIDI Out of a MIDI interface connected to your computer to the MIDI In of
the PPS-2. Although the PPS-2 Remote software doesn’t receive MIDI messages from
the PPS-2, other MIDI software you are using probably will, so you should also connect
the PPS-2 MIDI Out to the interface’s MIDI In.
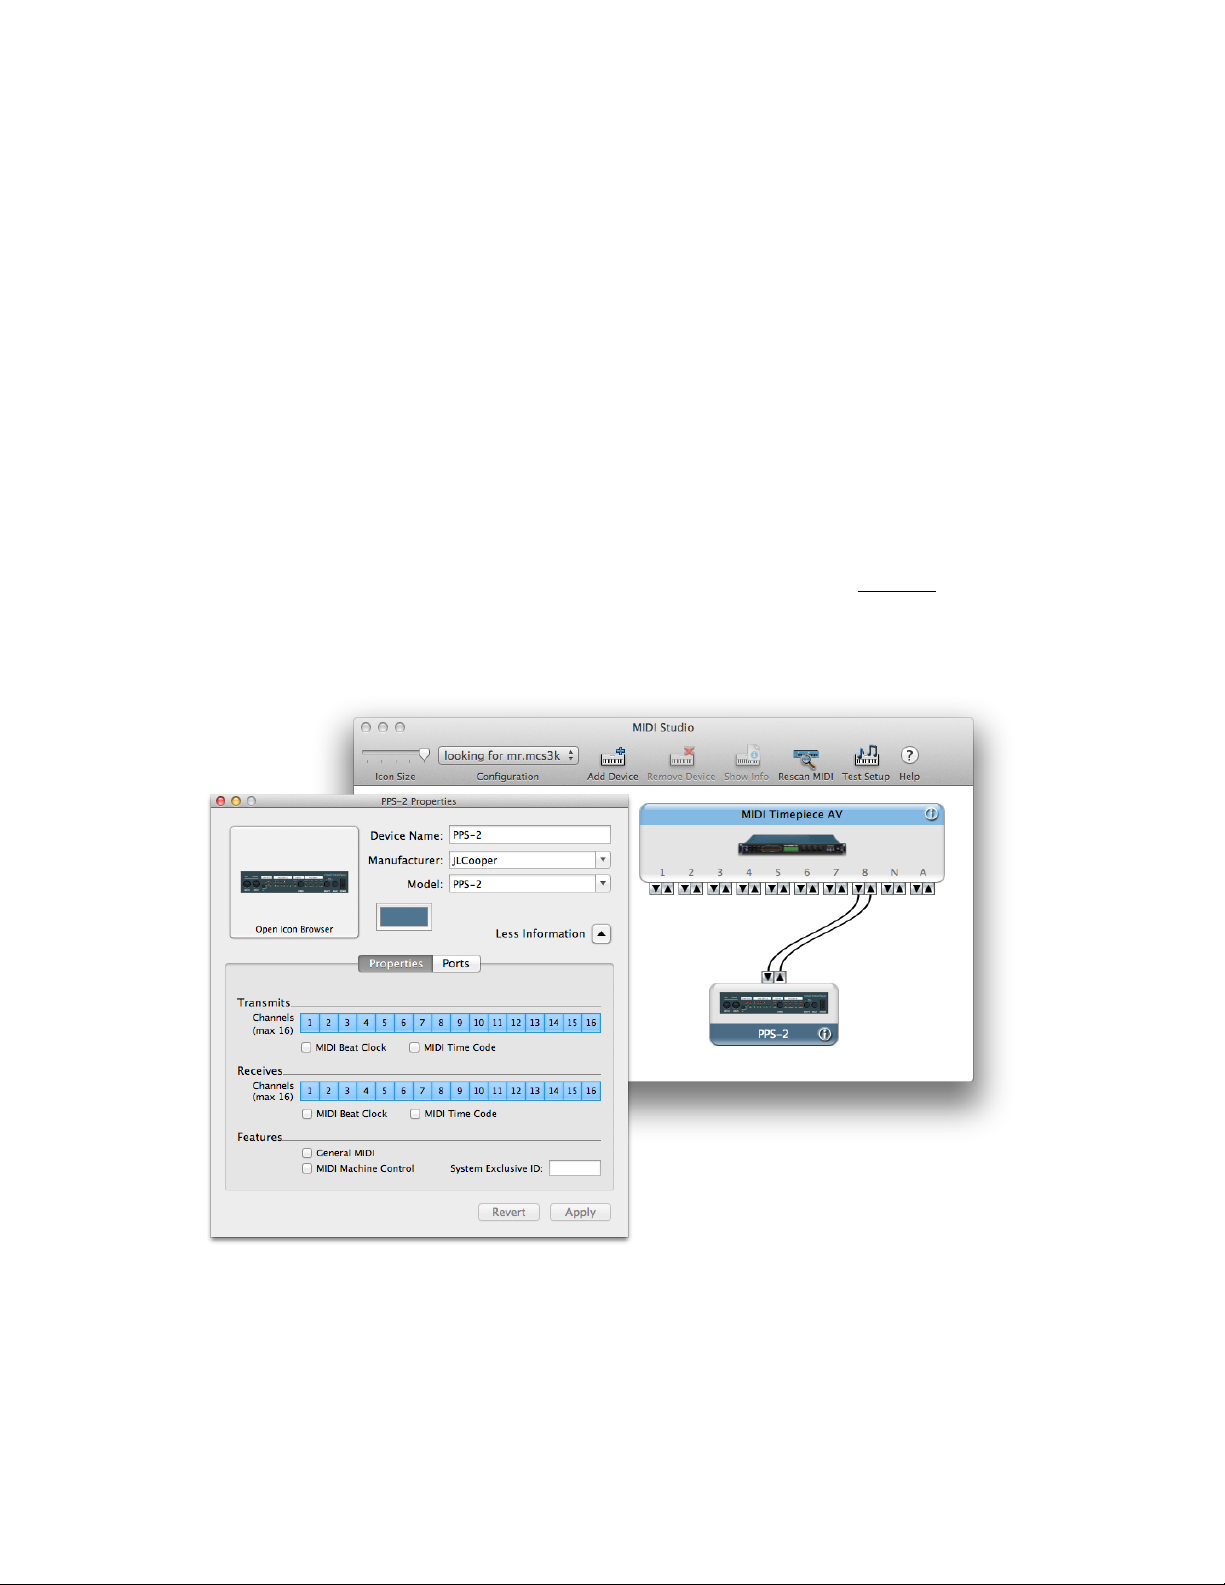
If you want to see the PPS-2 listed by name in your MIDI applications, open Apple’s
Audio MIDI Setup (/Applications/Utilities/). If you don’t see the MIDI Studio window,
chose Show MIDI Window from the Window menu. Click on the Add Device button,
then double click on the new external device icon that appears. This will open the
Properties editor.
Set up the Properties editor as in the following graphic. You can put anything you want
for the Device name. This is what will appear in your MIDI applications. For
Manufacturer and Model you should type “JLCooper” and “PPS-2”. Do Not use the
popup menus to select these settings. The information that Audio MIDI Setup has stored
about JLCooper is incorrect, and using these popups can cause a crash.
Close the Properties editor then drag from the PPS icon’s input to the output on the
MIDI interface icon that matches the physical input that your MIDI cable is connected to.
Make a similar connection from the PPS-2 Out to the interface’s Input.
Quit Audio MIDI Setup.
! PPS-2 Remote for Mac OS X™
! 2
Page 5
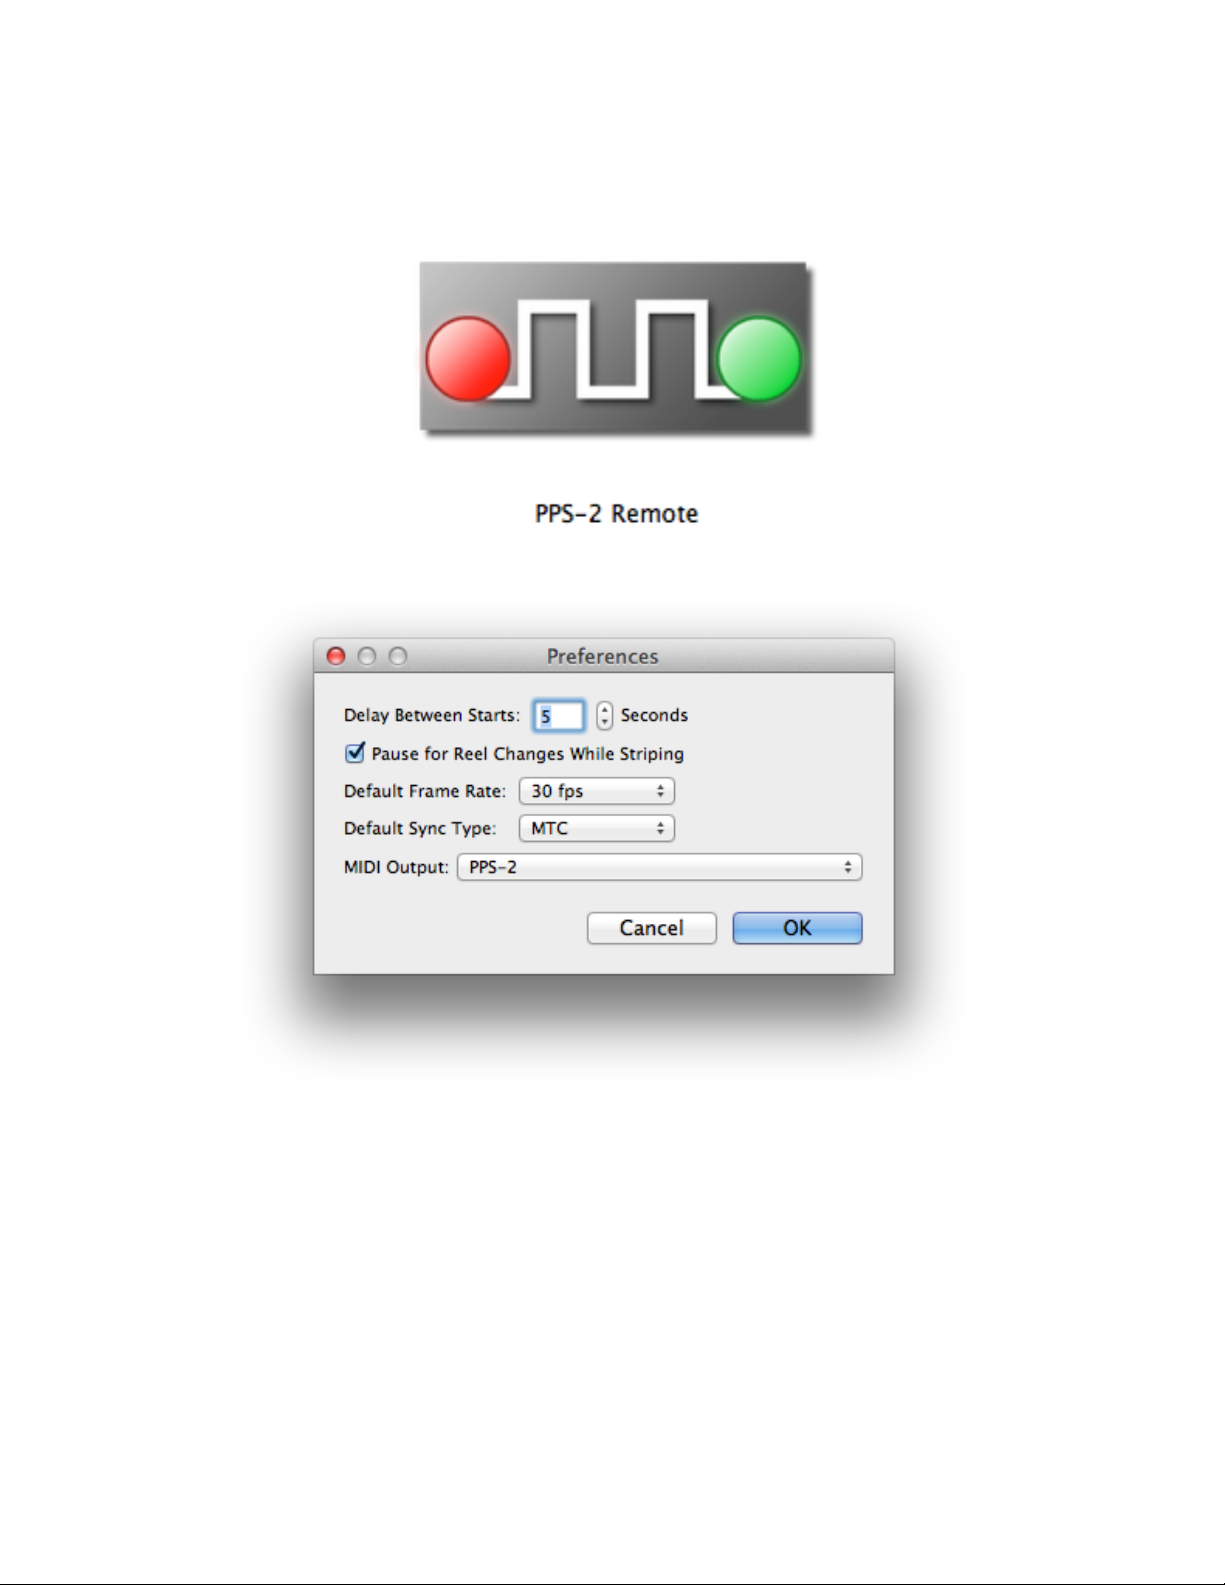
Navigate to /Applications/PPS-2 Remote Software and double-click on the PPS-2
Remote application, then go to Preferences under the PPS-2 Remote menu.
This will open the Preferences dialog.
If you will be using the batch striping feature you will want to set the number of seconds
of silence between each section of timecode, or Delay Between Starts. If you will be
batch striping multiple tapes, then you should also make sure that Pause for Reel
Changes While Striping is checked. These settings will be discussed in more detail,
and can be changed at any time.
! PPS-2 Remote for Mac OS X™
! 3
Page 6
The Default Frame Rate and Default Sync Type popups determine what frame rate
and sync type settings will be active each time the software is started up. These settings
can easily be overridden in the main window.
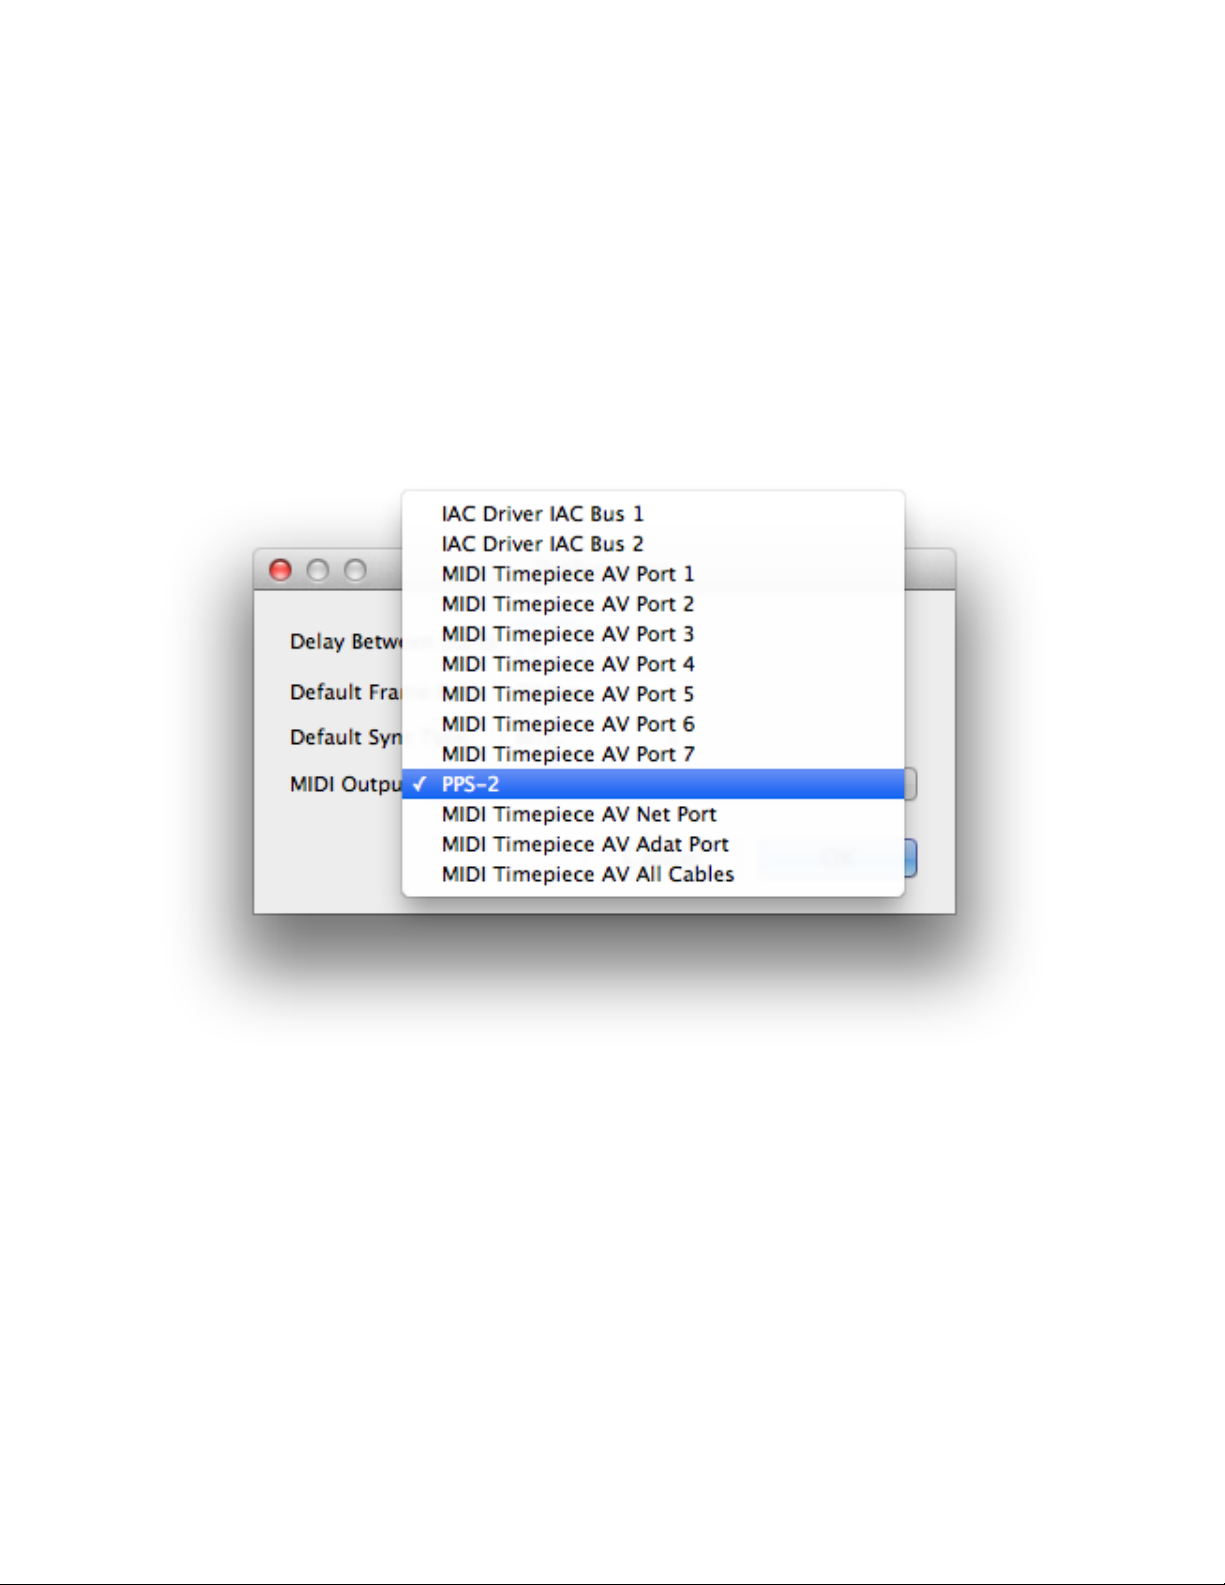
The MIDI Output popup lists all the MIDI ports that are present in your system. In order
for the PPS-2 software to communicate with the PPS-2, it needs to know what ports the
PPS-2 is connected to. If you previously created a PPS-2 device in Audio MIDI Setup
as described above, the name you chose for the PPS-2 will appear in the popups. If not,
the name of the port it is connected to will appear. Choose the PPS-2’s port from the
popup then hit OK.
The PPS-2 and the PPS-2 Remote application should now be communicating.
! PPS-2 Remote for Mac OS X™
! 4
Page 7

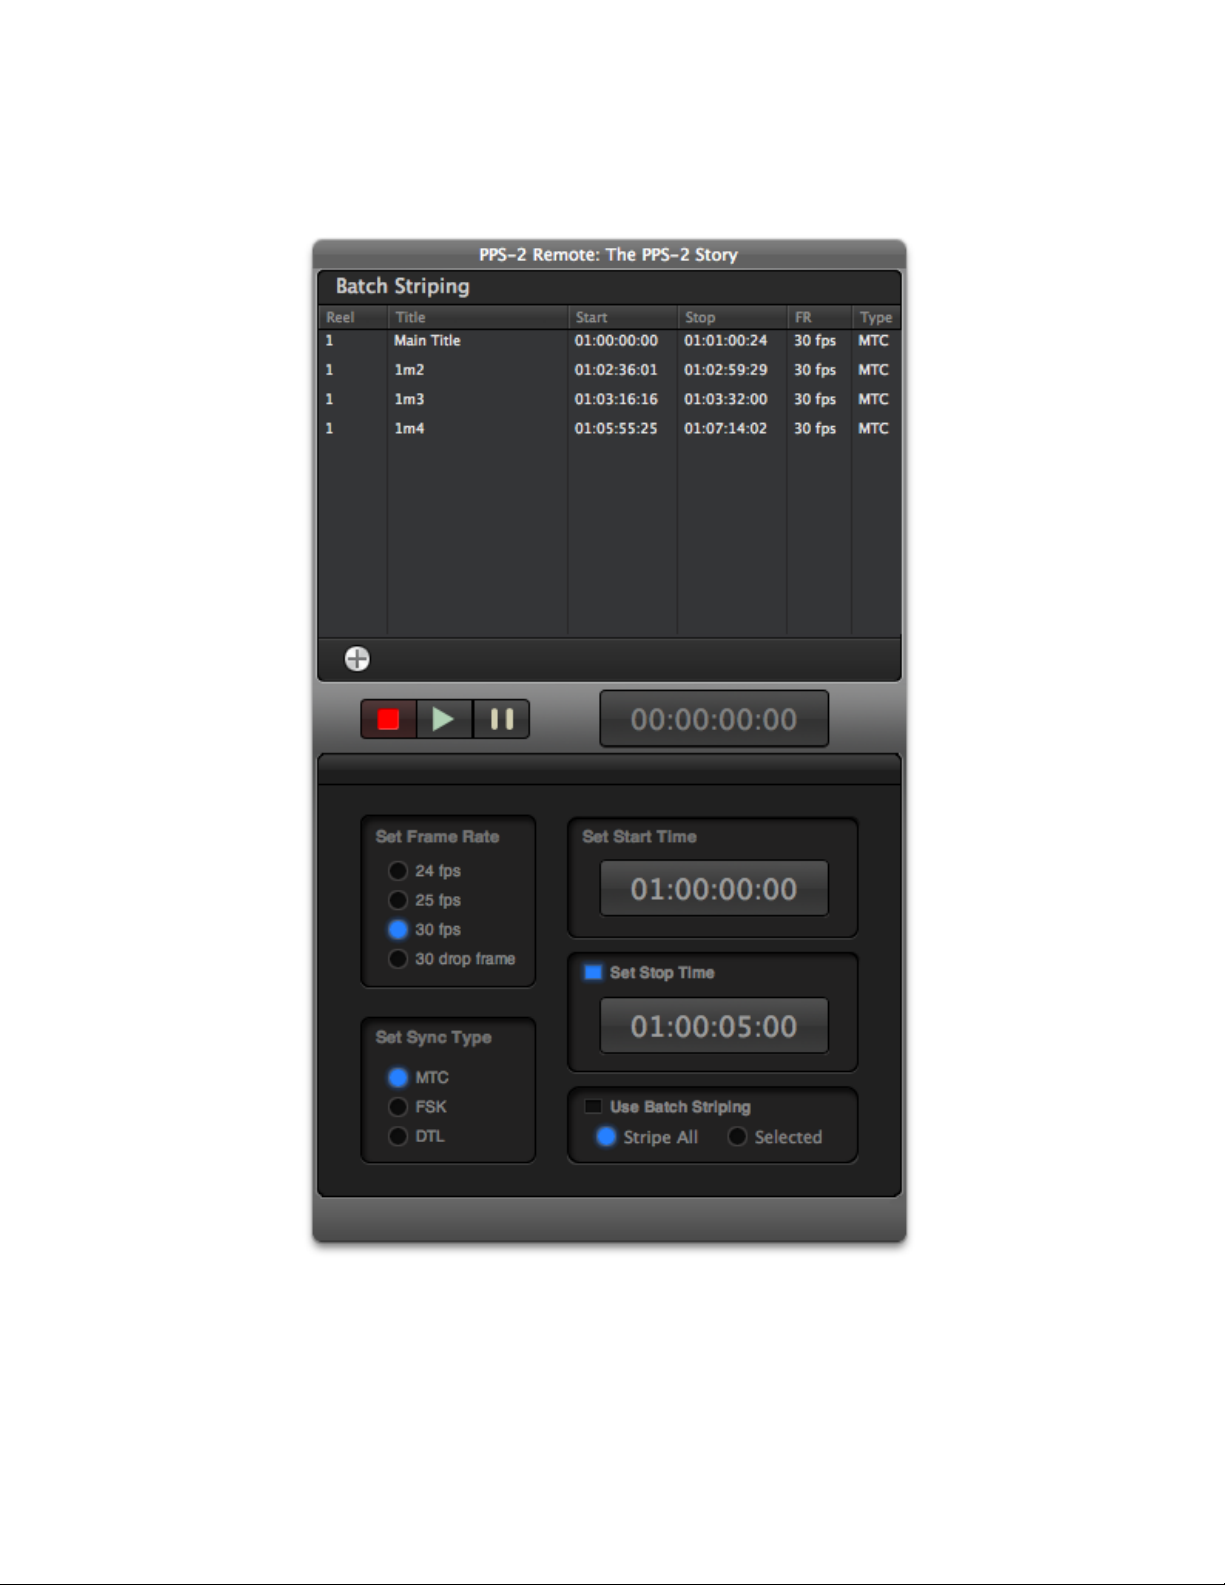
Operation
The main user interface is divided into several areas, Frame Rate, Sync Type, Start
Time, Stop Time, the Batch Striping List, Batch Stripe settings and Striping Controls.
Frame Rate
The PPS-2 can stripe at four different frame rates- 24 frames per second, 25 frames per
second, 30 frames per second, and 30 drop frame.
It should be noted that in the video world, 30 frames per second actually runs at 29.97
frames per second, but the displayed timecode rolls over to the next displayed second
every 30 frames. Video 30 frame timecode will lose 18 frames every 10 minutes
compared to the clock on the wall. In the music world, 30 frames per second often
actually means 30 frames per second. This is the case with the PPS-2.
30 drop frame also runs at 29.97 frames per second, but its counter skips over frames 0
and 1 of each minute (except for minutes that are multiples of 10) so that the displayed
timecode matches the clock on the wall. This is the format that the PPS-2 uses when it
is set for 30 drop frame.
The Frame Rate setting overrides the Default Frame Rate set in the Preferences dialog.
Changes to the Frame Rate setting are undoable and redoable.
! PPS-2 Remote for Mac OS X™
! 5
Page 8

Sync Type
The PPS-2 can work with three different synchronization types, MTC (MIDI Time Code)
Smart FSK (Frequency Shift Keying) and DTL (Direct Time Lock). MTC and DTL are
protocols for converting SMPTE time code into MIDI information that music software
and hardware can synchronize to. Neither of these settings affect how the PPS-2 stripes
SMPTE.
When the PPS-2 is in FSK mode, it doesn’t stripe a tape with SMPTE. Instead it stripes
the tape with a tone. When the tape is played back, the PPS-2 converts the tone into
MIDI Song Position Pointer and MIDI Clock messages. Some older music software and
hardware use this method of syncing to tape.
Since frame rate has no meaning when FSK is being used, the Frame Rate controls are
disabled when you choose FSK. They will be re-enabled when you choose either MTC
or DTL.
DTL and FSK are rarely used anymore, and you will probably keep the Sync Type set to
MTC.
The Sync Type setting overrides the Default Sync Type set in the Preferences dialog.
Changes to the Sync Type setting are undoable and redoable.
! PPS-2 Remote for Mac OS X™
! 6
Page 9
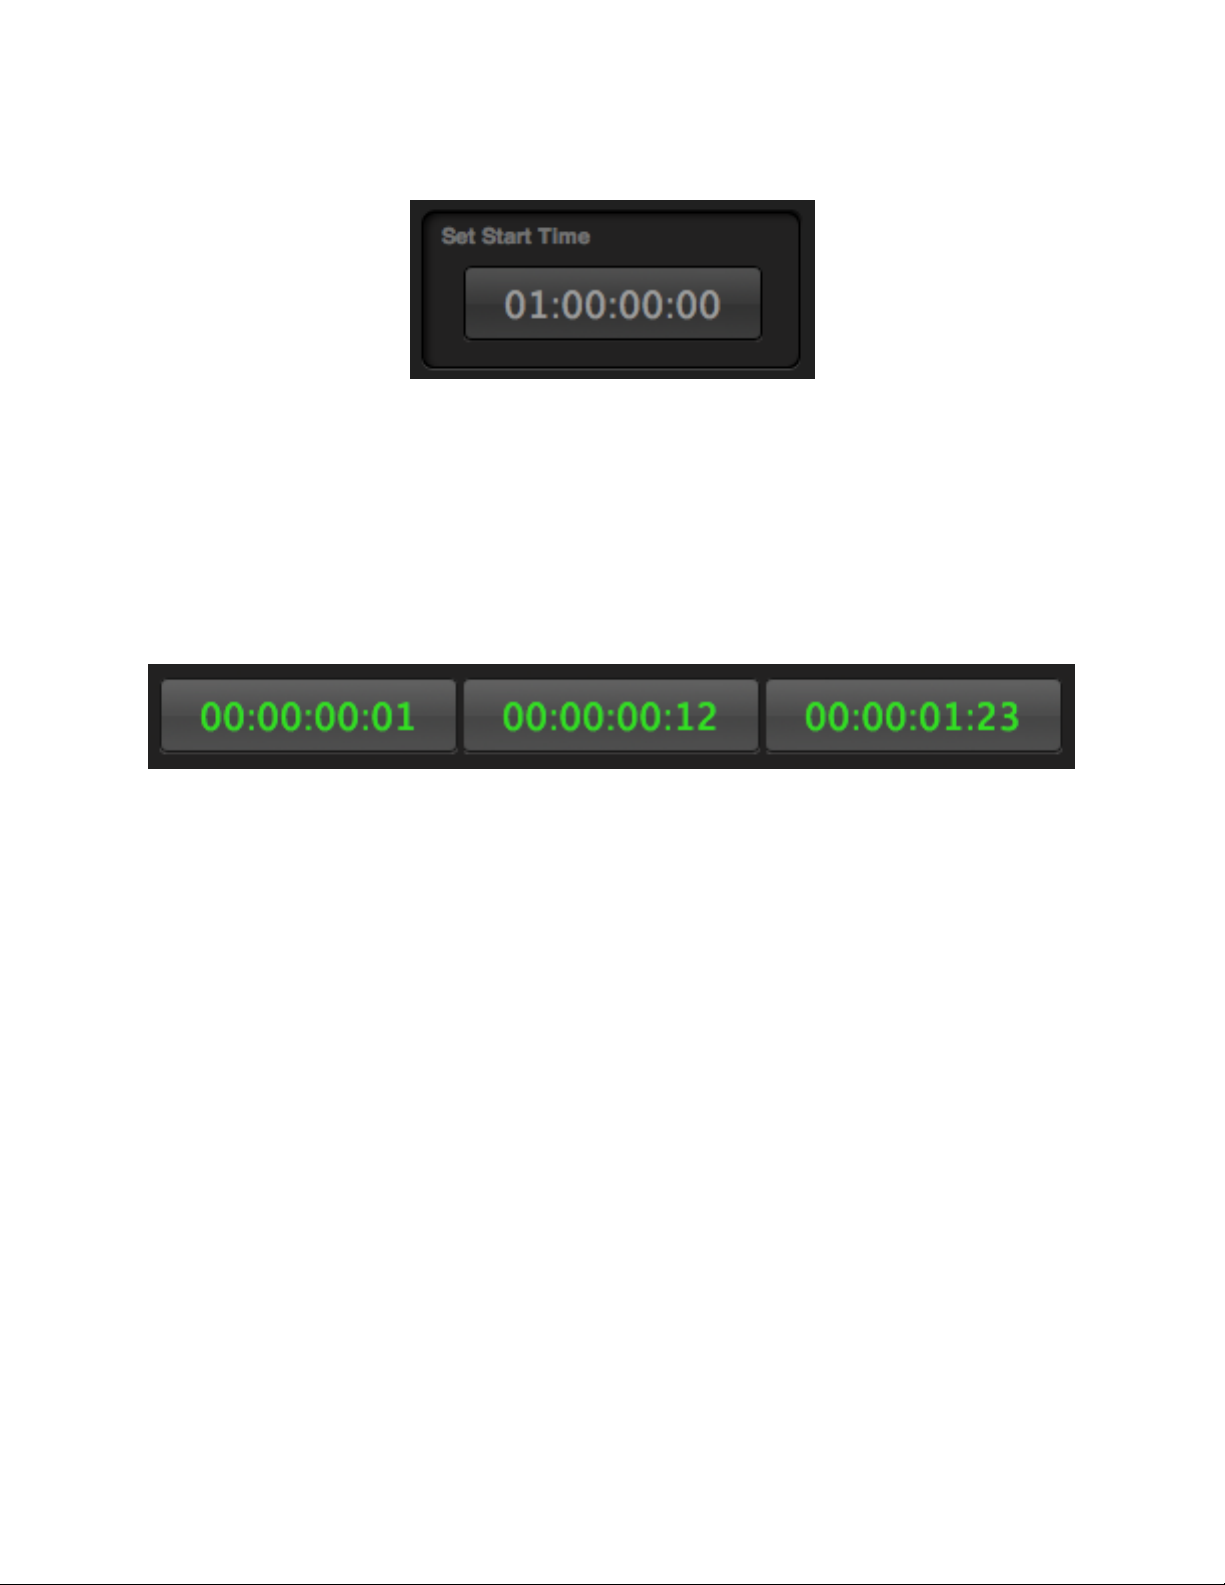
Start Time
The Start Time is the timecode number that the PPS-2 will begin with when you tell it to
start striping. It is displayed as HOURS:MINUTES:SECONDS:FRAMES.
To change the start time, click on it. The timecode number will turn green. Start by
typing a digit. The digit you typed will appear in the ones column. Each time you type
another digit, the current timecode will shift one column to the left and the new digit will
go into the ones column. There is no need to type “:” The colons are inserted
automatically.
If you make a mistake, hit the BACKSPACE key and the whole number will shift one
column to the right.
When you have typed the whole timecode number, hit the ENTER, RETURN or TAB
key, or click on the start time. If the if you have entered a valid timecode number, it will
be accepted and the number will return to its gray color. If the timecode isn’t valid, the
Mac will beep and the number will stay green until you correct it.
Reasons that a timecode number could be invalid are HOURS larger than 23,
MINUTES larger than 59, SECONDS larger than 59 or FRAMES equal to or larger than
the frame rate. For example, if the frame rate is 25 frames per second, then a value of
24 or higher for FRAMES will be invalid. If the Frame Rate is 30 drop, then any
timecode ending in 00:00 or 00:01 where the minute is not a multiple of 10 will also be
flagged as invalid.
Changes to the Start Time are undoable and redoable.
! PPS-2 Remote for Mac OS X™
! 7
Page 10

Stop Time
If no Stop Time is set, then once the PPS-2 has started stringing, it will keep going until
you manually stop it. If a Stop Time has been set, then the PPS-2 will stop striping when
it’s generated timecode matches the Stop Time.
Editing the Stop Time is identical to editing the Start Time. Click on it then type the digits
of the desired timecode number. Hit the ENTER, RETURN or TAB key or click on it to
accept the number you have typed.
In order for the Stop Time to take effect, the Set Stop Time box must be checked. Any
time you try and set a Stop Time that is less than or equal to the Start Time, the
software will change the Stop Time to equal the Start Time plus five seconds.
Changes to the Stop Time and Set Stop Time setting are undoable and redoable.
! PPS-2 Remote for Mac OS X™
! 8
Page 11

The Batch Striping List
If you are going to batch stripe your tapes, this is where you will list all the start and stop
times.
If you have set a Stop Time and have checked the Set Stop Time box, then the Add to
Batch Stripe List button (“+”) will appear. Clicking it will bring up the Add to Batch
Striping List dialog, where you can add a reel number and a title.
The Reel Number will default to be the same as the hour of the Start Time, but can be
changed to any number you want. The Title can be a song title, a film cue number, or
any other name that helps to identify what this timecode is being used for.
! PPS-2 Remote for Mac OS X™
! 9
Page 12

Hit Add and a new entry will appear in the Batch Stripe List.
The list is automatically sorted as entries are added. The sorting order is based on the
reel number, the start time, the title and the stop time. If two items are the same after
these criteria are applied, then the one that was entered first will be first in the list.
Adding entries to the Batch List is undoable and redoable.
! PPS-2 Remote for Mac OS X™
! 10
Page 13

You can select an entry by clicking on it. You can select a contiguous range by clicking
on the first item in the range and SHIFT-clicking on the last item in the range.
Discontiguous items can be selected by COMMAND-clicking.
Once one or more items have been selected, the Remove Selected Items from Batch
List button (“-”) will appear. Clicking on it will delete the selected items. They may also
be deleted by hitting the BACKSPACE key. Deleting is undoable and redoable.
Batch Stripe Settings
When the Use Batch Striping box is left unchecked, then striping will be based on the
current Start and Stop times. If it is checked, then striping will be controlled by the Batch
Stripe List. The Use Batch Striping box will not be selectable unless there is at least
one entry in the Batch Striping List.
The default setting is to stripe all the items in the list, but if any of them are selected,
you can choose to only stripe the selected items.
All changes to the Batch Stripe Settings are undoable and redoable.
! PPS-2 Remote for Mac OS X™
! 11
Page 14

Striping
The Striping Controls consist of a Stop Button, a Play Button, a Pause button and a
timecode display. What happens when you click each one varies slightly depending on
the Stop Time Settings and the Batch Stripe settings.
The timecode display will show the timecode numbers being generated by the PPS-2. If
the PPS-2 is generating FSK, then the timecode display counts from the Start Time, and
continues until striping stops.
If neither Set Stop Time nor Use Batch Striping is checked, then when you hit Play,
the PPS-2 will start striping from the Start Time, and continue until you hit Stop or
Pause. If you hit Stop, then the next time you hit Play, striping will start from the Start
Time again. If you hit Pause, then the next time you hit Play, striping will start from
where it was when you hit Pause.
If Set Stop Time is checked but Use Batch Striping is not, then hitting Play will cause
the PPS-2 to stripe from the Start Time to the Stop Time, then stop striping. If you hit
Stop or Pause before the Stop Time is reached, they behave as above. Stop terminates
striping and resets the counter to the Start Time. Pause terminates striping but leaves
the counter unchanged so hitting Play will start striping where it left off.
! PPS-2 Remote for Mac OS X™
! 12
Page 15

Batch Striping
If Use Batch Striping is checked, then striping will be controlled by the Batch Striping
List. Hitting the Play button will start striping from the first item (or first selected item,
depending on settings) in the list. Hitting either Stop or Pause will terminate striping and
reset the time and item counters. So after stopping or pausing, pressing Play again will
start over from the beginning.
There are a couple of settings that affect how the Batch Stripe List is used. Stripe All
causes striping to start with the first entry in the list, and continue sequentially, striping
each item until the end of the list is reached. If at least one entry in the Batch Striping
list is selected, then the Stripe Selected choice becomes available. In this case, only
the selected items in the list will be striped.
While batch striping is in progress the title of the entry currently being striped is
displayed at the top of the window.
! PPS-2 Remote for Mac OS X™
! 13
Page 16
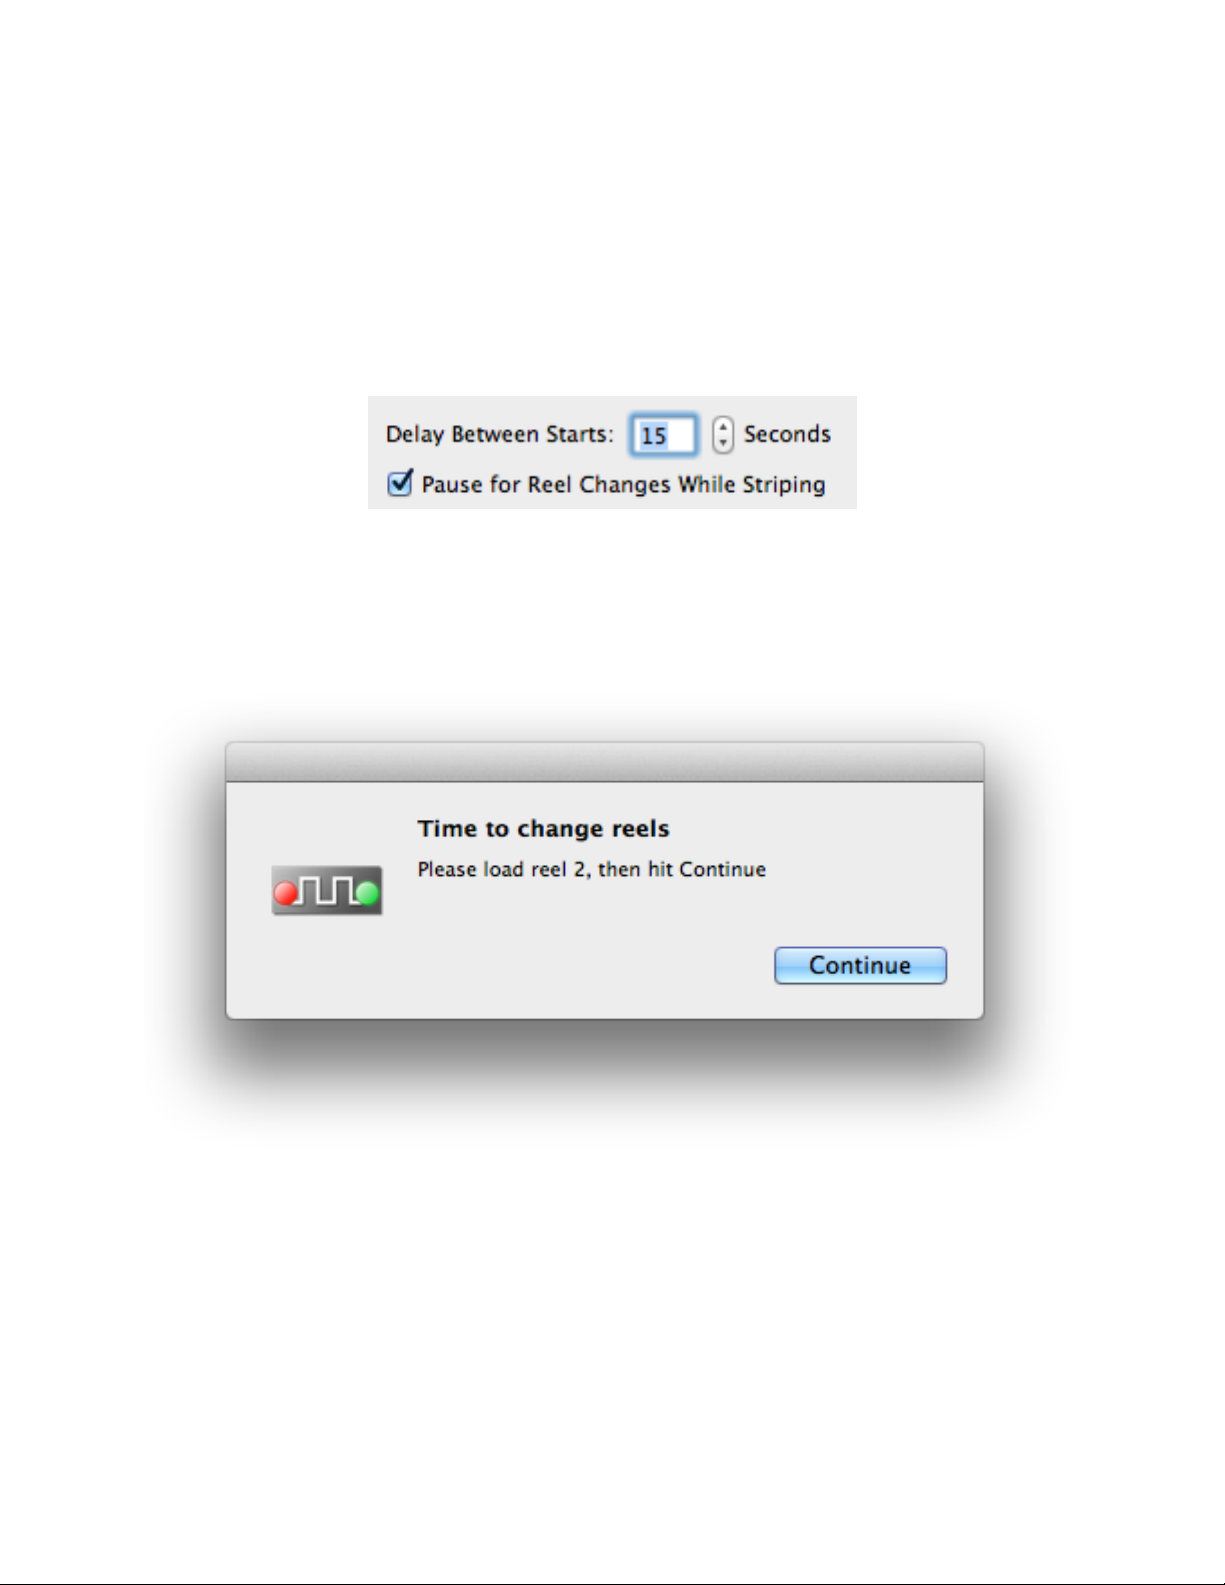
There are two preference settings that affect Batch Striping. To access them, go to
Preferences under the PPS-2 Remote menu.
Delay Between Starts determines how much silence will be left on the tape in between
the end of one entry and the start of the next one. It can be any whole number between
1 and 60 seconds, and can be set either by typing or with the up/down arrows. The
default setting is five seconds, but you should set it long enough so that you always
have time to take the tape machine out of record before the next song.
Pause for Reel Changes While Striping is useful if you are striping multiple reels of
tape, but don’t want to “babysit” the entire striping process. If this box is set, then during
striping, any time a reel change is encountered striping will pause and an alert will be
displayed. Once you have changed reels and put the tape machine into record, click
Continue and striping will resume.
Saving and Restoring
The settings in the Preferences dialog are automatically saved to your preferences file
and retrieved each time the program is opened.
You can also save and open Batch Lists. This makes it possible to prepare for a session
ahead of time, even on a different computer from the one that will be controlling the
striping. Just bring the saved Batch List to the session and open it in PPS-2 Remote
and start striping.
! PPS-2 Remote for Mac OS X™
! 14
Page 17
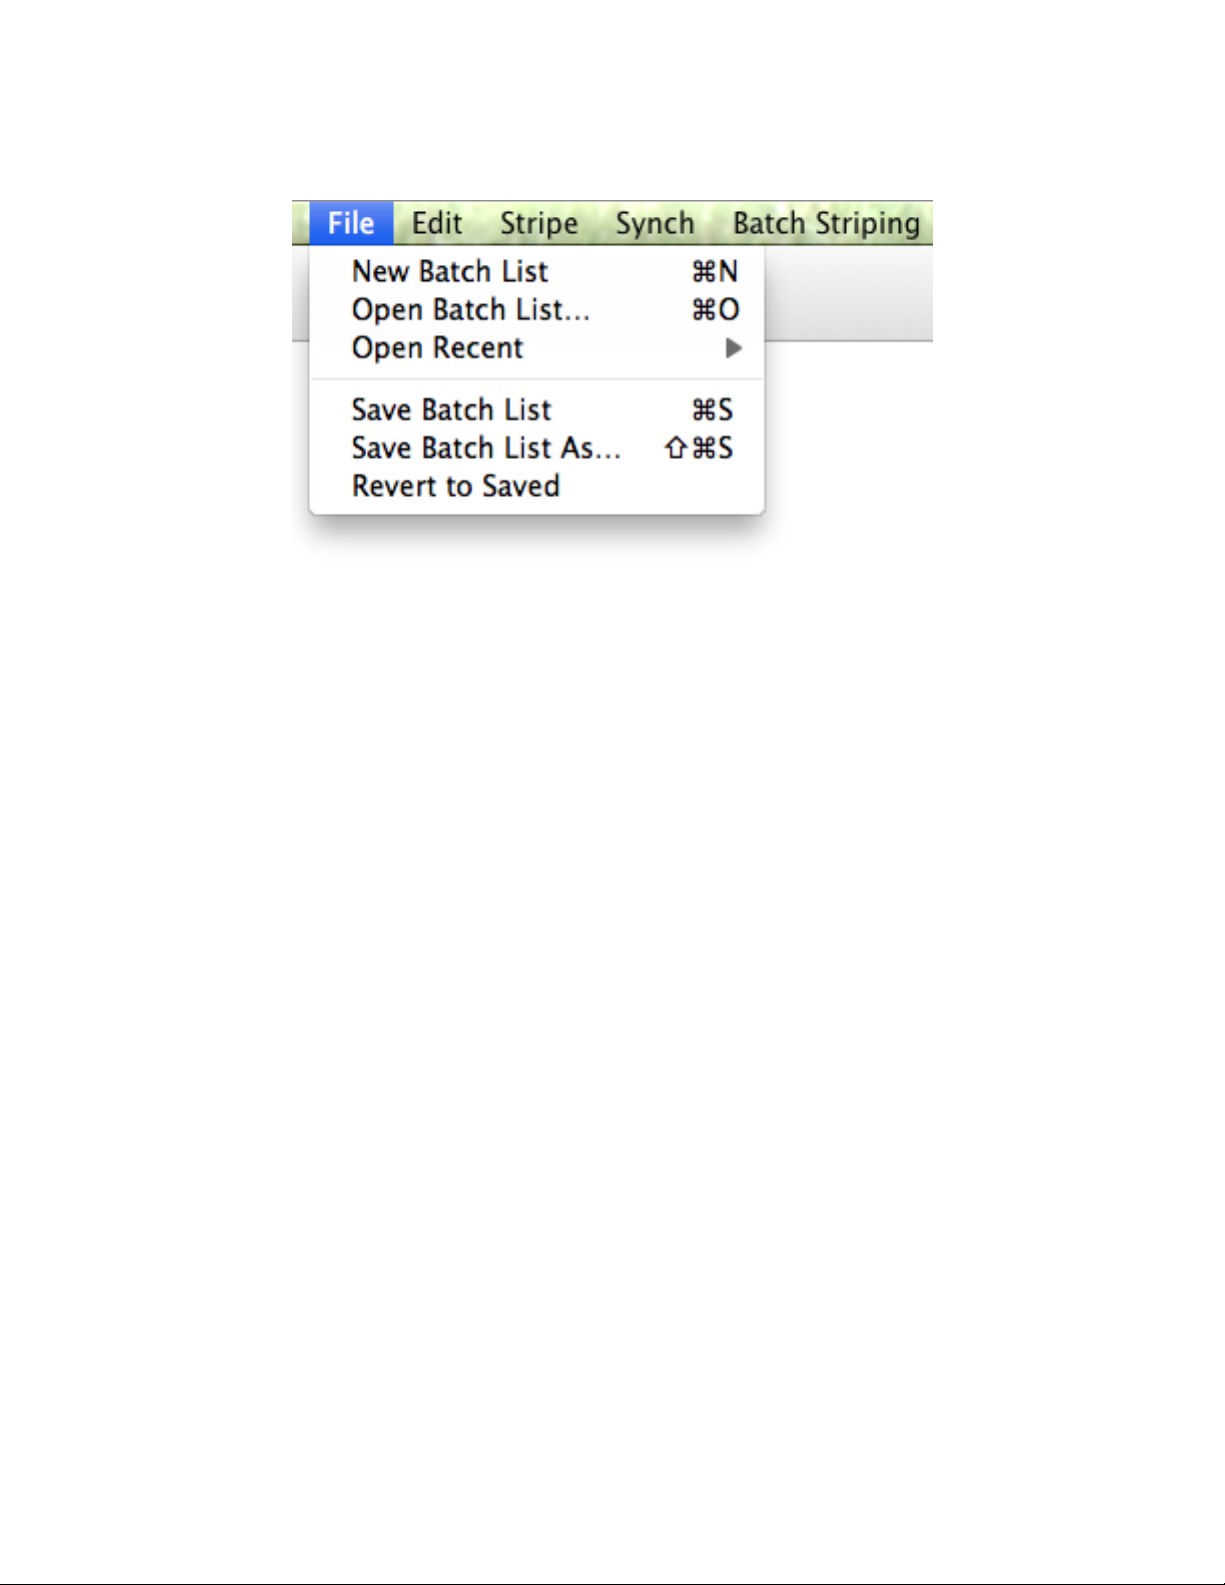
The commands under the File menu work just like they do in other Mac applications:
New Batch List creates an empty Batch List, giving you a chance to save your current work
first.
Open Batch List… opens a previously saved Batch List, using the standard Mac Open dialog.
You have a chance to save your current work first.
Open Recent presents a list of recently opened Batch Lists. Choosing one from the list opens it,
after giving you a chance to save your current work.
Save Batch List will save a previously saved Batch List to its original location. If the Batch List
has never been saved, then Save Batch List actually performs a Save Batch List As…
command. It is only available if the current Batch List has never been saved or if it has changed
since it was last saved.
Save Batch List As… allows you to name and save a previously unsaved file to a location of
your choice. It will also let you save a copy of a previously saved file with a new name and/or
location. It uses the standard Mac Save dialog.
Revert to Saved will reopen the last saved version of the current Batch List. It is only available
if the current Batch List has been previously saved, and has changed since it was saved.
! PPS-2 Remote for Mac OS X™
! 15
Page 18
Other Menus
Edit Menu
Undo and Redo are the only Edit menu items that apply to PPS-2 Remote. As mentioned
earlier they apply to all changes that can be made in the main user interface. The number of
undo/redo levels is unlimited.
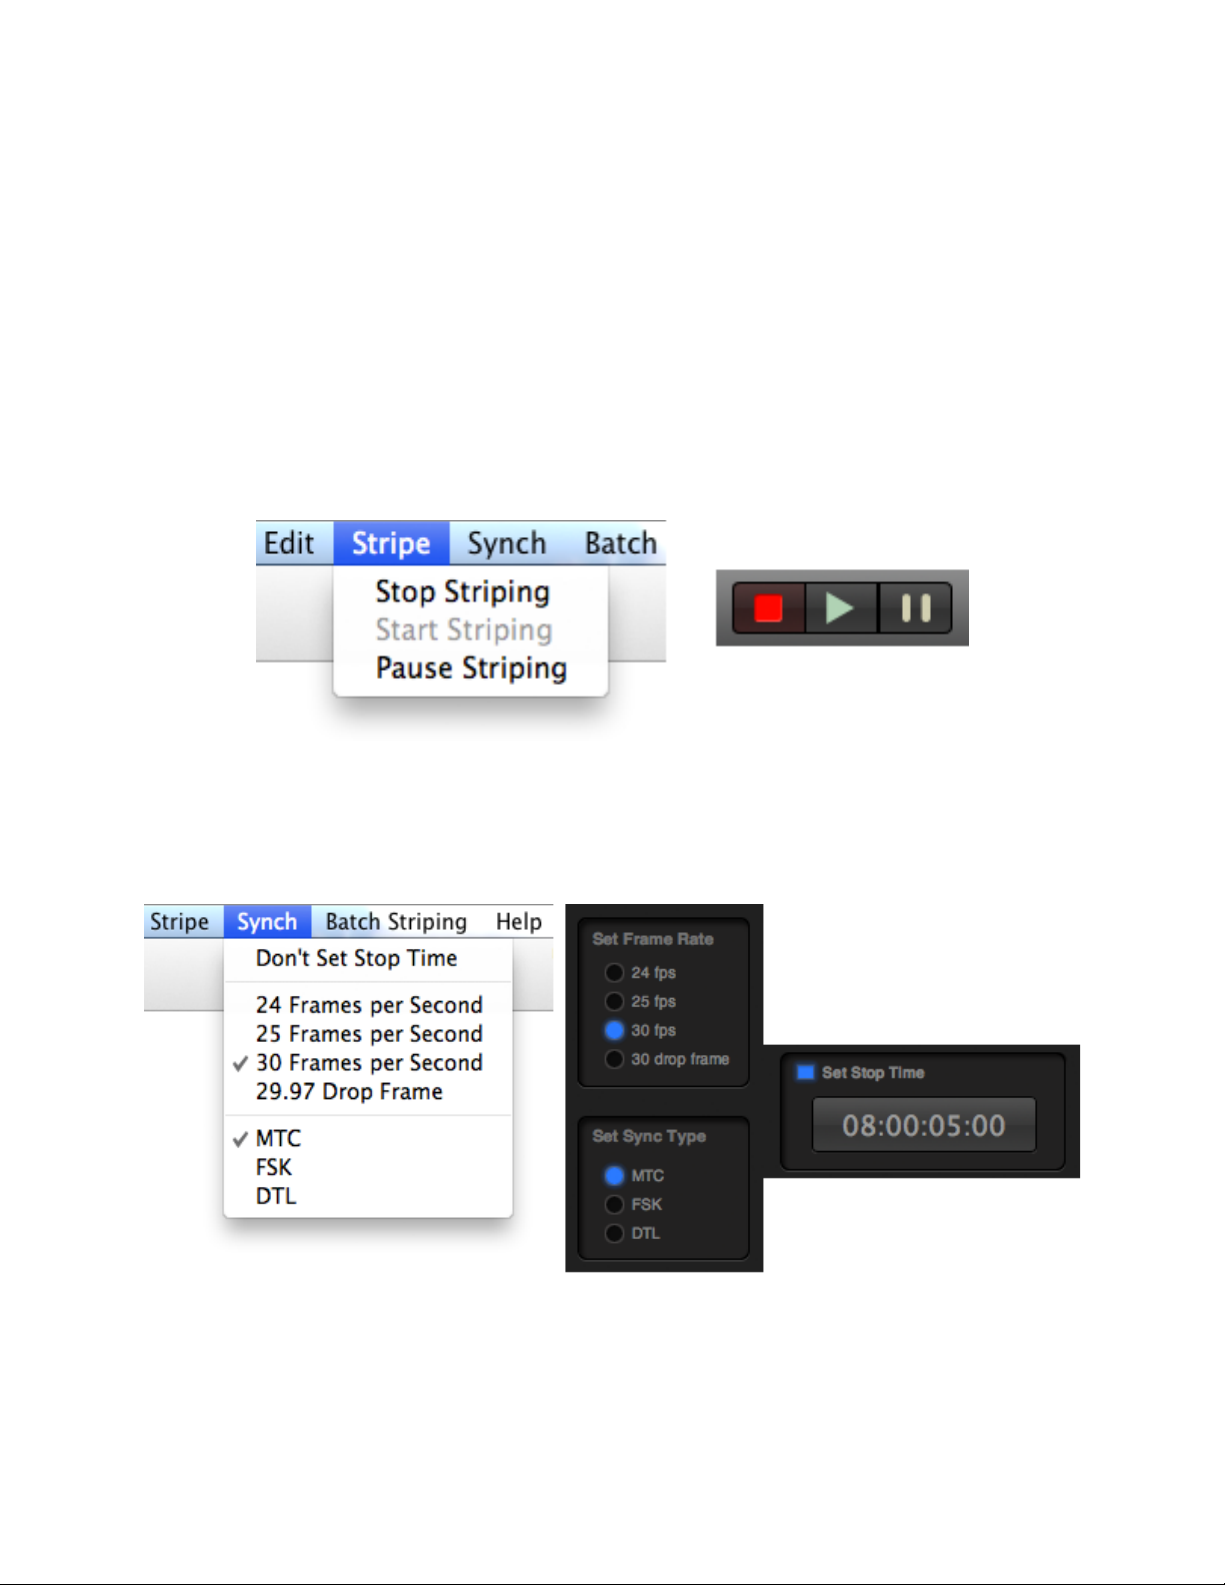
Stripe Menu
The items in the Stripe menu match the Striping Controls- Stop Striping, Start Striping and
Pause Striping. Choosing one of these commands has the exact same effect as clicking on one
of the Striping Controls.
Synch Menu
The items in the Synch menu correspond to the Frame Rate, Synch Type and Set Stop Time
controls in the main user interface. Choosing one of these commands has the exact same effect
as clicking on one of those controls.
! PPS-2 Remote for Mac OS X™
! 16
Page 19
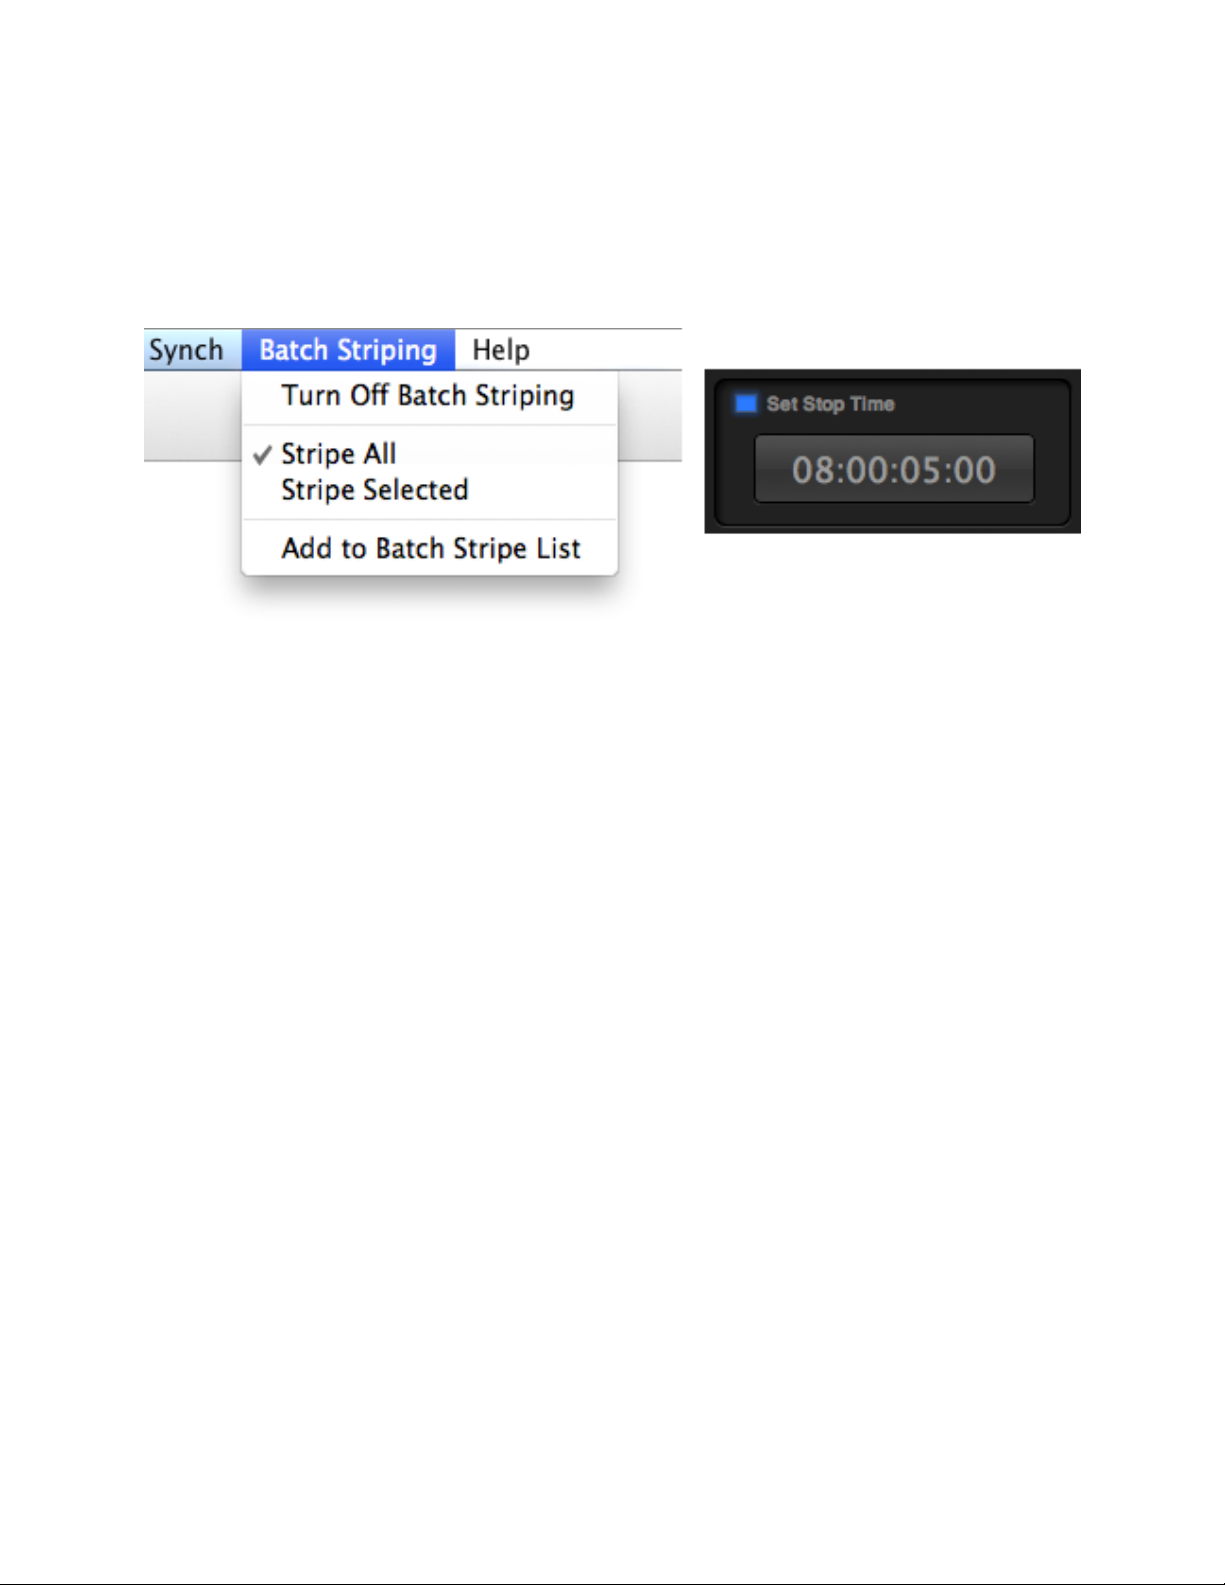
Batch Striping Menu
The items in the Batch Striping menu correspond to the Batch Striping Controls in the main user
interface. Choosing one of these commands has the exact same effect as clicking on one of
those controls. Add to Batch Stripe List duplicates the functionality of the Add to Batch
Stripe List button (“+”).
! PPS-2 Remote for Mac OS X™
! 17
 Loading...