

Page 1
MCS5
USB Media Control Station
User Manual
Page 2

MCS5 User Manual
MCS5 User Manual
Part Number 932458
May 8, 2014
©2014 JLCooper Electronics
142 Arena St, El Segundo, CA, 90245, USA
Phone: +1 (310) 322-9990 Fax: +1 (310) 335-0110
web: www.jlcooper.com email: info@jlcooper.com
MCS5 is a trademark of JLCooper Electronics.
All other brand names are property of their respective owners.
2
Page 3

MCS5 User Manual
Table of Contents
.............................................................................................................Installation! 5
.......................................................................................................System Setup! 8
Mac OS X 10.9 (Mavericks)
Mac OS X 10.7 (Lion) and 10.8 (Mountain Lion)
...........................................................Introduction to the MCS5 USB Hardware! 11
............................................................Introduction to the MCS5 USB Software! 12
Keysets
...................................................................................................Editing Keysets! 13
......................................................................................................Bank Buttons! 14
........................................................................................The Inspector Window! 15
.........................................................................................................Action Tabs! 17
Keystrokes Tab
Mouse Tab
MIDI Tab
Emulation Tab
Special Tab
Built In Actions Tab
.......................................................................................................LCD Display! 38
Display Button Labels Tab
Built In Tab
Display Text Tab
Display MIDI Tab
Display Emulation Tab
..................................................................................Keyset Summary Window! 44
......................................................................................Final Cut Pro™ Support! 45
Final Cut Pro™ and Control Surfaces
Using the MCS5 with Final Cut Pro
The MCS5 Final Cut Pro Keyset
..................................................................................Final Cut Pro X™ Support! 46
The Final Cut Pro X Keyset
............................................................................Adobe Premier Pro™ Support! 47
The Adobe Premier Pro Keyset
....................................................................Avid Media Composer 6™ Support! 48
The Media Composer 6 Keyset
..................................................................................Soundtrack Pro™ Support! 49
The Soundtrack Pro Keyset
.............................................................Logic Pro™ and Logic Pro X™ Support! 50
The Logic Pro Keyset
3
Page 4

MCS5 User Manual
..............................................................................................Nuendo™ Support! 52
The Nuendo Keyset
.........................................................................................................Uninstalling! 53
................................................................................JLCooper Limited Warranty! 55
4
Page 5
MCS5 User Manual
Installation
Connect the MCS5 to a USB port on your Mac, or to a powered USB hub connected to your Mac.
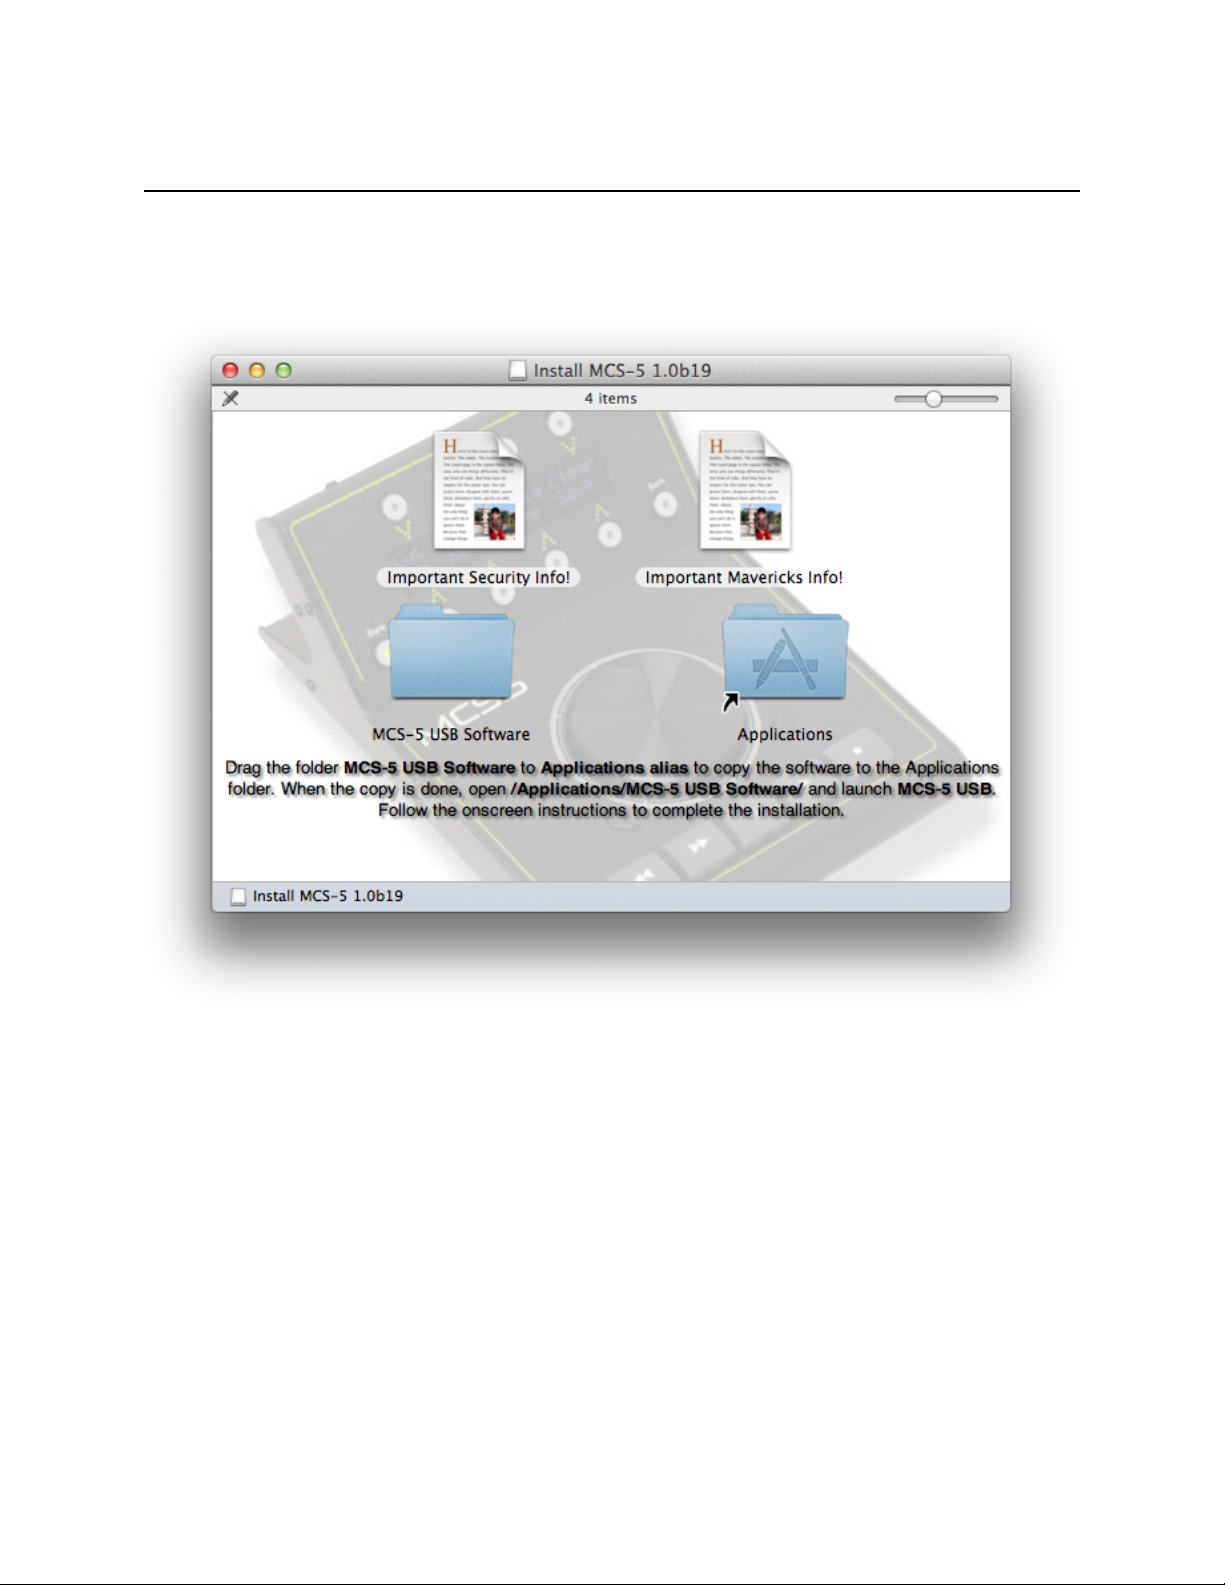
After downloading and double-clicking the Install_MCS5_USB.dmg file, you should see the following
window:
Drag the icon labeled MCS5 USB Software over the icon labeled Applications alias then release the
mouse. This will cause the Finder to copy the MCS5 software to your Applications folder.
5
Page 6
MCS5 User Manual
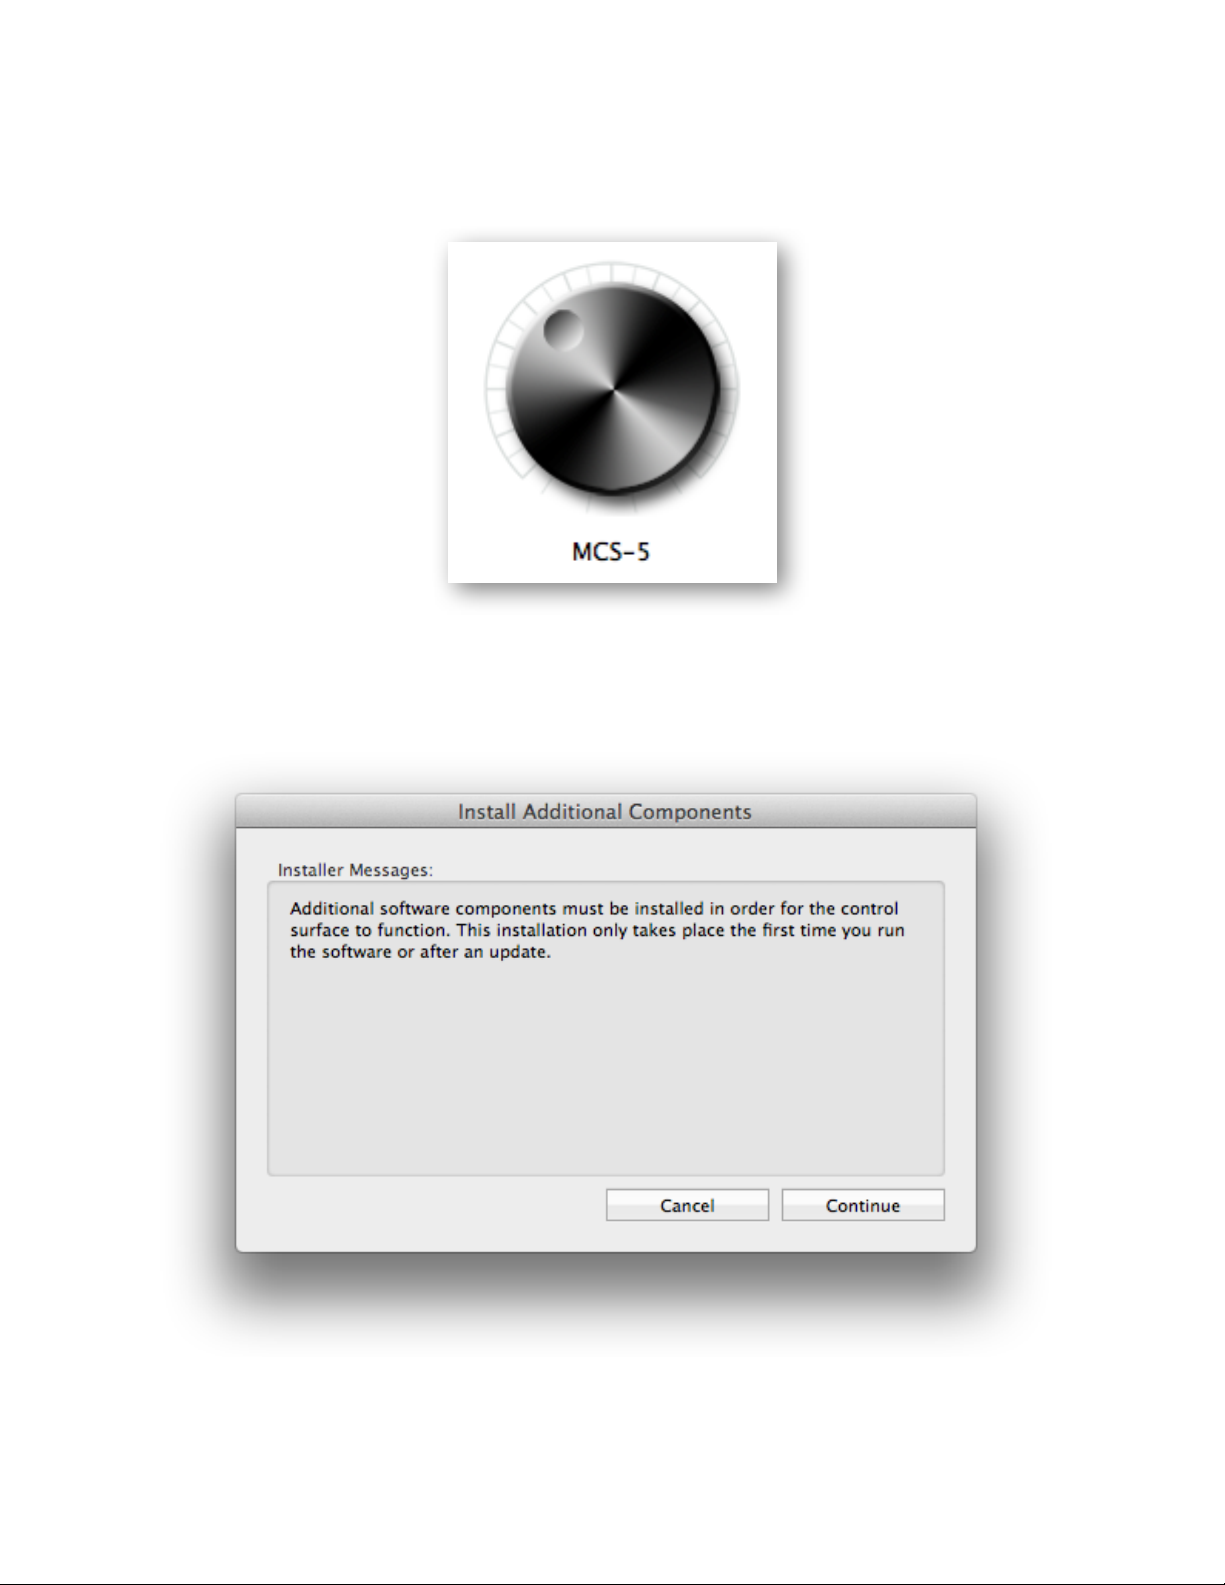
Once the copy is complete, open the /Applications/MCS5 USB Software/ folder and double-click
on the MCS5 USB application.
If this is the first time you are installing this software, or if you are installing a newer version, an installation
dialog will appear. Click on Continue to finish the installation, or Cancel if you want to finish it the next
time you run the MCS5 USB application. The installation must be completed before the MCS5 software
will be fully functional.
6
Page 7
MCS5 User Manual
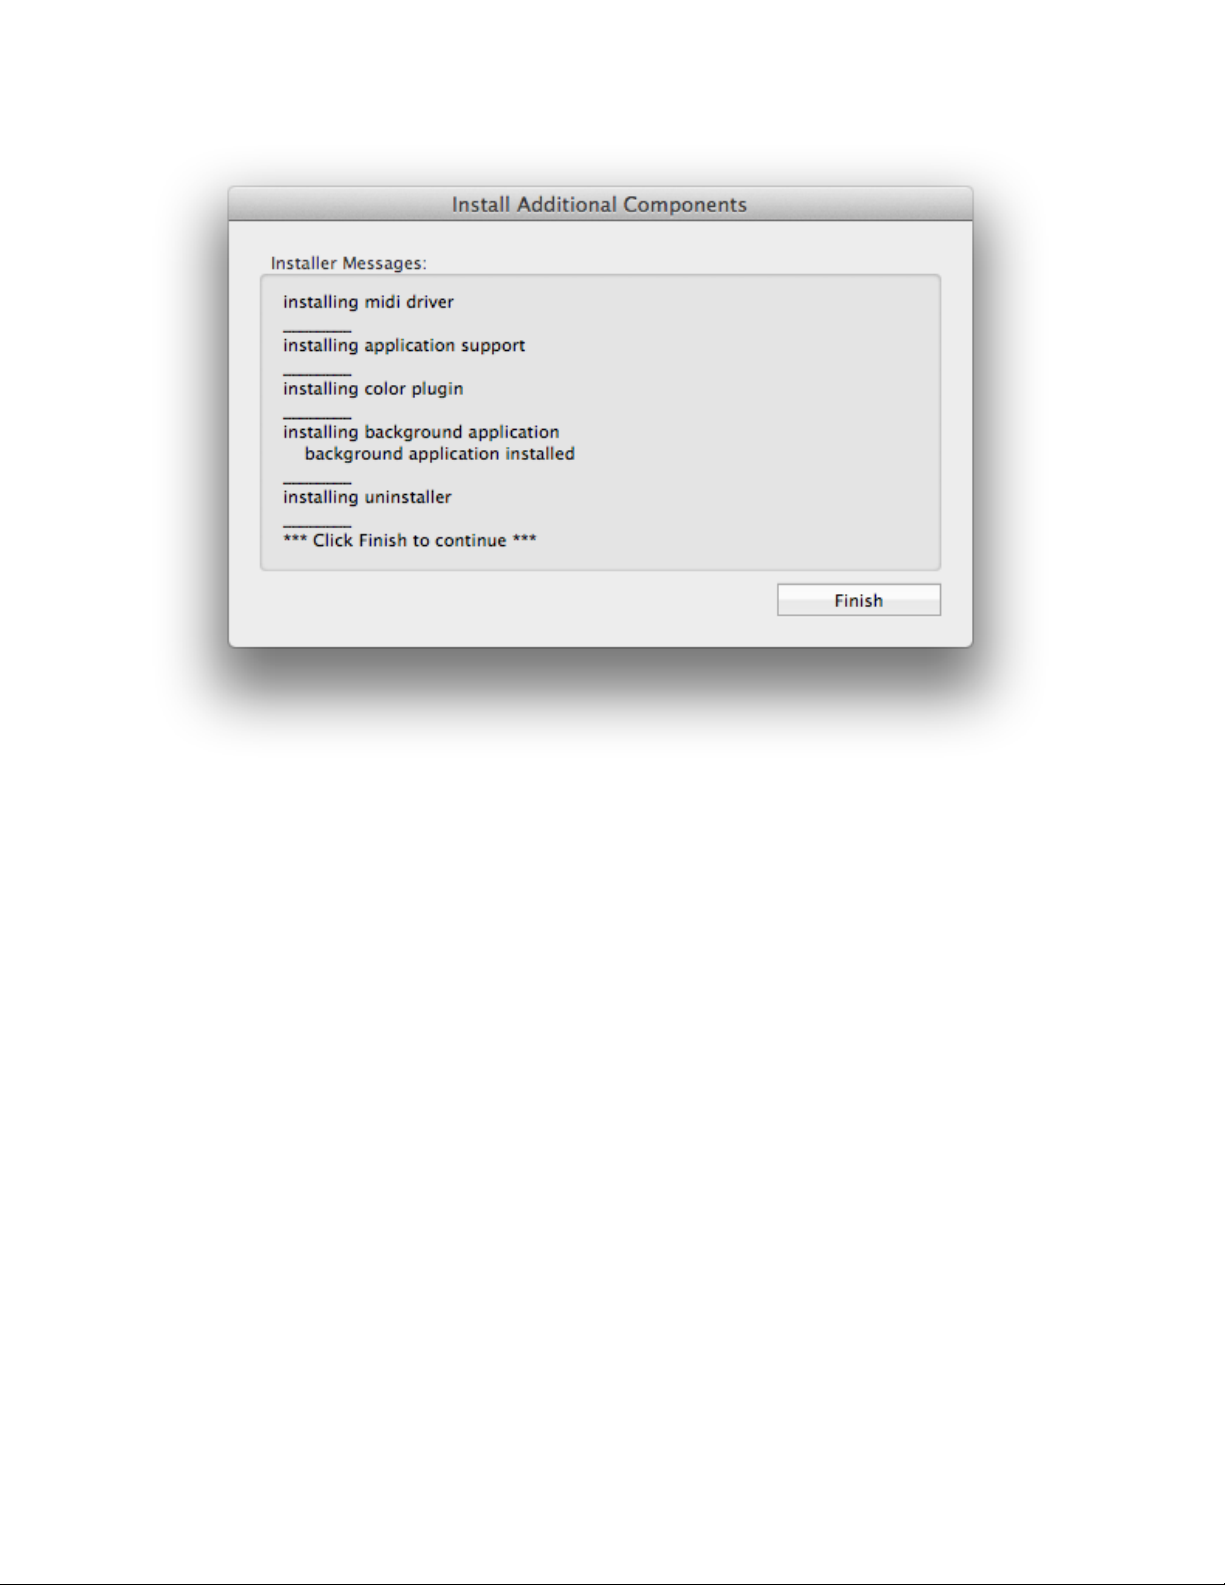
Once all the software components have been installed, click on the Finish button.
At this point a connection will be established between the MCS5 software and the MCS5 hardware, and
you can start working with the software.
7
Page 8
MCS5 User Manual
System Setup
The MCS5 software relies on Apple’s Universal Access to perform mouse emulation. In order for the
MCS5 software to work correctly, certain Universal Access settings must be enabled. This is
accomplished in different ways depending on which version of Mac OS X you are running.
Mac OS X 10.9 (Mavericks)
You don’t actually need to change any Accessibility settings before starting to use the MCS5 software.
In fact, you can’t change them before using the software. Just start using the software and Mavericks will
let you make the changes the first the time they are needed. Following is a description of how this will
happen.
Previous versions of Mac OS X had a setting called Enable access for assistive devices which was
found in the Universal Access pane in System Preferences. This setting has been moved and
renamed. It also has to be set for every application that makes use of Universal Access features.
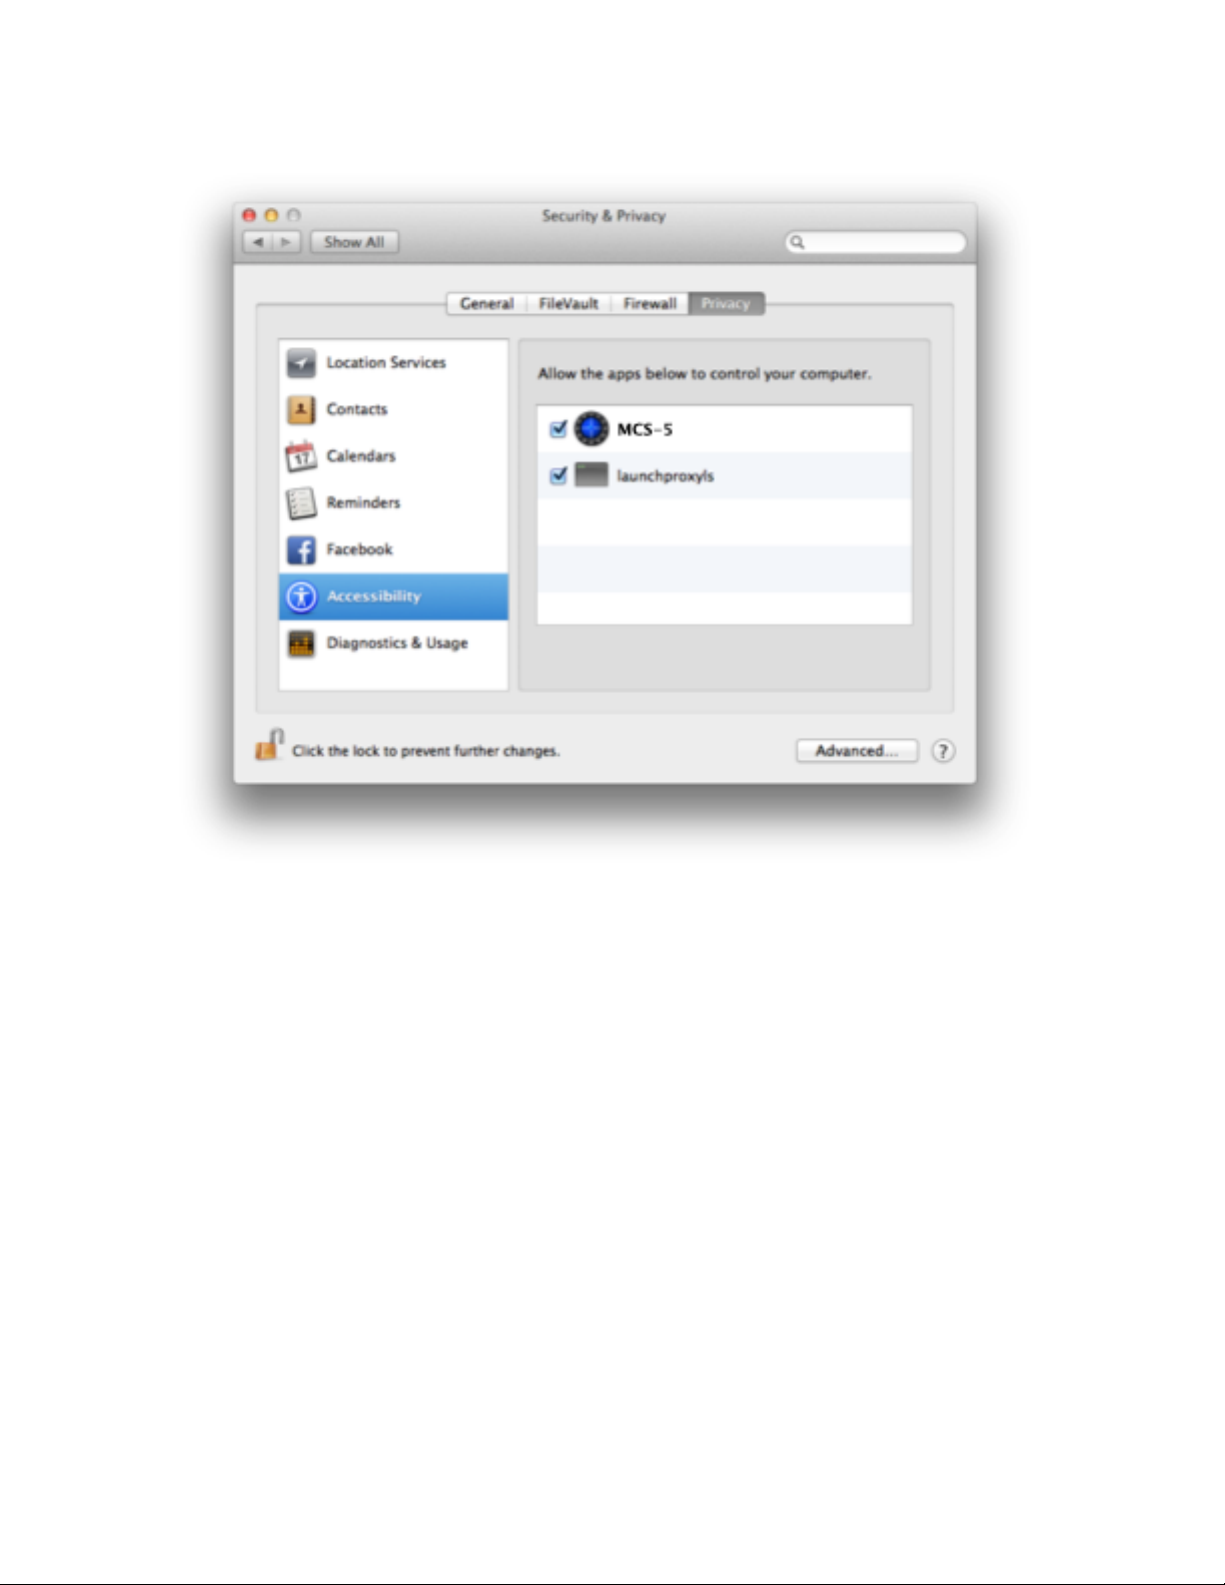
This setting is now found in the Security & Privacy pane in System Preferences under the Privacy tab.
When you click on Accessibility in the left-hand column, the applications that are allowed to use the
Accessibility features will appear in a list on the right.
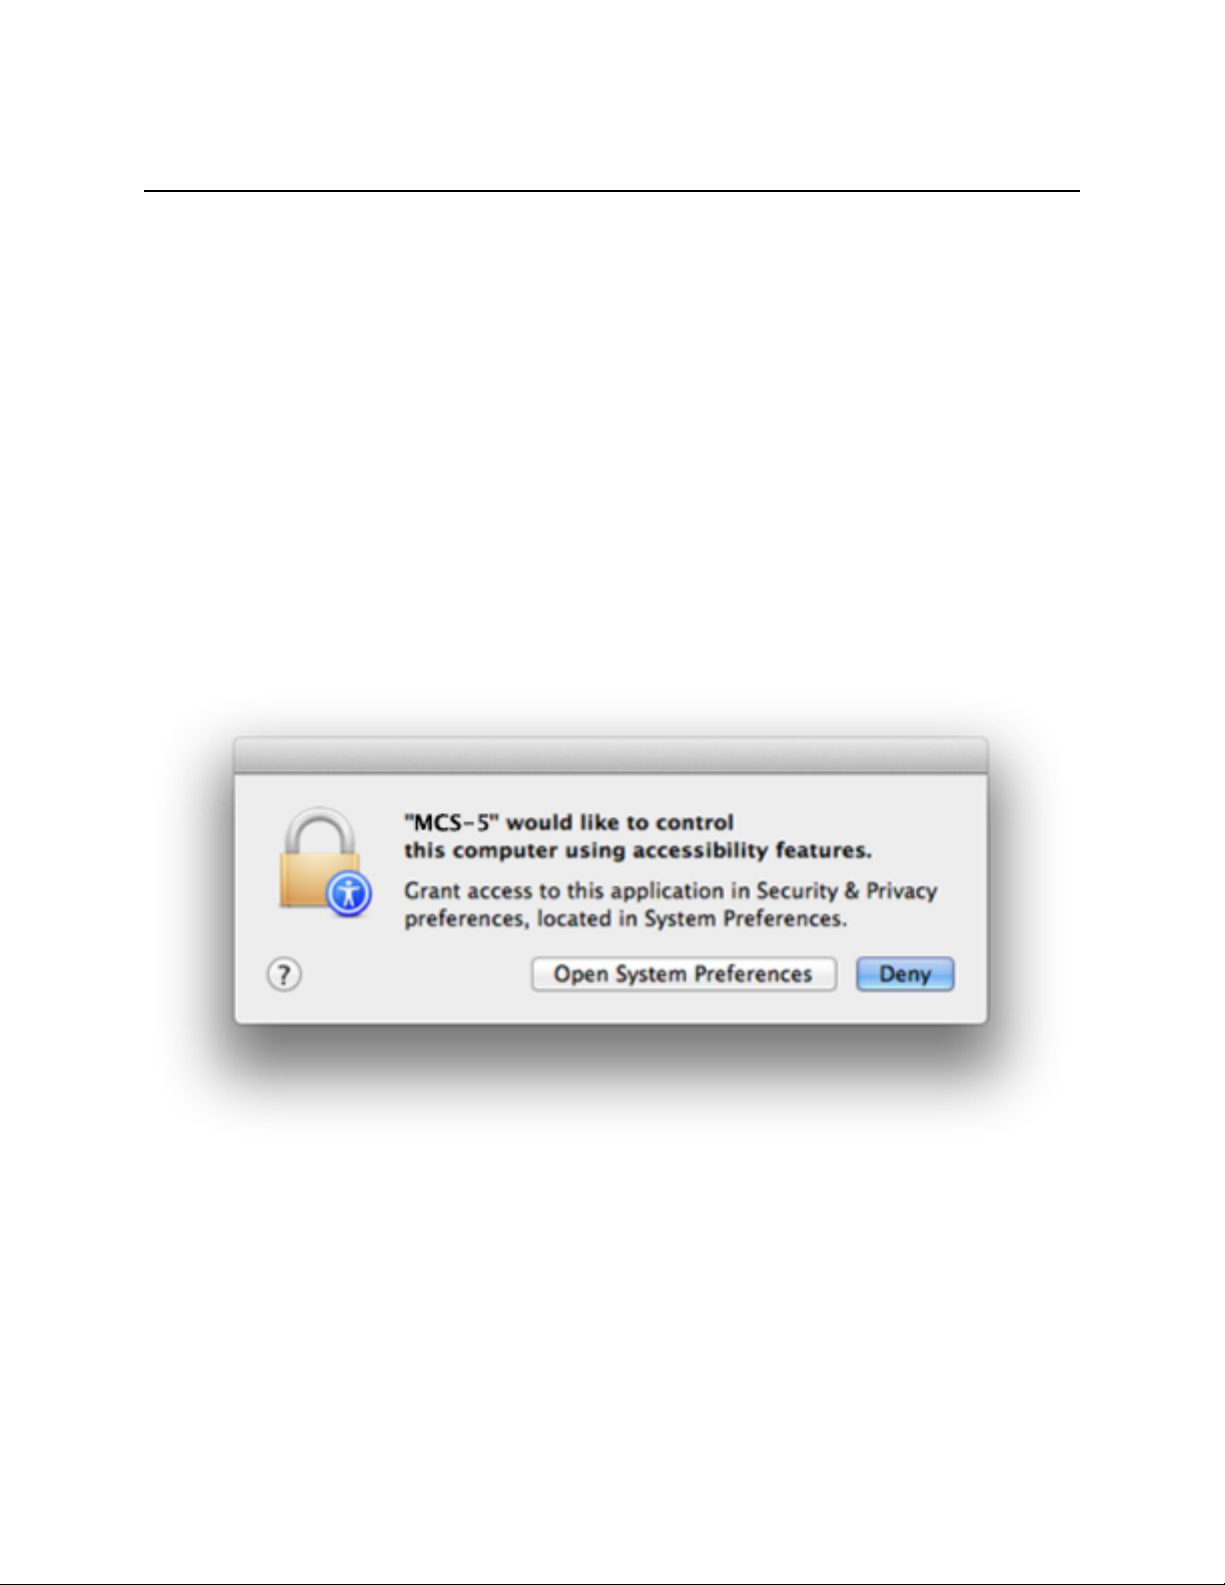
Initially, the list will probably be empty. An application is only added to the list if it tries to use an
Accessibility feature. When that happens the OS will display a dialog box similar to the one below.
Click on Open System Preferences. System Preferences will open to the Security & Privacy pane and
Privacy tab with Accessibility selected. The application will appear in the list on the right. Make sure the
checkbox next to the application’s name is checked.
There are two applications that need to appear in this list in order for the MCS5 software to function
correctly. The first is the MCS5 application. The “MCS5 would like to control this computer...” dialog
should appear right after you click the Finish button. Then you will be able to add the application to the
list.
8
Page 9
MCS5 User Manual
The other is MCS5USBBackground. It will actually appear in the list as launchproxyls. It will be added to
the list the first time the MCS5 software tries to perform a mouse action or certain Built in Commands.
9
Page 10
MCS5 User Manual
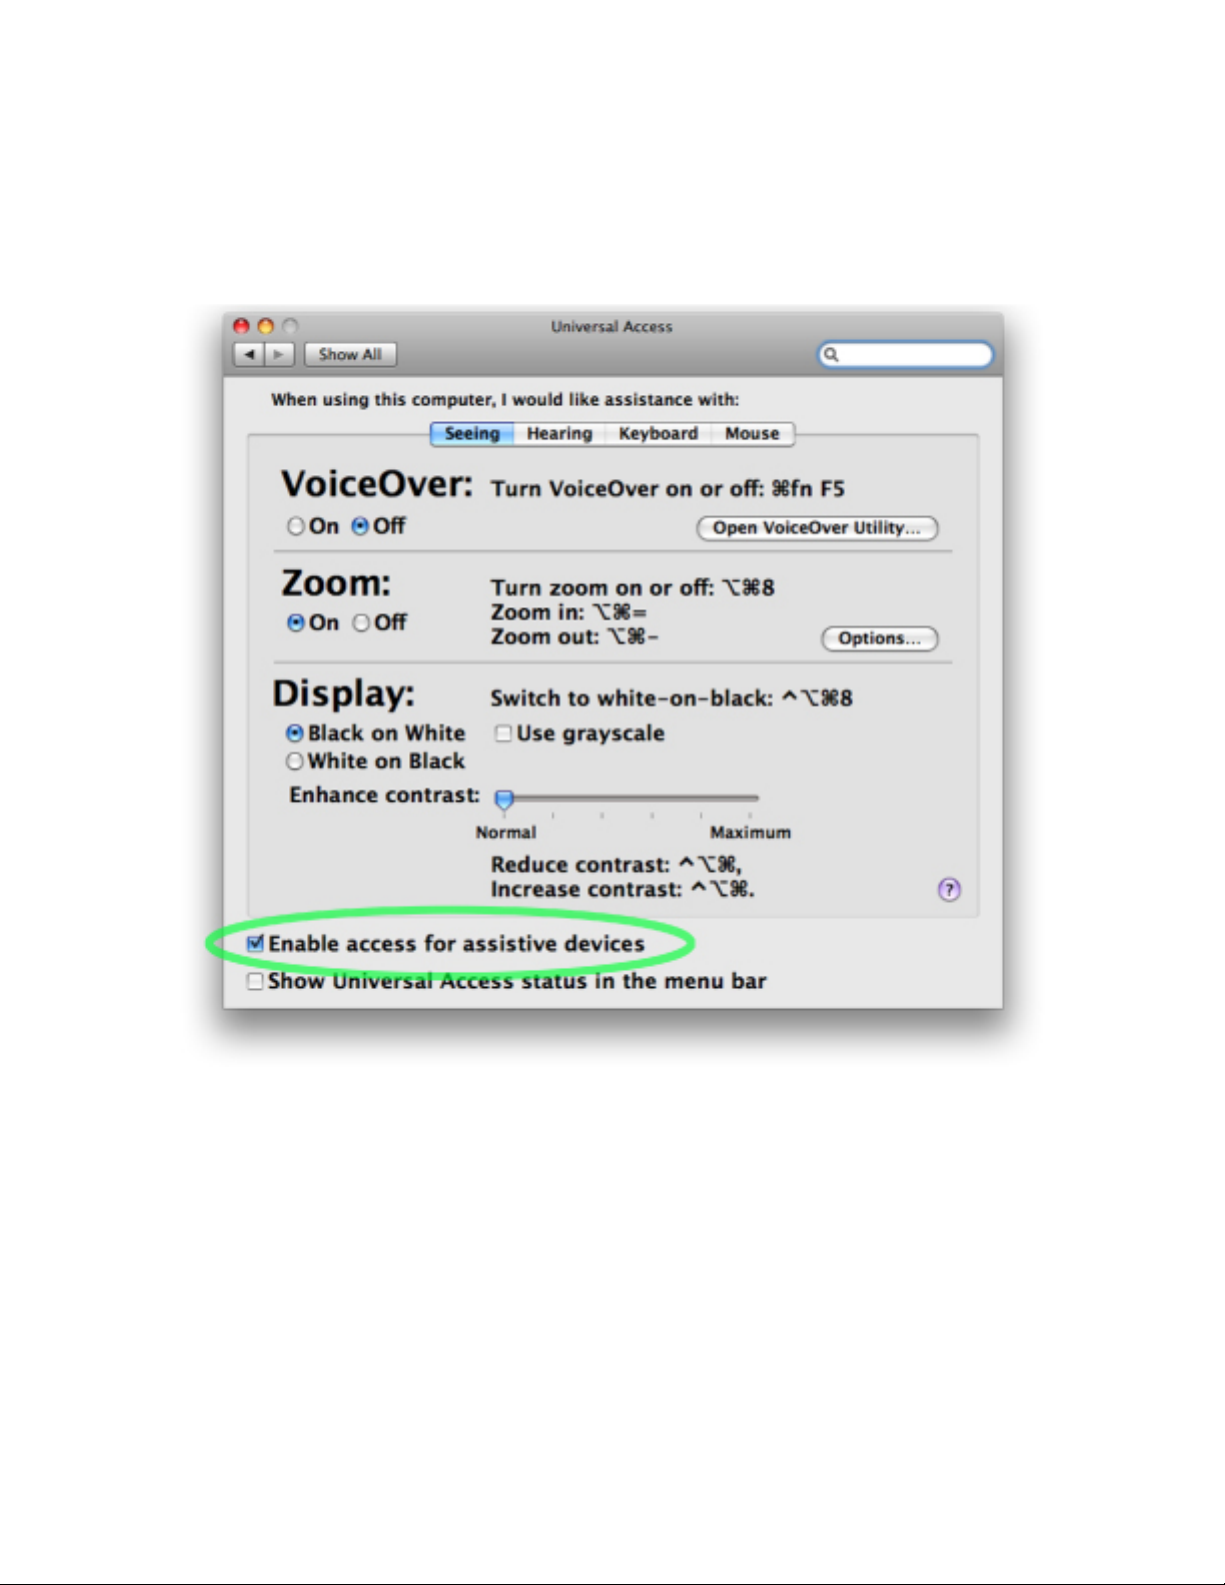
Mac OS X 10.7 (Lion) and 10.8 (Mountain Lion)
The MCS3 software relies on Apple’s Universal Access to perform mouse emulation. In order for the
MCS3 software to work correctly under Mac OS X 10.7 and 10.8, you must open System Preferences
and go to the Universal Access pane. Make sure “Enable access for assistive devices” is checked
then quit System Preferences.
10
Page 11

MCS5 User Manual
Introduction to the MCS5 USB Hardware
The MCS5 is designed to always communicate with a host application or device.
The MCS5 consists of 5 Transport buttons, a Jog wheel and 8 application defined buttons (App Buttons),
situated four above and four below a two line 23 character LCD screen.
There are actually two banks of App Buttons, Bank 1 (buttons A-1 to A-8) and Bank 2 (buttons B-1 to B-8).
The banks are switched by the Bank buttons on either side off the LCD display. Both buttons behave
identically. The first time either one is pressed, the MCS5 switches to Bank 2. When either one is pressed
a second time, the MCS5 returns to Bank 1. “Bank 1” or “Bank 2” briefly appears on the LCD whenever
banks are switched.
The App buttons can have labels assigned to them, and under normal operation, these labels are
displayed on the LCD screen. However, the host application can display arbitrary text on the screen
instead of labels.
11
Page 12

MCS5 User Manual
Introduction to the MCS5 USB Software
The MCS5 Software enables the MCS5 hardware’s ability to control various applications running on your
Macintosh™. It does this by communicating with applications via MIDI and other messaging protocols
built into the Mac OS. It can also simulate mouse clicking and dragging, keystrokes and can even
emulate other control surfaces if necessary.
Keysets
The MCS5 software uses “keysets” which are sets of various actions that are taken when MCS5 controls
are pressed or turned. Different keysets can be applied to different applications, and the MCS5 will
choose the correct keyset for whichever application is in the foreground. If no keyset has been created for
the current foreground application, the MCS5 will use a built in keyset called the “Default” keyset.
To create or edit MCS5 keysets, open the application, “MCS5”. To create a new keyset, choose New
Keyset in the File menu and navigate to the application that will use the new keyset. You can also use
Import Keyset from the File Menu to get an existing keyset. Keysets that ship with the MCS5 are located
at /Applications/MCS5 USB Software/keysets/. You only need to use New Keyset or Import
Keyset once for a given application. After that, keysets are stored with the MCS5 software’s preferences.
You can use Export Keyset from the File Menu to save a copy of a keyset so it can be transported to
another Mac or archived for safekeeping. You don’t need to use Export in your daily use of the MCS5. As
previously pointed out, your changes are added to the MCS5 software’s preferences file automatically.
There are several sample keysets included in this package, including ones for Final Cut Pro™, Final Cut
Pro X™ and Logic™ and Premier Pro™.
12
Page 13
MCS5 User Manual
Editing Keysets
The application presents a graphical representation of the MCS5 front panel. When you click on an onscreen control (or move a control on the MCS5 itself), that control is selected and information about it
appears in the floating Inspector window.
You can choose which keyset to edit within the MCS5 application using the Keysets menu. The menu
lists all keysets that you have created or imported. The name of the currently selected keyset will be
displayed at the bottom of the main window.
13
Page 14
MCS5 User Manual
Bank Buttons
The Bank Buttons can be used in two ways. Normally they are used to switch between the two banks of
App Buttons. However, some applications may do their own handling of bank switching, and need to
know when a Bank button has been pressed or released.
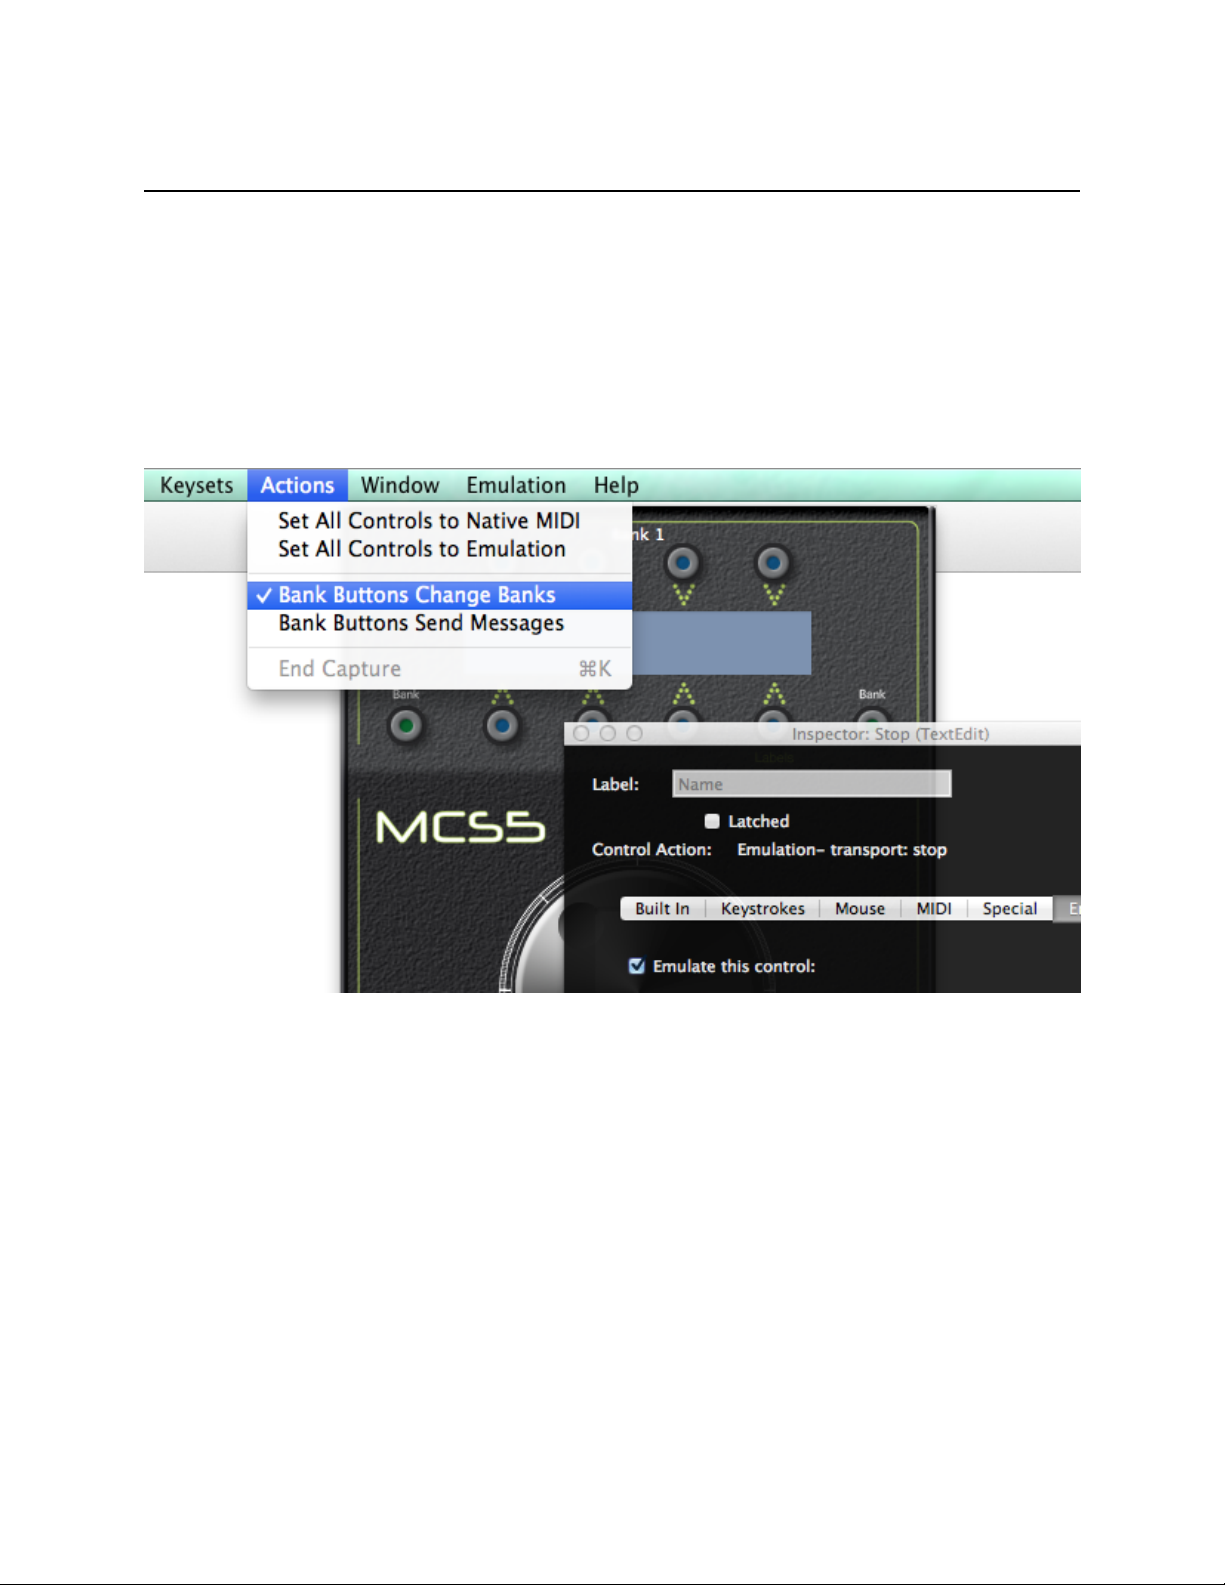
To handle these two situations, the Actions Menu has the commands Bank Buttons Change Banks
and Bank Buttons Send Messages. The default setting is Bank Buttons Change Banks. When it is
chosen, the MCS5 software handles bank switching.
If Bank Buttons Send Messages is selected, the Bank Buttons behave like any of the MCS5‘s other
buttons, and do not control bank switching. In this case, it is up to the third party application what
happens when these buttons are pressed.
This is a per-keyset setting. That is, it can be different in each application’s keyset.
14
Page 15
MCS5 User Manual
The Inspector Window
The Inspector window is where all your work takes place. It displays information about the currently
selected control and contains the facilities for editing that information.
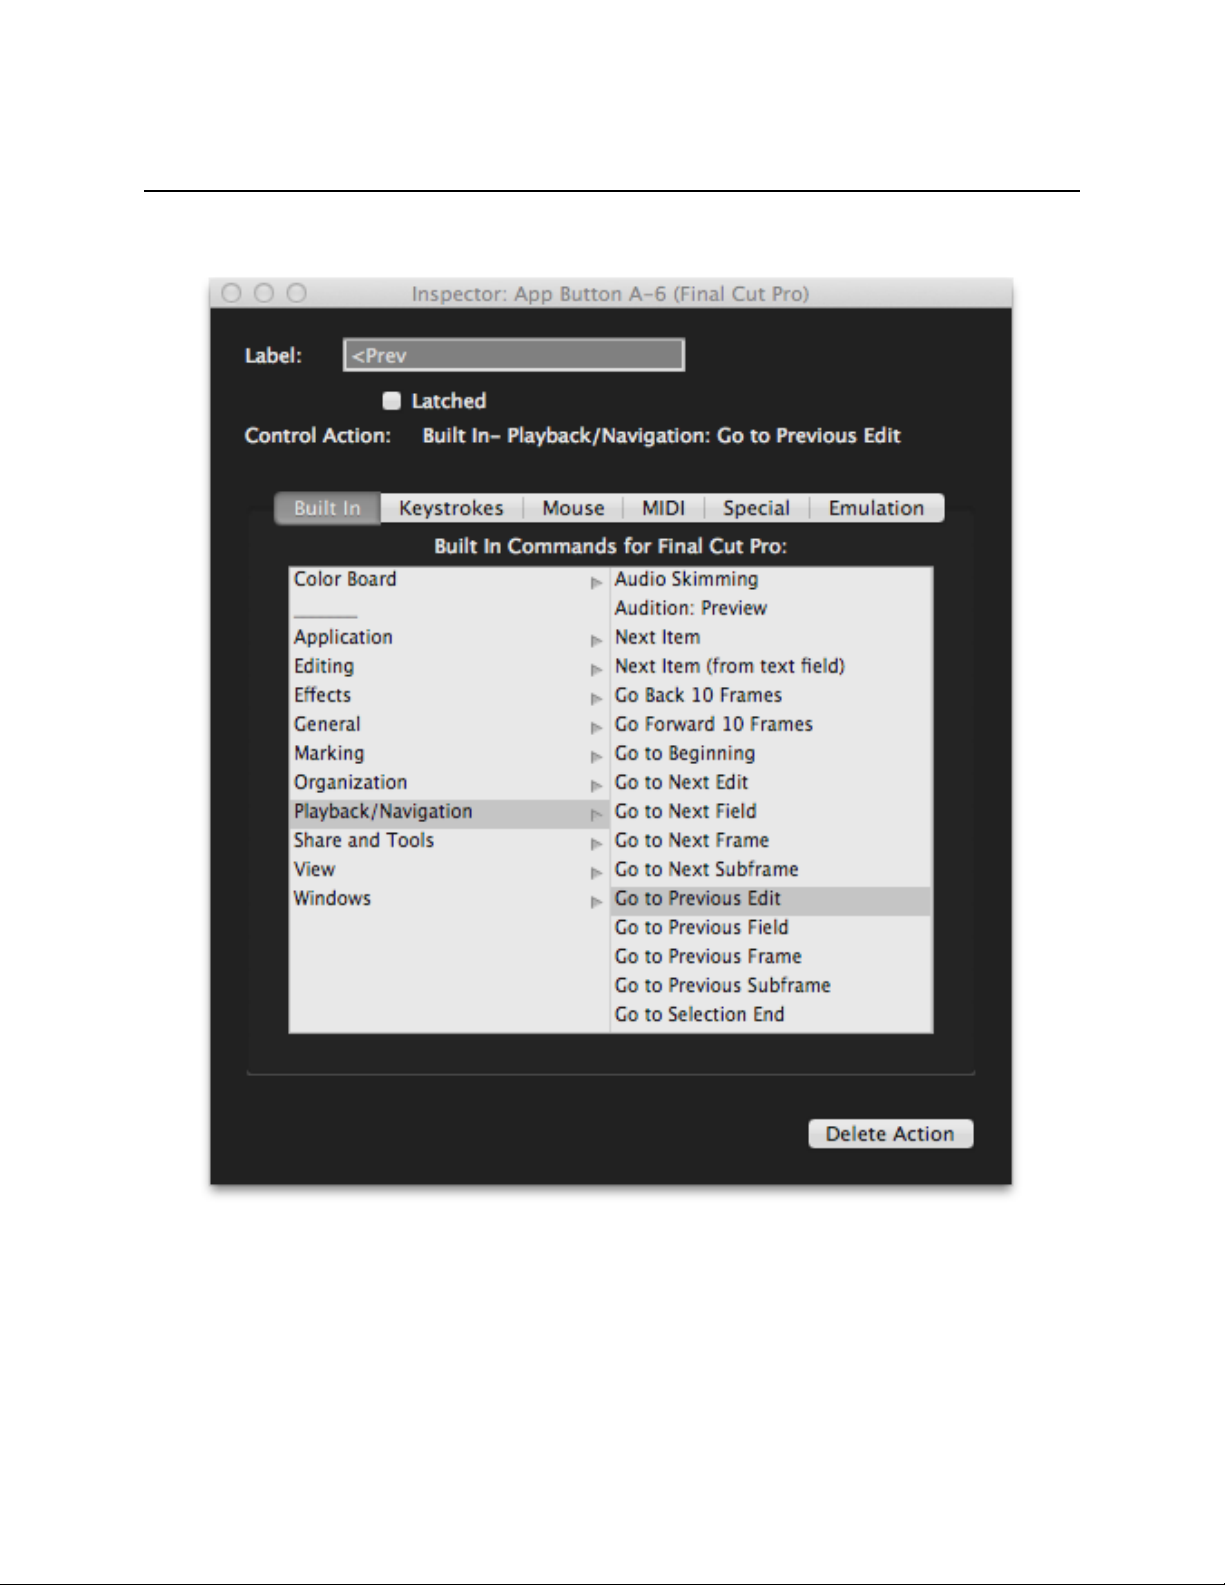
The Label text box allows you to give a control a descriptive name. In the example above, “App Button 6”
has been assigned the action that Go to Previous Edit in Final Cut Pro, and the button has been given
the label “<Prev”. The App Button labels are normally displayed on the LCD screen, which makes it easy
to remember what functions the buttons perform.
15
Page 16
MCS5 User Manual
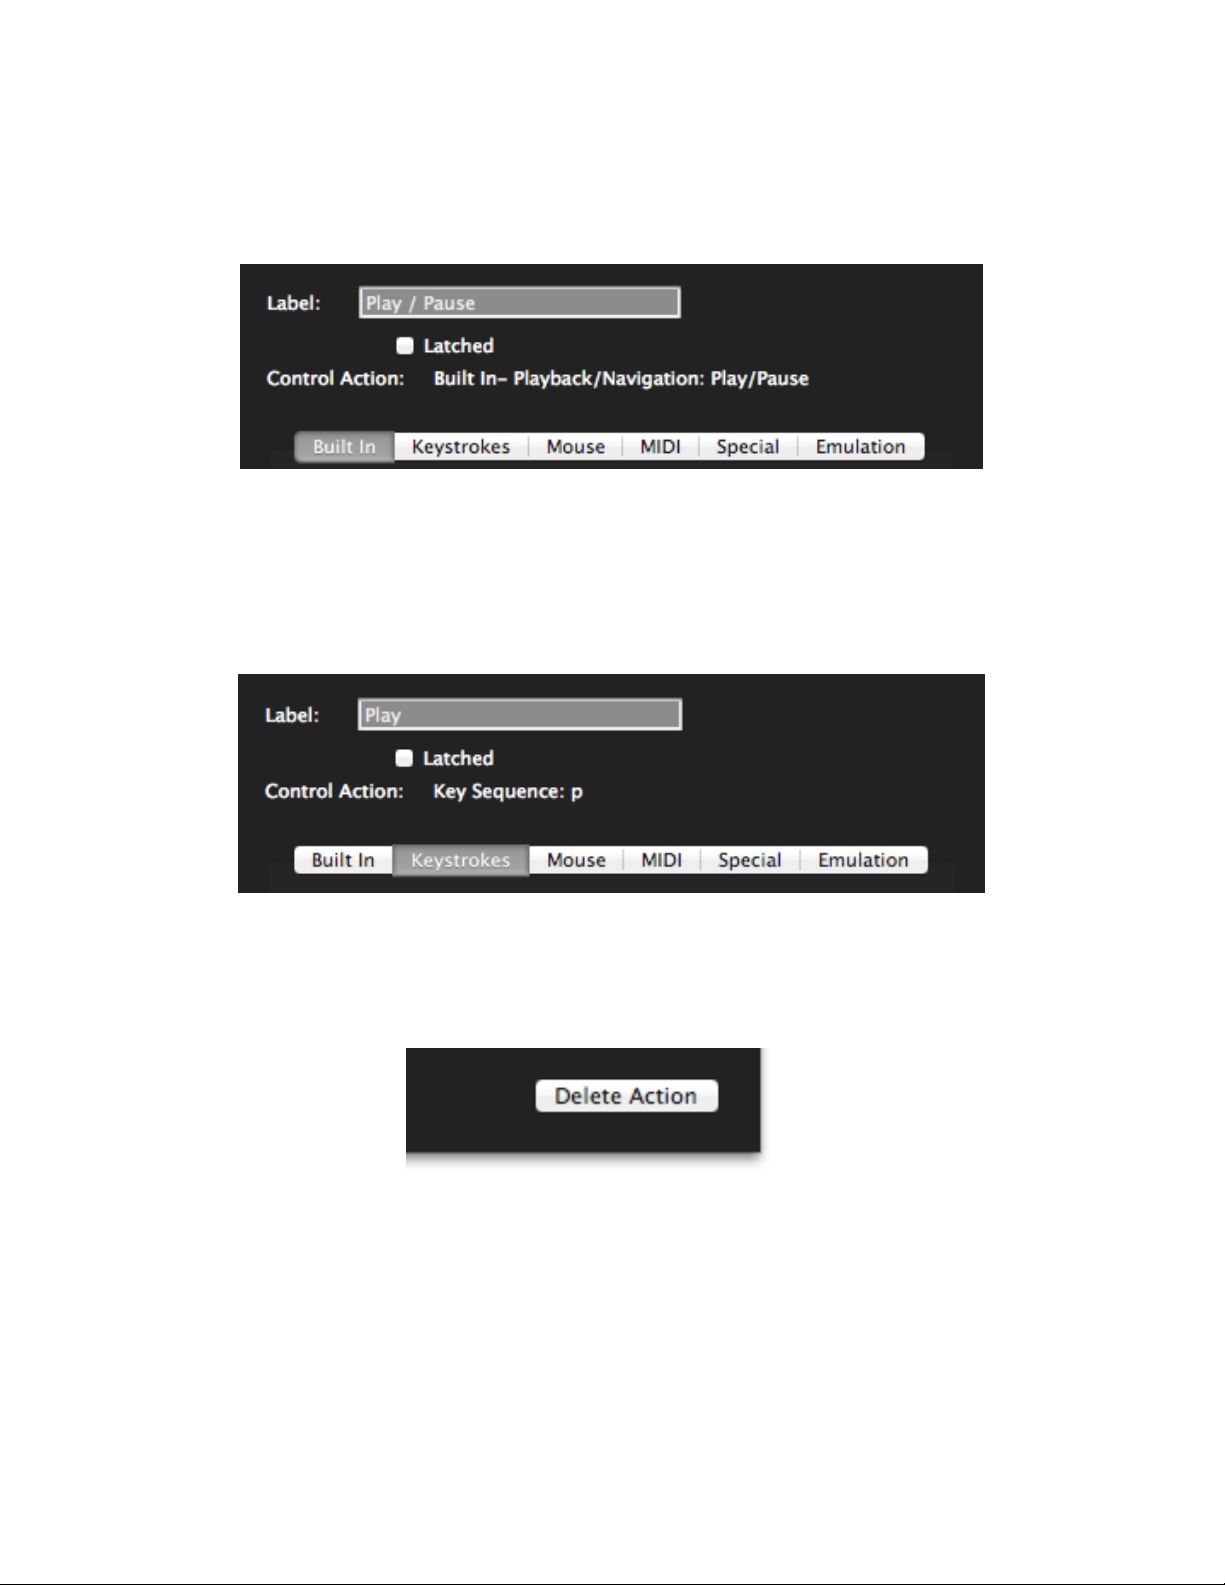
Immediately below the Label field are editing controls that vary depending on what kind of MCS5 control
is being edited. If the control is a button, you will see a “Latched” checkbox that lets you choose between
a momentary (pressing the button turns it “on”, releasing it turns it “off”) or latched (pressing and releasing
it turns it “on” and pressing and releasing it a second time turns it “off”) behavior.
If the selected control is the Jog Wheel, the Latched checkbox will not appear.
Next is a description of the action that is to take place when the selected MCS5 control is pressed or
turned while the target application is active. Below that is the area where this action can be edited. There
are a series of tabs representing the different kinds of actions that can be performed and clicking on one
of these tabs will display controls for editing its kind of action. The available actions are Built In,
Keystrokes, Mouse, MIDI, Special and Emulation.
Any changes made in one of these tabs are immediately applied to the selected control. The MCS5
software allows multiple levels of Undo, so you can easily get back to any starting point.
At the bottom of the Inspector window is the Delete Action button. When pressed it will delete the action
currently assigned to the selected control. This is also undoable.
16
Page 17
MCS5 User Manual
Action Tabs
Keystrokes Tab
The MCS5 controls can be assigned to send a sequence of keystrokes to an application just as if they
were typed on the Mac keyboard. These assignments are set up in the Keystrokes Tab.
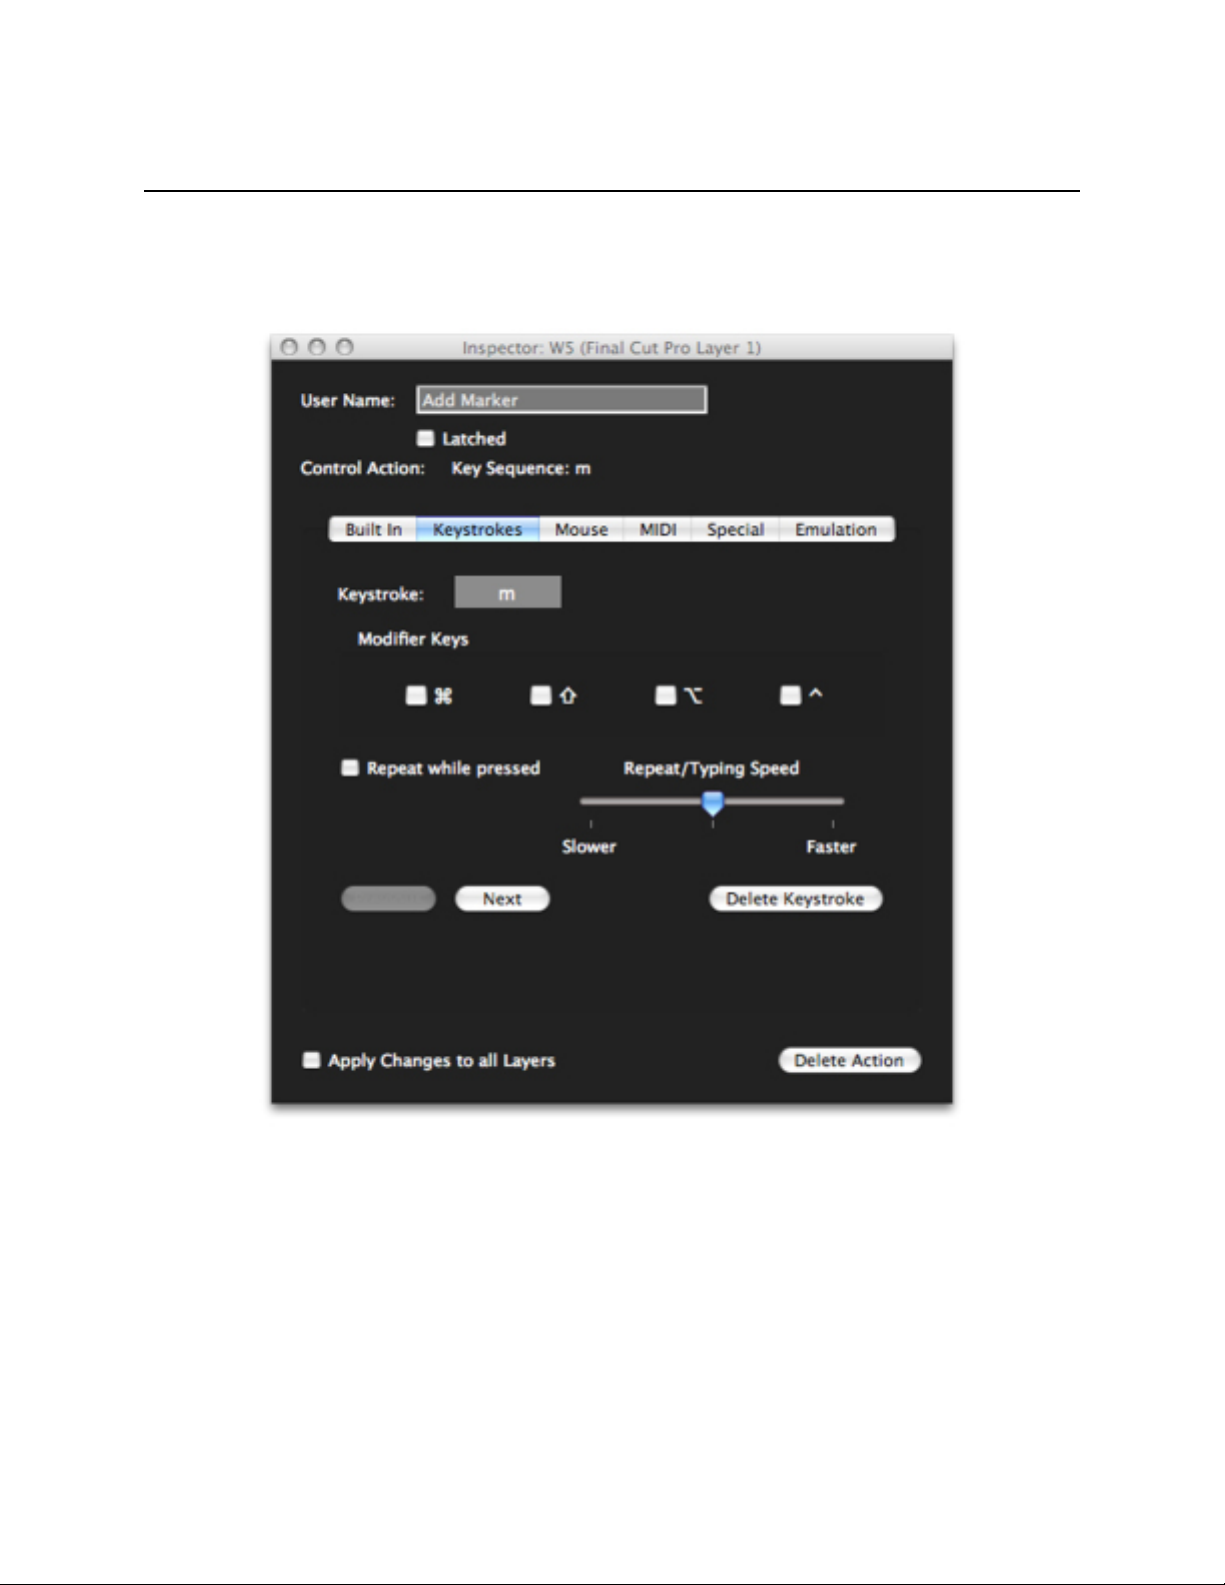
Select a control to edit, place the cursor in the Keystroke field and type a key. If you hold down any
modifier keys (command, shift, option or control) while typing this key, the modifier checkboxes will be set
up accordingly. You can also manually change the modifier checkboxes by clicking on them.
17
Page 18

MCS5 User Manual
Some key/modifier combinations may be intercepted by the operating system before they reach the
Inspector window. If this happens, just type the key without any modifiers, then click on the appropriate
checkboxes to add the desired modifiers.
To add more keystrokes to the sequence, click on the Next button and repeat the above procedure. You
can move forwards or backwards in the sequence with the Next and Previous buttons. The Delete
Keystroke button will remove the currently displayed keystroke from the sequence.
If Repeat while pressed is checked, the keystroke (or sequence) will repeat as long as the MCS5 control
is held down. The speed of the repeat is controlled by the Repeat/Typing Speed slider. This slider also
determines how much time there is between keystrokes if the sequence is more than one keystroke.
If the key sequence in the example below was assigned to the W5 button, pressing W5 would be the
equivalent of typing the word “mark”.
18
Page 19

MCS5 User Manual
The Keystrokes tab will look different if the Jog Wheel is selected. For the Jog Wheel, different key
sequences can be assigned to each direction. Click on the Counter Clockwise or Clockwise radio
button to choose which direction’s sequence to edit.
In the example below, a counter clockwise turn would send a “-” and a clockwise turn would send a “+”.
19
Page 20

MCS5 User Manual
Mouse Tab
The controls on the MCS5 can be made to emulate the Macintosh mouse. Buttons can perform clicks and
the Jog Wheel can perform horizontal and vertical moves and drags.
20
Page 21

MCS5 User Manual
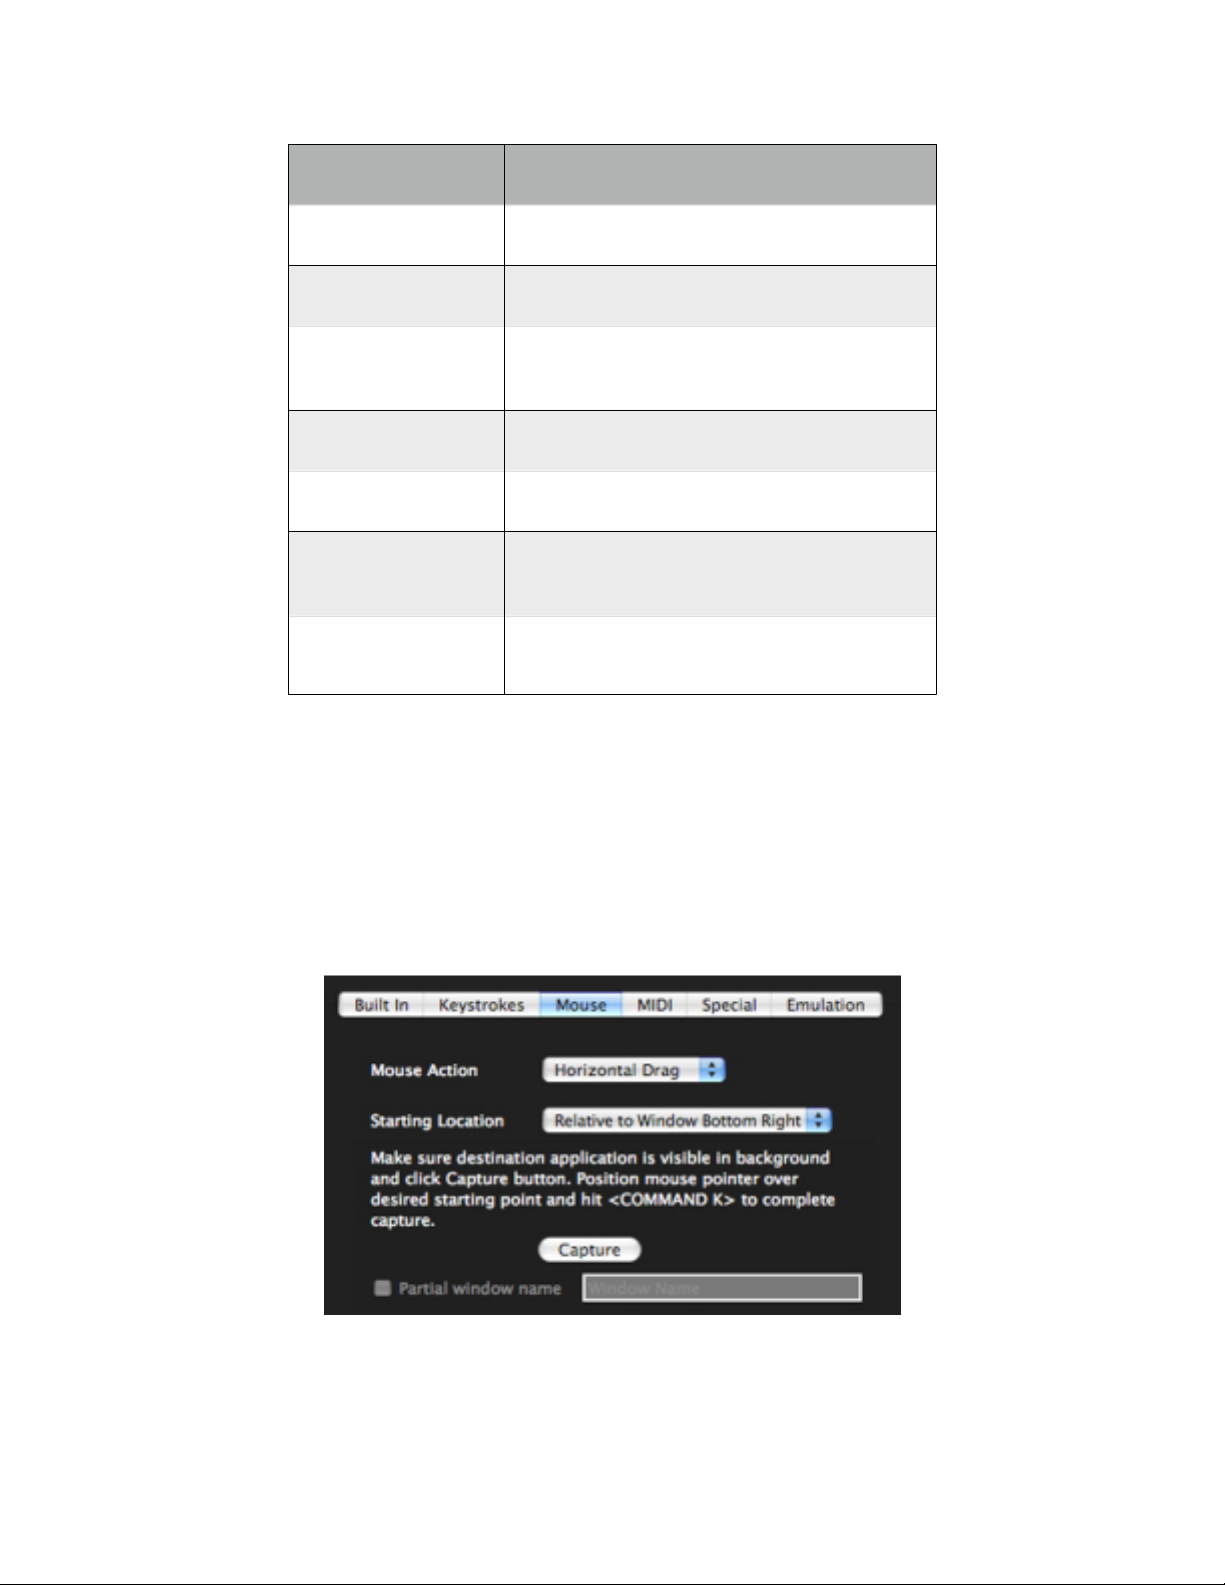
The Mouse Action popup lists the actions available for the selected control. For example, if the Jog
Wheel is selected the popup would look like this:
The Starting Location popup lets you choose where the click, move or drag will originate.
If you choose Don’t Capture, the mouse action will always begin at the current location of the Mouse
pointer. If you choose any other option, you will be prompted to pick a coordinate in one of the target
application’s windows. The options in this menu determine how the MCS5 will find that coordinate in the
event that the destination window has been resized or moved.
21
Page 22
Option
When Destination Window is Resized or
Moved
Relative to Window
Top Left
The start point will stay the same distance from the
top left corner of the window.
Relative to Window
Top Righ t
The start point will stay the same distance from the
top right corner of the window.
Relative to Window
Top Percentage of
Width
The start point will stay the same distance from the
top of the window, but it’s horizontal position will be
a percentage of the window’s width..
Relative to Window
Bottom Left
The start point will stay the same distance from the
bottom left corner of the window.
Relative to Window
Bottom Right
The start point will stay the same distance from the
bottom right corner of the window.
Relative to Window
Bottom Percentage
of Width
The start point will stay the same distance from the
bottom of the window, but it’s horizontal position will
be a percentage of the window’s width..
Relative to Screen
Top Left
The start point will stay the same distance from the
top left corner of the screen, no matter what the size
or position of the window.
MCS5 User Manual
For example, let’s say that a particular application has an onscreen jog control in the lower right hand
corner of it’s Timeline window, and the center of that control is 100 pixels from the right of the window and
20 pixels from the bottom of the window. When the window is resized, the control stays at 100 pixels from
the right and 20 pixels from the bottom of the window.
Suppose the only way to access this program’s jog function is by dragging this control left or right. You
could program the MCS5 Jog Wheel to do a horizontal drag starting at 100, 20 Relative to Window
Bottom Right.
Once you have chosen from the Starting Location popup, you will be prompted to actually pick the
starting point.
22
Page 23

MCS5 User Manual
Make Sure the target application is open in the background, and that the destination window is visible. Hit
the Capture button then position the mouse pointer over the desired starting point and type
<COMMAND + K>.
23
Page 24

MCS5 User Manual
The Inspector window will be updated to show the window name and coordinates where the click, drag
or move should take place.
From now on, whenever you are in the target application and use the assigned control, it will move the
destination window to the front, then click, move or drag at the selected location.
Once a window name and mouse location has been captured, you have the option of using a partial
window name. This is useful in applications like Final Cut Pro, where the Viewer Window’s title always
starts with the word "Viewer" but the rest of the window title changes depending on what you're editing.
Normally, the MCS5 tries to find a window with the exact name as the window where the click was first
captured, but if the window name has changed, it will fail. You can choose the have the MCS5 just look
for a Final Cut window with the word “Viewer” in its title and it will always find the Viewer Window, even if
the exact name of the Viewer Window changed since the click was captured.
24
Page 25

MCS5 User Manual
To use the partial name feature, click on the Partial Window Name checkbox. In the text box on the right,
change the full window name to the partial name you want the MCS5 to use.
25
Page 26

Selection
Description
None
No MIDI message for the selected control. If some
other type of action has already been assigned, the
None button will be selected. Clicking on the None
button will delete the currently assigned action.
Native MIDI
Native MIDI actions send and respond to the MCS5
hardware’s built MIDI protocol. You would typically
use this setting with an application which directly
supports the MCS5 protocol. It could also be used
with an application that has a MIDI “Learn” feature.
For convenience, choosing Set all Controls to
Native MIDI in the Actions menu will assign Native
MIDI actions to all of the MCS5 controls on all banks
in the current keyset.
Custom MIDI
Custom MIDI actions send and respond to user
defined MIDI messages.
MCS5 User Manual
MIDI Tab
An MCS5 can be made to appear as a MIDI device to MIDI applications. Any MCS5 control can be
programmed to send and respond to a MIDI message.
There are three radio buttons for choosing the type of MIDI message to assign.
26
Page 27

Value
Definition
nn
Button number (see table below)
dd
7F for depression, 00 for release
Name
Number (in hex)
Rewind
00h
Fast Forward
01h
Stop
02h
Play
03h
Record
04h
Right Bank Button
05h
Left Bank Button
06h
Application Button #1
08h
Application Button #2
09h
Application Button #3
0Ah
Application Button #4
0Bh
Application Button #5
0Ch
Application Button #6
0Dh
Application Button #7
0Eh
Application Button #8
0Fh
Left Wheel Button
18h
Right Wheel Button
19h
MCS5 Button Numbering
MCS5 User Manual
Normal Button and Wheel Messages
When Native MIDI is chosen, the MCS5 software will send the following messages to the host application
when a control is pressed or moved. These values are shown in hexadecimal notation.
Buttons
80 nn dd
27
Page 28

Button LED Messages
Value
Definition
nn
Button LED number (see table below)
dd
7F for LED illuminated
00 for LED extinguished
Name
Number (in hex)
Record
04h
Right Bank Button
05h
Left Bank Button
06h
Application Button #1
08h
Application Button #2
09h
Application Button #3
0Ah
Application Button #4
0Bh
Application Button #5
0Ch
Application Button #6
0Dh
Application Button #7
0Eh
Application Button #8
0Fh
MCS5 LED Numbering
Value
Definition
vv
Relative change in wheel’s value since the last
message.
The range is:
Counterclockwise -64 (C0)
to
Clockwise +63 (2F)
MCS5 User Manual
80 nn dd
If the Bank Button Mode is set to Bank Button Changes Bank, then sending an LED message to the
Bank Button will change the LED and the bank.
Sending dd of 00h will select Bank 1. Sending dd of 7Fh will select Bank 2.
If the Bank Button Mode is Bank Button Sends Messages then sending an LED message to the Bank
Button will only change the state of the Bank Button’s LED.
Jog Wheel
81 00 vv
28
Page 29

Value
Definition
mm
7F for Bank Button Sends Message
00 for Bank Button Changes Bank
MCS5 User Manual
Special Messages
There are several Native MIDI messages that can be sent from the host application to the MCS5. These
messages can control button LEDs, the Bank, the display, and various operating modes.
Query Message
85 00 00
When this message is sent to the MCS5, the MCS5 will respond with the following:
Query Response
85 00 05
This message can be used to determine if an MCS5 is connected and functioning properly.
Bank Button Mode
81 00 mm
If the Bank Button Mode is set to Bank Button Changes Bank, then sending an LED message to the
Bank Button will change the LED and the bank.
Sending dd of 00h will select Bank 1. Sending dd of 7Fh will select Bank 2.
If the Bank Button Mode is Bank Button Sends Messages then sending an LED message to the Bank
Button will only change the state of the Bank Button’s LED.
Button Labels Mode
82 00 00
When this message is sent to the MCS5, its LCD will display the App Buttons’ labels, below or above
each button. The actual button labels are set with the Label Message.
Custom Text Mode
82 00 01
When this message is sent to the MCS5, its LCD will display arbitrary text. The actual text is set with the
Notification Message. The Notification and Label messages use MIDI system exclusive (SysEx)
because they contain too much data to fit into standard one, two or three byte messages.
29
Page 30

Notification Message
Value
Definition
<text>
Exactly 46 characters of text, which will be
displayed as 2 lines of 23 characters.
Value
Definition
bb
Button number
00 - 07 for App buttons A-1 - A-8
08 - 0F for App Buttons B-1 - B-8
<text>
Exactly 5 characters of text, which will be the button
label.
Label Message
MCS5 User Manual
F0 15 7F 40 04 <text> F7
F0 15 7F 40 00 bb <text> F7
NOTE: The button numbering in this message is different than the numbering used in the Button LED
message.
30
Page 31

MCS5 User Manual
When Custom MIDI is chosen, more controls will become visible for editing the custom messages.
The MIDI Message Type popup lets you choose any of the basic MIDI messages except for system
exclusive and MIDI Time Code.
The first group of messages in the popup include a MIDI channel. If you choose one of these message
types, a channel editor appears. You can either type or use the up and down arrows to set the channel.
This editor accepts values from 1 through 16.
All MIDI messages except for system exclusive are either one, two or three bytes long. The first byte
always is the message type, called the status byte. If there is a MIDI channel, it is embedded in the status
byte. The bytes following the status byte, if any, are referred to as data bytes and contain additional
information such as note numbers, velocities, control values, etc...
31
Page 32
MCS5 User Manual
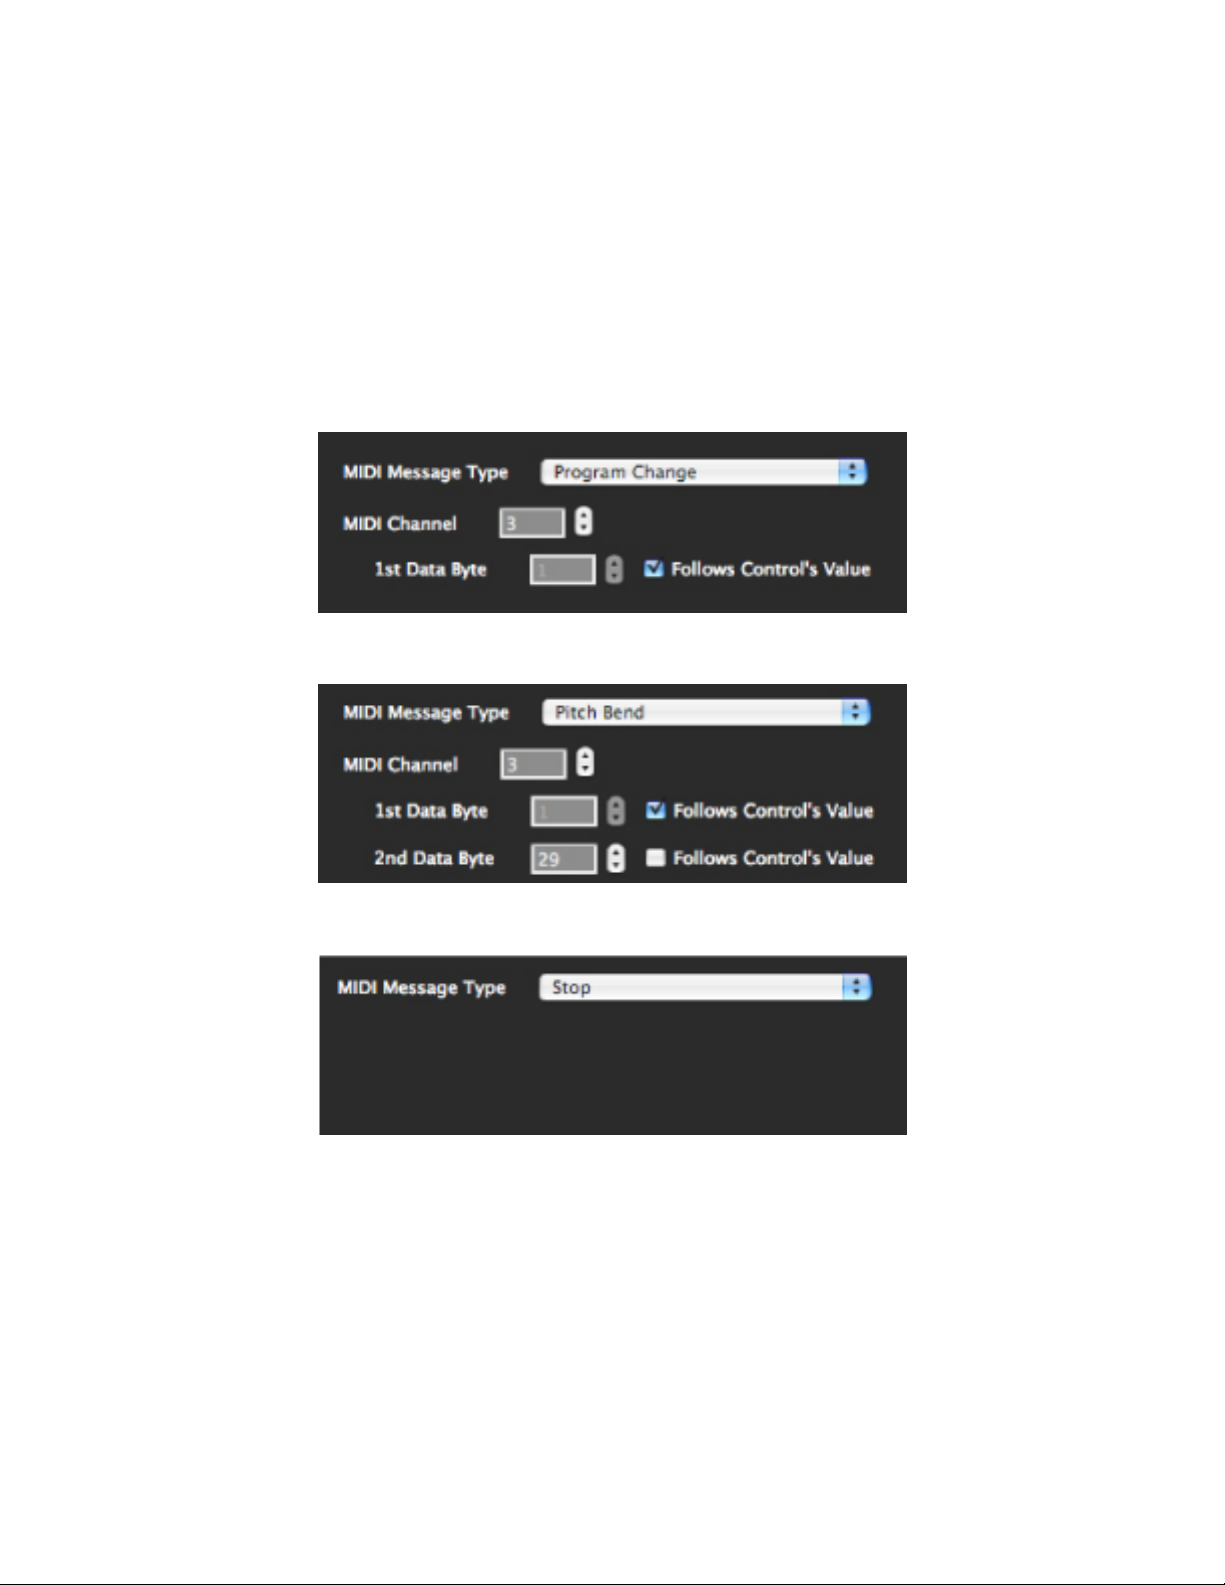
If you choose a message type that is more than one byte long the 1st Data Byte ( and possibly the 2nd
Data Byte) editor appears. You can set the data byte’s value by typing or using the up/down arrows. The
editor accepts values from 0 through 127.
Instead of setting an absolute value for a data byte, you can check the Follows Control’s Value box. In
this case, the value of that data byte is determined by the state of the MCS5 hardware control this
message is assigned to. In other words, if you assigned a Custom MIDI Message to the Jog Wheel and
the 2nd data byte was set to Follows Control’s Value, a number representing the position of the Jog
Wheel would be inserted as the 2nd data byte of the custom message. For MCS5 buttons, a value of 127
will be inserted for button presses, and 0 for button releases.
Following are some samples of the MIDI Tab’s appearance for various message types.
For convenience, choosing Set all Controls to Native MIDI in the Actions menu will assign Emulation
Actions to all of the MCS5 controls on all banks in the current keyset.
32
Page 33

MCS5 User Manual
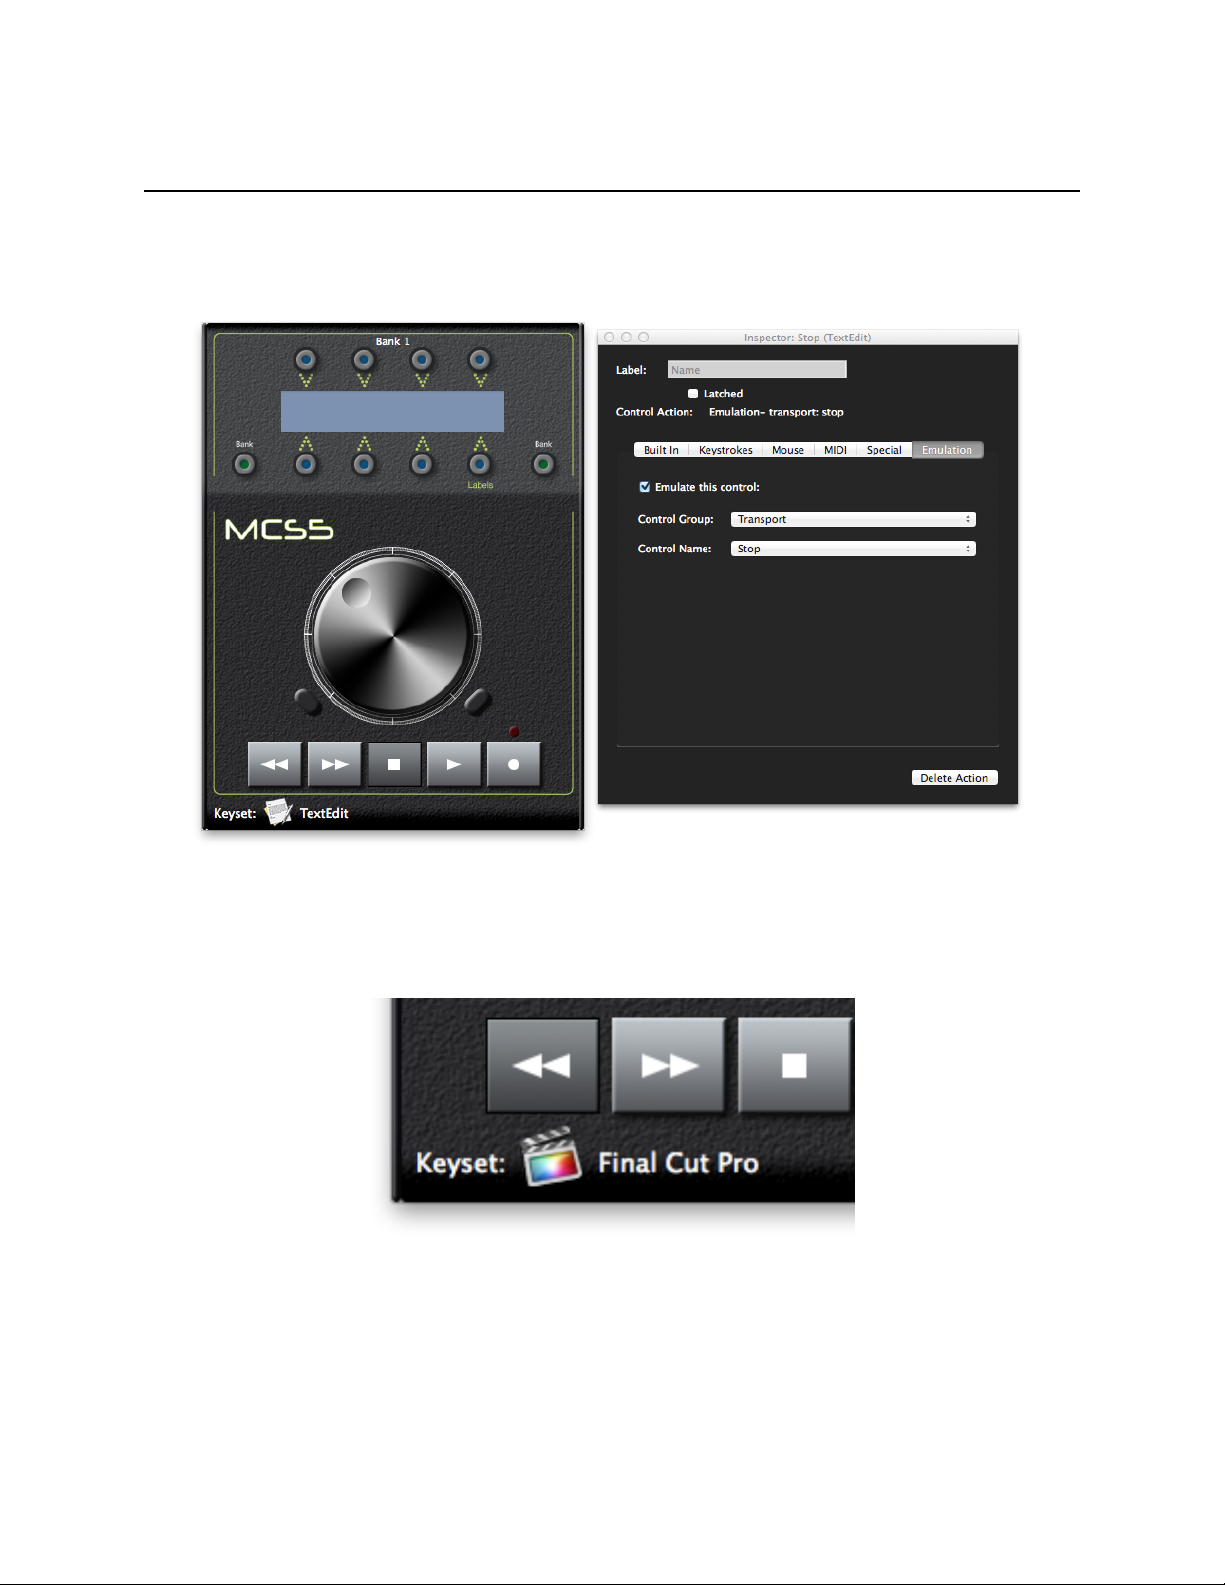
Emulation Tab
The MCS5 software has the ability to emulate other MIDI based control surfaces. This feature is useful if
you are using the MCS5 with an application which doesn’t directly support the MCS5, but which supports
one of these other controls surfaces.
You can set any control on the MCS5 to emulate a control on one of these control surfaces using the
Emulation Tab. The Emulation Tab is not available until you turn on Emulation in the Emulation Menu.
Here you can choose None, Mode A, or Mode B. Mode A and B represent the two control surfaces that
the MCS5 can emulate. Which one you choose depends on the application you are using with the MCS5.
More on this later.
The contents of the Emulation Tab varies depending on whether a button or the Jog Wheel is selected.
This is what you will see at first if you select a button.
The Control Group popup lists the basic categories of controls that can be emulated by the selected
MCS5 control. Checking Emulate this control: or choosing from the Control Group popup will assign an
Emulation action to the selected control. It will also display either a second popup or a numerical editor for
choosing which control in the group to emulate.
33
Page 34

MCS5 User Manual
For some control categories, such as Transport, the individual controls in that category have names,
such as Rewind, Fast Forward, Stop, Play and Record. For these categories a second popup will list
the control names.
For other categories, such as F-Keys, the controls are just numbered. For these categories a numerical
editor will appear. This allows you to either type or use up/down arrows to set the control number.
The Jog Wheel only has one choice, Emulate Jog Wheel.
For convenience, choosing Set all Controls to Emulation in the Actions menu will assign Emulation
Actions to all of the MCS5 controls on both banks in the current keyset.
34
Page 35

MCS5 Control
Assignment
Rewind
Rewind
Fast Forward
Fast Forward
Stop
Stop
Play
Play
Record
Record
Jog
Jog
Left Bank
Bank Left
Right Bank
Bank Right
App Button A-1
Add Marker
App Button A-2
Nudge
App Button A-3
Cycle
App Button A-4
Drop
App Button A-5
Replace
App Button A-6
Click
App Button A-7
Solo
App Button A-8
Zoom
App Button B-1
Add Marker
App Button B-2
Nudge
App Button B-3
Cycle
App Button B-4
Drop
App Button B-5
Replace
App Button B-6
Click
App Button B-7
Solo
App Button B-8
Zoom
LCD Display
Timecode
MCS5 User Manual
The following assignments are made when Set all Controls to Emulation is chosen.
35
Page 36

MCS5 User Manual
Special Tab
The Special Tab is available when a button is selected. There are two choices available, None and
Show / Hide Button Labels.
Choosing None has the same effect as clicking on the Delete Action button.
If the LCD display is set to an action other than Display Button Labels (see the section titled LCD Display
for more information), pressing a button that has been assigned the Show / Hide Button Labels action will
cause the display to show the button labels. Releasing the button will switch the display back to its
original content. If the button is also latched, then the display will remain in Button Label mode until the
button is pressed a second time.
NOTE: All keysets supplied by JLCooper which use the Show / Hide Buttons Labels action assign it to
Application Button A-8 and/or B-8. In fact, this button has been named “Label” on the MCS5 hardware
and in the main window of the MCS5 software. If you use Show / Hide Buttons Labels in a custom keyset,
it is recommended that you assign it to Application Buttons A-8 and B-8.
If the display is already assigned to show button labels, then there is no need for the Show / Hide Buttons
Labels action, and A-8 and B-8 may used for other purposes.
36
Page 37

MCS5 User Manual
Built In Actions Tab
The built in actions are actions that are predefined for specific applications. When you choose a keyset,
the built in actions appropriate to that keyset’s application are displayed. If no built in actions have been
defined for the current application, the display will be blank.
The built in actions are presented in two columns. The left hand column lists basic categories and the
right hand column lists the actual actions. Clicking on a category in the left hand column will change the
list of actions displayed on the right. Double-click an action in the right hand column to assign it to the
selected MCS5 control.
Most of the categories and actions correspond to the keyboard shortcuts listed in the target application's
manual. However, there are also actions defined by JLCooper that are not simple keyboard shortcuts.
These actions will always appear at the beginning of the list, and there will be a separator line between
them and other built in actions.
37
Page 38

MCS5 User Manual
LCD Display
The MCS5 has an two line, 23 character per line LCD display. You can assign functions to this display in
much the same way as you assign actions to controls.
NOTE: If you are using an application that communicates directly with the MCS5 via MIDI, you should
probably not assign any functions to the displays in the keyset for that application. The application will
likely be writing its own information to the displays.
When you click on a display to select it, information about it appears in the Inspector window. This
information includes a Label, a description of the function assigned to the display and Tabs which contain
controls for editing the display’s function.
The available Tabs are Built In, Text , Button Labels, MIDI and Emulation.
38
Page 39

MCS5 User Manual
Display Button Labels Tab
If you check the Display Button Labels box the labels of the eight App buttons will be shown on the
LCD. This probably the setting you will use for most of your keysets. If you need to display other
information, you can always assign the Labels function to App Button 8. Then pressing App Button 8 will
cause button labels to be displayed, and releasing it will cause the display to show its original content.
The display will update whenever the label of one of the buttons changes. If a button does not have a
label, then the display directly above or below it will be blank.
Un-checking the Display Button Labels box will delete any function assigned to the display.
39
Page 40
MCS5 User Manual
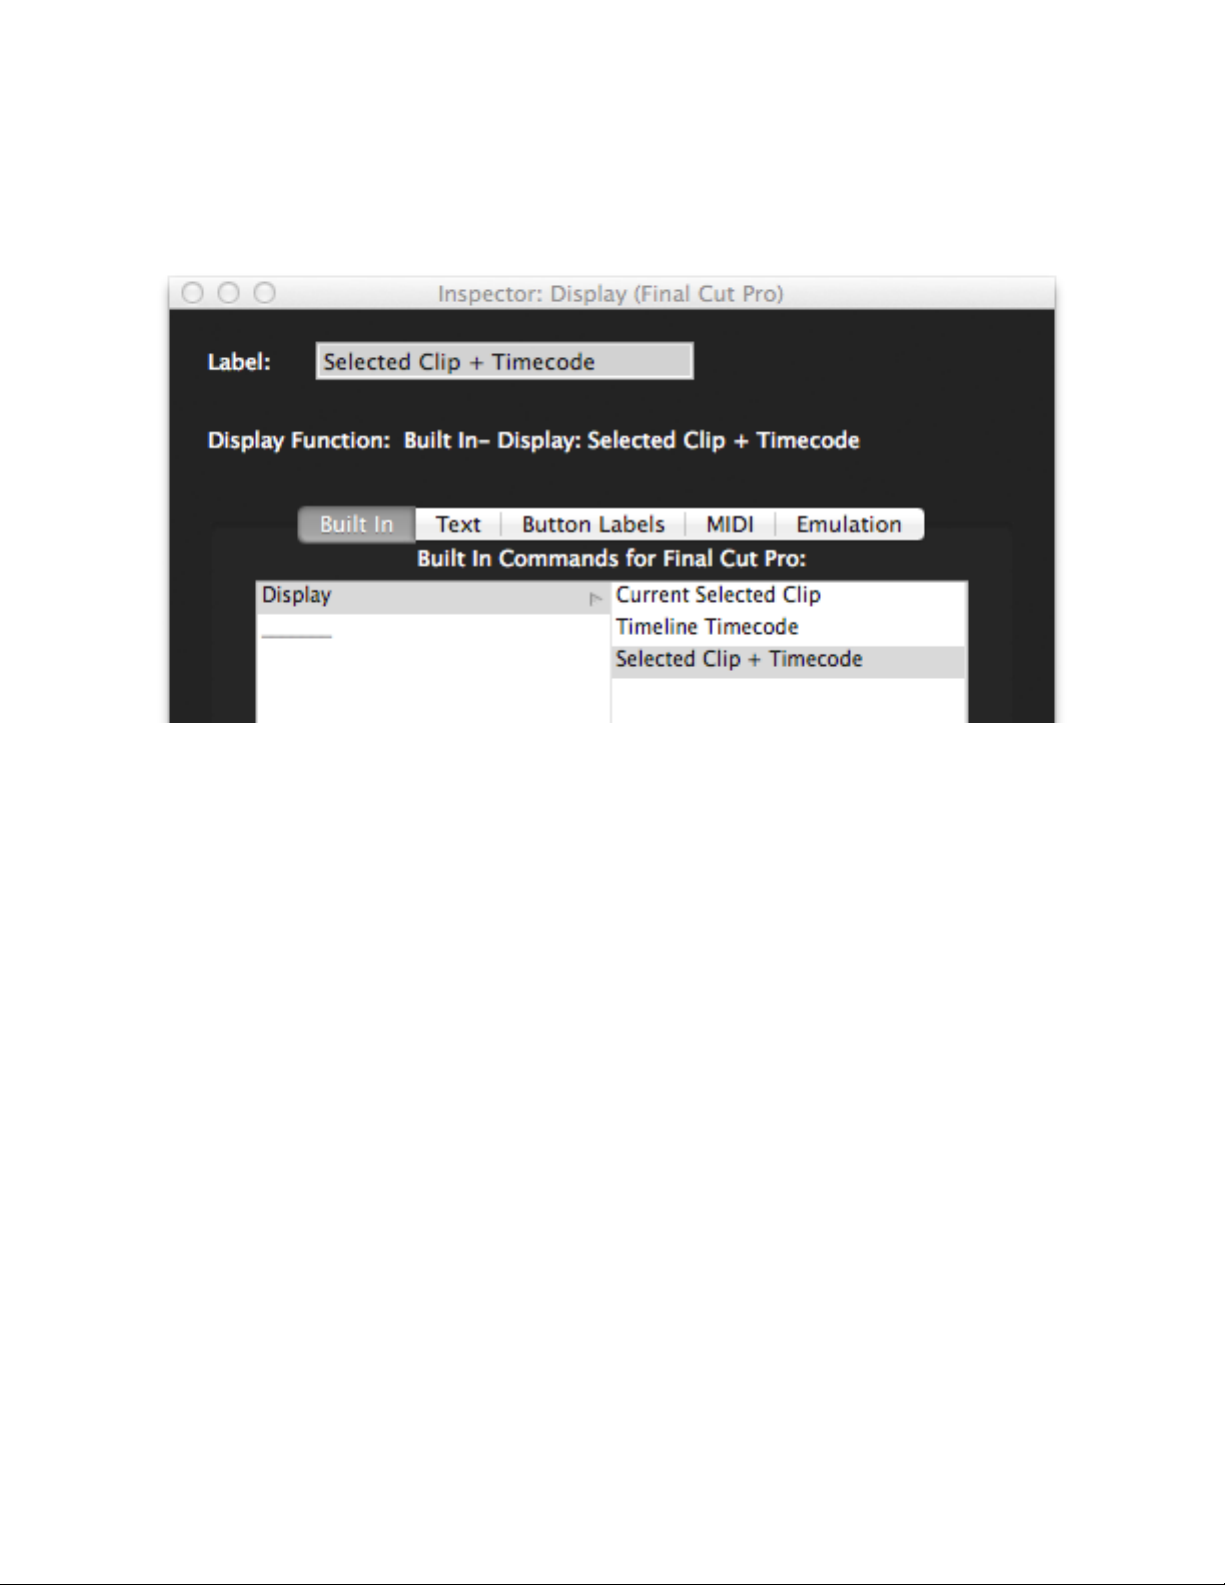
Built In Tab
There are three Built In Display actions, Current Selected Clip, Timeline Timecode and Selected Clip
+ Timecode. These actions are available only in Final Cut Pro X.
Current Selected Clip - If this action is assigned to the display, then selecting a clip in Final Cut Pro X’s
Timeline, Timeline Index or Event Browser will cause that clip’s title to be displayed on the MCS5’s LCD.
Timeline Timecode - This action causes the timeline’s timecode to be displayed on the LCD. It will not
display timecode for clips in the Event Browser.
Timeline Timecode and Selected Clip + Timecode - The name of the selected clip will be shown on the
top line of the display, and the timeline timecode will be shown on the bottom line.
As mentioned earlier, if you want to use one of these built-in display options, but sometimes need to see
the button labels, you can assign the Labels function to App Button 8. Whenever you press App Button 8,
the button labels will be shown. Releasing it will cause the display to revert to the built-in function.
40
Page 41

MCS5 User Manual
Display Text Tab
If you check the Display Custom Text box or type into the text boxes below it and hit the ENTER key, the
text you type will be shown on the LCD display line whenever the target application is in front. You can
enter up to 23 characters per line.
Un-checking the Display Custom Text box will delete any function assigned to the currently selected
display line.
As mentioned earlier, if you have reason to display custom text, but sometimes need to see the button
labels, you can assign the Labels function to App Button 8. Whenever you press App Button 8, the button
labels will be shown. Releasing it will cause the display to show the custom text.
41
Page 42
MCS5 User Manual
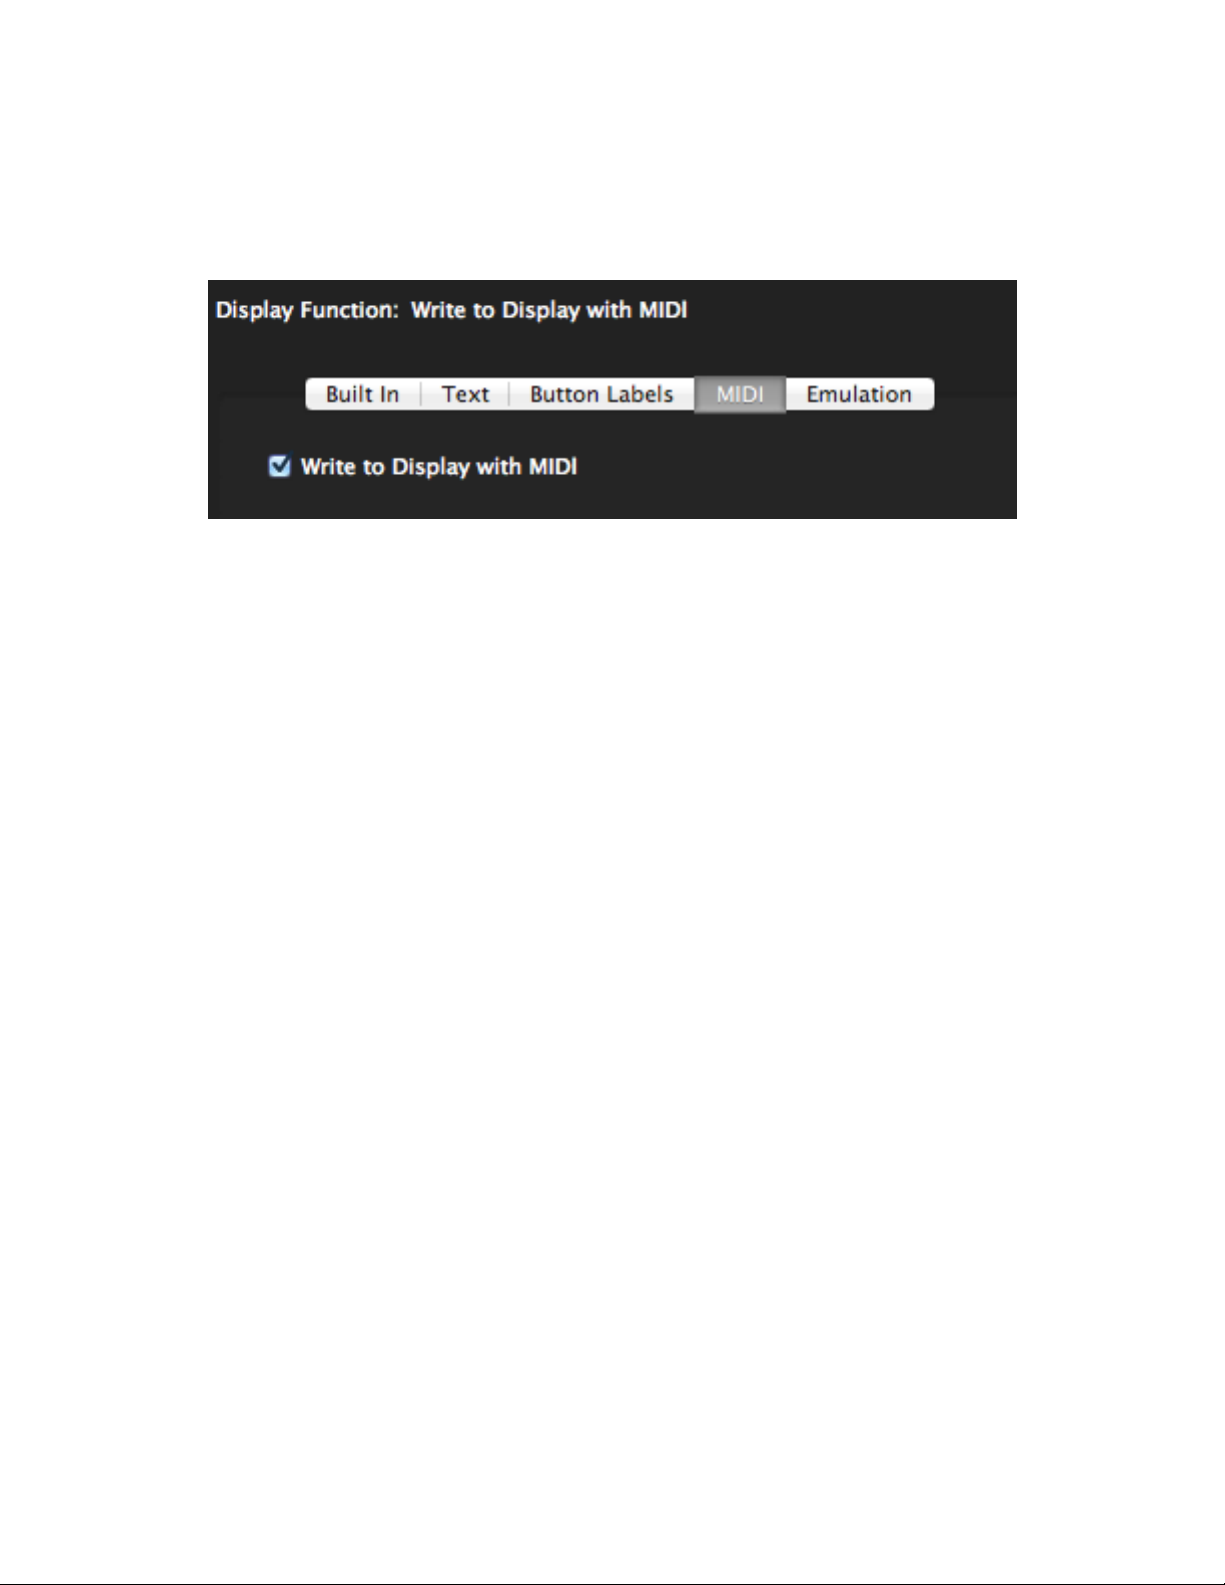
Display MIDI Tab
If Write to Display with MIDI is checked the MCS5 will accept the Notification SysEx Message,
described in the earlier section on the Native MIDI Protocol. Un-checking the Write to Display with
MIDI box will delete any function assigned to the display.
As mentioned earlier, if you want another application to write to the MCS5 screen, but sometimes need to
see the button labels, you can assign the Labels function to App Button 8. Whenever you press App
Button 8, the button labels will be shown. Releasing it will cause the display to revert to the built-in
function.
42
Page 43

MCS5 User Manual
Display Emulation Tab
If you have enabled Emulation in the current keyset, you can have MCS5 show timecode intended for the
emulated control surface..
Click on the Emulate Mode X Timecode Display checkbox to enable timecode display emulation.
Uncheck it to delete any function assigned to the display.
As mentioned earlier, if you want to show timecode, but sometimes need to see the button labels, you can
assign the Labels function to App Button 8. Whenever you press App Button 8, the button labels will be
shown. Releasing it will cause the display to show timecode again.
43
Page 44

MCS5 User Manual
Keyset Summary Window
The Keyset Summary Window displays information about several controls at once, making it easier to
tell at a glance how a particular keyset is set up. You choose the Keyset Summary from the Windows
menu.
The window has three columns. The first column lists the currently active keysets. These are the same
keysets that appear in the Keysets Menu. Clicking on a keyset in this column will change the selected
keyset, just as if you had chosen a keyset from the Keysets Menu. Conversely, choosing a new keyset
from the Keysets Menu will cause that keyset to be selected in the Keyset Summary Window.
The second column lists controls grouped by function, either Transport, Bank, Application or Display.
Selecting one of these groups will cause the fourth column to display all of the controls in that group.
Each control name is followed by its Label, if any, and a description of its assigned function. Clicking on a
control in this column will cause that control to be selected in the main window and its information to be
displayed in the Inspector Window for editing.
44
Page 45

MCS5
Final Cut
Rewind
Rewind
Fast Forward
Forward
Stop
Stop
Play
Play
Jog
Jog
App Button A-1
Timeline
App Button A-2
Canvas
App Button A-3
Viewer
App Button A-4
Browser
App Button A-5
Add Marker
App Button A-6
Previous Marker
App Button A-7
Next Marker
App Button A-8
Show / Hide Button Labels
Display
Timecode
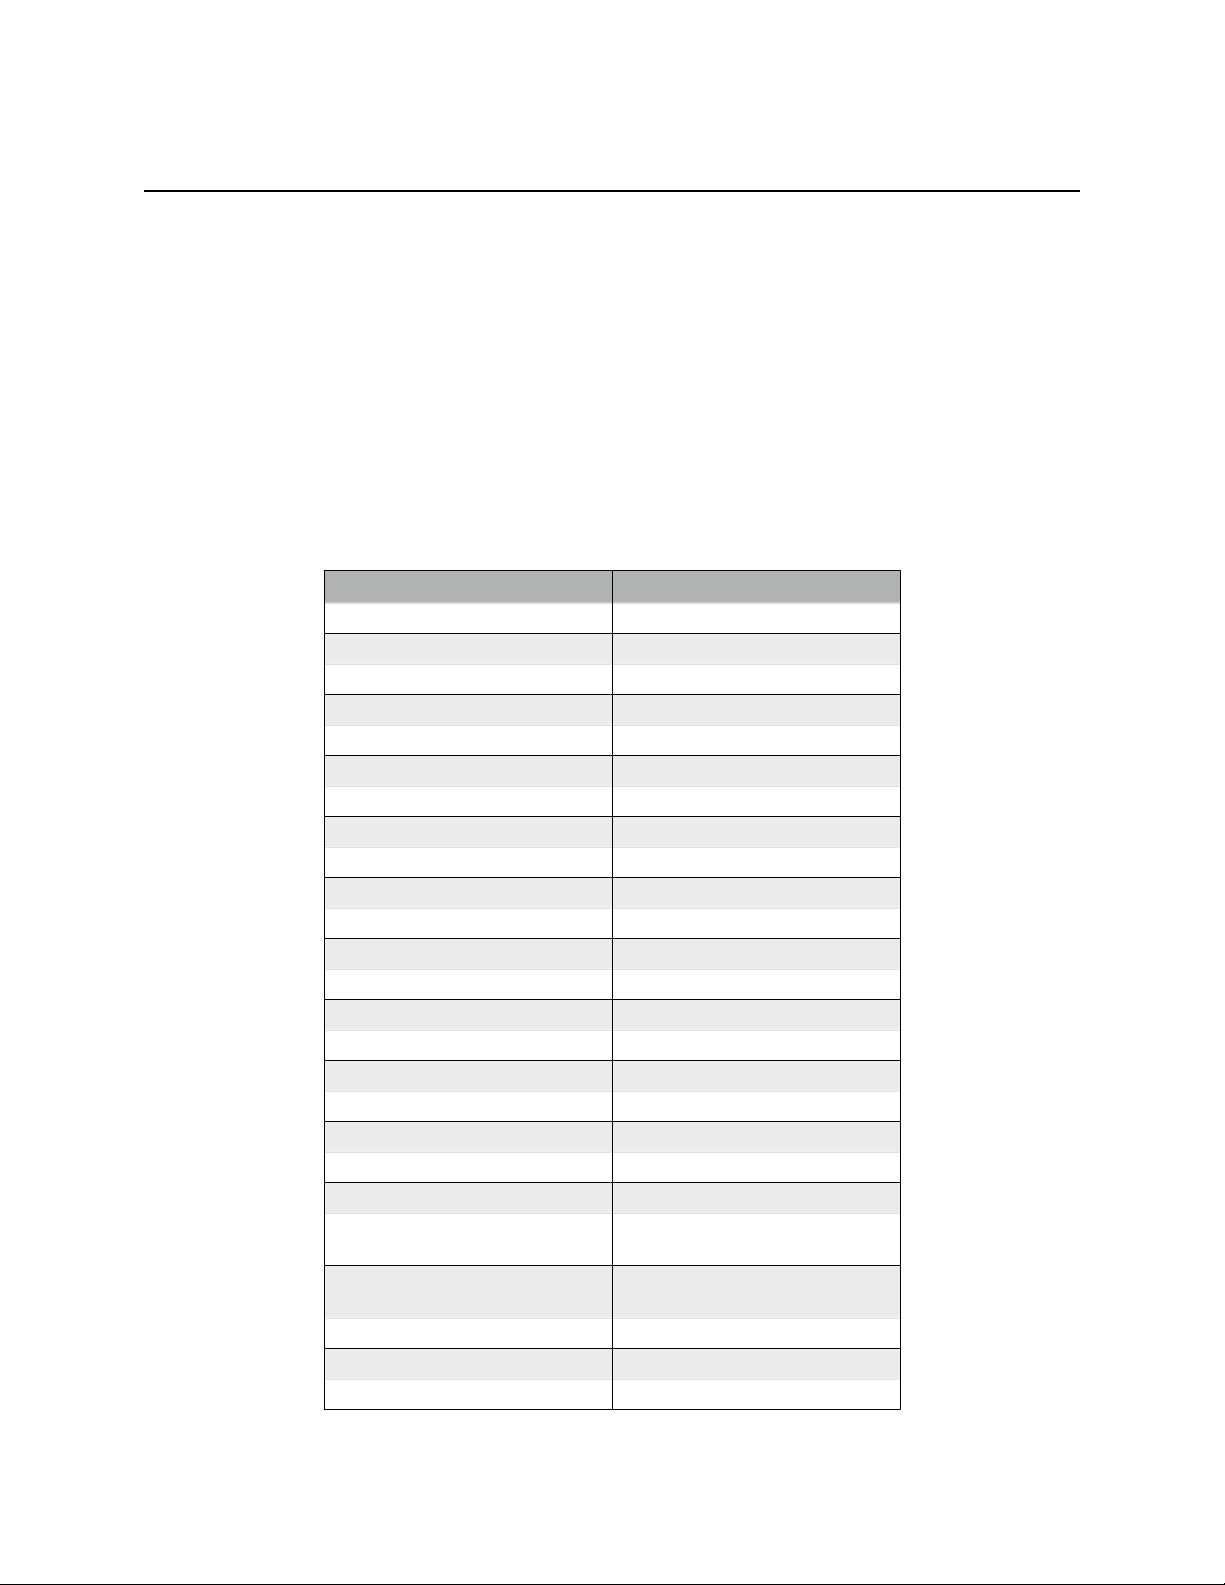
MCS5 User Manual
Final Cut Pro™ Support
Final Cut Pro™ and Control Surfaces
With Final Cut Pro version 5 some support for MIDI control surfaces was added. Unfortunately, only audio
parameters and transport functions are controllable via MIDI. Fortunately, the MCS5 software not only
emulates the supported control surfaces, it also can control many other parameters in Final Cut Pro.
The MCS5 has an advantage over other control surfaces when used with Final Cut Pro because it is not
limited to just the functions included in Final Cut’s MIDI control surface support. With its built in functions
and the ability to emulate the mouse and keyboard coupled with Final Cut Pro’s control surface support,
almost every function in Final Cut Pro can be controlled with the MCS5.
Using the MCS5 with Final Cut Pro
To use the MCS5 with Final Cut Pro, first run the MCS5 application and import the Final Cut keyset
provided by JLCooper. Now run Final Cut and open the Control Surfaces dialog from the Tools menu.
Click on the “+” button to add a control surface and choose Mackie Control. Then choose MCS5 USB -
MCS5 for the input connection and output connections. Click OK to exit the dialog.
Final Cut requires the Audio Mixer (Tools Menu) to be open in order for control surface support to be
active. You might want to save a window layout that has the Audio Mixer open.
The MCS5 Final Cut Pro Keyset
The MCS5 Final Cut Pro keyset uses a combination of emulated controls, mouse emulation, keystrokes
and built-in commands. It is fully customizable using the techniques presented in this manual, so you can
easily adapt it to your working style.
The display is set to show the current Canvas or Viewer timecode by default. Pressing Application
Button A-8 will switch the display to Button Labels. Releasing button A-8 will return the display to
showing timecode. If you want, you can set A-8 to be latched.
Here are the control assignments in the current version of the Final Cut Pro keyset:
45
Page 46

MCS5
Final Cut Pro X
Rewind
Rewind
Fast Forward
Forward
Stop
Stop
Play
Play / Pause
Jog
Jog
Left Wheel Button
Go to Previous Edit
Right Wheel Button
Go to Next Edit
App Button A-1
Cut
App Button A-2
Copy
App Button A-3
Paste
App Button A-4
Undo
App Button A-5
Redo
App Button A-6
Arrow Tool
App Button A-7
Blade Tool
App Button A-8
Show / Hide Button Labels
App Button B-1
Show Color Board
App Button B-2
Color Tab
App Button B-3
Saturation Tab
App Button B-4
Exposure Tab
App Button B-5
Reset Current Tab
App Button B-6
Append to Storyline
App Button B-7
Insert
App Button B-8
Show / Hide Button Labels
Display
Selected Clip + Timecode
MCS5 User Manual
Final Cut Pro X™ Support
Unlike Final Cut Pro 7, Final Cut Pro X includes no built-in support for control surfaces. However, the
MCS5 is quite useful with Final Cut Pro X because JLCooper has converted all of the Final Cut Pro X
keyboard shortcuts into MCS5 Built-In Commands. There are also several JLCooper-defined commands
that allow controlling Color Board functions.
In the keyset supplied by JLCooper, the display is assigned a built-in command which shows the name of
the currently selected clip plus the timeline timecode. The display can be temporarily switched to show
button labels by pressing Application Button A-8. A second press will return the display to the selected
clip and timecode.
The JLCooper Final Cut Pro X keyset has assigned Built-In Commands to many of the MCS5 controls,
but still leaves room for customization.
The Final Cut Pro X Keyset
Following is a list of the Final Cut Pro X keyset assignments.
46
Page 47

MCS5
Premier Pro
Rewind
Rewind
Fast Forward
Forward
Stop
Stop
Play
Play / Pause
Jog
Jog
Left Wheel Button
Go to Previous Edit Point
Right Wheel Button
Go to Next Edit Point
App Button A-1
Source Monitor Panel
App Button A-2
Program Monitor Panel
App Button A-3
Timeline Panel
App Button A-4
Project Panel
App Button A-5
Set In Point
App Button A-6
Set Out Point
App Button A-7
Go To In Point
App Button A-8
Go To Out Point
App Button B-1
Selection Tool
App Button B-2
Track Select Tool
App Button B-3
Ripple Edit Tool
App Button B-4
Rolling Edit Tool
App Button B-5
Razor Tool
App Button B-6
Slip Tool
App Button B-7
Slide Tool
App Button B-8
Hand Tool
Display
Button Labels
MCS5 User Manual
Adobe Premier Pro™ Support
Adobe Premier Pro doesn’t directly support the MCS5, however the MCS5 is still quite useful with Premier
because JLCooper has converted all of the Premier keyboard shortcuts into MCS5 Built-In Commands.
In the keyset supplied by JLCooper, the display shows button labels. Buttons A-1 through A-4 open
various panels, while A-5 through A-8 are used for setting and locating to In and Out Points. Buttons B-1
through B-8 are used for selecting different editing tools.
The Adobe Premier Pro Keyset
Following is a list of the Premier keyset assignments.
47
Page 48

MCS5
Media Composer 6
Rewind
Reverse
Fast Forward
Forward
Stop
Pause
Play
Play / Stop
Jog
Jog
Left Wheel Button
Goes to the marked in point
Right Wheel Button
Goes to the marked out point
App Button A-1
Timeline
App Button A-2
Composer
App Button A-3
Project
App Button A-4
Effects Palette
App Button A-5
Lift/Overwrite Tool
App Button A-6
Extract/Splice-in Tool
App Button A-7
Trim Away Tool
App Button A-8
Trim Ripple Tool
App Button B-1
Cut
App Button B-2
Copy
App Button B-3
Paste
App Button B-4
Undo
Display
Button Labels
MCS5 User Manual
Avid Media Composer 6™ Support
JLCooper has converted all of Media Composer’s keyboard shortcuts into Built-In Commands..
In the JLCooper Avid keyset, the display is set to show button labels. The top row of App buttons is used
for selecting various windows or panels, and the second row is for choosing tools. In the second bank, the
top row is assigned the editing commands, Cut, Copy, Paste and Undo.
There is some room for customization. Many of Avid’s commands do not have keyboard equivalents, and
Avid leaves it up to the individual user to customize them using the Command Palette and the Keyboard
Settings panel. If you have added custom keyboard shortcuts to your Media Composer settings you will
probably want to add matching Keystroke commands to your Avid MCS5 keyset.
The Media Composer 6 Keyset
Following is a list of the Media Composer 6 keyset assignments.
48
Page 49
MCS5
Soundtrack Pro
Rewind
Reverse
Fast Forward
Forward
Stop
Stop
Play
Play
Record
Record
Jog
Jog
Left Wheel Button
Move playhead to previous marker
Right Wheel Button
Move playhead to next marker
App Button A-1
Cut
App Button A-2
Copy
App Button A-3
Paste
App Button A-4
Undo
App Button A-5
Redo
App Button A-6
Open
App Button A-7
Save
App Button A-8
Show / Hide Button Labels
App Button B-1
Insert time marker at playhead
App Button B-2
Set Cycle Region In Point
App Button B-3
Set Cycle Region Out Point
App Button B-4
Activate/deactivate cycle region
App Button B-5
Move Cycle Region Playhead to In
Point
App Button B-6
Move Cycle Region Playhead to
Out Point
App Button B-7
Scrub Tool
App Button B-8
Show / Hide Button Labels
Display
Timecode
MCS5 User Manual
Soundtrack Pro™ Support
Setting up the MCS5 for use with Soundtrack Pro is almost identical to setting up for Final Cut Pro.
Open the MCS5 application and Import the Soundtrack Pro keyset or create a keyset of your own. If you
create your own, start by setting the Emulation Mode to B then choosing Set All Controls to Emulation
from the Actions menu. Later on you can customize this keyset with built-in commands, key sequences
and mouse actions.
The next time you run Soundtrack Pro, open the Preferences dialog from the Soundtrack Pro menu
then go to the Control Surfaces panel. Click on the “+” button to add a control surface and choose
Mackie Control. Choose MCS5 USB - MCS5 for the input connection and output connections. Click OK to
exit the dialog.
The Soundtrack Pro Keyset
The Soundtrack Pro keyset is a combination of emulated actions, built-in commands and keystrokes.
49
Page 50

MCS5 User Manual
Logic Pro™ and Logic Pro X™ Support
The MCS5 software works identically with both Logic Pro and Logic Pro X.
Open the MCS5 application and Import the Logic Pro keyset or create a keyset of your own. If you create
your own, start by setting the Emulation Mode to A then choosing Set All Controls to Emulation from
the Actions menu. Later on you can customize this keyset with key sequences, emulation and mouse
actions.
Next run Logic Pro and choose Preferences > Control Surfaces > Setup from the
Logic Pro Menu. In the resulting window’s New menu, choose Install, and in the
next window click on Scan. In a moment, Logic should tell you that it is connected to a Mackie Control
on the Input and Out Port named MCS5. If it isn’t successful then select Mackie Control from the list and
click on Add. Then manually connect the control surface to the Input and Out Port named MCS5.
50
Page 51

MCS5
Logic Pro
Rewind
Rewind
Fast Forward
Fast Forward
Stop
Stop
Play
Play
Record
Record
Jog
Jog
Left Wheel Button
Go To Previous Marker
Right Wheel Button
Go To Next Marker
App Button A-1
SMPTE / Beats (toggles the MCS5
display)
App Button A-2
Mixer Global View
App Button A-3
Cycle
App Button A-4
Auto Punch
App Button A-5
Replace
App Button A-6
Solo
App Button A-7
Click
App Button A-8
Show / Hide Button Labels
App Button B-1
Read
App Button B-2
Write
App Button B-3
Touch
App Button B-4
Latch
App Button B-5
Create Marker
App Button B-6
Delete Marker Under Playhead
App Button B-7
Rename Marker Under Playhead
App Button B-8
Show / Hide Button Labels
Display
Timecode
MCS5 User Manual
The Logic Pro Keyset
Most of the assignments in the Logic Pro keyset are to Emulation Mode B. Consult the Control Surfaces
Support document found under Logic’s Help menu for details on using the Logic Control with Logic. The
display is set to show SMPTE timecode. Pressing App Button A-1 will toggle the display to Bars and
Beats. Pressing A-1 again will return the display to SMPTE. Application Buttons A-8 and B-8 are set to
Show / Hide Button Labels so you can temporarily view the Button labels on the display. Releasing A-8
or B-8 returns the display to Timecode.
51
Page 52

MCS5
Nuendo
Rewind
Rewind
Fast Forward
Fast Forward
Stop
Stop
Play
Play
Record
Record
Jog
Jog
Left Wheel Button
Locate Previous Marker
Right Wheel Button
Locate Next Marker
App Button A-1
SMPTE / Beats
App Button A-2
Auto Punch In
App Button A-3
Auto Punch Out
App Button A-4
Cycle
App Button A-5
Add Marker
App Button A-6
Click
App Button A-7
Solo
App Button A-8
Show / Hide Button Labels
Display
Timecode
MCS5 User Manual
Nuendo™ Support
Steinberg Nuendo doesn’t have built in support for the MCS5, but the MCS5 software can emulate one of
Nuendo’s supported control surfaces.
Open the MCS5 application and Import the Nuendo keyset or create a keyset of your own. If you create
your own, start by setting the Emulation Mode to A then choosing Set All Controls to Emulation from
the Actions menu. Later on you can customize this keyset with key sequences and mouse actions.
The next time you run Nuendo, open the Device Setup dialog from the Devices menu then go click on
Mackie Control under Remote Devices. Choose MCS5 for the MIDI Output and MIDI Input. Hit OK to
accept your settings and close the Setup Dialog.
The Nuendo Keyset
The Nuendo keyset is a combination of emulation, Built-In Commands and keystrokes. Here are the
mappings from the MCS5 controls to Nuendo functions. More details can be found in the document
Remote Control Devices supplied with Nuendo.
52
Page 53

MCS5 User Manual
Uninstalling
To uninstall run the MCS5 USB Uninstaller located in the /Applications folder. Click on the Uninstall
button to begin. When the uninstall is finished, click on the Quit button.
If there are multiple user accounts on this Mac, there may be multiple installations of the MCS5 software,
one for each user. Each user shares the MCS5 USB application and the MCS5 USB uninstaller, but
other software components are installed separately for each user account.
When the uninstaller is launched under the admin account, you will see a checkbox labeled “Remove
MCS5 USB Software Folder?” This checkbox will not appear when the uninstaller is launched under any
other user account. You should always uninstall the software from all non-admin users before uninstalling
it from the admin account.
After the software has been uninstalled from all accounts, you can throw the uninstaller in the trash.
After uninstalling, you may notice that the MCS5 driver still appears in the Audio/MIDI Setup ( /
Applications/Utilities/ ) MIDI window. This is because the Mac OS X tries to remember the state
of your MIDI setup, even if there are changes such as removing or powering down equipment or
removing drivers.
To remove the driver from Audio/MIDI Setup, disconnect the MCS from the Mac and wait for the driver’s
icon in Audio/MIDI Setup to be dimmed as in the graphic below.
53
Page 54

MCS5 User Manual
Click on the MCS5 USB icon to select it, then hit the DELETE key on the Mac keyboard or choose Delete
from the Edit menu. Quit Audio/MIDI Setup.
The MCS5 software’s preference file is not removed by the uninstaller. It takes up relatively little space
and should have no impact on the operation of other software once the MCS5 software is uninstalled. If
you want to remove it, just delete the file ~/Library/Preferences/
com.jlcooper.MCS5USB.plist. Under Mac OS X 10.7, the ~/Library/ folder is hidden. To open it
in the Finder, click on the Go menu while holding down the OPTION key, and you will see Library as one
of the choices.
54
Page 55

MCS5 User Manual
JLCooper Limited Warranty
JLCooper Electronics ("JLCooper") warrants this product to be free of defects in materials or
workmanship for a period of 12 months from the date of purchase. This warranty is non-transferable and
the benefits apply only to the original owner. Proof of purchase in the form of an itemized sales receipt is
required for warranty coverage. To receive service under this warranty, customers in the United States
should contact the JLCooper factory at +1-310-322-9990 and talk to a service technician. If necessary, a
Return Authorization number may be issued. For our customers outside the United States, it is
recommended that you first contact your Dealer or Distributor, since they may offer their own service or
support policy. If local support is not obtainable, please send a FAX to JLCooper's Service Department at
+1-310-335-0110 with a detailed description of the service required. Upon issuance of return
authorization, the product should be packed in the original shipping materials and shipped prepaid and
insured to: Service Department, JLCooper Electronics, 142 Arena Street, El Segundo, CA 90245. Please
include the following: copy of the sales receipt, your name and address (no P.O. Boxes, please), a brief
description of the problem, and any other related items discussed with the service department and
considered necessary to evaluate the product or effect a repair. The return authorization number must be
clearly written on the outside of the package. JLCooper will at its option, without charge for parts or
labor, either repair or replace the defective part(s) or unit. Carriage, insurance, customs duties,
impounds, tariffs, taxes, surcharges, brokerage fees and other shipping costs are not covered by this
warranty. JLCooper's normal repair turn around time at the factory is approximately 15 business days
from receipt of product to shipping. Your actual turn around time will include return shipping. Actual turn
around time will vary depending upon many factors including the repeatability of the customer's reported
complaint, the availability of parts required for repair, the availability of related products needed to
evaluate the product if necessary. Priority services are available at additional cost. These should be
discussed with the service technician at the time the return authorization is issued. This warranty provides
only the benefits specified and does not cover defects or repairs needed as result of acts beyond the
control of JLCooper including but not limited to: abuse, failure to operate in accordance with the
procedures outlined in this owner's manual; nor does it cover damage from accident, negligence, using
incorrect power supply, modification, alteration, improper use, unauthorized servicing, tampering,
ingress of foreign matter; nor for damage from natural or man-made events such as, but not limited to
flooding, lightning, electrostatic discharge, tornadoes, earthquake, fire, civil unrest, war, terrorism, etc.
THE DURATION OF ANY OTHER WARRANTIES, WHETHER IMPLIED OR EXPRESS, INCLUDING
BUT NOT LIMITED TO THE IMPLIED WARRANTY OF MERCHANTABILITY, IS LIMITED TO THE
DURATION OF THE EXPRESS WARRANTY HEREIN. JLCOOPER HEREBY EXCLUDES
INCIDENTAL AND CONSEQUENTIAL DAMAGES, INCLUDING BUT NOT LIMITED TO: LOSS OF
TIME, INCONVENIENCE, DELAY IN PERFORMANCE OF THIS WARRANTY, THE LOSS OF USE OF
THE PRODUCT OR COMMERCIAL LOSS, AND FOR BREACH OF ANY EXPRESS OR IMPLIED
WARRANTY OF MERCHANTABILITY APPLICABLE TO THIS PRODUCT. JLCOOPER SHALL NOT BE
LIABLE FOR DAMAGES OR LOSS RESULTING FROM THE NEGLIGENT OR INTENTIONAL ACTS
OF THE SHIPPER OR HIS CONTRACT AFFILIATES. THE CUSTOMER SHOULD CONTACT THE
SHIPPER FOR PROPER CLAIMS PROCEDURES IN THE EVENT OF DAMAGE OR LOSS
RESULTING FROM SHIPMENT. THIS WARRANTY SHALL BE GOVERNED BY THE LAWS OF THE
STATE OF CALIFORNIA.
JLCooper makes no warranties, express or implied, regarding this software’s fitness for a particular
purpose, and in no event shall JLCooper Electronics be liable for incidental or consequential damages,
loss of profits, loss of data or data being rendered inaccurate, or losses sustained by third parties even if
JLCooper Electronics has been advised of the possibility of such damages.
55
 Loading...