

Page 1
Media Control Station
USB/RS232 For Windows98/2000/XP
3
User's Manual
Second Edition
©2000-2002 JLCooper Electronics
142 Arena Street • El Segundo, CA 90245 U.S.A.
Page 2

MCS, Media Control Station, MCS3 and Media Control Station3 are trademarks of
JLCooper Electronics. All other brand names are the property of their respective
holders.
MCS3 For Windows Version Users Manual Second Edition
Part number for this manual is 932076-WIN.
©2000-2002 JLCooper Electronics
142 Arena Street
El Segundo, CA 90245 U.S.A.
(310) 322-9990
(310) 322-0110 fax
www.jlcooper.com
Page 3

Table of Contents
Introduction............................................................. 4
Connecting the MCS
Installing the Software ............................................ 5
Getting Started ......................................................... 6
Setting the Serial Port.................................................6
Driver Popup Menu ................................................... 6
Launching Application .............................................. 7
Shuttle LEDs ............................................................... 7
V/Stick........................................................................7
What Does the MCS3 Do? ..........................................8
What is a Keyset? ....................................................... 9
Keyset Selection.......................................................10
Try it Now ................................................................10
About the Default Keyset ........................................ 11
Editing the Default Keyset ....................................... 12
Restoring the Default Keyset Using Clear ...............14
The MCS3 Editor Application ................................ 15
Creating a New Keyset ............................................ 16
Assigning the Keys and V-Stick ............................... 18
Hide Pointer............................................................. 22
Assigning the Jog Wheel and Shuttle Ring.............. 24
Wheel Modifier Key................................................. 25
Wheel Speed ............................................................ 28
Alerts During Clicks, Drags, Scrolls......................... 29
Special Wheel Modes .............................................. 30
Additional Time Saving Hints.................................. 31
About Delete and Tab ............................................. 32
Display Keyset .........................................................33
Saving and Deleting Keysets ...................................34
Importing and Exporting Keysets ........................... 34
Using Supplied Keysets ...........................................34
The MCS3 Editor Application Menus.......................35
3
........................................................5
Technical Information .......................................... 37
Specifications and Troubleshooting........................37
Care and Service ......................................................38
Warranty ..................................................................39
Page 4

Introduction
Thank you for purchasing the JLCooper Media Control Station3.
This MCS3 is a serial device (USB or RS-232), for use with
Windows 95, 98, 2000 and XP.
The MCS3 allows you to create a personalized control station
for virtually any application. You will find that the MCS3’s
smooth, optically encoded jog wheel and transport keys make
creative multimedia production and editing easier than ever.
The MCS3 wheel can play back movies, jog through sound
files, scroll through event lists, and more. And the MCS3 keys
can send function-key equivalents and mouse clicks.
This allows you to use your MCS3 to bring the most frequently
used menu items and commands speedily within reach,
providing more comfortable and creative control of your
favorite applications.
The MCS3 allows you to create an unlimited
You can have a different “Keyset” for each
The MCS3 detects which application is active, and the behavior
of the MCS3 changes accordingly as you change applications.
The included MCS3 application software and driver are
required for the MCS3 hardware to operate.
Please take a moment to send in your product registration card,
so we can notify you in the future about any new products or
updates as they become available.
number of “Keysets”
application.
4
.
Page 5

3
Connecting the MCS
Locate an available serial port on your PC (an RS-232 port will
be a D shell shaped 9 or 25 pin connector.
A USB port will be rectangular
with a symbol such as:
Connect the MCS3 to the PC. If the MCS3 is an RS-232 unit,
connect the power supply (supplied) to the power connector
at the end of the MCS3’s cable.
Installing the Software
Before you run the installation program, (as with any other
Windows installation program), it is strongly recommended
that you first quit all other programs.
If you have previously installed a version of the MCS3 software
on your computer, be sure that you unload the Driver prior to
installing the software. To do this, right-click the wheel icon in
the System Tray (lower right corner) and select ‘Exit’ from the
popup menu to unload the driver.
Launch the Installer
Then start the “setup.exe” program on the MCS3 disk.
Follow the instructions in the install routine. After the install
routine has installed the software, it prompts you to restart
your computer. It is strongly recommended to restart your
computer at this time to finalize the installation and
automatically load the MCS3 driver.
Remember that the MCS3 Driver is required for the MCS3 to
operate. The MCS3 will not appear to send any commands into
the PC unless the Driver has been properly loaded.
The reason for this is that the MCS3, unlike a mouse or
keyboard, sends special "invisible" codes into the PC.
And it is the Driver that is responsible for "re-mapping" these
commands into useful keyboard and mouse commands, such
as key presses and pointer movement.
5
Page 6

Getting Started
Serial Port Settings
Launch the MCS3 application, either from the Windows
Start Menu or by right-clicking on the MCS3 icon in the
Windows system tray and choosing “Control Panel”.
From the Edit menu, select "Preferences”.
If the MCS3 is a USB version, the PC will automatically identify
it on the USB bus. The driver will then recognize it. If the MCS3
is an RS-232 version, the MCS3 Driver will automatically scan
the available COM ports, starting with COM1. It tries to locate
an MCS3 on the first port that is currently not in use. If the
automatic scan process was not successful, you will need to set
the COM port manually, in the Preferences menu.
After you change the COM port you need to reload the driver.
This is done by right-clicking on the MCS3 icon in the lower left
of the computer monitor and select “Reload”.
If the port cannot identify the MCS3, please refer to the
Troubleshooting section of this manual.
Driver Popup Menu
In the lower left corner of the screen, the MCS3 “wheel icon”
appears in the system tray.
This indicates that the MCS3 “Driver” is loaded.
Right click on the icon to open the popup menu for the Driver.
The first menu item opens the Application.
Enable MCS3 (Disable MCS3).
There may be times when the MCS3 is connected to the PC, but
you do not want to use it. For example, you may not want to
accidentally engage or terminate playback because you
accidentally bumped the controller. You can temporarily
disable the MCS3 by selecting “Disable” from this menu.
Re-enable the MCS3 by selecting “Enable” from this menu.
6
Page 7

Reload Driver
There may be times when you need to reload the driver. To
reload the driver simply means to quit the driver and load it
again. For example, if you change COM Port settings in the
Preferences, you will need to re-load the driver. To Reload the
Driver, select Reload from this menu.
Exit
Selecting Exit Unloads the Driver. If you select Exit, the Driver
will unload and the icon will go away. To reload the driver
and begin using the MCS3 again, you will need to Restart the
computer.
Launching the MCS3 Software Application
The application is launched either from the Windows
Start Menu or by right-clicking on the MCS3 icon in the
Windows system tray and choosing “Open MCS3 Editor”.
MCS3 Shuttle LEDs
Normally, on power up, the shuttle ring LEDs will not light
until the shuttle ring is centered.
After that, the shuttle ring LEDs will light depending upon the
direction of rotation from center. Both LEDs are on when the
ring is centered.
V/Stick
The V/Stick is located to the upper right of the jog/shuttle
control. It is a soft, four position switch.
The switch is activated by applying pressure either left, right,
toward you, or away from you. (It is not necessary to press
down or rotate the control.)
Like the other MCS3 keys, it can be assigned to send a key
press or a mouse click.
Typical assignments include arrow keys, home and end keys,
page up and page down, etc.
7
Page 8

What Does the MCS3 Do?
When you press a key or turn the wheel, the MCS3 behaves
like a PC keyboard or mouse.
The MCS3 gives you the ease and convenience of using a
conventional tape recorder style transport control, which will
improve the speed you are able to work .
The MCS3 also provides a way of remotely controlling your
computer when seated at a location other than directly in front
of the monitor.
Key Press Emulation
The MCS3 can send a variety of commands, including simple
keystrokes, like the letters “a”, “j”, symbols such as “@”, and
function keys such as “F1”.
The MCS3 can also send keys with modifiers. Pressing a single
MCS3 key can send the equivalent of a cluster of keys, for
example, Control-Alt-A.
The simplest example is this: Many applications will play back
previously recorded music and or movies when you press the
keyboard’s spacebar. So, you might want the MCS3 Play key to
imitate a spacebar. When you press the MCS3 Play key, the PC
“thinks” that you have pressed the spacebar, and the software
begins to play back music and or movies.
Mouse Emulation
The MCS3 keys also send mouse clicks. Pressing the MCS3 key
can produce a mouse click at specific, user-selected location
within a window.
Most software applications have some on-screen buttons or
icons for which there is no key-equivalent at all. Again, the
MCS3 gives you single-key access to those buttons and icons.
8
Page 9

The Jog Wheel and Shuttle Ring
These can send repeated key characters, (such as arrow keys
for playing movies).
The jog wheel and shuttle ring are also capable of performing
horizontal and vertical mouse click and drag.
The rate of pointer movement or repeated key presses is set by
a Speed Slider, which allows the user to personally customize
the wheel response.
Certain applications allow even more control from the MCS
wheel, including features such as video or audio jog or shuttle.
3
What is a Keyset?
The MCS3 has five keys called “Transport” keys.
They’re called Transport keys because they are labeled with
the standard “tape recorder” transport icons for rewind, fast
forward, stop, play, and record.
There are 6 keys along the top, F1 through F6.
There are 7 keys around the jog/shuttle wheel,
There are four switches built into the "V/Stick".
All of these are user-definable. Each key can send a different
command. That is a total of 22 commands.
In addition to Jog and Shuttle, one key may be assigned to be a
wheel modifier. The wheel can send different kinds of
commands depending on the state of the wheel modifier.
W1
through
W7
.
The 22 key commands, plus the wheel commands, and
the shuttle commands, are collectively called a “Keyset”.
9
Page 10

Keyset Selection
One Keyset may be created for each application.
The MCS3 automatically senses which application is running,
and selects the appropriate Keyset.
For example, say you've already configured the MCS3 to
control a certain application.
Now suppose you click on a window in the background, and
make a different application active.
This immediately “re-configures” the MCS3 with a completely
different Keyset, with 22 different commands and different
jog/shuttle assignments.
When you return to the previous application, its associated
Keyset is instantly and automatically restored.
For example, suppose that one application plays a movie when
you press the spacebar, and a different application plays a
song when you press the return key.
You can set up the MCS3 so that the MCS3 Play key will always
cause the movie or the song to play.
The MCS3 will keep track of which application is active, and
"know" whether pressing the MCS3 Play key should send a
spacebar or a return key.
Try it Now
Launch the MCS3 application.
Select "About Media Control Station".
Rotating the wheel causes the "movie" to go forward and also
makes the picture of the wheel slowly rotate.
The transport keys on the MCS3 make the movie rewind, stop,
play, and go fast forward.
10
Page 11

About The Default Keyset
The first time you use the MCS3, the so-called "Default Keyset"
is automatically selected.
The Default Keyset is ready to use and should have some
functionality with certain applications.
The wheel sends left and right arrow keys, to playback
QuickTime™ movies one frame at a time. The QuickTime™
application will also recognize the Play and Stop keys to toggle
between play and puase.
Play and Stop keys send a space and return, respectively.
F1 through F6 send function keys F1 through F6.
The V-Stick sends up, down, left and right arrow keys.
The W keys have no assignment. They will not send any
keyboard commands or mouse clicks unless you edit the
Default Keyset.
Any time you open an application, if you haven’t yet created a
Keyset for that specific application, the Default Keyset will be
automatically selected.
11
Page 12
Editing the Default Keyset
You can edit (that is, change) the Default Keyset at any time,
using the MCS3 application. Here are two simple examples of
how to edit the default Keyset:
Example of Changing What the Wheel Does
Presently, the wheel sends left and right arrow keys at a
medium speed.
Turning the wheel will play a movie in a QuickTime™ related
application.
Suppose you are editing a movie, and you want to use the
wheel to easily view the movie frame by frame. You may want
to slow down the response of the wheel, to make it easier to
find a specific frame.
We will use the Wheel Speed slider. First, select the Wheel.
Rotate the wheel a little in either direction. Alternately, you
may click on the picture of the wheel.
12
Page 13

The Wheel Speed slider setting affects the wheel for both
directions of rotation. For the purposes of this example, it
doesn't matter whether you select clockwise or
counterclockwise rotation.
Click on the Wheel Speed slider and drag it to the left.
Now the next time you switch to a QuickTime™ related
application, the wheel will make the movie play back more
slowly, allowing finer control.
The wheel will still produce the equivalent of typing arrow
keys, but with a slower key press repeat rate.
13
Page 14

Example of Changing What a Key Does
Presently, in the Default Keyset, pressing the Record key does
nothing. Suppose that you want the Record key to send the
equivalent of the PC's Enter key.
Press the MCS3 Record key to select it. Notice that the "Control
Info box" shows which key you've selected, Record, and the
Key Press that the Record key will emulate: None.
Tab to select the Key Press field. On the keyboard, press Enter.
Now the MCS3 Record key will send Enter.
Restoring the Default Keyset Using Clear
To restore the default Keyset back to its original generic
QuickTime™ settings, select Clear from the Edit menu.
The wheel will send left and right arrow keys again, to
playback QuickTime movies one frame at a time.
Play and Stop keys make the MCS3 send space and return.
14
Page 15

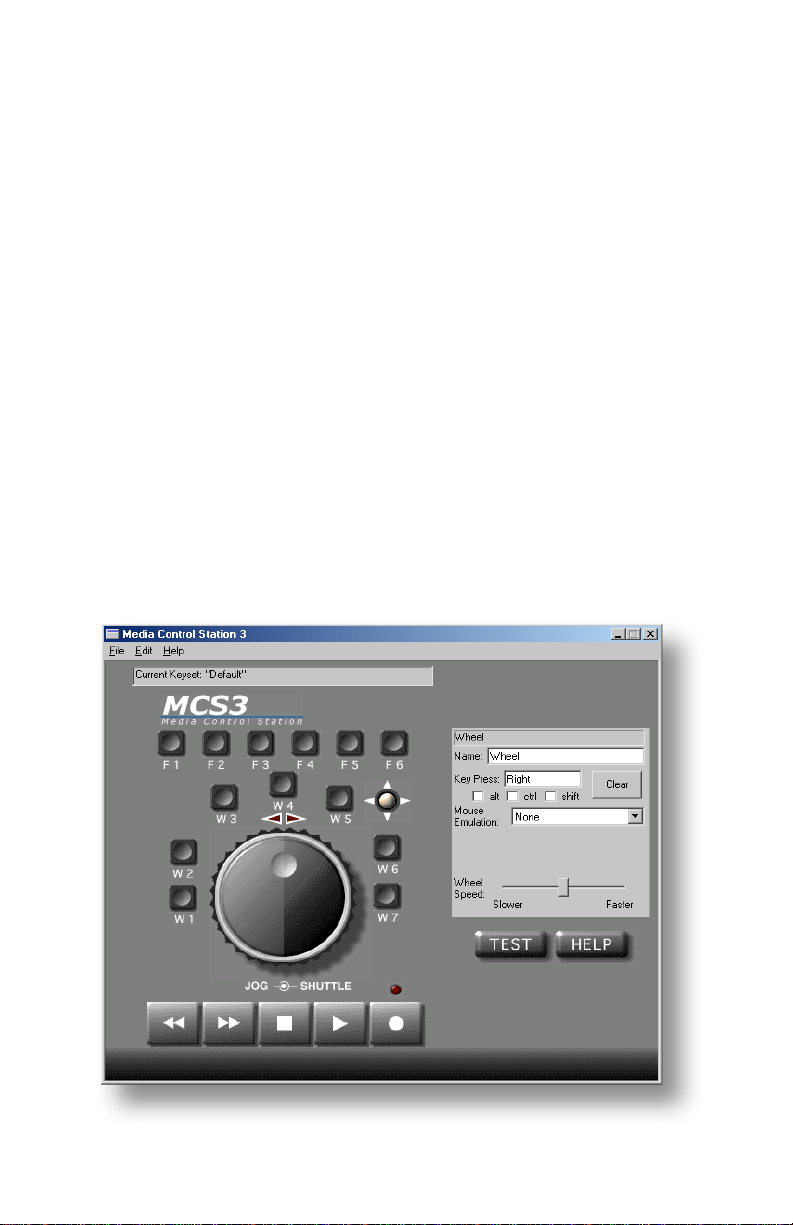
The MCS3 Editor
Application
The MCS3 application features a picture of the MCS3.
In the upper left is the name of the current Keyset.
To the right is the “Control Info Box”, which displays what
each MCS3 control will do within a specific application.
To edit (change) what the MCS3 sends, first select the control
by pressing the desired key or rotating the wheel.
(Or, use the mouse to click on the picture of the control).
The control's name and function are displayed in the Control
Info Box, where they can be edited.
When "Stop" is pressed on the MCS3, it will emulate the PC's "Return" key.
The "Stop" key is selected
15
Page 16

Creating a New Keyset
Remember that a Keyset is the collection of commands that the
MCS3 can send. Each application can have its own Keyset.
The MCS3 senses which application is active, so it knows
which Keyset applies to each application.
When you are ready to start programming the MCS3, you begin
by selecting New Keyset from the File menu. This "links" the
operation of the MCS3 with the application you want to
control.
Select New Keyset from the File menu.
This opens a Select dialogue. Select the application that you
wish use with the new Keyset.
The currently active Keyset name is displayed in the upper
leftt part of the MCS3 window.
16
Page 17

Launch the Target Application
We will refer to the application that you wish to control as the
target application, to distinguish it from the MCS3 application.
Launch the target application that you desire to control, if it is
not already open.
You use the MCS3 application to edit Keysets, to make the
MCS3 do what you want to do to the target application.
While you are editing and fine tuning your Keysets, you may
switch back and forth between the MCS3 application and the
target application.
Then, quit the MCS3 application, since it is not needed to use
the MCS3. Any time in the future that you open a target
application, the MCS3 will be ready to control that application.
Once you have created your Keysets, you do not need to open
the MCS3 application again to use the MCS3.
Remember also that if you open an application for which no
Keyset exists, the MCS3 will use the Default Keyset.
The only times that you ever need to open the
MCS3 application are when you wish to
Create a New Keyset, Delete a Keyset, Import, Export
or Edit an existing Keyset.
Once you have created the desired Keysets, ordinary daily use
of the MCS3 does not necessitate launching
the MCS3 application.
17
Page 18

Assigning the Keys and V-Stick
Select a key by pressing the key. Or, click the picture
The V-Stick is really four separate keys. Select by moving it left,
or right, or "up" (away from you) or "down" (toward you).
Look at the Control Info box.
The permanent name of the MCS3 key is displayed first.
Under this, the Name field is highlighted.
You may give the key a name which is more descriptive of the
key's actual function.
Then Tab or click to select the "Key Press" field.
The Key Press field sets the character to be sent.
(The Mouse Emulation pop up menu sets mouse clicks.)
Decide if you want the key to send a character, or a mouse
click, or both.
To Make a Key Send a Character
Simply type the character on the keyboard, with or without
modifier keys. Notice that the character and modifiers appear
in the MCS3 application's Key Press field.
of the key.
If you do not want the key to send any character, press the
keyboard's delete key.
If you want the key to send only a character, and not emulate a
mouse click, make sure that None is selected in the Mouse
Emulation pop up menu.
Understand that this process allows a single key on the MCS3 to
send a character with a "cluster" of modifiers.
For example, pressing Play only on the MCS3 can send the
equivalent of “Control-Alt-P".
18
Page 19

To Make the Key Send a Mouse Click
If you chose to assign a key to send either a left or a right
mouse click, the click can take place in a specific location
within a window.
Alternately, the click can be unspecific, that is, the click can
occur wherever the pointer happens to be located.
To Make a Key to Send a Simple Mouse Click:
Select a key by pressing the key.
Select Left or Right Click from the Mouse Emulation menu.
The click will occur within the target application, anywhere the
pointer is located.
19
Page 20

To Make an MCS3 Key Send a Click at a Specific Point:
This is the method that you use when you want an MCS3 key to
click on a button or icon within a window.
From the Mouse Emulation menu, select a Left or a Right Click.
Then check the box, “Capture Coordinates...”.
Now, switch to the target application. You will use your mouse
briefly to specify the place where you want the click to occur.
Use the mouse to position the pointer over the location where
you want the click to occur.
Now, very important, you capture the mouse pointer
coordinates by pressing the desired MCS3 key. (Not by
clicking with the mouse!)
Now the next time that you press that key on the MCS3, while
you are in the target application, a click will occur at the
desired coordinates, without having to use the mouse.
Example
Suppose you have an application which features a window
with transport buttons. And suppose that these transport
buttons have no key equivalents; the only way to activate them
is to click on them.
20
Page 21

First you need to create a New Keyset. Select New Keyset from
the file menu. Then select the application that you want to
control. The name of the application will be displayed as the
"Current Keyset:" in the MCS3 application.
We will refer to this application that you are controlling as the
"target application", to distinguish it from the MCS3 application.
We will program the MCS3 Play key so that pressing the MCS
3
Play key will result in a click on the target application's Play
button.
Select the Play key by pressing the Play key on the MCS3.
For this example, the key should send a mouse click only, and
no characters. Press the delete key on the keyboard to delete
any characters from the Key Press field.
Select Click from the Mouse Emulation pop up menu.
Check "Capture Coordinates".
21
Page 22

Hide Pointer
When the click occurs, you will see the pointer momentarily
move to the location where the click occurs. Then the pointer
quickly returns to its original location.
If you do not want to see the pointer move, check “Hide
Pointer" from the Keysets menu.
Then the mouse click will occur “invisibly”. This is a very nice
effect because it makes it appear the MCS3 was designed as a
hardware control surface especially for your application.
If a click does not do what you expected, uncheck Hide
Pointer so you can observe where the click is actually
occurring.
For each Keyset, you can choose to check or not to check Hide
Pointer in the Keysets menu.
22
Page 23

About Captured Coordinates
When a click has been captured, the coordinates of the click
and the name of the window in which the click occurred are
shown in the MCS3 application.
If the window does not have a name, then no name will
appear between the quotes.
Re-Capturing Coordinates
You may want to "re-capture" the coordinates. For example,
you may not have had the mouse positioned correctly the first
time that you pressed the MCS3 key.
In that case, simply uncheck the check box. It will revert to its
original "Capture Coordinates of [name of control]...". Then
check it again. This "re-arms" the MCS3 to capture fresh
coordinates the next time you switch to the target application.
23
Page 24

Assigning the Jog Wheel and Shuttle Ring
The MCS3 jog wheel and shuttle ring can send repeated key
presses, mouse emulation, or both.
(Some software applications may be able to read the wheel
commands directly, providing more precise control.
Consult the documentation or read me files for the software
that you are controlling to find out if there are any special
references regarding support for the MCS3.
The jog wheel is assigned by first selecting the wheel by
rotating it a little clockwise or counterclockwise. Alternately,
the wheel may be selected by clicking on the picture of the
wheel.
Select the right side of the wheel for assigning what the wheel
will send when rotated clockwise.
Select the left side of the wheel for assigning what the wheel
will send when rotated counterclockwise.
Select the shuttle ring by turning it away from center.
Alternately, click on the direction arrows.
Look at the Control Info box.
The direction is displayed first.
Under this, the Name field is highlighted.
You may give the jog wheel and shuttle ring a name which is
descriptive of its function.
Then Tab to select the "Key Press" field.
The Key Press field sets the character to be sent.
(The Mouse Emulation pop up menu sets mouse clicks.)
Decide if you want the wheel to send a character, or a mouse
click, or both.
24
Page 25

Wheel Modifier Key
Suppose that within one application, you want the wheel to
have two different functions.
For example, in some applications, repeated arrow keys are
used to play a movie frame by frame, while shifted-arrow keys
make a movie play back two frames at a time.
Any MCS3 key can be assigned as the Wheel Modifier key.
As long as the Wheel Modifier key is held down, the wheel can
send an entirely different command.
For example, to make W7 the Wheel Modifier key, first press
W7. Then use the mouse emulation menu to assign it to Wheel
Modifier.
Next, press and hold down W7 while selecting the wheel.
Notice in the Info Box that you can now assign the wheel to an
alternate set of clockwise or counter clockwise commands.
In actual use, turning the wheel will send one set
of commands.
Hold the Wheel Modifier key and turn the wheel to send a
different set of commands.
To Make the Wheel or Ring Send Repeated Characters
The wheel or ring will repeatedly send the same character over
and over again as you rotate the wheel. It can send a different
character for clockwise and counter clockwise rotation.
Type the desired character on the keyboard, with or without
modifier keys (Alt, Ctrl or Shift). Notice that the character and
modifiers appear in the MCS3 application's Key Press field.
Press the PC's Delete key if you do not want it to send any
keystrokes.
If you want it only send characters, and not emulate a mouse,
make sure that None is selected in the Mouse Emulation
pop up menu.
25
Page 26

To Make the Wheel or Ring Emulate a Mouse
The wheel and ring emulates a mouse by moving the pointer
either horizontal or vertical.
There are three possible ways that the wheel relates to the
mouse button, called Move, Drag, and Scroll.
Move
The pointer moves without any click.
Drag
Rotating the wheel automatically causes a click as if the mouse
button were being held mouse down. If the pointer is
positioned over a movable object, such as a window or icon,
then rotating the wheel will drag the object. The mouse click is
automatically released shortly after the user stops turning the
wheel.
Scroll
This is a pointer move that begins with a mouse-down, just like
a drag.
Only in this case, the mouse does not automatically "unclick"
(mouse-up) after the user stops turning the wheel.
Rather, the mouse-up occurs when the wheel is rotated back to
its original starting point, where the mouse-down first
occurred.
The mouse-up also occurs when any key is pressed.
This is useful for playing back audio and video in applications
that feature a small scroll bar for playback. The user can initiate
forward or backward playback by turning the wheel a little and
then taking their hands off the wheel, without having to
continuously rotate the wheel.
Since the Ring has a center detent, it is naturally suited for the
"scroll" function. (It cannot be assigned to Move or Drag.)
26
Page 27

Wheel Drag from Specific Coordinates
This is the method that you use when you want the MCS
3
wheel or ring to perform a drag or scroll from specific
coordinates within a window.
From the Mouse Emulation menu, select either Horizontal
Drag, Vertical Drag, Horizontal Scroll or Vertical Scroll.
Then check the box, “Capture Mouse Coordinates”.
Now, switch to the target application. You will use your mouse
briefly to simply specify the coordinates where you want the
click (mouse down) to occur.
Use the mouse to position the pointer over the area that you
want the click to occur.
Now, very important, you capture the mouse coordinates by
turning the wheel or ring. (Not by dragging with the mouse!)
Now the next time that you turn the wheel on the MCS3, while
you are in the target application, a drag will occur starting at
the previously captured coordinates.
Hide Pointer with Drag or Scroll
While dragging or scrolling, the pointer moves to the location
where the click occurs. Then the pointer quickly returns to its
original location.
If you do not want to see the pointer move, check “Hide
Pointer" from the Keysets menu.
Then the pointer will drag “invisibly”.
For each Keyset, you can choose to check or not to check Hide
Pointer.
27
Page 28

Wheel Speed
The rate of keystrokes or mouse movement is set by the
Wheel Speed slider.
This slider allows you to tune the responsiveness of the wheel.
For example, choose a faster speed for faster playback.
Choose a slower speed for finer control.
28
Page 29

Alert During Clicks, Drags and Scrolls
When Capture Coordinates is checked, MCS3 remembers the
pointer coordinates when you first pressed the key or turned
the wheel within the target application. A mouse click is
occurs, and the MCS3 remembers the name of the window in
which the click occurred.
So the next time you press a key or turn the wheel, the MCS
will "look for" the name of the window in which the pointer
coordinates were first captured, and produce a click.
It is also possible that the window name has been changed.
If you press a key or turn the wheel and the name of the
window has been changed since the click was first captured,
you will see a message like this.
The original window name and the new window name are
shown. Click Cancel to cancel the click. Click OK if you want
to replace the window name with the new window name.
The click, drag, or scroll will occur in the new window.
3
29
Page 30

Special Wheel Mode
The so called “Special Wheel Mode” is reserved for software
developers.
When the wheel is assigned to send a “Special” command, it
sends an invisible command code. The wheel will most likely
appear do nothing.
Some applications have been developed for enhanced MCS
3
support. The Special mode has been used by some developers
to implement features such as Audio and Video Jog and
Shuttle.
Some applications come with an MCS3 Keyset which makes
use of the Special mode. For specific information, refer to the
documentation of the software that you are controlling if it
includes an MCS3 Keyset.
30
Page 31

Additional Time Saving Hints
When capturing mouse clicks, it is not necessary to continually
switch back and forth between the MCS3 application and the
target application you intend to control.
You can "pre-arm" the MCS3 application to capture the pointer
coordinates for the wheel and all the keys.
Example
Suppose that you wish to create a Keyset that makes each
transport key click on a transport button within the window of
the target application. First, select New Keyset from the file
menu. Open the target application.
We will first delete the two "Default" key presses.
On the MCS3, press Stop to select the Stop key.
On the PC, press Delete.
On the MCS3, press Play to select the Play key.
On the PC, press Delete.
Next, arm each transport to capture coordinates.
From the Mouse Emulation menu, select Click.
Check "Capture Mouse Coordinates".
Repeat this process for the Fast Forward, Stop, Play, and
Record keys.
Then, switch to the target application. Use the mouse to point
to the "rewind" button within the target application.
On the MCS3, press the Rewind key.
This captures the mouse coordinates for the rewind button.
Move the mouse to the next on-screen button within the target
application, fast forward.
On the MCS3, press the fast forward key. This captures the
mouse coordinates for the fast forward button.
Repeat the process for each of the remaining keys.
31
Page 32

About Delete and Tab
When the Key Press field is highlighted, pressing the PC's
Delete key will clear any key press and insert the word "none".
No character is sent when the key is pressed or whee
If you want a control to actually send the equivalent of the PC's
Delete key, do the following.
Press Delete with a modifier key. For example, Alt-Delete.
The Key Press field will show that Alt-Delete was pressed.
Delete
Then use the mouse to click and de-select the Alt button.
This will leave the Delete intact. Now the MCS3 can send the
equivalent of the PC's Delete key.
Delete
When the PC's Tab key is pressed, you can select whether a
control's Key Press or Name field is highlighted.
If you want a control to actually send the equivalent of the PC's
Tab key, do the following.
l is
turned.
Press Tab with a modifier key. For example, Ctrl-Tab.
The Key Press field will show that Ctrl-Tab was pressed.
Tab
Then use the mouse to click and de-select the Ctrl button.
This will leave the Tab intact. Now the MCS3 key send the
equivalent of the PC's Tab key.
Tab
32
Page 33

Display Keyset
When Display Keyset is selected, a second window opens.
This window displays the current assignments of each control
in the Keyset.
The name of the controls are displayed, in addition to the
control's Key Press or Mouse Click assignments.
To make the window go away, click the Close box.
33
Page 34

Saving and Deleting Keysets
The MCS3 Keysets are automatically saved within MCS3’s
Preference file, called "MCS3 Prefs". You never have do a
"Save" when using the MCS3 application.
To delete a Keyset, select the Keyset from the Keyset menu.
Then select Delete from the Edit menu.
Importing and Exporting Keysets
Keysets, though automatically stored invisibly within the
Preferences file, may also be Exported or Imported.
This allows you to easily move Keysets from one location to
another, such as another computer. It also allows third-party
Keysets to be developed and added at any time.
To Import a Keyset, select Import Keyset from the File menu.
A standard Open dialogue lets you select the Keyset.
Once imported, the Keyset will appear in the Keysets menu.
It will also automatically be saved in the Preferences file.
To Export a Keyset, select Export Keyset from the File menu.
A standard save dialogue will appear, to allow you to choose
where to put the exported Keyset. The Keyset retains the name
of the application that it is linked to.
Using Supplied Keysets
Some Keysets for selected applications are included on the
MCS3 disk. Refer to any Read Me files on the disk for a
description of the functions provided by these Keysets.
To use any of these Keysets, select Import from the File menu.
Then select the Keyset within the Import dialogue.
The Keyset will then be automatically saved in the
Preferences file, and will appear in the Keysets menu.
34
Page 35

MCS3 Editor Application's Menus
File Menu
New Keyset...
Creates a New Keyset, and links it with a particular Target
Application.
In other words, when you are ready to start defining the
function of the MCS3, the first thing you do is select New
Keyset.
You will see a standard dialogue. Then select the application
that you wish to control with the MCS3. We refer to that
application as the "target" application, simply to distinguish it
from the MCS3 application.
Then you use the MCS3 application to assign what each control
will send. These assignments are collectively called a Keyset.
Import Keyset...
Imports a previously exported Keyset file.
Places the Keyset into the Keysets menu, and
saves the Keyset within the MCS3 application's Preference file.
Export Keyset...
Exports a Keyset as an independent file, to allow you to more
easily transfer the file to another computer.
Quit
Exits the MCS3 Application. Once you have defined your
Keysets, the MCS3 Application does not need to be running for
the MCS3 hardware to operate.
35
Page 36

Edit Menu
Undo Undoes last operation.
Cut Copies the currently selected text the Clipboard.
Clears text.
Copy Copies the currently selected text to the Clipboard.
Paste Pastes the previously copied text.
Delete Deletes the selected text.
Copy Keyset Copies the currently selected Keyset
to the Clipboard.
Paste Keyset Pastes the previously copied Keyset
into the current Keyset.
Clear Keyset Clears the Keyset.
Resets the individual controls to their Default settings.
Delete Keyset Deletes currently selected Keyset. Will not
delete the Default Keyset.
Keysets Menu
This menu contains a list of all the Keysets that you have
created or imported.
It will always at least contain the Default Keyset.
Use this menu to select a Keyset to display the control
assignments and edit them.
Display Keyset
Opens window which displays all the names and control
assignments in the Keyset.
Preferences
Opens window allowing the setting of preferences at the
program startup.
36
Page 37

Technical Information
Specifications
Dimensions:...................6.5" x 7.0" x 1.25"
Shipping Weight: ...........3.7 lbs
Troubleshooting
If for some reason the MCS3 does not give you the expected
results, take a moment to do some investigating.
The most important concept is that the Driver must be loaded
for the MCS3 to operate. Confirm this by observing that the
small wheel icon is present in the lower left corner of the
screen in the Windows "System Tray".
If the unit is not operating at all, or if an error dialog appears,
first perform a shutdown and restart. Depending on which
version of the MCS3 is installed, check the following:
For the RS-232 version: Confirm that the power supply is
connected. Confirm the COM port settings in the Preferences
dialog. Click on the small wheel icon, and Reload the Driver.
Also confirm from the popup menu that the MCS3 is "Enabled.”
For the USB version of the MCS3; verify that the USB bus
recognizes the MCS3. From the Start menu, click on Settings,
then Control Panel, then System. (on Windows 2000 and XP,
then click on Hardware then the Device Manager). Then click
on the Universal Serial Bus Controllers. The MCS3 USB should
be listed in the devices.
On Windows NT, 2000 and XP, make sure you are logged in
as system administrator, or the system will not allow the
software to be installed
If a mouse click does not appear to work, first try unchecking
"Hide Pointer", so you can see where the click is actually
occurring.
37
Page 38

Care and Service
If properly cared for, your MCS3 should provide years of
trouble-free performance. Avoid dropping the MCS3, or hard
banging on the keys.
Clean with a soft cloth dampened with window cleaner.
Do not allow liquids to get inside the unit.
There are no user-serviceable parts in the MCS3. Please refer to
the really fine print following for detailed warranty and service
information.
38
Page 39

JLCooper Electronics Limited Factory Warranty
JLCooper Electronics (“JLCooper”) warrants this product to be free of defects in
materials or workmanship for a period of 12 months from the date of purchase.
This warranty is non-transferable and the benefits apply to the original owner. Proof
of purchase in the form of an itemized sales receipt is required for
To receive service under this warranty, customers in the United States should
contact the JLCooper factory at 310-322-9990 and talk to a service technician.
If necessary, a Return Authorization number may be issued.
For our customers outside the United States, it is recommended that you first contact
your Dealer or Distributor, since they may offer their own service or support policy.
If local support is not obtainable, please send a FAX to JLCooper’s Service
Department at 310-335-0110, with a detailed description of the service required.
Upon issuance of return authorization, the product should be properly packed and
shipped to Service Department, JLCooper Electronics, 142 Arena St., El Segundo, CA
90245.
Please include the following: copy of the sales receipt, your name and address (no
P.O. Boxes, please), a brief description of the problem, and any other related items
discussed with the service department and considered necessary to evaluate the
product or effect a repair. The return authorization number must be clearly written
on the outside of the package.
JLCooper will, without charge for parts or labor, either repair or replace the
defective part(s). Shipping costs are not covered by this warranty.
JLCooper’s normal repair turn around time at the factory is approximately 15
business days, from receipt of product to shipping. Your actual turn around time
will include return shipping.
Actual turn around time will vary depending upon many factors including the
repeatability of the customer’s reported complaint, the availability of parts required
for repair, the availability of related products needed to evaluate the product if
necessary.
Priority services are available. These should be discussed with the service technician
at the time the return authorization is issued.
This warranty provides only the benefits specified and does not cover defects or
repairs needed as result of acts beyond the control of JLCooper including but not
limited to: abuse, damage by accident/negligence, modification, alteration,
improper use, unauthorized servicing, tampering, or failure to operate in accordance
with the procedures outlined in the owner’s manual; nor for acts of God such as
flooding, lightning, tornadoes, etc.
THE DURATION OF ANY OTHER WARRANTIES, WHETHER IMPLIED OR EXPRESS,
INCLUDING BUT NOT LIMITED TO THE IMPLIED WARRANTY OF
MERCHANTABILITY, IS LIMITED TO THE DURATION OF THE EXPRESS
WARRANTY HEREIN. JLCOOPER HEREBY EXCLUDES INCIDENTAL AND
CONSEQUENTIAL DAMAGES, INCLUDING BUT NOT LIMITED TO: LOSS OF TIME,
INCONVENIENCE, DELAY IN PERFORMANCE OF THIS WARRANTY, THE LOSS OF
USE OF THE PRODUCT OR COMMERCIAL LOSS, AND FOR BREACH OF ANY
EXPRESS OR IMPLIED WARRANTY OF MERCHANTABILITY, APPLICABLE TO THIS
PRODUCT. JLCOOPER SHALL NOT BE LIABLE FOR DAMAGES OR LOSS
RESULTING FROM THE NEGLIGENT OR INTENTIONAL ACTS OF THE SHIPPER
OR HIS CONTRACT AFFILIATES. THE CUSTOMER SHOULD CONTACT THE
SHIPPER FOR PROPER CLAIMS PROCEDURES IN THE EVENT OF DAMAGE OR
LOSS RESULTING FROM SHIPMENT.
warranty coverage.
 Loading...