

Page 1
MCS3 SP USB Software for OSX
JLCooper makes no warranties, express or implied, regarding this softwareʼs fitness for a particular
purpose, and in no event shall JLCooper Electronics be liable for incidental or consequential damages,
loss of profits, loss of data or data being rendered inaccurate, or losses sustained by third parties even if
JLCooper Electronics has been advised of the possibility of such damages.
Page 2

INSTALLATION .....................................................................................! 1
UNINSTALLING ....................................................................................! 2
SYSTEM AND SOFTWARE SETUP..........................................................! 2
INTRODUCTION TO THE MCS3 SP USB SOFTWARE..............................! 3
KEYSETS...................................................................................................! 3
EDITING KEYSETS ..............................................................................! 4
THE INSPECTOR WINDOW ...................................................................! 5
ACTION TABS .....................................................................................! 7
KEYSTROKES TAB......................................................................................! 7
MOUSE TAB ............................................................................................! 11
MIDI TAB ................................................................................................! 16
EMULATION TAB.......................................................................................! 20
SPECIAL TAB ...........................................................................................! 23
BUILT IN ACTIONS TAB .............................................................................! 24
FINAL CUT PRO™ SUPPORT .............................................................! 25
FINAL CUT PRO™ AND CONTROL SURFACES.............................................! 25
FINAL CUT PRO™ SHUTTLE .....................................................................! 25
USING THE MCS3 SP WITH FINAL CUT PRO ..........................................™! 25
THE MCS3 SP FINAL CUT PRO KEYSET ...................................................! 26
SOUNDTRACK PRO™ SUPPORT ........................................................! 30
THE SOUNDTRACK PRO KEYSET...............................................................! 30
GARAGEBAND™ SUPPORT ...............................................................! 33
THE GARAGEBAND KEYSET......................................................................! 33
IMOVIE™ SUPPORT ..........................................................................! 35
THE IMOVIE KEYSET ................................................................................! 35
LOGIC™ SUPPORT ...........................................................................! 37
THE LOGIC KEYSET..................................................................................! 37
NUENDO™ SUPPORT .......................................................................! 39
THE NUENDO KEYSET..............................................................................! 39
MCS3 SP USB Software" i
Page 3
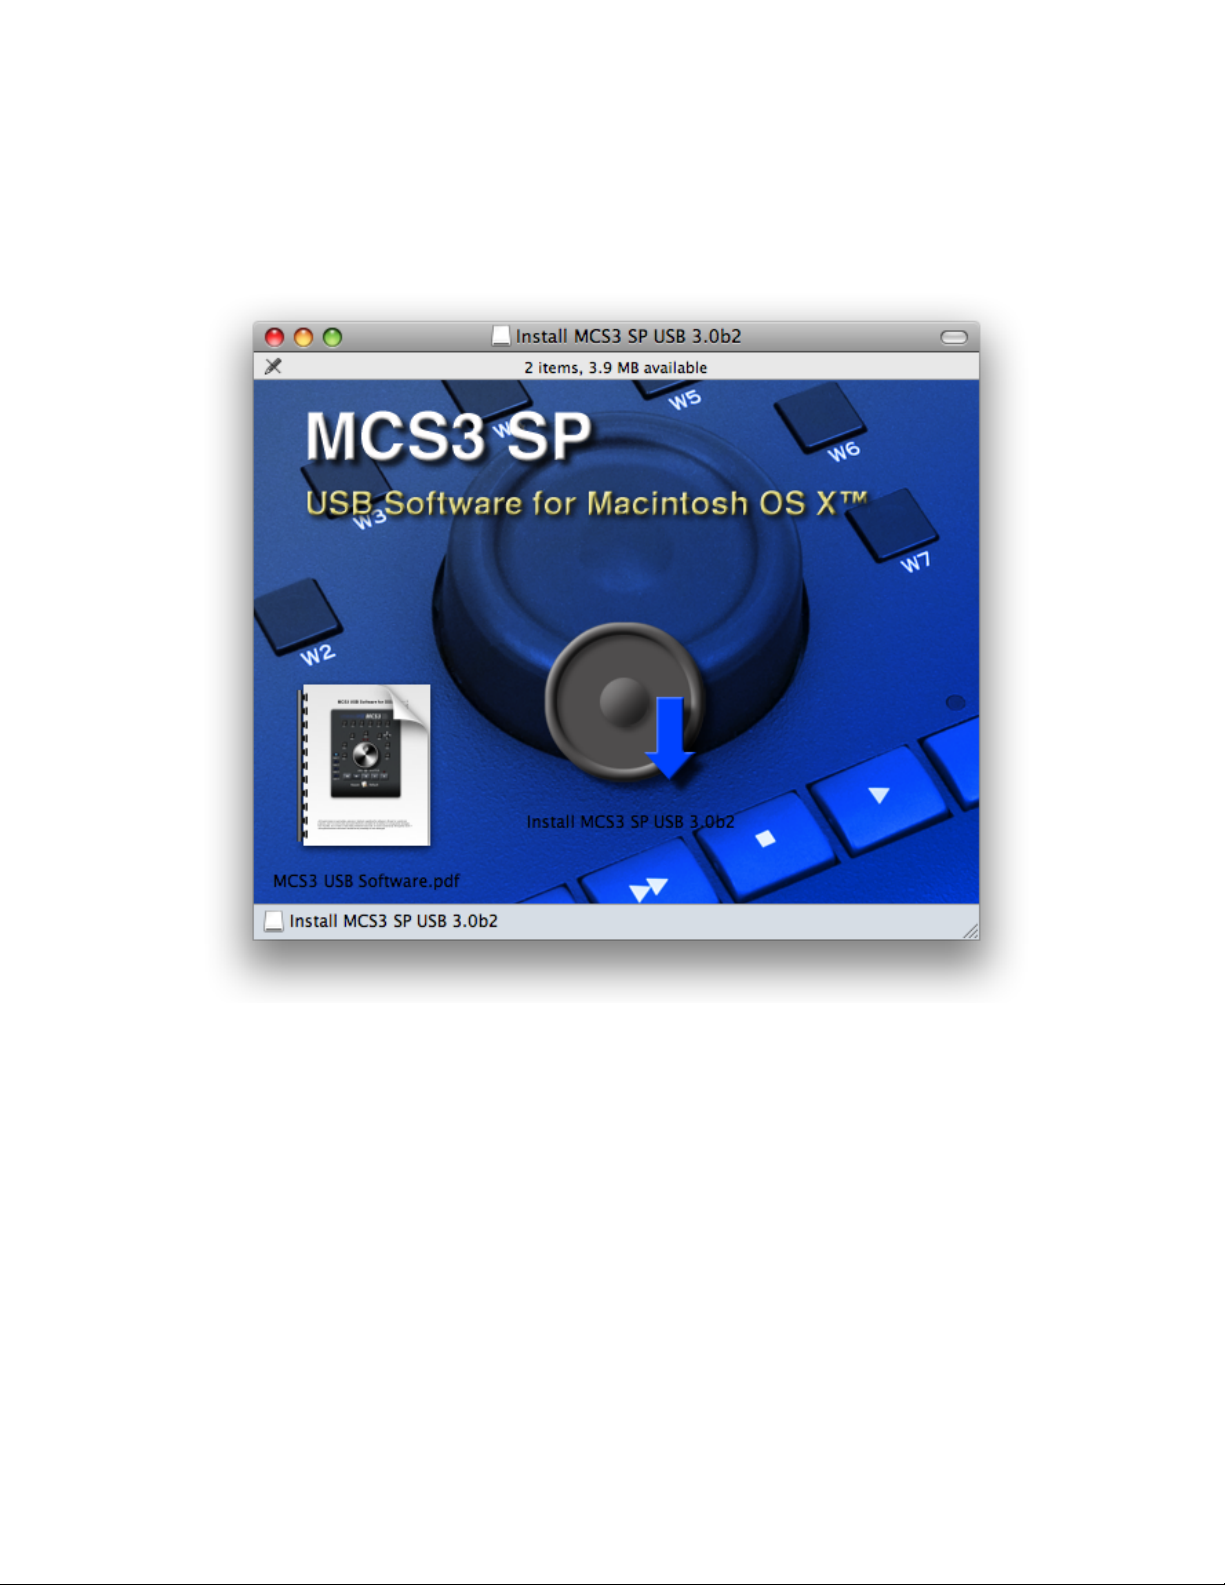
Installation
Double-click the file Install_MCS3_SP_USB_3.x to open a disk image. From the
window that opens, run the application Install MCS3 SP USB 3.x and follow the
onscreen instructions.
The following files will be installed on your main hard drive:
The folder MCS3 SP USB Software will be placed in the /Applications/ folder. This
folder contains the MCS3 SP USB application, keysets, and documentation.
MCS3SPUSBMIDIDriver.plugin will be placed in /Library/Audio/MIDI
Drivers/.
MCS3 SP USB Uninstaller will be placed in /Library/StartupItems/.
The folder JLCooper will be placed in /Library/Application Support.
The MCS3 SP USB Uninstaller application will be placed on the Desktop.
After the installation is complete, you will be directed to restart your computer.
MCS3 SP USB Software" 1
Page 4
Uninstalling
Launch the MCS3 SP USB Uninstaller application which is located on the Desktop.
Select the items you wish to uninstall (or click on the Select All checkbox) then click on
the Uninstall button.
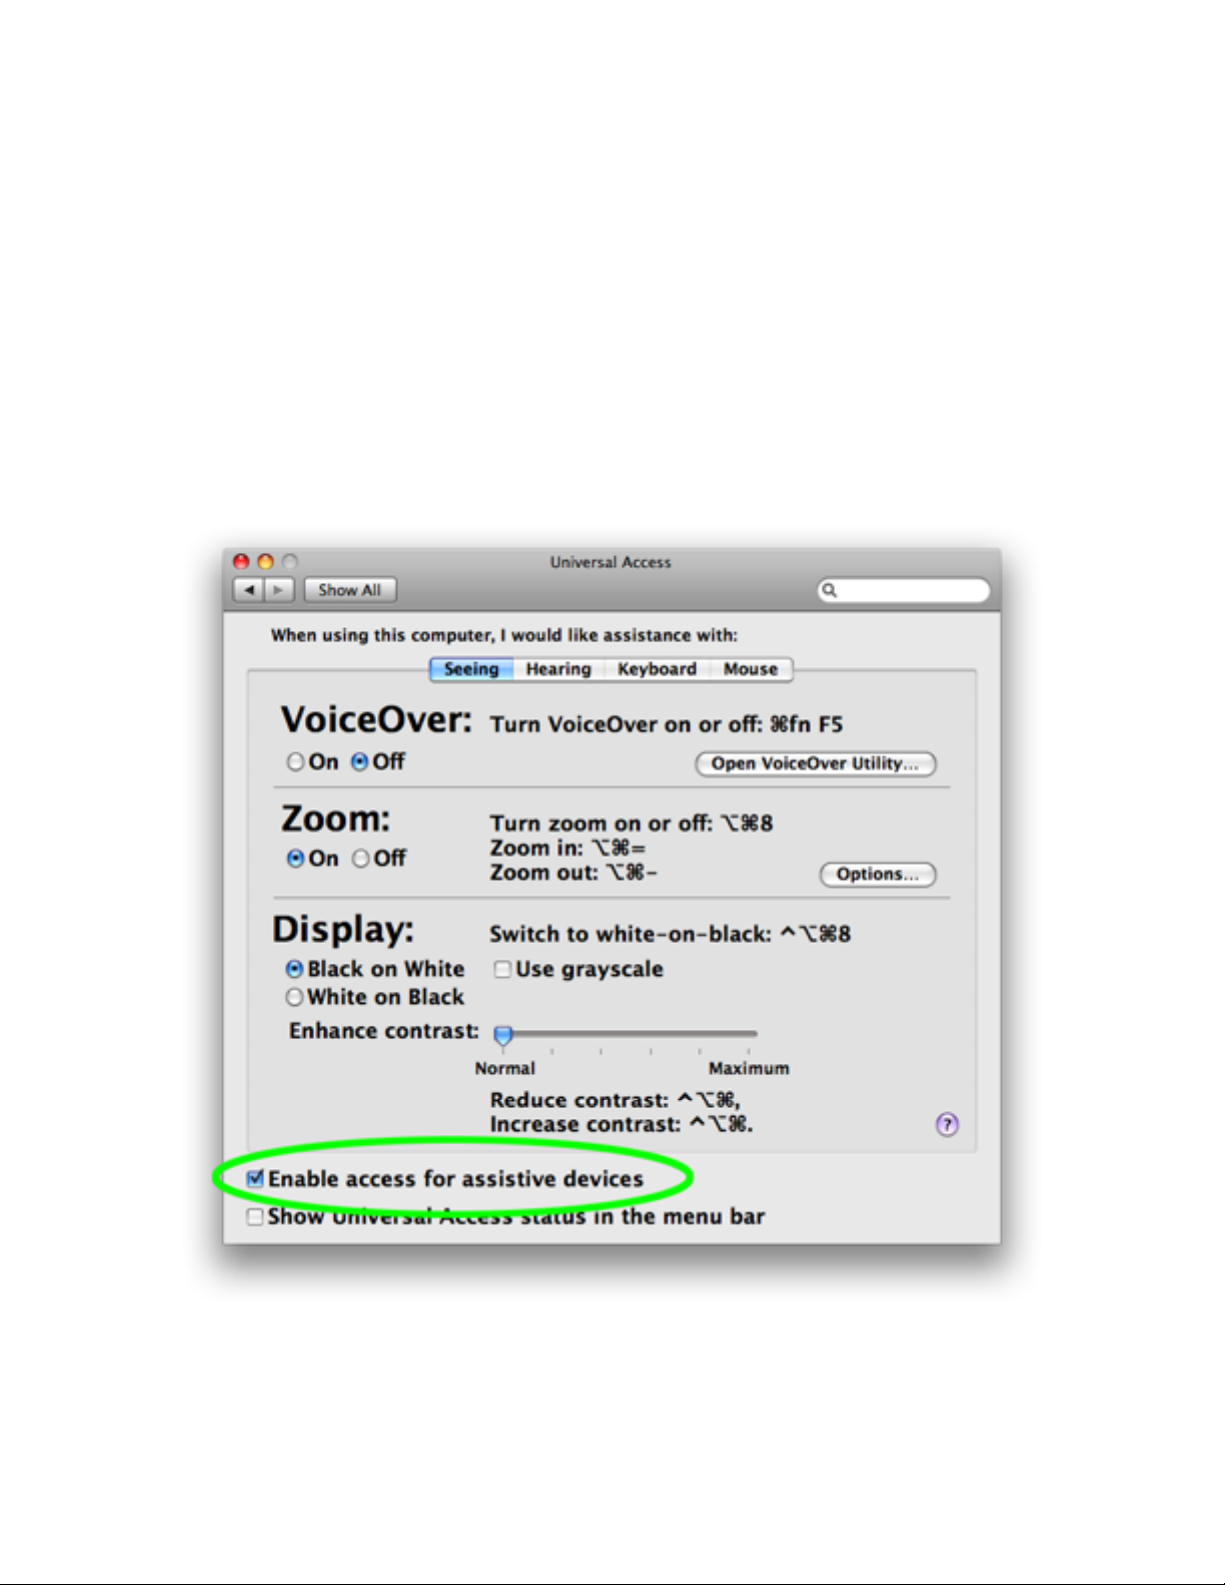
System and Software Setup
The MCS3 SP software relies on Appleʼs Universal Access to perform mouse emulation.
In order for the MCS3 SP software to work correctly, you must open System
Preferences and go to the Universal Access pane. Make sure “Enable access for
assistive devices” is checked then quit System Preferences.
MCS3 SP USB Software" 2
Page 5

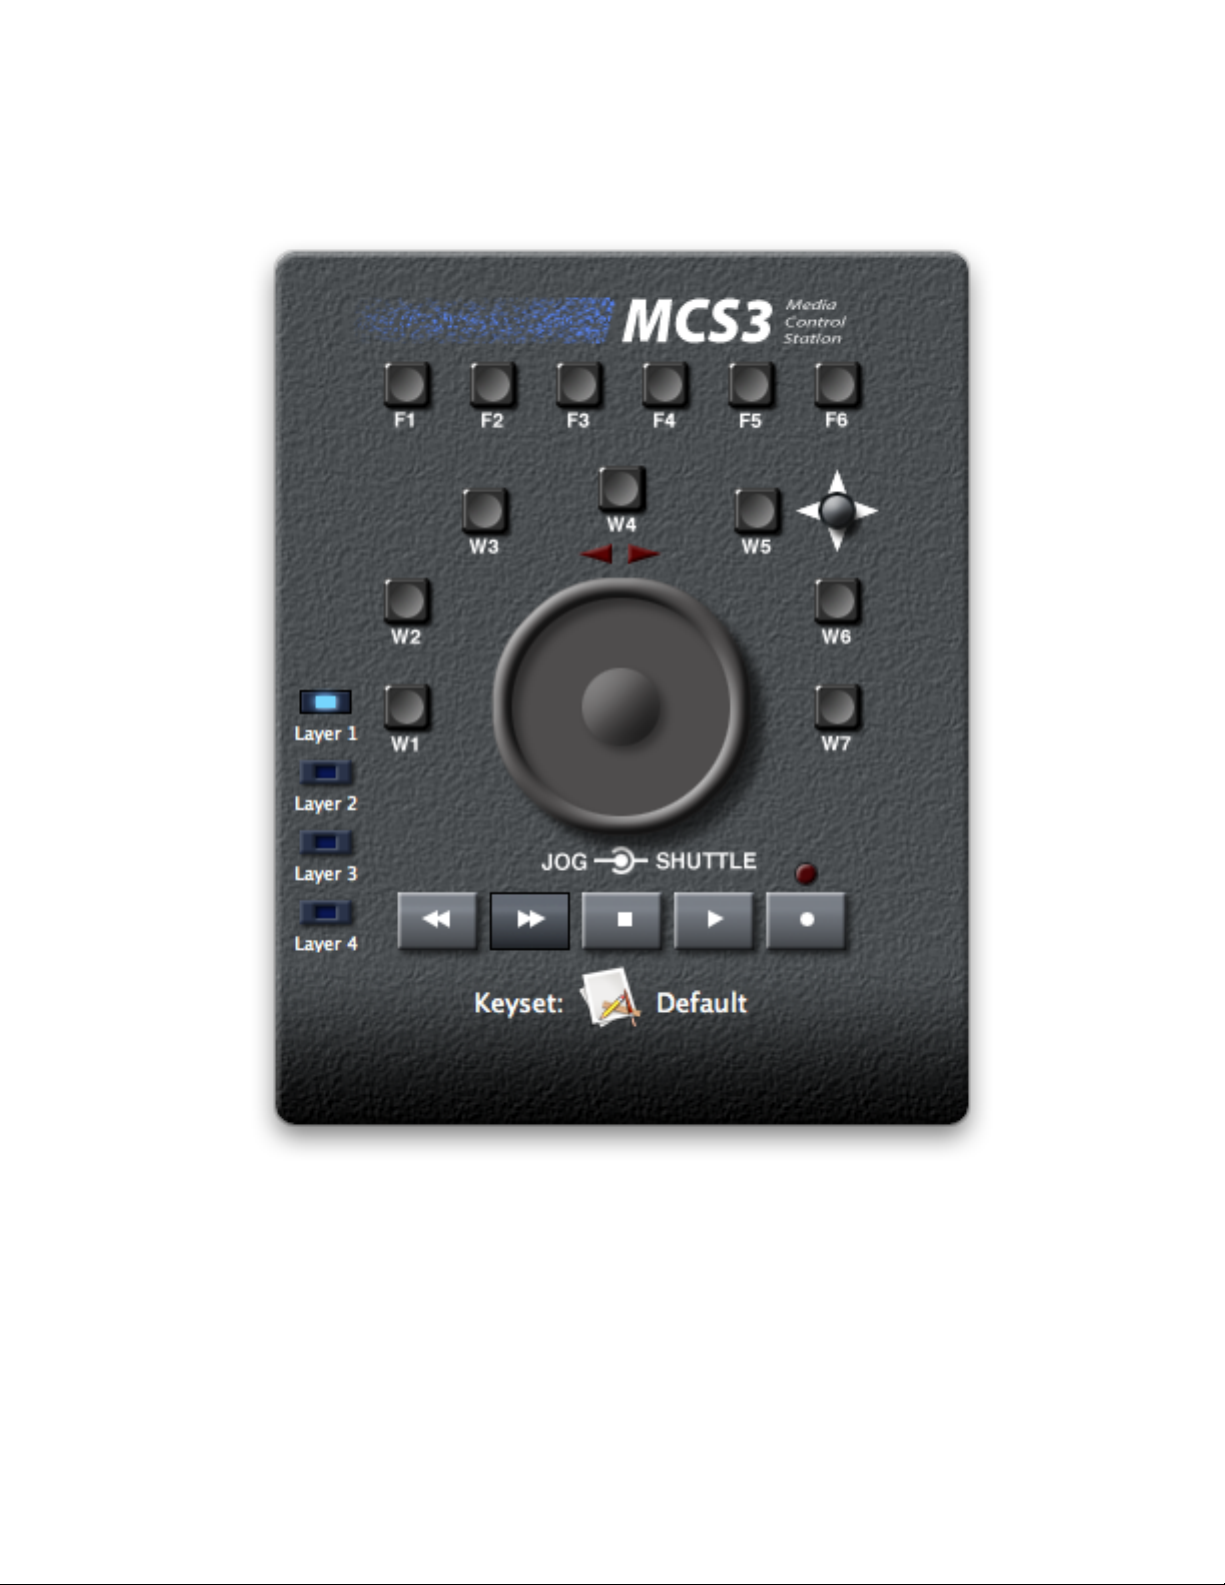
Introduction to the MCS3 SP USB Software
The MCS3 SP Software extends the MCS3 SP hardwareʼs ability to control various
applications running on your Macintosh™. It does this by communicating with
applications via MIDI, USB and other messaging protocols built into the Mac OS. It can
also simulate mouse clicking and dragging, keystrokes and can even emulate other
control surfaces if necessary.
Keysets
The MCS3 SP software uses “keysets” which are sets of various actions that are taken
when MCS3 SP controls are pressed or turned. Different keysets can be applied to
different applications, and the MCS3 SP software will choose the correct keyset for
whichever application is in the foreground. If no keyset has been created for the current
foreground application, the MCS3 SP will use a built in keyset called the “Default”
keyset.
To create or edit MCS3 SP keysets, open the application, MCS3 SP USB (/
Applications/MCS3 SP USB Software/). To create a new keyset, choose New
Keyset in the File menu and navigate to the application that will use the new keyset.
You can also use Import Keyset from the File Menu to get an existing keyset. Keysets
that ship with the MCS3 SP are located at /Applications/MCS3 SP USB
Software/keysets/. You only need to use New Keyset or Import Keyset once for a
given application. After that, keysets are stored with the MCS3 SP softwareʼs
preferences.
You can use Export Keyset from the File Menu to save a copy of a keyset so it can be
transported to another Mac or archived for safekeeping. You donʼt need to use Export in
your daily use of the MCS3. As previously pointed out, your changes are added to the
MCS3 SP softwareʼs preferences file automatically.
There are several sample keysets included in this package, including ones for Final Cut
Pro™ and Soundtrack Pro™.
MCS3 SP USB Software" 3
Page 6
Editing Keysets
The application presents a graphical representation of the MCS3 SP front panel. When
you click on an on-screen control (or move a control on the MCS3 SP itself), that control
is selected and information about it appears in the floating Inspector window.
You can choose which keyset to edit within the MCS3 SP USB application using the
Keysets menu. The menu lists all keysets that you have created or imported. The name
of the currently selected keyset will be displayed at the bottom of the main window.
MCS3 SP USB Software" 4
Page 7
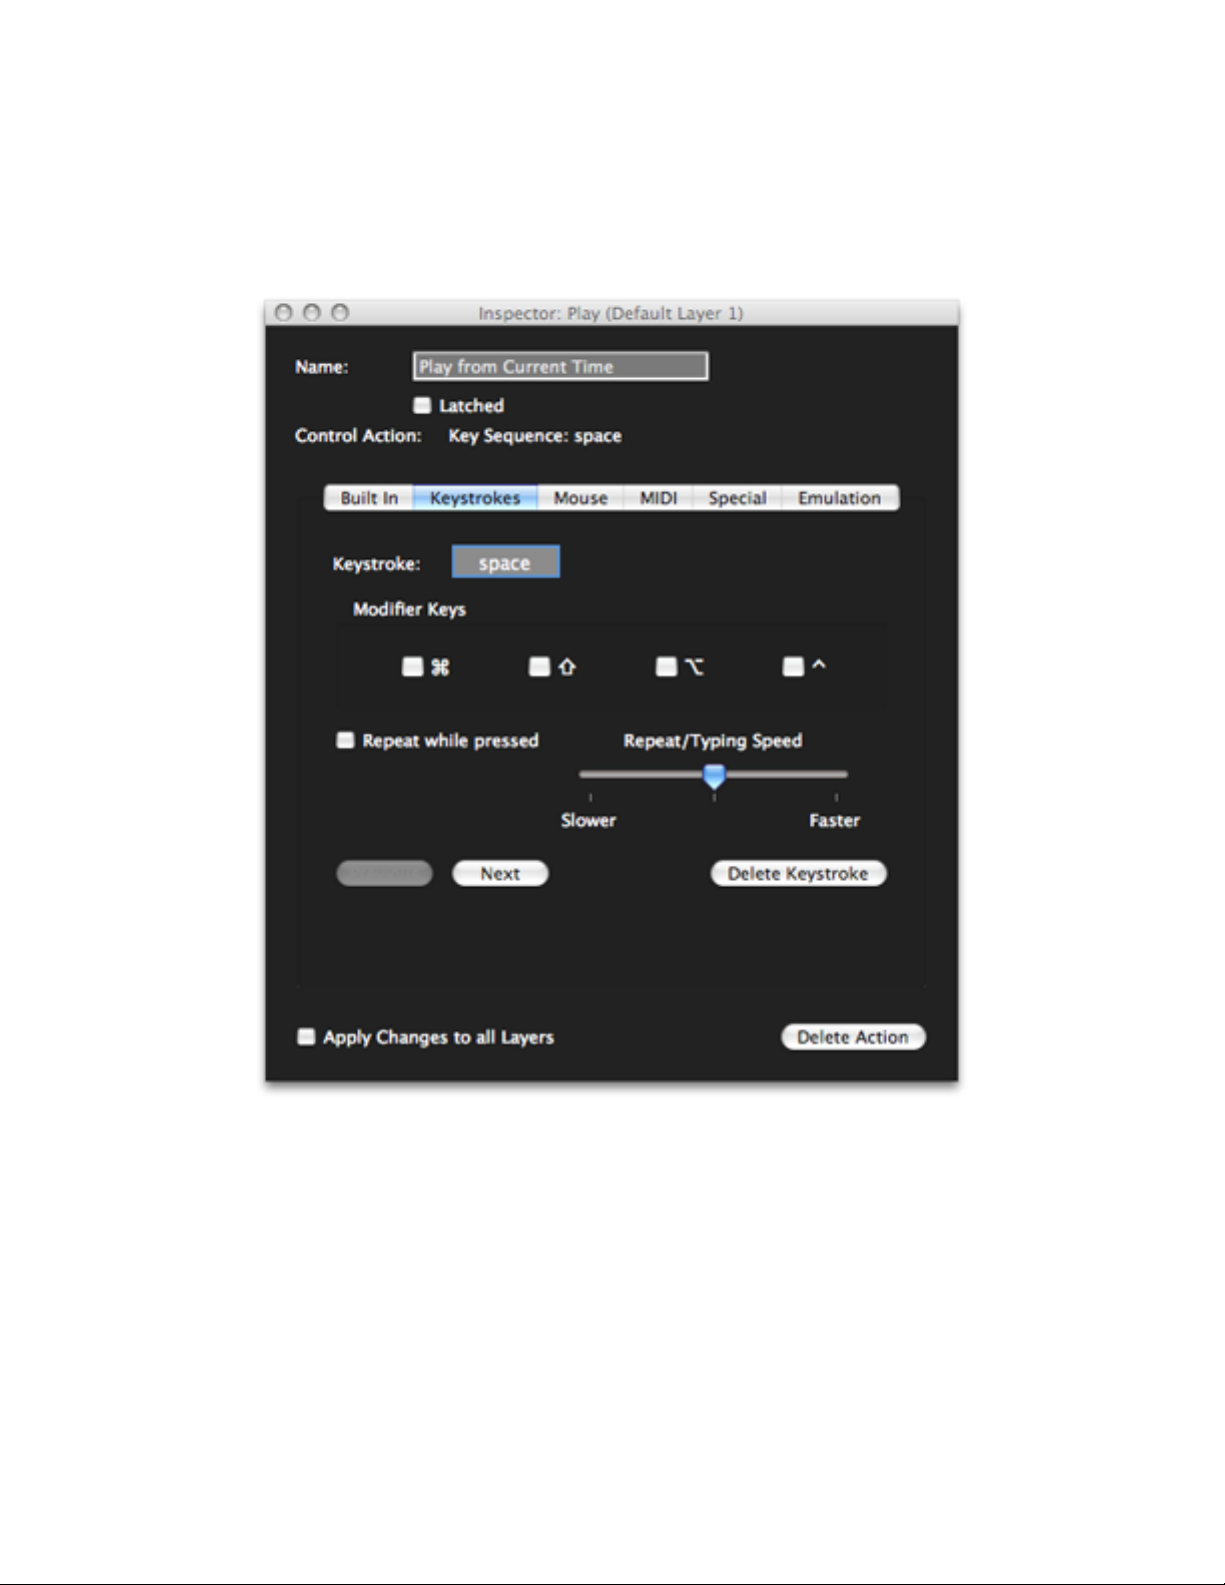
The Inspector Window
The Inspector window is where all your work takes place. It displays information about
the currently selected control and contains the facilities for editing that information.
The Name text box allows you to give a control a more descriptive name that describes
its precise function. In the example above, the “Play” button has been assigned an
action that starts playback from the current time indicator, so naming the button “Play
From Current Time” conveys more information than “Play”.
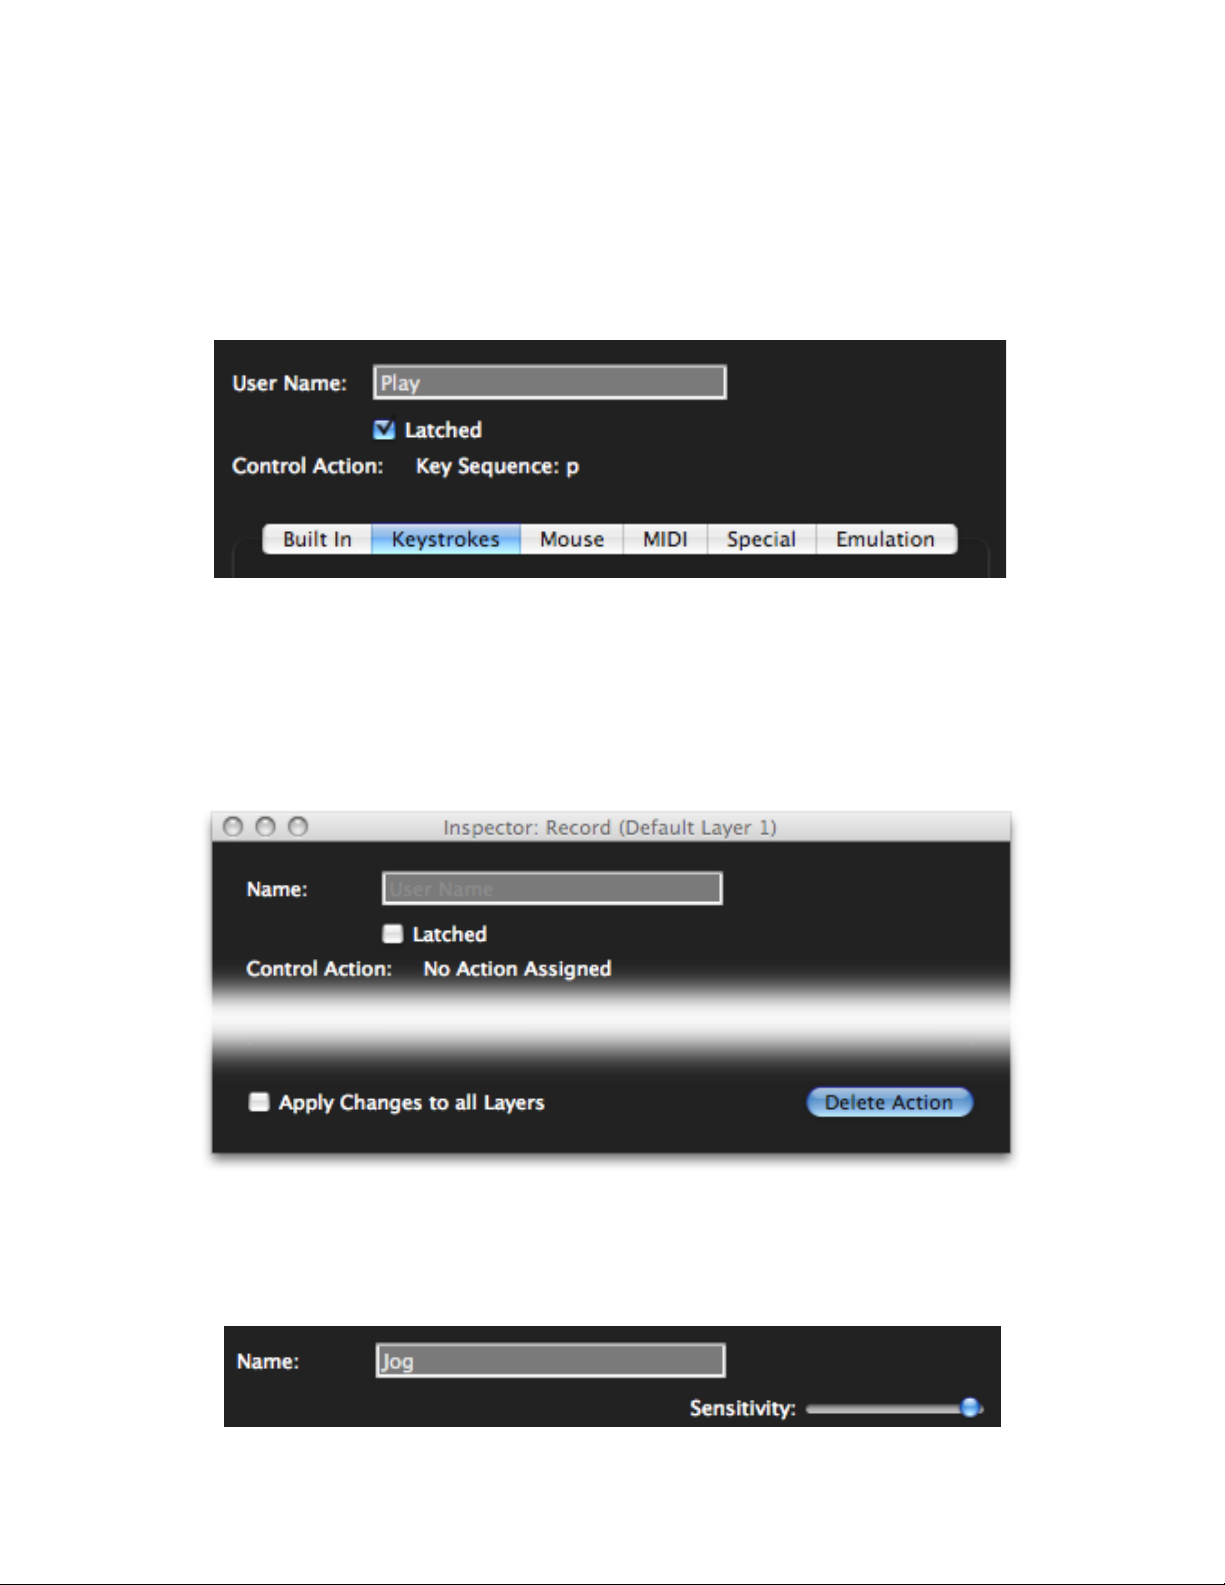
If the selected control is a button, then immediately below the Name you will see a
“Latched” checkbox that lets you choose between a momentary (pressing the button
turns it “on”, releasing it turns it “off”) or latched (pressing and releasing it turns it “on”
and pressing and releasing it a second time turns it “off”) behavior.
MCS3 SP USB Software" 5
Page 8
Next is a description of the action that is to take place when the selected MCS3 SP
control is pressed or turned while the target application is active. Below that is the area
where this action can be edited. There are a series of tabs representing the different
kinds of actions that can be performed. Clicking on one of these tabs will display
controls for editing its kind of action. The available actions are Built In, Keystrokes,
Mouse, MIDI, Special and Emulation.
Any changes made in one of these tabs are immediately applied to the selected control.
The MCS3 SP software allows multiple levels of Undo, so you can easily get back to
any starting point.
Also at the bottom of the Inspector window is the Delete Action button. When pressed
it will delete the action currently assigned to the selected control. This is also undoable.
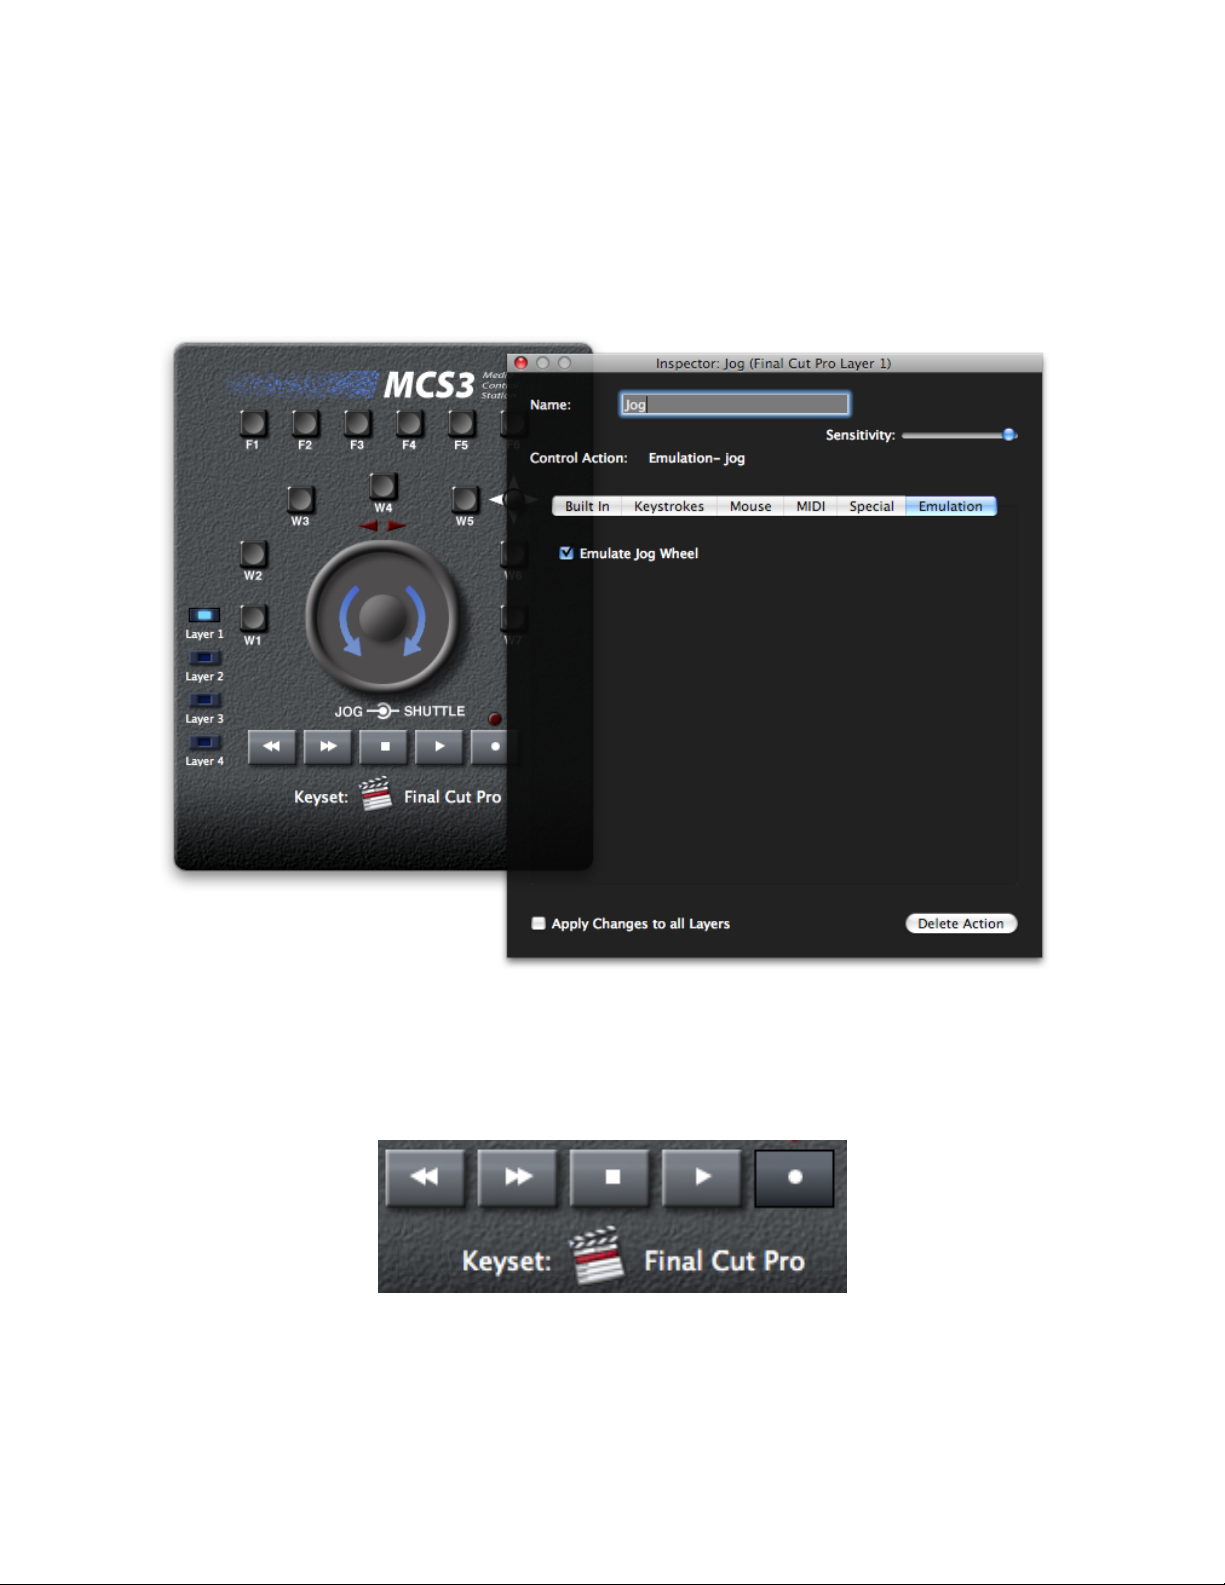
The Inspector will show one additional control at the top when the Jog Wheel is
selected- the Sensitivity Slider. Moving the slider to the right will make the Jog Wheel
more sensitive, and moving it to the left will make it less sensitive.
MCS3 SP USB Software" 6
Page 9
Action Tabs
Keystrokes Tab
The MCS3 SP controls can be assigned to send a sequence of keystrokes to an
application just as if they were keys on the Mac keyboard. These assignments are set
up in the Keystrokes Tab.
Select a control to edit, place the cursor in the Keystroke field and type a key. If you
hold down any modifier keys (command, shift, option or control) while typing this key,
the modifier checkboxes will be set up accordingly. You can also manually change the
modifier checkboxes by clicking on them.
MCS3 SP USB Software" 7
Page 10
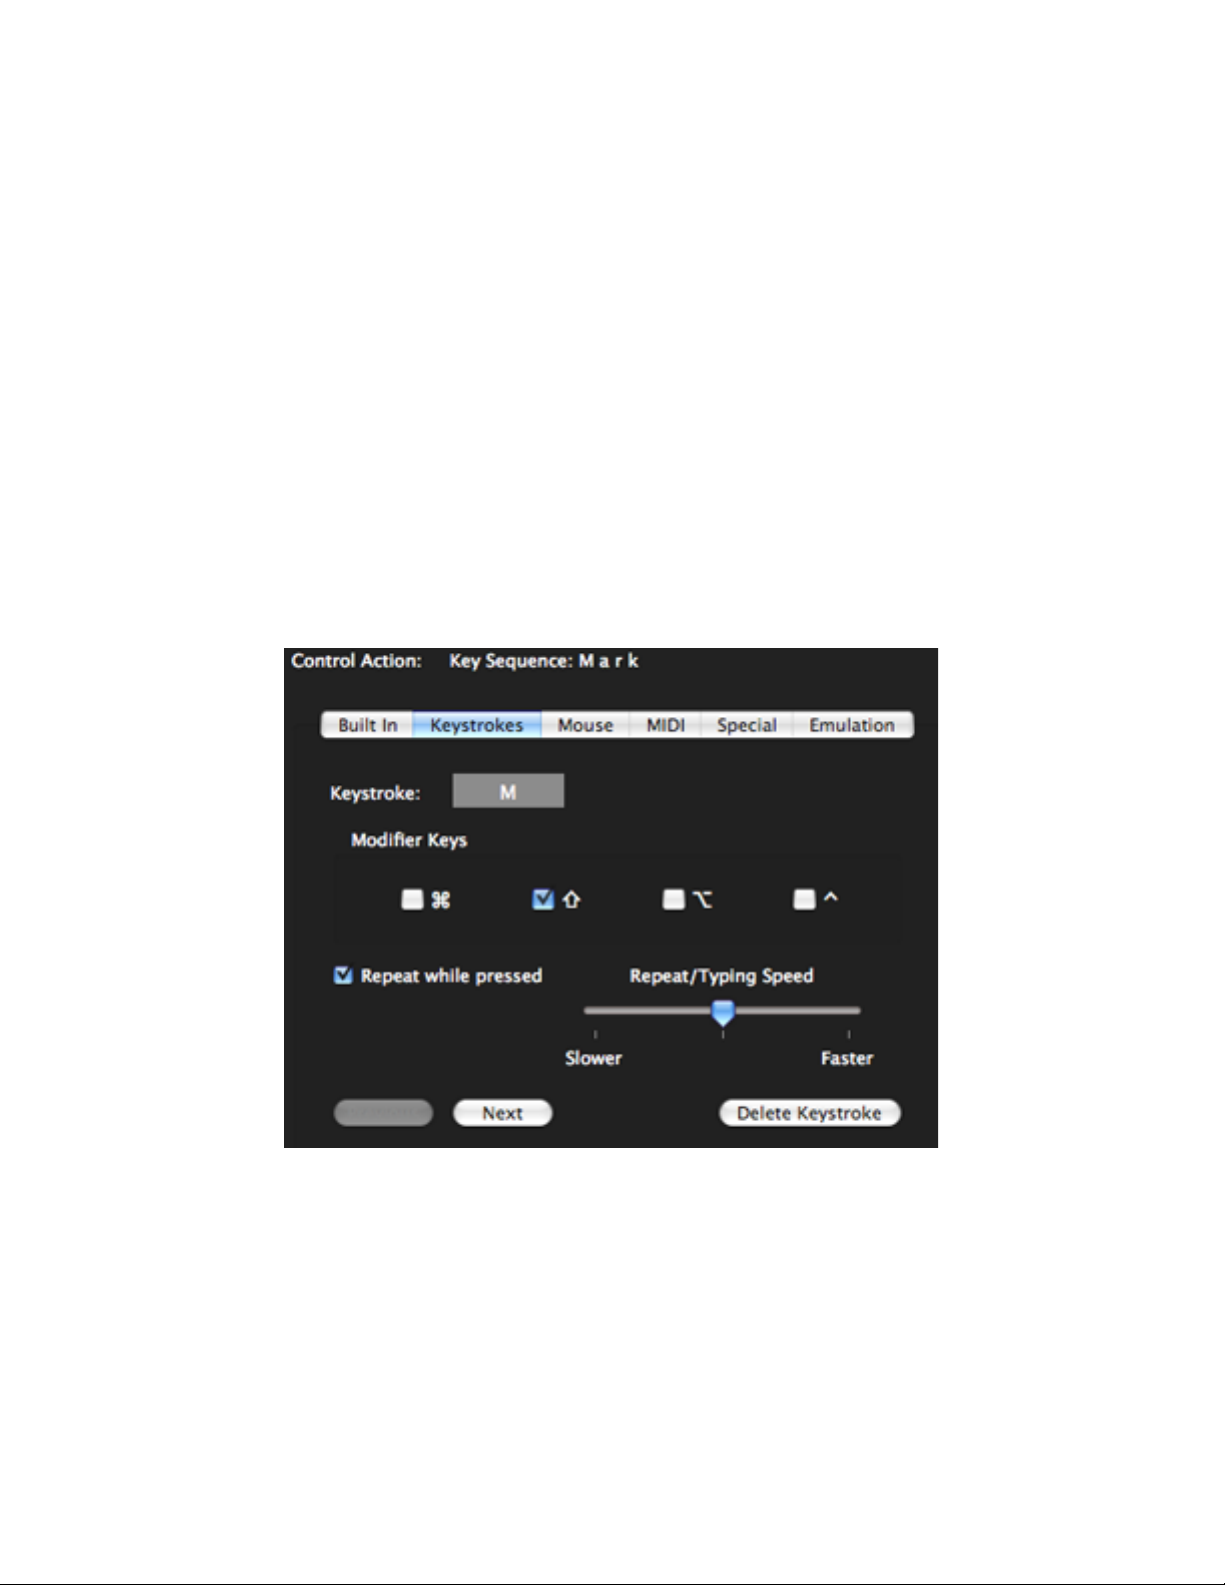
Some key/modifier combinations may be intercepted by the operating system before
they reach the Inspector window. If this happens, just type the key without any
modifiers, then click on the appropriate checkboxes to add the desired modifiers.
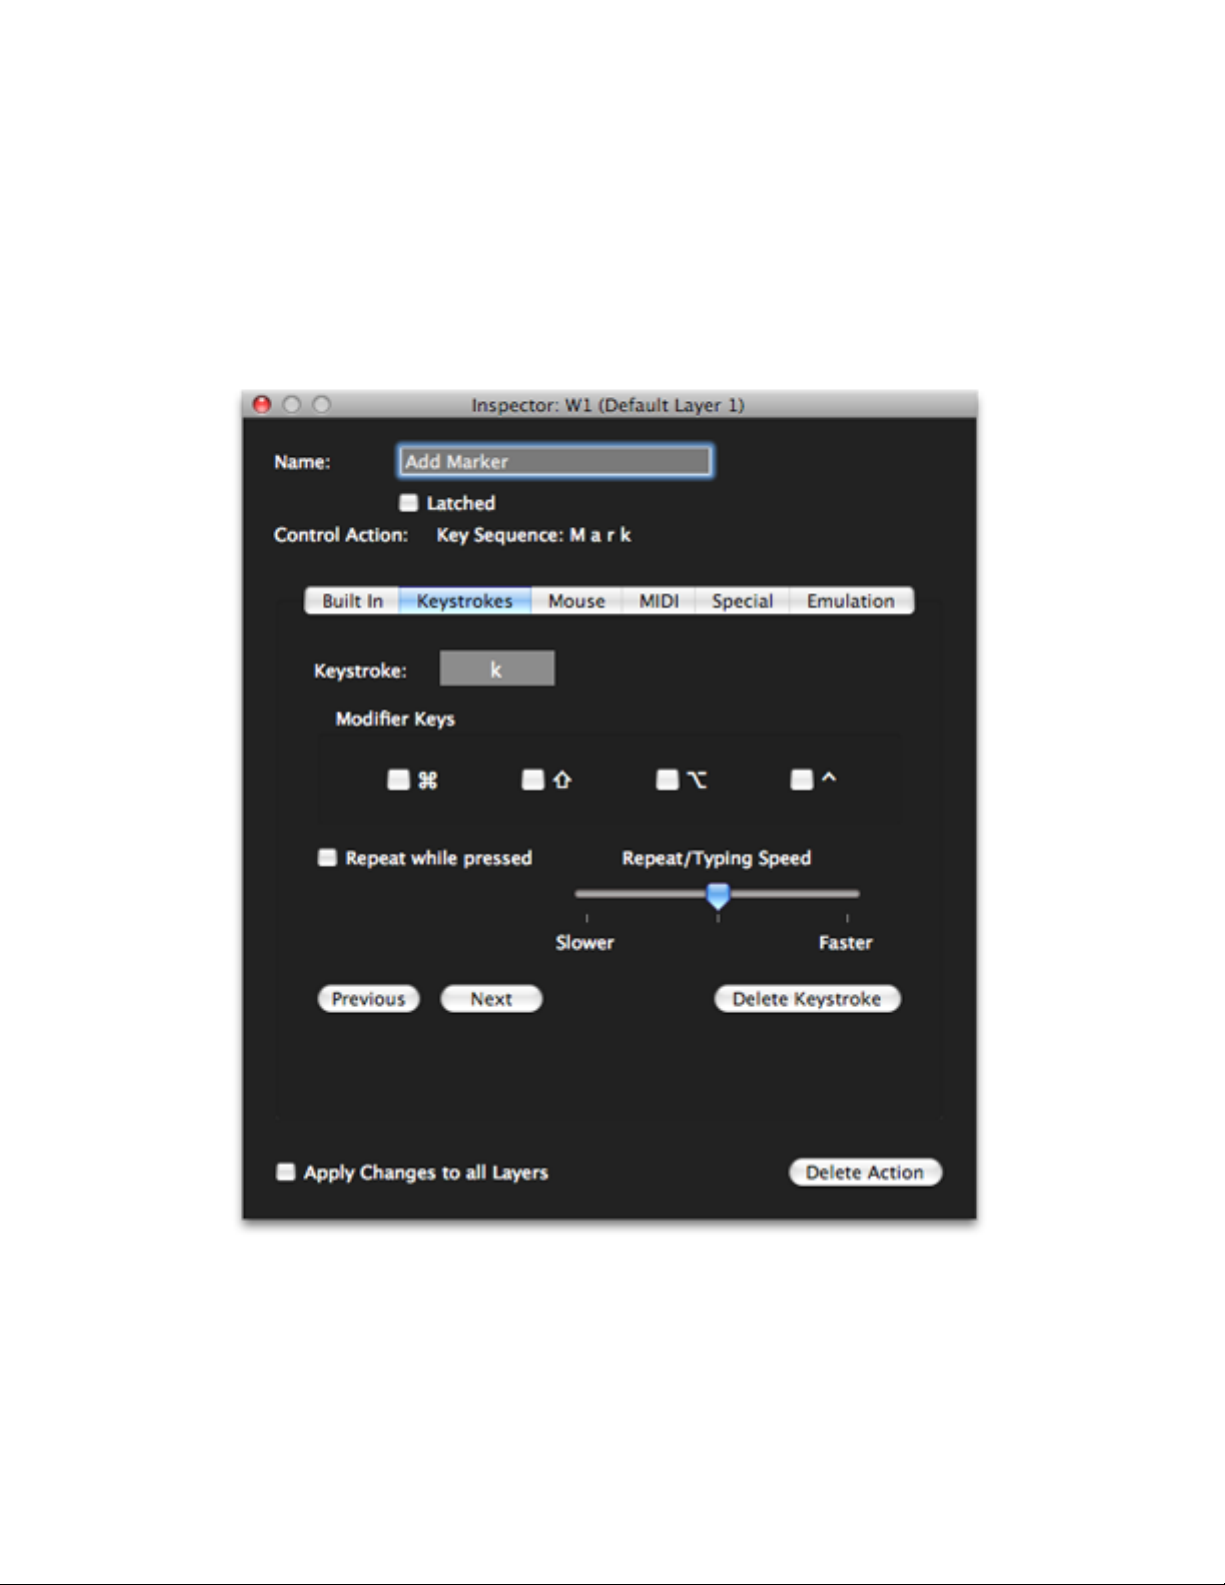
To add more keystrokes to the sequence, click on the Next button and repeat the above
procedure. You can move forwards or backwards in the sequence with the Next and
Previous buttons. The Delete Keystroke button will remove the currently displayed
keystroke from the sequence.
If Repeat while pressed is checked, the keystroke (or sequence) will repeat as long as
the MCS3 SP control is held down. The speed of the repeat is controlled by the Repeat/
Typing Speed slider. This slider also determines how much time there is between
keystrokes if the sequence is more than one keystroke.
If the key sequence in the example below was assigned to the STOP button, pressing
and holding STOP would be the equivalent of repeatedly typing the word “mark” until
STOP was released.
MCS3 SP USB Software" 8
Page 11
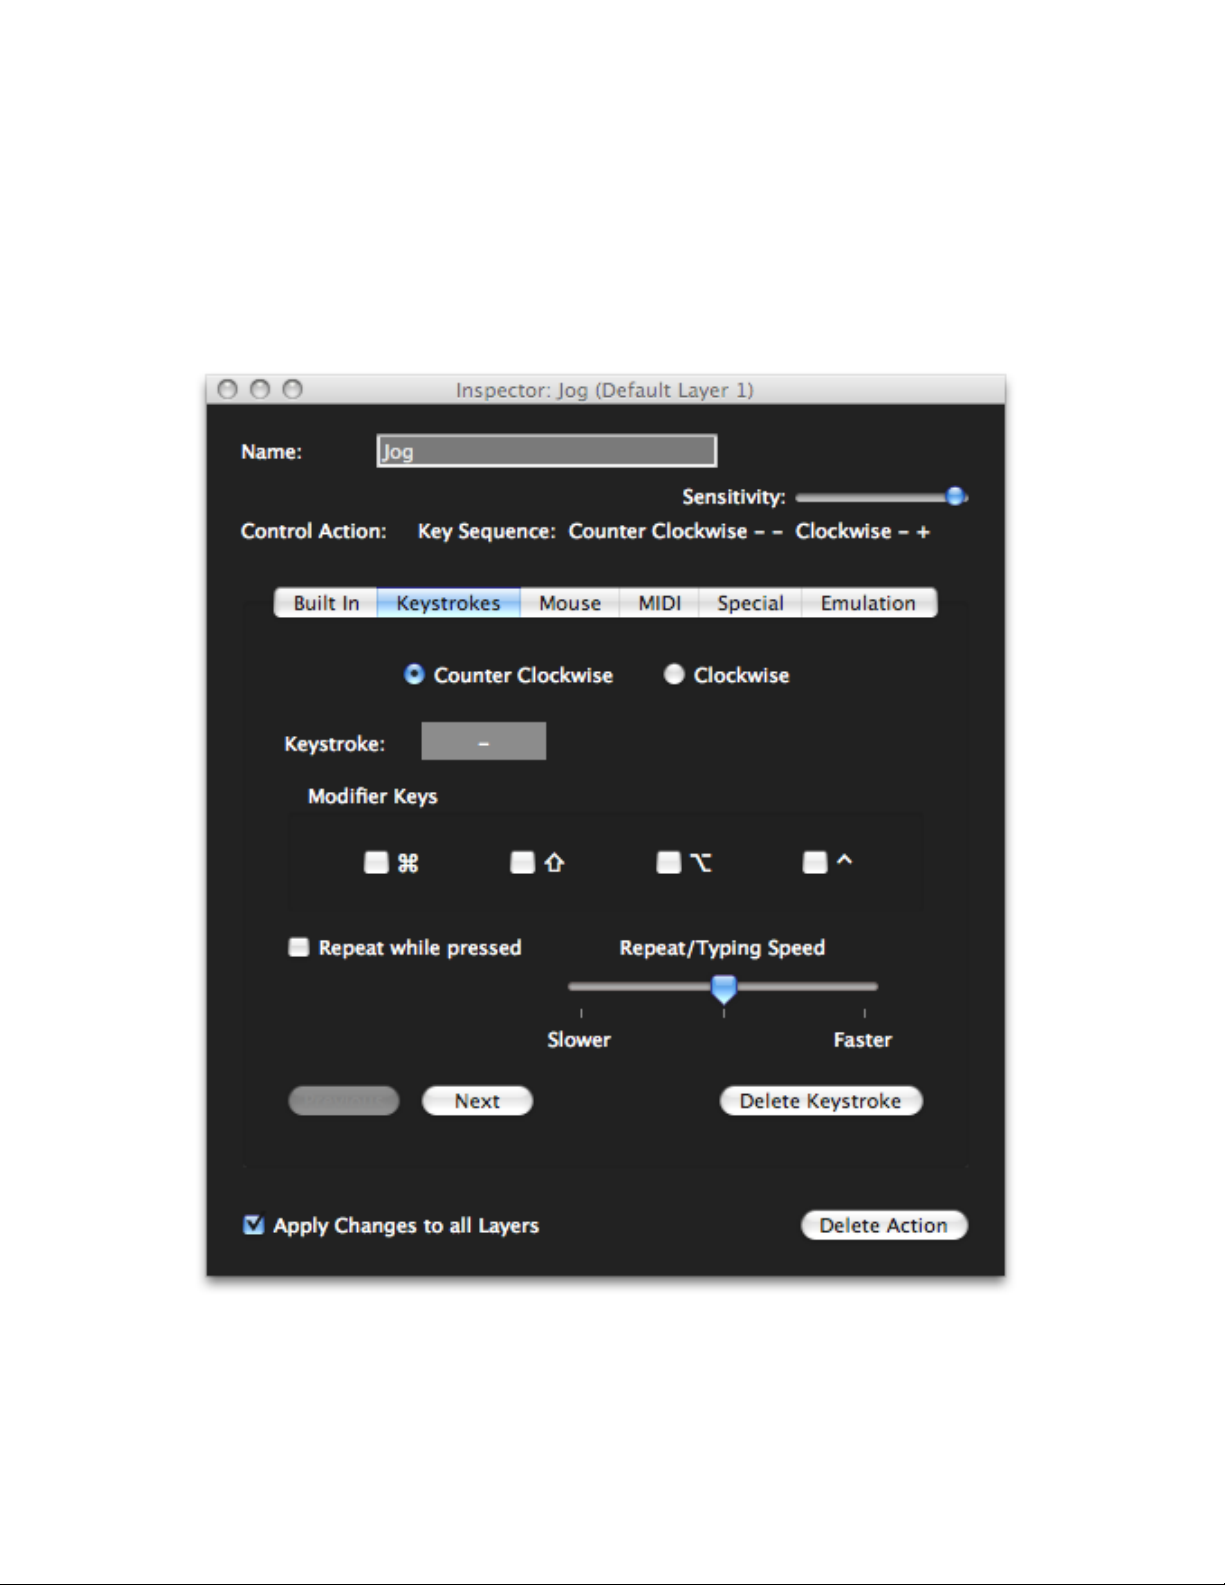
The Keystrokes tab can vary depending on the type of MCS3 SP control selected. For
the Jog Wheel, different key sequences can be assigned to each direction. Click on the
Counter Clockwise or Clockwise radio button to choose which directionʼs sequence to
edit.
In the example below, a counter clockwise turn would send a “-” and a clockwise turn
would send a “+”.
MCS3 SP USB Software" 9
Page 12
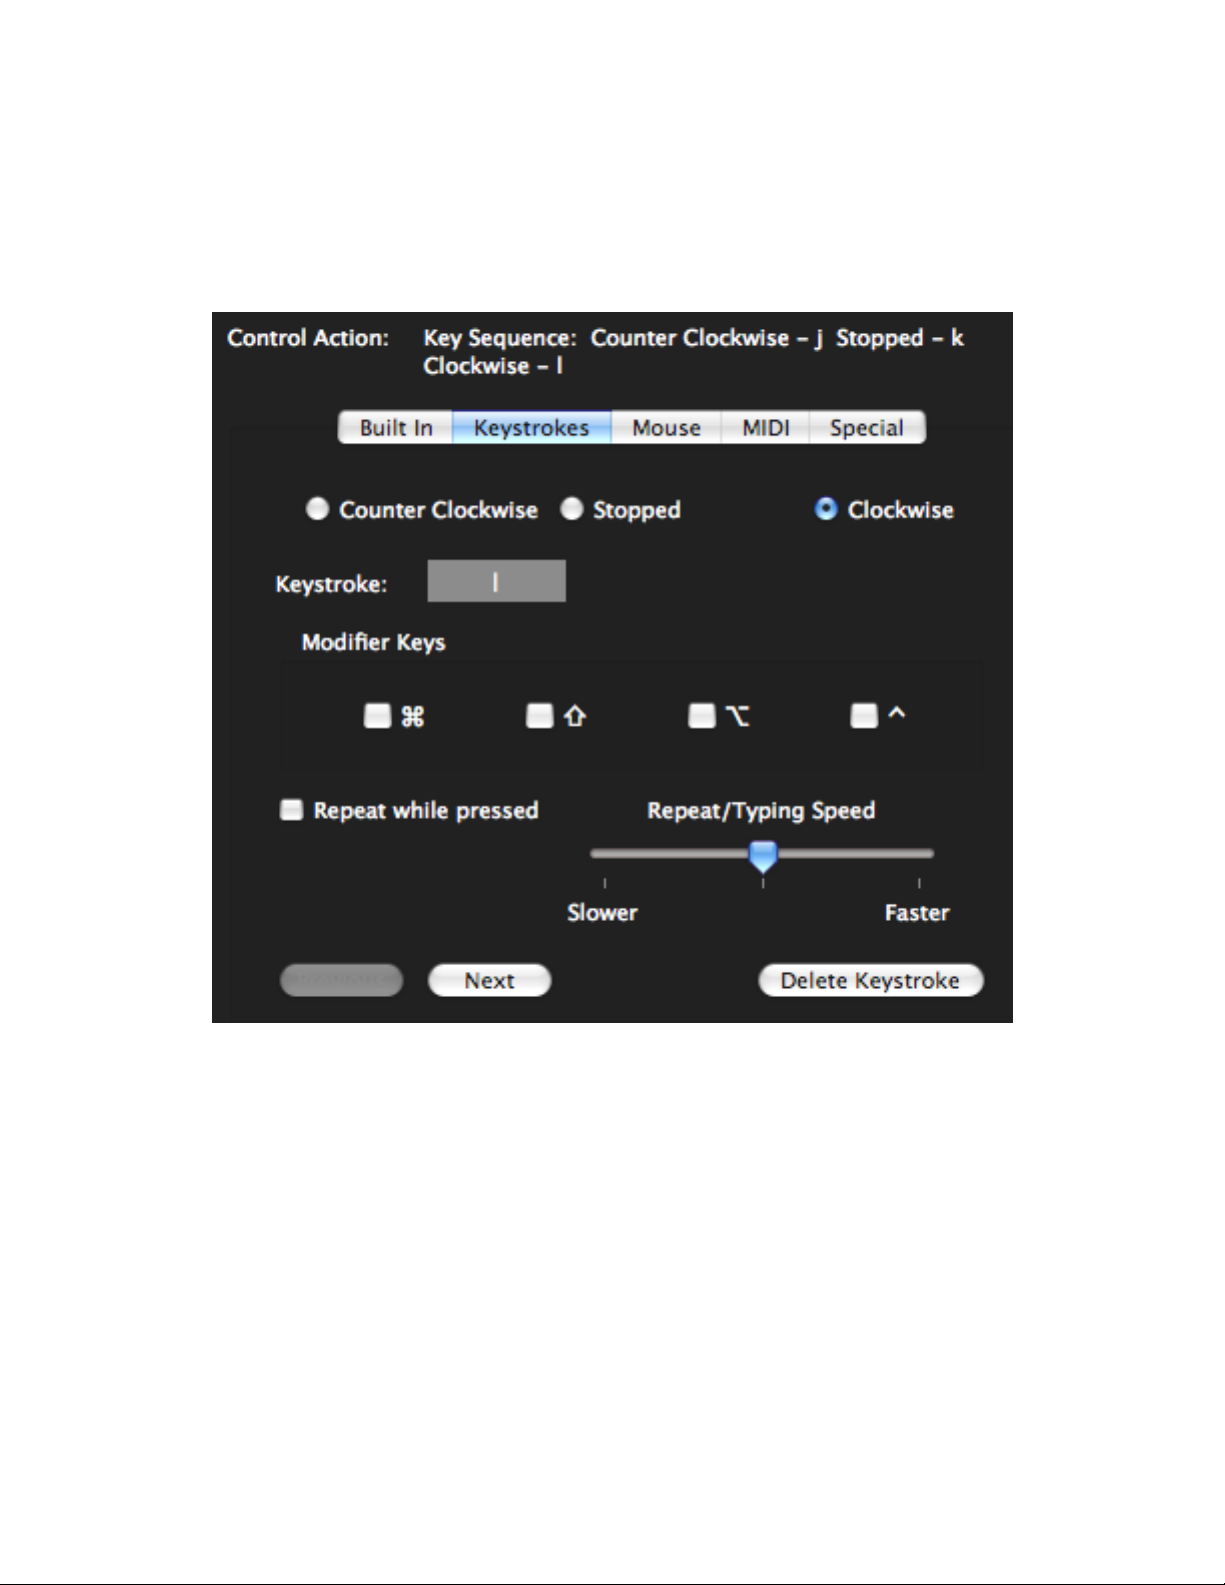
The Shuttle Control can have a key sequence assigned not only to its counter clockwise
and clockwise directions, but also to itʼs center detent. The example below implements
JKL shuttling which is used by several nonlinear video editors. In other words, the
shuttle will send a “j” when being turned counter clockwise, an “l” when being turned
clockwise and a “k” when it is returned to the center position.
MCS3 SP USB Software" 10
Page 13
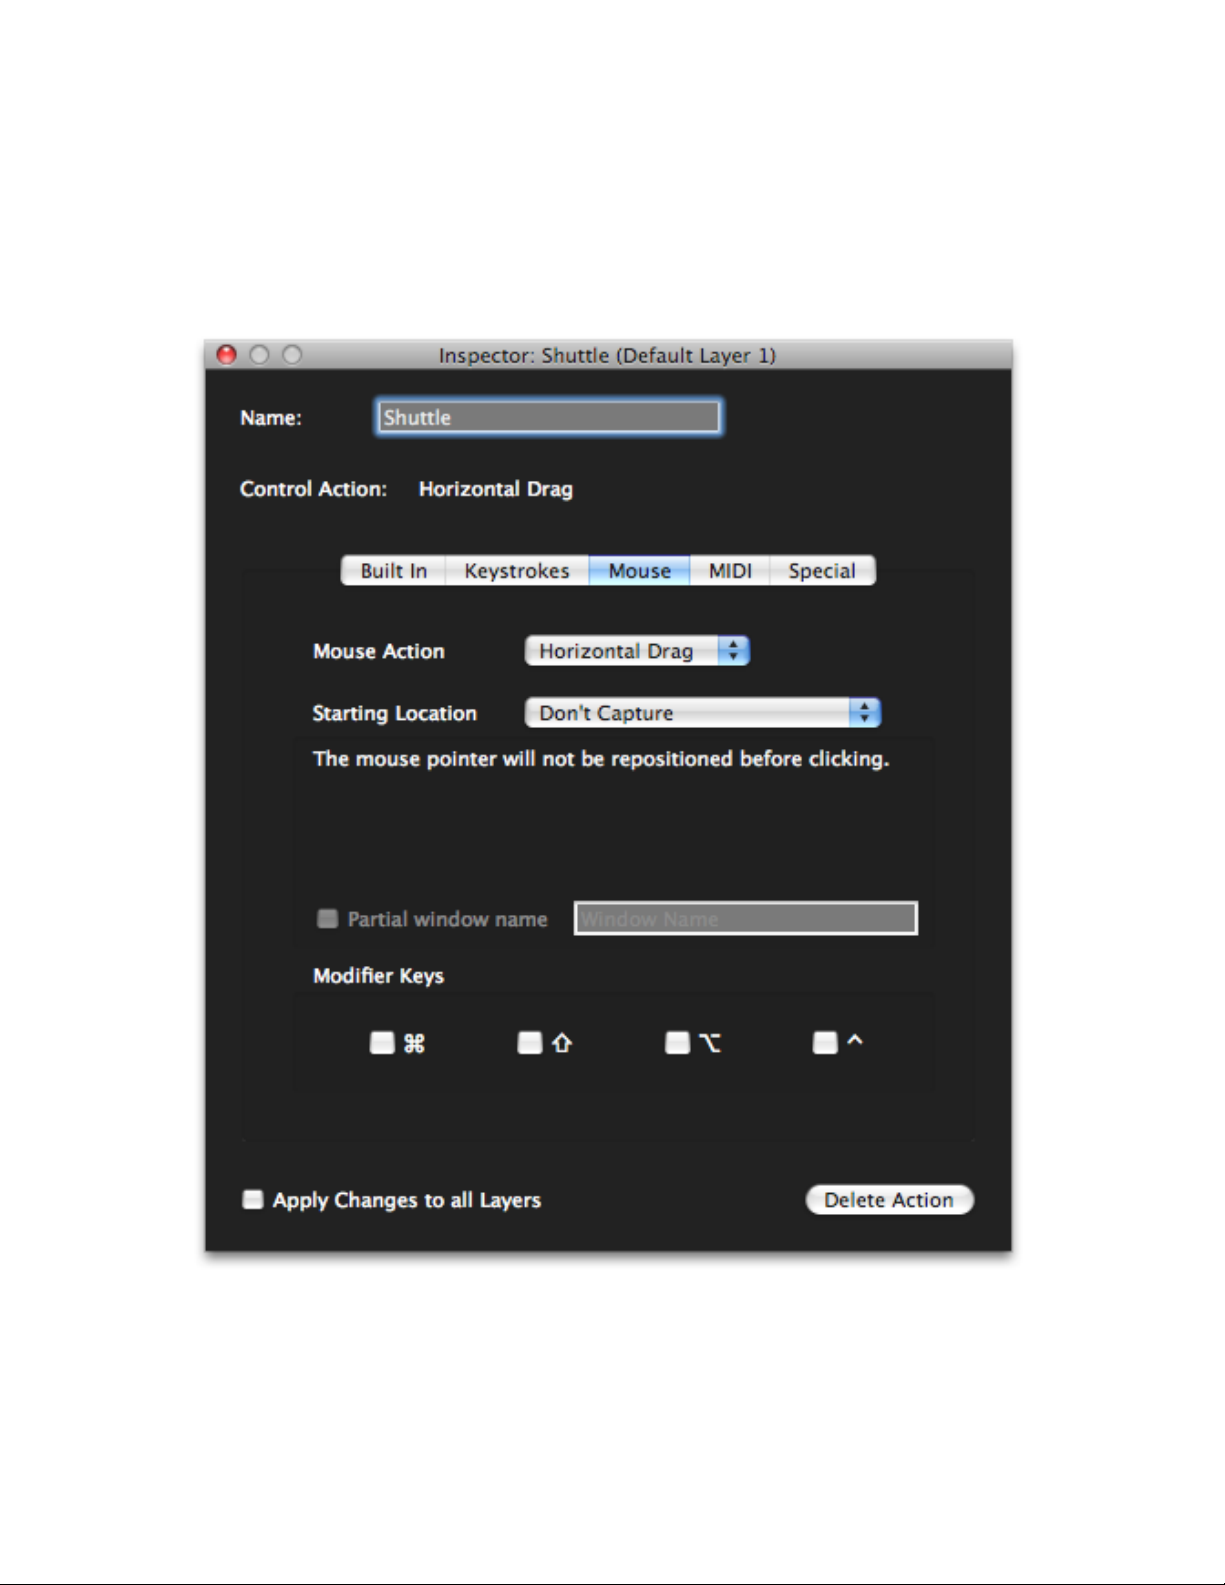
Mouse Tab
The controls on the MCS3 SP can be made to emulate the Macintosh mouse. Buttons
can perform clicks and the Jog Wheel and Shuttle Control can perform horizontal and
vertical moves and drags.
MCS3 SP USB Software" 11
Page 14

The Mouse Action popup lists the actions available for the selected control. For
Option
When Destination Window is
Resized or Moved
Relative to Window Top Left
The start point will stay the same
distance from the top left corner of
the window.
Relative to Window Top Right
The start point will stay the same
distance from the top right corner of
the window.
Relative to Window Top Percentage of Width
The start point will stay the same
distance from the top of the window,
but itʼs horizontal position will be a
percentage of the windowʼs width..
example, if the Jog Wheel is selected the popup would look like this:
The Starting Location popup lets you choose where the click, move or drag will
originate.
If you choose Donʼt Capture, the mouse action will always begin at the current location
of the Mouse pointer. If you choose any other option, you will be prompted to pick a
point in one of the target applicationʼs windows. The options in this menu determine how
the MCS3 SP will find that point in the event that the destination window has been
resized or moved.
MCS3 SP USB Software" 12
Page 15

Option
When Destination Window is
Resized or Moved
Relative to Window Bottom Left
The start point will stay the same
distance from the bottom left corner
of the window.
Relative to Window Bottom Right
The start point will stay the same
distance from the bottom right
corner of the window.
Relative to Window Bottom Percentage of Width
The start point will stay the same
distance from the bottom of the
window, but itʼs horizontal position
will be a percentage of the
windowʼs width..
Relative to Screen Top Left
The start point will stay the same
distance from the top left corner of
the screen, no matter what the size
or position of the window.
For example, letʼs say that a particular application has an onscreen shuttle slider in the
lower right hand corner of itʼs Timeline window, and the center of that slider is 100 pixels
from the right of the window and 20 pixels from the bottom of the window. When the
window is resized, the slider stays at 100 pixels from the right and 20 pixels from the
bottom of the window.
Suppose the only way to access this programʼs shuttle function is by dragging this slider
left or right. You could program the MCS3 SP Shuttle Control to do a horizontal drag
starting at 100, 20 Relative to Window Bottom Right.
MCS3 SP USB Software" 13
Page 16

Once you have chosen from the Starting Location popup, you will be prompted to
actually pick the starting point.
Make Sure the target application is open in the background, and that the destination
window is visible. Hit the Capture button then position the mouse pointer over the
desired starting point and type <COMMAND K>.
MCS3 SP USB Software" 14
Page 17

The Inspector window will be updated to show the window name and coordinates
where the click, drag or move should take place.
From now on, whenever you are in the target application and use the assigned control,
it will move the destination window to the front, then click, move or drag at the selected
location.
Once a window name and mouse location has been captured, you have the option of
using a partial window name. This is useful in applications like Final Cut Pro, where the
Canvas Windowʼs title always starts with the word "Canvas" but the rest of the window
title changes depending on what you're editing. Normally, the MCS3 SP tries to find a
window with the exact name as the window where the click was first captured, but if the
window name has changed, it will fail. If you choose to have the MCS3 SP just look for
the word Canvas in Final Cut Pro it will always find the Canvas Window, even if the
exact name of the Canvas Window changed since the click was captured.
To use the partial name feature, click on the Partial Window Name checkbox. In the
text box on the right, change the full window name to the partial name you want the
MCS3 SP to use.
MCS3 SP USB Software" 15
Page 18

MIDI Tab
None
No MIDI message for the selected control. If some other type of
action has already been assigned, the None button will be selected.
Clicking on the None button will delete the currently assigned
action.
Native MIDI
Native MIDI actions send and respond to the same messages as
the MIDI version of the MCS3. You would typically use this setting
with an application which directly supports the MCS3 SP protocol. It
could also be used with an application that has a MIDI “Learn”
feature.
For convenience, choosing Set all Controls to Native MIDI in the
Actions menu will assign Native MIDI actions to all of the MCS3
SP controls on all layers in the current keyset.
Custom MIDI
Custom MIDI actions send and respond to user defined MIDI
messages.
An MCS3 SP can be made to appear as a MIDI device to MIDI applications. Any MCS3
SP control can be programmed to send and respond to a MIDI message.
There are three radio buttons for choosing the type of MIDI message to assign.
MCS3 SP USB Software" 16
Page 19

When Custom MIDI is chosen, more controls will become visible for editing the custom
messages.
The MIDI Message Type popup lets you choose any of the basic MIDI messages
except for system exclusive and MIDI Time Code.
The first group of messages in the popup include a MIDI channel. If you choose one of
these message types, a channel editor appears. You can either type or use the up and
down arrows to set the channel. This editor accepts values from 1 through 16.
MCS3 SP USB Software" 17
Page 20

All MIDI messages except for system exclusive are either one, two or three bytes long.
The first byte always is the message type, called the status byte. If there is a MIDI
channel, it is embedded in the status byte. The bytes following the status byte, if any,
are referred to as data bytes and contain additional information such as note numbers,
velocities, control values, etc...
If you choose a message type that is more than one byte long the 1st Data Byte ( and
possibly the 2nd Data Byte) editor appears. You can set the data byteʼs value by typing
or using the up/down arrows. The editor accepts values from 0 through 127.
Instead of setting an absolute value for a data byte, you can check the Follows
Controlʼs Value box. In this case, the value of that data byte is determined by the state
of the MCS3 SP hardware control this message is assigned to. In other words, if you
assigned a Custom MIDI Message to the Jog Wheel and the 2nd data byte was set to
Follows Controlʼs Value, a number representing the movement of the Jog Wheel
would be inserted as the 2nd data byte of the custom message. For MCS3 SP buttons,
a value of 127 will be inserted for button presses, and 0 for button releases.
Following are some samples of the MIDI Tabʼs appearance for various message types.
MCS3 SP USB Software" 18
Page 21

To access the MCS3ʼs MIDI messages in your MIDI application, connect your
applicationʼs MIDI input and output ports to the ports labeled “MCS3”. Depending on the
application, the ports may be labeled “MCS3 SP USB”. The exact method for
connecting to MIDI ports varies from application to application. Consult the manuals of
the MIDI applications you are using to learn how to do this.
MCS3 SP USB Software" 19
Page 22

Emulation Tab
The MCS3 SP software has the ability to emulate other MIDI based control surfaces.
This feature is useful if you are using the MCS3 SP with an application which doesnʼt
directly support the MCS3, but which supports one of these other control surfaces.
You can set any control on the MCS3 SP to emulate a control on one of these control
surfaces using the Emulation Tab. The Emulation Tab is not available until you turn on
Emulation in the Emulation Menu. Here you can choose None, Mode A, or Mode B.
Mode A and B represent two different control surfaces. Which one you choose depends
on the application you are using with the MCS3. More on this later.
The contents of the Emulation Tab varies depending on the type of MCS3 SP control
that is selected. This is what you will see at first if you select a button.
MCS3 SP USB Software" 20
Page 23
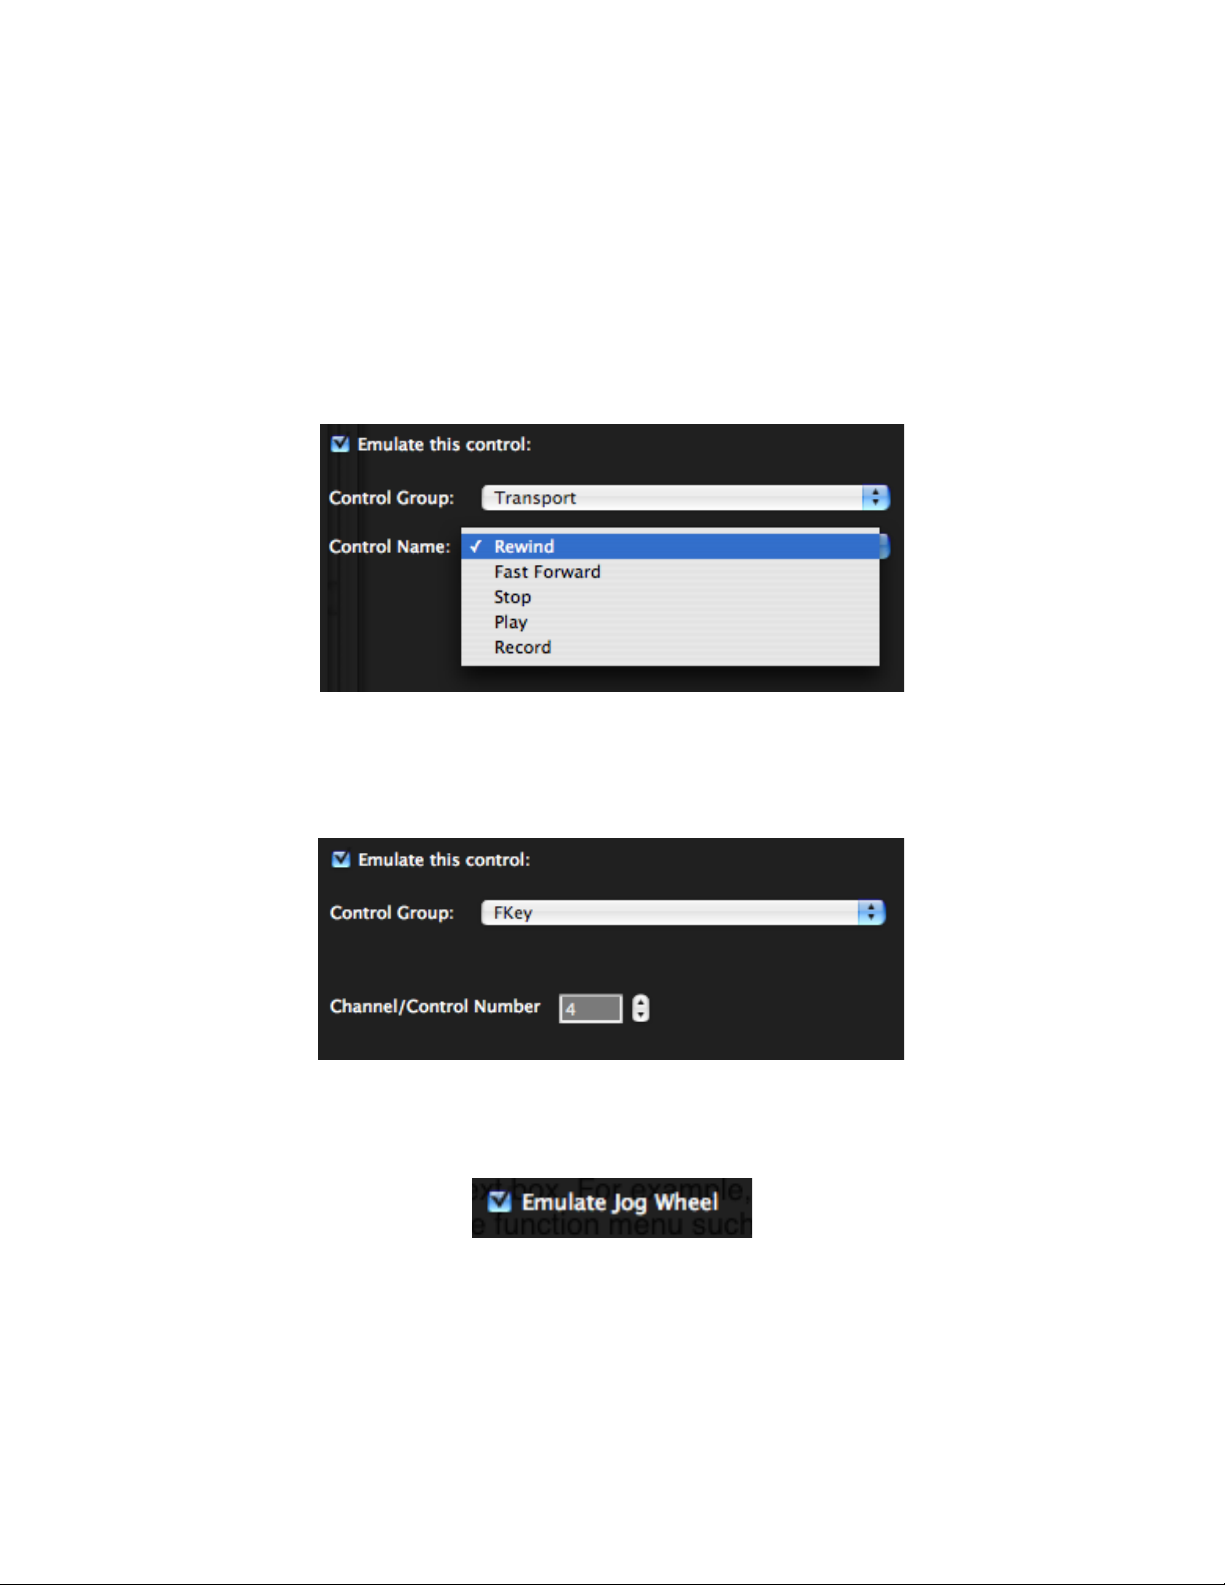
The Control Group popup lists the basic categories of controls that can be emulated by
the selected MCS3 SP control. Checking Emulate this control: or choosing from the
Control Group popup will assign an Emulation action to the selected control. It will also
display either a second popup or a numerical editor for choosing which control in the
group to emulate.
For some control categories, such as Transport, the individual controls in that category
have names, such as Rewind, Fast Forward, Stop, Play and Record. For these
categories a second popup will list the control names.
For other categories, such as F-Keys, the controls are just numbered. For these
categories a numerical editor will appear. This allows you to either type or use up/down
arrows to set the control number.
The Jog Wheel only has one choice, Emulate Jog Wheel.
You cannot assign Emulation actions to the Shuttle Control because none of the
emulated control surfaces have this function.
MCS3 SP USB Software" 21
Page 24

For convenience, choosing Set all Controls to Emulation in the Actions menu will
MCS3 SP Control
Assignment
Rewind
Fast Forward
Stop
Play
Record
JogW1W2W3W4W5F1F2F3F4F5F6Up
Right
Down
Left
Emulation- transport: rewind
Emulation- transport: fast forward
Emulation- transport: stop
Emulation- transport: play
Emulation- transport: record
Emulation- jog
Emulation- automation: read/off
Emulation- automation: write
Emulation- automation: trim
Emulation- automation: touch
Emulation- automation: latch
Emulation- fkey: 1
Emulation- fkey: 2
Emulation- fkey: 3
Emulation- fkey: 4
Emulation- fkey: 5
Emulation- fkey: 6
Emulation- cursor: up
Emulation- cursor: right
Emulation- cursor: down
Emulation- cursor: left
assign Emulation Actions to many of the MCS3 SP controls on all banks in the current
keyset. Some MCS3 SP controls do not correspond to any controls on the emulated
control surfaces, so those controls are left unassigned.
The following assignments are made when Set all Controls to Emulation is chosen.
The same assignments are made to all four layers
MCS3 SP USB Software" 22
Page 25

Special Tab
None
No Special Action for the selected control. If some other type of
action has already been assigned, the None button will be selected.
Clicking on the None button will delete the currently assigned action.
Layer Selectors
When assigned to an MCS3 SP button, that button can be used to
switch between layers. When a Layer Selector Special Action is
assigned to an MCS3 SP button, that assignment is automatically
copied to that button on all layers.
These options will not appear when the Jog Wheel or Shuttle Ring
are selected.
Developer Mode
This is intended for use with applications which directly support the
MCS3. This action uses messaging protocols built into Mac OS X to
communicate with these applications.
You normally wouldnʼt use this mode unless you knew that an
application you were using supported it. 3rd party developers who
support this mode would typically ship MCS3 SP keysets along with
their applications.
For convenience, choosing Set all Controls to Developer Mode in
the Actions menu will assign Developer Mode Special Actions to
all of the MCS3 SP controls on all layers in the current keyset.
The Special Tab is a collection of actions that donʼt easily fit into other categories.
The choices are:
MCS3 SP USB Software" 23
Page 26

Built In Actions Tab
The built in actions are actions that are predefined for specific applications. When you
choose a keyset, the built in actions appropriate to that keysetʼs application are
displayed. If no built in actions have been defined for the current application, the display
will be blank.
The built in actions are presented in two columns. The left hand column lists basic
categories and the right hand column lists the actual actions. Clicking on a category in
the left hand column will change the list of actions displayed on the right. Double-click
an action name to assign it to the selected MCS3 SP control.
Most of the categories and actions correspond to the keyboard shortcuts listed in the
target application's manual. However, there are also actions defined by JLCooper that
are not simple keyboard shortcuts. These actions will always appear at the beginning of
the list, and there will be a separator line between them and other built in actions.
MCS3 SP USB Software" 24
Page 27

Final Cut Pro™ Support
Final Cut Pro™ and Control Surfaces
With FCP version 5 some support for MIDI control surfaces was added. Unfortunately,
only audio parameters and transport functions are controllable via MIDI. Fortunately, the
MCS3 SP software not only emulates the supported control surfaces, it also can control
many other parameters in FCP.
The MCS3 SP has a large advantage over other control surfaces when used with Final
Cut Pro because it is not limited to just the functions included in Final Cutʼs MIDI control
surface support. With its built in functions and the ability to emulate the mouse and
keyboard coupled with FCPʼs control surface support, virtually every function in Final
Cut Pro can be controlled with the MCS3.
Final Cut Pro™ Shuttle
The FCP Built In Shuttle command works equally well in the Timeline, Canvas, Viewer
and Log and Capture windows.
Using the MCS3 SP with Final Cut Pro™
To use the MCS3 SP with FCP, first run the MCS3 SP USB application and import the
Final Cut keyset provided by JLCooper. Now run Final Cut and open the Control
Surfaces dialog from the Tools menu. Click on the “+” button to add a control surface
and choose Mackie Control. Then choose MCS3 SP USB - MCS3 SP for the input
connection and output connections. Click OK to exit the dialog.
Final Cut requires the Audio Mixer (Tools Menu) to be open in order for control surface
support to be active. You might want to save a window layout that has the Audio Mixer
open.
As mentioned earlier, in order for Mouse Emulation to work, the Accessibility System
Preferences most be set correctly. This is important to the FCP keyset since some of
the FCP Built In Commands use Mouse Emulation. Please see the section of this
manual entitled System and Software Setup if you are unsure about these settings.
MCS3 SP USB Software" 25
Page 28

The MCS3 SP Final Cut Pro Keyset
Layer 1
MCS3 SP
Control
Assignment
Rewind
Emulation- transport: rewind
Fast Forward
Emulation- transport: fast forward
Stop
Emulation- transport: stop
Play
Emulation- transport: play
Record
Built In- Capture: Batch Capture...
Jog
Emulation- jog
Shuttle
Built In- Jog and Shuttle: Shuttle
W1
Built In- Mark: Mark In
W2
Built In- Mark: Mark Out
W3
Built In- Goto: Go to In Point
W4
Built In- Goto: Go to Out Point
W5
Built In- Mark: Add Marker
W6
Built In- Goto: Go to Previous Marker
W7
Built In- Goto: Go to Next Marker
F1
Layer 1 Selector
F2
Layer 2 Selector
F3
Layer 3 Selector
F4
Built In- Windows: Show Timeline
The MCS3 SP Final Cut Pro keyset uses a combination of emulated controls, mouse
emulation, keystrokes and built-in commands. It is fully customizable using the
techniques presented in this manual, so you can easily adapt it to your working style.
The keyset uses three of the four layers, with some duplication in each layer where it
makes sense. The layers are selected with F1, F2 and F3.
Here are the control assignments in the current version of the FCP keyset:
MCS3 SP USB Software" 26
Page 29

F5
Built In- Windows: Show Canvas
F6
Built In- Windows: Show Viewer
Up
Key Sequence: Home#
Right
Built In- Other: Right
Down
Key Sequence: End#
Left
Built In- Other: Left
Layer 2
MCS3 SP
Control
Assignment
Rewind
Emulation- transport: rewind
Fast Forward
Emulation- transport: fast forward
Stop
Key Sequence: Esc#
Play
Emulation- transport: play
Record
Built In- Capture: Capture Now
Jog
Emulation- jog
Shuttle
Built In- Jog and Shuttle: Shuttle
W1
Built In- Mark: Mark In
W2
Built In- Mark: Mark Out
W3
Built In- Goto: Go to In Point
W4
Built In- Goto: Go to Out Point
W5
Built In- Mark: Add Marker
W6
Built In- Goto: Go to Previous Marker
W7
Built In- Goto: Go to Next Marker
F1
Layer 1 Selector
F2
Layer 2 Selector
F3
Layer 3 Selector
MCS3 SP USB Software" 27
Page 30

F4
Built In- Windows: Show Browser
F5
Built In- Windows: Show Favorites
F6
Built In- Windows: Show Effects
Up
Built In- View# Menu: Zoom Out
Right
Built In- Goto: Go to Next Edit
Down
Built In- View# Menu: Zoom In
Left
Built In- Goto: Go to Previous Edit
Layer 3
MCS3 SP
Control
Assignment
Rewind
Emulation- transport: rewind
Fast Forward
Emulation- transport: fast forward
Stop
Emulation- transport: stop
Play
Emulation- transport: play
Record
Built In- Capture: Batch Capture...
Jog
Emulation- jog
Shuttle
Built In- Jog and Shuttle: Shuttle
W1
Built In- Mark: Mark In
W2
Built In- Mark: Mark Out
W3
Built In- Goto: Go to In Point
W4
Built In- Goto: Go to Out Point
W5
Built In- Mark: Add Marker
W6
Built In- Goto: Go to Previous Marker
W7
Built In- Goto: Go to Next Marker
F1
Layer 1 Selector
F2
Layer 2 Selector
MCS3 SP USB Software" 28
Page 31

F3
Layer 3 Selector
F4
Built In- Capture: Log and Capture...
F5
Built In- Windows: Show Tool Bench
F6
Built In- Windows: Show Audio Meters
Up
Emulation- cursor: up
Right
Emulation- cursor: right
Down
Emulation- cursor: down
Left
Emulation- cursor: left
MCS3 SP USB Software" 29
Page 32

Soundtrack Pro™ Support
Layer 1
MCS3 SP Control
Assignment
Rewind
Move Back
Fast Forward
Move Forward
Stop
Stop
Play
Play
Record
Record
Jog
JogW1Insert Time Marker
W2
Add Region Marker for Selection
W3
Add Time Markers at Beg. & End
W4
Insert Beat Marker
W5
Goto Previous Marker
W6
Goto Next Marker
Setting up the MCS3 SP for use with Soundtrack Pro is almost identical to setting up for
Final Cut Pro.
Open the MCS3 SP USB application and Import the Soundtrack Pro keyset or create a
keyset of your own. If you create your own, start by setting the Emulation Mode to A
then choosing Set All Controls to Emulation from the Actions menu. Later on you can
customize this keyset with built-in commands, key sequences and mouse actions.
The next time you run Soundtrack Pro, open the Preferences dialog from the
Soundtrack Pro menu then go to the Control Surfaces panel. Click on the “+” button to
add a control surface and choose Mackie Control. Choose MCS3 SP USB - MCS3 SP
for the input connection and output connections. Click OK to exit the dialog.
The Soundtrack Pro Keyset
The Soundtrack Pro keyset is a combination of emulated actions, keystrokes and built in
commands. It uses three layers with some duplication between layers. As with all other
MCS3 SP keysets, it is fully customizable.
F1 - F3 function as layer selectors. In Layer 1, F4 - F6 are used to toggle various panes
on and off. In Layer 2, F4 - F6 toggle different HUD displays and in Layer 3, F4 - F6
Tabs in various panes. Activating a Tab also activates the pane it is in. Once a pane is
activated in this fashion, the left and right VStick in Layer 3 can be used to move
between Tabs in the currently active pane.
In Layer 1 the VStick is used for zooming and in Layer 2 it is used for navigating the
timeline.
MCS3 SP USB Software" 30
Page 33

Layer 1
MCS3 SP Control
Assignment
F1
Layer 1
F2
Layer 2
F3
Layer 3
F4
Toggle Left Pane
F5
Toggle Lower Pane
F6
Toggle Right Pane
Up
Zoom Out Vertical
Right
Zoom In Horizontal
Down
Zoom In Vertical
Left
Zoom Out Horizontal
Layer 2
MCS3 SP Control
Assignment
Rewind
Move Back
Fast Forward
Move Forward
Stop
Stop
Play
Play
Record
Record
Jog
JogF1Layer 1
F2
Layer 2
F3
Layer 3
F4
Toggle Multipoint Video HUD
F5
Toggle Sound Palette
F6
Toggle Timecode HUD
Up
Goto Beginning
Right
Forward One Frame
Down
Goto End of Cycle Region
Left
Back One Frame
Layer 3
MCS3 SP Control
Assignment
Rewind
Move Back
Fast Forward
Move Forward
Stop
Stop
Play
Play
Record
Record
Jog
JogF1Layer 1
F2
Layer 2
MCS3 SP USB Software" 31
Page 34

Layer 3
MCS3 SP Control
Assignment
F3
Layer 3
F4
Video Tab
F5
Mixer Tab
F6
Details Tab
Right
Next Tab
Left
Previous Tab
MCS3 SP USB Software" 32
Page 35

GarageBand™ Support
Layer 1
MCS3 SP Control
Assignment
Rewind
Rewind
Fast Forward
Fast Forward
Stop
Stop
Play
Play
Record
Start / Stop Recording
Jog
JogW1Show Chord / Tuner Mode
W2
Show Time Mode
W3
Show Measures Mode
W4
Show Tempo Mode
W5
Cycle Region on/Off
W6
Metronome On/Off
W7
Count in On/Off
F1
Layer 1
F2
Layer 2
F3
Layer 3
F4
Track Info
F5
Editor
F6
Loop Browser
Up
Goto Beginning
Open the MCS3 SP USB application and Import the GarageBand Keyset. Later on you
can customize this keyset with built-in commands, key sequences and mouse actions.
The GarageBand Keyset
The GarageBand keyset is a combination of keystrokes and built in commands. It uses
two layers with some duplication between layers. As with all other MCS3 SP keysets, it
is fully customizable.
F1 - F3 function as layer selectors. In Layers 1 and 2, F4 - F6 are used to show and
hide various panes and windows. In Layer 2, F4 - F6 toggle different HUD displays and
in Layer 3, F4 - F6 Tabs in various panes.
In Layer 1 the VStick is used for navigating the timeline, and in Layer 2, the VStick Up
and Down are used for zooming.
In Layer 1, the Jog Wheel is used for jogging, and in Layer 2 it is used to adjust the
Master Volume.
MCS3 SP USB Software" 33
Page 36

Layer 1
MCS3 SP Control
Assignment
Right
Forward
Down
Goto End
Left
Back
Layer 2
MCS3 SP Control
Assignment
Rewind
Rewind
Fast Forward
Fast Forward
Stop
Stop
Play
Play
Jog
Master Volume
F1
Layer 1
F2
Layer 2
F3
Layer 3
F4
Media Browser
F5
Onscreen Keyboard
F6
Musical Typing Window
Up
Zoom Out
Down
Zoom In
MCS3 SP USB Software" 34
Page 37

iMovie™ Support
Layer 1
MCS3 SP Control
Assignment
Rewind
Reverse
Fast Forward
Forward
Stop
Stop
Play
Play
Jog
JogW1Select All
W2
Mute Clip
W3
Split Clip
W4
Undo
W5
Redo
W6
Enter / OK / Done
W7
Cancel
F1
Layer 1
F2
Layer 2
F3
Layer 3
F4
Clip Adjustments Panel
F5
Video Panel
F6
Audio Panel
Right
Forward 1 Frame
Left
Back 1 Frame
Open the MCS3 SP USB application and Import the iMovie Keyset. Later on you can
customize this keyset with built-in commands, key sequences and mouse actions.
The iMovie Keyset
The iMovie keyset is a combination of keystrokes and built in commands. It uses two
layers with some duplication between layers. As with all other MCS3 SP keysets, it is
fully customizable.
F1 - F3 function as layer selectors. In all Layers, F4 - F6 are used to show and hide
various panes and windows. In each layer the Play button is assigned a different
variation of the Play command.
W1 - W7 are assigned various editing tasks in Layer 1.
MCS3 SP USB Software" 35
Page 38

Layer 2
MCS3 SP Control
Assignment
Rewind
Reverse
Fast Forward
Forward
Stop
Stop Full Screen
Play
Play Full Screen
Jog
Extend Selection
W6
Enter / OK / Done
W7
Cancel
F1
Layer 1
F2
Layer 2
F3
Layer 3
F4
Clip Trimmer
F5
Edit Trimmer
F6
Crop / Rotate / Ken Burns
Layer 3
MCS3 SP Control
Assignment
Rewind
Reverse
Fast Forward
Forward
Stop
Stop
Play
Play from Beginning
W6
Enter / OK / Done
W7
Cancel
F1
Layer 1
F2
Layer 2
F3
Layer 3
F4
Keywords Window
F5
Titles Pane
F6
Transitions Pane
MCS3 SP USB Software" 36
Page 39

Logic™ Support
Layer 1
MCS3 SP Control
Assignment
Rewind
Rewind
Fast Forward
Fast Forward
Stop
Stop
Play
Play
Record
Record
Jog
JogW1Selected Track - Read / Off (Emulation- automation: read/off)
W2
Selected Track - Touch
W3
Selected Track - Latch
W4
Selected Track - Write
W5
Create Marker
W6
Previous Marker
W7
Next Marker
F1
Screenset 1
F2
Screenset 2
F3
Screenset 3
F4
Screenset 4
F5
Screenset 5
Open the MCS3 SP USB application and Import the Logic Pro keyset or create a keyset
of your own. If you create your own, start by setting the Emulation Mode to B then
choosing Set All Controls to Emulation from the Actions menu. Later on you can
customize this keyset with built-in commands, key sequences and mouse actions.
The next time you run Logic Pro, open the Preferences dialog from the Logic Pro menu
then go to Control Surfaces > Setup. Click on Install in the New menu at the top of left
of the window. Choose Logic Control from the list of control surfaces and click on Add.
Choose MCS3 SP for the Out Port and Input. Close the Setup Dialog dialog.
The Logic Keyset
The Logic keyset is a combination of emulation, keystrokes and built in commands. It
uses one layer.
W1 - W7 are used to set the automation mode and to create and locate to markers. F1 F6 are used to select Screensets 1 - 6.
The VStick is used for track selection and zooming.
MCS3 SP USB Software" 37
Page 40

Layer 1
MCS3 SP Control
Assignment
F6
Screenset 6
Up
Select Previous Track
Down
Select Next Track
Right
Zoom In/Out
MCS3 SP USB Software" 38
Page 41

Nuendo™ Support
Layer 1
MCS3 SP Control
Assignment
Rewind
Rewind
Fast Forward
Fast Forward
Stop
Stop
Play
Play
Record
Record
Jog
JogW1Read
W2
Write
W3
Markers
W4
Previous Marker
W5
Next Marker
W6
OK/Enter
W7
Cancel
F1
Layer 1
F2
Layer 2
F3
Layer 3
Open the MCS3 SP USB application and Import the Nuendo keyset or create a keyset
of your own. If you create your own, start by setting the Emulation Mode to A then
choosing Set All Controls to Emulation from the Actions menu. Later on you can
customize this keyset with key sequences and mouse actions.
The next time you run Nuendo, open the Device Setup dialog from the Devices menu
then go click on Mackie Control under Remote Devices. Choose MCS3 SP USB MCS3
SP for the MIDI Output and MIDI Input. Hit OK to accept your settings and close the
Setup Dialog.
The Nuendo Keyset
The Nuendo keyset is a combination of emulation and keystrokes. It uses three layers
with some duplication between layers.
F1 - F3 are layer selectors. F4 - F6 are used to open and close various windows and
dialog boxes in all three layers.
W1 - W6 control automation modes, markers, locating events, OKʼing, Canceling, and
Closing windows, with slight differences between layers.
The VStick is used for track selection and zooming with some differences between
layers.
MCS3 SP USB Software" 39
Page 42

Layer 1
MCS3 SP Control
Assignment
F4
Transport Panel
F5
Mixer Window
F6
Video
Up
Select Previous Track
Right
Zoom Timeline In
Down
Select Next Track
Left
Zoom Timeline Out
Layer 2
MCS3 SP Control
Assignment
Rewind
Rewind
Fast Forward
Fast Forward
Stop
Stop
Play
Play
Record
Record
Jog
JogW1Read
W2
Write
W3
Markers
W4
Previous Event
W5
Next Event
W6
OK/Enter
W7
Cancel
F1
Layer 1
F2
Layer 2
F3
Layer 3
F4
Project Setup
F5
VST Connections
F6
Tempo Track
Up
Select Previous Track
Right
Zoom Track In
Down
Select Next Track
Left
Zoom Track Out
Layer 3
MCS3 SP Control
Assignment
Rewind
Rewind
Fast Forward
Fast Forward
Stop
Stop
Play
Play
MCS3 SP USB Software" 40
Page 43

Layer 3
MCS3 SP Control
Assignment
Record
Record
Jog
JogW1Read
W2
Write
W3
Markers
W4
Previous Marker
W5
Next Marker
W6
OK/Enter
W7
Close
F1
Layer 1
F2
Layer 2
F3
Layer 3
F4
Organize Workspaces
F5
Browser
F6
Pool
Up
Select Previous Track
Down
Select Next Track
MCS3 SP USB Software" 41
 Loading...