


IN STALL ATIO N
DIFFICULTY:
INSTALLATION GUIDE
for the
SB-GM-C6CONV/8W3v3
SKU# 94330
2005 - 2013 Chevrolet C6 Corvette Convertible
Thank you for choosing a JL Audio Stealthbox® for your automotive sound system. With proper installation, your new vehicle-
specific enclosed subwoofer system will deliver years of listening pleasure.
We strongly recommend that you have your new Stealthbox® installed by your authorized JL Audio dealer. The installation
professionals employed by your dealer have the necessary tools and experience to disassemble and reassemble your vehicle
properly. Also, keep in mind that your warranty coverage extends to 1 year if your system is installed or approved by your
authorized JL Audio dealer. If you prefer to perform your own installation, please read this installation guide completely
before beginning the process.
If you choose to per form the installation yoursel f, it is absolutel y vital that
the Stealthbox® be properly mo unted to the vehicle according to these
instructions . Failure to mount the en closure properly presents two p roblems:
1) The sub-bass per formance will suffer due to the movem ent of the enclosure
caused by the force exe rted by the woofer(s).
2) A loose enclosure presents a serious s afety hazard in the event of a collision
or sudden deceleration.
STEP 1
Place the convertible top in the down p osition, keeping the
protective lid open.
Position the seats all the way for ward.
Remove the pair of rear speakers.
Continued on Next Page
STEP 2
Pull out the pair of plastic push -in retainers. These hold the
painted interior trim piece to the rear bulkhead.
STEP 3
Remove the pair of Allen head screws from the top side of
the painted interior trim piece.
Remove the painted interior trim pie ce out of the vehicle.
SB-GM -C6CONV/8W3v3 INSTR _SKU#011225
2
5
OUT
OF
Continued on Next Page
SB-GM -C6CONV/8W3v3 INSTR _SKU#011225
STEP 7
Position each Stealthbox® into their mounting location, with
the leg to the middle of the vehicle.
Firmly press each Stealthbox® into the rear bulkhead.
Remove each Stealthbox® carefully, leaving the wax squares
in place. The head of the bolt will leave an impression on
each wax square.
Remove the 3/8” hex bolt from each Stealthbox®.
STEP 6
Fully thread in each supplied 3/8” hex head bolt into each
Stealthbox®.
STEP 5
Place a supplied wax squares onto the driver’s side of the rear
bulkhead.
The middle of the wax square should measure 3-1/2 inches
from the top of the rear bulkhead and 3 inches from the right
of the stand out, as se en in the picture at left.
STEP 4
Place a supplied wax square onto the passenger’s side of the
rear bulkhead.
The middle of the wax square should measure 3-1/2 inches
from the top of the rear bulkhead and 3 inches from the lef t
of the stand out, as se en in the picture at left.
Page 2 • JL Audio, Inc 2016
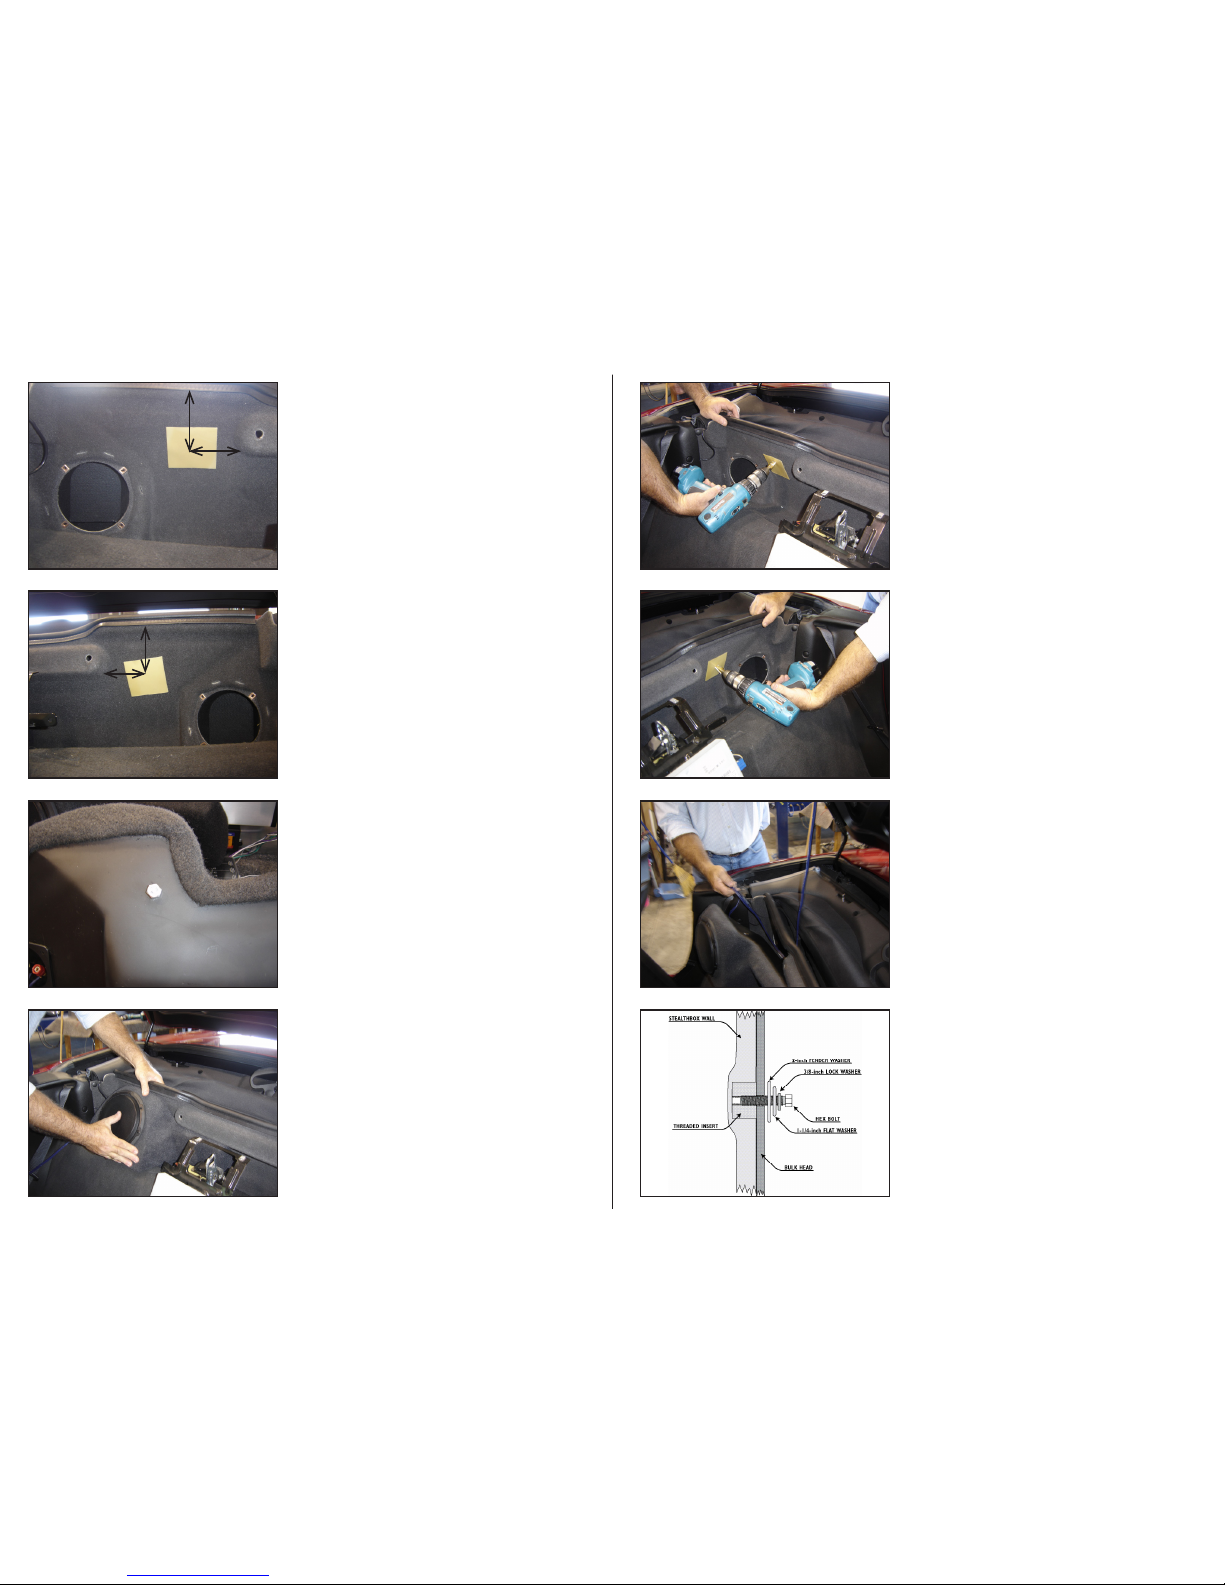
STEP 9
With a drill and a 1/2-inch drill bit, drill through the
impression made in the wax square and into the vehicle’s
wheel well. Remove the wa x squares and cut the carpet
from the area around the drilled hole, as seen in the
picture at lef t.
STEP 11
Place a supplied 3/8” lock washer, supplied 3/8” f lat washer
and supplied 3/8” fender washer o nto each supplied 3/8” hex
head bolt.
Place each bolt assembly through th e drilled hole from
STEP 8 & 9. This is from the back side o f the rear bulkhead, into
the threaded insert o f each Stealthbox®, as seen in the picture
at left.
Using an 9/16-inch open end wrench or socket, se cure the
bolt assembly. Do not over thighten the bo lt assembly.
STEP 10
Cut enough speaker wire to allow the run from the each
Stealthbox® location to the amplifier location.
Attach the speaker wire to the wire terminal on each
Stealthbox®. Check the woofer for prop er operation.
Place each Stealthbox® into their mounting position. Bring
the speaker wire through the fac tory speaker mounting
holes.
STEP 8
Note: Before drilling, make sure that you are not going
to be drilling into any gas lines, brake lines, transmission
lines, electrical wiring, or anything else that might
cause a reduction in your weekly pay. Always wear eye
protection when drilling!
With a drill and a 1/2-inch drill bit, drill through the
impression made in the wax square and into the vehicle’s
rear bulkhead. Remove the wa x squares and cut the carpet
from the area around the drilled hole, as seen in the
picture at lef t.
3 inches
3 1/2 inches
3 inches
3 1/2 inches

SB-GM -C6CONV/8W3v3 INSTR _SKU#011225
CONGRATULATIONS
You have completed the installation for this model!
Please refer to the Power Recommendation se ction for an
amplifier recommendation and basic set-up help.
STEP 14
From the back side of the rear bulkhead, place the last pair of
bolt assemblies through the factory holes.
Place a supplied 5/16” flat washer onto each hex head bolt,
between the painted interior trim piece and in front of the
rear bulk head.
Hand tighten these bolt assemblies to the coupling nut that
is attached to the painted interior trim piece.
STEP 13
Place the painted interior trim piece back into the ve hicle.
Mount the painted interior trim pie ce with the Allen screws
that were removed in STEP 3.
STEP 12
Place a supplied 5/16”lock washer and then a supplied 5/16”
flat washer onto each 5/16” hex head bolt.
From inside the trim piece, place two of th ese bolt assemblies
through the holes that are on the b ack side of the trim piece.
Place a supplied 5/16” flat washer onto each exposed 5/16”
hex head bolt. Hand t ighten each supplied coupling nu t onto
each 5/16” hex head bolt. Look to STEP 14 for a cross section
illustration.
Page 3 • JL Audio, Inc 2016
All specifications are subject to change without notice. “JL Audio®” and the JL Audio logo, “Stealthbox” and the Stealthbox logo are registered
trademarks of JL Audio, Inc. “Ahead of the Curve” and its respective logo is a trademark of JL Audio, Inc.
JLA-SKU# 011225 - 09.20.2016 • Printed in USA • ©2016 JL Audio, Inc.
For more detailed information please visit us online at www.jlaudio.com.
(954) 443-1100
www.jlaudio.com
10369 NORTH COMMERCE PARKWAY • MIRAMAR, FLORIDA • 33025 • USA
INCLUDED HARDWARE
(2) 3/8 -16 x 1“ Hex Head Bolts (2) 3/8” x 1-1/4” Fender Washers
(4) 5/16” Split Lock Washers (2) 3” x 3” Wax Squares
(2) 3/8” Split Lock Washers (2) 5/16 - 18 x 7/8” x 9/16” Coupling Nuts
(4) 3/8” x 2” Fender Washers (4) 5/16 - 18 x 1/2” Hex Head Bolts
(8) 5/16” Flat Washers
SPECIFICATIONS
Enclosure Type: Acoustic Suspension (sealed)
Driver Type: 8W3v3-4
Nominal Impedance: 2 ohm mono or 4 ohm stereo
Continuous Power Handling: 500 Watts
POWER RECOMMENDATION
JL Audio recommends using a high quality amplifier such as the JL Audio XD300/1v2.
The diagram below shows the recommended crossover, infrasonic filter and equalizer set tings for the XD300/1v2
when being used to power your Stealthb ox®.
The JL Audio XD300/1v2 is a very versatile audio component. Please consult the owner’s manual for even more
detailed information about installing and tuning this amplifier.
MID/HIGH FREQUENCY DRIVER FITMENT
A variety of JL Audio coa xial and component systems will fit in the factor y speaker locations of you vehicle.
Front Speaker Size / Location: 10-inches / Front Doors
*Fits JL Audio Models: TR650CSi, TR650-C Xi, C2-650, C2-650 x,
C3-650, C5-650, C5-650x, & ZR650-CSi
*Speakers require custom adaptors for installation.
Rear Speaker Size / Loc ation: 5.25-inches / Behind Seats
*Fits JL Audio Models: TR525-CXi, C2-525x, C3-525, & C5-525x
*Installation of Stealthbox® prevents installation of rear speakers
 Loading...