

JL Audio SMS-C-CTS/PREM, SMS-C-CTS/BASE Installation Manual
INSTALLATION GUIDE
for the
SMS-C-CTS/PREM
SMS-C-CTS/BASE
SKU# 94553/94554
2008 & Up Cadillac CTS/CTS-V
Thank you for choosing a JL Audio StealthMod® System for your automotive sound system.
With proper installation, your new vehicle-specific audio system
will deliver years of listening pleasure.
We strongly recommend that you have your new StealthMod® System installed by your authorized
JL Audio dealer. The installation professionals employed by your dealer have the necessary tools
and experience to disassemble and reassemble your vehicle properly. If you prefer to perform your
own installation, please read this installation guide completely before beginning the process.
If you choose to per form the installation yoursel f, it is abso lutely vital that
the Stealthbox
®
be properly mo unted to the vehicle according to these
instructions . Failure to mount the enclosure prop erly presents two problems:
1) The sub-bass per formance will suffer due to the movement of the enclosure
caused by the force exe rted by the woofer(s).
2) A loose enclosure pres ents a serious safety haza rd in the event of a collision
or sudden deceleration.
Continued on Next Page
SMS-C-CTS INS TR_SKU# 011357
IN STALL ATIO N
DIFFICULTY:
5
5
OUT
OF
ESTIMATED TIME:
5+ HOURS
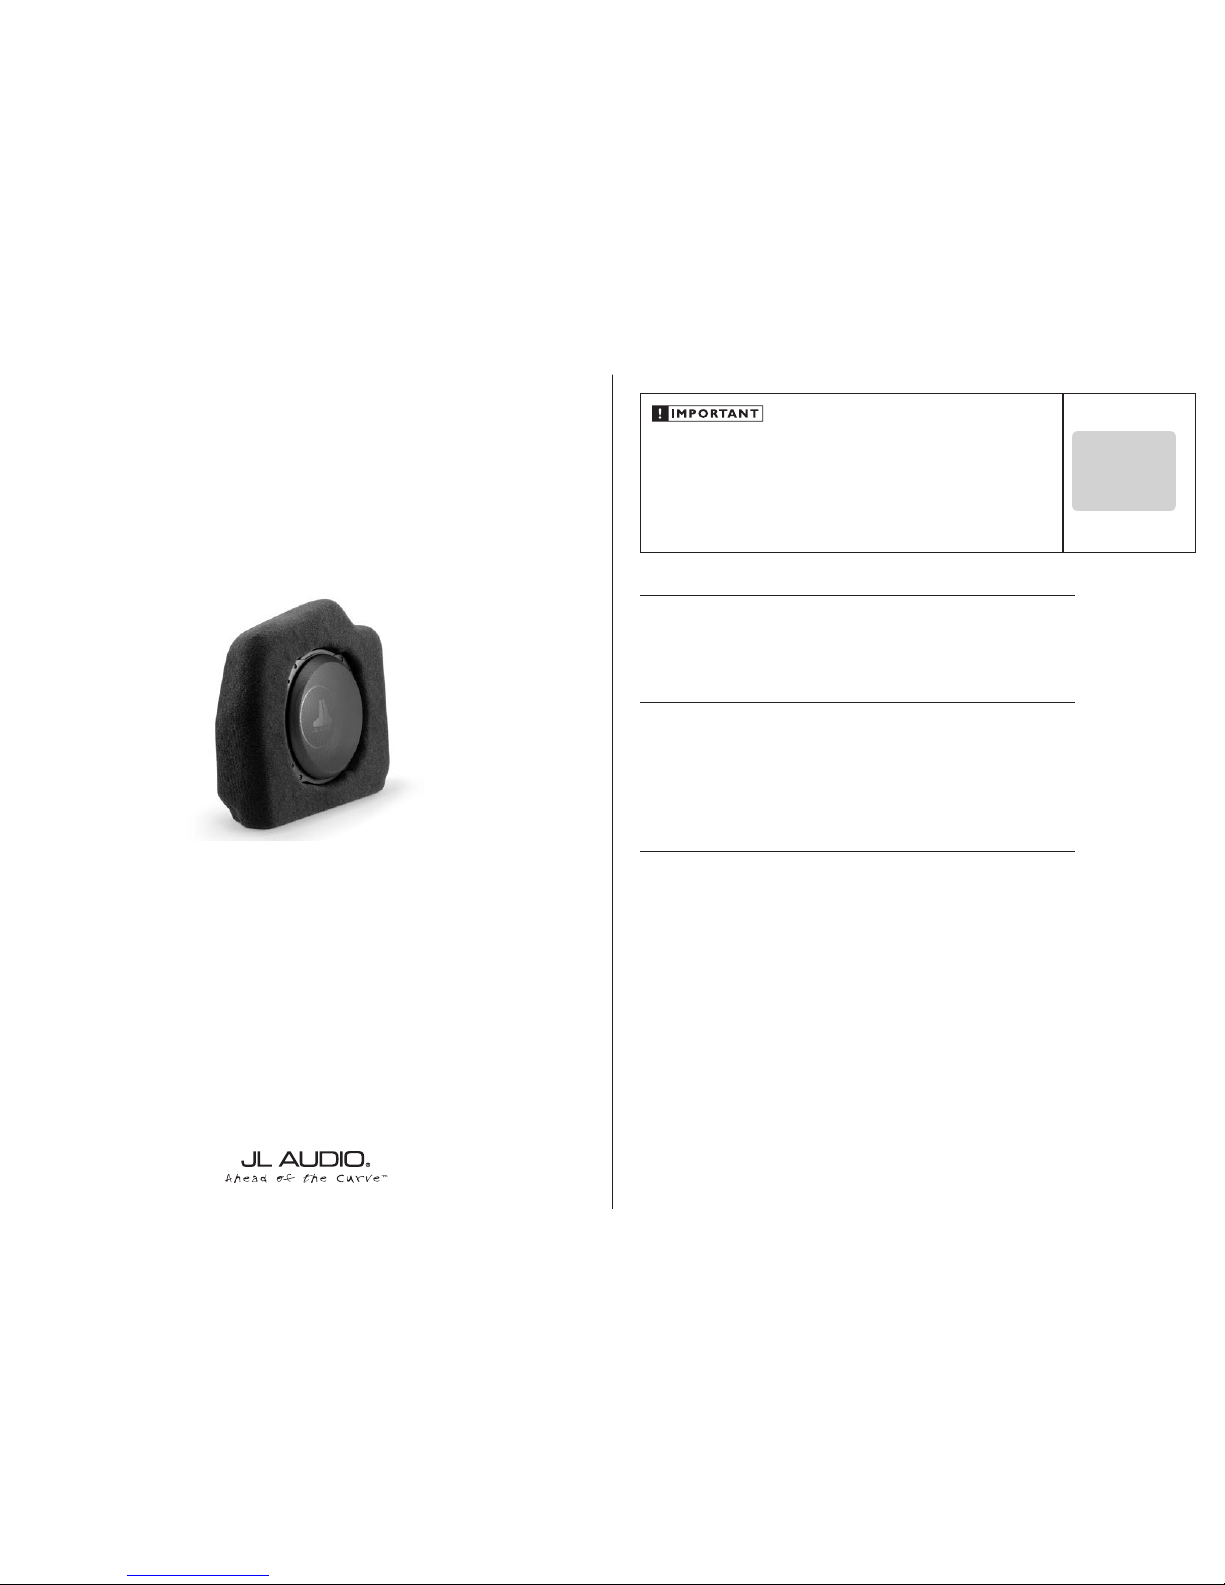
STEALTHBOX® SPECIFICATIONS
Enclosure Type: Sealed
Driver Type: 10TW3-D4
Nominal Impedance: 2 ohms
Continuous Power Handling: 400 watts (RMS method)
INCLUDED EQUIPMENT
(1) H D- RLC
Premium System O nly: Base System Only:
(1) XD700/5 Amplifier (1) XD500/3 Amplifier
(1) C5-650cw Speakers (1) Pair C5-650x Speakers
(1) Pair C2-350x Speakers
INCLUDED HARDWARE
(1) Rear Bracket (1) Amplifier Bracket
(1) Side Bracket (4) 1/4 - 20 x 5/8” Pan Head Screw
(2) 3/8 - 16 x 1” Hex Bolt (4) 1/4 “ Flat Washer
(4) 3/8” Flat Washer (4) 1/4 - 20 Keps Nut
(3) 3/8” x 1-1/4” Diameter Flat Washer (1) 8’ Power Wire
(5) 3/8” Lock Washer (1) 18” Ground Wire
(5) 3/8 16 Hex Nut (1) 8’ Remote Turn-on Wire
(3) 3/8 -16 U-Nut (1) 4’ 12 Gauge Speaker Cable
(3) 3/8” x 2-1/4” Set Screw (1) Mini Fuse Holder
(2) 6mm x 1.0 Flange Nut (1) 3 amp Mini Fuse
(4) 0.80 Thin Foam Strip (1) XD-MFB-MAXI Fuse Holder
(2) 0.875 Thick Foam Strip (1) XD-MAXI- 60 60 amp Fuse
(1) XB- MGLU Ground Lug (1) XD-CLRAIC Y-1F2M Y-adaptor
Premium System O nly: Base System Only:
(5) Speaker Wire to RCA Adaptor (3) Speaker Wire to RCA Adaptor
(1) 38’ 16 Gauge Speaker Cable (1) 32’ 16 Gauge Speaker Cable
(2) CTS-V Door Speaker Adaptor (2) CTS Door Speaker Adaptor
(2) Dash Speaker Adaptor (2) 12 ohm, 10 watt resistor / 2.2 uf capacitor
(24) #8 x 1-1/4” Pan Head Screw (8) #8 x 7/8” Pan Head Screw
(4) #8 x 3/4” Pan Head Screw (24) #8 x 3/4” Pan Head Screw
(4) Speed Clip (8) Speed Clip
(2) Crossover Bracket
StealthMod
®
SMS-C-CTS INS TR_SKU# 011357
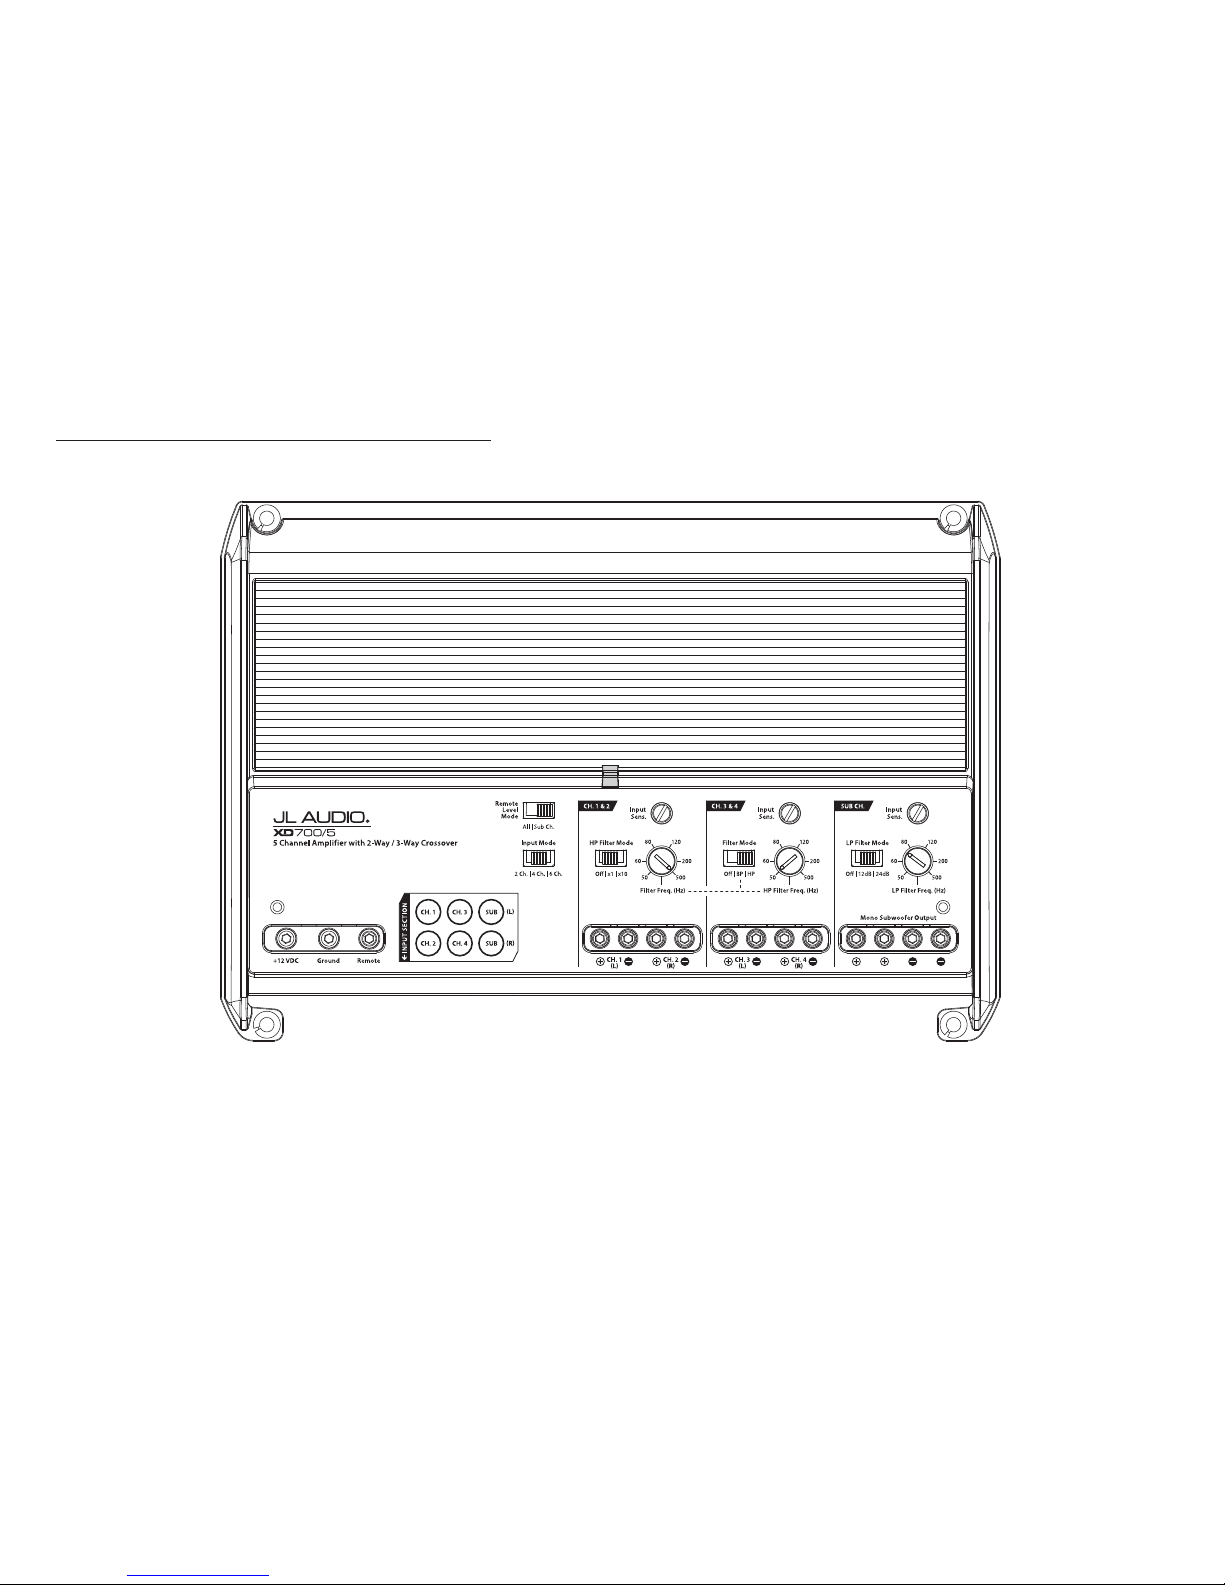
POWER RECOMMENDATION
The diagram bel ow shows the recommended crossover se ttings for the XD700/5 in the Premium System. For a detailed descriptio n of the amplier settings, consul t the owner’s manual for the amplier.
Continued on Next Page Page 2 • JL Audio, Inc., 2013
SMS-C-CTS INS TR_SKU# 011357
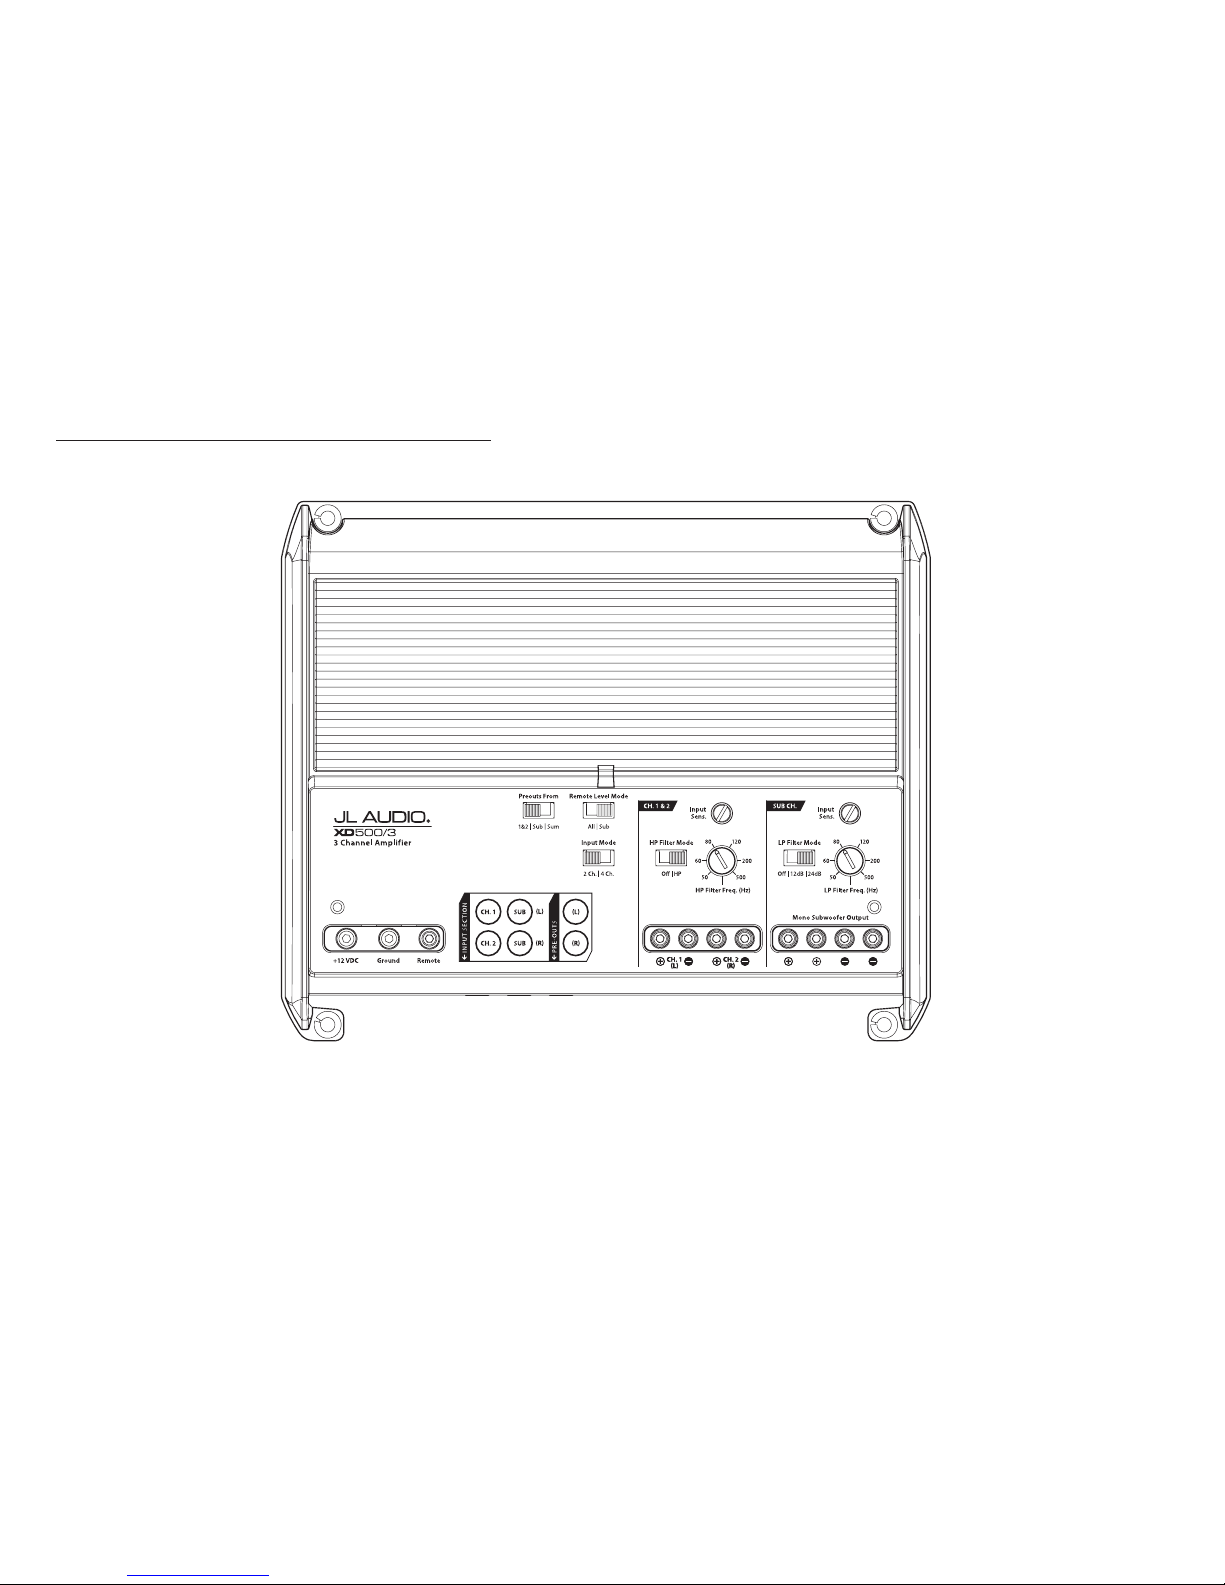
POWER RECOMMENDATION
The diagram bel ow shows the recommended crossover se ttings for the XD500/3 in the Base System. For a detailed de scription of the amplier set tings, consult the owner’s manual for the a mplier.
Continued on Next Page Page 3 • JL Audio, Inc., 2013

Continued on Next Page
SMS-C-CTS INS TR_SKU# 011357
Page 4 • JL Audio, Inc., 2013
STEP 4
Carefully unclip and remove the trunk sill panel.
STEP 8
Remove the two nuts that hold the computer bracket to the
fender well, and remove the bracket .
STEP 3
Unscrew each of the lower net but tons. Remove the trunk
floor panel.
STEP 7
Unclip the computer from the bracket located on the fender
well.
STEP 2
Unclip the covers around each of the upper tie-down ho oks.
STEP 6
Pull both the driver’s side and passenger side of the trunk
liner away from the trunk wall.
STEP 1
Empty out the trunk of the vehicle.
Disconnect the negative battery post connection.
STEP 5
On the driver’s side of the trunk, unscrew the upper net
button. Remove each of the clips that hold the trunk liner in
place. Repeat for the passenger side.
 Loading...