

Page 1
SB-POL-RNGR700 INSTR_SKU# 011295
Stealthbox
I N S T A L L A T I O N G U I D E
for the
SB-POL-RNGR700
SKU#94457
2009+
Thank you for choosing a JL Audio Stealthbox® for your side by side sport utility sound system. With
proper installation, your new vehicle-specific enclosed subwoofer system will deliver years of listening
pleasure.
®
We strongly recommend that you have your new Stealthbox
dealer. The installation professionals employed by your dealer have the necessary tools and experience
to disassemble and reassemble your vehicle properly. Also, keep in mind that your warranty coverage
extends to 2 years if your system is installed or approved by your authorized JL Audio dealer. If you
prefer to perform your own installation, please read this installation guide completely
before beginning the process.
installed by your authorized JL Audio
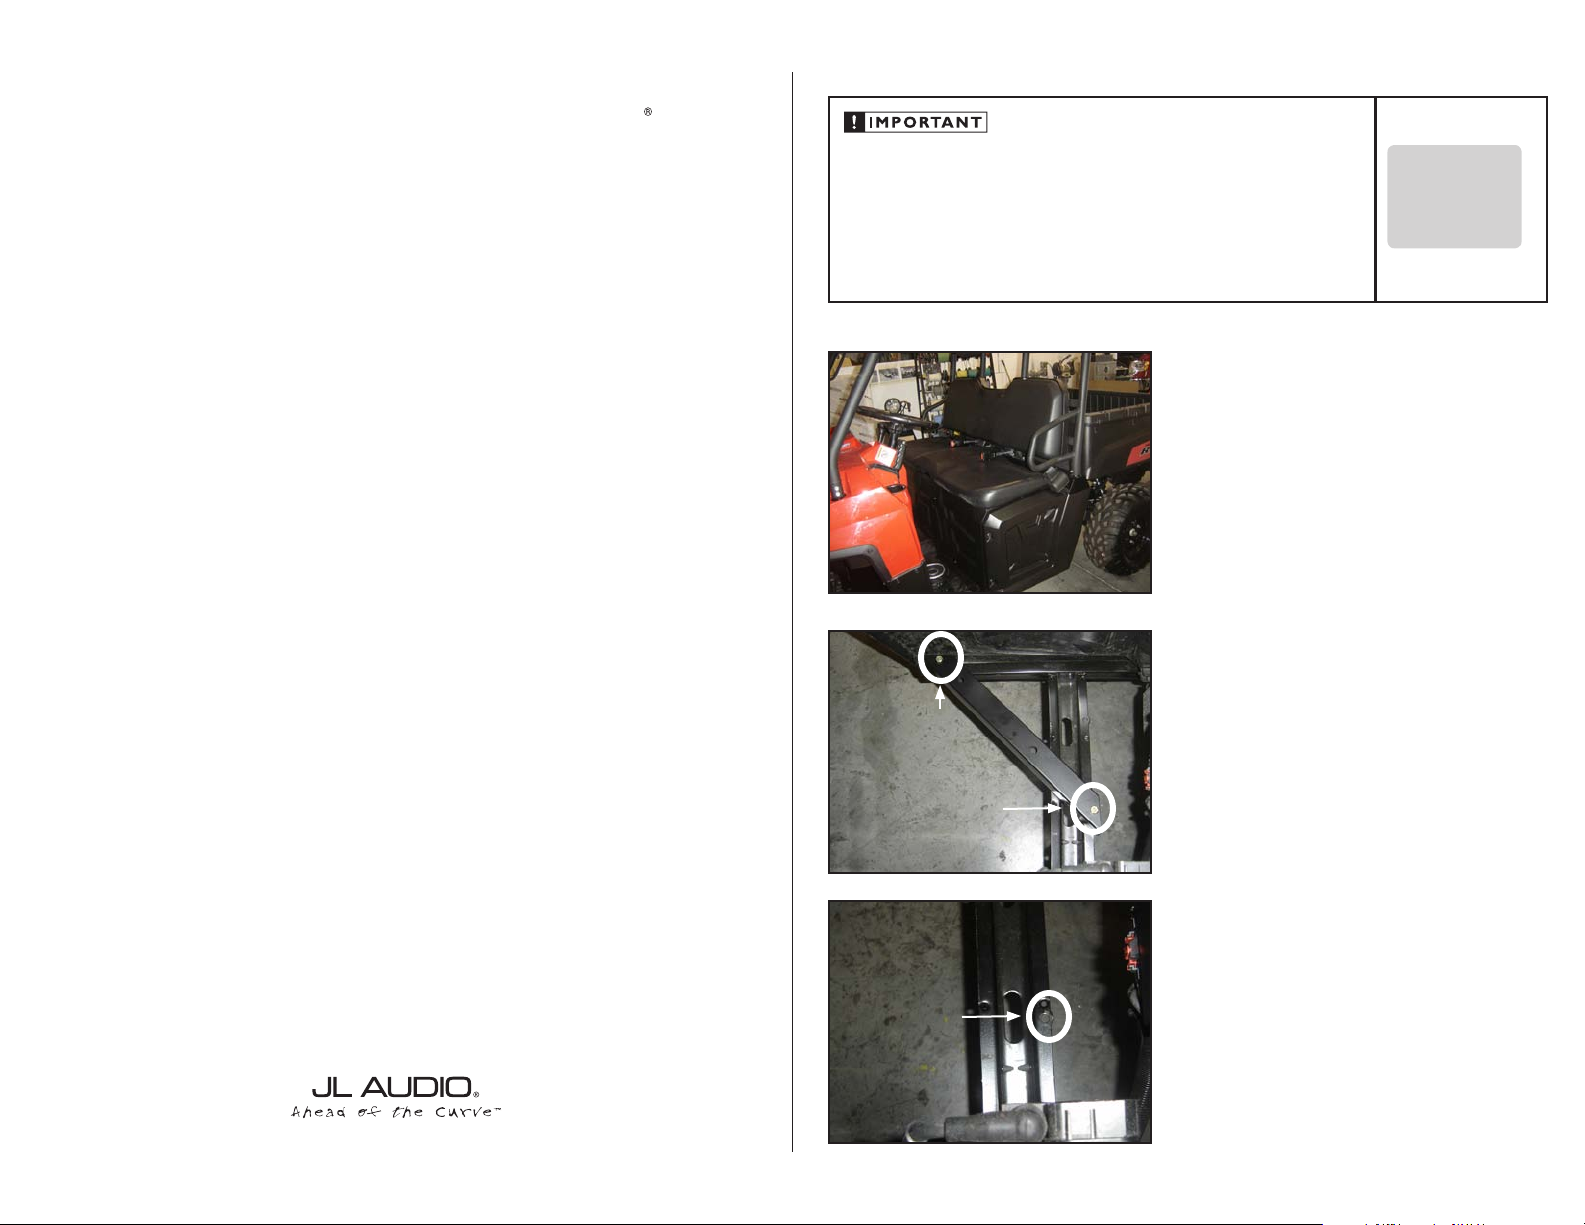
If you choose to perform the installation yourself, it is absolutely vital that the
®
Slampak
Failure to mount the enclosure properly presents two problems:
1) The sub-bass performance will suffer due to the movement of the enclosure
caused by the force exerted by the woofer(s).
2) A loose enclosure presents a serious safety hazard in the event of a collision
or sudden deceleration.
be properly mounted to the vehicle according to these instructions.
#2
S T E P 1
Clean off the area around the drivers seat, and the floor
around the drivers side.
Remove the seat bottom cusion.
S T E P 2
Looking down from the passenger side through the
opening where the driver would sit. Use the long bolt going
down through location #1 as reference (see detail below),
pivot bracket untill the end at #2 is parallel with the outer
frame rail. Mark the hole at #2 and drill the frame rail.
Notice the orientation of the bracket with the hole
closer to the end being installed towards the frame
#1
rail.
D E T A I L
INSTALLATION
D I F F I C UL T Y:
OU T
OF
15
ESTIMATED TIME:
12 HOURS
#1
Continued on Next Page
Page 2
SB-POL-RNGR700 INSTR_SKU# 011295
S T E P 3
Looking from the front of the vehicle towards location #1
from the previous steps, notice mounting and, orientation
of Hex Head Bolt, Split Lock Washer, Hex Nut. Use the Long
gold colored bolt, Split Lock Washer and Hex Nut at location
#2 in the previous step.
Once all of this hardware is installed, It’s also safe to now
tighten this all of this hardware.
S T E P 4
Set the enclosure on the ground in front of the drivers side
rear wheel oriented as shown.
S T E P 5
Lift the enclosure up onto the previously installed bracket.
S T E P 7
Install the “Zig- Zag” bracket as shown, line it up with the
upper seat rail and drill the upper mount hole. Install a
Hex Head Bolt, Split Lock Washer and Hex Nut,
all of this hardware as well as the hardware installed
in STEP6. Re-install the previously removed seat bottom
cusion.
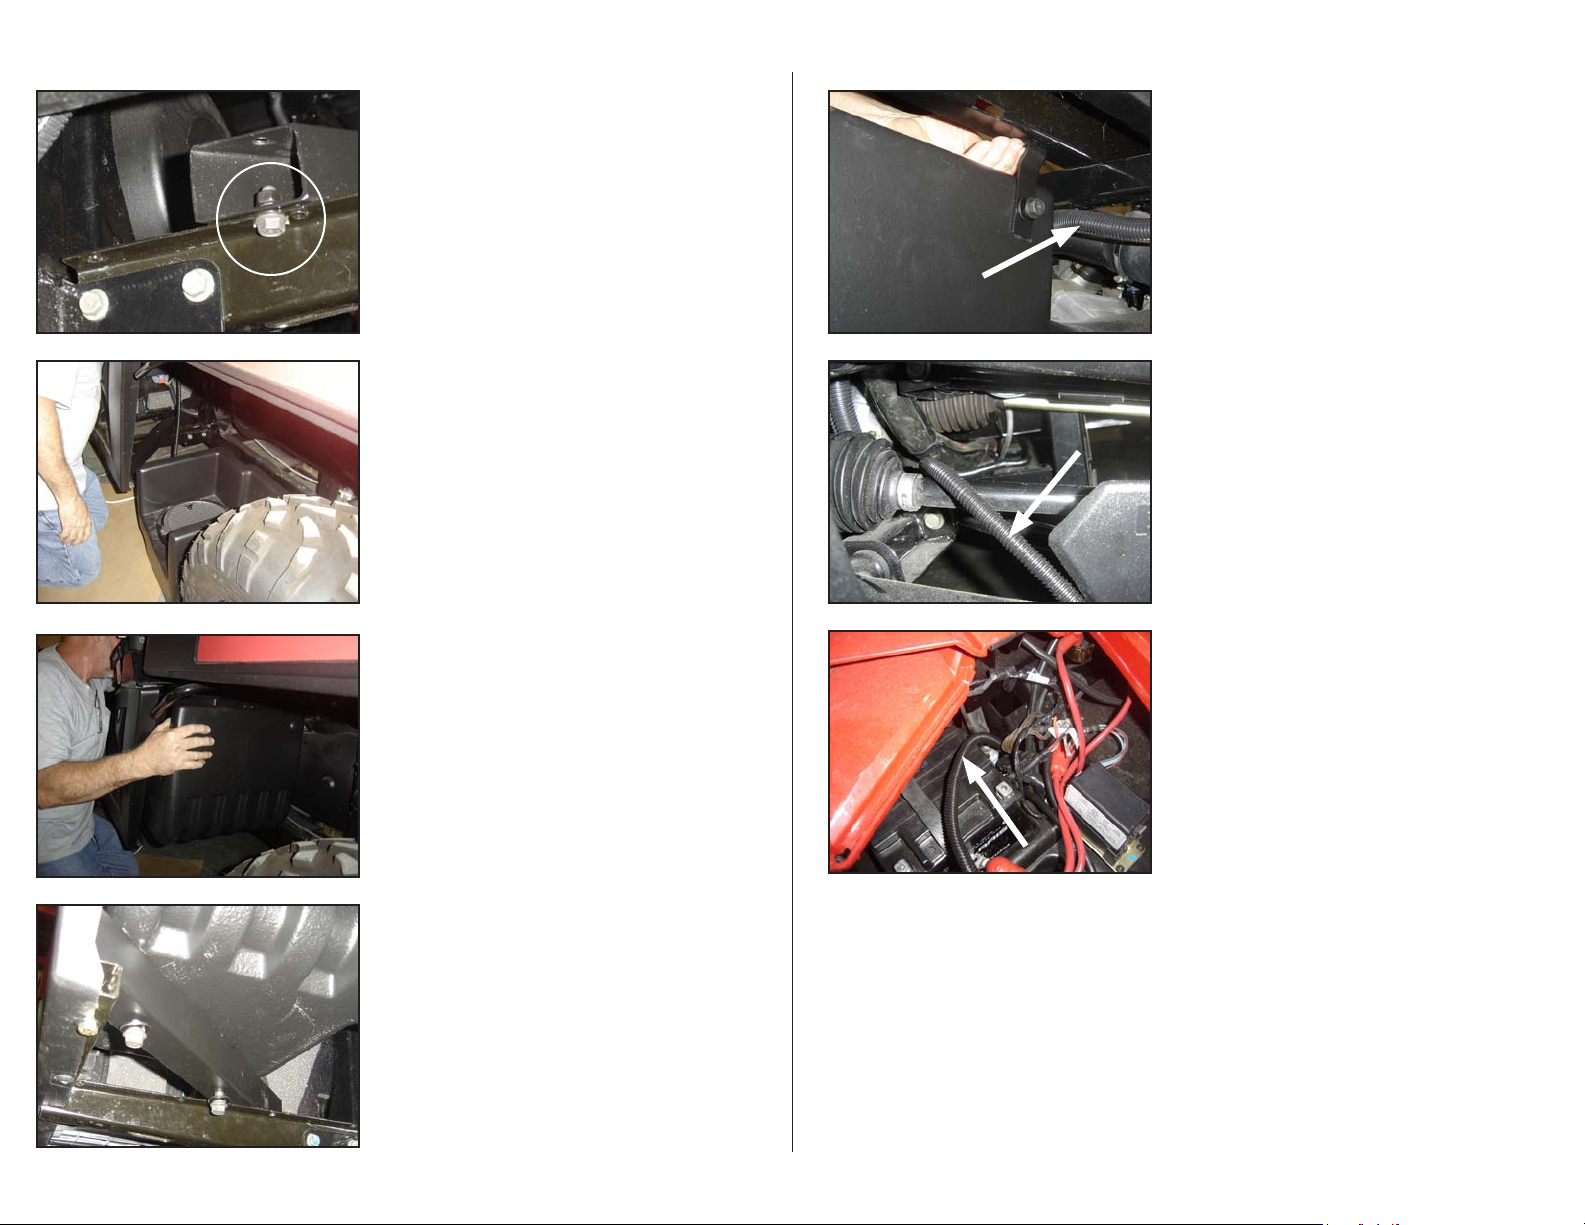
Run the speaker wire alongside the large harness
(indicated by the arrow) to the front of the vehicle (in this
installation, we ran the wire inside split loom (not included)),
secure as neccessary using zip ties to ensure that there is no
chance of the speaker wire getting entangelled in anything
ie: moving parts for suspension, steering, hot exhaust...
S T E P 8
Looking from the front back through the front suspension,
you can see the tunnel that the braided flexible brake line
goes through as well as the big harness that was indicated
in
STEP7, Run the speaker wire alongside the large harness
(indicated by the arrow) to the front of the vehicle, secure as
neccessary using zip ties to ensure that there is no chance of
the speaker wire getting entangelled in anything ie: moving
parts for suspension, steering, hot exhaust...
S T E P 9
Run the speaker wire through the front of the vehicle, up
under the hood, coming out near the other harnesses (as
indicated by the arrow) secure as neccessary using zip ties
to ensure that there is no chance of the speaker wire getting
entangelled in anything ie: moving parts for suspension,
steering, hot exhaust...
Tighten
Page 2 • JL Audio, Inc 2009
S T E P 6
From underneath the enclosure, start the hardware through
the holes in the bracket installed in
DO NOT TIGHTEN AT THIS TIME.
STEP 2.
Route the wire to your chosen amplifier mounting location,
secure and protect the wire as needed.
C O N G R A T U L A T I O N S !
You have completed the installation for this model!
Enjoy your new Stealthbox®!
Continued on Next Page
Page 3

I N C L U D E D H A R D W A R E
2) Custom Steel Bracket 2) 3/8-16 x 2 3/4” Hex Head Bolt
1) 3/8-16x 1” Hex Head Bolt 1) 3/8 x 1 1/4” Fender Washer
3) 3/8 Split Locking Washer 4) 5/16 SS Black Washer
2) 5/16-18 x 3/4” Steel Black Cap Screw 4) 5/16 Steel Split Lock Washer
1) 5/16-18 x 3-1/2” Steel Cap Screw 3) 5/16-18 Steel Hex Nut
S P E C I F I C A T I O N S
Subwoofer Enclosure Type: Acoustic Suspension (sealed)
Driver Type: M10W5
Nominal Impedance: 4 Ohms
Continuous Power Handling: 250 Watts (RMS)
P O W E R R E C O M M E N D A T I O N
JL Audio recommends using a high quality amplifier such as the JL Audio M4500. The diagram below shows the
recommended crossover and input settings for the M4500 when being used to power your Stealthbox® and a pair
of mids and highs such as the speakers suggested below.
The JL Audio M4500 is a very versatile audio component. Please consult the owner’s manual for even more
detailed information about installing and tuning this amplifier.
SB-POL-RNGR700 INSTR_SKU# 011295
C O N N E C T I O N S
Using quality power, signal and speaker wire is essential in ensuring the performance of your Stealthbox®.
JL Audio recommends using a 4 AWG power kit such as the XC-PCS4-1B for your Stealthbox® amplifier, other
kits are available should you be using more than one amplifier. Signal wire such as the JL Audio Premium
Audio Interconnect Cables should be used that will provide signal for both channels of the amplifier. JL Audio
reccommends using 12AWG speaker wire for subwoofers such as our XC-BCS12-25.
M I D / H I G H F R E Q U E N C Y D R I V E R F I T M E N T
A variety of JL Audio coaxial and component systems will fit in the various speaker locations available, we suggest
using either our MX-650, M-650, M-770 or M-770x speakers to compliment your new Stealthbox®.
(954) 443-1100
All specifications are subject to change without notice. “JL Audio®” and the JL Audio logo, “Stealthbox” and the Stealthbox logo are registered
trademarks of JL Audio, Inc. “Ahead of the Curve” and its respective logo is a trademark of JL Audio, Inc.
JLA-SKU#011295 ©9-15-2009 • Printed in USA • ©2008 JL Audio, Inc. • U.S. PATENTS: #5,734,734 #5,949,898 #6,118,884 #6,229,902 #6,243,479
#6,294,959 #6,501,844 #6,496,590 #6,441,685 #5,687,247 #6,219,431 #6,625,292 #D472,891 #D480,709 Other U.S. & Foreign patents pending.
For more detailed information please visit us online at www.jlaudio.com.
1 0 3 6 9 N O R T H C O M M E R C E P A R K W A Y • M I R A M A R , F L O R I D A • 3 3 0 2 5 • U S A
w w w. j l a u d i o . c o m
Page 3 • JL Audio, Inc 2009
 Loading...