

SB-M-3-SPD/10W3v3 INSTR_SKU# 011255
I N S T A L L A T I O N G U I D E
for the
SB-M-3-SPD/10W3v3
SKU# 94378/ 94379
20007+ Mazda 3/ Mazda Speed 3
Thank you for choosing a JL Audio Stealthbox® for your automotive sound system. With proper
installation, your new vehicle-specific enclosed subwoofer system will deliver years of listening pleasure.
If you choose to perform the installation yourself, it is absolutely vital that
the Stealthbox
instructions. Failure to mount the enclosure properly presents two problems:
1) The sub-bass performance will suffer due to the movement of the enclosure
caused by the force exerted by the woofer(s).
2) A loose enclosure presents a serious safety hazard in the event of a collision
or sudden deceleration.
®
be properly mounted to the vehicle according to these
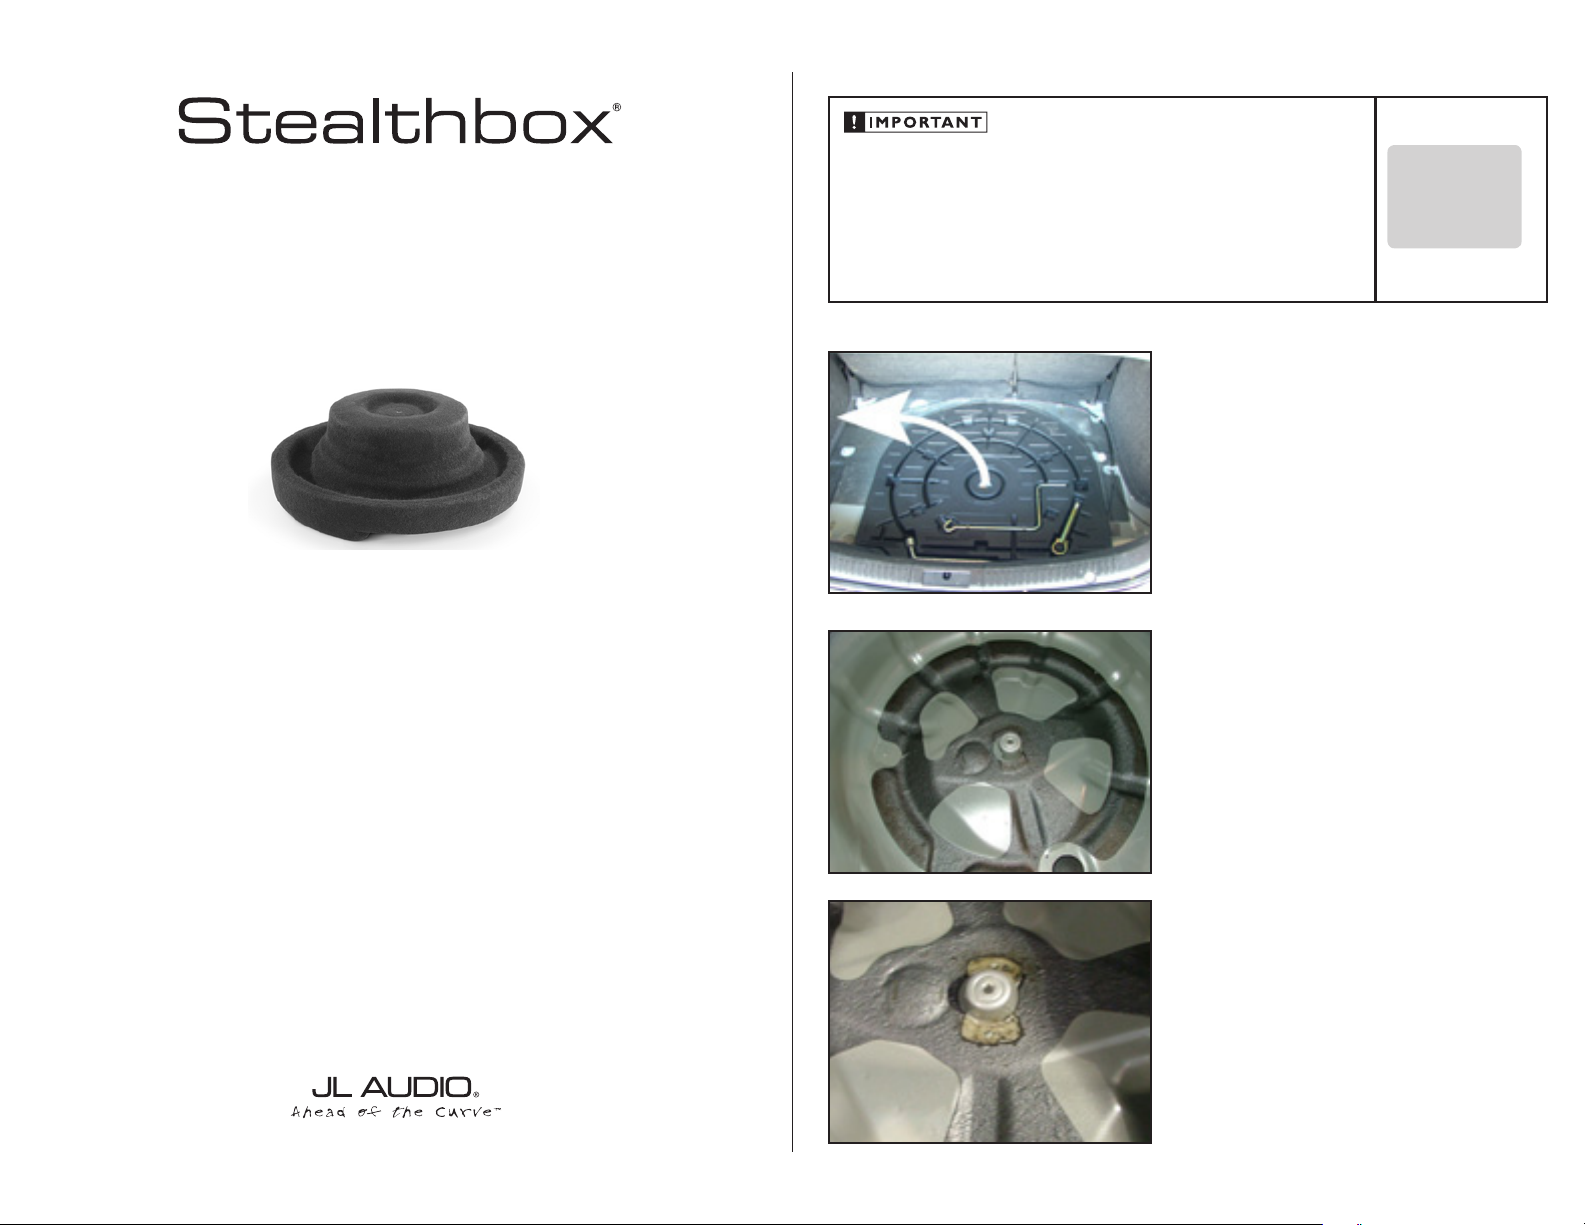
S T E P 1
In the Mazda3, remove carpeted floor panel by unsnapping
at rear-most edge then remove tool panel.
In the Speed3, remove the foam floor riser.
S T E P 2
Remove bolt securing spare tire with lug wrench provided in
tool panel then remove spare tire.
INSTALLATION
D I F F I C UL T Y:
OU T
OF
35
ESTIMATED TIME:
23 HOURS
We strongly recommend that you have your new Stealthbox® installed by your authorized JL Audio
dealer. The installation professionals employed by your dealer have the necessary tools and experience
to disassemble and reassemble your vehicle properly. If you prefer to perform your own installation,
please read this installation guide completely
before beginning the process.
S T E P 3
Remove sealant material from around mounting boss at
center of spare tire well.
Continued on Next Page
SB-M-3-SPD/10W3v3 INSTR_SKU# 011255
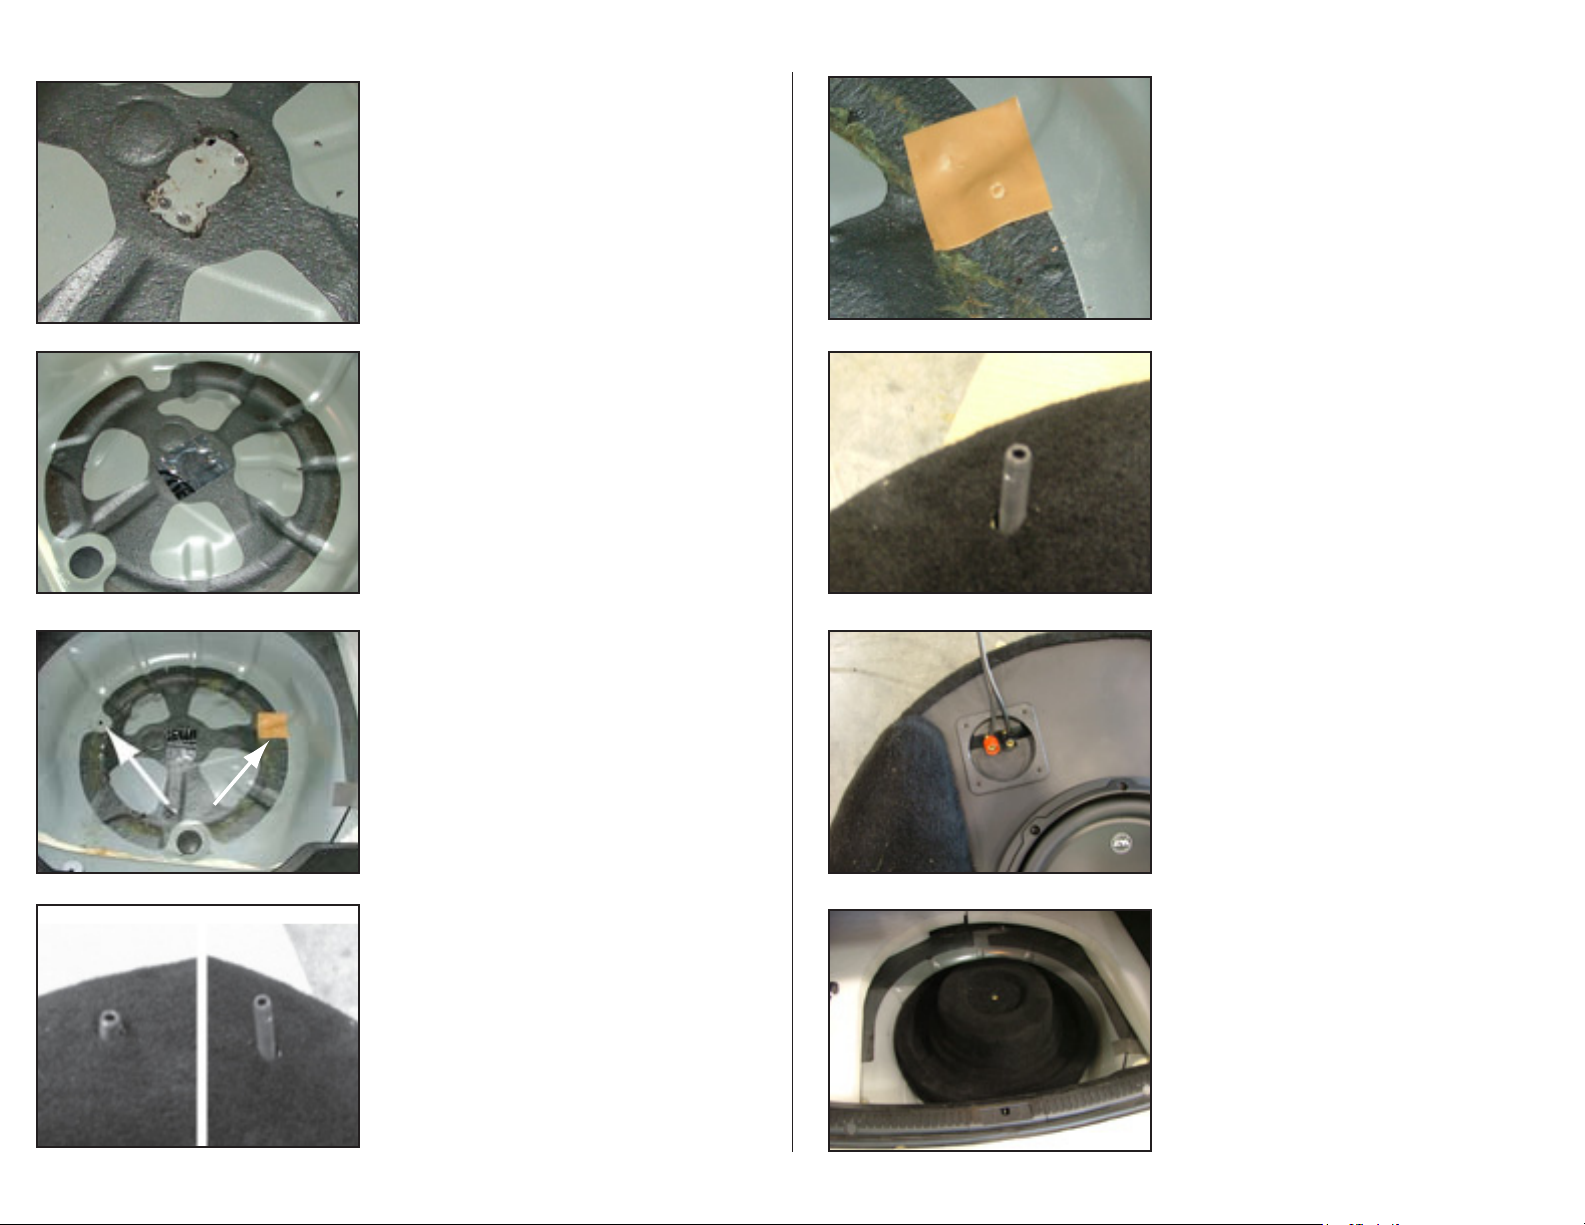
S T E P 4
Carefully drill out spot welds using appropriately sized drill bit
and pry mounting boss from spare tire well floor. Install (4)
#8-32 x 1 screws, nuts, washers to seal holes left by removed
spot welds.
S T E P 5
Place sealant sheet provided over modified area as shown
S T E P 6
Locate rivet in floor of spare tire well at approximately 10
o’clock position. Drill out rivet with 1/4-inch drill bit, then
enlarge to 1/2-inch (may need to be drilled from under the
car). Place wax square provided onto floor of spare tire well in
approximately 2 o’clock position as shown in illustration.
S T E P 8
Place the enclosure into the mounting location with driver’s
side stud extended through hole previously drilled in spare
tire well floor. Press down on the enclosure to make an
impression in the wax square. Remove the enclosure to
reveal the impression in the wax square. Drill 1/2-inch hole in
location indicated by impression in wax square.
S T E P 9
Extend the mounting stud on passenger side of enclosure to
1 1/2-inches.
S T E P 1 0
Route woofer wiring to Stealthbox® enclosure location and
connect to terminal cup at bottom of enclosure. If the rest
of the system is completed, test the Stealthbox® to ensure
it’s working.
Page 2 • JL Audio, Inc 2008
S T E P 7
Remove Stealthbox® from packaging and install 3/8 X 2.25
mounting studs into threaded inserts at bottom of enclosure.
Thread driver’s side stud in, leaving about 1 1/2-inches
extended. Thread passenger side stud in, leaving only about
1/2-inch extended.
S T E P 1 1
Place enclosure back into mounting position with both
mounting studs extended through holes drilled in floor.
Continued on Next Page

SB-M-3-SPD/10W3v3 INSTR_SKU# 011255
S T E P 1 2
From under vehicle, install fender washers, lock washers, and
3/8x16 nuts to mounting studs. Put some silicone sealent
between the vehicle body and, fender washer, tighten
securely.
S T E P 1 3
Place spare tire on top of enclosure and secure with 3/8 X 1
bolt, flat washer, and original spare tire flange.
If you are installing this Stealthbox® enclosure into a
MazdaSpeed3, please skip to step number 20.
S T E P 1 5
Put tool panel into place as shown.
Note that the foam supports have been
changed since this photograph was taken
to multiple square blocks.
S T E P 1 6
Identify 10-inch long Velcro® strip provided. Cut (2) 3-inch
long sections and (4) one inch sections. Remove backing
from “hook”3-inch sections and attach to tool panel as
shown.
S T E P 1 7
Place two 1-inch sections of the “loop side” of the Velcro
on RIGHT hand end of each 3-inch section as shown (white
squares). Press down to lock sections together.
Steps 14-19 Apply ONLY to the Mazda 3
Page 3 • JL Audio, Inc 2008
S T E P 1 4
Place foam floor supports into cargo area as shown.
Note that the foam supports have been
changed since this photograph was taken
to multiple square blocks.
S T E P 1 8
Remove backing from 1-inch sections that were placed
above. Set provided passenger side cargo floor panel into
place over Velcro® strips and press downward to engage
Velcro® and adhere to panel back. Place remaining 1-inch
“loop side” Velcro strips onto the LEFT ends of attached
3-inch “hook” strips as shown and, remove adhesive backing.
Continued on Next Page

SB-M-3-SPD/10W3v3 INSTR_SKU# 011255
S T E P 1 9
Place driver’s side cargo floor panel into place and press
down over Velcro to engage and adhere strips to floor panel
bottom.
C O N G R A T U L A T I O N S !
You have completed the Stealthbox® installation for the Mazda3
Enjoy your new Stealthbox®!
Please refer to the Power Recommendation section for an amplifier recommendation and basic set-up help.
The following steps apply ONLY if you are installing this
Stealthbox® enclosure into a MazdaSpeed3.
(continued from step 13)
S T E P 2 0
Remove screws securing rearmost edge of plastic floor support panel located across front of cargo area. install 7/8 inch
spacers with #8 x 2.25 screws to lift rear edge of panel as
shown
S T E P 2 1
Attach foam spacers to bottom of OEM foam cargo floor
support as shown. Place foam cargo floor support back into
original location.
S T E P 2 2
Replace OEM carpeted cargo floor panel
C O N G R A T U L A T I O N S !
You have completed the installation for this model!
Enjoy your new Stealthbox®!
Please refer to the Power Recommendation for an amplifier
recommendation and basic set-up help.
Page 4 • JL Audio, Inc 2008
Continued on Next Page

SB-M-3-SPD/10W3v3 INSTR_SKU# 011255
I N C L U D E D H A R D W A R E
(2) wax squares (4) #8-32x1 Button Head Phillips Screws
(2) 3/8-16 X 2-1/4” Set Screw Stud (4) #8-32 nuts
(2) 3/8 X 1-1/4” Fender Washer (4) #8 washers
(2) 3/8 X 2” Fender Washer (2) 3/8 Split lock Washer
(2) 3/8-16 Hex Nut (Multiple) Foam spacer blocks
(1) 10” length Velcro® (2) Replacement floor panels*
(1) 3/8x1 bolt (1) 3/8 flat washer
(1) self adhesive sealent sheet (2) 7/8” spacers (used only for MAZDA SPEED3)
* M A Z D A 3 O N L Y N O T I N C L U D E D W I T H M A Z D A S P E E D 3
S P E C I F I C A T I O N S
Enclosure Type: Acoustic Suspension (sealed)
Driver Type: 10W3v3-4
Nominal Impedance: 4 ohms mono
Continuous Power Handling: 500 Watts
P O W E R R E C O M M E N D A T I O N
JL Audio recommends using a high quality amplifier such as the JL Audio 250/1v2.
The diagram below shows the recommended crossover, infrasonic filter and equalizer settings for the 250/1v2
when being used to power your Stealthbox®.
Page 5• JL Audio, Inc 2008
The JL Audio 250/1v2 is a very versatile audio component. Please consult the owner’s manual for even more
detailed information about installing and tuning this amplifier.
M I D / H I G H F R E Q U E N C Y D R I V E R F I T M E N T
A variety of JL Audio coaxial and component systems will fit in the factory speaker locations of you vehicle.
Front Speaker Size / Location: 5”x 7” / 6”x 8”- Front Doors
Fits JL Audio Models: TR570-CXi, C5-570, C5-570x & ZR570-CSi
Rear Speaker Size / Location: 5”x 7” / 6”x 8”- Rear Door
Fits JL Audio Models: TR570-CXi, C5-570x
(954) 443-1100
All specifications are subject to change without notice. “JL Audio®” and the JL Audio logo, “Stealthbox” and the Stealthbox logo are registered
trademarks of JL Audio, Inc. “Ahead of the Curve” and its respective logo is a trademark of JL Audio, Inc.
JLA-SKU# 011255 3-19-2008 • Printed in USA • ©2007 JL Audio, Inc. • U.S. PATENTS: #5,734,734 #5,949,898 #6,118,884 #6,229,902 #6,243,479
#6,294,959 #6,501,844 #6,496,590 #6,441,685 #5,687,247 #6,219,431 #6,625,292 #D472,891 #D480,709 Other U.S. & Foreign patents pending.
For more detailed information please visit us online at www.jlaudio.com.
1 0 3 6 9 N O R T H C O M M E R C E P A R K W A Y • M I R A M A R , F L O R I D A • 3 3 0 2 5 • U S A
w w w. j l a u d i o . c o m
 Loading...