

JL Audio M-SWMCPv3-1.315, M-SWMCPv3-1.900, M-SWMCPv3-1.660, M-SWMCPv3-2.000, M-SWMCPv3-2.250 Installation Instructions Manual
...
Installation Instructions for
M-SWMCPv3-1.315 • M-SWMCPv3 -1.660 • M-SWMCPv3-1.900
M-SWMCPv3-2. 000 • M-SWMCPv3 -2.250
M-SWMCPv3-2. 375 • M-SWMCPv3-2.5 00
PIPE MOUNTING FIXTURES (SWIVEL)
FOR ETXv3 ENCLOSED SPEAKER SYS TEMS
LIMITED WARR ANTY MAR INE PRODU CTS USA
JL AUDIO warrants t his product to be f ree of defects i n materials a nd workmansh ip for a period of two (2) yea rs from the
original dat e of purchase.
This warrant y is not trans ferable and appli es only to the ori ginal purch aser from an aut horized JLAUDIO d ealer. Should ser vice
be necessary u nder this wa rranty for any r eason due to manu facturin g defect or malf unction, JL AU DIO will (at its dis cretion),
repair or replace t he defective pro duct with new or r emanufactu red product at no ch arge. Damage c aused by the fol lowing is not
covered under war ranty: acci dent, misuse , abuse, product mo dificat ion or neglect, fa ilure to follow i nstallat ion instruc tions,
unauthorize d repair attemp ts, misrepres entations by the s eller. This wa rranty does n ot cover incidenta l or consequent ial damage s
and does not cover the c ost of removing or re install ing the unit(s). Cos metic damage du e to accident or norma l wear and tea r is not
covered under war ranty.
Any applicable impl ied warra nties are lim ited in duratio n to the period of t he express war ranty as prov ided herein beg inning
with the date of t he original p urchase at reta il, and no war ranties, whe ther express o r implied, sha ll apply to thi s product
thereafter. Som e states do not al low limitatio ns on implied war ranties, t herefore these e xclusions may not appl y to you. This
warranty gi ves you specif ic legal right s, and you may als o have other right s which vary f rom state to stat e.
For Service Information in the U.S.A. please call
JL Audio Customer Service: (954 ) 44 3-11 00
9:00 AM – 5:30 PM (Easter n Time Zone)
JL Audio, Inc
10369 North Commerce Pk wy.
Miramar, FL 33025, USA
International Warranties:
Products purchase d outside the Unite d States of America a re covered only
by that country’s distr ibutor and not by JL Aud io, Inc.
w w w . j l a u d i o . c o m
JL Audio® and the JL Audio logo are regis tered trademar ks of JL Audio, Inc . “Ahead of the Curve” an d its respecti ve logo is a trademar k of JL Audio, Inc.
©2014 JLAudio, Inc. • For more detailed informa tion please vis it us online at www.jlaudio.com. Due to ou r policy of cont inuous produc t development , all specifi cations are subj ect to change wi thout notice.
SKU# 011429
Printed in U.S.A. • 040815
For best adhesion, it is recommended to clean the inside
of the aluminum cap with acetone (not included), prior
to attaching it to the speaker enclosure. Apply a circular
bead of silicone adhesive (included) to the inside of the
aluminum logo cap, about 1/2-inch (13 mm) from the
outer edge.
17
Align the aluminum logo cap to the desired angle of
rotation, and press it onto the back of the enclosure.
Apply masking tape (not included) to hold the cap in
place until the silicone cures (at least 24 hours).
18
Remove adhesive backing and install the JL Audio logo
badge (Sport Grille Models Only).
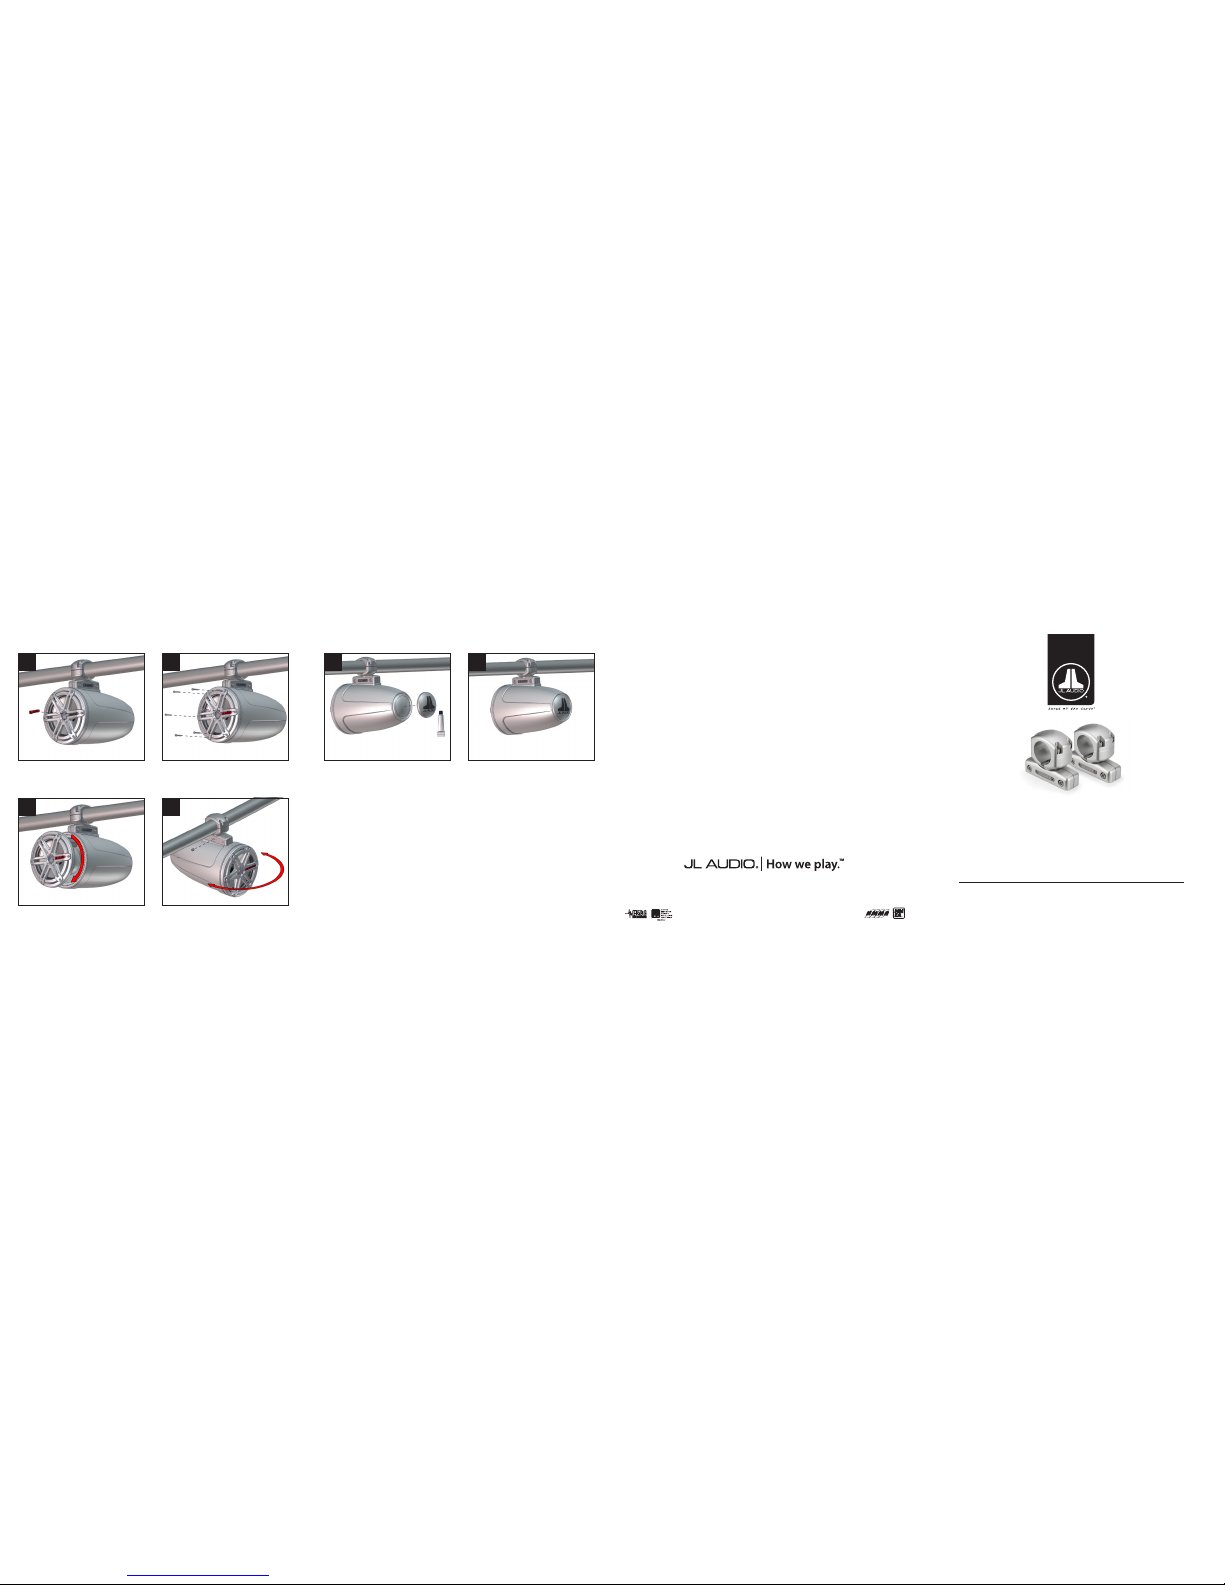
13
If a dierent speaker angle is desired, remove the speaker
mounting screws and washers.
14
Rotate the enclosure to the desired angle, install the
5/16 - 18 x 1/2” set screw into the base of the xture, and
fully tighten.
16
Rotate the speaker to the desired angle. Reinstall the
speaker and speaker mounting screws and washers.
Hand-tighten the screws in a criss-cross pattern.
15

Have a helper support the enclosure during this step.
Use the supplied butt connectors to connect the red (+)
and black (-) speaker cable exiting the ETXv3 enclosure
to the speaker cable exiting the pipe. e green and white
wires will not be used in this application.
9
Adjust the angle of the xture until level, mark the
location for the speaker cable hole. Remove the xture
assembly, and drill a 1/2” hole on the mark.
5
Align the two upper halves of the xture around the pipe.
Hand-tighten four 1/4 - 20 x 1-1/4” machine screws with
1/4” lock washers into the xture. DO NOT TIGHTEN
FULLY AT THIS POINT.
11
Compress the base and two upper halves of the xture
together while pushing the fork out through the small
pin holes on the opposite side. Flip the fork, and
reinstall, along with the two #8 - 32 x 3/8” machine
screws and lock washers.
3
Remove the four 1/4 - 20 x 1-1/4” machine screws and
1/4” lock washers to separate the two upper halves of
the xture. Pass the speaker cable exiting the enclosure
through the opening on the underside of the xture.
7
Slide the excess speaker cable and the butt connectors
into the opening in the pipe as you raise the enclosure to
ush the xture to the pipe.
10
In applications that require the logo to be inverted,
remove the two #8 -32 x 3/8” machine screws and lock
washers.
2
For applications where the cable cannot be routed
through the pipe, the cable can be passed through one of
the openings on the side of the xture.
6
Remove one of the 1/4 - 20 x 1-1/4” machine screws
and 1/4” lock washers at a time. Apply Loctite® red
thread-locking compound (included), reinstall, and fully
tighten. Repeat the same process for the other three
screws. (Continued on reverse.)
12
Determine the speaker mounting location, and
temporarily secure the xture around the pipe by hand
tightening the four 1/4 - 20 x 1-1/4” machine screws and
1/4” lock washers.
4
Apply Loctite® red thread-locking compound
(included) to two 5/16” - 18 x 1-1/4” machine screws
(included), thread them into the base of the xture, and
push down on the xture to ensure no gap while fully
tightening.
8
Be sure the indicated stopping points are on opposite
sides of the xture as shown. e enclosure can rotate
up to 205.5 degrees in the clockwise direction, and 128.5
degrees in the counter-clockwise direction.
1
128.5 205.5
IMPORTANT: Swivel mounting xtures should only be
attached to horizontal pipes. ETXv3 enclosures should
only be mounted directly above (12 O’clock position) or
directly below (6 O’clock position) a horizontal pipe.
NOTE: The M-SWMCPv3-2.0 00 fixture a nd
M770-ETXv3-SG- WH Enclosed Spea ker
System are used in this m anual for illustr ative
purposes only. The f ixture inst allation steps
are the same for all E TXv3 Enclosed Speak er
Systems and all M-SWMC Pv3 Swivel-Moun t
Fixtures listed o n front cover.
WARNING: Do not mount enclosures to a horizontal
pipe in any position other than directly above or directly
below.
WARNING: Never attach swivel mounting xtures to
vertical or angled pipes.
IMPORTANT WARNING
WARNING
 Loading...