

Page 1
OWNER’S MANUAL
Page 2

FCC COMPLIANCE STATEMENT
This equipment has been tested and
found to comply with the limits of
Part 15 of the FCC Rules. These limits
are designed to provide reasonable
protection against harmful interference
in a residential installation. This
equipment generates, uses and can
radiate radio frequency energy and,
if not installed in accordance with
the instructions, may cause harmful
interference to radio communications.
However, there is no guarantee
that interference will not occur in a
particular installation. If this equipment
does cause harmful interference to
radio or television reception, the user
is encouraged to try to correct the
interference by one or more of the
following measures:
- Reorient or relocate the
receiving antenna.
- Increase separation between the
equipment and the receiver.
- Connect the equipment to an outlet
on a circuit different from that to
which the receiver is connected.
- Consult the dealer or an experienced
radio/TV technician for help.
Any changes or modifications
not expressly approved by the
party responsible for compliance
could void the user’s authority
to operate this equipment.
SAFETY CONSIDERATIONS
• Only use this product in vehicles with
12 volt, negative-ground electrical
systems. This product is not certified or
approved for use in aircraft.
• Securely mount this product so that it
does not come loose in the event of a
collision, sudden jolt or as a result of
repeated vibrations during normal use.
• Do not replace the power wire fuse
with one of a different value.
Never bypass the fuse.
• Operate your audio system in a manner
that still allows you to hear necessary
noises to operate your vessel safely
(horns, sirens, etc.).
INSTALLATION CONSIDERATIONS
• Read this manual completely before
installation. Professional installation is
recommended.
• Install in a dry, well-ventilated location
that does not interfere with your
factory-installed systems. If a dry
environment is not available, a location
that is not exposed to heavy splashing
may be used.
• While this product is designed to be
water-resistant, it should never be
submerged under water or subjected to
high-pressure water spray.
• Before drilling, verify that you will not
be drilling into an exterior panel/hull,
fuel tank, gas/brake line, wiring harness,
or other vital system.
• Carefully route all system wiring away
moving parts and sharp edges; secure
with cable ties or wire clamps and use
grommets and loom where appropriate
to protect from sharp edges.
2
Page 3
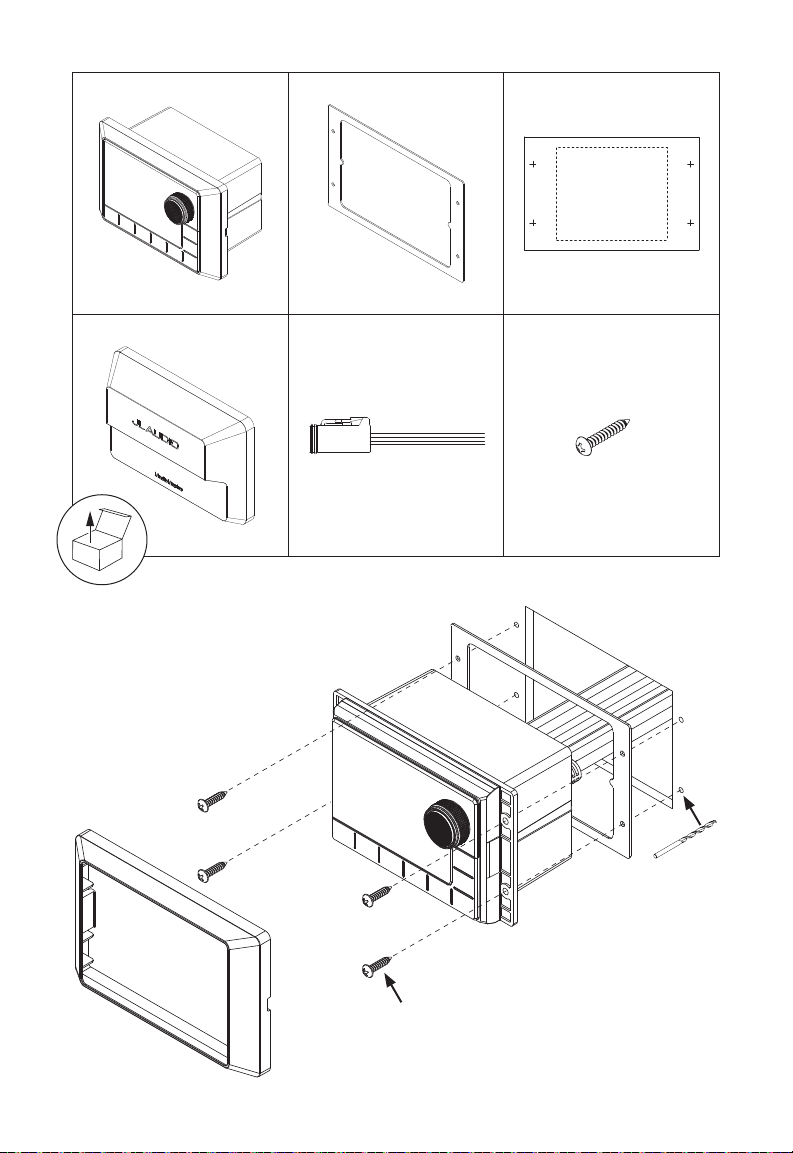
x1 x1 x1
x1 x1
GENERAL MOUNTING
#8 x 1 in (25 mm)
(x4)
7/64 in
(2.78 mm)
#8 x 1 in (25 mm)
3
Page 4
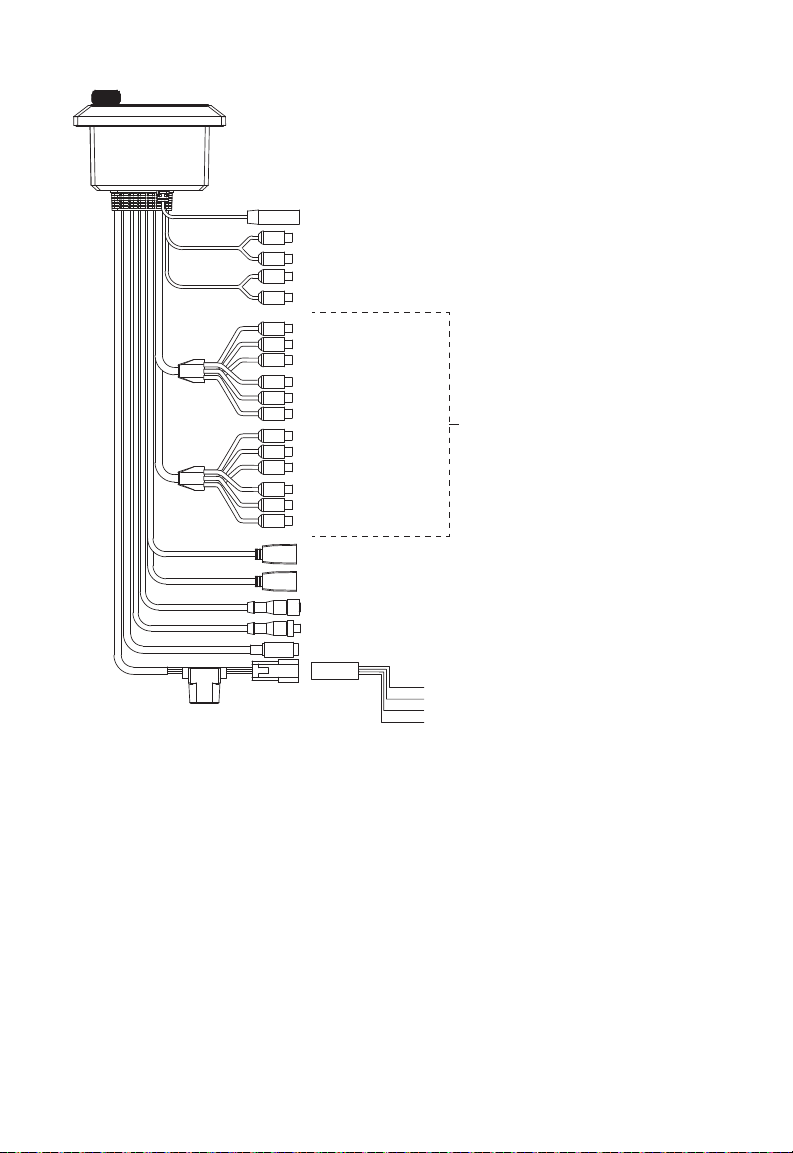
5A Fuse
GENERAL CONNECTIONS
ANT – Motorola® Style Antenna
AUX 1 – To PreAmp Aux 1 Source
AUX 2 – To PreAmp Aux 2 Source
ZONE 1 (MAIN)
ZONE 2
To Amplier
ZONE 3
ZONE 4
IPHONE / IPOD USB 1 – USB Storage Media or iPhone® SE or beyond
USB 2 – USB Storage Media
REMOTE – MMR Wired Remote Controllers (sold separately)
NMEA LEN 1 – NMEA 2000® Network (Micro-C connector)
SIRIUSXM – SiriusXM® Connect Tuner (sold separately)
POWER CONNECTIONS
+12VDC (Red) – Switched +12V Power
ILLUMINATION (Orange) – +12V Lighting Circuit
GROUND (Black) – Ground
AMP TURN-ON (Blue) – +12V Remote Turn-On Output to Amplier
4
Page 5
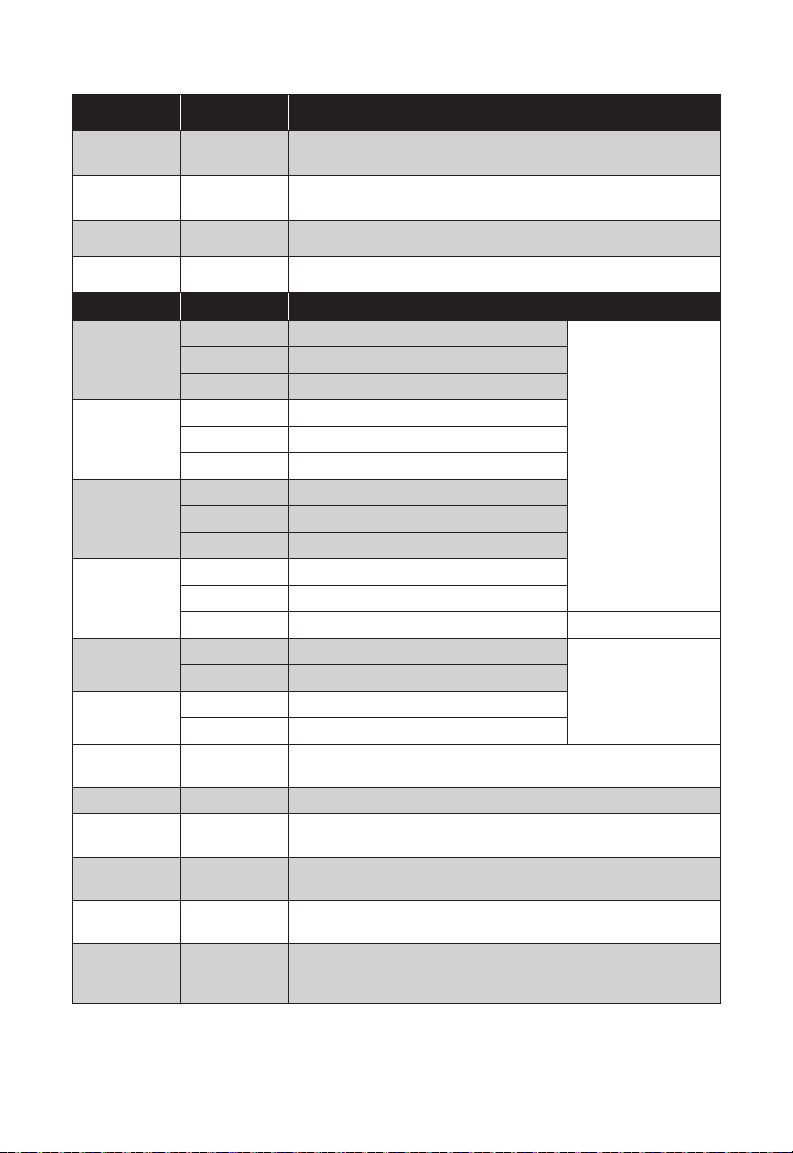
WIRING & HARNESS CONNECTIONS
Label Wire Color Connection
+12VDC Red
GROUND Black
ILLUMINATION Orange Positive (+12V) Lighting Circuit
Switched Positive (+12V) Source
• Install 5A fuse at connection point)
Metal Chassis Ground or Negative Battery Post
• Make all ground connections at the same location
AMP TURN-ON
Blue
Positive (+12V) Turn-On Output Negative (
Label Description Connection Notes
ZONE 1
(MAIN)
ZONE 2
ZONE 3
ZONE 4
AUX 1
AUX 2
SIRIUSXM
ANT Antenna Connect to Motorola style antenna
IPHONE / IPOD
USB 1
USB 2
REMOTE
NMEA LEN 1
Black RCA Left Channel Signal Output
Red RCA Right Channel Signal Output
Clear RCA Subwoofer Signal Output
Black RCA Left Channel Signal Output
Red RCA Right Channel Signal Output
Clear RCA Subwoofer Signal Output
Black RCA Left Channel Signal Output
Red RCA Right Channel Signal Output
Clear RCA Subwoofer Signal Output
Black RCA Left Channel Signal Output
Red RCA Right Channel Signal Output
Clear RCA Subwoofer Signal Output
Black RCA Left Channel Signal Input
Red RCA Right Channel Signal Input
Black RCA Left Channel Signal Input
Red RCA Right Channel Signal Input
10-pin Con-
nector
USB 1
Connection
USB 2
Connection
5-pin Threaded
Connector
5-pin NMEA 2K
Micro-C
Connector
Connect to SiriusXM-Connect Vehicle Tuner (sold separately)
USB connection for iPhone®/iPod® (MFi Certied) or USB storage device
(2.1 A charging output)
USB connection for media player or USB storage device
(500 mA charging output)
Connect to MMR wired remote controllers (sold separately)
Connect to MMR-40 Network Controller or NMEA 2000® network
See Audio Zone Setup
on pages 18-19 for
congurable settings
2V or 1V RMS
Input Sensitivity
5
Page 6
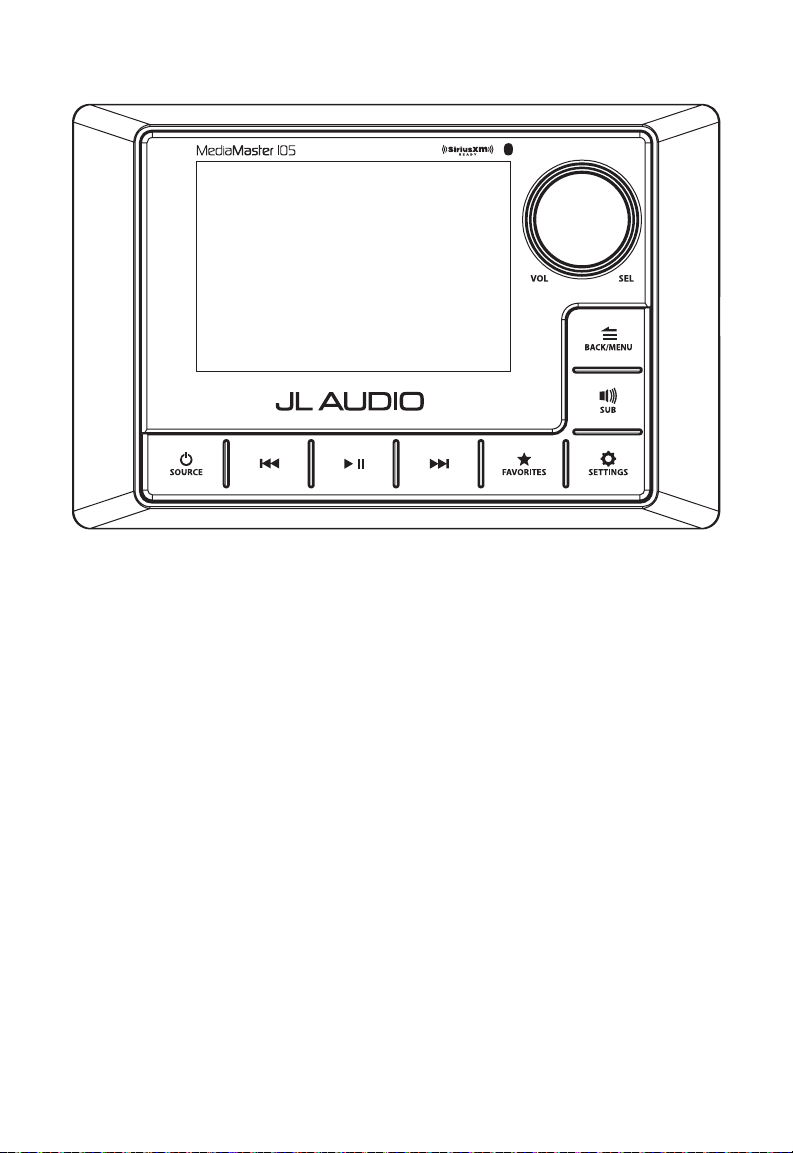
GENERAL CONTROLS
6
Page 7
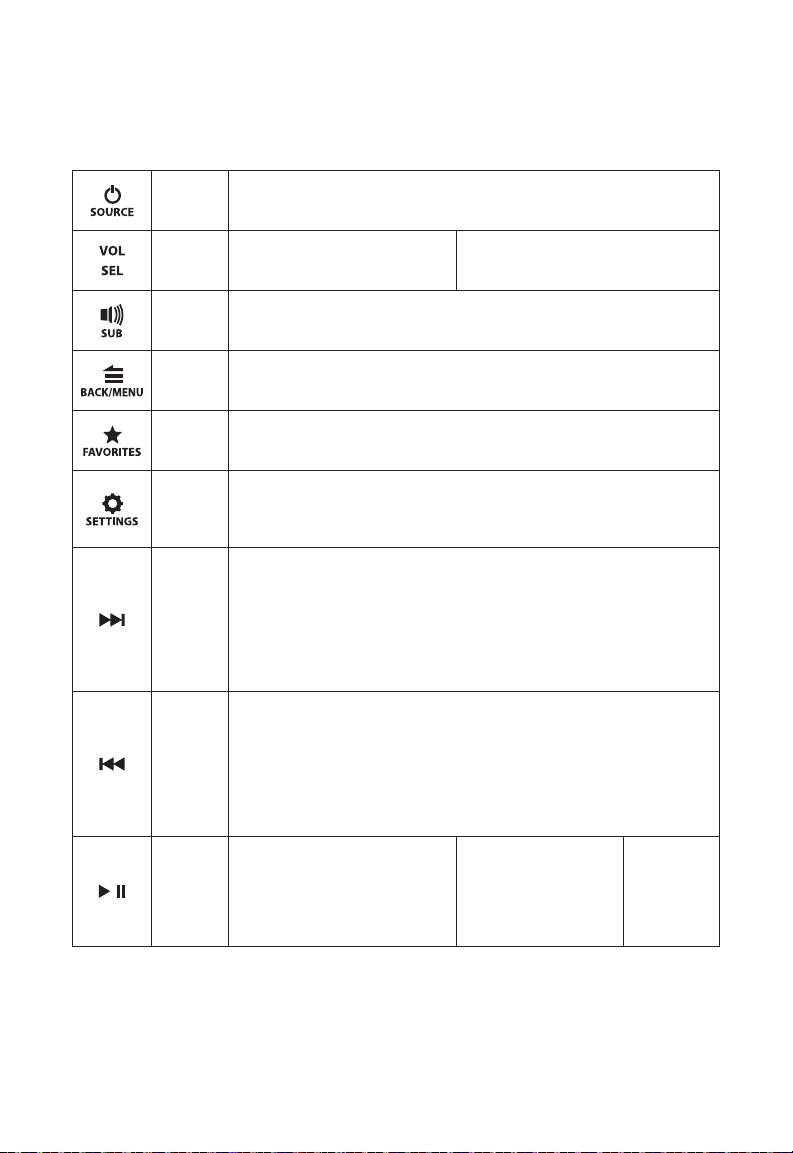
GENERAL CONTROL FUNCTIONS
Below is a list of general commands, including many common operations. The
functionality of each control will vary depending on the current source and
menu selected.
Source/
Power
Volume/
Select
SUB
Back/
Menu
Favorites
Settings
Forward
Backward
Mute/
Pause/
Resume/
• Press to turn the unit ON
• Press to display the SOURCE: Select menu
• Press and hold to turn the unit OFF
• Rotate to adjust volume
• Rotate to scroll thru menu options
• Press to enter selected options
• Press to access subwoofer trim settings
• Press VOL/SEL to advance through each zone’s subwoofer trim level
• Rotate VOL/SEL to adjust the selected subwoofer trim volume
• Press to go back or return to the Now Playing Screen (AM/FM/AUX1/AUX2)
• Press to access main menu options
(SiriusXM®/HD Radio™/DAB+/USB1/USB2/Bluetooth®)
• Press and hold to store a channel (AM/FM/SiriusXM) as a
preset (star will turn solid)
• Press to view your list of stored presets and the Favorites: Edit menu.
• Press and hold to access the System Settings: Main Menu
• Press to access the Audio Zone: Tone & Balance menu
• From a highlighted zone in the Audio Zone Level menu, press (and repeat) to
quickly change the Level Control Mode (Relative, Absolute, Off).
Press to:
• Tune to the next frequency (AM/FM) or next channel (SiriusXM/DAB+)
• Select the next track (USB1/USB2/Bluetooth)
Press and hold to:
• Seek to the next channel (FM)
• Skip forward ten frequency steps (AM)
• Initiate faster tuning (SiriusXM/DAB+).
• Fast-forward (USB1/USB2)
Press to:
• Tune to the previous frequency (AM/FM) or previous channel (SiriusXM/DAB+)
• Select the previous track (USB1/USB2/Bluetooth)
Press and hold to:
• Seek to the previous channel (FM)
• Skip backward ten frequency steps (AM)
• Initiate faster tuning (SiriusXM/DAB+).
• Fast-rewind (USB1/USB2)
• Press to mute audio
(AM/FM/SiriusXM/DAB+/
AUX1/AUX2)
• Press to pause or resume
the current selection (USB1/
USB2/Bluetooth)
• Rotate/press to access/adjust the Audio
Zone Level menu screen (see page 15
for more info)
• When the Audio Zone
Levels screen is displayed,
press to mute all audio
(AM/FM/SiriusXM/DAB+/
AUX1/AUX2/
USB1/USB2/Bluetooth)
• Press and
hold to
access the
USB: Play
Options
menu (USB)
7
Page 8
BLUETOOTH® AUDIO
You may wirelessly stream audio from a Bluetooth compatible device from up to
35 ft. away (11 m). Up to 8 devices can be paired to the MM105, but only one
streaming device can connect at one time.
Pairing a new device:
1. Press
2. Rotate
on the MM105
to highlight Bluetooth and press to enter Bluetooth: Pairing
to access the SOURCE: Select menu.
Mode.
3. Enable Bluetooth on your streaming device and scan for nearby devices; select
MM105 (or your custom name) from your list of available devices to connect.
Once connected, you may control your audio selections with the MM105 using the
controls listed on page 9 or directly from your device.
Options for managing paired or additional Bluetooth devices can be accessed from
the Bluetooth: Main Menu.
1. To access the Bluetooth: Main Menu, press
then use
to make your selections.
while in Bluetooth mode,
8
Page 9

USB CONNECTIONS
The MM105 includes two ports to connect with USB storage class devices (thumb
drive, digital audio player, etc.).
USB 1: High-speed connection for use with iPhone®/iPod® (MFi Certified) or
USB storage device (2.1 A charging output)
USB 2: Full-speed USB storage device connection (500 mA charging output)
Once connected, you may control your audio selections with the MM105 using the
controls listed on page 9 or directly from your device.
• Properly secure the connected device before driving to prevent
damage from dropping or sudden acceleration/braking.
• Control, functionality and display may vary depending on
the model and version of iPhone® connected.
• When connected via USB port, make sure to unpair or disable the
Bluetooth connection to avoid possible playback conflicts.
• If you experience abnormal performance during operation, disconnect the iPhone®
and check its condition. Restart your iPhone® if performance does not improve.
• “Made for iPhone” means that an electronic accessory has been designed to
connect specifically to an iPhone® and has been certified by the developer to
meet Apple performance standards. Apple is not responsible for the operation
of this device or its compliance with safety and regulatory standards. Please note
that the use of this accessory with an iPhone® may affect wireless performance.
• iPhone®, Lightning and all related marks and logos are trademarks
of Apple Inc., registered in the U.S. and other countries.
9
Page 10
SIRIUSXM® SATELLITE RADIO
Only SiriusXM® brings you more of
what you love to listen to, all in one
place. Get over 140 channels, including
commercial-free music plus the
best sports, news, talk, comedy and
entertainment. Welcome to the world of
satellite radio. A SiriusXM Vehicle Tuner
and Subscription are required. For more
information, visit www.siriusxm.com.
Activating Your SiriusXM Subscription
After installing your SiriusXM Connect
tuner and antenna, power on your
MM105 and select SiriusXM mode.
You should be able to hear the
SiriusXM preview channel on Channel
1. If you cannot hear the preview
channel, please check the installation
instructions to make sure your SiriusXM
Connect tuner is properly installed.
After you can hear the preview channel,
tune to Channel 0 to find the Radio ID
of your tuner. In addition, the Radio ID is
located on the bottom of the SiriusXM
Connect Vehicle Tuner and its packaging.
You will need this number to activate
your subscription. Write the number
down for reference.
Note: the SiriusXM Radio ID does
not include the letters I, O, S or F.
In the USA, you can activate online or
by calling SiriusXM Listener care:
• Visit www.siriusxm.com/activatenow
• Call SiriusXM Listener Care
at 1-86 6 - 635-2349
For Canadian Subscription,
please contact:
• Visit www.siriusxm.ca/activatexm
• Call XM Customer Care
at 1-877-438-9677
As part of the activation process, the
SiriusXM satellites will send an activation
message to your tuner. When your radio
detects that the tuner has received the
activation message, your radio will
display: “Subscription Updated”.
Once subscribed, you can tune to
channels in your subscription plan.
Note: The activation process usually
takes 10 to 15 minutes, but may take up
to an hour. Your radio will need to be
powered on and receiving the SiriusXM
signal to receive the activation message.
Parental Controls
Some SiriusXM channels contain mature
content. When the Parental Controls
feature is enabled, channels with mature
content are restricted and will require a
4-digit lock code to access.
Enabling Parental Controls
1. Press
to access the
SiriusXM: Main Menu.
2. Turn
to Parental Controls
and press to enter.
3. Press to select Lock
Mature Channels. After, you must
enter a 4-digit lock code to lock
mature content channels. (Parental
Control default passcode: 0000)
4. Use
to enter the 4-digit
lock code and select Save when
finished.
Changing the Lock Code
1. Press
to access the
SiriusXM: Main Menu.
2. Turn
to Parental Controls
and press to enter.
3. Turn to Edit Lock Code
and press enter.
4. Use
to enter the current
4-digit lock code and select Enter
when finished.
5. Use to enter the new lock
code and select Enter to confirm.
Make sure to save your 4-digit lock
code for future reference.
10
Page 11
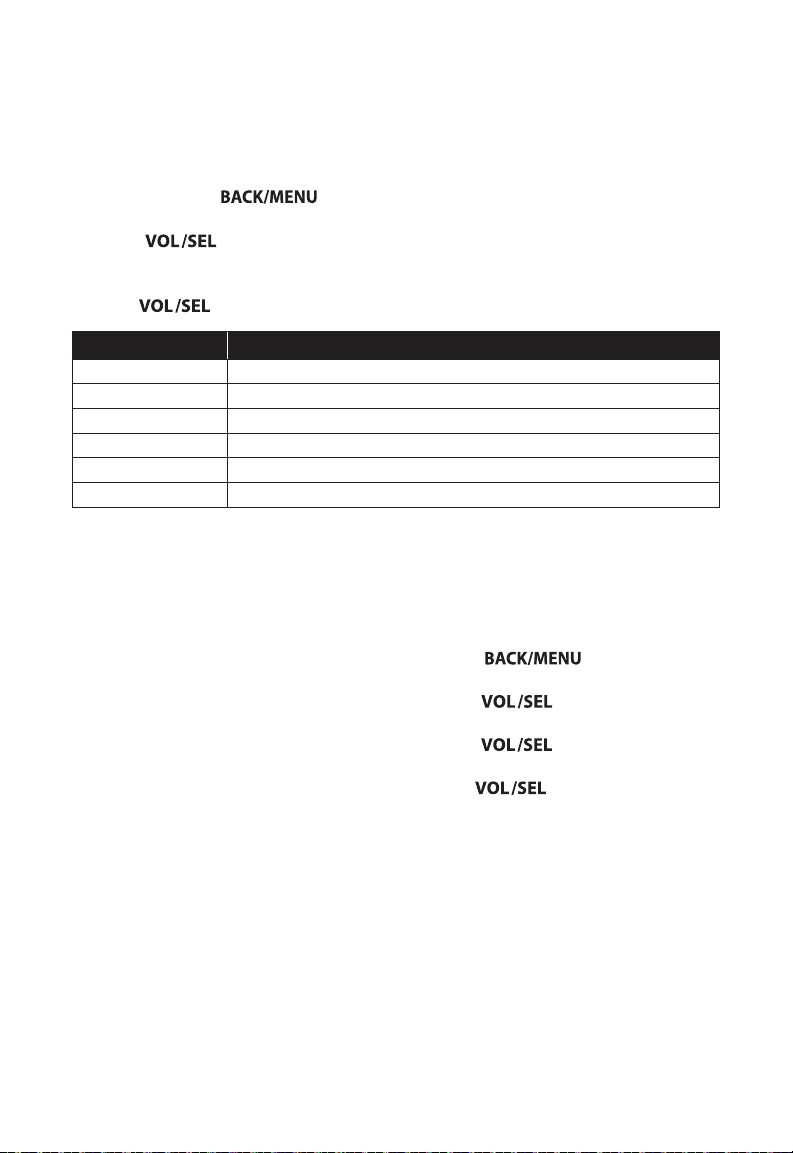
SIRIUSXM MAIN MENU
This allows access to the SiriusXM
operational menu options. Refer
to the table below for available
settings and functionality.
1. Press and hold
to
access the SiriusXM: Main Menu.
2. Turn
to highlight one of
the menu settings listed in the table
below and press to enter.
3. Use
Setting Function
Now Playing Return to the Now Playing Screen
Browse By Channel View list of available SiriusXM channels
Browse By Category View list of available SiriusXM channels by category
My Account View your SiriusXM account status, Radio ID and Reset Tuner command
Parental Controls Settings for access to channels containing mature content
Direct Tune Allows entry for direct channel selection
to make selections.
Album Art
Album art can be displayed for most of
the SiriusXM music channels. When album
art is not available, the channel logo or the
SiriusXM logo will be displayed.
Resetting SiriusXM Tuner Settings
A reset will restore all presets and
settings, including parental controls,
back to their factory defaults.
1. Press
to access the
SiriusXM: Main Menu.
2. Turn
to My Account and
press to enter.
3. Turn
to Reset Tuner and
press to enter.
4. Use to select Confirm.
Sirius, XM and all related marks and
logos are trademarks of Sirius XM
Radio Inc. All rights reserved.
11
Page 12
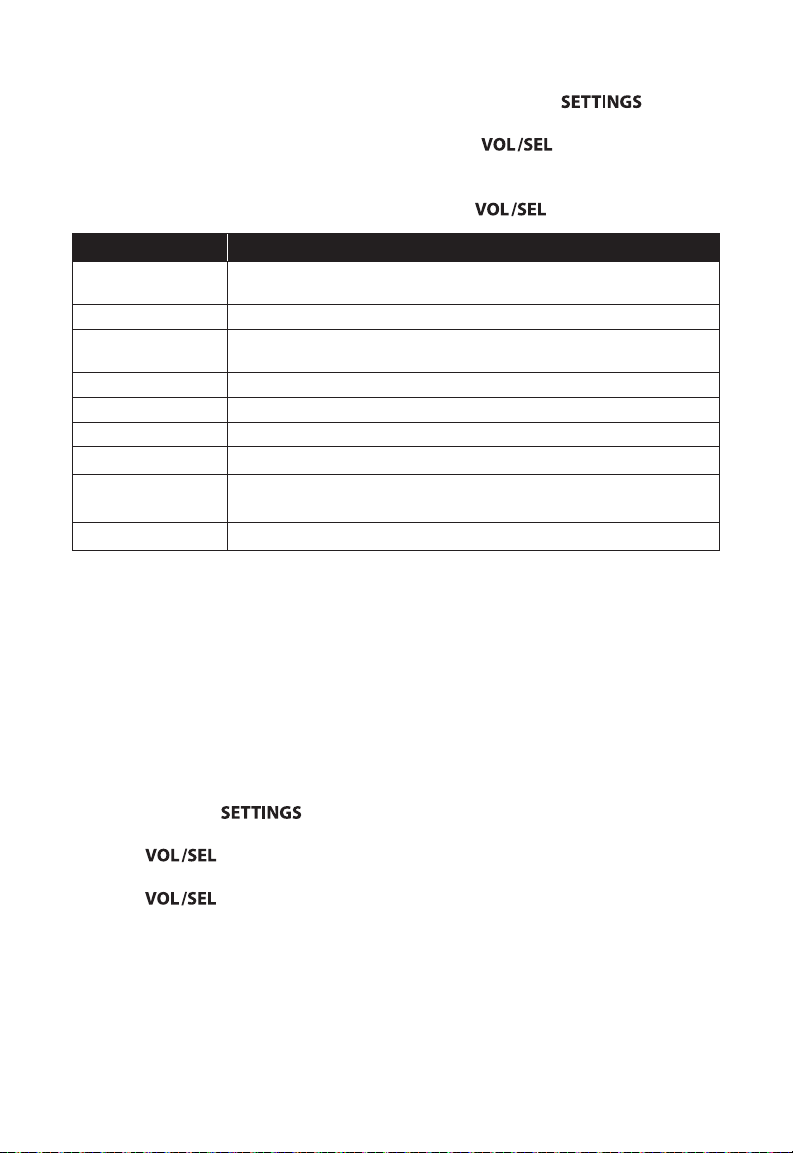
SYSTEM SETTINGS MAIN MENU
This menu allows access the main
operational settings and features of your
MM105. Refer to the table below for
available settings and functionality.
1. Press and hold to access
the System Settings: Main Menu.
2. Turn
to highlight one of
the menu settings listed in the table
below; press to select.
3. Use
Setting Function
Name this Device
Audio Zone Setup Congure settings for each set of audio zone outputs
AUX Input
Sensitivity
Diagnostic Displays serial number, hardware and software version info
Display Congures display and brightness settings
Low Voltage Alert Noties of low supply voltage conditions (see below for more info)
Scrolling Text Enables continuous scrolling of available RDS/track text info
Tuner Region
Power-up Settings Congures display activation upon connection to power.
Create a custom name to be displayed on connected Bluetooth
devices and NMEA 2000® networks
Congure the AUX input sensitivity: 2V or 1V RMS (default)
Congures AM/FM tuner range/scale for a specic region;
DAB+ replaces SiriusXM beyond North America
to make selections.
Low Voltage Alert
This built-in alert notifies when the
+12VDC supply voltage drops below 10
volts. If triggered, the unit will enter Safe
Mode and a warning tone will be heard
through the speakers. A warning will also
display on-screen with instructions to
turn the unit off until normal operating
voltage is restored.
1. Press and hold
to access
the System Settings: Main Menu.
2. Turn
to Low Voltage Alert
and press to enter.
3. Turn
to select ON or OFF
and press to enter.
12
Page 13
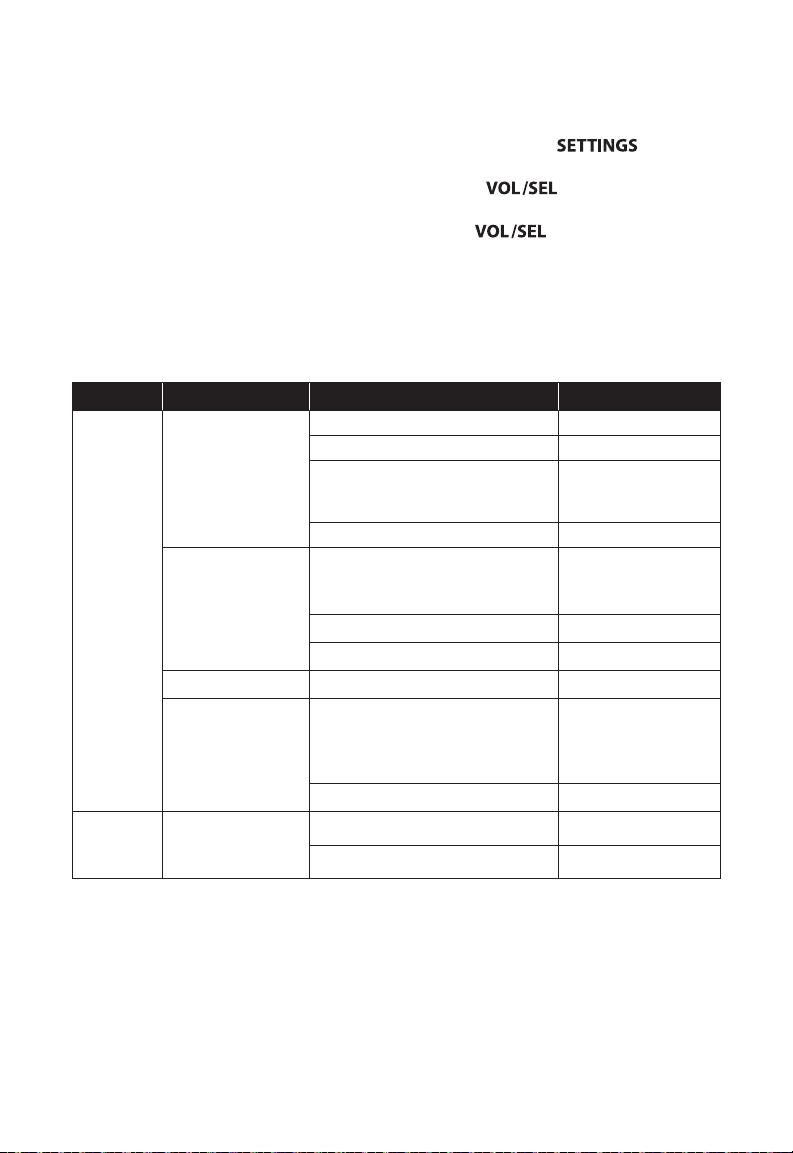
AUDIO ZONE SETUP
The MM105 is equipped with four sets
of low-voltage, line-level RCA outputs to
send audio signals to your aftermarket
amplifiers/equipment. Each output pair
delivers full-range, low-distortion audio,
arranged into four zones. Depending on
your equipment and vessel, this will allow
Access the Audio Zone Setup menu to
congure the functionality of each zone.
1. Press and hold
the System Settings: Main Menu.
2. Press to select Audio
Zone Setup.
3. Use
to make selections.
you to group speakers of an area together
for flexibility and control of audio levels
at separate zones. For example, you may
prefer to reduce the listening level in an
Refer to the table below and the
following page for each zone’s available
settings and functionality.
interior cabin, while keeping a louder
audio level on the main deck.
Zone Menu Setting 1 Setting 2
Relative
Absolute
4V RMS Max (default)
2V RMS Max
1V RMS Max
O (default)
60 Hz
80 Hz
100 Hz
Z1: Zone 1
Z2: Zone 2
Z3: Zone 3
Z4: Zone 4
Z2: Zone 2
Z3: Zone 3
Z4: Zone 4
Level Control Mode
Rename Zone
Max Volume Limit Max Vol Limit
Sub 1
Sub 2
Sub 3
Sub 4
Tone Control Mode
Fixed
O
Bow, Bridge, Cabin, Cockpit, Galley,
Helm, Stateroom 1, Stateroom 2,
Tower, Transom
Custom Name Alphanumeric Input
Factory Default
LPF ( Low Pass Filter)
Sub O
Same as Zone 1
Independent Tone Control
to access
13
Page 14
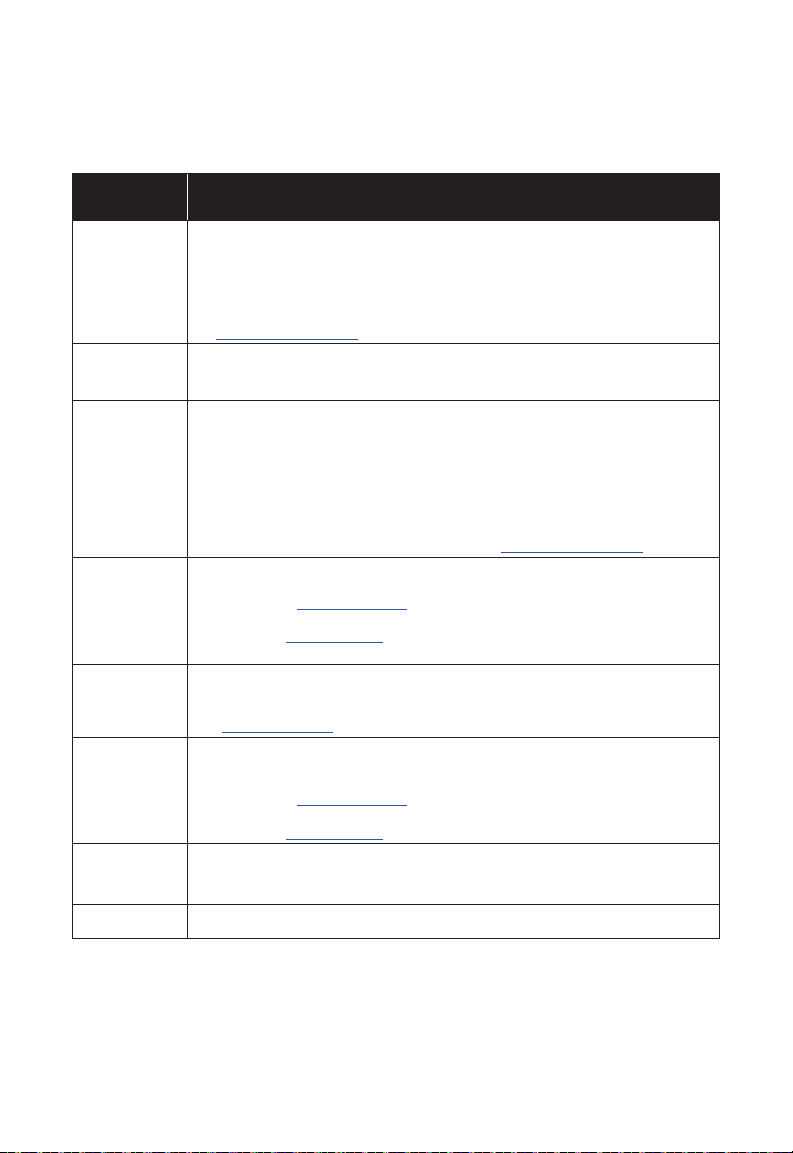
SIRIUSXM TROUBLESHOOTING
Advisory messages may appear on the display when a SiriusXM-Connect Vehicle
Tuner is connected to the MM105. Refer to the table below for an explanation and
suggested corrective actions.
Advisory
Message
The radio has detected a fault with the SiriusXM antenna. The antenna cable may be
either disconnected or damaged.
Check Antenna
Check Tuner
No Signal
Subscription
Updated
Channel
Unavailable
Channel
Unsubscribed
Channel Locked
No Content TuneScan is not available. Perform the operation with another preset channel.
• Verify that the antenna cable is connected to the SiriusXM Connect Vehicle Tuner.
• Inspect the antenna cable for damage and kinks. Replace the antenna if the cable
is damaged.
• SiriusXM products are available at your local audio retailer or online
at www.shop.siriusxm.com.
The radio is having diculty communication with the SiriusXM Connect Vehicle Tuner.
The tuner may be disconnected or damaged.
• Verify that the SiriusXM Connect Vehicle Tuner cable is securely connected to the radio.
The SiriusXM Connect Vehicle Tuner is having diculty receiving the SiriusXM
satellite signal.
• Verify that your vehicle/vessel is outdoors with a clear view of the sky.
• Verify that the SiriusXM antenna is mount on the exterior.
• Move the SiriusXM antenna away from any obstructions.
• Inspect the antenna cable for damage and kinks.
• Consult the SiriusXM Connect Vehicle tuner installation manual for more information
on antenna installation. Replace the antenna if the cable is damaged. SiriusXM products
are available at your local audio retailer or online at www.shop.siriusxm.com.
The radio has detected a change in your SiriusXM subscription status.
Press VOL/SEL to clear the message.
In the U.S.A., visit www.siriusxm.com or call 1-866-635-2349 if you have questions about
your subscription.
In Canada, visit www.siriusxm.ca or call 1-877-438-9677 if you have questions about your
subscription.
The channel that you have requested is not a valid SiriusXM channel or the channel you
were listening to is no longer available. You may also see this message briey when rst
connecting a new SiriusXM Connect Vehicle tuner.
Visit www.siriusxm.com for more information about the SiriusXM channel lineup.
The channel that you have requested is not included in your SiriusXM subscription
package of the channel that you were listening to is no longer included in your SiriusXM
subscription package.
In the U.S.A., visit www.siriusxm.com or call 1-866-635-2349 if you have questions about
your subscription package or would like to subscribe to this channel.
In Canada, visit www.siriusxm.ca or call 1-877-438-9677.
The channel that you have requested is Locked by the radio Parental Control feature. See
Parental Controls, page 13 for more information on the Parental Control feature and how
to access locked channels.
Description
14
Page 15
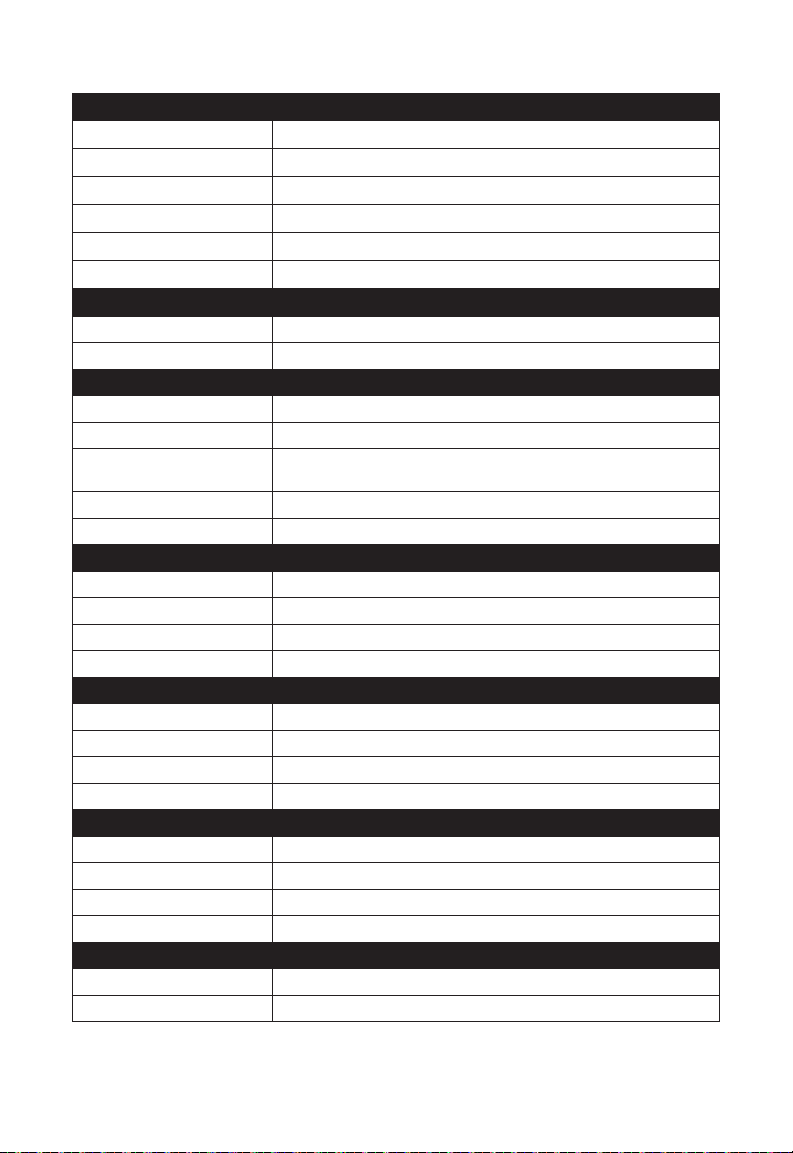
SPECIFICATIONS
Electrical
Operating Voltage 14.4V DC (10V – 15.9V allowable)
Maximum Current Draw 1.5 A
Standby Current Draw 120 mA
Fuse Value 5 A
NMEA 2000® LEN 1 (Micro-C connector)
Operating Temp Range -4 F to +158 F (-20 C to +70 C)
Display
Size / Type 3.5-inch / TFT LCD backlighted
Resolution 320 x 480
Audio Outputs/Inputs
Output Channels One stereo pair and mono subwoofer RCA plugs per zone
Output Zone Conguration Relative, Absolute, Fixed or O
Maximum Output Voltage
Output Impedance 250 ohm
Input Channels Two stereo pairs of RCA plugs (2V/1V RMS Input Sensitivity)
Tuner
FM Tuner with RDS 87.5 MHz to 107.9 MHz (0.2 MHz step)
AM Tuner 530 kHz to 1710 kHz (10 kHz step)
DAB+ Tuner 170 MHz to 230 MHz
Favorites 24 presets across all tuners/bands
Bluetooth®
Core Specication Version 2.1 + EDR
Connection Range Up to 35 ft / 11 m
USB
Interface USB 2.0
Maximum Current Output USB1: 2.1 A / USB2: 500 mA
Supported Audio Formats MP3, MP4, WAV, AAC, M4A, M4B
Apple Compatibility iPhone SE or beyond
Dimensions
Unit W x H x D 5.94 in. x 3.90 in. x 3.94 in. (151 mm x 99 mm x 100 mm)
Mounting Hole W x H 4.72 in. x 3.25 in. (120 mm x 83 mm)
Relative or Absolute: 4V RMS
Fixed: Selectable 4V/2V/1V RMS
Prole A2DP v1.2, AVRCP v1.4
Codec SBC, Qualcomm® aptX™ audio
(functionality contingent upon compatible iOS release)
15
Page 16

Limited Warranty – Electronics (USA)
JL Audio warrants this product to be free of defects in materials and workmanship
for a period of two (2) years from the original date of purchase.
This warranty is not transferable and applies only to the original purchaser from an authorized
JL Audio dealer. Should service be necessary under this warranty for any reason due to
manufacturing defect or malfunction, JL Audio will (at its discretion), repair or replace the
defective product with new or remanufactured product at no charge. Damage caused by
the following is not covered under warranty: accident, misuse, abuse, product modification
or neglect, failure to follow installation instructions, unauthorized repair attempts,
misrepresentations by the seller. This warranty does not cover incidental or consequential
damages and does not cover the cost of removing or reinstalling the unit(s). Cosmetic damage
due to accident or normal wear and tear is not covered under warranty.
Products installed as original equipment by boat manufacturers are covered by the boat
manufacturer’s warranty, not JL Audio, Inc.
Warranty is void if the product’s serial number has been removed or defaced.
Any applicable implied warranties are limited in duration to the period of the express warranty
as provided herein beginning with the date of the original purchase at retail, and no warranties,
whether express or implied, shall apply to this product thereafter. Some states do not allow
limitations on implied warranties, therefore these exclusions may not apply to you. This
warranty gives you specific legal rights, and you may also have other rights, which vary from
state to state.
If you need service on your JL AUDIO product:
All warranty returns should be sent to JL Audio ’s Electronics Service Facility freight-prepaid
through an authorized JL Audio dealer and must be accompanied by proof of purchase (a copy
of the original sales receipt). Direct returns from consumers or non-authorized dealers will be
refused unless specifically authorized by JL Audio with a valid return authorization number.
Warranty expiration on products returned without proof of purchase will be determined from
the manufacturing date code. Coverage may be invalidated as this date is previous to purchase
date. Non-defective items received will be returned freight-collect. Customer is responsible for
shipping charges and insurance in sending the product to JL Audio. Freight damage on returns
is not covered under warranty.
For Service Information in the U.S.A. please contact
JL Audio Customer Service: (954) 443-1100 (9:00 AM – 5:00 PM EST)
JL Audio Technical Support: www.jlaudio.com/support
JL Audio, Inc.
10369 North Commerce Pkwy.
(Do not send product for repair to this address)
Products purchased outside the United States of America are covered only
by that country’s distributor and not by JL Audio, Inc.
Miramar, FL 33025
International Warranties:
MM105-MAN 020221
 Loading...