

JL Audio MediaMaster 100s Owner's Manual

Thank you for purchasing a JL Audio MediaMaster®
Source Unit for your sound system.
T
his product has been designed and manufactured to exacting
standards in order to deliver years of musical enjoyment. For maximum
p
erformance, we highly recommend that you have your MM100s
installed by an authorized JL Audio dealer. Your authorized dealer has
the training, expertise and installation equipment to ensure optimum
performance from this product. Due to the complexity of modern
vehicle systems, we do not recommend self-installation unless you have
extensive experience in automotive and marine electrical systems.
Should you decide to install this product yourself, please take the time to
read this manual thoroughly to familiarize yourself with its installation
requirements and setup procedures.
If you have any questions regarding the instructions in this manual or
any aspect of the product’s operation, please contact your authorized
JL Audio dealer for assistance. If you need further assistance, please contact
t
he JL Audio Technical Support Department at technical@jlaudio.com
or call (954) 443–1100 during business hours.
OWNER’S MANUAL

2
Protect Your Hearing!
We value you as a long-term customer.
For that reason, we urge you to practice
restraint in the operation of this product
so as to not damage your hearing and
that of others in your vehicle. Studies
have shown that continuous exposure
to high sound pressure level can lead
to permanent (irreparable) hearing loss.
Mobile sound systems are capable of
producing such high sound pressure
levels. Please limit your continuous
exposure at high volumes. While driving,
operate your audio system in a manner
that still allows you to hear necessary
noises to operate your vehicle/vessel
safely (horns, sirens, etc.).
FCC Compliance Statement
This equipment has been tested and
found to comply with the limits of
Part 15 of the FCC Rules. These limits
are designed to provide reasonable
protection against harmful interference
in a residential installation. This
equipment generates, uses and can
radiate radio frequency energy and,
if not installed in accordance with
the instructions, may cause harmful
interference to radio communications.
However, there is no guarantee
that interference will not occur in a
particular installation. If this equipment
does cause harmful interference to
radio or television reception, the user
is encouraged to try to correct the
interference by one or more of the
following measures:
- Reorient or relocate the receiving
antenna.
- Increase separation between the
equipment and the receiver.
- Connect the equipment to an outlet
on a circuit different from that to
which the receiver is connected.
- Consult the dealer or an experienced
radio/TV technician for help.
Any changes or modifications not
expressly approved by the party
responsible for compliance could void
the user’s authority to operate this
equipment.

3
Safety Considerations
• Install this product in a dry, wellventilated location that does not
interfere
with your factory-installed systems. If
a dry environment is not available, a
location that is not exposed to heavy
splashing may be used.
• While this product is designed to be
water-resistant, it should never be
submerged under water or subjected to
high-pressure water spray.
• Do not mount this product in an engine
compartment or areas of extreme heat.
Areas exposed to a heater or hot air
should also be avoided.
• Securely mount this product so that it
does not come loose in the event of a
collision, sudden jolt or as a result of
repeated vibrations during normal use.
• Check before drilling to make sure that
you will not be drilling into an exterior
panel/hull, fuel tank, gas/brake line,
wiring harness or other vital system.
• Do not run system wiring outside or
underneath the vehicle/vessel. This is
an extremely dangerous practice, which
can result in severe damage/injury.
• Protect all system wires from
sharp edges and wear by carefully
routing them, tying them down and
using grommets and loom where
appropriate. Secure all wiring using
cable ties or wire clamps, as needed.
• Do not replace the power wire fuse
with one of a different value.
Never bypass the fuse.
• Never make power connections with a
“live” wire. Failure to make safe, tight,
high-integrity connections can result in
fire and extensive damage.
Installation Applications
This product is designed for operation
with 12 volt, negative-ground electrical
systems. Using this product in systems
with positive ground and/or voltages
other than 12 volts may result in
damage to the product and will void the
warranty. This product is not certified or
approved for use in aircraft.
What’s Included
(1) MediaMaster® MM100s Source Unit
(1) Power Connections Wire Harness
(1) Mounting gasket
(1) Mounting template
(4) Mounting screws
(1) User manual
Product Description
The MediaMaster® MM100s is a weatherresistant source unit designed for marine
and powersports applications.

4
The MM100s includes
the following features:
• Water-resistant chassis and
display (IP66 rated) is built to
withstand the elements
• Easy-to-read, high-brightness, 3.5inch full-color LCD display
• Separate day/night lighting modes
with user-defined display brightness,
button brightness, remote brightness
and display themes
• Intuitive interface with large text for
easy legibility while in motion
• Easy-to-use, large controls for marine/
powersports applications
• Digital AM/FM tuner with NOAA
weather band capability
• RDS (Radio Data System)
displays extended FM program
info, where available
• SiriusXM-Ready™ (tuner, antenna and
subscription sold separately)
• Quick access to 18 of your
favorite channels, programmable
across all bands
• Bluetooth® v2.1 with the aptX® codec
receives top-quality audio from
compatible devices with playback
control, up to 35 ft. (11 m) away
• USB direct-digital connection accesses
music files on your USB storage
device or iPhone®
• 1A USB output conveniently charges
your phone or portable music player
• 4 Separate audio zones with
independent feature and control
options deliver outstanding control
and flexibility
• 4 Sets of 4V RMS line-level outputs
deliver crystal-clear audio signals
to your amplifiers
• Auxiliary inputs accept audio
signals from any source with
line-level outputs
• Zero-clipping audio circuit design,
with self-limiting tone controls
prevent speaker system damage
• Connect up to three MMR-20 Wired
Remotes (sold separately) to add
remote control functionality from
extended locations
5
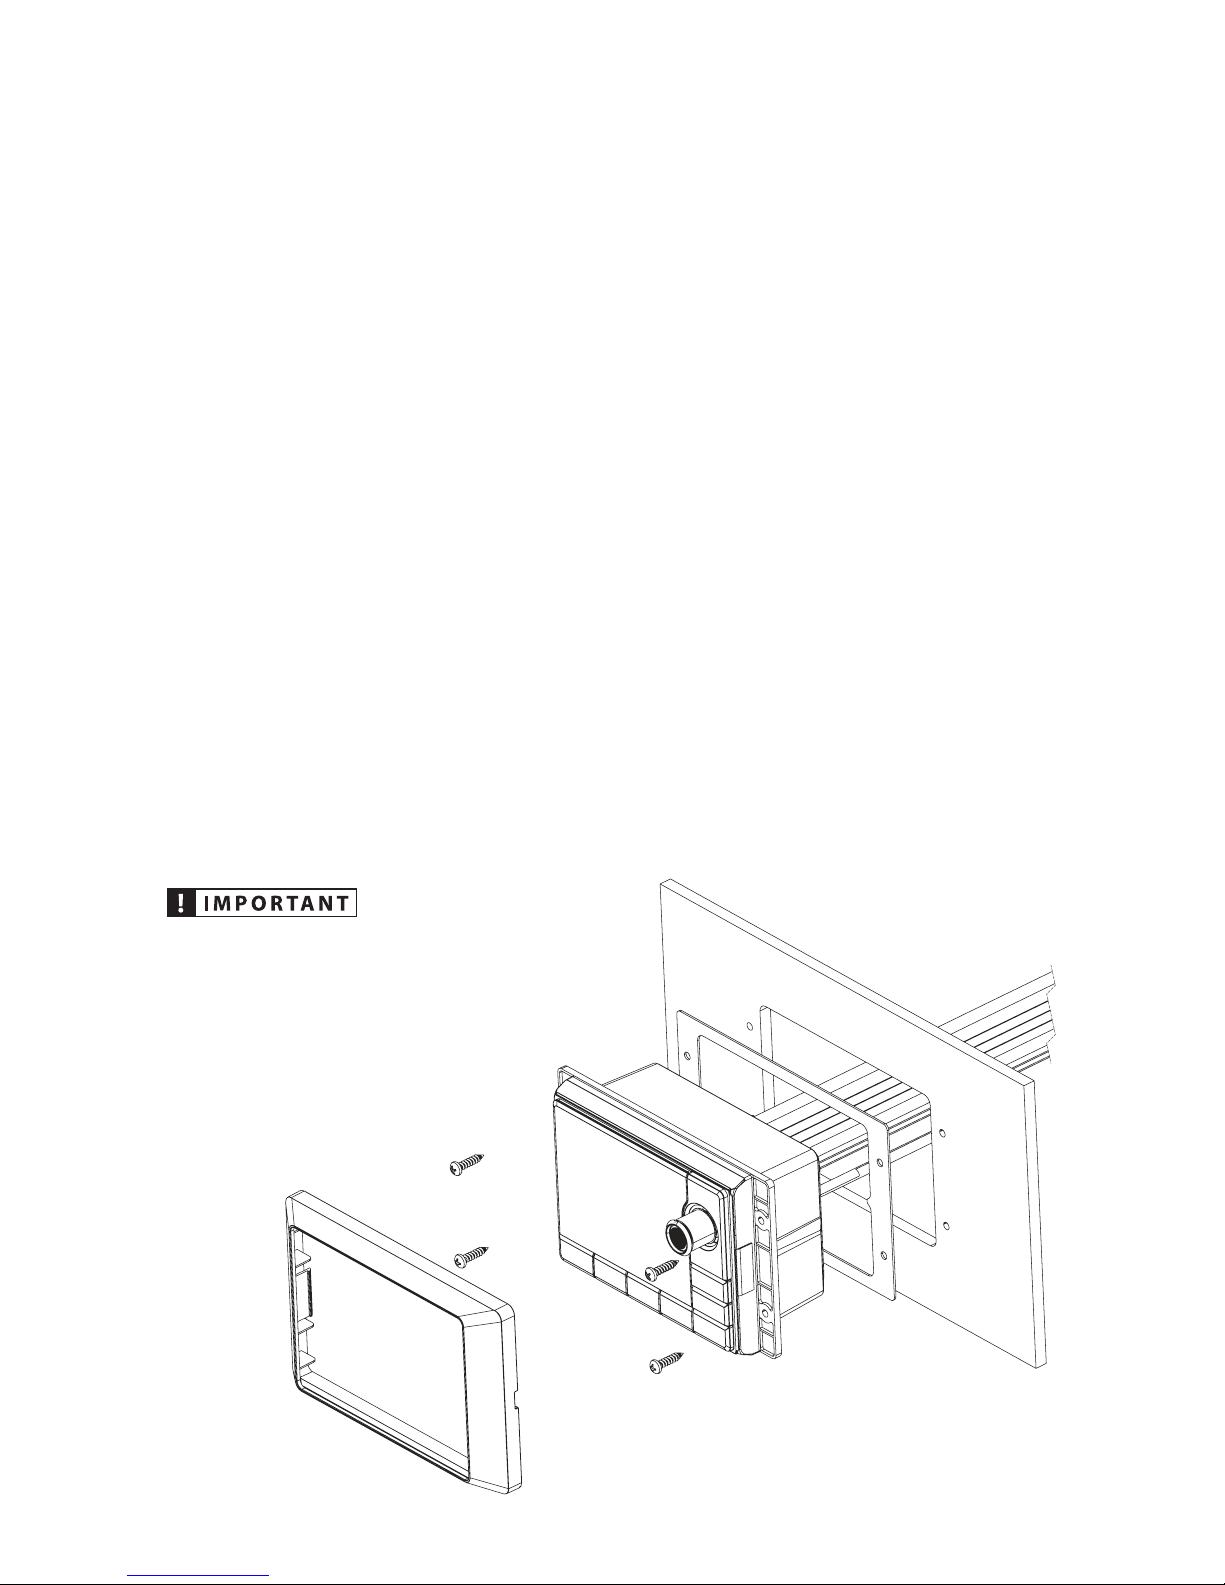
MOUNTING AND INSTALLATION
The diagram below shows a typical
mounting procedure into a fiberglass
panel. Always follow proper safety
procedures. Wear eye-protection
at all times with a dust mask and
gloves when cutting. A mounting
template is included to aid in
measuring and marking the mounting
surface before cutting or drilling.
1. Press along the perforation to
remove the center section of the
mounting template. (Discard the
center section.) The template can
be used to verify there is sufficient
flat surface area for mounting
and as a guide for cutting the
opening. Tape the template
to the mounting location and
mark the surface for cutting the
opening and drilling pilot holes.
2. Use a jigsaw or rotary tool to cut an
opening in the mounting surface.
If necessary, use a file or sandpaper
to adjust the opening for proper
fitment and smooth the edges.
3. Place the MM100s into the opening
and check that the mounting
holes remain aligned with the
pilot hole marks taken from
the template. If not, adjust and
mark new holes as necessary.
4. Remove the MM100s and drill four
(4) pilot holes in the mounting
surface at the pilot hole marks.
5. Peel the adhesive backing
from the mounting gasket and
affix to the rear of the bezel.
Connect all wiring and place
the MM100s into the opening.
6. Secure the MM100s using the
four (4) stainless steel screws.
Press the trim ring onto the
front of the MM100s.
Before drilling or cutting, make sure
there is adequate space behind the
mounting surface to fit the MM100s,
including its wire harness.
6
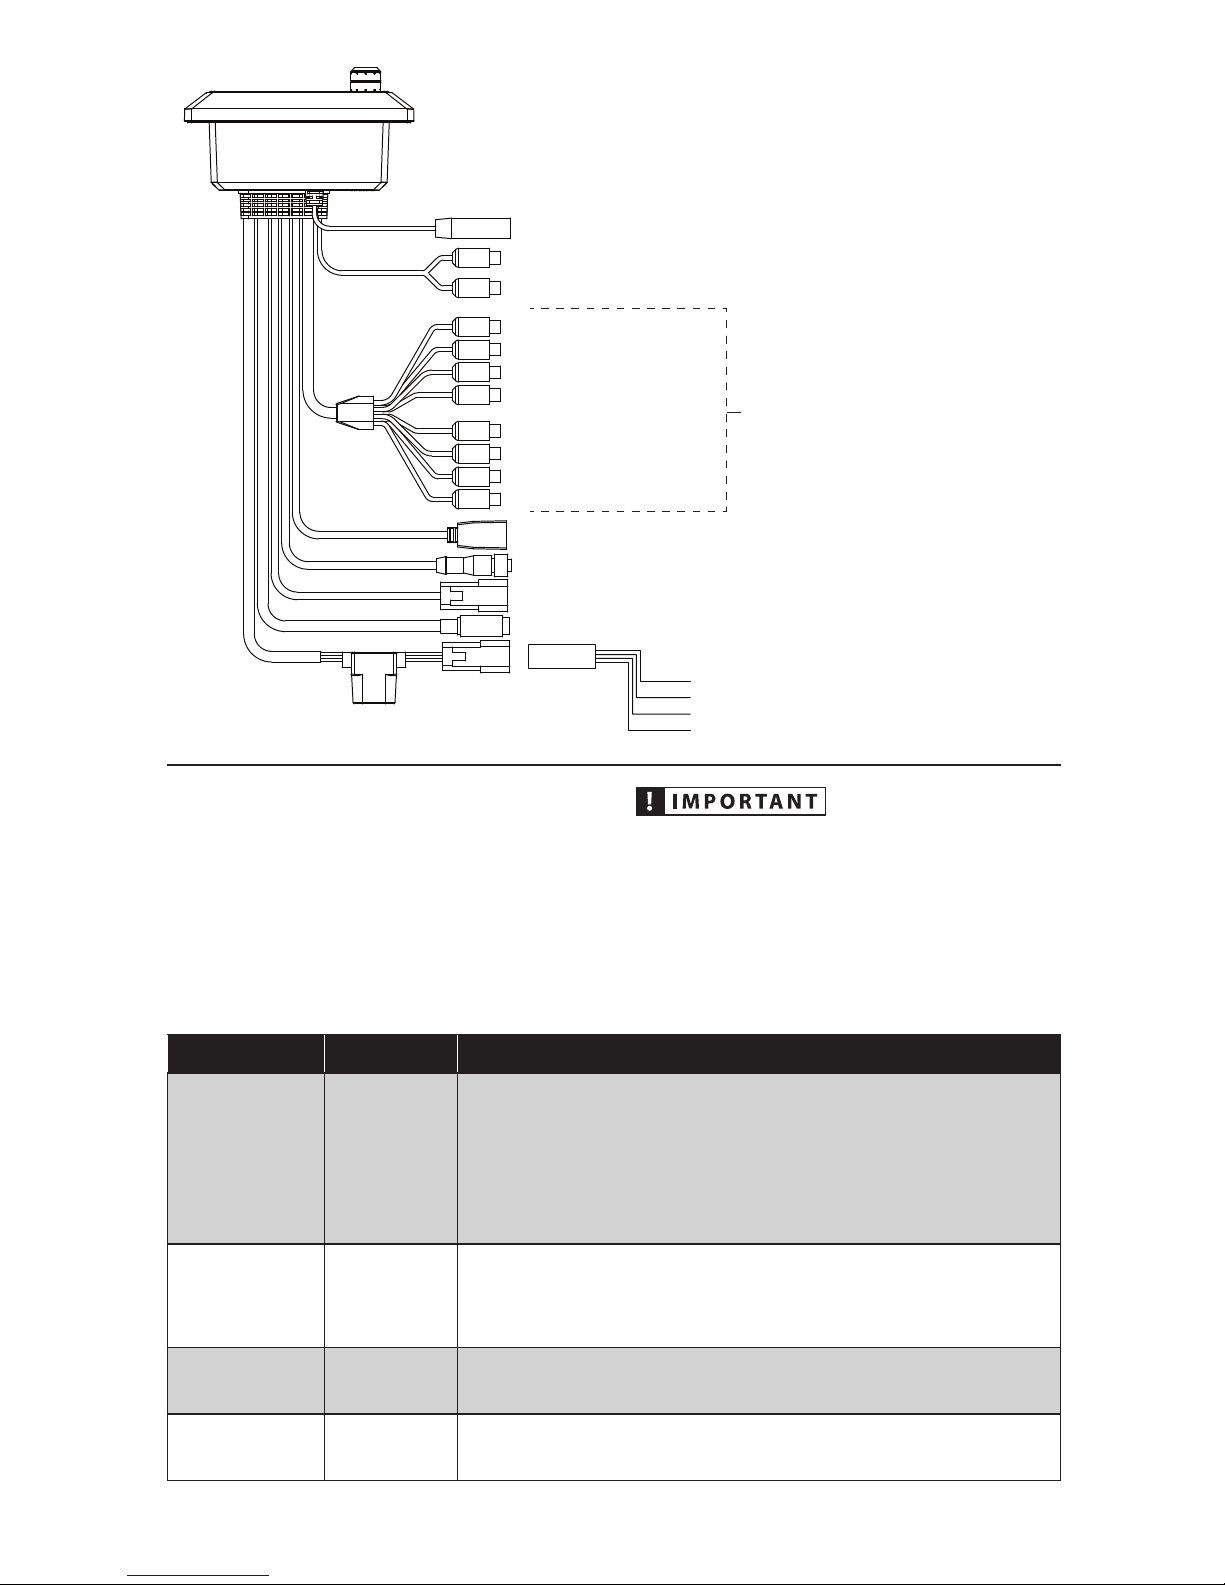
AUX-IN – To PreAmp Aux Source
CAN – NMEA2K Network
POWER CONNECTIONS
REMOTE – MediaMaster® MMR-20 Remote Control (Sold Separately)
USB – USB Storage Media or iPhone® 5 or 6
ANT – Motorola® Style Antenna
SIRIUSXM – SiriusXM® Connect Tuner (Sold Separately)
ZONE4 (FIXED LEVEL)
ZONE1 (MAIN)
ZONE2
ZONE3 (SUB)
+12VDC (Red) – Switched +12V Power
ILLUMINATION (Orange) – +12V Lighting Circuit
GROUND (Black) – Ground
AMP TURN-ON (Blue) – Remote Output to Amplier
To Amplier
5A Fuse
GENERAL CONNECTIONS
Label Wire Color Connection
+12VDC Red
Connect to a positive (+12V) source. This can be an ignition controlled,
accessory circuit or a vessel battery equipped with a main disconnect
switch. For added control functionality, we also recommend installing
a dedicated toggle switch (not included) at this wire lead’s +12V
connection point. Always install an appropriate fuse within 18 inches
(45 cm) of the +12V connection. If this is the only device using the
connection point, use a 5 amp fuse.
GROUND Black
Connect to a clean metal chassis ground, if available. If no metal chassis
ground is available, it may be necessary to connect this to the NEGATIVE
battery post. All ground connections (source unit and amplifiers)
should be made at the same location to minimize noise.
ILLUMINATION Orange
Connect to a +12V lighting circuit to automatically switch the
illumination to night mode when the lights are activated.
AMP TURN-ON
Blue
This wire provides a positive (+12V) turn-on voltage to activate
aftermarket amplifiers.
POWER CONNECTIONS
The 4-pin plug with wire leads is used
to make power related connections.
Make sure to carefully plan the wiring of
your system prior to routing wires and
making connections. Refer to the table
below when making power connections.
Disconnect the NEGATIVE battery
post connection and secure the
disconnected cable to prevent
accidental reconnection. This is
an essential safety precaution
during installation!
 Loading...