

JL Audio M103EWS-CG-WH-R, M103EWS-CG-WH-L Installation Manual

INSTALLATION GUIDE
for the
M103EWS-CG-WH-R/M103EWS-CG-WH-L
SKU#90136/90137
We strongly recommend that you have your new Enclosed 3-Way Weatherproof Subwoofer/Satellite system installed
by your authorized JL Audio dealer. The installation professionals employed by your dealer have the necessary tools
and experience to mount the enclosure properly. If you choose to attempt the installation yourself, please read this
installation guide completely before beginning the process.
If you choose to per form the installation yoursel f, it is absolutely vital that the
enclosure be prop erly mounted according to these instruc tions. Failure to
mount the enclosure properly presents two problems:
1) The sub-bass per formance will suffer due to the movement of the enclosure
caused by the force exe rted by the woofer(s).
2) A loose enclosure pres ents a serious safety haza rd in the event of a collision
or other such accident.
STEP 1
Determine the desired location for the Enclosed Subwo ofer/
Satellite then decicide on which sur face would be the
best location for the universal mounting bracket. It can
be installed on any side of the enclosure to fit a variety of
applications. Here the br acket is shown on the top.
Continued on Next Page
STEP 2
Align the template on the enclosure. The line on the
template can be used as a guide to help center the bracket
around the notch on the top of the enclosure.
Tape the template in place, if needed.
STEP 3
Mark the center of both mounting holes on the enclosure,
and remove the template.
M103EWS-CG-WH-R /L INSTR_SKU# 9 0136/90137
IN STALL ATIO N
DIFFICULTY:
2
5
OUT
OF
ESTIMATED TIME:
1 HOUR
M103EWS-CG-WH-R /L INSTR_SKU# 9 0136/90137
STEP 7
Align the bolts on the bracket with the holes in the
enclosure. Using the supplied hardware, secure the
enclosure to the bracket as outlined in Step 8.
STEP 6
Permanantly mount the bracket in place with the
appropriate hardware.
Before dril ling, always make sure that you ar e not
going to be drilling into any gas lines, brake lines,
tires, transmission lines, electrical wiring, exhaust
systems or any thing else that might ca use a
reducti on in your weekly pay.
Always wear eye protection when drilling!
STEP 5
Using a 9/16” drill bit, carefully drill the t wo mounting holes
marked in Step 3.
Before drilling, always make sure that you are not
going to be drilling into anything that might cause a
reducti on in your weekly pay.
Always wear eye protection when drilling!
STEP 4
Remove the 12 Phillips head screws around the subwoofer
and speaker, then remove both speakers from the enclosure.
From inside the larger subwoofer enclosure, drill a hole into
the smaller speaker chamber for the speaker cable.
Before drilling, always make sure that you are not
going to be drilling into anything that might cause a
reducti on in your weekly pay.
Always wear eye protection when drilling!
Page 2 • JL Audio, Inc 2010
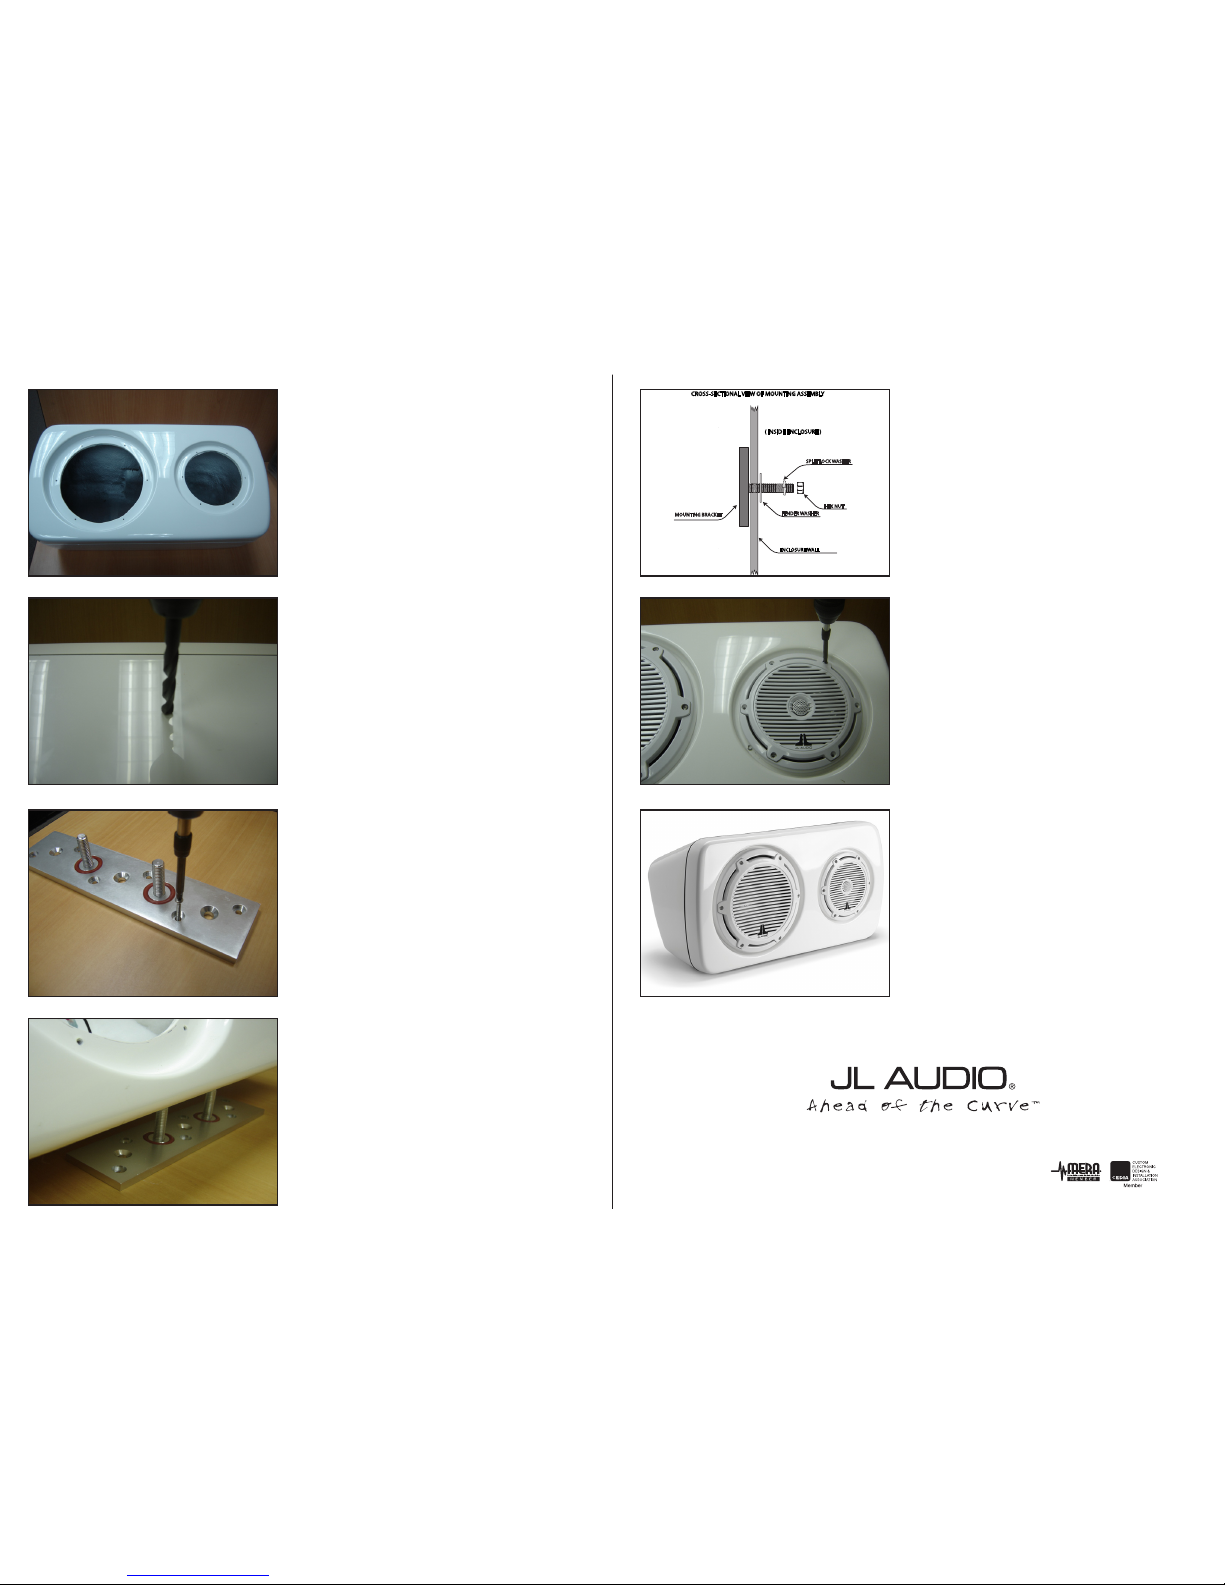
STEP 9
Route speaker cable into the enclosure, and conne ct both
speakers. Reinstall the subwo ofer and speaker into the
enclosure, and connect the speaker cables to the amplifier.
The subwoofer should be crossed over between 80-120 Hz.
STEP 8
From inside the enclosure, place a fender washer, a split lock
washer, and a hex nut over each of the studs, and tighten
fir mly.
SPLIT LOCK WASHER
FENDER WASHER
ENCLOSURE WALL
HEX NUT
MOUNTING BRACKET
CROSS-SECTIONAL VIEW OF MOUNTING ASSEMBLY
( INSIDE ENCLOSURE )
All specifications are subject to change without notice. “JL Audio®” and the JL Audio logo are registered trademarks of JL Audio, Inc. “Ahead of
the Curve” and its respective logo is a trademark of JL Audio, Inc.
JLA-SKU# 90136/90137 08.03.2010 • Printed in USA • ©2010 JL Audio, Inc. • U.S. PATENTS: #5,734,734 #5,949,898 #6,118,884 #6,229,902
#6,243,479 #6,294,959 #6,501,844 #6,496,590 #6,441,685 #5,687,247 #6,219,431 #6,625,292 #D472,891 #D480,709 Other U.S. & Foreign
patents pending. For more detailed information please visit us online at www.jlaudio.com.
(954) 443-1100
www.jlaudio.com
10369 NORTH COMMERCE PARKWAY • MIRAMAR, FLORIDA • 33025 • USA
STEP 9
CONGRATULATIONS!
You have completed the installation for this model!
Enjoy your new 3-Way Weatherproof Subwoofer/Satellite
Enclosure.
 Loading...