

JL Audio Dominion d108, Dominion d110 Owner's Manual
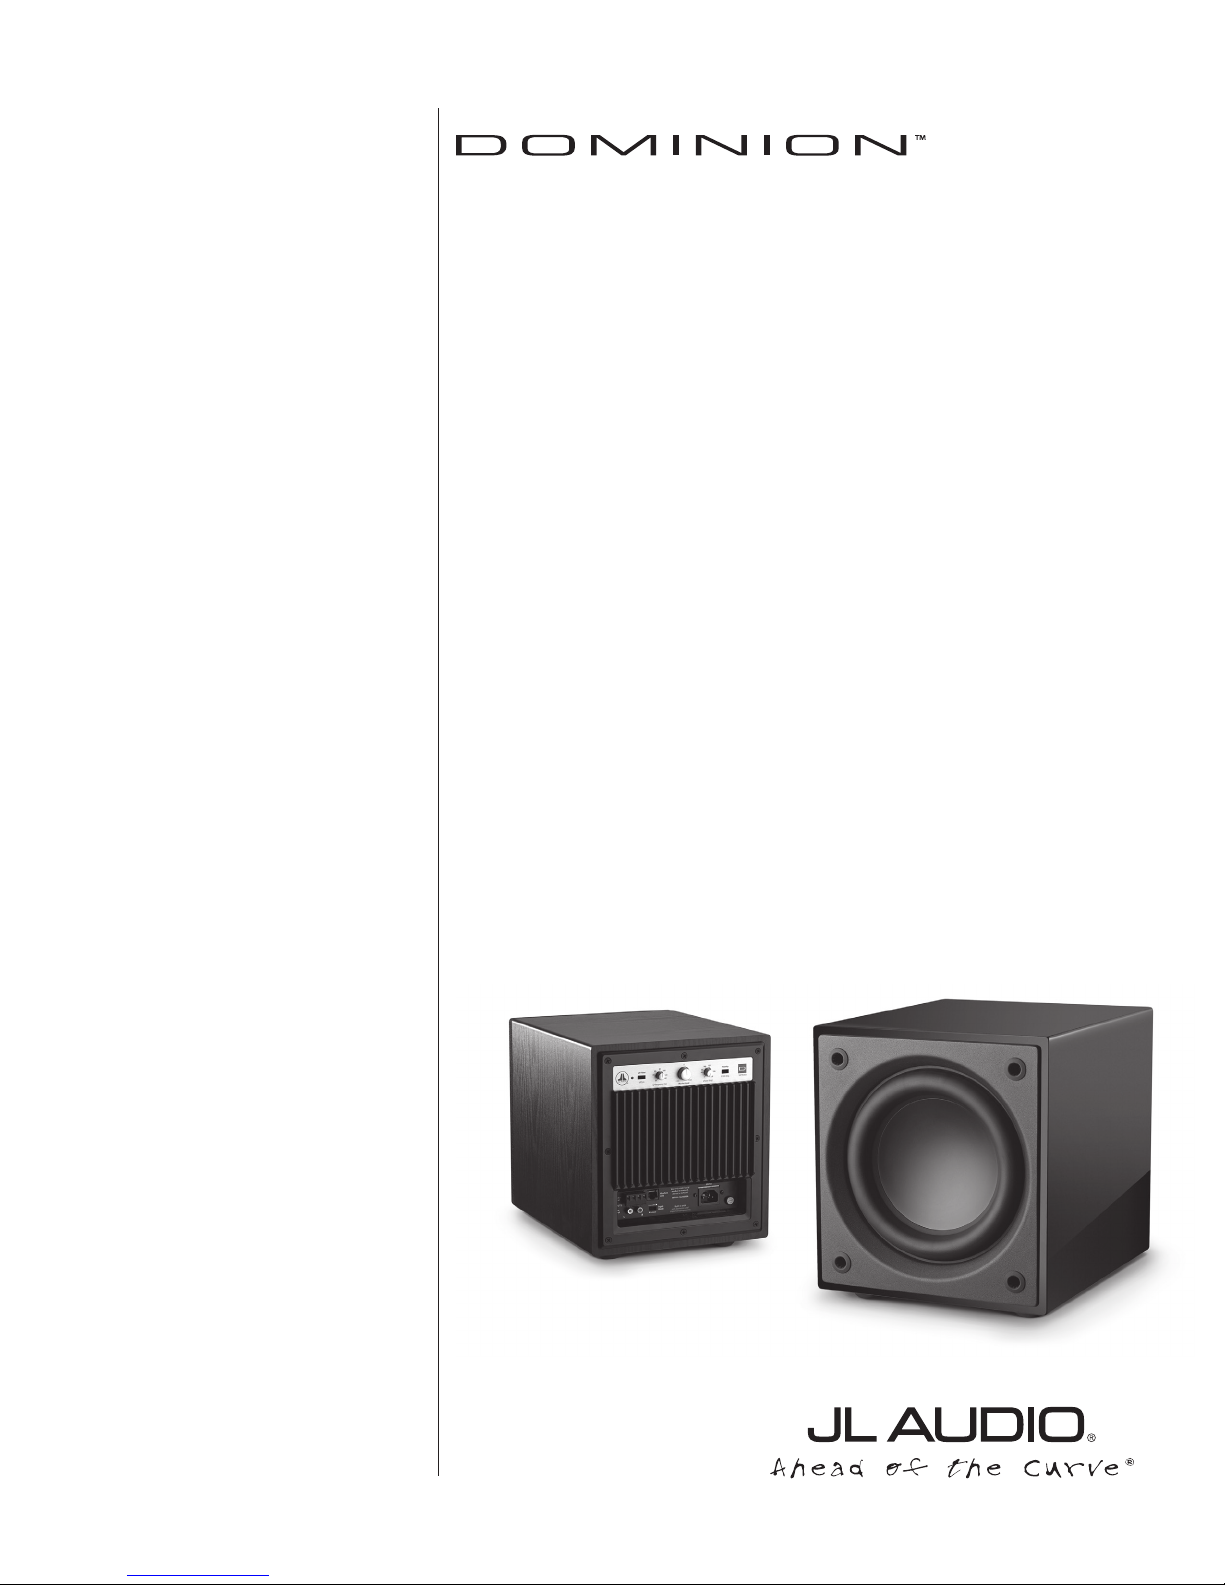
Owner’s Manua l
d108
d110

IMPORTANT SAFETY INSTRUCTIONS
WARNING: TO REDUCE THE RISK OF FIRE OR ELECTRIC SHOCK,
DO NOT EXPOSE THIS PRODUCT TO RAIN OR MOISTURE.
CAUTION
RISK OF ELECTRIC SHOCK
DO NOT OPEN
CAUTION: TO REDUCE THE RISK OF ELECTRIC SHOCK, DO NOT REMOVE
AMP PANEL OR SPEAKER. NO USER SERVICEABLE PARTS INSIDE. REFER
SERVICING TO QUALIFIED PERSONNEL.
1) Read the Instructions — All safety and operating instructions should be
read before the subwoofer is operated.
2) Retain the Instructions — e safety and operating instructions should be
retained for future reference.
3) Heed Warnings — All warnings on the subwoofer and in the operating
instructions should be followed.
e lightning ash with arrowhead
symbol within an equilateral triangle is
intended to alert the user to the presence
of uninsulated “dangerous voltage” within
the product’s enclosure that may be of
sucient magnitude to constitute a risk of
electric shock to persons.
e exclamation point within an
equilateral triangle is intended to alert the
user to the presence of important operating
and maintenance instructions in the
literature accompanying the product.
4) Follow Instructions — All operating and use instructions should
be followed.
5) Water and Moisture — e subwoofer should NOT be used near water – for
example, near a bathtub, washbowl, sink, laundry tub, in a wet basement,
near a swimming pool, etc.
6) Ventilation — e subwoofer should be situated so that its location or
position does not interfere with its proper ventilation. For example, the
subwoofer should not be situated on a bed, sofa, rug, or similar surface
that may block airow over the heatsink’s ns. If placing the subwoofer in
a “built-in” installation, ensure that airow to the heat sink at the rear of
the subwoofer is not impeded. Do not cover the subwoofer heatsink with
tablecloths, curtains, etc.
7) Heat and Flames — e subwoofer should be situated away from heat
sources such as radiators, heat registers, stoves, replaces, or other devices
that produce heat. Do not place candles on top of or near the subwoofer.
8) Power sources — e subwoofer should only be connected to a power supply of
the type described in the operating instructions or as marked on the subwoofer.
9) Power Cord Protection — Power-supply cords should be routed so that they
are not likely to be walked on or pinched by items placed upon or against
them, paying particular attention to cords at plugs, convenience receptacles,
and the point where they exit the subwoofer.
| d108 & d110Page 2
10) Cleaning — e subwoofer should be cleaned only as recommended in the
operating instructions.
11) Nonuse Periods — e power cord of the subwoofer should be unplugged
from the outlet when the subwoofer is le unused for long periods of time.
12) Lightning and Power Surges — We recommend that you disconnect the
subwoofer from the electrical outlet during electrical storms and/or recurring
power interruptions to prevent damage due to power surges.
13) Object or Liquid Entry — Care should be taken so that objects do not fall
into and liquids are not spilled onto the subwoofer enclosure. Do not expose
the subwoofer to dripping or splashing from liquids. Do not place objects
lled with liquids on top of or near the subwoofer. For example: ower vases,
beverages, liquid-fueled lamps, etc.
14) Damage Requiring Service — e subwoofer should be serviced by qualied
service personnel when:
a. the power-supply cord or plug has been damaged
b. objects have fallen or liquid has been spilled into the subwoofer
c. the subwoofer has been exposed to rain
d. the subwoofer does not appear to operate normally or exhibits a marked
change in performance
e. the subwoofer has been dropped or the cabinet has been damaged
f. the subwoofer driver’s cone and/or suspension has been
physically damaged
WARNING
15) Ser vicing — e user should not attempt to service the subwoofer beyond
what is described in the operating instructions. All other servicing should be
referred to qualied service personnel.
16) Overloading — Do not overload wall outlets, extension cords, or outlet strips
as this can result in a risk of re or electric shock.
17) Grounding — is subwoofer is supplied with a three-prong, grounded
power cord. Precautions should be taken so that the grounding means of the
subwoofer are not defeated. Defeating the grounding prong on the subwoofer
power cord could increase the risk of electric shock and could result in
permanent damage to the subwoofer’s electronics.
THIS SUBWOOFER IS CAPABLE OF PRODUCING VERY HIGH SOUND
PRESSURE LEVELS. PLEASE EXERCISE RESTRAINT IN ITS OPERATION TO
PROTECT YOUR HEARING FROM PERMANENT DAMAGE.
Page 3 | d108 & d110

FCC COMPLIANCE STATEMENT
NOTE: is equipment has been tested and found to comply with the limits of Part 15 of the FCC
Rules. ese limits are designed to provide reasonable protection against harmful interference in
a residential installation. is equipment generates, uses and can radiate radio frequency energy
and, if not installed in accordance with the instructions, may cause harmful interference to radio
communications. However, there is no guarantee that interference will not occur in a particular
installation. If this equipment does cause harmful interference to radio or television reception,
which can be determined by turning the equipment o and on, the user is encouraged to tr y to
correct the interference by one or more of the following measures:
- Reorient or relocate the receiving antenna.
- Increase the separation between the equipment and receiver.
- Connect the equipment into an outlet on a circuit dierent from that to which the
receiver is connected.
- Consult the dealer or an experienced radio/TV technician for help.
TABLE OF CONTENTS
Important Safety Instructions: ......................................... 2-3
Introduction:. . . . . . . . . . . . . . . . . . . . . . . . . . . . . . . . . . . . . . . . . . . . . . . . . . . . . . . . . . . 4
Product Overview: ...................................................... 5
Placing your Dominion™ in Your Listening Room: ........................ 6-10
Unpacking your Dominion™: ............................................ 11
Rear Control Panel Layout: ............................................. 12
Dominion™ Controls in Detail:. . . . . . . . . . . . . . . . . . . . . . . . . . . . . . . . . . . . . . . . .14-15
Connecting your Dominion™: .........................................16-23
Recommended Setup Procedure: ......................................24-26
Frequently Asked Questions: ............................................ 27
Cleaning Your Dominion™: .............................................. 28
Troubleshooting: ...................................................... 28
JL AUDIO TECHNOLOGIES INCLUDED
IN DOMINION™ SUBWOOFERS
DMA-Optimized Motor System
DMA is JL Audio’s proprietary Dynamic
Motor Analysis system aimed at
improving dynamic motor behavior. As a
result of DMA optimization, loudspeaker
motors remain linear in force over an
extreme range of excursion and also
maintain a highly stable xed magnetic
eld over a wide power range. is leads
to vastly reduced distortion and faithfully
reproduced transients... or put simply:
tight, clean, articulate bass.
VRC-Vented Reinforcement Collar
(U.S. Patent #6,118,884)
JL Audio’s patented Vented Reinforcement
Collar improves the rigidity and stability
of the cone/spider/voice coil junction
and directs airow over the voice
coil windings for improved thermal
performance.
Floating-Cone™ Attach Method
(U.S. Patent #6,501,844)
is assembly technique ensures proper
surround geometry in the assembled
speaker for better excursion control and
dynamic voice coil alignment.
Engineered Lead-Wire System
(U.S. Patent #7,356,157)
Carefully engineered lead-wire design and
attachments ensure controlled, quiet leadwire behavior under the most extreme
excursion demands, resulting in reduced
distortion, reduced mechanical noise and
improved reliability.
Limited Warranty / Service Information: ..................................31
Specications: ......................................................... 32
INTRODUCTION
Congratulations on your purchase of a JL Audio Dominion™ powered
subwoofer system. is product has been critically engineered to deliver
exceptional performance in your home theater or audio system for many years to
come.
As a company, we are intensely committed to core research into
high-performance loudspeaker and amplier technologies. JL Audio’s longexcursion subwoofer driver designs are widely considered as reference
standards for linear behavior and high output. We have also focused our
eorts to create powerful amplier and signal-processing technologies
specically aimed at delivering exceptional low-frequency performance. Your
Dominion™ subwoofer combines these core disciplines within a compact,
beautifully craed package to deliver an unparalleled listening experience.
| d108 & d110Page 4
We sincerely thank you for your purchase and invite you to read this
manual thoroughly in order to achieve the highest level of performance with
your Dominion™ subwoofer system. Enjoy.
PRODUCT OVERVIEW
JL Audio Dominion™ subwoofers combine a state-of-the-art
JLAudio subwoofer driver and electronics/amplier package within
a highly optimized enclosure to deliver an exceptional listening
experience in your home theater or home audio system.
e subwoofer driver in your Dominion™ subwoofer system is capable
of outstanding linear excursion without distress or audible distortion. is
purpose-engineered driver enables your Dominion™ subwoofer to reproduce
powerful low-frequency events with stunning impact and outstanding accuracy.
e Dominion™drivers oer peak-to-peak excursion capabilities well in excess of
2.5 inches (63 mm - d108), and 2.7 inches (68 mm - d110) to comfortably handle
the dynamics of the most demanding program material.
To get the most from this long excursion driver platform, your Dominion™
incorporates a precisely engineered switching amplier. e Dominion™ ampliers
are capable of unclipped output voltages equivalent to 500 watts (d108), and
750 watts (d110) of RMS power when referenced to the nominal loudspeaker
impedance, allowing us to take full advantage of each driver’s full excursion
envelope.
e beautiful cabinet enclosing the workings of your Dominion™ is also the
result of careful engineering. To contain the pressures created by the Dominion™
driver, we utilize solid, CNC-cut, MDF material with extensive internal bracing
features and advanced assembly techniques.
e Dominion™ subwoofers also include an on-board low-pass active
crossover, a polarity switch, and phase control to aid in achieving an optimal
acoustic transition between the subwoofer(s) and main speakers. Inputs are via
a pair of line level stereo RCA inputs or via a removable plug for speaker level
inputs.
As you can see from this brief introduction, there is a lot of technology in this
compact subwoofer. e contents of this manual will explain the features and
guide you through the setup and tuning of your Dominion™ to help achieve an
outstanding low-frequency listening experience.
IMP O R TANT
If you require assistance, we urge you to contact your authorized
JL Audio retailer for expert setup advice and service.
IMPORTANT! IT IS A VERY GOOD IDEA TO READ THE NEXT SECTION
BEFORE UNPACKING YOUR DOMINION™ SUBWOOFER. UNPACKING THE
SUBWOOFER NEAR ITS FINAL LOCATION IS RECOMMENDED.
Page 5 | d108 & d110
PLACING YOUR DOMINION™ SUBWOOFER
IN YOUR LISTENING ROOM:
Your listening room or theater is an integral part of your sound reproduction
system. e physical dimensions of the room and its furnishings, materials, doors
and windows play an important role in dening how your system sounds.
When you place a sound source in an enclosed rectangular space, “standing
waves” are created, resulting from the relationship between the sound’s
wavelength and your room’s dimensions. In other words, standing waves result
from sound energy that is trapped in the room as it bounces back and forth
between opposing walls. Standing waves in the room create acoustic peaks and
dips where the sound is either louder or soer, based solely on your physical
position in the room. Energy also “builds up” at the room’s boundaries, creating
exaggerated bass response at certain frequencies. ese fundamental room
resonances are called room “modes.”
e moral of this mode story is to try and avoid seating positions in standing
wave peak or dip regions. It is highly recommended that you place your listening
chairs in areas where modal peaks and dips are moderate and do not reinforce
one another. e two most obvious areas to avoid are those near the exact center
of the room and those close to any of the room’s walls.
Just as your listening seat can be in a peak or dip region, so can your
subwoofer. When placed in a room corner, a subwoofer maximally excites the
room’s mode structure, creating the strongest output with the fewest dips. When
the subwoofer is pulled away from a corner or wall, the room modes are excited
less, which can alter the sound at your listening seat.
Be sure to experiment with both your listening seat position and subwoofer
position to nd the best solution. Careful experimentation usually leads to a
superior sounding system. Use our setup suggestions (illustrated on the opposing
page and the following pages) to get you started.
We recommend that you begin by placing your Dominion™ in the front
of the room, on the oor, near the front le or right speaker. Placing the
Dominion™ near solid walls will reinforce bass response and pulling it away from
solid walls will decrease bass. Increasing the distance between the subwoofer and
the walls may help to smooth upper bass response in some rooms.
We recommend that you avoid placing the Dominion™ near windows to
prevent rattling and sound transmission to the outside world.
If you are planning to install your
Dominion™ inside a cabinet,
please refer to the guidelines on page 8.
| d108 & d110Page 6

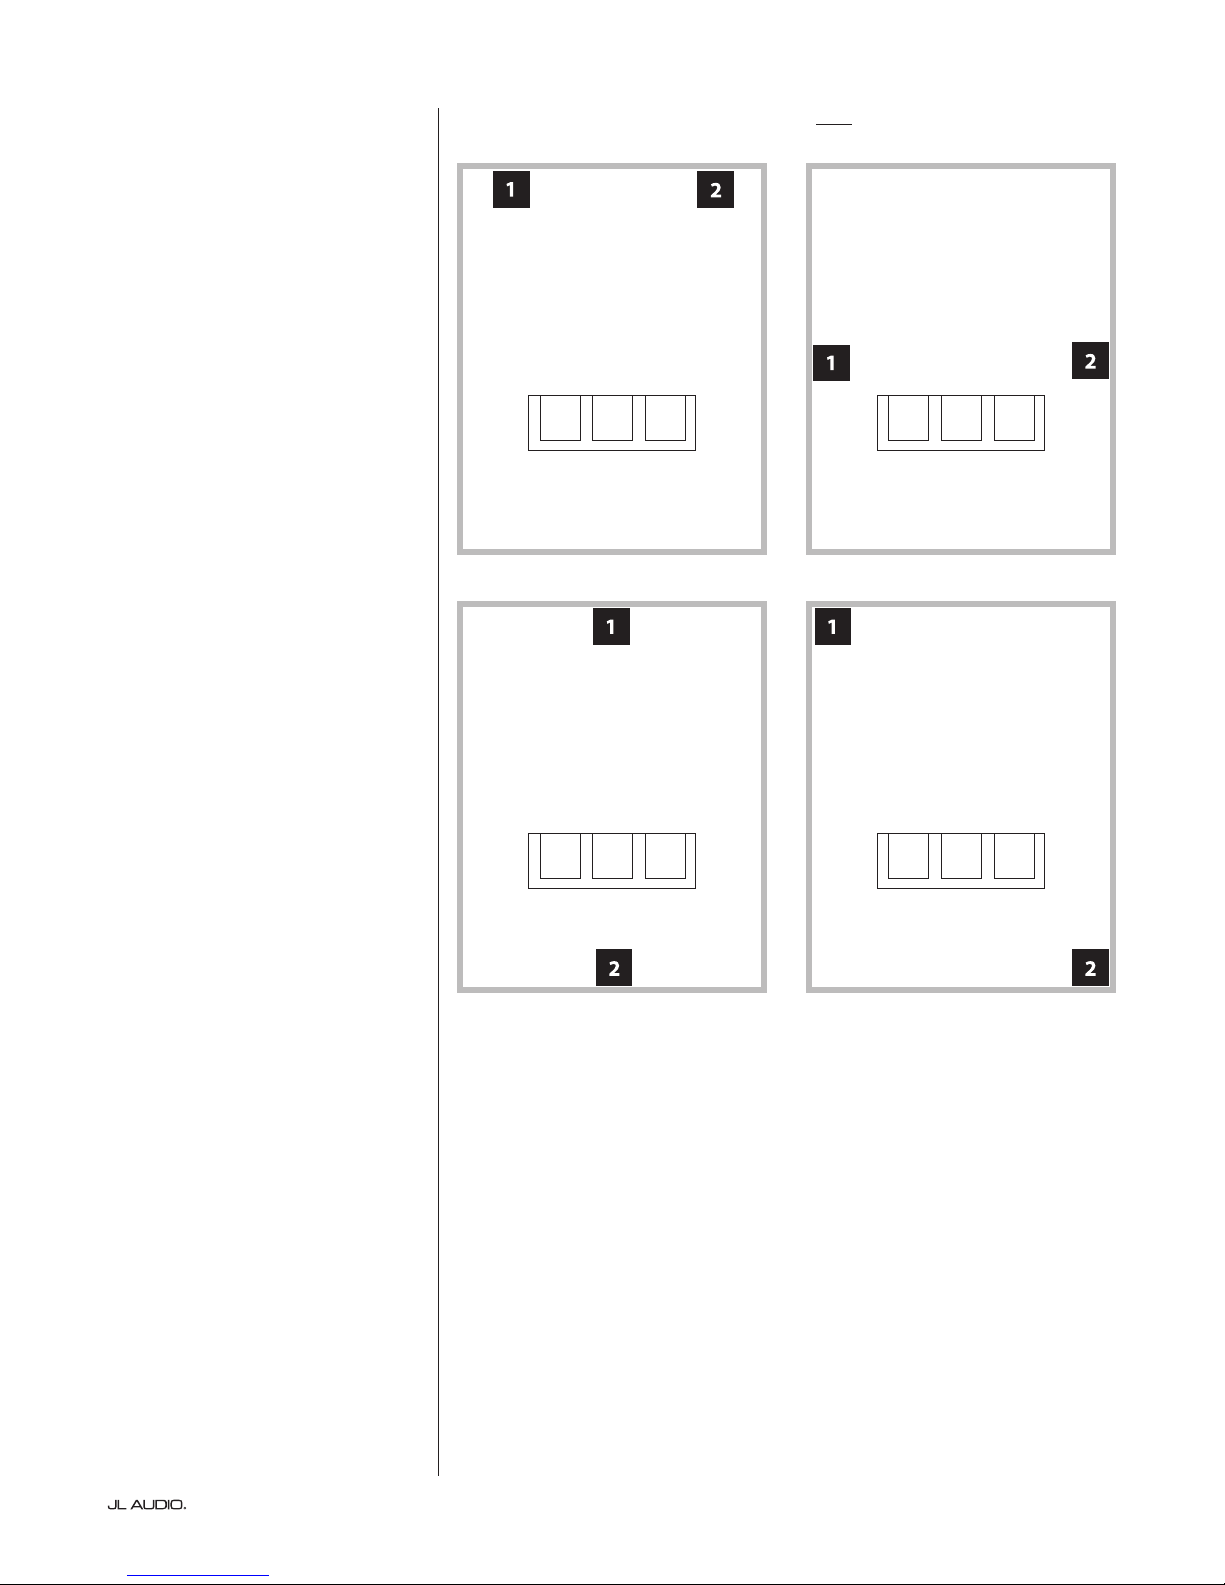
Recommended Floor Placement for One Dominion™ Subwoofer
MORE INTENSE
SMOOTHER
SMOOTHER
SMOOTHER
RECOMMENDED
SUBWOOFER
PLACEMENT
ZONES
(For Single Subwoofer)
MORE INTENSE
SMOOTHER
SMOOTHER
SMOOTHER
COMPROMISED SEATING POSITIONS
(Results in weaker, uneven bass performance)
BEST SEATING POSITIONS
(Most accurate bass performance)
COMPROMISED SEATING POSITIONS
(More intense but less accurate bass performance)
CENTERLINE OF ROOM
APPROX. 1/3 OF TOTAL ROOM
LENGTH AWAY FROM BACK WALL
CLOSE TO BACK WALL OF ROOM
WORST
SEAT
Page 7 | d108 & d110
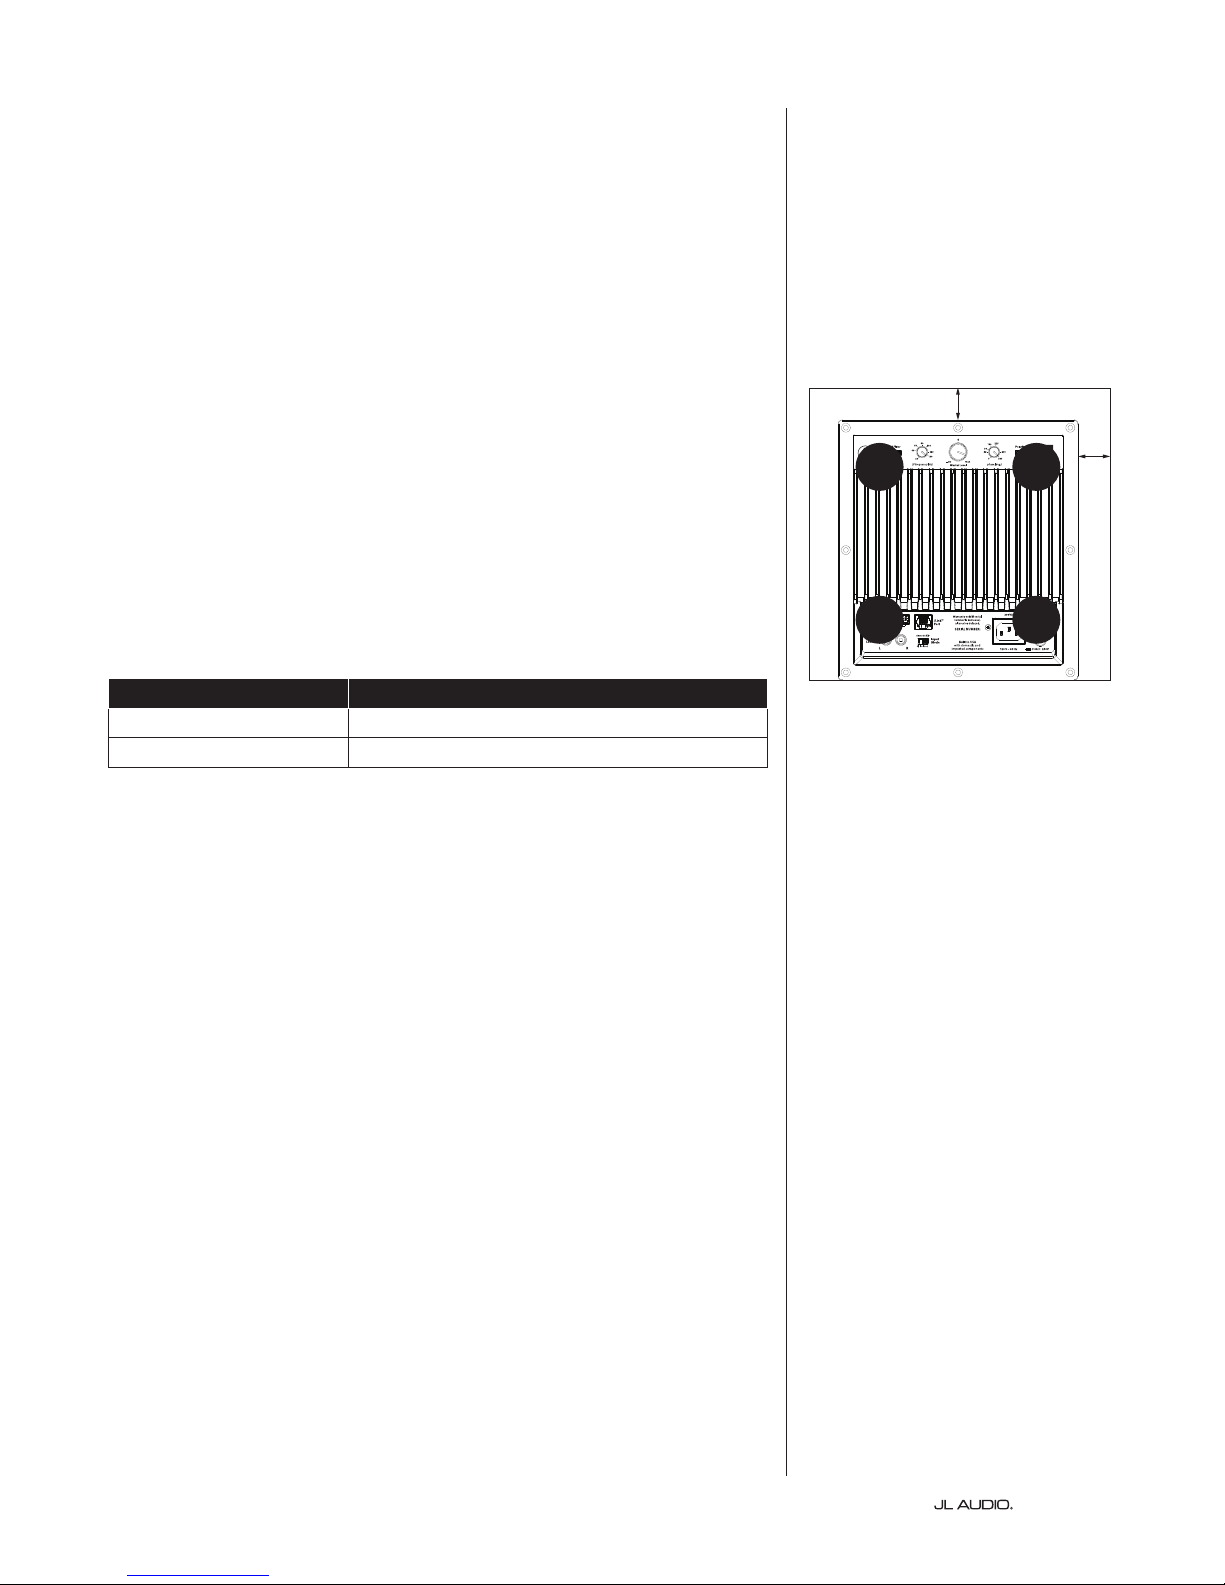
SPECIAL CONSIDERATIONS FOR BUILT-IN INSTALLATIONS
e Dominion™ subwoofer can be integrated into custom cabinetry by
following a few simple guidelines.
1) Allow 4 inches (10 cm) of clear space behind the amp panel of your Dominion™
for adequate cooling and connector clearance.
2) On all other sides (except the bottom), allow at least 2 inches
(5 cm) clearance for adequate ventilation.
3) While the Dominion™ generally runs only warm during spirited operation, we
do recommend that adequate heat vents are included in any custom cabinet that
encloses the Dominion™. A pair of 3 inch (7.5 cm) diameter vents near the bottom
of the cabinet and near the top of the cabinet, will allow cool air to circulate over
the amp panel of your Dominion™ subwoofer system, keeping it cool and happy.
4) Your Dominion™ subwoofer is capable of moving substantial quantities of air. If
the front of the Dominion™ is covered by a custom grille, the grille size must be
AT LEAST equal to the woofer cone area for each model to ensure the output is
not choked by the custom cabinet. Refer to the chart below for recommended
vent areas for each model.
Model Recommended Custom Grille Vent Area
d108 ≥ 33 in2 (213 c m2)
d110 ≥ 49 in2 (316 cm2)
Rear-view of cabinet install:
2 in. min.
VENT VENT
VENT VENT
2 in.
min.
| d108 & d110Page 8
Using Two Dominion™ Subs
When using two Dominion™
subwoofers, try placement near
the front corners of the room, at
diagonally-opposite corners of the
room, or at the center points of
opposing walls as shown at right.
Experimentation with
subwoofer and listener
placement is recommended to
achieve the best results – the
benets can be substantial.
High-resolution measurements
and professional system calibration
are recommended for the best possible
results and system performance.
Recommended Subwoofer Placement for Two Dominion™ Subwoofers
Page 9 | d108 & d110
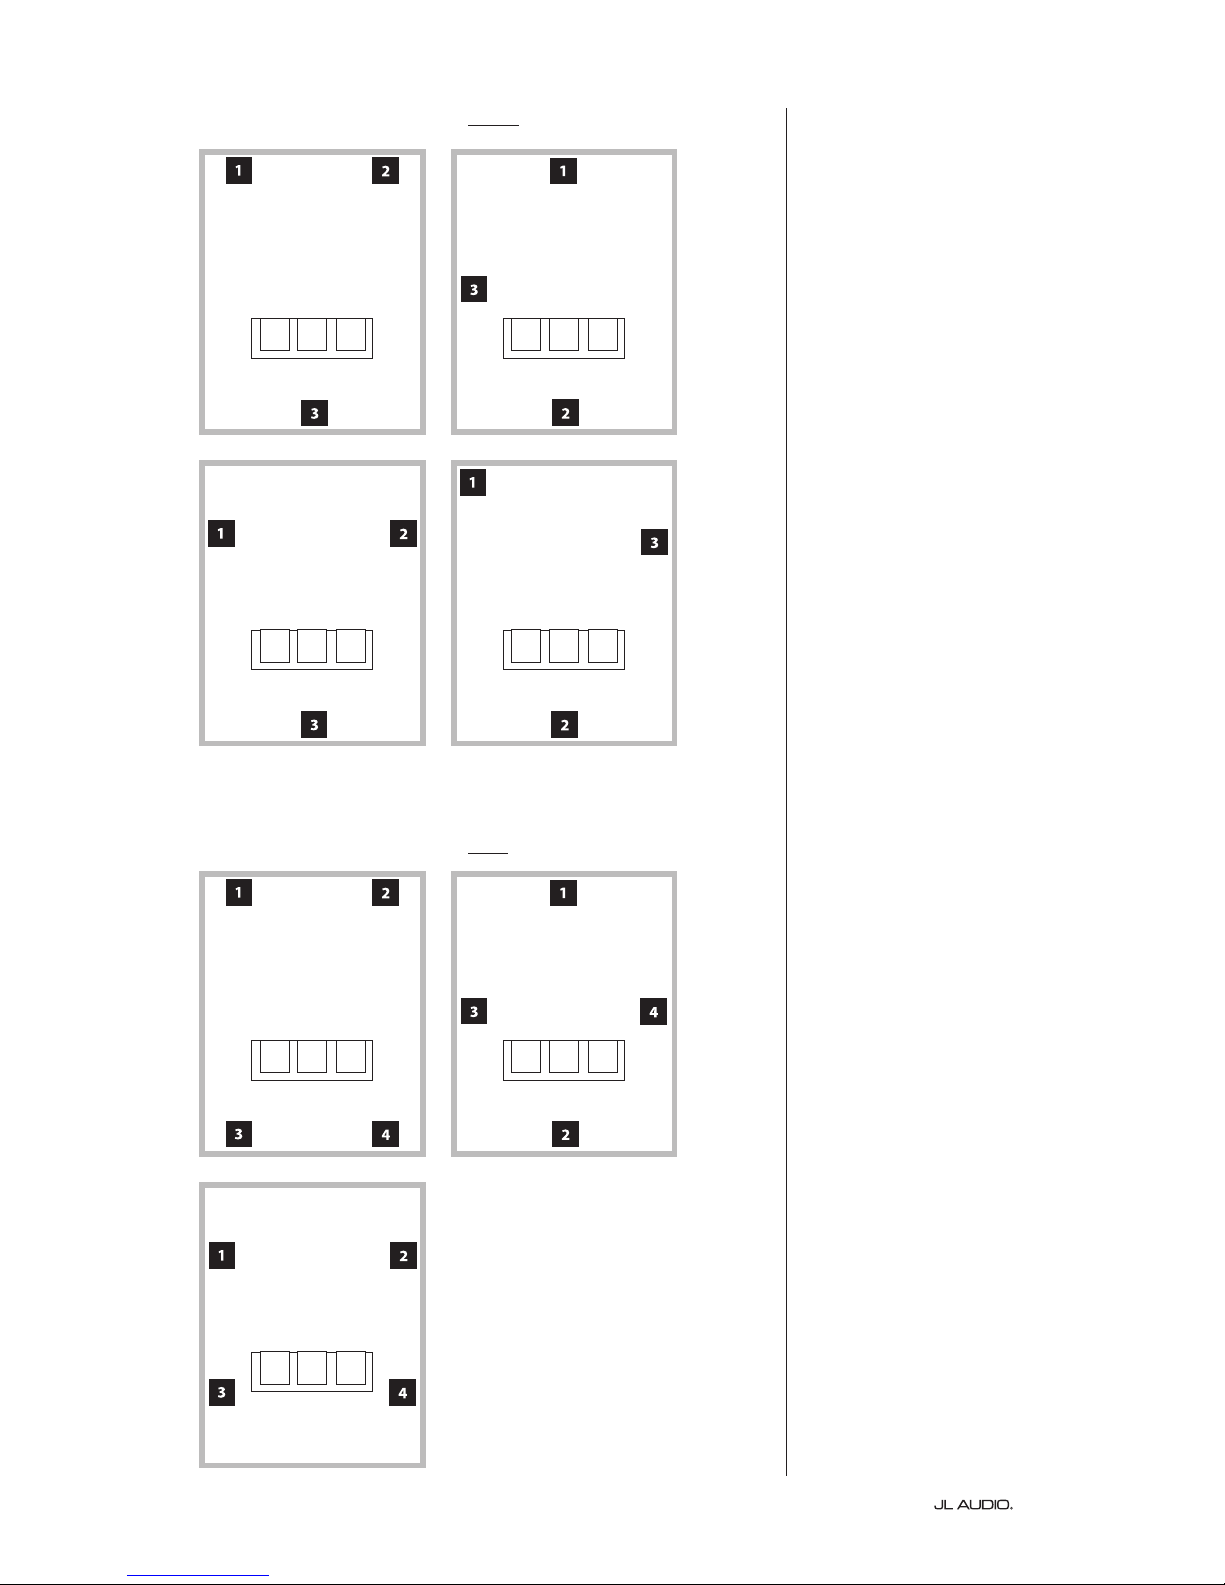
Recommended Subwoofer Placement for Three Dominion™ Subwoofers
Using Three or Four
Dominion™ Subwoofers
Research indicates that the
smoothest bass response for a large
listening area can be achieved using
four subwoofers, placing one at
the midpoint of each of the four
walls (although using two or three
subwoofers can be almost as good).
Experimentation with
subwoofer and listener
placement is recommended to
achieve the best results – the
benets can be substantial.
High-resolution measurements
and professional system calibration
are recommended for the best possible
results and system performance.
Recommended Subwoofer Placement for Four Dominion™ Subwoofers
| d108 & d110Page 10
 Loading...