

Page 1

INSTALLATION GUIDE
for the
SB-GM-COCREW2G/10TW3
SKU# 94635
2015-Up Chevrolet Colorado & GMC Canyon Crew Cab
Thank you for choosing a JL Audio Stealthbox® for your automotive sound system.
With proper installation, your new vehicle-specific enclosed subwoofer system
will deliver years of listening pleasure.
We strongly recommend that you have your new Stealthbox® installed by your
authorized JL Audio dealer. The installation professionals employed by your
dealer have the necessary tools and experience to disassemble and reassemble
your vehicle properly. If you prefer to perform your own installation, please read
this installation guide completely before beginning the process.
If you choose to per form the installation yoursel f, it is abso lutely
vital that the Stealthb ox
®
be properly mo unted to the vehicle
according to these instr uctions. Failure to mount the enclosure
properly presents two problems:
1) The sub-bass perfor mance will suffer due to the movement of th e
enclosure caused by the force exerted by the woofer(s).
2) A loose enclosure present s a serious safety hazard in th e event of a
collision or sudden deceleration.
INSTALLATION
DI FFIC ULT Y:
ESTIMATED TIME:
1 HOUR
Enclosure Type: Sealed
Driver Type: 10TW3-D4
Nominal Impedance: 2 ohms
Continuous Power Handling: 400 watts (RMS method)
Continued on Next Page
1
5
OUT
OF
SB-GM-COCREW2G/10TW3 INSTR_SKU# 011474
Page 2
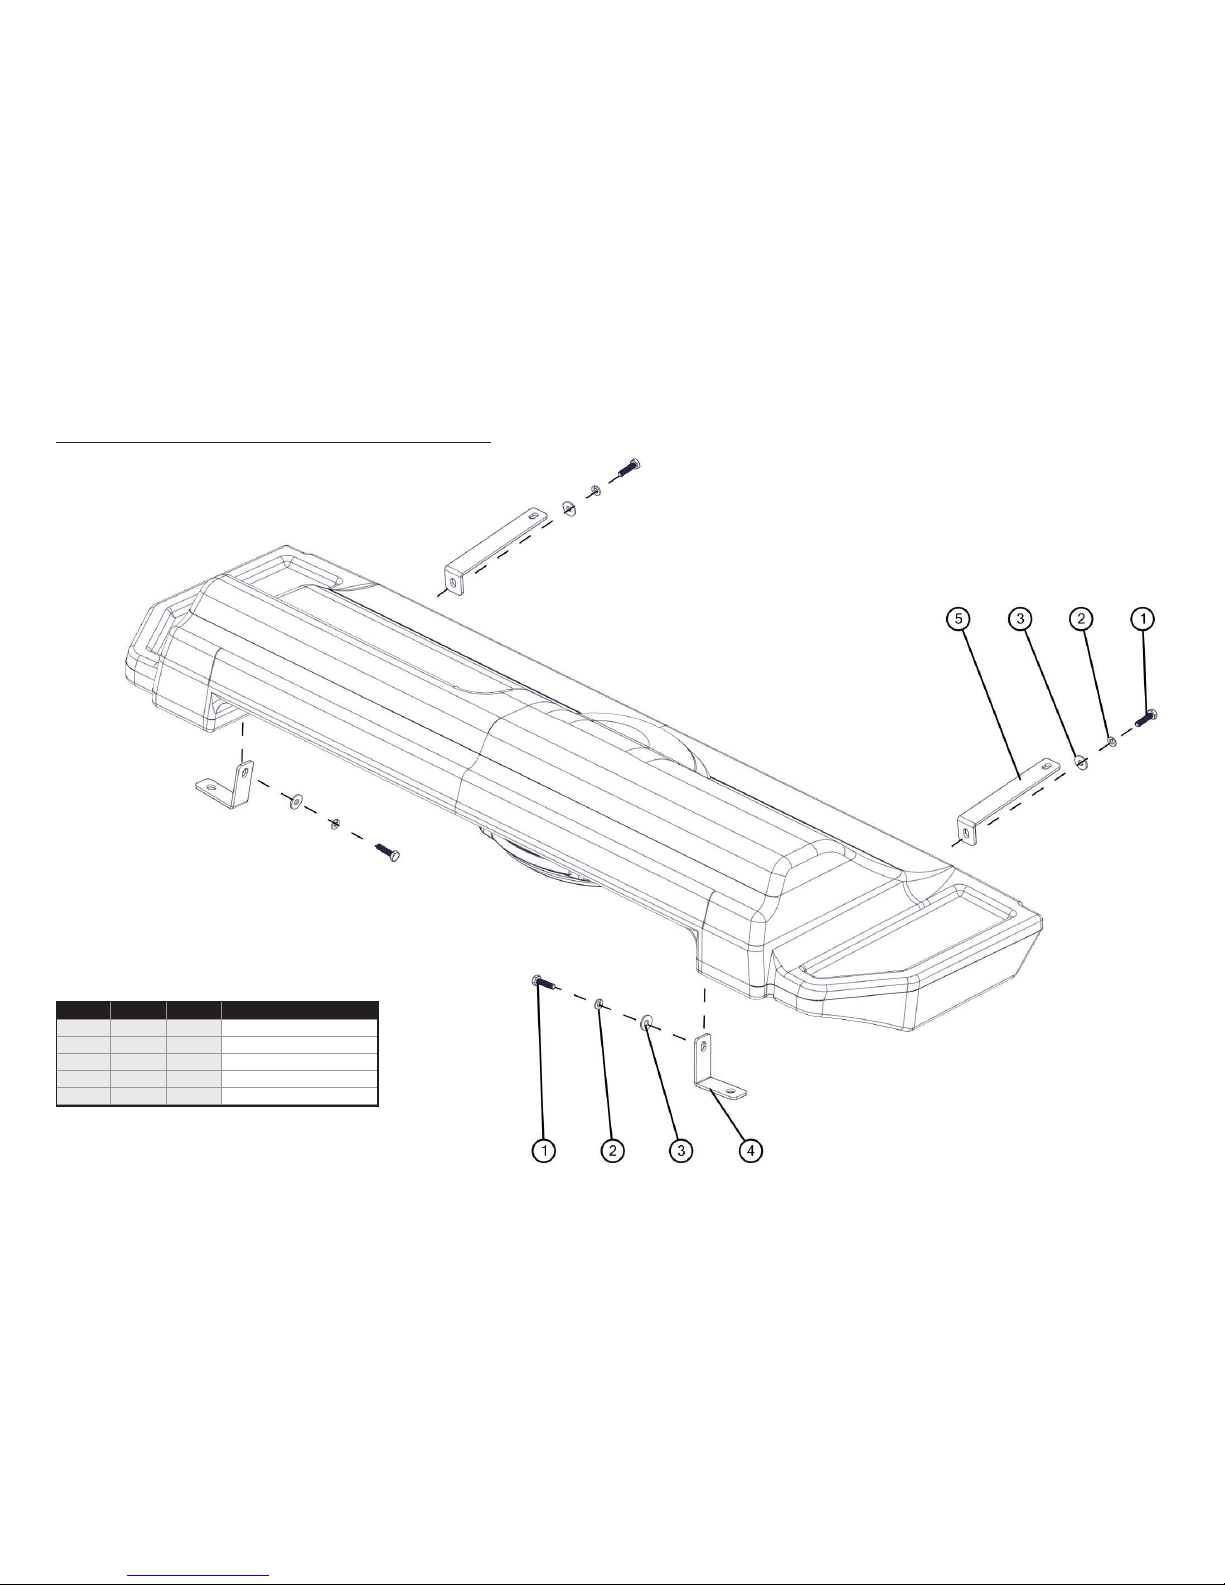
INCLUDED HARDWARE
Continued on Next Page
Page 2 • JL Audio, Inc., 2017
SB-GM-COCREW2G/10TW3 INSTR_SKU# 011474
BOM ID Qty SKU Description
1 4 151137 1/4 - 20 x 1” Hex Bolt
2 4 151098
1/4” Split Lock Washer
3 4 150068 1/4” Flat Washer
4 2 153859 Short Bracket
5 2 153860 Long Bracket
Page 3
POWER RECOMMENDATION
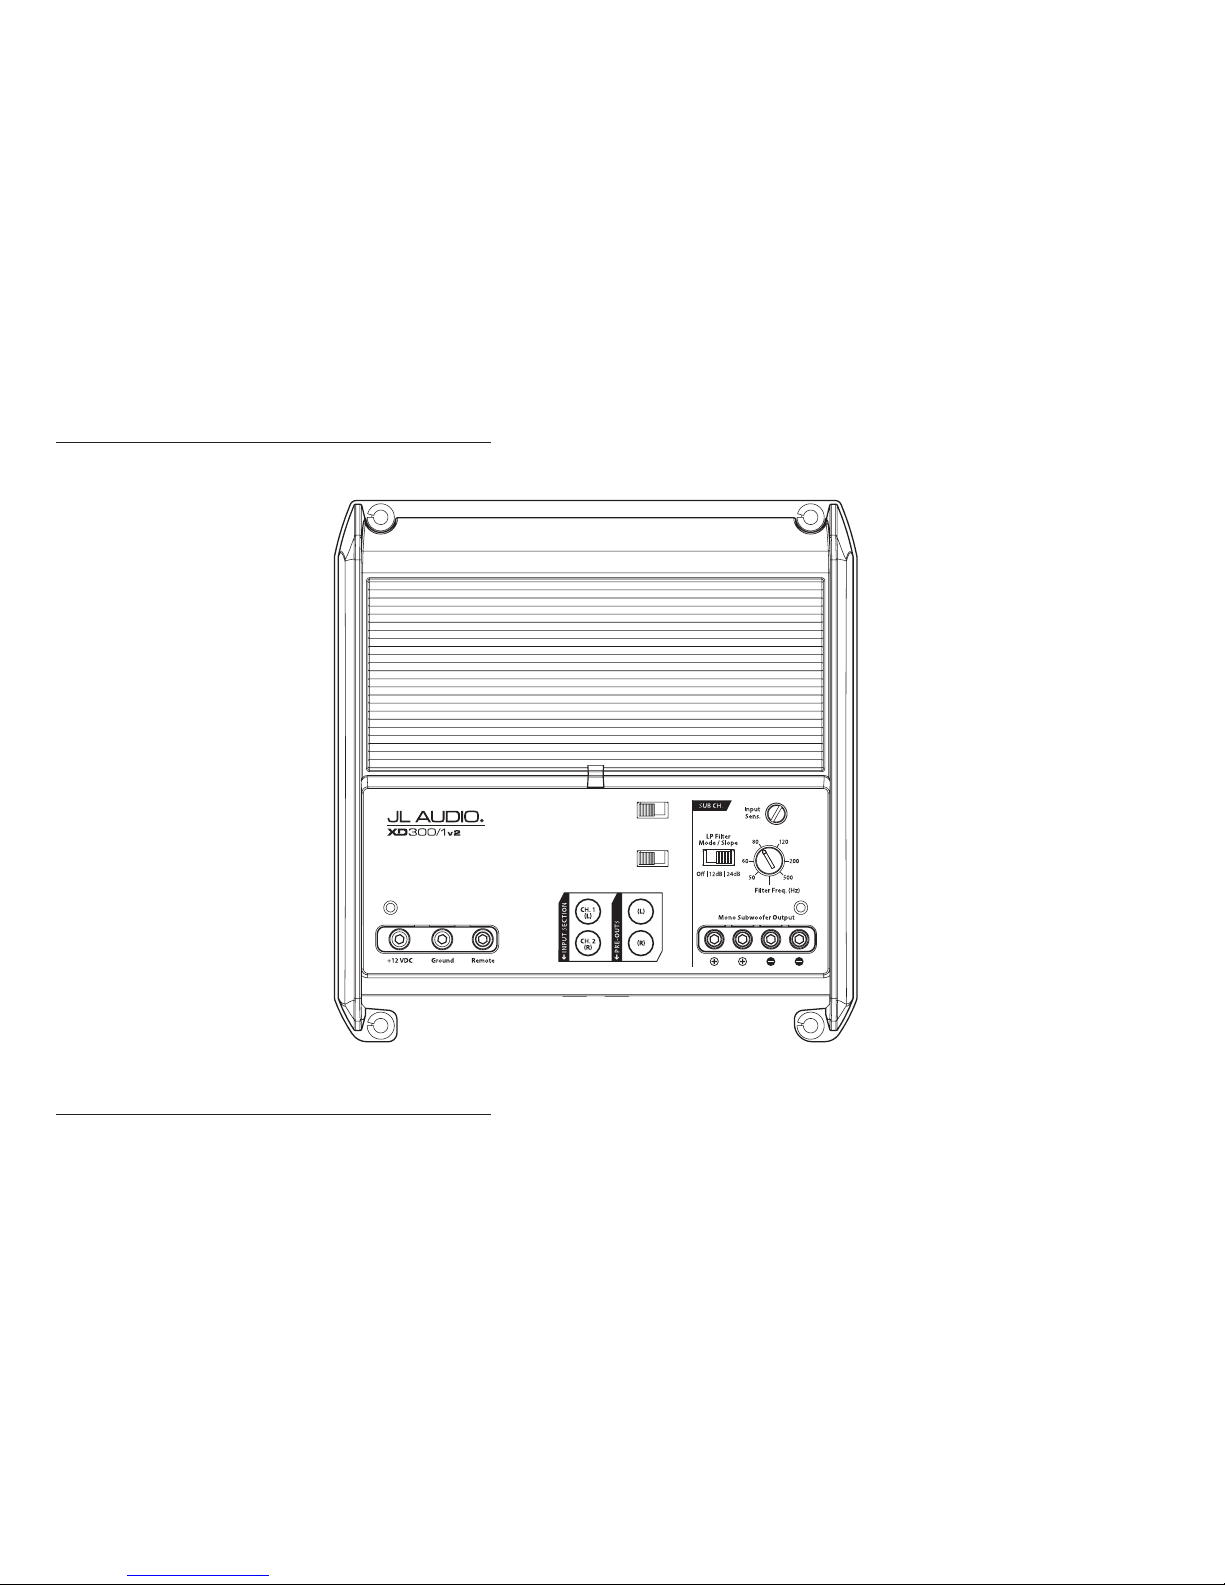
JL Audio recommends high quality amp liers such as the JL Audio XD300/1v2. The diagram below shows the recommended crossover set tings for the XD300/1v2. For a detailed description of the
amplier settings, consult the own er’s manual for the amplier. If another amplier is being used, please reference this illustration and use similar settings on that amplier.
Rem. | Oset | Signal
Input Voltage
Low | High
Turn-On Mode
Monoblock Subwoofer Amplifier
CONNECTIONS
Using quality power, signal, and speaker wire is essential in ensuring the p erformance of your Stealthbox®. JL Audio recommends using a 4 AWG power kit such as the XD-PCS4-1B for your
Stealthbox® amplier. Other kits are available should you be using more than one ampli er. Signal wire such as the JL Audio Premium Audio Interconne ct Cables should be used to provide signal for
both channels of the amplier. JL Audio recommends using 12 AWG speaker wire for subwoofers such as our XC-BCS12-25.
Continued on Next Page
Page 3 • JL Audio, Inc., 2017
SB-GM-COCREW2G/10TW3 INSTR_SKU# 011474
Page 4
Page 4 • JL Audio, Inc., 2017 Continued on Next Page
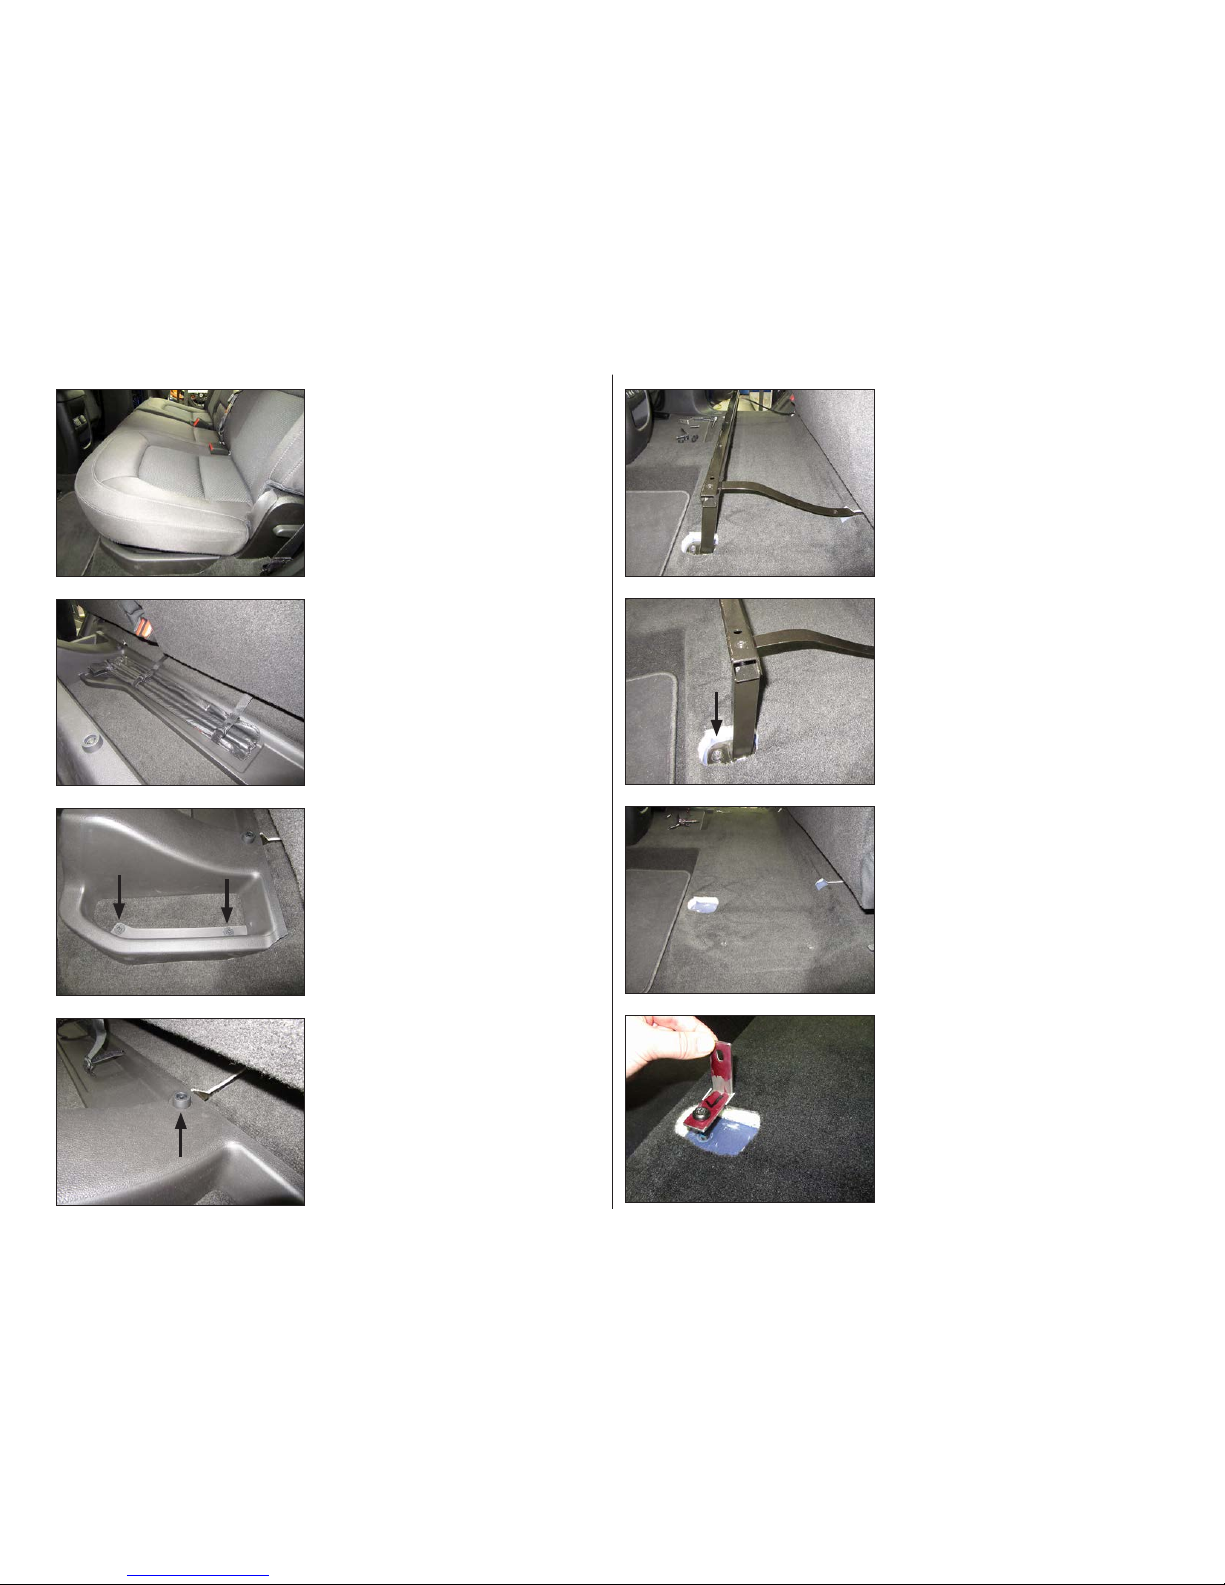
STEP 8
Slide a factory Torx bolt through the hole in a
Short Bracket, and partially thread it into the
front factory hole.
Align the Short Bracket horizontally, with the
slotted end facing inward, as shown.
Mark the location of the Short Bracket on the
carpet.
STEP 7
Remove the storage tray bracket from the
vehicle.
STEP 6
Remove the two Torx bolts and two nuts that
secure the storage tray bracket to the vehicle.
STEP 5
Lift up on the storage tray, and remove it from
the vehicle. Pictured is the storage tray bracket.
STEP 4
Remove the seven screws and bumpers from
the top of the storage tray.
STEP 3
Loosen the two clips from each side of the
under-seat storage tray.
STEP 2
Lift the rear seat. Loosen the straps around
the jack tools, and remove the tools from the
vehicle.
STEP 1
Empty the rear seat area.
SB-GM-COCREW2G/10TW3 INSTR_SKU# 011474
Page 5
Page 5 • JL Audio, Inc., 2017 Continued on Next Page
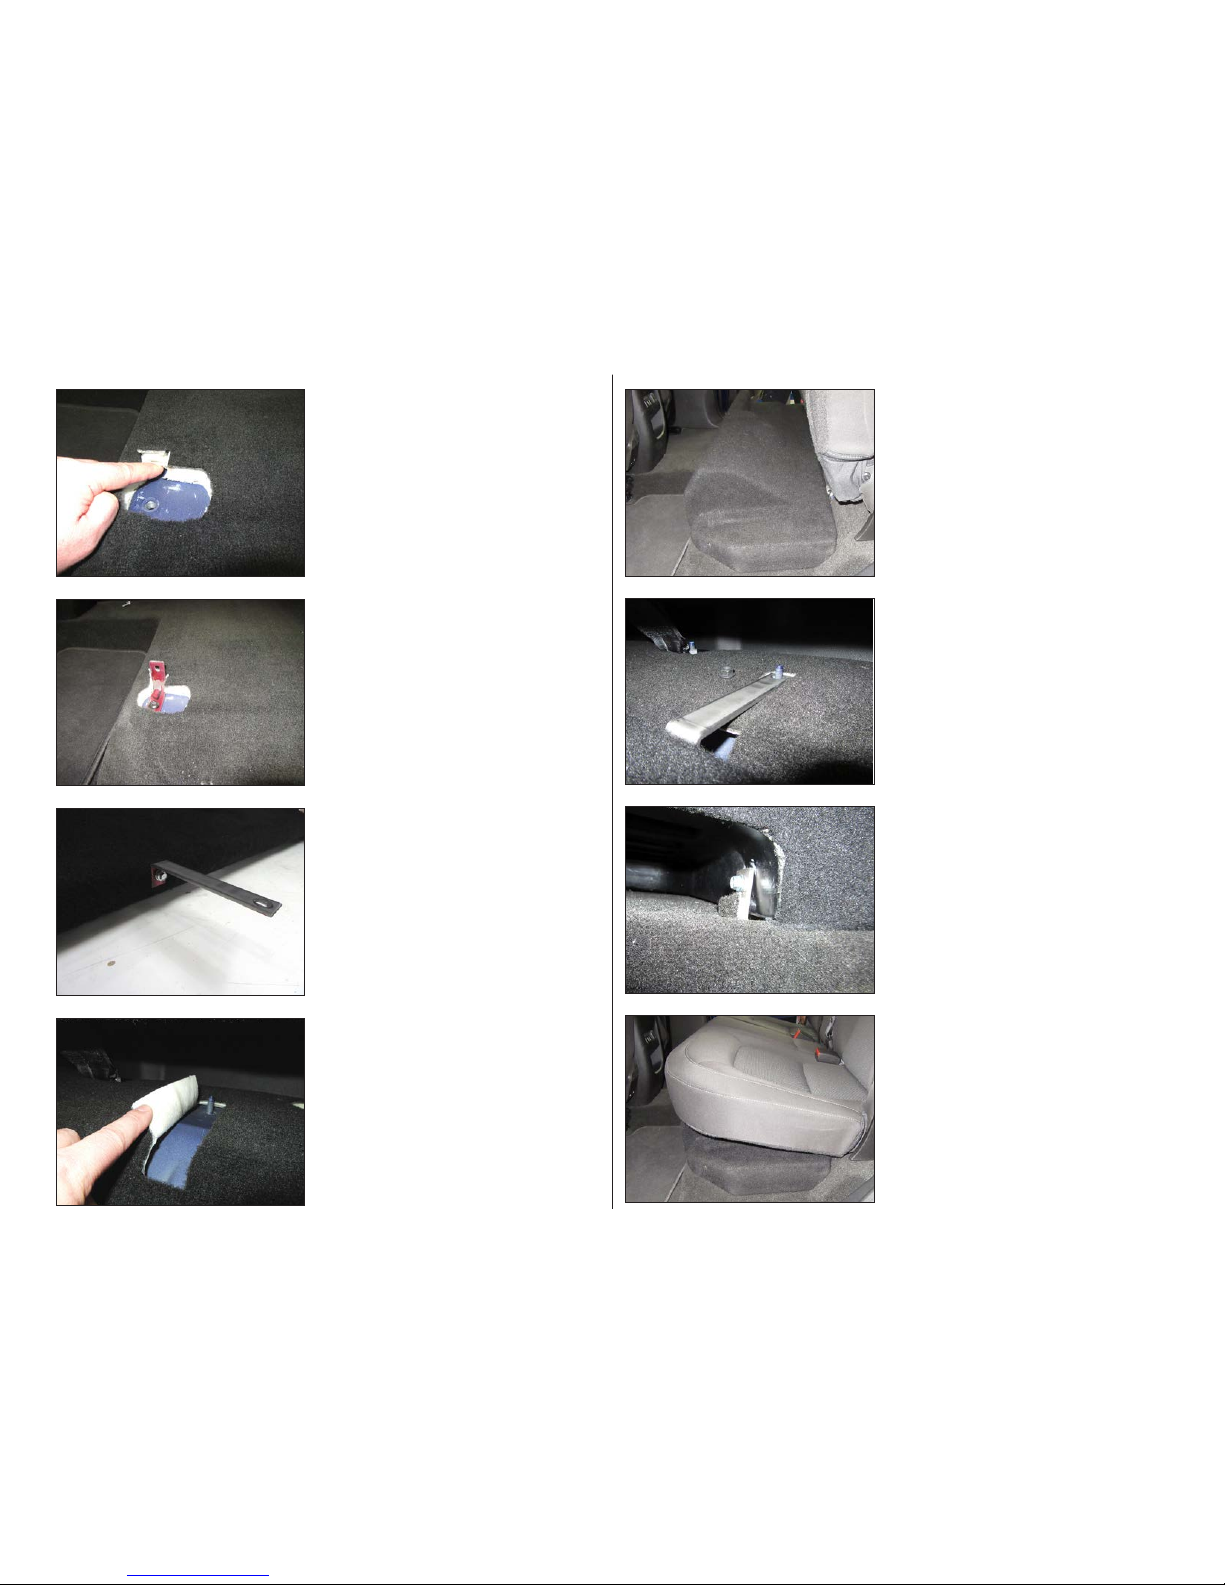
ST EP 16
Replace the jack tools, if desired, and fold the
rear seats back down.
ST E P 15
Slide a 1/4” Split Lock Washer and a 1/4” Flat
Washer over a 1/4 - 20 x 1” Hex Bolt, pass the
assembly through the slot in a Short Bracket,
into a threaded insert on the front of the
enclosure, and fully tighten.
Repeat the process for the opposite side.
ST E P 14
Align the slot in each of the Long Brackets with
the threaded studs, as shown. Add a factory
nut over each threaded stud, and fully tighten.
ST E P 13
Connect speaker cable to the terminal cup
on the side of the enclosure, and place the
Stealthbox into position, as shown. Route the
speaker cable as necessary.
ST E P 12
Note the location of the threaded studs in the
back of the vehicle. Push the carpet down,
leaving the threaded studs exposed.
STE P 11
Slide a 1/4” Split Lock Washer and a 1/4” Flat
Washer over a 1/4 - 20 x 1” Hex Bolt, and pass
the assembly through the short end of a Long
Bracket, and into a threaded insert on the back
of the enclosure.
Align the Long Bracket as shown, and fully
tighten.
Repeat the process for the opposite side.
ST EP 10
Fold the carpet up, reinstall the Short Bracket
and Torx bolt, and fully tighten.
Repeat Steps 8-10 for the opposite side.
STEP 9
Remove the Short Bracket and Torx bolt.
Carefully cut a slit in the carpet on each of the
marks made in the previous step to allow the
carpet to fold up.
SB-GM-COCREW2G/10TW3 INSTR_SKU# 011474
Page 6
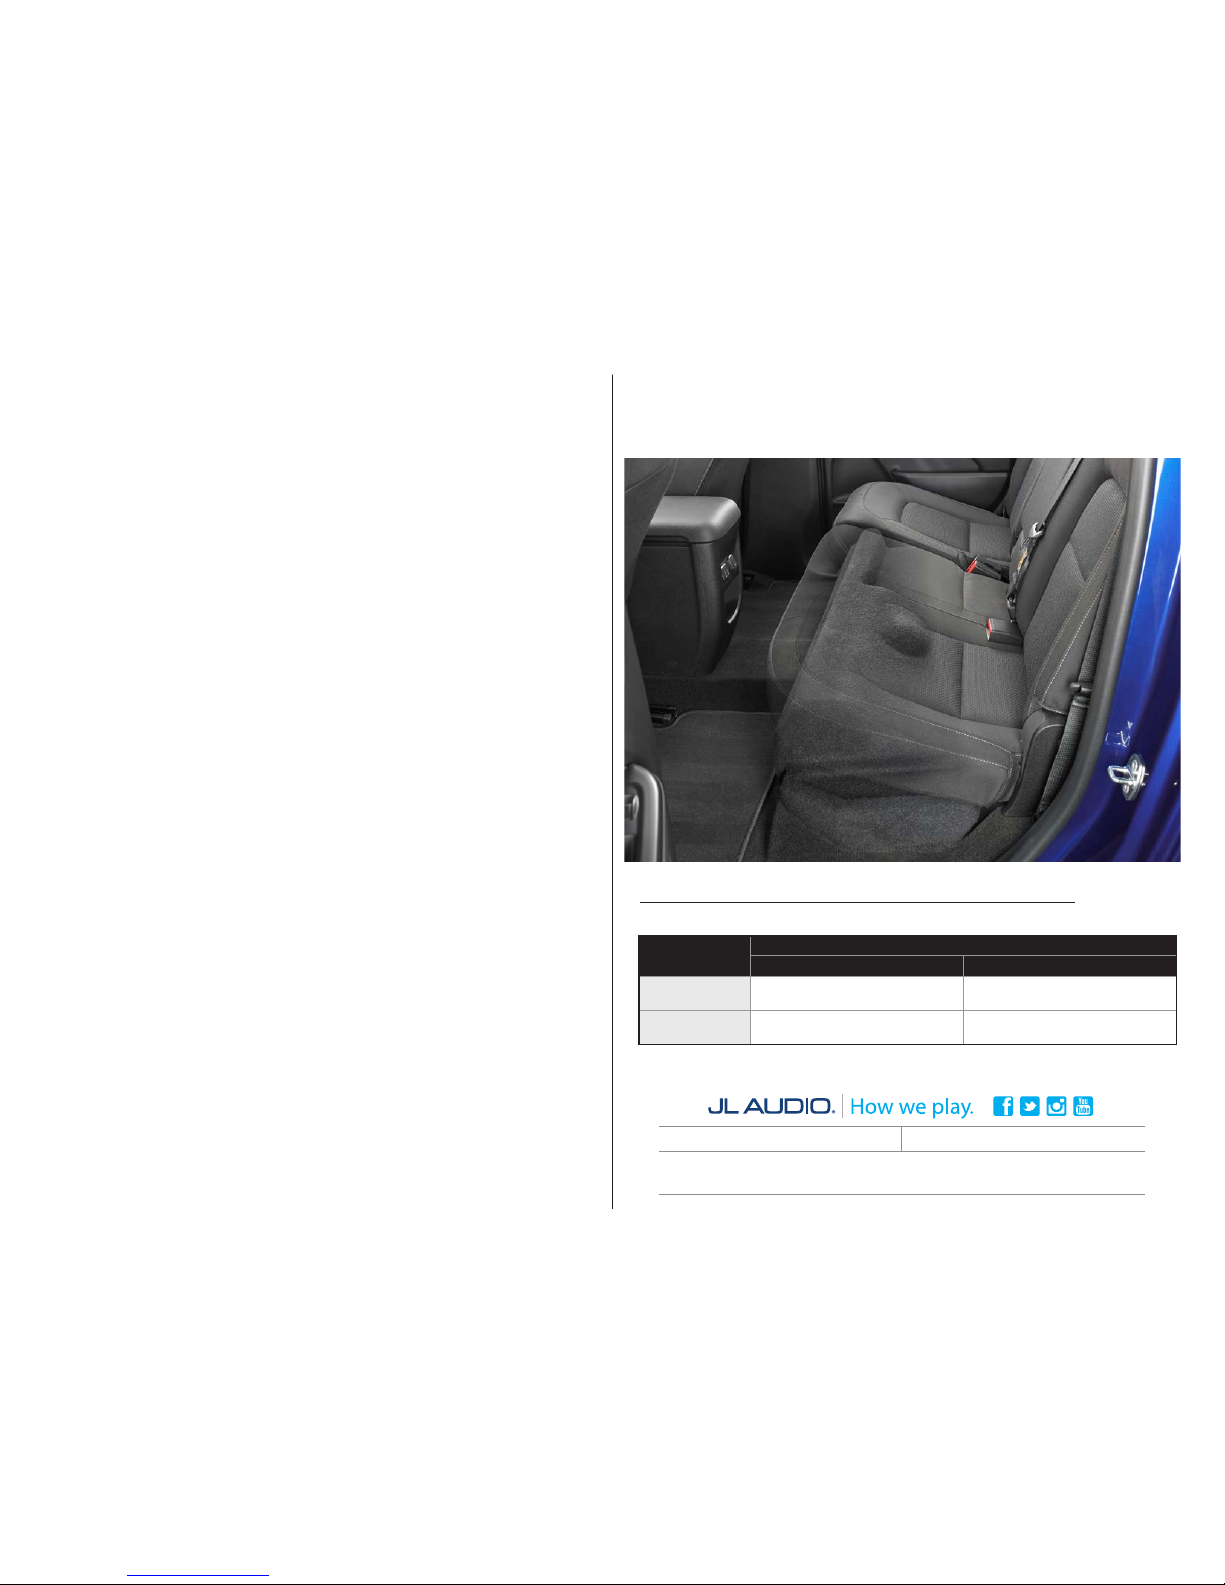
Page 6 • JL Audio, Inc., 2017
MID/HIGH FREQUENCY DRIVER FITMENT
A variety of JL Au dio coaxial and component syste ms will t in the factory spea ker locations of your vehicle.
All specifications are subject to change without notice. “JL Audio®” and the JL Audio logo, “Stealthbox®” and the Stealthbox logo, and “How we play®” are registered trademarks of JL Audio, Inc.
“Ahead of the Curve” and its respective logo are trademarks of JL Audio, Inc.
Printed in USA • ©2017 JL Audio, Inc. • For more detailed information please visit us online at www.jlaudio.com.
(954) 443-1100
www.jlaudio.com
JLA-SKU# 011474 • ver. 03.22. 2017 • 10369 NORTH COMMERCE PARKWAY • MIRAMAR, FLORIDA • 33025 • USA
CONGRATULATIONS!
You have completed the installation for this model! Enjoy your new Stealthbox®!
SB-GM-COCREW2G/10TW3 INSTR_SKU# 011474
Location / OEM
Speaker Size
Suggested JL Audio Speaker Models
Coaxial Models Component Models
Front Doors /
6 x 9-inch
C1-690x, C1-690tx,
C2-690tx, C5-650x
(1)
C1-690, C3-650
(1)
,
C5-650
(1)
, C7-650cw
(1,2)
Rear Doors /
6.5-inch
C1-650x, C2-650x, C5-650x
C1-650, C2-650, C3-650,
C5-650, C7-650cw
(2)
1 - Installatio n may require adaptor, 2 - Compon ent woofer only
®
 Loading...