

Page 1
We love that you are rocking JLab Audio!
We take pride in our products and fully stand behind them.
A
C
F
T
S
I
I
O
T
A
S
30
G
DAY
U
E
A
T
R
N
A
N
O
E
D
Y
E
E
T
I
M
I
L
W
A
T
R
N
R
A
GRAVITY WIRELESS
NECKBAND ADAPTOR +
EARBUDS
A
B
S
.
E
S
D
.
U
C
U
S
T
O
M
U
E
S
R
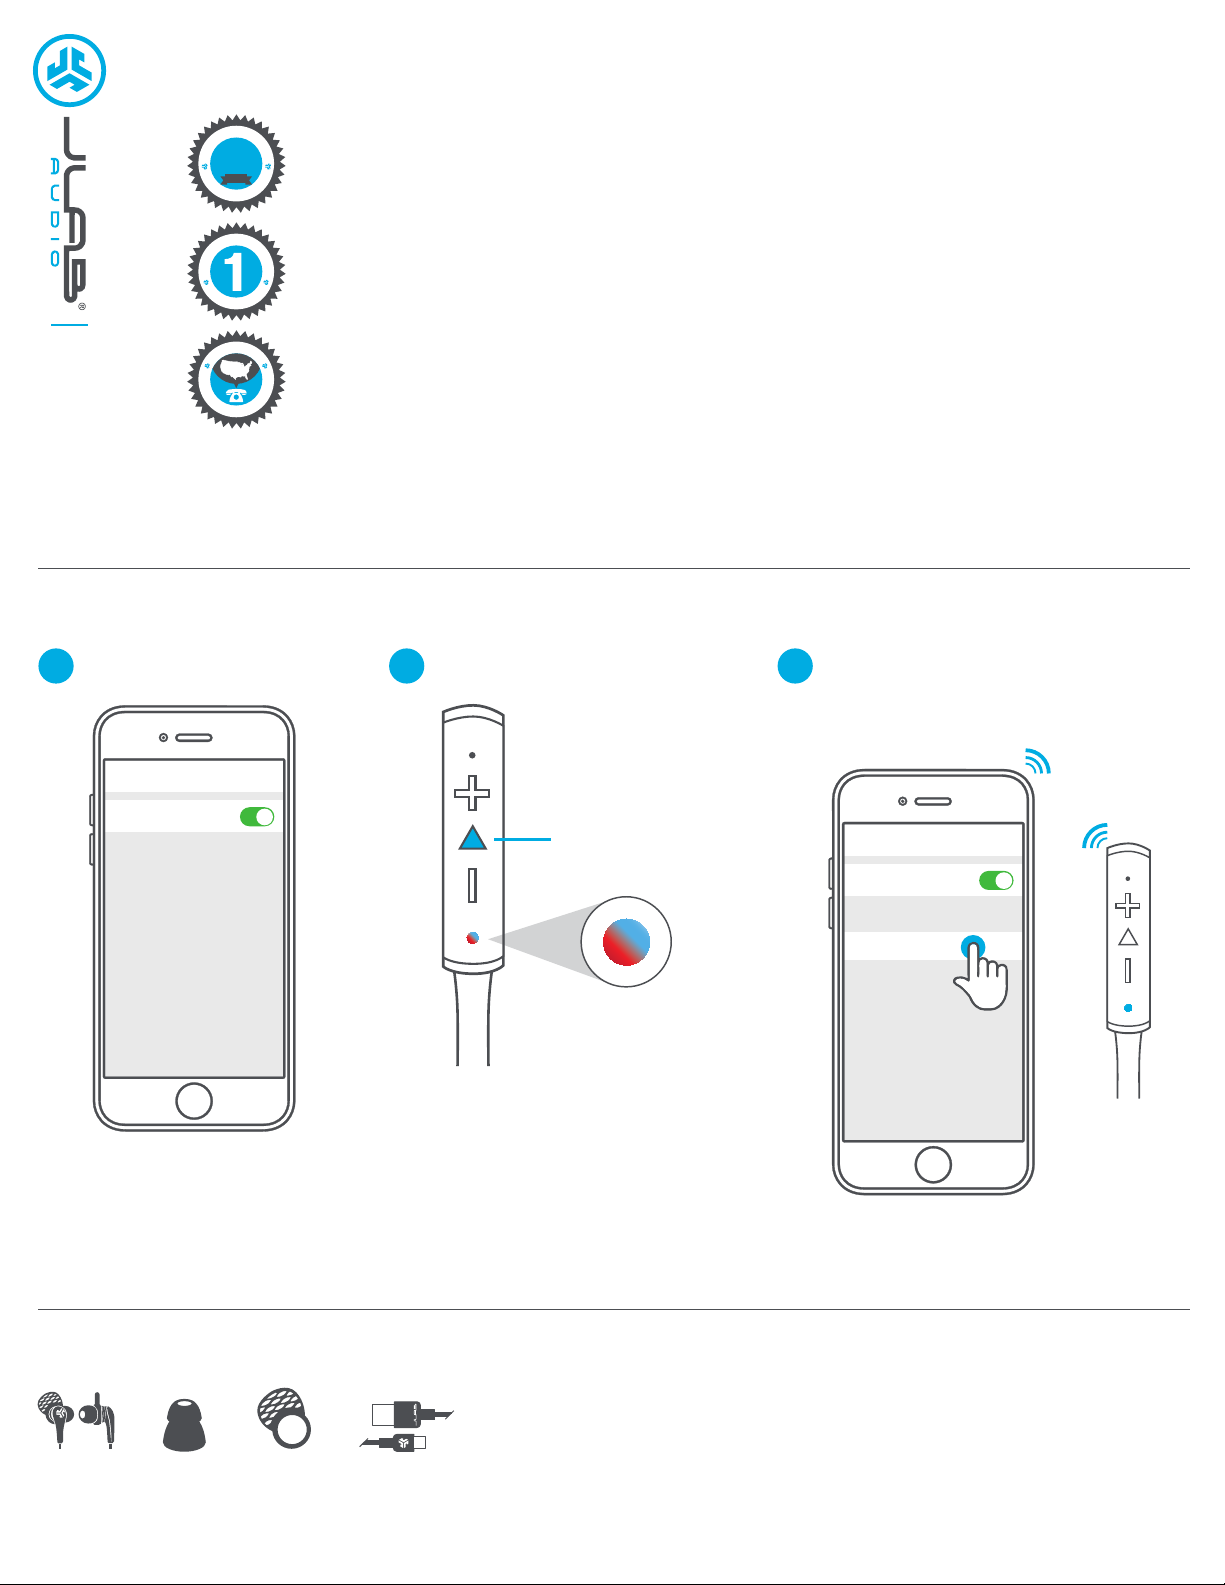
FIRST TIME SETUP: BLUETOOTH PAIRING
YOUR SATISFACTION IS GUARANTEED
N
You may exchange or return merchandise within 30 days of the purchase date.
E
Learn more at jlabaudio.com/guarantee
YOUR WARRANTY
A
R
You may register your product at jlabaudio.com/register. All warranty claims are subject to JLab Audio
Y
authorization and at our sole discretion. Retain your proof of purchase to ensure warranty coverage.
CONTACT US
T
R
Reach out to us at [email protected] or visit jlabaudio.com/contact
O
P
P
Turn on the Bluetooth
1
in your device settings.
Select “JLab Gravity” in your
32
device settings to connect.
Light will slow blink blue
Press and hold Play
when Bluetooth is paired.
Button for 10 seconds.
Settings
Bluetooth
Release.
Light will blink red
and blue to indicate
Settings
pairing mode.
Bluetooth
JLab Gravity
RECURRING USE
Once JLab Gravity has initially paired to your device, the earbuds will auto-connect to your Bluetooth device when powered back ON.
(Follow BUTTON FUNCTIONS instructions)
ACCESSORIES
JBUDS PRO
EARBUDS
3 TIP
SIZES
2 CUSH FIN
SIZES
™
MICRO USB
CABLE
Page 2
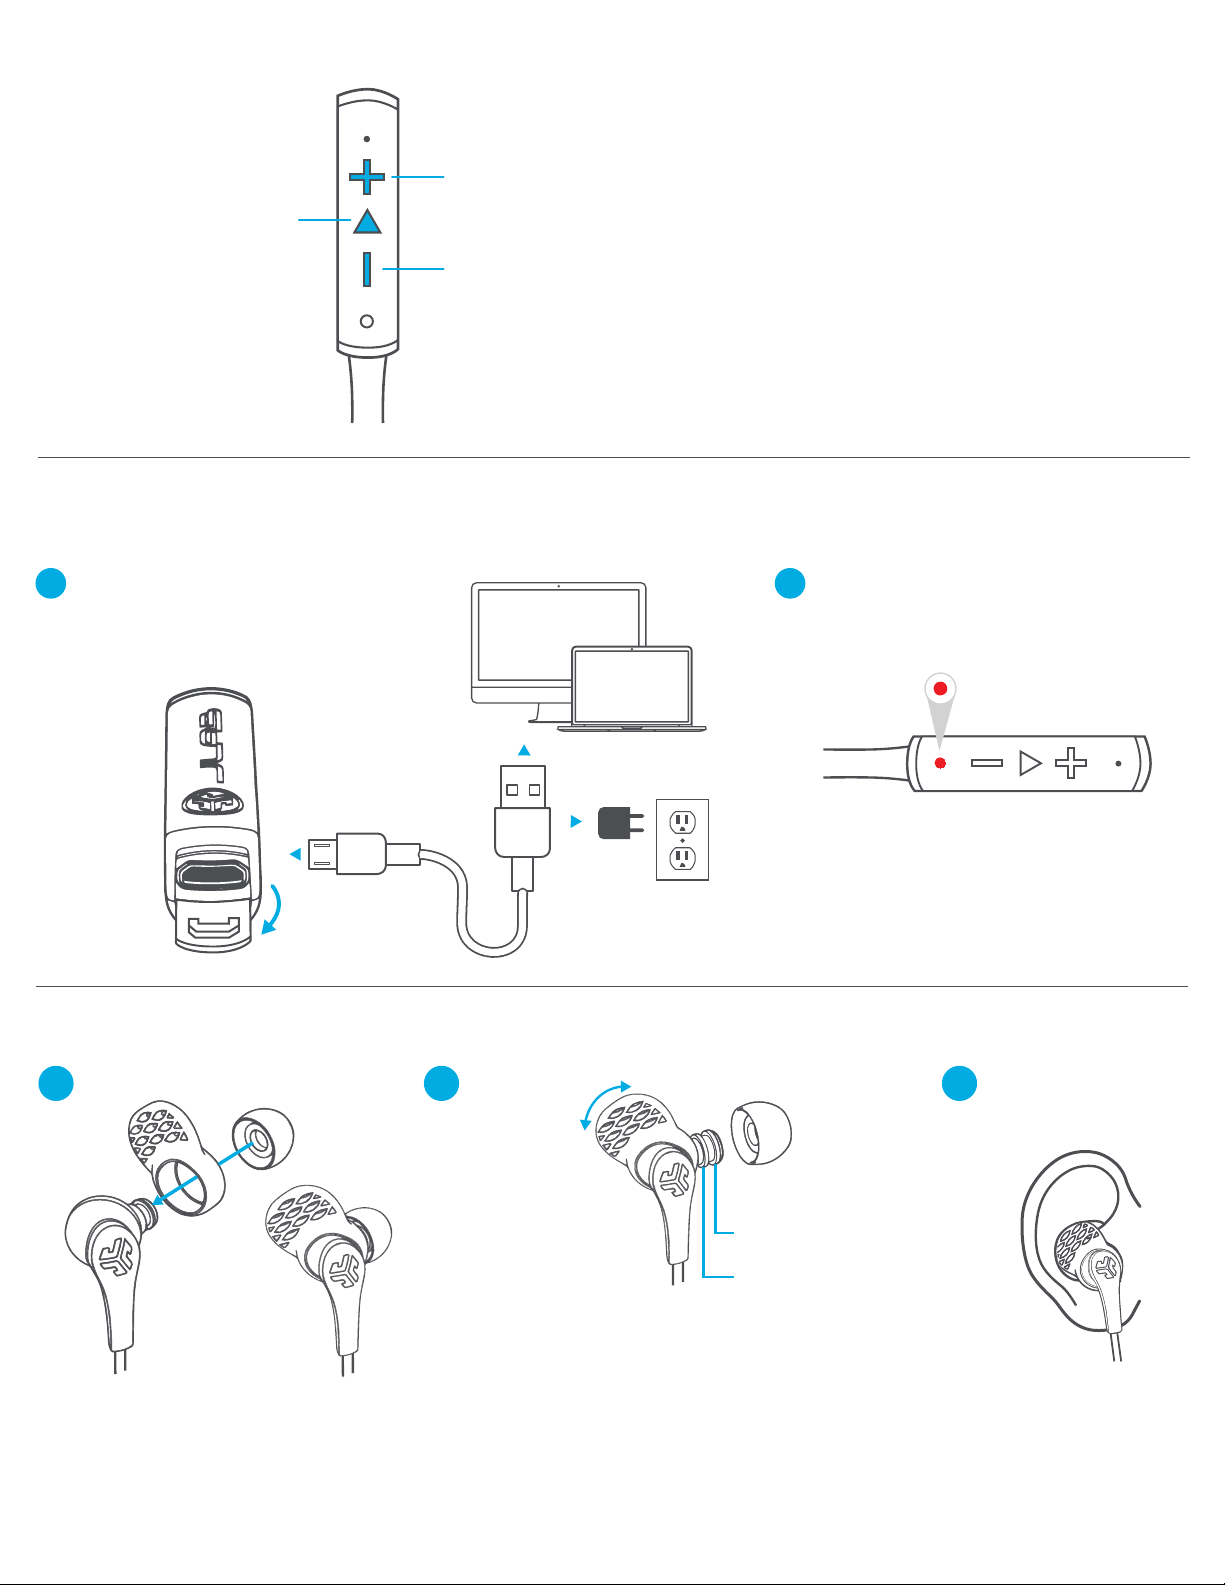
BUTTON FUNCTIONS VOICE PROMPTS
POWER ON / OFF:
Click and hold 3 seconds.
PLAY / PAUSE
ANSWER / HANG UP:
Click once.
ACTIVATE SIRI (iOS) OR
“OK GOOGLE” (ANDROID):
Click twice.
BLUETOOTH PAIRING:
(Follow First Time Setup)
VOLUME UP:
Click once.
TRACK FORWARD:
Click and hold 2+ seconds.
VOLUME DOWN:
Click once.
TRACK BACKWARD:
Click and hold 2+ seconds.
CHARGING
Note: For optimum performance, charge overnight with Micro USB cable prior to using.
Open USB door and connect the cable to a
1
computer or USB power source to charge.
Make sure the charging source is rated at
5v or less.
“HELLO”
Power is ON
“READY TO PAIR”
JLab Gravity is ready to connect
to your Bluetooth device.
“YOU’RE CONNECTED”
JLab Gravity is connected to your
Bluetooth device and ready for use.
“GOODBYE”
Power turning OFF
BATTERY VOICE PROMPT:
“Battery Full” = 100-75%
“Battery Medium” = 75-25%
“Low Battery” = less than 25%
Light will turn solid red when charging
2
and turn off when fully charged.
FITTING
1
EARBUD
Using included JBuds Pro earbuds.
CUSH FIN™
EAR TIP
Rotate
Cush Fins™
to desired
position.
Move ear tip
to desired
position.
ATP (ADVANCED
TIP PLACEMENT)
POSITION 1:
Snug, Deeper Fit
POSITION 2:
Relaxed, Shallow Fit
Try various ear tips
32
and Cush Fins™
to find the best fit.
Page 3
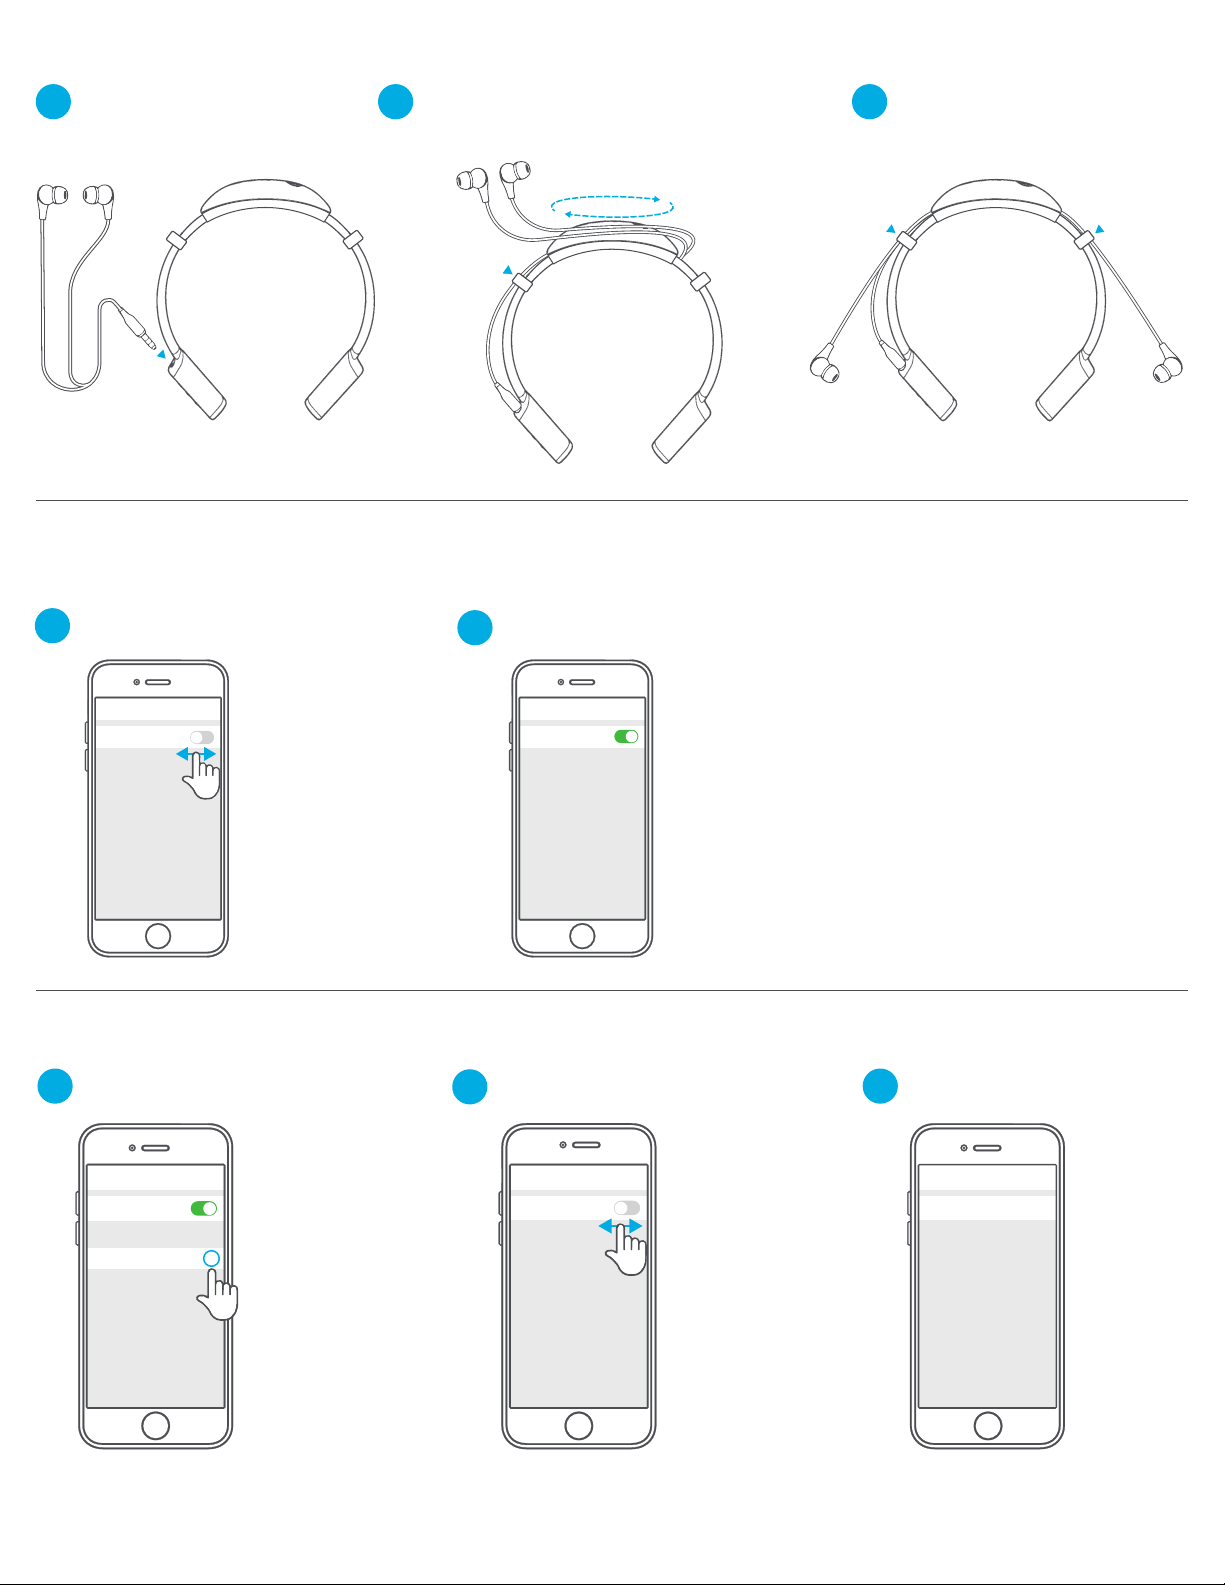
CABLE MANAGEMENT SYSTEM
Insert earbuds into earbud jack. Wrap cord around Cable Management System. Adjust cord to desired length.
1 2 3
CONNECTION TROUBLESHOOTING
I DO NOT SEE JLAB GRAVITY IN MY DEVICE
Turn Bluetooth off and then
1
back on in device settings.
Settings
Bluetooth
If you still do not see JLab Gravity,
2
repeat FIRST TIME SETUP: BLUETOOTH PAIRING directions.
Settings
Bluetooth
JLAB GRAVITY DOES NOT RECONNECT TO MY DEVICE AFTER POWERING ON
In device settings,
1
forget the JLab Gravity.
Settings
Bluetooth
Turn Bluetooth off then
2
back on in device settings.
Settings
Bluetooth
Repeat FIRST TIME SETUP:
3
BLUETOOTH PAIRING directions.
Settings
Bluetooth
JLab Gravity
i
Page 4
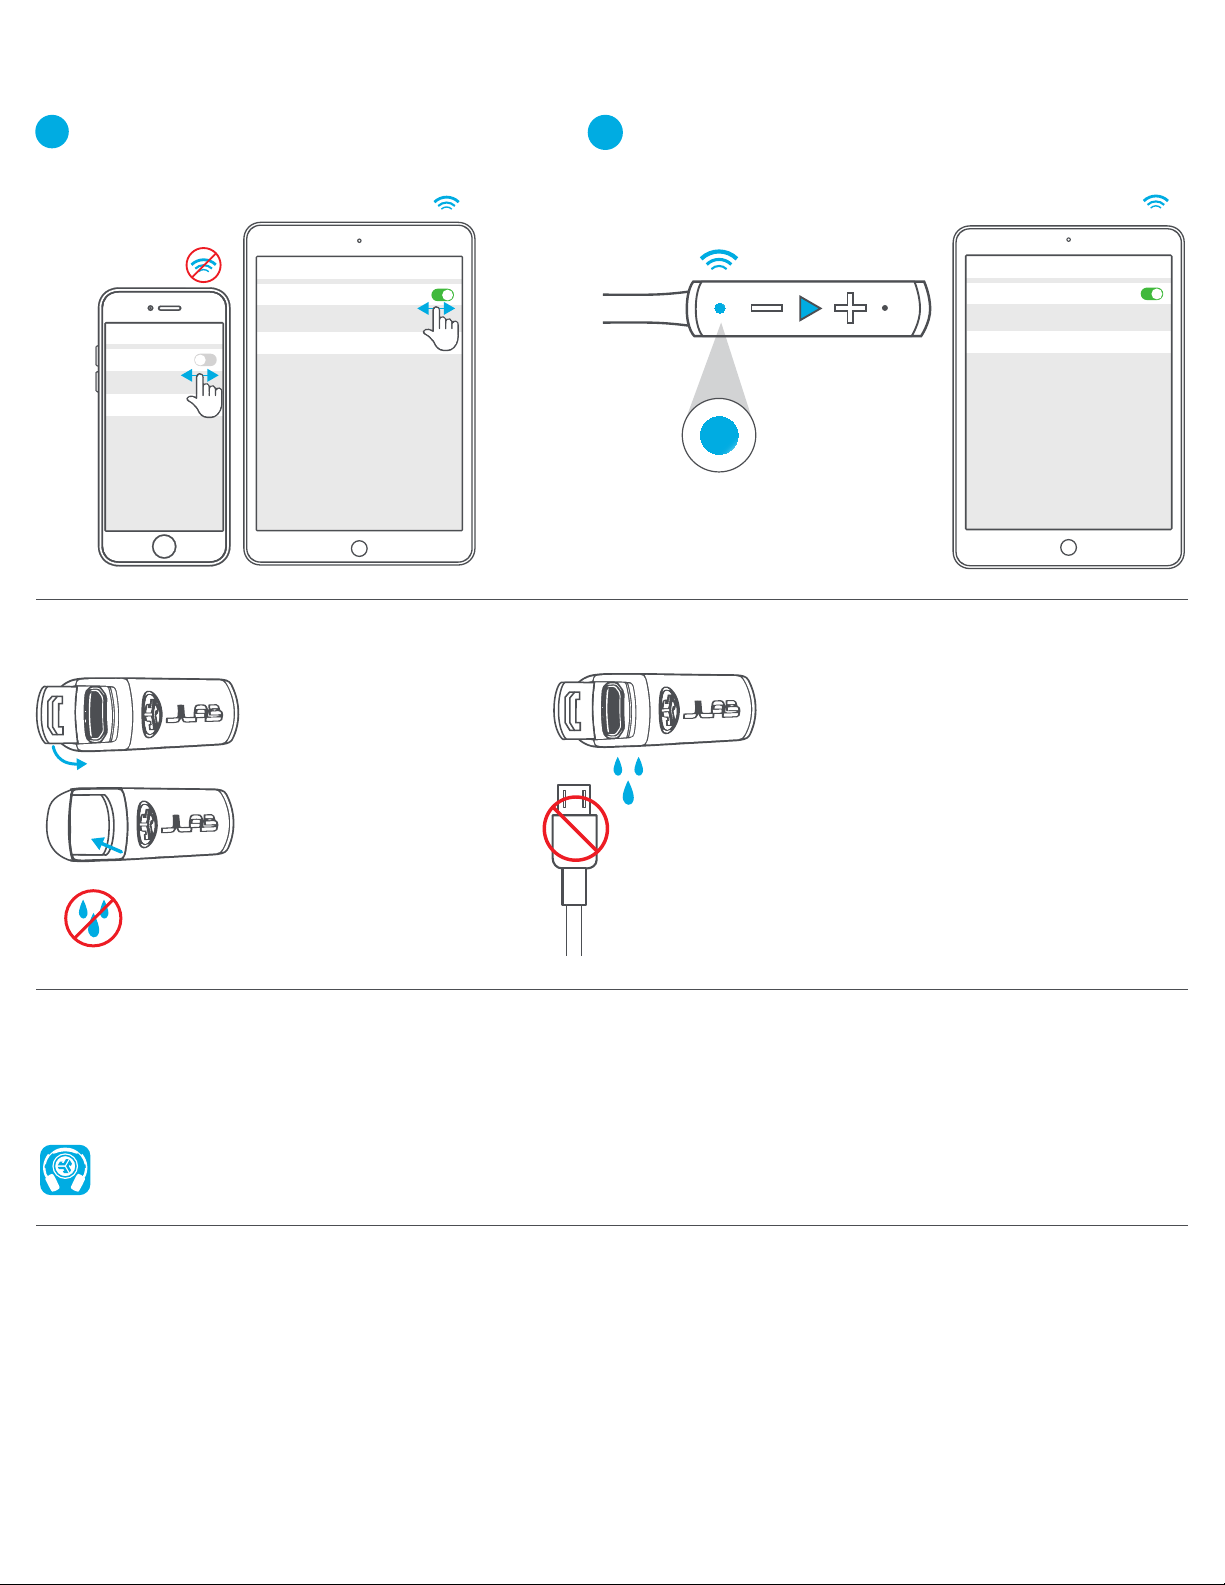
BLUETOOTH IS CONNECTING TO AN UNWANTED DEVICE
Note: The JLab Gravity can remember up to 8 devices. It will try to auto-connect to last device used.
If you have more than one device that was connected
1
to JLab Gravity, turn OFF Bluetooth on unwanted
devices and turn ON Bluetooth on chosen device.
Settings
Bluetooth
Settings
Bluetooth
JLab Gravity
JLab Gravity
JLab Gravity
WARNING
Make sure USB door
is closed and fastened.
This will protect against
sweat and water damage.
Power ON Gravity Neckband. Light will slow blink blue
2
2
and Bluetooth should auto-connect to your device.
If this does not occur, follow FIRST TIME SETUP:
BLUETOOTH PAIRING directions.
Settings
Bluetooth
JLab Gravity
Before charging, the JLab Gravity
earbuds need to be fully dry.
If there is any exposure to moisture,
the internal components may become
damaged.
Best practice is to air dry before charging.
WARM-UP YOUR HEADPHONES
Optional: Burn-in is the process for exercising new audio equipment. We recommend 40 hours of burn-in time for most headphones to reach
optimal performance. The main purpose of the process is to loosen the diaphragm of a newly crafted headphone and to stress the headphone
driver. Normal, everyday use can also burn-in the headphones though JLab’s proprietary burn-in provides an ideal mix of sounds and
frequency sweeps to achieve this.
Burn-in your audio equipment with the JLab Audio app available on the App Store and Google Play.
Or access the burn-in method at: jlabaudio.com/burnin
CAUTIONS
• Avoid getting moisture or liquids into the tip of the earbuds
or charging port.
• Avoid extreme heat, cold, and humidity.
• Avoid dropping or crushing the earbuds, stressing the cable by rapid
pulling or extreme force, or bending the cable at a sharp angle.
• Wax may build up in the earbud tips, lowering the sound quality.
Carefully remove the wax with a cotton swab or other small tool to
improve the sound quality.
• If you experience discomfort or pain, try lowering the volume
or discontinuing use temporarily.
• If you experience regular discomfort while using this product,
discontinue use and consult your physician.
• We recommend you treat your earbuds as you would a nice pair
of sunglasses and keep them in safe location when not in use.
JLABAUDIO.COM
 Loading...