

Page 1
INSTALLATION
INSTRUCTIONS
517-278-1226 • [email protected] • www.jksmfg.com
491 W. Gareld Avenue, Coldwater, MI 49036
Product: Adjustable Trackbar
Part Number: JKSOGS125 - JKSOGS126
Welcome
CONGRATULATIONS on purchasing a new Adjustable Trackbar from JKS Manufacturing. We are committed to providing you with the best products avail-
able and your satisfaction is our rst priority.
PLEASE READ these Installation Instructions carefully, and save them for future reference, as they contain
important installation and maintenance information.
Important
NOT COMPATIBLE WITH right hand drive
vehicles.
CHECK TORQUE SPECIFICATIONS regularly.
Tools Required
Metric/Standard Socket Wrench Set
Torque Wrench
Tie Rod End Remover *
Tape Measure
1-1/2” Open-End Wrench
9/16” Drill Bit
Flat Metal File *
Heavy Duty Ratchet Strap *
Anti-Seize Lubricant
Grease Gun with Zerk Fitting Coupler
Wheel Bearing Grease
* Asterisk denotes tools that are not required for some applica-
tions. Thoroughly read instructions rst to determine which tools
will be required for your application.
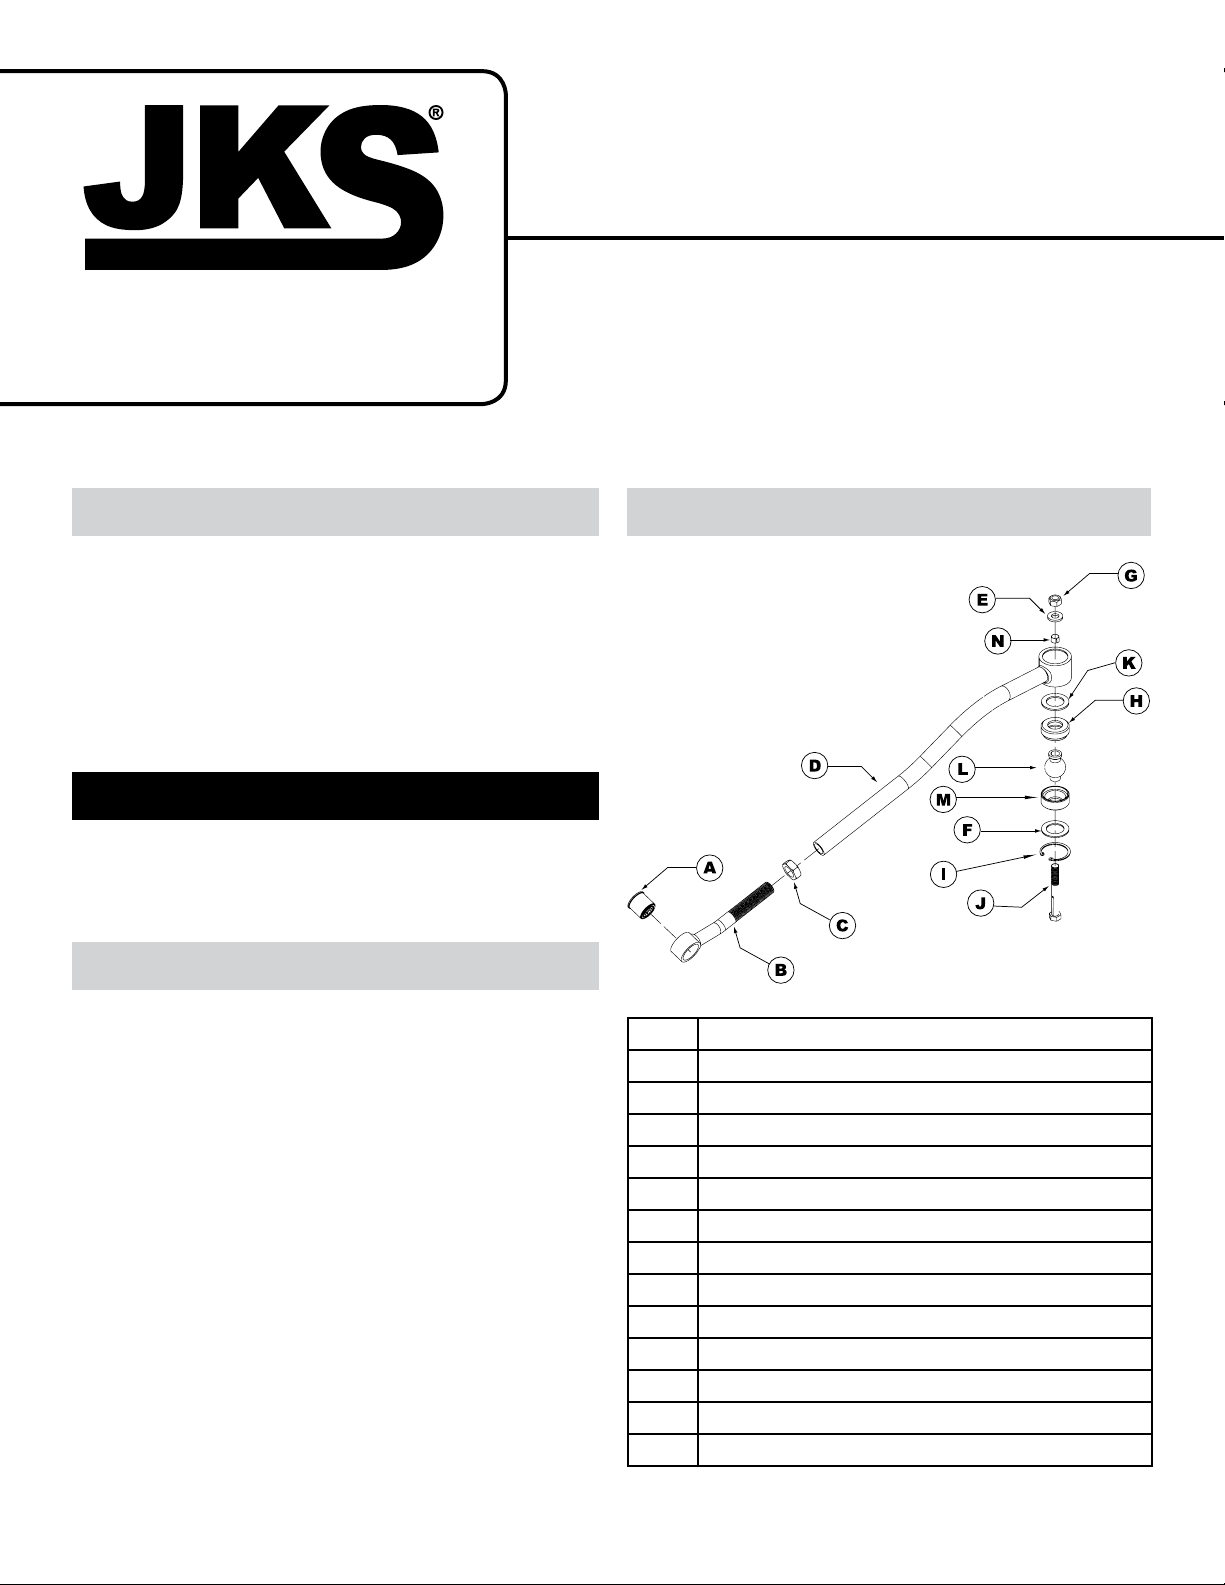
Parts
A
OE Rubber Bushing
B
Male Threaded (Axle) End
C
1” NF Jam Nut
D
Female Threaded (Chassis) End
E
9/16” SAE Flat Washer
F
Preload Washer
G
9/16” NF GR8 Ovalok Nut
H
Polyurethane Bushing
I
Snap Ring
J
9/16” x 4-1/2” GR8 Greaseable Bolt
K
Preload Washer
L
2.5” Johnny Joint Ball
M
Polyurethane Bushing
N
Tapered Split Cone
JKSOGS125 - J KS OGS126JKS Adjustable Trackbar Installation
Page 1
Page 2
Installation
1. REMOVE ORIGINAL EQUIPMENT
(OE) FRONT TRACK BAR
Remove front track bar and mounting hardware
per the factory service manual instructions for
your vehicle. HI N T: If difcult to remove, use
universal puller tool to separate OE track bar ball
stud from chassis rail bracket.
2. MOUNT ADJUSTABLE TRACKBAR TO
CHASSIS BRACKET
Using a 9/16” drill bit, enlarge the tapered mount-
ing hole in the chassis rail bracket located on the
driver-side of the vehicle.
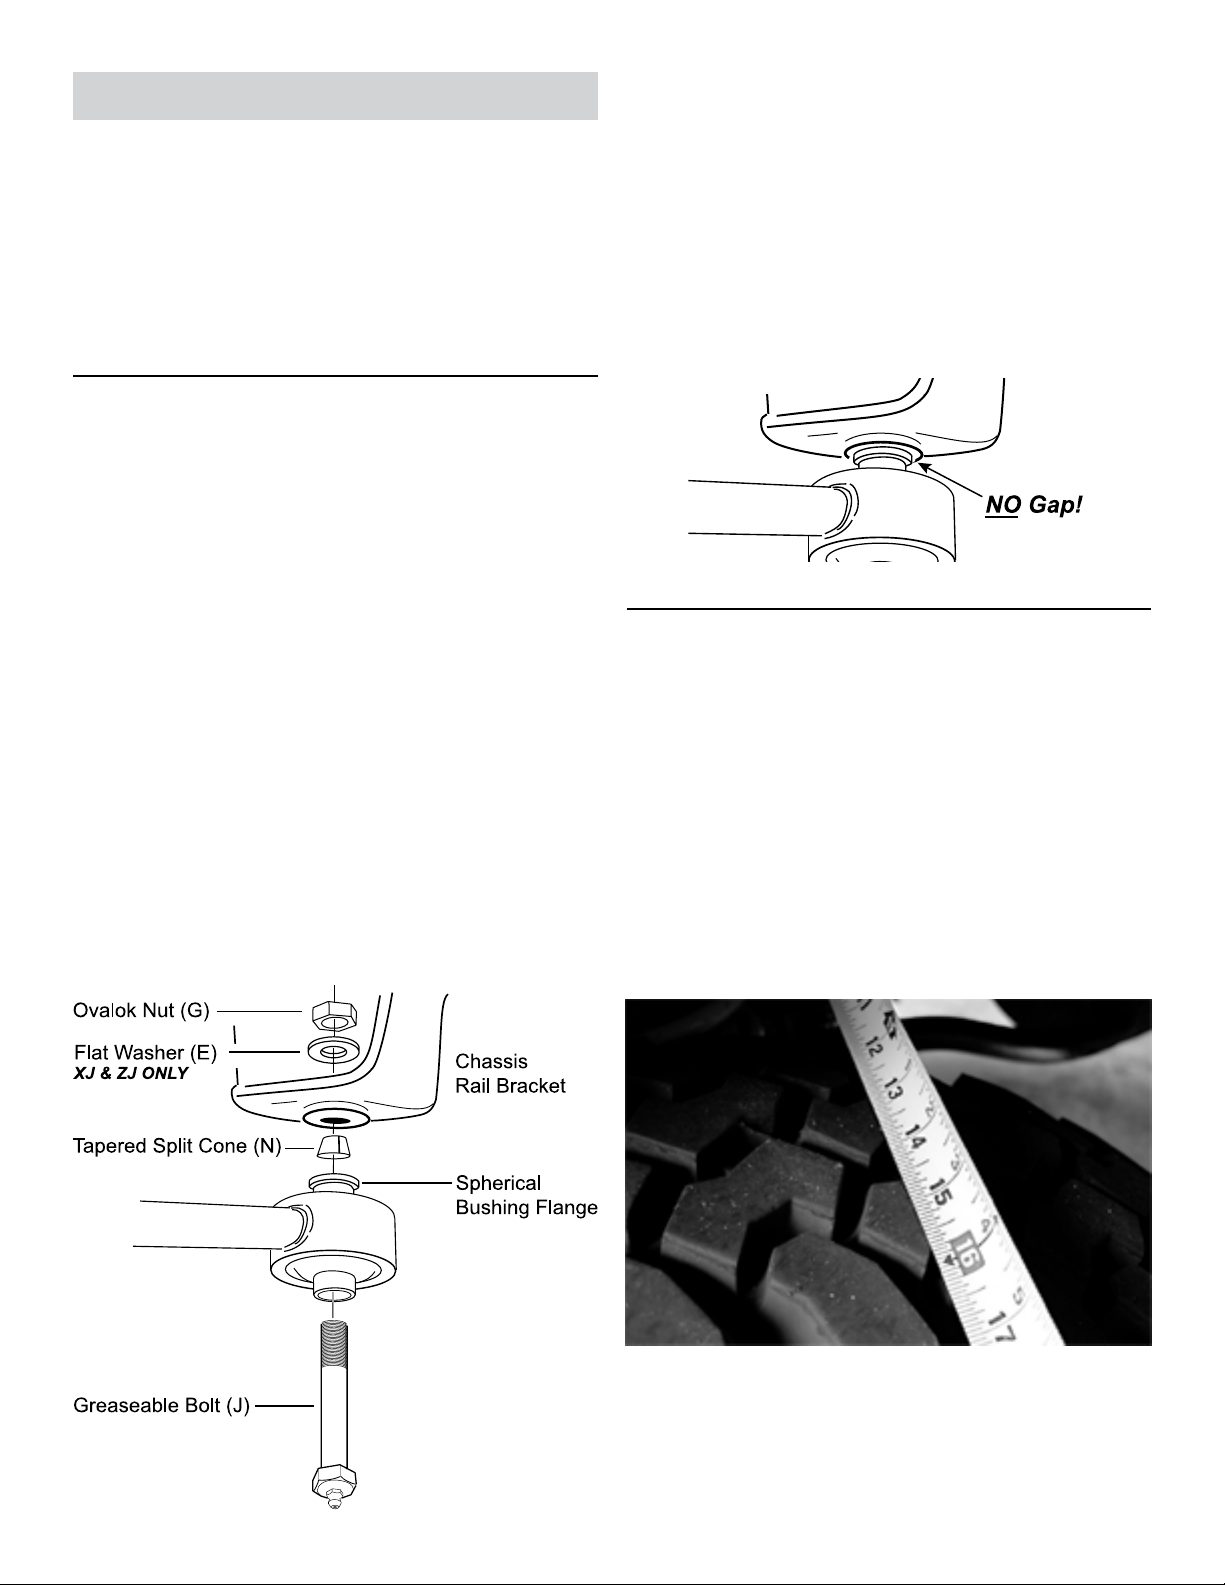
Locate Chassis End (D) of Adjustable Trackbar
and insert the 9/16” x 4-1/2” Greaseable Bolt (J)
through the Johnny Joint spherical bushing (L).
Place the Tapered Split Cone (N) over the bolt
threads with the narrow end facing away from the
trackbar.
Apply anti-seize lubricant to bolt threads.
Mount chassis end of Adjustable Trackbar to chas-
sis rail bracket by inserting the
9/16” x 4-1/2” Greaseable Bolt (J) upwards into en-
larged hole. Secure with 9/16” Flat Washer – only
if required – (E) and 9/16” Ovalok Nut (G).
IMPORTANT: Flat Washers are supplied for use with
1984-01 Cherokee XJ and 1993-1998 Grand Cherokee
ZJ models ONLY. Do NOT use Flat Washer on Wrangler TJ models.
HI N T: Tapered Split Cone (N) should be located between
ange of spherical bushing (L) and mounting surface of
chassis rail bracket, with the narrow end of tapered cone
facing up towards chassis.
Tighten 9/16” x 4-1/2” Greaseable Bolt (J) to 110
ft-lb. using a torque wrench.
IMPORTANT: The upper ange of spherical bushing
must t ush against the chassis rail bracket. If any
gap exists, it will be necessary to le the bottom edge
of the Tapered Split Cone until completely ush with
bottom of chassis rail bracket.
3. CENTER FRONT AXLE HOUSING
The front axle housing must be in perfect lateral alignment with vehicle chassis before Adjustable Trackbar
installation can be completed.
Before you center the axle housing, make sure the
vehicle is at normal ride height, on level ground,
with the suspension supporting the full vehicle
weight.
Determine if the axle housing is centered by mea-
suring the distance between the tire and chassis,
using the exact same points on each side of the
vehicle to ensure accuracy.
2 Page
HI N T: For example, measure from the edge of a tire tread
lug to the outboard side of the chassis, then repeat the
measurement on the other side of vehicle using the exact
same points.
JKSOGS125 - J KS OGS126
JKS Adjustable Trackbar Installation
Page 3

If the two measurements are equal, the axle is
centered. If the measurements vary, divide the
difference in half to determine the amount of adjustment required. HINT: If the axle housing is not
centered, the chassis can be laterally shifted using
either of the following methods.
Ratchet Strap (preferred)
 Attach a heavy duty ratchet strap to the chassis on
one side of the vehicle, and to the axle housing on
the other side.
 Tighten the strap in small increments to pull the
chassis in alignment with the axle.
 Take measurements after each adjustment until
centered.
Steering Wheel
 Have a partner turn the steering wheel in small in-
crements to shift the vehicle chassis side-to-side.
 After each adjustment, have your partner hold the
steering wheel steady while you take measurements.
4. SET ADJUSTABLE TRACKBAR
LENGTH AND MOUNT TO AXLE
IMPORTANT: The length of the Adjustable Trackbar
must be set with axle housing perfectly centered and
the vehicle at normal ride height.
With the axle housing centered beneath the chas-
sis, adjust the length of Adjustable Trackbar by rotating the axle end until the rubber bushing aligns
with the mounting holes on the axle bracket.
Install Axle End (B) of Adjustable Trackbar to the
axle bracket by securing with the original mounting
bolt and ag nut. Apply anti-seize lubricant to bolt
threads.
Take measurements again to ensure axle housing
is perfectly centered and make any nal adjustments if necessary.
Check the Chassis End (D) of Adjustable Trackbar
to ensure it is aligned with the chassis rail bracket.
If necessary, rotate fore/aft until the space between the trackbar and chassis rail bracket is
even.
IMPORTANT: The Chassis End of Adjustable Trackbar
must be in the “neutral” position (as illustrated above)
before the Jam Nut is tightened.
Once all adjustments are complete, fully tighten
the Jam Nut (C) to prevent Adjustable Trackbar
length from changing. HINT: It may be easier to
tighten Jam Nut with the Adjustable Trackbar removed from the vehicle.
Tighten original mounting bolt on axle bracket to
50 ft-lb. using a torque wrench.
5. LUBRICATE ADJUSTABLE TRACKBAR
Lubricate the 9/16” x 4-1/2” Greaseable Bolt (J) at
the chassis end of Adjustable Trackbar using common wheel bearing grease or equivalent.
Maintenance
Re-torque fasteners after driving 150 miles. Continue
to check torque specications as part of regular ve-
hicle maintenance routine.
The chassis end of the Adjustable Trackbar features a
spherical polyurethane bushing which is both greaseable and rebuildable. Lubricate the bushing via the
9/16” x 4-1/2” Greaseable Bolt (J) regularly as part of
vehicle maintenance schedule.
Regular cleaning with pressurized water is recommended to maximize ease of operation and reliability.
Always lubricate afterwards to evacuate any moisture.
©2013 JKS Manufacturing, Inc & Aftermarketing, LLC
Revision Date 10/31/2013
JKSOGS125 - J KS OGS126JKS Adjustable Trackbar Installation
Page 3
 Loading...