

Page 1
Warranty
The model RemoteAmp Three is covered by a 2
year warranty to be free from defective
workmanship and materials. In the event that the
RemoteAmp Three needs repair, you must call us
to get an authorization, and then carefully pack and
ship it to us. You will pay for shipping to us and we
will pay for return back to you, UPS ground. No
free repairs will be made if the defect was caused
by misuse, weather conditions, or other cause,
except for defective workmanship or materials.
THERE ARE NO EXPRESSED OR IMPLIED
WARRANTIES WHICH EXTEND BEYOND THE
WARRANTY HERE MADE.
07/09
JK Audio, Inc. 1311 E 6th Street, Sandwich, IL 60548 USA
Voice: (815) 786-2929 Toll Free: 800-JK-Audio
Fax: 815-786-8502
info@jkaudio.com www.jkaudio.com
Copyright © 2009 JK Audio, Inc. All rights reserved.
RemoteAmp Three
Portable Headphone Amplifier
User Guide
JK Audio
Page 2

Introduction
JK Audio combines professional audio electronics in
a rugged new belt pack design. RemoteAmp Three
provides a listen only connection for IFB or full
bandwidth audio monitoring. The XLR line level input accepts either a balanced mono signal or a one
or two channel party line intercom feed (listen-only).
The XLR source switch selects between balanced
input and intercom monitoring.
An integrated speaker is disabled when headphones
or earphones are connected. There are separate
volume controls for 2 channel party line monitoring.
The high output 1/4” headphone jack will cut through
any crowd noise. Connect a mono IFB earpiece or
stereo headphones to the 3.5 mm earpiece jack.
RemoteAmp Three contains a headphone
amplifier that is more powerful than a
consumer product. JK Audio products are
designed for the broadcast industry.
The broadcast professional must be able to hear
headphone signals over the ambient noise level.
From the cheering crowd at a football game to trackside at a car race, the program material or cues
must be heard at high volumes without distortion.
2
Notes
15
Page 3

Notes
Table of Contents
Introduction . . . . . . . . . . . . . . . . . . . . . . . . . . 2
Features
Front . . . . . . . . . . . . . . . . . . . . . . . . . 4-5
Rear . . . . . . . . . . . . . . . . . . . . . . . . . . 6-7
Power Options . . . . . . . . . . . . . . . . . . . . . . . . 8
Jumper Settings . . . . . . . . . . . . . . . . . 9
FAQs . . . . . . . . . . . . . . . . . . . . . . . . . . . . . . . 10-11
Block Diagram . . . . . . . . . . . . . . . . . . . . . . . . 12
Specifications . . . . . . . . . . . . . . . . . . . . . . . . . 13
Warranty . . . . . . . . . . . . . . . . . . . . . . . . . . . . . 16
14
3
Page 4

Features—Front
1 2 3
Specifications
Input:
Female XLR: Line level, balanced
0 dBu nom
4
5
6
20 k ohms impedance
Outputs:
1/4” Headphone: Stereo, 8 ohms impedance,
1/2 W per channel
3.5 mm Earpiece: Stereo, 16 ohms impedance
250 mW per channel
Frequency Response: 50 Hz - 20 kHz
Size: 4.7” x 3.75” x 1.65”
(12 x 9.5 x 4.2 cm)
Weight: 10 ounces (275 grams)
Note: While RemoteAmp Three was designed to
be very rugged and durable, it is not waterproof and
care should be taken to keep the unit dry.
4
13
Page 5

Block Diagram
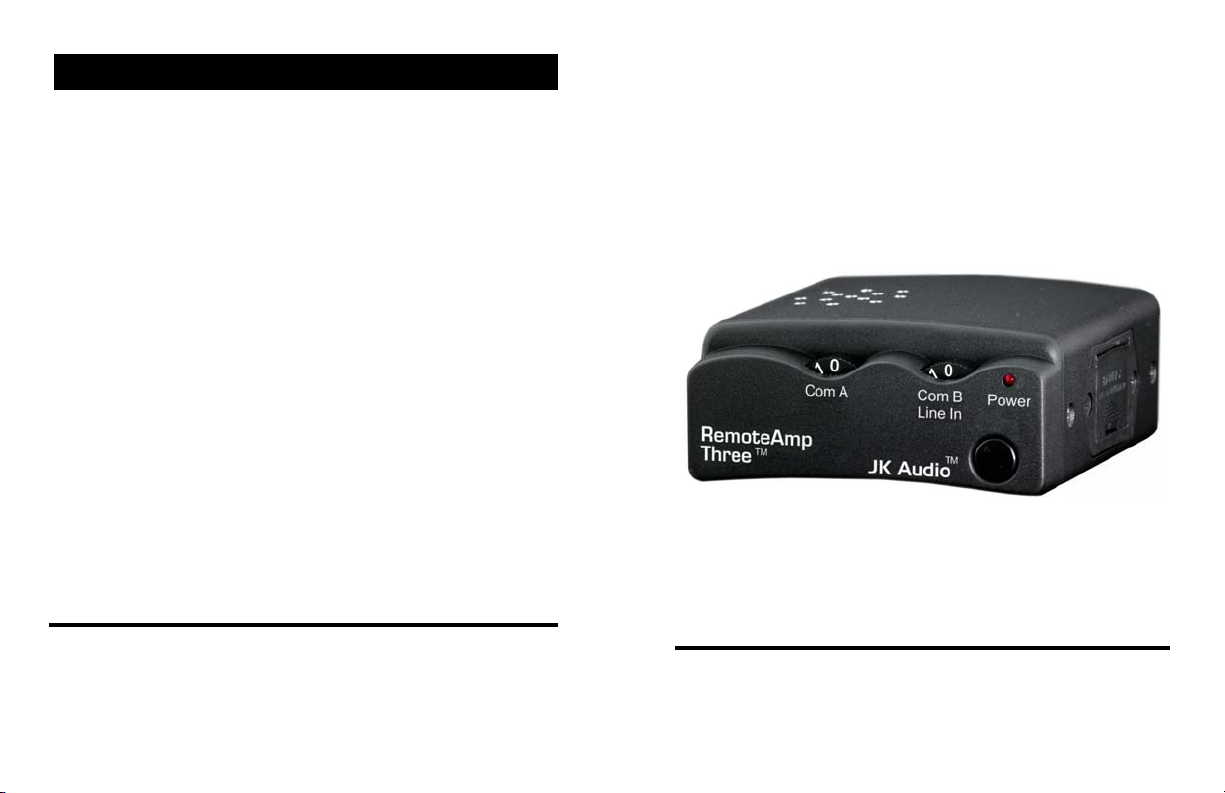
Features—Front
1. This built-in speaker lets you hear audio without connecting headphones.
2. This control will adjust the level of audio from
Channel A of the XLR Line In jack when the
selector switch is in the Intercom position.
3. This will adjust the audio level from Channel B
of the XLR input jack when the selector switch
is in the Intercom position or when you have a
balanced audio signal on the XLR and the
switch is in the Balanced Line Input position.
4. This red LED indicates when the power is
turned on.
5. Press this Power button in to activate the unit.
Press again to turn the unit off.
6. Power will be drawn from this 9 volt battery
automatically if the intercom line input does not
supply sufficient power. The battery will also be
used if both jumpers J3 and J5 have been
removed (see pages 8-9).
12
5
Page 6

Features—Rear
FAQs
7. Connect your stereo headphones to this high
output 1/4” headphone jack.
8. Connect your stereo earpiece to this 3.5 mm
output jack.
9. This switch will select whether the XLR Input
will come from a one or two channel intercom
system or from a balanced line input.
10. Connect the output of your audio console or
your intercom system to the XLR Input jack.
This input is line level only and is not suitable
for a microphone.
? My intercom system has its own power
supply. Will that damage the RemoteAmp
Three?
! No, the XLR jack on your RemoteAmp Three is
capacitively coupled so it is safe to connect to
powered intercom lines.
If your party line system supplies voltage on
either pin 2, pin 3 or both pins and you have the
jumper installed in either position J3 or J5 as
described on page 8, the intercom supply voltage will power the RemoteAmp Three. If your
intercom system does not supply sufficient voltage or the jumper has been removed, the RemoteAmp Three will draw power from the 9V
battery.
? Can I use both headphone jacks at the same
time?
! Yes, you can use the 1/4” Headphone jack and
the 1/8” Earpiece jack simultaneously. When
you connect either headphone, the integrated
speaker is disabled.
6
11
Page 7

FAQs
? Can I connect a microphone to the XLR in-
put jack?
! No, this input is line level only. You will need to
connect your mic to a mixer or preamp first.
? Can I connect the RemoteAmp Three to any
intercom unit?
! This headphone amplifier works well as a lis-
ten-only beltpack when connected to most 3 pin
XLR party line intercom systems such as ClearCom®, RTS™ TW, Audiocom® or other compatible intercom systems.
? How long will the battery last?
! Based on our tests with the RemoteAmp Three,
a standard alkaline battery should last for about
20 hours under normal use. Lithium batteries
can significantly increase the battery life, but at
a higher cost. As an indicator of low battery, the
red Power LED will grow dim and then extinguish a short while before the battery is completely exhausted and the unit shuts down.
Features—Rear
7 8 9
10
10
7
Page 8

Power Options
Jumper Settings
RemoteAmp Three was designed to be compatible
with most 3 pin XLR party line intercom systems
such as ClearCom®, RTS™ TW or Audiocom® or
other similar intercom systems. Many of these intercom systems provide power on either pin 2 or pin 3
of the XLR jack that can be used to operate a personal beltpack unit.
RemoteAmp Three has an internal jumper that can
be configured so this beltpack device can take advantage of that power when it is available. This unit
will draw power from a 9 V battery if power from the
intercom system is not available or is insufficient.
Please refer to the specifications for your intercom
system to determine where to set the jumper in the
RemoteAmp Three. Placing the jumper across J3
will draw power from Pin 3 of the XLR jack. Placing
the jumper across J5 will draw power from Pin 2 of
the XLR. Removing the jumper entirely will force the
RemoteAmp Three to draw power only from the 9V
battery.
The default jumper position is to have J5 closed. To
change the jumper or to remove it, you will need to
disassemble the RemoteAmp Three as follows:
• Remove the battery drawer and the two screws
from the battery compartment.
• Remove the headphone nut and the two XLR
screws from the back panel.
• Remove the four front and back panel screws
from each side of the unit. *Note that the screws
on the battery side of the unit are longer than
those on the other side.
• Remove the back panel.
• Slide the battery compartment out just enough to
allow the circuit board to slide out the front of the
enclosure. The circuit board will remain connected to the front panel.
• Unplug the battery harness to allow the circuit
board to be completely removed.
Both internal jumper pins J3 and J5 are located on
the lower right corner of the printed circuit board.
8
9
 Loading...