

Page 1
JK Audio
User Guide
Interchange LTD
™
Intercom Phone Bridge + Digital Hybrid
Page 2

Interchange LTD™ Intercom Phone Bridge + Digital Hybrid
ii
Thank You
Thank you for purchasing a JK Audio Interchange LTD™ Intercom Phone Bridge.
Please read this guide for instructions on setting up and using your new product.
Getting Assistance
If you have technical or application questions:
In the US & Canada, call us toll free at: 800-552-8346
All other countries dial: 815-786-2929 (M-F 8:30-5:00pm Central Time Zone)
Email us at: support@jkaudio.com
Or, check out our FAQ section for answers to common questions.
Limited Warranty
The Interchange LTD is covered by a 2-Year Warranty to be free from defective
workmanship and materials. To obtain service, contact JK Audio by phone or
email for return authorization. Once authorized, you will carefully pack and ship
the faulty product and all accessories to us. You will pay for shipping to us and
we will pay for return back to you.
This warranty does not cover damages due to accident, weather, re, ood,
earthquake, misuse, unauthorized repairs or modications, or damages occurred
in shipping, only defective workmanship or materials.
There are no expressed or implied warranties which extend beyond the
warranty here made.
Warnings & Safety Precautions
• Read and keep these instructions.
• Heed all warnings.
• Follow all instructions.
• Clean only with a soft dry cloth.
• Do not install near any heat sources such as radiators, heat registers, stoves,
or other apparatus (including ampliers) that produce heat.
• Do not defeat the safety purpose of the three-prong grounding type plug.
If the provided plug does not t into your outlet, consult an electrician for
replacement of the obsolete outlet.
• Do not use this unit if the electrical power cord is frayed or broken. The power
cord should be routed so that it is not likely to be walked on or pinched by
items placed upon or against it.
• CAUTION! To reduce the risk of re or electric shock, do not expose
this apparatus to rain or moisture. Use only No. 26 AWG or larger
telecommunication line cord.
• Refer all servicing to qualied service personnel.
Welcome
Page 3

Contents
iii
Contents
Overview 1
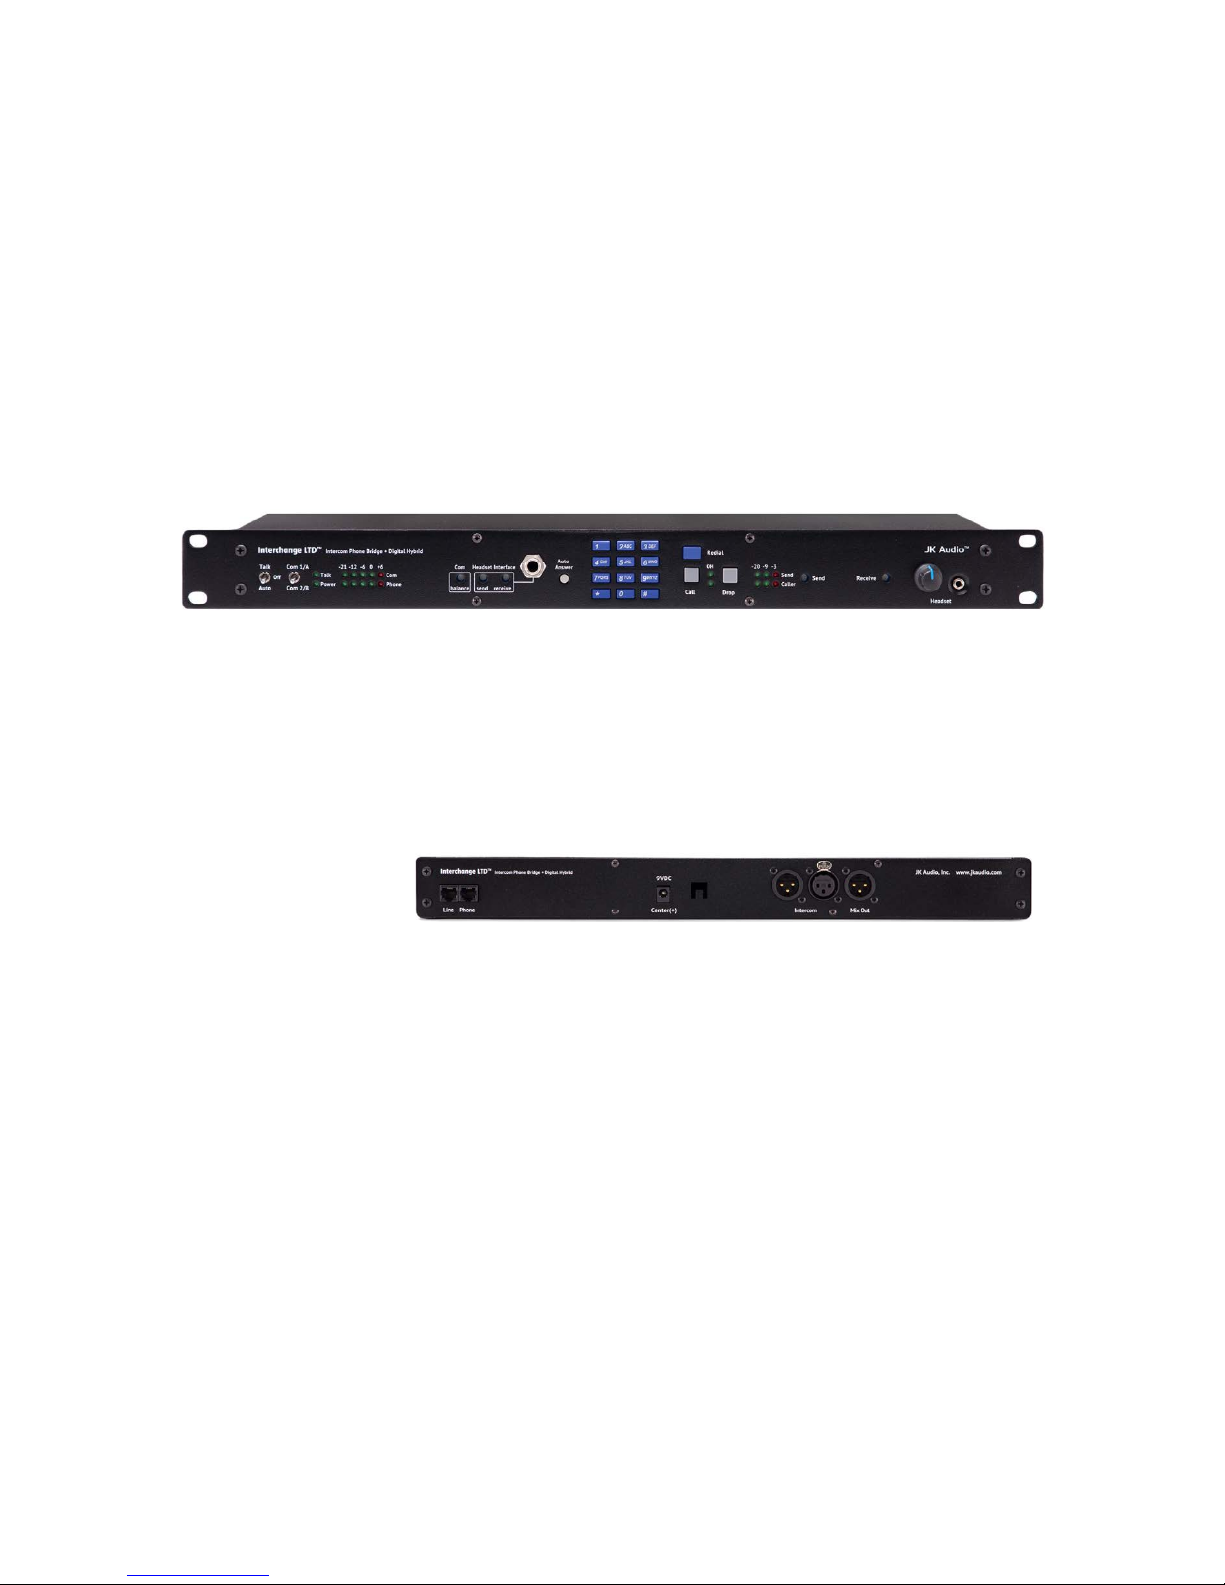
Getting to know your Interchange LTD™
2 Controls and Indicators
4 Inputs & Outputs
2
Getting Connected
5 Intercom
5 Mobile Device
6
Single Line Phone
5
Operation 6
Technical Information 8
Contents
Page 4

Interchange LTD™ Intercom Phone Bridge + Digital Hybrid
iv
Male and Female 3 Pin
XLR Intercom Loop Jacks
Male XLR Mix Line Out for Monitoring
Send and Receive LED Metering
Front Panel Screwdriver
Level Controls
Front Panel Channel Select
Front Panel Cell Phone Interface
Front Panel TRRS Monitor Headset
Jack with Volume Control
Listen Always,
Talk When Talk-Enabled
Enable/Disable Auto-Answer
16-bit DSP Technology
Front Panel Off-Hook LED
Send and Caller Signal Level LEDs
Features
Universal Power Supply
with Detachable Cord
RJ11 Phone Cord
3.5 mm TRRS Headset Interface
Cable (Part# CN113)
What’s in the Box?
Page 5

Overview
1
Introducing the Interchange LTD™
Interchange LTD allows remote access to your party-line intercom system.
This 1RU rackmount interface includes a digital hybrid for connection to
analog (POTS) phone lines. The front panel headset interface jack allows easy
connection to your wireless phone, tablet, or computer allowing remote access
through a phone call or conferencing app. The front panel DTMF keypad and
headset jack allow easy call setup.
The Listen-Always design allows both the phone hybrid and the mobile phone
headset interface to monitor the intercom just like any other belt pack. Listen
mode is a high impedance bridging tap on the intercom line. Talk mode is
enabled via a front panel switch, either Off, On, or Auto. Auto follows the phone
hybrid Auto-Answer mode.
The internal digital hybrid connects intercom audio to a standard analog
telephone line without the transmit/receive crosstalk common to analog hybrids.
Its DSP continuously monitors both the phone line and audio signals to deliver
excellent separation. This proprietary, dual-convergence echo canceller algorithm
can achieve excellent separation, typically exceeding 50 dB, without any setup
and without sending a noise burst down the line.
Ready to go?
The Interchange LTD controls and connectors are clearly marked and ready for
operation. If this is your rst exposure to a hybrid, we suggest that you read the
entire manual to allow you to take advantage of all these features.
Any Questions?
Before you pick up the phone… Please thumb through the rest of this manual.
You might nd those deep technical questions are covered on later pages.
Overview
Page 6

Interchange LTD™ Intercom Phone Bridge + Digital Hybrid
2
Getting to Know Your Interchange LTD
1 Talk Control
The position of the three position toggle switch determines when
Interchange LTD will send audio into the Party Line intercom.
Up = Talk: Interchange LTD sends and receives audio (simultaneously).
Use this position with the headset interface.
Center = Off: Interchange LTD functions as a listen-only device. No audio
will be sent into the Party Line intercom.
Down = Auto: Talk function follows the hook state of the innkeeper
Phone Hybrid.
2 Intercom Channel
Up = Audio on Intercom Channel 1/A (Pin 2)
Down = Audio on Intercom Channel 2/B (Pin 3)
3 Talk LED
Indicates audio transmission into the Party Line intercom.
4 Intercom Power LED
Indicates intercom power detected.
5 COM Level LEDs
Indicates audio signal level from the Intercom channel. The 0dB LED
corresponds to a nominal level of -10 dBu on the intercom channel.
6 Phone Level LEDs
Indicates audio signal level from the phone interface.
7 Com Balance
Fine tuning for the intercom hybrid function. Optimizes separation
between send and receive when pushing audio into the intercom with
the Talk function.
Controls & Indicators
2 5 7 10 11 12 13 15 201931
4 8 146 9 16 17 18
Page 7

Getting to Know Your Interchange LTD
3
Getting to Know Your Interchange LTD
Controls Cont’d
8 Headset Interface Send Level
Adjusts audio signal level to the mobile device.
9 Headset Interface Receive Level
Adjusts audio signal level coming from the mobile device.
10 Headset Interface Jack
Connect to the headset jack of your mobile device with supplied CN113
interface cable if no phone line is available.
11 Auto-Answer
When enabled, Interchange LTD automatically answers an incoming call
and then disconnects after the caller hangs up. Auto answer will occur on
the rst ring.
12 Numeric Keypad
Dial a number.
13 Redial
Press this button to instantly redial the last telephone number.
14 Call Button
Takes the line off-hook; press this button to answer a call or you can
direct a call from your aux phone through the hybrid.
15 OH LED
Lit when you are on line with a call (off-hook).
16 Power LED
Lit when unit is plugged in and receiving power.
17 Drop Button
Press this button to drop (hang up) a call.
18 Signal LEDs
Send LEDs represent the signal level going out to the telephone line.
Caller LEDs represent the signal level coming from the phone line,
after the DSP.
19 Send and Receive Level
Adjusts the audio signal that you are sending down the telephone line and
the level of the incoming caller’s audio as it is going out the Mixout jack.
20 3.5mm TRRS Headset Jack with Volume Control
Monitor Intercom/Hybrid audio with a TRRS headset.
Page 8

Interchange LTD™ Intercom Phone Bridge + Digital Hybrid
4
Getting to Know Your Interchange LTD
53 4
Inputs & Outputs
1 Phone Line
Connect to a standard, single line, analog telephone line.
2 Aux Phone
Connect a single line analog telephone for call setup / dialing, or producer
call screening.
3 Power Jack
For connection only to the supplied 9VDC regulated power supply.
AC power to Interchange LTD is only necessary when interfacing a POTS
line to your intercom system
4 Party Line Intercom
Connect to one or two channel 3-pin unbalanced Party Line
intercom system.
5 Mix Out XLR Jack
Contains a line level mix of both the phone and intercom audio.
21 21
Page 9

Getting Connected
5
Start by Connecting to the Intercom
1. Set the <Talk> switch to the <Off> position, and the <Com> switch to the
desired channel.
2. Connect Interchange LTD to your intercom network using one or both of the
<Intercom> XLR jacks.
3. As soon as Interchange LTD is connected to the intercom system, the
<Power> LED will light, and the <Com> LEDs will indicate any audio signal
present on the intercom channel.
If using a Mobile Device (If using a phone line, please skip to page 6.)
1. Connect the supplied CN113 interface cable between the front panel
Headset Interface jack and your mobile phone headset jack.
2. Using your mobile phone, place a call to a remote location. You should be
able to immediately monitor the intercom signal from the remote location.
3. Adjust the <Headset Interface Send> level control for desired signal level
at the remote location.
4. Change the <Talk> toggle switch to the <Talk> position to allow the remote
location to be heard on the intercom channel.
5. The return audio path from the remote location into the intercom can be
adjusted two ways. The front panel <Headset Interface Receive> level
control provides adjustment suitable for most mobile devices. However, most
mobile devices also have a headphone level control which works along with
the Interchange controls.
6. It is best to set the headphone level on your mobile device rst, then set
the level on Interchange for nal adjustment. This signal will appear on the
Interchange <Phone> LEDs, not necessarily on the <Com> LEDs. Monitor
receive levels by listening on an intercom belt pack.
Com Balance with Headset Interface
Interchange LTD features an active hybrid to separate the unbalanced 2-wire
intercom audio channel into separate (4-wire) send and receive audio paths.
While nominal separation is achieved with typical operation, the separation can
be ne tuned if the intercom loop offers additional challenges. Perform the tuning
operation when the intercom network is not in use. Using your mobile device, play
or generate a xed level tone or white noise into the intercom system. Adjust the
signal level to 0 dB on the Interchange <Phone> LED display. Be sure that the
<Talk> control switch is in the
<Talk> position. Adjust the <Com Balance> control
while observing the <Com> LEDs, to nd the minimum (the position where the
fewest <Com> LEDs are lit). Remove the test signal and proceed with normal
operation.
Getting Connected
Note: AC power is not necessary when using with a mobile device.
Page 10

Interchange LTD™ Intercom Phone Bridge + Digital Hybrid
6
Operation with a Phone Line
1. Connect the supplied RJ-11 phone line cable between the jack marked
<Line> and your wall jack. Be sure this jack supports standard single line
analog telephone operation.
2. Connect the supplied AC power cord to the back of the Interchange LTD and
then to an AC power outlet.
This device should be connected to an adequate surge protective
device at all times both for the power connector and for the
telephone line to avoid damage from lightning or electrical surges.
3. Your Interchange LTD is now ready to take calls. Along with using the
front panel keypad, you may also connect an auxiliary telephone to the
Interchange LTD <Phone> jack so you can dial out and set up calls, or use
the <Auto-Answer> feature to answer incoming calls.
4. Change the <Talk> toggle switch to the <Auto> position to allow
Interchange LTD to follow the call status of the phone hybrid. During an
active call, the remote location can now be heard on the intercom channel.
5. The signal from the remote location will appear on the Interchange LTD
<Phone> LEDs, not necessarily on the <Com> LEDs. Monitor receive levels
by listening on an intercom belt pack or TRRS Headset.
6. Changing the <Talk> switch to <Off> returns the system to a
remote Listen-Only conguration.
Com Balance with Phone Hybrids
Interchange LTD features an active hybrid to separate the unbalanced 2-wire
intercom audio channel into separate (4-wire) send and receive audio paths.
While nominal separation is achieved with typical operation, the separation can
be ne tuned if the intercom loop offers additional challenges. Perform the tuning
operation when the intercom network is not in use. Interchange LTD does not
have a test tone feature, therefore an alternate tone generator must be used.
Be sure that the <Talk> control switch is in the <Talk> position. Adjust the
<Com Balance> control while observing the <Com> LEDs, to nd the minimum
(the position where the fewest <Com> LEDs are lit). Remove the test signal and
proceed with normal operation.
Operation
Page 11

7
Auxiliary Telephone
An auxiliary telephone provides you with an easy way to dial out or set up
your calls. Interchange LTD will disconnect the auxiliary telephone when you
press the <Call> button. If you need to take the call back on the aux telephone,
simply pick up the telephone handset before the Interchange LTD’s <Drop>
button is pressed.
To use an auxiliary phone equipped with a “Hold” feature to place or screen a
call, rst set up the call and place the call on hold. When you are ready to take
the call on Interchange LTD, press the <Call> button on the innkeeper LTD and
your telephone will automatically release the hold.
Your phone will operate as a normal telephone anytime you are in Drop mode.
Leaving the hybrid connected between the wall jack and your telephone will not
affect normal use of your phone. Audio will only pass through the hybrid when
you press the <Call> button.
Optional Jumper Settings
If the incoming Caller level is too high and peaking the red -3 dB LED, you
may need to change the setting of an internal jumper. Disconnect power from
the hybrid and remove the cover of the innkeeper LTD to locate Jumper 1. The
default position for this jumper is closed (covering both pins). Changing the
jumper to the open position (either remove the jumper or cover just one pin) will
provide 6 dB attenuation of the incoming audio signal.
Auto-Answer
The <Auto-Answer> feature will answer on the rst ring.
When <Auto-Answer> is enabled, you can still make calls manually using the
<Call> button. When nished, you can either drop the call manually or allow the
call to Auto-Disconnect. Interchange LTD will look for a CPC disconnect signal
from the phone company to determine when a call has disconnected. This can
take up to a minute.
Operation
Page 12

Interchange LTD™ Intercom Phone Bridge + Digital Hybrid
8
Technical Information
Intercom Channel
Connection Male & Female 3-pin XLR
Output Level -10 dBu (250 mV RMS) nominal
Terminating Impedance 200 ohms
Bridging Impedance >15k ohms
Pin 1 Common
Pin 2 Audio + 30 VDC (+12 VDC min) 50 mA
Pin 3 Audio
Line Out
Balanced Male XLR 200 ohms / 500 mV RMS (-4 dBu nom) +12 dBu max
Headset Interface
Connection 3.5 mm TRRS
Frequency Response Wireless Interface 50 Hz - 7 kHz (HD Voice)
Misc
Phone Line RJ11C
Aux Phone RJ11C
Ringer 0.8B REN
Isolation 1500 VAC
Frequency Response Telephone Side 200 Hz-3600 Hz
Monitor Headset Jack 3.5 mm TRRS
Power 120-240 VAC Power Supply (included)
Maximum Ambient
Operating Temperature:
40°C (104°F)
Size 19” x 5.4” x 1.75”
Weight 5.2 lbs
Specications
Page 13

Technical Information
9
Technical Information
Interchange LTD Block Diagram
JK Audio Interchange LTD
Simplified Block Diagram
March 29, 2017
Headset Interface
Headset
Emulator
Intercom
Hybrid
1/A
2/B
Phone
Meter
Com
Meter
Control
Logic
ON
OFF
AUTO
Mix
Out
Intercom
Intercom
Limiter
Talk Control
Send
Receive
Send
Receive
Phone Line
Jack
Aux Phone
Jack
Digital
Hybrid
Page 14

Interchange LTD™ Intercom Phone Bridge + Digital Hybrid
10
FAQs
1. Does the interchange LTD send a burst or beep down
the phone line at the beginning of each call like our
current hybrid?
No. Interchange LTD uses the actual transmit signal to evaluate the phone
line and tune its algorithm. As you begin to speak, Interchange LTD is hard
at work separating intercom audio from phone line audio. Within milliseconds
your voice is reduced into the noise oor.
2. Can I use the innkeeper LTD on a VoIP line?
Many VoIP lines have an analog telephone adapter you can use to connect
Interchange LTD to your VoIP line.
3. The caller’s audio is too high and is always distorted even
though I have the Receive level control turned down low.
What else can I do?
The Caller LED meter will indicate the level of audio coming in from the
telephone line, just after it passes through the DSP. The Receive Level
control will have no effect on the LED meter. If your incoming audio level is
unusually hot and already peaking the –3 dB LED, there is a jumper on the
circuit board you can change to attenuate the incoming audio. Please see
page 7 for more information.
4. I have my new Interchange LTD connected to the phone jack
in my ofce. Why does it keep dropping the calls as soon as I
try to connect it?
The telephone jack in your ofce is very likely for a multi-line phone system.
The jack may look like a standard phone jack, but it is wired differently and
may carry voltage on different pins which could cause serious damage to
your hybrid. Interchange LTD should only be connected to a single, analog
phone line.
5. Why isn’t my headset working in the Headset Interface jack?
The 1/4” Headset Interface jack is only compatible with the supplied CN113
cable connected to the headset jack of a mobile device. Instead, plug your
TRRS headset into the 1/8” Headset jack.
6. I’ve lost my CN113 cable. Can I use any 3.5mm TRRS to 1/4”
TRS cable to use a cell phone with Interchange LTD?
No. CN113 was designed for this product. If you misplace this cable you will
have to purchase a new one from us directly or from an authorized dealer.
7. Can I use the Interchange with both a cell phone AND a
phone line call at the same time?
Yes. The two calls will not be conferenced together so they would not hear
each other, but there could be some faint crosstalk through the intercom.
Page 15

FCC Compliance Notice
11
FCC Registration
Your new JK Audio product has been registered with the Federal Communications
Commission (FCC). This product complies with the standards in Part 68 of the
FCC rules.
1. Connection and use with the nationwide telephone network
The FCC requires that you connect this telephone equipment to the national telephone network
through a USOC RJ-11C modular telephone jack. This equipment may not be used with Party Line
Service or Coin Telephone Lines. This equipment is hearing aid compatible.
2. Information for the telephone company
Upon request from your local telephone company, you are required to provide the following
information:
A. The “line” to which you will connect the telephone equipment (that is, your telephone
number), and
B. The telephone equipment’s FCC registration number.This can be found on the bottom of
your telephone equipment, and,
C. The ringer equivalence number (REN) for this equipment. The REN is used to determine
the quantity of devices which will be connected to the telephone line. Excessive RENs on
the telephone line may result in the devices not ringing in response to an incoming call. In
most, but not all areas, the sum of the RENs should not exceed 5.0. To be certain of the
number of devices that may beconnected to the line, as determined by the total RENs,
contact the local telephone company.
3. Repair Instructions
If it is determined that your telephone equipment is malfunctioning, the FCC requires that it not
be used and that it be unplugged from the modular outlet until the problem has been corrected.
Repairs to this telephone equipment can only be made by the manufacturer or its authorized
agents or by others who may be authorized by the FCC. For repair procedures, follow the
instructions outlined under the warranty section of the manual.
4. Rights of the telephone company
If telephone equipment is causing harm to the network, the telephone company may temporarily
discontinue your telephone service. If possible, they’ll notify you before they interrupt service.
If advanced notice isn’t practical, you’ll be notied as soon as possible. You’ll be given the
opportunity to correct the problem, and you’ll be informed of your right to le a complaint with
the FCC. Your telephone company may make changes in its facilities, equipment, operations or
procedures that could affect the proper functioning of your JK Audio product. If such changes are
planned, you’ll be notied by your telephone company.
FCC Part 15 Subpart A Compliance
This equipment has been tested and found to comply with the limits for a Class A digital device,
pursuant to Part 15 of the FCC Rules. These limits are designed to provide reasonable protection
against harmful interference when the equipment is operated in a commercial environment.
This equipment generates, uses, and can radiate radio frequency energy and, if not installed
and used in accordance with the instruction manual, may cause harmful interference to radio
communications. Operation of this equipment in a residential area is likely to cause harmful
interference in which case the user will be required to correct the interference at his/her
own expense.
Changes or modications not expressly approved by JK Audio can void the user’s authority to
operate the equipment.
FCC Registration
Page 16

JK Audio, Inc.
1311 E 6th St.
Sandwich, IL 60548
United States
Telephone: 815.786.2929
Toll Free: 1.800.jkaudio
Fax: 815.786.8502
www.jkaudio.com
© 2017 JK Audio, Inc. All rights reserved.
Interchange LTD
™
Intercom Phone Bridge + Digital Hybrid
User Guide Version 9/22/17
JK Audio
 Loading...