

Page 1
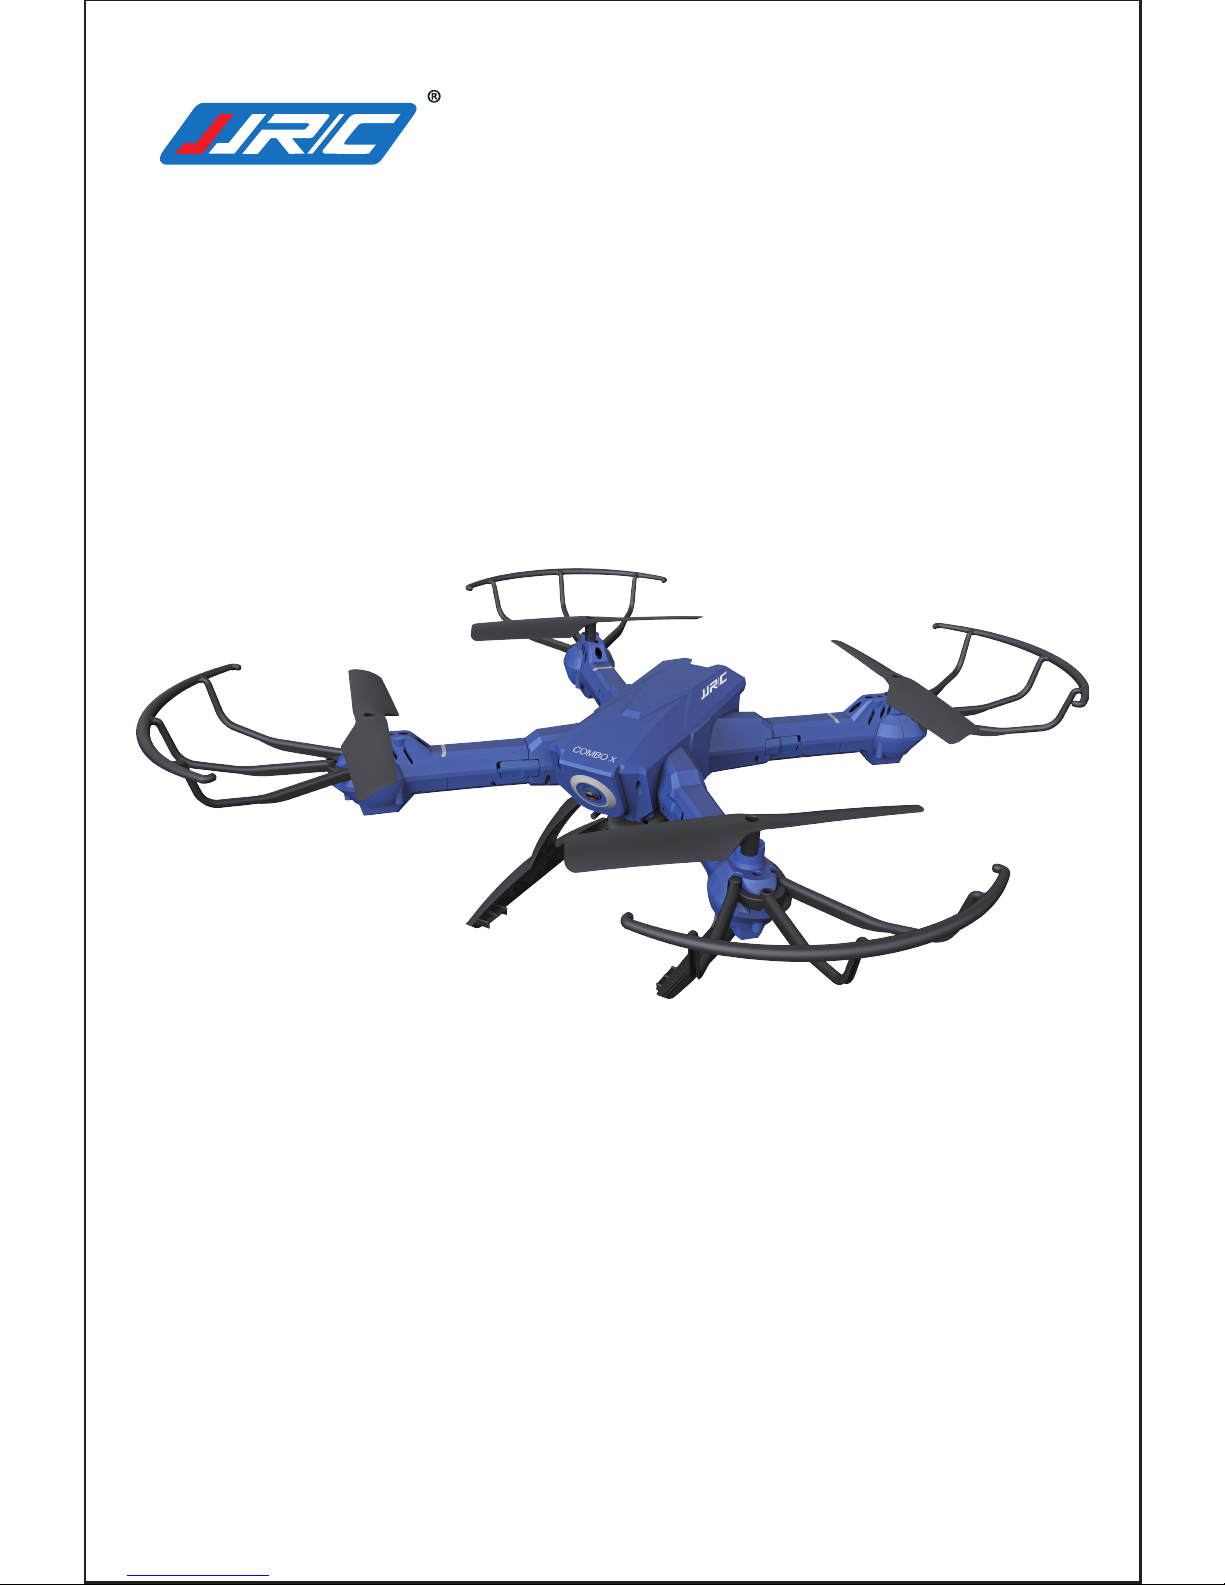
COMBO X
14+
*Please read this manual carefully before operation
and keep it properly for future reference.
Page 2
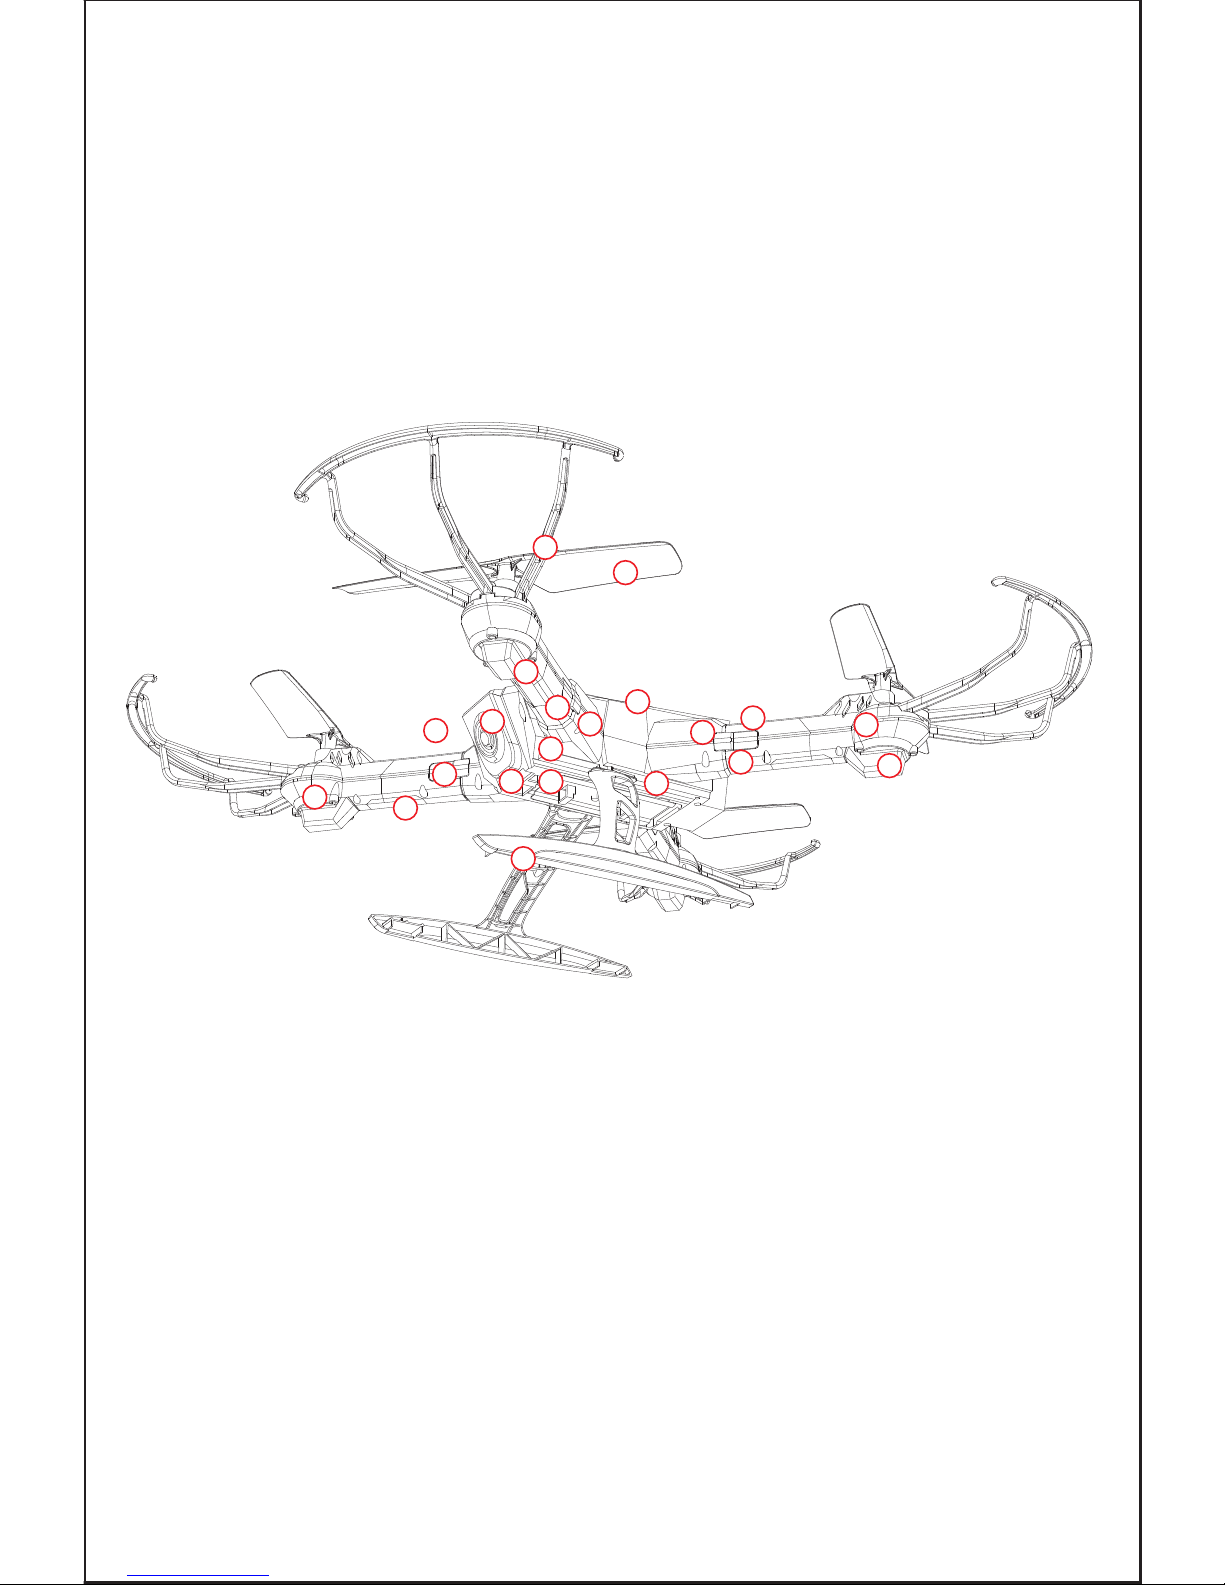
1.Up cover of enclosure
2.Down cover of enclosure
3.Propeller
4.Protective guard
5.Undercarriage
6.Battery cover
7.Flashing light
15.Fixed ring
16.Fastener
17.Spring
18.T-type male plug
19.T-type female plug
20.Lampshade
21.Camera
KNOW YOUR COMBO X
8.Motor
9.Switch board
10.Receiver
11.Gear components
12.Up cover of arm
13.Down cover of arm
14.Gear cover
1
2
4
3
5
6
7
8
9
10
12
11
13
14
15
19
20
21
18
16
17
1
With 2.4G frequency band for long remote control distance,
COMBO X allows multiple flights at the same time without
any interference. User can control it to fly, roll, hover and
take photos/videos with transmitter or APP on smart phone
(Wifi Version).
Page 3
COMBO X
14+
*请在飞行前仔细阅读说明书并妥善保管以便日后参考。
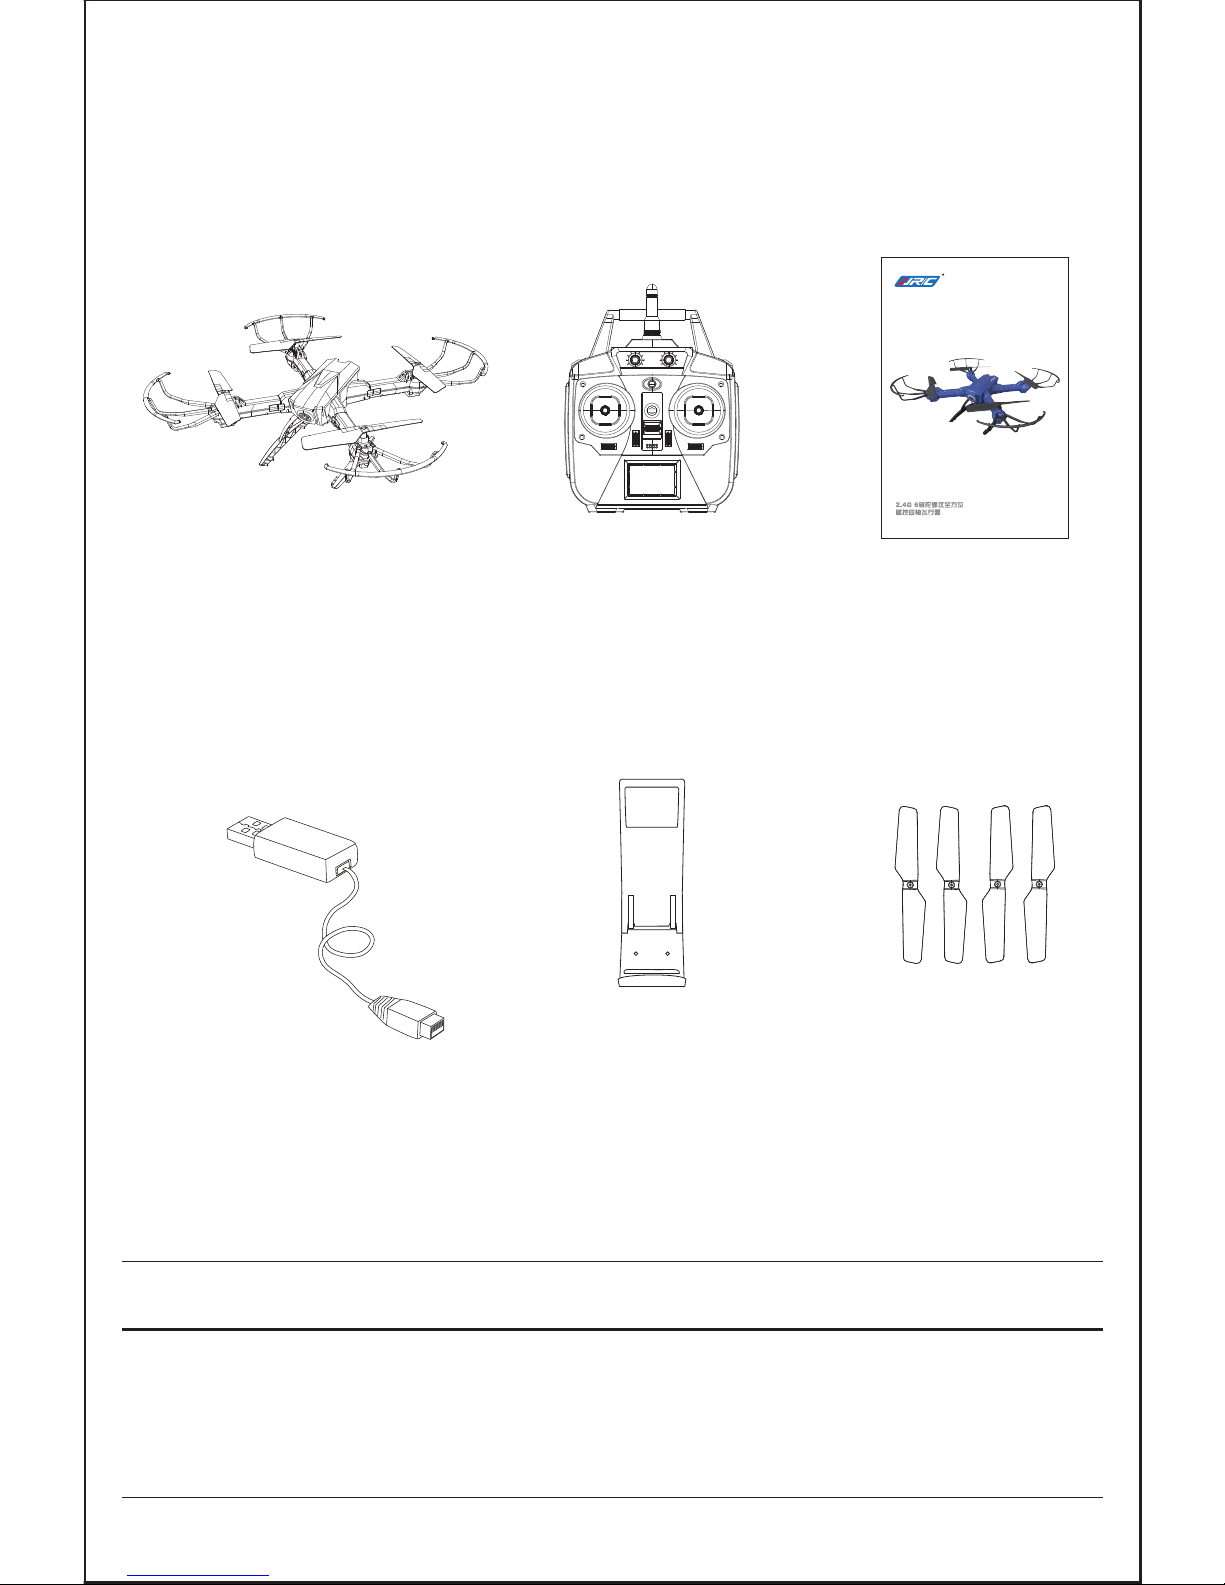
Phone clip x1
COMBO X x1
(Battery Included)
2
ACCESSORIES
Transmitter x1 User manual x1
USB charger x1
Backup
propellers x4
Please check the number of accessories carefully(as shown
above).Please provide proof of purchase and contact the store
for replacement if any missing parts.
Note:
Page 4
3
PRE-FLIGHT PREPARATION
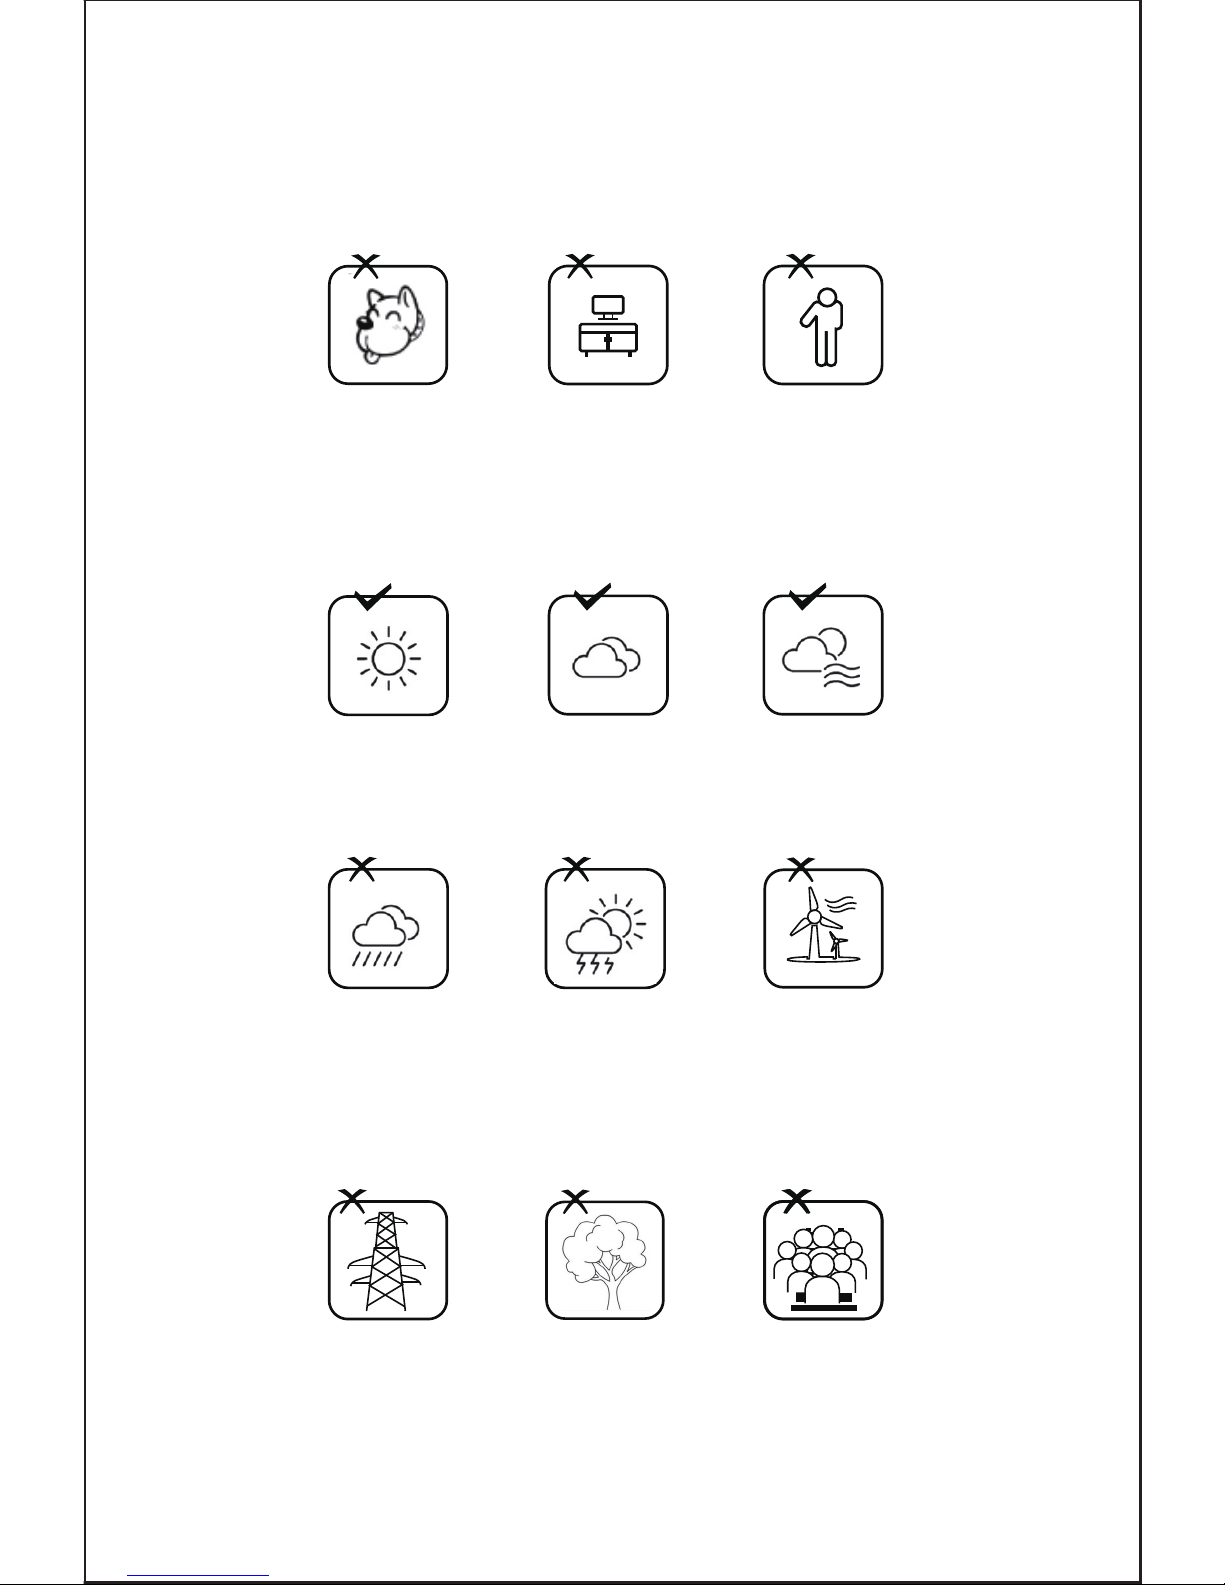
1.Flight Environment
Please keep the drone in sight during the flight and
keep it away from barriers, high-tension cables,
trees and people.
Indoor flying: Choose a wide place without barriers,
pets and people.
Outdoor flying: Choose a sunny and windless day.
Do not fly in extreme environment, such as hotness,
coldness, strong wind or heavy rain.
Page 5
A
A
B
B
B
BA
A
4
① ②
③ ④
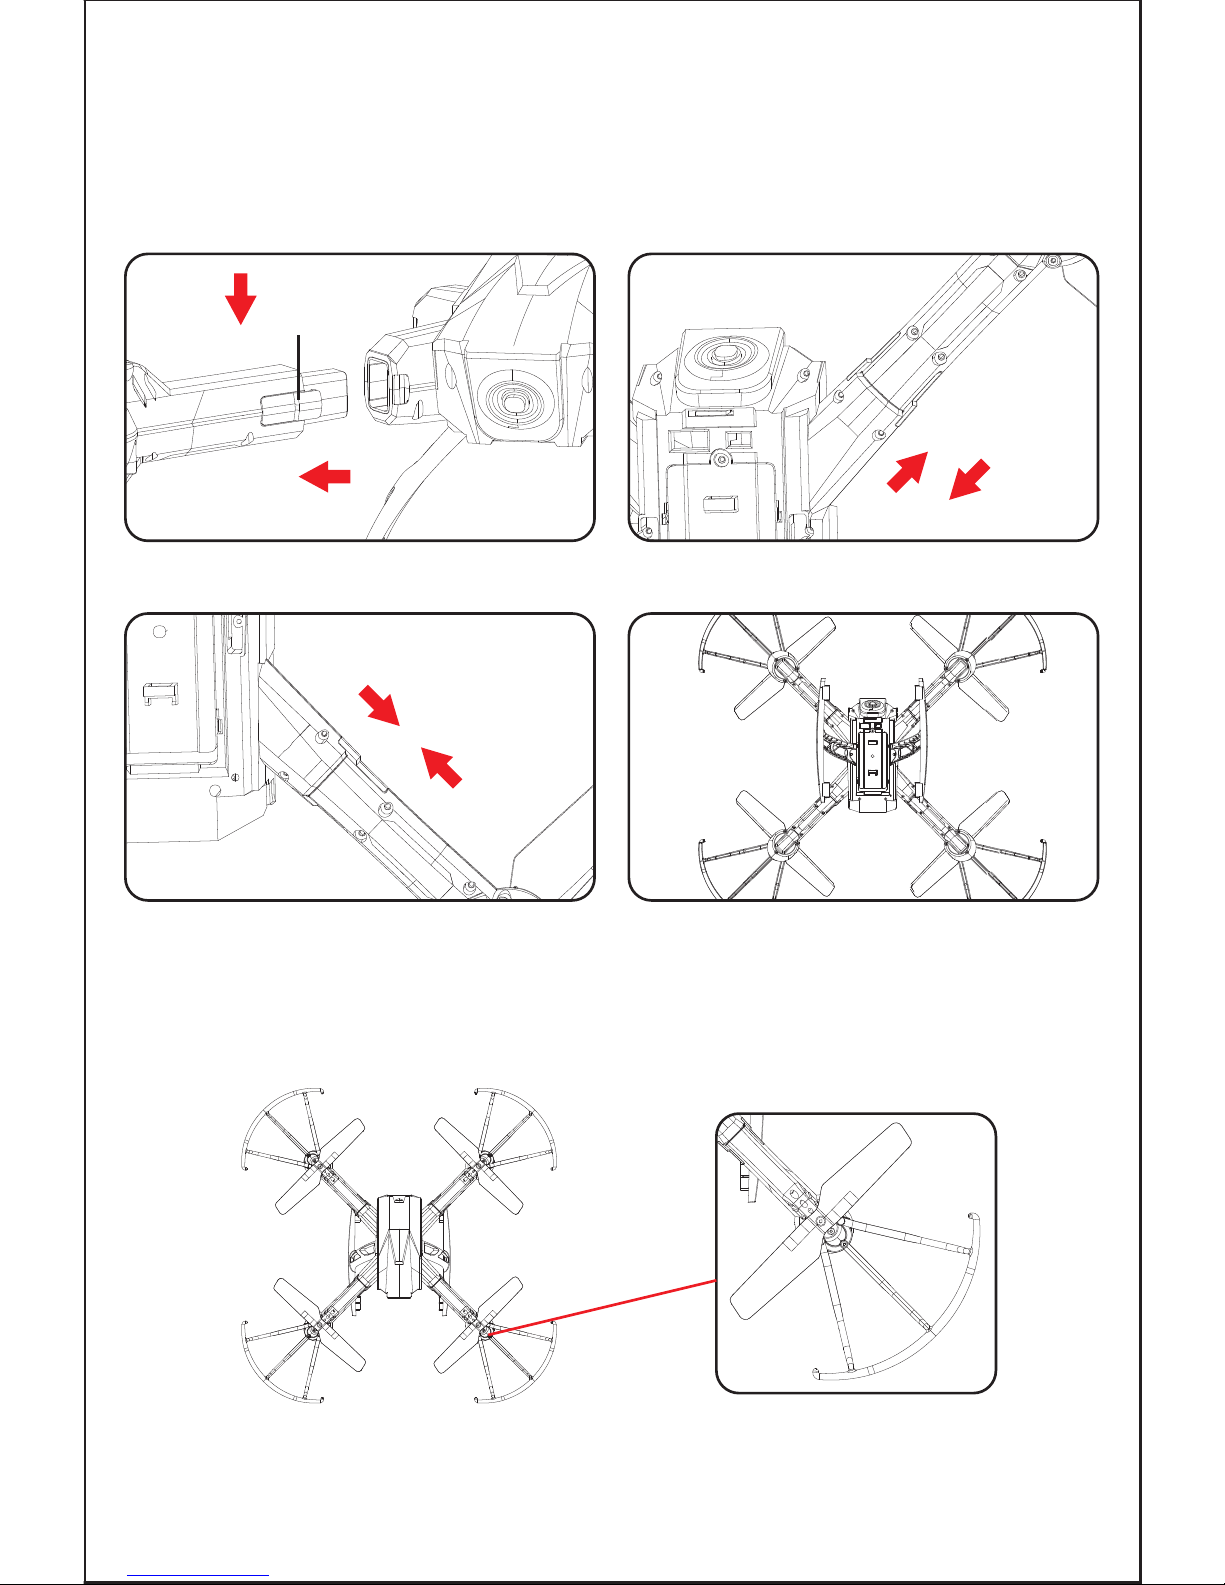
2.Crankshafts Installation
When install crankshafts,make sure the crankshaft and the
rack correspond correctly.(As shown in figure below)
PRESS
PULL OUT
3.Propellers Installation
A corresponds to A,B corresponds to B
FRONT
Page 6
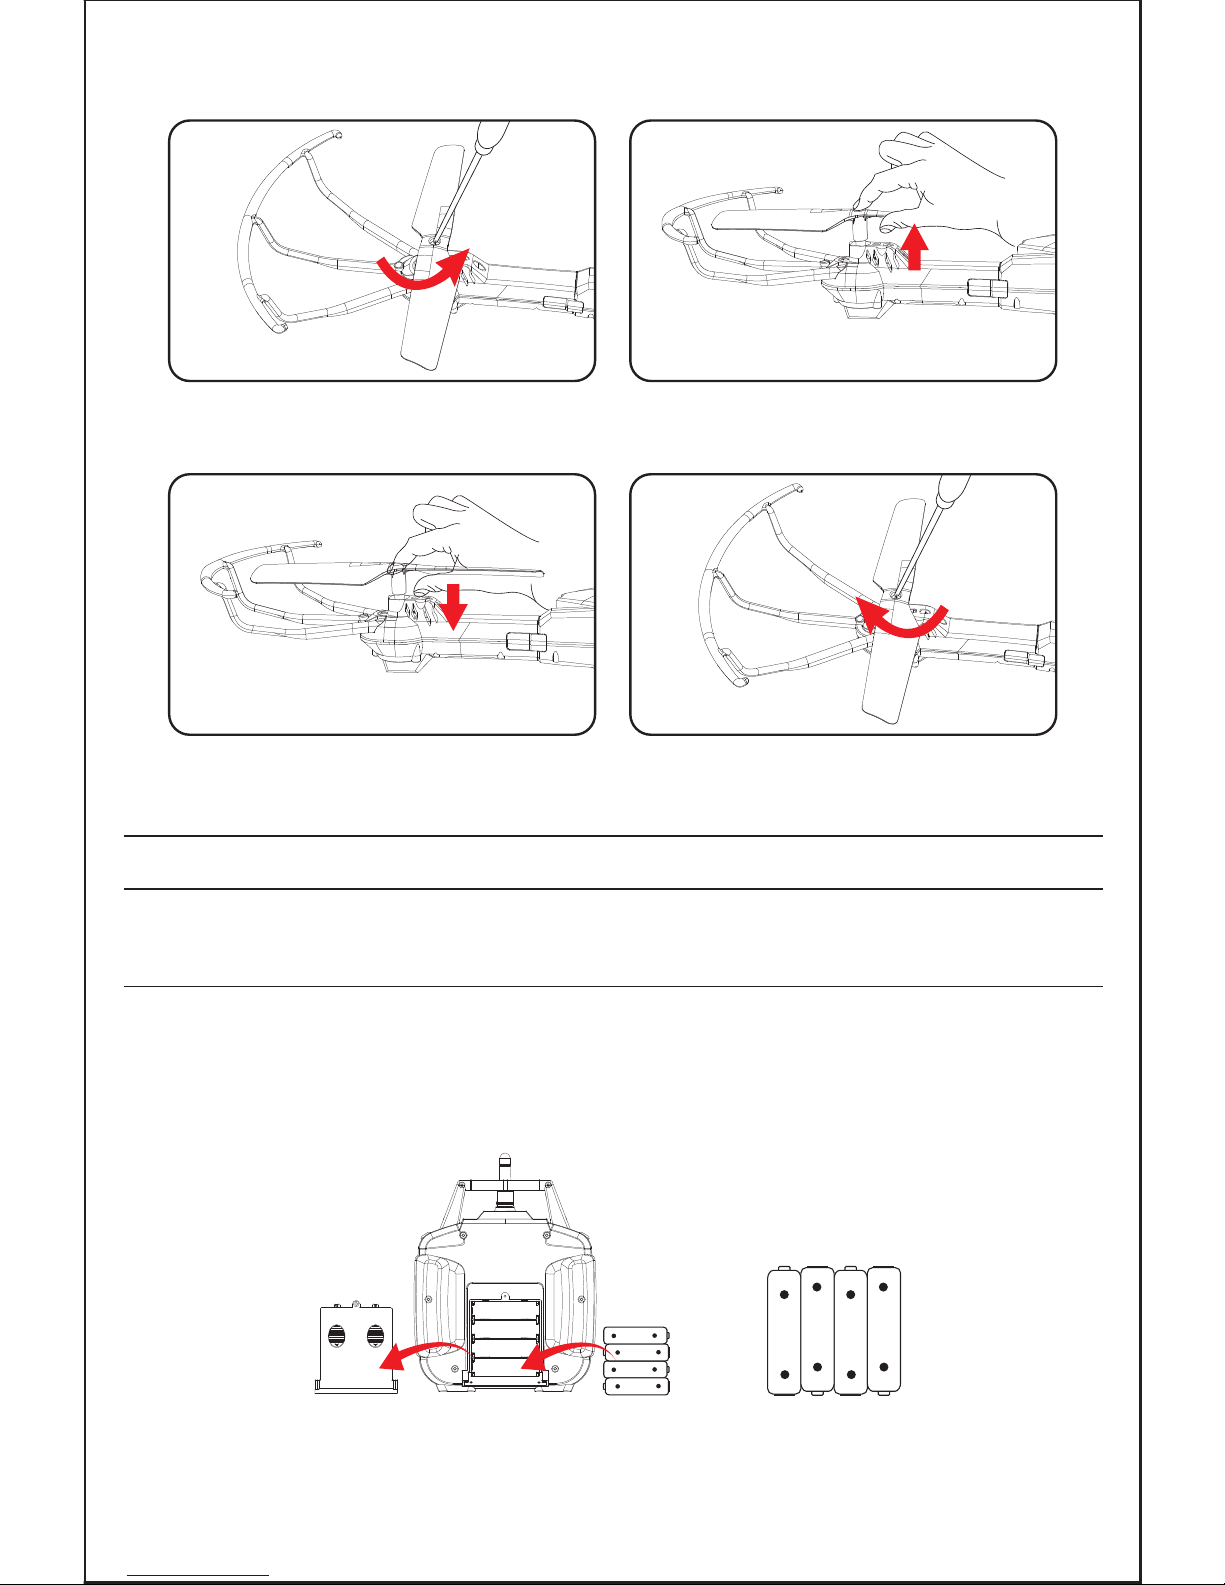
Remote control battery installation:
5
A.Remove the screw
with a screwdriver.
D.Use a screwdriver to
lock the screw.
B.Remove the blade
upwards.
C.Align the shaft with
the blade.
Open the battery cover and insert the 4 AA batteries correctly
according to the electrode instructions. (Batteries not included)
4.Propellers Replacement
Note:
When installing or dismantling the propeller, please do not
exert force on the propeller to avoid distortion.
5.Lithium Battery Instruction
+
-
1.5V“AA”
+
-
1.5V“AA”
+
-
1.5V“AA”
+
-
1.5V“AA”
+
-
1.5V“AA”
+
-
1.5V“AA”
+
-
1.5V“AA”
+
-
1.5V“AA”
AA batteries
Page 7
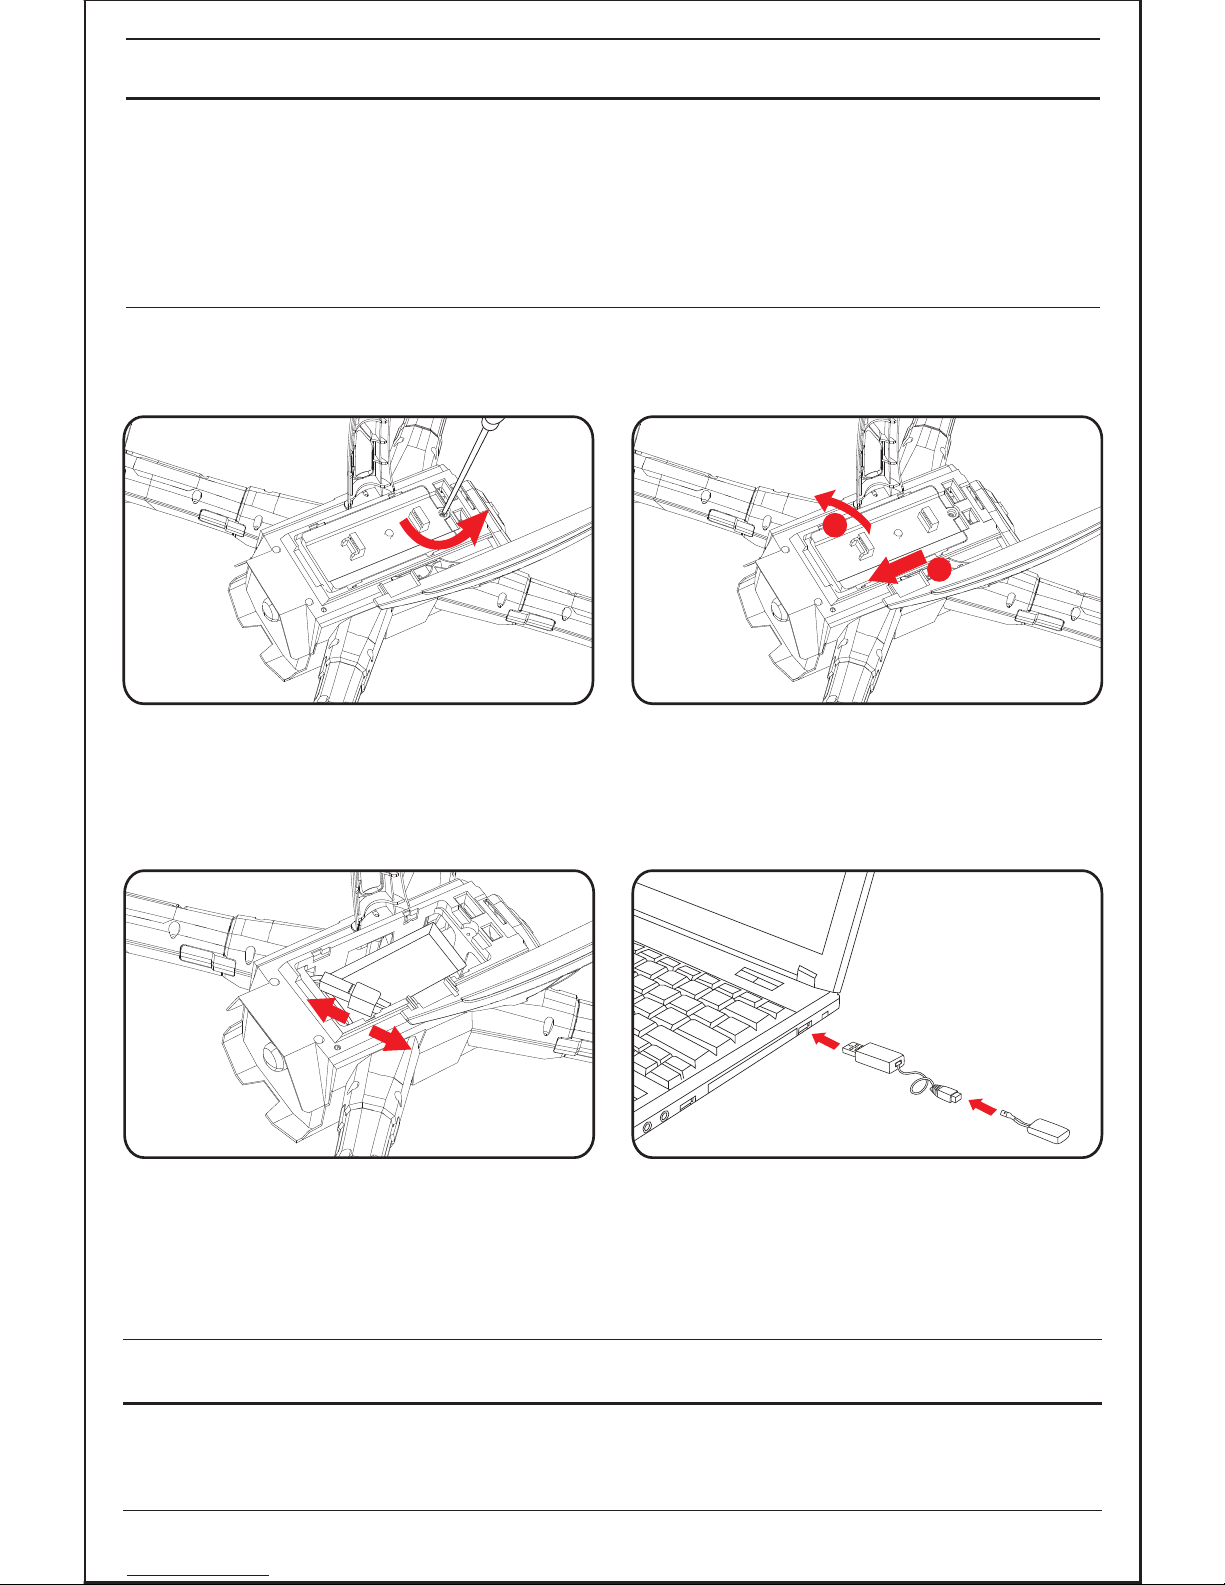
Body battery charging:
C.Unplug the power
connector to remove
the lithium battery.
D.Connect lithium battery
and USB charging
interface by USB charger.
B.Open the battery cover
on the bottom of the drone.
A.Use a screwdriver to
remove the screw
from the battery cover.
1
2
6
Note:
Note:
1.Make sure the battery are loaded correctly according to the
polarity indications on the battery compartment.
2.Please do not mix old and new batteries together.
3.Please do not mix different types of batteries together.
LED lights on when charging, LED lights off when finish charging.
Charging time is about 2~3 hour.
Page 8

7
There is a certain risk when using lithium battery. It may
cause fire, body injury or property loss. Users must be
aware of the risks and take full responsibility of using
battery improperly.
If battery leakage occurs, please avoid contacting your
eyes and skin with electrolyte. Once it happens, please
wash your eyes with clean water and seek medical care
immediately.
Please remove the plug immediately if you sense any
peculiar smell, noise or smog.
Battery Charging
Please use the charger from original factory to ensure
your safe usage.
Do not charge dilatant or outworn battery.
Do not over charge battery. Please unplug the charger
once fully charged.
Do not charge the battery next to inflammables, such as
carpet, timber floor or wood furniture or on the surface
of electro-conductive objects. Please always keep an
eye on the battery when charging.
Do not charge battery which not cool down yet.
The charging temperature should be between 0℃to 40℃.
Battery Recycling
Do not dispose the battery as daily rubbish. Please
familiarize yourself with the local garbage disposal
method and dispose it according to the special
requirement.
Battery Instructions
!
Page 9
1
2
4
3
5
6
7
11 12
10
8
9
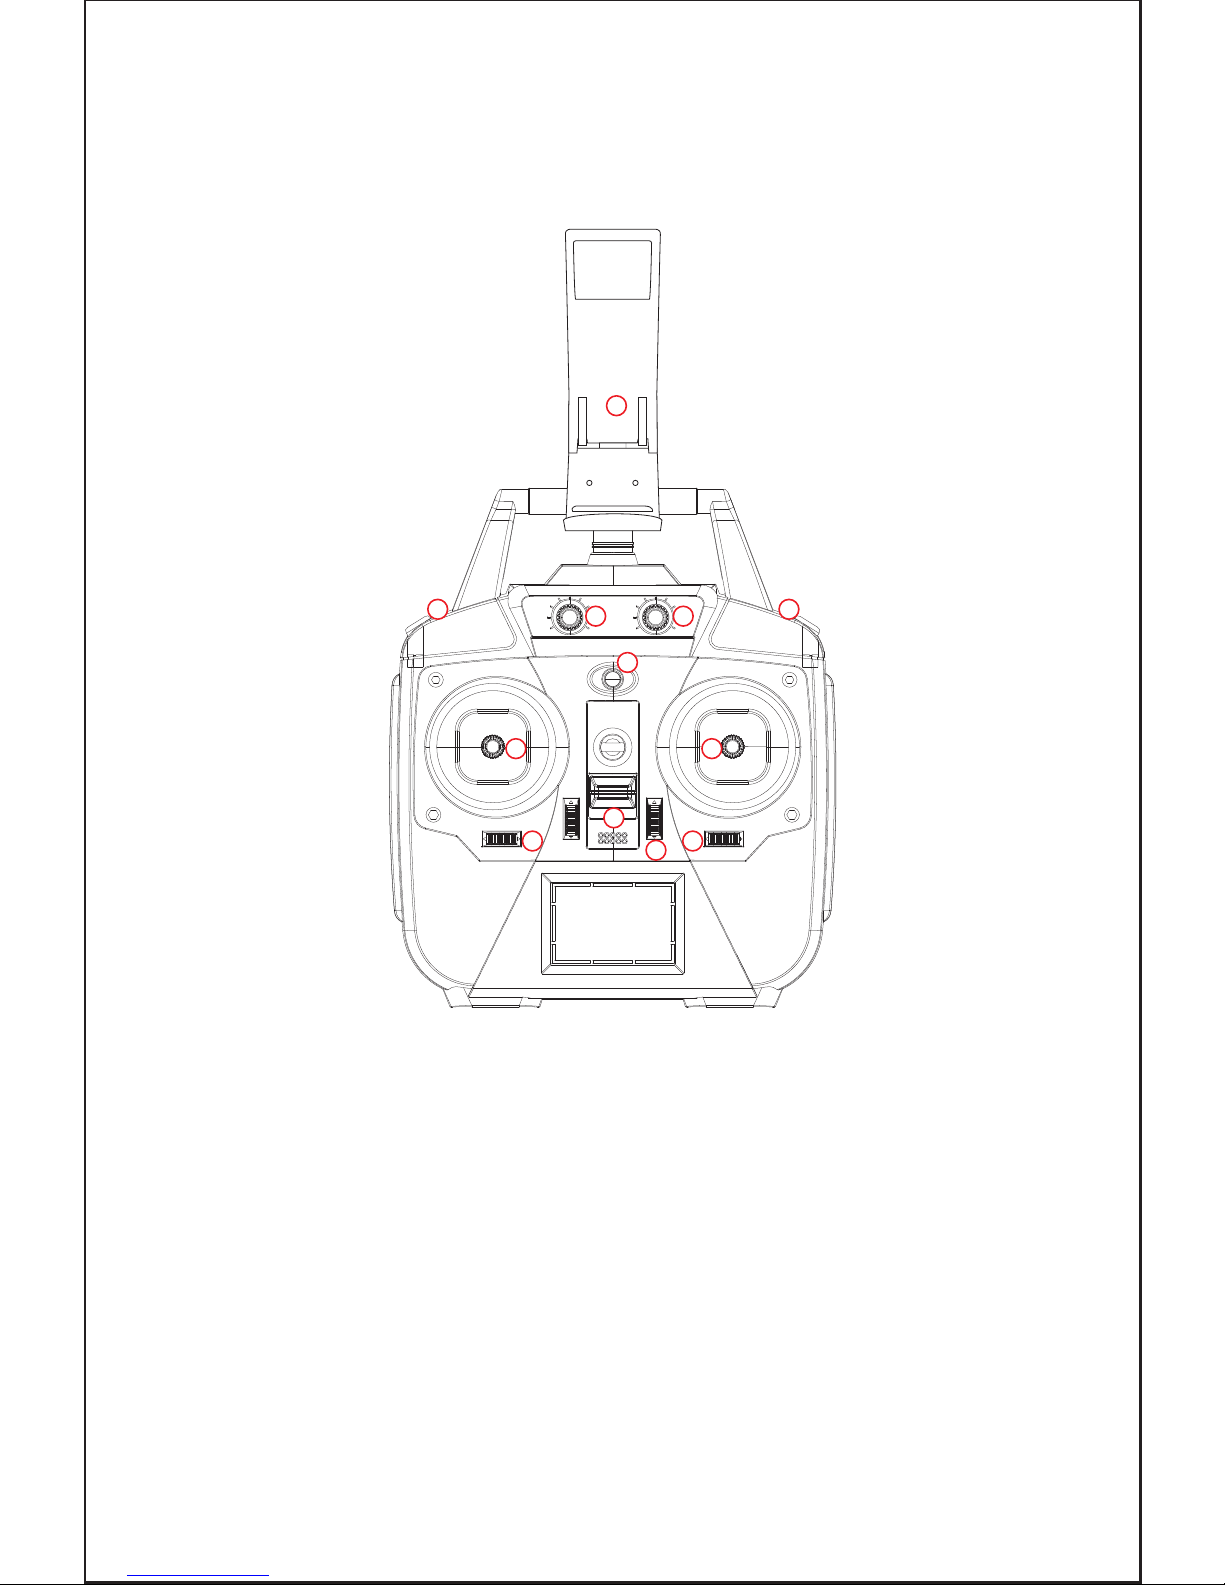
1.Phone clip
2.Short press to control speed/
Long press to return to home
3.Short press to 3D rotation/
Long press to enter headless mode
4.Short press to start/
Long press to control lamp
5.Short press to take photo/
Long press to take video
(Not for WIFI version)
6.Power indicator
7. Left joystick(ascend/
descend/turn left/right)
8. Right joystick(forward/
backward/left/right
side fly)
9. Power switch
10.Forward/Backward
fine-tuning
11.Left/Right fine-tuning
12.Left/Right side fly
fine-tuning
8
KNOW YOUR REMOTE CONTROL
1. Parts of remote control
Page 10
9
① ②
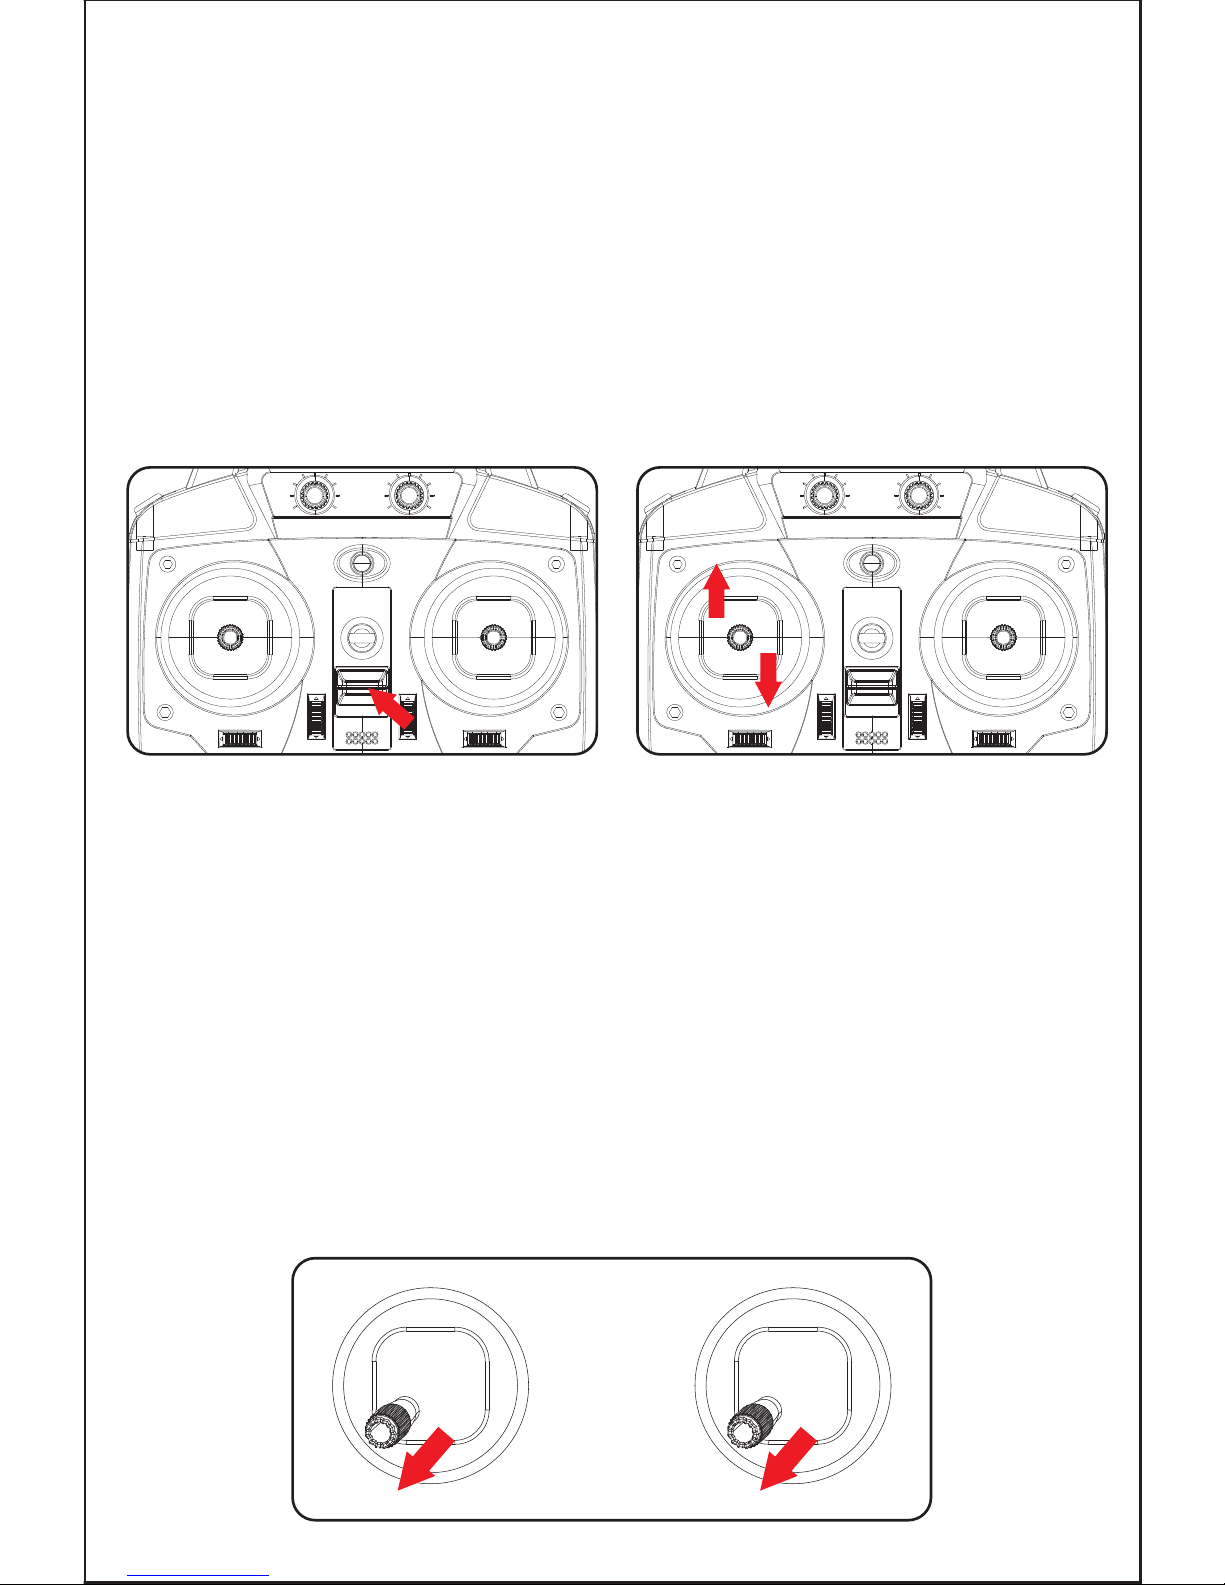
2.Signal connection of transmitter and receiver
①.Turn on the drone and place it on a level surface,
the indicator light of transmitter and the LED of drone
flashing.
②.Push the throttle joystick to the highest point then push
back to the lowest point,and when you hear two beeps,
the indicator light of transmitter and the LED of drone
become normally on,the signal connection has
completed.
3.Transmitter calibration
Apply transmitter calibration when the drone fails to take
off vertically.Push two joysticks at the same time to the
lower left corner together. When the lights of drone are
on and then start flashing and keep on again, the
calibration is complete. The drone must be placed on a
horizontal surface in a steady state when the calibration
is conducted.
Page 11
10
START YOUR FLIGHT
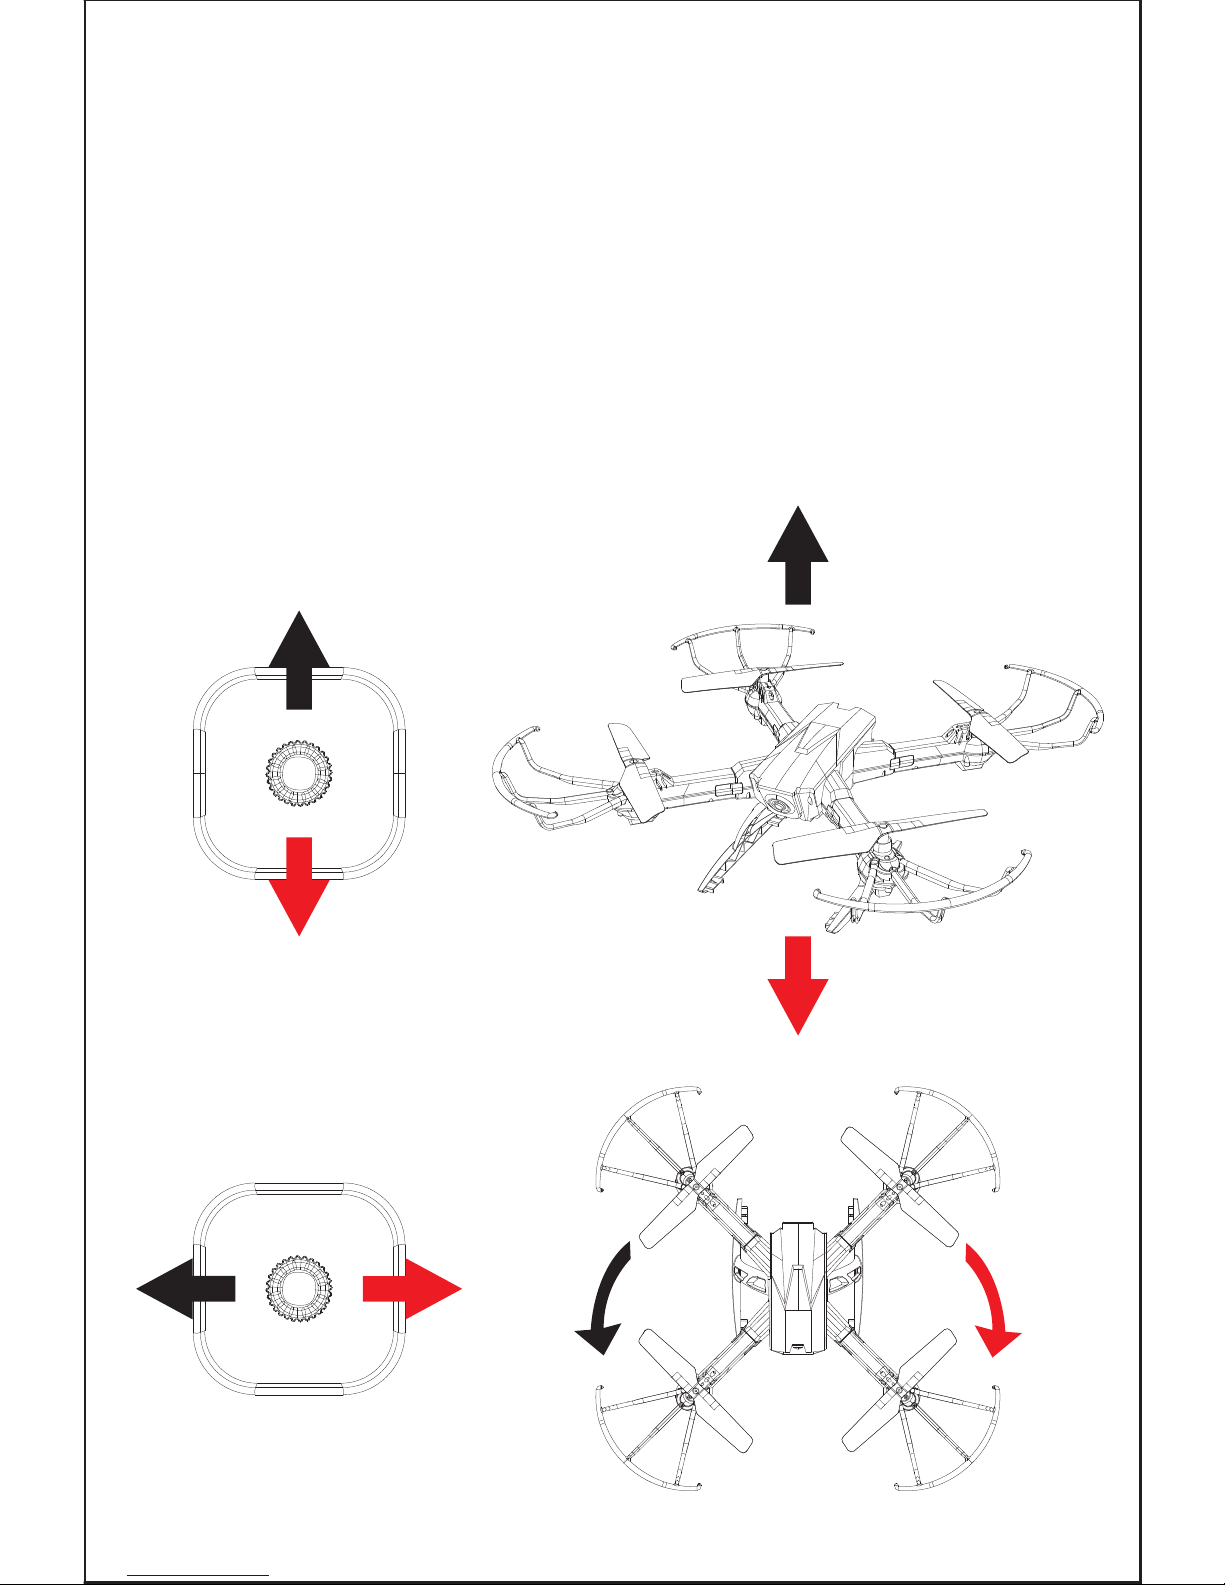
1.Basic Flight
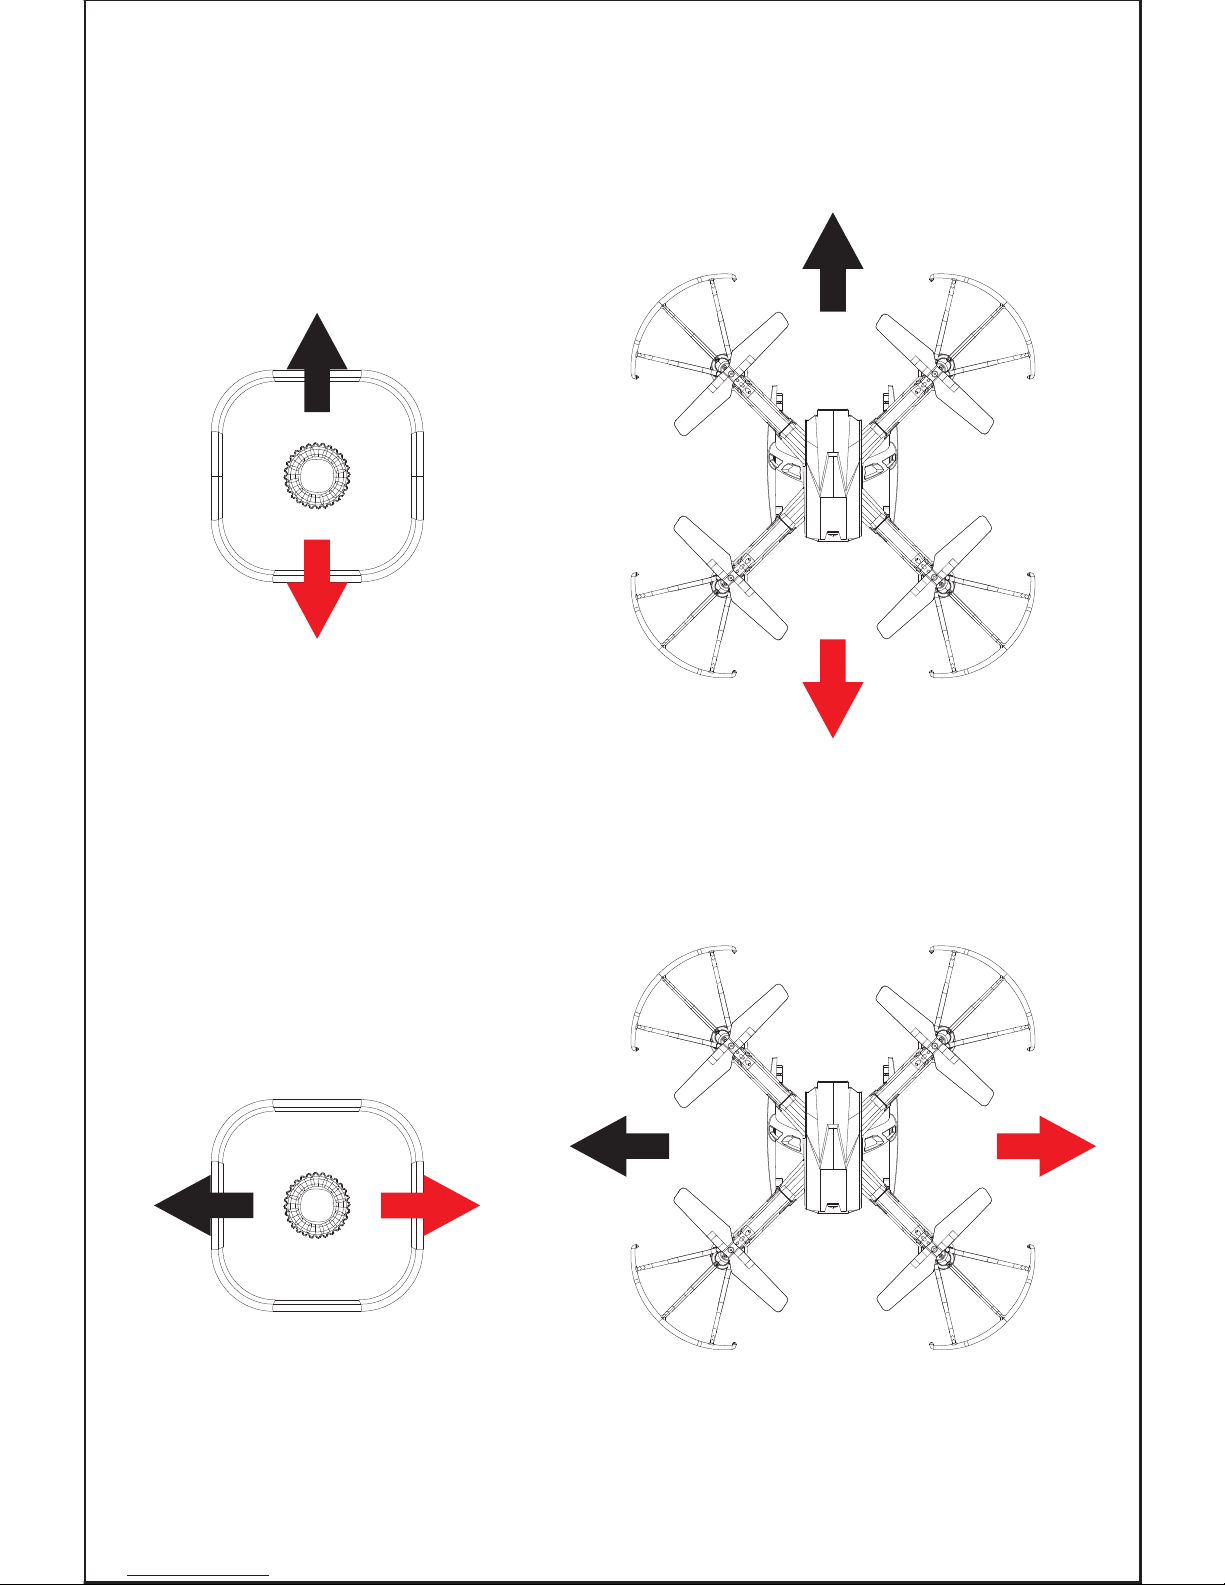
Use the left joystick to control the flight altitude and turn
left/right, and the right joystick to control the forward,
backward, left and right side flight directions.
Left Joystick
Ascent
Descent
Turn Right
Turn Left
Page 12
11
Right Joystick
Backward
Forward
Right Side
Flight
Left Side
Flight
Page 13
12
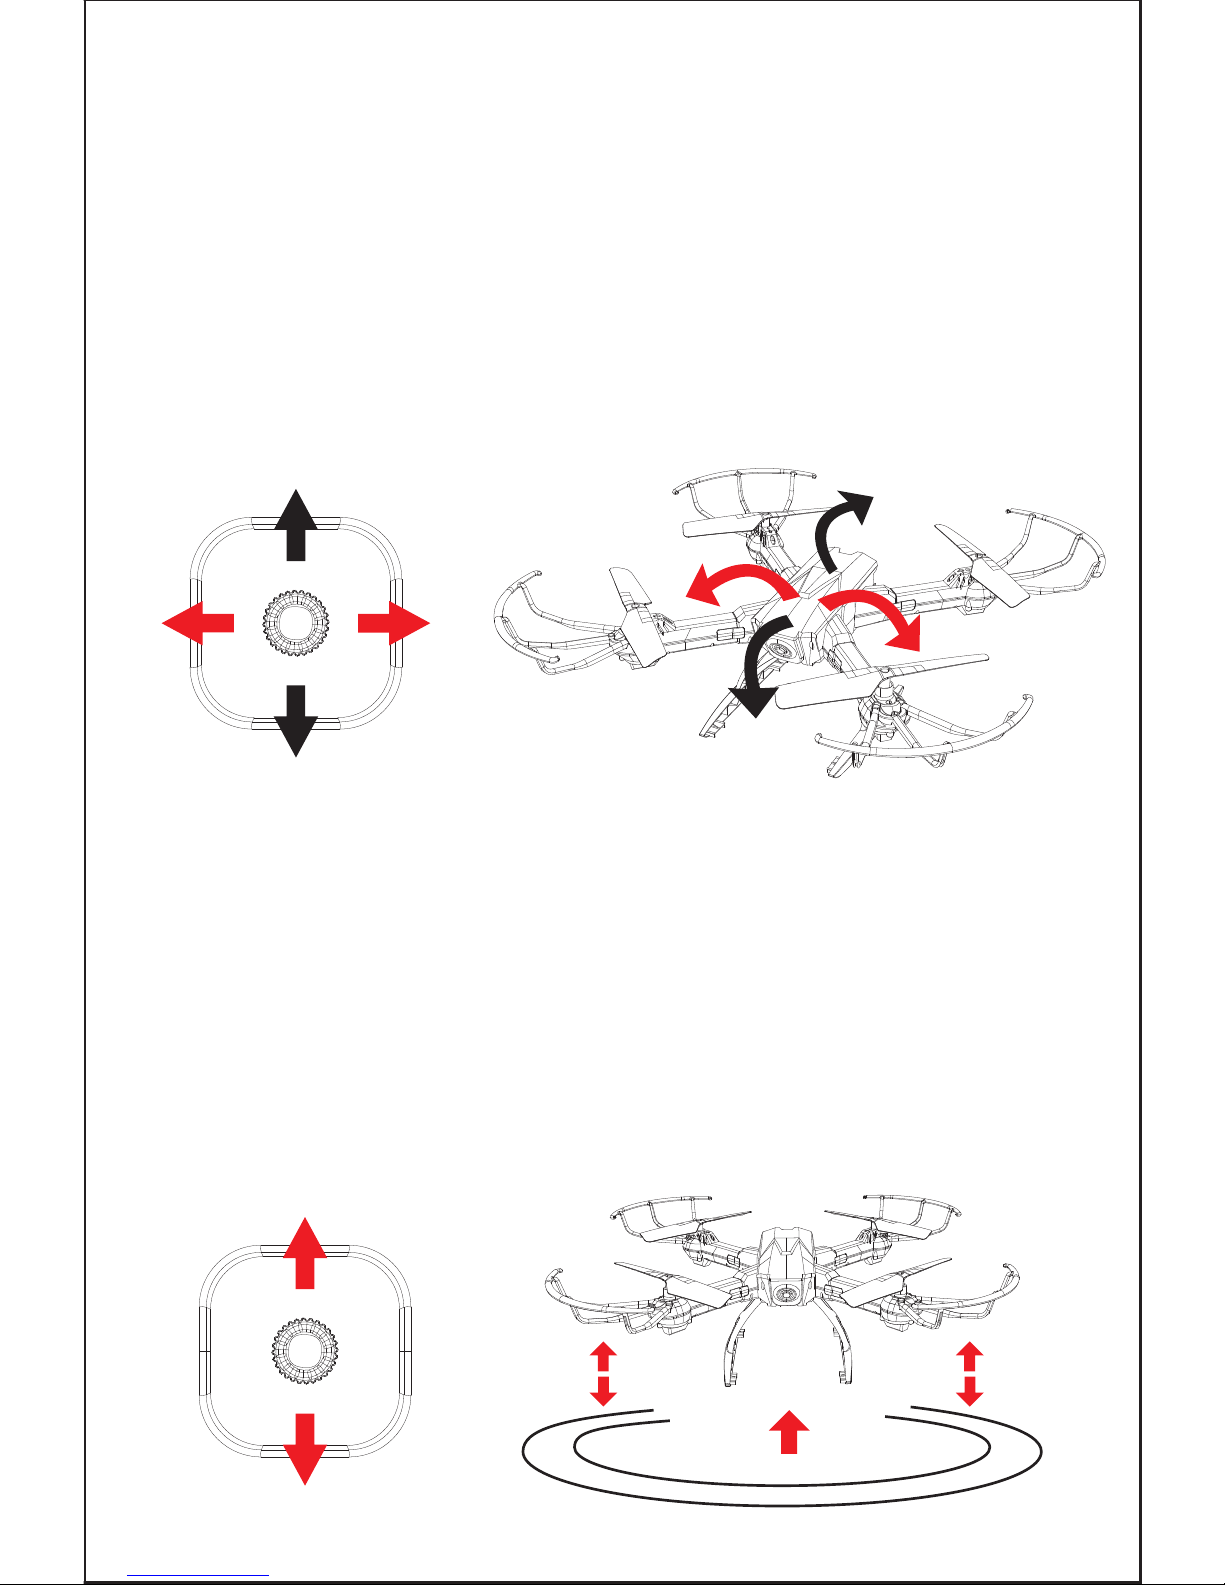
Left Joystick
Right Joystick
Flips&Rolls
When the drone is reaching more than 3 meters high,
click “360°flips and rolls”and move the right joystick
to a certain direction, the drone will rotate in that direction.
Front
somersault
Backward
somersault
Flip to
left
Flip to
right
Hover
When you release the left joystick (throttle) after the ascent/
descent action, the drone will hover at a certain height.
Page 14
1
2
3
1
2
3
13
Note:
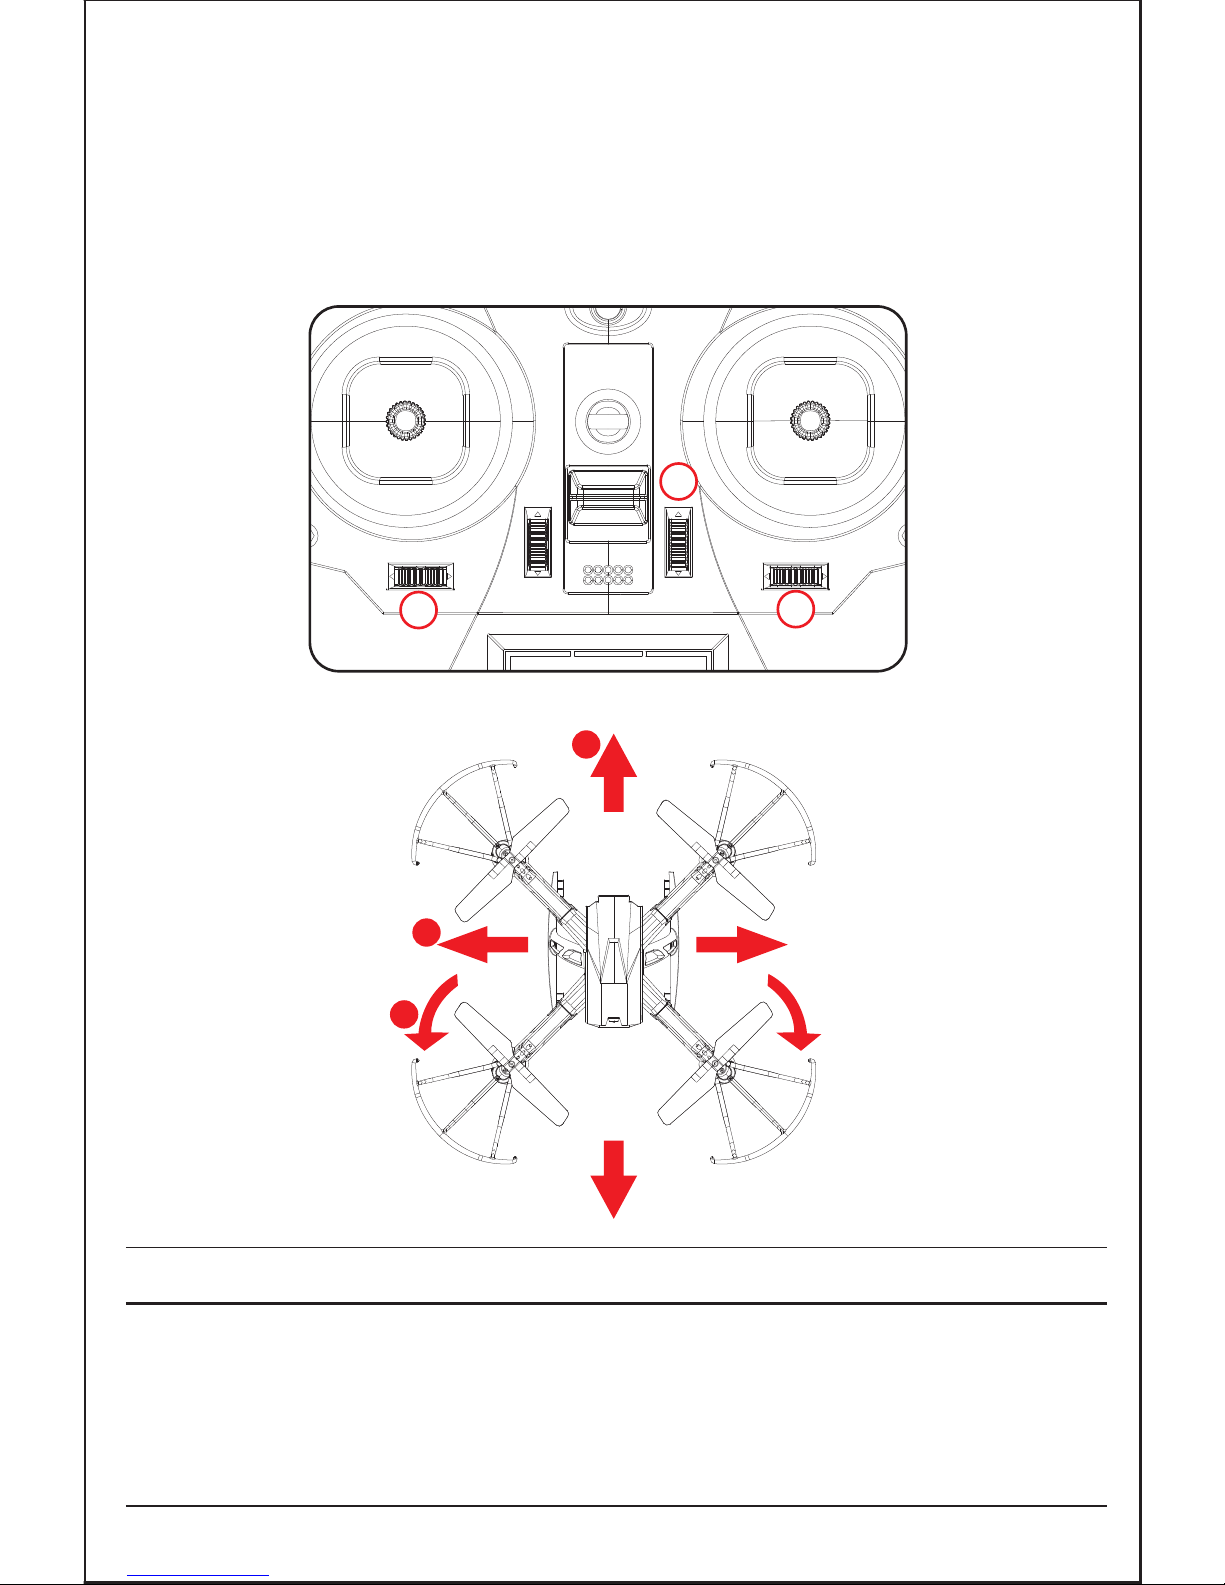
2.Fine-tuning Function
When deviating from course, click "Fine-tuning" for
calibration until the drone is back to normal.
Forward/Backward
Fine-tuning
Left/Right Turn
Fine-tuning
Left/Right Side Fly
Fine-tuning
When the drone is within 30cm from the ground, it will be
affected by the blade vortex made by itself and become
unstable. This is "ground effect". The lower the drone is,
the greater the effect will be.
Page 15
14
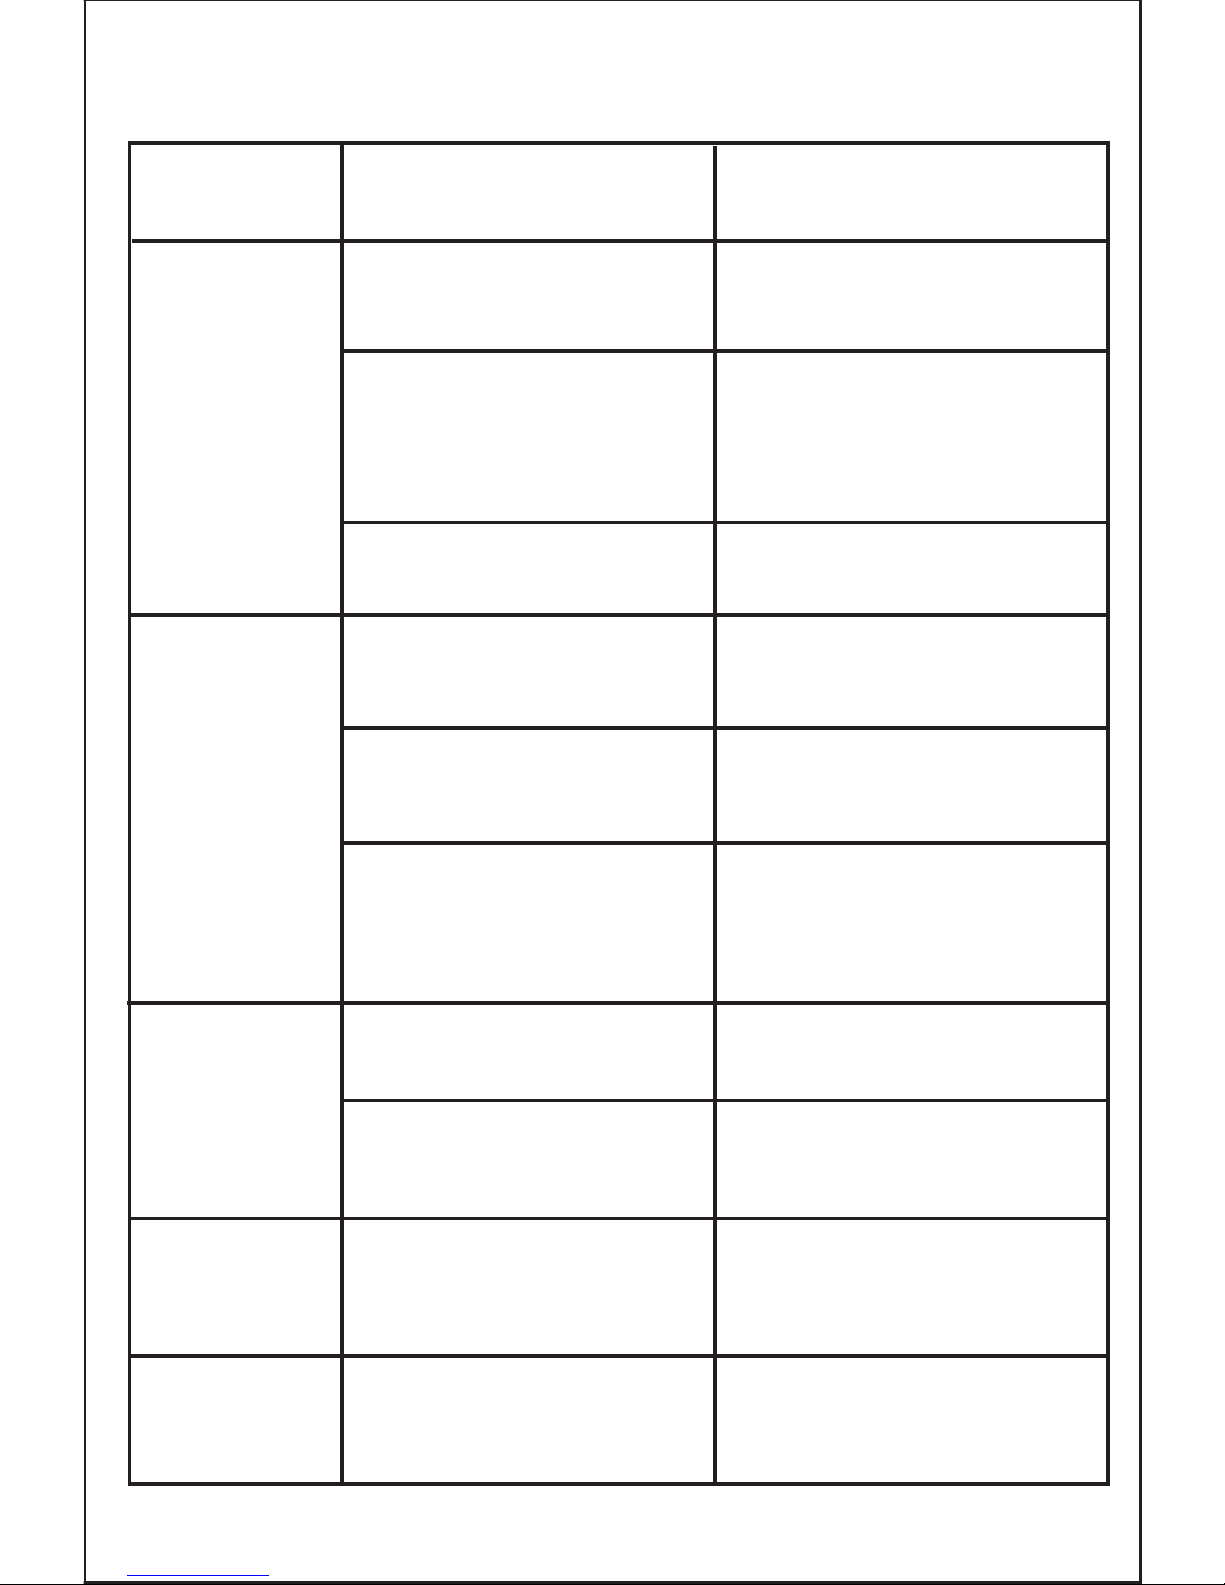
FAQ
Control
failure
PROBLEMS CAUSES SOLUTIONS
Not connect with the
drone battery.
Connect the drone battery in
right way.
Too strong wind force.
Do not fly in windy days. The
performance and the control
of the drone will be affected
by the strong winds.
Fail to
ascend
The rotation speed of
main blades is too slow.
Push up the throttle joystick.
The battery of the drone
is not fully charged.
Please full charge the drone.
Landing
too soon
The throttle stick is pulled
down too fast.
Pull down the throttle stick
slowly to perform a smooth
landing.
Out of
control
Beyond the effective
controlling distance.
Ensure that the flying
distance is within 30 meters.
The transmitter switch
is on“OFF”.
Turn on the transmitter.
Install the batteries
improperly.
Check and make sure that
the batteries are loaded
according to the polarity
instructions on the battery
box correctly.
Battery exhausted. Replace with new batteries.
The remote control is
not turned on.
Turn on the remote control.
Control
failure
Page 16

15
JJRC TECHNICAL SUPPORT
Dear Customer,
Thank you for choosing JJRC product. Please visit JJRC
official website for more FAQ and information if there
is any problem of using our product.
Product Operation: Please visit JJRC College for tutorial
video or user manual.
Product Features: Please refer to product page
description or product brochure.
After-sale Service: Please refer to conditions and terms
of after-sale service.
The final interpretation right belongs to all JJRC.
Should you have any further questions, please visit JJRC
Online Feedback and leave your message.
Thank you again for your support!
JIANJIAN TECHNOLOGY CO.,LTD.
www.jjrc-tech.com
 Loading...