

Page 1
JJC
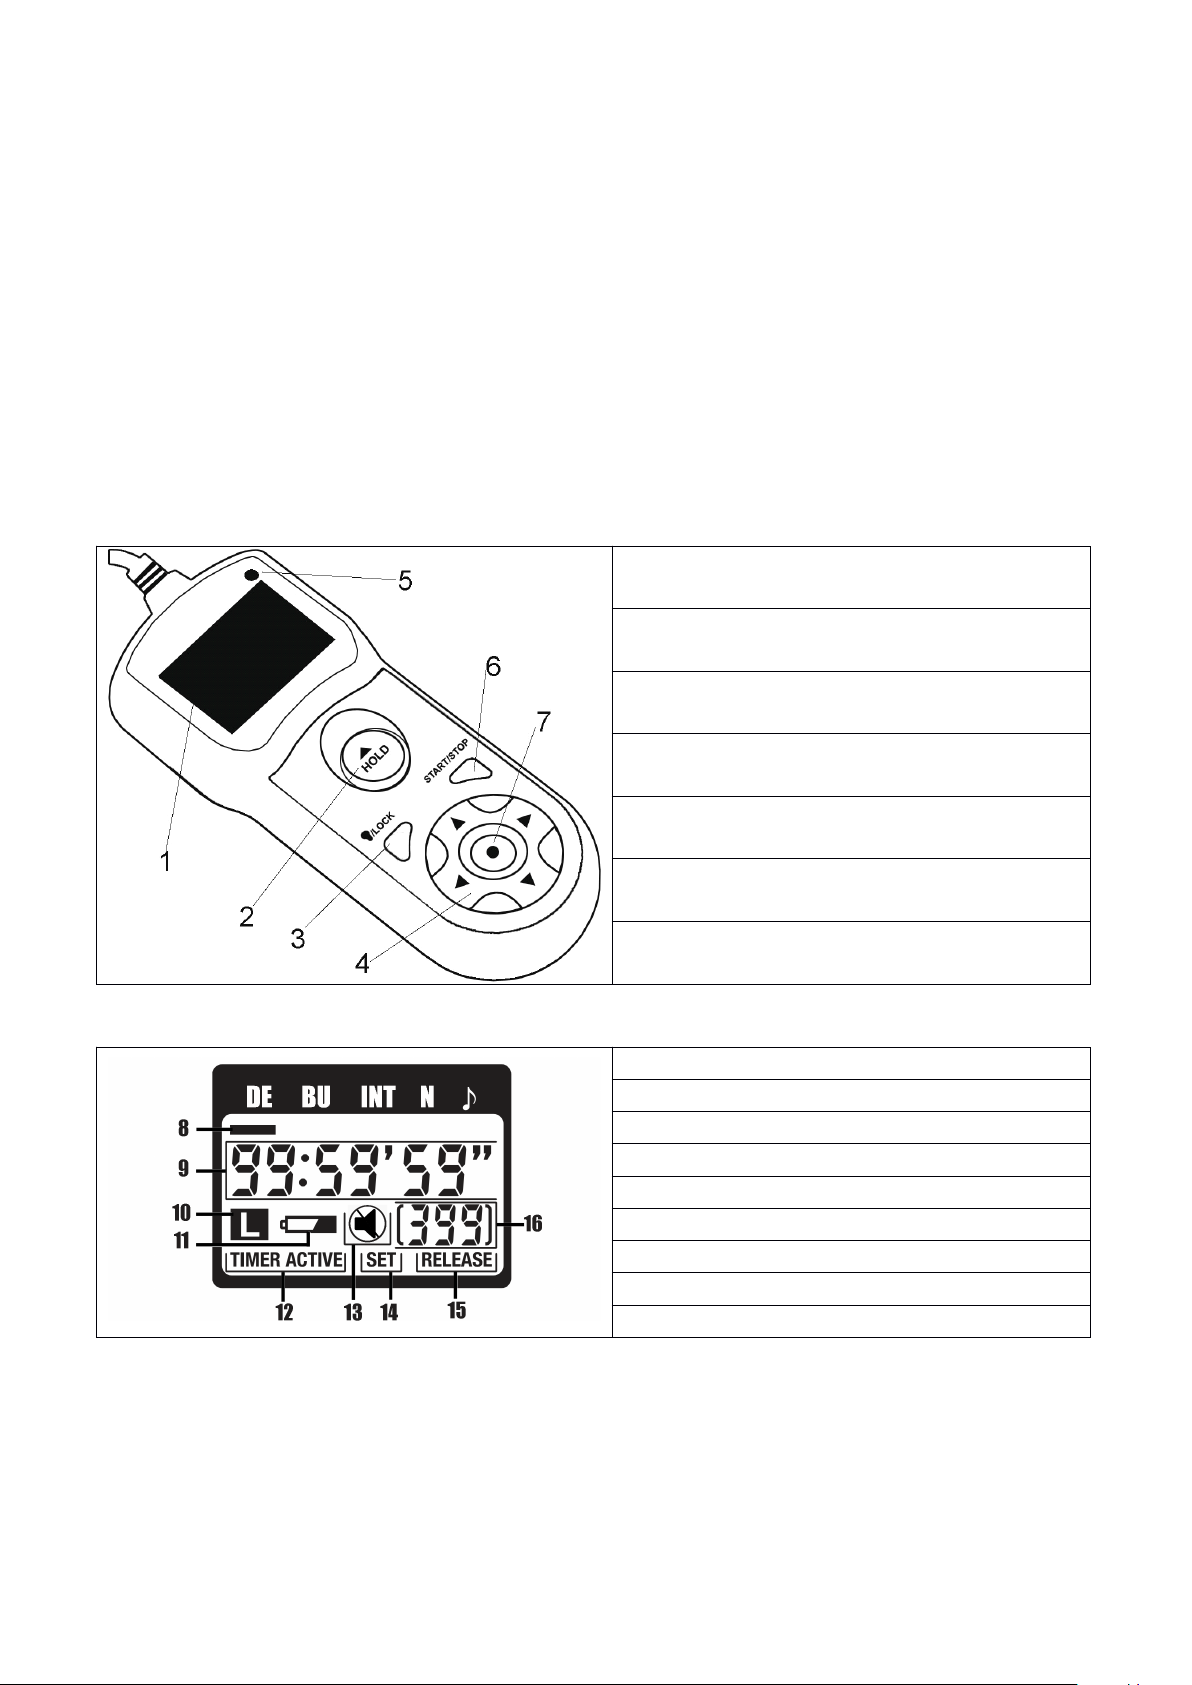
Control Panel
Shutter Release Button
LED Light / Lock Button
Arrow Button
Release Lamp
Timer Start/Stop Button
SET Button
Selection cursor
Timer Display
LOCK indicator
Low power indicator
Timer Active indicator
Speaker ON/OFF
SET indicator
RELEASE indicator
Number of shots
JJC
JJC
JJC TM - Series
Multi-Function
Multi-Function
Multi-Function
Multi-Function Timer
English
English
English
English Manual
JJC
TM
Thank you for purchasing JJC
performance, please read this manual instruction carefully before using.
Parts
of
TM
Parts
Parts
Parts of
of
of TM
controller:
TM
controller:
TM controller:
controller:
JJC
JJC TM
series
TM
series
TM series
series Multi-Function Timer Remote control .
1.
2.
3.
4.
Manual
Manual
Manual Instruction
Timer
Timer
Timer Remote
Remote
Remote
Remote Control
Instruction
Instruction
Instruction
Control
Control
Control
.
.
. For the best
5.
6.
7.
8.
9.
10.
11.
12.
13.
14.
15.
16.
Page 2
For Your Safety
Turn OFF the TM controller
Turn OFF the Camera and Disconnect the TM controller
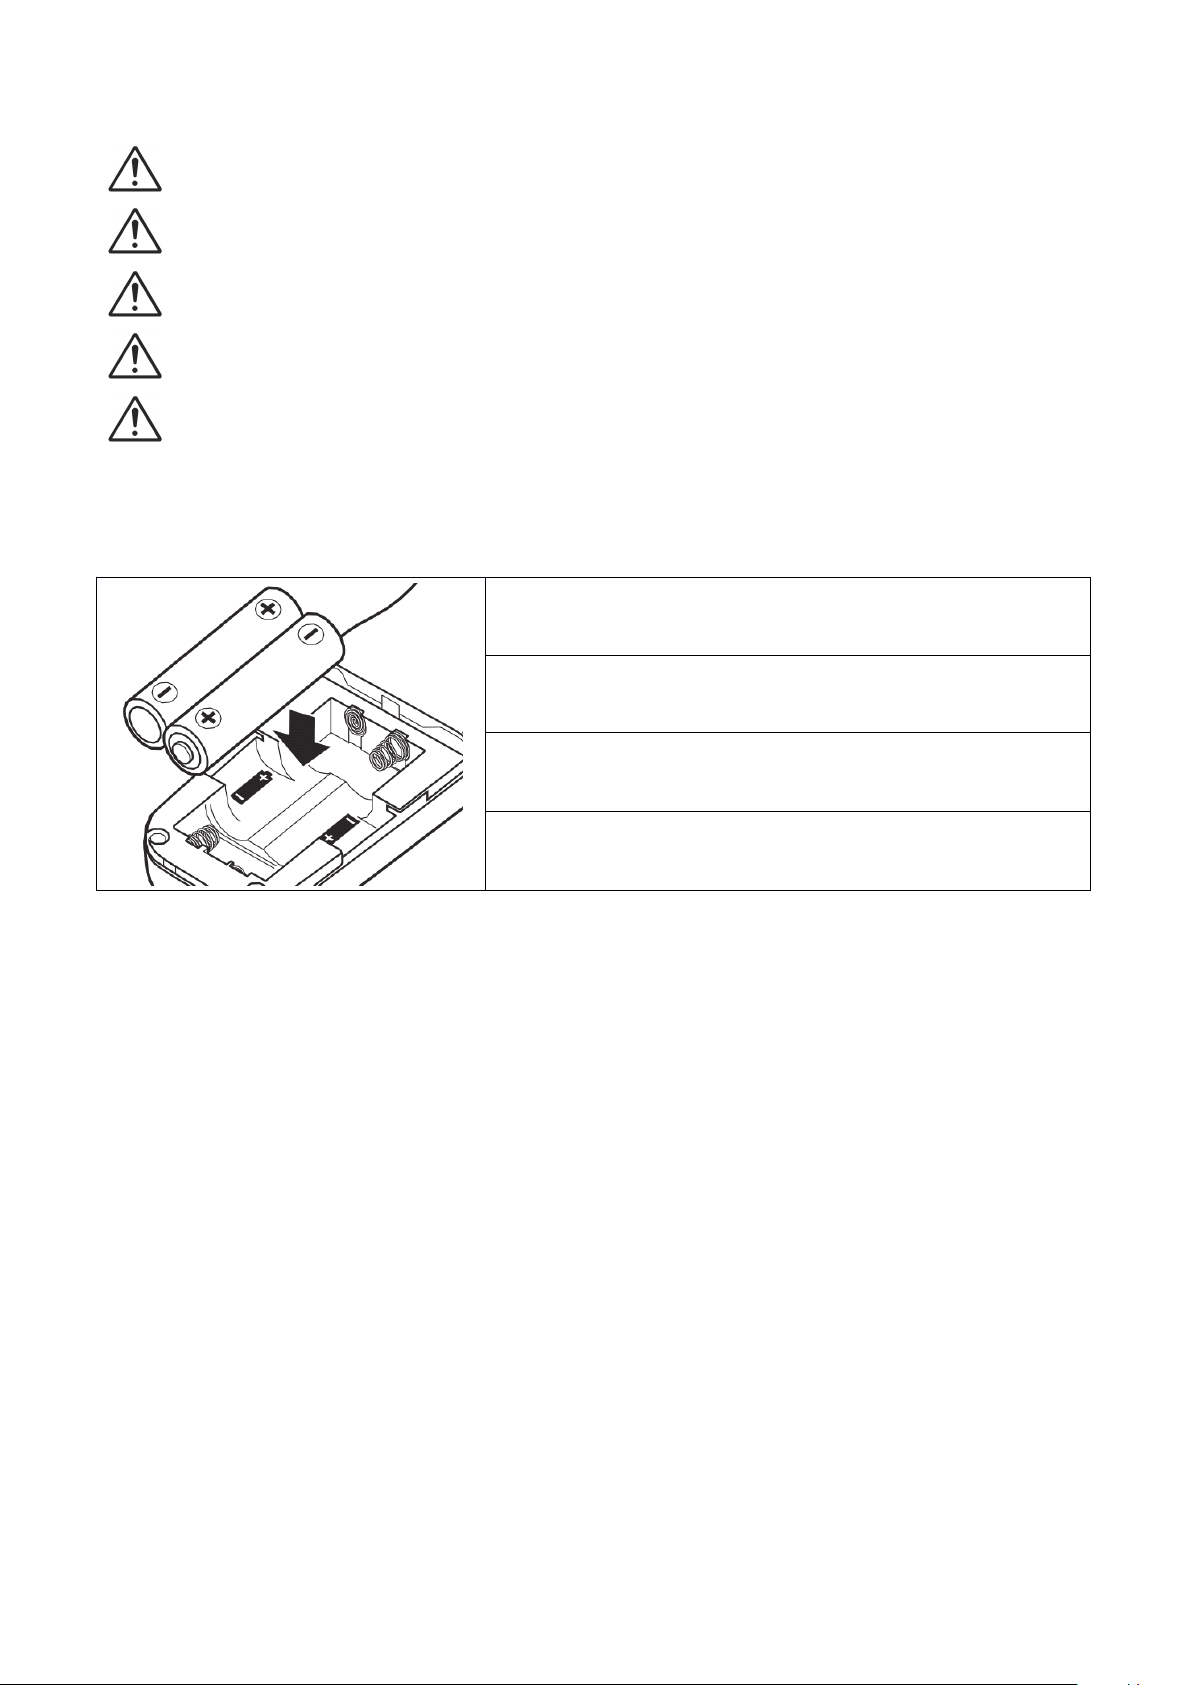
Remove the batteries (AAA 1.5V or LR03 Alkaline
batteries)
Insert two fresh batteries
Do not disassemble or modify
Keep Dry
Keep out of reach of children
Do not use in the presence of flammable gas
Do not expose to high temperatures
Replacing Batteries:
1.
2.
3.
4.
Connecting the TM controller:
1. Turn the camera and TM controller OFF
2. Remove the remote socket cover from the camera
3. Connect the plug to the remote socket
4. Turn the camera and TM controller ON
5. Now you can start program the function and enjoy the timer trigger.
Disconnecting the TM controller:
1. Turn the camera and TM controller OFF
2. Disconnect the plug from the camera body
3. Replace the remote socket cover
Page 3

Automatic
Exposure
Exposure
Exposure
Exposure Mode
Mode
Mode
Mode
M (manual)
Shutter
Shutter
Shutter
Shutter Speed
Speed
Speed
Speed
BULB
Interval
Interval
Interval
Interval Timer
Timer
Timer
Timer
OFF
Focus
Focus
Focus
Focus Mode
Mode
Mode
Mode
Auto Focus or Manual
Continuous
Continuous
Continuous
Continuous
S (single frame)
Option
Option
Option
Option
Description
Description
Description
Description
Supported
Supported
Supported
Supported Setting
Setting
Setting
Setting
DE
Just like the self timer on your camera. T he T M timer
remote switch allows you to set any delay (in 1 second
increments) up to 99 hours, 99 minutes and 99 seconds.
0s to 99hrs 59min 59s
BU
It allows you to take time exposures up to 100 hours in
length.
0s to 99hrs 59min 59s
INT
The Interval Timer can be set to any time period up to 100
hours as well. If you set it to 10 minutes, for example, one
exposure will be taken every 10 minutes until either the film
runs out or the Exposure Count limit has been reached.
1s to 99hrs 59min 59s
N
This setting permits you to set the number of exposures that
will be taken, up to 3 99 shots .
1 to 399 shots, --(unlimited)
Speaker ON/OFF
ON/OFF
Delay( DE
DE
DE
DE ), Exposure/BULB( BU
BU
BU
BU ) and Interval Settings ( INT
INT
INT
INT )
Automatic
Automatic
Automatic Function
Function
Function
Function Description:
Description:
Description:
Description:
DE
Automatic Timer Function, Choose the Delay / Self Timer ( DE
INT
Timer ( INT
Following table is the setting about the camera shutter speed.
1.
INT
INT ) and number of shots for timed interval photography e xposure ( Exposure Count ( N
Camera Setting
DE
DE ), BULB/ Long Exposure ( BU
a) Connect the TM controller to the camera and turn ON.
b) Adjust the camera setting
2. Set TIMER
Press the SET button (7). The SET icon will flash in the Control Panel (1).
Adjust the following settings
BU
BU
BU ), Interval
N
N
N )).
IMPORANTANT:
Please ensure the Interval time is longer than Exposure timer at least 2 seconds.
Page 4

Setting the Timer
1.Delay/Self Timer (Time until shooting starts)
Hours
Minutes
Seconds
2. BULB/ Long Exposure (Exposure Time)
Hours
Minutes
Seconds
3. Interval Timer ( INT
INT
INT
INT )
Hours
Minutes
Seconds
4.Number of Shots( N
N
N
N )
� Use the arrow button to set the timer. Press left or right to select, up or down to change. The current
selection is indicated by the selection cursor.
� Press the SET button at any time to complete the operation and display the new setting for the
selected item.
indicated by the selection cursor. Press the SET button to edit the current setting as described above .
To
view other setting, press the ARROW button left or right. The current selection is
Page 5

To
5.Speaker
Flashes while timer is active
Between
Between
Between
Between shots
shots
shots
shots : Time remaining until next
shot. While
While
While
While shutter
shutter
shutter
shutter is
is
is
is open
open
open
open : Time remaining
until shutter closes.
Number of shots remaining
Flashes while shutter is open
ensure correct operation, choose an interval at least two seconds longer than the exposure time.
When using autofocus, set the delay to two seconds or more and choose an interval at least two seconds
longer than the exposure time to ensure that the cam era has time to focus. When using long exposure
noise reduction, the interval should be at least twice the exposure time.
Intervals of 00:00:00 will automatically be reset to 00:00:01 when the SET button is pressed to put
settings into effect.
To
set the number of shots to - - (unlimited), select 1 and press the arrow button down or select 399
an d press the arrow button up.
After adjusting all setting, press the SET button to put the new settings ENABLE. A beep will sound (If the
speaker is ON) and the “ SET ” icon indicator will go out.
Start
Start
Start
Start the
Press the START/STOP button. The timer will start and “ TIMER ACTIVE ” will flash in the control panel.
Between shots, the control panel will show the time remaining until the next photograph is taken. If the
speaker is ON, a keep will sound three times at ONE-SECOND intervals before the shutter opens.
While the shutter is opened, the control panel will show the time remaining until the shutter closes, and
the release lamp and “ RELEASE ” indicator will flash at ONE-SECOND intervals. The number of shots
remaining will be updated each time a photograph is taken.
the
timer
the
timer
the timer
timer
1.
2.
3.
4.
Page 6

End
The
The
The
The Speaker
Speaker
Speaker
Speaker and
and
and
and Release
Release
Release
Release Lamp
Lamp
Lamp
Lamp
The following illustration shows when a beep will sound ( ) and the release lamp flash ( ) with a
delay of 5s, and exposure time of 4, and an interval of 9s.
CAMERA
CAMERA
CAMERA
CAMERA
Exposure
Exposure
Exposure
Exposure mode
mode
mode
mode
M (manual) or S (shutter-priority auto)
Shutter
Shutter
Shutter
Shutter speed
speed
speed
speed
Any
Interval
Interval
Interval
Interval timer
timer
timer
timer
OFF
Focus
Focus
Focus
Focus mode
mode
mode
mode
AF-C or M
Shooting
Shooting
Shooting
Shooting mode
mode
mode
mode
S (single frame)
TM
TM
TM
TM
Exposure
Exposure
Exposure
Exposure time
time
time
time
O s
Interval
Interval
Interval
Interval
Longer than camera shutter speed
Shooting
End
Shooting
End
End Shooting
Shooting
Shooting will end automatically when the selected number of shots has been taken.
before all photographs have been taken, press the START/STOP button.
To
end shooting
Using the camera to select shutter speed
To
take photographs at the shutter speed selected with the camera, adjust setting as follows:
*When using autofocus, please choose an interval at least two seconds longer than the camera shutter
speed to allow the camera time to focus. When using long exposure noise reduction, choose an interval
at least double the camera shutter speed.
Manual
Manual
Manual
Manual Function
Function
Function
Function Description:
Description:
Description:
Description:
Adjust Camera Settings
Turn OFF the TM controller. Remove the remote socket cover from the camera.
1.
Connect the TM controller to the camera and turn the camera ON. Select the M function and choose
2.
BULB of the camera.
Half press the shutter button for focus
3.
4.
5.
6.
7.
Fully press the shutter button for release shutter
Slide the shutter button to the HOLD position. The camera locks the shutter.
Slide
it
Release the button to end shooting.
in the opposite direction to release the lock.
Page 7

LED
CANON
CANON
CANON
CANON
NIKON
NIKON
NIKON
NIKON
PENTAX
PENTAX
PENTAX
PENTAX
SAMSUNG
SAMSUNG
SAMSUNG
SAMSUNG
OLYMPUS
OLYMPUS
OLYMPUS
OLYMPUS
PANASONIC
PANASONIC
PANASONIC
PANASONIC
SIGMA
SIGMA
SIGMA
SIGMA
LEICA
LEICA
LEICA
LEICA
MINOLT A
MINOLT A
MINOLT A
MINOLT A
SONY
SONY
SONY
SONY
FUJIFILM
FUJIFILM
FUJIFILM
FUJIFILM
KODAK
KODAK
KODAK
KODAK
LED
LED
LED Light
Press the LED
Press the LED
Press the LED
Light
Light
Light /
LED
LED
LED Light
LED
LED
LED Light
LED
LED
LED Light
/
Lock
/
Lock
/ Lock
Lock Button
Light
Light
Light /
Light
Light
Light /
Light
Light
Light /
Button
Button
Button
/
Lock
/
Lock
/ Lock
Lock Button
/
Lock
/
Lock
/ Lock
Lock Button
/
Lock
/
Lock
/ Lock
Lock Button
Button
Button
Button for 1 second to turn on the LED lamp of the control panel.
Button
Button
Button for 2 seconds to enable the Button Lock.
Button
Button
Button for 2 seconds to disable the Button Lock
Specifications:
Dimensions: Approx 110 X 45 X 2 2 mm
Weight: Approx 72 g
Battery Type: 2 AAA batteries / LR03 alkaline batteries
Length of cord: Approx 90cm (3meters/5meters/10merts also available)
Operating temperature: -20-+50 ° C
Product
Product
Product
Product Compatibility
TM-A
TM-A
TM-A
TM-A replaces
TM-B
TM-B
TM-B
TM-B replaces
TM-C
TM-C
TM-C
TM-C replaces
TM-E
TM-E
TM-E
TM-E replaces
TM-F
TM-F
TM-F
TM-F replaces
TM-G
TM-G
TM-G
TM-G replaces
TM-M
TM-M
TM-M
TM-M replaces
TM-J
TM-J
TM-J
TM-J replaces
Compatibility
Compatibility
Compatibility List:
replaces
replaces
replaces CANON
replaces
replaces
replaces NIKON
replaces
replaces
replaces CANON
replaces
replaces
replaces OLYMPUS
replaces
replaces
replaces MINOLTA
replaces
replaces
replaces NIKON
replaces
replaces
replaces NIKON
replaces
replaces
replaces OLYMPUS
CANON
CANON
CANON RS-80N3
NIKON
NIKON
NIKON MC-30
CANON
CANON
CANON RS-60E3
OLYMPUS
OLYMPUS
OLYMPUS RM-CB1
MINOLTA
MINOLTA
MINOLTA RC-1000S/L
NIKON
NIKON
NIKON MC-DC1
NIKON
NIKON
NIKON MC-DC2
OLYMPUS
OLYMPUS
OLYMPUS RM-UC1
List:
List:
List:
RS-80N3
RS-80N3
RS-80N3 /
MC-30
MC-30
MC-30 /
RS-60E3
RS-60E3
RS-60E3 /
MC-DC1
MC-DC1
MC-DC1
MC-DC2
MC-DC2
MC-DC2
/
/
/ MC-36
RM-CB1
RM-CB1
RM-CB1
RC-1000S/L
RC-1000S/L
RC-1000S/L /
RM-UC1
RM-UC1
RM-UC1
/
TC-80N3
/
TC-80N3
/ TC-80N3
TC-80N3
MC-36
MC-36
MC-36
/
PENTAX
/
PENTAX
/ PENTAX
PENTAX CS-205
/
RM-S1AM
/
RM-S1AM
/ RM-S1AM
RM-S1AM /
CS-205
CS-205
CS-205
/
RM-S1LM
/
RM-S1LM
/ RM-S1LM
RM-S1LM
Copyright
Copyright
Copyright
Copyright of
WWW.JJC.CC
WWW.JJC.CC
WWW.JJC.CC
WWW.JJC.CC
of
JJC
of
of JJC
Technology
JJC
Technology
JJC Technology
Technology
 Loading...