

Page 1
JJC RM-E5
Infrared Remote Control Instruction
Thank you for purchasing JJC RM-E5 Infrared Remote Control. For the best performance, please
read this instruction carefully before use.
z To use RM-E5 Remote Control
1. For the first time use, please pull out the plastic separator (if your remote control has it) at the
battery holder.
2. Mount the camera on a tripod (recommended) or place the camera on a stable, level surface.
3. Press the button and rotate main command dial until (delayed remote) or (quick response
remote) is displayed in the control panel.
4. Aim the transmitter on the remote control at the infrared receiver on the camera (usually within
+/- 20 degree of the lens axis, from the left to the right and from the top to the bottom) and
press the shutter-release button on the remote control (when using the remote outdoors, make
sure that the subject is not backlit and that the line of site between the transmitter and the
infrared receiver is not blocked by the lens or other obstacles).
5. How the camera focuses and shoots depends on the option selected in your camera's custom
setting. For further information, check your camera's manual.
Infrared can not be seen by human eyes. So you will see no visible light from the LED on the
front end of the remote control when operating.
1
Page 2
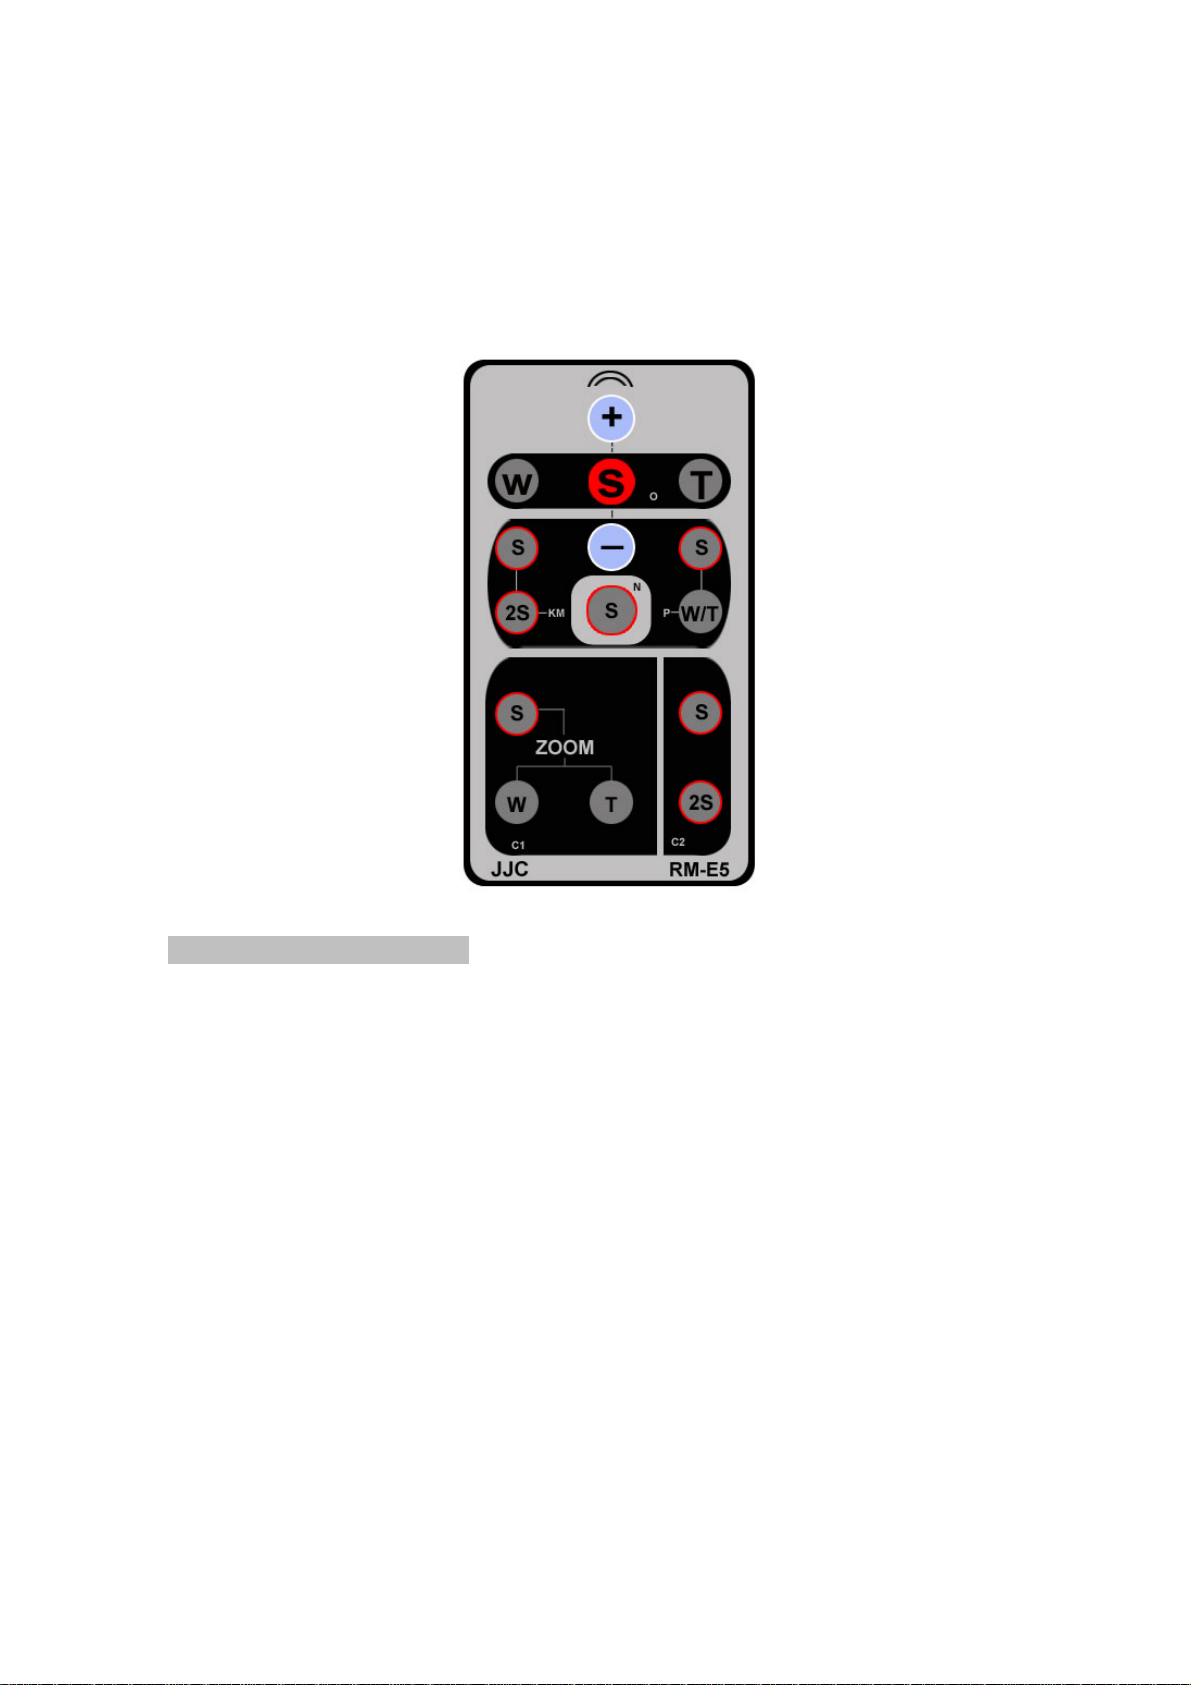
z Identifying the buttons
button for Canon DSLR/SLR camera instant shutter.
side for telephoto
O
Part
side for wide-angel
Move forwards (replay mode)
Move Backwards (replay mode)
KM
S button for Canon DSLR/SLR camera instant shutter.
Part
2S button for 2seconds delay shutter.
N
Part
S button for Nikon camera Shutter
P
S button for Pentax camera shutter.
Part
T/W button is to change Pentax camera’s lens ZOOM.
(T/W function is not working on Pentax DSLR/SLR camera.)
C1
S button for Canon DSLR/SLR camera instant shutter.
Part
2S button for 2seconds delay shutter.
S button for Canon DSLR/SLR camera instant shutter.
C2
Part
side for wide-angel
side for telephoto
z Specification
• Easy-to-replace CR2025 lithium battery.
• Operating temperature: 5 °C to 40 °C (40 °F to 105 °F).
• Typical Battery Life: up to 3 years, 20,000 exposures.
2
Page 3

z To Replace the Battery
1. The remote control is powered by a three-volt CR2025 lithium battery which has already
been included in.
2. After sliding the latch in the direction shown to unlatch the battery holder, remove the
holder.
3. Remove the battery from the battery holder.
4. Insert a fresh battery with the face marked "+" on top.
5. Slide the battery holder into the remote until the latch clicks into place.
z Attention
a. When the remote control is not in use over a long time, please remove the battery out of the
remote control.
b. Do not leave the remote control in places of which the temperature is extremely high.
RM-E5 compatible with Cameras
O Part compatible with Olympus Cameras
E1 E3 E10 E20 E30
Digital SLR
Design &
Performance
Easy & Fun
Power &
Versatility
Stylish
E100 RS E300 E330 E400 E410
E420 E450 E510 E520 E620
E600 E-P1 E-P2
Stylus 800 Stylus 500 Stylus 410 Stylus 400 Stylus 300
D40 ZOOM
C8080 Wide
Zoom
C7070 Wide
Zoom
C5000 Zoom C50 Zoom C4040 Zoom
C3000 Zoom C2500L
C2000 Zoom
µ800 Digital µ500 Digital µ410 Digital µ400 Digital µ300 Digital
Copyright of JJC Technology Company
C770 Ultra
Zoom
C7000 Ultra
Zoom
C755 Ultra
Zoom
C60 Zoom
C2100 Ultra
Zoom
C750 Ultra
Zoom
C5060 Wide
Zoom
C3040 Wide
Zoom
C2040 Zoom
C730 Ultra
Zoom
C5050
Zoom
C3030
Zoom
C2020
Zoom
3
Page 4

KM part compatible with Konica Minolta Cameras
Digital
DiMAGE S414 DiMAGE S404 DiMAGE S304
Film SLR
Dynax/Maxxum
Compact
Film
Riva/Freedom
DiMAGE F100 DiMAGE F200 DiMAGE F300 DiMAGE A200
Dynax/Maxxum
5 Date
50 Date
Riva/Freedom
/Capios
ZOOM 20
/Capios
ZOOM 130
Dynax/Maxxum
4 Date
Dynax/Maxxum
60
Riva/Freedom
/Capios
ZOOM 75W
Riva/Freedom
/Capios
ZOOM 140(A)
Dynax/Maxxum
3(L) Date
Dynax/Maxxum
70
Riva/Freedom
/Capios
ZOOM 115 Date
Riva/Freedom
/Capios
ZOOM 150 Date
Dynax/Maxxum
40
Riva/Freedom
/Capios
ZOOM 125 Date
Riva/Freedom
/Capios
ZOOM 160(A)
N part compatible with Nikon Cameras
Digital SLR
Film SLR
Coolpix
LiteTouch
Nuvis
D3000 D5000 D90 D80 D70s
D70 D60 D50 D40 D40x
F65 F75 N65 N75
9000 8800 8400 P6000
150ED 140ED 130ED 110S 100W
Nuvis S
P Part compatible with Pentax Cameras
Digital SLR
Optio
Film SLR
*ist DL *ist DS *ist D
S S4 S4i S5i S5n SV
330 430 450 550 555 750z
S50 S40 S60
*ist MZ6 MZ-L ZX-L K100D K110D
K10D K20D K200D KM K2000 K-x
K7
P Part compatible with Samsung Cameras
Digital SLR
GX-1L GX-1S GX-10
C1 part compatible with Canon Cameras
Power Shot
G2 G1 S1 IS S70*
*Only work with shutter function.
Pro 1 G6 G5 G3
S60* Pro 90 IS
Copyright of JJC Technology Company
4
Page 5

C2 part compatible with Canon Cameras
300D 350D 400D 450D 500D
Digital SLR
Film SLR
APS SLR
SureShot
(Prima Super)
ELPH
REBEL XSI KISS X2 Digital Rebel Digital Rebel XT Rebel T1i
5D Mark II EOS 7D 550D Rebel T2i
ELAN 7 10 30 33 50
55 100 300v 300x 3000v QD
Rebel K2 Rebel T1 Date Rebel T2 Date Kiss III Kiss III L
EOS IX
Z180u Z155 120
370Z Z3
Copyright of JJC Technology Company
5
 Loading...