

Page 1
www.jiyiuav.com
USER MANUAL
Ver. 1.00
Last updated: May 7. 2015
Thank you for choosing P2 Pro flight controller, hope you will have a
good flight with P2 Pro. We strongly recommend you read this
manual carefully before you install P2 Pro flight controller. The
following instructions will help you to make your P2 Pro flight
controller working perfectly.
Note: this manual shall be used together with the P2 Pro assistant
software, if there is any discrepancy between this manual guide
and the assistant software, the assistant software shall prevail.
If you meet any difficulty during the usage, please contact with JIYI
Robotic Co. Ltd. at [email protected]
Page 2

www.jiyiuav.com
Content:
1. Disclaimer
.......................................................................................
3
2. Technical Terms and Abbreviations
..............................................
3
3. Packing List
.....................................................................................
4
4. Installation Guide
...........................................................................
4
4.1 Frame Type
...............................................................................
4
4.2 Flight Controller Installation
...................................................
5
4.3 GPS Installation
........................................................................
5
5. Wire Connect Guide
.......................................................................
6
5.1 Connection
...............................................................................
6
5.2 Wiring Diagram
........................................................................
7
6. Configuration and Preparation
......................................................
8
6.1 Driver and Assistant Software Installation
............................
8
6.2 User Interface
..........................................................................
8
6.3 Aircraft Type Selection
............................................................
9
6.4 Remote Controller Calibration
..............................................
10
6.5 Accelerometer Calibration:
...................................................
11
6.6 Battery Setting
.......................................................................
12
6.7 Compass Calibration
..............................................................
13
6.8 Firmware Upgrade
.................................................................
15
6.9 Stability Sensitivity Setting
...................................................
16
7. Flight mode
...................................................................................
17
7.1 Disarm & Arm
........................................................................
17
7.2 Stable Mode (Attitude Mode)
..............................................
17
7.3 GPS Flight Mode
....................................................................
18
7.3.1 GPS Mode
.......................................................................
18
7.3.2 Go Home under GPS mode
............................................
18
7.4 Smart Circling Mode
..............................................................
19
7.5 Lost Control Protection (Fail Safe)
........................................
21
7.6 Sports Mode
...........................................................................
21
Appendix
...........................................................................................
23
Appendix 1: Product Specification
..............................................
23
Appendix 2 : LED Light Indicator and Meaning
..........................
24
Appendix 3 JIYI Technical Suppport
...........................................
25
Page 3

www.jiyiuav.com
1. Disclaimer
First of all, thank you for using JIYI product. This is not a toy, please read
the manual carefully before you use this product. Upon reading this,
you’re deemed to agree with the disclaimer, this products is not suitable
for people aged below 18 years old.
This entry-level flight controller is specially designed by JIYI for multirotor hobbyists. Under the normal electric supply and instant condition,
this controller can satisfy the leisure, FPV, Aerial photography usage. JIYI
is always aiming high quality, reliable and stable products. As safety
consideration, we strongly recommend you to remove the propeller
during the configuration, ensure the wiring connection and electric
supply are in place, and stay away from crowd, fragile and dangerous
objects during the flight.
If any of below reason (not limited to below reason) occur during the
use of our products, JIYI shall not be liable for any direct or indirect loss,
damages and injuries that result from the usage of our products. JIYI
shall only be responsible for flight controller damaged which is caused
by the controller itself. JIYI shall not be liable for any other form of
Liability and Compensation.
1. User do not follow the manual during the usage;
2. Weak structure of aircraft or damage on aircraft structure;
3. User using third party product which caused the abnormal flight;
4. User’s wrong judgment or improper handling;
5. User intended to against others;
6. User continue with the flight even though knew that the product is
function abnormally;
7. Flying under the condition of strong interference, radio interference
and prohibited area or vision unclear or blocked or unable to judge and
identify the flight condition;
8. Under bad weather condition or not suitable flight condition;
9. Abnormal working condition of flight controller where caused by user
tearing or modifying the JIYI product and accessories;
10. Flight where user under drunk, drug abuse or any other unhealthy
condition;
11. Any others products defects which is not caused by JIYI products.
Page 4
www.jiyiuav.com
2. Technical Terms and Abbreviations
3. Packing List
JIYI P2 Pro Flight controller x 1
GPS/ Compass Module x 1
GPS Stand x 1
LED/USB Module x1
POW Module x1
Servo wire x6
USB Cable (Micro-USB) x1
Some 3M adhesive
4. Installation Guide
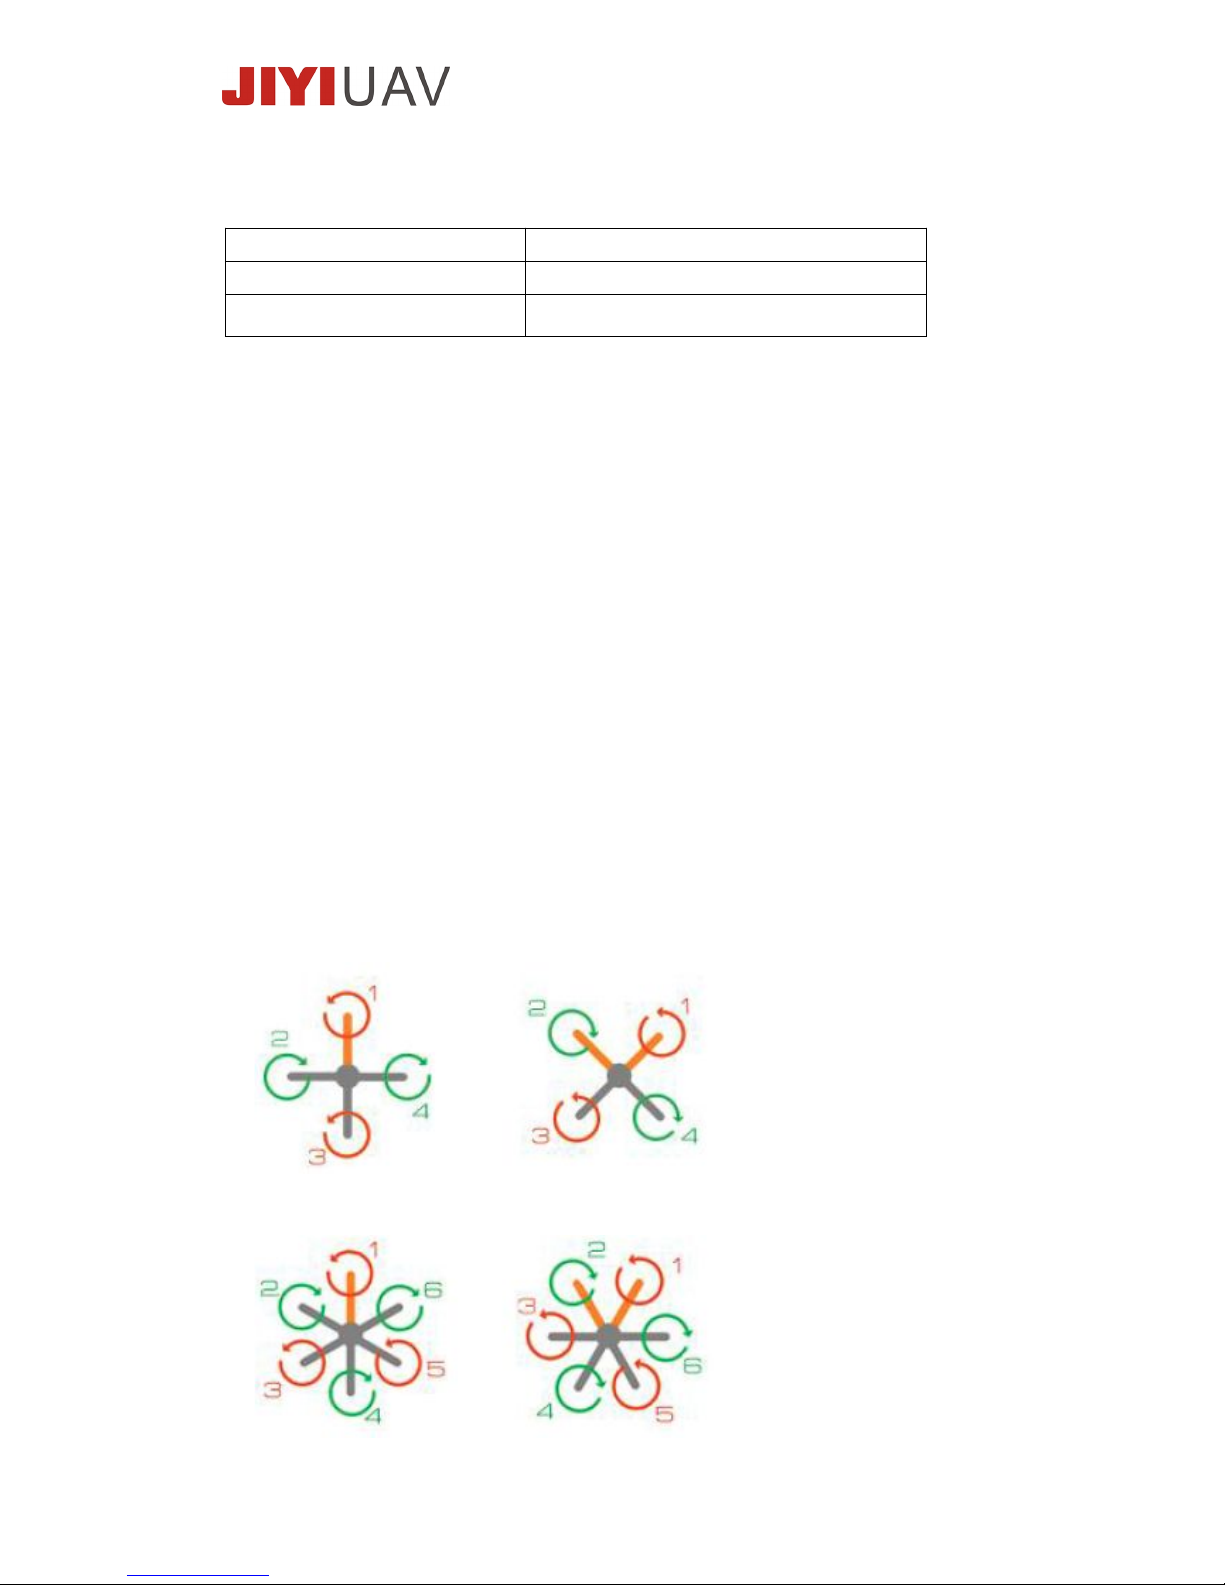
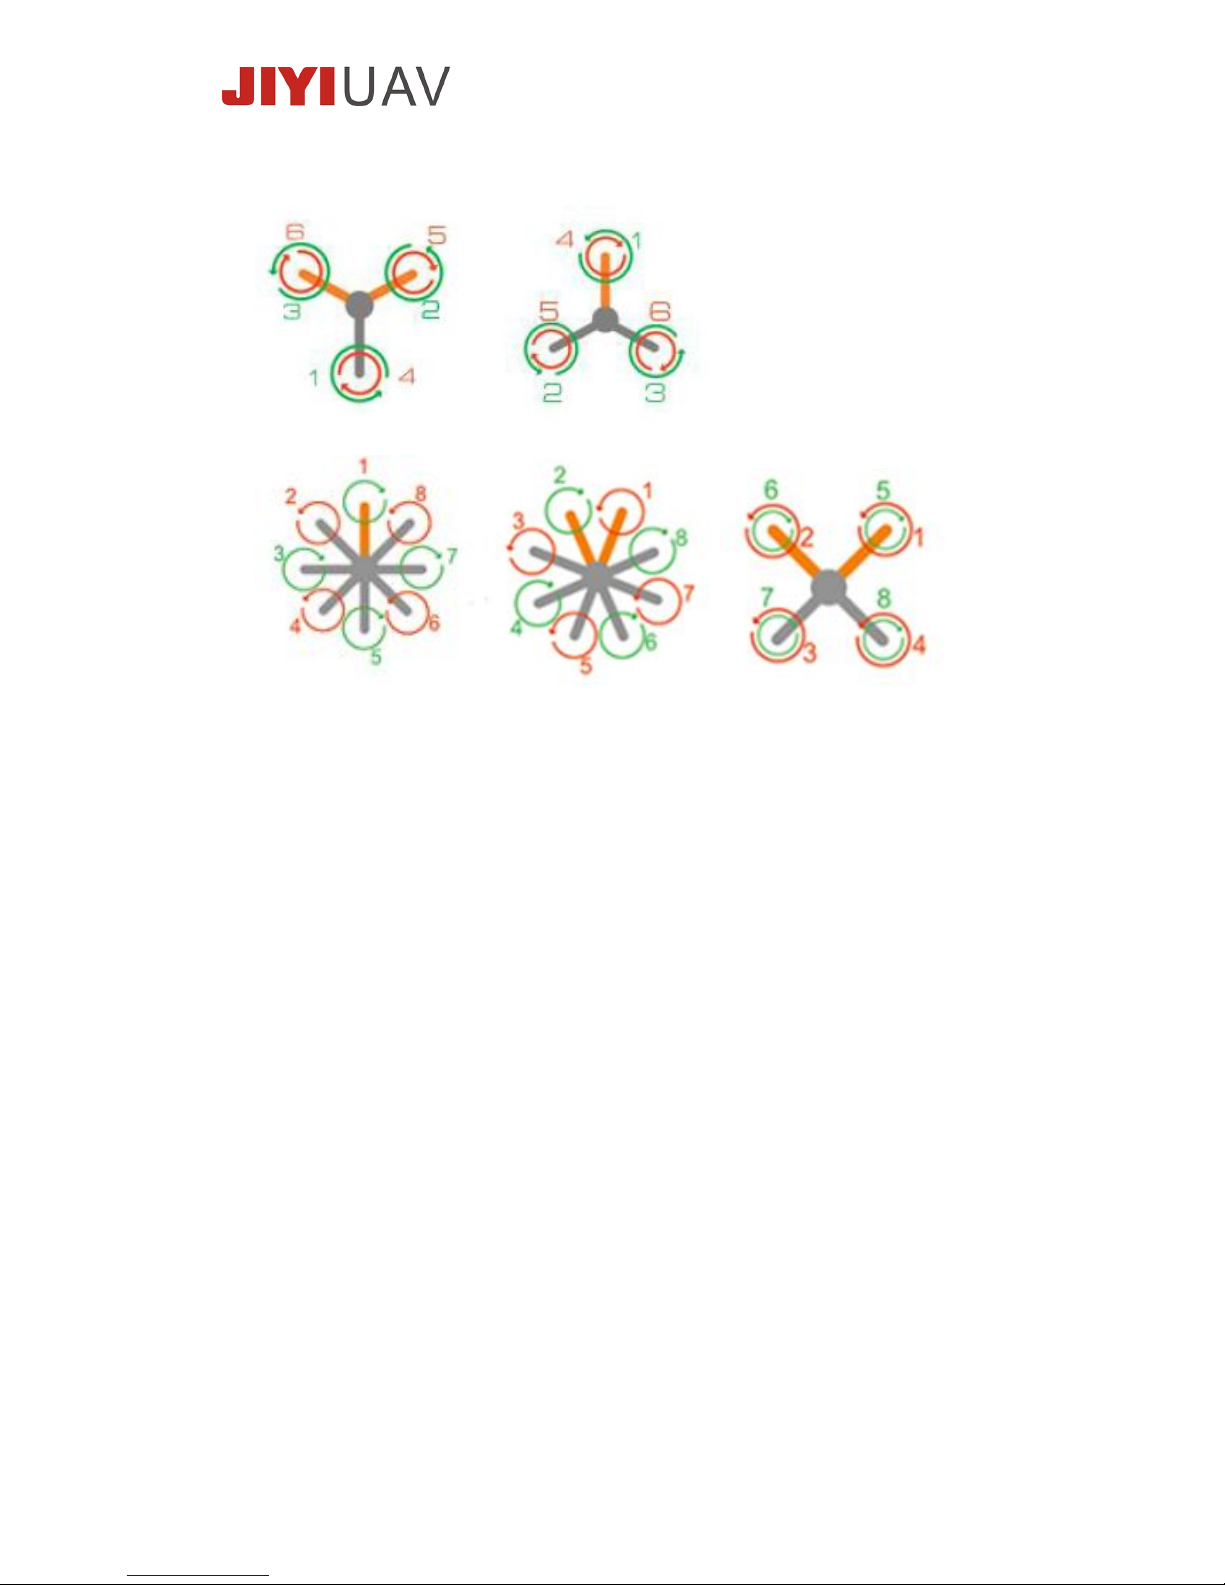
4.1 Frame Type
P2 Pro Flight controller support nine types of frame including + type,
X type, Y type, as follow:
a. Quad-rotor + type and X type
b.) Hexa-rotor + type and X type
CH
Channel
FS
Fail Safe (Loss Control Protection)
JIYI
JIYI Robotics Co. Ltd.
Page 5
www.jiyiuav.com
c.) Hexa-rotor Y type and IY type
d.) Octo-rotor + type, X type and X8 type
4.2 Flight Controller Installation
In order to get the excellent flying experience, Install the P2 Pro flight
controller to the weight center of the aircraft, ensure the flight
controller is install horizontally on flat surface, the arrow on
controller should points to the nose of aircraft. The flight controller
has built-in bumper, you only need to use the 3M adhesive to fix the
flight controller on aircraft.
Precaution:
a. Do not install the P2 Pro flight controller to any aircraft which
wheelbase is more than 1200mm;
b. If you install any FPV transmitter, please keep it away from flight
controller.
4.3 GPS Installation
Please ensure the GPS/Compass module is installed horizontally on
the GPS Stand, arrow on GPS points to the nose of aircraft. Ensure
the module is installed away from motors and ESCs.
Page 6
www.jiyiuav.com
5. Wire Connect Guide
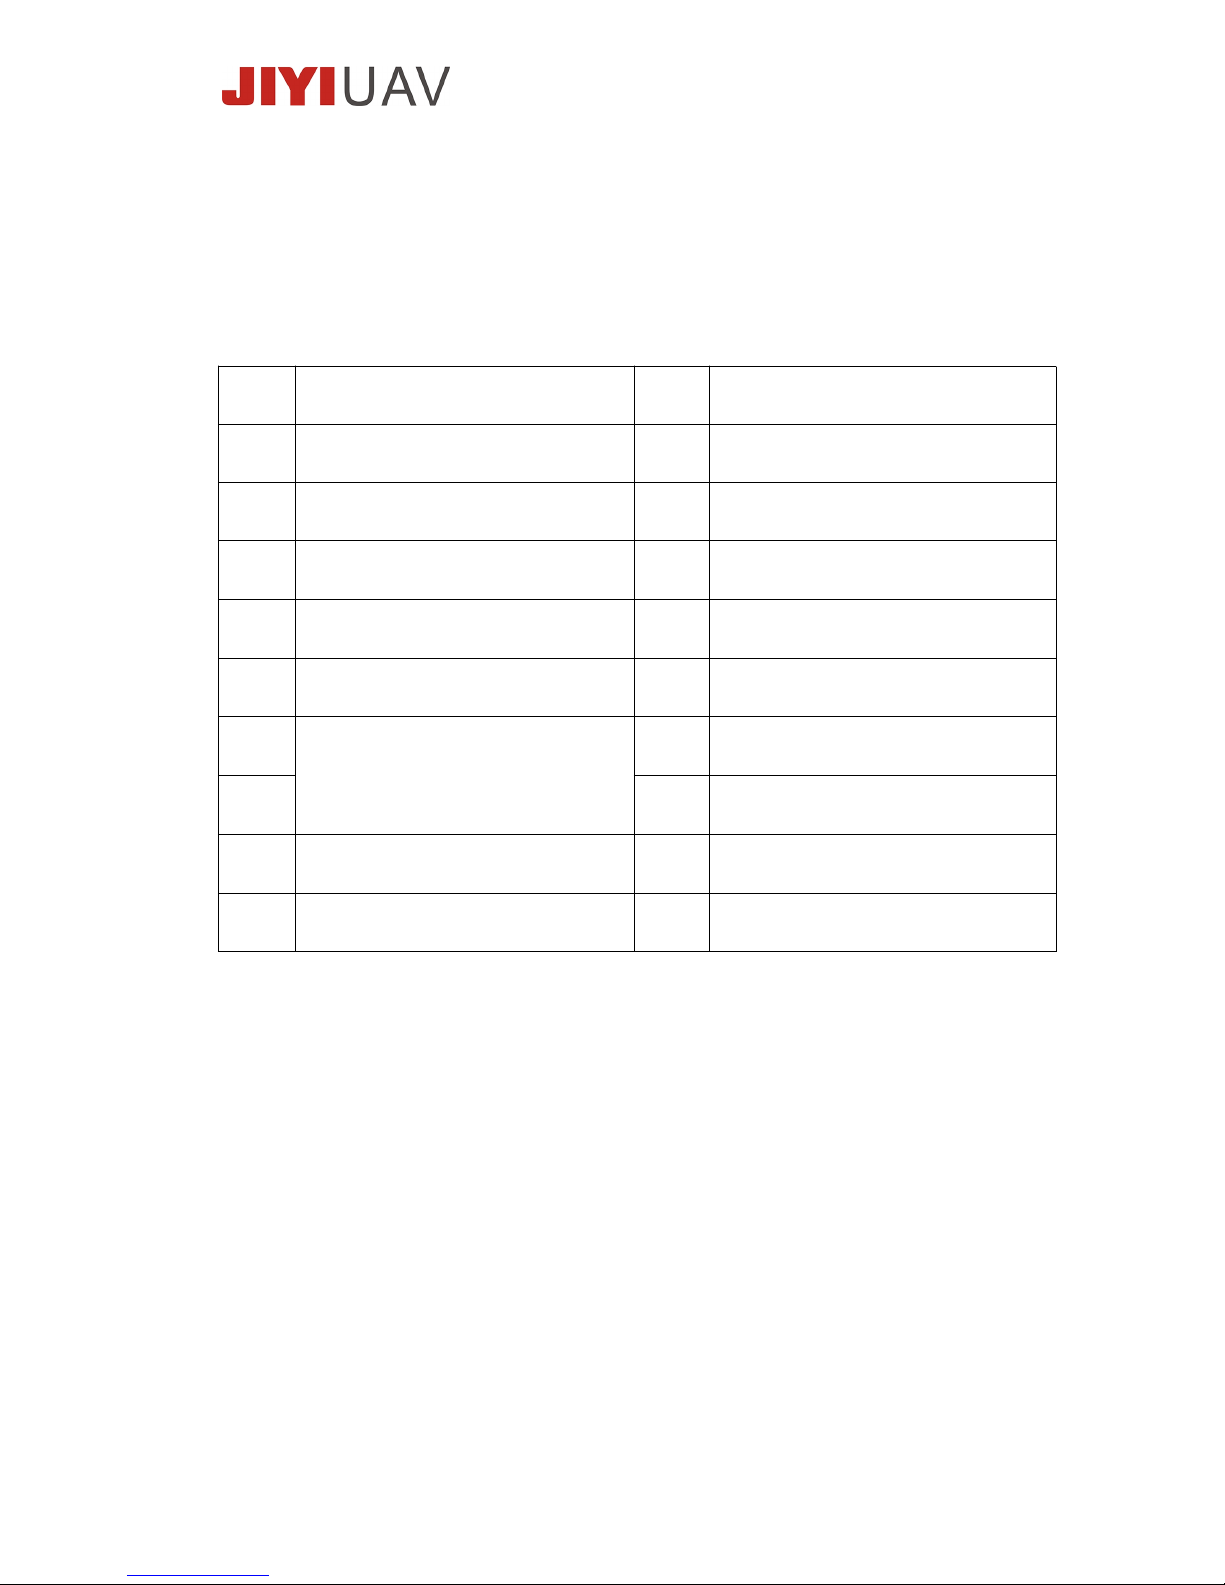
5.1 Connection
P2 Pro flight controller connect ports definition as below:
CH1
Aileron control
POW
Connect to POW Module
CH2
Elevation control
COM
Connect to OSD and datalink
CH3
Throttle control
M8
Connect to no 8 ESC
CH4
Rudder control
M7
Connect to no 7 ESC
CH5
Flight mode switching (Stable
Mode, GPS mode, OIC mode)
M6
Connect to no 6 ESC
CH6
Switching between Flight mode
and Go Home mode
M5
Connect to no 5 ESC
USB
Connect to LED/USB module
M4
Connect to no 4 ESC
LEDM3Connect to no 3 ESC
GPS-1
Connect to GPS/ Compass Module
– GPS
M2
Connect to no 2 ESC
GPS-2
Connect to GPS/ Compass Module
– Compass
M1
Connect to no 1 ESC
Page 7
www.jiyiuav.com
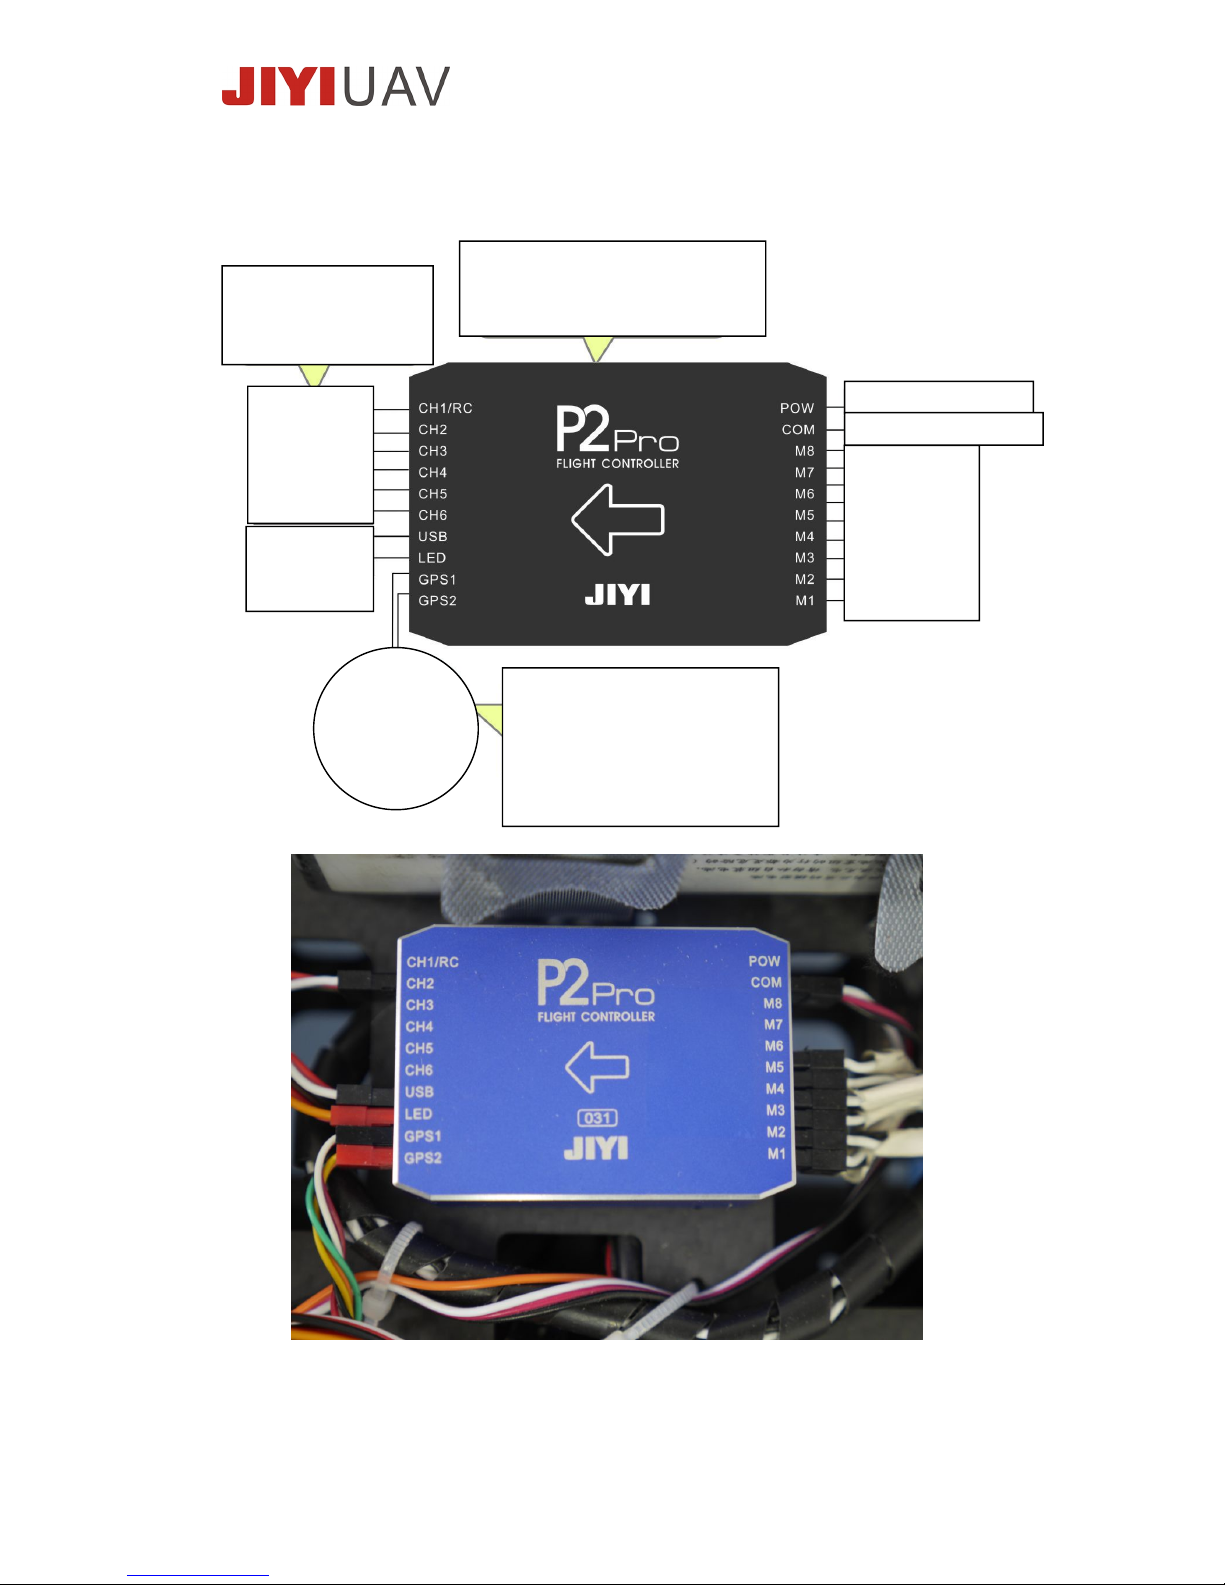
5.2 Wiring Diagram
P2 Pro flight controller wiring as below:
Notes:Please ensure white wire (signal wire) is on top when
connection, except LED and GPS-2 is yellow wire on top.
Please set A, E, R and
T channel in your
transmitter.
* The arrow should points to the nose
of aircraft.
* Ensure the flight controller is installed
in flat surface and horizontally.
* Please always keep GPS/ Compass
module away from strong magnetic
object/environment.
* The arrow of GPS points to the nose
of aircraft
* Keep the GPS horizontally,
and install as high as possible
Connect to
no. 1-8 ESC
Connect to POW module
PWM / SBUS
Receiver
Connect to
LED/USB
module
GPS/Compass
module
Remark: whitered-black
connect to GPS-1
Connect to OSD and datalink
Page 8
www.jiyiuav.com
6. Configuration and Preparation
6.1 Driver and Assistant Software Installation
1. Visit to JIYI official website: www.jiyiuav.com, download the
software according to your product. Unzip the file to your
specific folder
2. Open the folder you just unzipped, find “driver” folder and
open, install the driver according to your operation system.
3. Connect the P2 Pro flight controller to PC, wait till driver
install successfully, execute “gcs.exe” in the software folder.
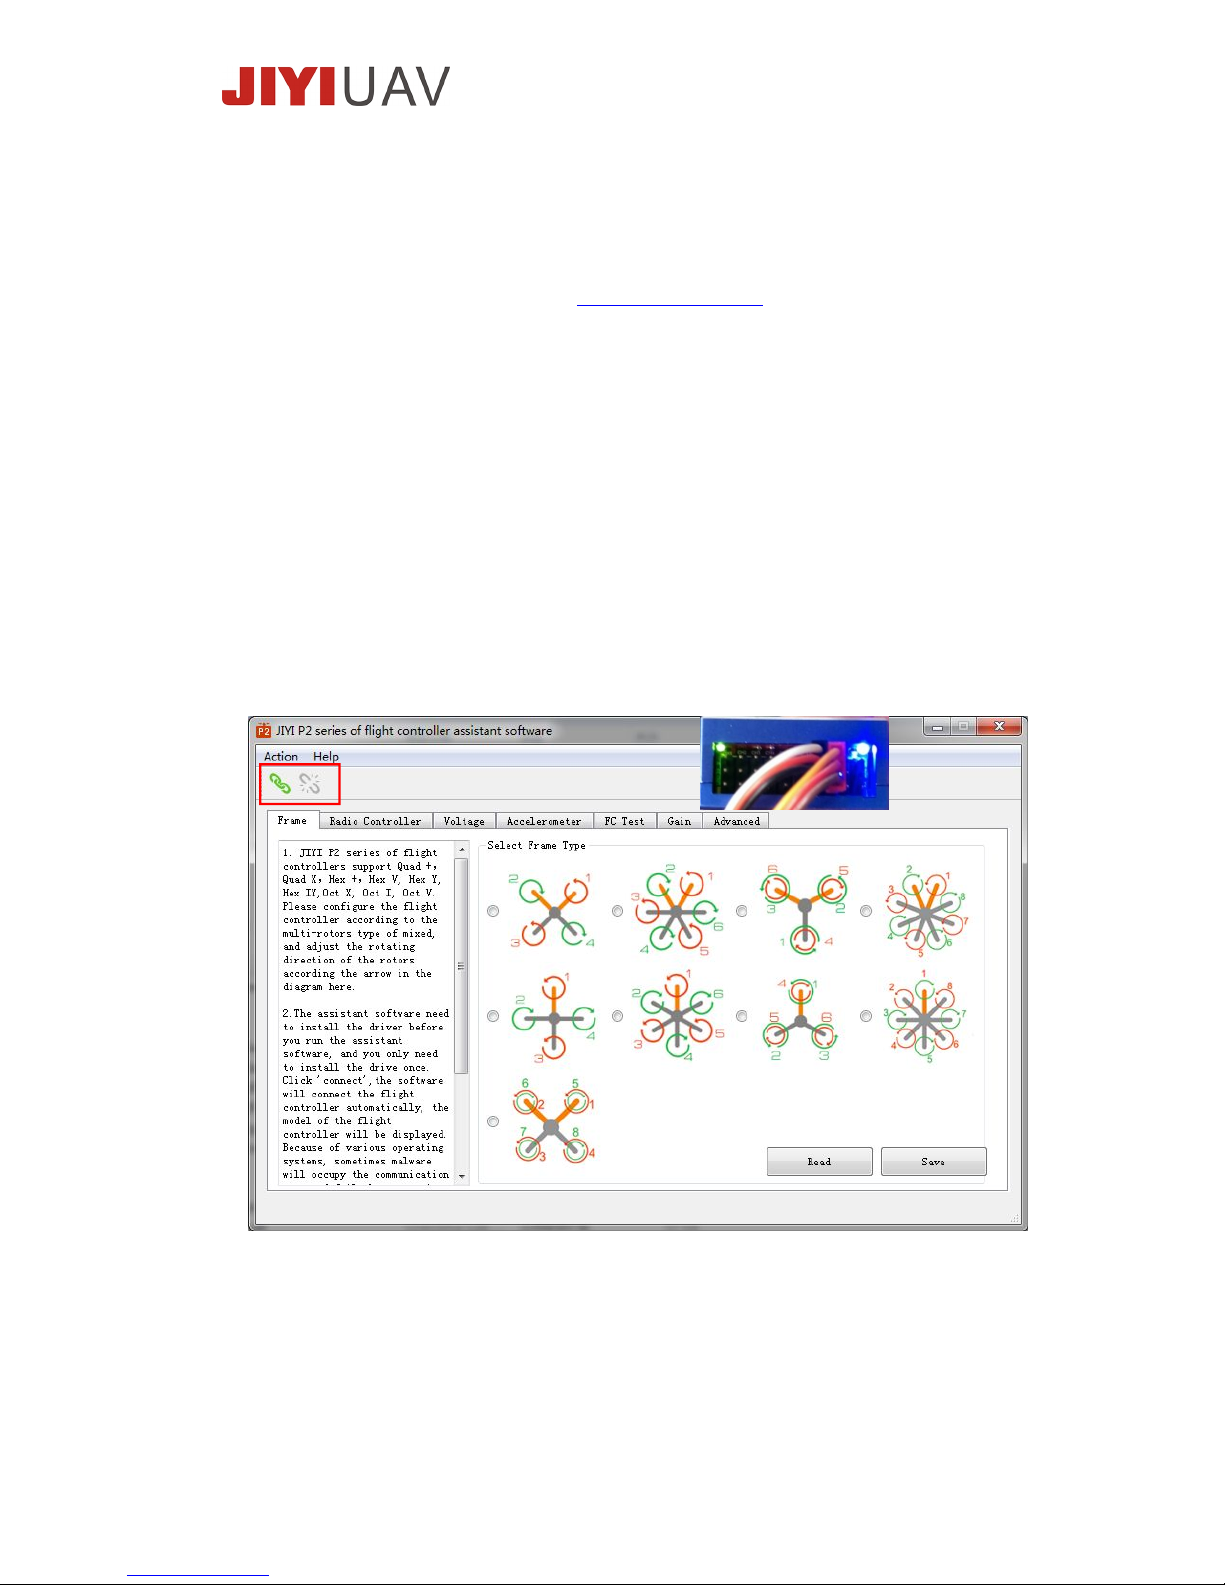
6.2 User Interface
After open the software, you will see the software interface below,
click the green connect button at left top of software. Make sure the
red LED inside flight controller(pic below) is off before click connect.
If you install the driver and software correctly, you will see
below:
Page 9
www.jiyiuav.com
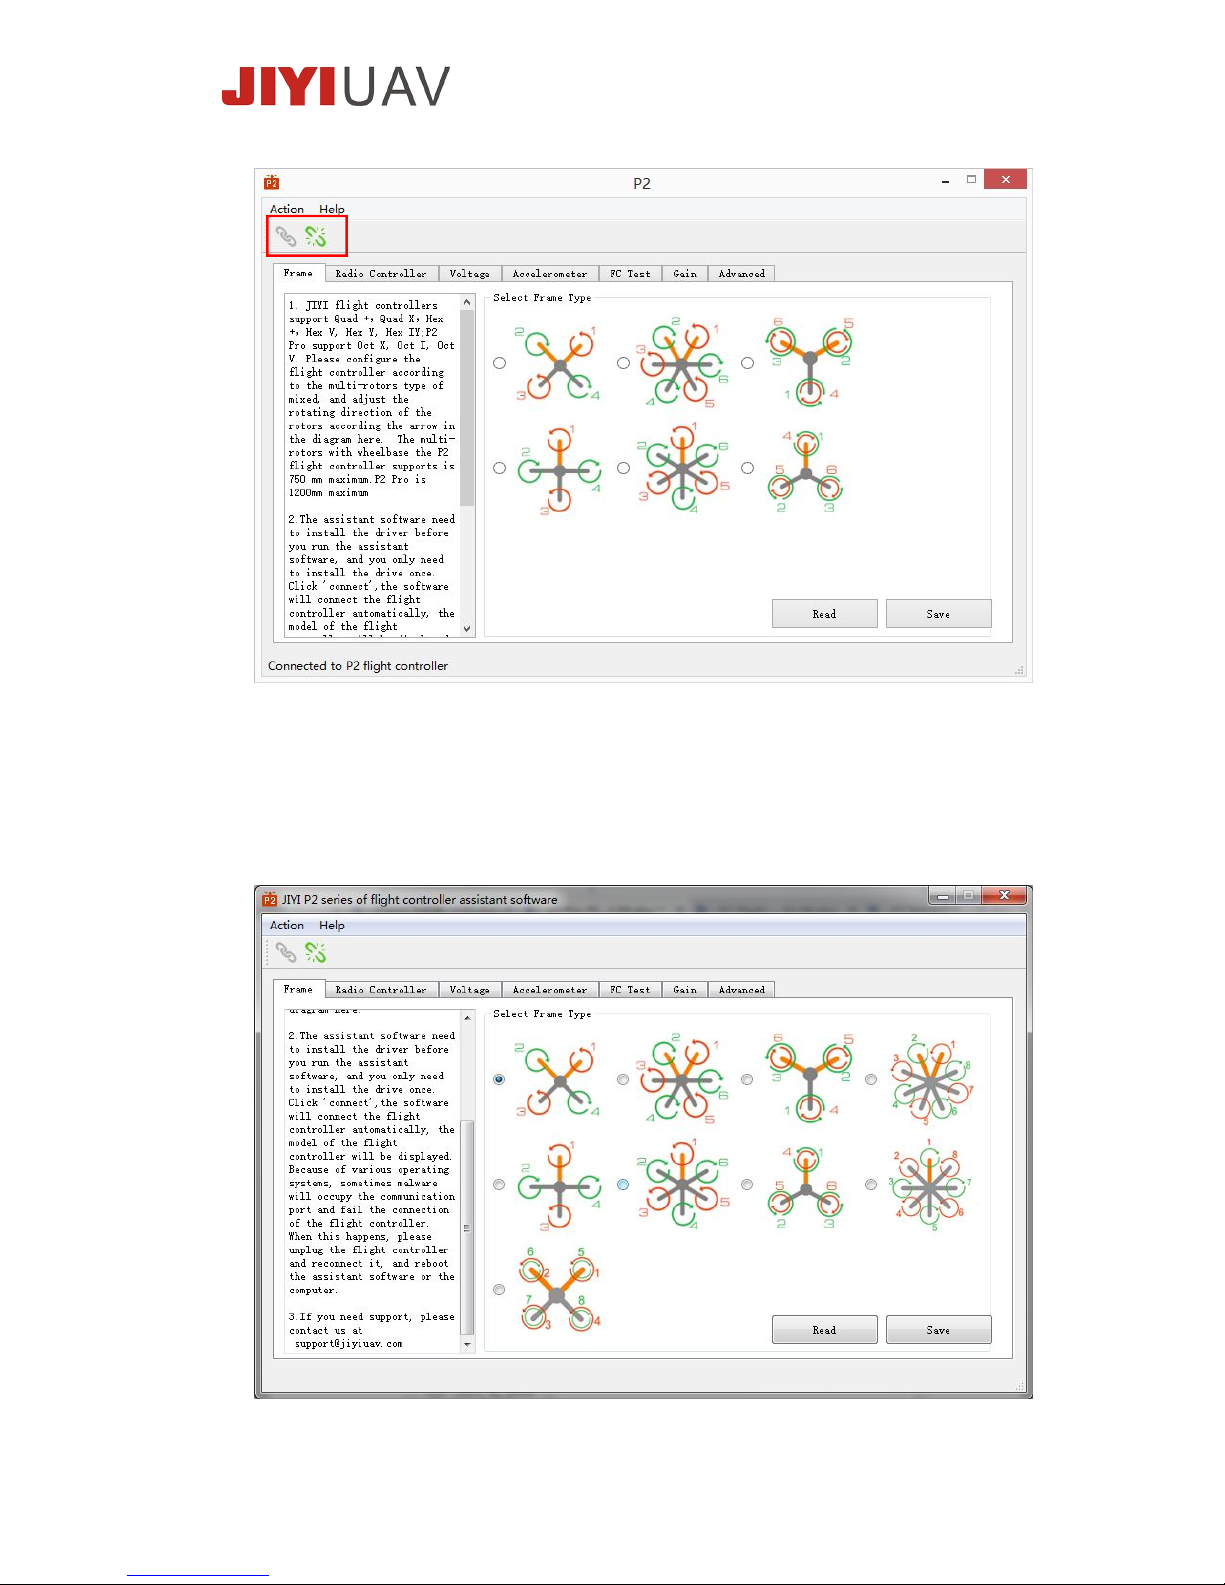
6.3 Aircraft Type Selection
Choose your aircraft mixer type, and click “Save” button.
Page 10
www.jiyiuav.com
6.4 Remote Controller Calibration
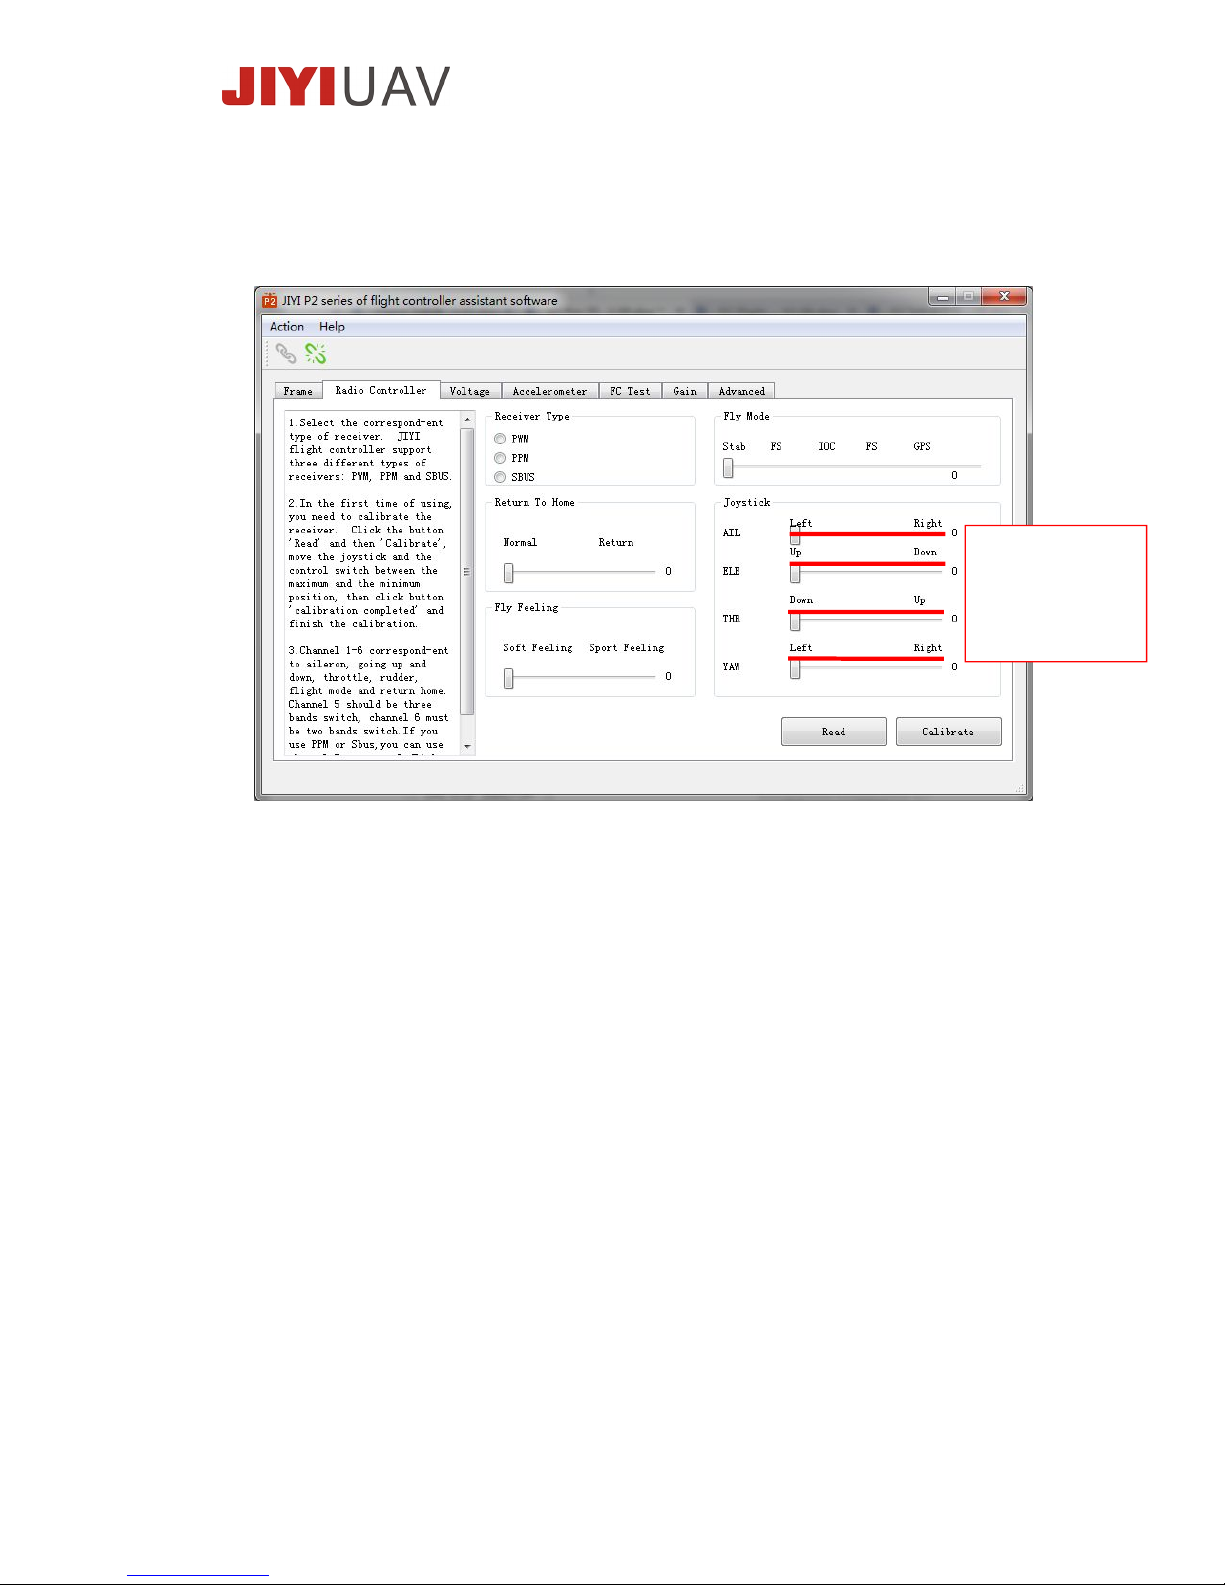
After selection of frame type, click “Radio Controller” to enter
into RC calibration.
P2 Pro supports PPM, PWM and S-BUS receiver, choose relevant
receiver type, and then click “Calibrate” to start calibration. Make
sure the connect is correct: CH1 AIL, CH2 ELE, CH3 THRO, CH4 RUDD,
CH5 Flight mode switching (Stable Mode, GPS mode, Smart Circling
(IOC) mode (3 step switch required), CH6 Switching between Flight
Mode and Go Home mode (2 step switch required). Please move
each stick max. and min. for CH1 to 4, and switch each step for CH5
to 6, and then CH1 to 4 return to middle, click “Calibrate Complete”.
Notes:
1. Please calibrate the transmitter for first usage or radio
controller changing.
2. Please set your radio control at airplane mode, and do not set
mix control.
Please pay attention
to the direction of
each channel, especial
ELE and THR direction
is different in our
software.
Page 11
www.jiyiuav.com
3. Please make sure the transmitter sticks’ moving direction of
each channel is the same the same as software shown.
6.5 Accelerometer Calibration:
Reminder: The accelerometer calibration must be performed before
first usage of flight controller. If you experience below condition, it is
suggested to re-calibrate the accelerometer sensor.
a.) In stable flight mode, the aircraft is tilting during take off
b.) Drifting occurs in stable flight mode, i.e. the aircraft doesn’t fly in
straight line.
Accelerometer calibration method:
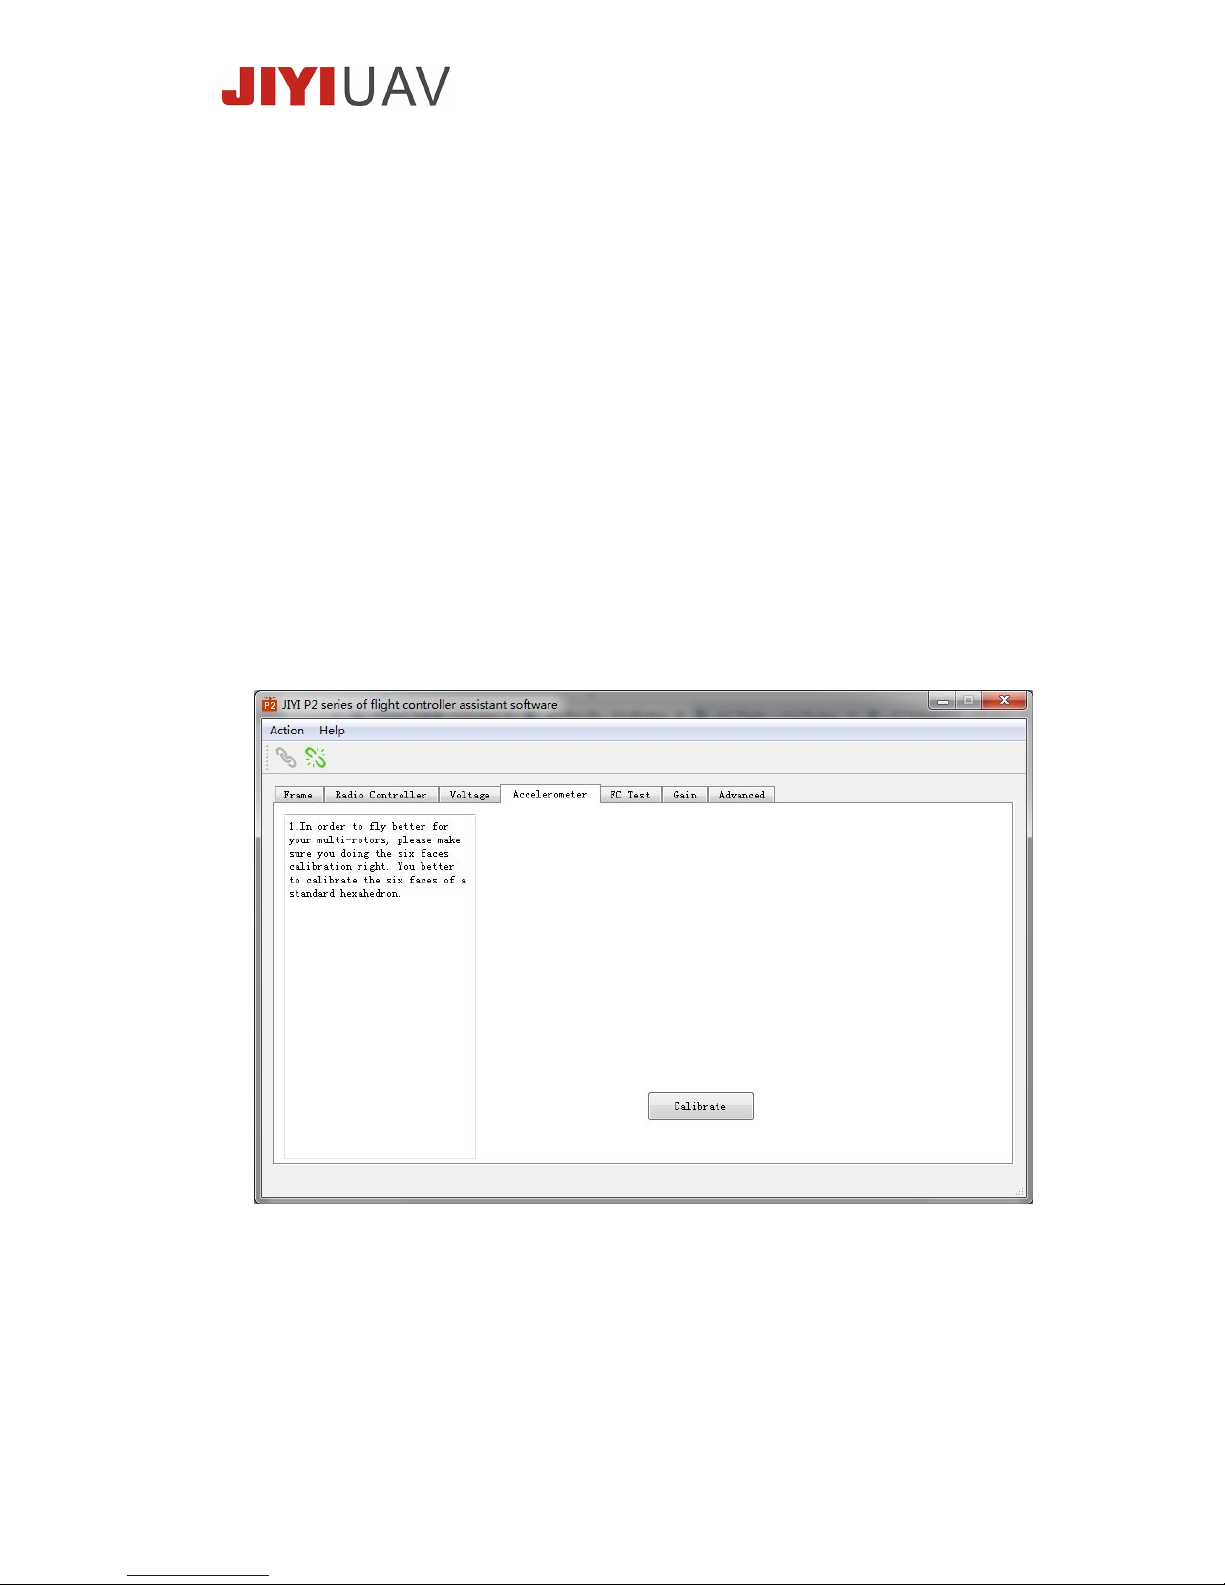
Suggest to perform the calibration in indoor. First, click
“accelerometer” in the software, make sure you connect the flight
controller correctly, then click “Calibrate”. Follow software
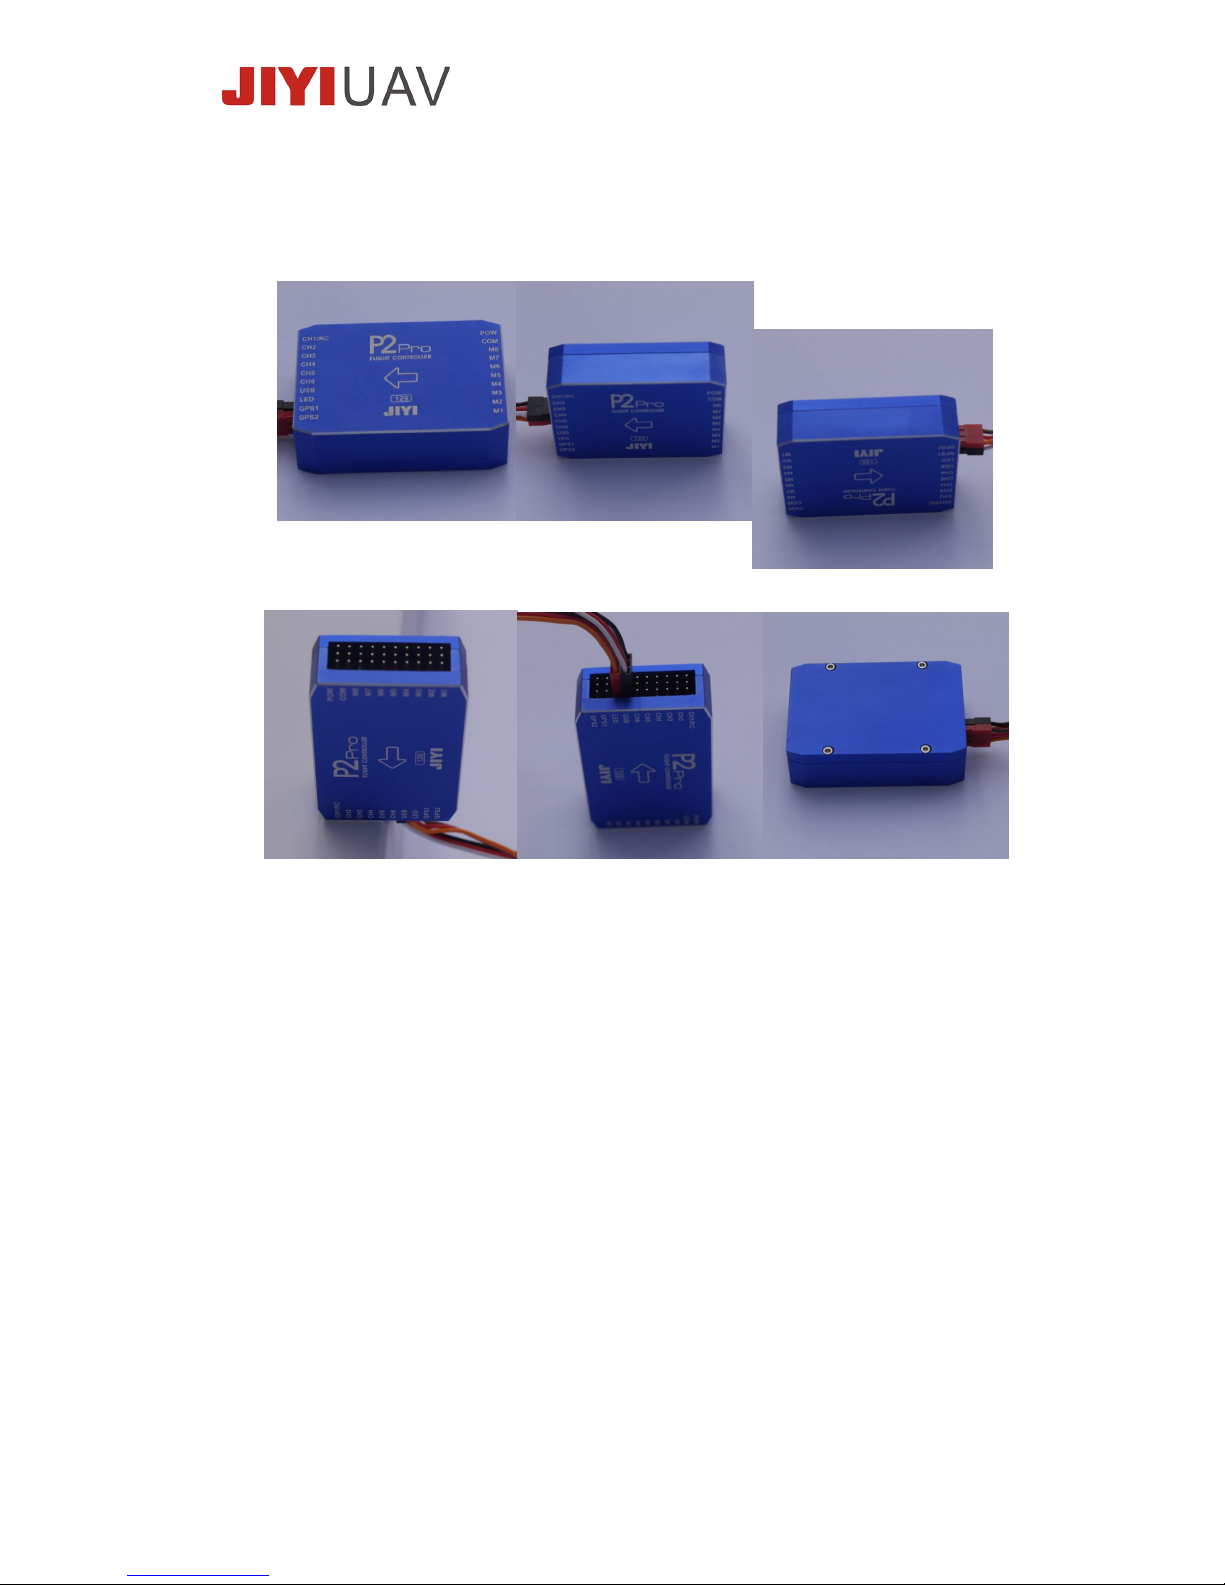
instruction, place the flight controller facing up, left, right, front,
Page 12
www.jiyiuav.com
back & down (total 6 faces) on a leveling surface in sequence. Total
6 surface of calibration.
Diagram for reference below:
Up Left Right
Front Back Down
Caution: In order to get the best calibration results. Every
direction calibration must be leveling. If any surface is not in
leveling position (vertically & horizontally), you need to perform
the calibration again. Suggest to perform the flight controller
accelerometer calibration before installing in aircraft. You may
need some assist tools a to ensure the good calibration results
after flight controller installed in aircraft.
6.6 Battery Setting
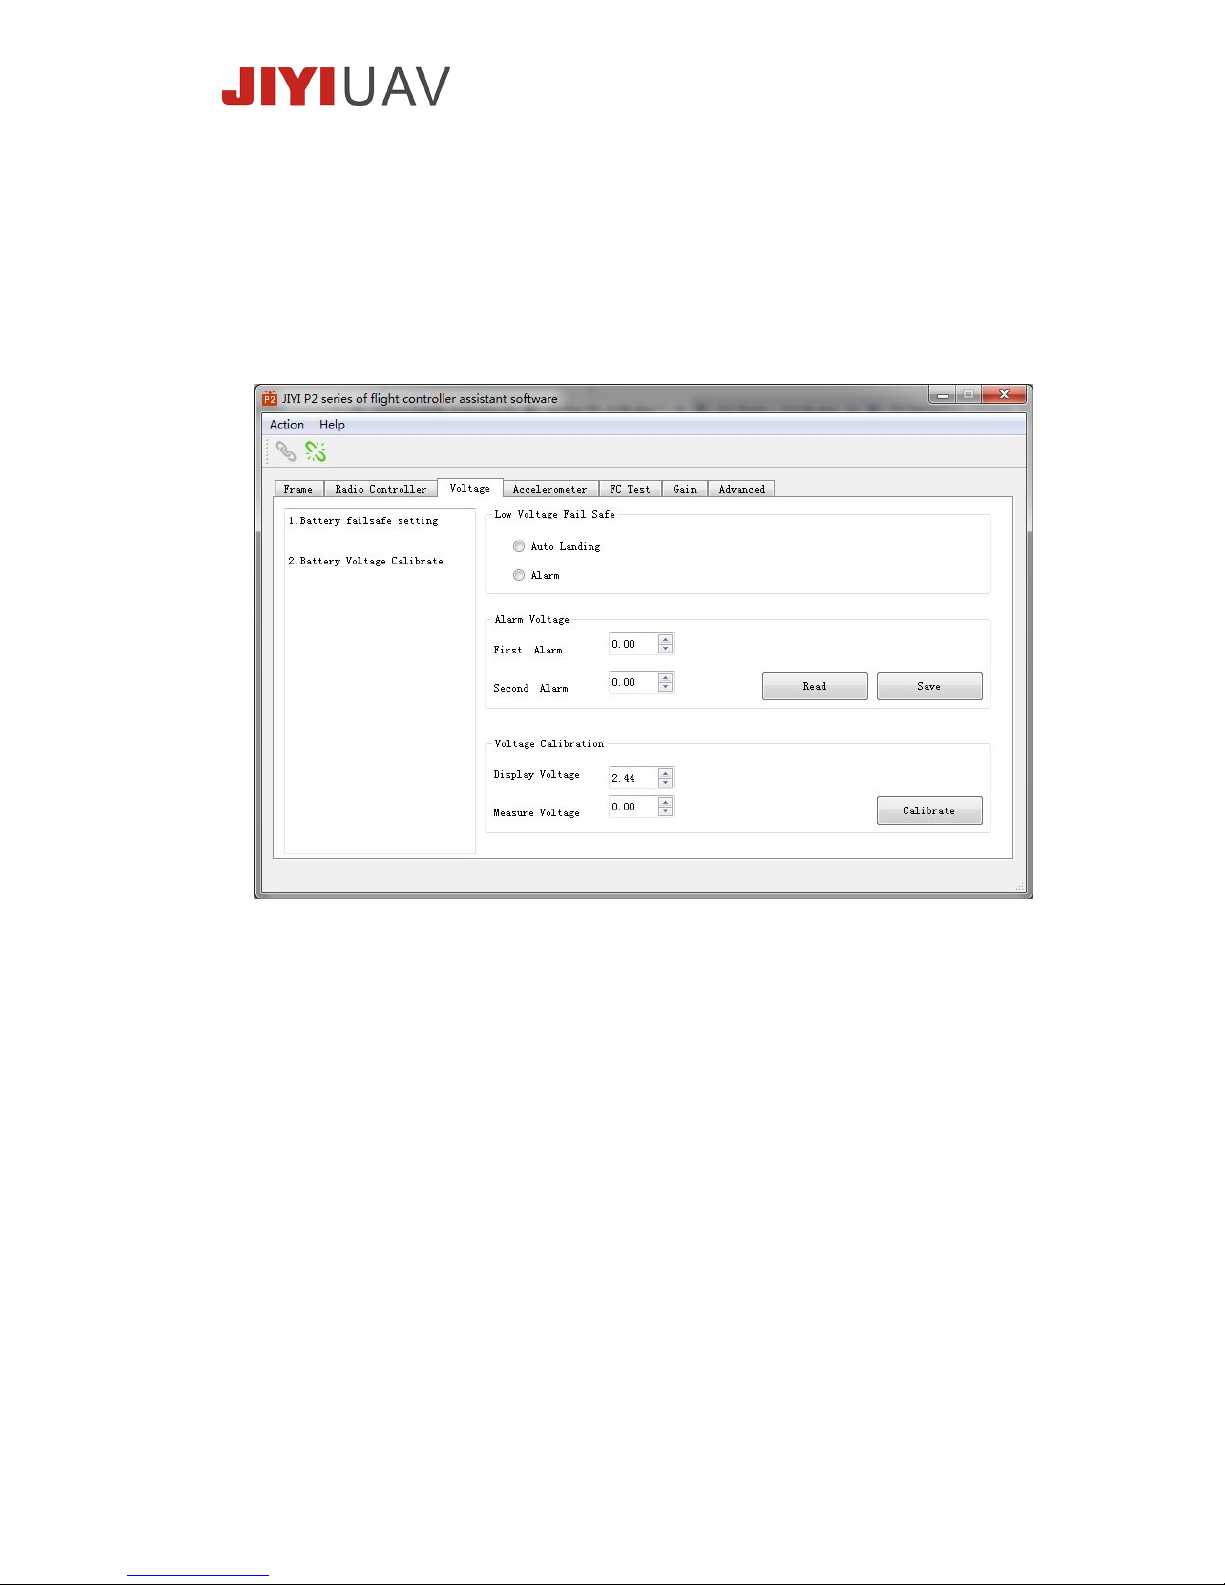
JIYI P2 Pro flight controller monitors the battery voltage through the
power module, equipped with the low voltage protection. You can
select the auto-landing or LED alarm. There is two levels of low
voltage warning. If alarm mode is chosen, the LED will be triple
blinking for the first level alarm, and fast blinking fast for second level
alarm. You must land the aircraft immediately when second level
alarm. If auto-landing is chosen, the aircraft will automatically
landing right below when voltage downs to second level alarm. To
Page 13
www.jiyiuav.com
eliminate the battery measurement tolerance, you need to calibrate
your battery voltage for the first usage, using the battery checker to
measure the actual battery voltage, fill the figure into the measure
voltage and click “Calibrate”.
Caution: Please set a reasonable voltage level for low voltage alarm
to avoid any damages caused by the aircraft low power.
6.7 Compass Calibration
GPS/Compass module must be connected when using the P2 Pro
flight controller. Prior to your first flight, you must calibrate the
compass. During the calibration, please stay away from any of
strong magnetic field interference, an empty & spacious open space
area outdoor is recommended. Before the calibration, make sure
the GPS/Compass is installed correct and firm, the arrow of GPS
should point to the nose of aircraft.
Method of calibration:
Page 14
www.jiyiuav.com
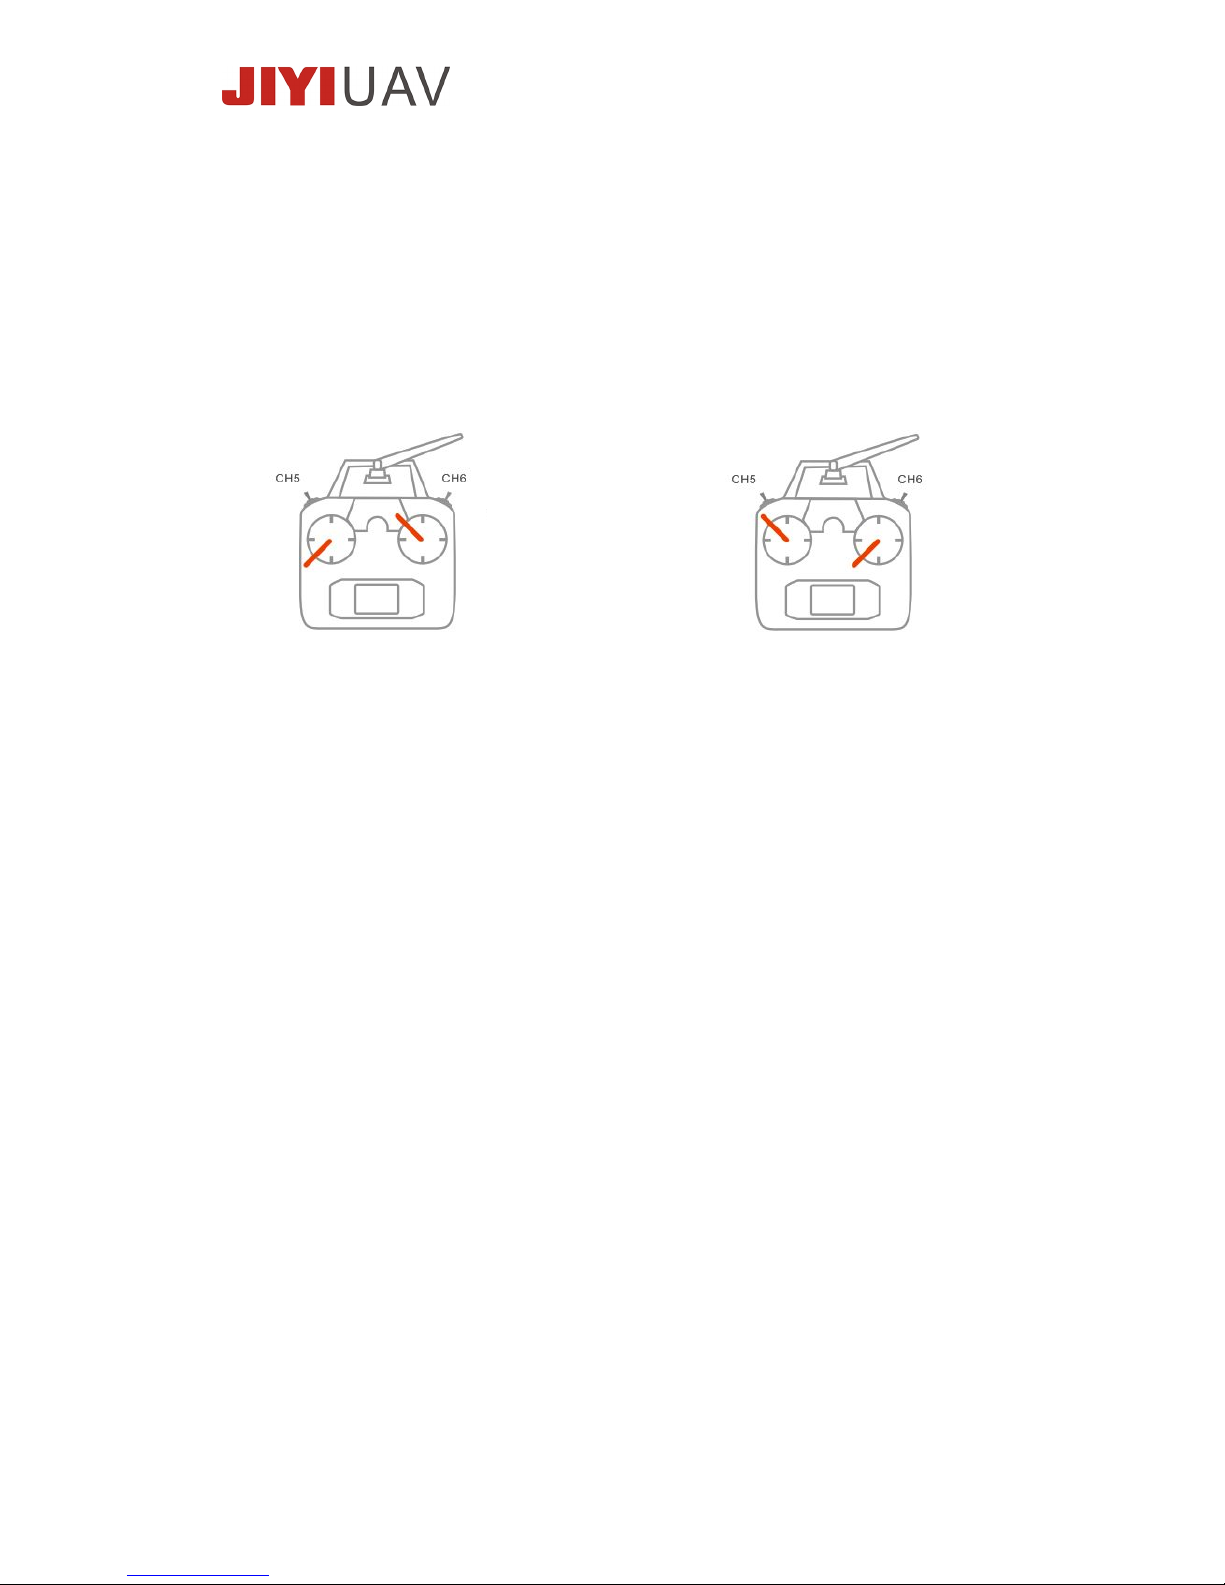
JIYI P2 Pro flight controller Compass calibration method is easy.
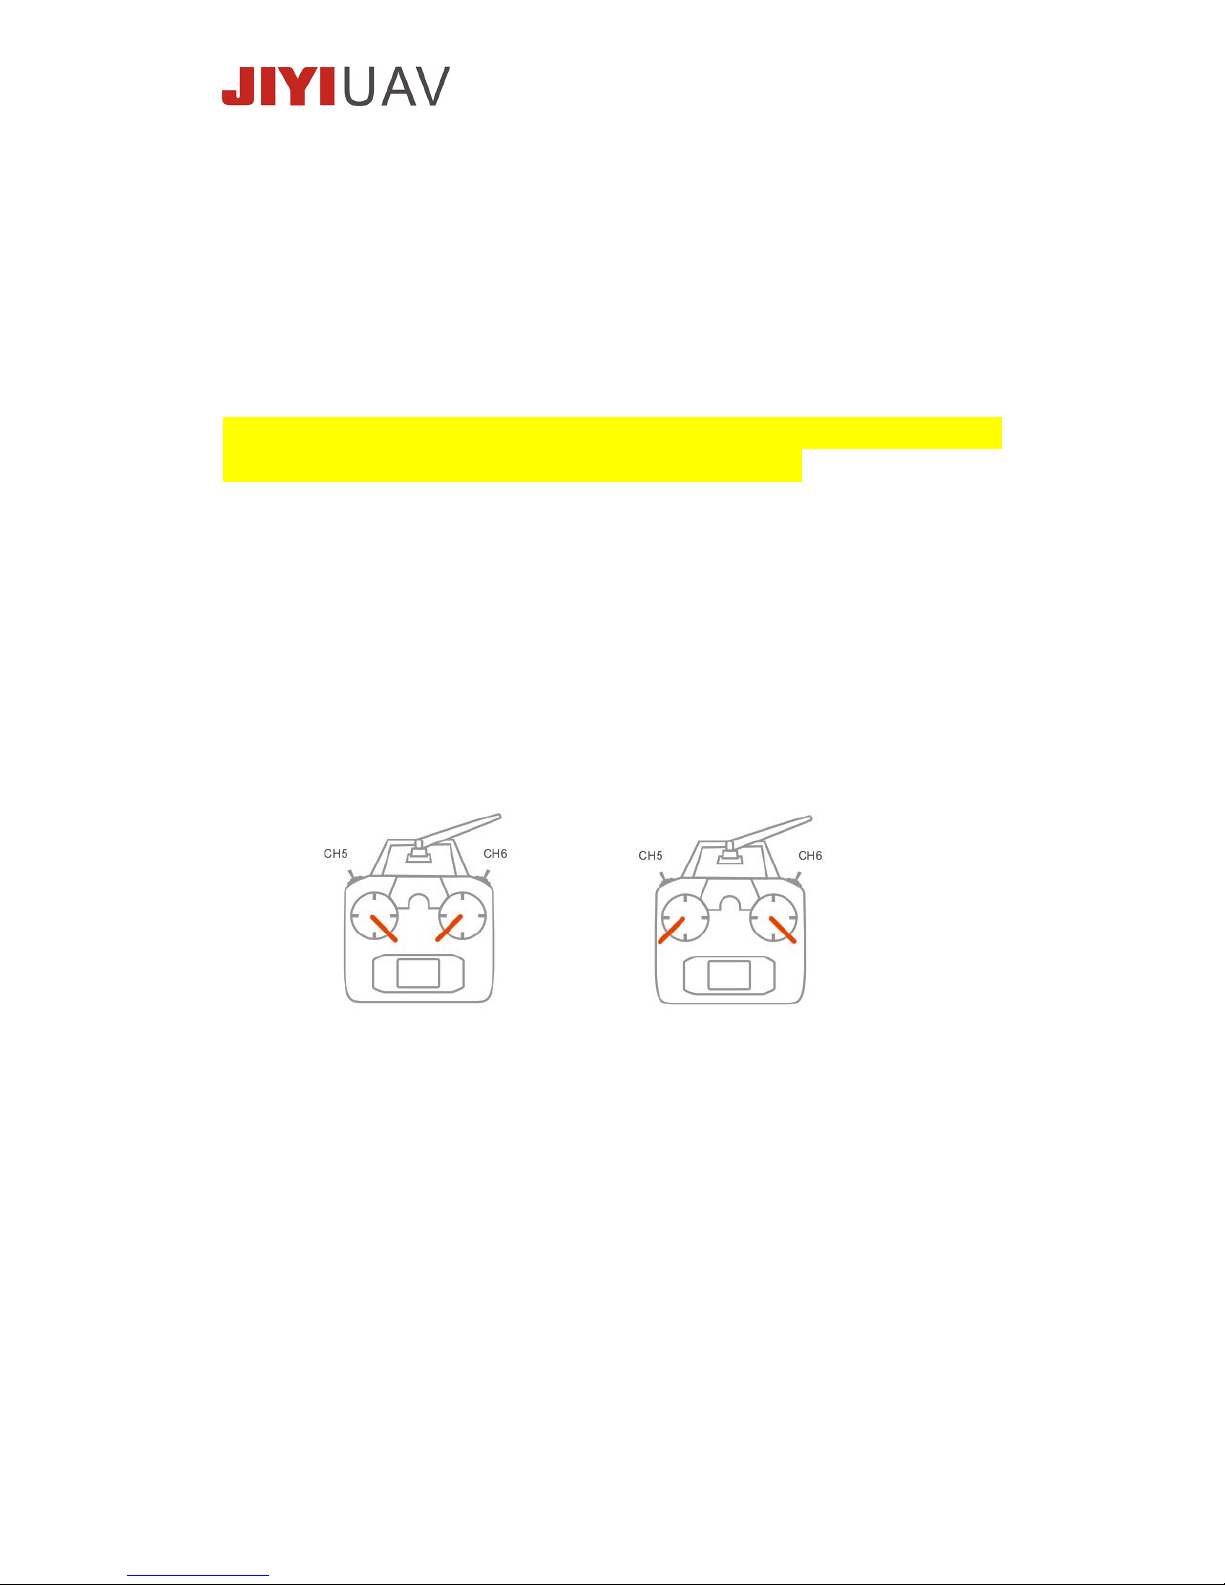
First, switch the CH6 to “Go Home” mode, put the throttle stick
to bottom, rudder to left, aileron to left, elevator to top. For US
mode controller (left hand throttle) as shown in pic 1. For
Japanese Mode Controller (right hand throttle) as shown in pic 2.
Pic 1 (left hand throttle) Pic 2 (right hand throttle)
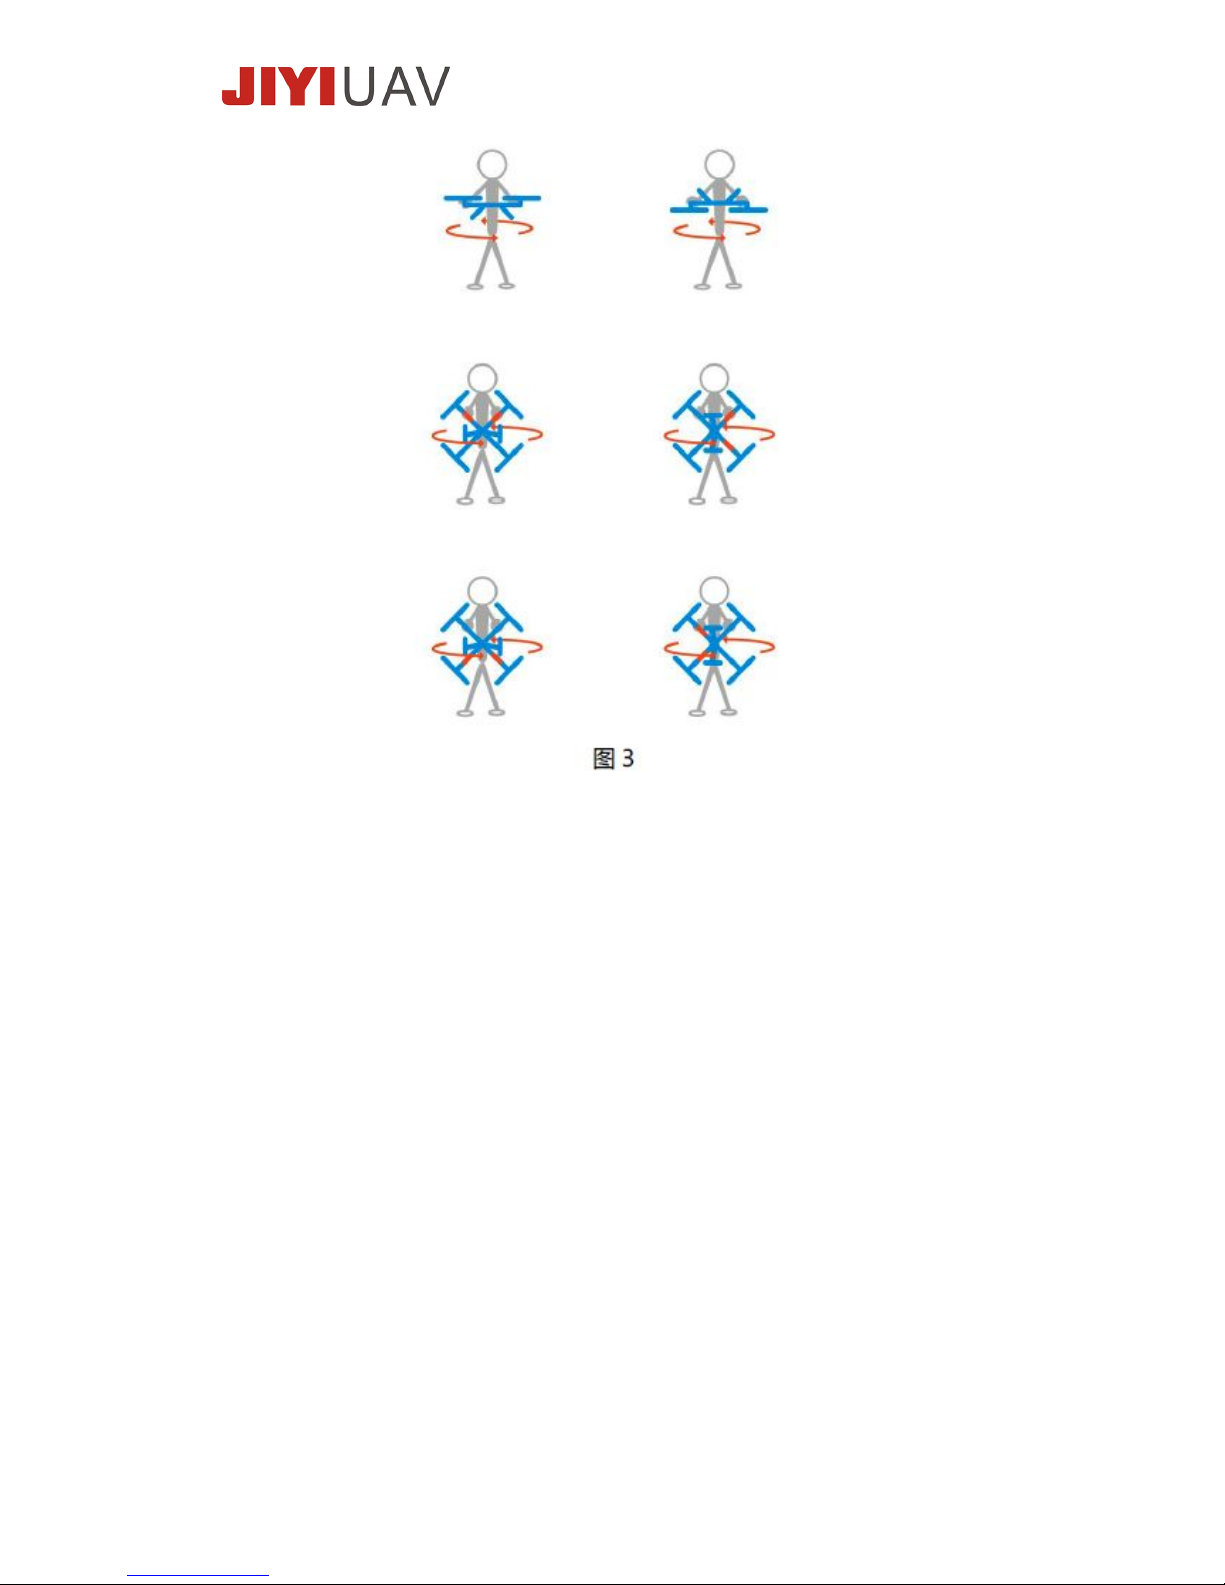
Wait for 2 seconds, the LED will light continuously (means entering
Compass calibration mode). After that follow by picture 3 for the
calibration, P2 Pro flight controller takes approximate 2 minutes of
calibration data collection. When the LED change from continuous
light to slow blinking, the calibration is completed.
Page 15
www.jiyiuav.com
Caution: GPS/Compass device is sensitive to ambient environment.
In order to get the best flight experience, it is advisable to calibrate
the compass again when you change the flight location.
6.8 Firmware Upgrade
In order to get the best flying experience, JIYI will release the latest
firmware from time to time, please update the latest firmware timely.
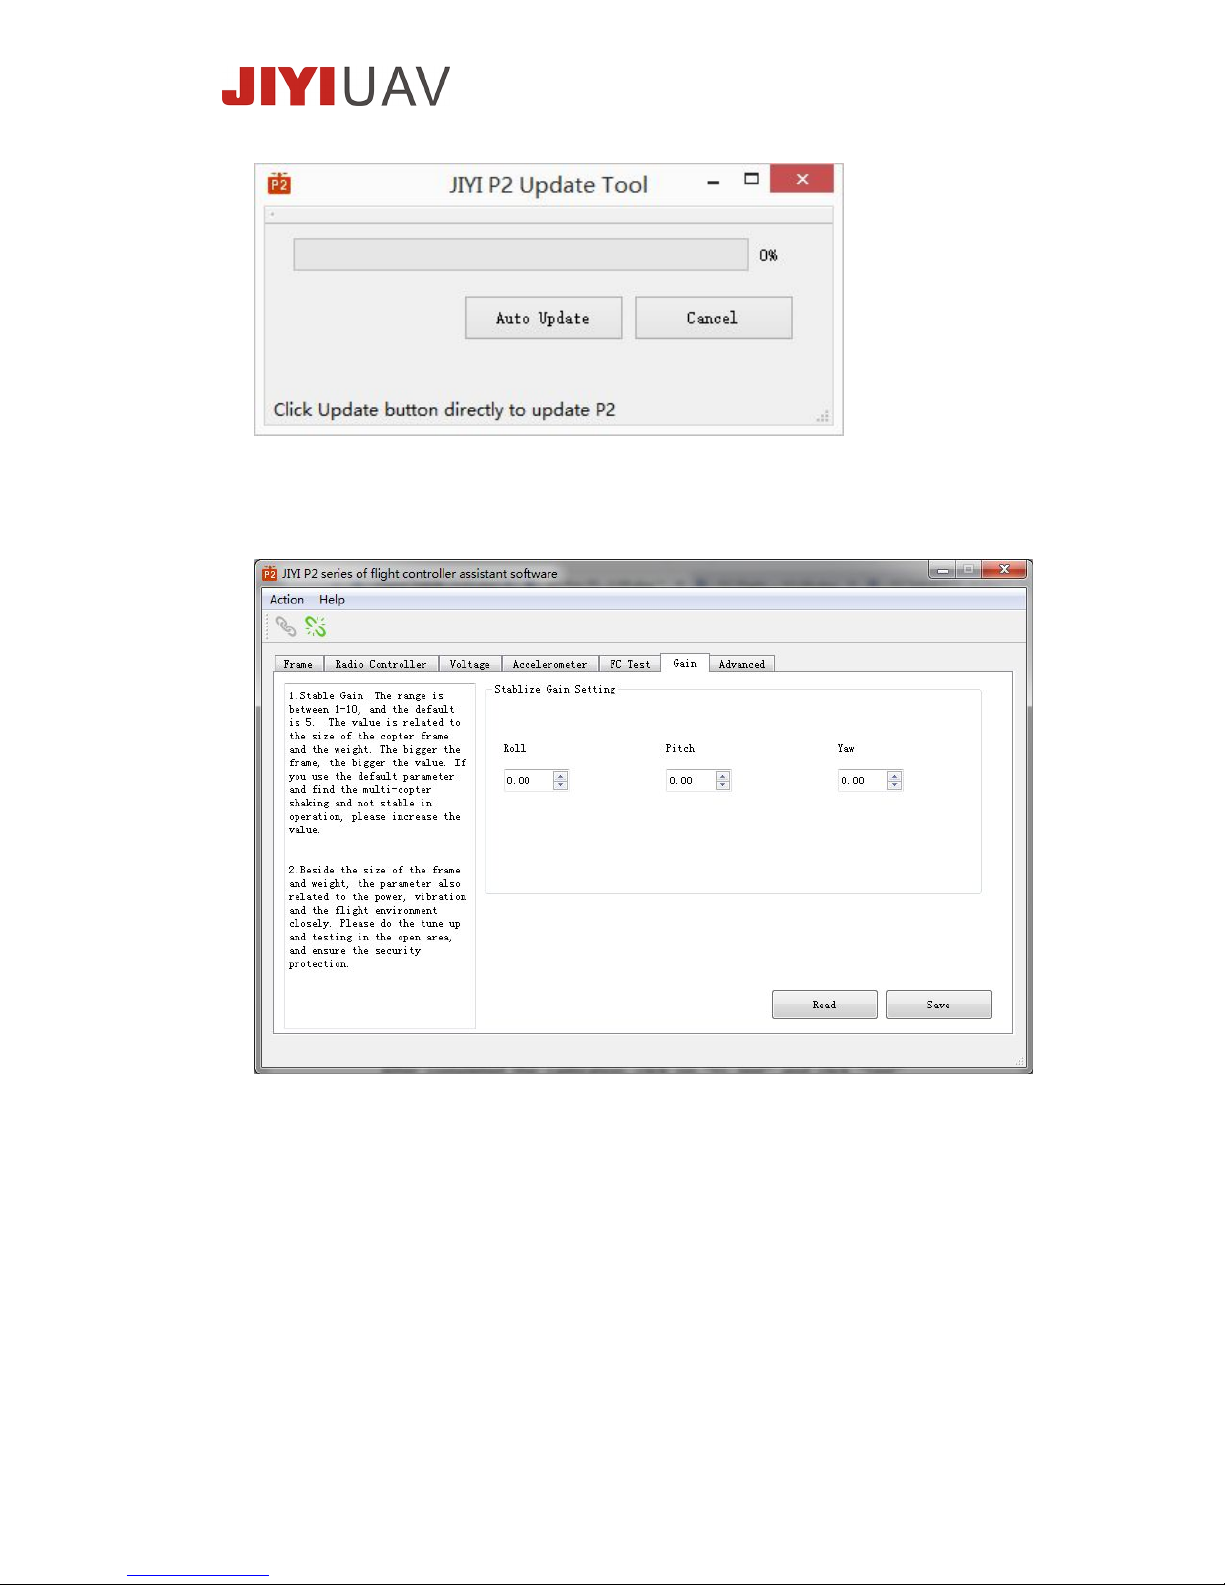
The firmware upgrade guide as below: Connect the flight controller
to computer, make sure internet access available, open “P2
ProUploader” in the P2 Pro software folding, click ”Auto Update” and
wait till download completed. The upgrade program may require
power off the flight controller and re-connect during the upgrade.
Please make sure the flight controller is totally power off including
the main power from aircraft. And then connect to computer again.
Wait till upgrade finished. After upgrade finished, please calibrate
the transmitter and accelerometer again.
Page 16
www.jiyiuav.com
6.9 Stability Sensitivity Setting
To pursue the stability and reliability, you can adjust parameter in
Gain. Under gain, you can adjust the Roll, Pitch and Yaw. The
adjustable range 1-10, the default setting of flight controller is
adjusted based on aircraft 450mm. If you aircraft frame is bigger than
450mm, or the aircraft is swinging or shaking when flying, you need
to adjust the roll sensitivity and pitch sensitivity to a higher value.
Page 17
www.jiyiuav.com
7. Flight mode
7.1 Disarm & Arm
After completed the calibration, click on “FC test” and click “Test”
button. If no further error notification, you may proceed for arming. If
any error message shown, you need to re-calibrate it before you’re
able to arm.
To arming P2 Pro, just put the throttle stick to bottom, rudder to right,
aileron to left, elevator to bottom, hold for 3 seconds.
For most left hand throttle or right hand throttle, switch the mode
switch to Stable mode, keeping the aircraft static, adjust the remote
controller sticks as shown in pic 1 for at least 3 seconds to arm. Adjust
the controller sticks as shown in pic 2 for 3 seconds to disarm it. After
arming, if the throttle stick is in minimum position for 3 seconds or
longer, P2 Pro flight controller will automatically locked the aircraft. If
arming in GPS mode, good GPS signal is needed to arm the aircraft.
Suggest arm in Stable mode and switch to GPS mode after arming.
Pic 1 Pic2
Caution: After the aircraft landed, please disarm the aircraft to prevent
the unintentionally touch on throttle stick, which can caused serious
injuries.
7.2 Stable Mode (Attitude Mode)
Switch the remote controller CH5 to Stable mode, arm the aircraft, and
increase the throttle softly till the aircraft lift up the ground (depend on
your throttle setting), the aircraft will take off steady. Thanks to advance
algorithm of P2 Pro Flight controller, during the indoor or breeze-less
Arm
Disarm
Page 18

www.jiyiuav.com
condition, you can get the stable hovering flight or excellent fixed height
flying.
Caution: 1. GPS/Compass module is not working in Stable mode flight.
2. The throttle control way is different between Stable mode and GPS
mode, please pay attention to throttle control when switching between
these 2 modes.
7.3 GPS Flight Mode
7.3.1 GPS Mode
Choose an open area outdoor where do not have any high-rise building
and no magnetic interference environment, connect the aircraft with
power, LED light shall double blink to entering satellite searching mode,
wait about 1 minute, when the LED change to slow blinking, the satellite
searching is completed and the position locating is successful.
Switch the remote control CH5 Stable mode to GPS mode position and
arm your aircraft (user can also switch stable mode to GPS mode during
flight), increase the throttle to 50% and above to make the aircraft
lifting from the ground, aircraft shall be lifting vertically. After the
aircraft reaches the desired altitude, keep the throttle at 50% level, the
aircraft shall hovering at the height automatically, if the user adjust the
aileron and elevation, the aircraft will fly at the keeping height.
Caution: Compass module is involved as assist when P2 Pro flight
controller working under GPS flight mode, you must stay away from
strong magnetic field. While the GPS module is also involved in this
mode, you need to choose a good GPS, and Satellite signal area (shall
stay away from high rise building).
7.3.2 Go Home under GPS mode
P2 Pro flight controller will record the location where the user arm the
aircraft as home location, switch your remote controller CH6 to Go
Home mode, the aircraft shall automatically lifting to 20 meter height,
keep the previous flying course and fly back to home location. During
the return flight, aircraft will not be controlled. Once the aircraft reach
the home point, it will hover at the air for about 2 seconds before
descending slowly, in this period you can adjust transmitter stick to
Page 19
www.jiyiuav.com
adjust the landing point (but throttle is not working). After the aircraft
landed, the motor shall spin slowly and stop. User shall put the throttle
at minimum level, the flight controller will automatically disarm after 3
seconds.
Caution: 1. The precondition of Go Home is GPS module records the
home point location (The location of arming) successfully. Home point
may be not recorded correctly if armed in stable mode. Suggest to arm
under GPS mode if you need to use Go Home.
2. To prevent from any injury, when the aircraft is near to human, it is
advisable not to switch to Go Home mode.
7.4 Smart Circling Mode
Make sure with good GPS signal during the flight, switch the
remote controller CH5 to IOC to enter Smart Circling mode. After
switch to Smart Circling, the aircraft will not start to circle flying
immediately, first it will be hovering, then start to circle flying,
default circle center is 10 meter away from nose of aircraft. In this
mode, radio controller only control the aircraft flying radius and
speed and will not control the flying direction. Please see below
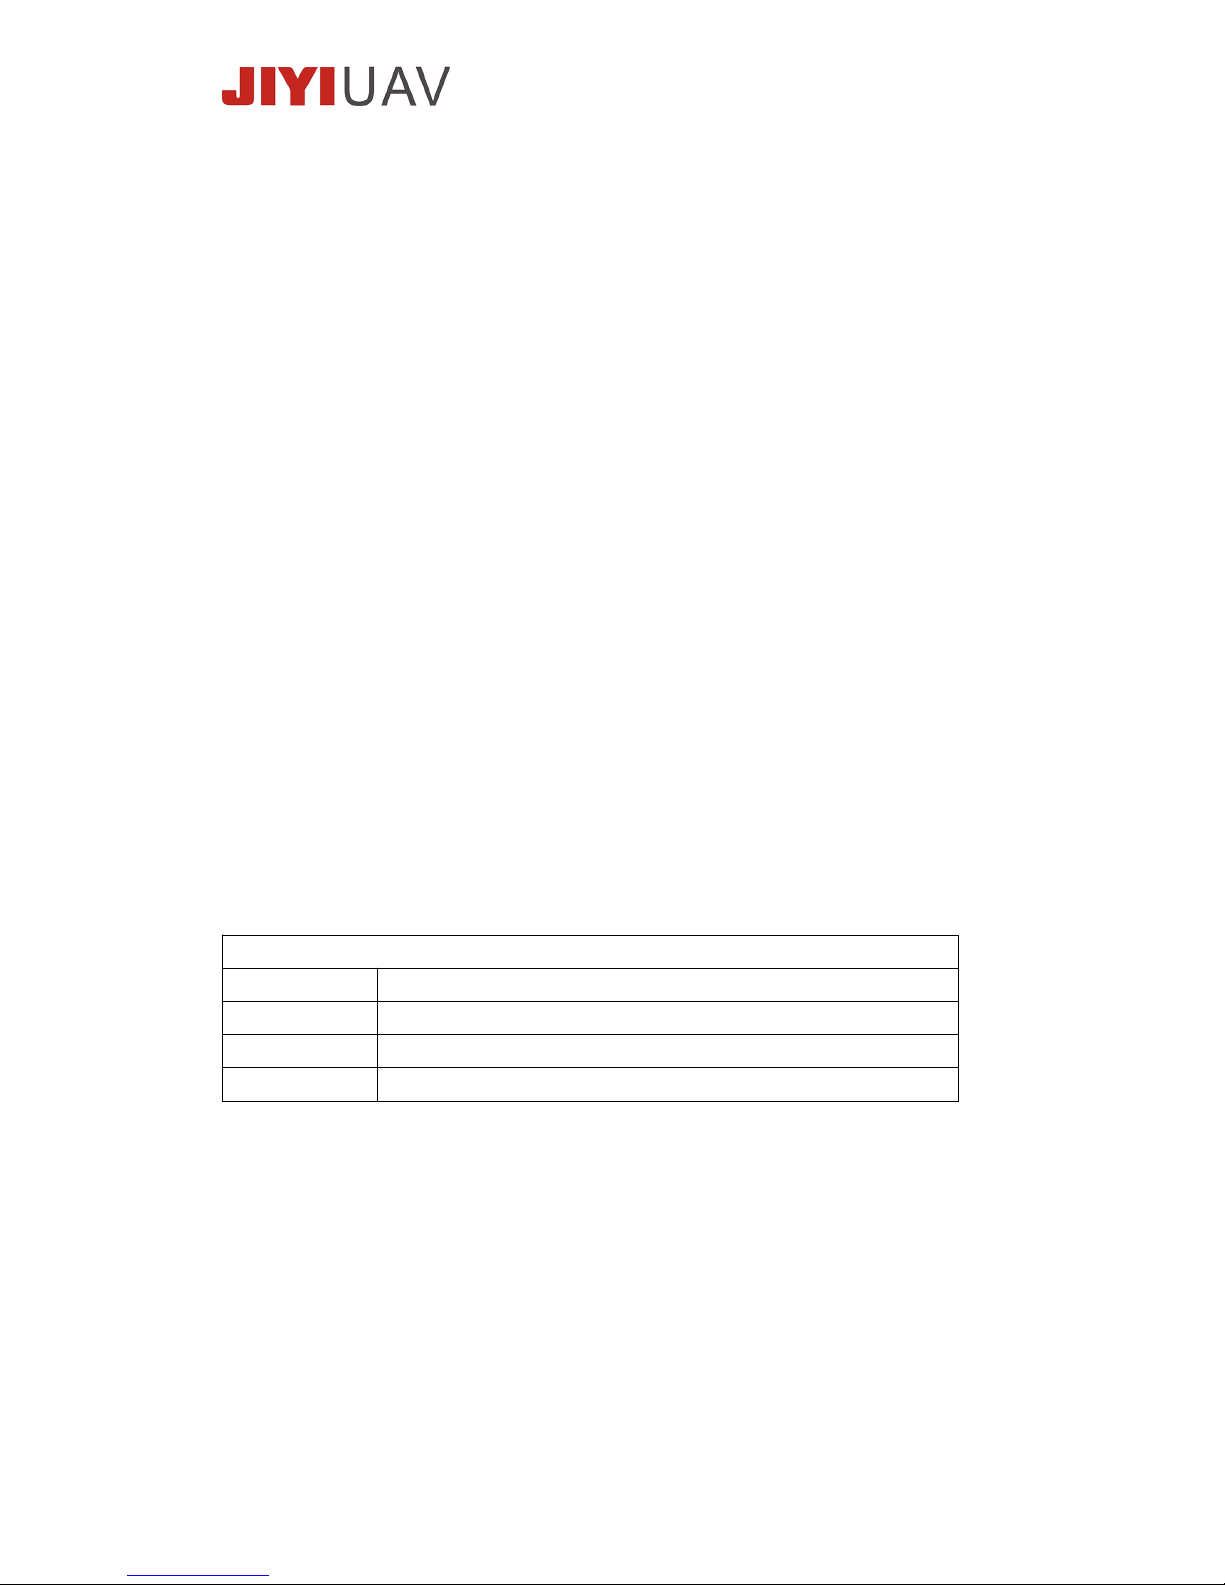
compare table of GPS mode and Smart Circling mode:
GPS Mode
CH1
Control the roll of aircraft (ROLL)
CH2
Control the pitch of aircraft (PITCH)
CH3
Control the altitude of aircraft (ALT)
CH4
Control the yaw of aircraft (YAW)
Page 20

www.jiyiuav.com
CH1 controls the aircraft circling speed and direction. When the
aircraft hovering, move stick to left, aircraft will start circling with
default radious (10 meters) clockwise. Keep stick on left, the
circling speed will become faster. The speed increase is decided by
the controller stick. Stick returns to center, the aircraft will be
circling at current speed. Stick moves to right, aircraft circling
speed will slow down till stop (hovering). Keep stick on right, the
aircraft starts circling counter-clockwise. The control way is the
same as clockwise circling.
CH2 controls the circling radius. Moving the stick up, the circling
radius will decrease. Moving the stick down, the circling radius will
increase. Stick in middle, aircraft keeps current radius circling.
When the circling radius is 0, the aircraft is in pan-shot mode, it will
be hovering and rotating. CH1 will control the rotating speed and
direction.
Caution: 1. Do not take off in Smart Circling mode to prevent accident,
because the control way is different with Stable and GPS mode.
2. Before switch to Stable and GPS mode, please make sure you are
clear about nose of aircraft, to prevent from any accident because
of not clear of nose of aircraft.
Smart Circling Mode
Channel Setting
Description
CH1
Control the
circling rate
Stick left and right control the
circling speed and direction
CH2
Control the
circling radius
Stick up and down control the
circling radius
CH3
Control the
flying altitude
Same as GPS mode
CH4
Control the
aircraft yaw
In circling mode, the nose of
aircraft default facing to the
circle center always. Once
move the yaw stick manually,
FC will not control the yaw
and operator can control the
yaw by radio controller.
Page 21

www.jiyiuav.com
7.5 Lost Control Protection (Fail Safe)
P2 Pro flight controller support lost control protection (fail safe). First of
all, your receiver must support FS setting, and you set your remote
controller correctly according to your remote controller manual.
In the good GPS satellite signal condition, once the receiver lost the
signal, the P2 Pro Controller shall activate the auto pilot and return to
home location (no matter in stable mode or GPS mode). The auto pilot
home will be same with the Go Home mode.
During the return flight, if the remote control is restarted and user
wants to re-control the aircraft, you need to switch the CH5 from Stable
mode and GPS mode one time, at the same time you should ensure the
throttle stick is not at the lowest position in order to gain control over
the aircraft again. If the remote control receiver encounter signal lost
under the bad GPS signal, the aircraft shall auto-landing at right below
ground.
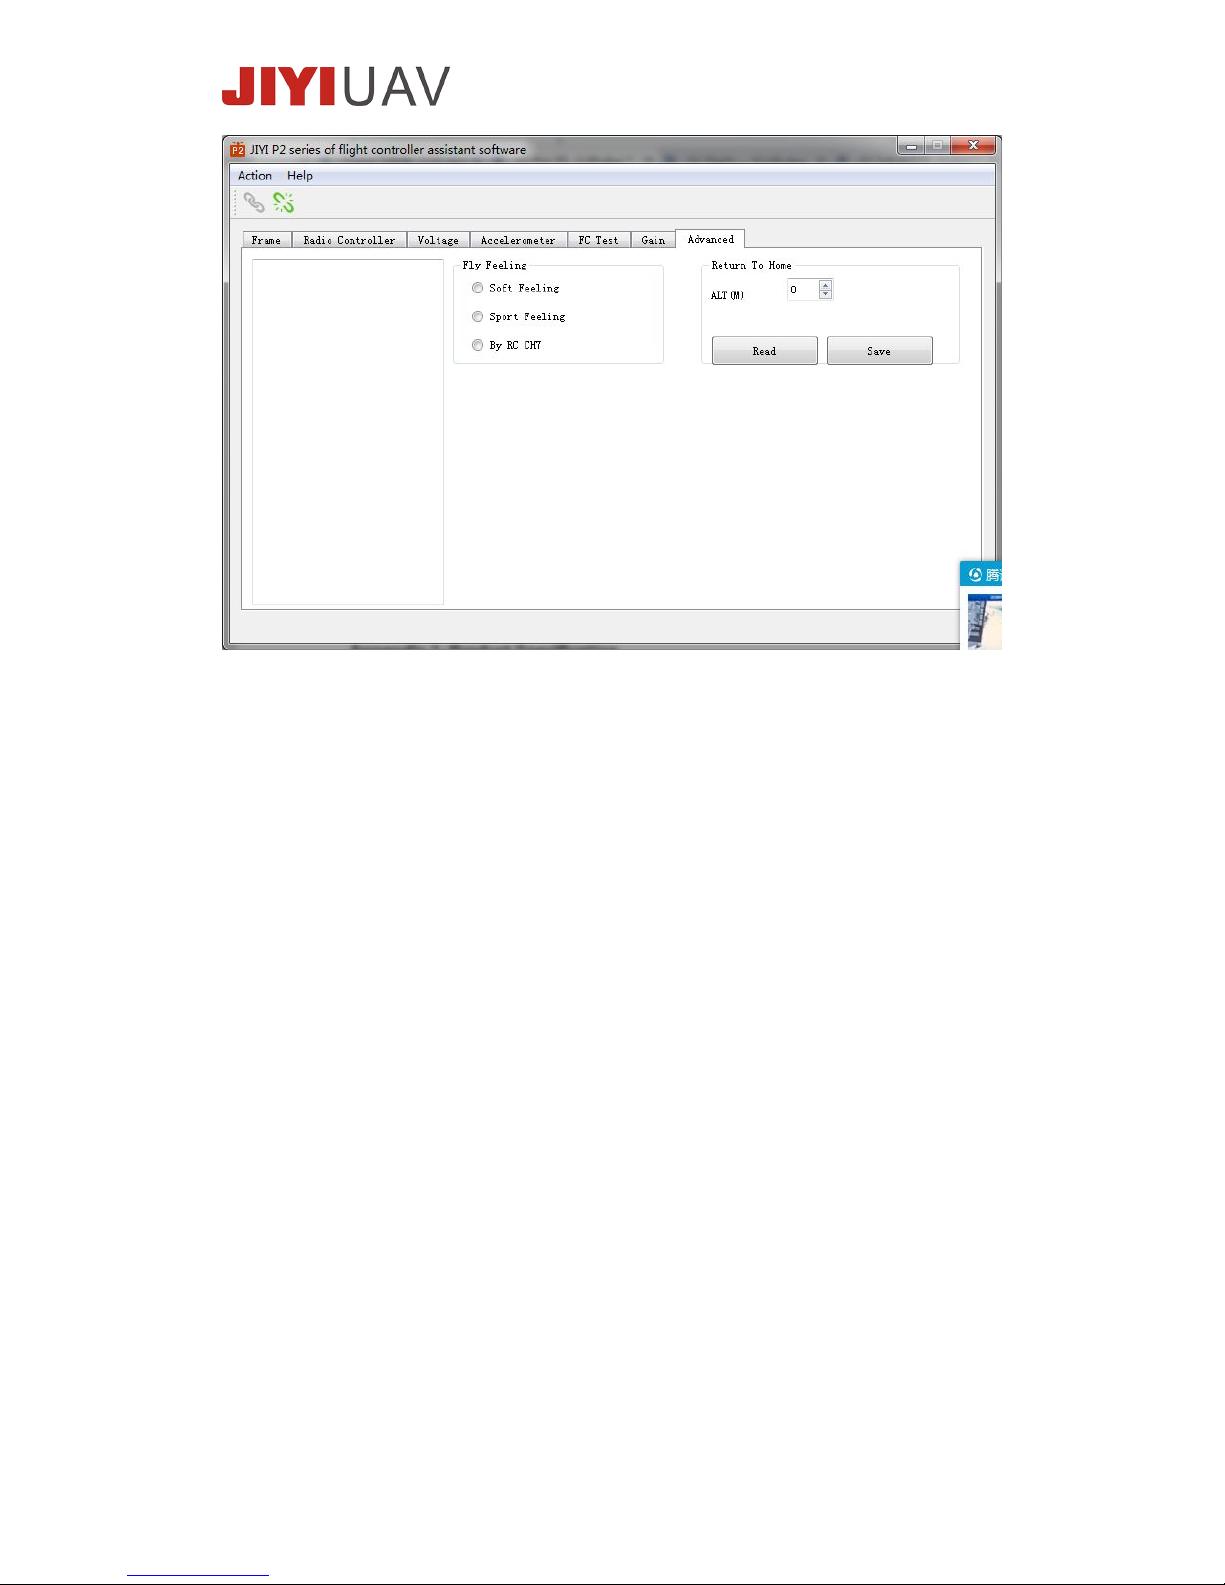
7.6 Sports Mode
P2 Pro flight controller is built in with two type of operation mode - soft
mode and sport mode. The default setting is soft mode. Only PPM and
S-BUS receiver are able to switch between this two modes by
transmitter, CH7 will be used as the switch for soft and sport mode.
During the flight, you can switch between two modes in order to have
different flying experience.
Page 22
www.jiyiuav.com
Caution: it is advisable that beginner user shall not change to the sport
mode during the flight. Suggest switch to this mode once the user flying
become skillful.
Page 23
www.jiyiuav.com
Appendix
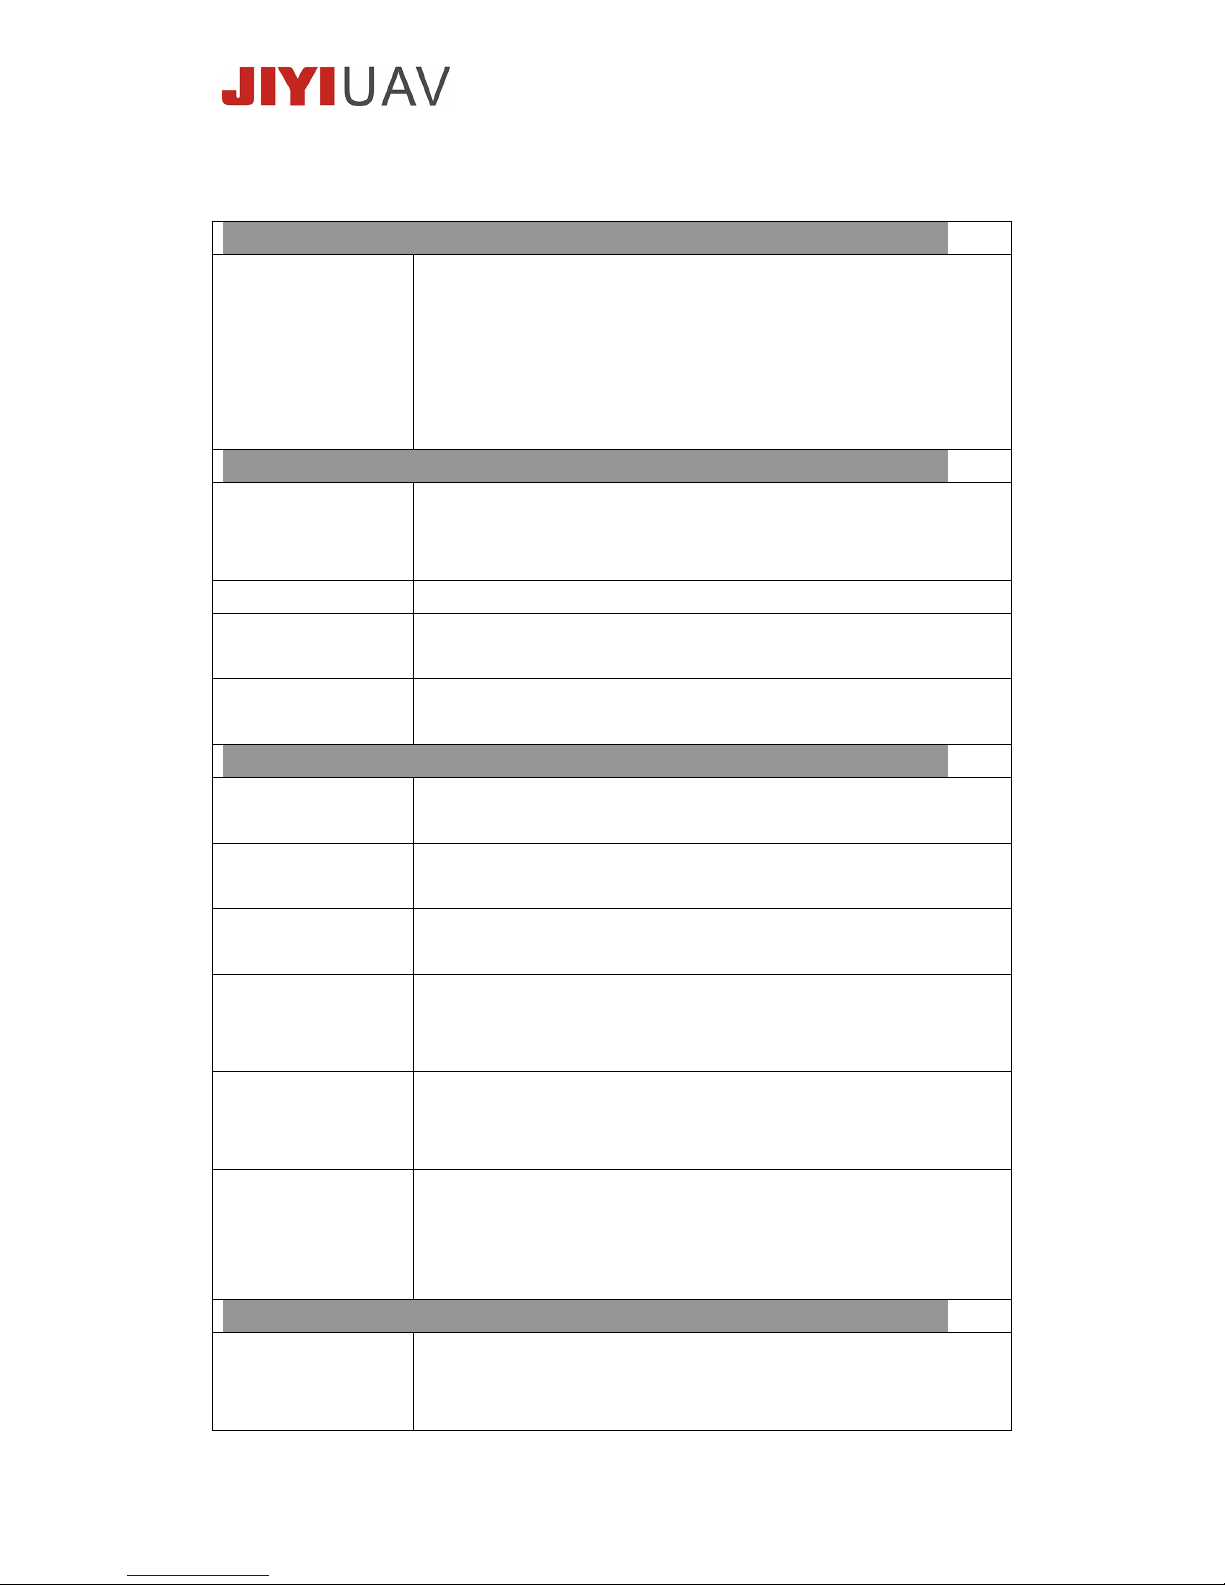
Appendix 1: Product Specification
General Characteristic
Function:
PPM, PWM, S-BUS receiver support
Superior Stable flight against interference
Gentle throttle setting
Precise spot GPS hovering
Low voltage protection
Lost control protection
Peripheral Equipment
Multi-Rotor
supported:
Quad-rotor I4, X4 / Hex-rotor I6, X6, IY6, Y6 /
Oct-rotor I8, V8, X8, not exceed 1200mm
wheelbase
ESC supported:
PWM ESC below 490HZ
Recommended
transmitter:
PWM and S-BUS. 6 channels
System
requirement:
Windows XP SP3, Window 7, Windows 8, IOS X
Basic Parameter:
Working
voltage:
Main controller 4.8V-5.5V
LED/ POW
module:
Input 7.4v-26V (recommend 2S-6S LiPo);
Output 2A @ 5V
Power
Consumption:
< 2W
Working
environment
temperature:
-10 ˚C – 60 ˚C
Storage
environment
Temperature:
-40 ˚C - 60 ˚C
Weight:
Main controller: 36g
GPS/Compass Module: 45g
LED/USB Module: 7g
POW Module: 11g
Flight Feature (Depending on aircraft frame and power unit)
Hovering
tolerance
(GPS Mode):
Horizontal: ±2.0m
Vertical: ±0.8m
Page 24
www.jiyiuav.com
Max Tilt Angle:
45°
Max Yaw
Angular
Velocity
150°/s
Ascent/Descent
6m/s
Wind
Resistance
<8m/s (17.9mph/28.8km/h)
Built in Flight
mode:
Attitude Mode
GPS Mode
Smart Circling Mode
Failsafe Mode
Low Voltage Protection
One key take off, Click and fly, Waypiont
(Groundstation function)
Remote/Cell phone adjustment
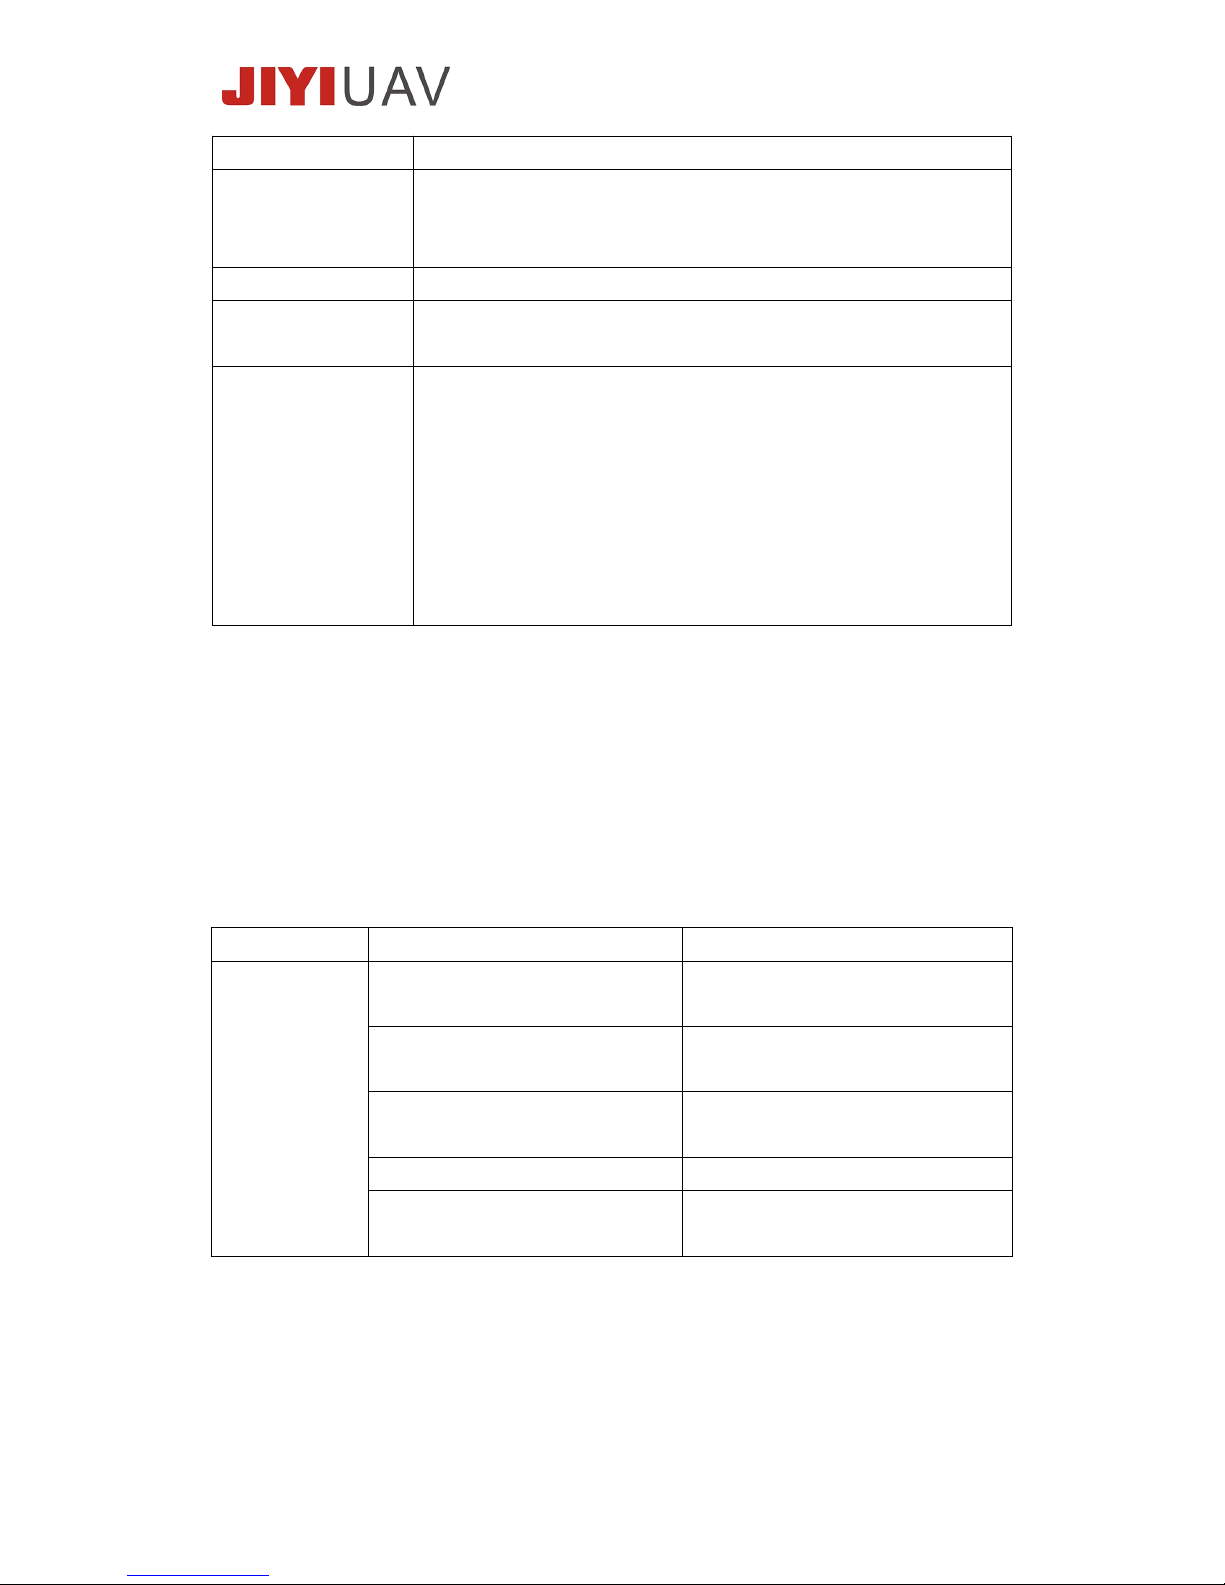
Appendix 2 : LED Light Indicator and Meaning
P2 Pro Flight controller only provide “red light” as indication of to flight
controller working status, indication as below table:
LED Light
LED status
P2 Pro working status
Red Light
Slow blinking
(Disarmed)
Standby
Double blinking
(Armed/disarmed)
Bad GPS signal
Triple blinking
(Armed)
First level low voltage
Off (Armed)
Working normal
Fast blinking
(Armed)
Second level low voltage
Page 25

www.jiyiuav.com
Appendix 3 JIYI Technical Suppport
If you have any problem during your usage, please contact JIYI for
technical support. You can download relevant information from JIYI
official website.
JIYI official website: www.jiyiuav.com
Technical support: [email protected]
Again, thank you for choosing JIYI P2 Pro!
 Loading...