

JinLing Electrical JM151713 Users Manual

Introduction
Product Description
Congratulations on your purchasing this new generation of monitor. Your LCD
monitor incorporates high quality display into a small light weighted module. It has
power-saving capabilities and emits no X-ray radiation. You will certainly benefit from
this monitor in lots of ways, to name some of them, comfort, safety, and environmental
protection.
This LCD monitor incorporates 15" color active matrix thin-film-transistor
liquid crystal display to provide superior display performance. A maximum resolution
of XGA 1024×768 is ideal for displaying complex graphics and high definition
images. Other outstanding designs that enhance this LCD monitor's performance are
Plug & Play compatibility, audio system and OSD (On Screen Display) controls.
Package Contents
Included with your LCD monitor are following items:
● 15" TFT LCD monitor
● User's manual
● Adapter & AC power cable
Product Features
● High contrast color TFT LCD display support resolution up to XGA
1024×768.
● Compatible with IBM VGA, VESA, and Macintosh standards.
● Power management system conforms to VESA DPMS standard.
● Support DDC 1/2B for Plug & Play compatibility.
● Advanced OSD control for picture quality adjustment.
(TFT)
- 1 -
Cleaning
Gently wipe screen with a clean camel hair lens brush, or a soft, clean, lint-free cloth.
This removes dust and other particles that can scratch the screen.
Do not apply pressure to the screen surface when wiping it clean.
Do not pour or spray any liquid directly onto the screen or case of the LCD monitor.
Chemical cleaners have been reported to damage the screen or case of the LCD
monitor.
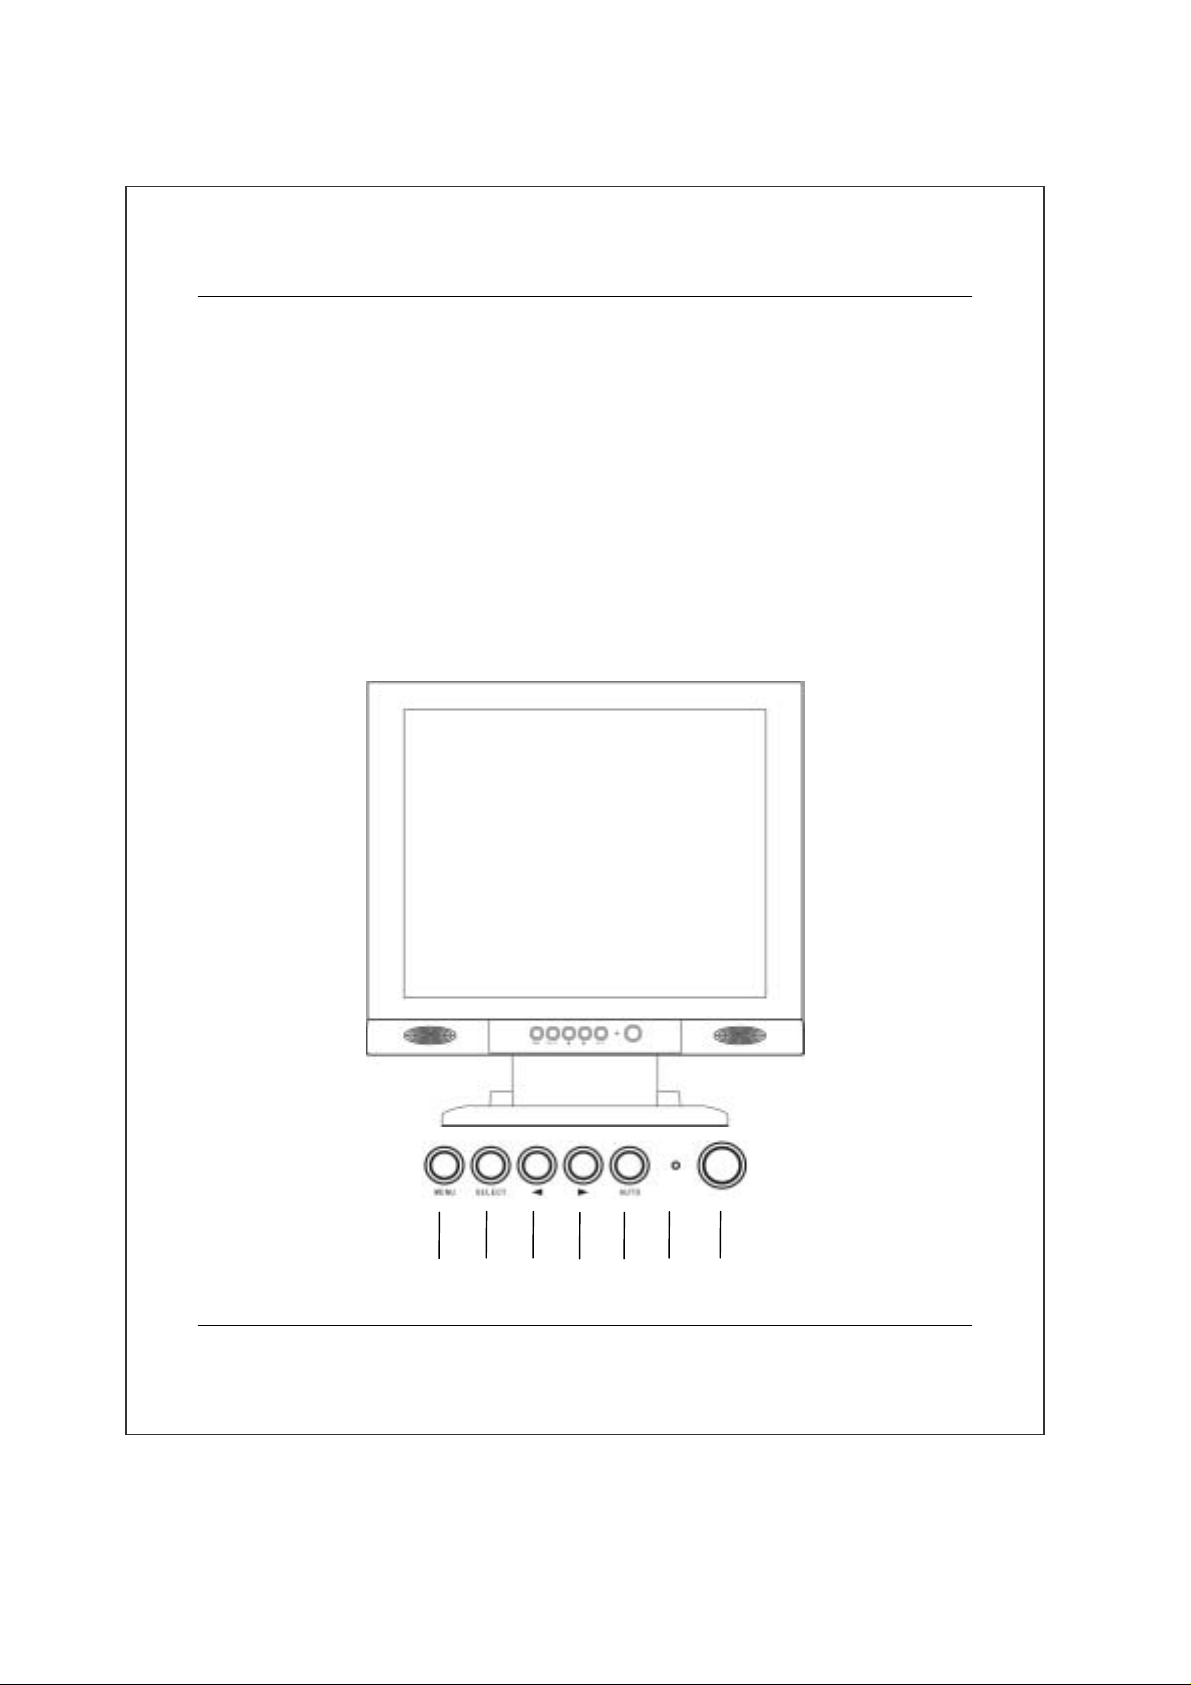
Control Function
Control Button Front View
3 4 5 6 7 2 1
- 2 -
1. Power Switch: Pressing this button turns the display system power on or off.
2. Power LED: This Power LED indicates different status when this unit operates
in different modes.
3. OSD Menu: Pressing this button pops up the OSD menus on the screen.
4. OSD Select: This button is used to select the OSD control option.
5. Decrease: This button is used to adjust the decreasing value of selected OSD
control option.
6. Increase: This button is used to adjust the increasing value of selected OSD
control option.
7. Auto Tuning: This button is used to make the picture be perfect.
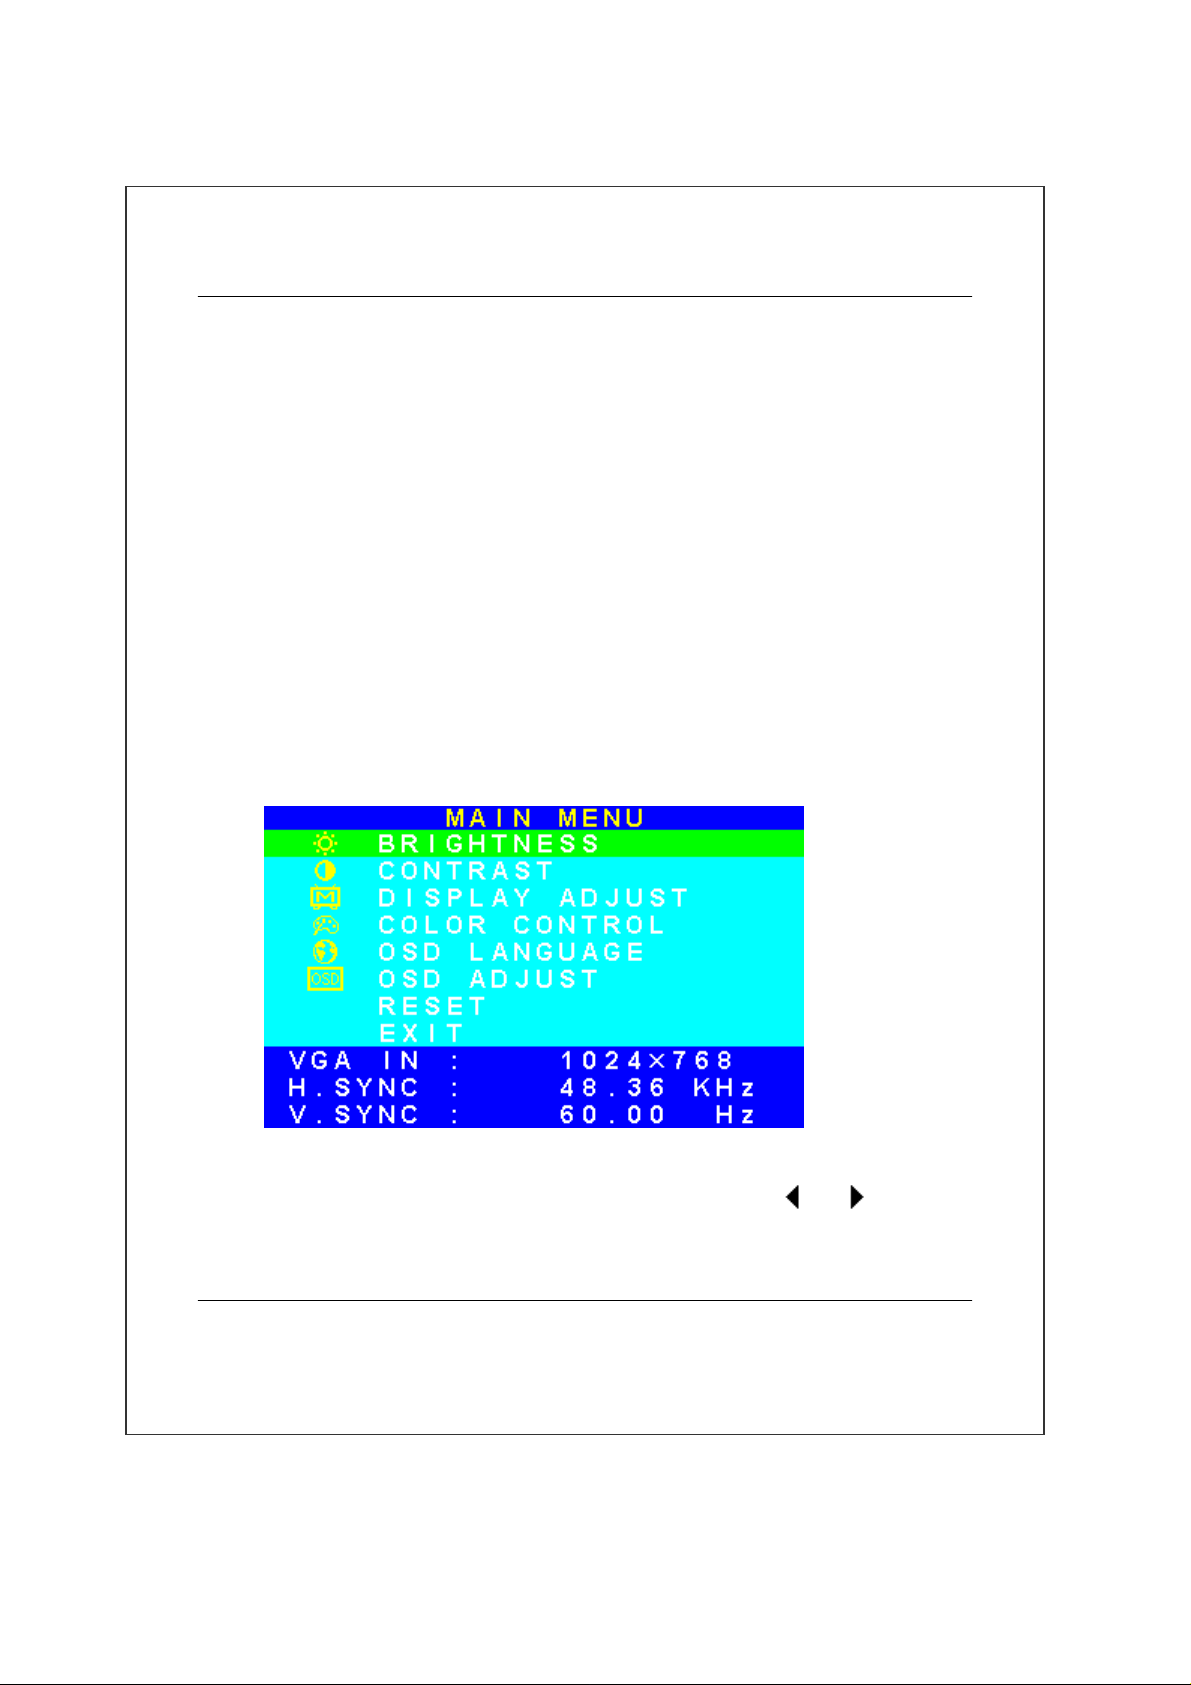
OSD Control Function List
Input for PC
Fig. 1
Press "MENU" the OSD main menu on the screen, then use "
the item you desire to change, then press "SELECT" to make the adjustment, then press
"MENU" again to go back to main menu.
- 3 -
" or " " to locate
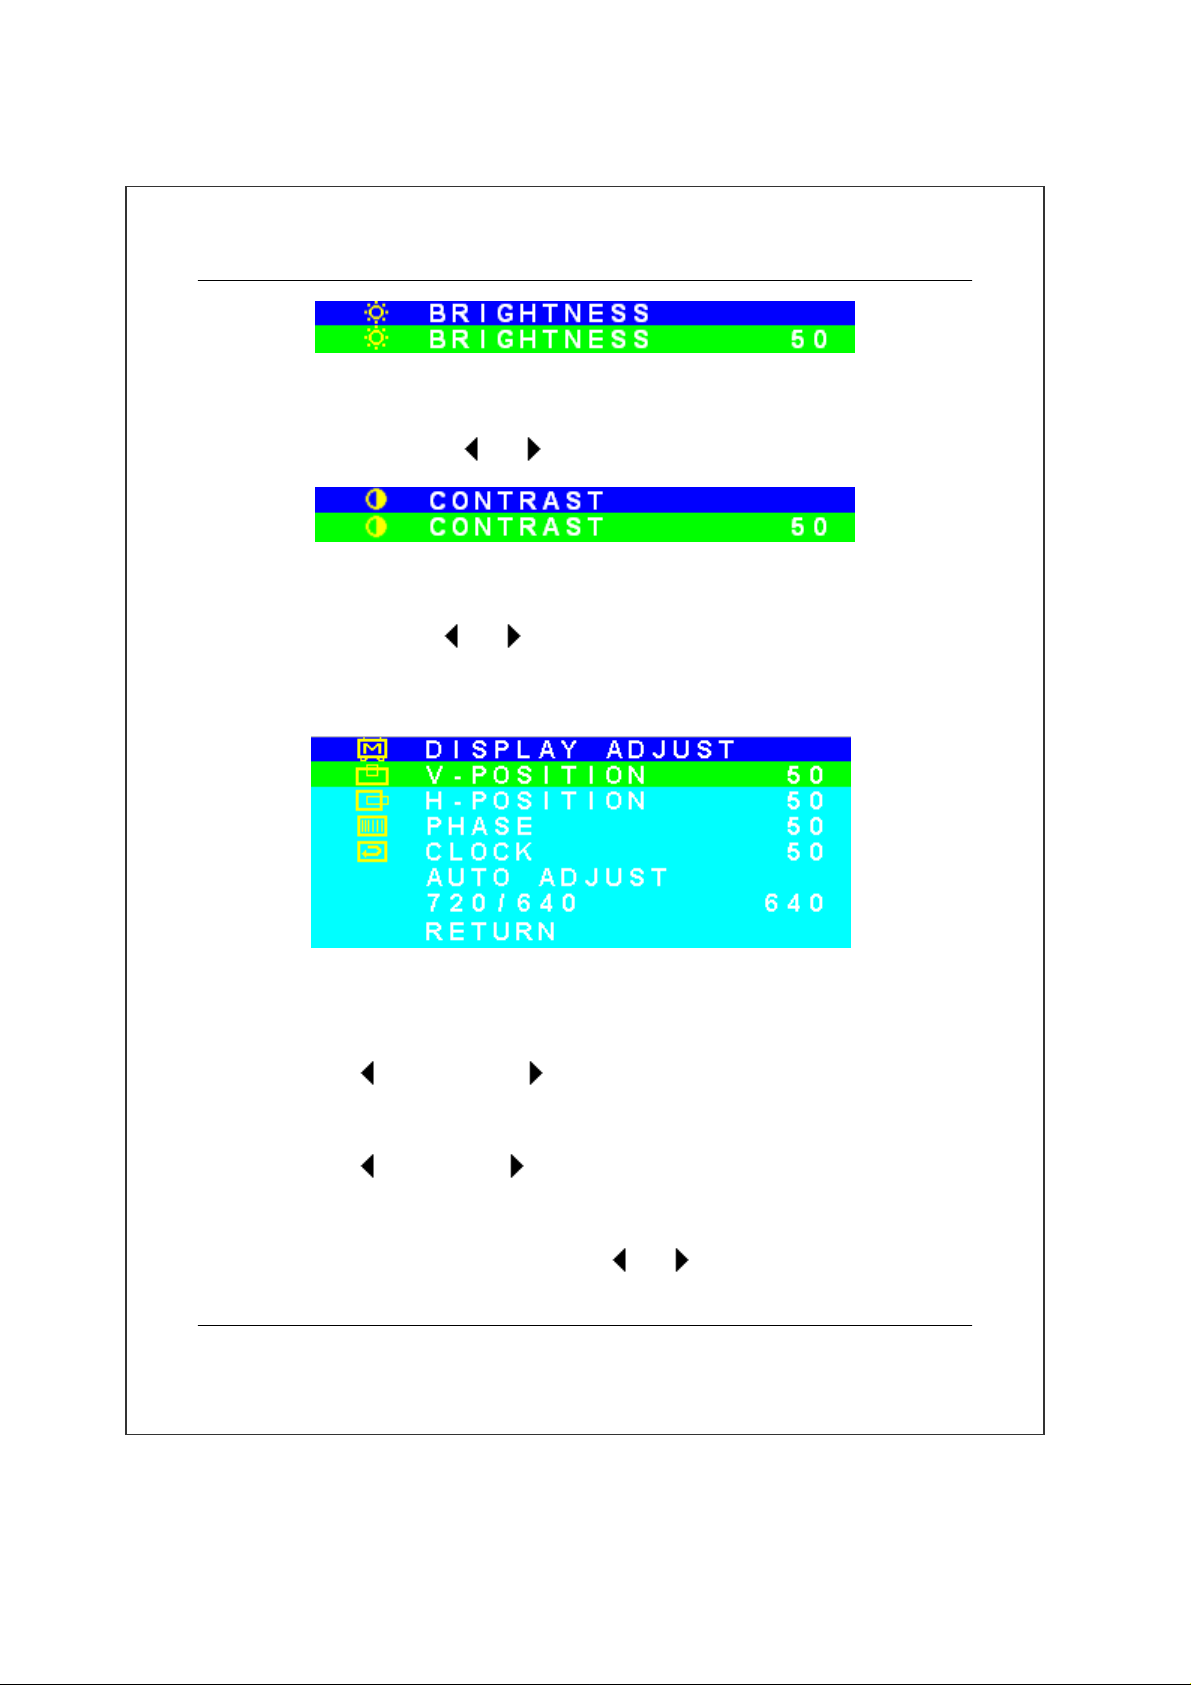
Fig. 2
BRIGHTNESS: Adjusts the Brightness.
Press "
" or " " to adjust the parameter.
Fig. 3
CONTRAST: Adjusts the difference between the light and dark areas.
Press "
" or " " to adjust the parameter.
DISPLA Y ADJUST: When you select the display adjust, press the "SELECT"
Button the menu:
Fig. 4
V- POSITION: Moves the display picture up or down.
Press "
H-POSITION: Move the display picture left or right.
Press "
PHASE: Adjusts the video distortion. It will appear vertical noise on the
screen while adjust the Phase.Press "
" to down, Press " " to up.
" to left, Press " " to right.
" or " " to adjust the parameter.
- 4 -
CLOCK: Adjusts the video distortion. It will appear horizontal noise on the screen
while adjust the Clock. Press "
" or " " to adjust the parameter.
AUTO ADJUST: Select this function can make the monitor have best efficiency.
720/640: the function applies to mode 720×400, 720×350 or 640×400,
640×350.
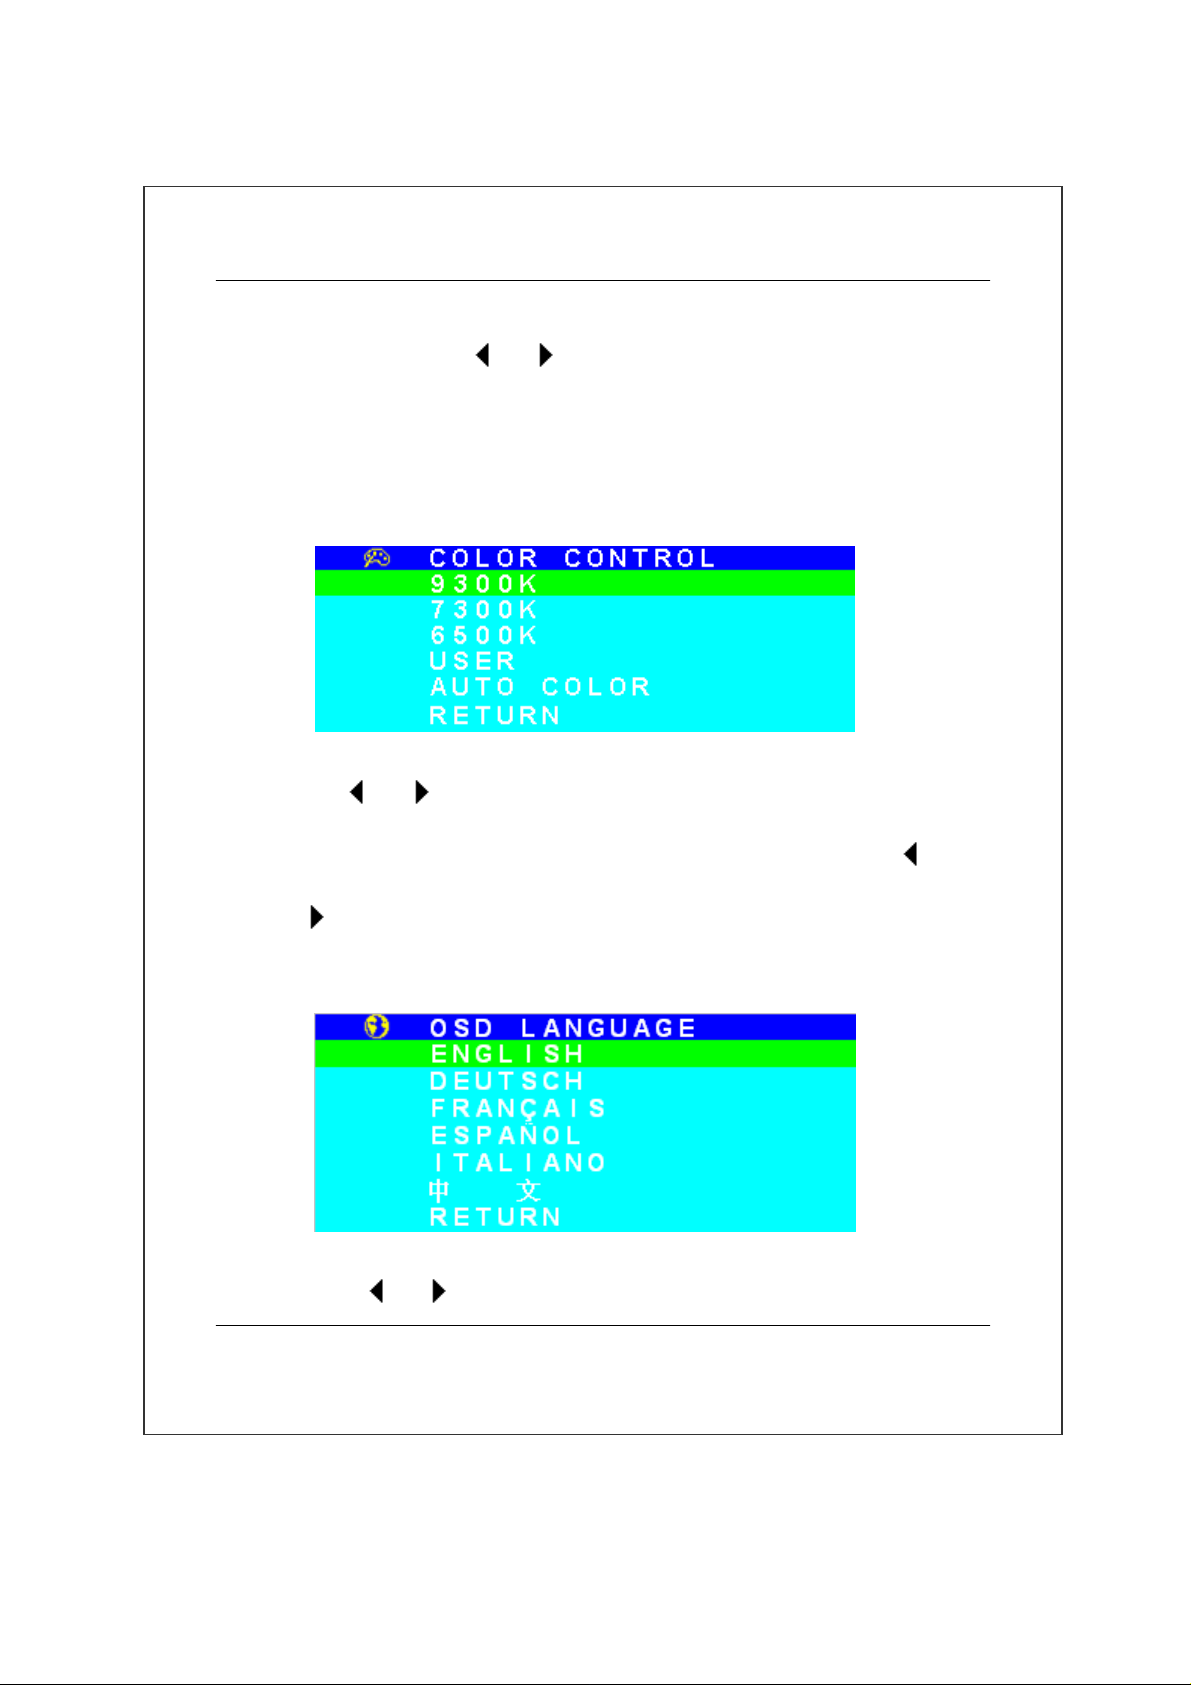
COLOR CONTROL: When you select the color control then press
the "SELECT" Button the menu:
Fig. 5
Use "
executing. If the preset color temperature can't acceptable then use "
"
" or " " to select the color temperature then press the "SELECT" to
" or
" select USER or AUTO COLOR fo r change the color temperature.
OSD LANGUAGE: When you select the language then press the "SELECT"
Button the menu:
Fig. 6
Use "
" or " " to select the language.
- 5 -
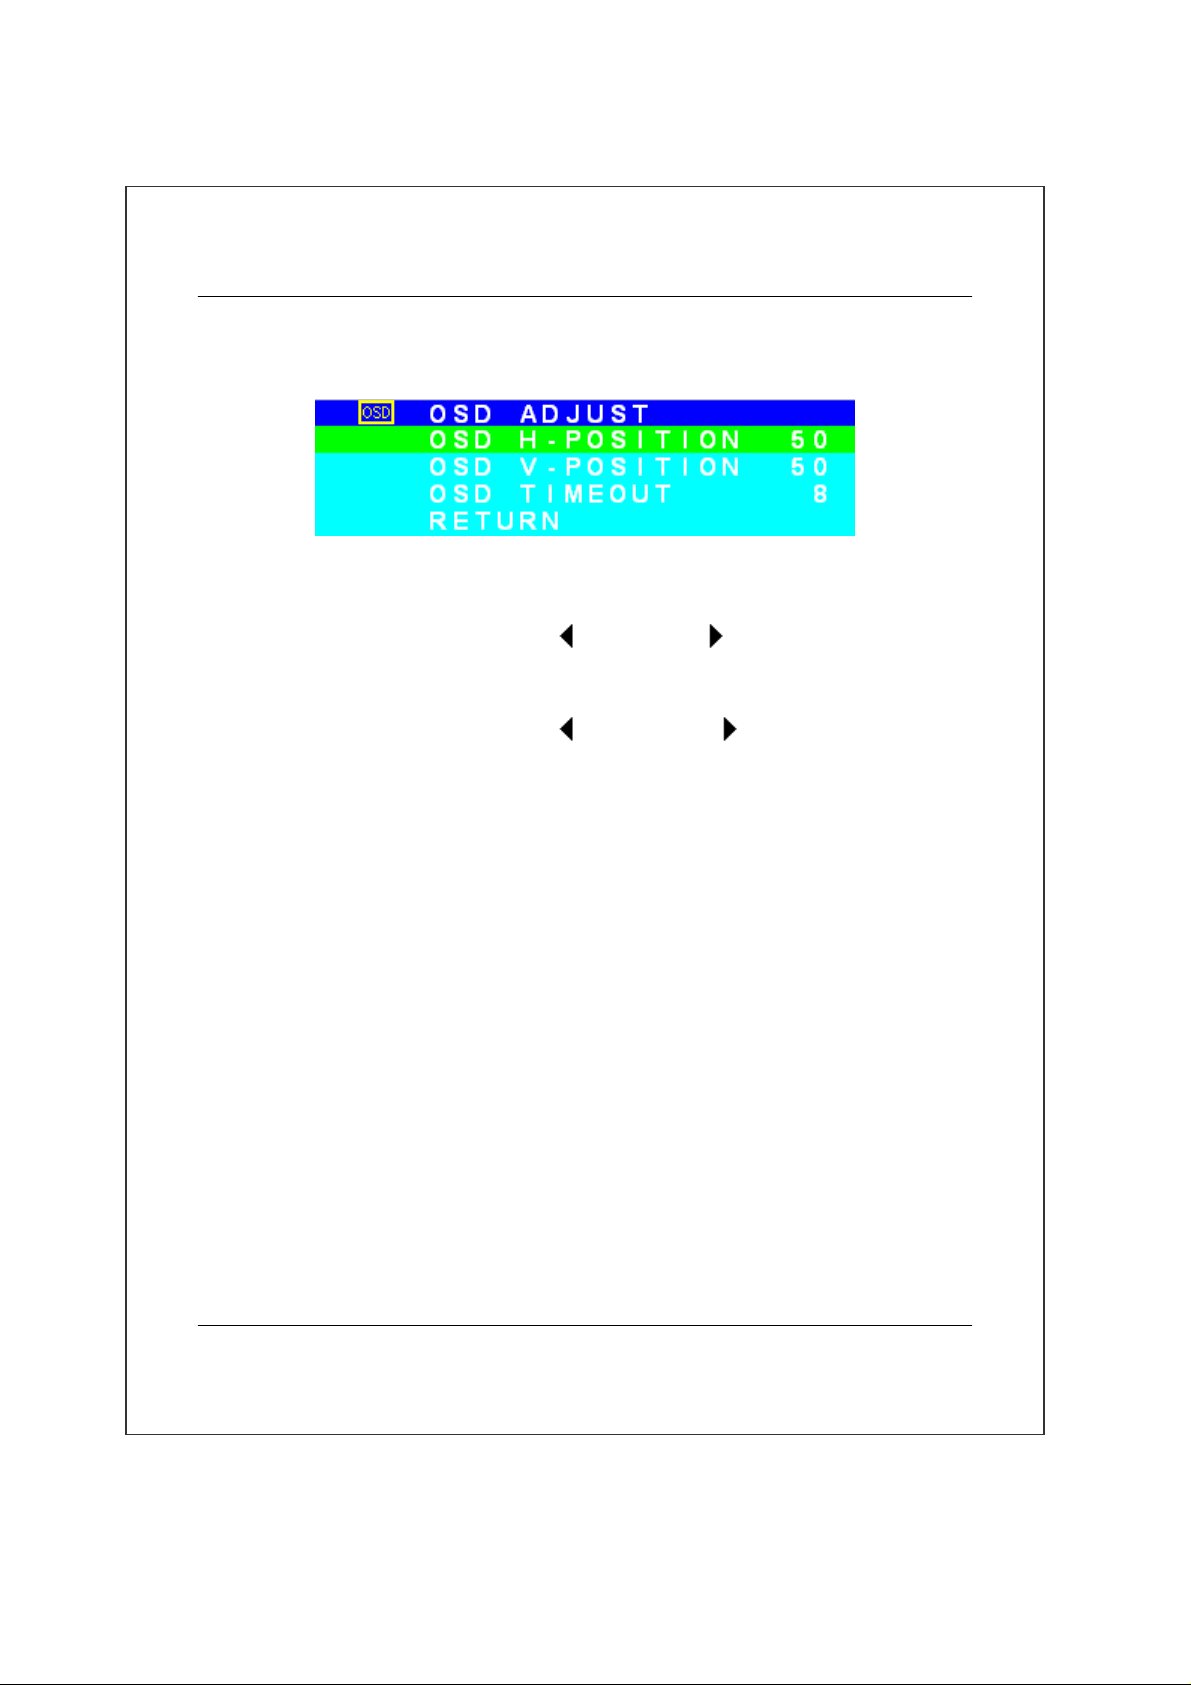
OSD ADJUST: When you select the OSD Adjust then press the "SELECT"
Button the menu:
Fig. 7
OSD H-POSITION: Adjusts the OSD Position left or right.
Press "
" to left, Press " " to right.
OSD V-POSITION: Adjusts the OSD Position up or down.
Press "
" to down, Press" " to up.
OSD TIMEOUT: Set the OSD time.
RESET: Restore the default value. Press "SELECT" to executing.
EXIT: Exit the OSD menu and save the values. Press "SELECT" to executing.
- 6 -
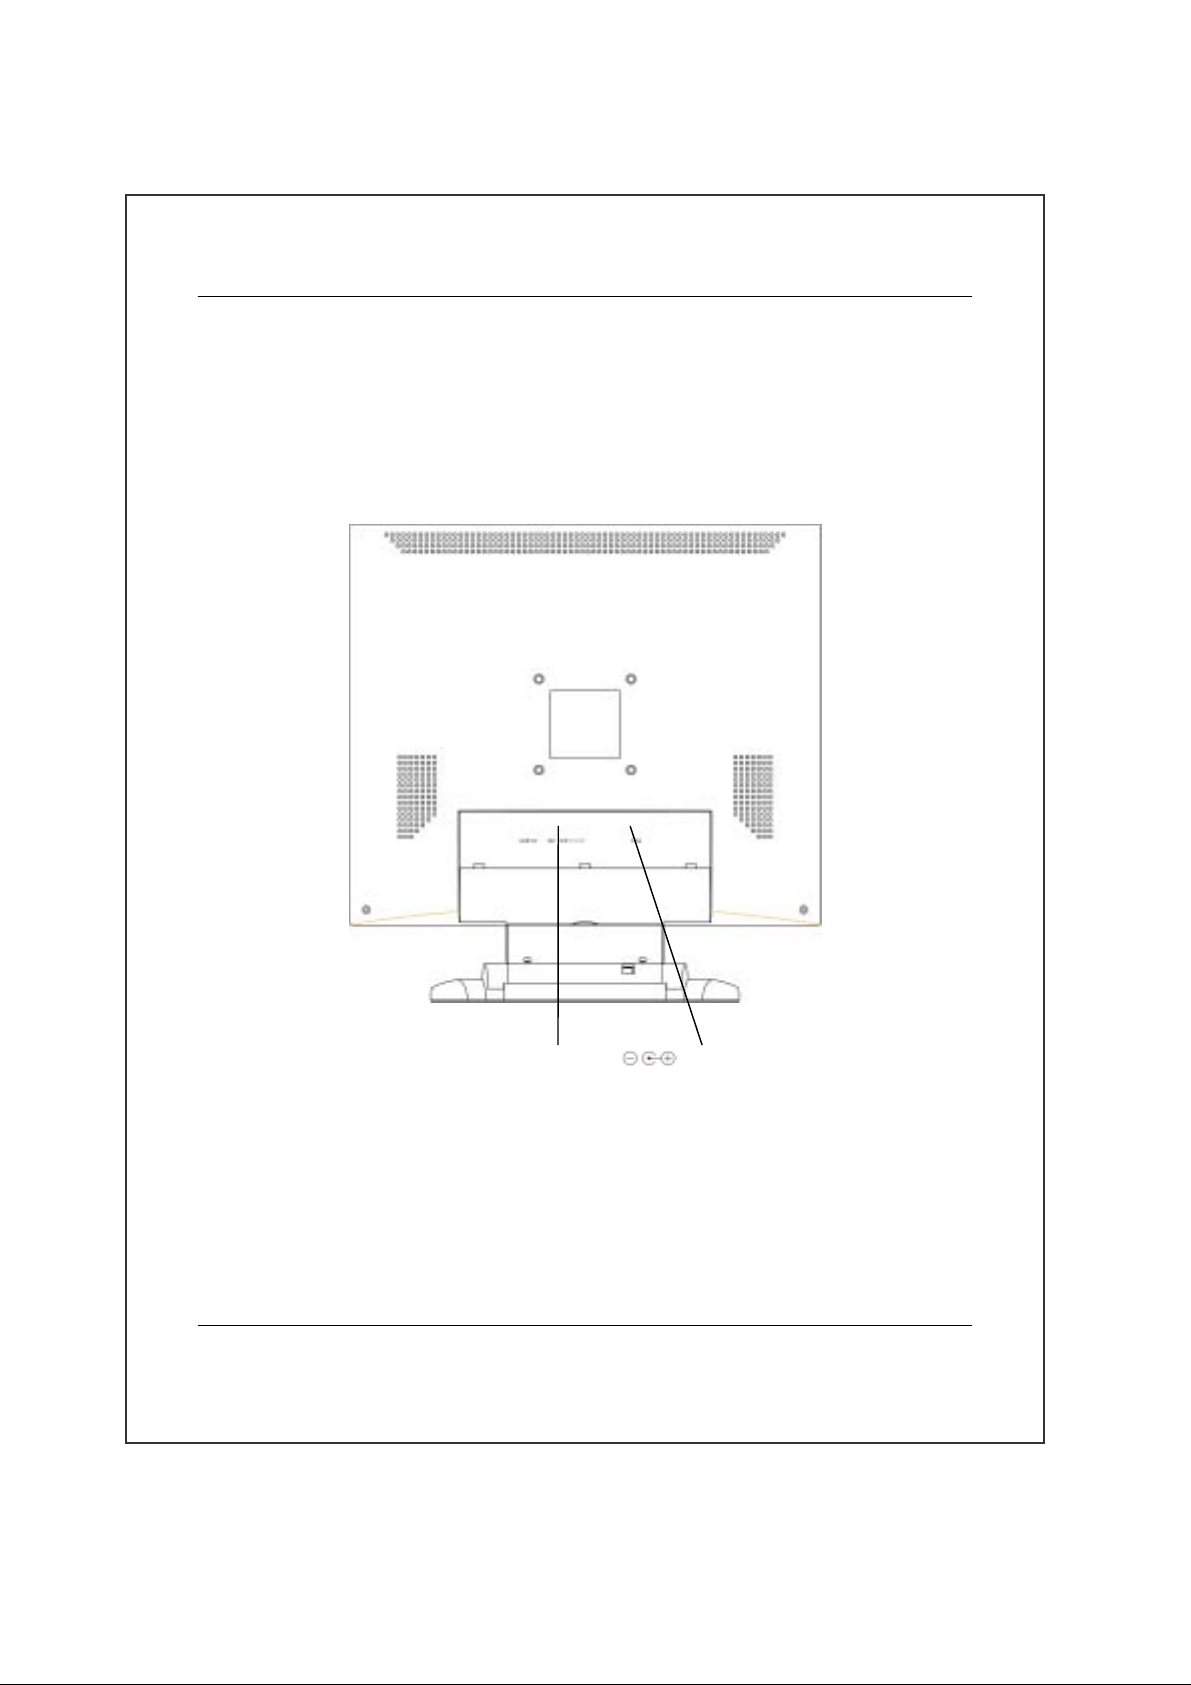
Inputs Diagram
Inputs
1. DC 12V
[1]. DC 12V: This is for connecting the power cable.
[2]. VGA: This can be connected with the D-Sub 15 pin signal connector.
2. VGA
- 7 -

Precautions
● Read all of these instructions and save them for later use.
● Follow all warnings and instructions on the product.
● Product
◆ Do not cover block the vent holes in the case.
◆ Do not insert sharp objects or spill liquid into the LCD monitor through cabinet
slots. They may cause accident fire, electric shock or failure.
◆ Disconnect the power plug from the AC outlet if you will not use it for an
indefinite period of time.
◆ Do not attempt to service this product yourself , as opening or removing covers
may expose you to dangerous voltage points or other risks.
◆ Do not touch the screen directly with your fingers. You may damage the screen,
and oil from your skin in difficult to move.
◆ Do not apply pressure to screen .The LCD is very delicate.
● Power
◆ Use the type of power indicated on the marking label.
● Plugs
◆ Do not remove any of the prongs of the monitor's three-pronged power plug.
◆ Disconnect the power plug from the AC outlet under following conditions:
▲ If you will not use it for an indefinite period time.
▲ When the power cord or plug is damaged of frayed.
▲ If the product does not operate normally when the operating instructions
are followed. Adjust only those controls that are covered by the
operating instructions. Improper adjustment of other controls may result
in damage and will often require extensive work by a qualified
technician to restore the product to normal operation.
▲ If the product has been dropped or the cabinet has been damaged.
▲ If the product exhibits a distinct change in performance, indicating a need
for service.
- 8 -
 Loading...