

Page 1
S4005L
USER MANUAL
Page 2

table of Contents
1. PRECAUTIONS ...................................................................................... 3
2. PARTS AND BUTTONS OF THE DEVICE .................................................. 5
3. TOUCH BUTTONS ................................................................................. 6
4. GETTING STARTED ................................................................................ 6
5. HOME SCREEN ..................................................................................... 8
6.QUICK NOTIFICATION PANEL ................................................................. 9
7. SETTINGS MENU ................................................................................ 10
8. INSERTING/REMOVING SIM CARDS .................................................... 13
9. MAKING AND RECEIVING CALLS ......................................................... 14
10. ANSWERING AND REJECTING CALLS ................................................. 14
11.Send message ................................................................................... 15
12. SOFTWARE KEYBOARD ..................................................................... 15
13. HOW TO CONNECT TO A COMPUTER ............................................... 17
14. CONNECTION TO INTERNET ............................................................. 17
15. MOBILE DATA AND INTERNET ........................................................... 18
16.BLUETOOTH ...................................................................................... 19
17. CAMERA ........................................................................................... 19
18.TROUBLE SHOOTING ......................................................................... 21
19.Split Screen Multitasking ................................................................... 22
Page 3

1. PRECAUTIONS
1)、On the Road
Using a device while driving is illegal in many countries. Please refrain
from using yourmobile while driving.
2)、Near Sensitive Electronics or Medical Equipment
Don’t use your device near sensitive electronic equipment –
particularly medical devices such as pacemakers – as it could cause
them to malfunction. It can also interfere with the operationof fire
detectors and other automatic-control equipment.
3)、While Flying
Your device can cause interference with aircraft equipment. So it’s
essential you follow airline regulations. And if airline personnel ask you
to switch off your device, or disable its wireless functions, please do as
they say.
4)、At a Petrol Station
Don’t use your device at petrol stations. In fact, it’s always best to
switch off whenever you’re nearfuels, chemicals or explosives.
5)、Making Repairs
Never take your device apart. Please leave that to the professionals.
Unauthorised repairs could break the terms of your warranty. Don’t
use your device if the antenna is damaged, as it could cause injury.
6)、Around Children
Keep your mobile out of children’s reach. It should never be used as
Page 4

a toy as this is hazardous.
7)、Near Explosives
Turn off your device in or near areas where explosive materials are
used. Always obey local laws and turn off your device when requested.
8)、Emergency Calls
To make an emergency call your device must be turned on and in an
area where there’s network coverage. Dial the national emergency
number and press “Send”. Explain exactly where you areand don’t
hang up until help has arrived.
9)、Working Temperature
The working temperature for the device is between 0 and 40 degree
Celsius. Please don’t use
the device outside the range. Using the device under too high or too
low temperature might cause problems.
At very high volume, prolonged listening to a mobile device can
damage your hearing.
Page 5
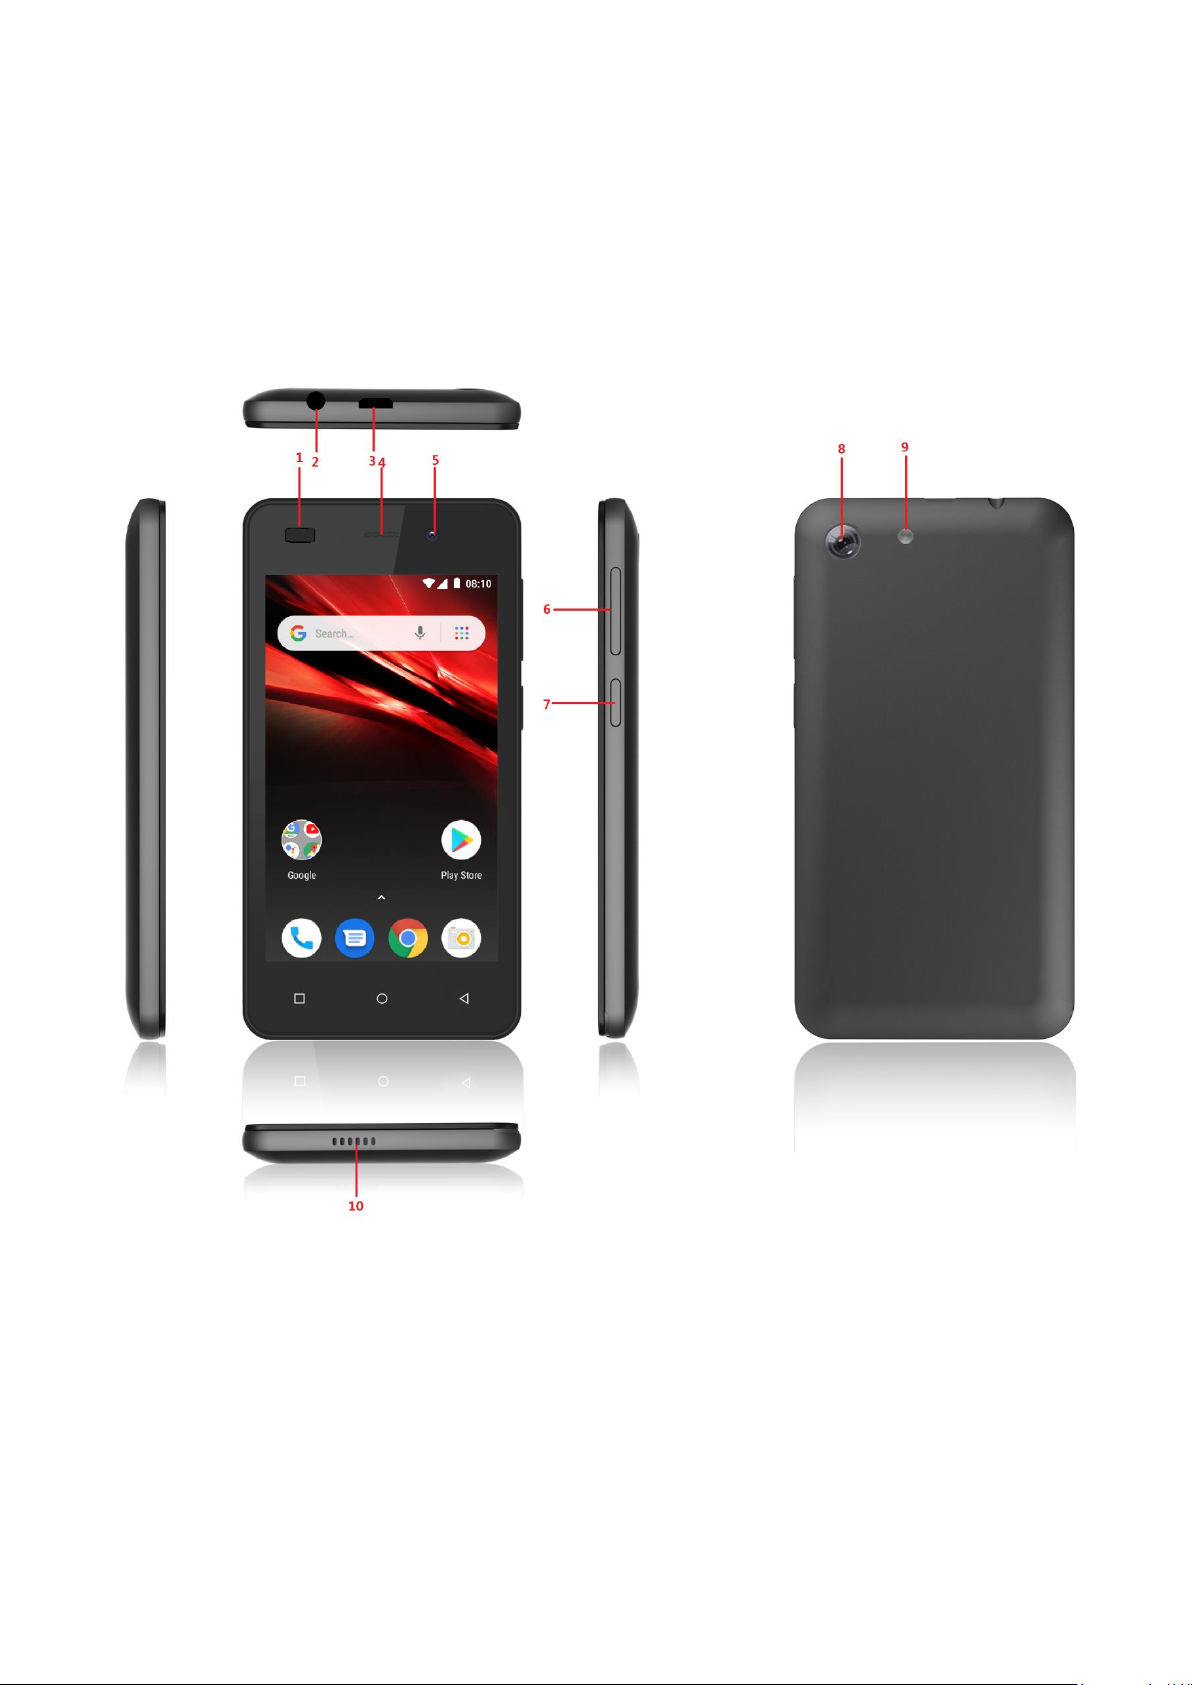
1. light distance sensor 2. Earphone jack
3. Micro USB and charging port 4. Receiver
5. Front camera 6. Volume button
7. Power button 8. Rear camera
9. Flash 10. Speaker
2. PARTS AND BUTTONS OF THE DEVICE
Page 6
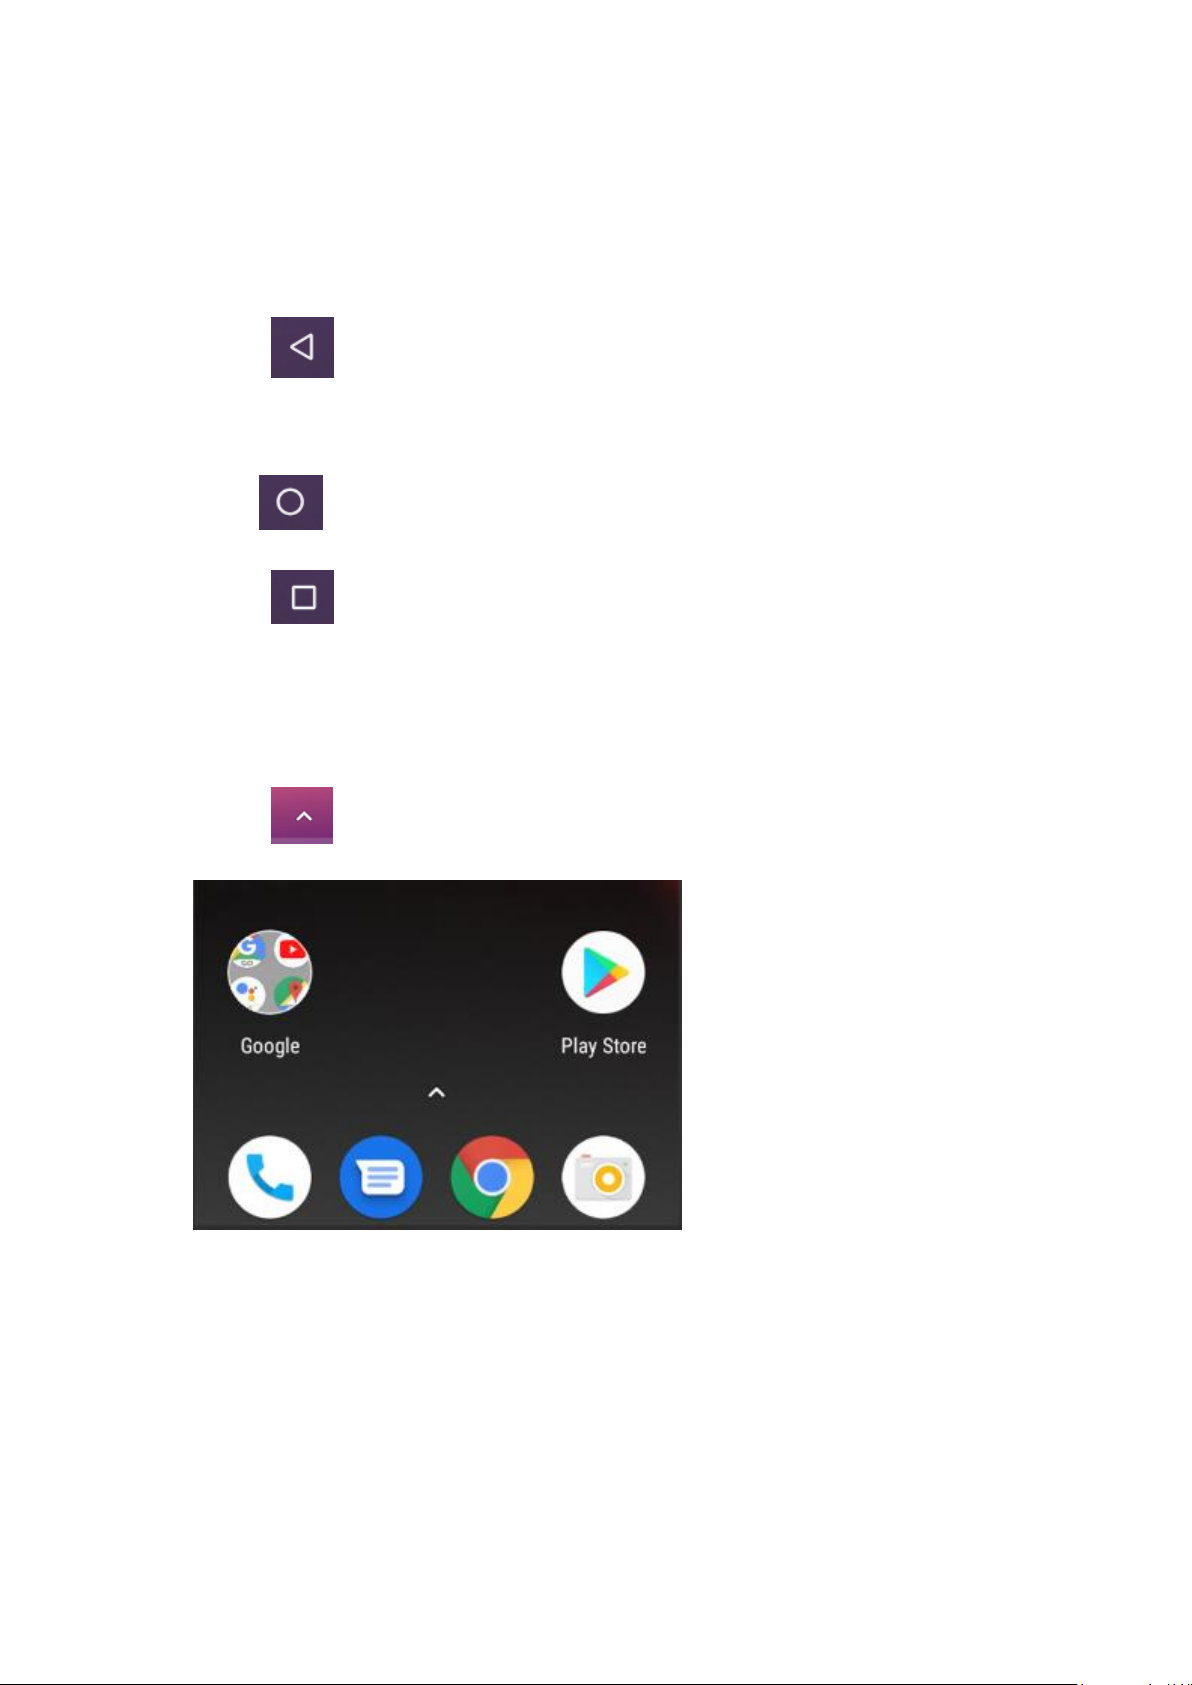
The button moves back one step to the previous
menu/page.
The button returns immediately to the main screen.
The button displays a menu of recently opened applications.
(This interface adds a “CLEAR ALL” button);Long press into the
Split screen interface
The button will launch the applications and settings menu.
Installingthe micro-SIM Card and Battery
Switch off your phone before installing or replacing the battery or the
3. TOUCH BUTTONS
4. GETTING STARTED
Page 7
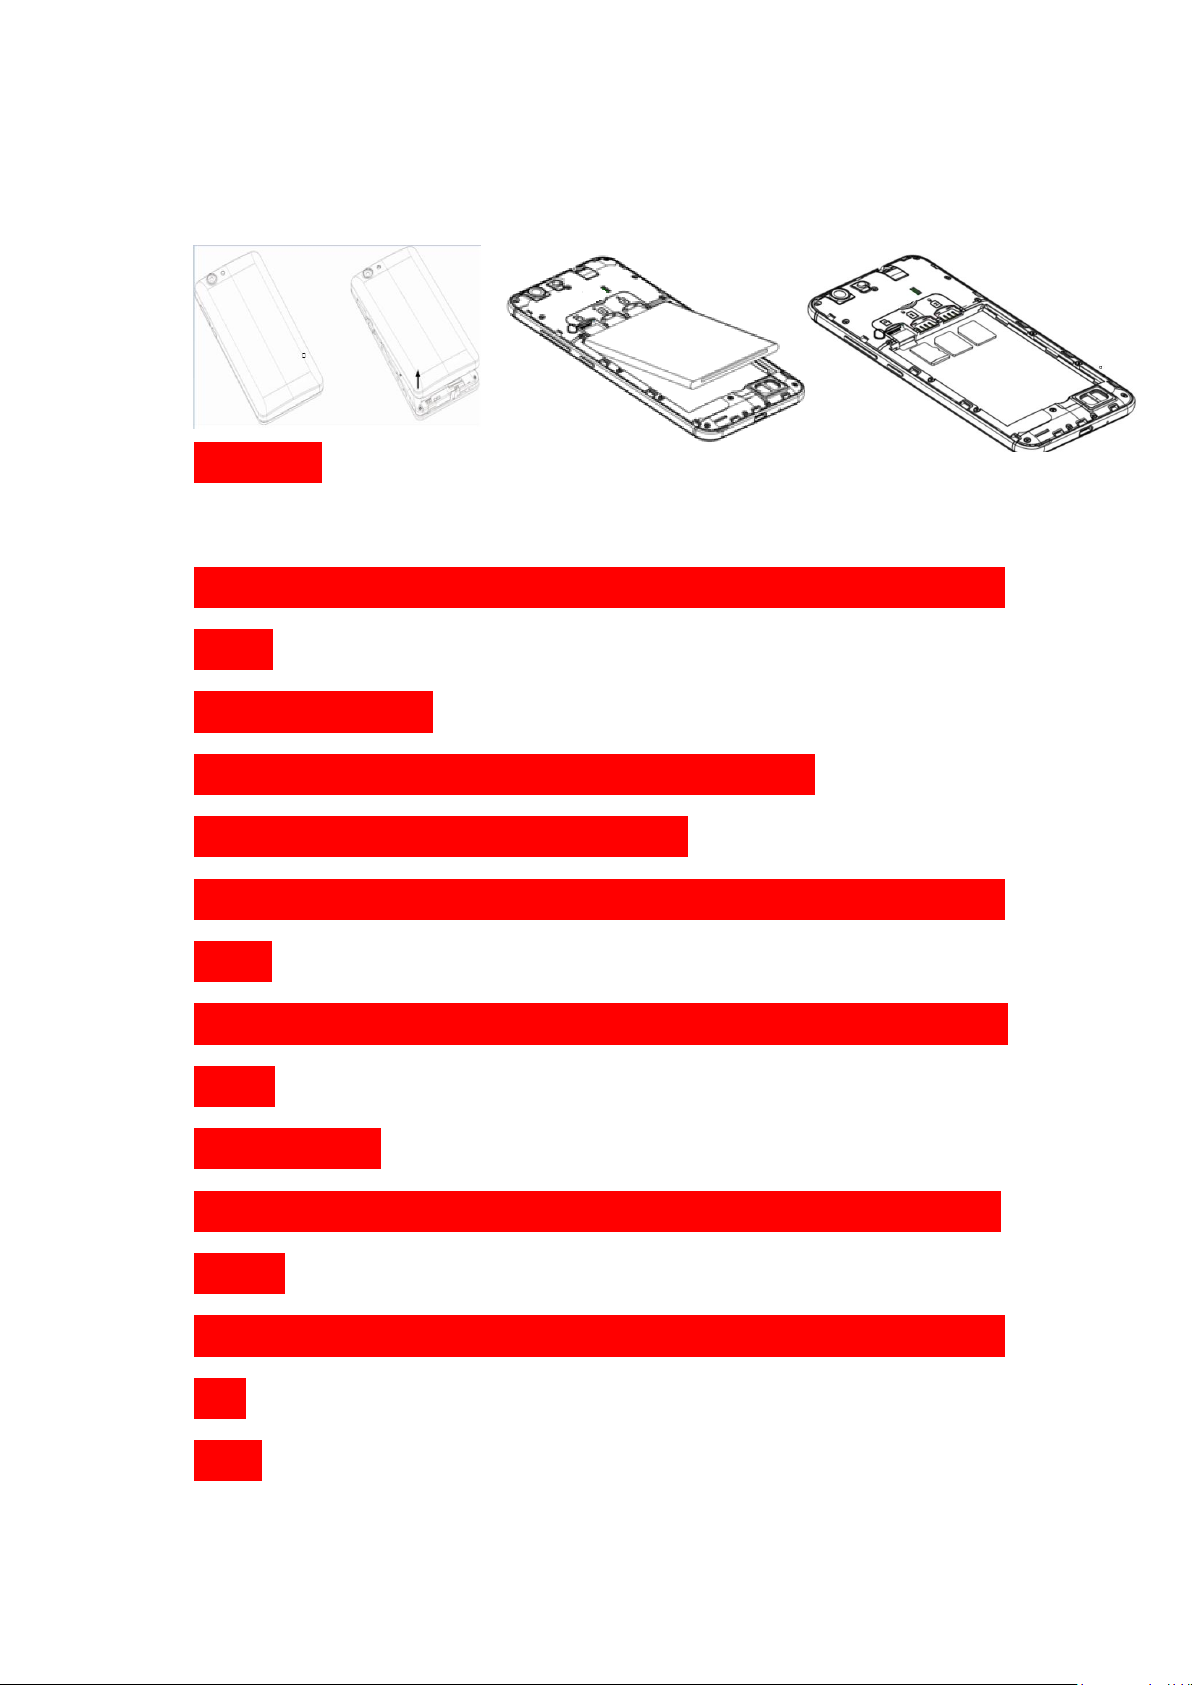
micro-SIM card.
Insert your fingernail into the slot at the bottom left of the back cover,
and slidefingernail across bottom of back cover to lift it off.
WARNING!
To avoid damage to the phone, do not use any other kind of SIM card,
or any
non-standard micro-
SIM card cut from a SIM card. You can get a standard
micro-SIM card from your service provider.
Insert the battery by aligning the metal contacts on the battery with th
emetal
contacts in the battery compartment. Gently push down on the battery
until it
clicks into place.
Align the back cover with the back of the phone and press the cover b
ack into
place. Ensure that all the tabs are secure and there are no gaps around
the
cover.
Page 8
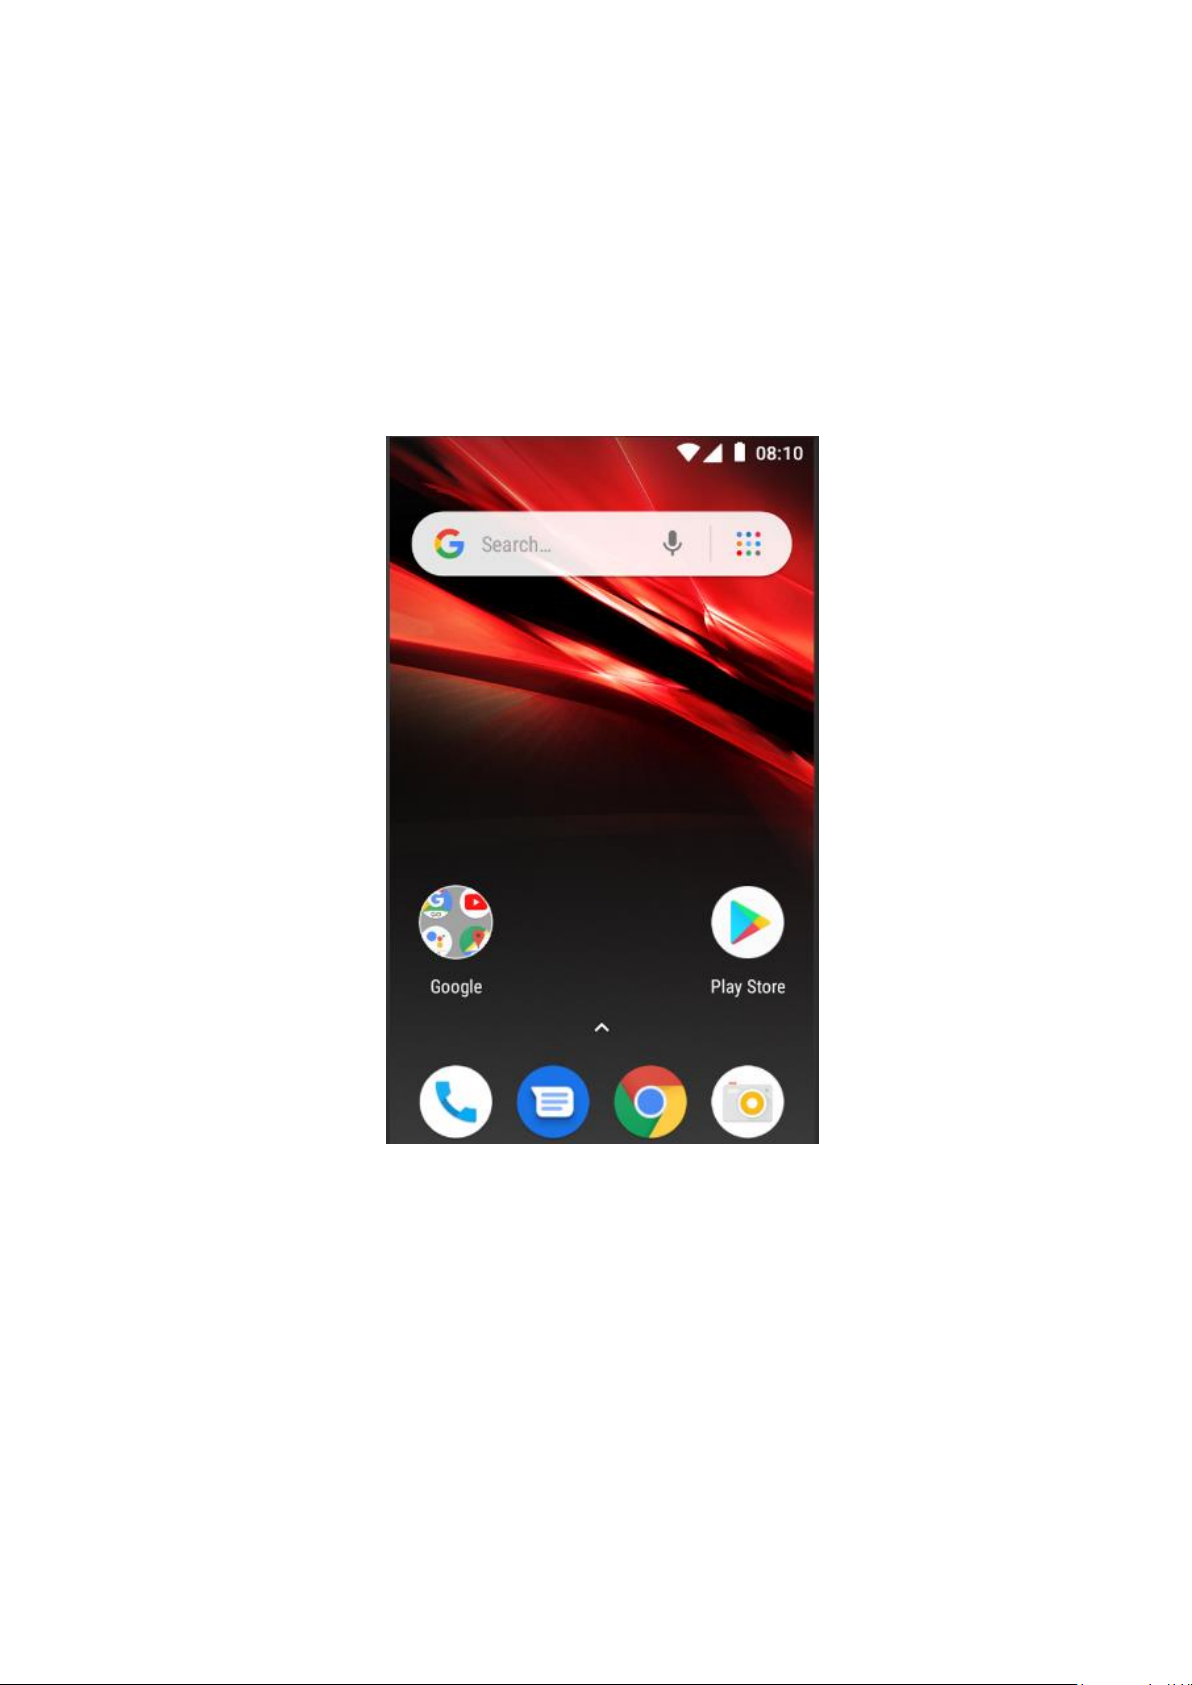
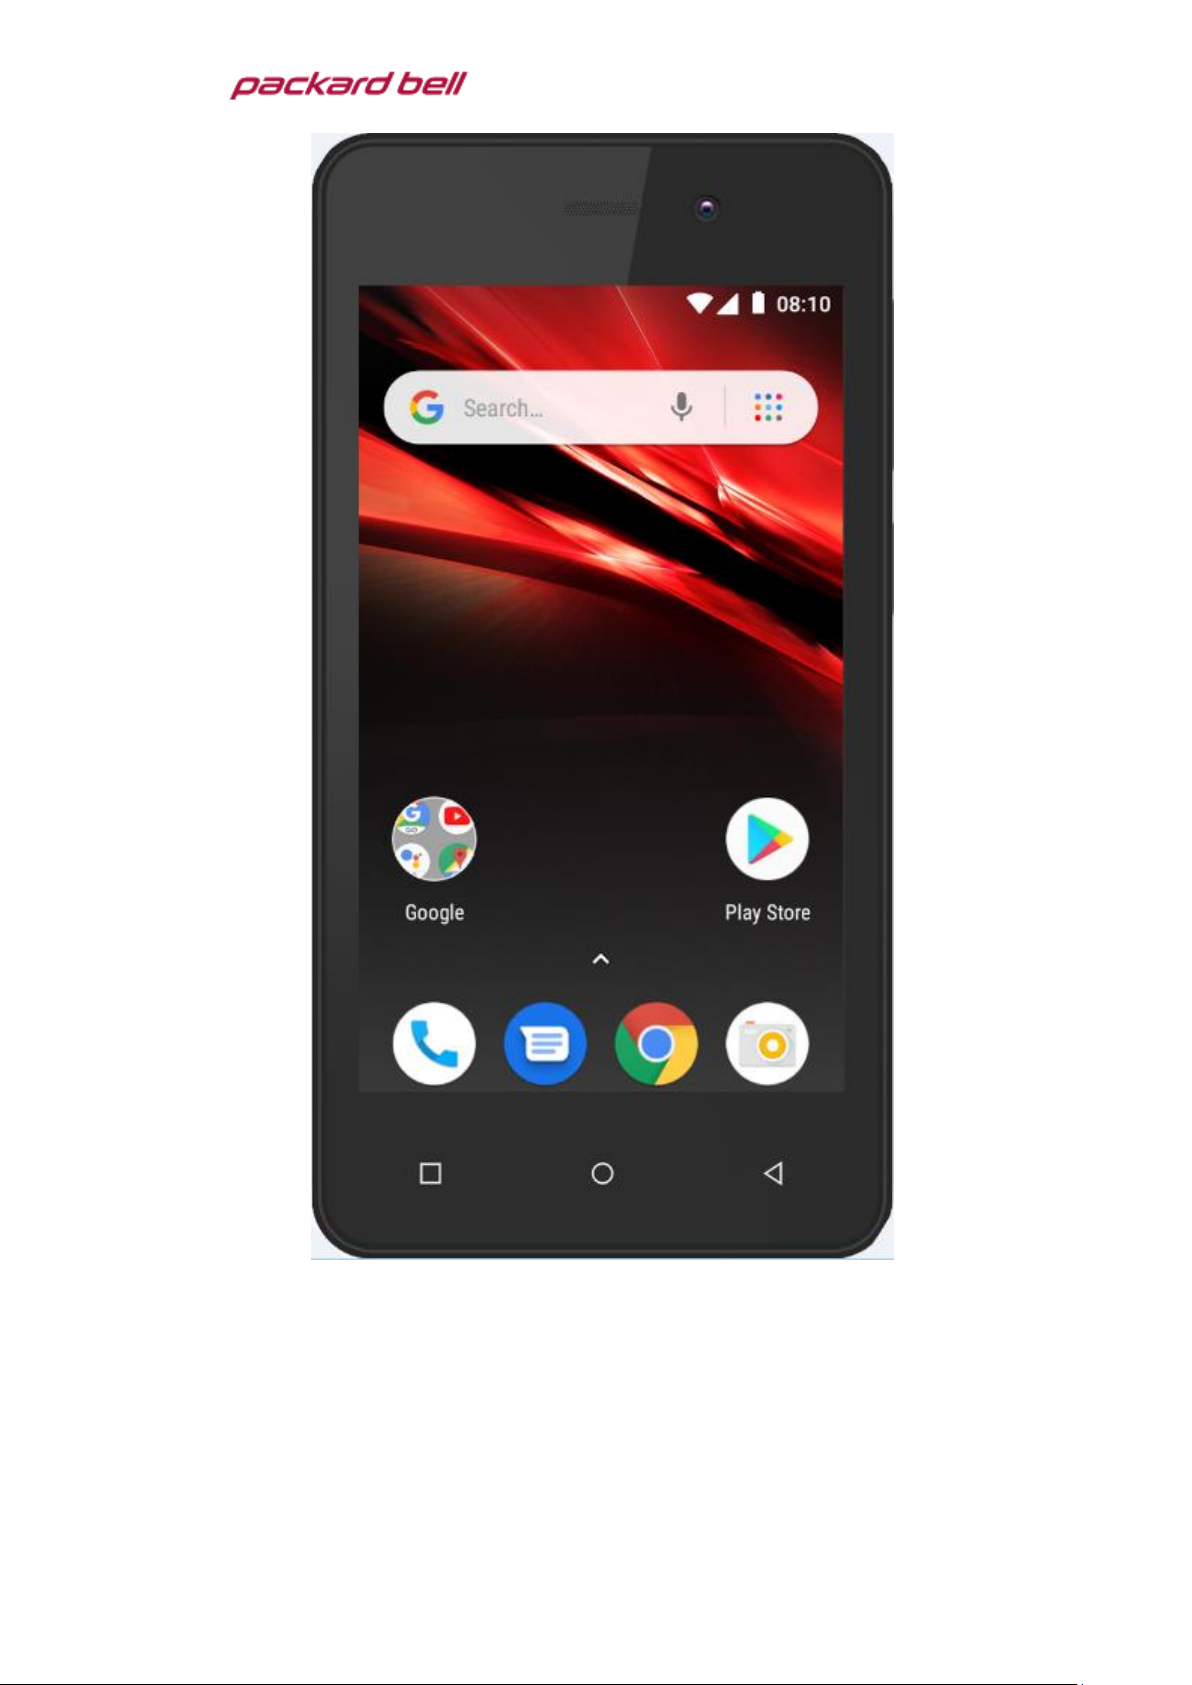
The home screen will look similar to the picture below. To switch
between screens, simply slide your finger left or right across the
display.
The home screen contains shortcuts to your most-used applications
and widgets.
The status bar displays system information, such as current time,
wireless connectivity and battery charge status.
5. HOME SCREEN
Page 9

When you receive a notification you can quickly view it by following
the below instructions. Slide your finger from the top of the screen
down to the center to access Notification Panel to see your
notifications.
Drag the notification menu down to display the second fast access
menu, the menu willlook similar to the below image.
6.QUICK NOTIFICATION PANEL
Page 10

Through this menu, it is possible to modify the functions such as
brightness, auto rotation, Wi-Fi, Bluetooth and more.
The settings menu allows you to adjust Tablet cellphone System
Confguration.
To Change Settings:
1. Touch the “Settings” menu icon on the Application menu.
The Settings menu will open.
2. Touch a category title to view further options .
2.1. Network&Internet
• Wi-Fi – Connect to/disconnect from wireless networks, view
connection status
• Moblie network - Insert SIM card and switch data
network(2G/3G/4G)
7. SETTINGS MENU
Page 11

• Data usage – Enable/disable mobile data, view current usage, set
mobile data limit
(note: this function is available only on devices supplied with 3G
card functionality)
• Hotspot & tethering - Including Usb tethering,Blutooth tethering
and Wi-Fi hotspot.
2.2. Connected devices
• Bluetooth – Connect or disconnect Bluetooth devices .
• USB - Insert the USB line to use this menu.
2.3. Apps & notifications
• Notifications – Adjust different notification settings
• App info – A list of all apps downloaded and running
• App permissions - View app permissions
• Battery – View the status of your battery and make adjustments to
power consumption
2.4.Display – Adjust display settings
2.5. Sound– Adjust the different audio settings such as ringtones
2.6.Storage – View your phone’s internal and external storage
settings
2.7. DuraSpeed – “ON” / “OFF”
2.8. Security& location
•Security- Adjust phone’s security settings;
•location- ‘Change approximate location detection, improve search
Page 12

results, GPS satellites .
2.9. User & accounts
• User - Switch between Owner and Guest;
• Accounts – Add or remove email and Google™ accounts such as
Gmail, Google.
3.0. System
• Language and input – add to the dictionary, edit on-screen
keyboard settings, vocal search, etc.
• Date and time – Set date, time zone, time, clock format etc.
•Backup– Backup and restore data, perform factory reset, etc.
• Reset
•DRM reset
•Network setting reset- this will reset all network settings.
•Reset app perferences- reset all perferences.
•Schedule power on&off:Set the time to turn on or off your phone.
• About Phone – Displays information about your phone
• Suggestions - Set some functions and slide these functions to the
right to remove this item.
Page 13

1. When phone is powered off insert a SIM card by removing the SIM
cover as illustrated above, insert your finger in the indent located near
the charging port and unclip the SIM cover, then insert the SIM card.
Please take note of the direction of insertion following the diagram on
the phone’s SIM port.
2. After inserting a SIM card, turn on the phone and wait a few
minutes for your phone to display Network information.
Inserting TF Card :
NB: Please ensure when inserting an SD card your phone is powered
“OFF”
1. Insert the TF card into the TF card slot located under the SIM card
cover as explained in the Inserting/Removing SIM card section. Gently
push TF card into slot until it clicksinto place.
2. A prompt will be seen on the screen saying “Preparing SD card”.
Removing TF Card:
1. Close all applications and documents which have been opened from
the TF card.
2. Select “Settings” and find “Storage” then click “Unmount SD
card”.
3. A prompt will be seen on the screen saying “SD card safe to
8. INSERTING/REMOVING SIM CARDS
Page 14

remove”.
9. MAKING AND RECEIVING CALLS
10. ANSWERING AND REJECTING CALLS
4. Gently press the TF card to remove and pull out the TF card.
Once your SIM cards are installed turn on your phone and wait a few
minutes for your phone to find a network.
Then select the Call icon. Here you can dial a number or
select a contact from your stored contacts list to call. You can also view
outgoing and incoming calls that have been made, as well as adding
or removing contacts.
Page 15

To answer a call – Slide your finger to the blue Call Answer key.
To reject a Call – Slide your finger to the Red Call End key.
11.Send message
Touch the Messaging icon to other mobile phone users to send
SMS or MMS, enter the name or phone number in the "Type name or
number" column, or select one from the contacts. Enter the
information content and select send.
The phone has a software keyboard which automatically displays when
you tap the place on screen where you want text or numbers to be
entered, then simply start typing.
12. SOFTWARE KEYBOARD
Page 16

Touchscreen
The touchscreen responds to finger touch.
Note:
• Don’t place any object on the touchscreen for it may damage or
crush the screen.
Single Click: Single click one icon to choose the icon or option you
want.
Long Press: Press and hold an icon to delete or move an icon or
app,and will display APP info 、Widgets、shortcut menu ect.
Drag: Press the icon and drag it to a different screen.
Page 17

Note:
• Turn on your phone before connecting the phone to a PC by USB
cable.
1. Use a USB cable to connect the phone with a computer. The phone
will automatically detect a USB connection.
2. The USB connection menu will be displayed in the notification bar,
select the desired USB operation.
3. The USB connection has been successful.
Wireless:
1. Select “Settings”.
2. Select Network & Internet.
3. Select “Wi-Fi” and slide OFF to ON status.
3. All detected wireless networks in the area will be listed. Click to
select desired wireless connection.
4. Enter network key if necessary.
5. Once connected to a wireless network, settings will be saved.
6. Wireless icon will appear on the taskbar when connected
successfully.
Note:
13. HOW TO CONNECT TO A COMPUTER
14. CONNECTION TO INTERNET
Page 18

• When the phone detects the same wireless network in the future, the
device will connect tohe network automatically with the same
password record.
Please Note: Cell Data may be turned “OFF” as a factory setting, to
allow data to flow through your network provider please turn Data
usage “ON” either from your quick drop down menu or in >
Settings >Network & Internet >Data usage, you will not be able to
access the Internet when Data usage is “OFF”.
NB: Mobile Data charges apply when this setting is “ON” – Data will
be passed through your network provider.
Web Browsing
Connect to the Internet and launch the browser.
Type in the desired browsing URL.
15. MOBILE DATA AND INTERNET
Page 19

Select “Settings”, select Bluetooth from “OFF” to “ON”.
Search for the device you would like to pair with and select “PAIR”.
You will see a message “Connected Successfully”.
16.BLUETOOTH
17. CAMERA
Page 20

Touch the icon to enter camera mode and the interface is
shown as follows:
1. Touch the icon to take a photo.
2. Touch the icon to start camera recording.
3. Touch the iconon the top right to see the previous picture and to
delete, share or set it as a wallpaper. Click the return button to exit
camera interface.
4. Touch the icon to switch from front to back camera.
Page 21

How to Close Applications
When an application is not responding you can manually shut the app
down in “Running Services” menu. This will ensure the system
responds as desired. Please shut down all idle applications to release
memory and get the system speed back to normal. To close the
application, click the icon on the shortcut bar to enter the
systemconfiguration interface. Select the ApplicationRunning and the
interface is
Tap the application you want to close. A pop-up window will be
displayed. Tap “Stop” to close that application.
Power “OFF” / Restart / Reset the Phone
1. Press and hold the power button for 5 seconds and the device will
18.TROUBLE SHOOTING
Page 22

be powered down.
2. Press the reset button located under the power button with a sharp
object and the device will be forced to restart.
Restore Default Setting
If you want to reset the phone to factory settings and erase all
materials, please press Settings Backup and resetFactory data reset.
WARNING:
actory Data Reset setting will delete ALL your data and system
configuration as well as any downloaded apps. Please use this function
carefully.
19.Split Screen Multitasking
Into an application, long press the APP SWITCH button can be divided
into two screens, divided into two windows, each window can run a
separate program, the two windows do not interfere with each
other.(Few applications are not supported)
Google, Android, Google Play and other marks are trademarks of Google LLC.
Page 23

FCC Caution:
Any Changes or modifications not expressly approved by the party responsible for
compliance could void the user's authority to operate the equipment.
This device complies with part 15 of the FCC Rules. Operation is subject to the following two
conditions: (1) This device may not cause harmful interference, and (2) this device must
accept any interference received, including interference that may cause undesired operation.
Note: This equipment has been tested and found to comply with the limits for a Class B digital
device, pursuant to part 15 of the FCC Rules. These limits are desi gned to provi de re asonable
protection against harmful interference in a residential installation. This eq uipment generates
uses and can radiate radio frequency energy and, if not installed and used in accordance with
the instructions, may cause harmful interference to radio communications. However, there is
no guarantee that interference will not occur in a particular installation. If this equipment does
cause harmful interference to radio or television recept ion, which can be determined by turning
the equipment off and on, the user is encouraged to try to correct the interference by one or
more of the following measures:
—Reorient or relocate the receiving antenna.
—Increase the separation between the equipment and receiver.
—Connect the equipment into an outlet on a circuit different from that to which the receiver is
connected.
—Consult the dealer or an experienced radio/TV technician for help.
Specific Absorption Rate (SAR) information
SAR tests are conducted using standard operating positions accepted by the FCC with the
phone transmitting at its highest certified power level in all tested frequency bands, although
the SAR is determined at the highest certified power level, the actual SAR level of the phone
while operating can be well below the maximum value, in general, the closer you are to a
wireless base station antenna, the lower the power output.
Before a new model phone is a available for sale to the public, it must be tested and certified to
the FCC that it does not exceed the exposure limit established by the FCC, Tests for each
phone are performed in positions and locations (e.g. at the ear and worn on the body) as
required by the FCC.
For body worn operation, this model phone has been tested and
guidelines when used with an accessory designated for this product or when used with an accessory that
contains no metal and that positions the handset a minimum of 10mm from the body.
Non-compliance with the above restrictions may result in violation of RF exposure guidelines.
meets the FCC RF exposure
Page 24

IC Warning:
This device complies with Industry Canada license-exempt RSS standard(s).
Operation is subject to the following two conditions:
(1) This device may not cause interference, and
(2) This device must accept any interference, including interference that may cause
undesired operation of the device.
Le présent appareil est conforme aux CNR d'Industrie Canada applicables aux
appareils radio exempts de licence. L'exploitation est autorisée aux deux conditions
suivantes : (1) l'appareil ne
doit pas produire de brouillage, et (2) l'utilisateur de l'appareil doit accepter tout
brouillage radioélectrique subi, même si le brouillage est susceptible d'en
compromettre le fonctionnement
Radio apparatus containing digital circuitry which can function sep arate ly from the operation of a
transmitter or an associated transmitter, shall comply with ICES-003. In such cases, the labeling
requirements of the applicable RSS apply, rather than the labeling requirements in ICES- 003.
This Class B digital apparatus complies with Canadian ICES-003.
Cet appareil numérique de la classe B est conforme à la norme NMB-003 du Canada.
IC SAR Waring :
The device has been tested and compliance with SAR limits, users can obtain Canadian
information on RF exposure and compliance
Le présent appareil est conforme
Après examen de ce matériel aux conformité aux limites DAS et/ou aux limites d’intensité
de champ RF, les utilisateurs peuvent sur l’exposition aux radiofréquences et la conformité
and compliance d’acquérir les informations correspondantes
 Loading...